1
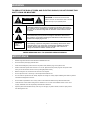
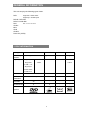
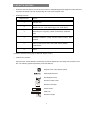
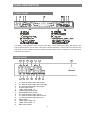
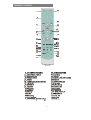
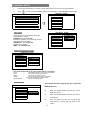
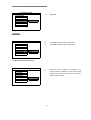
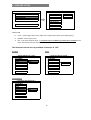
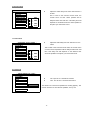
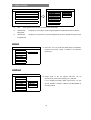
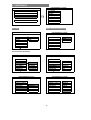
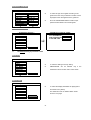
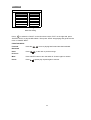
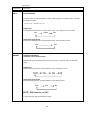
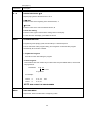
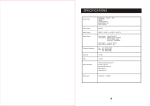
DVD/DIVX PLAYER Model: DXP-1000 INSTRUCTION MANUAL COMPACT DIGITAL AUDIO DVD / DivX / CD-DA / MP3 / CD / CD-R / CD-RW compatible Read this manual before installation and use TABLE OF CONTENTS Warning & Importance General Information 1. Disc information 2. Select a DVD disc 3. Care of disc Preparation 1. Unpack the unit 2. Loading batteries into the Remote Control System Connections 1. Connecting to TV set 2. Connecting to TV & Stereo Amplifier 3. Connecting to 5.1 channels Amplifier 4. Connecting to a AC3 or DTS Decoding Amplifier Panel Description 1. Front Panel 2. Rear Panel 3. Remote Control Getting Start 1. Play a Disc 2. Picture Setup 3. General Setup 4. Speaker Setup 5. Audio Setup 6. Preference Setup JPEG, MP3, DIVX Format Basic Operation Function Buttons Troubleshooting Specification Customer Support and Warranty page 1 2 2 3 4 5 5 6 7 8 9 10 10 11 12 13 14 16 18 20 22 25 27 32 34 35 WARNING TO REDUCE THE RISK OF FIRES AND ELECTRIC SHOCKS, DO NOT EXPOSE THIS UNIT TO RAIN OR MOISTURE CAUTION RISK OF ELECTRIC SHOCK DO NOT OPEN CAUTION: To reduce the risk of fires and electric shock, do not remove the cover of the unit. Refer servicing only to qualified person This lighting flash arrow symbol in a triangle is intended to alert users to the presence of non-insulated high voltage within the product’s enclosure that may be of sufficient magnitude to constitute a risk of electric shock to person The exclamation point symbol in a triangle is intended to alert users to the presence of important operating and maintenance instructions in the literature accompanying the unit CLASS 1 LASER PRODUCT The marking of products using lasers. The marking will be shown at the rear panel of the unit, means the unit have been classified as Class 1, and are utilizing laser beams that are of weaker class. There is no danger of hazardous radiation outside the unit REFER SERVICING ONLY TO QUALIFIED SERVICE PERSON IMPORTANCE Read through this instruction manual before installation and use. Do not touch the power plug with wet hand. When disconnecting the power cord from the power outlet, hold the plug, do not pull the wire. Switch off the main power when the unit is not in use. (Disconnect the power plug from the power outlet when you do not intend to use the unit for a prolonged period of time.) Before moving the unit, remove the disc from the unit’s tray first. Do not open the cover or touch any of the components inside the unit. Do not install or operate the unit directly exposed to sunlight or nearby objects radiating heat that may lead to overheat and dangerous to the unit. Do not install or operate the unit in overly moist or humid environments that may affect the laser head. Install the unit on flat surface with good air circulation. Do not cover the ventilation holes on the unit in anyway. Otherwise, the unit will possibly overheat and malfunction. Wipe the panel and case with soft dry cloth only. Do not apply any kind of thinner, alcohol or sprays when the cleaning of the unit. 1 GENERAL INFORMATION This unit can play the following types of disc: DVD single side / double sides single layer / double layers DVD-R / DVD-RW DVD+R / DVD+RW DivX Ver. 3.11 / 4.xx / 5.xx CD-DA MP3 CD-R CD-RW Photo CD (JPEG) 1. DISC INFORMATION Disc types DVD VCD DIVX CD Recording method Digital / MPEG II Digital / MPEG I MPEG 4 Digital Capacity 650MB 74min Single layer Single side 650MB 650MB 74min 4.7GB = 2 hr Single layer Double sides 8.5GB =4 hr Disc size 12cm / 8cm 12cm 12cm / 8cm Horizontal Resolution 500 lines up 240 lines up - Sub-titles 32 - - - Sound tracks 8 2 - COMPACT Symbol DIGITAL AUDIO 2 2. SELECT A DVD DISC DVD discs and DVD players are manufactured under the worldwide agreed DVD Regional Code System that the player will operate only with corresponding disc of the same Regional Code. DVD Regional Code: Regional Code 1 2 3 Region Canada, USA Europe (incl. Poland, Romania, The Czech republic), Japan, Middle East (incl. Saudi Arabia, Egypt, Iran, South Africa) East Asia (incl. Hong Kong, Taiwan, South Korea), Southeast Asia 4 Australia, Caribbean, Central & South America, Mexico, New Zealand 5 Africa, Former Soviet Union, India, North Korea, Pakistan, Turkmenistan 6 China ( Remarks: This DVD will only play the DVD with Region Code 1 ) Features of a DVD disc: Each DVD disc contains different combinations of features depending on the design and production of the disc. The following symbols representing some DVD features: 2 Regional Code / Video Output System NTSC DOLBY D I G I T I A L Dolby Digital Surround DTS Digital Surround 2 16 : 9 Number of audio Tracks 2 Number of Sub-titles LB Screen modes RESTRICTED 2 Child Lock Number of Angles 3 REMARK Some features of this unit are related to the DVD disc’s software. Some features of this unit cannot be preformed if the disc does not support the features, or required special settings. Check the features of the disc before playing it, or follow the instruction on screen menu of the disc. 3. CARE OF DISC Video disc contains high density compressed data that needs proper handling. Hold the disc with fingers, holding the hole at center and the edge do not touch the disc surface. Do not bend or press the disc, do not expose the disc to direct sunlight or heating source. Store discs in cabinet, vertically, in dry condition, prevent moisture or humidity. Clean the disc with soft dry cloth only, wipe gently, from center to the edge. Do not apply thinner, alcohol or sprays when cleaning. 4 PREPARATION 1. UNPACK THE UNIT The standard packing contains the following items: The DVD player unit. Infra red remote controller AV Cables Two AAA batteries User’s instruction manual Warranty Registration Card 2. LOADING BATTERIES INTO THE REMOTE CONTROL Remove the battery compartment cover. Load two AAA batteries into the battery compartment. Make sure that the batteries have been inserted in the right polarities matching to the symbols +, - as indicated in the battery compartment. When replacing batteries, replace both batteries. Do not mix new and used batteries operating together; otherwise, the operating lifetime will be much shorter than normal. Do not dispose batteries as normal rubbish. Be environment friendly, dispose batteries according to the Government’s regulation. Remove the batteries if you do not intend to use the unit for a prolonged period of time. 5 SYSTEM CONNECTIONS DO NOT connect the AC power socket to the wall outlet before the system connection is completed Before turning on the power standby button on the front panel or remote control, you should switch on the main power in the rear panel. Note: The light in the front panel will be red in color when it is in power off mode; green in color when it is in standby mode. 1. CONNECTING TO TV SET One set of AV cable is included in the Standard packing Connects the unit’s S-Video or video output (Video) to the TV’s S-Video or Video input terminal (Yellow). Connect the DVD unit’s Audio (FL, FR) output to the TV’s audio (L, R) input. 6 2. CONNECTING TO TV & STEREO AMPLIFIER Connect the unit’s S-Video or Video output to the TV’s S-Video or Video input. Connect the unit’s Audio (FR / FL) output to stereo amplifier’s input terminals Left (White) and Right (Red). 7 3. CONNECTING TO 5.1 CHANNELS AMPLIFIER Connect the unit’s ‘S-Video’ or ‘Video’ output to the TV’s S-Video or Video input. Connect the unit’s 5.1 channels surround audio output (FL, FR, SL, SR, CEN, SW) to the 5.1 channels amplifier’s audio input terminals, Front Left, Front Right, Surround Left, Surround Right, Center and Sub-Woofer. (An amplifier with 6 channels input and output is required, AC3 decoder is NOT required.) Connecting AC3/DTS digital outputs (Optical or Coaxial) to an AC3 or DTS decoding amplifier is also possible, see instruction in next page. 8 4. CONNECTING TO AC3 OR DTS DECODING AMPLIFIER Connect the unit’s S-Video or Video output to the TV’s S-Video or Video input. Connect the digital output (optical or coaxial) to the TV’s S-Video or Video input. Press the ‘SETUP’ button on the remote control to enter the unit’s SETUP MENU: Press ^ / v on the Remote Control to select AUDIO SETUP, and Press ^ / v again to select SPDIF/RAW, Press ‘ENTER’ buttons confirm the setting 9 PANEL DESCRIPTION 1. FRONT PANEL The items 1-4 are Karaoke function, simply put the DVD or VCD karaoke and getting start playing, then connect the microphone into the MIC1,2 and adjust between Microphone volume and Echo volume for the best effect on sound. Please note that the Volume and MIC buttons need to be pushed so that they pop out and allow for easy tuning. 2. REAR PANEL 1. 2. 3. 4. 5. 6. 7. 8. 9. 10. 11. 12. 13. 14. 5.1 channels Audio output Sub-woofer 5.1 channels Audio output Surround Right 5.1 channels Audio output Front Right S-Video Video output YPbPr Video output - Pr Coaxial Digital Audio output Optical Digital Audio output 5.1 channels Audio output Center 5.1 channels Audio output Surround Left 5.1 channels Audio output Front Left Video output YPbPr Video output - Pb YPbPr Video output – Y Main Power Switch 10 3.REMOTE CONTROL 11 GETTING STARTED Read through this instruction manual. Unpack the unit. Load batteries into the remote control. Connect the unit, make sure the connections are correct. Connect the power socket to wall outlet, power on the system via switch on rear of unit. Check the setting of the unit, TV and amplifier are correct and match each other. 1. PLAY A DISC Switch on the power Switch on the main power switch on the unit’s front panel, and switch on the TV set, and the amplifier if connected. Set the system Select the corresponding setting of the unit, TV set (AV or S-Video) and the amplifier, until the power on screen shows. Load a disc Press the “OPEN” button on the front panel or on the remote control, to open the disc tray. Load a disc into the tray and press the “OPEN” button again to close the disc tray. (Note: place the disc’s label side up, blank side down.) Automatic Play The unit will take several seconds to read the disc data, display the disc type logo at the left upper corner of the TV screen, and start playing automatically. (MP3 disc would take longer time to upload the data on ‘Smart NAVI’ Menu when loading) If a Disc Menu displayed on the screen: 1. Press the ► button to start playing, or 2. Press button on the remote control to select the desired item and then press ENTER button to confirm. A different kind of Disc Menu is displayed on the TV screen depending on the design and production of the disc. 12 2. PICTURE SETUP The unit’s TV output color is selectable to PAL or NTSC IMPORTANT If the TV set is NOT multi-video system, and the following is observed on the TV screen it could be a result of wrong color system matching with the TV set: Picture is distorted Picture is black and white, no color. Picture is not full screen, or border part of picture bas been blocked. The DVD Player is set to NTSC system output as default, if you are not playing in the U.S.A. or in PAL system, please change the output system of the unit by the steps below. If the above problem happens: 1. Set the TV set’s system to the proper setting, or 2. Change the DVD unit’s output system setting as following: 1. Press ‘SETUP’ on remote control, 2. Go to ‘PREFERENCE’ 3. Select the ‘TV TYPE’ MULTI, NTSC or PAL. If the above steps DO NOT fix the problem, see TROUBLESHOOTING. 13 3. GENERAL SETUP 1. Pressing the SETUP button on remote control during STOP or PLAY mode to SETUP MENU. 2. Using Cursor to select GENERAL SETUP. Press ENTER to enter GENERAL SETUP page. SETUP MENU - -- GENERAL PAGE -- MAIN PAGE TV DISPLAY PIC M ODE ANGLE M ARK OSD LANG CAPTIONS SCR SAVER M AIN PAGE GENERAL SETUP SPEAKER SETUP AUDIO SETUP PREFERENCE EXIT SETUP TV DISPLAY -- GENERAL PAGE -- Using cursor to move to desired setting and press ENTER to confirm. NORMAL/PS – 4 x 3 Pan Scan Full screen of picture on TV. Normally, left and right edges cannot be shown. NORMAL/LB – 4 x 3 Letter Box Original ratio of aspect. WIDE – 16 : 9 Widescreen TV DISPLAY PIC M ODE ANGLE M ARK OSD LANG CAPTIONS SCR SAVER M AIN PAGE NORM AL P/S NORM AL L/B W IDE PIC MODE (PICTURE MODE) -- GENERAL PAGE -TV DISPLAY PIC M ODE ANGLE M ARK OSD LANG CAPTIONS SCR SAVER M AIN PAGE AUTO FILM VIDEO SM ART SUPER SM ART This mode will depend on the type of video that you are playing. AUTO FILM VIDEO SMART - SUPER SMART - Automatically adjust to suit your recent playback Film movie mode (24 Pictures film) Video base on television mode This is a good mode to use for progressive and interlaced material with limited motion. Superior than Smart Mode ANGLE MARK This feature functions only for the disc, which has -- GENERAL PAGE -TV DISPLY PIC M ODE ANGLE M ARK OSD LANG CAPTIONS SCR SAVER M AIN PAGE ANGLE function. When the ANGLE MARK is set ON, the screen ON OFF displays the mark. When the ANGLE MARK is set OFF, the mark is not displayed. After you setting ON, then you can press the Angle button to change the view angle of the screen. 14 OSD LANG (ON SCREEN DISPLAY LANGUAGE) -- GENERAL PAGE -TV DISPLAY PIC M ODE ANGLE M ARK OSD LANG CAPTIONS SCR SAVER M AIN PAGE ENGLISH ENGLISH CAPTIONS -- GENERAL PAGE -TV DISPLAY PIC M ODE ANGLE M ARK OSD LANG CAPTIONS SCR SAVER M AIN PAGE The hidden subtitle is shown during ON The hidden subtitle is closed during OFF ON OFF SCR SAVER (SCREEN SAVER) There is a formatting problem here that needs to be fixed -- GENERAL PAGE -TV DISPLAY PIC M ODE ANGLE M ARK OSD LANG CAPTIONS SCR SAVER M AIN PAGE When the unit is stopped, no operation, or no function button is pressed in 1 minute, screen saver appears for the purpose to protect the TV screen if SCR SAVER is set ON. ON OFF 15ISDF 15 4. SPEAKER SETUP SETUP MENU - -- SPEAKER SETUP PAGE -- MAIN PAGE DOW NM IX CENTER REAR SUBW OOFER CNTR DELAY REAR DELAY TEST TONE GENERAL SETUP SPEAKER SETUP AUDIO SETUP PREFERENCE LT/RT STEREO OFF EXIT SETUP M AIN PAGE DOWNMIX LT/RT : Left and Right output mode ( Either Left or Right channel Audio output while playing ) STEREO : Stereo output mode OFF : Turn off the Downmix mode. 5.1 channels can be enabled only if Downmix is set OFF and the rest of other speaker setup is activated. The Selections below are only available if downmix is ‘OFF’ CENTER REAR -- SPEAKER SETUP PAG E -DO W NM IX CENTER REAR SUBW O O FER CNTR DELAY REAR DELAY TEST TO NE -- SPEAKER SETUP PAG E -DO W NM IX CENTER REAR SUBW O O FER CNTR DELAY REAR DELAY TEST TO NE ON O FF M AIN PAG E M AIN PAG E SUBWOOFER -- SPEAKER SETUP PAG E -DO WNM IX CENTER REAR SUBWO O FER CNTR DELAY REAR DELAY TEST TO NE ON O FF M AIN PAG E 16 ON O FF CNTER DELAY -- SPEAKER SETUP PAG E -- Adjust the audio delay from center channel from 0 to 5MS. DO WNM IX CENTER REAR SUBWO O FER CNTR DELAY REAR DELAY TEST TO NE This is used in the surround sound mode, the sounds come out from center speaker will be 5M S delayed rather than real time. This delay time will 3M S depends on the distance from the center speaker to 1M S O FF M AIN PAG E the place you receive the sound. REAR DELAY -- SPEAKER SETUP PAG E -- Adjust the audio delay from rear channel from 0 to 15MS. DO WNM IX CENTER REAR SUBWO O FER CNTR DELAY REAR DELAY TEST TO NE This is used in the surround sound mode, the sounds come out from surround speakers will be delayed rather than real 15M S 9M S time. This delay time will depends on the distance from surround speakers to the place you receive the sound. 3M S O FF M AIN PAG E TEST TONE -- SPEAKER SETUP PAG E -DO W NM IX CENTER REAR SUBW O O FER CNTR DELAY REAR DELAY TEST TO NE ON O FF ON : open the 5.1 channel test function. OFF : turn off the 5.1 channel test function. This function is to test the 5 speakers are working properly. The sounds will come out from the five speakers, one by one. M AIN PAG E 17 5. AUDIO SETUP SETUP MENU - -- AUDIO SETUP PAGE -- MAIN PAGE SPDIF OUTPUT OP M ODE DUAL M ONO COM PRESSION PRO LOGIC LPCM OUTPUT GENERAL SETUP SPEAKER SETUP AUDIO SETUP PREFERENCE OFF SPDIF/RAW SPDIF/PCM EXIT SETUP M AIN PAGE OFF: Audio signal is out from (FL/FR) AUDIO OUT (RCA) jacks. SPDIF/RAW: The player is connected to a Dolby Digital amplifier through DIGITAL OUT Coaxial or Optical jack. SPDIF/PCM: The player is connected to a 2-channel digital mode or stereo amplifier through Coaxial or Optical jack. OP MODE -- AUDIO SETUP -- LINE OUT: Line out mode with digital dialog normalization, compress input linear signal. It suitable to all television SPDIF OUTPUT OP M ODE DUAL M ONO COM PRESSION PRO LOGIC LPCM OUTPUT LINE OUT signal input. M AIN PAGE DUAL MONO -- AUDIO SETUP - Output mode SPDIF OUTPUT OP M ODE DUAL M ONO COM PRESSION PRO LOGIC LPCM OUTPUT of the L/R signals. Mix-mono can be functioned only if the DVD is playing in 5.1 channels. STEREO L-M ONO R-M ONO M IX-M ONO If your amplifier has Dolby digital output mode, you may choose STEREO, L-MONO, R-MONO, and MIX-MONO for decoding method M AIN PAGE 18 COMPRESSION -- AUDIO SETUP -SPDIF OUTPUT OP M ODE DUAL M ONO COM PRESSION PRO LOGIC LPCM OUTPUT M AIN PAGE - - FULL 6/8 4/8 2/8 OFF To adjust linear compression rate to obtain the different compression results of the signals only if the OP MODE is set to LINE OUT. The data from ‘2/8 to Full’ that will reflect the “dynamic range” compress of Dolby sounds output. PRO LOGIC -- AUDIO SETUP -SPDIF OUTPUT OP M ODE DUA L M ONO COM PRESSION PRO LOGIC LPCM OUTPUT To select Dolby Prologic Surround mode. To select LPCM output at 48K or 96K. OFF ON AUTO M AIN PAGE LPCM OUTPUT -- AUDIO SETUP -SPDIF OUTPUT OP M ODE DUAL M ONO COM PRESSION PRO LOGIC LPCM OUTPUT It is the Audio output signals (Kb/s). If the Audio media you play is the high quality music LPCM 48K LPCM 96K (e.g. HDCD), you can choose 96K playback. M AIN PAGE 19 6. PREFERENCE SETUP MENU - -- PREFERENCE PAGE -- MAIN PAGE TV TYPE VIDEO OUTPUT AUDIO SUBTITLE DISC M ENU LOCALE PARENTAL PASSW ORD GENERAL SETUP SPEAKER SETUP AUDIO SETUP PREFERENCE EXIT SETUP TV TYPE VIDEO OUTPUT SELECTION -- PREFERENCE PAGE -- TV TYPE VIDEO OUTPUT AUDIO SUBTITLE DISC M ENU LOCALE PARENTAL -- PREFERENCE PAGE -- M ULTI NTSC PAL TV TYPE VIDEO OUTPUT AUDIO SUBTITLE DISC M ENU LOCALE PARENTAL S-VIDEO YPbPr RGB LANGUAGE SELECTION -- PREFERENCE PAGE -- TV TYPE VIDEO OUTPUT AUDIO SUBTITLE DISC M ENU LOCALE PARENTAL -- PREFERENCE PAGE -- TV TYPE VIDEO OUTPUT AUDIO SUBTITLE DISC M ENU LOCALE PARENTAL ENGLISH FRENCH SPANISH CHINESE JAPANESE -- PREFERENCE PAGE -- TV TYPE VIDEO OUTPUT AUDIO SUBTITLE DISC M ENU LOCALE PARENTAL ENGLISH FRENCH SPANISH CHINESE JAPANESE OFF -- PREFERENCE PAGE -- TV TYPE VIDEO OUTPUT AUDIO SUBTITLE DISC M ENU LOCALE PARENTAL ENGLISH FRENCH SPANISH CHINESE JAPANESE 20 CHINA FRANCE HONG KONG JAPAN TAIW AN GBR USA PARENTAL CONTROL - - PREFERENCE PAGE -TV TYPE VIDEO OUTPUT AUDIO SUBTITLE DISC M ENU LOCALE PARENTAL PASSW ORD 1 2 3 4 5 6 7 8 G grade of the disc and your desired. The disc cannot PG PG 13 PG-R NC-17 ADULT To select an age control grade according to the be played for the rate higher than the grade set. Go to the PASSWORD VERIFY PAGE to input password after selection of Parental grade. PASSWORD SETTING -- PASSWO RD CHANG E PAG E - -- PREFERENCE PAGE -TV TYPE VIDEO OUTPUT AUDIO SUBTITLE DISC M ENU LOCALE PARENTAL PASSW ORD O LD PASSWO RD NEW PASSWO RD CO NFIRM PWD CHANGE The default setting of password is 3308. DEFAULTS -- PREFERENCE PAGE -VIDEO OUTPUT AUDIO SUBTITLE DISC M ENU LOCALE PARENTAL PASSW ORD DEFLAUTS To reset the settings to factory setting. PREFERENCE can be selected only if the Password mode is set OFF and in STOP mode. RESET SMART NAVI -- PREFERENCE PAGE -AUDIO SUBTITLE DISC M ENU LOCALE PARENTAL PASSW ORD DEFLAUTS SM ART NAVI To select the display with MENU for playing MP3 and PHOTO CD (JPEG). The details and uses of ‘SMART NAVI’ will be shown in next page. NO M ENU W ITH M ENU 21 JPEG, MP3 & DivX Format When disc with JPEG, MP3 and DivX Format is placed in the machine, one of the following screens will appear. The column ‘Root’ in the left of the SMART NAVI is showing the directory of the disc ; The column in the right will show the files under the directory that you choose. JPEG Format SM ART NAVI ROOT JPEG JPEG JPEG JPEG JPEG JPEG JPEG JPEG 1 2 3 4 5 6 7 8 JPEG Files listing Press to select the „ROOT“ on the left columns & the „FILE“ on the right side, press „ENTER“/“PLAY“ to view the JPEG PHOTOS. Then press “STOP” to go back to the menu of “SMART NAVI”. FUNCTION KEYS Zoom Press the “ZOOM” Button, then the screen will show “ZOOM ON”, and press Icons to “zoom in” or “zoom out”. Rotate Press Next/ Previous Press Menu Press “Menu” to preview the photos. to rotate the picture to the next or previous pictures. 22 MP3 Format SM ART NAVI ROOT M P3 M P3 M P3 M P3 M P3 M P3 M P3 M P3 1 2 3 4 5 6 7 8 MP3 Files listing Press to select the “ROOT” on the left columns & the “FILE” on the right side, press “ENTER”/”PLAY” to play the MP3 Music. Then press “STOP” stop playing and go back to the menu of “SMART NAVI”. FUNCTION KEYS Forward/ Backward Press the icons to playing fast forward ans fast backward. Next/ Previous Press Mute Press “MUTE” button to turn the audio off. Press it again to resume. Pause Press to the next or previous songs. to pause play & press again to resume. 23 DivX/MPEG4 FORMAT SM ART NAVI ROOT M P4 M P4 M P4 M P4 M P4 M P4 M P4 M P4 1 3 3 4 5 6 7 8 DivX/MPEG4 Files listing Press to select the “ROOT” on the left columns & the “FILE” on the right side, press “ENTER”/”PLAY” to play the DivX. Then press “STOP” stop playing and go back to the menu of “SMART NAVI”. FUNCTION KEYS Forward/ Backward Press the icons to playing fast forward and fast backward. Continuously pressing and back to normal. Next/ Previous Press Mute Press “MUTE” button to turn the audio off. Press it again to resume. Pause Press Slow Press “SLOW” and playback of slow motion. Please “Play” to resume it. Step Keep pressing the “STEP” button repeatedly to play frame by frame. GoTo Search the chapter and time you want. For functions please refer to “Function Buttons” in the manual. to the next or previous chapter or files. to pause playing & press again to resume. 24 BASIC OPERATION (see page 11) Function Key POWER Description POWER STANDBY ON / OFF (Always Switch Off the Main Power in the back of the unit if you don’t plan to use the player for a long period of time) OPEN / CLOSE DISC TRAY OPEN If you open the disc tray when a DVD is playing (do not press the STOP button memorize the stopping position. ), the unit will When the same disc is loaded again, the unit will continue playing from the position that it stopped. (If another disc has been loaded, the last memory will be cleared) PLAY – NORMAL PLAY/PAUSE PAUSE Pause the unit from playing temporarily Press button to resume normal PLAY. SEARCH FORWARD SEARCH BACKWARD Repeat pressing the SEARCH button on the remote or turning the SEARCH switch on the unit to change the SEARCH speed or back to normal PLAY. Press button to resume normal PLAY. 25 (see page 10/11) Function Key Description SKIP FORWARD SKIP BACKWARD Skip to the next or previous chapter / track. STOP / PRE-STOP Press once to stop the unit, memorizing the stopping position. a. Press to continue playing from the position that it stopped b. Press again to completely STOP the unit. 26 FUNCTION BUTTONS (see page 11) Function Key Description DISPLAY MENU BAR ON SCREEN DISPLAY Activate the Menu Bar On Screen Display, displaying the current status. Repeat pressing the button to activate the first page, the second page of Menu and clear the Menu display. PBC PLAYBACK CONTROL (only for VCD playback) When it is set to ‘ON’, there will be a ‘Play list’ on the screen for title choosing When it is turn to ‘OFF’, the VCD will be playing automatically after you insert the Disc. ENTER CONFIRM AN ENTRY Confirm a setting entry in the Unit / Disc’s Function Menu SHUFFLE Random play CURSOR Press the buttons moving UP, DOWN, LEFT, RIGHT in the Unit / Disc’s Function Menu RETURN RETURN TO THE MAIN MENU WHILE PLAYING VCD NUMERIC KEYS PROGRAM NUMBER ACCESS Input one to two digits CHAPTER / TRACK number, press ENTER button to start the selected CHAPTER / TRACK 27 (see page 11) Function Key Description GOTO GOTO SEARCH Press the button to enter the SEARCH mode, to select playing at a desired section. The Menu Bar display as follow: TITLE 01 / 20 CHAPTER 01 / 010 DVD mode Pressing the CURSOR button to select search mode, Title, Chapter and Time modes: Title Chapter Time Other disc types mode Pressing the CURSOR button to select search mode, Track and Time modes: Track REPEAT Time REPEAT PLAYBACK CHAPTER / TITLE (TRACK / DISC) Repeat playing a selected CHAPTER /TITLE of DVD disc, or TRACK / DISC of other disc types. DVD mode Repeat pressing the button to select REPEAT mode, CHAPTER / TITLE: Track Disc Off Other disc types mode Repeat pressing the button to select REPEAT mode, TRACK / DISC: Track Disc NOTE : PBC must be set OFF To clear the menu bar, press DISPLAY button 28 Off (see page 11) Function Key Description A–B REPEAT SECTION A Æ B Repeat playing back a selected section A Æ B A Æ Start Press the button at the beginning of the desired section, A Æ B End Press the button at the end of the desired section, B Cancel the setting Press the button again to switch Off the setting, back to normal play To clear the menu bar display, press DISPLAY button PROG PROGRAM SETTING Programming a disc playing (VCD, DVD and MP3) in a desired sequence. The unit memorizes a disc program setting, and recognizes a memorized disc program automatically when the disc is loaded. 1. Playback a Program Press PLAY button after setting the program. 2. Set a Program: Press PROG button and numeric keys to select track and press ENTER button, the track will be programmed. PROGRAM P 00 : 00 Title number Program order For example : Press 2 Æ Press 5 Æ Press 1 Æ P 01 : 02 P 02 : 05 P 03 : 01 then then NOTE: DVD CANNOT BE PROGRAMMED MENU DISC MAIN MENU Stop the unit, back to the disc Menu or beginning of disc 29 (see page 11) Function Key Description MUTE TURN OFF THE VOLUME ZOOM ZOOM PICTURE Enlarge the picture to 4 times In the ZOOM mode, press SLOW to adjust the position of zooming position. SLOW MOTION Repeat pressing the button to change the SLOW motion speeds or back to normal PLAY mode The unit is Muted when slow is pushed STEP TO PLAY THE DISC AT STEP MODE TITLE GO TO DVD DISC TITLE MENU (DVD DISC ONLY) SUB TITLE SUB TITLE LANGAGE Press SUBTITLE button to switch the subtitle language ANGLE VIEW ANGLE Repeat pressing the button to select different VIEW ANGLES available from DVD disc AUDIO DVD AUDIO TRACK Repeat pressing the button to select up to 8 dialogues available from DVD disc 30 (see page 11) Function Key Description L/R TO CHANGE THE AUDIO TRACK SETUP GO TO SETUP MENU VIDEO SYSTEM SELECTION (NTSC/PAL) ( For Progressive Scan Model ) PROGRESSIVE SCAN TV AND INTERLACED TV SELECTION VIDEO - + Press “+” and “-“ to increase or decrease the audio volume. 31 TROUBLESHOOTING When having a problem with this unit, check this list for a possible solution before asking for service: Symptom No Power Check and Action 1. Check the power cord has been properly connected to the wall outlet 2. Check the main power has been switched on in back of unit. Does not play 1. No disc, load a disc 2. Disc has been loaded upside down. Place the disc with the label side up 3. Disc’s region code does not match to the unit 4. Disc is not correct type to be played 5. Disc is damaged or dirty, clean the disc or try another disc 6. Moisture may be condensed inside the unit. Remove the disc and leave the unit power on for one or two hours No Picture 1. Check the TV set has been powered on, and setting at the correct AV mode 2. Check the system connection is secure 3. Check if the connection cables are damaged 4. Clean the disc Picture noise / distorted 1. Disc is dirty or damaged. Clean the disc or try another disc 2. Reset the color system of the DVD unit or the TV set 3. Try to direct the DVD unit to the TV set instead of via the components like VCR. Picture not full screen Cannot SKIP or SEARCH 1. Select the screen format. Enter SETUP MENU Æ (TV DISPLAY) 2. Select the screen format from DVD disc menu 1. Some disc are programmed that do not allow users to SKIP or SEARCH forward at some sections, especially at the beginning WARNING section 2. Single Chapter disc cannot apply SKIP function No sound or Sound output not complete 1. Check the TV and amplifier has been powered on and correctly set 2. Check the TV and amplifier system connections are secure 3. Press AUDIO button select other audio tracks output of disc 4. Check if the MUTE function of the DVD, TV or amplifier has be activated 5. There will be no sound output during REVERSE PLAY / PAUSE / STEP / SLOW / SEARCH 32 TROUBLESHOOTING (continue) Symptom Check and Action No surround sound 1. Check if the audio output has been changed to Analog. MP3 disc no sound or noise 1. When program files or other data files mixed with MP3 files in the same disc, the unit may play the non-MP3 files with noise or no sound 2. Check the disc, if all the files on disc are MP3 files 3. Skip the file, or try the other file Remote control does no function 1. Remove the obstacles between the remote and the unit 2. Point the remote at the remote sensor on the unit 3. Check the batteries of the remote control had been loaded with correct polarities 4. Replace the batteries of the remote control 33 SPECIFICATION Type of Disc DVD DVD-R / DVD-RW DVD+R / DVD+RW DIVX Version 3.11 / 4.xx / 5.xx CD-DA CD MP3 CD-R / CD-RW PHOTO CD (JPEG) Video Format MPEG 1, MPEG 2, MPEG 4 Audio Format MPEG 1, LAYER 1, LAYER 2 Signal Output Color System : NTSC / PAL Audio System : AC3 decoded 5.1 channels output / digital output / DTS digital output Video Output : 1Vpp (at 75 ohm) Audio Output : (Stereo): 2Vpp Audio Output : (5.1 channels): 0.5Vpp Frequency Response CD: 4Hz – 20KHz (EIAT) DVD: 4Hz – 22KHz (48K) 4Hz – 44KHz (96K) S/N ratio > 92Db THD <0.04% Output Terminals S-Video output X 1 AC3 5.1 channel X 1 Optical digital output X 1 Coaxial digital output X 1 YCbCr / YPbPr output X 1 Power input 110 - 240VAC 50Hz/60Hz 25W Dimension Body size : W430 X D260 X H48 mm Packing size : W520 X D335 X H93 mm G.W. : 3.7Kg 34 CUSTOMER SUPPORT AND WARRANTY 1. CUSTOMER SUPPORT For installation, usage and repair assistance for both the Warranty and Post Warranty periods, go to www.avayon.com/support to access customer support. 35 . 2. WARRANTY AVAYON Technologies Inc.’s DVD/DivX Player One-Year Limited Warranty BEFORE YOU CONTACT AVAYON FOR WARRANTY SUPPORT, READ YOUR USER MANUAL Players purchased from AVAYON in the United States are warranted to be free from defects in materials or workmanship for a period of one (1) year (“Warranty Period”) from the date of their original retail purchase (“Effective Date”). If the unit fails to conform to this warranty, AVAYON will repair the Player using new or refurbished parts or replace the entire Player with a new or refurbished Player. TO ENSURE WARRANTY SERVICE, KEEP THE DATED SALES RECEIPT AS EVIDENCE OF THE PURCHASE DATE. Also, be sure to register for warranty either through returning the completed mail-in card found in the shipment box or on line at www.ayayon.com/support To obtain warranty service in the U. S., you must also go to www.avayon.com/support and access customer support. You will be required to provide the model, serial number and date of purchase. AVAYON retains the right to assess all warranty claims and to determine if damages are covered by this warranty. In case of a claim that is not covered by the warranty, you will be contacted to determine if AVAYON should repair the damage for a fee or if the product should be returned to you as received by the service center. During a period of ninety (90) days from the Effective Date, AVAYON will provide service labor to repair a manufacturing defect at its designated service center at no charge to you. If a defective part is replaced after ninety (90) days from the Effective Date, you pay labor charges for the repair. For one (1) year from the Effective Date, AVAYON will use new or refurbished parts for repairs. Such replacement parts are warranted for the remaining portion of the original Warranty Period. During the Warranty Period, AVAYON will, at its option and sole discretion, repair or replace defective parts, including replacement of the entire Player. You will be required to ship the unit to the service center indicated at the time you contact AVAYON customer service for warranty support. You are responsible for all transportation charges to and from the service center and for all loss or damage during transport. AVAYON is not responsible for the de-installation or re-installation of the player. 36 NOT COVERED BY THIS ONE-YEAR LIMITED WARRANTY This warranty does not cover defects, malfunctions or failures resulting from shipping or transit accidents, abuse, misuse, operation contrary to furnished instructions, operation on incorrect power supplies, operation with faulty associated equipment, modification, alteration, improper servicing from anyone other than an AVAYON authorized service center, tampering, normal wear and tear, if the serial number has been removed/defaced or deterioration of the external cabinet. ANY IMPLIED WARRANTIES, INCLUDING ANY IMPLIED WARRANTY OF MERCHANTABILITY AND FITNESS FOR A PARTICULAR PURPOSE SHALL BE LIMITED IN DURATION TO THE PERIOD OF TIME SET FORTH ABOVE. AVAYON’S LIABILITY FOR ANY AND ALL LOSSES AND DAMAGES RESULTING FROM ANY CAUSE WHATSOEVER, INCLUDING OUR NEGLIGENCE, ALLEGED DAMAGE OR DEFECTIVE GOODS, WHETHER SUCH DEFECTS ARE DISCOVERABLE OR LATENT, SHALL IN NO EVENT EXCEED THE PURCHASE PRICE OF THE PLAYER. WE SHALL NOT BE RESPONSIBLE FOR LOSS OF USE, COMMERCIAL LOSS OR OTHER INCIDENTAL OR CONSEQUENTIAL DAMAGES. 37