1
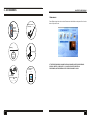
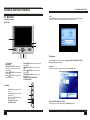
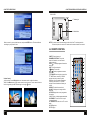
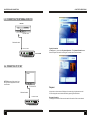
MATSUI
Instruction Manual
7 Inches 16:9 Widescreen Colour LCD TV
With DVBT
ENTER
MAT7DB2656E
BEFORE USING THIS PRODUCT, READ, UNDERSTAND,
AND FOLLOW THESE INSTRUCTIONS.
Save this booklet for future reference.
10. MAINTENANCE
1. IMPORTANT INSTRUCTIONS
1-1 SAFETY INSTRUCTIONS
Be sure to press POWER to set the TV to the s tandby mode and disconnect
the AC adaptor before cleaning the TV.
Wipe wit h a dry, soft cloth .
If the surfaces are extremely dirty ,wipe clean with a cloth which has been
dipped in a weak soap-and-water solution and wrung out tho roughly, and then
wipe again with a dry cloth.
Never use alcohol, benzine, thinner, c leaning fluid or o ther che micals. And do
not use compressed air to remove dust
C A U T I O N
R ISK OF ELECTRIC SHOCK
DO NOT OPEN
CAUTION: TO REDUCE THE RISK OF ELECTRIC SHOCK.
DO NOT REMOVE COVER (OR BACK).
NO USER SERVI CEABLE PARTS INSIDE.
USE THE RECOMMENDED ACCESSORIES ONLY.
REFER SERVICIN G TO QUALIFIED SERVICE PER SONNEL.
The graphic symbols on the back cover of the set m ean the following:
The l ighting flash with a rrowhe ad sy mbol w ithin a n equ ilatera l triang le is
inten ded to alert t he use r to th e pres ence o f unin sulate d dang erous voltag e.
Within the p roduc t's enc losure , there may be full of suff icient magni tude to
cons titute a risk o f elect ric sho ck to p erson s.
The e xclam ation point w ithin a n equ ilatera l triang le is intende d to alert the
user to the presen ce of import ant op erating and m ainte nance (servi cing)
instru ctions in the litera ture ac comp anying the appliance.
Da mage
Ne ver us e your TV if it is dam aged in any way. Always place your T V on a flat le vel su rface
avo iding anywh ere wh ich m ay be s ubjec t to str ong vi bration .
We ather
It is advis able to unplu g the aerial during an ele ctrica l storm .
Tem pera ture
Av oid ext remes of tem perat ure, ei ther ho t or co ld, pla ce you r TV w ell away from heat
sou rces s uch as radia tors or gas/e lectric fires.
Na ked Fl ames
Na ked fla mes s uch as candl es and night lights should not b e plac ed on o r near your T V.
Ornamen ts
Va ses an d othe r wate r conta iners or lam ps sho uld no t be pu t on to p of yo ur TV set.
Mo isture
Do not allow yo ur TV t o be e xpose d to ra in, moisture, dust. If any l iquid is spilt into yo ur TV
it c an cau se serious d amage . If yo u spill any liq uid int o your TV sw itch it off at t he ma ins
imm ediat ely. Co ntact your s tore.
Ca r Use On no accou nt mus t this unit be used by the driver of a m oving motor vehicl e. If
the unit is being used by a pa sseng er in y our ve hicle, make sure th at it d oes no t caus e
dis tractio n to th e drive r, is se cured or he ld safe ly and does not obstruct any sa fety de vice
27
1
CHAPTER 1 IMPORTANT INSTRUCTIONS
(e.g. a irbag, seat b elt, etc .) that is fitte d. It is advis ed tha t this p roduc t is ins talled in the
rear of the ve hicle o nly. M ake su re tha t it is a lways secur ely fas tened before use. N ever
place t he pro duct in a pos ition w here a sudd en sto p will c ause i t to be come dislodged.
Ventilation
The TV must be we ll vent ilated. Do no t cove r your TV or p lace i t inside a sm all con fined
space. Make sure t hat the re is a gap o f at lea st 10c m on b oth si des an d 20 c ms at the top .
Interfe rence
Do not place your T V on o r near applia nces w hich may ca use e lectrom agne tic inte rferen ce
(TV or Hi-Fi s peake rs). If you do , it ma y adve rsely affect the wo rking o f the u nit, an d cau se a
distort ed picture or sound .
Screen Burn
A char acteris tic of P lasma and L CD TV Pane ls is th at dis playin g the s ame im age f or a lo ng
time m ay cau se a p erman ent af ter-ima ge to remain on th e scre en. Th is is ca lled screen burn.
Most p ictures show n on y our TV will b e cons tantly movin g and fill the screen .
Examples of images that you need to watch out for are as follows (this is not an all-inclusive list):
- Black Bars: If black bars appear at the left/right or top/bottom of the screen it is recommended to
change the format so that the picture fills the entire screen.
- TV Channel Logos: e.g. Shopping channel logos and pricing displays - especially if they are bright
and stationary. Moving or low-contrast graphics are less likely to cause ageing of the screen.
- PIP and Multipip: Do not view for long periods of time using the PIP or Multipip functions.
- Time Disp lays
-Teletext : Do not view a stationary page for long periods of time.
- TV/DVD Menus: e.g. Listings of DVD disk content.
- Pause Mode: Do not leave the screen in pause mode for long periods of time, e.g. When watching
DVDs or videos.
9. TROUBLESHOOTING
Before requesting service for this player ,check the chart below for possible cause of the
problem you are experiencing. some simple checks or an adjustment on your part may
eliminate the problem and restore proper operation.
Fault Phenomenon
Resolve
Unit is on, but nothing
displays on screen
Insert the plug to the power socket on wall
firmly.
“No signal”
Reinstall the antenna and adjust it
Connect the digital TV tuner antenna aerial to
the set top box
Set the proper parameters of received
programs in the system settings menu
Set top box makes a
strange sound
Press the Audio or LANG button on the
Remote control to select the correct
audio track or audio
language.
Note: To pr event screen burn if view ing any of the above for long periods of time, reduce contrast and
brightness when viewing. Once burn-in occurs it will never disappear completely.
Ba tteries
Ba tteries are ea sily swallow ed by young children. Do not all ow yo ung ch ildren to play with
the remote cont rol uni t.
Co vers
Do not re move any fix ed cov ers as this m ay ex pose d angerous vo ltages .
Sta ndby
The stand by bu tton on the re mote contro l does n't swi tch off the TV comp letely and th e TV
wil l contin ue to draw e lectric ity fro m the mains supply. Ther efore i n the i nteres ts of sa fety
and to av oid un necess ary e nergy consumption , neve r leave your TV in s tandb y while
una ttend ed for long pe riods of tim e, eg. o vernight, wh ile on holida y or w hile ou t of the hous e.
Po wer Cord
Ma ke sur e your TV or TV sta nd is n ot res ting on top of the po wer c ord, as the w eight o f the T V
ma y dam age th e cord and c reate a safety haza rd. Ma ke sur e that the ma ins plu g is e asily
acc essib le.
Pa ckagi ng
If y ou can store the pa ckagi ng it will prov e useful sho uld yo u need to tra nsport the TV to
pro tect it while it is in transit. Try to reuse pack aging where ver you can. If you canno t store it,
co ntact y our local aut hority for details of your n eares t recyc ling fa cilities.
2
26
8. SPECIFICATIONS
1.CHANNEL BANDWIDTH: 6MHZ, 7MHZ&8MHZ
2. EARPHONE OUTPUT : ≥ 250mW (MAX)
3.Display device: Colour TFT LCD
4.Display Screen Size: 7 inches
5.Video Input: 1Vp-p
6.Audio Output: ≥1.6V+0.2V
7.Input Resistance : 75Ω
8.Power Consumption: ≤ 18w
9.Standby Power Consumption:
≤0.04W
10.Resolution: 1440 (H)*234 (V)
11.Dots Distance: 0.107(H) X 0.372(V)mm
12.Visible Range: 154.08(H) X87.05(V)mm
13.Power Source: AC adaptor or car adaptor(normal: DC 12V)
O
O
14 . O peration Temperature : -5 C to +45 C.
15.Measurement: 198(L) X 150 (W) X31(D) mm
16.Weight: Approx. 478g
17.Connection terminals:
1. Antenna Jack
2. Headphone Jack
3. AV OUT Jack
4. AV IN Jack
5. External Power Source Input Jack
Spe cifications are subj ect to ch ange w ithout n otic e.
2. FEATURES
7 ” TF T DISP LAY
This p layer h as a b uilt -in 7" TFT displa y w, to provi de clea r visio n, and low
radiat ion.
MANU AL/A UTO TV/ RA DIO SE ARCH ING F UNCT ION
MEMO RY FUNCTI ON
DIGITAL VID EO B ROAD CAST ING R ECEPT ION
7 DAY S ELE CTRO NIC P ROGR AMME GUID E(EPG )
MULTI-AUD IO FU NCTIO N
The a udio so undtr ack can be he ard in up to 8 langu ages. (The n umbe r of au dio sound
langu ages d epend s on th e soft ware.)
MULTI-SUB TITLES FUN CTION
Subtit les ma y be displayed in one of a maxim um of 32 lan guage s depe nding on the
softw are.
PARENTAL LOCK FUNC TION
This p reven ts play unsui table for child ren.
This s ymbol on the produ ct or i n the in struc tions m eans that yo ur ele ctrical and e lectron ic
equip ment s hould be dis posed at the end of its life sepa rately from y our ho useho ld was te.
There are se parat e colle ction s ystem s for recyclin g in th e EU.
For m ore inf ormat ion, please c ontact the lo cal authority or you r retai ler wh ere yo u
purch ased the pro duct.
Visit P artma ster.c o.uk to day fo r the e asiest way to buy e lectric al spa res an d acce ssorie s.
With o ver 1 million spare s and access ories in stoc k we c an deliver di rect to your d oor th e
e ry nex t day.
Visit ww w.par tmast er.co. uk
or ca ll
08 70 6001 338
(UK c ustom ers on ly)
Call s char ged at Nation al Rat e.
25
3
3. ACCESSORIES
CHAPTER 7 OPERATIONS
Game menu
Remote
control
(part no.:
GPRC05111
................1
External aerial
(antenna)...........1
Press Right n aviga tion button to select Gam e menu in M ain Menu and press Ok or function
button on pa nel to enter.
Battery
AV c able
....... ....1
+
Lit hiu m Cell
CR 202 5
3V DZ
In struction
manual
.. .........1
IF TH ERE ARE M ISSIN G CH ANNE LS OR NO C HANNELS A RE FO UND DURIN G A
SEARCH, ENTER “ CLEAR DATA ” IN “ CONFIG ” PAG E TO DELE TE AL L
PRO GRAM S, AND THE N BEGIN AU TO S EARC H CHANNE L AGA IN.
Instr uct ion Man ual
AC adaptor
(p art no.: Sw1201500
-W02
..................1
4
Di gi talTer restri al Re ceive r
BEFO RE USINGT HISPROD UCT, READ, U NDERSTAND,
AND F OLL OW T HESEI NSTRUCTI ONS.
3
Save this bookl etf or fut ur ere fere nce.
24
CHAP TER 7 OPERATIO NS
TAB LE OF CONTENTS
1
IMPORTANT INSTRUCTION.............................................1-2
2 FEATURES...........................................................................3
3 ACCESSORIES ......................................... .........................4
Pa rent L ock
If y ou select an d ente r the P arent Lock menu ,you ca n set a lock or mod ify the password.
-If the Pa rent L ock is set to ON , y ou must inpu t the c orrect passw ord to enter a locke d
ch annel.
-If the Ins tall L ock ite m is s et to O N , yo u mus t input the co rrect p assword to enter t he ma in
me nu. Th e defa ult pa ssword is 88 66.
4 GENERAL PARTS AND CONTROLS...................................6-8
4 -1 M AIN U NIT.. ......... ........ ........ ........ ......... ........ ........ ......... ........ ........ ........ .6-7
4 -2 REMOT E CO NTRO L..... ........ ........ ................. ........ ................. ........ ........ .7-8
5 BASIC CONNECTION
..................................................9-10
6 REMOTE CONTROL PREPARATION.. ... . .... .. .. ..... ... .... .... .... 11
7 OPERATIONS.................................................................12-24
7 -1
7 -2
7 -3
E NTER .... ......... .......... ..................... ..................... .......... ..................... .. 12
BASIC O PERAT IONS............ .......... ..................... ..................... .........1 2-13
MAIN ME NU..... ..................... .......... ..................... ..................... .........1 3-24
8 SPECIFICATIONS....................................................... ........25
9 TROUBLE SHOOTING.................................................. ........26
10 MAINTENANCE...................................................................27
23
5
CHAPT ER 7 OPERATIONS
4. GENERAL PARTS AND CONTROLS
INFO
Press INFO button once , a ba nner d ispla ys on the top of th e scre en(press ag ain to
remov e). Th e ban ner wi ll show the d etails of the curre nt ch annel.
4-1 MAIN UNIT
F RONT VIEW
1
10
11
CH
ENTER
2
V
MENU
S TANDBY
V
CH
3
4
5 6
1. TFT DISPLAY
2.SPEAKER
3.ENTER BUTTON -Can be use d as
ok button to c onfirm a operation only
in DVB mode.
4.VOL-/ BUTTON- To reduce volume
or move left.
5.CH+/ BUTTON- To select previous
channel or mo ve up.
7 8
Preference
9
6.CH+/ BU TTON -To se lect ne xt cha nnel
or mov e down.
7.MEN U BUT TON- To enter menu sett ing
page.
8.VOL+/
BUTTO N- Toincrese volum e
or mov e right .
9.STANDBY BUTTON- To set th e unit in
s tandb y mod e.
10.REMOTE CONT ROL SENSOR
11 LED INDICATOR
In the Pr eferen ce me nu yo u can s elect Langu age , O SD (O N SCREEN DISPL AY)
Se tting and Pa rent Lock i tems.
La nguage
Yo u can select differe nt lan guage s acco rding to Language menu .
AV IN
SIDE VIEW
12
AV O UT
12 .AV IN jack-use th e unit as a
monitor
13 .AV OUT jac k -use the un it as a
si gnal source
14 . Conn ect to HEADPHONE for
pr ivate listeni ng
15 .DCIN12V input ja ck
16 .POWER sw itch
6
13
14
DC
I N 12V
15
P OW E R
ON
16
O FF
OSD ( ON SC REEN DISP LAY) Settin g
Set th e colo r of th e menu by Se lectin g the O SD S etting option .
22
CHAPTE R 4 GENERAL PARTS AND CO NTRO LS
CHAPTE R 7 OP ERAT IONS
BA CK VIEW
17. Antenna jack
18. Stand Holder
Select a n even t in yo ur req uired t ime zo ne, an d pres s the RED bu tton. The tim er wil l be se t
ac cordin g to y our pre ferred time .
NOT E: You must conne ct exte rnal a ntenna to the unit b efore TV rec eiver o perat ion.
Be fore th is pro duct is used a s a TV make sure t he ext ernal a erial i s conn ected .
4-2 REMOTE CONTROL
Volum e Con trol
-Adjus t volume: Pr ess Le ft/right butt on on the rem ote c ontrol to adju st the volum e.
-Mute : Press Mute button on th e remote con trol to mute the so und. You can cancel the m ute
functi on by p ressin g the MUTE button again or the right
bu tton.
21
1.MUTE-T o mute the sou nd.
2.NUMERIC BUTTONS- To i np ut the
nume ric info rmatio n, suc h as c hanne l
numb er and so on.
3.CH+ /
- To sele ct pro gramm e forward or
move up.
4.OK- To co nfirm a selec tion.
5. b utton -To mo ve left.
6.CH-/ To select progr amme revers e or
move down.
7.TFT MOD E -Pres s this button to en ter the
TFT M ODE menu, move UP or DOWN
navig ation b utton to sele ct Con trast,
Brightness, Hue, S atura tion, S harpne ss
or Sca ling, t hen m ove LE FT or RIGHT
navig ation t o set the sele cted i tem as you
require.
8.AUDIO - To selec t the s ound track.
9.LAN G- To displa y and chang e subt itle
langu age.
10.IN FO- Dis plays the cu rrent progra mme
inform ation.
. 11.ALT -Re turn to last p rogram me w atched .
12.STANDBY- To turn on the Unit or p ut it
into s tandb y mode .
13.TV /RADIO Swi tch the unit in to TV or rad io
mode .
14.FR -Page down .
15.FF -Page up.
25
1
2
12
13
14
15
3
4
5
16
17
18
6
7
8
9
20
21
19
10
11
22
23
24
7
CHAPTE R 4 G ENERAL PARTS A ND CO NTRO LS
CHA PTER 7 OPERATI ONS
16.MENU -Displays the main menu and return to the previous menu.
17. Button -To adjust volume louder or move right.
18.EXIT-To return to parent menu. Pressing this button will also close all menu.
19.FAV -Display the user-settings favorite list
20.red button-To select different options according to the RED button displaying on OSD meun.
21.TEXT-To display current programme information .
22.GUIDE-Display the one-week EPG (electronic programme guide).
23.VOL+ -To adjust volume louder.
24.VOL- -To adjust volume lower.
25.FUNCTION -If you enter the menu setting, it can be used as OK button to confirm an operation
and also can switch the unit to AV IN or TV mode.
Note: This button is different from the function button on the panel.
Favorite List
Press FAV b utton on the remote control, the screen will display as shown b elow . You can
preview eac h channel by press ing th e UP/ DOWN button.
EP G (EL ECTRONIC PROG RAMM E GUIDE)
T h e EPG shows the e vent i nformation o f the c urrent chann el by t ime zo ne. Th e EPG is
div ided i nto We ekly m ode, Daily m ode, and Ex tend m ode. Press the EP G butt on, the
Weekly m ode w ill dis play as the d efault mode.
8
21
CHAPTER 7 OPERATIO NS
5. BASIC CONNECTION
E nsure all the cables are d isconn ected from t he ma in unit before conn ecting to the AC
pow er sou rce us ing the AC p ower a dapto r.
Read th rough the ins tructions be fore c onnec ting other eq uipme nt.
5-1 CONNECTING TO AC POWER SOURCE
To DC IN 12V jack
Main unit
① Channel type ic on, TV or rad io
② Current ti me
③ Channel number and the nam e of channel
④ Eve nt nam e
⑤ Teletext icon
⑥ Fav orite i con
⑦ Aud io trac k status, left, right or stereo
⑧ Lo ck status
- M UTE : Mutes the cu rrent c hanne l audi o track .
- POWER : Turn s the r eceive r power on/o ff.
- SOUND : Sets the cu rrent c hanne l audi o track to ste reo/ le ft-mon o/ right-mon o.
- LANG : Shows the list of th e audi o lang uage a vailab le in th e curr ent ch annel. (The s electe d
au dio lan guage inform ation is stored)
- TV/RAD IO : Switch t he uni t from TV to r adio m ode.
-Numeri c buttons(0-9) : Yo u can select chann el by i nputtin g the chann el num ber di rectly.
-Up/Dow n : En ter the previous/ne xt cha nnel o r move up/do wn.
- M ENU : To ent er the Main M enu.
- O K : To confirm a sel ection in any mode .
- EXIT : P ress th is but ton to exit ro ot men u.
-INFO : If you p ress th e INF O button onc e, a ba nner i s displayed o n the top of the screen,
an d if you press the b utton a gain b efore the ba nner h as dis appea red, th e ban ner wi ll now
sh own th e deta ils of t he cur rent ch annel .
- FAV :Press thi s butto n to d isplay Favorite List .
- EPG : To displ ay the ELEC TRON IC PRO GRA MME G UIDE menu .
NOTE:
Before connecti ng to AC power, push the
POWER ON/OFF switch to OFF.
To power ou tlet
AC ad aptor(inclu ded)
5-2 CONNECT EXTERNAL AERIAL( ANTENNA) TO UNIT
Install e xternal antenna in to the aerial (antenna) jack for best picture.
It i s recommended to conne ct a DVD /VCR.
En sure that this playe r and other e quipm ent to be connecte d are s et to o ff and
dis conne ct the AC ad aptor b efore comm encing conn ection .
E nsure that yo u obs erve th e colo r coding whe n connecting audio and v ideo c ables.
Note:
During DVD p lay, th e TV v olume may b e at a lower level than du ring T V broa dcasts , etc.
I f this is the ca se, ad just th e volu me to the de sired l evel.
Radio List
If you press the TV /RADIO/OK button on th e remo te con trol, th e scre en wil l displ ay as
show below .You can preview the channel a nd se lect th e chan nel by press ing the UP/
DOWN butto n.
20
9
CHA PTER 7 OPERATIO NS
CHAPTER 5 BA SIC C ONNE CTION
5-3 CONNECTING TO EXTERNAL DVD/VCR
DV D/VCR
TO AV OUT JACK
Video /audio cable
TO AV IN JACK
Syste m Inf ormation
In Co nfig m enu , you ca n sele ct Sys tem In forma tion . The Sy stem Information menu
shows the s ystem inform ation includ ing the Firmw are version and m ode na me.
DVB T PLAYER
5-4 CONNECTING TO TV SET
TV set
NO TE: M ake s ure all the co nnecti ons
ar e right and th e equi pment set to the
co rrect m ode.
TO AV IN JACK
In play s tatus, variou s men us wil l display on t he scr een by using the remote c ontrol .
You can chang e the curren t statu s and mode by pressing different butt ons.
Vide o/aud io cab le
T O AV OUT JACK
10
Playback
Program information
The disp lay at the bo ttom o f the s creen shows the in formation of the cu rrent c hanne l.
19
CHAP TER 7 OPER ATIO NS
6. REMOTE CONTROL PREPARATION
-De lete A ll Programs : Dele tes th e store d cha nnel d ata on ly ,othe r sett ing are not de leted .
-Re set To Defa ult : D elete a ll the curren t data stored , and r eset to facto ry sett ing.
TV Settin g
In Config menu , you can se lect th e TV Settin g optio ns.
Pr ess le ft or r ight n aviga tion b utton
to switc h the pictu re dis play s calin g
be tween 4:3 a nd 16 :9 mo de.
6-1 BATTERY INSTALLATION
Instal l the battery as sho wn in the pic ture below(fi g1). B e sure negat ive and posit ive
termin als ar e posi tioned as ind icated in the batter y com partme nt.
6-2 SERVICE LIFE OF BATTERIES
Th e pic ture is incis ed, n ot full .
-Th e batt eries n ormal ly last for about one year althou gh this depe nds on how o ften, a nd
for h ow oft en the remot e cont rol is u sed.
-If t he rem ote c ontrol fails to work even when it is ope rated near th e play er, rep lace the
batt eries.
- Use on e size CR20 25 bat tery.
Th ose b utton s are accor ding to
th ose o n the remot e con trol.
Se t Time
In Confi g men u , you can s elect Set Ti me to set yo ur SET TOP BOX time. T his fun ction is
us ed for EPG a nd som e timer sett ings. If your broadc ast station p rovide s GM T, you can se t
the time with G MT or set personal time.
-If the G MT us age is set to On a nd Cu rrent time i s automatica lly set ,you c an set the
tim e zone only.
-If you se t GMT Usag e to O FF, th en the calendar win dow w ill app ear on scree n.
-Yo u can selec t a date from calend ar.
Note:
Do not drop, step on or otherwise impact the remote control. This m ay damage the
parts or lead to malfunctio n.
If the remote control is not going to be used for a long t ime, remove the ba ttery.
6-3 REMOTE CONTROL OPERATION
Poin t the re mote contro l from no mo re
than about 6 m from the remote cont rol
sens or and within abou t 60 o of the front
of th e playe r (Fig2 ) .
Sys tem Upgrad e
You can s et Sys tem U pdate via an other SET TOP BO X.
18
Fig2
Fig1
NOTE:
-The o perating di stanc e may vary
according to the b right ness of the
room.
-Do no t poin t brig ht ligh ts at the remote
c ontrol sens or.
-Do no t plac e obj ects b etween the
r emote cont rol and the remot e control
s ensor.
-Do no t use this r emote cont rol wh ile
simult aneou sly operat ing the remote
c ontrol of an y othe r equ ipment.
R EMOTE CON TROL
SEN SOR
2
十
OPE N
十
PUSH
6m
1
30 C 30 C
十
十
3
十
十
4
11
CHAPTER 7 O PERATIONS
7. OPERATION
MAKE SURE ALL THE EQUIPMENT AND AC ADAPTOR
ARE CONNECTED PROPERLY AND THE UNIT IS SET IN
CORRECT MODE BEFORE OPERATION.
7-1 ENTER
-Connec t the e xterna l aeria l (ante nna) t o the a ntenn a aeria l loca ted on the ba ck of the unit.
-S witch the uni t to on .
-P ress T V /RADIO bu tton to enter TV/ R ADIO m ode. You a lso can switc h betw een m odes
by press ing th e FUN CTION butto n.
No te : If there is no si gnal or the s ignal i s too weak , the sc reen m ay be black or dist orted .
Config
In the m ain me nu, yo u can press the lef t or rig ht button to s elect the Config ic on . In this
menu, y ou can selec t Clea r Data , TV S etting , Set Time , System Update or Syste m
In forma tion .
7-2 BASIC OPERATIONS
SELECT WANTED PROGRAM
1 . Press C H - bu tton to enter next ch annel .
2. Press C H + b utton to enter previo us cha nnel.
3. P ress n umber button s on th e rem ote co ntrol di rectly to sele ct prog ramme numb ers 0 - 9.
4.To select two n umbe rs, pre ss the “-/-- ” b utton a nd ch oose th e “--” mode, then e nter en ter
y our pr ogram me num bers.
VOLUME CONTROL
C lear Da ta
In Confi g menu, you can select Clear D ata item .
Press the V+ or V- t o adju st the volum e .
NOTE: The le vel of VOLUME an d BAL ANCE can b e adju st from 0-24.
MUTE CONTROL
Pr ess th e MUT E button to m ute th e soun d, pre ss MU TE aga in or t he V+ button to switch the
so und O N agai n.
TFT MODE
Press TFT M ODE b utton, the sc reen will dis play:
12
17
CHAPTE R 7 OP ERAT IONS
CHAPTE R 7 OP ERAT IONS
Au to Sea rch
In Scan m enu , you ca n sele ct Aut o Sea rching . You can se arch a ll prog rams with th is
me nu in t he def ault fr equen cy ran ge.
Contrast
Brightness
Hue
Saturation
Sharpness
Scaling
50
50
50
50
1
16:9
Mov e the U P or DOWN navigation b utton to sele ct Con trast, Bright ness, H ue, S aturat ion,
Sha rpness or Sc aling, then p ress th e LEF T or R IGHT n aviga tion bu tton to adjus t the level
of th e sele cted it em.
NOT E: The level of Co ntrast, Brigh tness, Hue a nd Sat uration can b e adju sted b etwee n
0-10 0. And the le vel of Sharp ness c an be adjust ed 0 - 3.The Scalin g can b e adju sted
betw een 1 6:9 an d 4:3 m odes .
Pres s TFT MODE butto n again to ex it the TFT M ODE M enu P age.
Manual Se archin g
In Sc an me nu, yo u can select Manu al Sea rching item.
-Sele ct TP Frequ ency a nd Ba ndwid th .
-Swit ch Au to Mode to NO
-Sele ct the Trans Mode and G uard Interv al par amete r.
-If there are some signa ls disp laying in
Sign al Pow er an d Sign al Qu-lity .P ress th e RED butto n to se arch p rogram. If th ere is
no si gnal, p lease check the pa ramet er sett ing.
7-3 MAIN MENU
The unit co ntains differ ent se tting m enus.
-Pre ss the MENU butto n the screen will d isplay :
-pre ss the MENU butto n agai n to re turn to the pr evious menu .
-Pre ss OK to con firm a select ion.
-Pre ss CH +/CH- To mo ve up or down.
-Pre ss EXIT to ex it all m enus .
Edit
In th e main menu , you can press lef t or Right button to select Edit i tem . In this m enu, you
can select Channel Ma nager , Add Favo rites o r Favo rite M anager .
16
13
CHAPTE R 7 O PERATIONS
C HAPT ER 7 O PERATIONS
-Sel ect the desir ed cha nnel b y pres sing th e Up/Down button , and t hen pr ess the Red
butt on on t he rem ote co ntrol to set select ed cha nnel a s one of favo rites. Press the
Red button again , the s electe d channel w ill be c ancell ed from your favori te list.
-To s elect Radio chann el on t he TV list, pr ess the TV / Radio button on the remo te con trol,
and then p ress th e TV / Radio butto n to se lect TV chan nel on the Ra dio ch annel list.
- Pre ss the MENU butto n to e xit cur rent m enu, th e scre en wil l display a di alog, t his dia log
will s how y ou ho w to co nfirm y our o peratio n.
- Pre ss the Fav b utton to ente r the f avorite list while wa tching TV (o r listening to Radio )
in no rmal s tate.
Fav orite M anag er
The functi on ope ration s are t he sam e like the ch annel manag er me nu ope ration s.
Channel Manag er
You can e dit cha nnel i nforma tion in the C hanne l Man ager Menu .
Pre ss TV/ Radio butto n to display T V or radio ch annel list. A ccordi ng to t he menu, yo u can
set the ch annel positio n.
Scan
Press the le ft or rig ht but tons to selec t Scan icon from t he ma in men u. In th is me nu, can
select Auto Searc hing o r Man ual Se archi ng .
Add F avori tes
Press Add F avori tes button, y ou can selec t channels fr om the curre nt TV/ Radio list as
favorite channels.
14
15