1
+3-RUQDGD6HULHV
3RFNHW3&
8VHUV*XLGH
Printed in Singapore
Edition 1
&RS\ULJKW
The information contained in this document is provided “as is” and is subject to
change without notice.
Hewlett-Packard Company makes no warranty of any kind with regard to this
manual, including, but not limited to, the implied warranties of merchantability
and fitness for a particular purpose. Hewlett-Packard Co. shall not be liable for
any errors contained herein or for incidental or consequential damages in
connection with the furnishing, performance, or use of this manual or the
examples herein.
© Hewlett-Packard Co. 2001.
This document contains proprietary information that is protected by copyright.
All rights are reserved. No part of this document may be photocopied,
reproduced, adapted, or translated to another language without the prior
written consent of Hewlett-Packard Co., except as allowed under the copyright
laws.
The programs that control this product are copyrighted and all rights are
reserved. Reproduction, adaptation, or translation of those programs without
prior written permission of Hewlett-Packard Co. is also prohibited.
Microsoft, ActiveSync, Outlook, Pocket Outlook, Expedia, AutoRoute Express,
MapPoint, Windows, Windows NT, the Windows logo, and the Windows CE
logo are either registered trademarks or trademarks of Microsoft Corporation
in the United States and/or other countries. Microsoft products are licensed to
OEMs by Microsoft Licensing, Inc., a wholly owned subsidiary of Microsoft
Corporation.
All other brand names and product names used in this document are trade
names, service marks, trademarks, or registered trademarks of their
respective owners.
+HZOHWW3DFNDUG6LQJDSRUH3WH/WG
$VLD3DFLILF3HUVRQDO&RPSXWHU'LYLVLRQ
$OH[DQGUD5RDG
6LQJDSRUH
&RQWHQWV
1 | Welcome ...................................................................................... 1
What’s in the box ...................................................................... 2
Using this manual ..................................................................... 2
What’s on your HP Jornada ...................................................... 4
Where to find information.......................................................... 7
2 | Getting started .............................................................................. 9
Hardware features .................................................................. 10
Using your HP Jornada for the first time ................................. 12
Turning your HP Jornada on and off ....................................... 14
Using the hardware buttons and LED ..................................... 14
Navigating in Windows for Pocket PC .................................... 16
Entering information................................................................ 20
Finding and organizing information ......................................... 27
3 | Connecting to your desktop PC .................................................. 29
Installing Microsoft ActiveSync on your desktop PC ............... 30
Installing the HP Dynamic Voice audio codec......................... 31
Connecting your HP Jornada.................................................. 33
Establishing a partnership....................................................... 36
Synchronizing data ................................................................. 37
Browsing your HP Jornada from your desktop........................ 39
Transferring files between your HP Jornada
and your desktop PC......................................................... 40
Backing up and restoring data ................................................ 40
4 | Connecting to the Internet or to a network.................................. 45
Connecting your HP Jornada.................................................. 46
Creating an ISP or network connection .................................. 48
Browsing the Web (or a corporate intranet) ............................ 50
Sending and receiving e-mail.................................................. 55
5 | Configuring your HP Jornada ..................................................... 61
Managing power ..................................................................... 62
Managing memory .................................................................. 63
Adjusting settings.................................................................... 64
Security................................................................................... 66
Configuring hardware buttons................................................. 68
Configuring menus.................................................................. 70
Adding or removing programs................................................. 72
6 | Microsoft Pocket Outlook............................................................ 75
Calendar: scheduling appointments and meetings ................. 76
Contacts: tracking friends and colleagues .............................. 77
Tasks: keeping a to-do list ...................................................... 79
Notes: capturing thoughts and ideas ...................................... 80
Exchanging appointments, contacts, tasks, and
notes with other devices (HP info exchange) .................... 81
7 | Companion programs ................................................................. 83
Microsoft Pocket Word............................................................ 84
Microsoft Pocket Excel............................................................ 85
Microsoft Windows Media Player ............................................ 86
Microsoft Reader .................................................................... 89
OmniSolve .............................................................................. 90
8 | Accessories ................................................................................ 91
HP branded accessories......................................................... 92
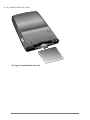
CompactFlash cards ............................................................... 93
9 | Troubleshooting.......................................................................... 95
Resetting your HP Jornada..................................................... 96
Basic problems ....................................................................... 98
Remote connections ............................................................. 101
Display problems .................................................................. 103
10 | Support and service................................................................ 105
Web site................................................................................ 105
Customer support ................................................................. 105
Service.................................................................................. 105
Contacting Hewlett-Packard worldwide................................. 106
Warranty........................................................................................ 109
Glossary ........................................................................................ 115
Appendix A: Character recognition............................................... 119
Appendix B: Migrating data from other devices ............................ 123
Index ............................................................................................. 127
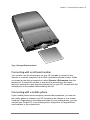
|1
_:HOFRPH
Congratulations on purchasing the Hewlett-Packard Jornada 520 Series
Pocket PC, a Microsoft® Windows®-powered Pocket PC. Your HP Jornada
Pocket PC lets you keep your most important business and personal
information current and close at hand. Your HP Jornada includes the Microsoft
Windows for Pocket PC software, such as the latest version of Microsoft
Pocket Outlook®, so you can read and write e-mail while on the road and
manage your appointments and contacts. You will find that your HP Jornada is
also the perfect companion to your desktop or notebook PC, allowing you to
take vital business data and documents with you and easily upload updated
information upon returning to your desk. HP Jornada offers you the highest
quality in performance and power management as well as rich programs and
utilities designed by Hewlett-Packard, making HP Jornada your powerful,
reliable, mobile business partner.
In this chapter, you will find:
•
a list of the HP Jornada package contents
•
an overview of this User’s Guide, and pointers to other sources of helpful
information
•
descriptions of the programs and features included with your Pocket PC
2 | HP Jornada 520 Series User’s Guide
:KDWVLQWKHER[
Your HP Jornada package includes the following items:
•
HP Jornada Pocket PC, with carrying pouch and stylus
•
ac adapter
•
serial cable for connection to a desktop PC
•
HP Jornada Quick Start Guide—a graphic guide to setting up your HP
Jornada
•
HP Jornada CD-ROM—includes programs and utilities that add
functionality to your HP Jornada; this User’s Guide, which provides
detailed information about your HP Jornada hardware and software; and
the HP Jornada Accessories Guide, which provides information about
optional add-ons to your HP Jornada.
•
HP documentation pack—includes the Regulatory Information Leaflet and
the HP Jornada Accessory Guide
•
Microsoft ActiveSync® CD-ROM and Getting Started with Microsoft
ActiveSync booklet
8VLQJWKLVPDQXDO
This User's Guide is designed to help you get started using your HP Jornada
quickly and easily. Although great care has been taken to ensure the accuracy
of procedures and artwork, some of the screens displayed on your HP
Jornada may be different than the ones that appear in this User’s Guide.
Detailed, step-by-step instructions for using the programs on your HP Jornada
are also included in online Help, so you will always have access to them, and
you do not have to carry this guide when you travel. (For more information on
using online Help, see “Using online Help on your HP Jornada” later in this
chapter.)
This User's Guide includes the following chapters:
•
Chapter 1, Welcome. Offers a quick overview of the HP Jornada
package and this User's Guide.
•
Chapter 2, Getting started. Provides step-by-step instructions for
charging your Pocket PC, completing the Welcome Wizard, and preparing
to use your HP Jornada for the first time.
•
Chapter 3, Connecting to your desktop PC. Offers everything you need
to know to connect your Pocket PC, transfer files, and synchronize
Microsoft Pocket Outlook data and e-mail messages.
Chapter 1 | Welcome | 3
•
Chapter 4, Connecting to the Internet or to a network. Explains how to
use a CompactFlash card modem* to connect to the Internet through an
Internet service provider, or install a CompactFlash network interface card
to connect to a network. Once you are online, you can browse the Internet
or intranet, and send and receive e-mail directly from your Pocket PC.
•
Chapter 5, Configuring your HP Jornada. Details the many ways you
can add functionality to your HP Jornada by installing additional software
and programs, and explains how you can customize your HP Jornada
using HP settings and control panels.
•
Chapter 6, Microsoft Pocket Outlook. Describes the Contacts,
Calendar, Tasks, and Notes programs (“personal information manager”
programs) included with your HP Jornada.
•
Chapter 7, Companion programs. Describes the productivity programs
included with your HP Jornada, including the Microsoft Windows for
Pocket PC software (Microsoft Pocket Word, Pocket Excel, Microsoft
Reader, and the Windows Media™ Player), and the OmniSolve®
calculator from Landware.
•
Chapter 8, Accessories. Describes the HP accessories available for
your Pocket PC, and includes instructions on how to add functionality
using a CompactFlash card.
•
Chapter 9, Troubleshooting. Explains how to reset your Pocket PC and
how to restore your Pocket PC to the factory default settings, and
provides helpful tips and procedures to follow when things do not work
quite as you expected.
•
Chapter 10, Support and service. Includes phone numbers and
directions to help you obtain technical support from Hewlett-Packard.
This User's Guide includes certain visual cues that will help you find the
information you want easily.
A shortcut, another way to do something, or expanded information
about the topic.
Caution or warning information about the topic. This is important
information that should be observed to prevent loss of data or
damage to your HP Jornada.
Helpful information related to the topic.
* Modem must be purchased separately. Some Web sites/content may not be available.
4 | HP Jornada 520 Series User’s Guide
:KDWVRQ\RXU+3-RUQDGD
Your HP Jornada already includes the full suite of software you need to
function as a mobile professional. These programs are introduced below.
Detailed information can be found in later chapters.
The programs listed below are installed in ROM. They cannot be deleted, and
you will never need to reinstall them.
+3SURJUDPV
HP settings. Adjust the brightness and contrast of the display and set the
speaker volume to suit your work environment. Choose from four preset
profiles or create your own.
HP security. Protect your data with a four-digit password that prevents
unauthorized users from accessing your HP Jornada.
HP backup. Protect your valuable data even when you are away from your
office by backing up your personal information manager (PIM) databases
(Contacts, Calendar, and Tasks) or your entire Pocket PC to a
CompactFlash card.
HP game buttons. Run up the score in your favorite games on your Pocket
PC. Use the HP game buttons application to assign game actions to your
Pocket PC hardware buttons.
HP home menu. Quickly launch your favorite programs or open frequently
used documents. Assign each of the buttons on the HP home menu to a
different document or program.
HP task switcher. Switch between open programs and documents, or
close any program from a pop-up menu on the Today screen.
HP info exchange. Send and receive contacts, appointments, and tasks to
and from non–Windows-powered devices from within Pocket Outlook. Also
receive (but not send) notes and store them as a text file in the My
Documents folder of your HP Jornada.
Chapter 1 | Welcome | 5
0LFURVRIW:LQGRZVIRU3RFNHW3&VRIWZDUH Calendar. Keep track of your appointments and create meeting requests.
Contacts. Keep track of your friends and colleagues.
Inbox. Send and receive e-mail messages.
Notes. Create handwritten or typed notes, drawings, and recordings.
Pocket Excel. Create new workbooks, or view and edit Excel workbooks
created on your desktop PC.
Pocket Word. Create new documents, or view and edit Word documents
created on your desktop PC.
Tasks. Keep track of your tasks.
Microsoft Pocket Internet Explorer. Browse the Web and view channels
and subscription content.
Microsoft Windows Media Player for Pocket PC. Play songs and sound
clips on your Pocket PC. Windows Media Player lets you play songs or files
that have been recorded in MP3, WMA, or WAV format.
Microsoft Reader. Read electronic books on your HP Jornada.
7KLUGSDUW\VRIWZDUH
OmniSolve. Perform complex mathematical and business calculations with
this full-featured calculator from Landware.
$GGLWLRQDOSURJUDPV
The CD-ROMs included with your HP Jornada include additional programs
you can install. For installation instructions, see “Adding or removing
programs” in chapter 5.
You can also install programs from a variety of sources, including the Internet.
For more information, see “Adding or removing programs” in chapter 5.
6 | HP Jornada 520 Series User’s Guide
Find the following programs on the HP Jornada CD-ROM:
•
HP Jornada User’s Guide. The User’s Guide provides detailed information
about your HP Jornada hardware and software. The User’s Guide is
provided in Portable Document Format (PDF), and requires the Adobe®
Acrobat® Reader, available from the Adobe Web site at www.adobe.com.
•
Yahoo!® Messenger* from Yahoo! Inc. Yahoo! Messenger allows you to
instantly communicate with all your online friends, and check stock-prices,
news, sports scores, and more.
•
AudiblePlayer™ 2.0 for Windows CE and AudibleManager™ 3.0 from
Audible Inc.* Listen to best-selling audiobooks, newspapers, magazines,
and more.
•
MusicMatch® Jukebox 6.0 from MusicMatch Corporation. MusicMatch
Jukebox 6.0, with new Internet Radio, gives music fans the power to play,
record, organize, and discover new music. MusicMatch Jukebox and HP
Jornada Pocket PC—the ultimate personal music system!
•
EzWAP from EZOS. This browser enables you to browse Internet sites
that use wireless access protocol (WAP) to deliver content designed
specifically for mobile devices.
•
Sample MP3 songs from EMusic.com™.* EMusic.com is the premier site
for your MP3 music. Whether you are into rock, jazz, blues, techno, or hip
hop, EMusic.com features thousands of tracks from the artists you are
looking for.
•
HPC Notes™ 3.05 Lite Edition (full) and Professional Edition (trial) from
PhatWare™ Corporation.* HPC Notes 3.05 is a powerful notes creator
and organizer for Windows for Pocket PC. It allows users to create notes,
password-protect them, and organize them by type, subject, and creation
and modification date.
The programs included on the CD-ROMs are subject to change. Check your
CD-ROM for the complete list, and visit the HP Web site at
www.hp.com/jornada/solutions for even more programs and software updates.
Find the following programs on the ActiveSync CD-ROM:
•
Microsoft Transcriber version 1.1 for Windows CE. Transcriber lets you
take down phone numbers, notes, and more as easily and naturally as
writing on a piece of paper. Transcriber recognizes all handwriting,
whether cursive, printed, or a combination of both.
* Available on English language versions only.
Chapter 1 | Welcome | 7
•
Microsoft Money for Pocket PC. Record expenses, balance your
checkbook, and track your investments. You can also update Microsoft
Money accounts on your desktop PC with information from your HP
Jornada. (Microsoft Money for Pocket PC can synchronize only with the
US English version of Microsoft Money.)
•
Microsoft Internet Explorer 5. Browse the Web with the latest version of
the Microsoft browser software for your desktop PC.
•
Microsoft Outlook 2000. Manage your messages, appointments, contacts,
and tasks on your desktop PC.
•
Microsoft Windows Media Manager for Pocket PC. Convert different
music and sound files to the proper format and transfer them to your HP
Jornada.
•
Sample content for use with Microsoft Reader.
:KHUHWRILQGLQIRUPDWLRQ
The following table is a guide to additional information to help you use your
HP Jornada.
For information on:
See this source:
Programs on your HP Jornada
This User’s Guide or online Help on your
device. Tap Help on the Start menu to
view Help for the active program.
Additional programs that can be
installed on your HP Jornada
The HP Jornada CD-ROM, the Extras
folder on the ActiveSync CD-ROM, and
the HP Web site at
www.hp.com/jornada/solutions.
Connecting to and
synchronizing with a desktop
PC
The Getting Started with Microsoft
ActiveSync booklet or ActiveSync Help
on your desktop PC. For more details
and the latest updates, visit the Microsoft
Web site at www.pocketpc.com.
Last-minute updates and
detailed technical information
The Readme files in the Microsoft
ActiveSync folder on your desktop PC
and CD-ROM, and the HP Jornada Web
site at www.hp.com/jornada.
8 | HP Jornada 520 Series User’s Guide
For information on:
See this source:
Troubleshooting connections
Chapter 9 of this User’s Guide or the
ActiveSync Troubleshooter on your
desktop PC. On the ActiveSync File
menu, click Connection Settings, and
then click Help. For more help, visit the
Microsoft Web site at
www.pocketpc.com.
The latest on Windows–
powered Pocket PCs
The Microsoft Windows for Pocket PC
Web site at www.pocketpc.com.
The complete text of this User's Guide is also available on the HP Web site at
www.hp.com/jornada/products/product_tour. You can download the User's
Guide to your desktop PC and view it using the Adobe Acrobat Reader,
available from the Adobe Web site at www.adobe.com.
8VLQJRQOLQH+HOSRQ\RXU+3-RUQDGD
You can get help for specific programs and for Windows for Pocket PC by
tapping Help on the Start menu. Help is displayed for the active program. To
display a menu of all Help files available on your Pocket PC, tap the View
menu, and then tap All Installed Help, or simply tap Help while the Today
screen is active.
Navigate in Help just as you navigate in Microsoft Internet Explorer: by tapping
links or tapping the Back button. When you have finished viewing Help, tap
to return to the program you were using.
|9
_*HWWLQJVWDUWHG
This chapter will help you start using your HP Jornada Pocket PC. You will
become familiar with the hardware, learn how to set up your HP Jornada, and
find a brief introduction to the Windows for Pocket PC operating system. When
you finish this chapter, you will have all the information you need to begin
working with your HP Jornada.
This chapter includes step-by-step instructions to help you
•
Identify hardware features.
•
Complete the Welcome Wizard.
•
Navigate in Windows for Pocket PC.
•
Enter information.
•
Find and organize information.
10 | HP Jornada 520 Series User’s Guide
+DUGZDUHIHDWXUHV
The illustrations below introduce you to the various buttons, connectors, ports,
and other features of your HP Jornada.
4
14
1
5
6
2
13
7
3
8
12
11
10
9
1.
2.
3.
4.
5.
6.
7.
8.
Stylus.
Carrying pouch.
Stylus slot.
Rubber studs. Remove the studs to add
an accessory cover. Note that once
removed, the rubber studs cannot be
replaced.
Microphone.
Action button. Press to select the highlighted item, or rock to the button to
scroll up or down in a document.
Record button. Hold while recording.
HP hot keys. Press to open an
application.
9.
10.
11.
12.
13.
14.
Serial port. Connect to your
desktop PC using a sync cable
or cradle.
DC jack.
On/Off button.
Speaker.
Touch screen.
Notification LED. Signals an
alarm or reminder and
indicates power status while
recharging.
Chapter 2 | Getting started | 11
15
16
15. Reset button.
16. Stereo headphone jack.
17. CompactFlash card slot. Add
memory or accessories using
Type I CompactFlash cards.
18. Infrared port. Transfer files
and data between other
devices without using wires or
cables.
17
18
HP home menu
Contacts
Calendar
Tasks
The HP hot keys
&DULQJIRU\RXU+3-RUQDGD
When treated properly, your HP Jornada will be a reliable desktop PC
companion. Follow these tips to ensure long and trouble-free use:
•
Protect the screen. Pressing too hard on the touch screen may damage
the screen. To protect the screen, keep your HP Jornada in the carrying
pouch while you are not using it. You can also protect the screen with an
optional screen protector or a color cover. For more information, see “HP
branded accessories” in chapter 8.
12 | HP Jornada 520 Series User’s Guide
Use the stylus to tap the HP Jornada screen to avoid scratches or
damage to the screen. To clean the screen, use a small amount of
commercial glass cleaner sprayed on a soft cloth. Avoid spraying the
screen directly.
Be sure to turn off your HP Jornada before cleaning the touch screen.
•
Do not drop your HP Jornada. Dropping or jarring your HP Jornada can
cause damage to delicate components such as the display. Accidental
damage is not covered under the Hewlett-Packard express warranty.
•
Avoid radiated interference. Radiated interference from other electronic
equipment may affect the appearance of the display of your HP Jornada.
Removing the source of the interference will return the display to normal.
•
Avoid high temperatures. Your HP Jornada is designed to operate at
temperatures between 0 to 40 ºC (32 to 104 ºF). Subjecting the device to
temperatures outside this range may damage the unit or result in loss of
data. Be especially careful not to leave your HP Jornada in direct sunlight
or in a car where temperatures can rise to harmful levels.
8VLQJ\RXU+3-RUQDGDIRUWKHILUVWWLPH
Follow these steps to begin using your HP Jornada.
1.
Connect to ac power. Assemble the ac adapter, and connect it to
the dc jack on your Pocket PC.
Chapter 2 | Getting started | 13
2.
Reset your HP Jornada. Press the red Reset button on the back of
your Pocket PC.
3.
Follow the Welcome Wizard. The first time you start your HP
Jornada, the Hewlett-Packard Welcome screen appears. Then, after
a few moments, the Welcome Wizard begins. The Welcome Wizard
presents a brief orientation to Windows for Pocket PC, helps you
align the touch screen, and prompts you to select your city and time
zone.
4.
Adjust the display. Before you begin, you may need to adjust the
contrast and brightness of the display to a comfortable level. Press
and hold the HP home menu hot key until HP settings appears, and
then move the sliders for each setting.
5.
Register your HP Jornada. To ensure that you receive warranty
coverage, technical support, and information on upgrades, register
your HP Jornada at www.hp.com/jornada.
14 | HP Jornada 520 Series User’s Guide
7XUQLQJ\RXU+3-RUQDGDRQDQGRII
One of the most convenient features of HP Jornada is “instant on.” With
instant on, there is no waiting for HP Jornada to start up or shut down; you can
start working immediately by pressing the On/Off button.
You can also turn on your HP Jornada simply by tapping the touch screen. On
the Preferences tab in HP settings, select the Tap screen to power on check
box.
When you are finished working, turn off your HP Jornada by pressing the
On/Off button. By default, the backlight will dim after 1 minute of inactivity, and
your HP Jornada will turn off automatically after 3 minutes of inactivity if it is
not connected to an ac power source. You can use the Power control panel to
change these settings. On the Start menu, tap Settings, tap the System tab,
and then tap the Power icon.
If you select Tap screen to power on, your HP Jornada may accidentally turn
on when you slide it into the carrying pouch.
8VLQJWKHKDUGZDUHEXWWRQVDQG/('
The hardware buttons on your HP Jornada (that is, the buttons on the device
itself, rather than buttons or icons that appear on the display) can be used to
start a particular program and to turn on your HP Jornada. The features
associated with each button are described below. In addition, most buttons
can be reassigned or configured to start a program that you designate. For
more information, see “Configuring hardware buttons” in chapter 5.
1RWLILFDWLRQ/('
•
A blinking green LED indicates an alarm or reminder. The LED continues
blinking until you tap Snooze or Dismiss on the touch screen.
•
While your HP Jornada is connected to ac power, an amber LED
indicates that your HP Jornada is charging. A solid (not blinking) green
LED indicates that your HP Jornada is fully charged.
•
A blinking amber LED indicates that the display is off (but the device is
still on).
Chapter 2 | Getting started | 15
5HFRUGEXWWRQ
•
Press and release the Record button to turn on your HP Jornada.
•
Press and hold the Record button to turn on your HP Jornada and begin
recording. If the speaker is not muted, a beep indicates that recording has
started.
•
Release the Record button to stop recording. If the speaker is not muted,
a double beep indicates that recording has stopped.
To avoid inadvertently turning on your HP Jornada, you can disable the
Record button. For more information, see “Adjusting settings” in chapter 5.
+3KRWNH\V
•
Press any HP hot key to start the associated application:
HP home menu hot key
Contacts hot key
Calendar hot key
Tasks hot key
•
Press the HP home menu hot key to launch the HP home menu.
•
Press the HP home menu hot key a second time to display the second
page of buttons.
•
Press and hold the HP home menu hot key to launch HP settings.
•
Press the Calendar, Contacts, or Tasks hot key to launch that application.
•
In Calendar, Contacts, or Tasks, press the associated hot key again to
change views (for example, to switch from Day view to Week view).
•
Press and hold the Tasks hot key to turn the display off (without turning
off the device). Press the Tasks hot key (when device is off) to turn the
display on again.
•
You can also set the HP hot keys to turn on your HP Jornada and start
the associated application with one touch. For more information, see
“Adjusting settings” in chapter 5.
16 | HP Jornada 520 Series User’s Guide
2Q2IIEXWWRQ
•
Press the On/Off button to turn your HP Jornada on or off.
•
If the display has been turned off, press the On/Off button to turn on the
display.
•
Press and hold the On/Off button to open the Align Screen application
and recalibrate the stylus and touch screen. For more information, see
“Aligning the touch screen” later in this chapter.
1DYLJDWLQJLQ:LQGRZVIRU3RFNHW3&
8VLQJWKHVW\OXV
Use the stylus to navigate and select objects on the screen:
•
Tap. Touch the screen once with the stylus to open items and select
options.
•
Drag. Hold the stylus on the screen and drag to select text and images.
Drag in a list to select multiple items.
•
Tap-and-hold. Tap and hold the stylus on an item to see a list of actions
available for that item.
For convenience, the stylus is stored in the stylus slot on the carrying pouch of
your HP Jornada.
$OLJQLQJWKHWRXFKVFUHHQ
From time to time, you might notice that the accuracy of your stylus taps
diminishes. When this happens, you can realign your touch screen using the
Align Screen control panel.
=XXYNW]QN*URPW<L[NNWLXW][XUYJWNU
1.
2.
3.
On the Start menu, tap Settings.
On the System tab, tap the Align Screen icon.
Tap the targets as they appear at each new location to calibrate the
touch screen.
You can also open the Align Screen control panel—without using the stylus—
by pressing and holding the On/Off button.
Chapter 2 | Getting started | 17
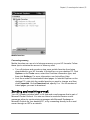
7RGD\VFUHHQ
When you turn on your HP Jornada for the first time each day (or after 4 hours
of inactivity), you will see the Today screen. You can also display it by tapping
Today on the Start menu. The Today screen displays all the important
information about your day. To customize the information that is displayed, tap
the Today screen header.
The Today screen
6ZLWFKLQJSURJUDPV
Use the HP home menu application or the Start menu to quickly launch your
favorite programs or open frequently used documents. You can also use HP
task switcher to switch between running programs.
=X\]J[]X[\`R]LQY[XP[JV\^\RWP19QXVNVNW^
1.
2.
Press the HP home menu hot key.
Tap the button that corresponds to the program or document.
18 | HP Jornada 520 Series User’s Guide
HP home menu displays two pages of buttons and icons that represent the
programs and documents on your Pocket PC. To display the second page,
press the HP home hot key a second time, or tap the HP home menu icon in
the lower-right corner of the HP home menu screen.
The icons displayed on the buttons assigned to the Memory control panel and
Power control panel change to indicate when storage memory is low or power
is low.
=X\]J[]X[\`R]LQY[XP[JV\^\RWP]QN<]J[]VNW^
1.
2.
Tap
in the Navigation bar to display the Start menu.
On the Start menu, tap the name of the program you want to switch
to.
–or–
Tap one of the miniature icons at the top of the Start menu to switch
to a recently used program.
You can customize both HP home menu and the Start menu to make it easier
to access the programs you use most. For more information, see “Configuring
menus” in chapter 5.
=X\`R]LQY[XP[JV\^\RWP19]J\T\`R]LQN[
1.
2.
On the Today screen, tap the HP task switcher status icon
in the
Command bar.
–or–
Press the HP home menu hot key and tap the HP task switcher icon.
On the pop-up menu, tap the name of one of the running programs.
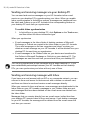
1DYLJDWLRQEDU
The Navigation bar is located at the top of the screen. It displays the active
program and current time, and allows you to switch to other programs and
close screens.
The Windows for Pocket PC Navigation bar
Chapter 2 | Getting started | 19
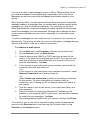
&RPPDQGEDU
Use the Command bar at the bottom of the screen to perform tasks in
programs. The Command bar includes the menus and buttons for the active
program, status icons, and the Input panel button. To create a new item in the
current program, tap New.
To see the name of a button, tap and hold the stylus on the button. Drag the
stylus off the button so that the command is not carried out.
The Windows for Pocket PC Command bar
6WDWXVLFRQV
When the Today screen is displayed, you may see the following status icons
on the Command bar. In most cases, you can tap a status icon to display the
associated control panel or more information related to the item. For example,
tap the active dial-up connection icon to disconnect from a modem connection.
Icon
Meaning
Speaker is on.
Pocket PC is charging.
Less than 50% power remains.
Power is very low. A warning message also appears.
External (ac) power source is connected.
Dial-up connection is active.
Direct connection to a desktop PC is active.
HP task switcher is active.
HP game buttons are enabled.
20 | HP Jornada 520 Series User’s Guide
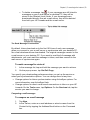
3RSXSPHQXV
Use pop-up menus to choose an action for the selected item. For example,
you can use the pop-up menu in the Contact list to quickly delete a contact,
make a copy of a contact, or send an e-mail message to a contact. The
actions on the pop-up menus vary from program to program. To open a popup menu, tap and hold the stylus on the item that you want to perform the
action on. When the menu appears, lift the stylus, and then tap the action you
want to perform. Tap anywhere outside the menu to close the menu without
performing an action.
The pop-up menu for Tasks
(QWHULQJLQIRUPDWLRQ
You have several options for entering information on your Pocket PC:
•
Use the soft keyboard on the Input panel to enter text.
•
Use the Character Recognizer on the Input panel to enter text.
•
Write directly on the screen.
•
Speak into the microphone to record a voice note.
Chapter 2 | Getting started | 21
6RIWNH\ERDUG
The soft keyboard is an onscreen keyboard displayed at the bottom of the
screen. Tap a letter on the keyboard to enter that letter, just as if you were
typing.
=XMR\YUJb]QN\XO]TNbKXJ[M
1.
Tap the Input panel icon at the right edge of the Command bar.
The icon may look like either a keyboard or a pen, depending on which input
option you have selected. If
is displayed (meaning that the Character
Recognizer is selected), tap the arrow to the right of the Input panel icon, and
then tap Keyboard.
•
To display a numeric keypad, tap
keyboard.
•
at the lower-left corner of the soft
To type accented characters, tap
keyboard. The display shows the available accented characters.
•
To type capital letters, tap the V key.
•
To use keyboard shortcuts, such as F9for Paste or F=for Undo,
tap the Fkey, and then tap the letter of the command.
at the upper-left corner of the soft
To change the size of the onscreen keys and set other options for the soft
keyboard, tap the arrow next to the Input panel icon and then tap Options, or
use the Input control panel.
The Input panel icon and menu
22 | HP Jornada 520 Series User’s Guide
&KDUDFWHU5HFRJQL]HU
The Character Recognizer is an onscreen writing area that interprets the
strokes of your stylus on the screen into typed letters in the active document.
You use the stylus to write in the Input panel, just as if you were writing on a
piece of paper.
=XMR\YUJb]QN,QJ[JL]N[;NLXPWRcN[
1.
Tap the Input panel icon at the right edge of the Command bar.
The Input panel icon may look like either a keyboard or a pen, depending on
is displayed (meaning that the soft
which input option you have selected. If
keyboard is selected), tap the arrow to the right of the Input panel icon, and
select Character Recognizer.
The Character Recognizer input screen
•
To enter capital letters, write in the area at the left of the Input panel under
the “ABC” symbol.
•
To enter lowercase letters, write in the center portion of the Input panel,
under the “abc” symbol.
•
To enter numbers and symbols, write in the area at the right of the Input
panel, under the “123” symbol.
•
To enter symbols, tap the “@$” symbol to display an onscreen keyboard.
Chapter 2 | Getting started | 23
Because certain letters use similar stylus strokes, it may take some practice to
achieve the writing style for the Character Recognizer. For a table of stylus
motions and the corresponding letters, see Appendix A, “Character
recognition.”
For a demonstration of proper stylus motions, tap
.
To select either uppercase or lowercase writing style and set other options for
the Character Recognizer, tap the arrow next to the Input panel icon and then
tap Options, or use the Input control panel.
:ULWLQJRUGUDZLQJRQWKHVFUHHQ
Some programs, such as Pocket Word, Notes, and the Notes tabs in
Calendar, Contacts, and Tasks, accept writing directly on the screen. When
you write on the screen, you can edit and format what you have written or
convert the information to text.
=X`[R]NXW]QN\L[NNW
1.
2.
Tap
to switch to writing mode.
Write on the screen using the stylus, as you would write on paper.
=XLXW_N[]`[R]RWP]X]Na]
1.
2.
3.
4.
Next to the writing you want to convert, tap and hold the stylus until
the insertion point appears.
Without lifting the stylus, drag it to select the writing.
On the Tools menu, tap Recognize.
If the conversion is incorrect, tap and hold the stylus on the incorrect
word to display the pop-up menu, and then tap Alternates. Tap the
word you want to use, or tap the writing at the top of the menu to
return to the original writing.
Tips for writing on the screen:
•
Write neatly.
•
Write on the lines and draw descenders below the line. Write the cross of
the “t” and apostrophes below the top line so that they are not confused
with the word above. Write periods and commas above the line.
24 | HP Jornada 520 Series User’s Guide
•
For better recognition, try increasing the zoom level to 300% using the
Tools menu.
•
Write the letters of a word close together and leave big gaps between
words, so that it is clear where words begin and end.
•
Hyphenated words, foreign words that use special characters such as
accents, and some punctuation cannot be converted.
•
If you add writing to a word to change it (such as changing a “3” to an “8”)
after you attempt to recognize the word, the writing you added will not be
included if you attempt to recognize the writing again.
=XM[J`XW]QN\L[NNW
1.
2.
Tap
to switch to writing mode.
Draw on the screen using the stylus, being sure to cross three ruled
lines on your first stroke.
The first stroke of your drawing must cross three horizontal rules.
3.
Continue drawing, as you would draw on paper, making sure that
subsequent strokes appear in or touching the drawing box.
You may want to change the zoom setting so that you can more easily work
on or view your drawing. Tap Tools and then select a zoom setting.
Chapter 2 | Getting started | 25
5HFRUGLQJYRLFHQRWHV
In any program where you can write or draw on the screen, you can also
quickly capture thoughts, reminders, and phone numbers by recording a voice
note. In Calendar, Tasks, and Contacts, you can include a recording on the
Notes tab. In the Notes program, you can either create a standalone recording
or include a recording in a written note. If you want to include the recording in
a note, open the note first.
You can share voice notes with other Windows-powered devices by sending
them over infrared or as an attachment to an e-mail message.
The recording feature is intended for recording personal voice notes. It is not
suitable for recording presentations, music, or lectures. Some static or
electrical noise may be heard during playback.
=XL[NJ]NJ[NLX[MRWP
1.
2.
3.
Press and hold the Record button until you hear a beep. The LED
glows amber.
While holding the Record button, speak into the microphone. For best
results, limit the length of recordings to less than 3 minutes. To create
the highest quality recordings, record in a location with low levels of
ambient noise, and speak in a normal voice with your mouth
approximately 10 cm (4 inches) from the microphone.
Release the Record button. Two beeps will sound. The new
recording appears in the note list or as an embedded icon.
You can also record a voice note by tapping
on the Recording toolbar.
=XYUJbJ[NLX[MRWP
1.
Tap the name of the recording in the file list.
–or–
Tap the recording icon in the note.
–or–
Press the Action button to play the selected recording.
26 | HP Jornada 520 Series User’s Guide
;NLX[MRWPOX[VJ]\
Your HP Jornada supports several formats for voice notes. The formats vary in
both the quality of the recording and the size of the sound file. When selecting
a recording format, you should consider the quality you need as well as how
much storage memory the recording will use on your HP Jornada.
In addition, not all recording formats are compatible with other software or
computers. If you will share your recordings with others or transfer a recording
to your desktop PC, be sure to choose a recording format that is supported by
the software used to play recordings on the other computer. The default
recording format is HP Dynamic Voice. For instructions on installing HP
Dynamic Voice codec on your desktop PC, see “Installing the HP Dynamic
Voice audio codec” in chapter 3.
=X\NUNL]J[NLX[MRWPOX[VJ]
1.
2.
On the Start menu, tap Settings, and then tap the Input icon.
On the Options tab in the Input control panel, select a voice
recording format from the drop-down list.
The table below lists the compatibility of various recording formats with other
computers. The list of recording formats on your HP Jornada indicates the
sample rate, whether the format is stereo or mono, and how much storage
memory is required per second of recording. You may need to experiment with
different sample rates and formats to determine which format best suits your
voice.
Compatibility
Format
Quality
HP Jornada
520 series
Pocket PC
Windows
CE 2.0
device
PC with
ActiveSync
installed
Windows
95/98/NT/
2000/Me
PCM
High
yes
yes
yes
yes
Mobile Voice
Low
yes
yes
yes
no
GSM 6.10
Medium
yes
yes
no
no
HP Dynamic Voice
High
yes
no
yes*
yes*
* You must first install HP Dynamic Voice codec on your desktop PC. See “Installing the
HP Dynamic Voice audio codec” in chapter 3
Chapter 2 | Getting started | 27
=X\NWMJ[NLX[MRWP]XJWX]QN[LXVY^]N[
1.
2.
3.
4.
In the Notes application or in File Explorer, locate the recording you
want to send.
Tap and hold the name of the recording to display the pop-up menu.
On the pop-up menu, tap either Send via E-mail or Send via
Infrared.
Enter an e-mail address.
–or–
Align the infrared port on your HP Jornada with the infrared port on
the recipient’s computer. (The recipient’s computer must be in
infrared receive mode.)
)LQGLQJDQGRUJDQL]LQJLQIRUPDWLRQ
You can find and organize the files and information on your Pocket PC in
much the same way you do on your desktop PC: by using the Find feature or
by using File Explorer.
Use the Find feature to locate files that contain a specified text string or that
match specific criteria.
=XORWMJORUN
1.
2.
3.
4.
On the Start menu, tap Find.
In the Find box, type the text you want to locate.
If you want to narrow your search to files of a specific type, select the
file type in the Type list.
Tap Go.
To quickly find information that is taking up storage space on your device,
select Larger than 64 KB in the Type list.
Use File Explorer to browse the folders on your Pocket PC and to organize
files into folders.
=XK[X`\NOXUMN[\
1.
On the Start menu, tap Programs, and then tap File Explorer.
28 | HP Jornada 520 Series User’s Guide
| 29
_&RQQHFWLQJWR\RXU
GHVNWRS3&
To get the most from your HP Jornada, you will want to connect to your
desktop or notebook PC. This chapter describes how to establish the
connection between your HP Jornada and your desktop PC, and how to
synchronize and transfer files between your Pocket PC and your desktop (or
any PC that has Microsoft ActiveSync installed). In this chapter, you will learn
to
•
Install Microsoft ActiveSync 3.1 on your desktop PC.
•
Connect your HP Jornada by sync cable, cradle, or infrared.
•
Establish a partnership between your HP Jornada and your desktop PC.
•
Synchronize data between your HP Jornada and desktop PC.
•
Browse files on your HP Jornada from your desktop PC.
•
Transfer files between your HP Jornada and a desktop PC.
•
Back up the data on your HP Jornada.
30 | HP Jornada 520 Series User’s Guide
,QVWDOOLQJ0LFURVRIW$FWLYH6\QFRQ\RXUGHVNWRS3&
Before you can connect your HP Jornada to a desktop PC, you must install
Microsoft ActiveSync on the desktop PC. Microsoft ActiveSync enables you to
browse, synchronize, and transfer files between your desktop PC and your HP
Jornada.
Microsoft ActiveSync 3.1 is included on the ActiveSync CD-ROM, which
comes with your HP Jornada. For instructions on installing ActiveSync, refer to
the Getting Started with Microsoft ActiveSync booklet that accompanies the
CD-ROM. For information on using ActiveSync, see ActiveSync Help on your
desktop PC after you have installed the program.
Check the Microsoft Web site for updates to the ActiveSync software.
6\VWHPUHTXLUHPHQWV
The minimum desktop PC system requirements for installing and running
Microsoft ActiveSync 3.1 are as follows:
•
Microsoft Windows 2000, Microsoft Windows NT® Workstation 4.0 with
Service Pack 3 or later, Microsoft Windows Me, or Microsoft Windows
95/98
•
Pentium processor for Windows NT or Windows 2000 (166 MHz required
for Windows 2000; 150 MHz required for Windows Me); 486/66 DX or
higher processor (Pentium P90 recommended) for Windows 95/98
•
16 MB of memory for Windows 95/98 (more memory will improve
performance) or Windows NT (32 MB recommended) or Windows 2000
(64 MB recommended); 32 MB of memory for Windows Me
•
hard disk drive with 10 to 50 MB of available hard disk space (actual
requirements will vary based on selection of features and your current
system configuration)
•
available 9- or 25-pin communications port (adapter required for 25-pin
communication port) or infrared port
•
CD-ROM drive
•
VGA graphics card or compatible video graphics adapter at 256 colors or
higher
•
keyboard
•
Microsoft Mouse or compatible pointing device
Chapter 3 | Connecting to your desktop PC | 31
Optional components
•
audio card/speakers for sound
•
modem and/or Ethernet LAN connection for remote synchronization
•
Microsoft Internet Explorer 4.0 or higher for Mobile Channels or Mobile
Favorites support. (Internet Explorer 5.0 is included on the ActiveSync
CD-ROM.)
•
additional 153 MB of disk space for Microsoft Outlook 2000. 24 MB
system RAM recommended. (Microsoft Outlook 2000 is included on the
ActiveSync CD-ROM.)
,QVWDOOLQJWKH+3'\QDPLF9RLFHDXGLRFRGHF
HP Dynamic Voice is the default format for recording voice notes on your HP
Jornada. You can transfer recordings from your HP Jornada to your desktop
PC; however, before you can play a voice note recorded in HP Dynamic Voice
on your desktop PC, you must install the HP Dynamic Voice compressor/
decompressor (codec). The procedure for installing the codec depends on
your operating system. Follow the appropriate instructions below for your
version of Microsoft Windows.
=XRW\]JUU19-bWJVRL?XRLNXW@RWMX`\""!6N
1.
2.
3.
4.
5.
6.
Insert the HP Jornada CD-ROM into a drive on your desktop PC.
In the HP Dynamic Voice folder on the HP Jornada CD-ROM, open
the Win9x folder.
Right-click the hpdynv.INF file, and then click Install on the pop-up
menu.
If you are prompted to insert a disk, make sure that your HP Jornada
CD-ROM is inserted, and then click OK.
Installation should begin automatically, and you should see the
Copying Files dialog box.
If you see a message stating that the hpdynv.acm file is not found,
click Browse, and then select the file from the Win9x folder in the HP
Dynamic Voice folder on the HP Jornada CD-ROM.
=XRW\]JUU19-bWJVRL?XRLNXW@RWMX`\7=
1.
2.
3.
4.
5.
Insert the HP Jornada CD-ROM into a drive on your desktop PC.
On the Start menu, point to Settings, and then click Control Panel.
In Control Panel, click Multimedia.
On the Devices tab, select Audio Compression CODEC.
Click Add.
32 | HP Jornada 520 Series User’s Guide
6.
7.
8.
Select Unlisted or Updated Driver from the list, and then click OK.
Click Browse.
In the Drives list, select the drive that contains the HP Jornada CDROM.
9. In the Directories list, open the HP Dynamic Voice directory, and
then select the WinNT directory.
10. Click OK. The Install Driver dialog box should display the path for
downloading HP Dynamic Voice.
11. Click OK. The Add Unlisted or Updated Driver dialog box should
display “Hewlett Packard Dynamic Voice”.
12. Click OK to install the codec onto your desktop PC.
=XRW\]JUU19-bWJVRL?XRLNXW@RWMX`\
1.
2.
1.
2.
3.
4.
5.
6.
7.
8.
9.
10.
11.
12.
13.
14.
15.
Insert the HP Jornada CD-ROM into a drive on your desktop PC.
On the Start menu, point to Settings, and then click Control Panel.
In Control Panel, double-click the System icon.
On the Hardware tab, click Hardware Wizard.
On the Welcome to the Add/Remove Hardware Wizard screen,
click Next.
On the Choose a Hardware Task screen, click Add/Troubleshoot a
device, and then click Next.
In the list of devices, select Add a new device, then click Next.
In the Find New Hardware dialog box, select No, I want to select
the hardware from a list, and then click Next.
In the list of Hardware types, select Sound, video and game
controller, and then click Next.
In the Select a Device Driver dialog box, click Have Disk, and then
click Browse.
In the Drives list, select the drive that contains the HP Jornada CDROM.
In the Directories list, open the HP Dynamic Voice directory, select
the Win2000 folder, and then click OK.
If the Digital Signature Not Found dialog box appears, click Yes to
continue installation.
In the Select a Device Driver screen, select Hewlett-Packard
Dynamic Voice, and then click Next.
Click Next to start installation.
If the Digital Signature Not Found dialog box appears, click Yes to
continue installation.
Click Finish to complete the installation.
Chapter 3 | Connecting to your desktop PC | 33
&RQQHFWLQJ\RXU+3-RUQDGD
You can connect your HP Jornada to a desktop or notebook computer in three
ways:
•
Use a sync cable to connect to a serial port.
•
Use a serial cradle to connect to a serial port.
•
Use the infrared port on your Pocket PC (if the desktop or notebook
computer also has an infrared transmitter).
Each of these methods works with all models of the HP Jornada Pocket PC.
Serial sync cradle and additional sync cables are available as optional
accessories. Both serial and infrared connections work with Windows 95,
Windows 98, and Windows 2000. Windows NT supports serial connection, but
does not support connection by infrared.
Serial connections require a 9-pin serial communications (COM) port on your
desktop PC. If the 9-pin serial port is in use by another device, or if your
desktop PC has no 9-pin serial port, obtain an adapter from your computer’s
manufacturer.
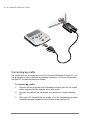
&RQQHFWLQJE\V\QFFDEOH
If a sync cable was not included with your HP Jornada, you can purchase a
serial cable as an optional accessory. For more information, see the HP
Jornada Accessories Guide.
=XLXWWNL]Kb\bWLLJKUN
1.
2.
Connect the sync cable to a serial port on your desktop PC.
Connect the other end of the sync cable to your HP Jornada. Your
HP Jornada should start automatically and establish a connection to
the desktop PC.
34 | HP Jornada 520 Series User’s Guide
&RQQHFWLQJE\FUDGOH
If a cradle was not included with your HP Jornada 520 Series Pocket PC, you
can purchase a serial cradle as an optional accessory. For more information,
see the HP Jornada Accessories Guide.
=XLXWWNL]KbL[JMUN
1.
2.
3.
Connect the dc plug from the ac adapter to the dc jack on the cradle
cable, and plug the ac adapter into a wall outlet.
Connect the cable from the cradle to a serial port on your desktop
PC.
Slide your HP Jornada into the cradle. Your HP Jornada should start
automatically and establish a connection to the desktop PC.
Chapter 3 | Connecting to your desktop PC | 35
When you remove your HP Jornada from the cradle, hold the cradle down with
one hand and gently lift the HP Jornada with the other to avoid putting stress
on the connectors.
&RQQHFWLQJE\LQIUDUHG
The infrared port on your HP Jornada provides a convenient way to connect to
an IrDA-equipped PC without using a cable or cradle. Many notebook
computers have built-in infrared ports; however, you may need to install and
configure an infrared port on a desktop PC. To install the port, follow the
manufacturer’s instructions. More information about infrared drivers for
Microsoft Windows is available on the Windows for Pocket PC Web site at
www.pocketpc.com.
36 | HP Jornada 520 Series User’s Guide
For complete instructions on connecting to your desktop PC by infrared, refer
to ActiveSync help on your desktop PC.
(VWDEOLVKLQJDSDUWQHUVKLS
When you install Microsoft ActiveSync, you are prompted to connect your HP
Jornada and create a partnership. A partnership enables your desktop PC to
recognize your HP Jornada when you connect and to remember the
synchronization and file conversion settings you set.
You can connect your HP Jornada to a desktop PC without establishing a
partnership; however, only Pocket PCs that have a partnership with a desktop
PC can synchronize information between the two computers.
Your HP Jornada can have partnerships with up to two desktop (or notebook)
PCs, for example, your home and office computers. If you regularly
synchronize your HP Jornada with both desktop PCs, you can ensure that
important files, contacts, and appointments are always up-to-date and identical
on all three computers.
Although you can establish partnerships with two desktop PCs, you can
synchronize e-mail messages with only one desktop PC.
A single desktop PC can have partnerships with many Pocket PCs or other
mobile devices. This is useful if you have more than one Windows-powered
device, or if several mobile professionals share a single desktop PC.
7KH1HZ3DUWQHUVKLS:L]DUG
The first time you connect, the New Partnership Wizard on your desktop PC
helps you establish a partnership and set options for synchronizing Pocket
Outlook data, e-mail messages, and files between your HP Jornada and
desktop PC.
=XN\]JKUR\QJYJ[]WN[\QRY
1.
2.
When the New Partnership dialog box appears on your desktop PC
screen, click Yes to synchronize, and then follow the instructions to
complete the New Partnership Wizard.
At the prompt, type a name and description for your HP Jornada. The
name must start with a letter, and it can be anything you choose (up
to 15 characters, no spaces).
Chapter 3 | Connecting to your desktop PC | 37
You can later change the name and description on the Device ID tab of the
About control panel on your HP Jornada. On the Start menu, tap Settings, tap
the System tab, and then tap the About icon.
3.
4.
Set the number of partnerships your HP Jornada will have. If you will
synchronize information between your Pocket PC and more than one
computer, or if you have already established a partnership with
another desktop PC, select two.
Set options for synchronization, including the types of files and
information you want to synchronize and whether to synchronize
automatically each time you connect.
If you choose to establish partnerships with two desktop PCs, the two desktop
PCs must be configured with the same synchronization settings. In addition,
both desktop PCs must use the same PIM program (for example, Microsoft
Outlook).
6\QFKURQL]LQJGDWD
Synchronization compares the data on your HP Jornada with the data on your
desktop PC and updates both computers with the most recent information.
You can synchronize any of the files on your HP Jornada with the
corresponding files on your desktop PC. For example
•
Keep Pocket Outlook data up to date by synchronizing your Calendar,
Contacts, and Tasks databases with Microsoft Outlook on your desktop
PC.
•
Synchronize Microsoft Word and Microsoft Excel files between your
device and desktop PC. Your files are automatically converted to the
correct format.
•
Synchronize e-mail messages in your HP Jornada Inbox with e-mail
messages in Microsoft Outlook on your desktop PC.
•
Copy favorite Web site addresses* and any Web pages you have marked
for offline viewing in Microsoft Internet Explorer to your HP Jornada.
By default, ActiveSync synchronizes only Contacts, Calendar, Tasks, and your
Mobile Favorites. You can set synchronization options when you first establish
a partnership, or use ActiveSync options to turn synchronization on and off for
other files and information types.
* Modem must be purchased separately. Some Web sites/content may not be available.
38 | HP Jornada 520 Series User’s Guide
Control when synchronization occurs by selecting a synchronization mode. For
example, you can synchronize continually while your HP Jornada is
connected, or only when you choose the Synchronize command.
Select which information types are synchronized and control how much data is
synchronized. For example, you can choose how many weeks of past
appointments you want synchronized.
5HVROYLQJV\QFKURQL]DWLRQFRQIOLFWV
If the same item (for example an appointment or a task) has been modified on
both your HP Jornada and desktop PC, ActiveSync indicates that a
synchronization conflict has occurred.
When the Resolve items message appears in the ActiveSync window, click it
to display the Resolve Conflict dialog box. To resolve the conflict, you must
specify one of the items to replace.
You can resolve each conflict manually at the time of synchronization, or you
can resolve conflicts automatically, by setting a default option for conflict
resolution.
=X\N]JMNOJ^U]XY]RXWOX[LXWOURL][N\XU^]RXW
1.
2.
In the ActiveSync window on your desktop PC, click Options on the
Tools menu.
On the Rules tab, choose one of the options under Conflict
Resolution.
6\QFKURQL]LQJIURPDUHPRWHORFDWLRQ You can synchronize while connected to your desktop PC by a dial-up
modem* connection or over a local area network (LAN). This can be useful if
you need to synchronize files or PIM information while traveling. Before you
leave, you must configure both your HP Jornada and your desktop PC.
8WbX^[193X[WJMJ
You must create a partnership between your HP Jornada and the desktop PC
using one of the direct connection methods (serial cable or infrared
connection) described in this chapter. And you must configure a dial-up or
network connection on your HP Jornada, as described in chapter 4,
“Connecting to the Internet or to a network.”
* Modem must be purchased separately. Some Web sites/content may not be available.
Chapter 3 | Connecting to your desktop PC | 39
8WbX^[MN\T]XY9,
Before you can synchronize remotely, the desktop PC or network server must
be configured to allow your HP Jornada to connect. If the desktop PC uses
Windows NT or Windows 2000, you must install and configure Remote Access
Services. If it uses Windows 95/98/Me, install and configure Dial-Up
Networking.
You must also ensure that ActiveSync is configured to allow a network
connection. By default, ActiveSync allows a network connection; however, to
confirm the setting or to enable connection if it has been disabled, follow the
procedure below.
=XNWJKUNJWN]`X[TLXWWNL]RXWRW*L]R_N<bWL
1.
2.
On the File menu, click Connection Settings.
Select Allow network (Ethernet) and Remote Access Service
(RAS) server connection with this desktop computer.
Follow these steps to prepare your desktop PC before you leave:
•
If you are using a modem on your desktop PC, turn the modem on before
you leave.
•
Leave your desktop PC on, and be sure you logged on under the same
user name that you used when you created the partnership.
•
Ensure your PIM program and e-mail program (Microsoft Outlook or
Microsoft Exchange) are running.
If you receive an error message on your HP Jornada that states that an
information type needs attention, or if unresolved items are reported after
synchronization, you need to synchronize directly with your desktop PC using
a serial cable, cradle, or infrared connection.
%URZVLQJ\RXU+3-RUQDGDIURP\RXUGHVNWRS
While your HP Jornada is connected to a desktop PC, you can use ActiveSync
to browse the contents of your HP Jornada from your desktop PC. In the
ActiveSync window on your desktop PC, click Explore on the File menu. The
contents of your HP Jornada are displayed in the Mobile Device window.
You can also browse the contents of your HP Jornada from Windows Explorer
by double-clicking the Mobile Device icon in My Computer or in the drop-down
list of available drives.
While you browse, you can cut, paste, and copy files between folders on your
HP Jornada or transfer files between your HP Jornada and desktop PC simply
by dragging the file icons between folders.
40 | HP Jornada 520 Series User’s Guide
You cannot open documents or start programs stored on your HP Jornada by
double-clicking their icons in the Mobile Device window on your desktop PC.
Double-clicking an icon displays the properties for that file.
7UDQVIHUULQJILOHVEHWZHHQ\RXU+3-RUQDGD
DQG\RXUGHVNWRS3&
You can copy files between your HP Jornada and desktop PC by dragging
icons to or from the Mobile Device window or by using the Cut, Copy, and
Paste commands on the Edit menu.
Files created on your desktop PC may need to be converted before you can
use them on your HP Jornada, and files created on your HP Jornada may
need to be converted before you can use them on your desktop PC. By
default, ActiveSync automatically converts files to the appropriate type;
however, you can choose not to convert files, or you can choose to specify the
conversions for each type of file by changing options in ActiveSync.
=X\N]ORUNLXW_N[\RXWXY]RXW\
1.
2.
3.
4.
Start ActiveSync on your desktop PC.
On the Tools menu, click Options.
On the Rules tab, click Conversion Settings.
To turn off automatic conversion, clear the Convert files when
synchronized, copied, or moved check box.
%DFNLQJXSDQGUHVWRULQJGDWD
To prevent loss of data, you should back up your HP Jornada frequently. You
can back up your HP Jornada in two ways:
•
Use ActiveSync to back up all data to your desktop PC.
•
Use the HP backup application to back up all data or only your Contacts,
Calendar, and Tasks databases (PIM data) to a CompactFlash card or to
internal memory.
Backup files are not password-protected, even if you have set a password for
your HP Jornada. If you store sensitive information on your HP Jornada,
protect the backup file as you would any other file that contains sensitive
information.
Chapter 3 | Connecting to your desktop PC | 41
%DFNLQJXSGDWDZLWK$FWLYH6\QF
When you back up your HP Jornada using Microsoft ActiveSync, the backup
file contains all the files, databases, PIM information, and RAM-based
programs on your Pocket PC. The backup file is stored on your desktop PC.
If you have established a partnership between your HP Jornada and desktop
PC, you can set ActiveSync to back up data automatically each time you
connect. You can also back up your HP Jornada manually any time you want.
ActiveSync lets you decide whether to back up all information each time, or
only new and updated information.
=XKJLT^YMJ]J`R]Q*L]R_N<bWL
1.
2.
3.
4.
5.
Connect your HP Jornada to your desktop PC.
In the ActiveSync window on your desktop PC, click Backup/Restore
on the Tools menu, and then click the Backup tab.
Select either Full Backup (to back up all information every time) or
Incremental Backup (to back up only new or updated information).
Click Change to change the name of your backup file or to specify a
location for your backup file.
Click Back Up Now.
%DFNLQJXSGDWDZLWK+3EDFNXS
The HP backup application gives you added flexibility in backing up your
valuable data. With HP backup, you can back up all data or back up only your
Calendar, Contacts, and Tasks databases (PIM databases). You can save the
backup file to internal memory or to a CompactFlash card, so you can
safeguard your data even while you are traveling or away from your desktop
PC.
Backing up data to a file stored on your HP Jornada will not preserve your
data if your Pocket PC loses power or if you restore your HP Jornada to the
factory default settings. To ensure the safety of your data, it is recommended
that you back up to a CompactFlash card or to your desktop PC.
=XKJLT^YMJ]J^\RWP19KJLT^Y
1.
2.
3.
Use HP task switcher to close all running applications. (In the Today
screen, tap the HP task switcher icon, and then tap Close Window
and Close All on the pop-up menu.)
Disconnect your HP Jornada from your desktop PC.
On the Start menu on your HP Jornada, tap Settings.
42 | HP Jornada 520 Series User’s Guide
4.
5.
6.
7.
Tap the System tab, and then tap HP backup.
On the Backup tab, tap Back up all data or Back up PIM
databases.
In the Name box, type a name for the backup file, and select a
storage location from the drop-down list.
Tap OK to start the backup.
The backup file (.dbe or .dbb) is always saved in the My Documents folder. If
you back up data to a CompactFlash card, a My Documents folder is
automatically created.
5HVWRULQJGDWD
When you use the backup file to restore information to your HP Jornada,
information on the device is replaced with the information stored in the backup
file. If you have created files on your HP Jornada since the last backup and do
not want to delete these files during the restore process, move the files from
your HP Jornada to your desktop PC before restoring information. You can
restore data using ActiveSync or the HP backup application.
5HVWRULQJGDWDZLWK$FWLYH6\QF
Restoring data from ActiveSync replaces all information stored on your HP
Jornada. Any data added after the backup file was created will be lost.
=X[N\]X[NMJ]J`R]Q*L]R_N<bWL
1.
2.
3.
4.
5.
Connect your HP Jornada to your desktop PC.
Use HP task switcher to close all running applications on your HP
Jornada. (In the Today screen, tap the HP task switcher icon, and
then tap Close Window and Close All on the pop-up menu.)
In the ActiveSync window on your desktop PC, click Backup/Restore
on the Tools menu, and then click the Restore tab.
Click Restore Now. Do not use your device until the restore process
is complete.
Disconnect the sync cable or remove your HP Jornada from the
cradle, remove the CompactFlash card (if installed), and reset your
HP Jornada. See “Resetting your HP Jornada” in chapter 9.
Chapter 3 | Connecting to your desktop PC | 43
;N\]X[RWPRWL[NVNW]JUKJLT^Y\
If you have made incremental backups, you must restore each backup file
individually, starting with the original (full) backup and progressing in sequence
from the oldest to the most recent.
To select the backup file you want to restore, connect your HP Jornada to your
desktop PC as a guest. If you have already established a partnership, you
must delete the partnership on the desktop PC. (In ActiveSync, click Delete
Partnership on the File menu.)
5HVWRULQJGDWDZLWK+3EDFNXS
Use the HP backup application to replace all data on your Pocket PC or only
data in your Contacts, Calendar, and Tasks databases (PIM databases) with
data from an existing backup file.
Depending on the type of backup file, the restore operation replaces all
information stored in your PIM databases or all data stored on your Pocket
PC. Any data added after the backup file was created will be lost.
=X[N\]X[NMJ]J`R]Q19KJLT^Y
1.
2.
3.
4.
5.
6.
Use HP task switcher to close all running applications. (In the Today
screen, tap the HP task switcher icon, and then tap Close Window
and Close All on the pop-up menu.)
Disconnect your HP Jornada from your desktop PC.
Start HP backup on your HP Jornada.
On the Restore tab, tap Restore all data or Restore PIM
databases.
In the file list, tap the name of a backup file you want to restore from.
Remove the CompactFlash card (if installed), and reset your HP
Jornada. See “Resetting your HP Jornada” in chapter 9.
44 | HP Jornada 520 Series User’s Guide
| 45
_&RQQHFWLQJWRWKH,QWHUQHW
RUWRDQHWZRUN
In addition to connecting your HP Jornada to your desktop PC partner, you
may want to connect to remote computers so you can access e-mail, browse
the Internet, or retrieve files from a corporate network (LAN), whether you are
at home or on the road. This chapter describes
•
the several methods you can use to connect your HP Jornada to a
modem,* cellular phone, or network
•
the process of configuring your HP Jornada to connect to an Internet
service provider (ISP) or network
•
browsing the Web (or a corporate intranet) from your HP Jornada using
Microsoft Internet Explorer and Mobile Channels
•
sending and receiving e-mail messages with your HP Jornada
* Modem must be purchased separately. Some Web sites/content may not be available.
46 | HP Jornada 520 Series User’s Guide
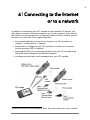
&RQQHFWLQJ\RXU+3-RUQDGD
Your HP Jornada gives you several options for connecting to a remote
computer. You can use an optional CompactFlash card modem, an infrared
modem, or a mobile phone. Each of these methods requires purchase of a
modem or adapter as an optional accessory. For more information about
compatible modems and accessories, visit the HP Jornada Web site at
www.hp.com/jornada/accessories.
&RQQHFWLQJZLWKD&RPSDFW)ODVKFDUGPRGHP Your HP Jornada Pocket PC supports a variety of Type I CompactFlash card
modems and network interface cards (NICs). Whether you use a CompactFlash card modem or CompactFlash NIC, the card must be a Type I
CompactFlash card. For a list of compatible CompactFlash cards, go to the
HP Jornada accessories page at www.hp.com/jornada/accessories.
Many NICs also require that you install a software driver. The card manufacturer must provide a software driver for the HP Jornada Pocket PC. Follow
the card manufacturer’s instructions for installing the card and configuring the
driver for use with your HP Jornada.
The driver for the Socket Low Power Ethernet CF+ card NIC is preinstalled on
your HP Jornada.
After you have installed and configured the card, the make and model of the
card will appear in the list of modems or the list of network adapters when you
create a new connection (see “Creating an ISP or network connection” later in
this chapter).
When you are ready to connect, connect the CompactFlash card modem to an
analog telephone line or a network connection using the appropriate cable.
Follow the card manufacturer’s instructions to attach the cable to the port on
the card.
Do not connect a CompactFlash card modem to a digital telephone line unless
it is specifically designed for use with a digital line.
Chapter 4 | Connecting to the Internet | 47
Type I CompactFlash card slot
&RQQHFWLQJZLWKDQLQIUDUHGPRGHP You can also use the infrared port on your HP Jornada to connect to the
Internet or a remote computer via an IrDA-compatible infrared modem. When
you create a new dial-up connection, select Generic IrDA modem from the
modem list. Connect the modem to a phone line according to the manufacturer’s instructions, and align the infrared port on your HP Jornada with the
infrared port on the modem before dialing the call.
&RQQHFWLQJZLWKDPRELOHSKRQH
If your mobile phone service supports remote data connection, you can use
the mobile phone to connect your HP Jornada to the Internet or to a remote
computer. Depending on the make and model of your mobile phone, you can
connect your Pocket PC to the mobile phone using either a CompactFlash
card interface or the infrared port.
48 | HP Jornada 520 Series User’s Guide
,XVYJL]/UJ\QLXWWNL]R_R]bTR]
You may be able to obtain a Type I CompactFlash connectivity kit from the
manufacturer of your phone, or from a third-party manufacturer. In either case,
the kit must be designed to work with the specific model of your phone, and
the manufacturer must provide a driver for use with the HP Jornada Pocket
PC.
After you have installed and configured the card, the make and model of the
card will appear in the list of modems or the list of network adapters when you
create a new connection (see “Creating an ISP or network connection” later in
this chapter).
?RJRWO[J[NM
If your mobile phone has a built-in IrDA-compatible infrared port (or if an
optional infrared connectivity kit is available for your phone), you can use the
infrared port on your HP Jornada to connect to it. When you create a new dialup connection, select Generic IrDA modem from the modem list. Align the
infrared port on your HP Jornada with the infrared port on the mobile phone
before dialing the call. For detailed instructions on how to establish a wireless
connection using a mobile phone, check the HP Jornada Web site at
www.hp.com/jornada/solutions/hardware/wireless_solutions.
&UHDWLQJDQ,63RUQHWZRUNFRQQHFWLRQ
To connect to a network or the Internet, you need an account with an ISP, an
account on your corporate network, or access permission to dial in to a
specific computer.
For each account, you will need a user name and password provided by the
ISP or account administrator. If you are connecting to a commercial ISP, you
will also need to know the dialup telephone number and IP and DNS
addresses (if required).
If you plan to use the account to send or receive e-mail messages directly
from your HP Jornada, you must also obtain the following information from
your ISP or account administrator:
•
a user name and password for your e-mail account (these may be
different than the user name and password you use to connect)
•
the name of the POP3 or IMAP4 server (for incoming messages)
•
the name of the SMTP server (for outgoing messages)
Chapter 4 | Connecting to the Internet | 49
Before you can use a modem to connect to an ISP or to dial in to a specific
desktop PC, you must create a connection for that service on your HP
Jornada. If you use an NIC to connect to a corporate network, you must
configure your network connection. Your HP Jornada will recognize the
connection once you attach the network cable to the NIC.
=XL[NJ]NJMRJU^YLXWWNL]RXW]XJW2<9X[J\YNLRORL9,
1.
Install a modem or NIC. For more information, see “Connecting your
HP Jornada” earlier in this chapter.
2. On the Start menu, tap Settings, and then tap the Connections tab.
3. Tap the Modem icon.
4. Tap New Connection.
5. Enter a name for the connection. The name can be anything you
want, but it should describe the connection, for example, “corporate
dialup.”
6. Select the make and model of your modem from the list. If your
modem is not listed, it may be installed incorrectly. Refer to the
manufacturer’s instructions to be sure.
7. Select the baud rate. The selected rate must be supported by both
your modem and the ISP or network computer you will connect to. If
you are not sure about the rate, contact your account administrator.
8. If your ISP or account administrator provided specific settings, such
as IP addresses, DNS addresses, or parity or flow control—or if your
connection uses SLIP—tap Advanced, and enter this information on
the appropriate tab.
9. Tap Next, and then enter the telephone number you dial to connect
to your ISP or network computer.
10. Tap Next, and then set dialing options.
11. Tap Finish.
12. On the Dialing tab, select your dialing location and set any
necessary options or dialing patterns. (For a description of dialing
strings and dialing options, see online Help on your HP Jornada.)
To establish a connection, follow the procedure “To connect to an ISP or
desktop PC,” below.
=XLXWORP^[NJWN]`X[TLXWWNL]RXW
1.
2.
3.
On the Start menu, tap Settings, and then tap the Connections tab.
Tap the Network icon.
On the Adapters tab, select the name of your CompactFlash card
NIC in the list of installed adapters.
50 | HP Jornada 520 Series User’s Guide
4.
5.
If your ISP or account administrator provided specific settings, such
as IP addresses or DNS addresses, enter this information on the
appropriate tab, and then tap OK.
On the Identification tab, enter your user name, password, and the
domain (if required).
=XLXWWNL]]XJW2<9X[MN\T]XY9,
1.
2.
3.
4.
5.
6.
7.
8.
On the Start menu, tap Programs, and then tap the Connections
icon.
Tap the icon for the connection. All connections you have created
should appear as icons in the Connections folder.
Type your user name, password, and domain (if required).
Select a dialing location. Tap Dialing Options to confirm or change
settings for the selected location or to create a new location.
In the Dialing Options dialog box, tap Dialing Patterns to make any
necessary changes to the dialing pattern for this call. For an
explanation of dialing patterns, see online Help on your HP Jornada.
Tap OK to close the Dialing Options dialog box.
Tap Connect.
In the Connect To dialog box, confirm that the proper phone number
is displayed. If the phone number is not displayed correctly, adjust
the settings in Dialing Options or Dialing Patterns.
After you have set up an e-mail service, you can also connect to your e-mail
server from within Inbox. Select the appropriate service on the Services
menu, and then tap the Connect button (or tap Connect on the Services
menu). For more information, see “Sending and receiving e-mail” later in this
chapter.
%URZVLQJWKH:HERUDFRUSRUDWHLQWUDQHW
Once you are connected, you can browse the Internet or a corporate intranet
using Microsoft Pocket Internet Explorer, and you can download mobile
channels for offline viewing on your HP Jornada.
0LFURVRIW3RFNHW,QWHUQHW([SORUHU
You can use Microsoft Pocket Internet Explorer to browse mobile favorites and
channels that you have downloaded to your HP Jornada without connecting to
the Internet. Or, you can connect to the Internet (or a corporate network) to
browse the Web or a corporate intranet.
Chapter 4 | Connecting to the Internet | 51
The Pocket Internet Explorer home page
=XK[X`\N]QN@NK
1.
2.
3.
4.
5.
6.
7.
8.
On the Start menu, tap Internet Explorer.
Connect your HP Jornada to a modem or network. (See “Connecting
your HP Jornada” earlier in this chapter.)
On the Tools menu, tap Options, and then tap the Connections tab.
On the Connections tab, select a connection from the Type list.
If your ISP requires you to connect to a proxy server, select the Use
proxy server check box, and then enter the address of the proxy
server. For more information, consult your account administrator.
Tap OK to return to Internet Explorer, and then on the Tools menu,
tap Connect.
On the View menu, tap Address Bar, and then type an URL.
–or–
Tap
, and then tap the favorite you want to view.
To close the connection, tap Tools and then Disconnect.
52 | HP Jornada 520 Series User’s Guide
You can have Pocket Internet Explorer automatically connect to the Internet
when you attempt to access a page that is not stored on your HP Jornada. On
the Tools menu, tap Options, and then tap the Connections tab. Select a
connection, and the select the Access remote content automatically check
box.
&KDQQHOFRQWHQW
Channels are Web sites designed specifically for offline viewing on a Pocket
PC. You can subscribe to two types of channels at no fee: AvantGo Channels
and Mobile Channels provided by Microsoft partners.
*_JW]0X,QJWWNU\
AvantGo is a free interactive service that gives you access to personalized
content and thousands of popular Web sites. Unlike Mobile Channels, you can
subscribe to AvantGo Channels directly from your HP Jornada. AvantGo
Channels are downloaded to your HP Jornada when you synchronize with
your desktop PC or when you connect to the Internet. For more information,
visit http:\\avantgo.com\help.
=X\RPW^YOX[*_JW]0X
1.
In ActiveSync on your desktop PC, click Options on the Tools menu,
and then select the AvantGo information type.
2.
In Pocket Internet Explorer on your HP Jornada, tap
to display
your list of favorites.
Tap the AvantGo Channels link.
Tap Activating AvantGo.
Follow the directions on your screen. You will need to synchronize
your HP Jornada with your desktop PC, and then tap the My
Channels button to complete AvantGo setup.
3.
4.
5.
When synchronization is complete, tap the AvantGo Channels link in your list
of favorites to see a few of the most popular channels. To add or delete
channels, tap the Add or Delete link.
You can change settings for your AvantGo server or add a specific server for
AvantGo channels. On the Start menu, tap Settings, and then on the
Connections tab, tap the AvantGo Connect icon.
Chapter 4 | Connecting to the Internet | 53
6XKRUNLQJWWNU\
Mobile channels are sites you subscribe to on your desktop PC. They are
stored in the Channels subfolder in the Mobile Favorites folder of your
Microsoft Internet Explorer folder and are downloaded to your HP Jornada
during synchronization. To see a list of mobile channels you can subscribe to
at no fee, visit the Windows for Pocket PC Web page at www.pocketpc.com.
While a channel Web page is displayed, click the Add Mobile Channel button,
and then select Make available offline to download the channel to your
desktop PC. The mobile channel will be transferred to your device the next
time you synchronize.
=X_RN`LQJWWNU\
1.
2.
Tap
to display your list of favorites.
Tap the channel you want to view.
Internet Explorer displays the page that was downloaded the last time you
synchronized with your desktop PC. If the page is not stored on your HP
Jornada, the favorite will be dimmed, and you must synchronize with your
desktop PC or connect to the Internet before you can view the page.
0RELOHIDYRULWHV
When you install ActiveSync, a subfolder called Mobile Favorites is created in
the Favorites folder on your desktop PC. You can synchronize the favorites in
this subfolder with the favorites on your HP Jornada. Unless you mark the
favorite link as a mobile favorite, only the link will be downloaded to your
device, and you will need to connect to your ISP or network to view the
content.
If you use Microsoft Internet Explorer 5 on your desktop PC, you can mark a
link as a mobile favorite, and then download your mobile favorites to your HP
Jornada. This enables you to view Web pages while you are disconnected
from your ISP and desktop PC. Use the Internet Explorer 5 plug-in installed
with ActiveSync to create mobile favorites quickly.
=XL[NJ]NJVXKRUNOJ_X[R]N
1.
2.
3.
In Internet Explorer 5 on your desktop PC, click Tools and then
Create Mobile Favorite.
To change the link name, type a new name in the Name box.
If you want to update the page on a regular basis, select an update
schedule from the Update list.
54 | HP Jornada 520 Series User’s Guide
4.
5.
6.
Click OK. Internet Explorer downloads the latest version of the Web
page to your desktop PC.
If you want to download the pages that are linked to the mobile
favorite you just created, in Internet Explorer on the desktop PC,
right-click the mobile favorite and then click Properties. On the
Download tab, specify the level of links you want to download.
Synchronize your device and desktop PC. Mobile favorites that are
stored in the Mobile Favorites folder in Internet Explorer 5 are
downloaded to your device.
If you do not specify an update schedule in step 3, you must manually update
the information on your HP Jornada. Before you synchronize, in Internet
Explorer on your desktop PC, click Tools and then Synchronize. Check the
last time content was downloaded, and manually download content if needed.
You can add a button to the Internet Explorer toolbar for creating mobile
favorites. In Internet Explorer 5 on your desktop PC, click View, Toolbars, and
then Customize.
=X_RN`VXKRUNOJ_X[R]N\
1.
2.
Tap
to display your list of favorites.
Tap the mobile favorite you want to view.
You will see the page that was downloaded the last time you
synchronized with your desktop PC. If the page is not on your device,
the favorite will be dimmed, and you will need to synchronize with
your desktop PC or connect to the Internet to view the page.
Chapter 4 | Connecting to the Internet | 55
Mobile favorites
,XW\N[_RWPVNVX[b
Mobile favorites can use a lot of storage memory on your HP Jornada. Follow
these tips to minimize the amount of memory used:
•
Turn off pictures and sounds or stop some mobile favorites from being
downloaded to your HP Jornada. In ActiveSync on your desktop PC, click
Options on the Tools menu, select the Favorites information type, and
then click Settings. For more information, see ActiveSync Help.
•
Limit the number of downloaded linked pages. In Internet Explorer on the
desktop PC, right-click the mobile favorite you want to change, and then
click Properties. On the Download tab, specify 0 or 1 for the number of
linked pages you want to download.
6HQGLQJDQGUHFHLYLQJHPDLO
Your HP Jornada includes Inbox, a full-featured e-mail program that is part of
Microsoft Pocket Outlook. You can use Inbox to send and receive e-mail
messages either by synchronizing messages with Microsoft Exchange or
Microsoft Outlook on your desktop PC, or by connecting directly to an e-mail
server through an ISP or a network.
56 | HP Jornada 520 Series User’s Guide
6HQGLQJDQGUHFHLYLQJPHVVDJHVYL D\RXUGHVNWRS3&
You can send and receive messages on your HP Jornada via the e-mail
service on your desktop PC by synchronizing your Inbox. When you enable
Inbox synchronization in ActiveSync options, messages are transferred from
the Inbox and Outbox on your HP Jornada to the corresponding folders on
your desktop PC each time you synchronize.
=XNWJKUN2WKXa\bWLQ[XWRcJ]RXW
1.
In ActiveSync on your desktop PC, click Options on the Tools menu,
and then select the Inbox information type.
When you synchronize
•
E-mail messages in the Inbox folder of desktop versions of Microsoft
Exchange or Outlook are copied to the Inbox folder on your HP Jornada.
The e-mail messages on the two computers are linked, so when you
delete an e-mail message on your HP Jornada, it will be deleted from your
desktop PC the next time you synchronize.
•
E-mail messages in the Outbox folder on your device are transferred to
the Outbox in Microsoft Exchange or Outlook on your desktop PC. The
messages are sent the next time you send mail from your desktop PC.
You can only synchronize e-mail messages with a single desktop PC. If you
have established partnerships between your HP Jornada and two desktop
PCs, you can synchronize your Inbox with only one of them.
6HQGLQJDQGUHFHLYLQJPHVVDJHVZLWK,QER[ If you have an e-mail account with an ISP or on a corporate network, you can
connect to the e-mail server for that account with a modem or network card,
and then use Inbox to send and receive e-mail messages directly.
When you connect to the e-mail server, new messages are downloaded to the
Inbox folder on your HP Jornada, messages in your Outbox folder are sent,
and messages that have been deleted on the e-mail server are deleted from
the Inbox folder.
Messages that you receive directly from an e-mail server (rather than from
your desktop PC) remain linked to the e-mail server. If you delete a message
on your HP Jornada, the message will be deleted from the e-mail server the
next time you connect.
Chapter 4 | Connecting to the Internet | 57
You can work with e-mail messages online or offline. When working online,
you read and respond to messages while connected to the e-mail server.
Messages are sent as soon as you tap Send, which saves space on your
device.
When working offline, you can disconnect from the e-mail server, review the
message headers or messages that you downloaded, and then decide which
messages you want to download completely. The next time you connect,
Inbox downloads the complete messages you have marked for retrieval and
sends the messages you have composed. Working offline reduces the time
you are connected and can save money, especially if you are dialing long
distance.
To retrieve messages from an e-mail account, you must set up a service for
that account. The service includes your account information, message delivery
options, and a link to a dial-up or network connection.
=XL[NJ]NJWNVJRU\N[_RLN
1.
2.
3.
4.
5.
6.
7.
On the Start menu, tap Programs, and then tap the Inbox icon.
On the Services menu, tap New Service.
Select a service type (IMAP4 or POP3) and type a name for the
service. The name can be anything you choose. If you are not sure
what type of service is associated with your account, consult your
account administrator. Tap Next.
If you connect to your mail server using a modem, select a dial-up
connection from the drop-down list.
–or–
If you connect to your mail server over a network connection, select
Network Connection from the drop-down list.
–or–
Select Create new connection to create a new dial-up connection
for this service. For more information on creating a dial-up
connection, see “Creating an ISP or network connection” earlier in
this chapter.
Type the name of your e-mail server, your e-mail user name, and
your password.
Enter the domain (if required for Windows NT networking), the
address of your outgoing (SMTP) mail server, and the return address
for replies to your messages. Tap Next.
Set message delivery options for your service, and then tap Finish.
To connect to your e-mail server from within Inbox, select the appropriate
service on the Services menu, and then tap the Connect button (or tap
Connect on the Services menu).
58 | HP Jornada 520 Series User’s Guide
:RUNLQJZLWKPHVVDJHVRQ\RXU+3-RUQDGD >\RWP]QNVN\\JPNUR\]
Messages you receive are displayed in the message list. By default, the most
recently received messages appear first in the list. Unread messages are
displayed in bold.
The Inbox message list
=X[NJMJVN\\JPN
1.
In the message list, tap the icon of the message you want to read.
•
To reply to or forward the message, tap
•
To read the next message, tap the down arrow on the Command
bar.
.
Chapter 4 | Connecting to the Internet | 59
•
. If your messages are still linked to
To delete a message, tap
messages on your e-mail server or desktop PC, they will be
stored in the Deleted (local) folder. If your messages were
downloaded directly from an e-mail server, they will be deleted
from both your HP Jornada and the e-mail server.
The Read Message Command bar
By default, Inbox downloads only the first 100 lines of each new message
when you connect to your e-mail server or synchronize with your desktop PC.
No e-mail attachments are downloaded. The original messages remain on the
e-mail server or your desktop PC. If you want to read the full message with
attachments, you must mark the message in Inbox, and then connect to the
mail server or synchronize again.
=XVJ[TJVN\\JPNOX[[N][RN_JU
1.
2.
In the message list, tap and hold the message you want to retrieve.
On the pop-up menu, tap Get Full Copy.
You specify your downloading preferences when you set up the service or
select your synchronization options. You can change them at any time:
•
Change options for Inbox synchronization using ActiveSync options. For
more information, see ActiveSync Help.
•
Change options for direct e-mail server connections in Inbox on your HP
Jornada. On the Tools menu, tap Options. On the Services tab, tap the
service you want to change.
,XVYX\RWPNVJRUVN\\JPN\
=XLXVYX\NJWNVJRUVN\\JPN
1.
2.
Tap New.
In the To box, enter an e-mail address or select a name from the
Contact list by tapping the Address Book button on the Command
bar.
60 | HP Jornada 520 Series User’s Guide
3.
4.
Compose your message.
To attach a file, tap the attachment icon.
When you send a file as an attachment, be sure the message recipient can
read the type of file you are sending. If the recipient does not have a Windowspowered Pocket PC, be sure you save the file in an alternative format.
5.
Tap Send when you have finished the message.
The message is placed in the Outbox folder on your device and will be
delivered the next time you connect to your e-mail server or synchronize
messages with your desktop PC.
6JWJPRWPNVJRUVN\\JPN\JWMOXUMN[\
By default, messages are displayed in one of four folders for each service you
have created: Inbox, Deleted (local), Outbox, and Sent. The Deleted (local)
folder contains messages that have been deleted on your HP Jornada, but are
still linked to messages on your e-mail server or desktop PC.
If you are using IMAP4, you may see a Deleted Items folder. This folder is for
messages deleted on the e-mail server.
The behavior of the Deleted (local) and Sent folders depends on the options
you have chosen. In the message list, tap Tools and then Options. On the
Message tab, select your options.
If you want to organize messages into additional folders, tap Tools, and then
New Folder to create new folders. To move or copy a message to another
folder, tap and hold the message in the message list, and then tap Move to or
Copy to on the pop-up menu.
Moving an e-mail message into a folder you create breaks the link between
the messages on your HP Jornada and the copy on your desktop PC or POP3
e-mail server. The next time you synchronize, the message may be deleted
from the Inbox folder on the mail server or desktop PC. This prevents you from
storing duplicate copies of an e-mail message, but it also means that you will
no longer have access to the e-mail messages you moved out of Inbox except
from your HP Jornada. If you have an e-mail account on an IMAP4 mail
server, the folders you create and the messages you move will be duplicated
on the e-mail server.
| 61
_&RQILJXULQJ\RXU
+3-RUQDGD
This chapter details ways you can optimize your HP Jornada using settings
and the HP applications, and describes ways you can expand the features and
functionality by adding programs. This chapter also offers important tips on
safeguarding your data by managing power and memory and using the
security settings.
In this chapter, you will learn to
•
Manage power effectively.
•
Manage the memory on your HP Jornada.
•
Adjust settings for the display and sounds.
•
Use security features to protect your data.
•
Configure hardware buttons for games.
•
Configure menus for easy access to programs and documents.
•
Add or remove programs.
62 | HP Jornada 520 Series User’s Guide
0DQDJLQJSRZHU
Because the data and files you save on your HP Jornada are stored in RAM,
maintaining a continuous power supply to the HP Jornada at all times is
extremely important. If your HP Jornada runs out of power, all information you
have entered is lost. Although the Windows for Pocket PC operating system
and programs cannot be erased, any custom settings and programs you have
added are erased if you lose power.
Under typical usage conditions, your HP Jornada should operate for approximately 8 hours between charges. Some functions, such as listening to music
or using CompactFlash cards, use considerable power and may reduce this
time significantly.
You should respond as soon as possible when your HP Jornada displays a
dialog box warning of low power. If you continue to use your HP Jornada until
power reaches a critical low condition, a Battery very low message appears,
and the device shuts down automatically. You will be unable to use your
Pocket PC until you connect to external power for charging. Data will be
retained for up to 5 days.
Because your HP Jornada is charged automatically whenever it is connected
to ac power, simply connect the HP Jornada to ac power to recharge when the
power is low. While your HP Jornada is connected to ac power, the
Notification LED indicates the charging status:
•
Amber indicates that the battery is charging (connected to ac power).
•
Green indicates that the battery is fully charged.
=XLQNLT]QN[NVJRWRWPYX`N[
1.
On the Start menu, tap HP settings. The remaining power is
displayed on a status bar at the bottom of the Settings tab.
Under certain conditions, the power status icon is displayed on the Command
bar in the Today screen. Simply tap the power status icon to open the Power
control panel.
Follow these tips to ensure the longest use of your HP Jornada between
charges:
•
Use the Power control panel to set your HP Jornada to turn off after a
short period of inactivity.
•
Use the Backlight control panel to set the backlight to dim after a short
period of inactivity.
Chapter 5 | Configuring your HP Jornada | 63
•
If you are playing music or using other functions that do not require the
display, turn off the display by pressing and holding the Tasks hot key.
(Turn on the display by pressing the Tasks hot key again or by pressing
the On/Off button.)
0DQDJLQJPHPRU\
The memory on your HP Jornada is allocated between storage memory and
program memory. Windows for Pocket PC automatically manages the
allocation between storage and program memory; however, in some situations
(such as when memory is low), it may not be able to automatically adjust the
allocation. If you receive a message stating that storage or program memory is
unavailable, try the following solutions.
,QFUHDVLQJVWRUDJHPHPRU\
You can try any or all of these solutions to increase storage memory:
•
Buy an optional Type I CompactFlash memory card, and move files from
internal memory to the card. (For more information on CompactFlash
cards, see “CompactFlash cards” in chapter 8.)
•
Delete unnecessary files.
•
Remove Web pages stored for offline viewing in Internet Explorer folders.
•
Remove programs you no longer use. See “Adding or removing
programs” later in this chapter.
•
Clear program memory. See “Increasing program memory,” below.
,QFUHDVLQJSURJUDPPHPRU\
You can try any or all of these solutions to increase program memory:
•
Use HP task switcher or the Memory control panel to stop programs you
are not currently using. In most cases, programs automatically stop to free
needed memory. However, in some situations, such as when a dialog box
is waiting for a response, the program may not be able to stop
automatically.
•
Clear storage memory as described in the preceding section. This will free
some storage memory so that it can be reallocated as program memory.
•
Disconnect the sync cable or remove your HP Jornada from the cradle,
remove the CompactFlash card (if installed), and reset your HP Jornada.
See “Resetting your HP Jornada” in chapter 9.
64 | HP Jornada 520 Series User’s Guide
=X^\N]QN6NVX[bLXW][XUYJWNU]X\]XYY[XP[JV\
1.
2.
Open the Memory control panel, and then tap the Running
Programs tab.
Select a program in the list, and then tap Stop.
=X^\N19]J\T\`R]LQN[]X\]XYY[XP[JV\
1.
2.
In the Today screen, tap the HP task switcher icon.
On the pop-up menu, tap Close Window and then tap Close All.
$GMXVWLQJVHWWLQJV
Use the HP settings application to quickly change settings such as screen
brightness and contrast and speaker volume, to display system information
such as memory status and remaining power, and to change display, button,
and power driver settings.
=X\]J[]19\N]]RWP\
1.
On the Start menu, tap HP settings.
–or–
Press and hold the HP home menu hot key.
7KH6HWWLQJVWDE
On the Settings tab you can adjust the screen brightness and contrast, adjust
the speaker volume to suit your work environment, and check the remaining
power. You can also mute the speaker by selecting the speaker mute check
box.
Chapter 5 | Configuring your HP Jornada | 65
HP settings
To change the speaker volume settings, you can quickly switch to the Sounds
& Reminders control panel by tapping the Speaker button.
Save your preferred settings to any of the four profiles. Select the profile you
want to change, and then adjust the sliders to fine-tune the settings.
The remaining power is displayed on a status bar at the bottom of the
Settings tab. To switch to the Power control panel, tap the battery icon next to
the power status bar.
7KH0HPRU\WDE
The Memory tab displays total and available (free) Storage, Program, and
Storage Card memory. For information on allocating memory between storage
and programs, see “Managing memory” earlier in this chapter.
7KH3UHIHUHQFHVWDE
Use the Preferences tab to customize button settings and certain power
options.
66 | HP Jornada 520 Series User’s Guide
To prevent inadvertently turning on your Pocket PC, you can disable the
Record button. On the Preferences tab, select the Disable record button
check box.
You can also set your Pocket PC to turn on when you press one of the HP hot
keys. On the Preferences tab, clear the Disable HP hot keys check box. (By
default, the HP hot keys are disabled to prevent you from inadvertently turning
on your Pocket PC.)
You can set your Pocket PC to turn on whenever you tap the touch screen. On
the Preferences tab, select the Tap screen to power on check box.
6HFXULW\
This section provides some tips to safeguard your HP Jornada and the data it
holds from theft or loss. You can set a password to protect your data and keep
a record of when someone tries to access data on your HP Jornada.
6HWWLQJDSDVVZRUG
Use the HP security application to prevent unauthorized access to your HP
Jornada and the data it holds. You can set a password to protect your data,
set a reminder password, and keep a record of when anyone attempts to
access data on your HP Jornada.
If you enable password protection, you must enter your password each time
you turn on your Pocket PC. Or, you can set a short delay, so you do not need
to re-enter your password if you turn on your HP Jornada within a short period
of time. The delay feature can be convenient if you frequently turn your HP
Jornada on and off to conserve power.
=X\N]JY[RVJ[bYJ\\`X[M
1.
2.
3.
On the Start menu, tap Settings, and then on the Personal tab, tap
the HP security icon.
On the Primary tab, enter a four-digit password by tapping the
onscreen keypad.
Select the Enable password protection check box.
If you forget your password, you must restore your HP Jornada to the factory
default settings. This will erase all data you have stored on your HP Jornada.
For more information, see “Resetting your HP Jornada” in chapter 9.
Chapter 5 | Configuring your HP Jornada | 67
=XL[NJ]NJWMNWJKUNJ[NVRWMN[YJ\\`X[M
1.
2.
3.
4.
5.
On the Start menu, tap Settings, and then on the Personal tab, tap
the HP security icon.
On the Reminder tab, use the Input panel to enter a question in the
Question box.
In the Answer box, enter the answer to your reminder question.
Select the Enable reminder password check box.
In the Prompt after box, enter the number of times you want to try
your primary password before HP security prompts you with the
question for your reminder password.
When you tap OK, your changes are saved and password protection is
enabled. You must enter the password each time you start your HP Jornada
and each time you open the HP security application.
=X\N]JYJ\\`X[MMNUJb
1.
2.
3.
Set your primary password.
Select the Delay activation after suspend for check box.
Using the input panel, enter a number of minutes for the delay.
=XLUNJ[bX^[YJ\\`X[M
1.
On the Primary tab, tap CLR on the numeric keypad.
&UHDWLQJDVHFXULW\ORJ
You can also use the HP security application to record all attempts to access
your HP Jornada, and any attempts to modify the password settings. You can
view the log on your HP Jornada or export it as a file to save or edit on your
desktop PC.
=XNWJKUN\NL^[R]bUXPPRWP
1.
On the Log tab, select the Enable logging check box.
•
Entries appear in the table on the Log tab.
•
To clear all entries, tap Clear Log.
•
To export the log to a file, tap Export Log.
$GGLQJRZQHULQIRUPDWLRQ
If you lose your HP Jornada, owner information can provide an easy way for
someone to identify you as the owner and to return your Pocket PC. Use the
Owner Information control panel to enter or update this information.
68 | HP Jornada 520 Series User’s Guide
=XJMMX[LQJWPNX`WN[RWOX[VJ]RXW
1.
2.
3.
On the Start menu, tap Settings, and then tap the Owner Information
icon.
On the Identification tab, enter, your name, address, and/or other
information.
On the Notes tab, type any other information you want displayed (for
example, a temporary address, or an offer of a reward for the safe
return of your HP Jornada).
To display your owner information each time you turn on your HP Jornada,
select the Show information when device is turned on check box.
&RQILJXULQJKDUGZDUHEXWWRQV
You can configure the hardware buttons on your HP Jornada to suit the way
you work. Individual buttons can be assigned to different programs using the
Buttons control panel, and the HP game buttons application enables you to
create hardware profiles for specific games.
7KH%XWWRQVFRQWUROSDQHO
Use the Buttons control panel to assign any of the HP Jornada hardware
buttons—the HP hot keys and the Record button—to any program. You can
also customize the Action button to control the speed at which you scroll
through documents.
=XJ\\RPWJY[XP[JV]XJQJ[M`J[NK^]]XW
1.
2.
3.
On the Start menu, tap Settings, and then tap the Buttons icon.
On the Program Buttons tab, select a button from the list.
In the Button assignment list, select the program you want to assign
to the button.
=XLXW][XU]QN\L[XUU\YNNM
1.
2.
On the Start menu, tap Settings, and then tap the Buttons icon.
On the Up/Down Control tab, move the sliders to set the repeat rate
and the delay before repeat.
Chapter 5 | Configuring your HP Jornada | 69
+3JDPHEXWWRQV
The HP game buttons application makes it easier to enjoy your favorite games
on your HP Jornada. Use HP game buttons to assign game actions to the
hardware buttons of your Pocket PC.
=X\]J[]19PJVNK^]]XW\
1.
2.
3.
4.
On the Start menu, tap Settings.
Tap the System tab, and then tap the HP game buttons icon.
Select the Enable mapping check box to activate the gaming
buttons.
In the drop-down list, select a game profile to use or modify, or create
a new game profile.
To make it easy to enable or disable the game buttons, select the Show
status icon check box. The HP game buttons status icon will appear in the
Command bar of the Today screen. Simply tap the status icon to enable or
disable the gaming buttons.
,[NJ]RWPJPJVNY[XORUN
You can create a different profile for each of your favorite games by assigning
the hardware buttons on your Pocket PC to the actions associated with each
game.
=XL[NJ]NJPJVNY[XORUN
1.
2.
3.
4.
5.
Start the HP game buttons application.
Tap the drop-down list of game profiles. The Input panel appears.
Using the Input panel, enter a name for the profile.
In the settings list, select an action, and then press the hardware
button you want to assign to the action.
Repeat step 4 until you have assigned all the important game actions
to hardware buttons.
70 | HP Jornada 520 Series User’s Guide
&RQILJXULQJPHQXV
You can customize the menus on your device to ensure you have easy access
to programs or documents.
+3KRPHPHQX
Use the HP home menu application to quickly launch your favorite programs
or open frequently used documents. You can modify each of the 21 buttons on
the HP home menu by adding descriptions or by assigning them to the
programs or documents you use most.
=XVXMRObJK^]]XWJ\\RPWVNW]
1.
2.
3.
Press the HP home menu hot key to open HP home menu. To
display the second page of buttons, press the hot key a second time,
or tap the HP home menu icon in the lower-right corner of the HP
home menu screen.
Tap and hold the stylus on the button you want to modify.
On the pop-up menu, tap Assign, Rename, or Delete.
•
Assign—Tap Assign, and then browse to select the program or
document you want to assign to the button.
•
Rename—Tap Rename, and then type a description to be
displayed under the button. The description can be up to 10
characters long. The default description is the file name.
•
Delete—Tap Delete to clear the current button assignment.
Chapter 5 | Configuring your HP Jornada | 71
The HP home menu screen
6WDUWPHQX
You can also add or remove programs from the Start menu to make it easier
to access the programs you use most.
=XJMMJY[XP[JV]X]QN<]J[]VNW^
1.
2.
On the Start menu, tap Settings, and then tap Menus.
On the Start Menu tab, select the check box for the program you
want to add.
The Start Menu tab displays only the programs stored in the Start Menu folder
on your HP Jornada. If you do not see a particular program listed, use File
Explorer to move the program to the Start Menu folder.
1HZPHQX
You can also add or remove programs from the New menu to make it easier to
create documents in common programs.
72 | HP Jornada 520 Series User’s Guide
=XJMMJMXL^VNW]]X]QNVNW^
1.
2.
On the Start menu, tap Settings, and then tap Menus.
On the New Menu tab, select the Turn on New button menu check
box, and then select the document types you want to appear on the
menu.
$GGLQJRUUHPRYLQJSURJUDPV
,QVWDOOLQJSURJUDPV
You can add even more functionality to your HP Jornada by installing
additional software and programs. A wide variety of software is available for
Windows for Pocket PC, ranging from custom business applications and
system utilities to games and entertainment. Some programs are available on
the CD-ROMs included with your HP Jornada. Other programs are available
from software vendors or on the Web.
The only programs that will run on your HP Jornada are those designed
specifically to run on Windows for Pocket PC. You cannot run programs
designed for Windows 95, 98, 2000, Me, or NT on your HP Jornada. In
addition, you may need a version of the program designed specifically for the
SH3 processor.
Install software to your HP Jornada by first loading the installation files onto
your desktop PC, and then using ActiveSync or running the Application
Manager.
=XRW\]JUUY[XP[JV\
1.
2.
3.
Download the software program or installer from the Web to your
desktop PC.
–or–
Insert the floppy disk or compact disk into the appropriate drive on
your desktop PC.
Connect your HP Jornada to your desktop PC.
If the program includes an installer program (typically named
Setup.exe or Install.exe), double-click the installer program on the
desktop PC. The installer program copies the necessary files to the
HP Jornada.
Chapter 5 | Configuring your HP Jornada | 73
If the program does not have an associated installer or setup program, drag
the program file (typically an *.exe file type) to the HP Jornada icon in the
ActiveSync window. If the No Converter Selected dialog box appears, tap
OK to copy the file without conversion. Software installed in this way may not
appear on the Remove Programs list, and you may have to delete the
program manually if you wish to remove it from the HP Jornada.
=XJMMY[XP[JV\`R]Q*YYURLJ]RXW6JWJPN[
1.
2.
3.
Connect the HP Jornada to your desktop PC, and then open the
ActiveSync window.
On the Tools menu in the ActiveSync window, click Add/Remove
Programs.
Select the check box for the program you want to add.
5HPRYLQJSURJUDPV
To free storage memory on your HP Jornada, you can remove programs you
no longer use. Only programs you have added can be removed; that is, only
programs that are stored in RAM. The preinstalled programs—programs
stored in ROM—cannot be removed; however, these programs do not use
storage memory.
=X[NVX_NJY[XP[JV
1.
2.
3.
On the Start menu, tap Settings.
On the System tab, tap Remove Programs.
Select the program in the list, and then tap Remove.
If the program does not appear in the list of installed programs, use File
Explorer on your device to locate the program, tap and hold the program, and
then tap Delete on the pop-up menu.
74 | HP Jornada 520 Series User’s Guide
| 75
_0LFURVRIW3RFNHW2XWORRN
Microsoft Pocket Outlook includes Calendar, Contacts, Tasks, Inbox, and
Notes. You can use these programs individually or together. For example,
e-mail addresses stored in Contacts can be used to address e-mail messages
in Inbox.
Using ActiveSync, you can synchronize information in Microsoft Outlook or
Microsoft Exchange on your desktop PC with information in Pocket Outlook on
your HP Jornada. Each time you synchronize, ActiveSync compares the
changes you made on your device and desktop PC and updates both
computers with the latest information. For information on using ActiveSync,
see ActiveSync Help on your desktop PC.
In this chapter, you will learn to
•
Schedule appointments and meetings using Calendar.
•
Keep track of friends and colleagues using Contacts.
•
Keep a to-do list in Tasks.
•
Capture thoughts and ideas with Notes.
76 | HP Jornada 520 Series User’s Guide
&DOHQGDUVFKHGXOLQJDSSRLQWPHQWVDQGPHHWLQJV
Use Calendar to schedule appointments, including meetings and other events.
You can check your appointments in one of several views (Agenda, Day,
Week, Month, and Year) and easily switch views by using the View menu.
The Day view in Calendar
When you tap an appointment in Calendar, a summary screen of the
information you entered is displayed. Tap the top portion of the summary
screen to change the appointment information.
You can customize the Calendar display—for example, changing the first day
of the week—by tapping Options on the Tools menu.
=XL[NJ]NJWJYYXRW]VNW]
1.
2.
In Day or Week view, tap the desired date and time for the
appointment.
Tap New.
Chapter 6 | Microsoft Pocket Outlook | 77
3.
4.
5.
6.
7.
Using the Input panel, enter a description and a location for the
appointment.
If needed, tap the date and time to change them.
Enter other desired information. (You may need to hide the Input
panel to see all available fields.)
To add notes, tap the Notes tab. You can enter text, draw, or create
a recording. For more information on creating notes, see “Notes:
capturing thoughts and ideas” later in this chapter.
When you are finished, tap OK to return to Calendar.
If you select Remind me in an appointment, your HP Jornada will remind you
according to the options you set in the Sounds & Reminders control panel.
&UHDWLQJPHHWLQJUHTXHVWV
You can use Calendar to set up meetings with users of Outlook or Pocket
Outlook. A meeting notice is created automatically and sent either when you
synchronize Inbox or when you connect to your e-mail server. Indicate how
you want meeting requests sent by tapping Tools and then Options. If you
send and receive e-mail messages through ActiveSync, select ActiveSync.
=X\LQNM^UNJVNN]RWP
1.
2.
3.
Create an appointment.
In the appointment details, hide the Input panel, and then tap
Attendees.
From the list of e-mail addresses you have entered in Contacts,
select the meeting attendees.
The meeting notice is created automatically and placed in the Outbox folder.
For more information on sending and receiving meeting requests, see
Calendar Help and Inbox Help on your HP Jornada.
&RQWDFWVWUDFNLQJIULHQGVDQGFROOHDJXHV
Contacts maintains a list of your friends and colleagues so that you can easily
find the information you are looking for, whether you are at home or on the
road. Using the infrared port on your HP Jornada, you can quickly share
Contacts information with other Windows-powered devices.
78 | HP Jornada 520 Series User’s Guide
The Contacts list
When you tap a contact in the Contact list, a summary screen of the
information you have entered is displayed.
To change the way contacts are displayed in the list, tap Tools and then
Options.
=XL[NJ]NJLXW]JL]
1.
2.
3.
4.
5.
Tap New.
Using the Input panel, enter a name and other contact information.
You will need to scroll down to see all available fields.
To assign the contact to a category, scroll to and then tap
Categories. Select a category from the list. In the Contact list, you
can display contacts by category.
To add notes, tap the Notes tab. You can enter text, draw, or create
a recording. For more information on creating notes, see “Notes:
capturing thoughts and ideas” later in this chapter.
When finished, tap OK to return to the Contact list.
Chapter 6 | Microsoft Pocket Outlook | 79
7DVNVNHHSLQJDWRGROLVW
Use Tasks to keep track of what you have to do. In the Task list, overdue
tasks are displayed in red. When you tap a task in the Task list, a summary
screen of the information you entered is displayed.
The Task list
To change the way information is displayed in the list, tap Tools and then
Options.
=XL[NJ]NJ]J\T
1.
2.
3.
Tap New.
Using the Input panel, enter a subject.
You can enter a start date and due date or enter other information by
first tapping the field. If the Input panel is open, you will need to hide
it to see all available fields.
80 | HP Jornada 520 Series User’s Guide
4.
5.
6.
To assign the task to a category, tap Categories, and then select a
category from the list. (In the Task list, you can display tasks by
category.)
To add notes, tap the Notes tab. You can enter text, draw, or create
a recording. For more information on creating notes, see ”Notes:
capturing thoughts and ideas” later in this chapter.
When finished, tap OK to return to the Task list.
To quickly create a task with only a subject, tap Entry Bar on the Tools menu.
Then, tap Tap here to add a new task and enter your task information.
1RWHVFDSWXULQJWKRXJKWVDQGLGHDV
Quickly capture thoughts, reminders, ideas, drawings, and phone numbers
with Notes. You can create a written note or a recording. You can also include
a recording within a note. If a note is open when you create the recording, it
will be included in the note as an icon. If the note list is displayed, the
recording will be created as a standalone recording.
The Notes list
Chapter 6 | Microsoft Pocket Outlook | 81
=XL[NJ]NJWX]N
1.
2.
Tap New.
Create your note by writing, drawing, typing, and/or recording. For
more information about using the Input panel, writing and drawing on
the screen, and creating recordings, see “Entering information” in
chapter 2.
([FKDQJLQJDSSRLQWPHQWVFRQWDFWVWDVNVDQGQRWHV
ZLWKRWKHUGHYLFHV+3LQIRH[FKDQJH
HP info exchange allows you to send and receive PIM data to and from non–
Windows-powered PDA devices (for example, Palm devices) from within
Calendar, Contacts, and Tasks via infrared. You can also receive (but not
send) memos from a PDA device and store them as text files in the My
Documents folder of your HP Jornada.
When you receive an item from a PDA device, it does not matter which Pocket
Outlook application is active when you select Recv(non-Windows). For
example, you can have Contacts open and still receive a Calendar or Task
item. (HP info exchange is not available in Pocket Outlook Inbox.)
HP info exchange runs only on your HP Jornada. No additional software is
required for IrDA-equipped PDA devices.
=X\NWM926RWOX[VJ]RXWO[XVbX^[193X[WJMJ]XJW2[-*NZ^RYYNM
9-*MN_RLN
1.
2.
In Contacts, Calendar, Tasks, tap to select the item you want to send.
Make sure the PDA device is powered on. Align the infrared port on
your HP Jornada with the infrared port on the receiving device.
3. Tap Send(non-Windows) on the Tools menu of a PIM application
on your HP Jornada. The HP info exchange Send window will
appear, indicating that your HP Jornada is looking for a receiving
device.
The PDA device will receive the transmitted items automatically.
You cannot send notes from your HP Jornada to a non–Windows-powered
device by infrared.
82 | HP Jornada 520 Series User’s Guide
=X[NLNR_N926RWOX[VJ]RXWXWbX^[193X[WJMJO[XVJW2[-*
NZ^RYYNM9-*MN_RLN
1.
2.
3.
Set the PDA device to beam selected item(s).
Align the infrared port on your HP Jornada with the infrared port on
the sending device.
Select Recv(non-Windows) on the Tools menu of a PIM application
on your HP Jornada. The HP info exchange Receive window will
appear indicating that your HP Jornada is looking for a sending
device.
$ERXWWKHGDWDEHLQJWUDQVIHUUHG
HP info exchange makes it easy to exchange essential information with an
IrDA-equipped PDA device. The data fields of your HP Jornada Contacts,
Calendar, and Tasks applications are mapped to the data fields on the PDA
device to allow capture of important PIM information. However, not all of the
data fields correspond between the two devices, so not all data can be
exchanged. Some notes on the features and characteristics of the field
mappings for exchanged data are listed below:
•
HP info exchange supports sending and receiving multiple contacts,
appointments and tasks.
•
A number of Pocket Outlook fields are not used (e.g. Children, Spouse),
because they are not used by other PDA devices or are not supported by
the v-card standard.
•
If the number of entries of important field types (e.g. phone numbers)
received exceeds the number of Pocket Outlook fields available to store
them, the extra entries will be placed in the Notes section of the item.
•
For standard Contact fields (which support only single-line text), multiline
text on PDA devices is converted into single-line text, and all CR/LF pairs
converted to spaces. All information is retained.
•
Your HP Jornada treats Business Cards received from a PDA device as
contacts.
•
Contents marked as ”private” in other PDA devices are not sent to your
HP Jornada.
•
Memos received from a PDA device are stored as text files in the My
Documents folder of your HP Jornada. The received memos may be
renamed so that no existing memos in your HP Jornada will be
overwritten. (You cannot send a memo from your HP Jornada to a PDA
device.)
| 83
_&RPSDQLRQSURJUDPV
Your HP Jornada includes Microsoft Windows for Pocket PC, as well as
programs from other vendors. The Pocket PC software includes Microsoft
Pocket Word, Microsoft Pocket Excel, Microsoft Windows Media Player for
Pocket PC, and Microsoft Reader. Third-party programs include OmniSolve
from Landware. This section provides an overview of these programs and
enough information to get you started. For complete instructions on using a
program, refer to online Help for that program.
In this chapter you will learn about
•
Microsoft Pocket Word
•
Microsoft Pocket Excel
•
Microsoft Windows Media Player for Pocket PC, MusicMatch Jukebox,
and Windows Media Manager
•
Microsoft Reader
•
Landware OmniSolve financial calculator
84 | HP Jornada 520 Series User’s Guide
0LFURVRIW3RFNHW:RUG
Microsoft Pocket Word works with Microsoft Word on your desktop PC to give
you easy access to copies of your documents. You can create new documents
on your HP Jornada, or you can copy documents from your desktop PC to
your HP Jornada. Synchronize documents between your desktop PC and your
HP Jornada regularly so that you have the most up-to-date content in both
locations.
=X^\N9XLTN]@X[M
1.
2.
On the Start menu, tap Programs, and then tap the Pocket Word
icon.
Tap the name of a document in the file list.
–or–
Tap New to open a blank document.
To open a template rather than a blank document, select a template for new
documents. On the Tools menu, tap Options, and then browse to select the
default template. When you tap New, the template appears with appropriate
text and formatting already provided.
You can open only one document at a time; when you open a second
document, you will be asked to save the first. You can save a document you
create or edit in a variety of formats, including Pocket Word (.psw), Rich Text
Format (.rtf), and Plain Text (.txt).
You can enter information in Pocket Word in four modes: writing, drawing,
typing, and recording. Use the View menu to switch between modes. Each
mode has its own toolbar, which you can show and hide by tapping the
Show/Hide Toolbar button on the Command bar.
•
Typing Mode. Use the Input panel to enter typed text into the document
with either the soft keyboard or the Character Recognizer. For more
information on entering typed text, see “Entering information” in chapter 2.
•
Writing Mode. In writing mode, use your stylus to write directly on the
screen. Ruled lines are displayed as a guide, and the zoom magnification
is greater than in typing mode to allow you to write more easily. For more
information on writing and selecting writing, see “Entering information” in
chapter 2.
Written words are converted to graphics (metafiles) when a Pocket Word
document is converted to a Word document on your desktop PC.
Chapter 7 | Companion programs | 85
•
Drawing mode. In drawing mode, use your stylus to draw on the screen.
Gridlines appear as a guide. When you lift your stylus off the screen after
the first stroke, you will see a drawing box indicating the boundaries of the
drawing. Every subsequent stroke within or touching the drawing box
becomes part of the drawing. For more information on drawing and
selecting drawings, see “Entering information” in chapter 2.
•
Recording mode. Use recording mode to embed a recording into your
document. Recordings are saved as .wav files. For more information on
recording, see “Entering information” in chapter 2.
7LSVIRUZRUNLQJLQ3RFNHW:RUG
•
You can change the zoom magnification by tapping View and then Zoom.
Then select the percentage you want. Select a higher percentage to enter
text and a lower one to see more of your document.
•
If you are opening a Word document created on a desktop PC, select
Wrap to Window on the View menu so that you can see the entire
document.
0LFURVRIW3RFNHW([FHO
Microsoft Pocket Excel works with Microsoft Excel on your desktop PC to give
you easy access to copies of your workbooks. You can create new workbooks
on your device, or you can copy workbooks from your desktop PC to your
device. Synchronize workbooks between your desktop PC and your device so
that you have the most up-to-date content in both locations. Pocket Excel
provides fundamental spreadsheet tools, such as formulas, functions, sorting,
and filtering, which enable you to create simple workbooks such as expense
reports and mileage logs.
=X^\N9XLTN].aLNU
1.
2.
On the Start menu, tap Programs, and then tap the Pocket Excel
icon.
Tap the name of a workbook in the file list.
–or–
Tap New to open a blank workbook.
To open a template rather than a blank workbook, select a template for new
workbooks. On the Tools menu, tap Options, and then browse to select the
default template. When you tap New, the template appears with appropriate
text and formatting already provided.
86 | HP Jornada 520 Series User’s Guide
You can open only one workbook at a time; when you open a second
workbook, you will be asked to save the first. You can save a workbook you
create or edit in a variety of formats, including Pocket Excel (.pxl) and Excel
(.xls).
7LSVIRUZRUNLQJLQ3RFNHW([FHO
•
Use full-screen mode to see as much of your worksheet as possible. Tap
View and then Full Screen. To exit full-screen mode, tap Restore.
•
If your workbook contains sensitive information, you can protect it with a
password. To do so, open the workbook, tap Edit, and then Password.
•
Show and hide window elements. Tap View and then tap the elements
you want to show or hide.
•
Freeze panes on a worksheet. First select the cell where you want to
freeze panes. Tap View and then Freeze Panes. You might want to
freeze the top and leftmost panes in a worksheet to keep row and column
labels visible as you scroll through a sheet.
•
Split panes to view different areas of a large worksheet. Tap View and
then Split. Then drag the split bar to where you want it. To remove the
split, tap View and then Remove Split.
•
Show and hide rows and columns. To hide a row or column, select a cell
in the row or column you want to hide. Then tap Format, then Row or
Column, and then Hide. To show a hidden row or column, tap Tools,
then Go To, and then type a reference that is in the hidden row or
column. Then tap Format, then Row or Column, and then Unhide.
0LFURVRIW:LQGRZV0HGLD3OD\HU
Use Microsoft Windows Media Player for Pocket PC to listen to digital audio
files, such as songs or sound clips. Media Player supports sound files
recorded in the following formats: WMA, MP3, and WAV.
=X\`R]LQ]X@RWMX`\6NMRJ9UJbN[
1.
On the Start menu, tap Programs, and then tap the Windows Media
Player icon.
Chapter 7 | Companion programs | 87
The Windows Media Player Welcome screen
To save power, turn off the display while listening to music on your HP
Jornada. Press and hold the Tasks hot key to turn the display off (without
turning off the device). Press the Tasks hot key (when device is off) to turn the
display on again.
&UHDWLQJDXGLRILOHVIRU\RXU+3-RUQDGD You can copy music files to enjoy on your HP Jornada by converting or
“ripping” files from your favorite audio CDs or by downloading songs from a
Web site such as EMusic.com. When you have saved the audio file on your
desktop PC, use the Microsoft Windows Media Manager for Pocket PC to
convert the file to the appropriate format and copy it to your HP Jornada.
,XYbRWP\XWP\O[XVJ^MRX,-\
Use the MusicMatch Jukebox application to record songs from your favorite
audio CDs in a format that can be played on your HP Jornada. MusicMatch
Jukebox is included on the HP Jornada CD-ROM.
88 | HP Jornada 520 Series User’s Guide
=XLXYbJ\XWPO[XVJWJ^MRX,-
1.
2.
3.
4.
5.
6.
7.
Install MusicMatch Jukebox from the HP Jornada CD-ROM onto your
desktop PC. For more information, refer to the HP Jornada CD-ROM.
On your desktop PC, start the Jukebox program.
Insert an audio CD into the CD-ROM drive on your desktop PC.
Jukebox should automatically detect the audio CD.
In the Jukebox window, select the song that you want to copy.
Enter the name of the song, the album title, and the artist’s name.
Click the Play button (triangular arrow) to begin copying.
To specify the location of the song file, click Recorder on the
Options menu, click Settings, and then select a folder.
>\RWP6RL[X\XO]@RWMX`\6NMRJ6JWJPN[OX[9XLTN]9,
Use Microsoft Windows Media Manager for Pocket PC on your desktop PC to
create digital audio files in Windows Media format and to transfer audio files to
your HP Jornada. Files saved in Windows Media use very little storage
memory compared to some other recording formats.
Windows Media Manager is included in the Extras folder on the ActiveSync
CD-ROM. You must install Windows Media Manager on your desktop PC to
copy and convert digital audio files.
Some vendors distribute audio files as “packaged content”; that is, digital
music that has been encrypted to protect the copyright. You must have a valid
license to play packaged content on your HP Jornada. For more information
about obtaining a license and specific license terms, read the license
agreement provided by the file vendor.
8VLQJWKH3OD\OLVW0DQDJHU
Use the Playlist Manager to set the track playback order. All My Music is the
default playlist. It contains all digital audio files available for playback on your
HP Jornada (including those stored on a CompactFlash card, if one is
installed). To see a list of recently selected playlists, tap Select Playlist. To
create or edit playlists, tap All Playlists.
Tap and hold a track or playlist to perform actions such as copying, moving,
and deleting.
Chapter 7 | Companion programs | 89
:RUNLQJZLWKDXGLRILOHVRQD&RPSDFW)ODVK&DUG Because songs and audio files can use a lot of storage memory, you might
want to store them on a Type I CompactFlash card. When you store songs
and audio files on a Type I CompactFlash card, the files must be stored in a
folder named My Documents. In addition, it is recommended that you use
Microsoft Windows Media Manager for Pocket PC to transfer files from your
desktop PC to the storage card, because Media Manager can automatically
resolve security protocols for packaged content. For more information on
installing a CompactFlash card and working with files on a storage card, see
“CompactFlash cards” in chapter 8.
When you store songs and audio files on a CompactFlash card, the files must
be stored in a folder named My Documents.
0LFURVRIW5HDGHU
Use Microsoft Reader to read electronic books (eBooks) on your HP Jornada.
Download books to your desktop PC from eBook Web sites. Then, use
ActiveSync to copy the book files to your Pocket PC. The books appear in the
Reader Library.
An eBook includes many features not available with a paper book. These
features are available from any book page. You can add notes or bookmarks,
highlight text, search for words or phrases, and copy text to use in other
documents or messages.
The Reader Guidebook is preinstalled on your HP Jornada, and contains all
the information you will need to use Microsoft Reader. Open the Guidebook
from within Microsoft Reader, as described below.
=X\]J[]6RL[X\XO];NJMN[
1.
2.
On the Start menu, tap Programs, and then tap Microsoft Reader.
Microsoft Reader displays the Library, a list of all the eBooks stored
on your HP Jornada.
To open a book, tap the title in the Library list.
The MSReader folder in the Extras folder on the ActiveSync CD-ROM
contains sample books and a dictionary. Use ActiveSync to download the files
from your desktop PC to your device as described in the Readme file in the
MSReader folder.
90 | HP Jornada 520 Series User’s Guide
When you have finished reading a book, you may want to delete it to conserve
space on your device. If a copy of the book is stored on your desktop PC, you
can download it again at any time. To remove a book from your device, tap
and hold the title in the Library list and then tap Delete on the pop-up menu.
2PQL6ROYH
OmniSolve is a financial application that is designed specifically for real estate,
retail, and business professionals who use Pocket PCs to make financial
decisions quickly and accurately. OmniSolve employs a form-filling metaphor
to provide a rich problem-solving environment that is unparalleled in ease of
use, power, and flexibility.
=X\]J[]8VWR<XU_N
1.
On the Start menu, tap Programs, and then tap the OmniSolve icon.
For detailed help and procedures about using OmniSolve, refer to online Help
or see the LandWare Web site at www.landware.com/omnisolve.
For other non-HP Pocket PC software solutions, refer to the HP Jornada CDROM or visit the HP Jornada Web site at www.hp.com/jornada/solutions
| 91
_$FFHVVRULHV
By purchasing accessories for your HP Jornada, you can add functionality,
replace lost parts, and protect your Pocket PC from accidental damage. HP
makes a variety of accessories designed specifically to enhance your HP
Jornada Pocket PC. In addition, you can purchase CompactFlash card
accessories from many vendors. This chapter describes
•
accessories available from HP
•
how to install and use CompactFlash cards
92 | HP Jornada 520 Series User’s Guide
+3EUDQGHGDFFHVVRULHV
The following optional accessories are available from Hewlett-Packard. (HP
item numbers are listed in parentheses.) Check the Hewlett-Packard Web site
at www.hp.com/jornada/accessories for updates to this list. These accessories
work with all models of the HP Jornada 520 Series Pocket PC.
•
Serial Cradle (F1834A). Connect your HP Jornada to a serial
communications port on a desktop PC using this desktop cradle.
•
Serial Cable (F1819A). Connect your HP Jornada to a serial
communications port on a desktop PC.
•
AC Adapter (F1817A). Connect to ac power anywhere in the world with
this worldwide voltage adapter.
•
Executive Leather Case (F1829A). Protect your HP Jornada in style with
this slim, executive design leather case with stylus holder. Flip-top design
allows for maximum ergonomic fit and functionality.
•
Executive Bi-Fold Leather Case (F1826A). Protect your HP Jornada
with this elegantly designed bifold leather case for classical look and
functionality.
•
Leather Clip Pouch in Brown (F1887A) or Black (F1886A). Keep your
HP Jornada at your side with a clip-on belt pouch.
•
Stylus Pens (F1818A). Replace your lost stylus with this pack of three
original pens.
•
Color Cover (F1850A). Protect your HP Jornada in style with a colorful
metal cover with built-in stylus slot.
•
Screen Protectors (F1827A). Protect your touch screen from scratches
and scuffs with a plastic screen protector (pack of six).
Chapter 8 | Accessories | 93
&RPSDFW)ODVKFDUGV
CompactFlash cards provide a wide range of additional functionality, such as
additional memory, removable storage, connection to an external monitor,
connection to a network, and modems.* Many cards have been tested
specifically for use with the HP Jornada. For a list of recommended cards, visit
the HP Web site at www.hp.com/jornada/accessories.
Before you can use a particular card, you may need to install the software
driver for that card. The software drivers for the Windows for Pocket PC
operating system should be available from the card’s manufacturer. Install
software drivers as you would install any other software or program. For more
information, see “Adding or removing programs” in chapter 5.
=XRW\]JUUJ,XVYJL]/UJ\QLJ[M
1.
2.
Open the door to the CompactFlash slot.
Insert the CompactFlash card into the slot.
If you are using a CompactFlash memory card or another card that does not
require a cable, you can close the door to the CompactFlash slot while the
card is installed in your HP Jornada.
If you are using a CompactFlash Card modem or NIC, which requires a cable
connection to the card, the cable connector will protrude from the slot, and you
cannot close the door. Slide the door into the casing of the device parallel to
the CompactFlash card until it is recessed inside your HP Jornada.
* Modem must be purchased separately. Some Web sites/content may not be available.
94 | HP Jornada 520 Series User’s Guide
The Type I CompactFlash card slot.
| 95
_7URXEOHVKRRWLQJ
If you encounter difficulty while using your HP Jornada Pocket PC, this chapter
will help you find answers. If you need information about troubleshooting
ActiveSync, click Microsoft ActiveSync Help on the Help menu in
ActiveSync.
The information in this chapter will help you
•
Reset your HP Jornada.
•
Restore your HP Jornada to the factory default settings.
•
Troubleshoot basic problems.
•
Troubleshoot problems with remote connections.
•
Troubleshoot problems with the display and touch screen.
96 | HP Jornada 520 Series User’s Guide
5HVHWWLQJ\RXU+3-RUQDGD
Occasionally, you may need to reset your HP Jornada; for example, you may
reset after you restore data from your desktop PC or when the operating
system stops responding. Resetting your HP Jornada is similar to restarting
your desktop PC. It restarts the operating system and preserves any saved
data, but you will lose any unsaved data. Some user-configurable HP settings
may not be saved when you reset your HP Jornada.
Reset after restoring data from a backup file or when the HP Jornada appears
to be “frozen” or “locked up.”
When you reset, you lose unsaved data in all open documents or programs. Use
HP task switcher to close all open documents and programs. (In the Today
screen, tap the HP task switcher icon, and then tap Close Window and Close
All on the pop-up menu.)
=X[N\N]
1.
2.
3.
Disconnect the sync cable or remove your HP Jornada from the serial
cradle.*
Remove the CompactFlash card (if installed).
Use the stylus to press the Reset button on the back of the HP
Jornada, as shown in the following illustration.
* Serial cradle can be purchased as an optional accessory.
Chapter 9 | Troubleshooting | 97
The Reset button
5HVWRULQJIDFWRU\GHIDXOWV
In some cases, such as when your HP Jornada does not respond after being
reset or when you forget your password, you may need to restore your HP
Jornada to the factory default settings. This erases all data you have entered,
including all files, system settings, and programs you have installed.
To ensure the safety of your information should it be necessary to restore the
factory defaults, you should regularly back up your data to your desktop PC
(using ActiveSync) or to a CompactFlash card (using the HP backup
application). For more information on backing up data, see “Backing up and
restoring data” in chapter 3.
Restoring the factory default settings erases all files, programs, and data you
have entered. You can restore only data that has been backed up to your
desktop PC or CompactFlash card. (For more information, see “Backing up
and restoring data” in chapter 3.)
98 | HP Jornada 520 Series User’s Guide
=X[N\]X[N]QNOJL]X[bMNOJ^U]\
1.
2.
3.
4.
5.
Disconnect your HP Jornada from ac power and disconnect it from
your desktop PC.
Use the tip of the stylus to press and hold the Reset button on the
back of your HP Jornada.
While holding the Reset button, press the On/Off button.
Release the Reset button.
Press the On/Off button again to restart your HP Jornada.
After you restore the factory defaults, you will need to complete the Welcome
Wizard and re-establish a partnership with your desktop PC. You may also
want to restore data to your HP Jornada from your most recent backup file.
For more information, see “Using your HP Jornada for the first time” in
chapter 2 and “Backing up and restoring data” in chapter 3.
%DVLFSUREOHPV
If you have a specific problem, review the information below to see if you can
quickly find the answer. Or, visit the HP Web site at www.hp.com/jornada for
more information about common difficulties.
Problem
Diagnosis/Remedy
HP Jornada does not turn
on when not connected to
ac power.
Power is too low to run your Pocket PC.
Connect to ac power, and then turn on your
HP Jornada. (Charge the battery regularly to
avoid running out of battery power.)
Battery runs out of power
quickly.
You are using your HP Jornada in ways that
drain power quickly. Use external power to
charge and power your device whenever
possible, especially when using a
CompactFlash card that requires significant
power (such as a modem card or NIC).
For more information, see “Managing
power” in chapter 5.
HP Jornada does not autosuspend when connected to
a desktop PC.
The HP Jornada is designed to stay on
while connected to a computer. This is the
correct behavior. No action is needed.
Chapter 9 | Troubleshooting | 99
Problem
Diagnosis/Remedy
HP Jornada automatically
shuts down/suspends.
Power is too low to run the Pocket PC.
When a critically low power condition is
encountered, the HP Jornada initiates a
safety shutdown. Connect to ac power and
charge the battery.
–or–
Auto-suspend activated. To conserve
power, the HP Jornada auto-suspends if it is
idle for 1 minute immediately after power is
turned on. It also auto-suspends if it is
continuously idle for 3 minutes.
–or–
HP Jornada is locked up. Connect to
external power, and reset your HP Jornada.
(See “Resetting your HP Jornada” in this
chapter.) (Caution: You may lose any
unsaved data when resetting.)
HP Jornada locks up when
running applications, or it
runs slowly.
HP Jornada is locked up. Connect to ac
power, and reset. (See “Resetting your HP
Jornada” in this chapter.) Note: Check to
ensure that the device is not running low on
power, and avoid running several
applications at the same time. Use HP task
switcher to close applications that are not in
use.
HP Jornada does not turn
on or display appears to be
off, even though power is
on.
The display contrast and brightness are too
low. Use HP settings to adjust contrast and
brightness for optimal viewing. (Refer to
“Adjusting settings” in chapter 5.)
Use HP settings to choose Outdoor in very
bright light and Low Power in very dark
conditions. (Refer to “Adjusting settings” in
chapter 5.)
–or–
The device has been reset. After a reset, the
screen remains blank for approximately 3
seconds after pressing the On/Off button.
100 | HP Jornada 520 Series User’s Guide
Problem
Diagnosis/Remedy
HP Jornada does not turn
on or display appears to be
off, even though power is
on.
HP Jornada has run out of power. Charge
the device by connecting to ac power
Backup file created with the
HP backup application on
another HP handheld device
cannot be restored to the
HP Jornada.
Only PIM data can be migrated to HP
Jornada 520 Series Pocket PCs. Because
the HP Jornada 520 Series Pocket PC uses
a newer operating system, it is
recommended that you restore PIM data
from an older device by using Microsoft
ActiveSync or Microsoft Outlook rather than
HP backup. Synchronize your older HP
handheld device with Microsoft Outlook on
your desktop PC, and then establish a new
partnership to transfer data to your new HP
Jornada.
Difficult to install or run
software from previous HP
handheld on HP Jornada
520 Series.
Software that runs on previous HP handheld
devices may not run on your HP Jornada
520 Series Pocket PC. Because the HP
Jornada 520 Series Pocket PC uses a
newer operating system, software built for
previous-generation Windows CE for palmsized PCs (such as HP Jornada 430/420)
may not run on your HP Jornada 520
Series. Check with the software vendor for
an upgrade or newer version that will run on
the HP Jornada 520 Series.
Inaccurate response to
stylus tap.
The calibration of the touch screen may be
off. Realign the touch screen by pressing
and holding the On/Off button to open the
Align Screen control panel.
Cannot find or replace main
or backup battery.
The HP Jornada 520 Series is designed with
an integral high-performance rechargeable
Li-ion battery for operation and data
retention. You need only connect to external
power to charge the battery for
uninterrupted usage and data retention.
Chapter 9 | Troubleshooting | 101
Problem
Diagnosis/Remedy
Cannot reset the factory
default settings because
there is no backup battery.
Refer to “Resetting your HP Jornada” in this
chapter. Note that all data in device memory
will be erased.
Unable to locate files in
CompactFlash memory in
applications.
Files must be stored in the My Documents
folder on the CompactFlash card. Create the
My Documents folder using File Explorer,
and move files into this folder.
Data is lost.
HP Jornada has run out of power. Restore
data from a backup file on your desktop PC
or a CompactFlash card.
–or–
Factory default settings have been restored.
Restore data from a backup file on your
desktop PC or a CompactFlash card.
5HPRWHFRQQHFWLRQV
This section offers troubleshooting help for connecting your HP Jornada to
other computers. For problems communicating with your desktop PC, see
ActiveSync Help.
$EOHWRGLDORXWEXWXQDEOHWRPDNHSURSHUFRQQHFWLRQ Make sure the network to which you are trying to connect supports Point-toPoint Protocol (PPP). Your ISP or network administrator can verify this.
Verify that the dialing location is correct. On the Start menu, tap Settings, and
then tap Connections, Modem, Dialing to ensure the Location field reflects
your current location.
0RGHPFRQQHFWLRQLVXQUHOLDEOH
Make sure the modem is firmly seated and connected to your device and the
telephone jack.
Disable Call waiting. On the Start menu, tap Settings, and then tap the
Connections tab. Tap the Modem icon, and then on the Dialing tab, select
the Disable call waiting check box and enter the disable code specified by
your telephone company.
102 | HP Jornada 520 Series User’s Guide
8QDEOHWRXVHLQIUDUHGWUDQVIHUEHWZHHQ:LQGRZVSRZHUHG
GHYLFHV
If you are unable to use infrared to transfer information between Windowspowered devices, try the following:
•
Transfer only one file, or no more than 25 contact cards, at a time.
•
Position the infrared ports so that they line up and are less than 20 cm
(8 inches) but more than 5 cm (2 inches) apart.
•
Make sure nothing is between the two infrared ports.
•
Adjust the room lighting. Some types of light interfere with infrared
communication. Try moving to a different location or turning off some
lights.
1HWZRUNFRQQHFWLRQSUREOHPV
The following solutions may help if you encounter problems when using a
network card for network connections. Additional troubleshooting information
is available in Connections Help on the device and ActiveSync Help on the
desktop PC.
•
Verify that your NIC is compatible with the HP Jornada 520 Series Pocket
PC.
•
Verify that you have added necessary server information. On the Start
menu, tap Settings. On the Connections tab, tap Network. Tap your
installed adapter (usually your Ethernet card's name) and enter any
necessary information. Most networks use DHCP, so you should not have
to change these settings unless your network administrator instructs you
to do so.
•
If Network Connection is not listed as a connection method in the
ActiveSync dialog box when starting synchronization, wait a few minutes
and try again. Also, if synchronization does not start right away, the
network is probably busy, and it may take a minute for your device to
connect to the network.
•
Make sure that the proper drivers for your card are installed on the device.
For more information, see the owner’s manual for the network card.
•
Verify with your network administrator that your user name and password
are correct.
•
Verify with your network administrator that the network you are trying to
connect to is available, or try to connect to it from another computer.
Chapter 9 | Troubleshooting | 103
•
You may need to change the device name if you are trying to connect to a
network and cannot because another device with the same name is
already connected. To change the device name, on the Start menu, tap
Settings. On the System tab, tap About, and then the Device ID tab.
&DEOHDQGFUDGOHFRQQHFWLRQSUREOHPV The following solutions may help if you encounter problems when connecting
to your desktop PC. Additional troubleshooting information is available in
Connections Help on your HP Jornada and ActiveSync Help on your desktop
PC.
•
Ensure the device is turned on.
•
If a modem or Ethernet card is inserted into your device, remove it.
•
Ensure that you do not have any other active connections. On the Start
menu, tap Today. Tap
tap Disconnect.
or
at the bottom of the screen and then
•
Ensure the cable is securely plugged into the COM port on the back of
your desktop PC. Use the cable that came with the device without any
extra cables or extenders attached.
•
Plug the other end of the cable securely into the correct port on your
device. If you are using a cradle, push your device securely into the
cradle.
'LVSOD\SUREOHPV
If you are having trouble viewing data on your HP Jornada screen, follow
these suggestions.
6FUHHQLVEODQN
Follow these steps if the screen remains dark or if the device does not
respond when you briefly press the On/Off button:
•
Press the Tasks hot key to ensure that the display is on.
•
Adjust the display contrast and brightness. On some devices, the screen
can be darkened or lightened until the device appears to be powered off.
(Refer to “Adjusting settings” in chapter 5.)
•
Reset the device. After a reset, the screen remains blank for
approximately 3 seconds after pressing On/Off buttons.
•
Charge the device by connecting to ac power.
104 | HP Jornada 520 Series User’s Guide
6FUHHQLVGDUN
Prolonged exposure to direct sunlight may cause your device screen to
temporarily darken. This is normal for LCD screens and is not permanent.
'LVSOD\LVGLIILFXOWWRVHHLQVXQOLJKWRULQGDUNURRPV Use HP settings to adjust contrast and brightness for optimal viewing. (Refer
to “Adjusting settings” in chapter 5). In very bright light, select the Outdoor
profile in HP settings. In very dark conditions, select the Low Power profile. In
a dark room, you may also need to ensure that the backlight is on and/or
position a lamp so that the light shines directly on the screen.
6FUHHQLVKDUGWRUHDG
If you are having a hard time viewing a document in Notes, try changing the
size of the view. To do this, tap a zoom percentage on the Tools menu. In
Pocket Word and Pocket Excel, tap Zoom on the View menu and then select
a zoom percentage. In Pocket Internet Explorer, tap Text Size on the View
menu, and then select a size.
If you are having a hard time viewing Pocket Outlook data, try enlarging the
display font. To do this within Calendar, Tasks, or Contacts, tap Tools, then
Options, and then select Use large font.
| 105
_6XSSRUWDQGVHUYLFH
:HEVLWH
You can obtain product information as well as tips and hints on how to get
more from the HP Jornada product at our Worldwide Web site. This computer
service is provided free of charge; you pay only for telephone charges and
Internet service fees. To connect to this Web site from a computer via the
Internet, go to www.hp.com/jornada.
&XVWRPHUVXSSRUW
If you have questions that this User’s Guide or the Web site does not answer
(after checking the contents and index), you can contact Hewlett-Packard
Worldwide Support and Services for Handheld Products at the telephone
numbers listed in the following table.
If the device requires service, contact Hewlett-Packard for service information,
shipping instructions, and out-of-warranty service charges before you send
your device to HP for repair.
In countries not listed in the table, contact the Hewlett-Packard authorized
dealer or sales office.
6HUYLFH
For diagnostic instructions and other service information, contact one of the
technical support numbers listed. Please do not ship your device for service
without first contacting a Hewlett-Packard office. If your device qualifies for inwarranty service, be ready to supply a dated proof of purchase. In countries
not listed in the following table, contact the Hewlett-Packard authorized dealer
or sales office.
Before you contact us for help, be sure to:
1.
2.
Review the manuals whenever possible.
Have the following information about the product:
•
model number
•
serial number
•
purchase date
106 | HP Jornada 520 Series User’s Guide
3.
4.
Have your product ready to use. The support personnel may ask you
to run tests and other operations.
Organize your question or problem. The more detailed information
you can provide, the quicker the support personnel can help you.
&RQWDFWLQJ+HZOHWW3DFNDUGZRUOGZLGH
You will be pleased to know that our commitment to quality does not stop at
the sale. Our worldwide customer support network is available to give you
personal telephone service should you need it.
Country/Region
Telephone
Argentina
Buenos Aires
54-11-4778-8380
Rest of the country
0810-555-5520
ext. 4778/8380
Australia
61-3-88778000
Austria
43-711-4201080
Belgium (Dutch)
32-2-6268806
Belgium (French)
32-2-6268807
Brazil
Sao Paulo
11-3747-7799
Rest of the country
0800-157751
Canada
1-905-2064663
Chile
56-800-360999
China
86-10-65645959
Czech Republic
420-2-61307310
Denmark
45-39-294099
Finland
358-20347288
France
33-1-43623434
Germany
49-1-805258143
Greece
30-1-6896411
Hong Kong
800-967729
Chapter 10 | Support and service | 107
Country/Region
Telephone
Hungary
36-1-3430310
India
91-11-6826035
Indonesia
62-21-3503408
Ireland
353-1-6625525
Israel
972-9-9524848
Italy
39-2-26410350
Japan
81-3-33358333
Korea
82-2-32700700
Malaysia
60-03-2952566
Mexico
Mexico City
52-58-9922
Rest of the country
01-800-4720684
Netherlands
31-20-6068751
New Zealand
64-9-3566640
Norway
47-22-116299
Philippines
63-2-8673551
Poland
48-22-8659999
Portugal
351-13180065
Russia
7-095-9169821
Singapore
65-2725300
South Africa
27-11-8061030
Spain
34-91-7820109
Sweden
46-8-6192170
Switzerland (German)
41-1-4332728
Switzerland (French)
41-1-4332729
Taiwan
886-2-27170055
Thailand
66-2-6614000
108 | HP Jornada 520 Series User’s Guide
Country/Region
Telephone
Turkey
90-212-2245925
UK
44-870-6083003
USA
Pre-sales Information
1-800-4431254
(toll-free, no operator is
available)
Support & Service
1-970-635-1000
Palmtops & Organizers (toll
call)
Venezuela
Caracas
207-8488
Rest of the country
800-47-777
Vietnam
84-0-88234530
All Customer Care Centers are available during office hours. Pre-sales
Information in the USA is available 24 hours per day, 7 days per week.
Support & Service in the USA can be contacted from 5 am to 5 pm Pacific
Time, Monday through Friday.
| 109
:DUUDQW\
Important: This is your hardware product warranty statement. Read it
carefully.
Warranty terms may be different in your country. If so, your Authorized HP
Dealer or Hewlett-Packard Sales and Service office can give you details.
2QH\HDUOLPLWHGKDUGZDUHZDUUDQW\
Hewlett-Packard (HP) warrants this hardware product against defects in
material and workmanship for a period of one year from receipt by the original
end-user purchaser.
If HP receives notice of the above-defined defects during the warranty period,
HP will either, at its option, repair or replace products that prove to be
defective.
Should HP be unable to repair or replace the product within a reasonable
amount of time, the customer's alternate exclusive remedy shall be a refund of
the purchase price upon return of the product.
/LPLWDWLRQRIZDUUDQW\
The above warranty shall not apply to defects resulting from: misuse; dropping
the unit; unauthorized modification; opening for any reason except to perform
an official upgrade using an HP Upgrade Kit; operation or storage outside the
environmental specifications for the product; in-transit damage; improper
maintenance; or defect resulting from use of non-HP software, accessories,
media, supplies, consumables, or such items not designed for use with the
product.
HP makes no other express warranty, whether written or oral, with respect to
this product.
Any implied warranty of merchantability or fitness for a particular purpose is
limited to the one-year duration of this written warranty.
Some states, provinces, or countries do not allow limitations on how long an
implied warranty lasts, so the above limitation or exclusion may not apply to
you.
110 | HP Jornada 520 Series User’s Guide
This warranty gives your specific legal rights, and you may also have other
rights that vary from state to state, province to province, or country to country.
/LPLWDWLRQRIOLDELOLW\DQGUHPHGLHV
The remedies provided above are the customer's sole and exclusive
remedies.
In no event shall HP be liable for any direct, indirect, special, incidental, or
consequential damages (including lost profit), whether based on warranty,
contract, tort, or any other legal theory.
Some states, provinces, or countries do not allow the exclusion or limitation of
incidental or consequential damages—including lost profit—so the above
limitation or exclusion may not apply to you.
&RQVXPHUWUDQVDFWLRQVLQ$XVWUDOLD1HZ=HDODQGDQGWKH
8QLWHG.LQJGRP
The preceding disclaimers and limitations shall not apply to consumer
transactions in Australia, New Zealand and the United Kingdom, and shall not
affect the statutory rights of consumers.
)RUFRQVXPHUVLQ$XVWUDOLD
The above warranty terms and any other warranty statement enclosed with
this product, except to the extent lawfully permitted, do not exclude, restrict, or
modify and are in addition to the statutory rights implied by the Trade Practices
Act 1974 or any corresponding State or territory legislation applicable to the
sale of this product to you. If you have any queries about your rights, contact
the Hewlett-Packard Customer Care Center at 61-3-88778000.
)RUFRQVXPHUVLQ1HZ=HDODQG
The above warranty terms or any other warranty statement enclosed with this
product, except to the extent lawfully permitted, do not exclude, restrict or
modify and are in addition to the statutory rights implied by the Consumer
Guarantees Act 1993 applicable to the sale of this product to you. If you have
any queries about your rights contact the Hewlett-Packard End User Support
line at 0800-733547.
Warranty | 111
+3VRIWZDUHSURGXFWOLFHQVHDJUHHPHQWDQG+3
VRIWZDUHSURGXFWOLPLWHGZDUUDQW\
This HP product contains preinstalled software programs. Please read the HP
Software Product License Agreement before proceeding.
Important: Carefully read this License Agreement and the Limited Warranty
statement before operating the equipment. The rights to the software are
licensed, not sold. HP or its licensors continue to own all intellectual property
rights to the software, and you will be granted certain rights to use the
software upon your acceptance of this license. Rights in the software are
offered only on the condition that you agree to all terms and conditions of the
License Agreement. Operating the equipment indicates your acceptance of
these terms and conditions. If you do not agree to the terms and conditions of
the License Agreement, return the complete package for a full refund now.
+36RIWZDUH3URGXFW/LFHQVH$JUHHPHQW The HP Software Product License Agreement shall govern the use of all
software that is provided to you, the customer, as part of this HP product with
the exception of Microsoft Software. Microsoft Products are licensed to you
under the Microsoft End User License Agreement (EULA) contained in the
Microsoft documentation. Any third-party software supplier's warranty terms
that may be found online, or in any documentation or other materials
contained in the product packaging, shall govern the use of that third-party
software.
The following License Terms govern the use of the software:
>\N
You may only use the software on a single computer. You may not reverse,
assemble, or decompile the software.
Transaction in European Union member states: The prohibition against
decompilation shall be subject to Directive 91/250/EEC.
,XYRN\JWMJMJY]J]RXW\
You may make copies or adaptations of the software (a) for archival purposes,
or (b) when copying or adaptation is an essential step in the use of the
software with a computer so long as the copies and adaptations are used in no
other manner.
You have no other rights to copy unless you acquire an appropriate license to
reproduce which is available from HP for some software.
112 | HP Jornada 520 Series User’s Guide
You agree that no warranty, free installation, or free training is provided by HP
for any copies or adaptations made by you.
All copies and adaptations of the software must bear the copyright notice(s)
contained in or on the original.
8`WN[\QRY
You agree that you do not have any title to or ownership of the software, other
than ownership of the physical media. You acknowledge and agree that the
software is copyrighted and protected under the copyright laws. You
acknowledge and agree that the software or part thereof may have been
developed by a third-party software supplier named in the copyright notice(s)
included with the software, who shall be authorized to hold you responsible for
any copyright infringement or violation of this or their own License Agreement.
=[JW\ON[XO[RPQ]\RW\XO]`J[N
You may transfer rights to the software to a third party only as part of the
transfer of all your rights and only if you obtain the prior agreement of the third
party to be bound by the terms of this License Agreement. Upon such a
transfer, you agree that your rights to the software are terminated and that you
will either destroy all your copies and adaptations or deliver them to the third
party. Transfer to a U.S. government department or agency or to a prime or
lower tier contractor in connection with a U.S. government contract shall be
made only upon prior written agreement to terms required by HP.
<^KURLNW\RWPJWMMR\][RK^]RXW
You may not lease, sublicense the software, or distribute copies or
adaptations of the software to the public in physical media, by
telecommunication or at all without the prior written consent of HP.
=N[VRWJ]RXW
HP may terminate this software license for failure to comply with any of these
terms, provided HP has requested you to cure the failure and you have failed
to do so within thirty (30) days of such notice.
>YMJ]N\JWM^YP[JMN\
You agree that the software does not include updates and upgrades that may
be available from HP under a separate support agreement.
.aYX[]LUJ^\N
You agree not to export or re-export the software or any copy or adaptation in
violation of the U.S. Export Administration regulations or other applicable
regulations.
Warranty | 113
><PX_N[WVNW][N\][RL]NM[RPQ]\
The Software and Documentation have been developed entirely at private
expense. They are delivered and licensed as “commercial computer software”
as defined in DFARS 252.227-7013 (Oct 1988), DFARS 252.211-7015 (May
1991) or DFARS 252.227- 7014 (Jun 1995), as “commercial item” as defined
in FAR 2.101 (a), or as “Restricted computer software” as defined in FAR
52.227-19 (Jun 1987) (or any equivalent agency regulation or contract clause),
whichever is applicable. You have only those rights provided for such Software
and Documentation by the applicable FAR or DFARS clause or the HP
standard software agreement for the product involved.
+36RIWZDUH3URGXFW/LPLWHG:DUUDQW\ Important: This HP Software Product Limited Warranty shall cover all software
that is provided to you, the customer, as part of the HP product, including any
operating system software. Any third-party software supplier's warranty terms
that may be found on-line, or in any documentation or other materials
contained in the product packaging shall supersede the HP Software Product
Limited Warranty with regard to that third-party software.
7RWN]b-Jb5RVR]NM<XO]`J[N@J[[JW]b
HP warrants for a period of NINETY (90) DAYS from the date of purchase that
the software product will execute its programming instructions when all files
are properly installed. HP does not warrant that the software will be
uninterrupted or error free. In the event that this software product fails to
execute its programming instructions during the warranty period, your remedy
shall be replacement or refund only. Return the media to HP for replacement.
Should HP be unable to replace the media within a reasonable amount of
time, HP shall refund the purchase price upon return of the product and all
copies.
;NVX_JKUNVNMRJRO\^YYURNM
HP warrants the removable media, if supplied, upon which this product is
recorded to be free from defects in material and workmanship under normal
use for a period of NINETY (90) DAYS from the date of purchase. In the event
the media proves to be defective during the warranty period, your remedy shall
be replacement or refund only. Return the media to HP for replacement.
Should HP be unable to replace the media within a reasonable amount of
time, HP shall refund the purchase price upon return of the product and
destruction of all other non-removable media copies of the software product.
114 | HP Jornada 520 Series User’s Guide
7X]RLNXO`J[[JW]bLUJRV\
You must notify HP in writing of any warranty claim not later than thirty (30)
days after the expiration of the warranty period.
5RVR]J]RXWXO`J[[JW]b
HP makes no other express warranty, whether written or oral, with respect to
this product.
Any implied warranty of merchantability or fitness for a particular purpose is
limited to the 90-day duration of this written warranty. Some states, provinces,
or countries do not allow limitations on how long an implied warranty lasts, so
the above limitation or exclusion may not apply to you. This warranty gives
specific legal rights, and you may also have other rights that vary from state to
state, province to province, or country to country.
5RVR]J]RXWXOURJKRUR]bJWM[NVNMRN\
THE REMEDIES PROVIDED ABOVE ARE YOUR SOLE AND EXCLUSIVE
REMEDIES. IN NO EVENT SHALL HP BE LIABLE FOR ANY DIRECT,
INDIRECT, SPECIAL, INCIDENTAL, OR CONSEQUENTIAL DAMAGES
(INCLUDING LOST PROFIT), WHETHER BASED ON WARRANTY,
CONTRACT, TORT, OR ANY OTHER LEGAL THEORY. Some states,
provinces, or countries do not allow the exclusion or limitation of incidental or
consequential damages—including lost profit—so the above limitation or
exclusion may not apply to you.
In no case shall HP's liability exceed the purchase price for the software
and/or product. The limitations set forth above will apply regardless of whether
you accept the software.
Consumer transactions in Australia and the United Kingdom: The disclaimers
and limitations above shall not apply and shall not affect the statutory rights of
a Consumer.
| 115
*ORVVDU\
AC adapter. An external power supply that converts ac power from a standard
household electrical outlet to the low-voltage dc required to operate your HP
Jornada.
Backup. A duplicate copy of your HP Jornada files and data that is stored on
your desktop PC or on a PC card.
CompactFlash. A removable media for high-performance memory cards and
other peripherals such as modems and network interface cards.
Cradle. A desktop base for your HP Jornada that allows instant connectivity to
a desktop PC. The cradle remains connected to your desktop PC, even when
you remove your HP Jornada.
Dial-up connection. A connection between your HP Jornada and another
computer by modem. You can have a dial-up connection with an ISP, a
network, or with a modem attached to a PC.
Direct connection. A connection between your HP Jornada and another
computer by means of the sync cable or IR port.
DNS (Domain Name System). An Internet service that translates domain
names into IP addresses. For example, the domain name www.jornada.com
might translate as 198.125.247.4.
Driver. A control program that enables a computer to work with a specific
device or peripheral.
IMAP4 (Internet Messaging Access Protocol v4). A protocol that enables a
computer to retrieve messages from a mail server.
Infrared port. A communication port that uses optical (infrared) signals rather
than wires or cables to transmit data.
Internet. A worldwide network of computers offering services such as e-mail,
the Worldwide Web, FTP, Usenet news, and others.
Intranet. A network that offers services similar to the Internet, but is usually
accessible only to users within a single company or organization.
IP (Internet Protocol). The standard by which packets of information are
transmitted over the Internet.
116 | HP Jornada 520 Series User’s Guide
IrDA (Infrared Data Association protocol). An established standard for
infrared communications between computers and other peripherals and
devices.
ISP (Internet service provider). A commercial business that provides Internet
access to individuals or businesses, usually for a fee.
LAN (local area network). A group of computers, usually in close proximity
(either in the same building or in buildings in close proximity), that are linked
together to share files and exchange data.
Modem. A communication device that enables a computer to transmit data
over telephone lines.
NIC (network interface card). A network interface card (NIC) is a card that is
installed in a computer so that it can be connected to a network. Network
interface cards can provide a dedicated, full-time connection to a network.
Partnership. An established relationship between your HP Jornada and your
PC for the purpose of synchronizing and transferring data.
PIM (personal information manager). An application or set of applications
that organizes information such as addresses, appointments, and notes.
POP3 (Post Office Protocol v3). A protocol that enables a computer to
retrieve messages from a mail server.
PPP (Point-to-Point Protocol). The default method your HP Jornada uses to
communicate with an ISP network server.
Proxy server. A server that sits between a client computer or Web browser
and the Internet. A proxy server provides security by filtering requests and can
improve performance by storing local copies of requested information.
RAM (random access memory). Volatile memory that be read and written.
Data stored in RAM is retained only while power is maintained.
Remote connection A connection between your HP Jornada and a remote
computer or server.
Reset. The process of restarting your HP Jornada and reinitializing the
operating system. Performing a reset erases any unsaved data in open
documents, but preserves data that has been saved.
Restore. To return your device to the state it was in when it was last backed
up. This involves copying your backup data to your HP Jornada.
ROM (read-only memory). A memory circuit into which programs and data
are permanently installed. Data in ROM cannot be modified or deleted.
Glossary | 117
Serial connection. A cable connection between your HP Jornada and a serial
(COM) port on your desktop PC.
SLIP (Serial Line Internet Protocol). A method of connecting to the Internet.
Similar to PPP, but older and simpler.
SMTP (Simplified Mail Transport Protocol). A protocol for sending e-mail
messages between computers on the Internet.
Stylus. A pen-like utensil designed for navigating on a touch screen.
Synchronization. The process of comparing the files or data on two
computers to ensure that they contain the exact same information.
Touch screen. A touch-sensitive screen that allows you to open files, launch
programs, and select text by touching or tapping the screen with the stylus.
118 | HP Jornada 520 Series User’s Guide
| 119
$SSHQGL[$
&KDUDFWHUUHFRJQLWLRQ
Using Character Recognizer, you can write characters directly on your HP
Jornada screen with your stylus, just as you would on a piece of paper. The
characters you write are translated into typed text. Use Character Recognizer
anywhere you want to enter text; for example, to write a note or to fill in fields
in a dialog box.
The default writing mode for Character Recognizer is lowercase (Jotcompatible) mode. In this mode, you write characters in lowercase. The chart
at the end of this appendix contains examples of how to write characters in
lowercase mode. You can also choose to write in uppercase (Graffiticompatible) mode. In this mode, you write characters in uppercase. If you
prefer to write in uppercase mode, tap Uppercase Mode in Options on the
input method menu. Whether a letter appears in uppercase or lowercase when
it is converted to typed text depends on where in the Input panel you write it,
not on the mode you have selected.
The Character Recognizer Input panel is divided into three writing areas.
Letters written in the left area (labeled ABC) create uppercase letters, and
letters written in the middle area (labeled abc) create lowercase letters. Use
the right area (labeled 123) for writing numbers, symbols, special characters,
and punctuation.
120 | HP Jornada 520 Series User’s Guide
The following chart is a partial display of the characters you can write while in
lowercase mode (the dot on each character is the starting point for writing).
Remember that even though you write a letter in its lowercase form, the case
of the text that is displayed depends on where you write the letter. For
example, if you write a lowercase “a” in the ABC area, an uppercase “A” is
displayed on the screen.
Appendix A | Character recognition | 121
For more information on using Character Recognizer and for demos of all
characters, tap
on the Character Recognizer Input panel.
122 | HP Jornada 520 Series User’s Guide
| 123
$SSHQGL[%
0LJUDWLQJGDWDIURP
RWKHUGHYLFHV
7UDQVIHUULQJGDWDIURPDSDOPVL]HRUKDQGKHOG3&
If you are currently using a Windows-powered palm-size or handheld PC, you
can transfer data to your HP Jornada Pocket PC. If you have offline folders in
Inbox on your palm-size or handheld PC that contain e-mail messages you
want to transfer to your Pocket PC, you will have to follow a separate
procedure, included below.
=X][JW\ON[MJ]JO[XVJWX]QN[@RWMX`\YX`N[NMMN_RLN
1.
2.
3.
4.
5.
6.
7.
8.
Install Microsoft ActiveSync 3.1 on your desktop PC. For information
on installing ActiveSync, see the Getting Started with Microsoft
ActiveSync booklet.
Synchronize your device with your desktop PC, so that the
information on your desktop PC is current.
If you have files on your device that you want to transfer, such as
Note Taker notes and recordings, turn file conversion off in
ActiveSync options so that the files stay in device format, and use
ActiveSync Explorer to copy the files to your desktop PC. For specific
instructions, see ActiveSync Help on the desktop PC.
Synchronize your Pocket PC with your desktop PC. This will update
your HP Jornada with the current data from your desktop PC.
Reinstall programs. Check with the program vendors to find out if
new versions that have been optimized for the Pocket PC are
available.
Using ActiveSync Explorer, copy the files you transferred to your
desktop PC in step 3 to your Pocket PC.
In ActiveSync, turn file conversion on again.
Enter settings and connection information on the Pocket PC.
124 | HP Jornada 520 Series User’s Guide
=X][JW\ON[XOOURWNOXUMN[\
1.
Connect your palm-size or handheld PC to your desktop PC, and
then click Windows CE Inbox Transfer on the Microsoft Outlook
Tools menu.
2. Select Copy or move selected messages to your desktop
computer, and then click the Browse button.
3. Select the offline folder that contains the messages you want to
transfer to your desktop PC, and then click OK.
4. Click the Transfer button and select the folder you want to transfer
the messages to or click New Folder to create a new folder. Click OK
to transfer the messages. Now you must transfer the messages from
your desktop PC to your HP Jornada.
5. In Inbox on your HP Jornada, tap Tools and then tap New Folder to
create a folder for the messages you are going to transfer.
6. In Outlook on your desktop PC, select the messages you want to
transfer.
7. Connect your HP Jornada to your desktop PC, and then click
Windows CE Inbox Transfer on the Outlook Tools menu.
8. Select Copy selected messages to your mobile device, and then
click the Browse button.
9. Select the offline folder on your device that you want to transfer the
messages to, and then click OK.
10. Click the Transfer button. The selected messages are moved to your
HP Jornada.
0LJUDWLQJGDWDIURP3DOPGHYLFHV
0LJUDWLQJIURP3DOP,,,DQGQHZHUSURGXFWV
Palm V™ and Palm III™ series connected organizers can synchronize data
with Microsoft Outlook 97/98. From Microsoft Outlook you can synchronize the
data to your HP Jornada using ActiveSync. Use PocketMirror® from
Chapura™ (included with the Palm™ Desktop organizer software) to
synchronize data between your Palm Computing handheld and Microsoft
Outlook.
To use Chapura’s PocketMirror conduit, first install the Palm desktop software
that is included with your Palm IIIx™ or Palm V organizer. If you choose to
synchronize with Microsoft Outlook, the PocketMirror conduit will be installed
with the Palm desktop software. For more information, go to the Palm Web
site at www.palm.com.
Appendix B | Migrating data | 125
0LJUDWLQJIURPROGHU3DOPRUJDQL]HUV
If you would like to use PocketMirror to synchronize your PalmPilot or Pilot
organizer with Microsoft Outlook, you will need to purchase the commercial
version of the software from Chapura, the maker of PocketMirror. Check with
Chapura directly.
126 | HP Jornada 520 Series User’s Guide
| 127
,QGH[
$
&
ac adapter ...................... 2, 12, 34, 115
accessories ...................................... 92
Action button ........................ 10, 25, 68
ActiveSync ...... 2, 7, 29, 30, 36, 41, 95,
100, 123
installing ...................................... 30
system requirements ................... 30
ActiveSync CD-ROM ........ 6, 7, 30, 31,
88, 89
adding programs .......................... 5, 72
address book ..................See Contacts
alarm ................................................ 14
appointments ................. See Calendar
AudibleManager................................. 6
AudiblePlayer..................................... 6
audio files
creating.................................. 87, 88
formats .................................... 5, 86
packaged content ........................ 88
playing ................................... 86, 88
storing on CompactFlash card .... 89
AvantGo Channels......... See channels
calculator .....................See OmniSolve
Calendar 3, 4, 5, 15, 23, 25, 37, 40, 41,
43, 75, 76, 77, 81, 82, 104
Calendar hot key ..............................15
cellular phone ..........See mobile phone
channels ..... See also Mobile Favorites
AvantGo.................................52, 53
mobile ........................31, 45, 52, 53
synchronizing...............................53
viewing.........................................53
Character Recognizer ...20, 21, 22, 23,
84, 119, 121
charging...............................See power
clock .................................................18
Command bar...................................19
CompactFlash card
installing.................................47, 93
memory..................................63, 93
modem...................................46, 93
NIC...............................................46
Socket Low Power
Ethernet card...........................47
CompactFlash card slot........11, 47, 94
connecting
by cradle ......................................34
by infrared..............................35, 48
by LAN ...................................38, 39
by mobile phone ..........................48
by modem ....................................46
by sync cable ...............................33
to a desktop PC ...............33, 34, 35
to a network ...............................102
to a remote computer...................45
to an ISP ......................................48
to the Internet.........................45, 48
troubleshooting connections ......103
contacting HP .................................106
Contacts .....3-5, 15, 23, 25, 37, 40, 41,
43, 75, 77, 78, 81, 82, 104
Contacts hot key...............................15
contrast.............................. See display
%
backing up.................................. 40, 41
restoring data ........................ 42, 43
to a CompactFlash card .............. 41
to a desktop PC ........................... 41
using ActiveSync ................... 40, 41
using HP backup ................... 40, 41
backlight............................. 14, 62, 104
Backlight control panel..................... 62
batteries .............................. See power
brightness ..........................See display
browser, Web........See Pocket Internet
Explorer
browsing
files and folders ..................... 27, 39
the Web ................................. 51, 52
128 | HP Jornada 520 Series User’s Guide
converting files ................................. 40
cover .................................. 10, 16, 113
cradle ............................................... 33
customer service See technical support
'
dc jack........................................ 12, 34
dial-up connection, disconnecting.... 19
disconnecting dial-up connection..... 19
display
brightness .... 4, 13, 64, 99, 103, 104
cleaning ....................................... 11
contrast........ 4, 13, 64, 99, 103, 104
troubleshooting .................... 12, 103
turning off .................................... 87
drawing onscreen....................... 24, 85
drivers, installing .............................. 93
(
eBooks ............................................. 89
e-mail
attachments ........................... 59, 60
creating an e-mail service ........... 57
deleting messages ................ 56, 59
folders.......................................... 60
receiving messages......... 55, 56, 58
sending messages .......... 55, 56, 59
sending recordings in .................. 27
synchronizing .............................. 56
EMusic.com ................................. 6, 87
entering information ................... 20, 84
+
hardware buttons........4, 14, 61, 68, 69
configuring ...................................68
headphone jack ................................11
HP backup.................4, 40-43, 97, 100
HP Dynamic Voice ...........................26
installing.......................................31
HP game buttons..............4, 19, 68, 69
HP home menu ...4, 13, 15, 17, 18, 64,
70, 71
HP home menu hot key....................15
HP hot keys ....................10, 11, 15, 68
HP info exchange ...................4, 81, 82
HP Jornada CD-ROM.....2, 6, 7, 87, 88
HP security ....................... See security
HP settings ....4, 13, 14, 15, 62, 64, 65,
99, 103, 104
HP task switcher... 4, 17-19, 41-43, 63,
64, 96, 99
HPC Notes .........................................6
,
factory default settings ..................... 97
Favorites folder ................................ 53
File Explorer................. 27, 71, 73, 101
files
converting .................................... 40
transferring ............................ 39, 40
Find feature...................................... 27
finding information............................ 27
IMAP4 protocol.............49, 57, 60, 115
Inbox5, 37, 50, 55-60, 75, 77, 123, 124
folders ..........................................60
Inbox synchronization.......................56
information
entering..................................20, 84
exchanging ........................4, 81, 82
owner ...........................................68
infrared modem ................................48
infrared port ................................11, 81
Input panel........................................20
installing programs .......................5, 72
interference, radiated .......................12
Internet
Pocket Internet Explorer ..............51
Web browsing ..............................51
Internet service provider
connecting to ...............................48
intranet ...................................3, 45, 51
ISP..........See Internet service provider
*
./0
games . See profiles, HP game buttons
GSM files ......................................... 26
keyboard..................See soft keyboard
LAN ....................................31, 38, 116
mail......................................See e-mail
Media Player ....... See Windows Media
Player
meeting requests..............................77
)
Index | 129
memory
increasing ........................ 63, 73, 90
managing..................................... 63
program ....................................... 63
storage ............... 18, 26, 27, 55, 63,
73, 88, 89
microphone ................................ 20, 25
Microsoft ActiveSync... See ActiveSync
Microsoft Exchange ............. 55, 56, 75
Microsoft Outlook .... 31, 37, 39, 55, 56,
75, 100, 124, 125
Microsoft Pocket Outlook .... See Inbox,
Contacts, Calendar, or Tasks
Microsoft Reader................ 5, 7, 83, 89
Mobile Channels ............ See channels
Mobile Favorites....... 31, 37, 53, 54, 55
mobile phone ................................... 48
Mobile Voice .................................... 26
modem
CompactFlash card ..................... 46
disconnecting .............................. 19
infrared ........................................ 48
installing ...................................... 46
MP3 files .................................. 5, 6, 86
music.............................See audio files
MusicMatch JukeBox ................... 6, 87
1
navigating......................................... 16
Navigation bar.................................. 18
network ..................................See LAN
network interface card......... 46, 47, 49,
50, 93, 102, 116
New Partnership Wizard .................. 36
NIC............ See network interface card
Notes............... 3, 5, 23, 25, 27, 68, 75,
77, 78, 80-82, 104
Notification LED ................. 10, 14, 103
2
OmniSolve ......................... 3, 5, 83, 90
On/Off button .......... 10, 14, 16, 98-100
online Help ............... 2, 7, 8, 50, 83, 90
owner information ............................ 68
3
Palm devices
migrating data............................ 124
Palm devices, migrating data. 124, 125
partnership
establishing..................................36
multiple ........................................36
New Partnership Wizard ..............36
passwords
clearing ........................................67
for a network ..................49, 50, 102
for backup files.............................40
for e-mail ................................49, 57
for HP Jornada...................4, 66, 67
delay........................................67
primary ..............................66, 67
reminder ..................................67
for notes .........................................6
for Pocket Excel workbooks.........86
for the Internet .......................49, 50
forgetting................................67, 97
PCM files ..........................................26
personal information manager...........4,
37-43, 81, 82, 100, 116
PIM See personal information manager
Playlist Manager...............................88
Pocket Excel.........3, 5, 83, 85, 86, 104
templates .....................................85
Pocket Internet Explorer..............5, 51,
52, 104
Pocket Outlook ...........................81, 82
Pocket Word..........3, 5, 23, 83-85, 104
POP3 protocol ..............49, 57, 60, 116
pop-up menus ..................................20
power................................................62
charging .......................2, 14, 19, 62
conserving ...................................62
LED indicators .............................62
low-power warnings .....................62
typical usage................................62
Power control panel........14, 18, 62, 65
profiles
games ................................4, 68, 69
settings ............................64, 65, 99
program memory ..............................63
programs
additional .......................................5
assigning to a hardware button....68
closing..........................................63
HP..................................................4
installing...................................5, 72
Microsoft ........................................5
quitting .........................................63
removing .....................4-6, 8, 63, 73
switching ......................................17
third-party.......................................5
130 | HP Jornada 520 Series User’s Guide
45
quitting programs ............................. 63
radiated interference ........................ 12
recharging ........................... See power
Record button .......... 10, 15, 25, 66, 68
disabling ...................................... 15
recording
formats ............................ 26, 31, 85
playing ......................................... 25
sending ........................................ 27
voice notes ... 10, 15, 20, 25, 77, 78,
80, 81, 84, 85
registration ....................................... 13
removing programs ............... 4-6, 8, 73
Reset button................... 11, 13, 96, 98
resetting ........................................... 96
restoring
factory defaults ............................ 97
from backup................................. 42
incremental backups ................... 43
using ActiveSync ......................... 42
using HP backup ......................... 43
6
screen protector ......................... 11, 92
scrolling speed ................................. 69
searching ......................................... 27
security............................................. 66
log................................................ 67
owner information........................ 68
passwords ......................... 4, 66, 67
serial connector............... 2, 10, 33, 34,
38, 39, 92
settings....................... See HP settings
Socket Low Power Ethernet card..... 47
soft keyboard ............................. 20, 21
software drivers................................ 93
Software Product
License Agreement .................... 111
speaker ...................................... 19, 65
mute............................................. 64
volume ............................... 4, 64, 65
Start menu ................................. 18, 71
status icons ...................................... 19
stopping programs ........................... 63
storage memory .................. 18, 26, 27,
55, 63, 73, 88, 89
stylus................................................ 92
calibrating .................................... 16
using ............................................ 16
switching programs .......................... 17
switching views.................................15
sync cable ........................................33
synchronization ..7, 36, 37, 55, 56, 116
channels ......................................53
conflicts........................................38
Inbox ............................................56
remote....................................38, 39
system requirements, ActiveSync ....30
7
Tasks................3-5, 15, 20, 23, 25, 37,
40, 41, 43, 75, 79, 81, 82, 104
Tasks hot key .............................15, 87
technical support ..................3, 13, 105
temperature ......................................12
templates
Pocket Excel ................................85
Pocket Word ................................84
Today screen.......... 4, 8, 17-19, 41-43,
62, 69, 96
touch screen.....................................10
aligning ................................16, 100
cleaning .......................................11
transferring
data from handheld PCs ............123
files ........................................39, 40
offline folders .............................124
recordings ....................................31
troubleshooting
basic problems.............................98
connections............................8, 103
display..................................12, 103
infrared.......................................102
network connections ..................102
remote connections ...................101
9:
voice notes .................... See recording
warranty
hardware....................................109
software .....................................111
WAV files......................................5, 86
Web ............................................51, 52
Welcome Wizard ................2, 9, 13, 98
Windows Media Manager........7, 87-89
Windows Media Player.....5, 83, 86, 87
WMA files .....................................5, 86
writing onscreen ...........22, 23, 84, 119
WWW .................................... See Web