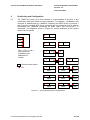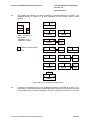
1
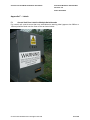
Document Number: ECP 05-9531 Date: 03/09/2014 ENGINEERING CONSTRUCTION PROCEDURE ECP 05-9531 CONTROL UNIT AND RTU INSTALLATION PROCEDURE Network(s): EPN, SPN Summary: This document details the installation procedure for the control units and remote terminal units (RTU) used with ground-mounted switchgear. It includes the physical installation of the control unit together with installation of the mains supply, earthing and communications. Owner: Kevin Burt Date: 03/09/2014 Approved By: Steve Mockford Approved Date: 16/09/2014 This document forms part of the Company’s Integrated Business System and its requirements are mandatory throughout UK Power Networks. Departure from these requirements may only be taken with the written approval of the Director of Asset Management. If you have any queries about this document please contact the author or owner of the current issue. Circulation UK Power Networks External All UK Power Networks G81 Website Asset Management Contractors Capital Programme ICPs/IDNOs Connections Meter Operators HSS&TT Network Operations UK Power Networks Services Other THIS IS AN UNCONTROLLED DOCUMENT, THE READER MUST CONFIRM ITS VALIDITY BEFORE USE Version: 2.0 Control Unit and RTU Installation Procedure Document Number: ECP 05-9531 Version: 2.0 Date: 03/09/2014 Revision Record Version 2.0 Review Date 27/07/2015 Date 03/09/2014 Author James Ford Update: Location section added (Section 8) to specify RTU location for safe egress by operator Version 1.2 Review Date 27/07/2015 Date 17/10/2012 Author Stephen Tucker Minor Update: Document renumbered from ECP 11-0531. Earth conductor sizes amended (section 10). Reviewed for G81 website Version 1.1 Review Date Date 13/09/2011 Author John Lowe Minor Update: Reclassification of document from Installation and Commissioning Manual 5.31 Version 1.0 Review Date Date 01/06/2012 Author Stephen Tucker Original © UK Power Networks 2014 All rights reserved 2 of 29 Control Unit and RTU Installation Procedure Document Number: ECP 05-9531 Version: 2.0 Date: 03/09/2014 Contents 1 Introduction ............................................................................................................. 5 2 Scope ....................................................................................................................... 5 3 References ............................................................................................................... 5 4 Abbreviations and Definitions ................................................................................ 5 5 Description............................................................................................................... 6 6 Equipment ................................................................................................................ 6 7 Communications ..................................................................................................... 7 8 Location ................................................................................................................... 8 9 Positioning and Configuration ............................................................................... 9 10 Mains Supply ......................................................................................................... 11 10.1 General ................................................................................................................... 11 10.2 LV Transformer-mounted Fuse Cabinet................................................................... 11 10.3 LV Pillar ................................................................................................................... 12 10.4 LV Main (Switching Stations) ................................................................................... 13 10.5 Consumer Units (Indoor Substations) ...................................................................... 14 10.6 HV Metering Unit (HV Customers and Switching Stations) ...................................... 14 11 Earthing.................................................................................................................. 14 12 Labelling ................................................................................................................ 14 13 Final Checks .......................................................................................................... 14 Appendix A – Control Unit Details ................................................................................... 15 A.1 Schneider T200E..................................................................................................... 15 A.2 Schneider T200E Series 3 ....................................................................................... 16 A.3 Lucy Gemini ............................................................................................................ 17 Appendix B – Plinth Drawings ......................................................................................... 18 B.1 Schneider T200E Plinth ........................................................................................... 18 B.2 Lucy Gemini Plinth................................................................................................... 19 Appendix C – Stand Drawings ......................................................................................... 20 C.1 Lucy Gemini Stand used for Ground Mounting ........................................................ 20 C.2 Lucy Gemini Stand used for Wall Mounting (e.g. GRP) ........................................... 21 Appendix D – GRP Mounting Arrangements................................................................... 22 D.1 GRP RTU Fixing Drawing ........................................................................................ 22 D.2 Lucy Gemini GRP Mounting Arrangements ............................................................. 23 Appendix E – Material Lists.............................................................................................. 24 E.1 Auxiliary Supply Components .................................................................................. 24 E.2 Automation Components ......................................................................................... 25 © UK Power Networks 2014 All rights reserved 3 of 29 Control Unit and RTU Installation Procedure Document Number: ECP 05-9531 Version: 2.0 Date: 03/09/2014 Appendix F – Labels ......................................................................................................... 27 F.1 Control Unit Door Label for Multiple Switchboards ................................................... 27 F.2 T200E Circuit Label ................................................................................................. 28 F.3 Gemini Circuit Label ................................................................................................ 29 Figures Figure 7-1 – Paknet Aerial Mounting on Schneider Switchgear ............................................. 7 Figure 7-2 – Paknet Aerial Mounting on LUCY Switchgear ................................................... 7 Figure 7-3 – Paknet Aerial Mounting on a GRP Substation ................................................... 7 Figure 9-1 – Schneider Switchgear Configurations ............................................................... 9 Figure 9-2 – Lucy Switchgear Configurations ...................................................................... 10 Figure 10-1 – Transformer-mounted Cabinet Auxiliary Supply Terminal Block .................... 12 Figure 10-2 – Mains Supply using a Street Lighting Pillar ................................................... 13 Tables Table E-1 – RTU and Mounting Kits .................................................................................... 25 Table E-2 – Schneider Ring Main Unit (RN2c, RN6c and RE2c) Components .................... 25 Table E-3 – Schneider Extensible Switches (SE6) and Circuit-Breaker (CE6/CE2) Components ...................................................................................................... 26 Table E-4 – Lucy Components ............................................................................................ 26 Table E-5 – Paknet Components ........................................................................................ 26 © UK Power Networks 2014 All rights reserved 4 of 29 Control Unit and RTU Installation Procedure Document Number: ECP 05-9531 Version: 2.0 Date: 03/09/2014 1 Introduction 1.1 This document details the installation procedure for the control units and remote terminal units (RTU) used with ground-mounted switchgear. It includes the physical installation of the control unit together with installation of the mains supply, earthing and communications. 1.2 This procedure shall be carried out in accordance with the requirements of the UK Power Networks Distribution Safety Rules. 1.3 This procedure shall be carried out having regard to the requirements and recommendations of the manufacturer. If conflict exists between the requirements of the manufacturer and those of UK Power Networks the matter shall be referred to Asset Management (or your UK Power Networks nominated contact). 2 Scope 2.1 This procedure applies to the following control units: Schneider T200E (aka Talus 200); Lucy Gemini 2 and 2.5. 2.2 The Remsdaq control units used in LPN are covered by procedure ECP 05-9535. 3 References 3.1 This procedure should be read in conjunction with the following references: UK Power Networks Distribution Safety Rules. Generic task risk assessments (internal document only). Schneider T200E User Manual. Lucy Gemini 2 Installation, Operation and Maintenance User Manual. Schneider RN2c-RN2-SE6-CE6 OEM Actuators Installation Instructions. ECP 11-0532 Schneider T200E Control Unit and RTU Commissioning Procedure (internal document only). ECP 11-0534 Lucy Gemini 2.5 Control Unit and RTU Commissioning Procedure (internal document only). ECP 11-0533 Schneider T200 Series 3 Control Unit and RTU Commissioning Procedure (internal document only). ECS 06-0023 Secondary Distribution Network Earthing Construction. EOS 05-9201 Paknet Communication System (internal document only). 4 Abbreviations and Definitions 4.1 The following abbreviations are used throughout this procedure. Term Definition RTU Remote Terminal Unit SWBD Switchboard © UK Power Networks 2014 All rights reserved 5 of 29 Control Unit and RTU Installation Procedure Document Number: ECP 05-9531 Version: 2.0 Date: 03/09/2014 5 Description 5.1 The Schneider T200E and Lucy Gemini 2 are control units/RTUs that are used to provide local and remote control of secondary switchgear. A description of these units is given in Appendix A. 5.2 New switchgear ordered with remote control will generally be supplied and delivered to site with the remote control already fitted. The list below shows some of the most popular configurations: RN2c – remote control on ring switch 1, FPI fitted to ring switch 1. RN6c – remote control on ring switch 1 and circuit-breaker, FPI fitted to ring switch 1. RE2c/SE6 – remote control on ring switch 1, ring switch 2 and SE6, FPI fitted to ring switch 1, ring switch 2 and SE6. RE2c/CE2 – remote control on ring switch 1, FPI fitted to ring switch 1 and ring switch 2. CE6 – remote control on circuit-breaker. VRN2a – remote control on ring switch 1, FPI fitted to ring switch 1. VRE2a/SSE – remote control on ring switch 1 and SSE, FPI fitted to ring switch 1, ring switch 2 and the SSE. However on occasions it will be necessary to revise the as delivered arrangement, typically to facilitate mounting of the control unit onto the substation wall or a free standing frame, or to provide remote control for additional equipment installed later on site. A number of additional components are required to carry out these tasks which are listed in Appendix E of this document for easy reference. 6 Equipment 6.1 The following test equipment is required: Vodafone Paknet Signal Strength Test Set CS1051 or CS106-6. Test lamp. 1kV insulation resistance tester (e.g. Megger). © UK Power Networks 2014 All rights reserved 6 of 29 Control Unit and RTU Installation Procedure Document Number: ECP 05-9531 Version: 2.0 Date: 03/09/2014 7 Communications 7.1 Prior to the installation of remote control switchgear it is advisable to carry out a Paknet communications survey using a Paknet test set (CS1051 or CS106-6) to determine if a suitable signal strength is available. If this cannot be achieved UK Power Networks Operational Telecoms (or your UKPN nominated contact) should be consulted so that an alternative can be established. 7.2 A Paknet aerial can usually be mounted onto the switchgear using the bracket supplied with the equipment - refer to examples in Figure 7-1 and Figure 7-2. For equipment that is installed in a GRP it is important to orientate the mounting bracket on the equipment to ensure the aerial is reasonably upright and not bent over by the GRP roof. It is often necessary to mount the aerial outside of the GRP to get the best reception - refer to Figure 7-3. Figure 7-1 – Paknet Aerial Mounting on Schneider Switchgear Figure 7-2 – Paknet Aerial Mounting on LUCY Switchgear Figure 7-3 – Paknet Aerial Mounting on a GRP Substation © UK Power Networks 2014 All rights reserved 7 of 29 Control Unit and RTU Installation Procedure Document Number: ECP 05-9531 Version: 2.0 Date: 03/09/2014 8 Location 8.1 The RTU should be situated such that an operator has safe egress from the substation after operation which would usually mean a location near the main door of the substation. 8.2 Generally the Schneider T200E control unit is supplied mounted directly onto the switchgear which is satisfactory for most installations. 8.3 The Lucy VRN2a/VRE2a is supplied with the Gemini control unit mounted directly onto the ring main unit (RMU), above ring switch 2 cable end box. The control unit shall be removed and either mounted onto a suitable wall in the substation or onto the purpose-built free-standing frame (refer to 13.1Appendix C) which is supplied with the switchgear. Note: Care shall be taken to ensure that the conduit is able to reach the control unit from the RMU when positioning the control unit. © UK Power Networks 2014 All rights reserved 8 of 29 Control Unit and RTU Installation Procedure Document Number: ECP 05-9531 Version: 2.0 Date: 03/09/2014 9 Positioning and Configuration 9.1 The T200E can control up to four switches or circuit-breakers at any site, in any combination with either linear or rotary operation. For example, a substation may comprise of switchboard one (SWBD1) containing an RE2c where ring switch 1 and 2 and the coupled SE6 (linear operation) are all automated and in addition switchboard two (SWBD2) containing an RN2c where just ring switch 1 is automated. The diagrams shown in Figure 9-1 provide examples of the various remote control options. T200 1 1 2 RN2c 2 3 1 4 2 RN2c Note – FPI 2, 3 and 4 may require the installation of an additional FPI module 1 4 RN2c 2 RE2c 1 4 SE6 2 RE2c x 3 3 4 SE6 RN2c Remote control switch FPI 1 2 3 RN2c 1 RE2c 2 4 RE2c 2 RN2c SE6 3 RN2c 1 4 SE6 3 RE2c 4 SE6 Figure 9-1 – Schneider Switchgear Configurations © UK Power Networks 2014 All rights reserved 9 of 29 Control Unit and RTU Installation Procedure Document Number: ECP 05-9531 Version: 2.0 Date: 03/09/2014 9.2 The Gemini can control up to three switches or circuit-breakers at a location. The diagrams shown in Figure 9-2 provide examples of the various remote control options. Gemini 2 1 1 VRN2a 2 2 3 3 1 2 VRN2a Note – FPI 2 and 3 require the installation of an expansion module x 2 1 2 VRE2a Remote control switch FPI 1 3 VRN2a 3 SSE 2 VRE2a 1 2 VRN2a 1 3 SSE 3 VRE2a 2 VRN2a VRN2a SSE 3 VRE2a SSE 3 1 2 VRN6a Figure 9-2 – Lucy Switchgear Configurations 9.3 A mixture of Schneider and Lucy switchgear should be avoided at a site. If it is necessary to install both makes of switchgear then remote control should be limited to one make only to avoid the installation of both a T200E and a Gemini on the site. © UK Power Networks 2014 All rights reserved 10 of 29 Control Unit and RTU Installation Procedure Document Number: ECP 05-9531 Version: 2.0 Date: 03/09/2014 10 Mains Supply 10.1 General 10.1.1 The type of mains supply will depend on the actual installation and the type of low voltage supply available at the substation. However, it is important to ensure that the supply is reliable and robustly installed as it will not only power the remote control equipment and keep the battery charged but it will also give indication of the availability of supply to a substation, thus providing useful information to aid fault restoration. Caution: All work to facilitate a low voltage supply for a control unit is covered by UK Power Networks Distribution Safety Rules. 10.1.2 Suitable procedures for installing the mains supply for the various low voltage options below and detailed in the sections that follow. LV transformer-mounted fuse cabinet. LV pillar. LV main (switching stations). Consumer unit (indoor substations). HV metering unit (HV customers and switching stations). 10.2 LV Transformer-mounted Fuse Cabinet 10.2.1 Install a 2.5mm2 steel-wire armoured cable between the transformer-mounted fusecabinet and the control unit. To avoid a parallel earth path the armouring shall only be earthed at the control unit end with a suitable gland, the transformer-mounted fuse-cabinet end should be secured in a plastic gland. 10.2.2 The transformer-mounted fuse-cabinet should be inspected and assessed for the availability of an auxiliary supply; typically a fused supply is available at a connection block in the bottom of the cabinet but other options especially in older equipment may need to be considered. 10.2.3 A fused auxiliary supply should be confirmed as live and un-switched (for example via the cabinet door switch). The auxiliary supply fuse should be proved and the appropriate fuse way noted. 10.2.4 The standard transformer-mounted fuse-cabinet (Schneider) provides for an easy connection of a 6A fused auxiliary supply for automation (H2-H5 'External Lighting' – refer to Figure 10-1). This auxiliary supply source should be the preferred option for the control unit on all new installations. 10.2.5 The supply fuse and terminal block should be clearly labelled 'CAUTION – Automation Supply' so as to avoid inadvertent disconnection. 10.2.6 A list of materials to assemble this supply arrangement is detailed in Appendix E. © UK Power Networks 2014 All rights reserved 11 of 29 Control Unit and RTU Installation Procedure Document Number: ECP 05-9531 Version: 2.0 Date: 03/09/2014 Figure 10-1 – Transformer-mounted Cabinet Auxiliary Supply Terminal Block 10.3 LV Pillar 10.3.1 Install a 2.5mm2 steel-wire armoured cable between the transformer-mounted fusecabinet and the control unit. To avoid a parallel earth path the armouring shall only be earthed at the control unit end with a suitable gland, the LV pillar end should be secured in a plastic gland. Any unused cores should be made safe and left as spare. 10.3.2 The supply to the automation should be connected to the existing LV auxiliary supply; either directly from an existing spare auxiliary fuse (fused at 5A or less) or via a metal-clad fused-spur (fused at 3A), mounted securely in the pillar and supplied directly from an auxiliary supply within the pillar. 10.3.3 Label the fused spur or auxiliary fuses 'CAUTION - Automation Supply' using a suitable label so as to avoid inadvertent disconnection. 10.3.4 The connection of an auxiliary supply from an existing pillar should be subject to both careful consideration and any proposed method of working subject to a detailed site specific risk assessment. 10.3.5 A list of materials to assemble this supply arrangement is detailed in Appendix E. © UK Power Networks 2014 All rights reserved 12 of 29 Control Unit and RTU Installation Procedure Document Number: ECP 05-9531 Version: 2.0 Date: 03/09/2014 10.4 LV Main (Switching Stations) 10.4.1 Where no LV supply is available from a transformer-mounted fuse cabinet, LV pillar or existing domestic wiring within a substation building then a new service with a minimum capacity of 16A shall be installed. Typically this will require a new service from a passing LV main but in some circumstances considerably more work maybe involved. 10.4.2 If the substation is outdoors the new service should be terminated using a street lighting pillar. The street lighting pillar should contain an un-switched spur for the control unit and a socket outlet as shown in Figure 10-2. A standard 'Danger' notice shall be attached to the pillar. Figure 10-2 – Mains Supply using a Street Lighting Pillar 10.4.3 If the substation is indoors, including a GRP enclosure, the new service should be mounted onto a meter-board securely fitted to the structure. The opportunity should be taken to fit an un-switched spur for the control unit and a socket outlet as a minimum. A list of materials to assemble such a supply arrangement is shown in Appendix E. 10.4.4 Install a 2.5mm2 steel-wire armoured cable between the street lighting pillar and the control unit. To avoid a parallel earth path the armouring shall only be earthed at the control unit end with a suitable gland. The street lighting pillar end should be secured in a plastic gland. Any unused cores should be made safe and left as spare. 10.4.5 Label the un-switched spur 'CAUTION - Automation Supply' using a suitable label to avoid inadvertent disconnection. 10.4.6 A list of materials to assemble this supply arrangement is detailed in Appendix E. © UK Power Networks 2014 All rights reserved 13 of 29 Control Unit and RTU Installation Procedure Document Number: ECP 05-9531 Version: 2.0 Date: 03/09/2014 10.5 Consumer Units (Indoor Substations) 10.5.1 Where an indoor substation has existing domestic supply available then these should be adapted to provide an un-switched metal clad spur adjacent to the control unit. Wherever possible the supply for the control should be wired as a separate circuit from the local consumer unit and protected by a 3A fuse in the spur with appropriate circuit protection at the consumer unit. 10.5.2 Label the un-switched spur 'CAUTION - Automation Supply' using a suitable label so as to avoid inadvertent disconnection. 10.5.3 A list of materials to assemble this supply arrangement is detailed in Appendix E. 10.6 HV Metering Unit (HV Customers and Switching Stations) 10.6.1 An alternative option for use at HV customer sites or switching stations is to use a HV metering unit. An 110V supply can be taken from the metering unit auxiliary supply terminals to power the control unit. Note: The T200E control unit requires the installation of an 110V input transformer (available from Schneider) to facilitate this. The original 230V input transformer should be left in the control unit for future use. 11 Earthing 11.1 If the control unit is mounted onto a wall or free standing frame then it shall be suitably bonded to the substation earthing using minimum of 35mm2 stranded aluminium or 16mm2 stranded copper PVC covered earth cable as specified in ECS 06-0023. 11.2 If the control unit is mounted onto the switchgear the installed control unit bonding braid shall be securely attached to the switchgear earth. 11.3 The mains supply cable shall be earthed at the control unit end only (and not at the supply end). The earth shall be insulated at the other end. 12 Labelling 12.1 If the control unit is controlling more than one switchboard at a location then the door of control unit should be clearly labelled as shown in Appendix F. 12.2 Each switch in the control unit shall be clearly labelled to indicate which circuit it is controlling as shown in Appendix F. 13 Final Checks 13.1 Check that: The cabinet is secure. The mains supply is complete. The earthing is complete. The correct labels are fitted. © UK Power Networks 2014 All rights reserved 14 of 29 Control Unit and RTU Installation Procedure Document Number: ECP 05-9531 Version: 2.0 Date: 03/09/2014 Appendix A – Control Unit Details A.1 Schneider T200E The Schneider T200E has remote control facilities for up to four switches or circuit-breakers (or a mixture of both). The cabinet layout is shown below and consists of the following elements: Control module (left card), Comms module (middle card) and Power module (right card). Space for Paknet pad etc. Switchgear interface module. Batteries, power supply transformer and mains MCB. Cable glands for cable entry. For further information refer to the relevant commissioning procedure. © UK Power Networks 2014 All rights reserved 15 of 29 Control Unit and RTU Installation Procedure Document Number: ECP 05-9531 Version: 2.0 Date: 03/09/2014 A.2 Schneider T200E Series 3 The T200E can be used to control Schneider switchgear (with rotary and/or linear actuators) and other switchgear via the standard secondary switchgear telecontrol interface. The T200E can also be used to control retrofit actuators on legacy oil switchgear using an additional interface card. Each switch to be controlled needs an umbilical cable connection to the T200E. For further information refer to the relevant commissioning procedure. CONTROL Module COM Module Configuration Port POWER Module MODBUS Port Local Control Panel (See Figure 6) External Modem Internal Modem Switchgear Interface Card Mains Supply and Isolation Battery Switchgear Connectors FPI Modules Cable Entry © UK Power Networks 2014 All rights reserved 16 of 29 Control Unit and RTU Installation Procedure Document Number: ECP 05-9531 Version: 2.0 Date: 03/09/2014 A.3 Lucy Gemini The Gemini has remote control facilities for up to three switches or circuit-breakers (or a mixture of both). Each switch to be controlled needs an umbilical cable connection to the Gemini. The cabinet layout is shown below. For further information refer to the relevant commissioning procedure. RTU (Inner Box) Identification Label Local/Remote Switch Modem Control Panel Communications and Configuration Ports Battery © UK Power Networks 2014 All rights reserved Optional Expansion Module (FPI2 and FPI3) Power Supply Unit Mains Supply and Isolation 17 of 29 Control Unit and RTU Installation Procedure Document Number: ECP 05-9531 Version: 2.0 Date: 03/09/2014 Appendix B – Plinth Drawings B.1 Schneider T200E Plinth © UK Power Networks 2014 All rights reserved 18 of 29 Control Unit and RTU Installation Procedure Document Number: ECP 05-9531 Version: 2.0 Date: 03/09/2014 B.2 Lucy Gemini Plinth © UK Power Networks 2014 All rights reserved 19 of 29 Control Unit and RTU Installation Procedure Document Number: ECP 05-9531 Version: 2.0 Date: 03/09/2014 Appendix C – Stand Drawings C.1 Lucy Gemini Stand used for Ground Mounting © UK Power Networks 2014 All rights reserved 20 of 29 Control Unit and RTU Installation Procedure Document Number: ECP 05-9531 Version: 2.0 Date: 03/09/2014 C.2 Lucy Gemini Stand used for Wall Mounting (e.g. GRP) © UK Power Networks 2014 All rights reserved 21 of 29 Control Unit and RTU Installation Procedure Document Number: ECP 05-9531 Version: 2.0 Date: 03/09/2014 Appendix D – GRP Mounting Arrangements D.1 GRP RTU Fixing Drawing © UK Power Networks 2014 All rights reserved 22 of 29 Control Unit and RTU Installation Procedure Document Number: ECP 05-9531 Version: 2.0 Date: 03/09/2014 D.2 Lucy Gemini GRP Mounting Arrangements © UK Power Networks 2014 All rights reserved 23 of 29 Control Unit and RTU Installation Procedure Document Number: ECP 05-9531 Version: 2.0 Date: 03/09/2014 Appendix E – Material Lists E.1 Auxiliary Supply Components List of useful items to assist in the installation of control unit auxiliary supplies. Category Item Materials Code Pillar Street Lighting Pillar 1010 x 160 x 170mm 33724D Street Lighting Pillar 1010 x 210 x 170mm 33725N Metal-clad 13A fused spur 01295W Metal-clad single socket outlet 05362R Metal-clad double socket outlet 05363B 5A BS 1362 fuse 11116F Sockets and Spurs Fuses 6A busman fuse (for TOC) Cable 2 4-core SWA 2.5mm cable 2 2.5mm flex cable 2 Glands Zip Ties Crimps Miscellaneous 1 1 11432G 05971L Procure locally 70mm earth cable 05865J Brass gland (for SWA cable) 03601T Plastic gland 03605H Plastic gland 03606S Zip tie 2.5mm x 100mm 03552P Zip tie 3.5mm x 200mm 03551E Zip tie 3.5mm x 300mm 02232U Zip tie 4.5mm x 150mm 03550U Zip tie 7.5mm x 375mm 02234P Crimp terminals blue 03026P Crimp rings 6mm hole blue 14450S Crimp rings 6mm hole yellow 14451C Anchor bolts for switchgear 13046H UK Power Networks Logistics materials code for internal use only. © UK Power Networks 2014 All rights reserved 24 of 29 Control Unit and RTU Installation Procedure Document Number: ECP 05-9531 Version: 2.0 Date: 03/09/2014 E.2 Automation Components The tables below contain a summary of the key components that maybe required as replacements/spares or to facilitate the addition of remote control to new or existing switches or circuit breakers. Table E-1 – RTU and Mounting Kits 2 Item Materials Code (Supplier Reference) EPN SPN 3 48761H 4 Schneider T200 E04M RTU 14940W Schneider T200 mounting kit – RN2c/RE2c/RN6c 48770G (RMR A406) 48770G (RMR A406) Schneider T200 mounting kit – SE6/CE6 48771R 48771R Schneider T200 mounting kit – freestanding 48772B (RMR A220) 48772B (RMR A220) Lucy Gemini RTU Supplied with ring main unit Lucy Gemini Stand Supplied with ring main unit Table E-2 – Schneider Ring Main Unit (RN2c, RN6c and RE2c) Components 2 Item Materials Code (Supplier Reference) Ring Switch 1 (RSW1) Ring Switch 2 (RSW2) Circuit Breaker (CB) 48802X (RMR A520) Rotary actuator 48777A (RMR A507) Motor off alarm 48800D (RMR A608) 48801N (RMR A609) Auxiliary switch 48779U (RMR A606) 48778K (RMR A607) 2.5m conduit 48783U (RMR F377) 48787J (RMR F378) 48791J (RMR F379) 5m conduit 48810M 48788T 48792T 48785P 48789D 48793D 10m conduit Data acquisition card 5 48773L (T200AC) Refer to Schneider RN2c-RN2-SE6-CE6 OEM Actuators Installation Instructions for further information on installing actuators, motor off alarms and auxiliary switches. 2 UK Power Networks Logistics materials code for internal use only. T200 E04M software version 3.03 including T200AC, Paknet aerial bracket, Paknet power lead, Paknet serial cable and Paknet internal aerial fly-lead. 4 T200 E04M software version 4.01 including T200AC Paknet aerial bracket, Paknet power lead, Paknet serial cable and Paknet internal aerial fly-lead. 5 The T200E is supplied with one T200AC data acquisition card fitted. 3 © UK Power Networks 2014 All rights reserved 25 of 29 Control Unit and RTU Installation Procedure Document Number: ECP 05-9531 Version: 2.0 Date: 03/09/2014 Table E-3 – Schneider Extensible Switches (SE6) and Circuit-Breaker (CE6/CE2) Components 6 Item Materials Code (Supplier Reference) Linear actuator SE6 CE2/CE6 48776Q 48776Q 1.145m conduit 48816V (RMR F433) 5m conduit 48795X (RMR F244) 48817F (RMR F562) 10m conduit 48796H (RMR F245) 48818Q (RMR F563) Data acquisition card 48773L (T200AC) Refer to Schneider RN2c-RN2-SE6-CE6 OEM Actuators Installation Instructions for further information on installing actuators, motor off alarms and auxiliary switches. Table E-4 – Lucy Components 6 Item Materials Code (Supplier Reference) VRN2a/VRN6a 10M Umbilical Cable 13939W 5M Umbilical Cable 13940S (X080000150) Actuator Kit including Interface PCB 13941C (THM0001329) Gemini 2.5 FPI Expansion Module 13937C (X0204215AO) Gemini 2.5 PSU 13936S Gemini 2.5 L12V15 Battery (set of 2) 13938M FPI CT Shorting PCB 13942M Switchgear Simulator 13943W 7 Table E-5 – Paknet Components Item 6 7 Materials Code 6 EPN SPN Paknet pad 61525V 47412W Paknet aerial 61532A N-type aerial plug 01688X UK Power Networks Logistics materials code for internal use only. Refer to EOS 05-9201 (Paknet communication system) for further information. © UK Power Networks 2014 All rights reserved 26 of 29 Control Unit and RTU Installation Procedure Document Number: ECP 05-9531 Version: 2.0 Date: 03/09/2014 Appendix F – Labels F.1 Control Unit Door Label for Multiple Switchboards If a control unit controls more than one switchboard a warning label (approx size 300mm x 150mm) shall be fixed onto the front of the as shown below. . © UK Power Networks 2014 All rights reserved 27 of 29 Control Unit and RTU Installation Procedure Document Number: ECP 05-9531 Version: 2.0 Date: 03/09/2014 F.2 T200E Circuit Label The label shown below is provided on the inside of the door on a T200E and is supplied on all EPN and SPN units from September 2008. Spare labels for use on older stock are available from Schneider Electric. Engraved circuit labels of size 55mm x 25mm shall be added for each switch/circuit-breaker in use as shown below. Adhesive Label on Back of Door Engraved Labels 55mm x 25mm Another engraved label of size 86 x 15mm (with four equal sections) showing all circuits shall be placed over the yellow paper strip as shown below. Engraved Label 86 x 15mm © UK Power Networks 2014 All rights reserved 28 of 29 Control Unit and RTU Installation Procedure Document Number: ECP 05-9531 Version: 2.0 Date: 03/09/2014 F.3 Gemini Circuit Label Engraved circuit labels of size 55mm x 25mm shall be added for each switch in use as shown below. Engraved Labels 55mm x 25mm © UK Power Networks 2014 All rights reserved 29 of 29