1
Getting Started with
Flash Communication Server
Macromedia Flash Communication Server MX
™
™
macromedia
®
Trademarks
Afterburner, AppletAce, Attain, Attain Enterprise Learning System, Attain Essentials, Attain Objects for Dreamweaver,
Authorware, Authorware Attain, Authorware Interactive Studio, Authorware Star, Authorware Synergy, Backstage, Backstage
Designer, Backstage Desktop Studio, Backstage Enterprise Studio, Backstage Internet Studio, Design in Motion, Director,
Director Multimedia Studio, Doc Around the Clock, Dreamweaver, Dreamweaver Attain, Drumbeat, Drumbeat 2000, Extreme
3D, Fireworks, Flash, Fontographer, FreeHand, FreeHand Graphics Studio, Generator, Generator Developer’s Studio, Generator
Dynamic Graphics Server, Knowledge Objects, Knowledge Stream, Knowledge Track, Lingo, Live Effects, Macromedia,
Macromedia M Logo & Design, Macromedia Flash, Macromedia Xres, Macromind, Macromind Action, MAGIC, Mediamaker,
Object Authoring, Power Applets, Priority Access, Roundtrip HTML, Scriptlets, SoundEdit, ShockRave, Shockmachine,
Shockwave, Shockwave Remote, Shockwave Internet Studio, Showcase, Tools to Power Your Ideas, Universal Media, Virtuoso,
Web Design 101, Whirlwind and Xtra are trademarks of Macromedia, Inc. and may be registered in the United States or in other
jurisdictions including internationally. Other product names, logos, designs, titles, words or phrases mentioned within this
publication may be trademarks, servicemarks, or tradenames of Macromedia, Inc. or other entities and may be registered in
certain jurisdictions including internationally.
Third-Party Information
Speech compression and decompression technology licensed from Nellymoser, Inc. (www.nellymoser.com).
Sorenson™ Spark™ video compression and decompression technology licensed from
Sorenson Media, Inc.
This guide contains links to third-party websites that are not under the control of Macromedia, and Macromedia is not
responsible for the content on any linked site. If you access a third-party website mentioned in this guide, then you do so at your
own risk. Macromedia provides these links only as a convenience, and the inclusion of the link does not imply that Macromedia
endorses or accepts any responsibility for the content on those third-party sites.
Copyright © 2002 Macromedia, Inc. All rights reserved. This manual may not be copied, photocopied, reproduced,
translated, or converted to any electronic or machine-readable form in whole or in part without prior written approval of
Macromedia, Inc.
Acknowledgments
Director: Erick Vera
Producer: JuLee Burdekin
Writing: Jay Armstrong, Jody Bleyle, JuLee Burdekin, Barbara Herbert, and Barbara Nelson
Editing: Mary Ferguson, Anne Szabla
Multimedia Design and Production: Aaron Begley, Benjamin Salles
Print Design, Production, and Illustrations: Chris Basmajian
First Edition: May 2002
Macromedia, Inc.
600 Townsend St.
San Francisco, CA 94103
CONTENTS
CHAPTER 1
Introducing Flash Communication Server
.............................5
Flash Communication Server editions . . . . . . . . . . . . . . . . . . . . . . . . . . . . . . . . . . . . . . .
About this manual. . . . . . . . . . . . . . . . . . . . . . . . . . . . . . . . . . . . . . . . . . . . . . . . . . . . . .
Guide to instructional media. . . . . . . . . . . . . . . . . . . . . . . . . . . . . . . . . . . . . . . . . . . . . .
Using additional resources . . . . . . . . . . . . . . . . . . . . . . . . . . . . . . . . . . . . . . . . . . . . . . . .
CHAPTER 2
Installation and Workflow
5
5
5
7
............................................9
System requirements for Flash Communication Server . . . . . . . . . . . . . . . . . . . . . . . . . . 9
System requirements for the Flash Player. . . . . . . . . . . . . . . . . . . . . . . . . . . . . . . . . . . . 10
About the installed files . . . . . . . . . . . . . . . . . . . . . . . . . . . . . . . . . . . . . . . . . . . . . . . . . 12
Installing Flash authoring components on the Macintosh . . . . . . . . . . . . . . . . . . . . . . . 12
How Flash Communication Server works . . . . . . . . . . . . . . . . . . . . . . . . . . . . . . . . . . . 14
How do I use Flash Communication Server? . . . . . . . . . . . . . . . . . . . . . . . . . . . . . . . . . 16
GLOSSARY
Flash Communication Server Terms . .
. . . . . . . . . . . . . . . . . . . . . . . . . . . . . . . 21
3
4
Contents
CHAPTER 1
Introducing Flash Communication Server
Welcome to Macromedia Flash Communication Server MX—the easiest way to create rich
communication applications in Macromedia Flash MX. Flash Communication Server lets two or
more people participate in a real-time conversation using text, audio, or video. For example, you
can use Flash Communication Server for meetings, online communities, customer support, sales
support, training, remote presence, or instant messaging. Flash Communication Server is a
platform for streaming live data across networks for delivery to the Internet, PDAs, interactive
TV, and more, and it is part of Macromedia’s complete solution for database connectivity,
directory systems, and presence services. Flash Communication Server can also be used for
personal projects such as a house intercom, a pet camera, or video publishing.
Flash Communication Server editions
Flash Communication Server is available in a variety of editions. See the Flash Communication
Server website at http://www.macromedia.com/go/flashcom_mx for a description of each edition.
The information in the Flash Communication Server documentation applies to all Flash
Communication Server editions.
About this manual
This manual contains information to help you get started using Flash Communication Server and
the documentation set. It tells where to find all the other manuals and help systems, provides
system requirements and instructions for installing the software, presents an overview of the Flash
Communication Server architecture, and describes your workflow.
The Flash Communication Server documentation set assumes that you already have Macromedia
Flash MX installed and know how to use it.
Guide to instructional media
The Flash Communication Server instructional media is designed to be used in conjunction
with the Flash MX documentation, namely Using Flash MX and the Flash MX online
ActionScript Dictionary.
All Flash Communication Server documents are available in PDF format (viewable and printable
with Adobe Acrobat Reader) and as HTML help.
For the best experience with Flash Communication Server Help, Macromedia strongly
recommends that you use a browser with Java player support, such as Microsoft® Internet
Explorer 6.0 or later. Flash Help also supports Netscape 6.1 or later on Windows and the
Macintosh. Running Flash MX and Flash Communication Server Help simultaneously on a
Macintosh may require up to 32 MB of memory, depending on your browser’s memory needs.
5
The Flash Communication Server instructional media includes the following documentation:
• This manual, Getting Started with Flash Communication Server, explains how to install the
server and provides an overview of the software architecture.
You can find the PDF version of this manual on the Flash Communication Server CD
(FlashCom_GetStarted.pdf ). To view this manual as HTML help within Flash MX, select
Help > Welcome to Flash Communication Server, click General, and click Getting Started
with Flash Communication Server.
• Managing Flash Communication Server explains the details of configuring and maintaining the
server and using the Administration Console.
If you’re an administrator, you can use the PDF version of this manual on the Flash
Communication Server CD (FlashCom_Managing.pdf ). Administrators also have access to
HTML help within Flash MX and through the Help button on the Administration Console.
• Developing Communication Applications is a “how-to” book that illustrates the steps involved in
setting up a development environment and creating Flash Communication Server applications,
including debugging and testing applications. It describes samples that can serve as templates
for your own applications, and it includes tips and tricks to help you optimize your
applications.
You can find the PDF version of this manual on the Flash Communication Server CD
(FlashCom_Developing.pdf ). To view this manual as HTML help within Flash MX, select
Help > Welcome to Flash Communication Server, click Developer, and click Developing
Communication Applications.
• The Client-Side Communication ActionScript Dictionary documents the ActionScript you can
use to create client-side functionality.
You can find the PDF version of this manual on the Flash Communication Server CD
(FlashCom_CS_ASD.pdf ). To view this manual as HTML help within Flash MX, select
Help > Welcome to Flash Communication Server; click Developer, click the right arrow, and
click Client-Side Communication ActionScript Dictionary. You can also read this information
by clicking the Reference button in the Flash MX Actions panel.
• The Server-Side Communication ActionScript Dictionary documents the ActionScript you can
use to create server-side functionality.
You can find the PDF version of this manual on the Flash Communication Server CD
(FlashCom_SS_ASD.pdf ). To view this manual as HTML help within Flash MX, select
Help > Welcome to Flash Communication Server; click Developer, click the right arrow, and
click Server-Side Communication ActionScript Dictionary. You can also read this information
by clicking the Reference button in the Flash MX Actions panel.
6
Chapter 1
Using additional resources
The Flash Communication Server Support Center website at www.macromedia.com/go/
flashcom_support is updated regularly with the latest information on Flash Communication
Server, plus advice from expert users, advanced topics, examples, tips, and other updates. Check
the website often for the latest news on Flash Communication Server and how to get the most out
of the program.
The Flash Communication Server Designer & Developer Center at http://
www.macromedia.com/go/flashcom_desdev provides tips and support for application developers.
The Flash Communication Server Online Forum at http://www.macromedia.com/go/
flashcom_forum provides a place for you to chat with other Flash Communication Server users.
Release notes
For late-breaking information and a complete list of issues that are still outstanding, read the
Flash Communication Server release notes at http://www.macromedia.com/go/
flashcom_mx_releasenotes.
Third-party resources
Macromedia recommends several websites with links to third-party resources on Flash
Communication Server:
These include the following:
• Macromedia Flash community sites
• Macromedia Flash books
• Object-oriented programming concepts
You can access these websites at http://www.macromedia.com/go/Flashcom_resources.
Introducing Flash Communication Server
7
8
Chapter 1
CHAPTER 2
Installation and Workflow
Macromedia Flash Communication Server MX is a development framework and a deployment
environment for rich communication applications. A developer uses Macromedia Flash MX
and Flash Communication Server MX to write a communication application, and then uses Flash
Communication Server to deploy the application and its scripts. Flash Player 6 is the end
user’s interface.
The server is available only for Microsoft® Windows. However, you can also use either Windows
or the Macintosh for your development environment.
This chapter provides system requirements and installation instructions, presents an overview of
the Flash Communication Server architecture, and describes the workflow for developers and
administrators.
System requirements for Flash Communication Server
The following hardware and software are required to run Flash Communication Server.
Development
You can develop Flash Communication Server applications on a computer running either the
Windows operating system or the Mac OS.
• For Microsoft Windows: Macromedia Flash MX; an Intel Pentium 200 MHz or equivalent
processor running Windows XP Professional, Windows XP Home, Windows 2000
Professional, or Windows NT 4.0 Workstation SP6 or later (Windows 98 and Windows ME
are supported for application authoring, but not deployment); 64 MB of available RAM (128
MB recommended); 50 MB of available disk space; a 16-bit color monitor capable of 1024 x
768 resolution; and a CD-ROM drive.
• For the Macintosh (application authoring only): Macromedia Flash MX; a Power Macintosh
running Mac OS 9.1 (or later) or Mac OS X version 10.1 (or later); 64 MB of available RAM
(128 MB recommended); 10 MB of available disk space; a 16-bit color monitor capable of
1024 x 768 resolution; and a CD-ROM drive.
Deployment
Flash Communication Server applications must be deployed on the Windows operating system.
Your deployment system requires a Pentium III 500 MHz processor or greater (dual Pentium 4 or
better recommended) running Windows 2000 Advanced Server or Windows NT 4.0 Server (SP6
or later); 256 MB of available RAM (512 MB recommended); 50 MB of available disk space; and
a CD-ROM drive.
9
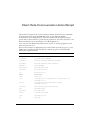
System requirements for the Flash Player
Because the client side of a Flash Communication Server application runs in Flash Player 6, you
(and your users) need to run one of the following operating systems and browsers.
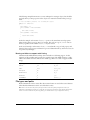
Platform
Browser
Microsoft Windows 95, 98, ME
Microsoft Internet Explorer 4.0 or later
Netscape Navigator 4 or later
Netscape 6.2 or later, default installation
America Online 7
Opera 6
Microsoft Windows NT, 2000, XP, or later
Microsoft Internet Explorer 4.0 or later
Netscape Navigator 4 or later
Netscape 6.2 or later, default installation
CompuServe 7 (Windows 2000 and XP only)
America Online 7
Opera 6
Mac OS 8.6, 9.0, 9.1, 9.2
Netscape Navigator 4.5 or later
Netscape 6.2 or later
Microsoft Internet Explorer 5.0 or later
Opera 5
Mac OS X version 10.1 or later
Netscape 6.2 or later
Microsoft Internet Explorer 5.1 or later
Opera 5
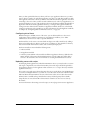
Installing Flash Communication Server
The Flash Communication Server must be installed on Microsoft Windows 2000 Advanced
Server or Windows NT 4.0 Server (SP6 or later).
Installing the server is easy. Be prepared to choose an administrator user name and password
during the installation; you’ll need them to use the server’s administration, monitoring, and
debugging tools. You can change them later if necessary.
In addition to the Flash Communication Server, the installer adds two windows to the
Macromedia Flash MX authoring environment if you have it installed on the same computer.
These two windows are the Communication App inspector and the NetConnection Debugger.
For more information about these windows, see Developing Communication Applications.
During installation, you can choose either a Developer Install or a Production Install of the
product. If you choose Developer Install, you can run the samples and test your applications from
the \flashcom\applications directory under the directory you specify. For convenience during
development, client-side application files (SWFs and HTMLs) are stored in the same directory
with your server-side application files (ASCs, FLVs, FLAs).
When you deploy applications, you'll need to separate client files from your server-side source
files. While your SWF and HTML files should be accessible through a web server, your serverside ASC files, your audio/video FLV files, and your ActionScript FLA source files should not be
accessible to a user browsing your Web site. You can either install the server again on your
production machine and choose Production Install, or you can change the configuration
settings in the administration XML files as described in the Managing Flash Communication
Server manual.
10
Chapter 2
If you choose Production Install, you can specify both the location of your client-side application
files (SWFs and HTMLs) and the location of your server-side application files (ASCs, FLVs, and
FLAs). The server will look for your client-side files under \flashcom\applications in the Web
server’s root directory and will look for your server-side application files under \applications
under the directory you specify.
System configuration
You can set up your software in one of a few configurations:
• You can install the Flash Communication Server software on the same computer that is
running Flash MX and the Flash Player.
• You can install the Flash Communication Server software on one computer and use another
computer for Flash MX and the Flash Player.
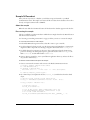
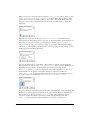
To install Flash Communication Server:
1
Locate the FlashComInstaller.exe file.
This file is on your installation CD, or you may have downloaded it.
2
Double-click the installer icon. The installer launches.
3
Enter your name and serial number in the dialog box that appears. Click OK.
4
Read the license agreement and click Yes to accept the agreement.
5
The installer suggests a default location for the server installation. The default location is
C:\Program Files\Macromedia\Flash Communication Server MX. Click Next to accept the
default location or Browse to choose another location.
6
Choose either the typical installation or a custom installation. (A typical installation is
recommended.) Click Next.
7
Enter the user name and password you have chosen. You must enter a password. The server
does not accept administrators with empty passwords.
The installer copies your user name and password into the server’s XML configuration
files. You can edit or add administrators later using the Administration Console.
For more information, see “Adding and editing administrators” in Managing Flash
Communication Server.
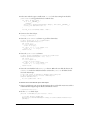
8
Choose Developer Install or Production Install. If you choose Production Install, you will be
asked to provide two directories: a directory for the Flash SWF files and accompanying
HTML files, and another directory for server-side files that should not be accessible to users
browsing your site. If you choose Developer Install, both types of files will be installed in the
same location.
9
Next, the installer suggests a location for the server administration tools and sample files,
including the Administration Console. If you have a web server installed on the same
computer, the installer asks if you want to install these files into the web server’s publishing
directory. You can install these files into the web server’s publishing directory or click Browse to
choose another location. Click Next when you are satisfied with the installation location.
10
Click Next to accept the new program icons.
11
Click Next to accept the installer settings and install Flash Communication Server.
Installation and Workflow
11
12
Click Finish. The Flash Communication Server service starts up. The server runs as a
service, which means it runs in the background and starts automatically when the computer
is started up.
The installation is complete. If you choose not to start the Flash Communication Server service
right away, you can start it later. See “Starting and stopping the server” in Managing Flash
Communication Server.
About the installed files
When the server has been installed, you’ll find several files together with it in the installation
directory. If you chose the default directory in the installer, these files are located in C:\Program
Files\Macromedia\Flash Communication Server MX\.
It’s a good idea to familiarize yourself with the contents of the Flash Communication Server MX
directory before continuing with this chapter. The Flash Communication Server MX directory
contains these items:
•
•
•
•
•
•
•
•
FlashCom.exe is the server application.
FlashComAdmin.exe is the server’s administration controller.
License.htm contains the text of the Flash Communication Server license agreement.
Js32.dll contains the server’s Server-Side Communication ActionScript engine.
TcSrvMsg.dll, xmlparse.dll, and xmltok.dll are additional components of the server.
The conf directory contains the server’s hierarchy of XML configuration files.
The Tools directory contains BAT files that can be used to start and stop the server.
The flashcom application directory contains sample client applications you can use to
experiment with the server and get an idea of the kinds of things that can be done with it. Also
included is the Administration Console (admin.swf ) that you can use to connect to the server
to monitor and control its activity remotely.
• The admin directory contains the Administration Console (admin.swf ), which you can use to
connect to the server to monitor and control its activity remotely.
• You can find running samples in \flashcom\applications and additional documentation
samples in flashcom_help\help_collateral, both of which can serve as templates for your own
applications.
• If you have Flash MX installed on the same computer, the Flash Communication Server
installer adds the new Communication App inspector and the NetConnection Debugger to
Flash MX. These provide support for creating and debugging communication applications.
For more information on using these features, see Developing Communication Applications.
Installing Flash authoring components on the Macintosh
To install the Communication App inspector, NetConnection Debugger, and related help files
into an existing copy of Macromedia Flash MX on a Macintosh computer, you use the Macintosh
FlashComInstaller.
12
Chapter 2
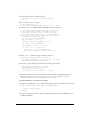
To install the authoring components:
1
Locate the FlashComInstaller file.
This file is on your installation CD, or you may have downloaded it.
2
Double-click the installer icon. The installer launches. The installer locates your existing copy
of Flash MX automatically.
3
Click Install to install the authoring components and help. The installer copies files to your
hard disk.
When the installation is complete you can launch Flash MX and begin using the new windows to
create communication applications. For more information about creating communication
applications, see Developing Communication Applications.
Installation and Workflow
13
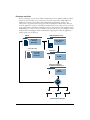
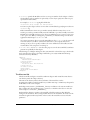
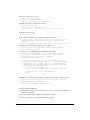
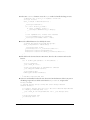
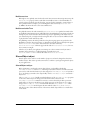
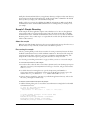
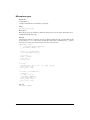
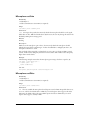
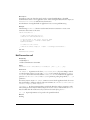
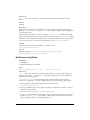
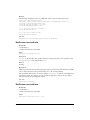
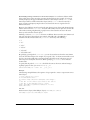
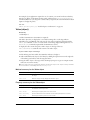
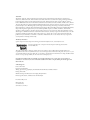
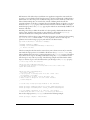
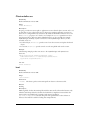
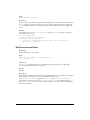
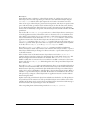
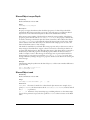
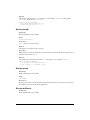
How Flash Communication Server works
The Flash Communication Server platform comprises the server that provides the means of
communication and a Flash application (a SWF file that runs in Macromedia Flash Player) that
provides the end user’s interface. You use the Flash MX authoring tool as your development
environment to create applications that use Flash Communication Server services. You can also
use server-side scripting to add functionality to your application.
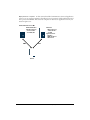
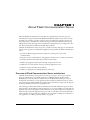
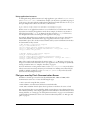
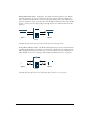
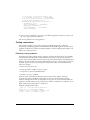
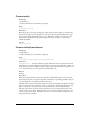
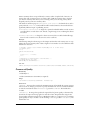
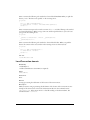
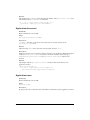
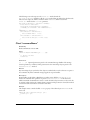
Communications pass through Flash Communication Server and are delivered to the client—the
Flash Player on a user’s computer. When a Flash movie uses Flash Communication Server, the
player connects to the server, which provides a flow of information, called a network stream, to
and from the client. Other users can connect to the same server and receive messages, data
updates, and audio/video streams.
Flash Communication Server
Sends/receives
data stream
Clients running the Flash Player
You can design Flash Communication Server applications so that the Flash Communication
Server and the application server communicate with each other. Flash Communication Server can
talk to other application servers such as Macromedia ColdFusion MX Server, Macromedia JRun,
Microsoft® .NET Framework, IBM WebSphere, and Apache Tomcat. For a more detailed
explanation, see Developing Communication Applications.
14
Chapter 2
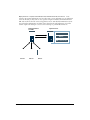
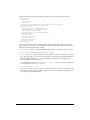
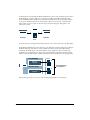
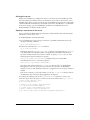
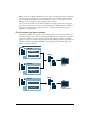
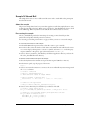
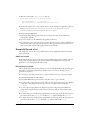
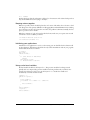
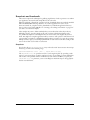
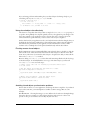
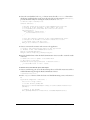
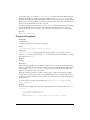
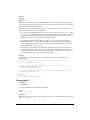
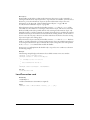
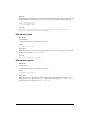
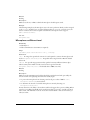
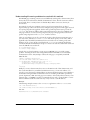
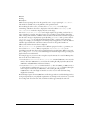
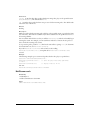
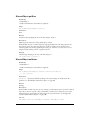
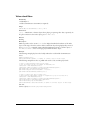
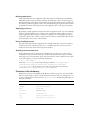
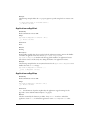
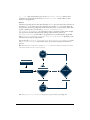
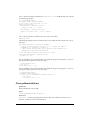
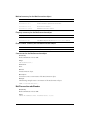
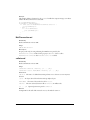
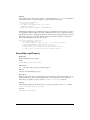
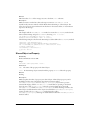
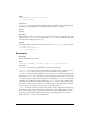
Client connections to Flash Communication Server use the Real-Time Messaging Protocol
(RTMP), which, unlike HTTP, provides a persistent socket connection for two-way
communication between Flash Player clients and the Flash Communication Server.
Web server
Sends SWF
1
HTTP
Client
Plays SWF using
Flash Player
2
RTMP
3
Flash Communication Server
Sends/receives
data stream
Flash Communication Server applications include two basic items: a server-side data stream that
plays from the server thin client, and shared objects.
Sever-side data stream The server-side data stream is managed by two objects: the
NetConnection object and a Stream object.
Installation and Workflow
15
The NetConnection object tells the Flash Player to connect to an application on the server. You
can use NetConnection objects to create powerful Flash Communication Server applications. For
example, you could get weather information from an application server, or share an application
load with other Flash Communication Servers or application instances.
The Stream object lets you handle each stream in a Flash Communication Server application. A
user can access multiple streams at the same time, and there can be many Stream objects active at
the same time.
Shared objects are used to store data from the client. They let you manage
distributed data with ActionScript in the Flash Player. If you’re a developer, you can use shared
objects to create your own models for how the data is managed.
Shared objects
For more information about NetConnection objects, Stream objects, and shared objects, see
Developing Communication Applications.
How do I use Flash Communication Server?
The following sections describe your workflow, depending on what you intend to do with Flash
Communication Server.
For the locations of the manuals mentioned in the following sections, see Guide to instructional
media.
16
Chapter 2
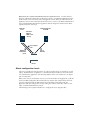
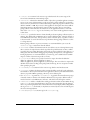
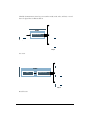
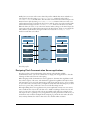
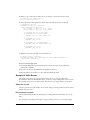
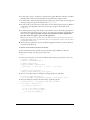
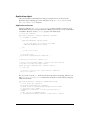
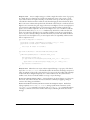
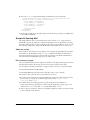
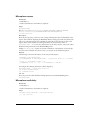
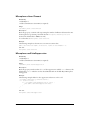
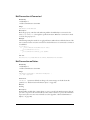
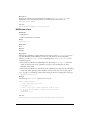
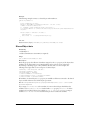
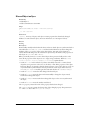
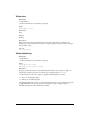
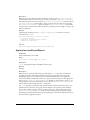
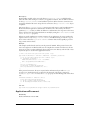
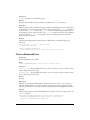
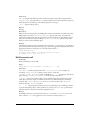
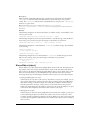
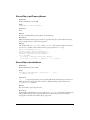
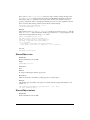
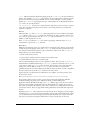
Developer workflow
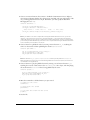
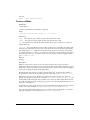
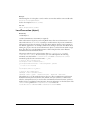
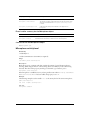
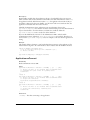
If you’re a developer, you can create a Flash Communication Server application that has a client
component and, if needed, a server component. The client component is a Flash MX movie
(SWF) that you develop using Client-Side Communication ActionScript, and the server
component is a program you write using Server-Side Communication ActionScript. After you
create the application, register it on the Flash Communication Server; if there are any server-side
scripts, upload them to the Flash Communication Server. You can then test the application using
the Flash Player to connect to the server. While you’re testing the movie, you can debug it using
the NetConnection Debugger and the Communication App inspector. After the application
works properly, you can deploy it.
Flash Communication Server
SWF file
Create using
client-side
ActionScript
Register application
with server
Server-side scripts
Flash Player
Create using
server-side
ActionScript
Test SWF
NetConnection Debugger
Communication App inspector
Debug
application
Deploy
Clients running the Flash Player
Installation and Workflow
17
The following resources will help you develop Flash Communication Server applications.
To get started in the development process, begin with Developing Communication
Applications. This manual describes how to connect to the Flash Communication Server. It also
supplies samples that you can use as templates for creating, testing, and debugging applications.
To use these samples, open the directory where Flash MX is installed, and go to
\flashcom_help\help_collateral\.
To begin
Scripting
For scripting reference, consult the following manuals:
• The Client-Side Communication ActionScript Dictionary explains the ActionScript commands
you use in the Flash MX authoring environment.
• The Server-Side Communication ActionScript Dictionary explains the ActionScript commands
you use in scripts that reside on the server.
• Using Flash MX describes how to write basic ActionScript, presents samples, and provides
references to additional instructional media that can assist you in becoming a Flash
developer. Using Flash MX is available in printed form and as a help system (select Help >
Using Flash MX).
When you’re ready to test and debug your application, use the
Communication App inspector and the NetConnection Debugger.
Testing and debugging
• The Communication App inspector lets you view detailed server information when the
application is running. To open this inspector, in Flash MX select Window >
Communication App Inspector. When the inspector is open, you can view online help by
clicking the Help button.
• The NetConnection Debugger lets you debug applications when they are running. To open
this debugger, in Flash MX select Window > NetConnection Debugger. When the debugger is
open, you can view online help by clicking the Help button.
You may want to explore these other sources of information on Flash
Communication Server:
Additional resources
• The Flash Communication Server Support Center at http://www.macromedia.com/go/
flashcom_support provides TechNotes and up-to-date information about Flash
Communication Server.
• The Flash Communication Server Designer & Developer Center at http://
www.macromedia.com/go/flashcom_desdev provides tips and samples for creating Flash
Communication Server applications.
18
Chapter 2
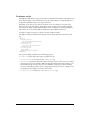
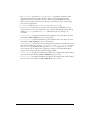
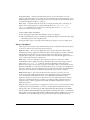
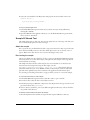
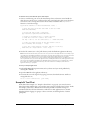
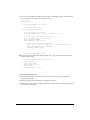
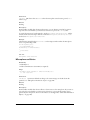
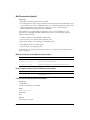
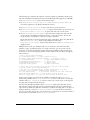
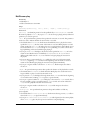
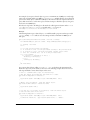
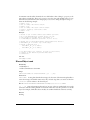
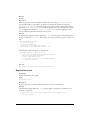
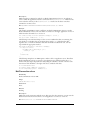
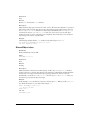
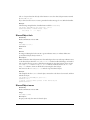
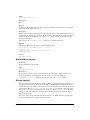
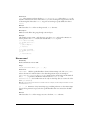
Administrator workflow
If you’re an administrator, you’ll use the Administration Console to configure Flash
Communication Server, set up system security, monitor usage, start and stop the server, and
add users.
Flash Communication Server
Sends/receives
data stream
Administration Console
Configuration
Security
Monitoring usage
Clients running the Flash Player
Use the following resources to help you manage Flash Communication Server:
• Managing Flash Communication Server tells how to use the Administration Console to install,
manage, start and stop, and configure the Flash Communication Server.
• To read online help, open the Administration Console (in Windows, select Start > Programs >
Macromedia Flash Communication Server MX > Server Administrator) and select the
appropriate documentation.
• The Flash Communication Server Support Center at http://www.macromedia.com/go/
flashcom_support provides TechNotes and up-to-date information about Flash
Communication Server.
• The Flash Communication Server Designer & Developer Center at http://
www.macromedia.com/go/flashcom_desdev provides tips and samples for creating Flash
Communication Server applications.
Installation and Workflow
19
20
Chapter 2
GLOSSARY
Flash Communication Server Terms
Software that helps a web server process web pages that contain server-side
scripts or tags. When such a page is requested, the web server sends the page to the application
server for processing before sending the page to the browser.
application server
Common application servers include Macromedia ColdFusion MX Server, Macromedia JRun,
Microsoft .NET Framework, IBM WebSphere, and Apache Tomcat.
The communication protocol used to connect to servers on
the World Wide Web. HTTP’s primary function is to establish a connection with a web server
and transmit HTML pages to a client browser.
HTTP (Hypertext Transfer Protocol)
NetConnection object
The object that tells the Flash Player to connect to an application on
the server.
The communication protocol that provides persistent
socket connection for two-way communication between Flash Player clients and the Flash
Communication Server.
Real-Time Messaging Protocol (RTMP)
shared objects
stream object
Objects used to store data locally or remotely.
An object that lets you handle each stream in a Flash Communication Server
application.
streaming audio
The continuous transmission of audio over a data network.
streaming video
The continuous transmission of video over a data network.
thin client A user’s computer that stores nothing locally but downloads the program from a
server. It performs normal computer processing, but stores data on the server.
The client side (user side) of the web. A web client can be the user’s web browser,
plug-ins, or other applications that support the browser.
web client
web server
Software that sends web pages in response to requests from web browsers.
21
Managing Flash
Communication Server
Macromedia Flash Communication Server MX
™
™
macromedia
®
Trademarks
Afterburner, AppletAce, Attain, Attain Enterprise Learning System, Attain Essentials, Attain Objects for Dreamweaver,
Authorware, Authorware Attain, Authorware Interactive Studio, Authorware Star, Authorware Synergy, Backstage, Backstage
Designer, Backstage Desktop Studio, Backstage Enterprise Studio, Backstage Internet Studio, Design in Motion, Director,
Director Multimedia Studio, Doc Around the Clock, Dreamweaver, Dreamweaver Attain, Drumbeat, Drumbeat 2000, Extreme
3D, Fireworks, Flash, Fontographer, FreeHand, FreeHand Graphics Studio, Generator, Generator Developer’s Studio, Generator
Dynamic Graphics Server, Knowledge Objects, Knowledge Stream, Knowledge Track, Lingo, Live Effects, Macromedia,
Macromedia M Logo & Design, Macromedia Flash, Macromedia Xres, Macromind, Macromind Action, MAGIC, Mediamaker,
Object Authoring, Power Applets, Priority Access, Roundtrip HTML, Scriptlets, SoundEdit, ShockRave, Shockmachine,
Shockwave, Shockwave Remote, Shockwave Internet Studio, Showcase, Tools to Power Your Ideas, Universal Media, Virtuoso,
Web Design 101, Whirlwind and Xtra are trademarks of Macromedia, Inc. and may be registered in the United States or in other
jurisdictions including internationally. Other product names, logos, designs, titles, words or phrases mentioned within this
publication may be trademarks, servicemarks, or tradenames of Macromedia, Inc. or other entities and may be registered in
certain jurisdictions including internationally.
Third-Party Information
Speech compression and decompression technology licensed from Nellymoser, Inc. (www.nellymoser.com).
Sorenson™ Spark™ video compression and decompression technology licensed from
Sorenson Media, Inc.
This guide contains links to third-party websites that are not under the control of Macromedia, and Macromedia is not
responsible for the content on any linked site. If you access a third-party website mentioned in this guide, then you do so at your
own risk. Macromedia provides these links only as a convenience, and the inclusion of the link does not imply that Macromedia
endorses or accepts any responsibility for the content on those third-party sites.
Copyright © 2002 Macromedia, Inc. All rights reserved. This manual may not be copied, photocopied, reproduced,
translated, or converted to any electronic or machine-readable form in whole or in part without prior written approval of
Macromedia, Inc.
Acknowledgments
Director: Erick Vera
Producer: JuLee Burdekin
Writing: Jay Armstrong, Jody Bleyle, JuLee Burdekin, Barbara Herbert, and Barbara Nelson
Editing: Anne Szabla
Multimedia Design and Production: Aaron Begley and Benjamin Salles
Print Design, Production, and Illustrations: Chris Basmajian
First Edition: May 2002
Macromedia, Inc.
600 Townsend St.
San Francisco, CA 94103
CONTENTS
INTRODUCTION
Managing Flash Communication Server
.............................. 5
Intended audience . . . . . . . . . . . . . . . . . . . . . . . . . . . . . . . . . . . . . . . . . . . . . . . . . . . . . .
System requirements . . . . . . . . . . . . . . . . . . . . . . . . . . . . . . . . . . . . . . . . . . . . . . . . . . . .
About the Flash Communication Server documentation . . . . . . . . . . . . . . . . . . . . . . . . .
Typographical conventions . . . . . . . . . . . . . . . . . . . . . . . . . . . . . . . . . . . . . . . . . . . . . . .
Additional resources . . . . . . . . . . . . . . . . . . . . . . . . . . . . . . . . . . . . . . . . . . . . . . . . . . . .
CHAPTER 1
Installing Flash Communication Server
5
5
6
6
6
............................... 7
Installing the server . . . . . . . . . . . . . . . . . . . . . . . . . . . . . . . . . . . . . . . . . . . . . . . . . . . . . 7
About the installed files . . . . . . . . . . . . . . . . . . . . . . . . . . . . . . . . . . . . . . . . . . . . . . . . . . 9
Installing Flash authoring components on the Macintosh . . . . . . . . . . . . . . . . . . . . . . . 10
CHAPTER 2
Managing the Server
. . . . . . . . . . . . . . . . . . . . . . . . . . . . . . . . . . . . . . . . . . . . . . . 11
Performing administration tasks . . . . . . . . . . . . . . . . . . . . . . . . . . . . . . . . . . . . . . . . . . 11
Using the Administration Console . . . . . . . . . . . . . . . . . . . . . . . . . . . . . . . . . . . . . . . . 16
Performing advanced administration tasks. . . . . . . . . . . . . . . . . . . . . . . . . . . . . . . . . . . 22
CHAPTER 3
Configuring Flash Communication Server .
. . . . . . . . . . . . . . . . . . . . . . . . . . . 25
Typical configurations . . . . . . . . . . . . . . . . . . . . . . . . . . . . . . . . . . . . . . . . . . . . . . . . . . 25
About configuration levels . . . . . . . . . . . . . . . . . . . . . . . . . . . . . . . . . . . . . . . . . . . . . . . 29
About the configuration files . . . . . . . . . . . . . . . . . . . . . . . . . . . . . . . . . . . . . . . . . . . . . 32
CHAPTER 4
Understanding Flash Communication Server Security
. . . . . . . . . . . . . . . . 49
Managing server security . . . . . . . . . . . . . . . . . . . . . . . . . . . . . . . . . . . . . . . . . . . . . . . .
About authentication and authorization . . . . . . . . . . . . . . . . . . . . . . . . . . . . . . . . . . . .
Choosing passwords . . . . . . . . . . . . . . . . . . . . . . . . . . . . . . . . . . . . . . . . . . . . . . . . . . .
Developing secure applications . . . . . . . . . . . . . . . . . . . . . . . . . . . . . . . . . . . . . . . . . . .
About privacy . . . . . . . . . . . . . . . . . . . . . . . . . . . . . . . . . . . . . . . . . . . . . . . . . . . . . . . .
Deploying secure applications . . . . . . . . . . . . . . . . . . . . . . . . . . . . . . . . . . . . . . . . . . . .
INDEX . .
49
51
52
52
53
53
. . . . . . . . . . . . . . . . . . . . . . . . . . . . . . . . . . . . . . . . . . . . . . . . . . . . . . . . . . . . 55
3
4
Contents
INTRODUCTION
Managing Flash Communication Server
Macromedia Flash Communication Server MX enables one-to-one, one-to-many, many-to-one,
and many-to-many communication in real time between applications created in Macromedia
Flash MX. Developers create these applications using Flash MX ActionScript, a scripting
language based on the same standard used by the JavaScript language.
Flash Communication Server MX uses the Real-Time Messaging Protocol (RTMP), an
unencrypted TCP/IP protocol designed for high-speed transmission of audio, video, and
data messages.
This manual describes how to configure and manage Flash Communication Server to support
communication applications deployed on a variety of network configurations. The rest of this
chapter provides system requirements, describes the Flash Communication Server
documentation, and lists additional resources.
Flash Communication Server enables applications to communicate with other servers. This
manual does not discuss web server and application server management or server operating
system setup.
Intended audience
This manual is aimed at system administrators who will configure and manage the Flash
Communication Server to support communication applications. You should already be familiar
with basic network infrastructure and security. You should also have some familiarity with clientserver application models, XML, and JavaScript.
System requirements
Flash Communication Server applications must be deployed on the Microsoft® Windows
operating system.
Your deployment system requires a Pentium III 500 MHz processor or greater (dual Pentium 4 or
better recommended) running Windows 2000 Advanced Server or Windows NT 4.0 Server (SP6
or later); 256 MB of available RAM (512 MB recommended); 50 MB of available disk space; and
a CD-ROM drive.
For the best experience with Flash Communication Server Help, Macromedia strongly
recommends that you use a browser with Java player support, such as Microsoft® Internet
Explorer 6.0 or later. Flash Communication Server Help also supports Netscape 6.1 or later on
Windows and Macintosh. Running Macromedia Flash MX and Flash Communication Server
Help simultaneously on a Macintosh may require up to 32 MB of memory, depending on your
browser’s memory needs.
5
About the Flash Communication Server documentation
All Flash Communication Server documents are available in PDF format (viewable and printable
with Adobe Acrobat Reader) and as HTML help. For document locations, see Getting Started
with Flash Communication Server.
Typographical conventions
The following typographical conventions are used in this book:
•
Code font indicates ActionScript statements, XML tag and attribute names, and literal text
used in examples.
• Italic indicates placeholder elements in code or paths. For example, \settings\myPrinter\ means
that you should specify your own location for myPrinter.
Additional resources
The Flash Communication Server documentation was written before the code in the product was
complete. Therefore, there may be discrepancies between the final implementation of the
product’s features and how they are documented in this manual. For a list of known discrepancies,
see the documentation update in the Flash Support Center (http://www.macromedia.com/go/
flashcom_documentation_update).
The Flash Support Center is updated regularly with the latest information on Flash and Flash
Communication Server, as well as advice from expert users, advanced topics, examples, tips, and
other updates.
6
Introduction
CHAPTER 1
Installing Flash Communication Server
Installing Macromedia Flash Communication Server MX is a simple process. This chapter
describes the installation procedure and the files that are installed.
The Flash Communication Server must be installed on Microsoft Windows 2000 Advanced
Server or Windows NT 4.0 Server (SP6 or later).
Installing the server
Installing the server is easy. Be prepared to choose an administrator user name and password
during the installation; you’ll need them to use the server’s administration, monitoring, and
debugging tools. You can change them later if necessary.
In addition to the Flash Communication Server, the installer adds two windows to the
Macromedia Flash MX authoring environment if you have it installed on the same computer.
These two windows are the Communication App inspector and the NetConnection Debugger.
For more information about these windows, see Developing Communication Applications.
During installation, you can choose either a Developer Install or a Production Install of the
product. If you choose Developer Install, you can run the samples and test your applications from
the \flashcom\applications directory under the directory you specify. For convenience during
development, client-side application files (SWFs and HTMLs) are stored in the same directory
with your server-side application files (ASCs, FLVs, FLAs).
When you deploy applications, you'll need to separate client files from your server-side source
files. While your SWF and HTML files should be accessible through a web server, your serverside ASC files, your audio/video FLV files, and your ActionScript FLA source files should not be
accessible to a user browsing your Web site. You can either install the server again on your
production machine and choose Production Install, or you can change the configuration settings
in the administration XML files as described in Chapter 3, “Configuring Flash Communication
Server,” on page 25.
If you choose Production Install, you can specify both the location of your client-side application
files (SWFs and HTMLs) and the location of your server-side application files (ASCs, FLVs, and
FLAs). The server will look for your client-side files under \flashcom\applications in the Web
server's root directory and will look for your server-side application files under \applications
under the directory you specify.
7
To install Flash Communication Server:
1
Locate the FlashComInstaller.exe file.
This file is on your installation CD, or you may have downloaded it.
2
Double-click the installer icon. The installer launches.
3
Enter your name and serial number in the dialog box that appears. Click OK.
4
Read the license agreement and click Yes to accept the agreement.
5
The installer suggests a default location for the server installation. The default location is
C:\Program Files\Macromedia\Flash Communication Server MX. Click Next to accept the
default location or Browse to choose another location.
6
Choose either the typical installation or a custom installation. (A typical installation is
recommended.) Click Next.
7
Enter the user name and password you have chosen. You must enter a password. The server
does not accept administrators with empty passwords.
The installer copies your user name and password into the server’s XML configuration files.
You can edit or add administrators later using the Administration Console. For more
information, see Adding and editing administrators.
8
Choose Developer Install or Production Install". If you choose Production Install, you will
be asked to provide two directories: a directory for the Flash SWF files and accompanying
HTML files, and another directory for server-side files that should not be accessible to users
browsing your site. If you choose Developer Install, both types of files will be installed in the
same location.
9
Next, the installer suggests a location for the server administration tools and sample files,
including the Administration Console. If you have a web server installed on the same
computer, the installer asks if you want to install these files into the web server’s publishing
directory. You can install these files into this location or click Browse to choose another
location. Click Next when you are satisfied with the installation location.
10
Click Next to accept the new program icons.
11
Click Next to accept the installer settings and install Flash Communication Server.
12
Click Finish. The Flash Communication Server service starts up. The server runs as a
service, which means it runs in the background and starts automatically when the computer is
started up.
The installation is complete. If you choose not to start the Flash Communication Server service
right away, you can start it later. See Starting and stopping the server.
8
Chapter 1
About the installed files
When the server has been installed, you’ll find several other files in the installation directory. If
you chose the default directory in the installer, these files are located in C:\Program
Files\Macromedia\Flash Communication Server MX\.
It’s a good idea to become familiar with the contents of the Flash Communication Server MX
directory before continuing with this chapter. The Flash Communication Server MX directory
contains these items:
• FlashCom.exe is the server application.
• FlashComAdmin.exe is the server’s administration controller. When administrators connect to
the server with the Administration Console, they are actually connected to the FlashCom
Admin Service, which communicates with the server to perform administration tasks. For
more information about the Administration Console, see Using the Administration Console.
•
•
•
•
License.htm contains the text of the Flash Communication Server license agreement.
Js32.dll contains the server’s Server-Side Communication ActionScript engine.
TcSrvMsg.dll, xmlparse.dll, and xmltok.dll are additional components of the server.
The conf directory contains the server’s hierarchy of XML configuration files. For more
information about these files, see Chapter 3, “Configuring Flash Communication Server,” on
page 25.
• The Tools directory contains BAT files that can be used to start and stop the server. For more
information, see Starting and stopping the server.
• The flashcom application directory contains sample client applications you can use to
experiment with the server.
• The admin directory contains the Administration Console (admin.swf ), which you can use to
connect to the server to monitor and control its activity remotely. For more information, see
Using the Administration Console.
• If you have Flash MX installed on the same computer, the Flash Communication Server
installer adds the new Communication App inspector and the NetConnection Debugger to
Flash MX. These features provide support for creating and debugging communication
applications. For more information on using these features, see Developing Communication
Applications.
Installing Flash Communication Server
9
Installing Flash authoring components on the Macintosh
To install the Communication App inspector, NetConnection Debugger, and related help files
into an existing copy of Macromedia Flash MX on a Macintosh computer, you use the Macintosh
FlashComInstaller.
To install the authoring components:
1
Locate the FlashComInstaller file.
This file is on your installation CD, or you may have downloaded it.
2
Double-click the installer icon.
The installer launches. The installer locates your existing copy of Flash MX automatically.
3
Click Install to install the authoring components and help.
The installer copies files to your hard disk.
When the installation is complete you can launch Flash MX and begin using the new windows to
create communication applications. For more information about creating communication
applications, see Developing Communication Applications.
10
Chapter 1
CHAPTER 2
Managing the Server
As a Flash Communication Server administrator, you’ll need to perform several administrative
tasks after the server is installed. This chapter describes how Macromedia Flash Communication
Server MX is configured when you first install it, how to set up additional administrators, and
how to monitor the server’s activity.
For many of these tasks, you’ll use the Administration Console that was installed with the server.
This chapter describes the Administration Console in detail.
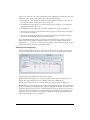
Performing administration tasks
When you’ve installed Flash Communication Server, you should perform the following tasks
before connecting to the server with client applications:
•
•
•
•
•
•
•
Review the included sample applications.
Become familiar with the server’s initial configuration.
Define additional server administrators.
Register client applications.
Configure virtual hosts.
Configure new applications, including uploading server-side scripts or audio/video files.
Become familiar with the procedures for starting and stopping the server.
Reviewing the sample applications
When you install Flash Communication Server, several sample applications are included. To see a
description of each one, select Programs > Macromedia Flash Communication Server MX >
Macromedia Flash Communication Server MX Sample Applications from the Start menu in
Microsoft Windows.
Understanding application elements
It is important to understand the files, scripts, and other parts of a communication application
that runs on the server. These elements include the following:
A Macromedia Flash MX SWF file that is served from a web server.
This is the application itself.
This
is the name the SWF file uses when connecting to Flash Communication Server. The server
registers each application when it finds its directory in the flashcom application directory. For
more information about the flashcom application directory, see Registering client applications.
A directory inside the flashcom application directory, named to match the application name.
11
An optional Application.xml file in the application’s directory in the flashcom application directory.
If present, this file provides specific settings for the application that may be different from the
settings in the server’s primary Application.xml file. For more information about the server’s
configuration files, see About the configuration files.
Some applications may make use of Server-Side Communication
ActionScript. If server-side scripts are used, they are located in the application’s directory in the
flashcom application directory or in the directory specified in the <ScriptLibPath> tag in the
application’s optional Application.xml file. These scripts may have file extensions of .js or .asc.
Optional server-side scripts.
Optional audio and/or video stream files. Some applications may make use of preexisting audio/
video streams or may record them to disk. Stream files have the extension .flv. These files are
located in a directory named Streams inside the application’s directory in the flashcom application
directory or in the directory specified in the <StreamManager>:<StorageDir> tag in the
application’s optional Application.xml file.
Optional shared object files. Some applications may make use of preexisting shared objects or may
write them to disk. Shared objects contain nonstreaming data that is used by more than one client
of a communication application. Shared object files have the extension .fso. These files are located
in a directory named Sharedobjects inside the application’s directory in the flashcom application
directory or in the directory specified in the <SharedObjManager>:<StorageDir> tag in the
application’s optional Application.xml file. Shared objects can also exist on the client side. For
more information about using shared objects, see Developing Communication Applications.
Understanding basic server settings
When Flash Communication Server is first installed, it’s configured in a generic way so that you
can begin using it with the sample client applications. You should become familiar with this
configuration so that you can make decisions about how to change it to suit your needs.
The server is installed with a set of configuration files in XML format. These files define a default
server adaptor, a default flashcom application directory, default server administrators, and default
settings for application behavior.
The default server adaptor uses port 1935, the number assigned to Flash Communication Server
by the Internet Assigned Numbers Authority (www.iana.org). Although you can use any port
number, this increases the risk of conflicting with another application that may be assigned to the
same port. Applications must be authored to use the same port the server is using. Be sure the
port is set to the open state.
The server is preconfigured with one adaptor containing one virtual host. The virtual host is
equivalent to a domain name. The default application directory for the default virtual host is the
the flashcom applications directory. If you chose Developer Install during installation, this
directory is under \flashcom\applications. You can view this location by looking at the value for
the AppsDir tag in the vhost.xml file. This directory is where the server will look for application
subdirectories at startup; you must place an application subdirectory here for each client
application that you plan to connect to the server, and the client subdirectory must have the same
name as the client application. The presence of the application subdirectory registers the
application with the server.
12
Chapter 2
When you install the server, the default flashcom application directory includes sample
applications that are provided to illustrate the essential capabilities of the server. Each sample
application resides in its self-named directory in the flashcom application directory. However,
when you build a Flash MX SWF file of your own, you do not need to place a copy of it in its
subdirectory in the flashcom application directory. The only requirement is that the subdirectory
exists and is named with the name of the application.
You can add adaptors and virtual hosts and change the location of the application directory by
editing the server’s configuration files and creating directories in the server’s conf directory. For
more information, see Chapter 3, “Configuring Flash Communication Server,” on page 25.
The default server administrator has the user name and password you chose during the Flash
Communication Server installation, and is defined in the Server.xml configuration file. The server
administrator can connect to the FlashCom Admin Service with the Administration Console and
perform a variety of server administration tasks, including shutting down the server and
disconnecting client applications. (In the nomenclature of server administration, this server
administrator is equivalent to the “root” user.)
Virtual host administrators can only perform tasks relating to the applications running on their
own virtual host. There are no virtual host administrators defined when the server is first
installed. Server administrators, including the default server administrator defined during
installation, have access to all virtual hosts. Server administrators can add virtual host
administrators using the Administration Console. For more information about adding
administrators, see Adding and editing administrators.
Registering client applications
The server is configured at installation with one adaptor directory named _defaultRoot_
containing one virtual host directory named _defaultVHost_. The server defines its virtual hosts
at startup by searching for directories within the adaptor directory that contain valid Vhost.xml
files, such as the _defaultVHost_ directory. At the same time, the server defines each application
that will be allowed to connect to a virtual host by looking for application directories inside a
directory specified by the <AppsDir> tag in the Vhost.xml file.
You can specify the directory you want to use to store your client applications’ directories by
editing the <AppsDir> tag in the Vhost.xml file. By changing the path specified in this tag, you
can locate the application directory for the virtual host anywhere you want. If no application
directory is specified, it defaults to the virtual host directory itself.
To edit the <AppsDir> tag in the Vhost.xml file:
1
Locate the Vhost.xml file for the virtual host you are working with.
2
Open the file in a text editor.
3
Replace the path inside the <AppsDir> tag with the path of your choice, such as C:\Server
Files\flashcom\applications. Do not use quotation marks.
4
Save the Vhost.xml file.
You must restart the server in order for this change to take effect.
Managing the Server
13
Once you have specified the directory where you’ll store your application directories, you must
create a directory inside it for each client application you plan to use with that virtual host. Each
client application must have a directory with the same name that the client application uses when
connecting to the server. Once you have created a subdirectory for each of your applications, you
can decide whether to give any of the applications their own Application.xml file. By including an
Application.xml file in a client application’s directory, you can give that application different
settings from those defined in the virtual host’s Application.xml file, which serve as the default
settings for applications on the virtual host. For more information about the Application.xml file,
see Chapter 3, “Configuring Flash Communication Server,” on page 25.
Configuring virtual hosts
With the Enterprise and ISP versions of the server, you can add virtual hosts to the server’s
configuration. This is useful for separating sets of applications and allows you to define
administrators who have access only to a specific virtual host.
Each virtual host on the server is associated with an adaptor. You add a virtual host by adding a
directory inside the adaptor’s directory in the server’s conf directory. The virtual host’s directory
must be named with the virtual host name, such as www.myCompany.com.
Each new virtual host must include the following items:
• A Vhost.xml file.
• An Application.xml file.
• A directory named admin in the virtual host’s flashcom application directory (defined in the
VHost.xml file). This ensures that the Administration Console (admin.swf ) will be able to
connect to the virtual host. For more information, see Using the Administration Console.
Uploading server-side scripts
In developing client applications for Flash Communication Server, you may decide to use serverside scripts to implement some of their functionality. Server-side scripts should be uploaded to
the application directory for the application that uses them, or to a “scripts” directory inside the
application’s directory.
If you create server-side scripts that use characters that are not in the classic 7-bit ASCII character
set, such as non-English characters, you must use a text editor that encodes text in UTF-8 format.
Macromedia Dreamweaver MX encodes text in this format. (A list of text editors that use the
UTF-8 format is available at http://www.thefreecountry.com/developercity/editors.shtml.)
Script files that are encoded in UTF-8 format must be transferred to the server via a binary
file transfer.
For more information about using server-side scripts, see Developing Communication Applications.
14
Chapter 2
The Communication App inspector and NetConnection Debugger
If you have Flash MX installed, you’ll find two new windows related to Flash Communication
Server: the Communication App inspector and the NetConnection Debugger.
• The Communication App inspector lets you view information about the applications running
on the Flash Communication Server.
• The NetConnection Debugger lets you view information about the events that are taking place
on the server. These events include client application connection requests and initiation of data
streams. This information can be useful when you are testing and debugging your Flash
applications.
For detailed information about using these windows, see Developing Communication Applications.
Starting and stopping the server
Because Flash Communication Server runs as a service, it does not appear in the Windows
taskbar. Therefore, you don’t shut down or restart the server as you would other applications.
You can shut down and restart the server in a few ways:
• Use the Administration Console to connect to the server and then shut it down or halt it
remotely. (Only server administrators can perform these tasks.) For more information, see
Using the Administration Console and Using the Maintenance panel.
• Use the BAT files in the Flash Communication Server MX\Tools directory.
• Use the Windows Services control panel.
To start or stop the server by means of the BAT files:
In the Start menu, choose Programs > Macromedia Flash Communication Server MX > Start
Service or Stop Service. The BAT file executes and then closes automatically.
To stop the server in the Services control panel:
1
In the Windows Start menu, select Settings > Control Panel.
2
In the Control Panels folder, double-click the Administrative Tools folder.
3
In the Administrative Tools folder, open the Services control panel.
4
In the Services list, scroll down and select Flash Communication Server.
5
Click the Stop button at the top of the control panel. The server shuts down.
To restart the server in the Services control panel:
1
Open the Services control panel.
2
Select Flash Communication Server.
3
Click the Start button at the top of the control panel. The server starts up.
Managing the Server
15
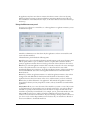
Using the Administration Console
You can do common server administration and monitoring tasks using the graphical user interface
of the Administration Console and, in Flash MX, the Communication App inspector. These are
Flash applications that Macromedia created using public APIs (application programming
interfaces). The source files for these applications are available on Macromedia’s Flash MX
Support Center (www.macromedia.com/support/flash/). You can use the same ActionScript APIs
to create your own custom administration tools or extend the ones provided with the server.
When you install Flash Communication Server, the installer places the Administration Console
(admin.swf ) in the admin directory. If you have the Flash Player installed, you can monitor
and control the server’s activity by launching the Administration Console and connecting to
the server.
With the Administration Console, you can perform the following tasks:
•
•
•
•
•
Check the status of the server and the applications running on it
Shut down or restart the server, a virtual host, or individual client applications
Add and edit administrators
View logs of server connections and other server events
View and update the server’s license key and its bandwidth and connection limits
As a security feature, when you connect to the server with the Administration Console, the
console actually connects to a separate FlashCom Admin Service that runs in parallel with the
server service. The Admin Service then communicates with the server to perform its
administration functions.
To connect to the Flash Communication Server with the Administration Console:
1
In the Windows Start menu, select Programs > Macromedia Flash Communication Server MX >
Server Administrator. The Administration Console opens in your web browser.
2
In the Host text box, enter the address of the server you want to connect to.
The default address is localhost, which refers to the computer that the Administration Console
is running on. If you are connecting remotely by running the Administration Console on
another computer, enter the address of the server you want to connect to, such as
FlashComServer.myCompany.com or 12.34.56.78. If the <HostPort> tag in the Server.xml
file is set to a port other than 1111, include the port number after the host name, separated by
a colon. (For more information about server configuration, see Chapter 3, “Configuring Flash
Communication Server,” on page 25.)
16
3
In the Name and Password boxes, enter the name and password you entered during the Flash
Communication Server installation. If you’ve changed the administrator user name and
password using the Administration Console or manually in the Server.xml file, enter the new
user name and password.
4
If you want the Administration Console to remember your login and password when you use it
in the future, select the Remember Connection Data option.
5
If you want the Administration Console to automatically connect to the server when you open
it, select the Automatically Log In option.
6
Click the Connect button.
Chapter 2
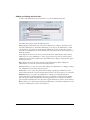
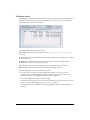
You are now connected to the server, and the Diagnostics, Maintenance, Admin Users, Live Log,
and License panels appear. These panels perform the following functions:
• The Diagnostics panel displays information about the applications that are connected to the
server and the number of instances and users of each one.
• The Maintenance panel allows you to shut down the server, virtual hosts, or an individual
application connected to the server.
• The Admin Users panel allows you to add and edit administrators’ log-on information.
• The Live Log panel lets you view information about connections, disconnections, and other
server events as they happen.
• The License panel displays the server serial number and information about the number of
connections and bandwidth enabled by that serial number.
To use the Administration Console on a computer other than the server computer, copy the
Admin folder from the flashcom application directory to the other computer. You’ll need to
configure the <Allow> and <Deny> tags in the Server.xml file to allow connections from the other
computer’s IP address. See About the configuration files.
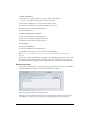
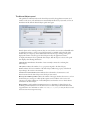
Viewing server diagnostics
To view information about the server’s responsiveness, the amount of time the server has been
running, and the applications that are connected to the server, you use the Diagnostics panel.
The Diagnostics panel displays the following information:
indicates how long the server has been running continuously and is updated once per
minute. The uptime information is not available to virtual host administrators.
Uptime
Ping
lets you verify that the server is running and view its responsiveness in milliseconds.
Update allows you to get current information about the application instances that are running on
the server. The name of each application is displayed, along with the number of instances of the
application that have been created on or unloaded from the server, the number of users that are
connected, and the total number of connections that have been accepted and rejected for each
application. If you are connected as a virtual host administrator, Update displays information
only for the virtual host you are connected to.
Managing the Server
17
An application may have more than one instance if its clients connect to the server by using
different application instance parameters within their ActionScript NetConnection calls. (For
more information on the NetConnection object, see the Client-Side Communication ActionScript
Dictionary.)
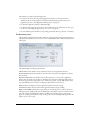
Using the Maintenance panel
To restart or stop the server, a virtual host, or a client application or application instance, you use
the Maintenance panel.
Virtual host administrators can shut down only the applications on their own virtual host and
restart only that virtual host.
The Maintenance panel includes the following items:
Apps allows you to choose from the applications currently running on the server. The Apps menu
will not update while it is open or selected; to allow it to update, click outside the menu. To
specify an application instance that is not listed, type the name of the instance into the text box.
lets you reload an application instance that is currently connected to the server. You might
do this to reload the instance’s server-side scripts or to disconnect all of its users while
immediately allowing new connections. To reload an application instance, select it from the Apps
menu and click Reload. (You cannot reload applications that have been unloaded with the
Remove button).
Reload
Unload lets you delete an application instance. To unload an application instance, select it from
the Apps menu and click Unload. This disconnects all the clients of that instance. (If the
application has more than one instance on the server, only the instance you choose is deleted).
Remove lets you delete all elements of an application. This includes the application instances,
the application directory and any script files it contains, and any stream files associated with the
application.
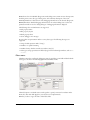
Adaptor/VHost allows you to enter the name of the virtual host you want to control. If you want
to perform functions on the virtual host you are currently connected to, you can leave this text
box blank. To specify another virtual host, enter the name of its adaptor and the name of the
virtual host, separated by a forward slash (/), for example, _Root1_/www.macromedia.com. The
Adaptor/VHost text box is not visible to virtual host administrators because they can only
connect to and control their own virtual host. If you are running a developer edition of the server,
you do not need to use the Adaptor/VHost text box because only one virtual host is allowed on
the server in addition to the default virtual host.
18
Chapter 2
VHost Restart lets you restart a virtual host. Restarting a virtual host disconnects all users of that
virtual host and removes all application instances from memory. If you are a server administrator
you can restart any of the server’s virtual hosts except the default virtual host (_defaultVHost_).
To restart a virtual host, enter its name in the Adaptor/VHost text box and click Restart. If you
are a virtual host administrator, you can only connect to and administer your own virtual host.
Click Restart to restart the virtual host.
Start lets you start a virtual host that has been previously stopped. This button is available only to
server administrators. If you are a server administrator, you can start any of the server’s virtual
hosts except the default virtual host (_defaultVHost_). To start a virtual host, enter its name in
the Adaptor/VHost text box and click Start.
As a security feature, virtual host administrators are not allowed to start a virtual host that has
been stopped.
lets you stop a virtual host. This button is available only to server administrators. Stopping a
virtual host disconnects all users from that virtual host and prevents future connections. If you
are a server administrator you can stop any of the server’s virtual hosts except the default virtual
host (_defaultVHost_). To stop a virtual host, enter its name in the Adaptor/VHost text box
and click Stop.
Stop
Server Restart lets you restart the server. This button is available only to server administrators.
Restarting the server disconnects all connected users and unloads all application instances on all
virtual hosts from memory. A restart also reloads the server’s configuration files, allowing any
manually entered changes to those files to be read by the server.
lets you exit from the server. This button is only available to server administrators.
When you use the Shutdown button, the server unloads all application instances and cleans up all
streams and other shared objects that the applications may be using. Shutting down can take a
few seconds while the server performs this cleanup procedure. When the server is shut down, the
Administration Console is disconnected.
Shutdown
Halt Now lets you quit the server immediately without any cleanup of streams or shared objects.
This button is only available to server administrators.
Messages appear at the bottom of the Maintenance panel to indicate the success or failure of each
operation you perform.
Managing the Server
19
Adding and editing administrators
To add or edit administrator log-on information, you use the Admin Users panel.
The Admin Users panel contains the following items:
displays a hierarchical view of the server’s administrators, adaptors, virtual hosts, and
virtual host administrators. Virtual host administrators can only see the administrators of their
own virtual host. To perform an operation in the Admin Users panel, you first select a server,
virtual host, or administrator icon in the Admins pane; then you use the text boxes and buttons to
finish the operation.
Admins
displays the level of server access of the currently selected administrator. If the selected
administrator is a server administrator, “Server” appears in the Scope text box. If the selected
administrator is a virtual host administrator, that administrator’s adaptor and virtual host appear
in the Scope text box.
Scope
displays the user name of the currently selected administrator. When adding new
administrators, you enter the user name in the Name text box.
Name
Password allows you to enter a password when adding a new administrator or editing an existing
one. Administrators cannot have empty passwords.
allows you to reenter the password when adding or updating an administrator. The
password must match the one entered in the Password text box for the operation to be successful.
Confirm
allows you to add a new administrator or change an existing administrator’s
password; the button is labeled Add when the server or a virtual host is selected in the Admins
pane. The button is labeled Update when an existing administrator is selected in the Admins
pane. Virtual host administrators can only add or update administrators of their own virtual host.
Add/Update
Remove allows you to delete the currently selected administrator. Virtual host administrators can
only remove administrators of their own virtual host.
20
Chapter 2
To add an administrator:
1
Select the server or the virtual host you want to add the administrator to.
The server or virtual host name appears in the Scope text box.
2
Enter the new administrator’s user name in the Name text box.
3
Enter the new administrator’s password in the Password text box.
4
Reenter the password in the Confirm text box.
5
Click the Add button.
To update an administrator’s password:
1
Select the administrator in the Admins pane.
2
Enter the new password in the Password text box.
3
Reenter the password in the Confirm text box.
4
Click Update.
To remove an administrator:
1
Select the administrator in the Admins pane.
2
Click Remove. Be sure not to remove the last server administrator.
Note: When you use the Admin Users panel, the Server.xml file must be writable and not open in any other
application.
You can also add and edit administrator information by manually editing the server’s Server.xml
file. Changes made in this way will not take effect on the server until after a server restart. For
more information about editing the server’s configuration files, see About the configuration files.
Viewing server logs
To view a list of server activity, you use the Live Log panel. The Live Log panel is not available to
virtual host administrators because it may contain sensitive information.
The Live Log panel includes the following options:
Access lets you view information about user connections and disconnections to and from the
server. When you select this option, these items are displayed in green in the output pane.
Managing the Server
21
System lets you view server error messages, such as attempts to connect to nonexistent
applications. When you select this option, server messages are displayed in blue.
Clear Window
lets you clear the log text from the pane.
Viewing and editing license information
To view or change the server’s license key and its capacity parameters, you use the License panel.
This panel is only available to server administrators.
To change the license key, enter the new key and click Update. Entering a new license key will
write the new key to the Server.xml file, but will not change the key that is in memory on the
server. To assert the new key on the server, you must restart the server in the Maintenance panel
(see Using the Maintenance panel).
When updating the license key, be sure the Server.xml file is writable and not open in any other
application.
Performing advanced administration tasks
Once you’re familiar with basic Flash Communication Server administration tasks, you can make
operating and troubleshooting the server more convenient and effective.
Advanced administration tasks include the following:
• Viewing server events in the Windows event viewer
• Configuring the server at runtime
Viewing server events in the Windows event viewer
In addition to the Communication App inspector and NetConnection Debugger in Flash MX,
you can also use the Windows event viewer for tracking Flash Communication Server activity and
debugging server applications. The event viewer displays a list of events that the server generates.
To use the Windows event viewer:
22
1
From the Windows Start menu, select Settings > Control Panel > Administrative Tools > Event
Viewer.
2
Select the Application panel.
3
Double-click an event generated by Flash Communication Server to view the details of
the event.
Chapter 2
Configuring the server at runtime
Using a special set of ActionScript commands, you can view and edit the server’s configuration
settings by building your own customized administration applications. You can add or remove
administrators, change their user names and passwords, and change most of the other server
settings in all four of the server’s XML files. For detailed information about using these
ActionScript commands, see the Flash MX Support Center (http://www.macromedia.com/
support/flash/).
Managing the Server
23
24
Chapter 2
CHAPTER 3
Configuring Flash Communication Server
Macromedia Flash Communication Server MX has been designed to accommodate many types of
communication applications. After installation, the server’s configuration files contain only
simple, generic settings. You’ll need to make some decisions about how to configure it to best suit
your needs.
This chapter describes the server’s initial configuration and the XML files that define the
configuration. It then explains how to edit these files to suit the needs of the client applications
you intend to use.
Typical configurations
Flash Communication Server can be used in a variety of different ways, with different
configurations. In most cases, the server will be used in conjunction with a web server. As
described in Chapter 2, “Managing the Server,” on page 11, applications that run on Flash
Communication Server consist of clients developed in Macromedia Flash MX (SWF files);
directories on the server register the application on the server and contain streams and scripts used
by the application.
Your web server is responsible for serving the SWF client files and the HTML pages in which they
are embedded. In addition, you may use an application server in conjunction with your web
server and Flash Communication Server to incorporate database or other features into your
communication applications.
The following diagrams illustrate some typical deployment scenarios.
During the development process, you may choose to use one computer with a
web server, Flash Communication Server, and Flash MX installed.
Development
SERVER
FlashCom Application
Directory (port 1935)
and
Web root Directory (port 80)
are the same directory
Macromedia Flash MX
25
The Web root directory in this scenario would contain all the components of your applications,
such as the flashcom application directory and its individual application subdirectories. These
subdirectories would contain the application’s FLA, SWF, HTML, script, stream and shared
object files. This setup provides a simple working environment for designing and testing your
applications.
For security reasons, this configuration is not recommended for deployment.
A relatively simple deployment scenario consists of one computer
with a web server, Flash Communication Server MX, and a firewall installed. The firewall
provides security for the server computer and the rest of your local network.
Deployment: one computer
SERVER
Web root Directory
(port 80)
FlashCom Application
Directory (port 1935)
In this and any other deployment scenario, the server-side files (ASCs), the audio/video files
(FLVs), and the source files (FLAs) should not reside in the flashcom application directory under
the web server's published directories. These files should be located under the application
directory you chose during installation or when editing the Application.xml file.. The web server’s
Web root directory should contain only the HTML and SWF files for your applications.
26
Chapter 3
Deployment: two computers In this scenario the Flash Communication Server and application
server are on two separate computers. This allows for more separation of files and functions and
more processor bandwidth. The web server computer can also host an application server if your
situation requires one.
Flash Communication Server MX
Flash Communication
applications directory
- Server-side files
- Ports 1935, 80
RTMP
Web Server
- Web root directory
- Client-side files
- Port 80
Application Server
- Database
- LDAP and other di
- Web services
HTTP
End user
Configuring Flash Communication Server
27
Some
scenarios may require authentication of users who want to access information on an application
server. In this case you may want to use a separate computer for Flash Communication Server
MX, and another for the web server and application server. Your Flash Communication Server
can perform the authentication and then retrieve data from the web/application server. This
scenario requires the developer to create server-side scripts to perform these functions.
Deployment: two computers with authentication via Flash Communication Server
Flash Communication
Server MX
Application Server
Web Server
Database
LDAP or other directory
End user
28
Chapter 3
End user
End user
You may decide to
have users authenticated before they are allowed to connect to your Flash Communication Server.
In this scenario, users connect first to the web/application server. If they are authenticated, the
application server creates a ticket that the user then uses to connect to the Flash Communication
Server. The Flash MX communication application must be designed to check for these tickets,
typically with server-side scripts.
Deployment: two computers with authentication via an application server
Application
Server
Flash Communication
Server MX
- Web Server
- Database
- LDAP or other
directory
2 Server-supplied
ticket
1
3
Connect
with ticket
HTTP/S user
authentication
request
End user
About configuration levels
The server is capable of hosting more than one adaptor and more than one virtual host on each
adaptor. Each virtual host is equivalent to a domain name. Each virtual host can run more than
one communication application. (The Developer Edition of the server is limited to one adaptor
and one virtual host.)
When you’re ready to customize the server for your own virtual hosts and applications, you’ll edit
the server’s XML configuration files and the directory structure that contains them. The server
uses four configuration files in XML format: Server.xml, Adaptor.xml, Vhost.xml, and
Application.xml. You configure the server by editing the contents of these files, either in a text
editor or with the Administration Console.
The following sections explain in detail how to configure the server using these files.
Configuring Flash Communication Server
29
About the configuration hierarchy
Flash Communication Server can support several adaptors, virtual hosts, and applications
simultaneously. Each adaptor on the server can serve multiple virtual hosts, and each virtual host
can host multiple applications. By supporting multiple adaptors and virtual hosts, Flash
Communication Server facilitates management of multiple websites that may have different
configurations and administrators.
Each of these layers of service has its own configuration settings, stored in separate XML files.
These files are stored in a directory structure that reflects the hierarchy of adaptors, virtual hosts,
and applications you want to use with the server.
The default directory structure installed with the server looks like this:
The directory structure includes three subdirectories: conf, _defaultRoot_, and _defaultVHost_.
• The conf subdirectory, at the top of the hierarchy, holds all the configuration files for the
server. This subdirectory contains the Server.xml file and the _defaultRoot_ subdirectory. The
Server.xml file contains settings that relate to the server only. The specific settings for the
adaptors, virtual hosts, and applications are stored in separate XML files.
• The _defaultRoot_ subdirectory is the default adaptor directory for the server. It contains the
Adaptor.xml file and the _defaultVHost_ subdirectory. The Adaptor.xml file contains the
settings that relate to the adaptor. (If there were a separate adaptor, it would have its own
subdirectory at the same level as the _defaultRoot_ subdirectory.)
• The _defaultVHost_ subdirectory is the default virtual host subdirectory for the adaptor. It
contains the Vhost.xml file, which contains the settings for the virtual host, and the
Application.xml file, which contains default settings for the client applications that will
connect to the server. (If there were another virtual host on the same adaptor, it would have its
own subdirectory at the same level as the _defaultVHost_ subdirectory.) Each adaptor
directory must contain a _defaultVHost_ directory.
Adding adaptors and virtual hosts
To add an adaptor to the server, you must add a complete adaptor directory structure to the
server’s conf directory. Each adaptor directory must contain an Adaptor.xml file and at least one
virtual host directory, called _defaultVHost_. When you add virtual hosts, these must be in
addition to _defaultVHost_. Each virtual host subdirectory contains a Vhost.xml file and an
Application.xml file.
When you design an application in Macromedia Flash MX that will connect to the Flash
Communication Server, you add a subdirectory with the application’s name to the application
directory of the virtual host it will connect to. The application’s subdirectory can contain its own
Application.xml file if you want the application to override any of the settings in the generic
Application.xml file in the virtual host directory.
30
Chapter 3
A typical customized server conf directory might look like this:
A customized conf directory containing multiple adaptor, virtual host, and application subdirectories
and configuration files
The conf directory illustrated here contains two adaptor subdirectories: the _defaultRoot_
subdirectory and the _SecondAdaptor_ subdirectory.
• The _defaultRoot_ subdirectory contains the _defaultVHost_ subdirectory and another virtual
host subdirectory named www.macromedia.com. Each of these virtual host subdirectories
contains an application subdirectory. The application subdirectory for www.macromedia.com
contains an admin directory in addition to directories for the applications testApplication and
videoConference.
• The _SecondAdaptor_ subdirectory contains a _defaultVHost_ directory and another virtual
host directory named www.streamingVideo.com. The www.streamingVideo.com subdirectory
contains an application subdirectory with directories for the Administration Console
(admin.swf ), AnotherTestApplication, and a WhiteBoard application.
Configuring Flash Communication Server
31
In the preceding example, each virtual host directory contains a subdirectory named applications.
Each virtual host’s Vhost.xml must define a flashcom application directory in its <AppsDir> tag.
The flashcom application directory contains subdirectories for each application that can connect
to the virtual host. However, you do not need to name the directory “applications” or locate it
inside the virtual host directory. Each virtual host’s flashcom application directory must contain a
directory named admin so that the Administration Console can connect to the virtual host. For
more information about the Administration Console, see Using the Administration Console.
About the configuration files
Flash Communication Server uses separate XML configuration files for each level of the server
hierarchy: server, adaptor, virtual host, and application. Each of these files contains configuration
tags that relate to the server, adaptor, virtual host, or application they are associated with. To
customize the functionality of the server, you edit these tags. The server edits some of these tags
itself when you use the Administration Console.
The following sections describe the tags in each XML file in detail.
The Server.xml file
The Server.xml file is located at the root level of the conf directory and contains tags that define
user names and passwords for server administrators and virtual host administrators. You edit the
Server.xml file to add or remove administrators. The administrators defined in this file will be
able to connect to the server with the Administration Console. Server administrators can use all of
the features and see all of the information available in the Administration Console. Virtual host
administrators can use the Administration Console only to see information and perform tasks
that relate to their particular virtual host.
32
Chapter 3
The Server.xml file contains the following tag structure, along with comments that briefly
describe each tag.
<Root>
<Admin>
<Server>
<UserList>
<User name="admin">
<Password encrypt="true">YWRtaW4=</Password>
<Allow></Allow>
<Deny></Deny>
<Order>Deny,Allow</Order>
</User>
</UserList>
</Server>
<Adaptor name="_defaultRoot_">
<VirtualHost name="_defaultVHost_">
<UserList>
<User name="">
<Password encrypt"false"></Password>
<Allow></Allow>
<Deny></Deny>
<Order>Deny,Allow</Order>
</User>
</UserList>
</VirtualHost>
</Adaptor>
</Admin>
<Server>
<LicenseInfo>FSW100-XXXXX-XXXXX-XXXXX</LicenseInfo>
<AdminServer>
<HostPort>:1111</HostPort>
</AdminServer>
</Server>
<ServerDomain></ServerDomain>
</Root>
The tags in the Server.xml file serve the following purposes:
• <Root> is the root tag for the XML document. It is a container for all the other tags.
• <Admin> is a container for server administrator and virtual host administrator settings.
• The first <Server> tag is a container for the server administrator <UserList> tags.
• <UserList> is a container for one or more <User> tag groups.
Configuring Flash Communication Server
33
• The <User> tag inside the <UserList> tag specifies the user name of a server administrator in
its name parameter and is a container for the <Password>, <Allow>, <Deny>, and <Order>
tags.
To connect with the Administration Console that is installed with the server, a user must be
defined in a <User> tag group. For more information about using the Administration Console
(admin.swf ), see Using the Administration Console.
You define the first administrator when you run the server installer. There must be at least one
administrator defined for the server. Otherwise no users can connect with the Administration
Console. You can define additional administrators by including additional <User> sections in
the Server.xml file. Each <User> section must contain a <Password> tag. Normally, you edit
administrator user names and passwords using the Administration Console. You may use any
characters in user names entered with the Administration Console. However, if you edit this
information directly in the Server.xml file, remember to use only valid XML.
By default, only the Administration Console requires a valid administrator user name and
password when a connection is being made to the server. Other client applications do not
require any user name or password unless they are explicitly programmed to do so by the
author.
•
<Password>
•
<Allow> contains a list of hosts from which the administrator user should be allowed to
connect. You can include whole host names (also called domain names) or IP addresses in the
list. Separate each host name or address with a comma. The keyword all can be specified to
allow connections from all hosts.
specifies the password for the <User> tag that contains it. The encrypt attribute
indicates whether to encrypt the contents of the password. If the encrypt attribute is set to
true, the password you see in the file is the encrypted password. If you edit the contents of this
tag directly in the Server.xml file rather than with the Administration Console, you must set
the encrypt attribute to false and use only valid XML in the password. Passwords cannot be
empty ("").
For example, an <Allow> tag might look like this:
<Allow>www.macromedia.com, 12.34.56.78</Allow>
Whenever possible, use IP addresses in the <Allow> tag. This increases the server’s
performance when processing connection requests.
•
contains a list of hosts from which the administrator user should not be allowed to
connect. You can include whole or partial host names (also called domain names) or IP
addresses in the list. By including partial host names, such as myCompany.com, you can deny
connections to users connecting from any computer within the myCompany.com domain.
Separate host names or addresses with a comma. The keyword all can be specified to deny
connections from all hosts.
<Deny>
For example, a <Deny> tag might look like this:
<Deny>hackerSite.com, 87.65.43.21</Deny>
As with the <Allow> tag, use IP addresses in the <Deny> tag whenever possible for increased
server performance.
34
Chapter 3
•
specifies the order in which to evaluate the preceding <Allow> and <Deny> tags. It
can be set to either Deny,Allow (the default) or Allow,Deny.
<Order>
When Deny,Allow is specified, the server allows the user specified in <Username> to connect
from any host that is not included in the <Deny> tag or is included in the <Allow> tag. Access
is denied from any host that is included in the <Deny> tag and is not included in the <Allow>
tag.
When Allow,Deny is specified, the server allows the specified user to connect only from hosts
that are included in the <Allow> tag and are not included in the <Deny> tag. Access is denied
from any host that is not included in the <Allow> tag or is included in the <Deny> tag.
•
<Adaptor> specifies the name of an adaptor in its name attribute. It is a container for one or
more <VirtualHost> tag groups that specify the virtual host administrators for each virtual
host in the adaptor. You may specify multiple adaptors by adding additional <Adaptor> tag
groups to the Server.xml file.
•
<VirtualHost> specifies the name of a virtual host in its name parameter. It is a container for a
<UserList> tag that defines administrators for the virtual host. The default value is
<VirtualHost name="_defaultVHost_"> because the default virtual host included with the
server is named _defaultVHost_. The name parameter tells the server which virtual host the
enclosed <UserList> tag refers to. A virtual host is defined on the server simply by having a
directory inside the adaptor directory that contains a valid Vhost.xml file. If you have more
than one virtual host on one or more adaptors on the server, you specify their administrator
information with separate sets of <VirtualHost> tags in the Server.xml file.
• The <UserList> tag is a container for one or more <User> tag groups.
• The next <User> tag specifies the name of a virtual host administrator in its name parameter.
The user name can contain only alphanumeric characters. The <User> tag contains the same
set of password and host-permission tags as the <User> tag in the earlier <Server> tag, but this
<User> tag specifies the administrator user information for the virtual host tag that contains it.
Virtual host administrators can only perform administration tasks relating to the applications
running on their own virtual host. Administration tasks relating to the virtual host itself must
be performed by a server administrator.
You can specify multiple administrator users for a single virtual host by including additional
sets of <User> tags in the <UserList> tag for the virtual host.
Only users defined here and in the earlier <User> tag (in the <Server> section) are allowed to
connect to the Administration Console. (For more information, see Using the Administration
Console.) Normally, you add and edit virtual host administrator information with the
Administration Console. If you edit user names directly in the Server.xml file, you must use
only valid XML in the <User> and <Password> tags.
By default, only the Administration Console requires a valid administrator user name and
password when connecting to the server. Other client applications do not require any user
name or password unless they are explicitly programmed to do so by the author.
• The <Password> tag specifies the password for the <User> tag that contains it. Its format is the
same as the <Password> tag inside the earlier <Server> tag.
• The <Allow> tag inside the <VirtualHost> tag works the same way as the <Allow> tag inside
the earlier <Server> tag, but applies only to the <User> tag that contains it.
• The <Deny> tag inside the <VirtualHost> tag works the same way as the <Deny> tag inside
the earlier <Server> tag, but applies only to the <User> tag that contains it.
Configuring Flash Communication Server
35
• The <Order> tag inside the <VirtualHost> tag works the same way as the <Order> tag inside
the earlier <Server> tag, but applies only to the <User> tag that contains it.
• The <Server> tag near the end of the file contains the <LicenseInfo> tag. This <Server> tag
is distinct from the <Server> tag found under the <Admin> tag earlier in the file.
36
•
<LicenseInfo> contains the serial number for the server. The value of this tag is written to the
Server.xml file by the server installer during installation.
•
•
<AdminServer>
•
<ServerDomain>
is a container for the <HostPort> tag.
specifies the port that the Admin Service binds to. The Admin Service is separate
from the Flash Communication Server. When administrators connect to the server with the
Administration Console, they are connecting to the Flash Communication Admin Service,
which in turn connects to the Flash Communication Server. The default value is :1111 (note
the colon). Only one port number may be specified in this tag.
<HostPort>
specifies the domain name of the server. Set this to the server’s domain name
so that it can pass the domain name to any application servers it connects to. For security
purposes, some application servers require this information as a part of incoming connection
requests.
Chapter 3
The following set of Server.xml tags has been customized for real-world use. Two server
administrators are defined, root and jsmith. An administrator named panderson is defined for
two virtual hosts, _defaultVHost_ and www.macromedia.com. The <Allow> and <Deny> tags are
set for all four administrators to allow them to connect only from the IP address 12.34.45.678.
The server domain is set to www.macromedia.com.
<Root>
<Admin>
<Server>
<UserList>
<User name="root">
<Password encrypt="true">WTs5Ka9</Password>
<Allow>12.34.45.678</Allow>
<Deny>all</Deny>
<Order>Deny,Allow</Order>
</User>
<User name="jsmith">
<Password encrypt="true">4flYnH1</Password>
<Allow>12.34.45.678</Allow>
<Deny>all</Deny>
<Order>Deny,Allow</Order>
</User>
</UserList>
</Server>
<Adaptor name="_defaultRoot_">
<VirtualHost name="_defaultVHost_">
<UserList>
<User name="panderson">
<Password encrypt="true">jhdAYT2E7</Password>
<Allow>12.34.45.678</Allow>
<Deny>all</Deny>
<Order>Deny,Allow</Order>
</User>
</UserList>
</VirtualHost>
<VirtualHost name="www.macromedia.com">
<UserList>
<User name="panderson">
<Password encrypt="true">jhdAYT2E7</Password>
<Allow>12.34.45.678</Allow>
<Deny>all</Deny>
<Order>Deny,Allow</Order>
</User>
</UserList>
</VirtualHost>
</Adaptor>
</Admin>
<Server>
<LicenseInfo>FSW100-12345-67890-54321</LicenseInfo>
<AdminServer>
<HostPort>:1111</HostPort>
</AdminServer>
</Server>
<ServerDomain>www.macromedia.com</ServerDomain>
</Root>
Configuring Flash Communication Server
37
The Adaptor.xml file
The Adaptor.xml file defines settings for an adaptor. It determines the number of threads that can
be used by the adaptor, the communications ports that adaptor binds to, and the IP addresses or
domains from which the adaptor can accept connections.
Each adaptor must have its own directory inside the server’s conf directory. The name of the
directory is the name of the adaptor. Each adaptor directory must contain an Adaptor.xml file.
For example, the default adaptor included with the server at installation is named _defaultRoot_,
and its directory is found in the \Flash Communication Server MX\conf\ directory.
To change an adaptor’s settings, you edit the tags in the Adaptor.xml file.
The Adaptor.xml file contains the following tag structure, along with brief comments for each
tag:
<Adaptor>
<ResourceLimits>
<MaxThreads>100</MaxThreads>
</ResourceLimits>
<HostPortList>
<HostPort>:1935</HostPort>
</HostPortList>
<Allow></Allow>
<Deny></Deny>
<Order>Deny,Allow</Order>
</Adaptor>
The tags in the Adaptor.xml file serve the following purposes:
•
•
•
<Adaptor>
contains all the other adaptor configuration tags.
<ResourceLimits>
is a container for the <MaxThreads> tag.
<MaxThreads> specifies the maximum number of threads to create on the server for processing
input/output requests. The default is 100. Increasing this number allows more threads to run
concurrently, but also increases the processor workload by requiring more thread-switching
operations. Generally you will not need to change this setting. If you do want to change it, test
you applications thoroughly to determine the best value.
•
38
<HostPortList>
Chapter 3
is a container for one or more <HostPort> tags.
•
<HostPort> specifies
the IP address and one or more port numbers for the adaptor to bind to.
The IP address and port number are separated by a colon. If you specify more than one port,
separate them with commas.
For example, a <HostPort> tag might look like this:
<HostPort>12.34.56.78:1935, 80, 443</HostPort>
You can set up the adaptor to listen on more than one IP address by specifying more than one
<HostPort> tag.
Flash Communication Server uses port number 1935 by default. You may choose to use
another port, such as port 80 (normally reserved for HTTP) or port 443 (normally reserved for
HTTPS) if your firewall restricts access to other ports. Whichever port you use, be sure it is set
to the “open” state. When you change the port number, you must also change it in the client
application’s ActionScript NetConnection call.
As a security precaution, when you specify an IP address in the <HostPort> tag, the server will
not bind to (listen to) localhost. (The term localhost refers to the computer the server is
running on.) If you do not specify an address, the server will bind to both localhost and the
true IP address of the computer it is running on.
•
<Allow>, <Deny>,
and <Order> serve the same purposes as in the Server.xml file, but indicate
permissions specifically for this adaptor.
The following set of Adaptor.xml tags has been customized for real-world use. Up to five threads
can be created for the adaptor. The adaptor will bind to ports 1935 and 80 and will accept
connections from any IP address.
<Adaptor>
<ResourceLimits>
<MaxThreads>5</MaxThreads>
</ResourceLimits>
<HostPortList>
<HostPort>:1935, 80</HostPort>
</HostPortList>
<Allow>all</Allow>
<Deny></Deny>
<Order>Deny,Allow</Order>
</Adaptor>
The Vhost.xml file
The Vhost.xml file configures a virtual host within an adaptor. Each virtual host must have its
own directory inside the adaptor directory.
The name of the directory must be the actual name of the virtual host, such as
streaming.macromedia.com. Each virtual host you define must map to a DNS entry that specifies
an IP address on the server computer.
Each adaptor must contain a _defaultVHost_ directory in addition to the custom virtual hosts
that you define. If a client application tries to connect to a virtual host that does not exist, the
server attempts to connect it to _defaultVHost_.
Each virtual host directory contains a Vhost.xml file. This file contains tags that define the
settings for the virtual host. These settings include aliases for the virtual host, the location of the
virtual host’s application directory, limits on the resources the virtual host can use and other
parameters.
Configuring Flash Communication Server
39
The Vhost.xml file contains the following tag structure, with brief comments for each tag:
<VirtualHost>
<AliasList>
<Alias></Alias>
</AliasList>
<AppsDir>C:\inetpub\wwwroot\flashcom\applications\</AppsDir>
<RecordAccessLog>true</RecordAccessLog>
<ResourceLimits>
<MaxConnections>-1</MaxConnections>
<MaxAppInstances>-1</MaxAppInstances>
<MaxStreams>-1</MaxStreams>
<MaxSharedObjects>-1</MaxSharedObjects>
</ResourceLimits>
<VirtualDirectory>
<Streams></Streams>
</VirtualDirectory>
<DNSSuffix></DNSSuffix>
<Allow>all</Allow>
</VirtualHost>
The tags in the Vhost.xml file are described below. You can change the values of some of these
tags at runtime; to learn how, see the administration API article at Macromedia’s website (http://
www.macromedia.com/go/flashcom_admin).
•
•
•
<VirtualHost>
<AliasList>
is the root tag for the XML document. It is a container for all the other tags.
is a container for one or more <Alias> tags.
<Alias> allows you to specify an alternative short name to use when connecting to the virtual
host. You can use this tag to shorten long host names. You can specify an unlimited number of
aliases by adding additional <Alias> tags. Each alias you specify must be mapped to the
correct IP address for the virtual host.
For example, if the host name is machineName.company.com, then you could use the alias tag
to shorten the host name to machineName:
<Alias>machineName</Alias>
Do not use the same alias for more than one virtual host. If more than one virtual host on the
same adaptor has the same alias defined, then the first match found will be used by the server.
This can cause unpredictable results.
40
Chapter 3
•
<AppsDir> specifies the path to the flashcom application directory for this virtual host. The
application directory must contain a subdirectory for each application that will run on the
server. This tag allows you to locate your application directories outside the virtual host
directory if you wish. If no application directory is specified, it defaults to C:\Program
Files\Macromedia\Flash Communication Server MX\conf\_defaultRoot_\_defaultVHost_\.
To run on the server, each application must have a directory named with the name of the
application inside the flashcom application directory. For example, if you have an application
named VideoConference and another named Collaboration and you specify the path
C:\MyApps in the <AppsDir> tag, then the directories C:\MyApps\VideoConference\ and
C:\MyApps\Collaboration\ must exist.
Be sure to include a directory named admin in each virtual host’s flashcom application
directory. This ensures that the Administration Console (admin.swf ) will be able to connect to
the virtual host. For more information, see Using the Administration Console.
The default Vhost.xml file installed with Flash Communication Server contains your
application directory name. If you chose Developer Install during installation, the application
path is \flashcom\applications\ under the publishing directory of your web server if you have
one installed. If you do not have a web server installed, or if you chose Production Install
during installation, the default directory is under C:\Program files\Macromedia\Flash
Communication Server MX\flashcom\applications\. The server-side flashcom application
directory (containing your ASC, FLV, and FLA files) should be separated from your web root
directory when you deploy the server and applications. Only your SWF and HTML files
should be inside the web publishing directory.
•
<RecordAccessLog>
•
<ResourceLimits>
•
<MaxConnections>
•
<MaxAppInstances> specifies the maximum number of application instances that can be
loaded by this virtual host. (A chat application, for example, might require more than one
instance, because each chat room would be represented by a separate instance of the
application on the server.) A Flash movie defines which application instance it is connecting to
by the parameters it includes with its ActionScript connect call.
indicates whether the server should (true) or should not (false) record
connections to the server. This information is written to an access.flv file in the virtual host’s
admin\Streams\Logs\ directory inside its application directory.
is a container tag for the next five tags. By specifying values for these five
tags, you can ensure that the server does not consume excessive resources for the virtual host,
and you can prevent denial of service attacks to the server.
specifies the maximum number of simultaneous connections allowed on
this virtual host. Connections are denied if the specified limit is exceeded. The default of -1
allows an infinite number of connections. If you supply a different value, it must be a positive
integer. If you specify a negative or non-numeric value, the default is used. This value can be
changed at runtime.
The default value of -1 allows an infinite number of application instances. If you specify a
different value, it must be a positive integer. This value can be changed at runtime.
•
<MaxStreams> specifies
the maximum number of streams that the virtual host can create. The
default value of -1 allows an infinite number of streams. If you supply a different value, it must
be a positive integer. This value can be changed at runtime.
Configuring Flash Communication Server
41
•
<MaxSharedObjects>
•
<VirtualDirectory>
•
<Streams> allows you to specify a virtual directory for storing stream resources used by more
than one application. By using a virtual directory, you can specify a relative path that points to
a shared directory used by multiple applications. The contents of this tag must be in the form
virtualDirectory;actualDirectory.
specifies the maximum number of shared objects that the virtual host
can create. (For more information about shared objects, see Developing Communication
Applications.) The default value of -1 allows an infinite number of streams. If you supply a
different value, it must be a positive integer. This value can be changed at runtime.
is a container for one or more <Streams> tags that specify virtual
directories for shared stream resources.
For example, suppose you specify the following:
<Streams>common;C:\FlashComServer\myApplications\shared\resources\</
Streams>
In this case, any application that refers to a stream whose path begins with common\ will access
the item in C:\FlashComServer\myApplications\shared\resources\ regardless of the
application’s own directory structure. Therefore, if the application VideoConference refers to
the item common\video\recorded\June5 and the application Collaboration refers to
common\video\recorded\June5, they both actually refer to the item
C:\FlashComServer\myApplications\shared\resources\video\recorded\June5.
If the virtual directory you specify does not end with a backslash, one is added by the server.
You can specify more than one virtual directory mapping by adding multiple <Streams> tags.
•
<DNSSuffix> allows you to specify a primary DNS suffix for this virtual host, such as
myCompany.com or myUniversity.edu. If a reverse DNS lookup fails to return the domain as
part of the host name, this tag is used as the domain suffix.
• The <Allow> tag lets you specify domain names from which client applications should be
allowed to connect to this virtual host. The default value is all, which allows connections
from any domain. If no value is specified, only connections from the domain that is being
connected to are allowed. If you list specific domains in this tag, only connections from those
domains are allowed. Separate each domain name in the list with a comma.
42
Chapter 3
The following set of Vhost.xml tags has been customized for real-world use. The alias stream is
defined for the virtual host. The application directory is set to C:\Inetpub\wwwroot\apps\. The
maximum number of simultaneous connections is set to 50. The virtual directory for streams is
set to \streamTemp. The domain suffix is set to macromedia.com for reverse DNS lookups.
Finally, the virtual host will accept connections from any IP address.
<VirtualHost>
<AliasList>
<Alias>stream</Alias>
</AliasList>
<AppsDir>C:\inetpub\wwwroot\flashcom\applications\</AppsDir>
<RecordAccessLog>true</RecordAccessLog>
<ResourceLimits>
<MaxConnections>50</MaxConnections>
<MaxAppInstances>-1</MaxAppInstances>
<MaxStreams>-1</MaxStreams>
<MaxSharedObjects>-1</MaxSharedObjects>
</ResourceLimits>
<VirtualDirectory>
<Streams>streamTemp</Streams>
</VirtualDirectory>
<DNSSuffix>macromedia.com</DNSSuffix>
<Allow>all</Allow>
</VirtualHost>
The Application.xml file
The Application.xml file contains the settings for applications that will run on the server. These
settings include, for example, the size of the Server-Side Communication ActionScript runtime
engine, the location at which streams and shared objects are stored, and bandwidth limitations.
Each virtual host can contain multiple Application.xml files. The Application.xml file in the
virtual host directory configures the default settings for applications within the virtual host. If you
want to have different settings for a particular application, it can have its own Application.xml file
in its own application directory.
Each tag in the virtual host’s Application.xml file can include an optional override parameter, as
in this example:
<LoadOnStartup override="no">false</LoadOnStartup>
When this parameter is included in a tag and set to no, no application-specific Application.xml
files can override that tag’s setting. If the tag contains subtags, they also cannot be overridden.
When you omit the override parameter, the tag can be overridden. Only the <Client> tag
described in the following text includes an override="no" parameter by default.
Configuring Flash Communication Server
43
The Application.xml file contains the following tag structure, with brief comments for each tag:
<Application>
<LoadOnStartup>false</LoadOnStartup>
<MaxAppIdleTime>1200</MaxAppIdleTime>
<RecordAppLog>false</RecordAppLog>
<JSEngine>
<RuntimeSize>1024</RuntimeSize>
<GCInterval>20</GCInterval>
<MaxTimeOut>0</MaxTimeOut>
<ScriptLibPath></ScriptLibPath>
</JSEngine>
<StreamManager>
<StorageDir></StorageDir>
<GCInterval>20</GCInterval>
<EnhancedSeek>false</EnhancedSeek>
</StreamManager>
<SharedObjManager>
<StorageDir></StorageDir>
</SharedObjManager>
<Client>
<Bandwidth override="yes">
<ServerToClient>25000</ServerToClient>
<ClientToServer>250000</ClientToServer>
</Bandwidth>
<BandwidthCap override="no">
<ServerToClient>10000000</ServerToClient>
<ClientToServer>10000000</ClientToServer>
</BandwidthCap>
</Client>
</Application>
The tags in the Application.xml file perform the following functions:
•
•
<Application>
is the root tag for the XML document. It is a container for all the other tags.
<LoadOnStartup> indicates whether an application instance is loaded by default when the
server starts up. Having an application instance loaded at server startup saves time when the
first client connects to that application. The default value is false. If you set this tag to true
in the virtual host’s Application.xml file, an instance of each application on the server will be
loaded at startup. If you set this tag to true in an application’s optional Application.xml file,
only that application will have an instance loaded at startup.
•
<MaxAppIdleTime>
•
<RecordAppLog> indicates whether to write the application log to a file. The default value is
false. If you set this tag to true, a log stream file named applicationName.flv is created for
indicates the number of seconds between the last client disconnection and
the unloading of the application instance from the server’s memory. The default is 1200
seconds (20 minutes). If this value is set to 0 or less, the default is used.
each application in the virtual host’s \admin\Streams\Logs\ directory. (Be sure to include an
admin directory in each virtual host’s application directory; the server creates the \Streams\ and
\Logs\ directories.) Each log file records connections to the application and any error messages
that are generated by the server for the application.
To view the contents of the log stream, you must build a communication application that
retrieves the stream file from the server. Because the log files contain no audio or video, they
are sent all at once by the server. For more information about creating communication
applications, see Developing Communication Applications.
44
Chapter 3
•
<JSEngine>
•
<RunTimeSize> indicates the maximum number of bytes that a particular application instance
can use to run server-side ActionScript on the server before garbage collection is performed—
that is, before any unreferenced or unused ActionScript objects are purged from memory. The
default is 1024K or 1 MB. If you create a client application that requires more than 1 MB of
ActionScript memory, this value must be increased. If a new script object is created after
garbage collection that will cause the runtime size of the application instance to exceed the
value of the <RunTimeSize> tag, an out-of-memory error occurs and the application instance
is shut down.
•
<GCInterval> specifies the amount of time that will pass between garbage collection cycles, in
is a container for the next two tags, which control the resource usage of the
Server-Side Communication ActionScript engine.
minutes. The default value is 20 minutes. If you specify a different value, it must be between 1
and 1440 minutes (24 hours). To keep memory as free of unused objects as possible, set this to
a shorter interval. To avoid a brief decrease in performance during garbage collection, set this
to a longer interval.
Because garbage collection is processor intensive, it is recommended that you not set the
tag to a value lower than the default.
<GCInterval>
•
<MaxTimeOut>
•
<ScriptLibPath> allows you to specify a location for scripts other than the default of
\flashcom_application_directory\application_name\ or
\flashcom_application_directory\application_name\scripts\. The server looks for scripts in the
default locations before looking at the path specified in this tag. Do not use quotation marks
when specifying the path.
•
•
<StreamManager>
indicates the maximum time in seconds that a server-side script function may
take to execute. If a script function takes longer than the specified amount of time, it will be
stopped by the server. Using this feature increases the processor workload. Setting this tag to a
value greater than 0 is useful for debugging scripts during development of your applications.
During deployment, it is recommended that you set this tag to the default value of 0, which
imposes no limit on the time scripts take to execute.
is a container for the next two tags, which control media streams.
indicates the directory where streams should be recorded for each application.
The default is a directory named Streams in the application’s directory. The default is used if no
directory is specified. When specifying a directory, use an absolute path.
<StorageDir>
• The <GCInterval> tag inside the <StreamManager> tag specifies the interval between purges
of unused streams, in minutes. The default is 20 minutes. If you specify a different value, it
must be between 1 and 1440 minutes (24 hours). This value can be changed at runtime.
•
<EnhancedSeek> enables or disables finer seeking performance within streams. When this tag
is set to true, the server inserts keyframes at the point in the stream where the seek begins if
there is no preexisting keyframe there. This results in better visual display while seeking. When
this tag is set to false (the default), no keyframes are inserted by the server and seeks begin at
the nearest existing keyframe.
•
<SharedObjManager>
is a container tag for the <StorageDir> tag.
Configuring Flash Communication Server
45
• The <StorageDir> tag inside the <SharedObjManager> tag indicates the directory where
shared objects should be stored. The default is a directory named Sharedobjects in the
application’s directory. The default is used if no directory is specified. When specifying a
directory, use an absolute path. (For more information about shared objects, see Developing
Communication Applications.)
•
•
46
<Client>
is a container for the <Bandwidth> and <BandwidthCap> tags.
<Bandwidth> is a container for two tags that control the amount of bandwidth to use for
upstream (client-to-server) and downstream (server-to-client) data traffic. By default, this tag
includes an override parameter set to "yes", which allows both of its subtags to be
overridden.
•
<ServerToClient>
•
<ClientToServer>
•
<BandwidthCap>
•
<ServerToClient>
•
<ClientToServer>
specifies the maximum speed at which the server sends data to the client.
The default is 250K (250,000 bytes per second) per client.
specifies the maximum speed at which the client sends data to the server.
The default is 250K (250,000 bytes per second) per client.
is a container for two tags that specify the maximum values that can be used
when remotely editing the preceding <ServerToClient> and <ClientToServer> tags inside
the <Bandwidth> tag. By default, this tag includes an override parameter set to "no". For
more information about editing server configuration remotely, see the Macromedia Flash
Support Center at http://www.macromedia.com/support/flash/.
specifies the maximum speed that can be configured remotely for sending
data to the client. The default is 10 MB (10,000,000 bytes per second).
specifies the maximum speed that can be configured remotely for sending
data to the server. The default is 10 MB (10,000,000 bytes per second).
Chapter 3
The following set of Application.xml tags has been customized for real-world use. The
<RecordAppLog> tag is set to TRUE. The runtime size of the JavaScript (JS) engine is increased
from the default to 2 MB. The directory for storing server-side scripts is set to
C:\FlashComScripts. The storage directory for streams is set to C:\FlashStreams\. The storage
directory for shared objects is set to C:\FlashObjs\. The bandwidth limits are set to the defaults.
<Application>
<LoadOnStartup>false</LoadOnStartup>
<MaxAppIdleTime>1200</MaxAppIdleTime>
<RecordAppLog>true</RecordAppLog>
<JSEngine>
<RuntimeSize>2048</RuntimeSize>
<GCInterval>20</GCInterval>
<MaxTimeOut>0</MaxTimeOut>
<ScriptLibPath>C:\FlashComScripts\</ScriptLibPath>
</JSEngine>
<StreamManager>
<StorageDir>C:\FlashStreams\</StorageDir>
<GCInterval>20</GCInterval>
<EnhancedSeek>false</EnhancedSeek>
</StreamManager>
<SharedObjManager>
<StorageDir>C:\FlashObjs\</StorageDir>
</SharedObjManager>
<Client>
<Bandwidth override="yes">
<ServerToClient>25000</ServerToClient>
<ClientToServer>250000</ClientToServer>
</Bandwidth>
<BandwidthCap override="no">
<ServerToClient>10000000</ServerToClient>
<ClientToServer>10000000</ClientToServer>
</BandwidthCap>
</Client>
</Application>
Configuring Flash Communication Server
47
48
Chapter 3
CHAPTER 4
Understanding Flash Communication
Server Security
Macromedia Flash Communication Server MX will typically be used in a network environment
where many users will have access to it; by changing its configuration, you can make the server
accessible from within a private network, from the public Internet, or both. When deploying any
server technology, you will want to consider the implications to both the security of your internal
network and the accessibility of the server’s host computer.
Flash Communication Server incorporates security features that take these kinds of concerns into
account. As a server administrator, you can provide additional security. This chapter describes the
security features built into Flash Communication Server as well as additional measures you can
take to protect your server.
Additional information about server security can be found in Macromedia’s Flash Support Center
(http://www.macromedia.com/support/flash/).
Managing server security
Flash Communication Server uses a high-speed TCP/IP protocol called Real-Time Messaging
Protocol (RTMP), which is binary and unencrypted. Because the protocol is unencrypted, you
must carefully consider the security of your server configuration and the sensitivity of the data
you send to and from the server.
Flash Communication Server’s default settings at installation provide good security, but as a server
administrator, you provide additional settings as you work with the configuration files and
manage ongoing file deployment.
Edit the security tags in the XML files. Utilize the limits that can be set in the server’s
configuration files. Use the following tags in the XML files to enhance the server’s security:
49
• Server.xml
The <User> tags allow you to specify exactly who can connect to the server with the
Administration Console. Only users specified with these tags can connect.
The <Allow> and <Deny> tags let you specify exactly which domains administrators can
connect from. Administrators cannot connect from domains that are not permitted with these
tags.
The <AdminServer>:<HostPort> tag allows you to specify the port of your choice for
connecting to the FlashCom Admin Service with the Administration Console. This allows you
to use a port that will work with your firewall configuration. The default is port 1111.
The <ServerDomain> tag lets you specify the domain that the Flash Communication Server is
running in so that it can identify its domain to application servers you may want it to connect
to.
• Adaptor.xml
The <ResourceLimits>:<MaxThreads> tag allows you to limit the number of threads to use
for processing input/output requests. This prevents denial-of-service attacks from bringing
down the server computer itself.
The <Allow> and <Deny> tags let you specify exactly which domains administrators can
connect from. Administrators cannot connect from domains that are not permitted with these
tags. In the Adaptor.xml file, these tags indicate permissions specifically for the adaptor.
The <HostPort> tag allows you to specify the port to use for client connections. This lets you
choose a port that works with your firewall configuration. The default is port 1935.
• Vhost.xml
The <ResourceLimits>:<MaxConnections> tag lets you specify the maximum number of
simultaneous connections to allow on the virtual host. This can help denial-of-service attacks
using very large numbers of connections. The default is -1, which allows unlimited
connections.
The <ResourceLimits>:<MaxAppInstances> lets you limit the number of application
instances that can exist simultaneously on the virtual host. This can help prevent denial-ofservice attacks. The default is -1, which allows unlimited application instances.
The <ResourceLimits>:<MaxStreams> lets you specify the maximum number of streams
that can exist simultaneously on the virtual host. This can help prevent denial of service
attacks. The default is -1, which allows unlimited streams.
The <ResourceLimits>:<MaxSharedObjects> lets you specify the maximum number of
shared objects that can exist simultaneously on the virtual host. This can help prevent denial of
service attacks. The default is -1, which allows unlimited shared objects.
The <Allow> tag lets you limit connections to the virtual host to only clients who connect
from the specified domains.
50
Chapter 4
• Application.xml
The <JSEngine>:<RuntimeSize> tag lets you limit the amount of memory that can be used
by the server-side ActionScript on the virtual host. This can help prevent attacks using very
large numbers of scripts. The default is 1024K.
The <StreamManager>:<StorageDir> and <SharedObjManager>:<StorageDir> tags let
you specify the locations for storing streams and shared objects. This allows you to store them
in locations outside your web publishing directory and outside your flashcom application
directory if you wish.
The <Bandwidth> tags groups let you specify the maximum amount of data that an
application can send and receive.
For more detailed information about the server’s XML tags, see Chapter 3, “Configuring Flash
Communication Server,” on page 25.
To prevent hackers from gaining access to the source files of
your applications, avoid placing sensitive files in your web server’s publishing directory. If you
have a web server, the Administration Console (admin.swf ) and sample applications are installed
by default in your web server’s publishing directory. During deployment, do not locate Flash
Communication Server application source or data files (FLA, FLV, ASC) or the flashcom
application directory in the web publishing directory; keep only your applications’ SWF and
HTML files in the publishing directory.
Place source and data files carefully.
In addition to its communication streams, the server’s configuration
files should be protected. To ensure that the server’s XML files and directory structure cannot be
accessed by unauthorized users, place the server computer in a physically secure location and
password-protect the operating system so that only the appropriate server administrators have
access.
Protect configuration files.
About authentication and authorization
To authenticate (validate) administrators, Flash Communication Server employs several layers of
host-based user security. (Host-based security refers to security measures that are implemented in
the server software itself.) When a user tries to connect to the Administration Console with an
administrator user name and password, the server uses the layers of settings in its XML
configuration files to determine whether the connection should be allowed. Only administrators
who have been explicitly defined can connect to the server to use the Administration Console.
The server authenticates administrators by evaluating the contents of the XML tags in the
following order:
1
Server.xml file: <Allow>, <Deny>, and <User> tags. These tags indicate whether a user is
allowed to connect to the Administration Console from the current IP address. Administrators
can connect only from IP addresses you have specified with these tags.
2
Adaptor.xml file: <Allow> and <Deny> tags. These tags indicate whether a user is allowed to
connect to the specified adaptor from their current IP address.
3
Vhost.xml file: <Allow> and <Deny> tags. These tags indicate whether a user is allowed to
connect to the specified virtual host from the current IP address.
The server authenticates administrators by comparing their user names and passwords to those
defined in the Server.xml file. When you choose these names and passwords, make sure they are
not simple ones that can be easily guessed.
Understanding Flash Communication Server Security
51
To have the server perform authentication of connecting users other than administrators, use the
<Allow> and <Deny> tags in the Adaptor.xml and Vhost.xml files. With these tags you can
prevent users from connecting from all domains other than those you specify. The server checks
incoming connections against the Adaptor.xml file and then the Vhost.xml file when processing
non-administrator connection requests.
To provide administrator authorization (assigning permissions), the server uses the Server.xml file.
When you define a user as a server or virtual host administrator in this file, the server associates
certain permissions with that user. Virtual host administrators can manage only a virtual host—
for example, they can reload or disconnect applications on that virtual host. Server administrators
can exercise control over all virtual hosts and perform server-level tasks, such as restarting or
shutting down the server.
By default, only the Administration Console performs user authorization. When developing your
own communication applications, you can decide whether to implement user authorization;
some kinds of applications need this capability while others do not. For example, when
developing a simple chat application, you might choose to create two different versions of your
Macromedia Flash MX client movie. One version might be a chat participant version; another
might be a chat moderator version, with additional functionality built in, such as the ability to
edit users’ posts or disconnect users. Using server-side ActionScript, you can define which uses are
able to connect with the moderator version of the movie.
As an additional security feature, the Administration Console actually connects to the FlashCom
Admin Service, which then communicates with the server service to perform administration tasks.
Choosing passwords
When choosing passwords, remember to make them as secure as possible. The following
guidelines help ensure that a password is secure:
• The minimum length of a password should be 7 characters.
• Passwords should not contain your user name or any part of it (for example: Jane, Doe, Jdoe).
• Passwords should contain three of the following four items: at least one uppercase letter (A-Z),
at least one lowercase letter (a-z), at least one numeric character (0-9), and at least one nonalphanumeric character shown here:
!_*#$%&;+-
• Passwords should be changed regularly and none of the last five passwords should be reused.
Developing secure applications
If you develop Flash Communication Server applications, there are some strategies you can use to
ensure the security of your applications and the data they use.
When you deploy a Flash Communication Server
application, use a server-side script to verify that connecting SWF files are coming from the
location you expect (and not from an unknown computer). You can do this by checking the
client.referrer property of the client object before the server accepts the connection.
Confirm the location of the client SWF.
For more information about writing server-side scripts, see Developing Communication
Applications.
52
Chapter 4
Use server-side script precautions. In server-side scripts do not use procedures that can be called
by a malicious movie, which could then fill a hard disk, consume the processor, or do other
damage. Procedures attached to client objects are particularly vulnerable. Procedures to be aware
of include writing to the hard disk without checking the quantity of data being written,
procedures that can be infinitely looped, and so on.
Send sensitive data via HTTPS. If you need to send sensitive data such as credit card information,
you can use HTTPS to communicate simultaneously between your Flash MX client application
and a separate application server that processes the data. To do this, use the ActionScript getURL
command. (For more information, see the online ActionScript Dictionary in the Flash MX Help
menu.)
About privacy
The technology in Macromedia Flash Communication Server MX enables the capture of client
audio and video streams. When creating applications, it is your responsibility to comply with all
applicable laws, rules, and regulations and to inform the user of privacy rights and your policies in
situations such as when the application transports audio or video data across insecure channels or
when audio or video data is being recorded for publication. For an example of adding user
notification to your sample application, see “Adding a privacy module” in the “Application
Development Tips and Tricks” chapter of Developing Communication Applications.
Deploying secure applications
When you deploy a Flash Communication Server application, it is important to take steps to
ensure that your network is secure.
In addition to the precautions taken during the application development process, it is
recommended that you deploy your communication applications in a firewall protected
environment. Firewalls provide port-based protection for your network and can be used to
prevent connections to the network from specific IP addresses.
You should take precautions when using log files to track server activity, since these files can
consume large amounts of disk space over time.
The following two sections describe these precautions in more detail.
About firewalls
A firewall is a combination of hardware and software that controls the flow of information
between networks, such as between a company intranet and the wider Internet. Firewalls provide
port-based security, meaning they can be configured to allow certain communication ports (1935,
80) to appear “outside” the firewall, making them accessible to external networks.
The port that Flash Communication Server uses should be behind a firewall if it’s being used only
by users of a private network, such as a corporate intranet. The port should be accessible from
outside the firewall if it’s meant to be accessible to outside users such as users of the Internet in
general.
If the Flash Communication Server and an application server are both behind a firewall, they can
communicate with each other and no outside party can eavesdrop on the data to gain access to
private information.
Understanding Flash Communication Server Security
53
You can also configure a firewall to provide additional protection against outside attacks. For
example, if the server is being flooded by a particular IP or range of IP addresses, you can
configure the firewall to ignore messages from those IP addresses.
The server allows you to strictly control which users can connect to it and where they can connect
from. You can also configure a firewall to control the ports users inside and outside your network
can connect to.
FIREWALL
(Port-based security)
Public
Private (server zone)
Port 1935
End user
Server
Port 1111
Server Administrator
Virtual Host Administrator
(name & password
authentication)
Port 80
XML configuration files
(host-based security)
End user
Log file precautions
A log file is a file that contains information about events that have occurred on the server. When
using log files (by specifying true for the Vhost.xml file’s <recordAccessLog> tag and the
Application.xml file’s <RecordAppLog> tag), you are vulnerable to denial-of-service attacks by
applications that can fill the hard disk—for example, by making high volumes of connection
requests. To prevent this problem, write an operating system script to delete or back up the
log regularly.
54
Chapter 4
INDEX
A
Adaptor tag (Adaptor.xml file) 38
Adaptor tag (Server.xml file) 35
adaptors, configuring 38
Adaptor.xml file 38
Adaptor tag 38
Allow tag 39
HostPort tag 39
HostPortList tag 38
MaxThreads tag 38
ResourceLimits tag 38
Admin Service 9, 16
Admin tag 33
Admin Users panel 20
Administration Console 16
Admin Users panel 20
and administrator access 32, 50
connecting 16, 34
Diagnostics panel 17
License panel 22
Live Log panel 21
Maintenance panel 18
administration tasks 11
configuring adaptors 38
configuring applications 13, 43
configuring virtual hosts 12, 14, 18, 30, 35, 39
defining administrators 20, 21, 34
halting the server 19
pinging the server 17
reloading applications 18
removing applications 18
restarting the server 19
restarting virtual hosts 19
runtime configuration 23
shutting down the server 19
starting the server 15
stopping the server 15
stopping virtual hosts 19
administration tasks (continued)
unloading applications 18
uploading server-side scripts 14
using Windows event viewer 22
administrators
defining 20, 34
virtual hosts 13
AdminServer tag 36
Alias tag 40
AliasList tag 40
Allow tag (Adaptor.xml file) 39
Allow tag (Server.xml file) 34, 35
Allow tag (Vhost.xml file) 42
App inspector 10, 15
application directory 9, 13
application server 27, 28, 29
Application tag 44
applications
configuring 13, 43
removing 18
unloading and reloading 18
Application.xml file 12, 43
Application tag 44
Bandwidth tag 46
BandwidthCap tag 46
Client tag 46
ClientToServer tag 46
EnhancedSeek tag 45
GCInterval tag 45
JSEngine tag 45
LoadOnStartup tag 44
MaxAppIdleTime tag 44
MaxTimeOut tag 45
RecordAppLog tag 44
RunTimeSize tag 45
ScriptLibPath tag 45
ServerToClient tag 46
SharedObjManager tag 45
55
Application.xml file (continued)
StorageDir tag 45, 46
StreamManager tag 45
AppsDir tag 41
authentication 28, 29, 51
authoring components 10
authorization 51
H
halting the server 19
HostPort tag (Adaptor.xml file) 39
HostPort tag (Server.xml file) 36
HostPortList tag 38
HTTPS 53
I
B
Bandwidth tag 46
BandwidthCap tag 46
installation 7
authoring components 10
files installed 9
server 8
C
client applications 11
configuring 13
server-side scripts 12
shared objects 12
streams 12
Client tag 46
ClientToServer tag 46
Communication App inspector 10, 15
configuration 25, 29, 32
of client applications 13
hierarchy 30
runtime 23
J
JSEngine tag 45
L
License panel 22
LicenseInfo tag 36
Live Log panel 21
LoadOnStartup tag 44
log files 21, 41, 44, 54
M
debugger, NetConnection 10, 15
Deny tag 34, 35
deployment 26, 27, 28, 29
Diagnostics panel 17
DNSSuffix tag 42
MacSharedObjects tag 42
Maintenance panel 18
MaxAppIdleTime tag 44
MaxAppInstances tag 41
MaxConnections tag 41
MaxStreams tag 41
MaxThreads tag 38
MaxTimeOut tag 45
E
N
EnhancedSeek tag 45
event viewer, Windows 22
NetConnection Debugger 10, 15
F
Order tag 35, 36
D
firewalls 26, 53
Flash authoring components 10
FlashCom Admin Service 9, 16
flashcom application directory 9, 13
G
GCInterval tag 45
56
Index
O
P
Password tag 34, 35
passwords 52
ping 17
privacy 53
R
RecordAccessLog tag 41
RecordAppLog tag 44
reloading applications 18
removing applications 18
ResourceLimits tag (Adaptor.xml file) 38
ResourceLimits tag (Vhost.xml file) 41
restarting the server 19
restarting virtual hosts 19
root 13
Root tag 33
runtime configuration 23
RunTimeSize tag 45
S
ScriptLibPath tag 45
security 49
authentication 28, 29, 51
authorization 51
file locations 51
file protection 51
firewalls 26, 53
HTTPS 53
log files 54
passwords 52
privacy 53
restricting connections 49, 52
server-side scripts 53
XML files 49
server
halting 19
license 22
logs 21, 41, 44, 54
restarting 19
shutting down 19
Server tag 33, 36
ServerDomain tag 36
server-side scripts 12, 14, 53
ServerToClient tag 46
Server.xml file 32
Adaptor tag 35
Admin tag 33
AdminServer tag 36
Allow tag 34, 35
Deny tag 34, 35
HostPort tag 36
LicenseInfo tag 36
Order tag 35, 36
Password tag 34, 35
Root tag 33
Server tag 33, 36
Server.xml file (continued)
ServerDomain tag 36
User tag 34, 35
UserList tag 33, 35
VirtualHost tag 35
shared objects 12
SharedObjManager tag 45
shutting down the server 19
starting the server 15
stopping the server 15
stopping virtual hosts 19
StorageDir tag 45
StreamManager tag 45
streams 12
Streams tag 42
U
unloading applications 18
uptime 17
User tag 34, 35
UserList tag 33, 35
V
Vhost.xml file 39
Alias tag 40
AliasList tag 40
Allow tag 42
AppsDir tag 41
DNSSuffix tag 42
MacSharedObjects tag 42
MaxAppInstances tag 41
MaxConnections tag 41
MaxStreams tag 41
RecordAccessLog tag 41
ResourceLimits tag 41
Streams tag 42
VirtualDirectory tag 42
VirtualHost tag 40
virtual hosts 18, 39
adding 30
administrators 13
configuring 12, 14, 18, 35, 39
restarting 19
starting 19
stopping 19
VirtualDirectory tag 42
VirtualHost tag (Server.xml file) 35
VirtualHost tag (Vhost.xml file) 40
W
Windows event viewer 22
Index
57
Developing Communication
Applications
Macromedia Flash Communication Server MX
™
™
macromedia
®
Trademarks
Afterburner, AppletAce, Attain, Attain Enterprise Learning System, Attain Essentials, Attain Objects for Dreamweaver,
Authorware, Authorware Attain, Authorware Interactive Studio, Authorware Star, Authorware Synergy, Backstage, Backstage
Designer, Backstage Desktop Studio, Backstage Enterprise Studio, Backstage Internet Studio, Design in Motion, Director,
Director Multimedia Studio, Doc Around the Clock, Dreamweaver, Dreamweaver Attain, Drumbeat, Drumbeat 2000, Extreme
3D, Fireworks, Flash, Fontographer, FreeHand, FreeHand Graphics Studio, Generator, Generator Developer’s Studio, Generator
Dynamic Graphics Server, Knowledge Objects, Knowledge Stream, Knowledge Track, Lingo, Live Effects, Macromedia,
Macromedia M Logo & Design, Macromedia Flash, Macromedia Xres, Macromind, Macromind Action, MAGIC, Mediamaker,
Object Authoring, Power Applets, Priority Access, Roundtrip HTML, Scriptlets, SoundEdit, ShockRave, Shockmachine,
Shockwave, Shockwave Remote, Shockwave Internet Studio, Showcase, Tools to Power Your Ideas, Universal Media, Virtuoso,
Web Design 101, Whirlwind and Xtra are trademarks of Macromedia, Inc. and may be registered in the United States or in other
jurisdictions including internationally. Other product names, logos, designs, titles, words or phrases mentioned within this
publication may be trademarks, servicemarks, or tradenames of Macromedia, Inc. or other entities and may be registered in
certain jurisdictions including internationally.
Third-Party Information
Speech compression and decompression technology licensed from Nellymoser, Inc. (www.nellymoser.com).
Sorenson™ Spark™ video compression and decompression technology licensed from
Sorenson Media, Inc.
This guide contains links to third-party websites that are not under the control of Macromedia, and Macromedia is not
responsible for the content on any linked site. If you access a third-party website mentioned in this guide, then you do so at your
own risk. Macromedia provides these links only as a convenience, and the inclusion of the link does not imply that Macromedia
endorses or accepts any responsibility for the content on those third-party sites.
Copyright © 2002 Macromedia, Inc. All rights reserved. This manual may not be copied, photocopied, reproduced,
translated, or converted to any electronic or machine-readable form in whole or in part without prior written approval of
Macromedia, Inc.
Acknowledgments
Director: Erick Vera
Producer: JuLee Burdekin
Writing: Jay Armstrong, Jody Bleyle, JuLee Burdekin, Barbara Herbert, and Barbara Nelson
Editing: Mary Ferguson, Anne Szabla
Multimedia Design and Production: Aaron Begley and Benjamin Salles
Print Design, Production, and Illustrations: Chris Basmajian
First Edition: May 2002
Macromedia, Inc.
600 Townsend St.
San Francisco, CA 94103
CONTENTS
INTRODUCTION
About This Manual
.................................................. 5
Intended audience . . . . . . . . . . . . . . . . . . . . . . . . . . . . . . . . . . . . . . . . . . . . . . . . . . . . . .
About the Flash Communication Server documentation . . . . . . . . . . . . . . . . . . . . . . . . .
Typographical conventions . . . . . . . . . . . . . . . . . . . . . . . . . . . . . . . . . . . . . . . . . . . . . . .
Additional resources . . . . . . . . . . . . . . . . . . . . . . . . . . . . . . . . . . . . . . . . . . . . . . . . . . . .
CHAPTER 1
About Flash Communication Server
5
5
6
6
.................................. 7
Overview of Flash Communication Server architecture . . . . . . . . . . . . . . . . . . . . . . . . . . 7
Flash Communication Server objects. . . . . . . . . . . . . . . . . . . . . . . . . . . . . . . . . . . . . . . 11
Applications and application instances . . . . . . . . . . . . . . . . . . . . . . . . . . . . . . . . . . . . . 14
File types used by Flash Communication Server . . . . . . . . . . . . . . . . . . . . . . . . . . . . . . 16
Setting up your development environment . . . . . . . . . . . . . . . . . . . . . . . . . . . . . . . . . . 17
Connecting to the server . . . . . . . . . . . . . . . . . . . . . . . . . . . . . . . . . . . . . . . . . . . . . . . . 17
Writing your first application . . . . . . . . . . . . . . . . . . . . . . . . . . . . . . . . . . . . . . . . . . . . 19
CHAPTER 2
About Flash Communication Server Applications .
. . . . . . . . . . . . . . . . . . . . 23
About Flash Communication Server services . . . . . . . . . . . . . . . . . . . . . . . . . . . . . . . . . 23
The Flash Communication Server design model . . . . . . . . . . . . . . . . . . . . . . . . . . . . . . 25
Designing Flash Communication Server applications . . . . . . . . . . . . . . . . . . . . . . . . . . 29
CHAPTER 3
Sample Applications
. . . . . . . . . . . . . . . . . . . . . . . . . . . . . . . . . . . . . . . . . . . . . . . 31
About the samples . . . . . . . . . . . . . . . . . . . . . . . . . . . . . . . . . . . . . . . . . . . . . . . . . . . . . 31
Sample 1: Recording a Stream . . . . . . . . . . . . . . . . . . . . . . . . . . . . . . . . . . . . . . . . . . . . 32
Sample 2: Shared Text . . . . . . . . . . . . . . . . . . . . . . . . . . . . . . . . . . . . . . . . . . . . . . . . . . 35
Sample 3: Shared Ball . . . . . . . . . . . . . . . . . . . . . . . . . . . . . . . . . . . . . . . . . . . . . . . . . . 37
Sample 4: Hello Server . . . . . . . . . . . . . . . . . . . . . . . . . . . . . . . . . . . . . . . . . . . . . . . . . 38
Sample 5: Text Chat . . . . . . . . . . . . . . . . . . . . . . . . . . . . . . . . . . . . . . . . . . . . . . . . . . . 41
Sample 6: Record a List . . . . . . . . . . . . . . . . . . . . . . . . . . . . . . . . . . . . . . . . . . . . . . . . . 46
3
CHAPTER 4
Application Development Tips and Tricks . .
. . . . . . . . . . . . . . . . . . . . . . . . . . 51
Application design and development . . . . . . . . . . . . . . . . . . . . . . . . . . . . . . . . . . . . . . . 51
Debugging your application . . . . . . . . . . . . . . . . . . . . . . . . . . . . . . . . . . . . . . . . . . . . . 58
Adding a privacy module. . . . . . . . . . . . . . . . . . . . . . . . . . . . . . . . . . . . . . . . . . . . . . . . 60
Coding conventions . . . . . . . . . . . . . . . . . . . . . . . . . . . . . . . . . . . . . . . . . . . . . . . . . . . 63
File types and paths . . . . . . . . . . . . . . . . . . . . . . . . . . . . . . . . . . . . . . . . . . . . . . . . . . . . 67
Snapshots and thumbnails . . . . . . . . . . . . . . . . . . . . . . . . . . . . . . . . . . . . . . . . . . . . . . . 70
Application object . . . . . . . . . . . . . . . . . . . . . . . . . . . . . . . . . . . . . . . . . . . . . . . . . . . . . 75
Camera object . . . . . . . . . . . . . . . . . . . . . . . . . . . . . . . . . . . . . . . . . . . . . . . . . . . . . . . . 76
Client object . . . . . . . . . . . . . . . . . . . . . . . . . . . . . . . . . . . . . . . . . . . . . . . . . . . . . . . . . 77
NetConnection object (client-side) . . . . . . . . . . . . . . . . . . . . . . . . . . . . . . . . . . . . . . . . 77
NetStream object. . . . . . . . . . . . . . . . . . . . . . . . . . . . . . . . . . . . . . . . . . . . . . . . . . . . . . 78
SharedObject object . . . . . . . . . . . . . . . . . . . . . . . . . . . . . . . . . . . . . . . . . . . . . . . . . . . 80
Stream object. . . . . . . . . . . . . . . . . . . . . . . . . . . . . . . . . . . . . . . . . . . . . . . . . . . . . . . . . 83
Microphone object . . . . . . . . . . . . . . . . . . . . . . . . . . . . . . . . . . . . . . . . . . . . . . . . . . . . 83
Video object . . . . . . . . . . . . . . . . . . . . . . . . . . . . . . . . . . . . . . . . . . . . . . . . . . . . . . . . . 83
CHAPTER 5
Application Server Connectivity
. . . . . . . . . . . . . . . . . . . . . . . . . . . . . . . . . . . . . 85
Connecting through Flash Remoting. . . . . . . . . . . . . . . . . . . . . . . . . . . . . . . . . . . . . . .
Sample 1: Simple Remoting . . . . . . . . . . . . . . . . . . . . . . . . . . . . . . . . . . . . . . . . . . . . .
Sample 2: Sending Mail. . . . . . . . . . . . . . . . . . . . . . . . . . . . . . . . . . . . . . . . . . . . . . . . .
Sample 3: Recordset . . . . . . . . . . . . . . . . . . . . . . . . . . . . . . . . . . . . . . . . . . . . . . . . . . .
APPENDIX
Flash Communication Server Management Tools
85
86
90
93
. . . . . . . . . . . . . . . . . . . . 97
Using the Communication App inspector . . . . . . . . . . . . . . . . . . . . . . . . . . . . . . . . . . . 97
Using the NetConnection Debugger . . . . . . . . . . . . . . . . . . . . . . . . . . . . . . . . . . . . . . 105
INDEX . .
4
. . . . . . . . . . . . . . . . . . . . . . . . . . . . . . . . . . . . . . . . . . . . . . . . . . . . . . . . . . . 109
Contents
INTRODUCTION
About This Manual
Welcome to Macromedia Flash Communication Server MX!
The Flash Communication Server provides the technology to integrate streaming audio, video,
and data into a Macromedia Flash MX application using the Macromedia Real-Time Messaging
Protocol (RTMP), without requiring users to have anything but the current Macromedia Flash
Player. The ability to integrate communication into your Flash MX application supports the
development of a wide variety of multiuser collaboration applications, such as chat, webcasts,
whiteboards, and multiuser games. The Flash Communication Server also enables scalability, by
means of distributing your application’s processing among multiple servers, and extensibility, by
means of communicating with external sources such as application servers or databases.
Intended audience
This manual is a “how-to” book that takes you, the Flash Communication Server developer,
through the steps involved in setting up a development environment and creating Flash
Communication Server applications, including debugging and testing applications.
You should already be familiar with Flash MX authoring, ActionScript, and the Flash Player. You
should also have some familiarity with JavaScript (because it forms the basis of server-side
ActionScript), client-server models, and networking concepts.
About the Flash Communication Server documentation
The Flash Communication Server documentation is designed to be used in with the Flash MX
documentation, namely Using Flash MX and the Flash MX online ActionScript Dictionary.
This manual explains how to use the Flash MX authoring environment and the Flash
Communication Server application programming interface (API) to create communication
applications. To develop these applications, you need to write scripts that are contained in your
Flash FLA file and, in some cases, scripts that are stored with your application on the server. To do
so, you use the objects and methods provided in the Client-Side Communication ActionScript
API and Server-Side Communication ActionScript API.
This manual contains a number of sample applications that you can re-create. The samples start
simply and increase in complexity, introducing many of the client-side and server-side objects and
methods. By following these examples, you can begin writing Flash Communication Server
applications right away with Flash MX.
Other Flash Communication Server documentation describes client-side and server-side
ActionScript in more detail. All Flash Communication Server documents are available in PDF
format (viewable and printable with Adobe Acrobat Reader) and as HTML help. For document
locations, see Getting Started with Flash Communication Server.
About This Manual
5
Typographical conventions
The following typographical conventions are used in this manual:
•
Code font indicates ActionScript statements, HTML tag and attribute names, and literal text
used in examples.
•
Italic
indicates placeholder elements in code or paths. For example, attachAudio(source)
means that you should specify your own value for source; \settings\myPrinter\ means that you
should specify your own location for myPrinter.
Additional resources
The Flash Communication Server documentation was written before the code in the product was
complete. Therefore, there may be discrepancies between the final implementation of the
product’s features and how they are documented in this manual. For a list of known discrepancies,
see the documentation update website (http://www.macromedia.com/go/
flashcom_documentation_update).
The Flash Communication Server Support Center (http://www.macromedia.com/go/
flashcom_support) is updated regularly with the latest information on Flash Communication
Server, as well as advice from expert users, advanced topics, examples, tips, and other updates.
6
Introduction
CHAPTER 1
About Flash Communication Server
Macromedia Flash Communication Server MX, the new platform for interactive personal
communication, integrates Macromedia Flash MX multimedia with live audio, video and data
streaming over networks, provides a system for storing recorded audio and video streams and
shared data objects, and enables the real-time sharing of synchronized distributed data among
multiple clients. This technology unites communication and applications, providing audio, video,
and data streaming between Macromedia Flash Player 6 clients.
The Flash Communication Server incorporates a number of features that support and enable the
creation of next-generation communication applications. In particular, the Flash Communication
Server:
• Provides an efficient, high-performance runtime for executing code, content and
communications.
•
•
•
•
•
•
Integrates content, communications, and application interfaces into a common environment.
Provides powerful and extensible object models for interactivity.
Enables rapid application development through components and re-use.
Enables the use of web and data services provided by application servers.
Embraces connected and disconnected clients.
Enables easy deployment on multiple platforms and devices.
Overview of Flash Communication Server architecture
The Flash Communication Server platform is made up of two parts: the server provides the
means of communication, and a Flash application (a SWF file that runs in Macromedia
Flash Player) provides the end user’s interface. You use the Flash MX authoring tool as your
development environment to create applications that use Flash Communication Server services.
Server-side scripting enables flexible control of shared state information and provides the logic for
mediating real-time interactions among multiple users.
The technology in Macromedia Flash Communication Server MX enables the capture of client
audio and video streams. When creating applications, it is your responsibility to comply with all
applicable laws, rules and regulations and to inform the user of privacy rights and your policies in
situations such as when the application transports audio or video data across insecure channels or
when video data is being recorded for publication. For an example of adding user notification to
your application, see “Adding a privacy module” on page 60.
7
Communications pass through the Flash Communication Server and are delivered to the client—
the Flash Player on a user’s computer—by means of the Macromedia Real-Time Messaging
Protocol (RTMP). When a Flash movie uses Flash Communication Server, the player connects
to the server, which provides a flow of information, called a network stream, to and from the
client. Other users can connect to the same server and receive messages, data updates, and
audio/video streams
Flash Player
Flash Player
Server
Communications pass through the Flash Communication Server and are delivered to the Flash Player.
As the Flash Communication Server developer, you make this connection happen by working in
the Flash authoring environment to create a Flash movie that uses client-side ActionScript
commands. The Flash movie is the client element of your application. You can increase the
capabilities of your application by using server-side ActionScript. The client-side ActionScript
and the server-side ActionScript, combined, form the Flash Communication Server application
FLASH AUTHORING
Client-side
component
.swf
Flash Communication
Server application
JAVASCRIPT EDITOR
Server-side
component
.asc
Flash authoring provides an easy way to create audio/visual applications in ActionScript.
8
Chapter 1
The Flash Communication Server lets you stream live media (audio, video, and data) or record
data to be played later, as illustrated below.
SERVER
NetStream object
Client publishes
Players
Live stream
SERVER
FLV
NetStream object
Players
Recorded stream
About Flash Communication Server
9
To create audio/video applications, you must have audio/video capture devices (such as a camera
and microphone), Flash MX authoring software, and access to a Flash Communication Server.
You can also write applications that don’t require audio or video devices, as well as applications
that enable communication between Flash Communication Server and application servers or
external databases.
The rest of this chapter introduces the objects and files used in Flash Communication Server
applications, takes you through the steps involved in setting up your development environment,
and shows you how to create your first Flash Communication Server application.
10
Chapter 1
Flash Communication Server objects
As mentioned earlier, Flash Communication Server provides two application program interfaces
(APIs): a client-side API and a server-side API. The client-side API provides the following objects:
Camera, Microphone, NetConnection, NetStream, SharedObject, and Video. For more
information on using these objects, see the Client-Side Communication ActionScript Dictionary.
The server-side API provides the following objects: Application, Client, NetConnection,
SharedObject, and Stream. For more information on using these objects, see the Server-Side
Communication ActionScript Dictionary.
As you can see, some objects have the same name in both APIs, such as NetConnection. However,
a client-side object and a server-side object of the same name don’t provide the same functionality.
In addition, some client-side objects have server-side counterparts, but others do not. The
following sections briefly describe each client-side and server-side object, then explain how some
of them work together to allow client-server communications.
Client-side objects
These objects are used only in client-side ActionScript. For more information about these objects,
see the Client-Side Communication ActionScript Dictionary.
The client-side Camera object lets you capture video from a video camera
attached to the computer that is running the Flash Player. When used with the Flash
Communication Server, this object lets you transmit, display, and optionally record the video
being captured. With these capabilities, you can develop communication applications such as
videoconferencing, instant messaging with video, and so on.
Camera object
You can also use a Camera object without a server (for example, to view a video feed from a
webcam attached to your local system).
Microphone object The client-side Microphone object lets you capture audio from a
microphone attached to the computer that is running the Flash Player. When used with the Flash
Communication Server, this object lets you transmit, play, and optionally record the audio being
captured. With these capabilities, you can develop communication applications such as instant
messaging with audio, recording presentations so others can replay them at a later date, and so on.
You can also use a Microphone object without a server—for example, to transmit sound from
your microphone through the speakers on your local system.
The client-side NetConnection object allows the Flash client to open a
TCP socket on the Flash Communication Server for continuous exchange of data using the RealTime Messaging Protocol (RTMP). You can also use the NetConnection object to connect to an
application server (see Chapter 5, “Connecting through Flash Remoting,” on page 85), but this
manual focuses on using the NetConnection object to communicate with the Flash
Communication Server.
NetConnection object
NetStream object The client-side NetStream object opens a one-way streaming connection
between the Flash Player and the Flash Communication Server through a connection made
available by a client-side NetConnection object. A NetStream object is like a channel inside a
NetConnection; this channel can either publish audio, video, and data, using the
NetStream.publish method, or subscribe to a stream and receive data, using the
NetStream.play method. You can publish or play live (real-time) data and play previously
recorded data. Multiple clients can play a given stream, but a stream can have only one publisher
at a time. For information about the creation and storage of recorded streams on the server, see
“Recorded stream files” on page 68.
About Flash Communication Server
11
Local shared object Client-side local shared objects let you store information on a user’s
computer, such as the high score in a game, that can be used later by the same application or by a
different application running on that computer. For more information about local shared objects,
see “Understanding shared objects” on page 14.
The client-side Video object lets you display streaming video on the Stage. To
display a video feed being played or captured through the use of a NetStream.play or
Camera.get command, place a Video object on the Stage and use the Video.attachVideo
method to attach the feed to the object.
Video object
To place a Video object on the Stage:
1
If the Library panel isn’t visible, select Window > Library to display it.
2
Add an embedded Video object to the library by clicking the Options menu at the upper right
of the Library panel and choosing New Video.
3
Drag the Video object to the Stage and use the Property inspector to give it a unique name.
Server-side objects
These objects are used only in server-side ActionScript. For more information about these objects,
see the Server-Side Communication ActionScript Dictionary.
The server-side Application object contains information about a Flash
Communication Server application instance that lasts until the application instance is unloaded.
The Application object lets you accept and reject client connection attempts, register and
unregister classes and proxies, and create functions that are invoked when an application starts or
stops, or when a client connects or disconnects.
Application object
Client object The server-side Client object represents each user’s connection to a Flash
Communication Server application instance. The Client object can receive messages sent by a
client-side NetConnection.call command, and can invoke methods of the client-side
NetConnection object. You can use the properties of the Client object to determine the version,
platform, and IP address of each client. Using the Client object, you can also set individual read
and write permissions of various application resources such as Stream objects and SharedObject
objects. For more information, see “Implementing dynamic access control” on page 57.
The server-side NetConnection object lets you create a two-way
connection between a Flash Communication Server application instance and an application
server, another Flash Communication Server, or another Flash Communication Server
application instance on the same server. You can also use server-side NetConnection objects to
create more powerful applications; for example, you could get weather information from an
application server, or share an application load with other Flash Communication Servers or
application instances.
NetConnection object
Using this object, you can connect to an application server for server-to-server interactions using
standard protocols (such as HTTP), or connect to another Flash Communication Server for
sharing audio, video, and data using the Macromedia Real-Time Messaging Protocol (RTMP).
You can use Macromedia Flash Remoting with the Flash Communication Server to communicate
with application servers such as Macromedia ColdFusion MX, .NET, and J2EE servers. For more
information, see the Flash Remoting site (http://www.macromedia.com/go/flashremoting).
12
Chapter 1
Remote shared object. Remote shared objects are created on the client but are also available to the
server. They let you share data in real-time between multiple clients, and also store data for later
retrieval by the same or different applications. For more information about client-side remote
shared objects, see “Understanding shared objects” on page 14.
SharedObject object. Server-side
shared objects let you communicate with client-side shared
objects and with objects on other Flash Communication Servers. For more information about
server-side shared objects, see “Understanding shared objects” on page 14.
Stream object. The
server-side Stream object lets you handle each stream in a Flash
Communication Server application. The Flash Communication Server automatically creates a
Stream object when the NetStream.play or NetStream.publish method is called in a clientside script. You can also create a stream in server-side ActionScript by calling the Stream.get
method. A user can access multiple streams at the same time, and there can be many Stream
objects active at the same time.
Client-server object communications
The following “object pairs” represent the potential connections you can establish between clientside and server-side objects. For example, when a client-side NetConnection object connects to
the server, a server-side Client object is created; this Client object can then call methods of its
NetConnection object counterpart.
The following table shows the client-side and server-side objects that are associated with each
other.
Client-side object
Corresponding server-side object
my_nc (NetConnection object)
my_client (Client object or application.clients
object)
my_ns (NetStream object)
my_server_stream (Stream object)
my_so (remote shared object)
my_server_so (server-side shared object)
In the following table, the client-side calls on the left invoke the server-side calls on the right.
Client-side call
Server-side call
my_nc.connect
application.onConnect
my_nc.close
application.onDisconnect
my_nc.call("doThing", myCallbackFcn, 1, "foo")
my_client.doThing(1, "foo")
my_so.send("doThing", 1, "foo")
my_server_so.doThing(1, "foo")
In the following table, the server-side calls on the left invoke the client-side calls on the right.
Server-side call
Client-side call
my_client.call ("doThing", myCallbackFcn,
1, "foo")
my_nc.doThing (1, "foo")
my_server_stream.send ("doThing", 1,
"foo")
my_ns.doThing (1, "foo")
my_server_so.send("doThing", 1, "foo")
my_so.doThing(1, "foo")
About Flash Communication Server
13
Understanding shared objects
Shared objects are a means for sharing data among different clients, among different instances of
an application running on the Flash Communication Server, and across applications running on
multiple Flash Communication Servers. The Flash Communication Server supports three types
of shared objects—local, remote, and server-side. These objects are discussed briefly below. For
more information on working with shared objects, see “SharedObject object” on page 80.
Local shared objects
One way to use shared objects is for local storage and retrieval of data. Data is stored on the enduser’s computer and may be accessed at different times by one or more Flash applications. Local
shared objects can also be non-persistent—that is, available only while the application is running.
Local shared objects don’t require a connection to the Flash Communication Server, and are not
discussed in detail in this manual. For information about where persistent local shared object data
is stored, see “Shared object files” on page 68. For more information about local shared objects,
see the SharedObject.getLocal entry in the Client-Side Communication ActionScript
Dictionary.
Remote shared objects
In client-side ActionScript, you can create and reference shared objects that are available to other
Flash Communication Server application instances running on the same or different clients. Like
local shared objects, these objects can persist on the local computer. However, they can also persist
on the server, so that any user who connects to the shared object has access to the same
information.
For example, you can open a remote shared object, such as a phone list, that is persistent on the
server. Whenever a client makes any changes to the shared object, the revised data is available to
all clients that are currently connected to the object or who later connect to it. If the object is also
persistent locally and a client changes the data while not connected to the server, the changes are
synchronized with the remote shared object the next time the client connects to the object.
Of all the types of shared objects, you will probably use remote shared objects most often in your
Flash Communication Server applications. Several of the samples in this manual use shared
objects for such tasks as sharing text (see “Sample 2: Shared Text” on page 35) and letting
multiple clients manipulate an object on the Stage at the same time (see “Sample 3: Shared Ball”
on page 37). For information about where persistent remote shared object data is stored, see
“Shared object files” on page 68. For more information about remote shared objects, see the
SharedObject.getRemote entry in the Client-Side Communication ActionScript Dictionary.
Server-side shared objects
As shown earlier (see “Client-server object communications” on page 13), you can use server-side
shared objects to communicate with client-side shared objects. In applications that implement
connectivity among multiple Flash Communication Servers, you can also use server-side shared
objects to share data between the servers. For more information about server-side shared objects,
see the SharedObject.get entry in the Server-Side Communication ActionScript Dictionary.
Applications and application instances
This section discusses where you must place application data that you want the server to find, and
also explains how and why to run application instances.
14
Chapter 1
The flashcom application directory
When your Flash application requires the Flash Communication Server, you must place your
application data where the server can locate it.
During installation, you choose either a Developer Install or a Production Install of the Flash
Communication Server. In both cases, if you don’t have a Web server installed, the default
directory is C:\Program files\Macromedia\Flash Communication Server
MX\flashcom\applications for both client-side application files—SWFs and HTMLs—and
server-side application files—ASC files, recorded stream (FLV) and remote shared object (FSO)
files, and your FLA source files.
• If you choose Developer Install, you can specify a different default directory during
installation, but Flash Communication Server will expect to find both client-side and serverside files in subdirectories this directory. The advantage of choosing Developer Install is that
you can run the samples and test your applications from a single directory in the
\flashcom\applications directory that has the same name as your application. That is, for
convenience during development, client-side application files are stored in the same directory
with your server-side application files.
• If you choose Production Install, you can specify a different default directory for client-side
files and a different default directory for server-side files. Flash Communication Server will
know where to look for the files it needs. The advantage of choosing Production Install is that
your client-side application files can be accessible through a web server, while your server-side
application files will not be accessible to a user browsing your Web site.
For organizational purposes during your development work, it’s convenient to store all your client
and server application files (FLA, SWF, HTML, and ASC) in this subdirectory. When you deploy
your application, you can place your SWF and HTML files in any location. However, the
chat_App subdirectory must remain on the server, along with any ASC files used by the
application. The server-side files (your ASC, FLV, FSO, and FLA files) should not be in your web
root directory when you deploy the server and applications. Only your SWF and HTML files
should remain inside the web publishing directory.
If you chose Developer Install and then want to deploy your applications on the same machine,
you’ll want to separate client files from your server-side files. To do so, you can either reinstall the
server (choosing Production Install) and then relocate your files to the appropriate locations, or
you can change the configuration settings in the administration XML files as described in
Managing Flash Communication Server and then relocate your files to the appropriate locations.
In all cases, you must create a directory in the server-side directory that has the same name as the
application you connect to when issuing the NetConnection.connect command.
For example, suppose you have an application called chat_App:
NetConnection.connect("rtmp://myServer.myDomain.com/chat_app")
You must create a subdirectory named chat_App in your server-side flashcom application
directory. Suppose also that this application uses some server-side scripting stored in a file called
main.asc. You must place main.asc in this same directory.
Note: You must create a subdirectory that matches your application name even if you have no server-side script files
to place there. This is because Flash Communication Server stores any stream or shared object files created by your
application in subdirectories of this directory (see “File types and paths” on page 67). Also, the existence of this
directory tells the Flash Communication Server that the application is authorized and that users can connect to
instances of this application.
About Flash Communication Server
15
Using application instances
To distinguish among different instances of a single application, pass a value for instanceName to
your NetConnection.connect command. For example, you may want to give different groups of
people access to the same application without having them interact with each other. To do so, you
can open multiple chat rooms at the same time, as shown below.
my_nc.connect("rtmp://myServer.myDomain.com/chatApp/room_01")
my_nc.connect("rtmp://myServer.myDomain.com/chatApp/room_02")
Another reason to use application instances is to avoid collision of recorded streams or shared
objects that are created by the application. In the above example, for instance, any streams or
shared objects created by room_01 are distinct from those created by room_02, and vice versa,
even though both instances are running the same application, chat_App.
For example, although the support application in the following code creates two shared objects
named CustomerInfo, each instance of the support application has access only to its own
CustomerInfo object. Also, the data in CustomerInfo used by session1 is different from the data
in CustomerInfo used by session2.
// One instance of application "support"
first_nc = new NetConnection();
first_nc.connect("myserver.mydomain.com/support/session1");
first_so = SharedObject.getRemote("CustomerInfo", first_nc.URI, false);
first_so.connect(first_nc.URI);
// Another instance of application "support"
second_nc = new NetConnection();
second_nc.connect("myserver.mydomain.com/support/session2");
second_so = SharedObject.getRemote("CustomerInfo", second_nc.URI, false);
second_so.connect(second_nc.URI);
Many of the samples in this manual use the instance name room_01. However, you can use any
string for an instance name that makes sense in your application. For an example of dynamically
creating an instance name, see “Sample 5: Text Chat” on page 41.
For more information on using instance names, see the NetStream.publish entry in the ClientSide Communication ActionScript Dictionary. For information on making remote shared objects
available to multiple applications, see the SharedObject.getRemote entry in the Client-Side
Communication ActionScript Dictionary.
File types used by Flash Communication Server
In addition to the file types created and used by Flash MX (FLA, SWF, and SWD), Flash
Communication Server uses or creates the following file types:
• ASC—server-side script files that you write
• FLV and IDX—recorded streams and their associated index files
• FSO, SOL, and SOR—shared objects that are persistent on the client, the server, or both
You use a JavaScript editor to write ASC files, which you must place in your application directory;
this is illustrated in many of the sample applications in this manual. For more information about
creating ASC files, see “Setting up your development environment” on page 17. For information
on where Flash Communication Server stores stream and shared object files, see “File types and
paths” on page 67.
16
Chapter 1
Setting up your development environment
To write Flash Communication Server applications, you must install the Flash MX authoring
software, Flash Communication Server, and the latest Flash Player. If you want to write
applications that capture audio or video, you also need to install a microphone or camera.
Additionally, if your application requires server-side scripts for your Flash Communication Server
applications, you’ll need a UTF-8 JavaScript editor, such as Macromedia Dreamweaver MX. Each
of these elements of the development environment is discussed in this section.
Flash MX authoring software
If you haven’t already installed Flash MX, see Getting Started with
Flash Communication Server.
If you haven’t already installed the server, see Getting
Started with Flash Communication Server.
Flash Communication Server software
Make sure that you are using the latest version of the Flash Player. To download
the latest version, go to the Macromedia Flash Player Download Center
(http://www.macromedia.com/go/getflashplayer).
Flash Player
Camera and microphone To install a camera or microphone, follow the instructions that
accompany your device. For a list of cameras that are known to be compatible with Flash
Communication Server, see the documentation on camera compatibility on the Macromedia
website (http://www.macromedia.com/go/camera_compatibility). Cameras that aren’t on this list
may be compatible with Flash Communication Server, but haven’t been tested by Macromedia.
Many cameras contain a built-in microphone. You can also install a separate microphone, or for
best results, a microphone/headset combination.
After you’ve installed your devices, you can specify which camera or microphone Flash should use
by default. Right-click (Windows) or Control-click (Macintosh) while any Flash MX movie is
playing, choose Settings from the context menu, click the Microphone or Camera panel, and
select your preferred device from the pop-up menu.
You can use any text editor to write server-side ActionScript code,
which you’ll store in files with an extension of .asc. You may prefer to use software specifically
designed for writing web-based applications, such as Macromedia Dreamweaver MX, which
offers syntax highlighting and code hinting for ASC files.
Using a JavaScript editor
If you want to include non-ASCII text in your server-side scripts, such as double-byte characters
used in Asian languages, you must use an editor that supports UTF-8 encoding. The Flash
Communication Server requires UTF-8-encoded ASC files in order to pass double-byte
characters from one client to another. For more information on setting up Dreamweaver MX for
double-byte languages, see “Writing double-byte applications” on page 57.
Connecting to the server
To connect to a Flash Communication Server, you first start the service and then issue
new NetConnection and NetConnection.connect commands in your client-side script. These
tasks are discussed briefly in this section. For more detailed information, see the Client-Side
Communication ActionScript Dictionary.
About Flash Communication Server
17
Starting the service
During server installation, you might have chosen to start the service automatically. If you did,
the service will be started whenever the server machine is started, and you don’t need to start it
manually. If you did not, you can start the server from the Windows Start menu: choose Programs
> Macromedia Flash Communication Server MX > Start Service. On Windows, to confirm that
the service is running, open the Task Manager and make sure both FlashCom.exe and
FlashComAdmin.e are listed in the Processes tab.
Opening a connection to the server
Open a new file in the Flash authoring environment, and then add the client-side ActionScript
commands to connect to the server.
To use ActionScript to connect to the server:
1
In a new Flash movie, begin opening a connection to the Flash Communication Server by
issuing the following command:
my_nc = new NetConnection();
2
Follow this command with a connect command:
my_nc.connect(targetURI);
In this basic syntax for NetConnection.connect (omitting optional parameters), targetURI
is the Uniform Resource Identifier (URI) of an application on the Flash Communication
Server that should run when the connection is made. To specify targetURI, use one of the
following formats (items in brackets are optional):
(acceptable if the movie and the Flash
Communication Server are on the same computer)
rtmp:[port]/appName[/instanceName]
rtmp://host[:port]/appName[/instanceName]
Note that in both syntax examples for targetURI, you must specify rtmp (the Real-Time
Messaging Protocol) as the protocol for the connection. If you omit it, the Flash Player
assumes you want to make an HTTP connection to an application server, and your connection
will fail.
If the server is running on your local machine, you can use "localhost" as the host name in
the URI; this is often convenient during application development.
For example, the following code uses the new NetConnection constructor to create a new
connection object. Then, the object is connected to the server with the call to my_nc.connect.
// Makes a new connection object
my_nc = new NetConnection();
// Connects to the instance named appInstance
// of the application named appName
// located on the Flash Communication Server
// that is running on myServer.myDomain.com
my_nc.connect("rtmp://myServer.myDomain.com/appName/appInstance");
18
Chapter 1
Writing your first application
The Flash Communication Server installation includes a sample application called doc_connect
that transmits text through the server between two clients. By viewing the source file and then
recreating the application yourself, you’ll learn how to write a simple Flash Communication
Server application. This example is included only to illustrate how easy it is to implement clientserver communication using Flash Communication Server. Before starting to write your own
programs, see Chapter 2, “About Flash Communication Server Applications,” on page 23.
Examining the sample connection application
The doc_connect application shows how to initialize a movie, connect to the server, and publish
and play a stream. It also explains where to save your sample files.
Note: These instructions assume that the service is running. For information on starting the service, see “Starting
the service” on page 18.
To view the source file:
Open the doc_connect.fla file located in the \Macromedia\Flash
MX\flashcom_help\help_collateral\doc_connect directory.
To see the sample in action:
1
Create a directory named doc_connect in the flashcom application directory (by default, the
application directory is Flash Communication Server MX\flashcom\applications).
2
Open the doc_connect.swf file located in the \Macromedia\Flash
MX\flashcom_help\help_collateral\doc_connect directory.
Note: If the application doesn’t seem to be working, make sure the service is running; see “Starting the service” on
page 18.
After allowing access to the audio and video devices, you see two images: the live stream from the
camera and the published stream sent back from the server.
About Flash Communication Server
19
Recreating the sample
This sample assumes you are using the Flash MX authoring environment on the computer that is
running the Flash Communication Server. If you aren’t, substitute your server URL for
“localhost” in the following steps. The sample also assumes that the service is running.
To create the user interface for this sample:
1
In the Flash authoring environment, select File > New to open a new file.
2
If the Library panel isn’t visible, select Window > Library to display it.
3
Add an embedded Video object to the library by clicking the Options menu at the upper right
of the Library panel and choosing New Video.
Options menu
4
Drag two embedded Video objects from the library onto the Stage and, in the Property
inspector, name them Live_video and Published_video.
5
Resize the Published_video video object to 200 x 150.
6
If you haven’t already done so, create a directory named doc_connect in your flashcom
application directory. Save the file as doc_connect.fla in this directory. (By default, the
application directory is Flash Communication Server MX\flashcom\applications).
To write the ActionScript for this sample:
1
Select the keyframe (frame 1) in the Timeline and open the Actions panel (Window >
Actions).
Note: While re-creating the sample, make sure all of the ActionScript is attached to this first keyframe, and not to
the objects you create on the Stage.
2
Get the default camera and attach it to the Live_video embedded video object.
client_cam = Camera.get();
Live_video.attachVideo(client_cam);
20
Chapter 1
3
Create a connection function that connects to the Flash Communication Server, displays a
trace message indicating whether the connection was successful, and opens and instance of the
doc_connect application named room_01. Remember, you must specify the Real-Time
Messaging Protocol, rtmp.
function doConnect() {
client_nc = new netConnection();
client_nc.onStatus = function(info) {
trace("Level: " + info.level + "
Code: " + info.code);
}
client_nc.connect("rtmp://localhost/doc_connect/room_01");
}
Note: If your SWF is on the same computer that is running the Flash Communication Server, you can use
rtmp:/doc_connect/test as a shortcut version of rtmp://localhost/doc_connect/test. This usage indicates a
relative path and lets you move the files to a different server without changing the code. Also, remember that if
you aren’t using the Flash MX authoring environment on the computer that is running the Flash Communication
Server, substitute your server URL for “localhost”.
4
Create a function to publish the video by creating a network stream out_ns, attaching the
camera to that stream, and then publishing the stream as myTestStream.
function publishMe() {
out_ns = new netStream(_root.client_nc);
out_ns.attachVideo(client_cam);
out_ns.publish("myTestStream");
}
Note: The statement out_ns.publish("myTestStream") omits the optional parameter howToPublish.
When this parameter is missing, the server automatically publishes the stream as live (that is, the stream is not
recorded while it is being published).
5
Create a function to play the published stream by creating a second network stream in_ns,
attaching the contents of that stream to the Published_video video object, and then playing
the stream named myTestStream that is being published by the server.
function playMe() {
in_ns = new netStream(_root.client_nc);
Published_video.attachVideo(in_ns);
in_ns.play("myTestStream");
}
6
Write the commands to call the functions you just created.
// Connect to the server
doConnect();
// Publish the live stream
publishMe();
// Play back the stream from the server
playMe();
7
Save the file.
About Flash Communication Server
21
To test your sample application:
1
Choose File > Publish Settings, select Flash and HTML, click Publish, and then click OK.
2
Choose Control > Test movie.
You see two video windows on the Stage, each displaying the same image.
3
To see how the movie looks in a browser, choose File > Publish Preview > Default, or press
Control+F12 (Windows) or Command+F12 (Macintosh).
Congratulations, you’ve just created and tested your first Flash Communication Server
application! This sample, of course, is for instructional purposes, and has both streams displayed
in a single movie. In a real application, one movie would publish the video feed and another
movie would play it.
This sample was included to show how just a few lines of code can implement client-server
communications using Flash Communication Server. Before you begin writing your own scripts,
be sure to read through the conceptual information provided in Chapter 2, “About Flash
Communication Server Applications,” on page 23, which provides an important overview of the
objects available to you as a Flash Communication Server developer.
22
Chapter 1
CHAPTER 2
About Flash Communication Server
Applications
With a few lines of code, your Macromedia Flash MX application (SWF) can communicate with
another client through the Macromedia Flash Communication Server MX. Using object-oriented
programming techniques and sound programming practices, you can write simple ActionScript
code to get started right away.
This chapter explains some ideas behind Macromedia Flash Communication Server MX and
describes the types of files you’ll generate. An overview of the ActionScript objects specific to
Flash Communication Server is also described here.
About Flash Communication Server services
You should be familiar with writing the instructions for a Flash application in a FLA file and
publishing it as a SWF file. When you run the SWF file, the Flash Player processes the
instructions. If these instructions do not include any calls to a Flash Communication Server, the
player relies on all of the technology within the player itself to execute each step. As soon as you
make a Flash Communication Server call in your ActionScript, however, the player sends that
request to the server.
After you use new NetConnection to create an instance of the NetConnection object, the first
call you make to the server is NetConnection.connect, which tells the player to connect to an
application on the server. The Flash Communication Server requires the use of the Real-Time
Messaging Protocol (RTMP):
my_nc = new NetConnection();
my_nc.connect("rtmp://myFlashComServer/myAppName/instanceName");
Once your Flash application issues this command (and succeeds in connecting to the server), it
has become a client-server application, and the instance of your Flash application running in the
player is referred to as the client.
Common client-server workflows
After the connection is established, the services provided by the server depend, in part, on what
the client expects. Four common scenarios are described below.
23
Passing data between clients In Chapter 1, the sample connection application (see “Writing
your first application” on page 19) connected to the server, opened a stream to publish some
video, and opened another stream to receive the data (play back the video). The only thing the
server was expected to do was to pass the video data through and back to the client. (In a real-life
scenario, of course, the video data would pass through the server to a different client at another
location.)
Client 1
Client 2
Server
The Flash Communication Server provides a channel of communication for clients.
The Flash Communication Server can store information that
is useful to multiple clients—for example, a recorded video or the high score in a multiuser game.
Many samples in this manual rely on the server to store information. (For more information on
where data files are stored, see “File types used by Flash Communication Server” on page 16.)
Storing data for delivery to clients
Client 1
Client 2
Server
The Flash Communication Server stores information that is useful to one or more clients.
24
Chapter 2
You can use server-side ActionScript to collect and display
information regarding clients, transform data, moderate the communication, test conditions,
notify using e-mail and other means, and provide many other services. For example, later you’ll
work through samples that not only rely on the server to route information, but also expect the
server to keep track of client information. When you expect the server to provide some
application logic and return a result, you must provide the instructions in the form of server-side
ActionScript commands.
Tracking client information
Client 1
Client 2
Server
The Flash Communication Server processes information and sends it back to the client.
You can also use server-side ActionScript to develop
applications that interact with other servers; for example, your application might access a
database, and application server, or another Flash Communication Server. In this way, server-side
ActionScript can be used to add dynamic content to your application.
Connecting to external sources
Client 1
Client 2
The Flash Communication Server communicates with other services.
The Flash Communication Server design model
In traditional client-server architecture, the client code provides the presentation layer, and the
server code enhances and organizes the experience using behind-the-scenes actions. For example,
server-side scripts in traditional web applications are most frequently used for some kind of
transaction; the client makes a request, the server does a database lookup or some resource-based
calculation, and then returns a result to the client.
About Flash Communication Server Applications
25
While you can use the Flash Communication Server server-side scripting language to implement
transactions, either internally or by communicating with an external server or data source, the
core use of Flash Communication Server is handling interactions—coordinating the actions of
multiple, connected applications and transmitting server-side data.
The rest of this section discusses the Flash Communication Server in the context of managing
client-server and client-client interactions. You should already be familiar with the workflow of
ActionScript as described in Using Flash MX. If not, see “Understanding the ActionScript
Language” in Using Flash MX.
Flash Communication Server workflow
This manual uses Flash Communication Server sample applications to demonstrate all the steps
involved in writing, testing, and deploying Flash Communication Server applications. In general,
however, the workflow is simple: it consists of adding client-side ActionScript to your Flash
application, using server-side ActionScript if necessary, and publishing your files in your flashcom
application directory. (By default, Flash MX automatically generates an HTML wrapper file
when you select File > Publish.)
SWF FILE
.swf
Flash MX logic
ActionScript
<HTML>
.swf
</HTML>
.swf
HTML FILE
.html
Web server
directory
HTML
HTML wrapper
ASC FILE
.asc
.asc
Server logic
Server-side
ActionScript
26
Chapter 2
.flv
Flash Com
application directory
When the user runs your Flash SWF file and the SWF file connects to the server, the server loads
the application and creates the application instance if it isn’t already running. The server accepts
the connection, creates a new Client object to represent the client application on the server, and
executes any server-side scripts that you have provided. The client also does its work, initiating
streams, sharing objects, and so on. The following sections describe this sequence of events in
more detail.
Note: Only the client application can initiate a communication session, and only the server can shut down an
application. Both the client and the server send and receive status messages, open and close streams, save and
share data, and end the network connection.
Application workflow
When the client connects to the server, the server calls onAppStart if the application instance
isn’t already running. Next, the server-side onConnect method is invoked with a newly created
Client object. The logic in this method determines whether to accept or reject the connection.
Back on the client side, the onStatus method is called to report whether the connection was
accepted or rejected. When the client closes the connection, the server-side onDisconnect
method is called. When the application is unloaded, onAppStop is invoked.
CLIENT FLOW
SERVER FLOW
onAppStart
connect
new Client object
onStatus
acceptConnection
close
onDisconnect
onConnect
Application is
unloaded
onAppStop
Connection flow
About Flash Communication Server Applications
27
After a successful connection, the client makes a call on the connection. If the client needs a result
returned, the client provides a callback object to hold the result. On the server, the method
corresponding to the client call is invoked; and a result is returned to the client. The client has an
onResult handler that is called on the callback object passed in.
CLIENT
call("doThis",
callback_obj,a,b)
SERVER
"doThis",a,b
clientObj.doThis(a,b)
onResult
resultObj
Call flow from client to server, with result passed back to client
Conversely, if a server makes a call to the client, it can provide a callback object. The client should
contain a method corresponding to the one called by the server code. Again, the client can return
a result, and the server’s onResult handler is called on the callback object sent to the client.
CLIENT
SERVER
"doThis",a,b
client.call("doThis",
callback_obj,a,b)
resultObj
resultObj.onResult
netConnection.doThis(a,b)
Call flow from server to client, with result passed back to server
28
Chapter 2
Finally, here’s an overview of the remote shared object flow. A Flash client movie subscribes to a
remote shared object by issuing a SharedObject.getRemote command, and provides a
SharedObject.onSync method with it. The client then connects the remote shared object to the
NetConnection object by issuing a SharedObject.connect command. The server sends out a
synchronization message for the shared object, but no method on the server side is invoked. This
synchronization message causes the SharedObject.onSync method on the client to be called.
When the client, the server, or any other movie instance makes a change to the shared object, the
server again sends out a synchronization message for the shared object. Again, no server method is
called, and the synchronization message from the server causes the SharedObject.onSync
method on each client to be called.
CLIENT 1 FLOW
SERVER FLOW
CLIENT 2 FLOW
getRemote("obj1")
getRemote("obj1")
connect
connect
onSync
"clear"
Sync
(Initialize data)
onSync
"clear"
Sync
(Update data)
onSync
"change"
obj1.data.x=4
onSync
"success"
Shared object flow
Designing Flash Communication Server applications
Now that you have a basic understanding of the structure and capabilities of Flash
Communication Server, you need to consider how to design your own applications to best take
advantage of client-side and server-side scripting.
When designing a Flash Communication Server application, determine what capabilities it will
have, what it requires of the server, and whether the application’s capabilities call only for clientside ActionScript or for server-side ActionScript as well. If you want the server to act as a conduit
for your audio, video, and text streams, you might need only client-side ActionScript; if you want
the server to process data, you’ll need to write server-side ActionScript as well.
Although building client-server applications may seem complicated, in many cases it is easier to
write a small amount of server-side code than it is to handle everything in client-side code. (Of
course, in some cases, only server-side code can accomplish certain tasks.) For example, serverside scripts can act as a “gatekeeper” for your application; by setting certain data on the server, you
can eliminate race conditions (multiple clients attempting to perform the same task at the same
time) and may eliminate the need for client-side code to handle conflict resolution.
About Flash Communication Server Applications
29
When designing your application, note the functionality used on both the client and the server.
For a description of how to use the client-side and server-side objects to fulfill the requirements
on both sides, see the Client-Side Communication ActionScript Dictionary and the Server-Side
Communication ActionScript Dictionary.
In general, when you write your ActionScript code, you divide it as follows:
• On the client side, write code for connecting, streaming data, getting and setting shared object
data, getting status information, and disconnecting.
• On the server side, write code for listening for when an application starts, accepting a
connection, providing methods to be invoked by clients, getting and setting shared object data,
getting status information, and listening for when an application stops and a connection ends.
In more advanced applications, you might also be connecting to external databases, application
servers, or other Flash Communication Servers.
For a simple illustration of using client-side and server-side ActionScript in your application, see
“Sample 4: Hello Server” on page 38. For more detailed suggestions on how to design and
implement your Flash Communication Server applications, see Chapter 4, “Application
Development Tips and Tricks,” on page 51.
30
Chapter 2
CHAPTER 3
Sample Applications
This chapter provides examples of a number of Macromedia Flash Communication Server MX
programming techniques, and illustrates how to use many of the Flash Communication Server
objects. These samples are different from the ones provided in the flashcom application directory,
although certain concepts are illustrated in both sets of samples. In general, the samples in this
chapter are simpler than a full-blown application would be; they have been designed specifically
to illustrate certain features in context.
About the samples
The samples in this chapter are progressive: skills shown in later samples rely on information you
gain from working with the prior samples. If you’re not sure how to proceed with a step, check an
earlier sample. You can read more about the commands used here in the Client-Side
Communication ActionScript Dictionary and the Server-Side Communication ActionScript
Dictionary. For the core ActionScript commands, see the online ActionScript Dictionary in
Macromedia Flash MX.
Each sample section provides an overview of the sample, a description of the user experience, a
procedure for creating the user interface and the ActionScript code, and a suggested methodology
for testing your application.
Files associated with the samples (FLA, SWF, HTML, and ASC) are located in subdirectories of
the \Macromedia\Flash MX\flashcom_help\help_collateral directory.
Creating your working environment
This section explains what you need to know before trying to re-create any of the samples.
The samples assume that the Flash Communication Server is
running. For more information, see “Starting the service” on page 18.
Make sure the server is running.
The samples assume you’re using the Flash MX authoring environment
on the same computer that is running the Flash Communication Server. If that isn’t the case, add
your server name to all the connect commands in the samples. For example, if your server is
running at myServer.myDomain.com, change a line like this:
Specifying the server URI.
new_nc.connect("rtmp:/doc_record/room_01");
to this:
new_nc.connect("rtmp://myServer.myDomain.com/doc_record/room_01");
Note: Be sure you use two slashes (//) after rtmp: in the revised code. The use of a single slash is supported only
when the SWF application and the Flash Communication Server are running on the same machine.
Sample Applications
31
You should have Flash MX configured to publish both SWF and
HTML files. To specify formats to be created during publishing, choose File > Publish Settings in
the Flash MX authoring environment.
Specifying publishing formats.
Unless otherwise noted, your client-side ActionScript code
should be attached to a layer on the first keyframe of your FLA file, not to individual objects.
Writing client-side ActionScript code.
Writing server-side ActionScript code. For the samples that use server-side ActionScript code,
your main.asc file should be written in a JavaScript editor, such as Macromedia Dreamweaver
MX. For more information on appropriate JavaScript editors, see “Setting up your development
environment” on page 17. Also, remember that server-side code is case-sensitive.
Add the following code as the first two lines in each sample as
you re-create it (these lines are in each sample FLA but are not included in the steps for recreating the sample):
Initializing your client-side code.
stop();
#include "netdebug.as"
The first line simply ensures that movies stop running before the sample starts. The second line
enables the use of the NetConnection debugger, which lets you trace and diagnose details about
the streams and shared objects your application is using. For more information on the debugger,
see “Using the NetConnection Debugger” on page 105.
Acknowledging the user’s right to privacy. Before
recording or broadcasting anyone’s image or
voice, it’s important to inform that person of your intention and to gain their consent or
agreement. In the samples that illustrate how to record or broadcast audio or video, you’ll see
instructions to add a text box that informs users they are being recorded or broadcasted and
gives them the opportunity to exit the application. For a more robust means of letting users
decide whether they want to be recorded or broadcasted, or not, see “Adding a privacy module”
on page 60.
If you have server administration privileges, you can view details
about an application while you are testing it, such as log messages it is generating, values of shared
objects, and so on. To do so, open the Communication App inspector in Flash MX (Window >
Communication App Inspector), connect to the Flash Communication Server, select the
application instance you want to monitor, and choose View Detail. For more information, see
“Using the Communication App inspector” on page 97.
Monitoring running applications.
Sample 1: Recording a Stream
This recording sample records a video stream. When the user clicks the Play button, the recorded
data is streamed back to the Flash movie.
About the sample
The user opens the doc_record.html file. After the user grants access to its video device, the live
output appears in the larger video area called Live_video. When the user clicks the Record
button, the live camera’s stream is sent for recording on the Flash Communication Server. When
the user clicks the Stop button, the server stops recording. When the user clicks the Play button,
the server sends the recorded stream back to the application, and the recorded stream plays in the
smaller video area.
32
Chapter 3
Re-creating the sample
The doc_record.fla file provides the ActionScript for getting a camera, attaching it to a Video
object, creating a network connection to the server, recording the camera data on an outgoing
stream to the server, and then playing that recorded stream in a second Video object.
When you record a stream in a Flash application, the server creates files with the extensions .flv
and .idx. For more information, see “Recorded stream files” on page 68.
See “Creating your working environment” on page 31 before you start to re-create the sample.
To create the user interface for this sample:
1
In the Flash MX authoring environment, select File > New to open a new file.
2
To add a Video object to your library, open the Library panel (Window > Library) and add an
embedded Video object by selecting New Video from the library’s Options menu.
3
Drag two embedded Video objects from the library onto the Stage, and give them the instance
names Live_video and Replay_video.
4
To add buttons to your movie, open the Components panel by selecting Window >
Components.
5
To add the button for recording, drag a push button from the Components panel onto the
Stage, placing it below the Live_video video object. In the Property inspector, give it the
instance name Record_btn, the label Record, and the click handler doRecord.
6
To add the button for playing, repeat the previous step to create a push button with the
instance name Play_btn, the label Play, and the click handler doPlay. Place this button
beneath the Replay_video video object.
7
To add the privacy message, select the Text tool and draw a text box. In the Property inspector,
select Static Text for the type of text box. Type (or copy and paste) text such as the following
text into the text box: Your image will be recorded or broadcasted and could be published at
a later date. If you don’t approve, please exit this application.
Note: Please note that this text is provided merely as an example, and the precise wording of the text that you
use will be dictated by the nature of your application and/or service and any privacy, legal, or other issues raised
by your application and/or service.
8
Create a directory named doc_record in your flashcom application directory, and save the file
as doc_record.fla in this directory.
To write the client-side ActionScript for this sample:
1
Select the keyframe in the Timeline and open the Actions panel (Window > Actions).
2
In the Actions panel, stop the progress of the movie.
stop();
3
Get and attach a camera.
// Attach the video device output from client_cam
// to the Live_video video clip
client_cam = Camera.get();
Live_video.attachVideo(client_cam);
Sample Applications
33
4
In the initStreams function, make a connection to the server. Create the output stream for
sending the video data to the server, and the input stream for the data coming back from the
server. Then attach the input stream to the Replay_video video clip.
function initStreams() {
// Make a connection to the application on the server
client_nc = new NetConnection();
// Note that this call includes the protocol, rtmp, the
// app name, doc_record, and the room, room_01
client_nc.connect("rtmp:/doc_record/room_01");
// Handle status message
client_nc.onStatus = function(info) {
trace("Level: " + info.level + " Code: " +
}
info.code);
// Create output stream
out_ns = new NetStream(client_nc);
// Create input stream
in_ns = new NetStream(client_nc);
Replay_video.attachVideo(in_ns);
}
// Connect to server and set up streams
initStreams();
5
Create the event handler for the Record button. If the user selected the button when the label
was Record, then attach video data from the camera to the output stream and publish it. If the
button label is Stop, close the stream.
function doRecord() {
if (Record_btn.getLabel() == "Record") {
// Start publishing the camera output as a recorded stream
out_ns.attachVideo(Camera.get());
out_ns.publish("my_recorded_stream", "record");
// Don’t allow the user to play when recording
Play_btn.setEnabled(false);
// Change the button label
Record_btn.setLabel("Stop");
} else if (Record_btn.getLabel() == "Stop") {
// Close output stream
out_ns.close();
// Now that you’re finished recording, allow the user to play
Play_btn.setEnabled(true);
// Change the button label
Record_btn.setLabel("Record");
}
}
34
Chapter 3
6
Create the event handler for the Play button that plays the stream recorded on the server.
function doPlay() {
in_ns.play("my_recorded_stream");
}
To test your sample application:
1
In the Flash MX authoring environment, after you have saved your work, publish it by
selecting File > Publish.
2
Open the SWF file in the application directory or, in the Flash MX authoring environment,
choose Control > Test Movie.
Sample 2: Shared Text
This sample allows users to share text. Any user can update the text on the stage, and other users
can see it immediately updated on their own stages.
About the sample
User 1 opens the doc_text.html file and is able to type text in the text box. User 2 opens the same
movie and automatically connects to the same shared object. User 2 can see the text as user 1
types it. When user 2 edits the text, user 1 can view the changes as they occur.
Re-creating the sample
The doc_text.fla file uses only a few lines of code to connect to the Flash Communication Server,
create and connect to a remote shared object, and update the shared object on the Stage that all
connected clients are viewing.
This sample introduces the idea of shared objects (for more information, see the Client-Side
Communication ActionScript Dictionary). In this sample, you call
SharedObject.getRemote("sharedtext", new_nc.uri, false). These shared objects are
synchronized with the server over an RTMP connection. Shared objects consist of name-value
pairs and can be updated by any client connected to the application and the shared object.
See “Creating your working environment” on page 31 before you start to re-create the sample.
To create the user interface for this sample:
1
In the Flash MX authoring environment, select File > New to open a new file.
2
From the toolbox, select the Text tool and draw a text box.
3
In the Property inspector (Window > Properties), select Input Text for the type of text box, and
give it the instance name TypingStage.
4
Create a directory named doc_text in your flashcom application directory, and save the file as
doc_text.fla in this directory.
To write the client-side ActionScript for this sample:
1
Select the keyframe in the Timeline and open the Actions panel (Window > Actions).
Sample Applications
35
2
Open a connection to the server.
// Open connection to server
client_nc = new NetConnection();
client_nc.connect("rtmp:/doc_text/room_01");
3
Handle the messages coming from the server.
// Handle status message
client_nc.onStatus = function(info) {
trace("Level: " + info.level + "
Code: " +
}
4
info.code);
Initialize the typing stage.
TypingStage.text = "";
5
Get a remote shared object to hold the text data from the client.
// Create a remote shared object. client_nc.uri is the URI of the
// NetConnection the shared object will use to connect to the
// server.
text_so = SharedObject.getRemote("sharedtext", client_nc.uri, false);
6
When you get a shared object, make sure you connect to it.
// The following is very important, nothing happens otherwise
text_so.connect(client_nc);
7
Create an onSync callback function to handle the text message.
// Each time something changes in the shared object, the server
// sends out a synchronization message. This onSync handler
// updates the movie based on the information.
text_so.onSync = function(list) {
// Update the text area in the typing stage with the latest
// text from the shared object. The ’for’ loop condition searches
// through the list of changes, and the ’if’ condition ensures
// that we apply the relevant change only if someone other than
// this client has changed the value.
for (var i = 0; i < list.length; i++)
if (list[i].name == "textValue" && list[i].code != "success")
{
TypingStage.text = text_so.data.textValue;
break;
}
};
8
When the text in the typing stage changes, update the shared object with the new text.
// Update the shared object every time the user types in new text
TypingStage.onChanged = function()
{
text_so.data.textValue = TypingStage.text;
};
To test your sample application:
36
1
In the Flash MX authoring environment, after you have saved your work, publish it by
selecting File > Publish.
2
Open two instances of the SWF file in the application directory.
3
Type in one text box to see the other immediately updated.
Chapter 3
Sample 3: Shared Ball
This sample allows users to move a ball around the screen and to watch while other participants
move the ball around.
About the sample
The previous sample shared text, but you can share graphics as well. This sample allows two users
to share the same ball on the Stage. When a user opens the doc_sharedball.htm file, there is a ball
on the SWF Stage. When any user moves the ball, all other connected users see it move.
Re-creating the sample
The doc_sharedball.fla provides the ActionScript for creating a remote shared object that
synchronizes and updates the ball position for each user.
See “Creating your working environment” on page 31 before you start to re-create the sample.
To create the user interface for this sample:
1
In the Flash MX authoring environment, select File > New to open a new file.
2
From the toolbox, select the Circle tool and draw a circle. With the circle still selected, convert
it to a movie clip by selecting Insert > Convert to Symbol, and name it ball. In the Property
inspector (Window > Properties), give it the instance name SharedBall_mc.
3
Create a directory named doc_sharedball in your flashcom application directory, and save the
file as doc_sharedball.fla in this directory.
To write the client-side ActionScript for this sample:
1
Select the keyframe in the Timeline and open the Actions panel (Window > Actions).
2
In the Actions panel, stop the progress of the movie.
stop();
3
Create a new network connection to connect to the server and handle any status messages with
the onStatus function.
// Create a connection
client_nc = new NetConnection();
// Show connection status in output window
client_nc.onStatus = function(info) {
trace("Level: " + info.level + "
Code: " +
};
info.code);
// Connect to the application
client_nc.connect("rtmp:/doc_sharedball/room_01");
4
Create a remote shared object to hold the x/y coordinates of the ball.
// Create a remote shared object
ball_so = SharedObject.getRemote("position", client_nc.uri, false);
// Update ball position when another participant moves the ball
ball_so.onSync = function(list) {
SharedBall_mc._x = ball_so.data.x;
SharedBall_mc._y = ball_so.data.y;
};
Sample Applications
37
5
When you get a shared object, make sure you connect it to the NetConnection object.
// Connect to the shared object
ball_so.connect(client_nc);
6
Create the function that updates the shared object data with the position of the ball.
// Manipulate the ball
SharedBall_mc.onPress = function() {
this.onMouseMove = function() {
ball_so.data.x = this._x = _root._xmouse;
ball_so.data.y = this._y = _root._ymouse;
// Constrain the ball to the stage
if (SharedBall_mc._x>=Stage.width) {
SharedBall_mc._x = Stage.width - 50;
}
if (SharedBall_mc._x<=0) {
SharedBall_mc._x = 50;
}
if (SharedBall_mc._y>=Stage.height) {
SharedBall_mc._y = Stage.height - 50;
}
if (SharedBall_mc._y<=0) {
SharedBall_mc._y = 50;
}
};
};
7
When the user releases the ball, remove the hold on it.
// Release control of the ball
SharedBall_mc.onRelease = SharedBall_mc.onReleaseOutside=function () {
delete this.onMouseMove;
};
To test your sample application:
1
In the Flash MX authoring environment, after you have saved your work, publish it by
selecting File > Publish.
2
Open two instances of the SWF file in the application directory.
3
Move the ball in one instance to see the other immediately updated.
Sample 4: Hello Server
This sample is the first to use server-side ActionScript. In it, you write your client-side
ActionScript in Macromedia Flash MX. Then, you write a corresponding function in server-side
ActionScript that you store in a main.asc file. First, however, you begin with the user interface.
About the sample
The user opens the doc_hello.swf file, enters a name, and gets a message back from the server that
includes the user’s name.
Re-creating the sample
The doc_hello.fla file provides the ActionScript for sending information from the server to the
client.
See “Creating your working environment” on page 31 before you start to re-create the sample.
38
Chapter 3
To create the user interface for this sample:
1
In the Flash MX authoring environment, select File > New to open a new file.
2
From the toolbox, select the Text tool and draw a text box. In the Property inspector (Window
> Properties), select Input Text for the type of text box and give it the instance name User.
3
Add a dynamic text box for a debug window by selecting the Text tool and drawing another
text box. In the Property inspector, select Dynamic Text for the type of text box, and give it the
instance name Message.
4
To add the button for connecting to the server, open the Components panel (Window >
Components) and drag a push button onto the Stage. In the Property inspector, give it the
instance name Connect_btn, the label Connect, and the click handler doConnect.
5
Create a directory named doc_hello in your flashcom application directory, and save the file as
doc_hello.fla in this directory.
To write the client-side ActionScript for this sample:
1
Select the keyframe in the Timeline and open the Actions panel (Window > Actions).
2
In the Actions panel, stop the progress of the movie.
stop();
3
Open a connection and handle any status message.
// Open connection to the server
client_nc = new NetConnection();
// Handle status message
client_nc.onStatus = function(info) {
trace("Level: " + info.level + "
Code: " +
}
info.code);
Sample Applications
39
4
Create the event handler for the Connect button. If the user selected the button when the label
was Connect, then connect to the server. If the button label is Disconnect, close the
connection.
// Event handler for Connect_Btn
function doConnect() {
// If user wants to connect...
if (Connect_btn.getLabel() == "Connect") {
// Connect to the chat application
client_nc.connect("rtmp:/doc_hello/room_01", User.text);
// Update button label
Connect_btn.setLabel("Disconnect");
// If user wants to disconnect...
} else if (Connect_btn.getLabel() == "Disconnect") {
// Close connection
client_nc.close();
// Reset button label
Connect_btn.setLabel("Connect");
// Reset the text fields
user.text = "";
message.text = "";
}
}
5
Write the function the server will call to return the message to the client.
// Callback function server calls to send message back to
// this client.
client_nc.msgFromSrvr = function(msg) {
var msg;
_root.Message.text = msg;
}
40
Chapter 3
To write the server-side ActionScript for this sample:
1
Create a new file using your server-side ActionScript editor, and write an event handler for
when the user connects. In it, you’ll receive the name passed in by the client, accept the client
connection, create a message that uses the client’s name, and call the client msgFromSrvr
function to return the message.
application.onConnect = function(newClient, name) {
// Give this new client the same name as the user name
newClient.name=name;
// Accept the new client’s connection
application.acceptConnection(newClient);
// Create a customized "Hello [client]" message
// that the server will send to the client
var msg = "Hello! You are connected as: " + newClient.name;
// Print out status message in the application console
trace("Sending this message: " + msg);
// Call the client function, message, and pass it the msg
newClient.call("msgFromSrvr", false, msg);
}
2
Save the file as main.asc in a doc_hello directory under the flashcom applications directory.
Note: Save this main.asc file where you’ve chosen to store your server-side application files. For example, if you
chose Developer Install during installation, save this file to the same directory where you’ve stored the client-side
SWF file and its source FLA file. If you chose Production Install and you have a Web server, the Flash
Communication Server will look for your client-side files under \flashcom\applications in your Web server's root
directory and will look for your server-side application files (including this main.asc file) under \applications in the
directory you specified during installation. The <AppsDir> tag in the Vhost.xml server configuration file contains
the location of your flashcom application directory. For more information see Chapter 1, “The flashcom
application directory,” on page 15.
To test your sample application:
1
In the Flash MX authoring environment, after you have saved your work, publish it by
selecting File > Publish.
2
Open the SWF file in the application directory.
3
Overwrite the text in the login box by typing your name, then click Connect. You’ll see a
message like this one:
Hello! You are connected as: [your name]
Sample 5: Text Chat
In the Shared Text example (see “Sample 2: Shared Text” on page 35), you created a remote
shared object that enabled a user to view another user’s typing in real time, letter by letter. In this
next sample, you’ll create a different kind of shared object that sends whole messages on
command. You’ll also add several elements to make the text chat application more versatile,
including fields for logging in, typing in a chat room name, and viewing the list of current
participants.
Sample Applications
41
About the sample
In a chat room, you want to view current users dynamically. When users log in to a room, the list
should be updated; when users log off, they should be removed from the list. It’s best to do this
processing work on the server, because keeping data centrally on the server means that any client
can come and go, and the data will always be accurate and available.
In addition, in this example, the server doesn’t simply hand off the text from one client to
another, it actually makes changes to the message by adding the name of the user who typed it.
Because you expect the server to provide this functionality, you need to write some server-side
ActionScript to handle this work.
Finally, this example also illustrates how to dynamically add an instance name to a
command based on data entered by the user.
NetConnection.connect
Re-creating the sample
The doc_textchat.fla file provides the ActionScript for letting multiple users share text in
real time.
See “Creating your working environment” on page 31 before you start to re-create the sample.
To create the user interface for this sample:
1
In the Flash MX authoring environment, select File > New to open a new file.
2
From the toolbox, select the Text tool and draw two text boxes. In the Property inspector
(Window > Properties), select Input Text for the type of text box, and give one the instance
name User, and the other, Room.
3
From the toolbox, select the Text tool and draw another text box. In the Property inspector,
select Input Text for the type of text box, and give it the instance name Message.
4
From the toolbox, select the Text tool and draw a fourth text box. In the Property inspector,
select Dynamic Text for the type of text box, and give it the instance name History.
5
To add a place where users are listed, open the Components panel (Windows > Components),
drag the List Box component onto the Stage, and give it the instance name People.
6
To add the button for connecting to the server, drag a push button from the Components
panel onto the Stage. In the Property inspector, give it the instance name Connect_btn, the
label Connect, and the click handler doConnect.
7
To add the button for sending messages, drag a push button from the Components panel onto
the Stage. In the Property inspector, give it the instance name Send_btn, the label Send, and
the click handler doSend.
8
Create a directory named doc_textchat in your flashcom application directory, and save the file
as doc_textchat.fla in this directory.
To write the client-side ActionScript for this sample:
1
Select the keyframe in the Timeline and open the Actions panel (Window > Actions).
2
In the Actions panel, stop the progress of the movie.
stop();
42
Chapter 3
3
Provide a value for the maximum scrolling of the History text box component.
// Set maximum scroll
History.maxscroll = 1000;
4
Prevent the user from sending until after the user has connected to the server.
// Don’t allow the user to send until after connection
_root.Send_btn.setEnabled(false);
5
Create a new network connection.
// Open a connection to the server
client_nc = new NetConnection();
6
Provide an onStatus function to handle any status messages.
// If connection is closed, clear the History and the list
client_nc.onStatus = function(info) {
trace("Level: " + info.level + "
Code: " +
info.code);
if (info.description == "NetConnection.Connect.Closed") {
History.text = "";
_root.People.removeAll();
}
}
7
Create the event handler for the Connect button. If the user selected the button when the label
was Connect, then connect to the server and update the buttons.
function doConnect() {
if (Connect_btn.getLabel() == "Connect") {
// Connect to the chat application.
// The second parameter, _root.Room.text,
// is the application instance.
_root.client_nc.connect("rtmp:/doc_textchat/" + _root.Room.text,
_root.User.text);
// Update button label
Connect_btn.setLabel("Disconnect");
// Enable send button
_root.Send_btn.setEnabled(true);
8
In the same doConnect function, create a remote shared object and connect to it.
// Create a remote shared object to keep track
// of the users. The value client_nc.uri is the URI of the
// NetConnection the shared object will use to connect to the
// server. I.e., the one just created.
users_so = SharedObject.getRemote("users_so", _root.client_nc.uri,
false);
// Attach the shared object to client_nc
users_so.connect(_root.client_nc);
Sample Applications
43
9
In the same doConnect function, create the onSync method to handle the change in users.
// When the list of users_so is updated, refresh the
// People list box.
users_so.onSync = function(userList) {
_root.People.removeAll();
for ( var i in users_so.data) {
if (users_so.data[i] != null) {
_root.People.addItem(users_so.data[i]);
}
}
// Sort alphabetically, because order returned
// is not guaranteed to be consistent.
_root.People.sortItemsBy("label", "ASC");
}
10
Provide a callback function to be called by the server.
// Update the shared object with the message.
users_so.msgFromSrvr = function(msg) {
_root.History.text += msg;
_root.History.scroll = _root.History.maxscroll;
historyScroll.setScrollTarget(history);
historyScroll.setScrollPosition(_root.History.maxscroll);
}
}
11
If the label on the Connect button is Disconnect, then close the connection and reset the
buttons.
else if (Connect_btn.getLabel() == "Disconnect") {
// Close connection
_root.client_nc.close();
// Don’t allow the user to send when not connected
_root.Send_btn.setEnabled(false);
// Rest button label
Connect_btn.setLabel("Connect");
}
} // doConnect function ends here
12
Create an event handler for when the user selects Send. In this function, if there’s any text in
the Message input text box, call the server function, msgFromClient, and pass it the
Message.text text.
// Send the message text by calling the server message function
function doSend() {
// If there’s message text, pass it to the server function msgFromClient
if (length(_root.Message.text) > 0) {
_root.client_nc.call("msgFromClient", null, _root.Message.text);
}
// Clear the message text
_root.Message.text = "";
}
44
Chapter 3
13
Create the setHistory function that the server calls to update the text in the History
dynamic text box.
// Update the History on the server with the message
client_nc.setHistory = function(msg) {
_root.History.text = msg;
}
To write the server-side ActionScript for this sample:
1
Create a new file using your server-side ActionScript editor, and write the event handler
onAppStart for initializing the application variables.
application.onAppStart = function()
{
trace("Begin sharing text");
// Get the server shared object users_so
application.users_so = SharedObject.get("users_so", false);
// Initialize the history of the text share
application.history = "";
// Initialize the unique user ID
application.nextId = 0;
}
2
Write the event handler onConnect for managing users and sending the history to all clients.
application.onConnect = function(newClient, name)
{
// Make this new client’s name the user’s name
newClient.name = name;
// Create a unique ID for this user while incrementing the
// application.nextID.
newClient.id = "u" + application.nextId++;
// Update the users_so shared object with the user’s name
application.users_so.setProperty(newClient.name, name);
// Accept the client’s connection
application.acceptConnection(newClient);
// Call the client function setHistory, and pass
// the initial history
newClient.call("setHistory", null, application.history);
// The client will call this function to get the server
// to accept the message, add the user’s name to it, and
// send it back out to all connected clients.
newClient.msgFromClient = function(msg) {
msg = this.name + ": " + msg + "\n";
application.history += msg;
application.users_so.send("msgFromSrvr", msg);
}
}
Sample Applications
45
3
Write the event handler onDisconnect to clean up.
application.onDisconnect = function(client)
{
trace("disconnect: " + client.name);
application.users_so.setProperty(client.name, null);
}
4
Save the file as main.asc in a doc_textchat directory under the flashcom applications directory.
Note: Save this main.asc file where you’ve chosen to store your server-side application files. For more
information see Chapter 1, “The flashcom application directory,” on page 15.
To test your sample application:
1
In the Flash MX authoring environment, after you have saved your work, publish it by
selecting File > Publish.
2
Open two instances of the SWF file in the application directory.
3
In each instance, type a user name and room name, and select Connect. (Choose different user
names but the same room name in both instances.) The logged-in users are listed in the box.
Type text and click Send, and all logged-in clients see the message.
Sample 6: Record a List
This sample lets users record a session and then choose from a playback list which session they
want to play back.
About the sample
In this sample, the user can record an audio stream, which then shows up in a playlist. The user
can also select from the playlist to play back recorded streams. Multiple users can join this
application to record and play back audio streams.
Re-creating the sample
The doc_list.fla file provides the ActionScript to create an audio playback list. By expanding upon
this sample, you can create playback lists of video sessions, text sessions, drawing sessions,
presentations, and more.
See “Creating your working environment” on page 31 before you start to re-create the sample.
To create the user interface for this sample:
46
1
In the Flash MX authoring environment, select File > New to open a new file.
2
From the toolbox, select the Text tool and draw a text box. In the Property inspector (Window
> Properties), select Input Text for the type of text box, and give it the instance name
ListItem.
3
To create a place for the playlist to be displayed, open the Component panel (Windows >
Components), drag the List Box component onto the Stage, and give it the instance name
Play_list.
4
To add the button for recording, drag a push button onto the Stage. In the Property inspector,
give it the instance name Record_btn, the label Record, and the click handler doRecord.
5
To add the button for recording, drag a push button onto the Stage. In the Property inspector,
give it the instance name Play_btn, the label Play, and the click handler doPlay.
Chapter 3
6
To add a Video object to your library, open the Library panel (Window > Library) and add an
embedded Video object by selecting New Video from the library’s Options menu.
7
To add the Video object for playing back the recording, drag a Video object onto the Stage. In
the Property inspector, give it the instance name Replay_video.
8
From the toolbox, select the Text tool and draw a text box. In the Property inspector (Window
> Properties), select Dynamic Text for the text box type, and give it the instance name
Status_msg.
9
To add the privacy message, select the Text tool and draw a text box. In the Property inspector,
select Static Text for the text box type. Type (or copy and paste) text such as the following text
into the text box: Your image will be recorded or broadcasted and could be published at a
later date. If you don’t approve, please exit this application.
Note: Please note that this text is provided merely as an example, and the precise wording of the text that you
use will be dictated by the nature of your application and/or service and any privacy, legal, or other issues raised
by your application and/or service.
10
Create a directory named doc_list in your flashcom application directory, and save the file as
doc_list.fla in this directory.
To write the client-side ActionScript for this sample:
1
Select the keyframe in the Timeline and open the Actions panel (Window > Actions).
2
In the Actions panel, stop the progress of the movie.
stop();
3
Create a new connection to the server, handle the status messages, and connect to the server.
// Create a connection
client_nc = new NetConnection();
// Handle status message
client_nc.onStatus = function(info) {
trace("Level: " + info.level + "
Code: " +
}
info.code);
// Connect to the application
client_nc.connect("rtmp:/doc_list/room_01");
4
Create a remote shared object to hold the recordings that the user will make.
// Create a remote shared object
rec_so = SharedObject.getRemote("recordings", client_nc.uri, false);
5
As new recordings are added to the shared object, update the play list.
// Update the list of recordings as new items are added
rec_so.onSync = function(list) {
_root.Play_list.removeAll();
// Fill list box with recordings
for (var i in _root.rec_so.data) {
_root.Play_list.addItem(i);
}
}
Sample Applications
47
6
Remember to connect the shared object to the NetConnection object.
// Connect to the shared object
rec_so.connect(client_nc);
7
Create an event handler for when the user selects Record, which publishes the new recordings
and updates the shared object.
function doRecord() {
if (ListItem.text == undefined || ListItem.text == "") {
Status_msg.text="Please enter a title.";
} else if (Record_btn.getLabel() == "Record") {
Status_msg.text="Recording...";
// Stop any currently playing stream
if (Play_btn.getLabel() == "Stop")
doPlay();
// Don’t allow the user to play while recording
Play_btn.setEnabled(false);
// Create output stream
out_ns = new NetStream(client_nc);
// Start publishing the audio output as a recorded stream
out_ns.attachAudio(Microphone.get());
// Publish the stream
out_ns.publish(ListItem.text, "record");
// This allows the entering of single-word list items
_root.rec_so.data[ListItem.text] = ListItem.text;
_root.rec_so.flush();
// Change the button label
Record_btn.setLabel("Stop");
8
If the button label is Stop, close the output stream and allow the user to play from the list.
} else if (Record_btn.getLabel() == "Stop") {
// Close output stream
out_ns.close();
// Now that you’re finished recording, allow the user to play
Play_btn.setEnabled(true);
// Change the button label
Record_btn.setLabel("Record");
// Clear the ListItem.text
ListItem.text="";
Status_msg.text="...";
}
}
48
Chapter 3
9
Create the event handler for the Play button. If the user selects Play, update the button label,
create an input stream, and play the selected recording.
// Do Play
function doPlay ()
{
if (Play_btn.getLabel() == "Play") {
Status_msg.text="Playing...";
Play_btn.setLabel("Stop");
// Get the selected recording
var playFileName = Play_list.getSelectedItem().label;
// Create input stream and play the recording
in_ns = new NetStream(_root.client_nc);
in_ns.play(playFileName);
in_ns.onStatus = function(info)
{
// Handle errors and stream stopping
if (info.level == "error" || info.code == "NetStream.Play.Stop") {
Status_msg.text="Stopped sending data...";
Play_btn.setLabel("Play");
}
}
Replay_video.attachAudio(in_ns);
10
If the user selects the Play button when the label is set to Stop, close the input stream and
update the button label.
} else if (Play_btn.getLabel() == "Stop") {
Status_msg.text="...";
//Close the stream
in_ns.onStatus = null;
in_ns.close();
Play_btn.setLabel("Play");
}
}
To test your sample application:
1
In the Flash MX authoring environment, after you have saved your work, publish it by
selecting File > Publish.
2
Open two instances of the SWF file in the application directory.
3
Add recordings to the playlist and play them back. Remember that titles containing more than
one word are not supported.
Sample Applications
49
50
Chapter 3
CHAPTER 4
Application Development Tips and Tricks
This chapter is designed to supplement, not replace, application development and best practices
recommendations included in Using Flash MX. For general information on how Macromedia
Flash MX streams data and how you can test and improve the performance of your Flash movies,
see “Streaming and file optimization techniques for Flash Player” on the Macromedia Flash
Support Site (http://www.macromedia.com/go/flash_stream_optimize).
The rest of this chapter points out some useful information specific to Macromedia Flash
Communication Server MX. It includes general sections on application design, coding
conventions, and debugging techniques, followed by information relevant to specific objects. (All
objects are client-side objects except where noted.)
The best way to use this chapter is to skim it once in its entirety before you begin writing Flash
Communication Server programs, to familiarize yourself with its contents. Then, as you begin
coding, refer to it as needed.
Application design and development
This section includes recommendations that apply to all Flash Communication Server
applications you write.
Designing for portability across servers
If your application (SWF file) is on the same computer that is running the Flash Communication
Server, you can use rtmp:/appName/instanceName as a shortcut version of rtmp://
server.domain.com/appName/instanceName. The use of a single slash followed by the
application name indicates a relative path and lets you move the files to a different server without
changing the code.
Designing for interdependence
Because the client-side and server-side ActionScript code are part of the same application, they
must work interdependently. One example of the interdependency between the client and server
code is the server-side ActionScript call method, which acts differently according to which
object it is associated with—a client-side NetConnection object or a server-side Client object.
51
For example, the code below shows how you could create a network connection on the client side,
and then make a call to it from the server side:
// This is client-side ActionScript in the FLA
my_nc = new NetConnection();
my_nc.someClientMethod = function()
{
// code here
}
// This is server-side ActionScript in the main.asc file
clientObj.call("someClientMethod");
The argument passed to clientObj.call must be a previously defined method of the client-side
NetConnection object. This is because any method in the client code that may be called by the
server must be a property of a client-side NetConnection object.
In contrast, suppose you use the call method from the client, to call a method on the server side:
// This is client-side ActionScript in the FLA
NetConnection.call("someServerMethod");
// This is server-side ActionScript in the main.asc file
client.prototype.someServerMethod = function()
{
// code here
}
// The following code would also work
onConnect(newClient)
{
newClient.someServerMethod = function()
{
// code
}
}
In this case, the argument passed to NetConnection.call must be a method of the server-side
Client object that was previously defined in the main.asc file. This is because any method in the
server code that may be called by the client must be a property of a server-side Client object.
Using multiple files
As your application increases in complexity, don’t try to use a single script to do everything: break
your functionality up into multiple scripts, each of which provides a specific set of functionality.
If you do use more than one file, you can optimize performance by using a “once-only inclusion”
definition to prevent a file from being evaluated more than once.
On the client side
For example, on the client side, if you want a file named my_file.as to be available to other files in
your application, include the following code in my_file.as:
if (_root._my_file_as == null) {
_root._my_file_as = true;
// All the code for myfile.as goes here
}
Then, in your other files, issue the following command:
#include "my_file.as";
52
Chapter 4
On the server side
On the server side, you must implement slightly different code, using global instead of _root.
Here, assume you want to include a file called my_file.asc.
if (global._my_file_asc == null) {
global._my_file_asc = true;
// All the code for myfile.asc goes here
}
Also, instead of using the #include command, the server-side script uses a load command:
load("my_file.asc");
Using unique instance names
A typical deployment environment consists of multiple users connecting to the same server at the
same time. To avoid collisions such as streams getting crossed or shared objects being overwritten,
use unique instance names in your NetConnection.connect commands. This technique is
discussed in detail elsewhere in this manual (see “Applications and application instances” on page
14). It is included here as a reminder of how important this is to Flash Communication Server
application development.
Adding the NetConnection debugger file
Get in the habit of including the NetConnection debugger file in the first line of your client-side
source code. Adding the following ActionScript to your FLA file allows you to view important
details about your network connection to the server.
#include "NetDebug.as"
Forcing the Player Settings panel to appear
When an application tries to access the user’s camera or microphone, or to save data on the client
machine, the Flash Player displays the Player Settings dialog boxes to get permission. The user can
also open the Player Settings panels by right-clicking (Windows) or Control-clicking (Macintosh)
on the player Stage. If you want to force the Player Settings panels to appear, use the following
code:
// Opens the panel the user viewed last
System.ShowSettings();
// Opens the Privacy panel
System.ShowSettings(0);
// Opens the Local Storage panel
System.ShowSettings(1);
// Opens the Microphone panel
System.ShowSettings(2);
// Opens the Camera panel
System.ShowSettings(3);
For example, if your application requires the use of a camera, you can inform the user that they
must choose “Allow” in the Privacy Settings panel, and then issue a System.showSettings(0)
command. (Make sure your Stage size is at least 215 by 138 pixels; this is the minimum size Flash
requires to display the panel.) For more information, see System.showSettings in the ClientSide Communication ActionScript Dictionary.
Application Development Tips and Tricks
53
Managing bandwidth
You can control the amount of data the server sends to each client by providing an approximate
bandwidth capacity. There are a few ways to do so. One way is to configure the capacity for the
Flash Communication Server in the configuration file (Config.xml). For more information on
this technique, see Managing Flash Communication Server. Another way is to use
NetStream.receiveVideo to specify the frame rate per second of the incoming video (the
default value is the frame rate of the movie). A third way to match the data flow with capacity is
to use Camera.setQuality on the client side and Client.setBandwidthLimit on the server
side to inform the server of the client’s capacity. This technique is illustrated in the following
sample.
The code in the doc_bandwidth.fla file allows the user to choose between different bandwidth
settings. On the client side, the microphone and camera settings are updated according to the
user’s selection. On the server side, the bandwidth limit is updated. You can find the sample file
for this code in the flashcom_help\help_collateral\doc_bandwidth directory under the installed
Macromedia Flash MX authoring directories.
To see this application in action, create a directory named doc_bandwidth in your flashcom
application directory, then open doc_bandwidth.swf. See “Creating your working environment”
on page 31 if you want to re-create the sample.
The client-side ActionScript provides the interface for the user to choose between three settings:
Modem, DSL, or LAN. There are three buttons on the stage, which when selected return 1 for a
modem setting, 2 for a DSL setting, or 3 for a LAN setting. When the user changes the
bandwidth limit choice, the camera and microphone settings are updated. Because this change is
barely noticeable, extra code in the updateBandwidth function also changes the screen size based
on the settings chosen.
_root.Modem_btn.onPress = function() {
// Call updateBandwidth to change
// camera and mic settings and inform
// the server
_root.updateBandwidth(1);
}
_root.DSL_btn.onPress = function() {
_root.updateBandwidth(2);
}
_root.LAN_btn.onPress = function() {
_root.updateBandwidth(3);
}
On the first frame of the FLA file, you can find the following code, which initializes the camera
and microphone, plays the stream from the server, and updates the camera and microphone
settings based on the user’s choices.
54
Chapter 4
Note: If you are using speakers instead of a headset, you may want to comment out the call to Microphone.get() to
avoid audio feedback. For more information, see “Avoiding audio feedback” on page 83.
#include "NetDebug.as"
stop();
// Initialize movie by getting a camera and microphone, and
// Configure the initial camera and microphone settings
client_cam = Camera.get();
client_cam.setMode(150,120,5);
client_cam.setQuality(0, 90);
client_mic = Microphone.get();
client_mic.setRate(22);
// Get the stream to publish and play
function getPlayStream() {
// Get new net connection
client_nc = new NetConnection();
// Handle status message
client_nc.onStatus = function(info) {
trace("Level: " + info.level + newline + "Code: " +
}
info.code);
client_nc.connect("rtmp:/doc_bandwidth/room_01");
// Create a stream to which to publish
out_ns = new NetStream(client_nc);
out_ns.attachVideo(client_cam);
out_ns.attachAudio(client_mic);
out_ns.publish("myAV");
// Create a stream to receive the published data
in_ns = new NetStream(client_nc);
Output_mc.fromSrvr.attachVideo(in_ns);
Output_mc.fromSrvr.attachAudio(in_ns);
in_ns.play("myAV");
}
// Called from the bandwidth buttons
function updateBandwidth(b) {
// Respond to a change in the bandwidth
// If "Modem" was selected
if ( b == 1 ) {
client_cam.setMode(160,120,2);
client_cam.setQuality(0, 75);
client_cam.setKeyFrameInterval(3);
client_mic.setRate(5);
// For demonstration purposes, change size of screen
Output_mc._height = 100;
Output_mc._width = 150;
// If "DSL" was selected
} else if ( b == 2 ) {
client_cam.setMode(160,120,5);
client_cam.setQuality(0, 85);
Application Development Tips and Tricks
55
cam.setKeyFrameInterval(5);
client_mic.setRate(11);
// For demonstration purposes, change size of screen
Output_mc._height = 130;
Output_mc._width = 175;
// If "LAN" was selected
} else /*if ( b == 3 )*/ {
client_cam = Camera.get();
client_cam.setMode(160,120,15);
client_cam.setQuality(0, 90);
client_cam.setKeyFrameInterval(10);
client_mic.setRate(22);
// For demonstration purposes, change size of screen
Output_mc._height = 150;
Output_mc._width = 200;
}
// Call the server function setBandwidth and pass the user’s
// selection, b.
client_nc.call("setBandwidth", 0, b);
}
// Get the stream to play
getPlayStream();
Meanwhile, the main.asc file contains a setBandwidth function, which when called from the
client-side code, updates the bandwidth limit with the appropriate settings.
// If server-side code is part of the application,
// it must define an onConnect function that accepts
// the client connection.
application.onConnect = function(client) {
// Establish the connection
application.acceptConnection(client);
}
// Called when user presses a bandwidth choice (Modem=1, DSL=2, LAN=3)
Client.prototype.setBandwidth = function(bw) {
// set the bandwidth for the client
if ( bw == 1 ) {
// modem settings
this.setBandwidthLimit( 35000/8, 22000/8 );
} else if ( bw == 2 ) {
// DSL settings
this.setBandwidthLimit( 800000/8, 100000/8 );
} else /*if ( bw == 3 )*/ {
// LAN settings
this.setBandwidthLimit( 400000, 400000 );
}
}
56
Chapter 4
Writing double-byte applications
If you are using server-side ActionScript in a development environment or language kit that
facilitates double-byte text (such as an Asian language character set), your server-side ActionScript
must be in an ASC file that has been UTF-8-encoded. This means you’ll need a JavaScript editor,
such as Macromedia Dreamweaver MX, that UTF-8-encodes files. (Simple text editors, such as
Microsoft Windows Notepad, don’t UTF-8-encode files.) Then, you can use built-in JavaScript
methods such as Date.toLocaleString, which converts the string to the locale encoding for that
system.
To ensure UTF-8 encoding, in Dreamweaver MX, you’ll need to change two settings: the
document encoding setting and the inline input setting.
• To change the document encoding setting, select Modify > Page Properties, then select
Document Encoding. Choose Other to create a document with the encoding your operating
system is using.
• To change the inline input setting, choose Edit > Preferences or Dreamweaver > Preferences
(Mac OS X), and then click General. Select Enable Double-Byte Online Input to enable to
enter double-byte text.
To use double-byte characters as method names, the method names must be assigned using the
object array operator and not the dot operator:
// This is the CORRECT way to create double-byte method names
obj["Any_hi_byte_name"] = function(){}
// This is the INCORRECT way to create double-byte method names
obj.Any_hi_byte_name = function() {}
Unloading and reloading applications
Application instances are normally unloaded because of garbage collection. The first time the
garbage collector runs after all clients have disconnected from an application, the application will
be unloaded. In other words, applications aren’t unloaded immediately when all clients
disconnect. Since application startup usually takes some time, it is better for the application to
stay open for a little while, so that the next client that connects doesn’t incur the startup cost.
By default, garbage collection happens once every 20 minutes (every 5 minutes for unused I/O
threads). You can configure these values to be any number of minutes (greater than zero); for
more information, see Managing Flash Communication Server.
Also, whenever you make changes to the main.asc file, you must reload the application for the
changes to be applied. This will disconnect all users currently connected to the application. You
can do this either through the Administration Console (see Managing Flash Communication
Server) or the Communication App inspector (see “Using the Communication App inspector” on
page 97).
Implementing dynamic access control
Server-side ActionScript provides a mechanism to implement dynamic access control list (ACL)
functionality for shared objects and streams. By default, all connections have full access to all
streams and shared objects. You can control who has access to create, read, or update shared
objects or streams. Every connection to a server-side application instance is represented by a
Client object on the server-side, and each Client object has two properties: readAccess and
writeAccess. Using these two properties, you can control access on a per-connection basis.
Application Development Tips and Tricks
57
Because shared object and stream names are strings, and both follow the same rules of URIencoded data, you can define access based on the name. The client.readAccess and
client.writeAccess commands take string values. These values can contain multiple string
tokens, or unique identifiers for the object names you want to control, separated by semicolons
(;). Here are two example strings:
client.readAccess = "appStream;/appSO/"
client.writeAccess = "appStreams/public/;appSO/public/"
Using these calls and the string token convention, you can create shared objects and streams that
follow well-defined patterns. For example, suppose all shared objects created by the application
start with the prefix appSO; shared objects available for all users begin with the prefix appSO/
public; and shared objects you want to protect have the prefix appSO/private.
If you set the read access as follows:
client.readAccess = "appSO/"
the server will allow all connected clients to subscribe to shared objects whose name begins with
appSO.
Similarly, you can make the call:
client.writeAccess= "appSO/public/"
and the client can create only shared objects with names beginning with appSO/public, such as
appSO/public/foo, but would be denied access to appSO/private, and so on.
By using the above feature, and designing a naming scheme for streams and shared objects, you
can implement ACL. For more information, see the Client.readAccess and
Client.writeAccess entries in the Server-Side Communication ActionScript Dictionary.
Debugging your application
This section includes recommendations to help you debug your Flash Communication Server
applications, including tips on using debugging tools and writing onStatus functions.
Using debugging tools
Flash Communication Server provides three powerful tools to help you debug your
applications—the Administration Console, the Communication App inspector, and the
NetConnection Debugger. You should have one or more of these open while you are debugging
your application, in order to see exactly what log messages are being generated, how object values
are being set and updated, etc. For more information on the Administration Console, see
Managing Flash Communication Server. For more information on the App inspector and the
debugger, see the Appendix, “Flash Communication Server Management Tools,” on page 97.
Using onStatus event handlers
The client-side Camera, Microphone, NetConnection, NetStream, and SharedObject objects, as
well as the server-side Application, NetConnection, Stream, and SharedObject objects, provide an
onStatus event handler that uses an information object for providing information, status, or
error messages. To respond to this event handler, you must create a function to process the
information object, and you must know the format and contents of the information object
returned.
58
Chapter 4
In addition to the specific onStatus methods provided for the objects listed above, Flash MX also
provides a “super function” called System.onStatus. If onStatus is invoked for a particular
object in an error condition and there is no function assigned to respond to it, Flash processes a
function assigned to System.onStatus if it exists.
By default, every information object has a code property containing a string that describes the
result of the onStatus method, and a level property containing a string that is either "status",
"warning", or "error". Some information objects have additional default properties, which
provide more information about the reason onStatus was invoked.
For more information about the values returned by various onStatus handlers, see the ClientSide Communication ActionScript Dictionary. The following table summarizes the information
objects returned by certain server-side calls; the server-side call on the left invokes the client-side
NetConnection.onStatus handler with the code value on the right. (This information is not
included in the Client-Side Communication ActionScript Dictionary.)
Server-side call
Code value for client-side NetConnection.onStatus handler
application.acceptConnection() NetConnection.Connect.Success
application.rejectConnection() NetConnection.Connect.Rejected
application.disconnect()
NetConnection.Connect.Closed
The next sections include additional recommendations on how to write applications to best
implement this feature.
Putting onStatus handlers in the right place in a script
Because of network and thread timing issues, it is best to place an onStatus handler before a
connect method in a script. Otherwise, the connection might complete before the script executes
the onStatus handler initialization. Also, all security checks are made within the connect
method, and notifications will be lost if the onStatus handler is not yet set up.
Overriding onStatus
One of the first things your application should do, even if you don’t need to do anything in the
handler, is to override the generic onStatus handler for all of the Flash
Communication Server objects. One strategy is to override the onStatus handler when you start
writing the application, as shown in the following example:
onStatus
// Trace all the status info
function traceStatus(info) {
trace("Level: " + info.level + "
Code: " + info.code);
}
NetConnection.prototype.onStatus = traceStatus;
NetStream.prototype.onStatus = traceStatus;
SharedObject.prototype.onStatus = traceStatus;
As you develop your application and determine that you need to actually override the handler for
a specific purpose, you can delete the code above, but in the meantime you will at least see all of
the messages related to your application.
Always check for status messages on both the client and server.
Application Development Tips and Tricks
59
Debugging NetConnection.Connect.Failed
If a NetConnection.connect command returns an information object with a code value of
NetConnection.Connect.Failed, you are unable to establish a connection with the server.
Every time you receive this error, ask yourself some standard troubleshooting questions:
• Are you connecting to a valid application? In other words, is there a subdirectory in the
flashcom application directory that has the same name as the application? (This is a very
common reason for a connection to fail.)
• Are you connecting to the right server?
• Is the server running?
• Are you specifying the protocol (rtmp:) for connecting to the server?
Attempts to connect to the server can also fail if the permissible number of socket connections on
either the client or the server machine is at its limit. This limit is dependent on how much
physical memory your server has, and how busy the connections are. On Windows systems, the
memory for socket connections is allocated out of the non-paged memory, so it cannot be
swapped out to a page file. You may see that you reach the maximum limit at different values
from time to time as other running programs (such as core OS services) will be competing with
yours for space in the non-paged memory pool.
Getting properties of an object
If you need to know why you might be having problems with a particular object, you can iterate
its properties like this:
for (i in my_obj) {
trace(i + " = " + my_obj[i]);
}
Adding a privacy module
When creating applications that capture client audio or video streams, you should provide users
with explicit notice that you are doing so, and request their permission. Including a self-view is a
good way to let the user know that they are “on camera” and a transmission light or microphone
activity indicator can let that person know that the microphone is on. For live communication
applications it is always a good idea to give the user easy access to controls that allow them to turn
their camera and microphone off and to mute the audio they are receiving.
Many of the sample applications provided in the flashcom application directory illustrate how to
implement one or more of these techniques. The following sample shows one way to request the
user’s permission before recording. You can find the sample file for this code in the
flashcom_help\help_collateral\doc_approval directory under the installed Macromedia Flash MX
authoring directories.
To create the privacy module:
60
1
In the Flash MX authoring environment, select File > New to open a new file.
2
From the Components panel (Window > Components), drag the Push Button symbol under
Flash UI components to a position near the bottom of the Stage. In the Property inspector
(Window > Properties), give it the instance name Record_btn, the label Record, and the click
handler doRecord.
Chapter 4
3
From the options menu in the Library panel (Window > Library), select New Symbol, and give
it the name warnRec_mc. Click Advanced if necessary, and under Linkage, select Export for
ActionScript, and then click OK.
4
On the warnRec_mc stage, select the Text tool and draw a text box. In the Property inspector,
select Static Text for the type of text box. Type (or copy and paste) text such as the following
text into the text box: Your image will be recorded or broadcasted and could be published at
a later date. Is this OK?
Note: Please note that this text is provided merely as an example, and the precise wording of the text that you
use will be dictated by the nature of your application and/or service and any privacy, legal, or other issues raised
by your application and/or service.
5
Drag two instances of the Push Button symbol onto the warnRec_mc stage. In the Properties
panel, give one the instance name Yes_btn, the label Yes, and the click handler onYes. Give
the other push button the instance name No_btn, the label No and the click handler onNo.
Application Development Tips and Tricks
61
6
Copy and paste the following code to the Actions panel for the first frame of the movie:
stop();
var userAnswer = false;
function doRecord() {
// If user selects button to record...
if (Record_btn.getLabel() == "Record") {
// Call function to get user’s approval to record.
getApproval();
// When user has provided an answer, if the answer’s
// yes, begin to record, otherwise, send a status
// message
WarnNow_mc.onUnload = function () {
// If user approved, Record.
if (userAnswer == true) {
//
// Record
// .
// .
// .
//
trace("Recording...");
// Change the button label
Record_btn.setLabel("Stop");
// Else if user refused, give status.
} else {
trace("User did not approve streaming.");
}
}
// Else if user selects button to stop recording...
} else if (Record_btn.getLabel() == "Stop") {
trace("Stopped Recording.");
// Change the button label
Record_btn.setLabel("Record");
}
}
function getApproval(){
// Attach the movie clip to prompt user input,
// and align it on the stage.
_root.attachMovie("warnRec_mc", "WarnNow_mc", 1);
var x = 275;
var y = 160;
setProperty("WarnNow_mc", _x, x);
setProperty("WarnNow_mc", _y, y);
// If the user selects the Yes button, they
// approved the recording. So, set userAnswer
// to true, unload the movie clip and return
// the updated userAnswer value.
WarnNow_mc.Yes_btn.onRelease = function () {
userAnswer = true;
trace("userAnswer: " + userAnswer);
WarnNow_mc.unloadMovie();
trace("Returning: " + userAnswer);
return userAnswer;
}
62
Chapter 4
// If the user selects the No button, they
// do not want to record. So, set userAnswer
// to false, unload the movie clip and return
// the updated userAnswer value.
WarnNow_mc.No_btn.onRelease = function () {
userAnswer = false;
trace("userAnswer: " + userAnswer);
WarnNow_mc.unloadMovie();
trace("Returning: " + userAnswer);
return userAnswer;
}
}
7
Create a directory named doc_approval in your flashcom application directory, and save your
file as doc_approval.fla in this directory.
You can now publish and test the application.
Coding conventions
This document outlines a system of best practices specifically designed for coding with
ActionScript and building applications with Macromedia Flash MX. Applications that use these
guidelines should be more efficient and understandable—and the underlying ActionScript code
will be easy to debug and reuse.
Following naming guidelines
An application’s naming scheme must be consistent and names should be chosen for readability.
This means that names should be understandable words or phrases. The primary function or
purpose of any entity should be obvious from its name. Since ActionScript is a dynamically typed
language, the name should also contain a suffix that defines the type of object being referred to by
the name. In general, noun-verb and adjective-noun phrases are the most natural choices for
names. For example:
•
•
•
•
Movie name: my_movie.swf
Entity appended to a URL: course_list_output
Component or object: ProductInformation
Variable or property: userName
Function names and variables should begin with a lowercase letter. Objects and object
constructors should be capitalized. Using mixed case is also recommended when naming
variables, although other formats are acceptable as long as they are used consistently within the
application. Variable names can only contain letters, numbers, and underscores. However, do not
begin variable names with numbers or underscores.
Examples of illegal variable names:
_count = 5; // begins with an underscore
5count = 0; // begins with a number
foo/bar = true; // contains a forward slash
foo bar = false; // contains a space
Application Development Tips and Tricks
63
In addition, words that are used by ActionScript should never be used as names. Also avoid using
variable names of common programming constructs, even if the Macromedia Flash Player does
not currently support those constructs. This helps to ensure that future versions of the Player will
not conflict with the application. For example, do not use commands such as MovieClip =
"myMovieClip" or case = false.
Since ActionScript is based on ECMAScript, application authors can refer to current and future
ECMA specifications to view a list of reserved words. While Flash MX does not enforce the use of
constant variables, authors should still use a naming scheme that indicates the intent of variables.
Variable names should be lower case or mixed case with a lower case first letter, and constant
names should be all upper case. For example:
course_list_output = "foo"; // variable, all lower case
courseListOutput = "foo"; // variable, mixed case
BASEURL = http://www.foo.com; // constant, all upper case
MAXCOUNTLIMIT = 10; // constant, all upper case
MyObject = function(){}; // constructor function
f = new MyObject(); // object
Finally, all SWF files should have names that are lowercase words separated by underscores (for
example, lower_case.swf ). This facilitates moving applications to a case-sensitive operating
system, such as UNIX.
Remember that these syntax recommendations are simply guidelines. The most important thing
is to choose a naming scheme and use it consistently.
Commenting your code
Always comment code in an application. Comments are the author’s opportunity to tell a story
about what the code was written to do. Comments should document every decision that was
made while building an application. At each point where a choice was made about how to code
the application, place a comment describing that choice and why it was made.
When writing code that is a work-around for specific issue, make sure you add a comment that
will make the issue clear to future developers who may be looking at the code. This will make it
easier for them to address that issue.
Here is an example of a simple comment for a variable:
var clicks = 0; // variable for number of button clicks
Block comments are useful when a comment contains a large amount of text:
/*
Initialize the clicks variable that keeps track of the number of times
the button has been clicked.
*/
Some common methods for indicating specific topics are:
•
// :TODO: topic
Indicates that there is more to do here.
•
// :BUG: [bugid] topic
Shows a known issue here. The comment should also explain the issue and give a bug ID if
applicable.
•
// :KLUDGE:
Indicates that the following code is not elegant or does not conform to best practices. This
comment alerts others to provide suggestions about how to code it differently next time.
64
Chapter 4
•
// :TRICKY:
Notifies developers that the subsequent code has a lot of interactions. Also advises developers that
they should think twice before trying to modify it.
Keeping actions together
Whenever possible, all code should be placed in one location. This makes the code easier to find
and debug. One of the primary difficulties in debugging Macromedia Flash MX movies is finding
the code. If most of the code is placed in one frame, this problem is eliminated. Usually, the best
place to put the code is in frame 1.
When large amounts of code are located in the first frame, make sure you separate sections with
comments to ensure readability, as follows:
/*** Button Function Section ***/
/*** Variable Constants ***/
Initializing your applications
Initialization of an application is used to set the starting state. It should be the first function call
in the application. This function should be the only call for initialization made in your program;
all other calls should be event driven.
// frame 1
this.init();
function init()
{
if (this.inited != undefined)
return;
this.inited = true;
// initialization code here
}
Using var for local variables
All local variables should use the keyword var. This prevents variables from being accessed
globally and, more importantly, prevents variables from being inadvertently overwritten. For
example, the following code does not use the keyword var to declare the variable and
inadvertently overwrites another variable.
counter = 7;
function loopTest()
{
trace(counter);
for(counter = 0; counter < 5; counter++)
{
trace(counter);
}
}
trace(counter);
loopTest();
trace(counter);
Application Development Tips and Tricks
65
This code outputs:
7
7
0
1
2
3
4
5
In this case, the counter variable on the main Timeline is overwritten by the counter variable
within the function. Below is the corrected code, which uses the keyword counter to declare
both of the variables. Using the counter declaration in the function fixes the bug in the code
above.
var counter = 7;
function loopTest()
{
trace(counter);
for(var counter = 0; counter < 5; counter++)
{
trace(counter);
}
}
trace(counter);
loopTest();
trace(counter);
Using prototypes when creating objects
When creating objects, attach object functions and properties that will be shared across all
instances of the object to the prototype of the object. This ensures that only one copy of each
function exists within memory. As a general rule, do not define functions within the constructor.
This creates a separate copy of the same function for each object instance and unnecessarily wastes
memory. This following example is the best practice for creating an object:
// Best practice for creating an object
MyObject = function()
{
}
MyObject.prototype.name = "";
MyObject.prototype.setName = function(name)
{
this.name = name;
}
MyObject.prototype.getName = function()
{
return this.name;
}
66
Chapter 4
The following example demonstrates a correct technique for creating an object, but should be
used only when you want properties of the object to be instance-based rather than prototypebased:
// Less desirable practice for creating an object
MyObject = function()
{
this.name = "";
this.setName = function(name)
{
this.name = name;
}
this.getName = function()
{
return this.name;
}
}
In the first example, each instance of MyObject points to the same functions and properties
defined in the object’s prototype. Note, for instance, that only one copy of getName exists in
memory, regardless of the number of MyObject objects created.
In the second example, each instance of MyObject created makes a copy of each property and
function. These extra property and function copies use additional memory, and in most cases, do
not provide any advantages.
Naming variables to support code hinting
The Macromedia Flash MX ActionScript editor has built-in code hinting support. To take
advantage of this, variables must be named in a specific format. The default format is to add a
suffix to the variable name that indicates the variable type. Below is a table of supported suffix
strings.
Object type
Suffix string
Example
Camera
_cam
my_cam
Video
_video
small_video
Microphone
_mic
the_mic
NetConnection
_nc
my_nc
NetStream
_ns
a_ns
SharedObject
_so
myRemote_so
File types and paths
Flash Communication Server creates files when certain features are used. This section discusses
where Flash Communication Server stores files that it creates.
Note: This section assumes that you are passing an instance name along with your application name (see
“Applications and application instances” on page 14), If you don’t pass an instance name, Flash Communication
Server stores files in a subdirectory named \_definst_ (for “default instance”) in your application directory.
Application Development Tips and Tricks
67
Recorded stream files
When you use methods that record audio, video, or data streams (for example,
Flash Communication Server creates two files—filename.flv and
filename.idx—where filename is the string that was passed to the method that recorded the stream.
These files are the recorded stream and its associated index file. For example, if you issue the
command NetStream.publish("me", "record"), files named me.flv and me.idx will be
created.
NetStream.publish),
Flash Communication Server stores the FLV and IDX files in subdirectories of the flashcom
application directory. Flash creates these directories automatically. For example, if the application
instance ChatApp/MondayChat records a stream named chat, the chat.flv and chat.idx files will
be stored in the following location: flashcom\applications\ChatApp\streams\MondayChat. If you
run an instance of ChatApp called TuesdayChat, its files will be stored in
flashcom\applications\ChatApp\streams\TuesdayChat.
If you want to play back an FLV file that was created by a specialized video application, such as
Sorenson Squeeze, place it in the directory where the Flash Communication Server expects to find
it; that is, a subdirectory of a \streams directory as discussed in the preceding paragraph. When
you run the application, Flash Communication Server will create an IDX file and store it in the
same subdirectory.
To avoid overwriting streams, consider using unique names for users, streams, and so on. For
example, when recording a new stream, you could provide an incremental value:
outStream.publish("myRecording" + numSnaps, "record");
For information on deleting recorded stream files, see Stream object. For more information on
instance names and file storage, see NetConnection.connect and NetStream.publish in the
Client-Side Communication ActionScript Dictionary.
Shared object files
Any shared object, either local or remote, can exist dynamically (for the life of the application
instance) or can be saved for use as persistent data. This section discusses the three types of
persistent shared objects you can create: persistent local shared objects, remote shared objects that
are persistent only on the server, and remote shared objects that are persistent on the client and
the server. (For more information on shared objects in general, see “Understanding shared
objects” on page 14.)
Local shared objects are always persistent on the client, up to available memory and disk space.
However, by default Flash can save locally persistent remote shared objects only up to 100 K in
size. When you try to save a larger object, the Flash Player displays a Local Storage dialog box,
which lets the user allow or deny local storage for the domain that is requesting access. The user
can also use this dialog box to delete all locally persistent remote shared objects. For more
information, see “Local disk space considerations” in the SharedObject entry of the Client-Side
Communication ActionScript Dictionary.
68
Chapter 4
Persistent local shared objects
You create persistent local shared objects by using the client-side SharedObject.getLocal
command. Persistent local shared objects have the extension .sol and are stored on the client
machine in a directory associated with the user who created the shared object. On Windows, the
default location is C:\Documents and Settings\userName\Application Data\Macromedia\Flash
Player\serverSubdomain\pathToMovie\movieName.swf. (You can override the default by passing a
value for the localPath parameter of the SharedObject.getLocal command.)
For example, if your logon ID is jsmith, you are running your server on a local machine
(localhost), your movie is named myMovie.swf and is located in the C:\test directory, a local
shared object created by the code below would be stored in the following location: C:\Documents
and Settings\jsmith\Application Data\Macromedia\Flash
Player\localhost\test\myMovie.swf.\myObject.sol.
my_so = SharedObject.getLocal("myObject");
Remotely persistent shared objects
You create remote shared objects that are persistent only on the server by passing a value of true
for the persistence parameter in the client-side SharedObject.getRemote command or in the
server-side SharedObject.get command. These shared objects are named with the extension
.fso, and are stored on the server in a subdirectory of the application that created the shared
object. The Flash Communication Server creates these directories automatically; you don’t have
to create a directory for each instance name. On Windows, the default location is C:\Program
Files\Macromedia\Flash Communication Server
MX\flashcom\applications\appName\sharedobjects\instanceName.
For example, a remote shared object created by the code below would be stored in the following
location: ..\flashcom\applications\myWhiteboard\sharedobjects\monday\myObject.fso.
my_nc = new NetConnection();
my_nc.connect("rtmp://myFlashServer.myDomain.com/myWhiteboard/monday");
// The third parameter of "true" specifies that the object
// should persist on the server.
my_so.getRemote("myObject", my_nc.uri, true);
my_so.connect(my_nc);
Remotely and locally persistent shared objects
You create remote shared objects that are persistent on the client and the server by passing a local
path for the persistence parameter in your client-side SharedObject.getRemote command.
The locally persistent shared object is named with the extension .sor and is stored on the client in
the specified path. The remotely persistent .fso file is stored on the server in a subdirectory of the
application that created the shared object (see “Remotely persistent shared objects” above).
By specifying a partial path for the location of a locally persistent remote shared object, you can
let several movies from the same domain access the same shared objects. For more information,
see SharedObject.getRemote in the Client-Side Communication ActionScript Dictionary.
Application Development Tips and Tricks
69
Snapshots and thumbnails
This section compares the techniques for grabbing single frames of video as pictures to use within
your application. You can find the sample files for the code in the
flashcom_help\help_collateral\doc_snapshot and \doc_thumbnails directories under the installed
Macromedia Flash MX authoring directories. To see these applications in action, create
directories named doc_snapshot and doc_thumbnails in your flashcom application directory,
then open the corresponding SWF file. See “Creating your working environment” on page 31 if
you want to re-create these samples.
These samples may seem to behave similarly when you run them, but in fact they work very
differently. The doc_snapshot sample records only one frame, which it then displays. The
doc_thumbnails sample records multiple frames (an entire stream), but displays only the first
frame. You might use a snapshot application when you want to “take a picture” rather than record
a stream, while you might use a thumbnail application when you want to let a user choose among
multiple streams to play; you could display thumbnails for each of the streams that would give the
user an idea of what was recorded on each stream.
Snapshots
If you look at the NetStream.attachVideo entry in the Client-Side Communication ActionScript
Dictionary, you will see the following usage:
myStream.attachVideo(source | null [, snapShotMilliseconds])
The snapShotMilliseconds parameter is used to send a single snapshot (by providing a value
of 0) or a series of snapshots—in effect, time-lapse footage—by providing a positive number that
adds a trailer of the specified number of milliseconds to the video feed. When you specify the
snapShotMilliseconds parameter, you are controlling how much time elapses during playback
between recorded frames.
70
Chapter 4
The following client-side ActionScript code in doc_snapshot.fla connects to the server and plays
camera output locally. When the user chooses to take a snapshot, the event handler, doRecord,
makes a call to out_ns.attachVideo(client_cam, 0). The second parameter, 0, causes just
one frame to be recorded.
#include "NetDebug.as"
stop();
// Recording state variable
RecState_box.text = 0;
// Number of snapshots
numSnaps = 0;
// Initialize button label
Record_btn.setLabel("Record");
// Connect to the snapshot app and get connection status
function doConnect() {
client_nc = new NetConnection();
client_nc.onStatus = function(info) {
trace("Level: " + info.level + newline + "Code: " + info.code);
};
client_nc.connect("rtmp:/doc_snapshot/room_01");
}
// Create a stream for recording and getting the snapshot
function initStreams() {
// Stream for recording
out_ns = new NetStream(client_nc);
out_ns.onStatus = function(info) {
trace("Level: " + info.level + newline + "Code: " + info.code);
};
// Stream for playing
in_ns = new NetStream(client_nc);
in_ns.onStatus = function(info) {
trace("Level: " + info.level + newline + "Code: " +
};
info.code);
}
// Get a camera instance and attach it to the local
// video, Live_video, and the output stream
client_cam = Camera.get();
Live_video.attachVideo(client_cam);
// Button event handler for publishing and showing the snapshot
function doRecord() {
// If you’re not recording, begin to record
if (RecState_box.text == 0) {
// Clear the snapshot window
Snapshot_mc.removeMovieClip();
// Take a snapshot
out_ns.attachVideo(client_cam, 0);
out_ns.publish("myRecording"+numSnaps, "record");
// Set the label to stop
Record_btn.setLabel("Stop");
// Update the recording state
RecState_box.text = 1;
// If you’re recording, stop
Application Development Tips and Tricks
71
} else {
// Stop publishing recorded stream
out_ns.publish(false);
// Close the stream so that we can use the same to publish again
out_ns.close();
// Set the label to "Record"
Record_btn.setLabel("Record");
// Update the recording state
RecState_box.text = 0;
showSnapshot();
}
}
// Show the snapshot by attaching the stream to the SnapView_video
// video object and playing it
function showSnapshot() {
// Create a new movie clip from the exportable movie clip View_mc,
// which contains a video object, SnapView_video. Provide a new name, and
// depth (a number relative to the other View_mcs on the stage used
// to prevent collision)
_root.attachMovie("View_mc", "Snapshot_mc", numSnaps);
// Attach the input stream to the SnapView_video video object
// in the v instance of the View_mc movie
Snapshot_mc.SnapView_video.attachVideo(in_ns);
Snapshot_mc._x=375;
Snapshot_mc._y=225;
// Play the recording
in_ns.play("myRecording"+numSnaps);
// Update the counter for the number of snapshots for next time.
numSnaps++;
}
// Connect to the server
doConnect();
// Initialize the streams
initStreams();
Thumbnails
Thumbnails are a smaller, discrete version of an original recording. Like snapshots, they provide
single-frame representations of recorded video stream. In the snapshot example, you are only
sending one frame of data. In this sample, you are playing only the first frame of a recorded
stream.
In the previous example, you used the snapShotMilliseconds property of the
object to get a snapshot of your stream. In this sample, you also need
to get a one frame picture of a stream. Here, however, you use a call to NetStream.play:
NetStream.attachVideo
thumbStream.play("myRecording", 0, 0, true)
If you look at the NetStream.play entry in the Client-Side Communication ActionScript
Dictionary, you can see that the first parameter describes what to play, "myRecording"; while the
second is where to begin on the stream (0 means at the start of a recorded stream); the third,
where to end (0 means play only one frame); and the fourth tells the Player to flush any previous
play streams.
72
Chapter 4
In the following client-side ActionScript code in doc_thumbnails.fla, the server records the
incoming stream until the user chooses to stop the recording. Then, with the call to
thumb_ns.play("myRecording", 0, 0, true), only the first frame of that recording is
returned to the client.
#include "NetDebug.as"
stop();
// Recording state variable
recState = 0;
// Initialize button label
Record_btn.setLabel("Record");
// Show the recording in a thumbnail
showThumb();
// Connect to the thumbnails app and get connection status
function doConnect()
{
client_nc = new NetConnection();
// If connection is closed, clear the History and the list
// Handle status message
client_nc.onStatus = function(info) {
trace("Level: " + info.level + newline + "Code: " +
}
info.code);
client_nc.connect("rtmp:/doc_thumbnails/room_01");
}
// Create a stream for recording and getting the thumbnail
function initStreams()
{
out_ns = new NetStream(client_nc);
out_ns.onStatus = function(info)
{
if (info.code == "NetStream.Publish.Success") {
var description = "You have published.";
trace(description);
}
};
thumb_ns = new NetStream(client_nc);
}
// Get a camera instance and attach it to the local
// video, Live_video, and the output stream
function initMovie()
{
client_cam = Camera.get();
Live_video.attachVideo(client_cam);
out_ns.attachVideo(client_cam);
}
// Button event handler for publishing and showing the thumbnail
function doRecord()
{
if (recState == 0) {
Application Development Tips and Tricks
73
out_ns.publish("myRecording", "record");
Record_btn.setLabel("Stop");
recState = 1;
} else {
out_ns.publish(false);
Record_btn.setLabel("Record");
recState = 0;
showThumb();
}
}
// Show the thumbnail by attaching the stream to the ThumbView_vc
// video object and playing it
function showThumb()
{
ThumbView_vc.attachVideo(thumb_ns);
thumb_ns.play("myRecording", 0, 0, true);
}
// Connect to the server
doConnect();
// Initialize the streams
initStreams();
// Initialize the movie
initMovie();
74
Chapter 4
Application object
This section includes recommendations to help you optimize your use of the server-side
Application object, including tips on how and why to set up application.OnConnect and
application.OnDisconnect functions.
Application.onConnect
Setting up methods in application.onConnect is a good approach when you want to set up
different methods based on user login information. However, if you want to set up a method that
is available to all clients, use the prototype property of the Client object:
// A user has connected
application.onConnect = function( newClient, userName )
{
if (userName == "admin")
{
newClient.adminFunc= function(param)
{
// some code that’s only useful to the admin
newClient.myAdminProperty = param;
}
} else
{
// code for most cases
}
// Allow the logon
application.acceptConnection( newClient );
}
// this part could be in a separate file
// Every client (including admin) is going to have this function
// (because of the way "prototype" works).
Client.prototype.commonFunction = function (myColor)
{
// some code
// use this to refer to the client instead of newClient
this.color = myColor;
}
Also, if you want to use the call method on the client object that is connecting, make sure you
call application.acceptConnection and know that the client is connected before issuing any
additional commands:
application.onConnect = function(clientObj,name,passwd)
{
// First accept the connection
application.acceptConnection(clientObj);
// After client is registered with the application instance
// you can use "call" method
clientObj.call("onWelcome", "You are now connected!!!");
return;
// Once you call acceptConnection or
// rejectConnection within onConnect, return value is ignored.
}
Application Development Tips and Tricks
75
Application.onDisconnect
The server calls the application.onDisconnect method when the NetConnection is closed.
You cannot use client.call on the object being passed inside onDisconnect. However, you can
send a message to all other clients about this event:
// On the server side you would have the following
application.onConnect = function(newClient, name)
{
newClient.name = name;
return true;
}
application.onDisconnect = function(client)
{
for (var i = 0; i < application.clients.length; i++)
{
application.clients[i].call("userDisconnects", client,name);
}
}
// On the client side you would have the following
nc = new NetConnection();
nc.userDisconnects= function (name) {
trace(name + "quits");
}
nc.connect ("rtmp:/app_name", userName);
Camera object
This section includes recommendations to help you optimize your use of the Camera object,
including tips for matching camera settings to available bandwidth and using one camera in
multiple applications.
Turning the camera off
If your application uses a Camera object attached to a NetStream object to record data, the
camera will stay on after you finish recording. To turn off the camera, use
NetStream.attachVideo(false) when you have finished recording.
Suggested settings for different bandwidth speeds
The default camera settings provide a good viewing experience for all bandwidth settings.
However, you can experiment with different settings for different bandwidths.
The code for setting the camera settings is as follows:
my_cam = Camera.get();
my_cam.setQuality(bandwidthSpeed,quality)
Use the following table as a starting point if you want to experiment with camera settings at
different bandwidth speeds.
Bandwidth
Effect
Code
Modem
Lower image quality, higher motion quality
my_cam.setQuality(4000,0)
Higher image quality, lower motion quality
my_cam.setQuality(0,65)
Lower image quality, higher motion quality
my_cam.setQuality(12000,0)
DSL
76
Chapter 4
Bandwidth
Effect
Code
Higher image quality, lower motion quality
my_cam.setQuality(0,90)
LAN
Lower image quality, higher motion quality
my_cam.setQuality(400000,0)
Higher image quality, lower motion quality
my_cam.setQuality(0,100)
Using one camera in multiple applications
Multiple applications (SWFs) can use the same camera at the same time, provided that they are
running in the same process. Generally, multiple browser windows are all in the same process, so
in the browser environment this capability works well.
However, a camera cannot be shared between applications running in two different processes—
for example, one in the browser and one in a stand-alone player.
Client object
When attaching methods to the Client object in server-side scripts, remember that all methods on
the client object can be called by a script in the SWF file on the client. You should not include
any methods on the client object that you would not want a remote computer to invoke. For
example, you wouldn’t want a client to be able to call a method that could disconnect an
application.
NetConnection object (client-side)
If an HTML page containing a movie is accessed differently (with regard to domain names) from
the way the movie itself accesses the Flash Communication Server, then the connection will not
be successful. This is a security feature of the Flash Player. But in some cases, this may be
inconvenient.
For example, if a web page containing a movie is served on an intranet from, say, http://
deptserver.mycorp.com, it can also be accessed simply by http://deptserver. If the page is accessed
via, say, http://deptServer/tcpage.htm, but the movie specifies deptServer.mycorp.com in as
targetURI, then the movie will not make a successful connection to the server. Similarly, if the
web page and movie are accessed as http://deptserver.mycorp.com/tcpage.htm, but the movie
specifies rtmp://deptserver as targetURI, it will not connect.
There are a few things you can do to prevent the security policies from inconveniencing you or
your users. First, and easiest, is not to include a server name in targetURI. (This is applicable
only if the Flash Communication Server and web server are running on the same machine.) To do
so, leave off the second slash in targetURI. For example, the following commands will make the
Flash Player attempt to connect to the same host and domain as the web server the SWF file was
served from.
nc = new NetConnection();
nc.connect("rtmp:/myApp");
Application Development Tips and Tricks
77
Second, there is a bit of JavaScript you can use in your HTML page to avoid the security
problem. Assuming the movie uses a fully qualified domain name URL to access the Flash
Communication Server, this JavaScript redirects the web page to an explicitly named full URL,
like this:
<SCRIPT language="javascript">
// if the URL didn’t have the domain on it
if (document.URL.indexOf("mycorp.com") == -1) {
// redirect to a version that does
document.URL="http://deptServer.mycorp.com/tcpage.htm";
}
</script>
Finally, if you own a domain name, have access to the DNS records of that domain name, and
have a static IP address for your Flash Communication Server, you can create address (“A”)
records to point a host name to that IP address. For instance, flashcom.mycorp.com could map to
the machine running the Flash Communication Server and having an IP address provided by
your IT department or ISP. Your web pages can continue to be hosted by whatever means you are
currently using. (“CNAME” records are recommended if you need to forward traffic to a server
that has a DNS-accessible host name but may or may not have a static IP address.)
NetStream object
This section includes recommendations to help you optimize your use of the NetStream object,
including tips on incorporating data into a stream and managing a stream’s buffer.
Multiple data types in a stream
In addition to streaming audio and video, you can include data in a stream. To do so, use the
NetStream.send and NetStream.call commands.
78
Chapter 4
Getting the stream time length in ActionScript
If you are buffering your streams, you can use the NetStream.bufferLength property to get the
number of seconds currently in the buffer. Sometimes, however, you may want to get the total
length of a stream; in this case, the Flash Player doesn’t know the length of the stream, but the
server does. The server has a Stream.length property that the client can request through a
message to the server.
You could write client-side ActionScript such as the following to request the stream length:
function getInfo()
{
nc.call("sendInfo", new MyResultSetName(), myStream);
}
function MyResultSetName()
{
this.onResult = function(retVal)
{
_root.streamlength = retVal;
};
this.onStatus = function(info)
{
trace("Level: " + info.level + "
Code: " + info.code);
// process error object
};
}
Then, in the corresponding server-side ActionScript, you would write the following in the
main.asc file:
application.onAppStart = function()
{
trace("::: Application has started :::");
}
application.onConnect = function(client)
{
application.acceptConnection(client);
// Add methods
client.prototype.sendInfo = function(name) {
var slen = Stream.length(name);
trace("slen: " + slen);
return slen;
};
}
Application Development Tips and Tricks
79
NetStream.time
Although it is not explicitly stated in the Client-Side Communication ActionScript Dictionary, the
property returns a value that is internally accurate to a few hundredths of a
second, and not just whole seconds. Therefore, you can use this command to return values at a
more granular level. For example, you can multiply the value returned by NetStream.time
by 1000 to determine the time to the nearest millisecond.
NetStream.time
NetStream.bufferTime
For playback streams, the value returned by NetStream.bufferTime specifies how much of the
stream Flash Communication Server will buffer before the Flash Player starts playing it back. For
example, if your recorded stream is 50 seconds long and your playback speed is twice as fast as
your download speed, you might consider setting this value to 25 seconds. You will thus be able
to play all of the stream without any stalls.
For publishing streams, this value specifies how long the outgoing queue can grow before the
Flash Player considers dropping messages; to determine how much data is currently in the queue,
use NetStream.bufferLength. For a fast connection, the value returned by
NetStream.bufferLength will never approach the value of NetStream.bufferTime, but on a
slow connection it might.
Therefore, if you know your application is running over a slow connection and you want to
minimize dropped messages or stalled playback, you might want to use
NetStream.setBufferTime to increase the value of NetStream.bufferTime.
SharedObject object
Shared objects can be used for a wide number of purposes, and can be designed and used in a
number of ways. This section provides some items to consider as you begin using shared objects
in your applications.
SharedObject.onSync
Before attempting to work with a remote shared object, you should first check that
SharedObject.connect returned true, indicating a successful connection, and then wait until
you receive a result from the function you have assigned to SharedObject.onSync. If you fail to
do so, any changes you make to the object locally—before SharedObject.onSync is invoked—
may be lost.
The SharedObject.onSync handler is invoked when any of the SharedObject.data properties
of the remote shared object are changed, and also the first time a client uses the
SharedObject.getRemote command to connect to a remote shared object that is persistent
locally and/or on the server. In the latter case, all the properties of the object are set to empty
strings, and SharedObject.onSync in invoked with the value of code set to "clear". Then
SharedObject.onSync is invoked again, this time with the value of code set to "change",
and the properties of the client’s instance of the remote shared object will be set to match those
on the server.
80
Chapter 4
If you are having problems understanding how your shared object is behaving, it helps to put
some debug code in your SharedObject.onSync handler:
so.onSync = function(list) {
for (var k in list) {
trace("name = " + list[k].name + ", event = " + list[k].code);
}
// do whatever else you want to do here
}
Using shared object slots effectively
The decision to encapsulate shared object data in a single slot (SharedObject.data property) or
to spread it among multiple slots depends partially on how your application posts changes to the
object. For example, if your application needs to send an entire array of strings to all of the
connected clients at specific intervals, you can store the entire array in a single slot.
On the other hand, if your application needs to send only information that has changed, then you
should divide the data among multiple slots. This implementation reduces network traffic and
thus enhances the performance of your application. It also minimizes the need for conflict
resolution code, as multiple slots can be updated simultaneously without data collision.
Flushing remote shared objects
Flash Communication Server automatically flushes remote shared objects to the disk, on both the
client and the server, when all users disconnect from the shared object or when the server shuts
down. At any other time, if you want the shared object to be updated on disk, you must call the
client-side SharedObject.flush method.
However, calling SharedObject.flush in the client-side ActionScript flushes only the local copy
of the shared object. To manually flush the server copy of the shared object, you must call
SharedObject.flush in a server-side script:
// Sample server-side code for flushing a persistent shared object
// to the server
// Get the shared object when the application is loaded.
application.onAppStart = function()
{
application.mySO = SharedObject.get("SharedObjName", true);
}
// When a user disconnects, flush the shared object.
application.onDisconnect = function(client)
{
application.mySO.flush();
}
Avoiding shared object synchronization problems
If more than one client (or a server application) can change the data in a single slot of your shared
object at the same time, you must implement a conflict resolution strategy. Here are some
examples:
The simplest strategy is to use a different slot for each user that might change
data in the object. For example, in a shared object that keeps track of users in a chat room,
provide one slot per user and have users modify only their own slots.
Use different slots
Application Development Tips and Tricks
81
A more complex strategy is to define a single client as the owner of a property
in a shared object for a limited period of time. You might write server code to create a “lock”
object, where a client can request ownership of a slot. If the server reports that the request was
successful, the client knows that it will be the only client changing the data in the shared object.
Assign an owner
Here’s some server-side ActionScript that locks and unlocks a shared object to make sure the true
highest score is returned to the game. Suppose the most recent highest score was 95, and player 1’s
score increased to 105, while player 2’s score increased to 110. If no locking occurred, both
players’ scores could be compared to the most recent highest score, 95, or a collision could take
place if both clients call updateHighScore simultaneously. You’d want to make sure that each
player was compared to the highest score, regardless of whether it was the most recent highest
score or any score currently coming in from all other clients. If you lock and unlock the shared
object used to store the highest score, you can compare each score sequentially, and thus ensure
that no comparison is lost.
application.onAppStart = function()
{
application.scoreSO = SharedObject.get("high_score_so", true);
application.scoreSO.onSync = function(listVal)
{
trace("got an onSync on scoreSO");
}
}
application.onConnect = function(newClient,name,passwd)
{
newClient.updateHighScore = function(final_score)
{
application.scoreSO.lock();
if (application.scoreSO.getProperty("high_score_so") < final_score)
{
application.scoreSO.setProperty("high_score_so", final_score);
}
application.scoreSO.unlock();
}
}
Notify the client When the server rejects a client-requested change to a property of the shared
object, the SharedObject.onSync event handler notifies the client that the change was rejected.
Thus, an application can provide a user interface to let a user resolve the conflict. This technique
works best if data is changed infrequently, as in a shared address book. If a synchronization
conflict occurs, the user can decide whether to accept or reject the change.
Some applications can accept changes on a “first come,
first served” basis. This works best when users can resolve conflicts by reapplying a change if
someone else’s change preceded theirs.
Accept some changes and reject others
Rather than
relying completely on SharedObject.onSync to manage synchronization activities, use the
SharedObject.send command as appropriate. The SharedObject.send command broadcasts
a message to all clients connected to a remote shared object, including the client that sent the
message.
Use the send method to increase your level of control over changes to objects
82
Chapter 4
Stream object
If you want to delete the FLV and IDX files associated with a recorded stream, you must use
server-side code:
s = Stream.get("foo");
if (s)
{
s.clear();
}
Microphone object
This section includes recommendations to help you optimize your use of the Microphone object,
including tips on avoiding audio feedback.
Avoiding audio feedback
If you’re using a microphone with external speakers and a reasonably high gain, you’re likely to
incur audio feedback problems. To reduce feedback from speakers, Flash Communication Server
implements echo suppression. To use echo suppression, use the following command:
myMicrophone.useEchoSuppression(true);
This should maintain a comfortable input level without transmitting too much echo from your
speakers.
Because echo suppression removes only a portion of the output signal from the user’s input, you
might still experience feedback if your microphone is too close to your speaker. To avoid
feedback, try following these guidelines:
•
•
•
•
Lower your speaker volume.
Move the microphone and speakers farther apart.
Troubleshoot your hardware setup for proper installation and settings.
Use a headset.
Keeping the microphone open
To save bandwidth, Flash Communication Server by default turns off the microphone when it is
not being used. However, you might want to keep it on in your application—for example, to
assure that there is never any delay when the microphone is activated. To do so, use the command
my_mic.setSilenceLevel(0).
Video object
This section includes recommendations to help you optimize your use of the Video object,
including tips on dynamically creating video objects.
Creating video objects dynamically
You can add video objects to your application only from inside the Flash MX authoring
environment, by dragging an embedded video object from the Library to the Stage. However, if
you want to implement video objects from within your ActionScript code, you can do so by
embedding them in a movie clip. This technique lets you create and remove video objects
dynamically using duplicateMovieClip() and removeMovieClip().
Application Development Tips and Tricks
83
Understanding frame rates
If you embed an FLV file in a movie in a static SWF file, its frame rate will be the same as the
frame’s playback rate on the Timeline. When you stream the data in an FLV, the video played
through Flash Communication Server can have a different frame rate than the SWF that
contains it.
For example, suppose you use another application to output a Broadband FLV file with a 15 fps
frame rate. If you import this FLV file into a 6 fps Flash MX movie, then the video will be off
sync, because the two frame rates are different. However, if instead you use Flash Communication
Server to stream the FLV file into the same 6 fps movie, it will be synchronized to 15 fps, because
streaming files do not use frame-based playback.
84
Chapter 4
CHAPTER 5
Application Server Connectivity
This chapter explains how to use Macromedia Flash Remoting services to add application server
connectivity to your Macromedia Flash Communication Server MX application. Macromedia
Flash Remoting is a gateway that connects your communication application to J2EE application
servers and Microsoft Windows .NET servers. Flash Remoting relies on its own client-side
ActionScript library, called NetServices, to link Macromedia Flash MX movies to a server-side
gateway.
The samples in this chapter illustrate how you can make Flash Remoting calls in your server-side
ActionScript to access NetServices. In the context, the Flash Communication Server acts as a
client to Flash Remoting. These samples work with Macromedia ColdFusion MX, which
includes Flash Remoting. To use Flash Remoting with other application servers, see the Flash
Remoting site (http://www.macromedia.com/go/flashremoting).
Connecting through Flash Remoting
“Common client-server workflows” on page 23 describes the different ways you can use Flash
Communication Server to connect clients and servers. The subsection “Connecting to external
sources” shows the Flash Communication Server connecting to other services. The client invokes
a method on the Flash Communication Server, which in turn invokes a method on additional
servers. The results move from the application server to the Flash Communication Server, and
finally back to the client.
Using the Flash Communication Server together with the Flash Remoting NetServices library,
you’ll invoke a Flash Communication Server method from the client, passing some parameters.
The Flash Communication Server will then invoke a NetServices method. When the NetServices
method passes the result to the Flash Communication Server, the server returns it to the client.
Re-creating the samples
The samples assume you’re using the Flash MX authoring environment on the same local host
that is running the Flash Communication Server and ColdFusion MX. Files associated with the
samples (FLA, SWF, HTML, and ASC) are located in subdirectories of the \Macromedia\Flash
MX\flashcom_help\help_collateral directory.
As with the samples in earlier chapters, you’ll create the user interface in a FLA file using the
client-side ActionScript. The client-side ActionScript in the FLA file will invoke a method in the
server-side ASC file that you will also create.
To add Flash Remoting services to your application, you’ll use server-side ActionScript in an ASC
file that you will create. This server-side code will act as a client to the Flash Remoting service by
invoking methods in the ColdFusion CFC file, which you will also create.
85
You’ll place the FLA and ASC files in your application directory, and place in that same directory
the netservices.asc file that enables NetServices. You’ll place the CFC or CFM file in the default
directory where you deploy your other ColdFusion script files.
Finally, you’ll test your movie by publishing the SWF file and running it. Make sure the Flash
Communication Server and the ColdFusion MX server are running before you attempt to test
your sample.
Sample 1: Simple Remoting
In this sample, the client application requests some calculations to be done on the application
server and the results to be returned in the string format. The client invokes calls to the Flash
Communication Server. The Flash Communication Server, in turn, acts as a client of the Flash
Remoting service—here, a CFC script—to request that the work be done by the back-end server
and the results returned.
About the sample
When the user clicks the Run Test button, the screen is updated with a message from the server, a
Boolean value, an array of months, and the result of an addition operation.
Re-creating the sample
The doc_remoting.fla file provides the user interface for testing connectivity between the client,
the Flash Communication Server, and the ColdFusion MX server. The main.asc file accepts the
connection from the client, and in turn, connects to ColdFusion using Flash Remoting. The
simple.cfc file contains the scripts for getting a Boolean value, an array, and a sum.
See “Creating your working environment” on page 31 before you start to re-create the sample.
To create the user interface for this sample:
1
From the toolbox, select the Text tool and draw a dynamic text box. In the Property inspector
(Window > Properties), select Dynamic Text for the type of text box, and give it the instance
name ResultBox.
2
To add the button for running the tests, open the Components panel (Window >
Components) and drag a push button onto the Stage. In the Property inspector, give it the
instance name Run_btn, the label Run Tests, and the click handler runTests.
3
Create a directory named doc_remoting in your flashcom application directory, and save the
file as doc_remoting.fla in this directory.
To write the client-side ActionScript for this sample:
1
Add the following debug code to trace all the status information coming back from the Flash
Communication Server.
// Trace all the status information.
function traceStatus(info) {
trace("Level: " + info.level + "
Code: " +
}
info.code);
// Create onStatus prototypes for the objects that
// will return status.
NetConnection.prototype.onStatus = traceStatus;
NetStream.prototype.onStatus = traceStatus;
SharedObject.prototype.onStatus = traceStatus;
86
Chapter 5
2
Create the event handler for the Run_btn button. Notice the call to runTests. This invokes
the function you’ll define later in the server-side code. The second parameter, new Result(),
provides the functionality for receiving the results of the call to runTests.
// Run the simple remoting tests.
function runTests() {
// Get the return value from the Flash Communication Server and
// display it in the ResultBox. In this sample, the server
// is returning the string "Ran the service on the server".
function Result() {
this.onResult = function(str) {
_root.ResultBox.text = str;
}
}
// Call the "runTests" function on the Flash Communication Server,
// and pass in an instance of the Result function to receive
// the return value from the server.
main_nc.call("runTests", new Result());
}
3
Create a new network connection and connect to the application.
// Create a new connection and connect to the application
// instance on the Flash Communication Server.
main_nc = new NetConnection();
main_nc.connect("rtmp:/doc_remoting/room_01");
4
Provide a handler function that the Flash Communication Server can call to return the results
of the tests.
// Handle the server’s update of ResultBox with
// the result of each test.
NetConnection.prototype.postResults = function(result) {
_root.ResultBox.text += "\n" + result;
}
To write the server-side ActionScript for this sample:
1
Create a new file using your server-side ActionScript editor, and load the netservices.asc file to
enable Flash Remoting through the Flash Communication Server.
load("netservices.asc");
2
In the onAppStart function, define the location of the Flash Remoting service, and connect to
it.
application.onAppStart = function() {
trace("***** on app start");
// Set the default gateway URL
NetServices.setDefaultGatewayUrl("http://localhost:8500/flashservices/
gateway");
// Connect to the gateway
this.gatewayConnnection = NetServices.createGatewayConnection();
}
Application Server Connectivity
87
3
In the onConnect function, accept the client’s connection.
application.onConnect = function (clientObj) {
trace("***** on connect");
// Accept the connection for this client
this.acceptConnection(clientObj);
return true;
}
4
Provide a prototype function that the client can call to invoke the tests.
Client.prototype.runTests = function() {
trace("***** runTests");
5
In the same function, create an instance of the Flash Remoting service, testService. The
second parameter, new TestResult(this), is a handler you’ll define farther down in this file
to catch the data coming back from the Flash Remoting service.
// Get a reference to the service. “simple.simple” refers
// to the ColdFusion file, simple.cfc, found in the "simple"
// directory under the deployed CF directory.
var testService =
application.gatewayConnection.getService("simple.simple",
new TestResult(this));
6
Call testService methods to get the results from the Flash Remoting methods getBoolean,
getArray, and addNumbers, and close the function.
// Call the "testService" function on Flash Remoting
// to get a Boolean, an array, and a sum.
testService.getBoolean(true);
testService.getArray();
testService.addNumbers(1,3);
return "Ran the service on the server";
}
7
Provide the TestResult function as a handler for data coming from the Flash Remoting
service.
// Create a TestResult function
function TestResult(client) {
this.client = client;
}
88
Chapter 5
8
For each test, receive the result, result. Then call the client-defined function postResults
and pass the client the result data.
// Get result of Boolean test and pass the result to the
// client with a call to postResults
TestResult.prototype.getBoolean_Result = function(result)
{
trace("***** getBoolean_Result: " + result);
this.client.call("postResults", null, result);
}
// Get result of addition test and pass the result to the
// client with a call to postResults
TestResult.prototype.addNumbers_Result = function(result) {
trace("***** addNumbers_Result: " + result);
this.client.call("postResults", null, result);
}
// Get the array and pass it back to the client
// with a call to postResults
TestResult.prototype.getArray_Result = function(result) {
trace("***** getArray_Result: " + result);
this.client.call("postResults", null, result);
}
Note: In the samples in this chapter, you subscribe to the remoting service by including netservices.asc in your
main.asc file. You need to provide a result method to handle any result value coming back from the remoting
service in the main.asc file as well. The samples in this chapter use the [methodName]_Result callback
convention from Flash Remoting. For example, for the call to getBoolean, you provide a call back to the
getBoolean_Result method.
9
Save the file as main.asc in a doc_remoting directory under the flashcom applications
directory.
Note: Save this main.asc file where you’ve chosen to store your server-side application files. For more
information see Chapter 1, “The flashcom application directory,” on page 15.
To write the ColdFusion component for this sample:
1
Using your standard editor, create a new file and add code to name the application and indicate
how to access it.
<cfcomponent name="simple" access="remote">
2
Create the addNumbers method that the Flash Communication Server will invoke.
<cffunction name="addNumbers" output="false"
description ="add two numbers" access="remote">
<cfargument name="num1" required="true" type="numeric"
description="the first number">
<cfargument name="num2" required="true" type="numeric"
description="the second number">
<cfreturn num1+num2>
</cffunction>
3
Create the getBoolean method that the Flash Communication Server will invoke.
<cffunction name="getBoolean" output="false" description="Returns a
boolean that you specify." access="remote">
<cfargument name="bool" required="true" type="boolean" description="The
boolean to return">
<cfreturn bool>
</cffunction>
Application Server Connectivity
89
4
Create the getArray method that the Flash Communication Server will invoke.
<cffunction name="getArray" output="false" description="Creates and
returns an array of 3 items" access="remote">
<cfset months = ArrayNew(1)>
<cfset months[1] = "January">
<cfset months[2] = "February">
<cfset months[3] = "March">
<cfreturn months>
</cffunction>
</cfcomponent>
5
Save the file as simple.cfc in the simple directory under the directory where you publish all of
your ColdFusion MX files.
Sample 2: Sending Mail
This sample illustrates how to send mail by means of the versatile CFMAIL tag. It shows how
valuable this tag is for the distribution of Flash Communication Server data. Before re-creating
this sample, make sure that you have configured your mail server in ColdFusion. To do so, select
Server Settings > Mail Server, and specify the IP address of the SMTP server you want to use.
About the sample
The user fills out four fields: To, From, Subject, and a message body field. When the user clicks
the Send button, the Flash Player sends a sendMail command to the Flash Communication
Server along with the user’s input in the four fields as parameters. The Flash Communication
Server then calls on the Flash Remoting service to send the mail.
Re-creating the sample
The doc_sendmail.fla file provides a simple user interface for sending a mail message. The clientside ActionScript requests the message be sent, but no result is returned to the client.
See “Creating your working environment” on page 31 before you start to re-create the sample.
To create the user interface for this sample:
90
1
In the Flash MX authoring environment, select File > New to open a new file.
2
From the toolbox, select the Text tool and draw four text boxes.
3
For each text box, in the Property inspector (Window > Properties), select Input Text for the
kind of text box, and type one of the following instance names: FromText, ToText,
SubjectText, and BodyText.
4
To add the button for sending the mail, open the Components panel (Window >
Components) and drag a push button onto the Stage. In the Property inspector, give it the
instance name Send_btn, the label Send, and the click handler sendMail.
5
Create a directory named doc_mailto in your flashcom application directory, and save the file
as doc_mailto.fla in this directory.
Chapter 5
To write the client-side ActionScript for this sample:
1
Add the following debug code to trace all the status information coming back from the Flash
Communication Server.
// Trace all the status information.
function traceStatus(info) {
trace("Level: " + info.level + "
Code: " +
}
info.code);
// Create onStatus prototypes for the objects that
// will return status.
NetConnection.prototype.onStatus = traceStatus;
NetStream.prototype.onStatus = traceStatus;
SharedObject.prototype.onStatus = traceStatus;
2
Create the event handler for the send_btn button. Notice the call to sendMail. This invokes
the function you’ll define later in the server-side code. The second parameter, null, tells the
Flash Communication Server that the client doesn’t expect a result to be returned.
// Send the mail. The second parameter, null, tells the
// Flash Communication Server not to return a value. The remaining
// parameters provide the data to send.
function sendMail() {
main_nc.call("sendMail", null, ToText.text, FromText.text,
SubjectText.text, BodyText.text);
}
3
Create a new network connection and connect to the application.
// Create a new connection and connect to the application
// instance on the Flash Communication Server.
main_nc = new NetConnection();
main_nc.connect("rtmp:/doc_mailto/room_01");
To write the server-side ActionScript for this sample:
1
Create a new file using your server-side ActionScript editor, and load the netservices.asc file to
enable Flash Remoting through the Flash Communication Server. Remember to add a copy of
this file in the doc_remoting directory.
load("netservices.asc");
2
In the onAppStart function, define the location of the Flash Remoting service, and connect to
it.
application.onAppStart = function() {
trace("***** on app start");
// Set the default gateway URL.
NetServices.setDefaultGatewayUrl("http://localhost:8500/flashservices/
gateway");
// Connect to the gateway.
var gatewayConnnection = NetServices.createGatewayConnection();
// Get a reference to the service. "mail.sendMail" refers
// to the ColdFusion file, sendMail.cfc, found in the mail
// application directory under the deployed ColdFusion directory.
this.mailSendService = gatewayConnnection.getService("mail.sendMail",
this);
}
Application Server Connectivity
91
3
In the onConnect function, accept the client’s connection.
application.onConnect = function (clientObj) {
trace("***** on connect");
// Accept the connection for this client.
this.acceptConnection(clientObj);
return true;
}
4
Provide a prototype function that the client can call to send the mail.
// Handle the client’s call to sendMail.
Client.prototype.sendMail = function(to, from, subject, body) {
trace("***** sending mail");
// Call the sendMail function of the Flash Remoting instance
// created in application.onAppStart, above.
application.mailSendService.sendMail(to, from, subject, body);
}
5
Save the file as main.asc in a doc_mailto directory under the flashcom applications directory.
Note: Save this main.asc file where you’ve chosen to store your server-side application files. For more
information see Chapter 1, “The flashcom application directory,” on page 15.
To write the ColdFusion component for this sample:
1
Using your standard editor, create a new file and add code to name the application and indicate
how to access it.
<cfcomponent name="sendMail" access="remote">
2
Create the sendMail function and define each parameter.
<cffunction name="sendMail" output="false"
description="send mail to a client" access="remote">
<cfargument name="to" required="true" type="string"
description="recipient of the email">
<cfargument name="from" required="true" type="string"
description="sender of the email">
<cfargument name="subject" required="true" type="string"
description="subject heading">
<cfargument name="body" required="true" type="string"
description="body text of the email">
3
Call the ColdFusion method cfmail to send the message.
<cfmail to = "#to#" from = "#from#"subject = "#subject#">#body#</cfmail>
<cftrace category="UDF End" inline = "True"
text = "Email was sent" var = "MyStatus">
</cffunction>
</cfcomponent>
4
92
Save the file as sendmail.cfc in the mail application directory under the directory where you
publish all of your ColdFusion MX files.
Chapter 5
Sample 3: Recordset
Once you have easy access to a database, you add data storage and retrieval to your Flash
Communication Server. This simple test retrieves all the recordsets from a database. The work is
done by one SQL statement inside a CFM file.
About the sample
When the user clicks the Get Records button, all the data in the database appears in the list box.
Re-creating the sample
The doc_rset.fla file provides an interface in which the user simply selects the Get Records button
and the record set is returned.
See “Creating your working environment” on page 31 before you start to re-create the sample.
To create the user interface for this sample:
1
In the Flash MX authoring environment, select File > New to open a new file.
2
To add an element for listing records, open the Components panel (Windows > Components),
drag the List Box component onto the Stage, and give it the instance name records_list.
3
To add the button for connecting to the server, drag a push button from the Components
panel onto the Stage. In the Property inspector, give it the instance name GetRecs_btn, the
label Get Records, and the click handler doGetRecords.
4
Create a directory named doc_rset in your flashcom application directory, and save the file as
doc_rset.fla in this directory.
To write the client-side ActionScript for this sample:
1
Create a new network connection and connect to the Flash Communication Server.
// Create a network connection and connect
nc = new NetConnection();
nc.onStatus = function(info) {
trace(info.level + ": " + info.code + " " + info.description);
}
nc.connect("rtmp:/doc_rset/room_01");
2
Get a shared object, and update the list box (records_list) with the data from the shared
object.
// Get the records from the records shared object
recset_so = SharedObject.getRemote("records", nc.uri, false);
recset_so.onSync = function(list) {
// Clear the list box
records_list.removeAll();
// Fill in the records, with column headers first. Use
// the getColumnString function, defined below, to get
// all of the column information.
records_list.addItem(getColumnString(this.data.__COLUMNS__), -1);
Application Server Connectivity
93
3
In the same method, assign a variable name, recstr, for the data coming from the call to
getRecordString and populate the list box with the data.
for (var i in this.data) {
if (i == "__COLUMNS__")
continue;
var recstr = getRecordString(this.data[i], this.data.__COLUMNS__);
records_list.addItem(recstr, i);
}
records_list.sortItemsBy("data", "ASC");
}
4
Connect to the shared object.
recset_so.connect(nc);
5
Create the getColumnString function to get all the column data.
// Get a string out of all column headers
function getColumnString(cols) {
var colstr = "";
if (cols.length > 0)
colstr += cols[0];
for (var i = 1; i < cols.length; i++)
colstr += ", " + cols[i];
return colstr;
}
6
Create the getRecordString function.
// Get a string containing all records in column order
function getRecordString(inx, recs, cols) {
var recstr = "";
if (cols.length > 0)
recstr += recs[cols[0]];
for (var i = 1; i < cols.length; i++)
recstr += ", " + recs[cols[i]];
return recstr;
}
7
Create the event handler for the GetRecs_btn button. When the user clicks the button, the
doGetRecords method is called; this function contains the getRecords call defined in the
server-side ActionScript.
// Call the server to initiate a database query and place
// the recordset data in ’records’ shared object
function doGetRecords() {
nc.call("getRecords", null);
}
To write the server-side ActionScript for this sample:
1
Create a new file using your server-side ActionScript editor, and load the netservices.asc file to
enable Flash Remoting through the Flash Communication Server.
load("netservices.asc");
2
Get the records shared object.
gRecords = SharedObject.get("records", false);
// Set the default gateway URL
NetServices.setDefaultGatewayUrl("http://localhost:8500/flashservices/
gateway");
94
Chapter 5
3
Create a global object to hold the recordset.
// An object to hold your service and recordset
gFoo = {};
4
Get a reference to the foo service.
// Get a named service
gFoo.service = gRemotingGateway.getService("foo", gFoo);
5
Create the onResult callback, which the Flash Remoting service expects.
// Set up the onResult callback and call it bar_Result.
// The function must be named such that if you call
// xxx method on the foo service, it will result in
// xxx_Result method being called. You set the data in
// the shared object so the Flash client can display it.
gFoo.bar_Result = function(result) {
var cols = result.getColumnNames();
trace("Columns: " + cols);
gRecords.setProperty("__COLUMNS__", cols);
var reclen = result.getLength();
trace("number of records " + reclen);
for (var i = 0; i < reclen; i++) {
trace(i + "] " + result.getItemAt(i));
gRecords.setProperty(i, result.getItemAt(i));
}
}
6
In the onConnect function, accept the client’s connection.
application.onConnect = function(client) {
trace(application.name + " connect from " + client.ip);
application.acceptConnection(client);
}
7
Provide a prototype function that the client can call to get the records.
Client.prototype.getRecords = function() {
// Call the bar method on foo service
var result = gFoo.service.bar();
trace("gFoo.service.bar returned " + result);
}
8
Save the file as main.asc in a doc_rset directory under the flashcom applications directory.
Note: Save this main.asc file where you’ve chosen to store your server-side application files. For more
information see Chapter 1, “The flashcom application directory,” on page 15.
To write the ColdFusion component for this sample:
1
Using your standard editor, create a new file and add code to query the database for all records.
<cfquery name="flash.result" datasource="ExampleApps">
SELECT *
FROM tblItems
</cfquery>
2
Save the file as bar.cfm in the foo directory under the directory where you publish all of your
ColdFusion MX files.
Application Server Connectivity
95
96
Chapter 5
APPENDIX
Flash Communication Server
Management Tools
As an application developer, one of your most important tasks is to monitor and debug your
applications while they are in use. Macromedia Flash Communication Server MX provides three
windows that display a variety of details and statistics regarding your running applications.
• The Administration Console lets you view a variety of information about server responsiveness.
It also lets you start and shut down the server, virtual hosts, and applications. To open the
Administration Console, from the Windows Start menu choose Programs > Macromedia Flash
Communication Server MX > Server Administrator. For more information, see Managing
Flash Communication Server.
• The Communication App inspector lets you unload or reload individual application instances.
It also displays information about an application instance that is currently running, including
log messages, stream data, and application usage statistics. For more information, see “Using
the Communication App inspector” below.
• The NetConnection Debugger lets you monitor debugging events that are related to
NetConnection objects. For more information, see “Using the NetConnection Debugger” on
page 105.
Using the Communication App inspector
The Communication App inspector displays a list of the application instances currently running
on the server. For any instance that you select, you can view detailed information about its status,
including the following:
• A running list of log messages that are generated by the application instance on the server
• Information about the streams and shared objects associated with the instance
• Information about the overall state of the selected application instance, such as total uptime,
number of users, and so on
You can also use the App inspector to load and unload application instances.
To open the App inspector, choose Window > Communication App Inspector from within
Macromedia Flash MX. On a server machine that doesn’t have Flash MX installed, open the
app_inspector.html file located in the admin subdirectory of the flashcom application directory.
To use the App inspector, you must have full server administator privileges or vhost
administrator privileges.
Flash Communication Server Management Tools
97
Connecting the App inspector to a server
When you open the App inspector, you use the log-on screen to connect as an administrator to
the server that is running the applications you want to manage.
The light icon in the upper right corner indicates whether the App inspector is connected to a
server. When you first start up the App inspector, the light is yellow, indicating that you are not
connected.
To connect to a server:
1
Type the server URL in the Host text field, or type localhost if the server and the
App inspector are running on the same computer. If your server is installed on a port other
than 1111 (the default), you must enter the port number as well, for example localhost:1234.
2
Enter your administrator user name and password.
3
If you want your user name and password to be saved across sessions, select Remember
Connection Data. If you also want to connect automatically whenever you open the
App inspector, select Automatically Connect.
4
Click Connect.
If the connection is successful, the light icon changes to green and the words “Not Connected”
change to “Connected.”
98
Appendix
The Application Instance panel
After you have connected to the server, the App inspector displays a panel that lists the currently
running application instances. This list is automatically refreshed every 10 seconds; to force an
immediate refresh, click Refresh Now.
If the App inspector is not able to display an application instance on the list—most likely because
a server-side ActionScript error prevented the application from loading—an alert icon appears at
the bottom right of the panel. Click the icon to display a panel that contains server-side log
messages; these messages can help you determine what might be preventing the application from
loading. When you close the panel, you return to the Application Instance panel.
This Application Instance panel lets you perform the following tasks:
• To view information about a running application instance, select it and click View Detail. The
Live Log panel will be displayed (see “The Live Log panel”).
• To terminate an application instance, disconnect all its users, and free any resources it was
using, select it and click Unload.
• To manually load an application instance, type its name in the text box at the bottom of the
panel and click Load. The application must already be configured on the server.
• To disconnect the App inspector from the server, click Disconnect. You’ll return to the log-on
screen (see “Connecting the App inspector to a server” on page 98).
Flash Communication Server Management Tools
99
The Live Log panel
The Live Log panel displays the log messages that are generated by the selected application
instance on the server and sent from the server to the App inspector. The information in this
panel is updated whenever the application instance generates a log message, and is selectable for
copying into another application.
This panel lets you perform the following tasks.
• To clear the contents of the log, click Clear Window.
• To return to the list of currently running application instances (so that you can view
information about another application instance), click Change App. You’ll return to the
application instance panel (see “The Application Instance panel” on page 99.)
• To reload the application instance—for example, if you changed one of the server-side scripts
used by the application or want to disconnect all users—click Reload App.
• To disconnect the App inspector from the server, click Disconnect. You’ll return to the log-on
screen (see “Connecting the App inspector to a server” on page 98).
• To view a different panel, click the corresponding panel name (Streams, Shared Objects, or
Statistics).
100 Appendix
The Streams panel
The Streams panel displays information about the streams associated with the selected application
instance. The information is automatically refreshed every 15 seconds; to force an immediate
refresh, click the Streams panel name again.
This panel displays the following information.
Name indicates
the stream name, as specified in the NetStream.publish or NetStream.play
command.
Stream# indicates the stream
ID number; this is simply a number representing the order in which
streams were loaded.
indicates the internal ID of the client; this represents an internal number Flash
Communication Server uses to identify each client.
Client ID
Type
indicates a server-provided string that describes what is happening on this stream.
Date
indicates the date and the time the stream began publishing or playing.
The Streams panel lets you perform the following tasks:
• To return to the list of currently running application instances (so that you can view
information about another application instance), click Change App. You’ll return to the
application panel (see “The Application Instance panel” on page 99.)
• To reload the application instance, click Reload App.
• To disconnect the App inspector from the server, click Disconnect. You’ll return to the log-on
screen (see “Connecting the App inspector to a server” on page 98).
• To view a different panel, click the corresponding panel name (Live Log, Shared Objects, or
Statistics).
Flash Communication Server Management Tools
101
The Shared Objects panel
This panel shows information about the shared objects used by the application instance (and
resident on the server). The information is automatically refreshed every 15 seconds; to force an
immediate refresh, click the Shared Objects panel name again.
Shared objects can be remotely persistent (they are stored on the server and are still available after
an application instance or server is stopped and restarted) or available only for the life of the
instance (they are temporary, and are deleted when the instance stops running). This panel
displays information on both types of shared objects used by the application instance.
To display information about a particular shared object, click the object to select it. The panel
then displays the following information.
# Users Connected
indicates the number of users currently connected to and using this
shared object.
# Properties
indicates the number of data properties assigned to the shared object.
indicates the version number of the shared object. When any property of the shared
object changes, the version is incremented.
Version
indicates the total number of connections to and
disconnections from the shared object since the object was created.
Total Connects and Total Disconnects
Messages In and Messages Out indicates the number of messages that have been sent to or from
the shared object; “messages in” reflect update requests sent from clients to the server, and
“messages out” reflect notification of successful updates sent from the server to clients that are
connected to the shared object.
is used by Flash Communication Server to determine if a shared object’s slot
should be permanently deleted or if the client version of a shared object should be cleared and
repopulated. For more information, see the SharedObject.resyncDepth entry in the Server-Side
Communication ActionScript Dictionary.
Resync Depth
102 Appendix
This panel lets you perform the following tasks:
• To return to the list of currently running application instances (so that you can view
information about another application instance), click Change App. You’ll return to the
application panel (see “The Application Instance panel” on page 99.)
• To reload the application instance, click Reload App.
• To disconnect the App inspector from the server, click Disconnect. You’ll return to the log-on
screen (see “Connecting the App inspector to a server” on page 98).
• To view a different panel, click the corresponding panel name (Live Log, Streams, or Statistics).
The Statistics panel
This panel shows information about the overall state of the application instance. The information
is updated automatically every 15 seconds; to force an immediate refresh, click the Statistics panel
name again.
This panel displays the following information.
# Active
indicates the number of users currently connected to the application instance.
Accepted (Total)
indicates the number of users who have connected to the application instance
since it started.
Rejected (Total) indicates the number of users whose attempts to connect to the application
instance since it started were rejected. To determine why connections might have failed, look at
the Live Log panel in the App inspector (see “The Live Log panel” on page 100) and the Access
Log in the Administration Console (see Managing Flash Communication Server).
Uptime
indicates the length of time the application instance has been running.
Launch Time
indicates the date and time the application instance began running.
indicates the average bytes per second being sent to and from the server.
The App inspector calculates this ratio by dividing the total number of bytes received in the most
recent 15 seconds and dividing that value by 15. When the panel first appears, these figures
appear as “pending” because there is only one data point to start with; figures will appear after the
panel is open for 15 seconds.
Bytes per Sec (In/Out)
Flash Communication Server Management Tools 103
indicates the average number of messages (video frames from cameras,
audio packets, and command messages) per second being sent to and from the server.
Messages per Sec (In/Out)
indicates the number of messages that have been dropped since the
application instance started because the client has fallen too far behind in receiving data that the
server is sending. For live streams, audio and video messages may be dropped; for recorded
streams, only video messages are dropped. Command messages are never dropped.
Messages Dropped
104 Appendix
Using the NetConnection Debugger
The NetConnection Debugger provides Flash MX developers with a tool to report and diagnose
processing and communication problems between the Flash client, Flash Communication Server,
Flash Remoting, and supported application servers.
To use the NetConnection Debugger to trace Flash Communication Server events:
1
Add the statement #include
"NetDebug.as"
to a layer on the first keyframe of your movie.
Note: To avoid unnecessary code in your movie and disable remote debugging, delete this line when you finish
debugging and are ready to publish your movie.
2
Choose Window > NetConnection Debugger from within Flash MX to open the debugger.
3
Click Filters to display the Filters UI (discussed in more detail later in this document).
4
Enter the user name and password of the admin user of the server your application is
connecting to. Also, if your server is installed on a port other than 1111 (the default), you must
enter the port number.
Note: If you are using the NetConnection Debugger to track non-Flash Communication Server applications,
such as a Flash Remoting implementation, you don’t need to perform this step.
5
Close the Filters UI to make room for more events to be displayed. (Optional.)
6
Test your movie using Control > Test Movie in the Flash authoring environment or opening
the SWF file in a browser.
If you close and then reopen the NetConnection Debugger, you must repeat steps 3 and 4.
NetConnection Debugger user interface
The NetConnection Debugger user interface (UI) contains the event display. To customize the
debugger, use the Filters menu and the Preferences menu. The following figure shows the
debugger UI:
This window displays the following information:
Flash Communication Server Management Tools 105
Events shows
a list of individual debug events. Each debug event contains an icon that represents
the debug event source, the type of debug event, and a summary description of the event.
Summary panel
shows a brief version of the debugging information for the selected debug event.
shows detailed debugging information for the selected debug event. Colors and
punctuation marks are used to distinguish types of debugging information displayed.
Details panel
The following colors and information are supported.
•
•
•
•
Red: property names
Blue: property objects
Black: property values
Green: debugger error messages
Property values use punctuation marks to convey data types. The following data types are
supported:
•
•
•
•
Strings: double quotation marks ("string")
Numbers: no special formatting
Numbered arrays: brackets around array indexes (array[1])
Other types: string representation followed by type name in italicized parentheses, such as true
(boolean).
Filters menu
The Filters menu lets you filter the debugging events by any debug event field and decide which
event types to monitor. The following figure shows the Filters menu:
The Field, Operator, and Value entries work together to specify a criterion for inclusion in the
Events list. (You must click Apply for your selections to be implemented.)
Field lets
106 Appendix
you select or type the name of the field to filter.
Operator lets
you select the comparison criterion that must be met for an event to appear in the
Events list. The contains operator only works with strings, and specifies that the event field must
compare the value as a substring.
Value lets
you enter a value to compare using the selected operator. Only events meeting the
criteria specified by the filter, operator, and value boxes will appear in the Events list.
Subscribed Event lets you specify which debug events are reported to the debugger, by selecting
and clearing check boxes next to the event type. After you click Apply, these changes take effect as
new debug events arrive. The following check boxes are specifically related to Flash
Communication Server:
•
•
•
•
•
subscribed event (if this is not selected, no debug events are recorded to the debugger)
client (if this is not selected, no client events are recorded to the debugger)
rtmp (this is the protocol used to connect to the server)
flashcom_server (if this is not selected, no server events are recorded to the debugger)
trace (if this is not selected, no traces are recorded to the debugger)
For information on the user name, password, and port, see “Using the NetConnection Debugger”
on page 105.
Preferences menu
The Preferences menu lets you set select various display options and select NetDebug
performance limiters. The following figure shows the Preferences menu:
The principal elements of the Preferences menu are Event Memory, Request Limits, and Font
Size. (You must click Apply for your selections to be implemented.)
Event Memory controls the number of total events that the debugger stores in the Events list. To
discard stored events as new events arrive, adjust the increment rate for the debugger. Total
specifies the maximum number of events stored in memory. Remove specifies how many events to
remove when the total number of events in memory has been exceeded. If you experience
debugger performance problems, you can adjust these settings.
Flash Communication Server Management Tools 107
Request Limits controls the maximum number of events that are displayed from an application
server per transaction, and the maximum number of array elements per nested array from a
application server. To see more debug events, or if you are experiencing debugger performance
problems, you can adjust these settings.
Font Size
108 Appendix
controls the size of the text that appears in the Summary and Details panels.
INDEX
Symbols
# Active 103
# Properties 102
# Users Connected 102
#include 52
#include "NetDebug.as" 32, 105
A
Accepted (Total) 103
ACL (access control list) implementation 57
ActionScript
client-side and server-side 30, 52
commands for connecting to server 18
including other scripts 52
naming variables to support code hinting 67
adding NetConnection Debugger file 53
adding a privacy module 60
Administration Console 97
API, Flash Communication Server 5
App inspector 97
Application Instance panel 99
application instances, using 16
Application object
about 12
tips and tricks 75
application server connectivity 85
application workflow 27
application.acceptConnection 59, 75
application.disconnect 59
application.onConnect 75
application.onDisconnect 76
application.rejectConnection 59
applications
capturing audio and video 17
client-server communications 51
creating your working environment 31
designing 29, 51
double-byte 17, 57
applications (continued)
and the flashcom application directory 15
initializing 65
and instance names 14, 16
portability 51
SWF file 7
tips and tricks 51
unloading and reloading 57
writing your first 19
architecture 7
ASC files
and the flashcom application directory 15
UTF-8 encoding 57
writing 17
audio feedback, avoiding 83
B
bandwidth
managing 54
and Microphone object 83
sample for managing capacity 54
bandwidth speed settings 76
Bytes per Sec (In/Out) 103
C
camera
capturing single frames 70
choosing default 53
specifying default device 17
turning off 76
using one in multiple applications 77
Camera object
about 11
tips and tricks 76
Camera.get, and Video object 12
Camera.setQuality 54
CFC (ColdFusion script file) 85
CFM (ColdFusion script file) 86
109
change, and SharedObject.onSync 80
clear, and SharedObject.onSync 80
Client ID 101
client information, tracking 25
Client object 12
and client-side NetConnection object 51
tips and tricks 77
client.call
and application.onDisconnect 76
following application.acceptConnection 75
Client.readAccess 58
client-server object communications 13, 28, 51
client-server workflows 23
Client.setBandwidthLimit 54
client-side methods, invoking from server 13, 51
client-side objects 11
client.writeAccess 58
code hinting, and variable names 67
coding conventions 63
ColdFusion MX 12, 85
Communication App inspector 97–104
connecting through Flash Remoting 85
connecting to external sources 25
connecting to the server 17
creating video objects dynamically 83
D
Date 101
debugging. See NetConnection Debugger,
troubleshooting
deleting recorded stream files 83
designing applications 29
for interdependence 51
for portability across servers 51
Details panel 106
development environment, setting up 17
double-byte applications 17, 57
downloading Flash Player 17
Dreamweaver MX 57
duplicateMovieClip 83
dynamic access control 57
E
error, and code property 59
event handlers, onStatus 58, 59
Event Memory 107
Events 106
external sources, connecting to 25
110
Index
F
feedback, avoiding 83
Field 106
file types
used by Flash Communication Server 16
where stored 67
files
including external in client-side ActionScript 53
including external in server-side ActionScript 53
using multiple 52
Filters menu 106
Flash Communication Server
architecture 7
connecting to 18
design model for 25
determining if running 18
objects. See objects
services 23
starting 18
workflow 26
Flash Player, downloading latest version 17
Flash Remoting
about 85
retrieving recordsets 93
sending mail 90
flashcom application directory location 15
flushing remote shared objects 81
FLV files
about 16
deleting 83
Font Size 108
frame rates, FLV and SWF 84
frames, capturing single 70
FSO files 16
G
getting object properties 60
getting stream time length in ActionScript 79
I
IDX files
about 16
deleting 83
initializing applications 65
instance names 14, 16, 53
J
J2EE servers 12, 85
JavaScript editors 17
L
Launch Time 103
Live Log panel 100
local shared object. See shared objects
local variables and var 65
localhost, and NetConnection.connect 18
locking and unlocking shared objects 82
M
mail, sending via Flash Remoting 90
main.asc
and the flashcom application directory 15, 41
JavaScript editor 32
reloading after changing 57
Messages Dropped 104
Messages In and Messages Out 102
Messages per Sec (In/Out) 104
microphone
choosing default 53
keeping open 83
specifying default device 17
Microphone object
about 11
tips and tricks 83
Microphone.setSilenceLevel 83
Microphone.useEchoSuppression 83
multiple data types in a stream 78
multiple files, using 52
N
Name 101
naming variables to support code hinting 67
.NET servers 12, 85
NetConnection Debugger 105–108
enabling 53
See also troubleshooting
NetConnection object, client-side 11
and Client object 51
tips and tricks 77
NetConnection object, server-side 12
NetConnection.call 12, 52
NetConnection.connect 23
and instance names 16
specifying URI 18
syntax for 18
NetConnection.Connect.Closed 59
NetConnection.Connect.Failed 60
NetConnection.Connect.Rejected 59
NetConnection.Connect.Success 59
NetConnection.onStatus 59
NetDebug.as 53
NetServices 85
NetStream object
about 11
tips and tricks 78
NetStream.attachVideo 70, 72, 76
NetStream.bufferLength 79, 80
NetStream.bufferTime 80
NetStream.call 78
NetStream.play 11, 13
and thumbnails 72
and Video object 12
NetStream.publish 11, 13, 16, 68
NetStream.receiveVideo 54
NetStream.send 78
NetStream.setBufferTime 80
NetStream.time 80
new NetConnection 18, 23
O
objects 11
Application object 12
Camera object 11
Client object 12
client-server communication 13, 28, 51
client-side objects 11
getting properties of 60
local shared objects 12, 14
Microphone object 11
NetConnection object (client-side) 11
NetConnection object (server-side) 12
NetStream object 11
remote shared objects 13, 14
server-side objects 12
server-side shared objects 13, 14
SharedObject object 14
Stream object 13
Video object 12
onAppStart 27
onAppStop 27
onConnect 27
onDisconnect 27, 76
onResult 28
onStatus 27, 59
overriding 59
using event handlers 58
onStatus handlers, placing in script 59
opening a connection to the server 18
Operator 107
overriding onStatus 59
Index
111
P
passing data between clients 24
persistence, and shared objects 68
Player Settings panel 53
Player, latest version 17
portability and application design 51
Preferences menu 107
privacy
displaying the Settings panel 53
importance of notifying users 60
sample module 60
properties, getting 60
prototype
and application.onConnect 75
using when creating objects 66, 75
R
read/write access, shared objects 57
recorded streams
avoiding collisions 16
deleting files 83
files for 68
recordsets, retrieving using Flash Remoting 93
Rejected (Total) 103
reloading and unloading applications 57
remote shared object. See shared objects
Remoting, Flash. See Flash Remoting
removeMovieClip 83
Request Limits 108
Resync Depth 102
RTMP (Real-Time Messaging Protocol) 18
S
sample applications, working environment 31
sample connection application
described 19
recreating 20
scripting. See ActionScript
servers
application server connectivity 85
moving applications among 51
server-side methods, invoking from client 13, 51
server-side objects 12
server-side shared object. See shared objects
shared objects 14
avoiding collisions 16
avoiding synchronization problems 81
client-server communications 29
controlling read/write access 57
flushing on server 81
local 12, 14
112
Index
shared objects (continued)
local and remote persistence 68
locking and unlocking 82
remote 13, 14
returning game’s high score 82
server-side 13, 14
slots 81
tips and tricks 80
types of 68
unlocking 82
where files are stored 68
Shared Objects panel 102
SharedObject object. See shared objects
SharedObject.connect 29
SharedObject.data 80, 81
SharedObject.flush 81
SharedObject.get 69
SharedObject.getLocal 69
SharedObject.getRemote 16, 29, 69, 80
SharedObject.onSync 80, 82
including debugging code in handler 81
and remote shared object flow 29
SharedObject.resyncDepth 102
SharedObject.send 82
single frames, capturing 70
slots, in shared objects 81
snapshots 70
SOL files 16
SOR files 16
starting the service 18
Statistics panel 103
status, and code property 59
storing data for delivery to clients 24
Stream object
about 13
tips and tricks 83
Stream# 101
Stream.get 13
Stream.length 79
streams
avoiding collisions 16
between server and Flash Player 8
controlling read/write access 57
deleting recorded stream files 83
getting time length 79
including data in 78
live and recorded 9
where files are stored 68
See also NetStream object, Stream object
Streams panel 101
Subscribed Events 107
Summary panel 106
System.onStatus 59
System.showSettings 53
T
thumbnails 70, 72
tips and tricks 83
Application object 75
Camera object 76
Client object 77
client-side NetConnection object 77
Microphone object 83
NetStream object 78
shared objects 80
Stream object 83
Total Connects and Total Disconnects 102
tracking client information 25
troubleshooting
application won’t connect to server 60
enabling NetConnection Debugger 53
including debugging code in SharedObject.onSync
handler 81
NetConnection.Connect.Failed 60
tools available 97
turning the camera off 76
Type 101
W
warning, and code property 59
workflow
application 27, 29
client-server 23
Flash Communication Server 26
working environment for sample applications 31
U
unloading and reloading applications 57
unlocking shared objects 82
Uptime 103
URI (Universal Resource Identifier) 18
and Flash Player security 77
shortcut for specifying 51
using localhost 18
UTF-8
and double-bye applications 57
enabling in Dreamweaver MX 57
V
Value 107
var, using for local variables 65
Version 102
Video object 12, 83
and Camera.get 12
and NetStream.play 12
tips and tricks 83
video objects, creating dynamically 83
video, capturing single frames 70
Video.attachVideo 12
Index
113
Client-Side Communication
ActionScript Dictionary
Macromedia Flash Communication Server MX
™
™
macromedia
®
Trademarks
Afterburner, AppletAce, Attain, Attain Enterprise Learning System, Attain Essentials, Attain Objects for Dreamweaver,
Authorware, Authorware Attain, Authorware Interactive Studio, Authorware Star, Authorware Synergy, Backstage, Backstage
Designer, Backstage Desktop Studio, Backstage Enterprise Studio, Backstage Internet Studio, Design in Motion, Director,
Director Multimedia Studio, Doc Around the Clock, Dreamweaver, Dreamweaver Attain, Drumbeat, Drumbeat 2000, Extreme
3D, Fireworks, Flash, Fontographer, FreeHand, FreeHand Graphics Studio, Generator, Generator Developer’s Studio, Generator
Dynamic Graphics Server, Knowledge Objects, Knowledge Stream, Knowledge Track, Lingo, Live Effects, Macromedia,
Macromedia M Logo & Design, Macromedia Flash, Macromedia Xres, Macromind, Macromind Action, MAGIC, Mediamaker,
Object Authoring, Power Applets, Priority Access, Roundtrip HTML, Scriptlets, SoundEdit, ShockRave, Shockmachine,
Shockwave, Shockwave Remote, Shockwave Internet Studio, Showcase, Tools to Power Your Ideas, Universal Media, Virtuoso,
Web Design 101, Whirlwind and Xtra are trademarks of Macromedia, Inc. and may be registered in the United States or in other
jurisdictions including internationally. Other product names, logos, designs, titles, words or phrases mentioned within this
publication may be trademarks, servicemarks, or tradenames of Macromedia, Inc. or other entities and may be registered in
certain jurisdictions including internationally.
Third-Party Information
Speech compression and decompression technology licensed from Nellymoser, Inc. (www.nellymoser.com).
Sorenson™ Spark™ video compression and decompression technology licensed from
Sorenson Media, Inc.
This guide contains links to third-party websites that are not under the control of Macromedia, and Macromedia is not
responsible for the content on any linked site. If you access a third-party website mentioned in this guide, then you do so at your
own risk. Macromedia provides these links only as a convenience, and the inclusion of the link does not imply that Macromedia
endorses or accepts any responsibility for the content on those third-party sites.
Copyright © 2002 Macromedia, Inc. All rights reserved. This manual may not be copied, photocopied, reproduced,
translated, or converted to any electronic or machine-readable form in whole or in part without prior written approval of
Macromedia, Inc.
Acknowledgments
Director: Erick Vera
Producer: JuLee Burdekin
Writing: Jay Armstrong, Jody Bleyle, JuLee Burdekin, Barbara Herbert, and Barbara Nelson
Editing: Zawadi Olatunji, Anne Szabla
Multimedia Design and Production: Aaron Begley, Benjamin Salles
Print Design and Production: Chris Basmajian
First Edition: May 2002
Macromedia, Inc.
600 Townsend St.
San Francisco, CA 94103
CONTENTS
Client-Side Communication ActionScript
.............................7
Camera (object). . . . . . . . . . . . . . . . . . . . . . . . . . . . . . . . . . . . . . . . . . . . . . . . . . . . . . . . 9
Camera.activityLevel . . . . . . . . . . . . . . . . . . . . . . . . . . . . . . . . . . . . . . . . . . . . . . . . . . . 11
Camera.bandwidth . . . . . . . . . . . . . . . . . . . . . . . . . . . . . . . . . . . . . . . . . . . . . . . . . . . . 11
Camera.currentFps . . . . . . . . . . . . . . . . . . . . . . . . . . . . . . . . . . . . . . . . . . . . . . . . . . . . 12
Camera.fps . . . . . . . . . . . . . . . . . . . . . . . . . . . . . . . . . . . . . . . . . . . . . . . . . . . . . . . . . . 12
Camera.get . . . . . . . . . . . . . . . . . . . . . . . . . . . . . . . . . . . . . . . . . . . . . . . . . . . . . . . . . . 13
Camera.height. . . . . . . . . . . . . . . . . . . . . . . . . . . . . . . . . . . . . . . . . . . . . . . . . . . . . . . . 15
Camera.index . . . . . . . . . . . . . . . . . . . . . . . . . . . . . . . . . . . . . . . . . . . . . . . . . . . . . . . . 15
Camera.keyFrameInterval . . . . . . . . . . . . . . . . . . . . . . . . . . . . . . . . . . . . . . . . . . . . . . . 16
Camera.loopback . . . . . . . . . . . . . . . . . . . . . . . . . . . . . . . . . . . . . . . . . . . . . . . . . . . . . 16
Camera.motionLevel . . . . . . . . . . . . . . . . . . . . . . . . . . . . . . . . . . . . . . . . . . . . . . . . . . . 17
Camera.motionTimeOut . . . . . . . . . . . . . . . . . . . . . . . . . . . . . . . . . . . . . . . . . . . . . . . 17
Camera.muted . . . . . . . . . . . . . . . . . . . . . . . . . . . . . . . . . . . . . . . . . . . . . . . . . . . . . . . 18
Camera.name . . . . . . . . . . . . . . . . . . . . . . . . . . . . . . . . . . . . . . . . . . . . . . . . . . . . . . . . 18
Camera.names. . . . . . . . . . . . . . . . . . . . . . . . . . . . . . . . . . . . . . . . . . . . . . . . . . . . . . . . 19
Camera.onActivity . . . . . . . . . . . . . . . . . . . . . . . . . . . . . . . . . . . . . . . . . . . . . . . . . . . . 20
Camera.onStatus . . . . . . . . . . . . . . . . . . . . . . . . . . . . . . . . . . . . . . . . . . . . . . . . . . . . . . 21
Camera.quality . . . . . . . . . . . . . . . . . . . . . . . . . . . . . . . . . . . . . . . . . . . . . . . . . . . . . . . 22
Camera.setKeyFrameInterval. . . . . . . . . . . . . . . . . . . . . . . . . . . . . . . . . . . . . . . . . . . . . 22
Camera.setLoopback . . . . . . . . . . . . . . . . . . . . . . . . . . . . . . . . . . . . . . . . . . . . . . . . . . . 23
Camera.setMode . . . . . . . . . . . . . . . . . . . . . . . . . . . . . . . . . . . . . . . . . . . . . . . . . . . . . . 24
Camera.setMotionLevel. . . . . . . . . . . . . . . . . . . . . . . . . . . . . . . . . . . . . . . . . . . . . . . . . 25
Camera.setQuality. . . . . . . . . . . . . . . . . . . . . . . . . . . . . . . . . . . . . . . . . . . . . . . . . . . . . 26
Camera.width . . . . . . . . . . . . . . . . . . . . . . . . . . . . . . . . . . . . . . . . . . . . . . . . . . . . . . . . 27
LocalConnection (object) . . . . . . . . . . . . . . . . . . . . . . . . . . . . . . . . . . . . . . . . . . . . . . . 28
LocalConnection.allowDomain. . . . . . . . . . . . . . . . . . . . . . . . . . . . . . . . . . . . . . . . . . . 30
LocalConnection.close . . . . . . . . . . . . . . . . . . . . . . . . . . . . . . . . . . . . . . . . . . . . . . . . . 31
LocalConnection.connect . . . . . . . . . . . . . . . . . . . . . . . . . . . . . . . . . . . . . . . . . . . . . . . 31
LocalConnection.domain . . . . . . . . . . . . . . . . . . . . . . . . . . . . . . . . . . . . . . . . . . . . . . . 33
LocalConnection.onStatus. . . . . . . . . . . . . . . . . . . . . . . . . . . . . . . . . . . . . . . . . . . . . . . 35
LocalConnection.send. . . . . . . . . . . . . . . . . . . . . . . . . . . . . . . . . . . . . . . . . . . . . . . . . . 36
Microphone (object) . . . . . . . . . . . . . . . . . . . . . . . . . . . . . . . . . . . . . . . . . . . . . . . . . . . 38
Microphone.activityLevel . . . . . . . . . . . . . . . . . . . . . . . . . . . . . . . . . . . . . . . . . . . . . . . 39
Microphone.gain . . . . . . . . . . . . . . . . . . . . . . . . . . . . . . . . . . . . . . . . . . . . . . . . . . . . . . 40
Microphone.get. . . . . . . . . . . . . . . . . . . . . . . . . . . . . . . . . . . . . . . . . . . . . . . . . . . . . . . 41
Microphone.index . . . . . . . . . . . . . . . . . . . . . . . . . . . . . . . . . . . . . . . . . . . . . . . . . . . . . 43
Microphone.muted . . . . . . . . . . . . . . . . . . . . . . . . . . . . . . . . . . . . . . . . . . . . . . . . . . . . 43
3
Microphone.name . . . . . . . . . . . . . . . . . . . . . . . . . . . . . . . . . . . . . . . . . . . . . . . . . . . . . 44
Microphone.names . . . . . . . . . . . . . . . . . . . . . . . . . . . . . . . . . . . . . . . . . . . . . . . . . . . . 45
Microphone.onActivity . . . . . . . . . . . . . . . . . . . . . . . . . . . . . . . . . . . . . . . . . . . . . . . . . 45
Microphone.onStatus . . . . . . . . . . . . . . . . . . . . . . . . . . . . . . . . . . . . . . . . . . . . . . . . . . 46
Microphone.rate . . . . . . . . . . . . . . . . . . . . . . . . . . . . . . . . . . . . . . . . . . . . . . . . . . . . . . 47
Microphone.setGain . . . . . . . . . . . . . . . . . . . . . . . . . . . . . . . . . . . . . . . . . . . . . . . . . . . 48
Microphone.setRate . . . . . . . . . . . . . . . . . . . . . . . . . . . . . . . . . . . . . . . . . . . . . . . . . . . 48
Microphone.setSilenceLevel . . . . . . . . . . . . . . . . . . . . . . . . . . . . . . . . . . . . . . . . . . . . . 49
Microphone.setUseEchoSuppression . . . . . . . . . . . . . . . . . . . . . . . . . . . . . . . . . . . . . . . 50
Microphone.silenceLevel . . . . . . . . . . . . . . . . . . . . . . . . . . . . . . . . . . . . . . . . . . . . . . . . 51
Microphone.silenceTimeout . . . . . . . . . . . . . . . . . . . . . . . . . . . . . . . . . . . . . . . . . . . . . 52
Microphone.useEchoSuppression . . . . . . . . . . . . . . . . . . . . . . . . . . . . . . . . . . . . . . . . . 52
MovieClip (object) . . . . . . . . . . . . . . . . . . . . . . . . . . . . . . . . . . . . . . . . . . . . . . . . . . . . 53
MovieClip.attachAudio . . . . . . . . . . . . . . . . . . . . . . . . . . . . . . . . . . . . . . . . . . . . . . . . . 53
NetConnection (object) . . . . . . . . . . . . . . . . . . . . . . . . . . . . . . . . . . . . . . . . . . . . . . . . 54
NetConnection.call . . . . . . . . . . . . . . . . . . . . . . . . . . . . . . . . . . . . . . . . . . . . . . . . . . . . 55
NetConnection.close . . . . . . . . . . . . . . . . . . . . . . . . . . . . . . . . . . . . . . . . . . . . . . . . . . . 56
NetConnection.connect . . . . . . . . . . . . . . . . . . . . . . . . . . . . . . . . . . . . . . . . . . . . . . . . 57
NetConnection.isConnected . . . . . . . . . . . . . . . . . . . . . . . . . . . . . . . . . . . . . . . . . . . . . 61
NetConnection.onStatus . . . . . . . . . . . . . . . . . . . . . . . . . . . . . . . . . . . . . . . . . . . . . . . . 61
NetConnection.uri . . . . . . . . . . . . . . . . . . . . . . . . . . . . . . . . . . . . . . . . . . . . . . . . . . . . 62
NetStream (object) . . . . . . . . . . . . . . . . . . . . . . . . . . . . . . . . . . . . . . . . . . . . . . . . . . . . 62
NetStream.attachAudio . . . . . . . . . . . . . . . . . . . . . . . . . . . . . . . . . . . . . . . . . . . . . . . . . 65
NetStream.attachVideo . . . . . . . . . . . . . . . . . . . . . . . . . . . . . . . . . . . . . . . . . . . . . . . . . 66
NetStream.bufferLength . . . . . . . . . . . . . . . . . . . . . . . . . . . . . . . . . . . . . . . . . . . . . . . . 68
NetStream.bufferTime. . . . . . . . . . . . . . . . . . . . . . . . . . . . . . . . . . . . . . . . . . . . . . . . . . 68
NetStream.close. . . . . . . . . . . . . . . . . . . . . . . . . . . . . . . . . . . . . . . . . . . . . . . . . . . . . . . 69
NetStream.currentFps . . . . . . . . . . . . . . . . . . . . . . . . . . . . . . . . . . . . . . . . . . . . . . . . . . 70
NetStream.onStatus. . . . . . . . . . . . . . . . . . . . . . . . . . . . . . . . . . . . . . . . . . . . . . . . . . . . 70
NetStream.pause . . . . . . . . . . . . . . . . . . . . . . . . . . . . . . . . . . . . . . . . . . . . . . . . . . . . . . 70
NetStream.play . . . . . . . . . . . . . . . . . . . . . . . . . . . . . . . . . . . . . . . . . . . . . . . . . . . . . . . 72
NetStream.publish. . . . . . . . . . . . . . . . . . . . . . . . . . . . . . . . . . . . . . . . . . . . . . . . . . . . . 74
NetStream.receiveAudio . . . . . . . . . . . . . . . . . . . . . . . . . . . . . . . . . . . . . . . . . . . . . . . . 76
NetStream.receiveVideo . . . . . . . . . . . . . . . . . . . . . . . . . . . . . . . . . . . . . . . . . . . . . . . . 76
NetStream.seek . . . . . . . . . . . . . . . . . . . . . . . . . . . . . . . . . . . . . . . . . . . . . . . . . . . . . . . 77
NetStream.send . . . . . . . . . . . . . . . . . . . . . . . . . . . . . . . . . . . . . . . . . . . . . . . . . . . . . . . 78
NetStream.setBufferTime . . . . . . . . . . . . . . . . . . . . . . . . . . . . . . . . . . . . . . . . . . . . . . . 79
NetStream.time . . . . . . . . . . . . . . . . . . . . . . . . . . . . . . . . . . . . . . . . . . . . . . . . . . . . . . . 80
SharedObject (object) . . . . . . . . . . . . . . . . . . . . . . . . . . . . . . . . . . . . . . . . . . . . . . . . . . 81
SharedObject.close . . . . . . . . . . . . . . . . . . . . . . . . . . . . . . . . . . . . . . . . . . . . . . . . . . . . 87
SharedObject.connect . . . . . . . . . . . . . . . . . . . . . . . . . . . . . . . . . . . . . . . . . . . . . . . . . . 87
SharedObject.data . . . . . . . . . . . . . . . . . . . . . . . . . . . . . . . . . . . . . . . . . . . . . . . . . . . . . 88
SharedObject.flush . . . . . . . . . . . . . . . . . . . . . . . . . . . . . . . . . . . . . . . . . . . . . . . . . . . . 89
SharedObject.getLocal. . . . . . . . . . . . . . . . . . . . . . . . . . . . . . . . . . . . . . . . . . . . . . . . . . 91
SharedObject.getRemote . . . . . . . . . . . . . . . . . . . . . . . . . . . . . . . . . . . . . . . . . . . . . . . . 92
SharedObject.getSize . . . . . . . . . . . . . . . . . . . . . . . . . . . . . . . . . . . . . . . . . . . . . . . . . . . 95
SharedObject.onStatus . . . . . . . . . . . . . . . . . . . . . . . . . . . . . . . . . . . . . . . . . . . . . . . . . 95
SharedObject.onSync . . . . . . . . . . . . . . . . . . . . . . . . . . . . . . . . . . . . . . . . . . . . . . . . . . 96
SharedObject.send. . . . . . . . . . . . . . . . . . . . . . . . . . . . . . . . . . . . . . . . . . . . . . . . . . . . . 97
SharedObject.setFps . . . . . . . . . . . . . . . . . . . . . . . . . . . . . . . . . . . . . . . . . . . . . . . . . . . 98
4
Contents
System (object) . . . . . . . . . . . . . . . . . . . . . . . . . . . . . . . . . . . . . . . . . . . . . . . . . . . . . . . 99
System.showSettings . . . . . . . . . . . . . . . . . . . . . . . . . . . . . . . . . . . . . . . . . . . . . . . . . . . 99
Video (object) . . . . . . . . . . . . . . . . . . . . . . . . . . . . . . . . . . . . . . . . . . . . . . . . . . . . . . . 100
Video.attachVideo. . . . . . . . . . . . . . . . . . . . . . . . . . . . . . . . . . . . . . . . . . . . . . . . . . . . 101
Video.clear . . . . . . . . . . . . . . . . . . . . . . . . . . . . . . . . . . . . . . . . . . . . . . . . . . . . . . . . . 102
Video.deblocking . . . . . . . . . . . . . . . . . . . . . . . . . . . . . . . . . . . . . . . . . . . . . . . . . . . . 102
Video.height . . . . . . . . . . . . . . . . . . . . . . . . . . . . . . . . . . . . . . . . . . . . . . . . . . . . . . . . 103
Video.smoothing . . . . . . . . . . . . . . . . . . . . . . . . . . . . . . . . . . . . . . . . . . . . . . . . . . . . . 103
Video.width . . . . . . . . . . . . . . . . . . . . . . . . . . . . . . . . . . . . . . . . . . . . . . . . . . . . . . . . 104
APPENDIX
Client-Side Information Objects .
. . . . . . . . . . . . . . . . . . . . . . . . . . . . . . . . . . . 105
Contents
5
6
Contents
Client-Side Communication ActionScript
This document is designed to be used in conjunction with the information in the online Flash
ActionScript Dictionary in the Flash MX Help menu. To write Macromedia Flash
Communication Server MX applications, you must be familiar with writing ActionScript in
general. Refer to that document for general scripting information, and use this document to add
Flash Communication Server functionality to your Flash applications.
For an overview of the Flash Communication Server objects, see Developing Applications with
Flash Communication Server.
Entries in this document are alphabetical by class name and then by method, property, or event
handler name. The following table lists all classes, methods, properties, and event handlers
individually in alphabetical order.
ActionScript element
See entry
activityLevel
Camera.activityLevel, Microphone.activityLevel
allowDomain
LocalConnection.allowDomain
attachAudio
MovieClip.attachAudio, NetStream.attachAudio
attachVideo
NetStream.attachVideo, Video.attachVideo
bandwidth
Camera.bandwidth
bufferLength
NetStream.bufferLength
bufferTime
NetStream.bufferTime
call
NetConnection.call
Camera
Camera (object)
clear
Video.clear
close
LocalConnection.close, NetConnection.close, NetStream.close,
SharedObject.close
connect
LocalConnection.connect, NetConnection.connect,
SharedObject.connect
currentFps
Camera.currentFps, NetStream.currentFps
data
SharedObject.data
deblocking
Video.deblocking
domain
LocalConnection.domain
flush
SharedObject.flush
fps
Camera.fps
7
ActionScript element
8
See entry
gain
Microphone.gain
get
Camera.get, Microphone.get
getLocal
SharedObject.getLocal
getRemote
SharedObject.getRemote
getSize
SharedObject.getSize
height
Camera.height, Video.height
index
Camera.index, Microphone.index
keyFrameInterval
Camera.keyFrameInterval
LocalConnection
LocalConnection (object)
loopback
Camera.loopback
Microphone
Microphone (object)
motionLevel
Camera.motionLevel
motionTimeOut
Camera.motionTimeOut
MovieClip
MovieClip (object)
muted
Camera.muted, Microphone.muted
name
Camera.name, Microphone.name
names
Camera.names, Microphone.names
NetConnection
NetConnection (object)
NetStream
NetStream (object)
onActivity
Camera.onActivity, Microphone.onActivity
onStatus
Camera.onStatus, Microphone.onStatus, NetConnection.onStatus,
NetStream.onStatus, SharedObject.onStatus
onSync
SharedObject.onSync
pause
NetStream.pause
play
NetStream.play
publish
NetStream.publish
quality
Camera.quality
rate
Microphone.rate
receiveAudio
NetStream.receiveAudio
receiveVideo
NetStream.receiveVideo
seek
NetStream.seek
send
LocalConnection.send, NetStream.send, SharedObject.send
setBufferTime
NetStream.setBufferTime
setFps
SharedObject.setFps
setGain
Microphone.setGain
setKeyFrameInterval
Camera.setKeyFrameInterval
ActionScript element
See entry
setLoopback
Camera.setLoopback
setMode
Camera.setMode
setMotionLevel
Camera.setMotionLevel
setQuality
Camera.setQuality
setRate
Microphone.setRate
setSilenceLevel
Microphone.setSilenceLevel
setUseEchoSuppression
Microphone.setUseEchoSuppression
SharedObject
SharedObject (object)
showSettings
System.showSettings
silenceLevel
Microphone.silenceLevel
silenceTimeout
Microphone.silenceTimeout
smoothing
Video.smoothing
time
NetStream.time
useEchoSuppression
Microphone.useEchoSuppression
Video
Video (object)
width
Camera.width, Video.width
Camera (object)
Availability
• Flash Player 6.
• Flash Communication Server MX (not required).
The Camera object lets you capture video from a video camera attached to the computer that is
running the Macromedia Flash Player. When used with Flash Communication Server, this object
lets you transmit, display, and optionally record the video being captured. With these capabilities,
you can develop communications applications such as videoconferencing, instant messaging with
video, and so on. (Flash provides similar audio capabilities; for more information, see the
“Microphone (object)” entry.)
You can also use a Camera object without a server—for example, to monitor a video feed from a
webcam attached to your local system.
To create or reference a Camera object, use Camera.get.
Client-Side Communication ActionScript
9
Method summary for the Camera object
Method
Description
Camera.get
Returns a default or specified Camera object, or null if the camera is
not available.
Camera.setKeyFrameInterval
Specifies which video frames are transmitted in full instead of being
interpolated by the video compression algorithm.
Camera.setLoopback
Specifies whether to use a compressed video stream for a local view of what
the camera is transmitting.
Camera.setMode
Sets aspects of the camera capture mode, including height, width, and
frames per second.
Camera.setMotionLevel
Specifies how much motion is required to invoke
Camera.onActivity(true) and how much time should elapse without
motion before Camera.onActivity(false) is invoked.
Camera.setQuality
Sets the maximum amount of bandwidth per second or the required picture
quality of the current outgoing video feed.
Property summary for the Camera object
10
Property (read-only)
Description
Camera.activityLevel
The amount of motion the camera is detecting.
Camera.bandwidth
The maximum amount of bandwidth the current outgoing video feed can use,
in bytes.
Camera.currentFps
The rate at which the camera is capturing data, in frames per second.
Camera.fps
The rate at which you would like the camera to capture data, in frames per second.
Camera.height
The current capture height, in pixels.
Camera.index
The index of the camera, as reflected in the array returned by Camera.names.
Camera.keyFrameInterval
A number that specifies which video frames are transmitted in full instead of being
interpolated by the video compression algorithm.
Camera.loopback
A Boolean value that specifies whether a local view of what the camera is
capturing is compressed or uncompressed.
Camera.motionLevel
The amount of motion required to invoke Camera.onActivity(true).
Camera.motionTimeOut
The number of milliseconds between the time the camera stops detecting motion
and the time Camera.onActivity(false) is invoked.
Camera.muted
A Boolean value that specifies whether the user has allowed or denied access to
the camera.
Camera.name
The name of the camera as specified by the camera hardware.
Camera.names
Class property; an array of strings containing the names of all available video
capture devices, including video cards and cameras.
Camera.quality
A number that specifies the current level of picture quality based on the amount of
compression being applied to each video frame.
Camera.width
The current capture width, in pixels.
Event handler summary for the Camera object
Method
Description
Camera.onActivity
Invoked when the camera starts or stops detecting motion.
Camera.onStatus
Invoked when the user allows or denies access to the camera.
Constructor for the Camera object
See Camera.get.
Camera.activityLevel
Availability
• Flash Player 6.
• Flash Communication Server MX (not required).
Usage
activeCamera.activityLevel
Description
Read-only property; a numeric value that specifies the amount of motion the camera is detecting.
Values range from 0 (no motion is being detected) to 100 (a large amount of motion is being
detected). The value of this property can help you determine if you need to pass a setting to
Camera.setMotionLevel.
If the camera is available but is not yet being used because neither Video.attachVideo nor
NetStream.attachVideo has been called, this property is set to -1.
If you are streaming only uncompressed local video—that is, you are not streaming the video
within a NetStream object and you have not called Camera.setLoopback(true)—this property
is set only if you have assigned a function to the Camera.onActivity event handler. Otherwise,
it is undefined.
See also
Camera.motionLevel, Camera.setMotionLevel
Camera.bandwidth
Availability
• Flash Player 6.
• Flash Communication Server MX (not required).
Usage
activeCamera.bandwidth
Description
Read-only property; an integer that specifies the maximum amount of bandwidth the current
outgoing video feed can use, in bytes. A value of 0 means that Flash video can use as much
bandwidth as needed to maintain the desired frame quality.
To set this property, use Camera.setQuality.
Client-Side Communication ActionScript
11
Example
The following example loads another movie if the camera’s bandwidth is 32 kilobytes or greater.
if(myCam.bandwidth >= 32768){
loadMovie("splat.swf",_root.hiddenvar);
}
See also
Camera.setQuality
Camera.currentFps
Availability
• Flash Player 6.
• Flash Communication Server MX (not required).
Usage
activeCamera.currentFps
Description
Read-only property; the rate at which the camera is capturing data, in frames per second. This
property cannot be set; however, you can use Camera.setMode to set a related property—
Camera.fps—which specifies the maximum frame rate at which you would like the camera to
capture data.
See also
Camera.fps, Camera.setMode
Camera.fps
Availability
• Flash Player 6.
• Flash Communication Server MX (not required).
Usage
activeCamera.fps
Description
Read-only property; the maximum rate at which you want the camera to capture data, in frames
per second. The maximum rate possible depends on the capabilities of the camera; that is, if the
camera doesn’t support the value you set here, this frame rate will not be achieved.
• To set a desired value for this property, use Camera.setMode.
• To determine the rate at which the camera is currently capturing data, use
Camera.currentFps.
12
Example
The following example sets the fps rate of the active camera, myCam.fps, to the value provided by
the user’s text box, this.config.txt_fps.
if (this.config.txt_fps != undefined) {
myCam.setMode(myCam.width, myCam.height, this.config.txt_fps, false);
}
Note: The setMode function does not guarantee the requested fps setting; it sets the fps you requested or the
fastest fps available.
See also
Camera.currentFps, Camera.setMode
Camera.get
Availability
• Flash Player 6.
• Flash Communication Server MX (not required).
Usage
Camera.get([index])
Note: The correct syntax is Camera.get(). To assign the Camera object to a variable, use syntax like
activeCamera = Camera.get().
Parameters
An optional zero-based integer that specifies which camera to get, as determined from
the array returned by Camera.names. To get the default camera (which is recommended for most
applications), omit this parameter.
index
Returns
• If index is not specified, this method returns a reference to the default camera or, if it is in use
by another application, to the first available camera. (If there is more than one camera
installed, the user may specify the default camera in the Flash Player Camera Settings panel.) If
no cameras are available or installed, the method returns null.
• If index is specified, this method returns a reference to the requested camera, or null if it is
not available.
Description
Method; returns a reference to a Camera object for capturing video. To actually begin capturing
the video, you must attach the Camera object either to a Video object (see Video.attachVideo)
or to a NetStream object (see NetStream.attachVideo). (The NetStream object is available only
with Flash Communication Server.)
Unlike objects that you create using the new constructor, multiple calls to Camera.get reference
the same camera. Thus, if your script contains the lines cam1 = Camera.get() and
cam2 = Camera.get(), both cam1 and cam2 reference the same (default) camera.
In general, you shouldn’t pass a value for index; simply use Camera.get() to return a reference
to the default camera. By means of the Camera settings panel (discussed later in this section), the
user can specify the default camera Flash should use. If you pass a value for index, you might be
trying to reference a camera other than the one the user prefers. You might use index in rare
cases—for example, if your application is capturing video from two cameras at the same time.
Client-Side Communication ActionScript
13
When a movie tries to access the camera returned by Camera.get—for example, when you issue
NetStream.attachVideo or Video.attachVideo—the Flash Player displays a Privacy dialog
box that lets the user choose whether to allow or deny access to the camera. (Make sure your
Stage size is at least 215 by 138 pixels; this is the minimum size Flash requires to display the
dialog box.)
When the user responds to this dialog box, the Camera.onStatus event handler returns an
information object that indicates the user’s response. To determine whether the user has denied or
allowed access to the camera without processing this event handler, use Camera.muted.
The user can also specify permanent privacy settings for a particular domain by right-clicking
(Windows) or Control-clicking (Macintosh) while a movie is playing, choosing Settings, opening
the Privacy panel, and selecting Remember.
You can’t use ActionScript to set the Allow or Deny value for a user, but you can display the
Privacy panel for the user by using System.showSettings(0). If the user selects Remember, the
Flash Player no longer displays the Privacy dialog box for movies from this domain.
If Camera.get returns null, either the camera is in use by another application, or there are no
cameras installed on the system. To determine whether any cameras are installed, use
Camera.names.length. To display the Flash Player Camera Settings panel, which lets the user
choose the camera to be referenced by Camera.get, use System.showSettings(3).
Note that scanning the hardware for cameras takes time. Once Flash finds at least one camera, the
hardware is not scanned again for the lifetime of the player instance. However, if Flash doesn’t
find any cameras, it will scan each time Camera.get is called. This is helpful if a user has
forgotten to connect the camera; if your movie provides a Try Again button that calls
Camera.get, Flash can find the camera without the user having to restart the movie.
14
Example
The following example captures and displays video locally within a Video object named myVid
on the Stage.
myCam = Camera.get();
myVid.attachVideo(myCam);
See also
Camera.index, Camera.muted, Camera.names, Camera.onStatus, Camera.setMode,
NetStream.attachVideo, System.showSettings, Video.attachVideo
Camera.height
Availability
• Flash Player 6.
• Flash Communication Server MX (not required).
Usage
activeCamera.height
Description
Read-only property; the current capture height, in pixels. To set a value for this property, use
Camera.setMode.
Example
The following line of code updates a text box in the user interface with the current height value.
_root.txt_height = myCam.height;
See also the example for Camera.setMode.
See also
Camera.setMode, Camera.width
Camera.index
Availability
• Flash Player 6.
• Flash Communication Server MX (not required).
Usage
activeCamera.index
Description
Read-only property; a zero-based integer that specifies the index of the camera, as reflected in the
array returned by Camera.names.
Example
The following example gets the camera that has the value of index.
myCam = Camera.get(index);
See also
Camera.get, Camera.names
Client-Side Communication ActionScript
15
Camera.keyFrameInterval
Availability
• Flash Player 6.
• Flash Communication Server MX (not required).
Usage
activeCamera.keyFrameInterval
Description
Read-only property; a number that specifies which video frames are transmitted in full (called
keyframes) instead of being interpolated by the video compression algorithm. The default value
is 15 (every 15th frame is a keyframe).
See also
Camera.setKeyFrameInterval
Camera.loopback
Availability
• Flash Player 6.
• Flash Communication Server MX (not required).
Usage
activeCamera.loopback
Description
Read-only property; a Boolean value that specifies whether a local view of what the camera is
capturing is compressed and decompressed as it would be for live transmission using Flash
Communication Server (true) or uncompressed (false). The default value is false.
To set this value, use Camera.setLoopback. To set the amount of compression used when this
property is true, use Camera.setQuality.
Example
See the example for Camera.setLoopback.
See also
Camera.setLoopback, Camera.setQuality
16
Camera.motionLevel
Availability
• Flash Player 6.
• Flash Communication Server MX (not required).
Usage
activeCamera.motionLevel
Description
Read-only property; a numeric value that specifies the amount of motion required to invoke
Camera.onActivity(true). Acceptable values range from 0 to 100. The default value is 50.
Video can be displayed regardless of the value of the motionLevel property. For more
information, see Camera.setMotionLevel.
See also
Camera.activityLevel, Camera.onStatus, Camera.setMotionLevel
Camera.motionTimeOut
Availability
• Flash Player 6.
• Flash Communication Server MX (not required).
Usage
activeCamera.motionTimeOut
Description
Read-only property; the number of milliseconds between the time the camera stops detecting
motion and the time Camera.onActivity(false) is invoked. The default value is 2000
(2 seconds).
To set this value, use Camera.setMotionLevel.
Example
The following example sets the number of milliseconds between the time the camera stops
detecting motion and the time Camera.onActivity(false) is invoked to 1000 milliseconds,
or one second.
if(myCam.motionTimeOut >= 1000){
myCam.setMotionLevel(myCam.motionLevel, 1000);
}
See also
Camera.onActivity, Camera.setMotionLevel
Client-Side Communication ActionScript
17
Camera.muted
Availability
• Flash Player 6.
• Flash Communication Server MX (not required).
Usage
activeCamera.muted
Description
Read-only property; a Boolean value that specifies whether the user has denied access to the
camera (true) or allowed access (false) in the Flash Player Privacy Settings panel. When this
value changes, Camera.onStatus is invoked. For more information, see Camera.get.
Example
In the following example, when the user clicks the button, Flash publishes and plays a live stream
if the camera is not muted.
on (press)
{
// If the user mutes camera, display offline notice.
// Else, publish and play live stream from camera.
if(myCam.muted) {
_root.debugWindow+="Camera offline." + newline;
} else {
// Publish the camera data by calling
// the root function pubLive().
_root.pubLive();
// Play what is being published by calling
// the root function playLive().
_root.playLive();
}
}
See also
Camera.get, Camera.onStatus
Camera.name
Availability
• Flash Player 6.
• Flash Communication Server MX (not required).
Usage
activeCamera.name
Description
Read-only property; a string that specifies the name of the current camera, as returned by the
camera hardware.
18
Example
The following example displays the name of the default camera in the Output window. In
Windows, this name is the same as the device name listed in the Scanners and Cameras
properties sheet.
myCam = Camera.get();
trace("The camera name is: " + myCam.name);
See also
Camera.get, Camera.names
Camera.names
Availability
• Flash Player 6.
• Flash Communication Server MX (not required).
Usage
Camera.names
Note: The correct syntax is Camera.names. To assign the return value to a variable, use syntax like
camArray = Camera.names. To determine the name of the current camera, use activeCamera.name.
Description
Read-only class property; retrieves an array of strings reflecting the names of all available cameras
without displaying the Flash Player Privacy Settings panel. This array behaves the same as any
other ActionScript array, implicitly providing the zero-based index of each camera and the
number of cameras on the system (by means of Camera.names.length). For more information,
see the “Array (object)” entry in the online Flash ActionScript Dictionary in the Flash MX
Help menu.
Calling Camera.names requires an extensive examination of the hardware, and it may take several
seconds to build the array. In most cases, you can just use the default camera.
Example
The following example uses the default camera unless more than one camera is available, in which
case the user can choose which camera to set as the default camera.
camArray = Camera.names;
if (camArray.length == 1){
Camera.get();
}
else
System.showSettings(3);
Camera.get();
See also
Camera.get, Camera.index, Camera.names
Client-Side Communication ActionScript
19
Camera.onActivity
Availability
• Flash Player 6.
• Flash Communication Server MX (not required).
Usage
activeCamera.onActivity = function(activity) {
// Your code here
}
Parameters
activity
A Boolean value set to true when the camera starts detecting motion, false when
it stops.
Returns
Nothing.
Description
Event handler; invoked when the camera starts or stops detecting motion. If you want to respond
to this event handler, you must create a function to process its activity value.
To specify the amount of motion required to invoke Camera.onActivity(true) and the
amount of time that must elapse without activity before invoking Camera.onActivity(false),
use Camera.setMotionLevel.
Example
The following example displays true or false in the Output window when the camera starts or
stops detecting motion.
// Assumes a Video object named "myVideoObject" is on the Stage
c = Camera.get();
myVideoObject.attachVideo(c);
c.setMotionLevel(10, 500);
c.onActivity = function(mode)
{
trace(mode);
};
See also
Camera.setMotionLevel
20
Camera.onStatus
Availability
• Flash Player 6.
• Flash Communication Server MX (not required).
Usage
activeCamera.onStatus = function(infoObject) {
// Your code here
}
Parameters
infoObject A parameter defined according to the status message. For details about this
parameter, see “Camera information objects” on page 106.
Returns
Nothing.
Description
Event handler; invoked when the user allows or denies access to the camera. If you want to
respond to this event handler, you must create a function to process the information object
generated by the camera. For more information, see the Appendix, “Client-Side Information
Objects,” on page 105.
When a movie tries to access the camera, the Flash Player displays a Privacy dialog box that lets
the user choose whether to allow or deny access.
• If the user allows access, the Camera.muted property is set to false, and this handler is
invoked with an information object whose code property is Camera.Unmuted.
• If the user denies access, the Camera.muted property is set to true, and this handler is invoked
with an information object whose code property is Camera.Muted.
To determine whether the user has denied or allowed access to the camera without processing this
event handler, use Camera.muted.
Note: If the user chooses to permanently allow or deny access for all movies from a specified domain, this handler is
not invoked for movies from that domain unless the user later changes the privacy setting. For more information,
see Camera.get.
Example
The following callback function displays a message whenever the user allows or denies access to
the camera.
myCam = Camera.get();
myVideoObject.attachVideo(myCam);
myCam.onStatus = function(infoMsg) {
if(infoMsg.code == "Camera.Muted"){
trace("User denies access to the camera");
}
else
trace("User allows access to the camera");
}
// Change the Allow or Deny value to invoke the function
System.showSettings(0);
See also
Camera.get, Camera.muted, System.showSettings
Client-Side Communication ActionScript
21
Camera.quality
Availability
• Flash Player 6.
• Flash Communication Server MX (not required).
Usage
activeCamera.quality
Description
Read-only property; an integer specifying the required level of picture quality, as determined by
the amount of compression being applied to each video frame. Acceptable quality values range
from 1 (lowest quality, maximum compression) to 100 (highest quality, no compression). The
default value is 0, which means that picture quality can vary as needed to avoid exceeding
available bandwidth.
See also
Camera.setQuality
Camera.setKeyFrameInterval
Availability
• Flash Player 6.
• Flash Communication Server MX (not required).
Usage
activeCamera.setKeyFrameInterval(keyframeInterval)
Parameters
keyframeInterval A numeric value that specifies which video frames are transmitted in full
(called keyframes) instead of being interpolated by the video compression algorithm. A value of 1
means that every frame is a keyframe, a value of 3 means that every third frame is a keyframe, and
so on. Acceptable values are 1 through 48. The default value is 15.
Returns
Nothing.
Description
Method; specifies which video frames are transmitted in full (called keyframes) instead of being
interpolated by the video compression algorithm. This method is generally applicable only if you
are transmitting video using Flash Communication Server.
The Flash video compression algorithm compresses video by transmitting only what has changed
since the last frame of the video; these portions are considered to be interpolated frames. It may
help to compare this concept with how tweening and keyframes interact within the Flash
authoring environment: the frames between keyframes are created (interpolated) based on the
contents of the previous frame. Similarly, frames of a video can be interpolated according to the
contents of the previous frame. A keyframe, however, is a video frame that is complete; it is not
interpolated from prior frames.
22
To determine how to set a value for keyframeInterval, consider both bandwidth use and video
playback accessibility. For example, specifying a higher value for keyframeInterval (sending
keyframes less frequently) reduces bandwidth use. However, this may increase the amount of time
required to position the playhead at a particular point in the video; more prior video frames may
have to be interpolated before the video can resume.
Conversely, specifying a lower value for keyframeInterval (sending keyframes more frequently)
increases bandwidth use, because entire video frames are transmitted more often, but may
decrease the amount of time required to seek a particular video frame within a recorded video.
See also
Camera.keyFrameInterval
Camera.setLoopback
Availability
• Flash Player 6.
• Flash Communication Server MX (not required).
Usage
activeCamera.setLoopback(compressLocalStream)
Parameters
compressLocalStream A Boolean value that specifies whether to use a compressed video
stream (true) or an uncompressed stream (false) for a local view of what the camera is receiving.
The default value is false.
Returns
Nothing.
Description
Method; specifies whether to use a compressed video stream for a local view of the camera. This
method is generally applicable only if you are transmitting video using the Flash Communication
Server; setting compressLocalStream to true lets you see more precisely how the video will
appear to users when they view it in real time.
Although a compressed stream is useful for testing purposes, such as previewing video quality
settings, it has a significant processing cost, because the local view is not simply compressed; it is
compressed, edited for transmission as it would be over a live connection, and then decompressed
for local viewing.
To set the amount of compression used when you set compressLocalStream to true, use
Camera.setQuality.
Example
In the following example, if the user presses a loopback button, the loopback value is set to true.
on (press) {
if (_root.myCam.loopback==false) {
_root.myCam.setLoopback(true);
} else {
debugWindow+="You’re already compressing the stream." + newline;
}
Client-Side Communication ActionScript
23
See also
Camera.loopback, Camera.setQuality
Camera.setMode
Availability
• Flash Player 6.
• Flash Communication Server MX (not required).
Usage
activeCamera.setMode(width, height, fps [,favorSize])
Parameters
width
The requested capture width, in pixels. The default value is 160.
height
The requested capture height, in pixels. The default value is 120.
The requested rate at which the camera should capture data, in frames per second. The
default value is 15.
fps
An optional Boolean parameter that specifies how to manipulate the width, height,
and frame rate if the camera does not have a native mode that meets the specified requirements.
The default value is true, which means that maintaining capture size is favored; the mode that
most closely matches width and height is selected, even if doing so adversely affects performance
by reducing the frame rate. To maximize frame rate at the expense of camera height and width,
pass false for favorSize.
favorSize
Returns
Nothing.
Description
Method; sets the camera capture mode to the native mode that best meets the specified
requirements. If the camera does not have a native mode that matches all the parameters you pass,
Flash selects a capture mode that most closely synthesizes the requested mode. This manipulation
may involve cropping the image and dropping frames.
By default, Flash drops frames as needed to maintain image size. To minimize the number of
dropped frames, even if this means reducing the size of the image, pass false for favorSize.
When choosing a native mode, Flash tries to maintain the requested aspect ratio whenever
possible. For example, if you issue the command activeCamera.setMode(400, 400, 30), and
the maximum width and height values available on the camera are 320 and 288, Flash sets both
the width and height at 288; by setting these properties to the same value, Flash maintains the 1:1
aspect ratio you requested.
To determine the values assigned to these properties after Flash selects the mode that most closely
matches your requested values, use Camera.width, Camera.height, and Camera.fps.
If you are using Flash Communication Server, you can also capture single frames or create timelapsed photography. For more information, see NetStream.attachVideo.
24
Example
The following example sets the width, height, and fps based on the user’s input if the user clicks
the button. The optional argument, favorSize is not included, because the default value, true,
will provide the settings closest to the user’s preference without sacrificing the picture quality,
although the fps may then be sacrificed. The user interface is then updated with the new settings.
on (press)
{
// Sets width, height, and fps to user’s input.
_root.myCam.setMode(txt_width, txt_height, txt_fps);
// Update the user’s text fields with the new settings.
_root.txt_width = myCam.width;
_root.txt_height = myCam.height;
_root.txt_fps = myCam.fps;
}
See also
Camera.currentFps, Camera.fps, Camera.height, Camera.width, NetStream.attachVideo
Camera.setMotionLevel
Availability
• Flash Player 6.
• Flash Communication Server MX (not required).
Usage
activeCamera.setMotionLevel(sensitivity [, timeout])
Parameters
sensitivity A numeric value that specifies the amount of motion required to invoke
Camera.onActivity(true). Acceptable values range from 0 to 100. The default value is
50.
An optional numeric parameter that specifies how many milliseconds must elapse
without activity before Flash considers activity to have stopped and invokes
Camera.onActivity(false). The default value is 2000 (2 seconds).
timeout
Returns
Nothing.
Description
Method; specifies how much motion is required to invoke Camera.onActivity(true).
Optionally sets the number of milliseconds that must elapse without activity before Flash
considers motion to have stopped and invokes Camera.onActivity(false).
Note: Video can be displayed regardless of the value of the sensitivity parameter. This parameter only
determines when and under what circumstances Camera.onActivity is invoked, not whether video is actually
being captured or displayed.
• To prevent the camera from detecting motion at all, pass a value of 100 for sensitivity;
Camera.onActivity is never invoked. (You would probably use this value only for testing
purposes—for example, to temporarily disable any actions set to occur when
Camera.onActivity is invoked.)
• To determine the amount of motion the camera is currently detecting, use
Camera.activityLevel.
Client-Side Communication ActionScript
25
Motion sensitivity values correspond directly to activity values. Complete lack of motion is an
activity value of 0. Constant motion is an activity value of 100. Your activity value is less than
your motion sensitivity value when you’re not moving; when you are moving, activity values
frequently exceed your motion sensitivity value.
This method is similar in purpose to Microphone.setSilenceLevel; both methods are used to
specify when the onActivity event handler should be invoked. However, these methods have a
significantly different impact on publishing streams:
•
Microphone.setSilenceLevel
•
Camera.setMotionLevel is designed to detect motion and does not affect bandwidth usage.
Even if a video stream does not detect motion, video is still sent.
is designed to optimize bandwidth. When an audio stream is
considered silent, no audio data is sent. Instead, a single message is sent, indicating that silence
has started.
Example
The following example sends messages to the Output window when video activity starts or stops.
Change the motion sensitivity value of 30 to a higher or lower number to see how different values
affect motion detection.
// Assumes a Video object named "myVideoObject" is on the Stage
c = Camera.get();
x = 0;
function motion(mode)
{
trace(x + ": " + mode);
x++;
}
c.onActivity = function(mode) {motion(mode);};
c.setMotionLevel(30, 500);
myVideoObject.attachVideo(c);
See also
Camera.activityLevel, Camera.motionLevel, Camera.motionTimeOut, Camera.onActivity
Camera.setQuality
Availability
• Flash Player 6.
• Flash Communication Server MX (not required).
Usage
activeCamera.setQuality(bandwidth, frameQuality)
Parameters
An integer that specifies the maximum amount of bandwidth the current outgoing
video feed can use, in bytes per second. To specify that Flash video can use as much bandwidth
as needed to maintain the value of frameQuality, pass 0 for bandwidth. The default value
is 16384.
bandwidth
frameQuality An integer that specifies the required level of picture quality, as determined by
the amount of compression being applied to each video frame. Acceptable values range from 1
(lowest quality, maximum compression) to 100 (highest quality, no compression). To specify that
picture quality can vary as needed to avoid exceeding bandwidth, pass 0 for frameQuality. The
default value is 0.
26
Returns
Nothing.
Description
Method; sets the maximum amount of bandwidth per second or the required picture quality of
the current outgoing video feed. This method is generally applicable only if you are transmitting
video using Flash Communication Server.
Use this method to specify which element of the outgoing video feed is more important to your
application—bandwidth used or picture quality.
• To indicate that bandwidth use takes precedence, pass the desired value for bandwidth and 0
for frameQuality. Flash will transmit video at the highest quality possible within the specified
bandwidth. If necessary, Flash will reduce picture quality to avoid exceeding the specified
bandwidth. In general, as motion increases, quality decreases.
• To indicate that quality takes precedence, pass 0 for bandwidth and a numeric value for
quality. Flash will use as much bandwidth as required to maintain the specified quality. If
necessary, Flash will reduce the frame rate to maintain picture quality. In general, as motion
increases, bandwidth use also increases.
• To specify that both bandwidth and quality are equally important, pass numeric values for
both parameters. Flash will transmit video that achieves the specified quality and that doesn’t
exceed the specified bandwidth. If necessary, Flash will reduce the frame rate to maintain
picture quality without exceeding the specified bandwidth.
Example
The following examples illustrate how to use this method to control bandwidth use and
picture quality.
// Ensure that no more than 8192 (8K/second) is used to send video
activeCamera.setQuality(8192,0);
// Ensure that no more than 8192 (8K/second) is used to send video
// with a minimum quality of 50
activeCamera.setQuality(8192,50);
// Ensure a minimum quality of 50, no matter how much bandwidth it takes
activeCamera.setQuality(0,50);
See also
Camera.bandwidth, Camera.quality
Camera.width
Availability
• Flash Player 6.
• Flash Communication Server MX (not required).
Usage
activeCamera.width
Description
Read-only property; the current capture width, in pixels. To set a desired value for this property,
use Camera.setMode.
Client-Side Communication ActionScript
27
Example
The following line of code updates a text box in the user interface with the current width value.
myTextField.text=myCam.width;
See also the example for Camera.setMode.
See also
Camera.height, Camera.setMode
LocalConnection (object)
Availability
• Flash Player 6.
• Flash Communication Server MX (not required).
The LocalConnection object lets you develop Flash movies that can send instructions to each
other without the use of FSCommand or JavaScript. LocalConnection objects can communicate
only between movies that are running on the same client machine, but they can be running in
two different applications—for example, a Flash movie running in a browser and a Flash movie
running in a projector. You can use LocalConnection objects to send and receive within a single
movie, but this is not a standard implementation; all the examples in this section illustrate
communication between different movies.
The primary methods used to send and receive data are LocalConnection.send and
LocalConnection.connect. At its most basic, your code will implement the following
commands; note that both the LocalConnection.send and LocalConnection.connect
commands specify the same connection name, lc_name:
// Code in the receiving movie
receivingLC = new LocalConnection();
receivingLC.methodToExecute = function(param1, param2)
{
// Code to be executed
}
receivingLC.connect("lc_name");
// Code in the sending movie
sendingLC = new LocalConnection();
sendingLC.send("lc_name", "methodToExecute", dataItem1, dataItem2)
The simplest way to use the LocalConnection object is to allow communication only between
LocalConnection objects located in the same domain, since you won’t have to address issues
related to security. However, if you need to allow communication between domains, you have a
number of ways to implement security measures. For more information, see the discussion of the
connectionName parameter in LocalConnection.send, and also the
LocalConnection.allowDomain and LocalConnection.domain entries.
28
Method summary for the LocalConnection object
Method
Description
LocalConnection.close
Closes (disconnects) the LocalConnection object.
LocalConnection.connect
Prepares the LocalConnection object to receive commands from a
LocalConnection.send command.
LocalConnection.domain
Returns a string representing the subdomain of the location of the
current movie.
LocalConnection.send
Invokes a method on a specified LocalConnection object.
Event handler summary for the LocalConnection object
Method
Description
LocalConnection.allowDomain
Invoked whenever the current (receiving) LocalConnection object receives a
request to invoke a method from a sending LocalConnection object.
LocalConnection.onStatus
Invoked after a sending LocalConnection object tries to send a command to
a receiving LocalConnection object.
Constructor for the LocalConnection object
Availability
• Flash Player 6.
• Flash Communication Server MX (not required).
Usage
myLC = new LocalConnection()
Parameters
None.
Returns
A reference to a LocalConnection object.
Description
Constructor; creates a LocalConnection object.
Example
The following example shows how a receiving and sending movie create LocalConnnection
objects. Note that the two movies can use the same name or different names for their respective
LocalConnection objects. In this example, they use the same name—LC.
// code in the receiving movie
LC = new LocalConnection();
LC.someMethod = function()
{
// your code here
}
LC.connect("connectionName");
// code in the sending movie
LC = new LocalConnection();
LC.send("connectionName", "someMethod");
Client-Side Communication ActionScript
29
See also
LocalConnection.connect, LocalConnection.send
LocalConnection.allowDomain
Availability
• Flash Player 6.
• Flash Communication Server MX (not required).
Usage
receivingLC.allowDomain = function([sendingDomain]) {
// Your code here returns true or false
}
Parameters
An optional parameter specifying the subdomain of the movie containing the
sending LocalConnection object.
sendingDomain
Returns
Nothing.
Description
Event handler; invoked whenever receivingLC receives a request to invoke a method from a
sending LocalConnection object. Flash expects the code you implement in this handler to return
a Boolean value of true or false. If the handler doesn’t return true, the request from the
sending object is ignored, and the method is not invoked.
Use this command to explicitly permit LocalConnection objects from specified domains, or from
any domain, to execute methods of the receiving LocalConnection object. If you don’t pass a
value for sendingDomain, you probably want to accept commands from any domain, and the
code in your handler would simply be return true. If you do pass a value for sendingDomain,
you probably want to compare the value of sendingDomain with domains from which you want
to accept commands. Both of these implementations are illustrated in the following examples.
Example
The following example shows how a LocalConnection object in a receiving movie can permit
movies from any domain to invoke its methods. Compare this to the example in
LocalConnection.connect, in which only movies from the same domain can invoke the Trace
method in the receiving movie. For a discussion of the use of the underscore (_) in the connection
name, see LocalConnection.send.
var aLocalConnection = new LocalConnection();
aLocalConnection.Trace = function(aString)
{
aTextField = aTextField + aString + newline;
}
aLocalConnection.allowDomain = function() {
// any domain can invoke methods on this LocalConnection object
return true;
}
aLocalConnection.connect("_trace");
30
In the following example, the receiving movie accepts commands only from movies located in
thisDomain.com or thatDomain.com.
var aLocalConnection = new LocalConnection();
aLocalConnection.Trace = function(aString)
{
aTextField = aTextField + aString + newline;
}
aLocalConnection.allowDomain = function(sendingDomain)
{
return(sendingDomain=="thisDomain.com" || sendingDomain=="thatDomain.com");
}
aLocalConnection.connect("_trace");
See also
LocalConnection.connect, LocalConnection.domain, LocalConnection.send
LocalConnection.close
Availability
• Flash Player 6.
• Flash Communication Server MX (not required).
Usage
receivingLC.close
Parameters
None.
Returns
Nothing.
Description
Method; closes (disconnects) a LocalConnection object. Issue this command when you no
longer want the object to accept commands—for example, when you want to issue a
LocalConnection.connect command using the same connectionName parameter in
another movie.
See also
LocalConnection.connect
LocalConnection.connect
Availability
• Flash Player 6.
• Flash Communication Server MX (not required).
Usage
receivingLC.connect(connectionName)
Client-Side Communication ActionScript
31
Parameters
connectionName A string that corresponds to the connection name specified in the
LocalConnection.send command that wants to communicate with receivingLC.
Returns
A Boolean value of true if no other process running on the same client machine has already
issued this command using the same value for connectionName, false otherwise.
Description
Method; prepares a LocalConnection object to receive commands from a
LocalConnection.send command (called the sending LocalConnection object). The object used
with this command is called the receiving LocalConnection object. The receiving and sending
objects must be running on the same client machine.
Be sure to define the methods attached to receivingLC before issuing this command, as shown
in all the examples in this section.
By default, the Flash Player resolves connectionName into a value of
"subdomain:connectionName", where subdomain is the subdomain of the movie containing the
LocalConnection.connect command. For example, if the movie containing the receiving
LocalConnection object is located at www.someDomain.com, connectionName resolves to
"someDomain.com:connectionName". (If a movie is located on the client machine, the value
assigned to subdomain is "localhost".)
Also by default, the Flash Player lets the receiving LocalConnection object accept commands only
from sending LocalConnection objects whose connection name also resolves into a value of
"subdomain:connectionName". In this way, Flash makes it very simple for movies located in the
same domain to communicate with each other.
If you are implementing communication only between movies in the same domain, specify a
string for connectionName that does not begin with an underscore (_) and that does not specify a
domain name (for example, "myDomain:connectionName"). Use the same string in the
LocalConnection.connect(connectionName) command.
If you are implementing communication between movies located in different domains,
see the discussion of connectionName in LocalConnection.send, and also the
LocalConnection.allowDomain and LocalConnection.domain entries.
Example
The following example shows how a movie in a particular domain can invoke a method named
Trace in a receiving movie in the same domain. The receiving movie functions as a trace window
for the sending movies; it contains two methods that other movies can call—Trace and Clear.
Buttons pressed in the sending movies call these methods with specified parameters.
// receiving movie
var aLocalConnection = new LocalConnection();
aLocalConnection.Trace = function(aString)
{
aTextField = aTextField + aString + newline;
}
aLocalConnection.Clear = function()
{
aTextField = "";
}
aLocalConnection.connect("trace");
stop();
32
Movie 1 contains the following code attached to a button labeled PushMe. When you push the
button, you see “The button was pushed.” in the receiving movie.
on (press)
{
var lc = new LocalConnection();
lc.send("trace", "Trace", "The button was pushed.");
delete lc;
}
Movie 2 contains an input text box with a var name of myText, and the following code attached
to a button labeled Copy. When you type some text and then push the button, you see the text
you typed in the receiving movie.
on (press)
{
_parent.lc.send("trace", "Trace", _parent.myText);
_parent.myText = "";
}
Movie 3 contains the following code attached to a button labeled Clear. When you push the
button, the contents of the trace window in the receiving movie are cleared (erased).
on (press)
{
var lc = new LocalConnection();
lc.send("trace", "Clear");
delete lc;
}
See also
LocalConnection.send
LocalConnection.domain
Availability
• Flash Player 6.
• Flash Communication Server MX (not required).
Usage
myLC.domain()
Parameters
None.
Returns
A string representing the subdomain of the location of the current movie.
Description
Method; returns a string representing the subdomain of the location of the current movie. For
example, if the current movie is located at www.macromedia.com, this command returns
"macromedia.com". If the current movie is a local file residing on the client machine, this
command returns "localhost".
Client-Side Communication ActionScript
33
The most common use of this command is to include the domain name of the sending
LocalConnection object as a parameter to the method you plan to invoke in the receiving
LocalConnection object, or in conjunction with LocalConnection.allowDomain to accept
commands from a specified domain. If you are enabling communication only between
LocalConnection objects that are located in the same domain, you probably don’t need to
use this command.
Example
In the following example, a receiving movie accepts commands only from movies located in the
same domain or at macromedia.com.
LC = new LocalConnection();
LC.allowDomain = function(sendingDomain)
{
return (sendingDomain==this.domain() || sendingDomain=="macromedia.com");
}
In the following example, a sending movie located at yourdomain.com invokes a method in a
receiving movie located at mydomain.com. The sending movie includes its domain name as a
parameter to the method it invokes, so the receiving movie can return a reply value to a
LocalConnection object in the correct domain. The sending movie also specifies that it will
accept commands only from movies at mydomain.com.
Line numbers are included for reference purposes. The sequence of events is as follows:
• The receiving movie prepares to receive commands on a connection named "sum" (line 11).
The Flash Player resolves the name of this connection to "mydomain.com:sum" (see
LocalConnection.connect).
• The sending movie prepares to receive a reply on the LocalConnection object named
(line 58). It also specifies that it will accept commands only from movies at
mydomain.com (lines 51 to 53).
"result"
• The sending movie invokes the aSum method of a connection named "mydomain.com:sum"
(line 59), and passes the following parameters: its domain (lc.domain()), the name of the
connection to receive the reply ("result"), and the values to be used by aSum (123 and 456).
• The aSum method (line 6) is invoked with the following values:
sender = "mydomain.com:result", replyMethod = "aResult", n1 = 123, and n2 = 456. It
therefore executes the following line of code:
this.send("mydomain.com:result", "aResult", (123 + 456));
34
• The aResult method (line 54) displays the value returned by aSum (579).
// The receiving movie at http://www.mydomain.com/folder/movie.swf
// contains the following code
1
2
3
4
5
6
7
8
9
10
11
var aLocalConnection = new LocalConnection();
aLocalConnection.allowDomain = function()
{
// allow connections from any domain
return true;
}
aLocalConnection.aSum = function(sender, replyMethod, n1, n2)
{
this.send(sender, replyMethod, (n1 + n2));
}
aLocalConnection.connect("sum");
// The sending movie at http://www.yourdomain.com/folder/movie.swf
// contains the following code
50
51
52
53
54
55
56
57
58
59
var lc = new LocalConnection();
lc.allowDomain = function(aDomain) {
// allow connections only from mydomain.com
return (aDomain == "mydomain.com");
}
lc.aResult = function(aParam) {
trace("The sum is " + aParam);
}
lc.connect("result");
lc.send("mydomain.com:sum", "aSum", lc.domain() + ’:’ + "result",
"aResult", 123, 456);
See also
LocalConnection.allowDomain
LocalConnection.onStatus
Availability
• Flash Player 6.
• Flash Communication Server MX (not required).
Usage
sendingLC.onStatus = function(infoObject) {
// Your code here
}
Parameters
infoObject A parameter defined according to the status message. For details about this
parameter, see the description below.
Returns
Nothing.
Client-Side Communication ActionScript
35
Description
Event handler; invoked after a sending LocalConnection object tries to send a command to a
receiving LocalConnection object. If you want to respond to this event handler, you must create a
function to process the information object sent by the LocalConnection object. For more
information, see the Appendix, “Client-Side Information Objects,” on page 105 and
“LocalConnection information objects” on page 106.
If the information object returned by this handler contains a level value of "status", Flash
successfully sent the command to a receiving LocalConnection object. This does not mean that
Flash successfully invoked the specified method of the receiving LocalConnection object, only
that Flash was able to send the command. For example, the method is not invoked if the receiving
LocalConnection object doesn’t allow connections from the sending domain, or if the method
does not exist. The only way to know for sure if the method was invoked is to have the receving
object send a reply to the sending object.
If the information object returned by this handler contains a level value of "error", Flash was
unable to send the command to a receiving LocalConnection object, most likely because there is
no receiving LocalConnection object connected whose name corresponds to the name specified
in the sendingLC.send command that invoked this handler.
In most cases, you will implement this handler only to respond to error conditions, as shown in
the following example.
Example
The following example displays information about a failed connection in a trace window.
sendingLC = new LocalConnection();
sendingLC.onStatus = function(infoObject)
{
if (infoObject.level == "error")
{
trace("Connection failed.");
}
}
sendingLC.send("receivingLC", "methodName");
See also
LocalConnection.send
LocalConnection.send
Availability
• Flash Player 6.
• Flash Communication Server MX (not required).
Usage
sendingLC.send (connectionName, method [, p1,...,pN])
36
Parameters
connectionName A string that corresponds to the connection name specified in the
LocalConnection.connect command that wants to communicate with sendingLC.
method A string specifying the name of the method to be invoked in the receiving
LocalConnection object. The following method names cause the command to fail: send,
connect, close, domain, onStatus, and allowDomain.
p1,...pN
Optional parameters to be passed to the specified method.
Returns
A Boolean value of true if Flash can carry out the request, false otherwise.
Note: A return value of true does not necessarily mean that Flash successfully connected to a receiving
LocalConnection object, only that the command is syntactically correct. To determine whether the connection
succeeded, see LocalConnection.onStatus.
Description
Method; invokes the method named method on a connection opened with the
LocalConnection.connect(connectionName) command (called the receiving LocalConnection
object). The object used with this command is called the sending LocalConnection object.
The movies that contain the sending and receiving objects must be running on the same
client machine.
There is a limit to the amount of data you can pass as parameters to this command. If the
command returns false but your syntax is correct, try breaking up the LocalConnection.send
requests into multiple commands.
As discussed in LocalConnection.connect, Flash adds the current subdomain to
connectionName by default. If you are implementing communication between different
domains, you need to define connectionName in both the sending and receiving
LocalConnection objects in such a way that Flash does not add the current subdomain to
There are two ways you can do so:
connectionName.
• Use an underscore (_) at the beginning of connectionName in both the sending and
receiving LocalConnection objects. In the movie containing the receiving object, use
LocalConnection.allowDomain to specify that connections from any domain will be
accepted. This implementation lets you store your sending and receiving movies in
any domain.
• Include the subdomain in connectionName in the sending LocalConnection object—for
example, myDomain.com:myConnectionName. In the receiving object, use
LocalConnection.allowDomain to specify that connections from the specified
subdomain
will be accepted (in this case, myDomain.com), or that connections from any domain will
be accepted.
Note: You cannot specify a subdomain in connectionName in the receiving LocalConnection object, only in the
sending LocalConnection object.
Example
For an example of communicating between LocalConnection objects located in the same domain,
see LocalConnection.connect. For an example of communicating between LocalConnection
objects located in any domain, see LocalConnection.allowDomain. For an example of
communicating between LocalConnection objects located in specified domains, see
LocalConnection.allowDomain and LocalConnection.domain.
Client-Side Communication ActionScript
37
See also
LocalConnection.allowDomain, LocalConnection.connect, LocalConnection.domain,
LocalConnection.onStatus
Microphone (object)
Availability
• Flash Player 6.
• Flash Communication Server MX (not required).
The Microphone object lets you capture audio from a microphone attached to the computer that
is running the Macromedia Flash Player. When used with Flash Communication Server, this
object lets you transmit, play, and optionally record the audio being captured. With these
capabilities, you can develop communications applications such as instant messaging with audio,
recording presentations so others can replay them at a later date, and so on. (Flash provides
similar video capabilities; for more information, see the “Camera (object)” entry.)
You can also use a Microphone object without a server—for example, to transmit sound from
your microphone through the speakers on your local system.
To create or reference a Microphone object, use Microphone.get.
Method summary for the Microphone object
Method
Description
Microphone.get
Returns a default or specified Microphone object, or null if the
microphone is not available.
Microphone.setGain
Specifies the amount by which the microphone should boost the signal.
Microphone.setRate
Specifies the rate at which the microphone should capture sound, in
kHz.
Microphone.setSilenceLevel
Specifies the amount of sound required to activate the microphone.
Microphone.setUseEchoSuppression Specifies whether to use the echo suppression feature of the audio
codec.
Property summary for the Microphone object
38
Property (read-only)
Description
Microphone.activityLevel
The amount of sound the microphone is detecting.
Microphone.gain
The amount by which the microphone boosts the signal before
transmitting it.
Microphone.index
The index of the current microphone.
Microphone.muted
A Boolean value that specifies whether the user has allowed or denied
access to the microphone.
Microphone.name
The name of the current sound capture device, as returned by the
sound capture hardware.
Microphone.names
Class property: an array of strings reflecting the names of all available
sound capture devices, including sound cards and microphones.
Microphone.rate
The sound capture rate, in kHz.
Property (read-only)
Description
Microphone.silenceLevel
The amount of sound required to activate the microphone.
Microphone.silenceTimeout
The number of milliseconds between the time the microphone stops
detecting sound and the time Microphone.onActivity(false)
is called.
Microphone.useEchoSuppression
A Boolean value that specifies whether echo suppression is
being used.
Event handler summary for the Microphone object
Method
Description
Microphone.onActivity
Invoked when the microphone starts or stops detecting sound.
Microphone.onStatus
Invoked when the user allows or denies access to the microphone.
Constructor for the Microphone object
See Microphone.get.
Microphone.activityLevel
Availability
• Flash Player 6.
• Flash Communication Server MX (not required).
Usage
activeMicrophone.activityLevel
Description
Read-only property; a numeric value that specifies the amount of sound the microphone is
detecting. Values range from 0 (no sound is being detected) to 100 (very loud sound is being
detected). The value of this property can help you determine a good value to pass to
Microphone.setSilenceLevel.
If the microphone is available but is not yet being used because neither MovieClip.attachAudio
nor NetStream.attachAudio has been called, this property is set to -1.
Example
The following examples sets the variable level to the activity level of the current microphone,
myMic.activityLevel.
var level = myMic.activityLevel;
See also
Microphone.setGain
Client-Side Communication ActionScript
39
Microphone.gain
Availability
• Flash Player 6.
• Flash Communication Server MX (not required).
Usage
activeMicrophone.gain
Description
Read-only property; the amount by which the microphone boosts the signal. Valid values are 0
to 100. The default value is 50.
Example
The following example is attached to the nib of a slide bar. When this clip is loaded, Flash checks
for the value myMic.gain and provides a default value if this value is undefined. The _x position
is then used to set the gain on the microphone to the user’s preference.
onClipEvent (load) {
if (_root.myMic.gain == undefined) {
_root.myMic.setGain = 75;
}
this._x = _root.myMic.gain;
_root.txt_micgain = this._x;
left = this._x;
right = left+50;
top = this._y;
bottom = top;
}
on (press) {
startDrag(this, false, left, top, right, bottom);
this._xscale = 100;
this._yscale = 100;
}
on (release, releaseOutside) {
stopDrag();
g = (this._x-50)*2;
_root.myMic.setGain(g);
_root.txt_micgain = g;
this._xscale = 100;
this._yscale = 100;
}
See also
Microphone.setGain
40
Microphone.get
Availability
• Flash Player 6.
• Flash Communication Server MX (not required).
Usage
Microphone.get([index])
Note: The correct syntax is Microphone.get(). To assign the Microphone object to a variable, use syntax like
activeMicrophone = Microphone.get().
Parameters
An optional zero-based integer that specifies which microphone to get, as determined
from the array returned by Microphone.names. To get the default microphone (which is
recommended for most applications), omit this parameter.
index
Returns
• If index is not specified, this method returns a reference to the default microphone or, if it is
not available, to the first available microphone. If no microphones are available or installed, the
method returns null.
• If index is specified, this method returns a reference to the requested microphone, or null if it
is not available.
Description
Method; returns a reference to a Microphone object for capturing audio. To actually begin
capturing the audio, you must attach the Microphone object either to a MovieClip object (see
MovieClip.attachAudio) or to a NetStream object (see NetStream.attachAudio). (The
NetStream object is available only with Flash Communication Server.)
Unlike objects that you create using the new constructor, multiple calls to Microphone.get
reference the same microphone. Thus, if your script contains the lines
mic1 = Microphone.get() and mic2 = Microphone.get(), both mic1 and mic2 reference the
same (default) microphone.
In general, you shouldn’t pass a value for index; simply use Microphone.get() to return a
reference to the default microphone. By means of the Microphone settings panel (discussed later
in this section), the user can specify the default microphone Flash should use. If you pass a value
for index, you might be trying to reference a microphone other than the one the user prefers. You
might use index in rare cases—for example, if your application is capturing audio from two
microphones at the same time.
Client-Side Communication ActionScript
41
When a movie tries to access the microphone returned by Microphone.get—for example, when
you issue NetStream.attachAudio or MovieClip.attachAudio—the Flash Player displays a
Privacy dialog box that lets the user choose whether to allow or deny access to the microphone.
(Make sure your Stage size is at least 215 by 138 pixels; this is the minimum size Flash requires to
display the dialog box.)
When the user responds to this dialog box, the Microphone.onStatus event handler returns an
information object that indicates the user’s response. To determine whether the user has denied or
allowed access to the camera without processing this event handler, use Microphone.muted.
The user can also specify permanent privacy settings for a particular domain by right-clicking
(Windows) or Control-clicking (Macintosh) while a movie is playing, choosing Settings, opening
the Privacy panel, and selecting Remember.
You can’t use ActionScript to set the Allow or Deny value for a user, but you can display the
Privacy panel for the user by using System.showSettings(0). If the user selects Remember, the
Flash Player no longer displays the Privacy dialog box for movies from this domain.
If Microphone.get returns null, either the microphone is in use by another application, or there
are no microphones installed on the system. To determine whether any microphones are installed,
use Microphones.names.length. To display the Flash Player Microphone Settings panel, which
lets the user choose the microphone to be referenced by Microphone.get, use
System.showSettings(2).
42
Example
The following example lets the user specify the default microphone, then captures audio and plays
it back locally. To avoid feedback, you may want to test this code while wearing headphones.
System.showSettings(2);
myMic = Microphone.get();
_root.attachAudio(myMic);
See also
Microphone.index, Microphone.muted, Microphone.names, Microphone.onStatus,
MovieClip.attachAudio, NetStream.attachAudio
Microphone.index
Availability
• Flash Player 6.
• Flash Communication Server MX (not required).
Usage
activeMicrophone.index
Description
Read-only property; a zero-based integer that specifies the index of the microphone, as reflected
in the array returned by Microphone.names.
See also
Microphone.get, Microphone.names
Microphone.muted
Availability
• Flash Player 6.
• Flash Communication Server MX (not required).
Usage
activeMicrophone.muted
Description
Read-only property; a Boolean value that specifies whether the user has denied access to the
microphone (true) or allowed access (false). When this value changes, Microphone.onStatus
is invoked. For more information, see Microphone.get.
Client-Side Communication ActionScript
43
Example
In the following example, when the user clicks the button, Flash publishes and plays a live stream
if the microphone is not muted.
on (press)
{
// If the user mutes microphone, display offline notice.
// Else, publish and play live stream from microphone.
if(myMic.muted) {
_root.debugWindow+="Microphone offline." + newline;
} else {
// Publish the microphone data by calling
// the root function pubLive().
_root.pubLive();
// Play what is being published by calling
// the root function playLive().
_root.playLive();
}
}
See also
Microphone.get, Microphone.onStatus
Microphone.name
Availability
• Flash Player 6.
• Flash Communication Server MX (not required).
Usage
activeMicrophone.name
Description
Read-only property; a string that specifies the name of the current sound capture device, as
returned by the sound capture hardware.
Example
The following example displays the name of the default microphone in the Output window.
myMic = Microphone.get();
trace("The microphone name is: " + myMic.name);
See also
Microphone.get, Microphone.names
44
Microphone.names
Availability
• Flash Player 6.
• Flash Communication Server MX (not required).
Usage
Microphone.names
Note: The correct syntax is Microphone.names. To assign the return value to a variable, use syntax like
micArray = Microphone.names. To determine the name of the current microphone, use
activeMicrophone.name.
Description
Read-only class property; retrieves an array of strings reflecting the names of all available sound
capture devices without displaying the Flash Player Privacy Settings panel. This array behaves the
same as any other ActionScript array, implicitly providing the zero-based index of each sound
capture device and the number of sound capture devices on the system (by means of
Microphone.names.length). For more information, see the “Array (object)” entry in the online
Flash ActionScript Dictionary in the Flash MX Help menu.
Calling Microphone.names requires an extensive examination of the hardware, and it may take
several seconds to build the array. In most cases, you can just use the default microphone.
Example
The following code returns information on the array of audio devices.
allMicNames = Microphone.names;
_root.debugWindow += "Microphone.names() located these device(s):" + newline;
for(i=0; i < allMicNames.length; i++){
debugWindow += "[" + i + "]: " + allMicNames[i] + newline;
}
For example, the following information could be displayed:
Microphone.names() located these device(s):
[0]: Crystal SoundFusion(tm)
[1]: USB Audio Device
See also
Array (object) in the online Flash ActionScript Dictionary in the Flash MX Help menu,
Microphone.name
Microphone.onActivity
Availability
• Flash Player 6.
• Flash Communication Server MX (not required).
Usage
activeMicrophone.onActivity = function(activity) {
// Your code here
}
Client-Side Communication ActionScript
45
Parameters
A Boolean value set to true when the microphone starts detecting sound, false
when it stops.
activity
Returns
Nothing.
Description
Event handler; invoked when the microphone starts or stops detecting sound. If you want to
respond to this event handler, you must create a function to process its activity value.
To specify the amount of sound required to invoke Microphone.onActivity(true), and the
amount of time that must elapse without sound before Microphone.onActivity(false) is
invoked, use Microphone.setSilenceLevel.
Example
The following example displays true or false in the Output window when the microphone
starts or stops detecting sound.
m = Microphone.get();
_root.attachAudio(m);
m.onActivity = function(mode)
{
trace(mode);
};
See also
Microphone.setSilenceLevel
Microphone.onStatus
Availability
• Flash Player 6.
• Flash Communication Server MX (not required).
Usage
activeMicrophone.onStatus = function(infoObject) {
// Your code here
}
Parameters
infoObject A parameter defined according to the status message. For details about this
parameter, see “Microphone information objects” on page 106.
Returns
Nothing.
Description
Event handler; invoked when the user allows or denies access to the microphone. If you want to
respond to this event handler, you must create a function to process the information object
generated by the microphone. For more information, see the Appendix, “Client-Side Information
Objects,” on page 105.
46
When a movie tries to access the microphone, the Flash Player displays a Privacy dialog box that
lets the user choose whether to allow or deny access.
• If the user allows access, the Microphone.muted property is set to false, and this event
handler is invoked with an information object whose code property is Microphone.Unmuted.
• If the user denies access, the Microphone.muted property is set to true, and this event handler
is invoked with an information object whose code property is Microphone.Muted.
To determine whether the user has denied or allowed access to the microphone without
processing this event handler, use Microphone.muted.
Note: If the user chooses to permanently allow or deny access for all movies from a specified domain, this method is
not invoked for movies from that domain unless the user later changes the privacy setting. For more information, see
Microphone.get.
Example
See the example for Camera.onStatus.
See also
Microphone.get, Microphone.muted, System.showSettings
Microphone.rate
Availability
• Flash Player 6.
• Flash Communication Server MX (not required).
Usage
activeMicrophone.rate
Description
Read-only property; the rate at which the microphone is capturing sound, in kHz. The default
value is 8 kHz if your sound capture device supports this value. Otherwise, the default value is the
next available capture level above 8 kHz that your sound capture device supports, usually 11 kHz.
To set this value, use Microphone.setRate.
Example
The following example saves the current rate to the variable original.
original = myMic.rate;
See also
Microphone.setRate
Client-Side Communication ActionScript
47
Microphone.setGain
Availability
• Flash Player 6.
• Flash Communication Server MX (not required).
Usage
activeMicrophone.setGain(gain)
Parameters
gain An integer that specifies the amount by which the microphone should boost the signal.
Valid values are 0 to 100. The default value is 50; however, the user may change this value in the
Flash Player Microphone Settings panel.
Returns
Nothing.
Description
Method; sets the microphone gain—that is, the amount by which the microphone should
multiply the signal before transmitting it. A value of 0 tells Flash to multiply by 0; that is, the
microphone transmits no sound.
You can think of this setting like a volume knob on a stereo: 0 is no volume and 50 is normal
volume; numbers below 50 specify lower than normal volume, while numbers above 50 specify
higher than normal volume.
Example
The following example ensures that the microphone gain setting is less than or equal to 55.
var myMic = Microphone.get();
if (myMic.gain > 55){
myMic.setGain(55);
}
See also
Microphone.gain, Microphone.setUseEchoSuppression
Microphone.setRate
Availability
• Flash Player 6.
• Flash Communication Server MX (not required).
Usage
activeMicrophone.setRate(kHz)
Parameters
The rate at which the microphone should capture sound, in kHz. Acceptable values are 5,
8, 11, 22, and 44. The default value is 8 kHz if your sound capture device supports this value.
Otherwise, the default value is the next available capture level above 8 kHz that your sound
capture device supports, usually 11 kHz.
kHz
48
Returns
Nothing.
Description
Method; sets the rate, in kHz, at which the microphone should capture sound.
Example
The following example sets the microphone rate to the user’s preference (which you have assigned
to the userRate variable) if it is one of the following values: 5, 8, 11, 22, or 44. If it is not, the
value is rounded to the nearest acceptable value that the sound capture device supports.
myMic.setRate(userRate);
See also
Microphone.rate
Microphone.setSilenceLevel
Availability
• Flash Player 6.
• Flash Communication Server MX (not required).
Usage
activeMicrophone.setSilenceLevel(level [, timeout])
Parameters
An integer that specifies the amount of sound required to activate the microphone and
invoke Microphone.onActivity(true). Acceptable values range from 0 to 100. The default
value is 10.
level
An optional integer parameter that specifies how many milliseconds must elapse
without activity before Flash considers sound to have stopped and invokes
Microphone.onActivity(false). The default value is 2000 (2 seconds).
timeout
Returns
Nothing.
Description
Method; sets the minimum input level that should be considered sound and (optionally) the
amount of silent time signifying that silence has actually begun.
• To prevent the microphone from detecting sound at all, pass a value of 100 for level;
Microphone.onActivity
is never invoked.
• To determine the amount of sound the microphone is currently detecting, use
Microphone.activityLevel.
Activity detection is the ability to detect when audio levels suggest that a person is talking. When
someone is not talking, bandwidth can be saved because there is no need to send the associated
audio stream. This information can also be used for visual feedback so that users know they (or
others) are silent.
Client-Side Communication ActionScript
49
Silence values correspond directly to activity values. Complete silence is an activity value of 0.
Constant loud noise (as loud as can be registered based on the current gain setting) is an activity
value of 100. After gain is appropriately adjusted, your activity value is less than your silence value
when you’re not talking; when you are talking, the activity value exceeds your silence value.
This method is similar in purpose to Camera.setMotionLevel; both methods are used to specify
when the onActivity event handler should be invoked. However, these methods have a
significantly different impact on publishing streams:
•
Camera.setMotionLevel is designed to detect motion and does not affect bandwidth usage.
Even if a video stream does not detect motion, video is still sent.
•
Microphone.setSilenceLevel
is designed to optimize bandwidth. When an audio stream
is considered silent, no audio data is sent. Instead, a single message is sent, indicating that
silence has started.
Example
The following example changes the silence level based on the user’s input. The button has the
following code attached:
on (press)
{
this.makeSilenceLevel(this.silenceLevel);
}
The makeSilenceLevel() function called by the button continues:
function makeSilenceLevel(s)
{
this.obj.setSilenceLevel(s);
this.SyncMode();
this.silenceLevel= s;
}
See also the example for Camera.setMotionLevel.
See also
Microphone.activityLevel, Microphone.onActivity, Microphone.setGain,
Microphone.silenceLevel, Microphone.silenceTimeout
Microphone.setUseEchoSuppression
Availability
• Flash Player 6.
• Flash Communication Server MX (not required).
Usage
activeMicrophone.setUseEchoSuppression(suppress)
Parameters
suppress A
not (false).
Returns
Nothing.
50
Boolean value indicating whether echo suppression should be used (true) or
Description
Method; specifies whether to use the echo suppression feature of the audio codec. The default
value is false unless the user has selected Reduce Echo in the Flash Player Microphone
Settings panel.
Echo suppression is an effort to reduce the effects of audio feedback, which is caused when sound
going out the speaker is picked up by the microphone on the same computer. (This is different
from echo cancellation, which completely removes the feedback.)
Generally, echo suppression is advisable when the sound being captured is played through
speakers—instead of a headset—on the same computer. If your movie allows users to specify the
sound output device, you may want to call Microphone.setUseEchoSuppression(true) if they
indicate they are using speakers and will be using the microphone as well.
Users can also adjust these settings in the Flash Player Microphone Settings panel.
Example
The following example turns on echo suppression.
_root.myMic.setUseEchoSuppression(true);
See also
Microphone.setGain, Microphone.useEchoSuppression
Microphone.silenceLevel
Availability
• Flash Player 6.
• Flash Communication Server MX (not required).
Usage
activeMicrophone.silenceLevel
Description
Read-only property; an integer that specifies the amount of sound required to activate the
microphone and invoke Microphone.onActivity(true). The default value is 10.
Example
See the example for Microphone.silenceTimeout.
See also
Microphone.gain, Microphone.setSilenceLevel
Client-Side Communication ActionScript
51
Microphone.silenceTimeout
Availability
• Flash Player 6.
• Flash Communication Server MX (not required).
Usage
activeMicrophone.silenceTimeout
Description
Read-only property; a numeric value representing the number of milliseconds between the time
the microphone stops detecting sound and the time Microphone.onActivity(false) is
invoked. The default value is 2000 (2 seconds).
To set this value, use Microphone.setSilenceLevel.
Example
The following example sets the timeout to two times its current value.
myMic.setSilenceLevel(myMic.silenceLevel, myMic.silenceTimeOut * 2);
See also
Microphone.setSilenceLevel
Microphone.useEchoSuppression
Availability
• Flash Player 6.
• Flash Communication Server MX (not required).
Usage
activeMicrophone.useEchoSuppression
Description
Read-only property; a Boolean value of true if echo suppression is enabled, false otherwise. The
default value is false unless the user has selected Reduce Echo in the Flash Player Microphone
Settings panel.
Example
The following example checks for echo suppression and turns it on if it is off.
_root.myMic.onActivity = function(active) {
if (active == true) {
if (_root.myMic.useEchoSuppression == false) {
_root.myMic.setUseEchoSuppression(true);
}
}
}
See also
Microphone.setUseEchoSuppression
52
MovieClip (object)
This object is discussed in detail in the online Flash ActionScript Dictionary in the Flash MX
Help menu. Only the method used by Flash Communication Server is discussed in this section.
Method summary for the MovieClip object
Method
Description
MovieClip.attachAudio
Starts or stops playback of an audio source.
MovieClip.attachAudio
Availability
• Flash Player 6.
• Flash Communication Server MX (not required).
Usage
anyMovieClip.attachAudio(source)
Parameters
source The object containing the audio to play. Valid values are a Microphone object, a
NetStream object (requires Flash Communication Server), and false (stops playing the audio).
Returns
Nothing.
Description
Method; specifies the audio source to be either played locally (Microphone object) or streamed
from the Flash Communication Server (NetStream object). To stop playing the audio source, pass
false for source.
• To play local audio, pass a Microphone object as source. This captures and plays local audio
from the microphone hardware.
• To play live or recorded audio streaming from the Flash Communication Server, pass a
NetStream object as source. (The same NetStream object can contain both audio and video
information. To play back video from a NetStream object, use the Video.attachVideo
method.)
You don’t have to use this method to play back incoming streamed audio; audio sent through a
stream is played through the subscriber’s standard audio output device by default when the
subscriber issues NetStream.play. However, if you use this method to route streaming audio to a
movie clip, you can then create a Sound object to control some aspects of the sound.
Example
The following code attaches a microphone to a movie clip.
myMic = Microphone.get();
this.attachAudio(myMic);
See also
Microphone (object), NetStream (object), NetStream.attachAudio, Sound (object) in the
online Flash ActionScript Dictionary in the Flash MX Help menu
Client-Side Communication ActionScript
53
NetConnection (object)
Availability
• Flash Player 6.Flash Communication Server MX.
• The NetConnection object manages a bidirectional connection between the Flash Player and a
server, which lets you connect to Flash Remoting or to the Flash Communication Server. The
Flash Communication Server enables you to share audio, video, and data using the
Macromedia Real-Time Messaging Protocol (RTMP).
For information on using Flash with an application server, see Using Flash Remoting. For
information on using Flash with Flash Communication Server, see the following entries in
addition to NetConnection:
•
•
•
•
•
NetStream (object)—for any RTMP communication
Camera (object)—for capturing and transmitting video
Microphone (object)—for capturing and transmitting audio
SharedObject (object)—for sharing data
Camera (object)—for displaying video
For information on creating a NetConnection object, see “Constructor for the NetConnection
object” on page 54.
Method summary for the NetConnection object
Method
Description
NetConnection.call
Invokes a command or method on the server.
NetConnection.close
Closes the connection with the server.
NetConnection.connect
Connects to an application on the Flash Communication Server.
Event handler summary for the NetConnection object
Method
Description
NetConnection.onStatus
Invoked when a status change or error is posted for the
NetConnection object.
Constructor for the NetConnection object
Availability
• Flash Player 6.
• Flash Communication Server MX.
Usage
new NetConnection()
Parameters
None.
Returns
A NetConnection object.
54
Description
Constructor; creates an object that can be used to connect the Flash Player to the Flash
Communication Server or to an application server. After creating the NetConnection object, use
NetConnection.connect to make the actual connection.
For information on using Flash with an application server, see Using Flash Remoting.
Example
The following doConnect() function uses the NetConnection constructor to create a new
connection and connect to the server.
function doConnect() {
// Make a new connection object
connection = new NetConnection();
// Get the name of the server from user input
// and assign it to a variable named myURL
myURL=serverName;
// Connect to the service
connection.connect("rtmp://" + myURL + "/someApp/someInstance");
}
See also
NetConnection.connect
NetConnection.call
Availability
• Flash Player 6.
• Flash Communication Server MX.
Usage
myConnection.call(remoteMethod, resultObject | null [, p1,...,pN])
Parameters
A parameter in the form [/objectPath/]method; if you are calling a method
on a NetConnection object, you can omit objectPath. For example, the parameter /someObj/
doSomething means the server must call the someObj.doSomething method of the application
passed to NetConnection.connect in its targetURI parameter, passing the specified p1,...,pN
parameters.
remoteMethod
For security reasons, certain remoteMethod names are reserved at the application level; do not use
this event handler to call those methods. The reserved names are /onConnect, /onDisconnect, /
onStatus, /onAppStop, and /onAppStart.
resultObject An object parameter that is needed only when the sender is expecting a result.
The result object can be any user-defined object. For it to be of use, a method named onResult
must be called when the result arrives. If you don’t need a result object, pass null.
p1,...pN
Optional parameters to be passed to the specified method.
Returns
Nothing.
Client-Side Communication ActionScript
55
Description
Method; invokes a command or method on the server. You must create a server-side function to
define this method. This method is also used when connecting to an application server. For
information on using Flash with an application server, see Using Flash Remoting.
Example
The following function checks for a message, sends it, then clears the local string.
function mySend()
{
if (length(msg) > 0) {
connection.call("message", null, msg);
}
msg = "";
}
NetConnection.close
Availability
• Flash Player 6.
• Flash Communication Server MX.
Usage
myConnection.close()
Parameters
None.
Returns
Nothing.
56
Description
Method; closes the connection with the server and invokes NetConnection.onStatus with a
code property of "NetConnection.Connect.Close". For more information, see
NetConnection.onStatus.
This method disconnects all NetStream objects running over this connection; any queued data
that has not been sent is discarded. (To terminate server streams without closing the connection,
use NetStream.close.) If you want to reconnect, you must recreate the NetStream object (see
“Constructor for the NetStream object” on page 64).
This method also disconnects all remote shared objects running over this connection.
However, you don’t need to recreate the shared object to reconnect. Instead, you can just call
SharedObject.connect to re-establish the connection to the shared object. Also, any data in the
shared object that was queued when you issued NetConnection.close will be sent after you
reestablish a connection to the shared object.
Example
The following disconnect() function stops the published stream, then calls
NetConnection.close to delete the source connection. With no source stream to play, the
destination stream automatically ends and is deleted.
function disconnect() {
// Stops publishing the stream.
srcStream.close();
// Deletes the source stream connection.
connection.close();
}
See also
NetConnection.connect, NetConnection.onStatus, NetStream.close,
SharedObject.connect
NetConnection.connect
Availability
• Flash Player 6.
• Flash Communication Server MX.
Usage
myConnection.connect(targetURI, [, p1 ... pN])
Parameters
The Uniform Resource Identifier (URI) of the application on the Flash
Communication Server that should run when the connection is made. To specify targetURI, use
one of the following formats (items in brackets are optional):
targetURI
•
rtmp:[port]/appName[/instanceName]
•
rtmp://host[:port]/appName[/instanceName]
(acceptable if the movie and the Flash
Communication Server are on the same machine)
Client-Side Communication ActionScript
57
For example, the following URIs are formatted correctly:
• rtmp://www.myCompany.com/myMainDirectory/groupChatApp/HelpDesk
• rtmp:/sharedWhiteboardApp/June2002
p1 ... pN Optional parameters of any type to be passed to the application specified in
targetURI. If the application is unable to process the parameters in the order in which they
received, NetConnection.onStatus is invoked with the code property set to
NetConnection.Connect.Rejected.
are
Returns
A Boolean value of true if you passed in a valid URI, false otherwise. (To determine if the
connection was successfully completed, use NetConnection.onStatus.).
Description
Method; connects to an application on the Flash Communication Server. This method can also
be used to communicate with an application server. For information, see Using Flash Remoting.
If you want to use this connection for publishing or playing audio or video in real time, or to
publish or play previously recorded audio or video streams, you must connect to the Flash
Communication Server and then create a NetStream object within this NetConnection object.
For more information, see the “NetStream (object)” entry.
If you want to use this connection for synchronizing data among multiple clients or between the
client and a server, you must connect to the Flash Communication Server and then create a
remote shared object within this NetConnection object. For more information, see the
“SharedObject (object)” entry.
When you call this method, the NetConnection.onStatus event handler is invoked with an
information object that specifies whether the connection succeeded or failed. For more
information, see the example below and NetConnection.onStatus. If the connection is
successful, NetConnection.isConnected is set to true.
Because of network and thread timing issues, it is better to place a NetConnection.onStatus
handler in a script before a NetConnection.connect method. Otherwise, the connection might
complete before the script executes the onStatus handler initialization. Also, all security checks
are made within the connect method, and notifications will be lost if the onStatus handler is
not yet set up.
If the specified connection is already open when you call this method, an implicit
method is invoked, and then the connection is reopened.
NetConnection.close
During the connection process, any server responses to subsequent NetConnection.call,
NetStream.send, or SharedObject.send methods are queued until the server authenticates
connection and NetConnection.onStatus is invoked. The call or send methods are then
the
processed in the order received. Any pending updates to remote shared objects are also queued
until the connection is successful, at which point they are transmitted to the server.
Video and audio, however, are not queued during the connection process. Any video or audio
that is streaming from the server is ignored until the connection is successfully completed. For
example, confirm that the connection was successful before enabling a button that calls the
NetStream.publish method.
58
If your connection fails, make sure you have met all the requirements for connecting successfully:
• You are specifying the correct protocol name for connecting to the server (rtmp for the Flash
Communication Server).
• You are connecting to a valid application on the correct server.
• You have a subdirectory in the FlashCom application directory with the same name as the
application.
• The server is running.
To distinguish among different instances of a single application, pass a value for instanceName as
part of targetURI. For example, you may want to give different groups of people access to the
same application without having them interact with each other. To do so, you can open multiple
chat rooms at the same time, as shown below.
nc.connect("rtmp://www.myserver.com/chatApp/peopleWhoSew")
nc.connect("rtmp://www.myserver.com/chatApp/peopleWhoKnit")
In another case, you may have an application named “lectureSeries” that records and plays back
classroom lectures. To save individual lectures, pass a different value for instanceName each time
you record a lecture, as shown below.
// Record Monday’s lecture
nc.connect("rtmp://www.myserver.com/lectureSeries/Monday");
...
ns.connect(nc);
ns.publish("lecture", "record");
// Record Tuesday’s lecture
nc.connect("rtmp://www.myserver.com/lectureSeries/Tuesday");
...
ns.connect(nc);
ns.publish("lecture", "record");
// and so on
// Play back one of the lectures
nc.connect("rtmp://www.myserver.com/lectureSeries/Monday");
...
ns.connect(nc);
ns.play("lecture")
You can also nest instance names, as shown below.
nc.connect("rtmp://www.myserver.com/chatApp/peopleWhoSew/Monday")
nc.connect("rtmp://www.myserver.com/chatApp/peopleWhoSew/Tuesday")
For information on where recorded streams are stored on the server, see NetStream.publish.
Client-Side Communication ActionScript
59
Understanding file naming and domains used with this method
If an HTML page containing a movie is accessed differently (with regards to domain names) from
the way the movie itself accesses the Flash Communication Server, then the connection will not
be successful. This is a security feature of the Flash Player. But in some cases, this may be
inconvenient.
For example, if a web page containing a movie is served on an intranet from, say, http://
deptserver.mycorp.com, it can also be accessed simply by http://deptserver. If the page is accessed
via, say, http://deptServer/tcpage.htm, but the movie specifies deptServer.mycorp.com in the
targetURI, then the movie will not make a successful connection to the server. Similarly, if the
web page and movie are accessed as http://deptserver.mycorp.com/tcpage.htm, but the movie
specifies rtmp://deptserver in the targetURI, it will not connect.
There are a few things you can do to prevent the security policies from inconveniencing you or
your users. First, and easiest, is to use a targetURI that doesn’t specify a server name. (This is
applicable only if the Flash Communication Server and web server are running on the same
machine.) To do so, leave off the second slash in the targetURI. For example, the following
commands will make the Flash Player attempt to connect to the same host and domain as the web
server the SWF file was served from.
nc = new NetConnection();
nc.connect("rtmp:/myApp");
Second, there is a bit of JavaScript you can use in your HTML page to avoid the security
problem. Assuming the movie uses a fully qualified domain name URL to access the Flash
Communication Server, this JavaScript redirects the web page to an explicitly named full
URL, like this:
<SCRIPT language="javascript">
//if the URL didn’t have the domain on it
if (document.URL.indexOf("mycorp.com") == -1) {
//redirect to a version that does
document.URL="http://deptServer.mycorp.com/tcpage.htm";
}
</script>
Finally, if you own a domain name, have access to the DNS records of that domain name, and
have a static IP address for your Flash Communication Server, you can create address ("A")
records to point a host name to that IP address. For instance, flashcom.mycorp.com could map to
the machine running the Flash Communication Server and having an IP address provided by
your IT department or ISP. Your web pages can continue to be hosted by whatever means you are
currently using. ("CNAME" records are recommended if you need to forward traffic to a server
that has a DNS-accessible host name but may or may not have a static IP address.)
Example
The following example connects to the funAndGames application on the macromedia server.
con = new NetConnection();
con.connect("rtmp://real.macromedia.com/funAndGames");
See also
NetConnection.close, NetConnection.onStatus
60
NetConnection.isConnected
Availability
• Flash Player 6.
• Flash Communication Server MX.
Usage
myConnection.isConnected
Description
Read-only property; a Boolean value indicating whether the Flash Player is connected to the
server (true) or not (false) through the specified connection. Whenever a connection is made
or closed, this property is set.
Example
The following example is attached to a toggle push button. When the user clicks the button, if the
user is connected to the server, the connection is closed. If the user is not connected, a connection
is established.
on (release) {
if (_root.connection.isConnected == true)
_root.connection.close();
else
_root.connection.connect(_root.myURI);
}
See also
NetConnection.close, NetConnection.connect, NetConnection.onStatus
NetConnection.onStatus
Availability
• Flash Player 6.
• Flash Communication Server MX.
Usage
myConnection.onStatus = function(infoObject) {
// Your code here
}
Parameters
infoObject A parameter defined according to the status message. For details about this
parameter, see “NetConnection information objects” on page 107.
Returns
Nothing.
Description
Event handler; invoked when a status change or error is posted for the NetConnection object. If
you want to respond to this event handler, you must create a function to process the information
object sent by the server. For more information, see the Appendix, “Client-Side Information
Objects,” on page 105.
Client-Side Communication ActionScript
61
Example
The following example writes data about the connection to a log file.
reconnection.onStatus = function(info)
{
_root.log += "Recording stream status.\n";
_root.log += "Event: " + info.code + "\n";
_root.log += "Type: " + info.level + "\n";
_root.log += "Message:" + info.description + "\n";
}
See also
NetConnection.call, NetConnection.close, NetConnection.connect
NetConnection.uri
Availability
• Flash Player 6.
• Flash Communication Server MX.
Usage
myConnection.uri
Description
Read-only property; a string representing the target URI that was passed in with
NetConnection.connect. If NetConnection.connect hasn’t yet been called for myConnection,
this property is undefined.
See also
NetConnection.connect
NetStream (object)
The NetStream object opens a one-way streaming connection between the Flash Player and the
Flash Communication Server through a connection made available by a NetConnection object. A
NetStream object is like a channel inside a NetConnection object; this channel can either publish
audio and/or video data, using NetStream.publish, or subscribe to a published stream and
receive data, using NetStream.play. You can publish or play live (real-time) data and play
previously recorded data.
You can also use NetStream objects to send text messages to all subscribed clients (see
NetStream.send).
62
The following steps summarize the sequence of actions required for publishing real-time audio
and video using Flash Communication Server and the Real-Time Messaging Protocol (RTMP):
1
Use new
2
Use NetConnection.connect("rtmp://serverName/appName/appInstanceName") to
connect the application to the Flash Communication Server.
3
Use new
4
Use NetStream.attachAudio(audioSource) to capture and send audio over the stream, and
NetStream.attachVideo(videoSource) to capture and send video over the stream.
5
Use NetStream.publish(publishName) to give this stream a unique name and send data
over the stream to the Flash Communication Server, so others can receive it. You can also
record the data as you publish it, so that users can play it back later.
NetConnection
to create a NetConnection object.
NetStream(connection)
to create a data stream over the connection.
Movies that subscribe to this stream will use the name specified here; that is, they will call the
same NetConnection.connect method as the publisher, and then call a
NetStream.play(publishName) method. They will also have to call Video.attachVideo to
display the video.
Multiple streams can be open simultaneously over one connection, but each stream either
publishes or plays. To publish and play over a single connection, open two streams over the
connection, as shown in the following example. This example publishes audio and video data
in real time on one stream and plays it back on another stream on the same client, through the
same connection.
// These lines begin broadcasting
nc = new NetConnection(); // create connection object
nc.connect("rtmp://mySvr.myDomain.com/App"); // connect to server
ns = new NetStream(nc);
// open stream within connection
ns.attachAudio(Microphone.get());
// capture audio
ns.attachVideo(Camera.get());
// capture video
ns.publish("todays_news");
// begin broadcasting
// These lines open a stream to play the video portion of the broadcast
// inside a Video object named myVideoArea.
// The audio is played through the standard output device--you don’t
// need to issue a separate command to hear the audio.
ns2 = new NetStream(nc);
// open another stream over the same connection
myVideoArea.attachVideo(ns2); // specify where to display video
ns2.play("todays_news"); // play uses the same name as publish, above
In the previous example, note that both the publisher and subscriber call an attachVideo
method. The publisher calls NetStream.attachVideo to connect a video feed to a stream. The
subscriber calls Video.attachVideo to connect a video feed to a Video object on the Stage; the
incoming video is displayed inside this object.
Note also that although the publisher calls an attachAudio method, the subscriber does not.
This is because audio sent through a stream is played through the subscriber’s standard audio
output device by default; the subscriber doesn’t have to attach the incoming audio to an object on
the Stage. However, you can use MovieClip.attachAudio to route audio from a NetStream
object to a movie clip. If you do this, you can then create a Sound object to control the volume of
the sound. For more information, see MovieClip.attachAudio.
Client-Side Communication ActionScript
63
Method summary for the NetStream object
Method
Description
NetStream.attachAudio
Publisher method; specifies whether audio should be sent over the stream.
NetStream.attachVideo
Publisher method; starts transmitting video or a snapshot from the specified
source.
NetStream.close
Stops publishing or playing all data on the stream and makes the stream available
for another use.
NetStream.pause
Subscriber method; pauses or resumes playback of a stream.
NetStream.play
Subscriber method; feeds streaming audio, video, and text messages being
published on the Flash Communication Server, or a recorded file stored on the
server, to the client.
NetStream.publish
Publisher method; sends streaming audio, video and text messages from the client
to the Flash Communication Server, optionally recording the stream during
transmission.
NetStream.receiveAudio
Subscriber method; specifies whether incoming audio plays on the stream.
NetStream.receiveVideo
Subscriber method; specifies whether incoming video will play on the stream, or
specifies the frame rate of the video.
NetStream.seek
Subscriber method; seeks to a position in the recorded stream currently playing.
NetStream.send
Publisher method; broadcasts a message to all subscribing clients.
NetStream.setBufferTime
Method; For a publishing stream, this number indicates how long the outgoing
buffer can grow before Flash starts dropping frames. For a subscribing stream, this
number indicates how long to buffer incoming data before starting to displaying
the stream.
Property summary for the NetStream object
Property (read-only)
Description
NetStream.bufferLength
The number of seconds of data currently in the buffer.
NetStream.bufferTime
The number of seconds assigned to the buffer by NetStream.setBufferTime.
NetStream.currentFps
The number of frames per second being sent or received on the publishing or
subscribing stream.
NetStream.time
The number of seconds a stream has been playing or publishing.
Event handler summary for the NetStream object
Method
Description
NetStream.onStatus
Invoked every time a status change or error is posted for the NetStream object.
Constructor for the NetStream object
Availability
• Flash Player 6.
• Flash Communication Server MX.
Usage
new NetStream(myRTMPConnection)
64
Parameters
A NetConnection object that is using the Real-Time Messaging Protocol
(RTMP) to communicate with the Flash Communication Server.
myRTMPConnection
Returns
A NetStream object.
Description
Constructor; creates a stream that can be used for publishing (sending) or playing (receiving) data
through the specified server connection.
You can’t publish and play data over the same stream at the same time. For example, if you are
publishing on a stream and then call NetStream.play, an implicit NetStream.close method is
called; the publishing stream then becomes a subscribing stream.
However, you can create multiple streams that run simultaneously over the same connection: one
stream publishes and another stream plays.
Example
The following example shows how a publishing client and a subscribing client can connect to the
Flash Communication Server and then open an application stream for sending (publishing) or
receiving (playing) data over this connection.
// Publishing client contains this code.
connection = new NetConnection();
// create NetConnection object
connection.connect("rtmp://myRTMPServer.myDomain.com/app");
// connect to
server
myStream = new NetStream(connection);
myStream.publish("myWeddingVideo");
// open app stream within connection
// publish data over this stream
// Subscribing client contains this code.
// Note that the connection and stream names are the same as those
// used by the publishing client. This is neither required nor prohibited,
// because the scripts are running on different machines.
// However, the parameters used with connect() and play() below
// must be the same as those used with connect() and publish() above.
connection = new NetConnection();
connection.connect("rtmp://myRTMPServer.myDomain.com/app");
myStream = new NetStream(connection);
myStream.play("myWeddingVideo");
For more examples, see “NetStream
(object)” on page 62
and Video.attachVideo.
See also
NetConnection (object), NetStream.attachAudio, NetStream.attachVideo,
NetStream.play, NetStream.publish, Video.attachVideo
NetStream.attachAudio
Availability
• Flash Player 6.
• Flash Communication Server MX.
Usage
myStream.attachAudio(source)
Client-Side Communication ActionScript
65
Parameters
source
The source of the audio to be transmitted. Valid values are a Microphone object
and null.
Returns
Nothing.
Description
Method; specifies whether audio should be sent over the stream (from a Microphone object
passed as source) or not (null passed as source). This method is available only to the publisher
of the specified stream.
You can call this method before or after you call the NetStream.publish method and actually
begin transmitting. Subscribers who want to hear the audio must call a NetStream.play method.
Subscribers can also attach their incoming audio to a movie clip and then create a Sound object to
control some aspects of the sound. For more information, see MovieClip.attachAudio.
Example
The following code attaches a microphone to a network stream.
srcStream.attachAudio(myMic);
See also
Microphone (object), MovieClip.attachAudio, NetStream.attachVideo,
NetStream.publish, NetStream.receiveAudio
NetStream.attachVideo
Availability
• Flash Player 6.
• Flash Communication Server MX.
Usage
myStream.attachVideo(source | null [, snapShotMilliseconds])
Parameters
source The source of the video transmission. Valid values are a Camera object (which starts
capturing video) and null. If you pass null, Flash stops capturing video, and any additional
parameters you send are ignored.
snapShotMilliseconds An optional integer that specifies whether the video stream is
continuous, a single frame, or a series of single frames used to create time-lapse photography.
• If this argument is omitted, Flash captures all video until you issue
myStream.attachVideo(null).
• If you pass 0, Flash captures only a single video frame. Use this value to transmit “snapshots”
within a preexisting stream.
Note: Flash interprets invalid, negative, or nonnumeric arguments as 0.
• If you pass a positive number, Flash captures a single video frame and then appends a pause of
length snapShotMilliseconds as a “trailer” on the snapshot. Use this value to create timelapse photography effects (see the description below.)
66
Returns
Nothing.
Description
Method; starts capturing video from the specified source, or stops capturing if source is null.
This method is available only to the publisher of the specified stream.
After attaching the video source, you must call NetStream.publish to actually begin
transmitting. Subscribers who want to display the video must call the NetStream.play and
Video.attachVideo methods to display the video on the Stage.
You can use snapShotMilliseconds to send a single snapshot (by providing a value of 0) or a
series of snapshots—in effect, time-lapse footage—by providing a positive number that adds a
trailer of the specified number of milliseconds to the video feed. The trailer extends the length of
time the video message is displayed. By repeatedly calling attachVideo with a positive value for
snapShotMilliseconds, the snapshot/trailer/snapshot/trailer... sequence creates time-lapse
footage. For example, you could capture one frame per day and append it to a video file. When a
subscriber plays back the file, each frame remains onscreen for the specified number of
milliseconds and then the next frame is displayed.
The snapShotMilliseconds parameter serves a different purpose from the fps parameter you
can set with Camera.setMode. When you specify the snapShotMilliseconds, you are
controlling how much time elapses during playback between recorded frames. When you specify
the fps using Camera.setMode, you are controlling how much time elapses during recording and
playback between recorded frames.
For example, suppose you want to take a snapshot every five minutes for a total of 100 snapshots.
You can do this in two different ways:
• You can issue a NetStream.attachVideo(source,500) command 100 times, once every five
minutes. This takes 500 minutes to record, but the resulting file will play back in 50 seconds
(100 frames with 500 milliseconds between frames).
• You can issue a Camera.setMode command with an fps value of 1/300 (1 per 300 seconds, or
1 each 5 minutes), and then issue a NetStream.attachVideo(source) command, letting the
camera capture continuously for 500 minutes. The resulting file will play back
in 500 minutes—the same length of time that it took to record—with each frame being
displayed for 5 minutes.
Both techniques capture the same 500 frames, and both approaches are useful; which approach to
use depends primarily on your playback requirements. For example, in the second case, you could
be recording audio the entire time. Also, both files would be approximately the same size.
Client-Side Communication ActionScript
67
Example
The following function publishes a stream containing the camera output.
function pubLive()
{
// Create a new source stream.
srcStream = new NetStream(connection);
// Attach the camera activity to the source stream. This
// call causes a warning message to show which service is
// requesting access. It also gives the user the option of
// not sending the camera activity to the server.
srcStream.attachVideo(myCam);
// Get the stream name from the user input.
mySubj=subject;
// Assuming the user named the stream ’webCamStream’,
// publish the live camera activity as 'webCamStream'.
srcStream.publish(mySubj, "live");
}
See also example for MovieClip.attachAudio.
See also
Camera (object), Camera.setMode, NetStream.publish, NetStream.receiveVideo,
Video.attachVideo
NetStream.bufferLength
Availability
• Flash Player 6.
• Flash Communication Server MX.
Usage
myStream.bufferLength
Description
Read-only property; the number of seconds of data currently in the buffer. You can use this
property in conjunction with NetStream.bufferTime to estimate how close the buffer is to
being full—for example, to display feedback to a user who is waiting for data to be loaded
into the buffer.
See also
NetStream.bufferTime
NetStream.bufferTime
Availability
• Flash Player 6.
• Flash Communication Server MX.
Usage
myStream.bufferTime
68
Description
Property; the number of seconds assigned to the buffer by NetStream.setBufferTime. The
default value is 0. To determine the number of seconds currently in the buffer, use
NetStream.bufferLength.
See also
NetStream.bufferLength, NetStream.setBufferTime
NetStream.close
Availability
• Flash Player 6.
• Flash Communication Server MX.
Usage
myStream.close()
Parameters
None.
Returns
Nothing.
Description
Method; stops publishing or playing all data on the stream, sets the NetStream.time property
to 0, and makes the stream available for another use. This method is invoked implicitly
whenever you call NetStream.play from a publishing stream, or NetStream.publish from
a subscribing stream.
• If this method is called from a publishing stream, all pending NetStream.play calls on the
stream are cleared on the server; subscribers no longer receive anything that was being
published on the stream.
• If this method is called from a subscribing stream, publishing continues and other subscribing
streams may still be playing, but the subscriber can now use the stream for another purpose.
• To stop play on a subscribing stream without closing the stream or changing the stream type,
use myStream.play(false).
Example
The following onDisconnect() function closes a stream.
function onDisconnect() {
// Stops publishing the stream.
srcStream.close();
// Deletes the source stream connection. With no source
// to play, the destination stream also ends and can be
// deleted.
connection.close();
}
See also
NetStream.pause, NetStream.play, NetStream.publish, NetStream.time
Client-Side Communication ActionScript
69
NetStream.currentFps
Availability
• Flash Player 6.
• Flash Communication Server MX.
Usage
myStream.currentFps
Description
Read-only property; the number of frames per second being sent or received on the specified
publishing or subscribing stream.
NetStream.onStatus
Availability
• Flash Player 6.
• Flash Communication Server MX.
Usage
myStream.onStatus = function(infoObject) {
// Your code here
}
Parameters
infoObject A parameter defined according to the status or error message. For details about this
parameter, see “NetStream information objects” on page 107.
Returns
Nothing.
Description
Event handler; invoked every time a status change or error is posted for the NetStream object. If
you want to respond to this event handler, you must create a function to process the information
object sent by the server. For more information, see the Appendix, “Client-Side Information
Objects,” on page 105.
NetStream.pause
Availability
• Flash Player 6.
• Flash Communication Server MX.
Usage
myStream.pause([pauseResume])
Parameters
pauseResume An optional Boolean parameter specifying whether to pause play (true) or
resume play (false). If you omit this parameter, pause acts as a toggle: the first time pause
called on a specified stream, it pauses play, and the next time it is called, it resumes play.
70
is
Returns
Nothing.
Description
Method; pauses or resumes playback of a stream. This method is available only to clients
subscribed to the specified stream, not to the stream’s publisher.
The first time you call this method on a given playlist (without sending a parameter), it pauses the
playlist; the next time, it resumes play. You might want to attach this method to a button that the
user presses to pause or resume playback.
Example
The following examples illustrate some uses of this method.
myStream.pause(); // pauses play first time issued
myStream.pause(); // resumes play
myStream.pause(false); // no effect, play continues
myStream.pause(); // pauses play
Suppose you have a playlist of three recorded streams.
connection = new NetConnection();
connection.connect("rtmp://localhost/appName/appInstance");
// Create a NetStream for playing
dstStream = new NetStream(connection);
myVideoObject.attachVideo(dstStream);
// To play record1
dstStream.play("record1", 0, -1, false);
// To play record2
dstStream.play("record2", 0, -1, false);
// To play record3
dstStream.play("record3", 0, -1, false);
// You click a button to pause while record2 is playing
dstStream.pause();
// Later, you want to resume the play
dstStream.pause();
// Later, you want to start a new playlist
// To play record4
dstStream.play("record4", 0, -1, true);
// To play record5
dstStream.play("record5", 0, -1, false);
// To play record6
dstStream.play("record6", 0, -1, false);
See also
NetStream.play
Client-Side Communication ActionScript
71
NetStream.play
Availability
• Flash Player 6.
• Flash Communication Server MX.
Usage
mystream.play(whatToPlay | false [,start [, length [, flushPlaylists]]])
Parameters
An identifying name for live data published by NetStream.publish, a recorded
file name for playback, or false. If you pass false, the stream stops playing and any additional
parameters you send are ignored.
whatToPlay
An optional numeric parameter that specifies the start time, in seconds. This parameter
can also be used to indicate whether the stream is live or recorded.
start
• The default value for start is -2, which means that Flash first tries to play the live stream
specified in whatToPlay. If a live stream of that name is not found, Flash plays the recorded
stream specified in whatToPlay. If neither a live nor a recorded stream is found, Flash opens a
live stream named whatToPlay even though no one is publishing on it; when someone does
begin publishing on that stream, Flash begins playing it.
• If you pass -1 for start, Flash plays only the live stream specified in whatToPlay. If no live
stream is found, Flash waits for it indefinitely if length is set to -1; if length is set to a
different value, Flash waits for length seconds before it begins playing the next item in
the playlist.
• If you pass 0 or a positive number for start, Flash plays only a recorded stream named
whatToPlay,
beginning start seconds from the beginning of the stream. If no recorded
stream is found, Flash begins playing the next item in the playlist immediately.
• If you pass a negative number other than -1 or -2 for start, Flash interprets the value as
if it were -2.
length
An optional numeric parameter that specifies the duration of the playback, in seconds.
• The default value for length is -1, which means that Flash plays a live stream until it is no
longer available or plays a recorded stream until it ends.
• If you pass 0 for length, Flash plays the single frame that is start seconds from the beginning
of a recorded stream (assuming start is equal to or greater than 0).
• If you pass a positive number for length, Flash plays a live stream for length seconds after it
becomes available, or plays a recorded stream for length seconds. (If a stream ends before
seconds, playback ends when the stream ends.)
length
• If you pass a negative number other than -1 for length, Flash interprets the value as
if it were -1.
flushPlaylists
An optional Boolean parameter that specifies whether to flush any
previous playlist.
• The default value for flushPlaylists is true, which means that any previous play calls are
cleared and whatToPlay is played immediately.
• If you pass false for flushPlaylists, whatToPlay is added (queued) in the current playlist;
that is, whatToPlay plays only after previous streams have completed playing.
72
Description
Method; feeds streaming audio, video, and text messages being published on the Flash
Communication Server, or a recorded file stored on the server, to the client. This method is
available only to clients subscribed to the specified stream, not to the stream’s publisher.
To view video data, you must call a Video.attachVideo method; audio being streamed with the
video will be played automatically. If audio-only data is being streamed, you must call a
MovieClip.attachAudio method to hear the audio.
You can use the optional parameters of this method to control various aspects of playback
behavior. The following table shows a few ways these values interact.
start
length
Flash Player behavior
(Default)
(Default)
Plays the live stream until it is no longer available. If a live stream of the
specified name is not found, the Flash Player plays a recorded stream until
it ends.
-2
19
Plays a live stream for up to 19 seconds after it becomes available. If a live
stream of the specified name is not found, the Flash Player plays a recorded
stream for 19 seconds.
15
19
Plays a recorded stream for 19 seconds, beginning 15 seconds from the
beginning of the stream.
15
(Default)
Plays a recorded stream, beginning 15 seconds from the beginning of the
stream, until the stream ends.
-1
(Default)
Plays a live stream until it is no longer available.
This method can invoke NetStream.onStatus with a number of different information objects.
For example, if the specified stream isn’t found, NetStream.onStatus is called with a code
property of "NetStream.Play.StreamNotFound". For more information, see
NetStream.onStatus.
If you want to create a dynamic playlist that switches among different live or recorded streams,
call play more than once and pass false for flushPlaylists each time. Conversely, if you want
to play the specified stream immediately, clearing any other streams that are queued for play, pass
true for flushPlaylists.
Example
The following examples show some ways to use this method to play back live or recorded streams.
Example 1:
myConnection = new NetConnection();
myConnection.connect("rtmp://localhost/appName/appInstance");
dstStream = new NetStream(myConnection);
myVideoObject.attachVideo(dstStream);
// To play a live stream named "stephen" being published elsewhere
// using the default values -- start time is -2, length is -1,
// and flushPlaylists is true -- don’t pass any optional parameters.
dstStream.play("stephen");
// To immediately play a recorded stream named record1
// starting at the beginning, for up to 100 seconds.
dstStream.play("record1", 0, 100, true);
Client-Side Communication ActionScript
73
Example 2:
// To play and switch between live and recorded streams:
// Suppose we have two live streams, live1 and live2,
// and three recorded streams, record1, record2, and record3.
// The play order is record1, live1, record2, live2, and record3.
myConnection = new NetConnection();
myConnection.connect("rtmp://localhost/appName/appInstance");
// Create a NetStream for playing
dstStream = new NetStream(myConnection);
myVideoObject.attachVideo(dstStream);
// Play record1
dstStream.play("record1", 0, -1, false);
// Switch from record1 to live1.
// live1 will start to play after record1 is done
dstStream.play("live1", -1, 5, false);
// Switch from live1 to record2.
// record2 will start to play after live1 plays for 5 seconds.
dstStream.play("record2", 0, -1, false);
// Interrupt the current play and play a segment in record1 again
// (we can implement a seek by this)
dstStream.play("record1", 1, 5, true);
See also
NetStream.close, NetStream.pause, NetStream.publish
NetStream.publish
Availability
• Flash Player 6.
• Flash Communication Server MX.
Usage
mystream.publish(whatToPublish | false [, howToPublish])
Parameters
A string that identifies the stream. If you pass false or an empty string, the
publish operation stops. Subscribers to this stream must pass this same name when they call
NetStream.play.
whatToPublish
howToPublish An optional string that specifies how to publish
"record", "append", and "live". The default value is "live".
the stream. Valid values are
• If you pass "record" for howToPublish, Flash publishes and records live data, saving the
recorded data to a new file named whatToPublish.flv. The file is stored on the server in a
subdirectory within the directory containing the server application. If the file already exists,
it is overwritten. For more information on where recorded streams are stored, see the
description below.
74
• If you pass "append" for howToPublish, Flash publishes and records live data, appending the
recorded data to a file named whatToPublish.flv, stored on the server in a subdirectory
within the directory containing the server application. If no file named whatToPublish.flv is
found, it is created.
• If you omit this parameter or pass "live", Flash publishes live data without recording it. If
whatToPublish.flv
exists, it will be deleted.
Returns
Nothing.
Description
Method; sends streaming audio, video and text messages from the client to the Flash
Communication Server, optionally recording the stream during transmission. This method is
available only to the publisher of the specified stream.
You don’t use this command when you want to let a subscriber play a stream that has already been
published and recorded. For example, assume you have recorded a stream named “allAboutMe.”
To enable someone to play it back, you need only open a stream for the subscriber to use:
publishStream = new NetStream(someConnection);
subscribeStream = new NetStream(someConnection);
subscribeStream.play("allAboutMe");
When you record a stream, Flash creates an FLV file and stores it in a subdirectory of the
FlashCom application directory on the server. Each stream is stored in a directory whose name is
the same as the instanceName passed to NetConnection.connect. Flash creates these directories
automatically; you don’t have to create one for each instance name. For example:
// Connect to a specific instance of an app that is stored in
// a directory named "lectureSeries" in your applications directory
nc = new NetConnection();
nc.connect("rtmp://server.domain.com/lectureSeries/Monday")
ns = new NetStream(nc);
ns.publish("lecture", "record")
// a file named "lecture.flv" is stored in a subdirectory named
// "...\yourAppsFolder\lectureSeries\streams\Monday"
// Connect to a different instance of the same app
// but issue an identical publish command
nc = new NetConnection();
nc.connect("rtmp://server.domain.com/lectureSeries/Tuesday")
ns = new NetStream(nc);
ns.publish("lecture", "record")
// a file named "lecture.flv" is stored in a subdirectory named
// "...\yourAppsFolder\lectureSeries\streams\Tuesday"
If you don’t pass a value for instanceName, whatToPublish.flv is stored in a subdirectory named
“...\yourAppsFolder\appName\streams\_definst_” (for “default instance”). For more information
on using instance names, see NetConnection.connect. For information on playing back FLV
files, see NetStream.play.
This method can invoke NetStream.onStatus with a number of different information objects.
For example, if someone is already publishing on a stream with the specified name,
NetStream.onStatus is called with a code property of "NetStream.Publish.BadName". For
more information, see NetStream.onStatus.
Client-Side Communication ActionScript
75
Example
The following example shows how to publish and record a video, and then play it back.
connection = new NetConnection();
connection.connect("rtmp://myServer.myDomain.com/appName/appInstance");
srcStream = new NetStream(connection);
srcStream.publish("stephen", "record");
srcStream.attachVideo(Camera.get());
// To stop publishing and recording
srcStream.publish(false);
// To play the recorded stream
srcStream.play("stephen");
See also
NetConnection.connect, NetStream.play, Video.attachVideo
NetStream.receiveAudio
Availability
• Flash Player 6.
• Flash Communication Server MX.
Usage
myStream.receiveAudio(receive)
Parameters
receive
(true) or
A Boolean value that specifies whether incoming audio plays on the specified stream
not (false). The default value is true.
Returns
Nothing.
Description
Method; specifies whether incoming audio plays on the specified stream. This method is available
only to clients subscribed to the specified stream, not to the stream’s publisher.
You can call this method before or after you call the NetStream.play method and actually begin
receiving the stream. For example, you can attach these methods to a button the user clicks to
mute and unmute the incoming audio stream.
See also
NetStream.receiveVideo
NetStream.receiveVideo
Availability
• Flash Player 6.
• Flash Communication Server MX.
Usage
myStream.receiveVideo(receive | FPS)
76
Parameters
receive
(true) or
A Boolean value that specifies whether incoming video plays on the specified stream
not (false). The default value is true.
A number that specifies the frame rate per second of the incoming video. The default value
is the frame rate of the movie.
FPS
Returns
Nothing.
Description
Method; specifies whether incoming video will play on the specified stream, or specifies the frame
rate of the video. This method is available only to clients subscribed to the specified stream, not to
the stream’s publisher.
You can call this method before or after you call the NetStream.play method and actually begin
receiving the stream. For example, you can attach these methods to a button the user presses to
show or hide the incoming video stream.
To stop receiving video, pass 0 for FPS. (This has the same effect as passing false.) To determine
the current frame rate, use NetStream.currentFps.
If you call NetStream.receiveVideo with a frame rate after calling
NetStream.receiveVideo(false), an implicit call to NetStream.receiveVideo(true)
is issued.
Example
The following example opens a stream and specifies that the video play at a specified rate.
myStream = new NetStream(myConnection);
myStream.receiveVideo(false);
// don’t display video being published
// Later....
myStream.receiveVideo(12);
// display video at 12 FPS
See also
NetStream.currentFps, NetStream.receiveAudio
NetStream.seek
Availability
• Flash Player 6.
• Flash Communication Server MX.
Usage
myRecordedStream.seek(numberOfSeconds)
Client-Side Communication ActionScript
77
Parameters
numberOfSeconds
The number of seconds to move forward or backward in a recorded stream
or playlist.
• To return to the beginning of the stream or playlist, pass 0 for numberOfSeconds.
• To seek forward from the beginning of the stream or playlist, pass the number of seconds you
want to advance. For example, to position the playhead at 15 seconds from the beginning, use
myStream.seek(15).
• To seek relative to the current position, pass mystream.time
+ n or mystream.time - n to
seek n seconds forward or backward, respectively, from the current position. For example, to
rewind 20 seconds from the current position, use myStream.seek(mystream.time - 20).
Returns
Nothing.
Description
Method; seeks the specified number of seconds into the recorded stream that is currently playing,
either from the beginning of the stream or from the current position. This method is available
only to clients subscribed to the specified stream, not to the stream’s publisher.
If you require an accurate return value from seeking, you may need to change the Application.xml
file's "Enhanced seeking" flag at the server.
"Enhanced seeking" is a Boolean flag in the Application.xml file. By default, this flag is set to
false. When a seek occurs, the server seeks to the closest video keyframe possible and starts from
that keyframe. For example, if you want to seek to time 15, and there are keyframes only at time
11 and time 17, seeking actually starts from time 17 instead of time 15. This is an approximate
seeking method that works well with compressed streams.
If the flag is set to true, some compression is invoked on the server. Using the example above, if
the flag is set to true, then the server creates a keyframe—based on the preexisting keyframe at
time 11—for each keyframe from 11 through 15. Even though a keyframe does not exist at the
seek time, the server generates a keyframe. This, of course, involves some processing time on the
server.
See also
NetStream.play, NetStream.time
NetStream.send
Availability
• Flash Player 6.
• Flash Communication Server MX.
Usage
myStream.send(handlerName [,p1, ...,pN])
Parameters
A string that identifies the message; also the name of the ActionScript handler to
receive the message. The handler name can be only one level deep (that is, it can’t be of the form
parent/child) and is relative to the stream object.
handlerName
Note: Do not use a reserved term for a handler name. For example, myStream.send("close") will fail.
78
p1, ...,pN Optional parameters that can be of any type. They are serialized and sent over the
connection, and the receiving handler receives them in the same order. If a parameter is a circular
object (for example, a linked list that is circular), the serializer handles the references correctly.
Returns
Nothing.
Description
Method; broadcasts a message on the specified stream to all subscribing clients. This method is
available only to the publisher of the specified stream.
To process and respond to the message, create a handler in the format myStream.HandlerName.
The Flash Player does not serialize methods or their data, object prototype variables, or nonenumerable variables. Also, for movie clips, the player serializes the path but none of the data.
The sending client has the following script:
myConnection = new NetConnection();
myConnection.connect("rtmp://myServer.myDomain.com/appName/appInstance");
tStream = new NetStream(myConnection);
tStream.publish("slav", "live");
tStream.send("Fun", "this is a test");//Fun is the handler name
The receiving client’s script looks something like this:
myConnection = new NetConnection();
myConnection.connect("rtmp://myServer.myDomain.com/appName");
tStream = new NetStream(myConnection);
tStream.play("slav", -1, -1);
tStream.Fun = function(str) { //Fun is the handler name
trace (str);
}
NetStream.setBufferTime
Availability
• Flash Player 6.
• Flash Communication Server MX.
Usage
myStream.setBufferTime(numberOfSeconds)
Parameters
The number of seconds to be buffered before Flash stops sending data (on a
publishing stream) or begins displaying data (on a subscribing stream). The default value is 0.
numberOfSeconds
Client-Side Communication ActionScript
79
Description
Method; behavior depends on whether this method is called on a publishing or a
subscribing stream.
• For a publishing stream, this method specifies how long the outgoing message queue can grow
before Flash starts dropping frames. On a high-speed connection, buffer time shouldn’t be a
concern; data will be sent almost as quickly as Flash can buffer it. On a slow connection,
however, there might be a significant difference between how fast Flash buffers the data and
how fast it can be sent to the client.
For example, suppose you set numberOfSeconds to 30, but after 30 seconds, only 5 seconds of
data have been sent over the connection. Flash may stop sending data to the buffer until more
data has been sent to the client. The client will receive the initial 30 seconds that were buffered
but might lose some intervening frames before the next set of buffered data is displayed.
• For a subscribing stream, this method specifies how long to buffer messages before starting to
display the stream. For example, if you want to make sure that the first 15 seconds of the
stream play without interruption, set numberOfSeconds to 15; Flash will begin playing the
stream only after 15 seconds of data have been buffered.
When a recorded stream is played, if numberOfSeconds is zero, Flash sets it to a small value
(approximately 10 milliseconds). If live streams are later played (for example, from a playlist),
this buffer time persists—that is, numberOfSeconds remains non-zero for the stream.
See also
NetStream.bufferTime
NetStream.time
Availability
• Flash Player 6.
• Flash Communication Server MX.
Usage
myStream.time
Description
Read-only property; for a subscriber stream, the number of seconds the stream has been playing;
for a publishing stream, the number of seconds the stream has been publishing.
This property is set to 0 when NetStream.play is called with flushPlaylists set to true, or
when NetStream.close is called.
For a publishing stream, if you stop sending data but don’t close the stream, this value stops
incrementing. When you resume publishing, this value continues incrementing from where
it left off.
For a subscribing stream, if the server stops sending data but the stream remains open, this value
stops incrementing. When the server begins sending data again, this value continues
incrementing from where it left off.
80
Example
The following example shows how this value increments for a publishing stream.
myStream.publish("someData", "live");
// After 10 seconds, myStream.time = 10
// You then stop publishing for a while
myStream.publish(false);
// Later you resume publishing on the same stream
// either the same feed or a different feed
myStream.publish("otherData", "live");
// After 10 seconds, myStream.time = 20
See also
NetStream.close, NetStream.play, NetStream.publish
SharedObject (object)
Availability
• Flash Player 6.
• Flash Communication Server MX (not required).
Shared objects are quite powerful: they offer real-time data sharing between multiple client
movies and objects that are persistent on the local or remote location. You can think of local
shared objects as “cookies” and remote shared objects as real-time data transfer devices. Common
ways to use shared objects are summarized below.
• Maintaining local persistence
This is the simplest way to use a shared object, and does not require Flash Communication
Server. For example, you can call SharedObject.getLocal to create a shared object, such as a
calculator with memory, in the player. Because the shared object is locally persistent, Flash
saves its data attributes on the user’s machine when the movie ends. The next time the movie
runs, the calculator contains the values it had when the movie ended. Alternatively, if you set
the shared object’s properties to null before the movie ends, the calculator opens without any
prior values the next time the movie runs.
• Storing and sharing data on a server
A shared object can store data on the Flash Communication Server for other clients to retrieve.
For example, you can open a remote shared object, such as a phone list, that is persistent on the
server. Whenever a client makes any changes to the shared object, the revised data is available
to all clients that are currently connected to the object or who later connect to it. If the object
is also persistent locally and a client changes the data while not connected to the server, the
changes are copied to the remote shared object the next time the client connects to the object.
• Sharing data in real time
A shared object can share data among multiple clients in real time. For example, you can open
a remote shared object that stores real-time data, such as a list of users connected to a chat
room, that is visible to all clients connected to the object. When a user enters or leaves the chat
room, the object is updated and all clients that are connected to the object see the revised list of
chat room users.
Client-Side Communication ActionScript
81
The following examples show a few ways shared objects are called within ActionScript programs.
Note that in order to create a remote shared object, you must first connect to the Flash
Communication Server with the RTMP protocol.
// Create a local shared object
so = SharedObject.getLocal("foo");
// Create a remote shared object that is not persistent on the server
nc = new NetConnection();
nc.connect("rtmp://server.domain.com/chat/room3";
so = SharedObject.getRemote("users", nc.uri);
so.connect(nc);
// Create a remote shared object that is persistent on the server
// but not on the client
nc = new NetConnection();
nc.connect("rtmp://server.domain.com/chat/room3";
so = SharedObject.getRemote("users", nc.uri, true);
so.connect(nc);
// Create a remote shared object that is persistent on the server
// and on the client
nc = new NetConnection();
nc.connect("rtmp://server.domain.com/chat/room3";
so = SharedObject.getRemote("users", nc.uri, "/chat");
so.connect(nc);
Designing remote shared objects
When designing remote shared objects, develop a model for how the data will be managed. Take
into account issues of data design and management, conflict resolution, and storage (persistence)
requirements, both locally and on the server. These issues are discussed briefly in this section.
When using a locally persistent remote shared object, make sure your Stage size is at least
215 by 138 pixels. The Flash Player needs at least this much space to display the Settings panels.
Data design and management
Data associated with shared objects is stored in attributes of the object’s data properties; each set
of attributes constitutes one slot. For example, the following lines assign values to three slots of a
shared object:
so.data.userID = "myLogonName";
so.data.currentStatus = "in a meeting";
so.data.lastLogon = "February 27, 2002";
Each time a client changes an attribute, all the attributes for that slot are sent to the server and
then propagated to all clients attached to the object. Thus, the more information a slot contains,
the more network traffic is generated when any attribute in that slot is changed.
For example, consider a shared object with the following attributes occupying a single slot:
so.data.year.month.dayOfMonth = someValue;
If a client changes the value of the year, month, or dayOfMonth attribute, the entire slot is
updated, even though only one data item was changed.
82
Compare this data structure to a shared object with the same attributes, but with a flat design that
occupies three slots instead of one:
so.data.year = someValue;
so.data.month = someValue;
so.data.dayOfMonth = someValue;
In this case, because each slot contains only one piece of information, less bandwidth is required
to update all connected clients when a single data attribute is changed.
You can use this information when designing your remote shared objects. For example, if an
object is designed to be updated frequently by multiple clients in real time, minimizing the
amount of data per slot can improve performance. This design can also help minimize data
collisions (multiple clients trying to change a single slot at the same time).
Conflict resolution
If more than one client (or a server application) can change the data in a single slot of your
shared object at the same time, you must implement a conflict resolution strategy. Here are
some examples:
The simplest strategy is to use a different slot for each player or server that
might change data in the object. For example, in a shared object that keeps track of users in a chat
room, provide one slot per user and have users modify only their own slots.
Use different slots
A more sophisticated strategy is to define a single client as the owner of a
property in a shared object for a limited period of time. You might write server code to create a
“lock” object, where a client can request ownership of a slot. If the server reports that the
request was successful, the client knows that it will be the only client changing the data in the
shared object.
Assign an owner
Notify the client When the server rejects a client-requested change to a property of the shared
object, the SharedObject.onSync event handler notifies the client that the change was rejected.
Thus, an application can provide a user interface to let a user resolve the conflict. This technique
works best if data is changed infrequently, as in a shared address book. If a synchronization
conflict occurs, the user can decide whether to accept or reject the change.
Some applications can accept changes on a “first come,
first served” basis. This works best when users can resolve conflicts by reapplying a change if
someone else’s change preceded theirs.
Accept some changes and reject others
Local disk space considerations
You can choose to make remote shared objects persistent on the client, the server, or both. (Local
shared objects are always persistent on the client, up to available memory and disk space.)
Client-Side Communication ActionScript
83
By default, Flash can save locally persistent remote shared objects up to 100 K in size. When you
try to save a larger object, the Flash Player displays a Local Storage dialog box, which lets the user
allow or deny local storage for the domain that is requesting access. (Make sure your Stage size is
at least 215 by 138 pixels; this is the minimum size Flash requires to display the dialog box.)
If the user chooses Allow, the object is saved and SharedObject.onStatus is invoked with a code
property of SharedObject.Flush.Success; if the user chooses Deny, the object is not saved and
SharedObject.onStatus is invoked with a code property of SharedObject.Flush.Failed.
The user can also specify permanent local storage settings for a particular domain by rightclicking (Windows) or Control-clicking (Macintosh) while a movie is playing, choosing Settings,
and then opening the Local Storage panel.
You can’t use ActionScript to specify local storage settings for a user, but you can display the Local
Storage panel for the user by using System.showSettings(1).
The following list summarizes how the user’s disk space choices interact with remote shared
objects from a specified domain that request local persistence.
• If the user selects Never, objects are never saved locally, and all SharedObject.flush
commands issued for the object return false.
• If the user selects Unlimited (moves the slider all the way to the right), objects are saved locally
up to available disk space.
• If the user selects None (moves the slider all the way to the left), all SharedObject.flush
commands issued for the object return "pending" and cause Flash to ask the user if additional
disk space can be allotted to make room for the object, as explained above.
• If the user selects 10 KB, 100 KB, 1 MB, or 10 MB, objects are saved locally and
SharedObject.flush returns true if the object fits within the specified amount of space. If
more space is needed, SharedObject.flush returns "pending", and Flash asks the user if
additional disk space can be allotted to make room for the object, as explained above.
84
Additionally, if the user selects a value that is less than the amount of disk space currently being
used for locally persistent data, Flash warns the user that any shared objects that have already been
saved locally will be deleted.
Note: There is no size limit in the Flash Player that runs from the Authoring environment; the limit applies only to the
stand-alone player.
Client-Side Communication ActionScript
85
Method summary for the SharedObject object
Method
Description
SharedObject.close
Closes the connection between a remote shared object and the Flash
Communication Server.
SharedObject.connect
Connects to a remote shared object on the Flash Communication Server.
SharedObject.flush
Immediately writes a locally persistent shared object to a local file.
SharedObject.getLocal
Returns a reference to a locally persistent shared object that is available only
to the current client.
SharedObject.getRemote
Returns a reference to a shared object that is available to multiple clients by
means of the Flash Communication Server.
SharedObject.getSize
Gets the current size of the shared object, in bytes.
SharedObject.send
Broadcasts a message to all clients connected to the remote shared object,
including the client that sent the message.
SharedObject.setFps
Specifies the number of times per second that a client’s changes to a shared
object are sent to the server.
Property summary for the SharedObject object
Property (read-only)
Description
SharedObject.data
The collection of attributes assigned to the data property of the object, which
will be shared and/or stored.
Event handler summary for the SharedObject object
Method
Description
SharedObject.onStatus
Invoked every time an error, warning, or informational note is posted for a
shared object.
SharedObject.onSync
Initially invoked when the client and server shared object are synchronized
after a successful call to SharedObject.connect, and later invoked
whenever any client changes the attributes of the data property of the
remote shared object.
Constructor for the SharedObject object
For information on creating objects that do not require Flash Communication Server, see
For all other objects, see SharedObject.getRemote.
SharedObject.getLocal.
86
SharedObject.close
Availability
• Flash Player 6.
• Flash Communication Server MX (not required).
Usage
myRemoteSharedObject.close()
Parameters
None.
Returns
Nothing.
Description
Method; closes the connection between a remote shared object and the Flash Communication
Server.
If a remote shared object is locally persistent, the user can make changes to the local copy of the
object after this method is called. Any changes made to the local object are sent to the server the
next time the user connects to the remote shared object.
See also
SharedObject.connect, SharedObject.flush
SharedObject.connect
Availability
• Flash Player 6.
• Flash Communication Server MX.
Usage
myRemoteSharedObject.connect(myRTMPConnection)
Parameters
myRTMPConnection A NetConnection object that is using the Real-Time Messaging Protocol
(RTMP) to communicate with the Flash Communication Server.
Returns
A Boolean value of true if the connection was successfully completed, false otherwise.
Description
Method; connects to a remote shared object on the Flash Communication Server through the
specified connection. Use this method after issuing SharedObject.getRemote. After a successful
connection, the SharedObject.onSync event handler is invoked.
Before attempting to work with a remote shared object, you should first check for a return value
of true, indicating a successful connection, and then wait until you receive a result from the
function you have assigned to SharedObject.onSync. If you fail to do so, any changes you make
to the object locally—before SharedObject.onSync is invoked—may be lost.
Note: SharedObject.onSync is not invoked if this call returns false.
Client-Side Communication ActionScript
87
Example
The following example connects to a shared object and initializes it.
function getMaster()
{
trace("getMaster called");
master = SharedObject.getRemote("master", con.uri, true);
connVal = master.connect(con);
if (connVal) print("Connection was successful");
else print("Unable to connect the shared object with the given NetConnection
object");
master.onSync = function (listVal) {
getPlayList();
trace("SO: " + so.data[currentPlaylist]);
}
}
See also
NetConnection (object), SharedObject.getRemote, SharedObject.onSync
SharedObject.data
Availability
• Flash Player 6.
• Flash Communication Server MX (not required).
Usage
myLocalOrRemoteSharedObject.data
Description
Read-only property; the collection of attributes assigned to the data property of the object; these
attributes can be shared and/or stored. Each attribute can be an object of any of the basic
ActionScript or JavaScript types—Array, Number, Boolean, and so on. For example, the
following lines assign values to various aspects of a shared object:
itemsArray = new Array(101,346,483);
currentUserIsAdmin = true;
currentUserName = "Ramona";
so.data.itemNumbers = itemsArray;
so.data.adminPrivileges = currentUserIsAdmin;
so.data.userName = currentUserName;
All attributes of a shared object’s data property are available to all clients connected to the shared
object, and all of them are saved if the object is persistent.
Note: Do not assign values directly to the data property of a shared object, as in so.data = someValue; Flash
ignores these assignments.
If you assign null or undefined to the attribute of a remote shared object, Flash deletes the
attribute, and SharedObject.onSync is invoked with a code property of "delete". To delete
attributes for local shared objects, use code like delete so.data.attributeName; setting an
attribute to null or undefined for a local shared object does not delete the attribute.
88
To create “private” values for a shared object—values that are available only to the client instance
while the object is in use and are not stored with the object when it is closed—create properties
that are not named data to store them, as shown in the following example.
so.favoriteColor = "blue";
so.favoriteNightClub = "The Bluenote Tavern";
so.favoriteSong = "My World is Blue";
Example
The following example sets the current stream to the user’s selection.
curStream = _root.so.data.msgList[selected].streamName;
See also
SharedObject.onSync
SharedObject.flush
Availability
• Flash Player 6.
• Flash Communication Server MX (not required).
Usage
myLocalOrRemoteSharedObject.flush([minimumDiskSpace])
Parameters
minimumDiskSpace An optional integer specifying the number of bytes that must be allotted
for this object. The default value is 0.
Returns
A Boolean value of true or false, or a string value of "pending".
• If the user has permitted local information storage for objects from this domain, and the
amount of space allotted is sufficient to store the object, this method returns true. (If you have
passed a value for minimumDiskSpace, the amount of space allotted must be at least equal to
that value for true to be returned).
• If the user has permitted local information storage for objects from this domain, but the
amount of space allotted is not sufficient to store the object, this method returns "pending".
• If the user has permanently denied local information storage for objects from this domain, or if
Flash is unable to save the object for any reason, this method returns false.
Description
Method; immediately writes a locally persistent shared object to a local file. The shared object can
be remote or local; however, this method only writes the file locally. If you don’t use this method,
Flash writes the shared object to a file when the shared object session ends—that is, when the
SWF movie is closed, when the shared object is garbage-collected because it no longer has any
references to it, or when you call SharedObject.close.
If this method returns "pending", the Flash Player displays a dialog box asking the user to
increase the amount of disk space available to objects from this domain (see “Local disk space
considerations” on page 83). To allow space for the shared object to “grow” when it is saved in the
future, thus avoiding return values of "pending", pass a value for minimumDiskSpace. When
Flash tries to write the file, it looks for the number of bytes passed to minimumDiskSpace, instead
of looking for just enough space to save the shared object at its current size.
Client-Side Communication ActionScript
89
For example, if you expect a shared object to grow to a maximum size of 500 bytes, even though
it may start out much smaller, pass 500 for minimumDiskSpace. If Flash asks the user to allot disk
space for the shared object, it will ask for 500 bytes. After the user allots the requested amount of
space, Flash won’t have to ask for more space on future attempts to flush the object (as long as its
size doesn’t exceed 500 bytes).
After the user responds to the dialog box, this method is called again and returns either true or
of
false; also, SharedObject.onStatus is invoked with a code property
SharedObject.Flush.Success or SharedObject.Flush.Failed.
Example
The following function gets a shared object, SO, and fills writable properties with user-provided
settings. Finally, flush is called to save the settings and allot a minimum of 1000 bytes of
disk space.
this.SyncSettingsCore=function(soname, override, settings)
{
var SO=SharedObject.getLocal(soname, "http://www.mydomain.com/app/sys");
// settings list index
var i;
// For each specified value in settings:
// If override is true, set the persistent setting to the provided value.
// If override is false, fetch the persistent setting, unless there
// isn’t one, in which case, set it to the provided value.
for (i in settings) {
if (override || (SO.data[i] == null)) {
SO.data[i]= settings[i];
} else {
settings[i]= SO.data[i];
}
}
SO.flush(1000);
}
For a remote shared object, calling SharedObject.flush in the client-side ActionScript file
flushes the object only on the client, not the server. The following example shows how a serverside script can flush a remote shared object on the server.
// This is a SERVER-SIDE script, not ActionScript
// Get the shared object when the application is loaded.
application.onAppStart = function()
{
application.mySO = SharedObject.get("SharedObjName", true);
}
// When a user disconnects, flush the shared object.
application.onDisconnect = function(client)
{
application.mySO.flush();
}
// You can also set a timer to periodically flush the shared object
// onto the hard disk on the server
application.onAppStart = function()
{
application.mySO = SharedObject.get("SharedObjName", true);
setInterval(function() { application.mySO.flush(); }, 60000);
}
90
See also
Local disk space considerations, SharedObject.close
SharedObject.getLocal
Availability
• Flash Player 6.
• Flash Communication Server MX (not required).
Usage
SharedObject.getLocal(objectName [, localPath])
Note: The correct syntax is SharedObject.getLocal. To assign the object to a variable, use syntax like
myLocalSO = SharedObject.getLocal.
Parameters
objectName The name of the object. The name can include forward slashes (/); for example,
work/addresses is a legal name. Spaces are not allowed in a shared object name, nor are the
following characters:
~ % & \ ; :
" ’ , < > ? #
localPath An optional string parameter that specifies the full or partial path to the SWF file
that created the shared object, and that determines where the shared object will be stored locally.
The default value is the full path. For more information on using this parameter, see
SharedObject.getRemote.
Returns
A reference to a shared object that is persistent locally and is available only to the current client. If
Flash can’t create or find the shared object (for example, if localPath was specified but no such
directory exists), returns null.
Description
Method; returns a reference to a locally persistent shared object that is available only to the
current client. To create a shared object that is available to multiple clients by means of the Flash
Communication Server, use SharedObject.getRemote.
Note: If the user has chosen to never allow local storage for this domain, the object will not be saved locally, even if a
value for localPath is specified. For more information, see “Local disk space considerations” on page 83.
Because local shared objects are available only to a single client, the SharedObject.onSync
method is not called when the object is changed, and there is no need to implement conflictresolution techniques.
To avoid name collisions, Flash looks at the location of the movie that is creating the shared
object. For example, if a movie at www.myCompany.com/apps/stockwatcher.swf creates a shared
object named portfolio, that shared object will not conflict with another object named
portfolio that was created by a movie at www.yourCompany.com/photoshoot.swf, because the
movies originate from two different directories.
Client-Side Communication ActionScript
91
Example
The following example saves the last frame a user entered to a local shared object kookie.
// Get the kookie
so = sharedobject.getlocal("kookie");
// Get the user of the kookie and go to the frame number saved for this user.
if (so.data.user != undefined) {
this.user = so.data.user;
this.gotoAndStop(so.data.frame);
}
The following code block is placed on each movie frame.
// On each frame, call the rememberme function to save the frame number.
function rememberme() {
so.data.frame=this._currentFrame;
so.data.user="John";
}
See also
SharedObject.close, SharedObject.flush, SharedObject.getRemote
SharedObject.getRemote
Availability
• Flash Player 6.
• Flash Communication Server MX.
Usage
SharedObject.getRemote(objectName, URI [, persistence])
Note: The correct syntax is SharedObject.getRemote. To assign the object to a variable, use syntax like
myRemoteSO = SharedObject.getRemote.
Parameters
objectName The name of the object. The name can include forward slashes (/); for example,
work/addresses is a legal name. Spaces are not allowed in a shared object name, nor are the
following characters: ~ % & \ ; : " ’ , < > ? #
URI The URI of the server on which the shared object will be stored. This URI must be
identical to the URI of the NetConnection object to which the shared object will be connected.
For more information and an example, see the “SharedObject (object)” entry.
An optional value that specifies whether the attributes of the shared object’s data
property are persistent locally, remotely, or both, and that may specify where the shared object
will be stored locally. Acceptable values are as follows:
persistence
•
(default) or false specifies that the shared object is not persistent on the client or server.
(These values have the same effect as omitting the persistence parameter.)
null
• true specifies that the shared object is persistent only on the server.
• A full or partial local path to the shared object, which indicates that the shared object is
persistent on the client and the server; on the client, it is stored in the specified path. On the
server, it is stored in a subdirectory within the FlashCom application directory. For more
information, see the description below.
Note: If the user has chosen to never allow local storage for this domain, the object will not be saved locally, even if a
local path is specified for persistence. For more information, see “Local disk space considerations” on page 83.
92
Returns
A reference to an object that can be shared across multiple clients. If Flash can’t create or find the
shared object (for example, if a local path was specified for persistence but no such directory
exists), returns null.
Description
Method; returns a reference to an object that can be shared across multiple clients by means of the
Flash Communication Server. To create a shared object that is available only to the current client,
use SharedObject.getLocal.
After issuing this command, use SharedObject.connect to connect the object to the Flash
Communication Server, as shown below.
con = new NetConnection();
con.connect("rtmp://somedomain.com/applicationName");
myObject = SharedObject.getRemote("mo", con.uri, false);
myObject.connect(con);
To confirm that the local and remote copies of the shared object are in sync, use the
SharedObject.onSync event handler.
All clients that want to share this object must pass the same values for objectName and URI.
By default, the shared object is not
persistent on the client or server; that is, when all clients close their connections to the shared
object, it is deleted. To create a shared object that is saved locally or on the server, pass a value for
persistence.
Understanding persistence for remote shared objects.
Once a value has been passed for the local persistence of a remote shared object, it is valid for the
life of the object. In other words, once you have gotten a remote shared object which is not
locally persistent, you cannot get the same shared object with local persistence while the shared
object is active.
For example, the second line of code in the following example does not get a locally persistent
remote shared object.
// Get a remote shared object (so1) that is persistent
// on the server but not on the client
so1 = SharedObject.getRemote("someObject", nc_uri, true);
// Get a remote shared object (so2) with the same name and path
// as so1, but with local persistence.
// so2 will just point to the same object as so1, and an onStatus
// message will be invoked for so2 with the "code" value of the
// information object set to "SharedObject.BadPersistence".
so2 = SharedObject.getRemote("someObject", nc.uri, "somePath");
Also, remote shared objects that are not persistent on the server are created in a different
namespace from remote shared objects that are persistent on the server. Therefore, if the following
line of code is added to the above example, no SharedObject.BadPersistence error will result
because so3 does not point to the same object as so1.
so3 = SharedObject.getRemote("someObject", nc.uri, false);
Client-Side Communication ActionScript
93
To avoid name collisions, Flash
looks at the location of the movie that is creating the shared object. For example, if a movie at
www.myCompany.com/apps/stockwatcher.swf creates a shared object named portfolio, that
shared object will not conflict with another object named portfolio that was created by a
movie at www.yourCompany.com/photoshoot.swf, because the movies originate from two
different directories.
Understanding naming conventions for remote shared objects.
However, if two different movies located in the same directory create objects with identical names
and the same location for persistence, the names will conflict, and one object can overwrite the
other without warning. Implemented properly, however, this feature lets movies in the same
directory read each other’s shared objects.
Similarly, you can use persistence to let movies in different directories in the same domain read
and write each other’s shared objects. For example, if the full path to the SWF file is
www.macromedia.com/a/b/c/d/foo.swf, persistence can be any of the following:
•
•
•
•
•
•
"/"
"/a/"
"/a/b/"
"/a/b/c/"
"/a/b/c/d/"
"/a/b/c/d/foo.swf/"
By specifying a partial path for persistence, you can let several movies from the same domain
access the same shared objects. For example, if you specify "/a/b/" for the movie named above and
also for a movie whose full path is www.macromedia.com/a/b/foo2.swf, each movie can read
shared objects created by the other movie. When specifying persistence, do not include a
domain name.
To specify that the path for persistence should be the same as the movie, without having to
explicitly specify its value, you can use MovieClip._url:
myRemoteSharedObject = (name, uri, _root._url);
Example
The following example illustrates the sequence of steps required to create a nonpersistent remote
shared object.
// open connection to server
nc = new NetConnection();
nc.connect("rtmp://myServer.myCompany.com/someApp");
//
// the URI for the shared object must be the same as
// the URI of the NetConnection it’s using
mySO = SharedObject.getRemote("myObject", nc.uri);
mySO.connect(nc);
See also
NetConnection (object), SharedObject (object), SharedObject.connect,
SharedObject.getLocal, SharedObject.onSync
94
SharedObject.getSize
Availability
• Flash Player 6.
• Flash Communication Server MX (not required).
Usage
myLocalOrRemoteSharedObject.getSize()
Parameters
None.
Returns
A numeric value specifying the size of the shared object, in bytes.
Description
Method; gets the current size of the shared object, in bytes.
Flash calculates the size of a shared object by stepping through each of its data properties; the
more data properties the object has, the longer it takes to estimate its size. For this reason,
estimating object size can have significant processing cost. Therefore, you may want to avoid
using this method unless you have a specific need for it.
Example
The following example gets the size of the shared object so.
var soSize= this.so.getSize();
SharedObject.onStatus
Availability
• Flash Player 6.
• Flash Communication Server MX (not required).
Usage
myLocalOrRemoteSharedObject.onStatus = function(infoObject) {
// Your code here
}
Parameters
infoObject A parameter defined according to the status message. For details about this
parameter, see “SharedObject information objects” on page 109.
Returns
Nothing.
Description
Event handler; invoked every time an error, warning, or informational note is posted for a shared
object. If you want to respond to this event handler, you must create a function to process the
information object generated by the shared object. For more information, see the Appendix,
“Client-Side Information Objects,” on page 105.
See also
SharedObject.getLocal, SharedObject.getRemote, SharedObject.onSync
Client-Side Communication ActionScript
95
SharedObject.onSync
Availability
• Flash Player 6.
• Flash Communication Server MX.
Usage
myRemoteSharedObject.onSync = function(objArray)
{
// Your code here
}
Parameters
objArray An array of objects; each object contains properties that describe the changed
members of a remote shared object. (For more information, see “Description” below.)
Returns
Nothing.
Description
Event handler; initially invoked when the client and server shared object are synchronized after a
successful call to SharedObject.connect, and later invoked whenever any client changes the
attributes of the data property of the remote shared object. You must create a function to
override this handler and process the information object sent by this method. The properties of
each object are code, name, and oldValue.
When you initially connect to a remote shared object that is persistent locally and/or on the
server, all the properties of this object are set to empty strings. Otherwise, Flash sets code to
"clear", "success", "reject", "change", or "delete" as explained below.
• A value of "clear" means either that you have successfully connected to a remote shared
object that is not persistent on the server or the client, or that all the properties of the object
have been deleted—for example, when the client and server copies of the object are so far out
of sync that Flash resynchronizes the client object with the server object. In the latter case,
SharedObject.onSync is invoked again, this time with the value of code set to "change".
• A value of "success" means the client changed the shared object.
• A value of "reject" means the client tried unsuccessfully to change the object; instead,
another client changed the object.
• A value of "change" means another client changed the object or the server resynchronized
the object.
• A value of "delete" means the attribute was deleted.
The name property contains the name of the property that has been changed.
The oldValue property contains the former value of the
null unless code has a value of "reject" or "change".
96
changed property. This parameter is
To minimize network traffic, this method is not called when a client “changes” a property to the
same value it currently has. That is, if a property is set to the same value multiple times in a row,
this method is invoked the first time the property is set, but not during subsequent settings, as
shown in the following example:
so.data.x = 15;
// The following line invokes onSync
so.data.x = 20;
// The following line doesn’t invoke onSync,
// even if issued by a different client
so.data.x = 20;
Example
//
//
//
so
Create or get a remote shared object named 'position',
nc is the NetConnection created earlier in code,
false means do not make this a persistent so.
= SharedObject.getRemote("position", nc.uri, false);
// Update ball position when another participant moves the ball
// sharedBall_mc is a movie clip on the stage.
so.onSync = function(list) {
sharedBall_mc._x= so.data.x;
sharedBall_mc._y= so.data.y;
}
// You must always call connect() in order to successfully
// connect to the shared object and share data.
so.connect(nc);
See also
SharedObject.data
SharedObject.send
Availability
• Flash Player 6.
• Flash Communication Server MX.
Usage
myRemoteSharedObject.send(handlerName [,p1, ...,pN])
Parameters
A string that identifies the message; also the name of the ActionScript handler to
receive the message. The handler name can be only one level deep (that is, it can’t be of the form
parent/child) and is relative to the shared object.
handlerName
Note: Do not use a reserved term for a handler name. For example, mySO.send("close") will fail.
p1, ...,pN Optional parameters that can be of any type. They are serialized and sent over the
connection, and the receiving handler receives them in the same order. If a parameter is a circular
object (for example, a linked list that is circular), the serializer handles the references correctly.
Returns
Nothing.
Client-Side Communication ActionScript
97
Description
Method; broadcasts a message to all clients connected to myRemoteSharedObject, including the
client that sent the message. To process and respond to the message, create a function named
handlerName attached to the shared object.
Example
The following example shows how to use send to display a message in the Output window.
//
//
//
on
Create a remote shared object called remoteSO
Place an Input Text text box named inputMsgTxt on the Stage
Attach this code to a button labeled "Send Message"
(release) {
_root.remoteSO.send("testMsg",inputMsgTxt);
}
// Attach this code to the frame containing the button
_root.remoteSO.testMsg = function(recvStr)
{
trace(recvStr);
}
// Type data in the text box and press the button to see the results
SharedObject.setFps
Availability
• Flash Player 6.
• Flash Communication Server MX.
Usage
myRemoteSharedObject.setFps(updatesPerSecond)
Parameters
updatesPerSecond A number that specifies how often a client’s changes to a remote shared
object are sent to the server. The default value is the frame rate of the movie.
• To send changes immediately and then stop sending changes, pass 0 for updatesPerSecond.
• To reset updatesPerSecond to its default value, pass a value less than 0.
Returns
A Boolean value of true if the update was accepted, false otherwise.
Description
Method; specifies the number of times per second that a client’s changes to a shared object are
sent to the server.
Use this method when you want to control the amount of traffic between the client and the
server. For example, if the connection between the client and server is relatively slow, you may
want to set updatesPerSecond to a relatively low value. Conversely, if the client is connected to a
multiuser game in which timing is important, you may want to set updatesPerSecond to a
relatively high value.
If you want to manually control when updates are sent, issue this command with
set to 0 when you want to send changes to the server. For example, if you
want to let the user push a button that sends updates to the server, attach
myRemoteSharedObject.setFps(0) to the button.
updatesPerSecond
98
Regardless of the value you pass for updatesPerSecond, changes are not sent to the server until
SharedObject.onSync has returned a value for the previous update. That is, if the response time
from the server is slow, updates may be sent to the server less frequently than the value specified in
updatesPerSecond.
See also
SharedObject.onSync
System (object)
This is a top-level object that contains the Capabilities object and the showSettings method. For
information on the Capabilities object, see System.capabilities in the online Flash
ActionScript Dictionary (in the Flash MX Help menu).
System.showSettings
Availability
• Flash Player 6.
• Flash Communication Server MX (not required).
Usage
System.showSettings([panel])
Parameters
An optional number that specifies which Flash Player Settings panel to display, as
illustrated in the following table.
panel
Value passed for panel
Settings panel displayed
none (parameter is omitted)
Whichever panel was open the last time the user closed the Player Settings panel
0
Privacy
1
Local storage
2
Microphone
3
Camera
Returns
Nothing.
Description
Method; displays the specified Flash Player Settings panel, which lets user do any of the following:
•
•
•
•
allow or deny access to their camera and microphone
specify settings for local disk space available for shared objects
select a default camera and microphone
specify microphone gain and echo suppression settings
Client-Side Communication ActionScript
99
For example, if your application requires the use of a camera, you can inform the user that they
must choose “Allow” in the Privacy Settings panel, and then issue a System.showSettings(0)
command. (Make sure your Stage size is at least 215 by 138 pixels; this is the minimum size Flash
requires to display the panel.)
See also
Camera.get, Microphone.get,
“Local disk space considerations” on page 83
Video (object)
Availability
• Flash Player 6.
• Flash Communication Server MX (not required).
The Video object lets you display live or recorded streaming video on the Stage without
embedding it in your SWF file. The video may be a live video stream being captured with the
Camera.get command, or a live or recorded video stream being displayed through the use of a
NetStream.play command (requires Flash Communication Server).
To display the video stream, first place a Video object on the Stage. Then use
to attach the video stream to the Video object.
Video.attachVideo
To place a Video object on the Stage:
1
If the Library panel isn’t visible, select Window >Library to display it.
2
Add an embedded Video object to the library by clicking the Options menu on the right side
of the Library panel title bar and choosing New Video.
3
Drag the Video object to the stage and use the Property inspector to give it a unique instance
name. (Do not name it Video.)
Note: You can also embed recorded streams (FLV files) using the File > Import or File > Import to Library commands.
For more information on embedding video files, see Using Flash.
Method summary for the Video object
Method
Description
Video.attachVideo
Specifies a video stream to be displayed within the boundaries of the Video object on
the Stage.
Video.clear
Clears the image currently displayed in the Video object.
Property summary for the Video object
100
Property
Description
Video.deblocking
Specifies the behavior for the deblocking filter that the video compressor applies as
needed when streaming the video.
Video.height
Read-only; the height in pixels of the video stream.
Video.smoothing
Specifies whether the video should be smoothed (interpolated) when it is scaled.
Video.width
Read-only; the width in pixels of the video stream.
Video.attachVideo
Availability
• Flash Player 6.
• Flash Communication Server MX (not required).
Usage
myVideoObject.attachVideo(source | null)
Parameters
source A NetStream or Camera object that is playing or capturing video data, respectively. To
drop the connection to the Video object, pass null for source.
Returns
Nothing.
Description
Method; specifies a video stream (source) to be displayed within the boundaries of the Video
object on the Stage. The video stream is either a NetStream object being displayed by means of
the NetStream.play command (requires Flash Communication Server), a Camera object, or
null. If source is null, video is no longer played within the Video object.
Example
The following example plays live video locally, without the need for Flash Communication
Server.
myCam = Camera.get();
myVid.attachVideo(myCam); // myVid is a Video object on the Stage
The following example shows how to publish and record a video, and then play it back.
// This script publishes and records video
// The recorded file will be named "allAboutMe.flv"
connection = new NetConnection();
connection.connect("rtmp://localhost/allAboutMe/mySpeech");
publishStream = new NetStream(connection);
publishStream.publish("allAboutMe", "record");
publishStream.attachVideo(Camera.get());
// This script plays the recorded file.
// Note that no publishing stream is required to play a recorded file.
connection = new NetConnection();
connection.connect("rtmp://localhost/allAboutMe/mySpeech");
subscribeStream = new NetStream(connection);
subscribeStream.play("allAboutMe");
myVid.attachVideo(subscribeStream);// myVid is a Video object on the Stage
See also
Camera (object), NetStream.play, NetStream.publish
Client-Side Communication ActionScript
101
Video.clear
Availability
• Flash Player 6.
• Flash Communication Server MX (not required).
Usage
myVideoObject.clear()
Parameters
None.
Returns
Nothing.
Description
Method; clears the image currently displayed in the Video object. This is useful when, for
example, the connection breaks and you want to display standby information without having to
hide the Video object.
See also
Video.attachVideo
Video.deblocking
Availability
• Flash Player 6.
• Flash Communication Server MX (not required).
Usage
myVideoObject.deblocking
myVideoObject.deblocking = setting
Description
Property; specifies the behavior for the deblocking filter that the video compressor applies as
needed when streaming the video. The following are acceptable values for setting:
• 0 (the default): Let the video compressor apply the deblocking filter as needed.
• 1: Never use the deblocking filter.
• 2: Always use the deblocking filter.
The deblocking filter has an effect on overall playback performance, and it is usually not necessary
for high-bandwidth video. If your system is not powerful enough, you might experience
difficulties playing back video with this filter enabled.
102
Video.height
Availability
• Flash Player 6.
• Flash Communication Server MX (not required).
Usage
myVideoObject.height
Description
Read-only property; an integer specifying the height of the video stream, in pixels. This value is
the same as the Camera.height property of the Camera object that is capturing (or previously
captured) the video stream. You may want to use this property, for example, to ensure that the
user is seeing the video at the same size at which it was captured, regardless of the actual size of the
Video object on the Stage.
Example
The following example lets the user press a button to set the height and width of a video stream
being displayed in the Flash Player to be the same as the height and width at which the video
stream was captured.
// First attach the stream to the Video object
myVid.attachVideo(videoSource);
// Then attach code like the following to a button
on (release) {
_root.myVid._width = _root.myVid.width
_root.myVid._height = _root.myVid.height
}
See also
Video.width
Video.smoothing
Availability
• Flash Player 6.
• Flash Communication Server MX (not required).
Usage
myVideoObject.smoothing
myVideoObject.smoothing = true | false
Description
Property; specifies whether the video should be smoothed (interpolated) when it is scaled. The
player has to be in high-quality mode for this to work. The default value is false.
Client-Side Communication ActionScript 103
Video.width
Availability
• Flash Player 6.
• Flash Communication Server MX (not required).
Usage
myVideoObject.width
Description
Read-only property; an integer specifying the width of the video stream, in pixels. This value is
the same as the Camera.width property of the Camera object that is capturing (or previously
captured) the video stream. You may want to use this property, for example, to ensure that the
user is seeing the video at the same size at which it was captured, regardless of the actual size of the
Video object on the Stage.
Example
See the example for Video.height.
104
APPENDIX
Client-Side Information Objects
The Camera, Microphone, LocalConnection, NetConnection, NetStream, and SharedObject
objects provide an onStatus event handler that uses an information object for providing
information, status, or error messages. To respond to this event handler, you must create a
function to process the information object, and you must know the format and contents of the
information object returned.
In addition to the specific onStatus methods provided for the objects listed above, Flash also
provides a “super” function called System.onStatus. If onStatus is invoked for a particular
object with a level property of "Error" and there is no function assigned to respond to it, Flash
processes a function assigned to System.onStatus if it exists.
The following example illustrates how you can create generic and specific functions to process
information objects sent by the onStatus method.
// Create generic function
System.onStatus = function(genericError)
{
// Your script would do something more meaningful here
trace("An error has occurred. Please try again.");
};
//
//
//
//
Create connection functions
If the connection attempt returns a different information object
from those listed below, with a level property of "Error",
System.onStatus will be invoked
nConn.onStatus = function(infoObject)
{
if (infoObject.code == "NetConnection.Connect.Success")
{
trace("Successful connection.");
}
if (infoObject.code == "NetConnection.Connect.Failed")
{
trace("Connection failed.");
}
};
// Attempt to open connection
nConn = new NetConnection();
nConn.connect("rtmp://myServer.myDomain.com/myRTMPapp");
Client-Side Information Objects 105
The following tables show the default properties of each information object and the
circumstances under which onStatus is invoked with each information object. When referring to
the tables, note the following:
• By default, every information object has a code property containing a string that describes the
result of the onStatus method, and a level property containing a string that is either
"status", "warning", or "error". Some information objects have additional default
properties, which provide more information about the reason onStatus was invoked. These
properties are noted as footnotes in the tables.
• For NetStream, NetConnection, and remote shared objects, which are available only with
Macromedia Flash Communication Server MX, the properties of the information objects are
determined by the methods available in server applications and should be documented by the
developers of your server-side application. The properties listed here are the ones available by
default; that is, these are the properties available if your server-side application doesn’t specify
other information object properties. For information on using Flash with an application server,
see Using Flash Remoting.
• For objects that do not require Flash Communication Server (Camera, Microphone,
LocalConnection, and local shared objects), the properties listed here are the only ones
available to onStatus, and no server-side application is required.
Camera information objects
The following events notify you when the user denies or allows access to a camera. To determine
whether access to a camera is currently denied or allowed, use the Camera.muted property.
Code property
Level property
Meaning
Camera.Muted
Status
The user denied access to a camera.
Camera.Unmuted
Status
The user allowed access to a camera.
LocalConnection information objects
The following events notify you when an attempt to send to a receiving LocalConnection object
has succeeded or failed.
Code property
Level property
Meaning
(none)
Status
Flash successfully sent a command to a receiving
LocalConnection object.
(none)
Status
Flash was unable to send to a receiving LocalConnection
object.
Microphone information objects
The following events notify you when the user denies or allows access to a microphone. To
determine whether access to a microphone is currently denied or allowed, use the
Microphone.muted property.
Code property
Level property
Meaning
Microphone.Muted
Status
The user denied access to a microphone.
Microphone.Unmuted
Status
The user allowed access to a microphone.
106 Appendix
NetConnection information objects
The following events notify you when certain NetConnection activities occur.
Code property
Level property
Meaning
NetConnection.Call.Failed
Error
The NetConnection.call method was not
able to invoke the server-side method or
command.*
NetConnection.Connect.AppShutdown
Error
The application has been shut down (for
example, if the application is out of memory
resources and must be shut down to prevent the
server from crashing) or the server has been
shut down.
NetConnection.Connect.Closed
Status
The connection was successfully closed.
NetConnection.Connect.Failed
Error
The connection attempt failed; for example, the
server is not running.
NetConnection.Connect.InvalidApp
Error
The application name specified during the
connection attempt was not found on
the server.
NetConnection.Connect.Rejected
Error
The client does not have permission to connect
to the application, or the application expected
different parameters from those that were
passed, or the application specifically rejected
the client.**
NetConnection.Connect.Success
Status
The connection attempt succeeded.
*
This information object also has a description property, which is a string that provides a more specific reason
for the failure.
**
This information object also has an application property, which contains the value returned by the
application.rejectConnection server-side method.
NetStream information objects
The following events notify you when certain NetStream activities occur.
Code property
Level property
Meaning
NetStream.Buffer.Empty
Status
Data is not being received quickly enough to fill
the buffer. Data flow will be interrupted until the
buffer refills, at which time a
NetStream.Buffer.Full message will be
sent and the stream will begin playing again.
NetStream.Buffer.Full
Status
The buffer is full and the stream will begin
playing.
NetStream.Failed
Error
An error has occurred for a reason other than
those listed elsewhere in this table, such as the
subscriber trying to use the seek command to
move to a particular location in the recorded
stream, but with invalid parameters.*
NetStream.Pause.Notify
Status
The subscriber has paused playback.
NetStream.Play.Failed
Error
An error has occurred in playback for a reason
other than those listed elsewhere in this table,
such as the subscriber not having read access.*
NetStream.Play.PublishNotify
Status
Publishing has begun; this message is sent to all
subscribers.
Client-Side Information Objects 107
Code property
Level property
Meaning
NetStream.Play.Reset
Status
The playlist has reset (pending play commands
have been flushed).
NetStream.Play.Start
Status
Playback has started.**
NetStream.Play.Stop
Status
Playback has stopped.
NetStream.Play.StreamNotFound
Error
The client tried to play a live or recorded stream
that does not exist.
NetStream.Play.UnpublishNotify
Status
Publishing has stopped; this message is sent to
all subscribers.
NetStream.Publish.BadName
Error
The client tried to publish a stream that is
already being published by someone else.
NetStream.Publish.Idle
Status
The publisher of the stream has been idling for
too long.
NetStream.Publish.Start
Status
Publishing has started.
NetStream.Record.Failed
Error
An error has occurred in record for a reason
other than those listed elsewhere in this table,
such as the disk is full.*
NetStream.Record.NoAccess
Error
The client tried to record a stream that is still
playing, or the client tried to record (overwrite) a
stream that already exists on the server with
read-only status.
NetStream.Record.Start
Status
Recording has started.
NetStream.Record.Stop
Status
Recording has stopped.
NetStream.Seek.Failed
Error
The subscriber tried to use the seek command
to move to a particular location in the recorded
stream, but failed.
NetStream.Seek.Notify
Status
The subscriber has used the seek command to
move to a particular location in the recorded
stream.
NetStream.Unpause.Notify
Status
The subscriber has resumed playback.
NetStream.Unpublish.Success
Status
Publishing has stopped.
*
This information object also has a description property, which is a string that provides a more specific reason
for the failure.
**
This information object also has a details property, which is a string that provides the name of the stream
currently playing on the NetStream. If you are streaming a playlist that contains multiple streams, this
information object will be sent each time you begin playing a different stream in the playlist.
108 Appendix
SharedObject information objects
The following events notify you when certain SharedObject activities occur.
Code property
Level property
Meaning
SharedObject.BadPersistence
Error
The persistence parameter passed to
SharedObject.getRemote is different from the one
used when the shared object was created.
SharedObject.Flush.Failed
Error
A SharedObject.flush command that returned
"pending" has failed (the user did not allot additional
disk space for the shared object when the Flash Player
displayed the Local Storage Settings dialog box).
SharedObject.Flush.Success
Status
A SharedObject.flush command that returned
"pending" has been successfully completed
(the user allotted additional disk space for the
shared object).
SharedObject.UriMismatch
Error
The URI parameter passed to
SharedObject.connect is different from the one
passed to SharedObject.getRemote when the
shared object was created.
Client-Side Information Objects 109
Server-Side Communication
ActionScript Dictionary
Macromedia Flash Communication Server MX
™
™
macromedia
®
Trademarks
Afterburner, AppletAce, Attain, Attain Enterprise Learning System, Attain Essentials, Attain Objects for Dreamweaver,
Authorware, Authorware Attain, Authorware Interactive Studio, Authorware Star, Authorware Synergy, Backstage, Backstage
Designer, Backstage Desktop Studio, Backstage Enterprise Studio, Backstage Internet Studio, Design in Motion, Director,
Director Multimedia Studio, Doc Around the Clock, Dreamweaver, Dreamweaver Attain, Drumbeat, Drumbeat 2000, Extreme
3D, Fireworks, Flash, Fontographer, FreeHand, FreeHand Graphics Studio, Generator, Generator Developer’s Studio, Generator
Dynamic Graphics Server, Knowledge Objects, Knowledge Stream, Knowledge Track, Lingo, Live Effects, Macromedia,
Macromedia M Logo & Design, Macromedia Flash, Macromedia Xres, Macromind, Macromind Action, MAGIC, Mediamaker,
Object Authoring, Power Applets, Priority Access, Roundtrip HTML, Scriptlets, SoundEdit, ShockRave, Shockmachine,
Shockwave, Shockwave Remote, Shockwave Internet Studio, Showcase, Tools to Power Your Ideas, Universal Media, Virtuoso,
Web Design 101, Whirlwind and Xtra are trademarks of Macromedia, Inc. and may be registered in the United States or in other
jurisdictions including internationally. Other product names, logos, designs, titles, words or phrases mentioned within this
publication may be trademarks, servicemarks, or tradenames of Macromedia, Inc. or other entities and may be registered in
certain jurisdictions including internationally.
Third-Party Information
Speech compression and decompression technology licensed from Nellymoser, Inc. (www.nellymoser.com).
Sorenson™ Spark™ video compression and decompression technology licensed from
Sorenson Media, Inc.
This guide contains links to third-party websites that are not under the control of Macromedia, and Macromedia is not
responsible for the content on any linked site. If you access a third-party website mentioned in this guide, then you do so at your
own risk. Macromedia provides these links only as a convenience, and the inclusion of the link does not imply that Macromedia
endorses or accepts any responsibility for the content on those third-party sites.
Copyright © 2002 Macromedia, Inc. All rights reserved. This manual may not be copied, photocopied, reproduced,
translated, or converted to any electronic or machine-readable form in whole or in part without prior written approval of
Macromedia, Inc.
Acknowledgments
Director: Erick Vera
Producer: JuLee Burdekin
Writing: Jay Armstrong, Jody Bleyle, JuLee Burdekin, Barbara Herbert, and Barbara Nelson
Editing: Anne Szabla
Multimedia Design and Production: Aaron Begley, Benjamin Salles
Print Design, Production, and Illustrations: Chris Basmajian
First Edition: May 2002
Macromedia, Inc.
600 Townsend St.
San Francisco, CA 94103
CONTENTS
Server-Side Communication ActionScript
............................ 5
Using server-side ActionScript . . . . . . . . . . . . . . . . . . . . . . . . . . . . . . . . . . . . . . . . . . . . . 5
Using naming conventions . . . . . . . . . . . . . . . . . . . . . . . . . . . . . . . . . . . . . . . . . . . . . . . 6
Contents of the dictionary. . . . . . . . . . . . . . . . . . . . . . . . . . . . . . . . . . . . . . . . . . . . . . . . 7
Application (object). . . . . . . . . . . . . . . . . . . . . . . . . . . . . . . . . . . . . . . . . . . . . . . . . . . . . 9
Application.acceptConnection. . . . . . . . . . . . . . . . . . . . . . . . . . . . . . . . . . . . . . . . . . . . 10
Application.clearSharedObjects . . . . . . . . . . . . . . . . . . . . . . . . . . . . . . . . . . . . . . . . . . . 11
Application.clearStreams . . . . . . . . . . . . . . . . . . . . . . . . . . . . . . . . . . . . . . . . . . . . . . . . 12
Application.clients. . . . . . . . . . . . . . . . . . . . . . . . . . . . . . . . . . . . . . . . . . . . . . . . . . . . . 13
Application.disconnect . . . . . . . . . . . . . . . . . . . . . . . . . . . . . . . . . . . . . . . . . . . . . . . . . 14
Application.name . . . . . . . . . . . . . . . . . . . . . . . . . . . . . . . . . . . . . . . . . . . . . . . . . . . . . 14
Application.onAppStart. . . . . . . . . . . . . . . . . . . . . . . . . . . . . . . . . . . . . . . . . . . . . . . . . 15
Application.onAppStop . . . . . . . . . . . . . . . . . . . . . . . . . . . . . . . . . . . . . . . . . . . . . . . . . 15
Application.onConnect . . . . . . . . . . . . . . . . . . . . . . . . . . . . . . . . . . . . . . . . . . . . . . . . . 16
Application.onDisconnect . . . . . . . . . . . . . . . . . . . . . . . . . . . . . . . . . . . . . . . . . . . . . . . 18
Application.onStatus . . . . . . . . . . . . . . . . . . . . . . . . . . . . . . . . . . . . . . . . . . . . . . . . . . . 19
Application.registerClass . . . . . . . . . . . . . . . . . . . . . . . . . . . . . . . . . . . . . . . . . . . . . . . . 20
Application.registerProxy. . . . . . . . . . . . . . . . . . . . . . . . . . . . . . . . . . . . . . . . . . . . . . . . 21
Application.rejectConnection . . . . . . . . . . . . . . . . . . . . . . . . . . . . . . . . . . . . . . . . . . . . 22
Application.server . . . . . . . . . . . . . . . . . . . . . . . . . . . . . . . . . . . . . . . . . . . . . . . . . . . . . 23
clearInterval. . . . . . . . . . . . . . . . . . . . . . . . . . . . . . . . . . . . . . . . . . . . . . . . . . . . . . . . . . 24
Client (object) . . . . . . . . . . . . . . . . . . . . . . . . . . . . . . . . . . . . . . . . . . . . . . . . . . . . . . . . 24
Client.agent. . . . . . . . . . . . . . . . . . . . . . . . . . . . . . . . . . . . . . . . . . . . . . . . . . . . . . . . . . 26
Client.call . . . . . . . . . . . . . . . . . . . . . . . . . . . . . . . . . . . . . . . . . . . . . . . . . . . . . . . . . . . 27
Client."commandName". . . . . . . . . . . . . . . . . . . . . . . . . . . . . . . . . . . . . . . . . . . . . . . . 28
Client.getBandwidthLimit. . . . . . . . . . . . . . . . . . . . . . . . . . . . . . . . . . . . . . . . . . . . . . . 29
Client.ip . . . . . . . . . . . . . . . . . . . . . . . . . . . . . . . . . . . . . . . . . . . . . . . . . . . . . . . . . . . . 30
Client.readAccess. . . . . . . . . . . . . . . . . . . . . . . . . . . . . . . . . . . . . . . . . . . . . . . . . . . . . . 30
Client.referrer . . . . . . . . . . . . . . . . . . . . . . . . . . . . . . . . . . . . . . . . . . . . . . . . . . . . . . . . 31
Client.__resolve. . . . . . . . . . . . . . . . . . . . . . . . . . . . . . . . . . . . . . . . . . . . . . . . . . . . . . . 31
Client.setBandwidthLimit . . . . . . . . . . . . . . . . . . . . . . . . . . . . . . . . . . . . . . . . . . . . . . . 32
Client.writeAccess . . . . . . . . . . . . . . . . . . . . . . . . . . . . . . . . . . . . . . . . . . . . . . . . . . . . . 33
load . . . . . . . . . . . . . . . . . . . . . . . . . . . . . . . . . . . . . . . . . . . . . . . . . . . . . . . . . . . . . . . . 33
NetConnection (object) . . . . . . . . . . . . . . . . . . . . . . . . . . . . . . . . . . . . . . . . . . . . . . . . 34
NetConnection.addHeader . . . . . . . . . . . . . . . . . . . . . . . . . . . . . . . . . . . . . . . . . . . . . . 35
NetConnection.call . . . . . . . . . . . . . . . . . . . . . . . . . . . . . . . . . . . . . . . . . . . . . . . . . . . . 36
NetConnection.close . . . . . . . . . . . . . . . . . . . . . . . . . . . . . . . . . . . . . . . . . . . . . . . . . . . 37
NetConnection.connect . . . . . . . . . . . . . . . . . . . . . . . . . . . . . . . . . . . . . . . . . . . . . . . . 38
3
NetConnection.isConnected . . . . . . . . . . . . . . . . . . . . . . . . . . . . . . . . . . . . . . . . . . . . . 38
NetConnection.onStatus . . . . . . . . . . . . . . . . . . . . . . . . . . . . . . . . . . . . . . . . . . . . . . . . 39
NetConnection.uri . . . . . . . . . . . . . . . . . . . . . . . . . . . . . . . . . . . . . . . . . . . . . . . . . . . . 40
setInterval . . . . . . . . . . . . . . . . . . . . . . . . . . . . . . . . . . . . . . . . . . . . . . . . . . . . . . . . . . . 40
SharedObject (object) . . . . . . . . . . . . . . . . . . . . . . . . . . . . . . . . . . . . . . . . . . . . . . . . . . 41
SharedObject.clear . . . . . . . . . . . . . . . . . . . . . . . . . . . . . . . . . . . . . . . . . . . . . . . . . . . . 43
SharedObject.close . . . . . . . . . . . . . . . . . . . . . . . . . . . . . . . . . . . . . . . . . . . . . . . . . . . . 44
SharedObject.flush . . . . . . . . . . . . . . . . . . . . . . . . . . . . . . . . . . . . . . . . . . . . . . . . . . . . 45
SharedObject.get . . . . . . . . . . . . . . . . . . . . . . . . . . . . . . . . . . . . . . . . . . . . . . . . . . . . . . 45
SharedObject.getProperty . . . . . . . . . . . . . . . . . . . . . . . . . . . . . . . . . . . . . . . . . . . . . . . 47
SharedObject.getPropertyNames . . . . . . . . . . . . . . . . . . . . . . . . . . . . . . . . . . . . . . . . . . 48
SharedObject.handlerName. . . . . . . . . . . . . . . . . . . . . . . . . . . . . . . . . . . . . . . . . . . . . . 48
SharedObject.lock . . . . . . . . . . . . . . . . . . . . . . . . . . . . . . . . . . . . . . . . . . . . . . . . . . . . . 49
SharedObject.name . . . . . . . . . . . . . . . . . . . . . . . . . . . . . . . . . . . . . . . . . . . . . . . . . . . . 49
SharedObject.onStatus . . . . . . . . . . . . . . . . . . . . . . . . . . . . . . . . . . . . . . . . . . . . . . . . . 50
SharedObject.onSync . . . . . . . . . . . . . . . . . . . . . . . . . . . . . . . . . . . . . . . . . . . . . . . . . . 50
SharedObject.purge. . . . . . . . . . . . . . . . . . . . . . . . . . . . . . . . . . . . . . . . . . . . . . . . . . . . 52
SharedObject.resyncDepth . . . . . . . . . . . . . . . . . . . . . . . . . . . . . . . . . . . . . . . . . . . . . . 53
SharedObject.send. . . . . . . . . . . . . . . . . . . . . . . . . . . . . . . . . . . . . . . . . . . . . . . . . . . . . 53
SharedObject.setProperty . . . . . . . . . . . . . . . . . . . . . . . . . . . . . . . . . . . . . . . . . . . . . . . 54
SharedObject.size . . . . . . . . . . . . . . . . . . . . . . . . . . . . . . . . . . . . . . . . . . . . . . . . . . . . . 55
SharedObject.unlock . . . . . . . . . . . . . . . . . . . . . . . . . . . . . . . . . . . . . . . . . . . . . . . . . . . 55
SharedObject.version. . . . . . . . . . . . . . . . . . . . . . . . . . . . . . . . . . . . . . . . . . . . . . . . . . . 56
Stream (object) . . . . . . . . . . . . . . . . . . . . . . . . . . . . . . . . . . . . . . . . . . . . . . . . . . . . . . . 56
Stream.bufferTime . . . . . . . . . . . . . . . . . . . . . . . . . . . . . . . . . . . . . . . . . . . . . . . . . . . . 57
Stream.clear. . . . . . . . . . . . . . . . . . . . . . . . . . . . . . . . . . . . . . . . . . . . . . . . . . . . . . . . . . 58
Stream.get . . . . . . . . . . . . . . . . . . . . . . . . . . . . . . . . . . . . . . . . . . . . . . . . . . . . . . . . . . . 58
Stream.length . . . . . . . . . . . . . . . . . . . . . . . . . . . . . . . . . . . . . . . . . . . . . . . . . . . . . . . . 59
Stream.name . . . . . . . . . . . . . . . . . . . . . . . . . . . . . . . . . . . . . . . . . . . . . . . . . . . . . . . . . 59
Stream.onStatus. . . . . . . . . . . . . . . . . . . . . . . . . . . . . . . . . . . . . . . . . . . . . . . . . . . . . . . 59
Stream.play . . . . . . . . . . . . . . . . . . . . . . . . . . . . . . . . . . . . . . . . . . . . . . . . . . . . . . . . . . 60
Stream.record . . . . . . . . . . . . . . . . . . . . . . . . . . . . . . . . . . . . . . . . . . . . . . . . . . . . . . . . 62
Stream.send . . . . . . . . . . . . . . . . . . . . . . . . . . . . . . . . . . . . . . . . . . . . . . . . . . . . . . . . . . 63
Stream.setBufferTime . . . . . . . . . . . . . . . . . . . . . . . . . . . . . . . . . . . . . . . . . . . . . . . . . . 64
trace . . . . . . . . . . . . . . . . . . . . . . . . . . . . . . . . . . . . . . . . . . . . . . . . . . . . . . . . . . . . . . . 65
APPENDIX
Server-Side Information Objects
4
Contents
. . . . . . . . . . . . . . . . . . . . . . . . . . . . . . . . . . . . 67
Server-Side Communication ActionScript
Server-Side Communication ActionScript is a scripting language on the server that lets you
develop efficient and flexible client-server Macromedia Flash Communication Server MX
applications. For example, you can use server-side ActionScript to control login procedures,
control events in connected Flash movies, determine what users see in their Flash movies, and
communicate with other servers. You can also use server-side scripting to allow and disallow users
access to various server-side application resources and to allow users to update and share
information.
Server-side ActionScript is based on the ECMA-262 specification (ECMAScript 1.5) derived
from JavaScript and lets you access the core JavaScript server object model. (For more
information, see the Netscape DevEdge website at http://developer.netscape.com/docs/manuals/
index.html?content=ssjs.html.) Server-side ActionScript provides global methods and objects and
exposes a rich object model for developing communication applications. You can also create your
own objects, properties, and methods. This dictionary provides detailed information about the
objects and their properties, methods, and events.
Client-Side Communication ActionScript is based on the ECMA-262 specification, but there are
some differences in its implementation. Server-side ActionScript, however, does not deviate from
the ECMA-262 specification. To learn how client-side ActionScript and server-side ActionScript
differ, see “Differences between ActionScript and JavaScript” in Using Flash Help. For
information about the relationship between server-side ActionScript and client-side ActionScript,
see Developing Communication Applications.
Using server-side ActionScript
To use server-side ActionScript with a Flash Communication Server application, you write the
code, copy the script into the appropriate server directory, and run the SWF file that connects to
the server. To understand Flash Communication Server applications, see Developing
Communication Applications.
Create the server-side ActionScript file and name it main.asc. All ActionScript code that is
embedded in the script file and not inside a function body executes once when the application is
loaded but before the application.onAppStart event handler is called.
Note: Any double-byte characters (including characters of all Asian languages) in the server-side ActionScript file
must be UTF-8-encoded. For more information, see “Writing double-byte language applications” in the
“Application Development Tips and Tricks” chapter in Developing Communication Applications.
Server-Side Communication ActionScript
5
To install and test the server-side ActionScript file, do the following:
1
Locate the flashcom application directory.
During installation, you can choose either a Developer Install or a Production Install of the
product. If you choose Developer Install, you can run the samples and test your applications
from the \flashcom\applications directory under the directory you specify. For convenience
during development, client-side application files (SWFs and HTMLs) are stored in the same
directory with your server-side application files (ASCs, FLVs, FLAs).
When you deploy applications, you’ll need to separate client files from your server-side source
files. While your SWF and HTML files should be accessible through a web server, your serverside ASC files, your audio/video FLV files, and your ActionScript FLA source files should not
be accessible to a user browsing your Web site. You can either install the server again on your
production machine and choose Production Install, or you can change the configuration
settings in the administration XML files as described in the Managing Flash Communication
Server manual.
If you choose Production Install, you can specify both the location of your client-side
application files (SWFs and HTMLs) and the location of your server-side application files
(ASCs, FLVs, and FLAs). The server will look for your client-side files under
\flashcom\applications in the Web server’s root directory and will look for your server-side
application files under \applications under the directory you specify.If you did not accept the
default installation settings and you aren’t sure where the application directory is located, the
location is specified in the <AppsDir> tag of the Vhost.xml file, which is located at \Flash
Communication Server MX\conf\_defaultRoot_\_defaultVhost_\. For information about
configuring a different application directory, see Managing Flash Communication Server.
2
Create a subdirectory in the server-side application directory called appName, where appName
is a name you choose as the filename of your Flash Communication Server application. You
must pass this name as a parameter to the NetConnection.connect method in the client-side
ActionScript.
3
Place the main.asc file in the appName directory or in a subdirectory called scripts in the
appName directory.
4
Open the Flash application (the SWF) in a browser or in the stand-alone Flash Player.
The SWF must contain ActionScript code that passes appName to the connect method of the
NetConnection object, as shown in the following example:
nc = new NetConnection();
nc.connect("rtmp://flashcomsvr.mydomain.com/myFlashComAppName");
Note: You can use the Communication App inspector or the Administration Console to check if the application
loaded successfully.
Using naming conventions
When you write server-side ActionScript code, there are certain naming conventions that you
must use to name your applications, methods, properties, and variables. These rules let you
logically identify objects so your code executes properly.
6
Naming applications
Flash Communication Server application names must follow the Uniform Resource Identifier
(URI) RFC 2396 convention (see http://www.w3.org/Addressing/). This convention supports a
hierarchical naming system where a forward slash (/) separates the elements in the hierarchy. The
first element specifies the application name. The element following the application name specifies
the application instance name. Each instance of the application has its own script environment.
Specifying instances
By specifying a unique application instance name after an application name, you can run multiple
instances of a single application. For example, rtmp:/support/session215 specifies a customer
support application named “support” and refers to a specific session of that application named
“session215”. All users who connect to the same instance name can communicate with each other
by referencing the same streams or shared objects.
Using JavaScript syntax
You must follow all syntax rules of JavaScript. For example, JavaScript is case-sensitive and does
not allow punctuation other than underscores (_) and dollar signs ($) in names. You can use
numbers in names, but names cannot begin with a number.
Avoiding reserved commands
Flash Communication Server has reserved commands that you cannot use in a script. These
commands are either that methods belong to the client-side NetConnection object or methods
that belong to the server-side Client object. This means that if you have a NetConnection object
on the client (player), you cannot make the following call:
nc.call( "reservedCmd", ... );
In this call, "reservedCmd" is any of the following commands: closeStream, connect,
createStream, deleteStream, onStatus, pause, play, publish, receiveAudio,
receiveVideo, or seek. It also cannot be any of the server-side Client object methods:
getBandwidthLimit, setBandwidthLimit, getStats, and ping.
Contents of the dictionary
All dictionary entries are listed alphabetically. However, methods, properties, and event handlers
that are associated with an object are listed along with the object’s name—for example, the name
property of the Application object is listed as Application.name. The following table helps you
locate these elements.
ActionScript element
See entry
acceptConnection
Application.acceptConnection
addHeader
NetConnection.addHeader
agent
Client.agent
application
Application (object)
bufferTime
Stream.bufferTime
call
Client.call, NetConnection.call
clear
SharedObject.clear, Stream.clear
Server-Side Communication ActionScript
7
clearInterval
8
clearInterval
clearSharedObject
Application.clearSharedObjects
clearStreams
Application.clearStreams
Client
Client (object)
clients
Application.clients
close
NetConnection.close, SharedObject.close
"commandName"
Client."commandName"
connect
NetConnection.connect
disconnect
Application.disconnect
flush
SharedObject.flush
get
SharedObject.get, Stream.get
getBandwidthLimit
Client.getBandwidthLimit
getProperty
SharedObject.getProperty
getPropertyNames
SharedObject.getPropertyNames
handlerName
SharedObject.handlerName
ip
Client.ip
isConnected
NetConnection.isConnected
length
Stream.length
load
load
lock
SharedObject.lock
name
Application.name, SharedObject.name, Stream.name
NetConnection
NetConnection (object)
onAppStart
Application.onAppStart
onAppStop
Application.onAppStop
onConnect
Application.onConnect
onDisconnect
Application.onDisconnect
onStatus
Application.onStatus, NetConnection.onStatus,
SharedObject.onStatus, Stream.onStatus
onSync
SharedObject.onSync
play
Stream.play
purge
SharedObject.purge
readAccess
Client.readAccess
record
Stream.record
referrer
Client.referrer
registerClass
Application.registerClass
registerProxy
Application.registerProxy
rejectConnection
Application.rejectConnection
__resolve
Client.__resolve
resyncDepth
SharedObject.resyncDepth
send
SharedObject.send, Stream.send
setBandwidthLimit
Client.setBandwidthLimit
setBufferTime
Stream.setBufferTime
setInterval
setInterval
setProperty
SharedObject.setProperty
SharedObject
SharedObject (object)
size
SharedObject.size
server
Application.server
Stream
Stream (object)
trace
trace
unlock
SharedObject.unlock
uri
NetConnection.uri
version
SharedObject.version
writeAccess
Client.writeAccess
Application (object)
The Application object contains information about a Flash Communication Server application
instance that lasts until the application instance is unloaded. A Flash Communication Server
application is a collection of stream objects, shared objects, and clients (connected users). Each
application has a unique name, and you can use the naming scheme described in “Using naming
conventions” on page 6 to create multiple instances of an application.
The Application object lets you accept and reject client connection attempts, register and
unregister classes and proxies, and create functions that are invoked when an application starts or
stops or when a client connects or disconnects.
Besides the built-in properties of the Application object, you can create other properties of any
legal ActionScript type, including references to other ActionScript objects. For example, the
following lines of code create a new property of type array and a new property of type number:
application.myarray = new Array();
application.num_requests = 1;
Server-Side Communication ActionScript
9
Method summary for the Application object
Method
Description
Application.acceptConnection
Accepts a connection to an application from a client.
Application.clearSharedObjects Clears all shared objects associated with the current instance.
Application.clearStreams
Clears all stream objects associated with the current instance.
Application.disconnect
Disconnects a client from the server.
Application.registerClass
Registers or unregisters a constructor that is called during object
deserialization.
Application.registerProxy
Registers a NetConnection or Client object to fulfill a method request.
Application.rejectConnection
Rejects a connection to an application.
Property summary for the Application object
Property (read-only)
Description
Application.clients
An object containing a list of all clients currently connected to the application.
Application.name
The name of an application instance.
Application.server
The platform and version of the server.
Event handler summary for the Application object
Event handler
Description
Application.onAppStart
Invoked when the application is loaded by the server.
Application.onAppStop
Invoked when the application is unloaded by the server.
Application.onConnect
Invoked when a client connects to the application.
Application.onDisconnect
Invoked when a client disconnects from the application.
Application.onStatus
Invoked when a script generates an error.
Application.acceptConnection
Availability
Flash Communication Server MX.
Usage
application.acceptConnection(clientObj)
Parameters
clientObj
Returns
Nothing.
10
A client to accept.
Description
Method; accepts the connection call from a client to the server. The application.onConnect
event handler is invoked on the server side to notify a script when NetConnection.connect is
called from the client side. You can use the application.acceptConnection method inside an
application.onConnect event handler to accept a connection from a client. You can use the
application.acceptConnection method outside an application.onConnect event handler
to accept a client connection that had been placed in a pending state (for example, to verify a user
name and password).
Example
The following example uses the application.acceptConnection method to accept the
connection from client1:
application.onConnect = function (client1){
// insert code here
application.acceptConnection(client1);
client1.call("welcome");
};
See also
Application.onConnect, Application.rejectConnection
Application.clearSharedObjects
Availability
Flash Communication Server MX.
Usage
application.clearSharedObjects(soPath);
Parameters
soPath
A string that indicates the URI of a shared object.
Returns
Nothing.
Description
Method; removes persistent shared objects specified by the soPath parameter and clears all
properties from active shared objects (both persistent and nonpersistent). You can use the
SharedObject object to create shared objects in a Flash Communication Server application
instance. The Flash Communication Server stores persistent shared objects for each application.
You can use application.clearSharedObjects to handle one shared object at a time, so you
must specify the name of the shared object. You can also use application.clearStreams to
remove all the recorded streams based on a stream path.
The soPath parameter specifies the name of a shared object, which can include a slash (/) as a
delimiter between directories in the path. The last element in the path can contain wildcard
patterns (for example, a question mark [?] and an asterisk [*]) or a shared object name. The
application.clearSharedObjects method traverses the shared object hierarchy along the
specified path and clears all the shared objects. Specifying the a slash clears all the shared objects
associated with an application instance.
Server-Side Communication ActionScript
11
The following are possible values for the soPath parameter:
•
•
/
clears all local and persistent shared objects associated with the instance.
/foo/bar
clears the shared object /foo/bar; if bar is a directory name, no shared objects are
deleted.
•
/foo/bar/*
•
/foo/bar/XX??
clears all shared objects stored under the instance directory /foo/bar. The bar
directory is also deleted if no persistent shared objects are in use within this name space.
clears all shared objects that begin with XX, followed by any two characters. If
a directory name matches this specification, all the shared objects within this directory are
cleared.
If you call the clearSharedObjects method and the specified path matches a shared object that
is currently active, all its properties are deleted, and a “clear” event is sent to all subscribers of the
shared object. If it is a persistent shared object, the persistent store is also cleared.
Example
The following example clears all the shared objects for an instance:
function onApplicationStop(clientObj){
application.clearSharedObjects("/");
}
Application.clearStreams
Availability
Flash Communication Server MX.
Usage
application.clearStreams(streamPath);
Parameters
streamPath
A string that indicates the URI of a stream.
Returns
Nothing.
Description
Method; clears recorded streams from the hard disk. You can use the Stream object to create
recorded streams in a Flash Communication Server application instance. The server stores
recorded files for each application instance. You can use application.clearStreams to handle
one stream at a time, so you must specify the name of the steam. You can also use
application.clearStreams to remove all the recorded streams based on a stream path.
The streamPath parameter specifies the name of a stream, which can include a slash (/) as a
delimiter between directories in the path. The last element in the path can contain wildcard
patterns (for example, a question mark [?] and an asterisk [*]) or a stream name. The
application.clearStreams method traverses the stream hierarchy along the specified path and
clears all the recorded streams that match the given wildcard pattern. Specifying a slash clears all
the streams associated with an application instance.
12
The following are possible values for the streamPath parameter:
•
•
•
/
•
/foo/bar/XX??
clears all recorded streams associated with the instance.
/foo/bar
clears recorded streams /foo/bar; if bar is a directory name, no streams are deleted.
clears all streams stored in the instance directory /foo/bar. The bar directory is
also deleted if no streams are in use within this name space.
/foo/bar/*
clears all streams that begin with XX, followed by any two characters. If there
are directories within the given directory listing, the directories are cleared of any streams that
match XX??.
If an application.clearStreams method is invoked on a stream that is currently recording, the
recorded file is set to length 0 (cleared), and the internal cached data is also cleared.
Note: You can also use the Administration API removeApp method to delete all the resources for a single instance.
Examples
The following example clears all recorded streams:
function onApplicationStop(clientObj){
application.clearStreams("/");
}
Application.clients
Availability
Flash Communication Server MX.
Usage
application.clients
Description
Property (read-only); an object containing all the Flash clients or other Flash Communication
Servers currently connected to the application. The object is a custom object like an array, but
with only one property, length. Each element in the object is a reference to a Client object
instance, and you can use the length property to determine the number of users connected to the
application. You can use the array access operator ([]) with the application.clients property
to access elements in the object.
The object used for the clients property is not an array, but it acts the same except for one
difference: you can’t use the following syntax to iterate through the object:
for(var i in application.clients) {
// insert code here
}
Instead, use the following code to loop through each element in a clients object:
for (var i = 0; i < application.clients.length; i++) {
// insert code here
}
Server-Side Communication ActionScript
13
Example
This example uses a for loop to iterate through each member of the application.clients array
and calls the method serverUpdate on each client:
for (i = 0; i < application.clients.length; i++){
application.clients[i].call("serverUpdate");
}
Application.disconnect
Availability
Flash Communication Server MX.
Usage
application.disconnect(clientObj)
Parameters
clientObj The client to disconnect.
application.clients array.
The object must be a Client object from the
Returns
A Boolean value of true if the disconnect was successful; otherwise, false.
Description
Method; causes the server to terminate a client connection to the application. When this method
is called, NetConnection.onStatus is invoked on the client side with a status message of
NetConnection.Connection.Closed. The application.onDisconnect method is also
invoked.
Example
This example calls the application.disconnect method to disconnect all users of an
application instance:
function disconnectAll(){
for (i=0; i < application.clients.length; i++){
application.disconnect(application.clients[i]);
}
}
Application.name
Availability
Flash Communication Server MX.
Usage
application.name
Description
Property (read-only); contains the name of the Flash Communication Server application instance.
14
Example
The following example checks the name property against a specific string before it executes some
code:
if (application.name == "videomail/work"){
// insert code here
}
Application.onAppStart
Availability
Flash Communication Server MX.
Usage
application.onAppStart = function (info){
// insert code here
};
Parameters
None.
Returns
Nothing.
Description
Event handler; invoked when the server first loads the application instance. You use this handler
to initialize an application state. You can use application.onAppStop and
application.onAppStop to initialize and clean up global variables in an application because
each of these events is invoked only once during the lifetime of an application instance.
Example
The following example defines an anonymous function for the application.onAppStart event
handler that sends a trace message:
application.onAppStart = function () {
trace ("onAppStart called");
};
Application.onAppStop
Availability
Flash Communication Server MX.
Usage
application.onAppStop = function (info){
// insert code here
};
Parameters
info An information object that explains why the application stopped running. See the
Appendix, “Server-Side Information Objects,” on page 67.
Returns
The value returned by the function you define, if any, or null. To refuse to unload the
application, return false. To unload the application, return true or any non-false value.
Server-Side Communication ActionScript
15
Description
Event handler; invoked when the application is about to be unloaded by the server. You can
define a function that executes when the event handler is invoked. If the function returns true,
the application unloads. If the function returns false, the application doesn’t unload. If you
don’t define a function for this event handler, or if the return value is not a Boolean value, the
application is unloaded when the event is invoked.
The Flash Communication Server application passes an information object to the
event. You can use server-side ActionScript to look at this information
object to decide what to do in the function you define. You could also define the
application.onAppStop event to notify users before shutdown.
application.onAppStop
If you use the Administration Console or the Administration API to unload a Flash
Communication Server application, application.onAppStop is not invoked. Therefore you
cannot use the application.onAppStop event, for example, to tell users that the application is
exiting.
Example
This example defines a function to perform the shutdown operations on the application. The
function is then assigned to the event handler so that it executes when the handler is invoked.
function onMyApplicationEnd(info){
// Do all the application-specific shutdown logic...
// insert code here
}
application.onAppStop = onMyApplicationEnd;
Application.onConnect
Availability
Flash Communication Server MX.
Usage
application.onConnect = function (clientObj [, p1, ..., pN]){
// insert code here to call methods that do authentication
// returning null puts client in a pending state
return null;
};
(usage 2)
application.onConnect = function (clientObj [, p1, ..., pN]){
// insert code here to call methods that do authentication
// accepts the connection
application.acceptConnection(clientObj);
}
(usage 3)
application.onConnect = function (clientObj [, p1, ..., pN])
{
// insert code here to call methods that do authentication
// accepts the connection by returning true
return true;
}
Parameters
clientObj
16
The client connecting to the application.
Optional parameters passed to the application.onConnect method. These
parameters are passed from the client-side NetConnection.connect method when a client
connects to the application.
p1 ..., pN
Returns
The value you provide. If you return a Boolean value of true, the server accepts the connection; if
the value is false, the server rejects the connection. If you return null or no return value, the
server puts the client in a pending state and the client can’t receive or send messages. If the client
is put in a pending state, you must call application.acceptConnection or
application.rejectConnection at a later time to accept or reject the connection. For example,
you can perform external authentication by making a NetConnection call in your
application.onConnect event handler to an application server, and having the reply handler
call application.acceptConnection or application.rejectConnection, depending on the
information received by the reply handler.
You can also call application.acceptConnection or application.rejectConnection inside
the application.onConnect event handler. If you do, any value returned by the function is
ignored.
Note: Returning 1 or 0 is not the same as returning true or false. The values 1 and 0 are treated the same as any
other integers and do not accept or reject a connection.
Accepted
client
Client-side ActionScript
true, acceptConnection
acceptConnection
NetConnection.connect
Server-side ActionScript
New Client object
(not accepted or rejected yet)
Application.onConnect
false, rejectConnection
none, null
Pending client
rejectConnection
Rejected
client
How to use application.onConnect to accept, reject, or put a client in a pending state
Server-Side Communication ActionScript
17
Description
Event handler; invoked on the server side when NetConnection.connect is called from the
client side and a client attempts to connect to an application instance. You can define a function
for the application.onConnect event handler. If you don’t define a function, connections are
accepted by default. If the server accepts the new connection, the application.clients object
is updated.
You can use the application.onConnect event in server-side scripts to perform authentication.
All the information required for authentication should be sent to the server by the client as
parameters (p1 ..., pN) that you define. In addition to authentication, the script can set the access
rights to all server-side objects that this client can modify by setting the Client.readAccess and
Client.writeAccess properties.
If there are several simultaneous connection requests for an application, the server serializes the
requests so there is only one application.onConnect handler executing at a time. It is a good
idea to write code for the application.onConnect function that executes quickly to prevent a
long connect time for clients.
Example
This example verifies that the user has sent the password “XXXX”. If the password is sent, the
user’s access rights are modified and the user can complete the connection. In this case, the user
can create or write to streams and shared objects in the user’s own directory and can read or view
any shared object or stream in this application instance.
// This code should be placed in the global scope
application.onConnect = function (newClient, userName, password){
// Do all the application-specific connect logic
if (password == "XXXX"){
newClient.writeAccess = "/" + userName;
this.acceptConnection(newClient);
}
var err = new Object();
err.message = "Invalid password";
this.rejectConnection(newClient, err);
};
If the password is incorrect, the user is rejected and an information object with a message
property set to “Invalid password” is returned to the client side. The object is assigned to
infoObject.application. To access the message property, use the following code on the client
side:
ClientCom.onStatus = function (info){
trace(info.application.message);
// it will print "Invalid password"
// in the Output window on the client side
};
See also
Application.acceptConnection, Application.rejectConnection
Application.onDisconnect
Availability
Flash Communication Server MX.
18
Usage
application.onDisconnect = function (clientObj){
// insert code here
};
Parameters
clientObj
A client disconnecting from the application.
Returns
The server ignores any return value.
Description
Event handler; invoked when a client disconnects from the application. You can use this event
handler to flush any client state information or to notify other users of this event. This event
handler is optional.
Example
This example uses an anonymous function and assigns it to the application.onDisconnect
event handler:
// This code should be placed in the global scope.
application.onDisconnect = function (client){
// Do all the client-specific disconnect logic...
// insert code here
trace("user disconnected");
};
Application.onStatus
Availability
Flash Communication Server MX.
Usage
application.onStatus = function (infoObject){
// insert code here
};
Parameters
infoObject An object that contains the error level, code, and sometimes a description. See the
Appendix, “Server-Side Information Objects,” on page 67.
Returns
Any value that the callback function returns.
Description
Event handler; invoked when the server encounters an error while processing a message that was
targeted at this application instance. The application.onStatus event handler is the root for
any Stream.onStatus or NetConnection.onStatus messages that don’t find handlers. Also,
there are a few status calls that come only to application.onStatus. This event handler can be
used for debugging messages that generate errors.
Server-Side Communication ActionScript
19
Example
The following example defines a function that sends a trace statement whenever the
application.onStatus method is invoked. You can also define a function that gives users
specific feedback about the type of error that occurred.
appInstance.onStatus = function(infoObject){
trace("An application error occurred");
};
Application.registerClass
Availability
Flash Communication Server MX.
Usage
application.registerClass(className, constructor)
Parameters
className
The name of an ActionScript class.
A constructor function used to create an object of a specific class type during
object deserialization. The name of the constructor function must be the same as className.
During object serialization, the name of the constructor function is serialized as the object’s type.
To unregister the class, pass the value null as the constructor parameter. Serialization is the
process of turning an object into something you can send to another computer over the network.
constructor
Returns
Nothing.
Description
Method; registers a constructor function that is used when deserializing an object of a certain class
type. If the constructor for a class is not registered, you cannot call the deserialized object’s
methods. This method is also used to unregister the constructor for a class. This is an advanced
use of the server and is necessary only when sending ActionScript objects between a client and a
server.
The client and the server communicate over a network connection. Therefore, if you use typed
objects, each side must have the prototype of the same objects they both use. In other words, both
the client-side and server-side ActionScript must define and declare the types of data they share so
that there is a clear, reciprocal relationship between an object, method, or property on the client
and the corresponding element on the server. You can use application.registerClass to
register the object’s class type on the server side so that you can use the methods defined in the
class.
Constructor functions should be used to initialize properties and methods; they should not be
used for executing server code. Constructor functions are called automatically when messages are
received from the client and need to be “safe” in case they are executed by a malicious client. You
shouldn’t define procedures that could result in negative situations such as filling up the hard disk
or consuming the processor.
The constructor function is called before the object’s properties are set. A class can define an
which is called after the object has been initialized with all its properties.
You can use this method to process data after an object is deserialized.
onInitialize method,
20
If you register a class that has its prototype set to another class, you must set the prototype
constructor back to the original class after setting the prototype. The second example below
illustrates this point.
Example
This example defines a Color constructor function with properties and methods. After the
application connects, the registerClass method is called to register a class for the objects of
type Color. When a typed object is sent from the client to the server, this class is called to create
the server-side object. After the application stops, the registerClass method is called again and
passes the value null to unregister the class.
function Color(){
this.red = 255;
this.green = 0;
this.blue = 0;
}
Color.prototype.getRed = function(){
return this.red;
}
Color.prototype.getGreen = function(){
return this.green;
}
Color.prototype.getBlue = function(){
return this.blue;
}
Color.prototype.setRed = function(){
this.red = value;
}
Color.prototype.setGreen = function(){
this.green = value;
}
Color.prototype.setBlue = function(){
this.blue = value;
}
application.onAppStart = function(){
application.registerClass("Color", Color);
};
application.onAppStop = function(){
application.registerClass("Color", null);
};
The following example shows how to use the application.registerClass method with the
prototype property:
function A(){}
function B(){}
B.prototype = new A();
B.prototype.constructor = B; // set constructor back to that of B
// insert code here
application.registerClass("B", B);
Application.registerProxy
Availability
Flash Communication Server MX.
Usage
application.registerProxy(methodName, proxyConnection [, proxyMethodName])
Server-Side Communication ActionScript
21
Parameters
The name of a method. All requests to execute methodName for this application
instance are forwarded to the proxyConnection object.
methodName
A Client or NetConnection object. All requests to execute the remote
method specified by methodName are sent to the Client or NetConnection object that is specified
in the proxyConnection parameter. Any result that is returned is sent back to the originator of
the call. To unregister, or remove, the proxy, provide a value of null for this parameter.
proxyConnection
proxyMethodName An optional parameter. The server calls this method on the object specified
by the proxyConnection parameter if proxyMethodName is different from the method specified
by the methodName parameter.
Returns
A value that is sent back to the client that made the call.
Description
Method; maps a method call to another function. You can use this method to communicate
between different application instances that can be on the same Flash Communication Server (or
different Flash Communication Servers). Clients can execute server-side methods of any
application instances to which they are connected. Server-side scripts can use this method to
register methods to be proxied to other application instances on the same server or a different
server. You can remove, or unregister the proxy by calling this method and passing null for the
proxyConnection parameter, which results in the same behavior as never registering the method
at all.
Example
In the following example, the application.registerProxy method is called in a function in
the application.onAppStart event handler and executes when the application starts. Inside the
function block, a new NetConnection object called myProxy is created and connected. The
application.registerProxy method is then called to assign the method getXyz to the
myProxy object.
application.onAppStart = function(){
var myProxy = new NetConnection();
myProxy.connect("rtmp://xyz.com/myApp");
application.registerProxy("getXyz", myProxy);
};
Application.rejectConnection
Availability
Flash Communication Server MX.
Usage
application.rejectConnection(clientObj, errObj)
Parameters
clientObj
A client to reject.
An object of any type that is sent to the client, explaining the reason for rejection. The
object is available in client-side scripts as the application property of the information
object that is passed to the application.onStatus call when the connection is rejected. For
more information, see the Appendix, “Client-Side Information Objects,” in the Client-Side
Communication ActionScript Dictionary.
errObj
errObj
22
Returns
Nothing.
Description
Method; rejects the connection call from a client to the server. The application.onConnect
event handler notifies a script when a new client is connecting. In the function assigned to
application.onConnect, you can either accept or reject the connection. You can also define a
function for application.onConnect that calls an application server for authentication. In that
case, an application could call application.rejectConnection from the application server’s
response callback to disconnect the client from the server.
Example
In the following example, the client specified by client1 is rejected and provided with the error
message contained in err.message. The message “Too many connections” appears on the server
side.
function onConnect(client1){
// insert code here
var err = new Object();
err.message = "Too many connections";
application.rejectConnection(client1, err);
}
The following code should appear on the client side:
clientConn.onStatus = function (info){
if (info.code == "NetConnection.Connect.Rejected"){
trace(info.application.message);
// this sends the message
// "Too many connections" to the Output window
// on the client side
}
};
See also
Application.onConnect, Application.acceptConnection
Application.server
Availability
Flash Communication Server MX.
Usage
application.server
Description
Property (read-only); contains the platform and the server-version information.
Example
The following example checks the server property against a string before executing the code
inside the if statement:
if (application.server == "Flash Communication Server-Windows/1.0"){
// insert code here
}
Server-Side Communication ActionScript
23
clearInterval
Availability
Flash Communication Server MX.
Usage
clearInterval(intervalID)
Parameters
intervalID
A unique ID returned by a previous call to the setInterval method.
Returns
Nothing.
Description
Method (global); cancels a time-out that was set with a call to the setInterval method.
Example
The following example creates a function named callback and passes it to the setInterval
method, which is called every 1000 milliseconds and sends the message “interval called” to the
Output window. The setInterval method returns a unique identifier that is assigned to the
variable intervalID. The identifier allows you to cancel a specific setInterval call. In the last
line of code, the intervalID variable is passed to the clearInterval method to cancel the
setInterval call:
function callback(){
trace("interval called");
}
var intervalID;
intervalID = setInterval(callback, 1000);
// sometime later
clearInterval(intervalID);
Client (object)
The Client object lets you handle each user, or client, connection to a Flash Communication
Server application instance. The server automatically creates a Client object when a user connects
to an application; the object is destroyed when the user disconnects from the application. Users
have unique Client objects for each application to which they are connected. Thousands of Client
objects can be active at the same time.
You can use the properties of the Client object to determine the version, platform, and IP address
of each client. You can also set individual read and write permissions to various application
resources such as Stream objects and shared objects. Use the methods of the Client object to set
bandwidth limits and call methods in client-side scripts.
When you call NetConnection.call from a client-side ActionScript script, the method that
executes in the server-side script must be a method of the Client object. In your server-side script,
you must define any method that you want to call from the client-side script. You can also call any
methods you define in the server-side script directly from the Client object instance in the serverside script.
24
If all instances of the Client object (each client in an application) require the same methods or
properties, you can add those methods and properties to the class itself instead of adding them to
each instance of a class. This process is called extending a class. You can extend any server-side or
client-side ActionScript class. To extend a class, instead of defining methods inside the
constructor function of the class or assigning them to individual instances of the class, you assign
methods to the prototype property of the constructor function of the class. When you assign
methods and properties to the prototype property, the methods are automatically available to all
instances of the class.
Extending a class lets you define the methods of a class separately, which makes them easier to
read in a script. And more importantly, it is more efficient to add methods to prototype,
otherwise the methods are re-interpreted each time an instance is created.
The following code shows how to assign methods and properties to an instance of a class. During
a client instance clientObj is passed to the server-side script as a
parameter. You can then assign a property and method to the client instance:
application.connect,
application.onConnect = function(clientObj){
}
clientObj.birthday = myBDay;
clientObj.calculateDaysUntilBirthday = function(){
// insert code here
}
The above example works, but must be executed every time a client connects. If you want the
same methods and properties to be available to all clients in the application.clients array
without defining them every time, you must assign them to the prototype property of the Client
object There are two steps to extending a built-in class using the prototype method. You can
write the steps in any order in your script. The following example extends the built-in Client
object, so the first step is to write the function that you will assign to the prototype property:
// first step: write the functions
function Client_getWritePermission(){
// "writeAccess" property is already built-in to the client class
return this.writeAccess;
}
function Client_createUniqueID(){
var ipStr = this.ip;
// "ip" property is already built-in to the client class
var uniqueID = "re123mn"
// you would need to write code in the above line
// that creates a unique ID for each client instance
return uniqueID;
}
// second step: assign prototype methods to the functions
Client.prototype.getWritePermission = Client_getWritePermission;
Client.prototype.createUniqueID = Client_createFriendlyUniqueID;
// a good naming convention is to start all class method
// names with the name of the class, followed by an underscore
You can also add properties to prototype, as shown in the following example:
Client.prototype.company = "Macromedia";
Server-Side Communication ActionScript
25
The methods are available to any instance, so within application.onConnect, which is passed a
clientObj argument, you can write the following code:
application.onConnect(clientObj){
var clientID = clientObj.createUniqueID();
var clientWritePerm = clientObj.getWritePermission();
};
Method summary for the Client object
Method
Description
Client.call
Executes a method on the Flash client asynchronously and returns the value
from the Flash client to the server.
Client.getBandwidthLimit
Returns the maximum bandwidth the client or the server can attempt to use
for this connection.
Client.__resolve
Provides values for undefined properties.
Client.setBandwidthLimit
Sets the maximum bandwidth for the connection.
Property summary for the Client object
Property
Description
Client.agent
The version and platform of the Flash client.
Client.ip
The IP address of the Flash client.
Client.readAccess
A list of access levels to which the client has read access.
Client.referrer
The URL of the SWF file or server where this connection originated.
Client.writeAccess
A list of access levels to which the client has write access.
Event handler summary for the Client object
Event handler
Description
Client."commandName"
Invoked when NetConnection.call(commandName) is called in a client-side
script.
Client.agent
Availability
Flash Communication Server MX.
Usage
Client.agent
Description
Property (read-only); contains the version and platform information of the Flash client.
26
Example
The following example checks the agent property against the string "WIN" and executes different
code depending on whether they match. This code is written inside an onConnect function.
function onConnect(newClient, name){
if (newClient.agent.indexOf("WIN") > -1){
trace ("Window user");
} else {
trace ("non Window user.agent is" + newClient.agent);
}
}
Client.call
Availability
Flash Communication Server MX.
Usage
Client.call(methodName, [resultObj, [p1, ..., pN]])
Parameters
methodName A method specified in the form [objectPath/]method.
command someObj/doSomething tells the client to invoke the
NetConnection.someObj.doSomething method on the client.
For example, the
An optional parameter that is required when the sender expects a return value from
the client. If parameters are passed but no return value is desired, pass the value null. The result
object can be any object you define and, in order to be useful, should have two methods that are
invoked when the result arrives: onResult and onStatus. The resultObj.onResult event is
triggered if the invocation of the remote method is successful; otherwise, the
resultObj.onStatus event is triggered.
resultObj
Optional parameters that can be of any ActionScript type, including a reference
to another ActionScript object. These parameters are passed to the methodName parameter when
the method executes on the Flash client. If you use these optional parameters, you must pass in
some value for resultObject; if you do not want a return value, pass null.
p1, ..., pN
Returns
A Boolean value of true if a call to methodName was successful on the client; otherwise, false.
Description
Method; executes a method on the originating Flash client or on another server. The remote
method may optionally return data, which is returned as a result to the resultObj parameter, if it
is provided. The remote object is typically a Flash client connected to the server, but it can also be
another server. Whether the remote agent is a Flash client or another server, the method is called
on the remote agent’s NetConnection object.
Example
The following example shows a client-side script that defines a function called random, which
generates a random number:
nc = new NetConnection();
nc.connect ("rtmp://someserver/someApp/someInst");
nc.random = function(){
return (Math.random());
};
Server-Side Communication ActionScript
27
The following server-side script uses the Client.call method inside the
application.onConnect handler to call the random method that was defined on the client side.
The server-side script also defines a function called randHander, which is used in the
Client.call method as the resultObj parameter.
application.onConnect = function(clientObj){
trace("we are connected");
application.acceptConnection(clientObj);
clientObj.call("random", new randHandler());
};
randHandler = function(){
this.onResult = function(res){
trace("random num: " + res):
}
this.onStatus = function(info){
trace("failed and got:" + info.code);
}
};
Client."commandName"
Availability
Flash Communication Server MX.
Usage
function onMyClientCommand([p1, ..., pN])
{
// insert code here
return val;
}
Parameters
Optional parameters passed to the command message handler if the message
contains parameters you defined. These parameters are the ActionScript objects passed to the
NetConnection.call method.
p1, ..., pN
Returns
Any ActionScript object you define. This object is serialized and sent to the client as a response to
the command only if the command message supplied a response handler.
Description
Event handler; invoked when a Flash client or another server calls the NetConnection.call
method. A command name parameter is passed to NetConnection.call on the client side,
which causes Flash Communication Server to search the Client object instance on the server side
for a function that matches the command name parameter. If the parameter is found, the method
is invoked and the return value is sent back to the client.
Example
This example creates a method called sum as a property of the Client object newClient on the
server side:
newClient.sum = function sum(op1, op2){
return op1 + op2;
};
28
The sum method can then be called from NetConnection.call on the Flash client side, as shown
in the following example:
nc = new NetConnection();
nc.connect("rtmp://myServer/myApp");
nc.call("sum", new result.sum(), 20, 50);
function result.sum(){
this.onResult = function (retVal){
output += "sum is " + retVal;
};
this.onStatus = function(errorVal){
output += errorVal.code + " error occurred";
};
}
The sum method can also be called on the server side, as shown here:
newClient.sum();
The following example creates two functions that you can call from either a client-side or serverside script:
application.onConnect = function(clientObj) {
// Add a callable function called "foo"; foo returns the number 8
clientObj.foo = function() {return 8;};
// Add a remote function that is not defined in the onConnect call
clientObj.bar = application.barFunction;
};
// The bar function adds the two values it is given
application.barFunction = function(v1,v2) {
return (v1 + v2);
};
You can call either of the two functions that were defined in the previous examples (foo and bar)
by using the following code in a client-side script:
c = new NetConnection();
c.call("foo");
c.call("bar", null, 1, 1);
You can call either of the two functions that were defined in the previous examples (foo and bar)
by using the following code in a server-side script:
c = new NetConnection();
c.onStatus = function(info) {
if(info.code == "NetConnection.Connect.Success") {
c.call("foo");
c.call("bar", null, 2, 2);
}
};
Client.getBandwidthLimit
Availability
Flash Communication Server MX.
Usage
Client.getBandwidthLimit(iDirection)
Parameters
An integer specifying the connection direction: 0 indicates a client-to-server
direction, 1 indicates a server-to-client direction.
iDirection
Server-Side Communication ActionScript
29
Returns
An integer indicating bytes per second.
Description
Method; returns the maximum bandwidth that the client or the server can use for this
connection. Use the iDirection parameter to get the value for each direction of the connection.
The value returned indicates bytes per second and can be changed with
Client.setBandwidthLimit. The default value for a connection is set for each application in
the Application.xml file.
Example
The following example uses Client.getBandwidthLimit with the iDirection parameter to set
two variables, clientToServer and serverToClient:
application.onConnect(newClient){
var clientToServer= newClient.getBandwidthLimit(0);
var serverToClient= newClient.getBandwidthLimit(1);
}
Client.ip
Availability
Flash Communication Server MX.
Usage
Client.ip
Description
Property (read-only); contains the IP address of the Flash client.
Example
The following example uses the Client.ip property to verify whether a new client has a specific
IP address. The result determines which block of code runs.
function application.onConnect(newClient, name){
if (newClient.ip == "127.0.0.1"){
// insert code here
} else {
// insert code here
}
}
Client.readAccess
Availability
Flash Communication Server MX.
Usage
Client.readAccess
Description
Property; provides read-access rights to application resources (shared objects and streams) for this
client. To give a client read access to directories containing application resources, list directories in
a string delimited by semicolons.
30
By default, all clients have full read access, and the readAccess property is set to slash (/). To give
a client read access, specify a list of access levels (in URI format), delimited by semicolons. Any
files or directories within a specified URI are also considered accessible. For example, if myMedia
is specified as an access level, then any files or directories in the myMedia directory are also
accessible (for example, myMedia/mp3s). Similarly, any files or directories in the myMedia/mp3s
directory are also accessible, and so on.
Clients with read access to streams can play streams in the specified access levels. Clients with read
access to shared objects can subscribe to shared objects in the specified access levels and receive
notification of changes in the shared objects.
• For streams, readAccess controls which streams can be played by the connection.
• For shared objects, readAccess controls if the connection can listen to shared object changes.
Example
The following onConnect function gives a client read access to myMedia/mp3s, myData/notes,
and any files or directories within them:
function application.onConnect(newClient, name){
newClient.readAccess = "myMedia/mp3s;myData/notes";
}
See also
Client.writeAccess
Client.referrer
Availability
Flash Communication Server MX.
Usage
Client.referrer
Description
Property (read-only); a string object whose value is set to the URL of the SWF file or the server in
which this connection originated.
Example
The following example defines an onConnect callback function that sends a trace to the Output
window indicating the origin of the new client when that client connects to the application:
function application.onConnect(newClient, name){
trace("New user connected to server from" + newClient.referrer);
}
Client.__resolve
Availability
Flash Communication Server MX.
Usage
Client.__resolve = function(propName){
// insert code here
};
Server-Side Communication ActionScript
31
Parameters
propName
The name of an undefined property.
Returns
The value of the undefined property, which is specified by the propName parameter.
Description
Method; provides values for undefined properties. When an undefined property of a Client object
is referenced by server-side ActionScript code, that object is checked for a __resolve method. If
the object has a __resolve method, the __resolve method is invoked and passed the name of
the undefined property. The return value of the __resolve method is the value of the undefined
property. In this way, __resolve can supply the values for undefined properties and make it
appear as if they are defined.
Example
The following example defines a function that is called whenever an undefined property is
referenced:
Client.prototype.__resolve = function (name) {
return "Hello, world!";
};
function onConnect(newClient){
trace (newClient.property1); // this will print "Hello World"
}
Client.setBandwidthLimit
Availability
Flash Communication Server MX.
Usage
Client.setBandwidthLimit(iServerToClient, iClientToServer)
Parameters
iServerToClient The bandwidth from server to client, in bytes per second. Use 0 if you don’t
want to change the current setting.
iClientToServer The bandwidth from client to server, in bytes per second. Use 0 if you don’t
want to change the current setting.
Returns
Nothing.
Description
Method; sets the maximum bandwidth for this client from client to server, server to client, or
both. The default value for a connection is set for each application in the Application.xml file.
The value specified cannot exceed the bandwidth cap value specified in the Application.xml file.
Example
The following example sets the bandwidth limits for each direction, based on values passed to the
onConnect function:
application.onConnect(newClient, serverToClient, clientToServer){
newClient.setBandwidthLimit(serverToClient, clientToServer);
application.acceptConnection(newClient);
}
32
Client.writeAccess
Availability
Flash Communication Server MX.
Usage
Client.writeAccess
Description
Property; provides write-access rights to application resources (shared objects, streams, and so on)
for this client. To give a client write access to directories containing application resources, list
directories in a string delimited by semicolons. By default, all clients have full write access, and
the writeAccess property is set to slash (/). For example, if myMedia is specified as an access
level, then any files or directories in the myMedia directory are also accessible (for example,
myMedia/mp3s). Similarly, any files or directories in the myMedia/mp3s directory are also
accessible, and so on.
• For shared object, writeAccess provides control over who can create and update the shared
objects.
• For streams, writeAccess provides control over who can publish and record a stream.
Example
The following example provides write access to the /myMedia/mp3s and myData/notes
directories.
function application.onConnect(newClient, name){
newClient.writeAccess = "/myMedia/mp3s;myData/notes";
application.acceptConnection();
}
See also
Client.readAccess
load
Availability
Flash Communication Server MX.
Usage
load(filename);
Parameters
filename
The relative path to an ActionScript file in relation to the main.asc file.
Returns
Nothing.
Description
Method (global); loads an ActionScript file inside the main.asc file. This method executes only
when the ActionScript file is first loaded. The loaded file is compiled and executed after the
main.asc file is successfully loaded, compiled, and executed, and before
application.onAppStart is executed. The path of the specified file is resolved relative to
main.asc. This method is useful for loading ActionScript libraries.
Server-Side Communication ActionScript
33
Note: For security reasons, your server-side applications directory, which contains ASC files, audio/video FLV files,
and ActionScript FLA source files, should not be accessible to a user browsing your Web site.
Example
The following example loads the myLoadedFile.as file:
load("myLoadedFile.as");
NetConnection (object)
The server-side NetConnection object lets you create a two-way connection between a Flash
Communication Server application instance and an application server, another Flash
Communication Server, or another Flash Communication Server application instance on the
same server. You can use NetConnection objects to create powerful applications; for example, you
can get weather information from an application server or share an application load with other
Flash Communication Servers or application instances.
You can use Macromedia Flash Remoting with the Flash Communication Server to communicate
with application servers such as Macromedia ColdFusion MX, Macromedia JRun, Microsoft
.NET, and J2EE servers using Action Message Format (AMF) over HTTP. AMF lets you transfer
light-weight binary data between a Flash Communication Server or a Flash client and a web
application server. For more information, see http://www.macromedia.com/go/flashremoting.
You can also connect to an application server for server-to-server interactions using standard
protocols (such as HTTP) or connect to another Flash Communication Server for sharing audio,
video, and data using the Macromedia Real-Time Messaging Protocol (RTMP).
To create a NetConnection object, use the constructor function described below.
34
Method summary for the NetConnection object
Method
Description
NetConnection.addHeader
Adds a context header.
NetConnection.call
Invokes a method or operation on a remote server.
NetConnection.close
Closes a server connection.
NetConnection.connect
Establishes connection to a server.
Property summary for the NetConnection object
Property
Description
NetConnection.isConnected
A Boolean value indicating whether a connection has been made.
NetConnection.uri
The URI that was passed by the NetConnection.connect method.
Event handler summary for the NetConnection object
Event handler
Description
NetConnection.onStatus
Called when there is a change in connection status.
Constructor for the NetConnection object
Availability
Flash Communication Server MX.
Usage
new NetConnection()
Parameters
None.
Returns
A NetConnection object.
Description
Constructor; creates a new instance of the NetConnection object.
Example
The following example creates a new instance of the NetConnection object:
newNC = new NetConnection();
NetConnection.addHeader
Availability
Flash Communication Server MX.
Usage
myNetConn.addHeader(name, mustUnderstand, object)
Server-Side Communication ActionScript
35
Parameters
name
A string that identifies the header and the ActionScript object data associated with it.
A Boolean value; true indicates that the server must understand and process
this header before it handles any of the following headers or messages.
mustUnderstand
object
Any ActionScript object.
Returns
Nothing.
Description
Method; adds a context header to the AMF packet structure. This header is sent with every future
AMF packet. If you call NetConnection.addHeader using the same name, the new header
replaces the existing header, and the new header persists for the duration of the NetConnection
object. You can remove a header by calling NetConnection.addHeader with the name of the
header to remove and an undefined object.
Example
The following example creates a new NetConnection instance, nc, and connects to an application
at web server www.foo.com that is listening at port 1929. This application dispatches the service /
blag/SomeCoolService. The last line of code adds a header called foo:
nc=new NetConnection();
nc.connect("http://www.foo.com:1929/blag/SomeCoolService");
nc.addHeader("foo", true, new Foo());
NetConnection.call
Availability
Flash Communication Server MX.
Usage
myNetConnection.call(methodName, [resultObj, p1, ..., pN])
Parameters
methodName A method specified in the form [objectPath/]method. For example, the
command someObj/doSomething tells the remote server to invoke the
clientObj.someObj.doSomething method, with all the p1, ..., pN parameters. If the
path is missing, clientObj.doSomething() is invoked on the remote server.
object
An optional parameter that is used to handle return values from the server. The
result object can be any object you defined and can have two defined methods to handle the
returned result: onResult and onStatus. If an error is returned as the result, onStatus is
invoked; otherwise, onResult is invoked.
resultObj
Optional parameters that can be of any ActionScript type, including a reference
to another ActionScript object. These parameters are passed to the methodName specified above
when the method is executed on the remote application server.
p1, ..., pN
Returns
For RTMP connections, returns a Boolean value of true if a call to methodName is sent to the
client; otherwise, false. For application server connections, it always returns true.
36
Description
Method; invokes a command or method on a Flash Communication Server or an application
server to which the application instance is connected. The NetConnection.call method on the
server works the same way as the NetConnection.call method on the client: it invokes a
command on a remote server.
Note: If you want to call a method on a client from a server, use the Client.call method.
Example
This example uses RTMP to execute a call from one Flash Communication Server to another
Flash Communication Server. The code makes a connection to the App1 application on server 2
and then invokes the method Sum on server 2:
nc1.connect("rtmp://server2.mydomain.com/App1", "svr2",);
nc1.call("Sum", newResult(), 3, 6);
The following server-side ActionScript code is on server 2. When the client is connecting, this
code checks to see whether it has an argument that is equal to svr1. If the client has that
argument, the Sum method is defined so that when the method is called from svr1, svr2 can
respond with the appropriate method:
application.onConnect = function(clientObj){
if(arg1 == "svr1"){
clientObj.Sum = function(p1, p2){
return p1 + p2;
}
}
return true;
};
The following example uses an AMF request to make a call to an application server. This allows
Flash Communication Server to connect to an application server and then invoke the quote
method. The Java adaptor dispatches the call by using the identifier to the left of the dot as the
class name and the identifier to the right of the dot as a method of the class.
nc = new NetConnection;
nc.connect("http://www.xyz.com/java");
nc.call("myPackage.quote", newResult());
NetConnection.close
Availability
Flash Communication Server MX.
Usage
myNetConnection.close()
Parameters
None.
Returns
Nothing.
Description
Method; closes the connection with the server. After you close the connection, you can reuse the
NetConnection instance and reconnect to an old application or connect to a new one.
Note: The NetConnection.close method has no effect on HTTP connections.
Server-Side Communication ActionScript
37
Example
The following code closes the NetConnection instance myNetConn:
myNetConn.close();
NetConnection.connect
Availability
Flash Communication Server MX.
Usage
myNetConnection.connect(URI, [p1, ..., pN])
Parameters
URI
A URI to connect to.
p1, ..., pN Optional parameters that can be of any ActionScript type, including references to
other ActionScript objects. These parameters are sent as connection parameters to the
application.onConnect event handler for RTMP connections. For AMF connections to
application servers, any RTMP parameters are ignored.
Returns
For RTMP connections, a Boolean value of true for success; false otherwise. For AMF
connections to application servers, true is always returned.
Description
Method; connects to the host. The host URI has the following format:
[protocol://]host[:port]/appName[/instanceName]
For example, the following are legal URIs:
http://appServer.mydomain.com/webApp
rtmp://rtserver.mydomain.com/realtimeApp
It is good practice to write an application.onStatus callback function and check the
NetConnection.isConnected property for RTMP connections to see whether a successful
connection was made. For Action Message Format connections, check
NetConnection.onStatus.
Example
This example creates an RTMP connection to another Flash Communication Server for the
myConn instance of NetConnection:
myConn = new NetConnection();
myConn.connect("rtmp://tc.foo.com/myApp/myConn");
The following example creates an AMF connection to an application server for the myConn
instance of NetConnection:
myConn = new NetConnection();
myConn.connect("http://www.xyz.com/myApp/");
NetConnection.isConnected
Availability
Flash Communication Server MX.
38
Usage
myNetConnection.isConnected
Description
Property (read-only); a Boolean value that indicates whether a connection has been made. It is set
to true if there is a connection to the server. It’s a good idea to check this property value in the
onStatus callback function. This property is always true for AMF connections to application
servers.
Example
This example uses NetConnection.isConnected inside an onStatus definition to check if a
connection has been made:
nc = new NetConnection();
nc.connect("rtmp://tc.foo.com/myApp");
nc.onStatus = function(infoObj){
if (info.code == "NetConnection.Connect.Success" && nc.isConnected){
trace("We are connected");
}
};
NetConnection.onStatus
Availability
Flash Communication Server MX.
Usage
myNetConnection.onStatus = function(infoObject) {
// Your code here
}
Parameters
infoObject An information object. For details about this parameter, see the Appendix,
“Server-Side Information Objects,” on page 67.
Returns
Nothing.
Description
Event handler; invoked every time the status of the NetConnection object changes. For example,
if the connection with the server is lost in an RTMP connection, the
NetConnection.isConnected property is set to false, and NetConnection.onStatus is
invoked with a status message of NetConnection.Connect.closed. For AMF connections,
NetConnection.onStatus is used only to indicate a failed connection. Use this event handler to
check for connectivity.
Server-Side Communication ActionScript
39
Example
This example defines a function for the onStatus handler that outputs messages to indicate
whether the NetConnection was successful:
nc = new NetConnection();
nc.onStatus = function(info){
if (info.code == "NetConnection.Connect.Success") {
_root.gotoAndStop(2);
} else {
if (! nc.isConnected){
_root.gotoAndStop(1);
}
}
};
NetConnection.uri
Availability
Flash Communication Server MX.
Usage
myNetConnection.uri
Description
Property (read-only); A string indicating the URI that was passed by the
NetConnection.connect method. This property is set to null before a call to
NetConnection.connect or after NetConnection.close is called.
setInterval
Availability
Flash Communication Server MX.
Usage
setInterval(function, interval[, p1, ..., pN]);
setInterval(object, methodName, interval[, p1, ..., pN]);
Parameters
The name of a defined ActionScript function or a reference to an anonymous
function
function.
object
An object derived from the ActionScript Object object.
The name of the method to call on object.
methodName
interval
The time (interval) between calls to function, in milliseconds.
p1, ..., pN
Optional parameters passed to function.
Returns
A unique ID for this call. If the interval is not set, the method returns -1.
40
Description
Method (global); continually calls a function or method at a specified time interval until the
clearInterval method is called. This method allows a server-side script to run a generic
routine. The setInterval method returns a unique ID that you can pass to the clearInterval
method to stop the routine.
Note: Standard JavaScript supports an additional usage for the setInterval method,
setInterval(stringToEvaluate, timeInterval), which is not supported by Server-Side Communication
ActionScript.
Example
The following example uses an anonymous function to send the message “interval called” to the
server log every second:
setInterval(function(){trace("interval called");}, 1000);
The following example also uses an anonymous function to send the message “interval called” to
the server log every second, but it passes the message to the function as a parameter:
setInterval(function(s){trace(s);}, 1000, "interval called");
The following example uses a named function, callback1, to send the message “interval called”
to the server log:
function callback1(){
trace("interval called");
}
setInterval(callback1, 1000);
The following example also uses a named function, callback2, to send the message “interval
called” to the server log, but it passes the message to the function as a parameter:
function callback2(s){
trace(s);}
setInterval(callback2, 1000, "interval called");
SharedObject (object)
Shared objects let you share data between multiple client movies in real time. Shared objects can
be persistent on the server and you can think of these objects as real-time data transfer devices.
You can also use the client-side ActionScript SharedObject object to create shared objects on the
client. For more information, see the SharedObject entry in the Client-Side Communication
ActionScript Dictionary. The following list describes common ways to use remote shared objects:
• Storing and sharing data on a server
A shared object can store data on the server for other clients to retrieve. For example, you can
open a remote shared object, such as a phone list, that is persistent on the server. Whenever a
client makes a change to the shared object, the revised data is available to all clients that are
currently connected to the object or that connect to it later. If the object is also persistent
locally and a client changes the data while not connected to the server, the changes are copied
to the remote shared object the next time the client connects to the object.
• Sharing data in real time
A shared object can share data among multiple clients in real time. For example, you can open
a remote shared object that stores real-time data (such as a list of users connected to a chat
room) that is visible to all clients connected to the object. When a user enters or leaves the chat
room, the object is updated and all clients that are connected to the object see the revised list of
chat room users.
Server-Side Communication ActionScript
41
Every shared object is identified by a unique name and contains a list of name-value pairs, called
properties, just like any other ActionScript object. A name must be a unique string and a value can
be any ActionScript data type. (For more information about data types, see Using Flash MX.) All
shared objects have a data property. Any property of the data property can be shared and is called
a slot.
A shared object can be owned by the current (local) application instance or by a different (remote)
application instance. The remote application instance can be on the same server or on a different
server. References to shared objects that are owned by a remote application instance are called
proxied shared objects.
The slot of a shared object owned by the local instance can be modified by multiple clients or by
the server simultaneously; there is no conflict on the server side when a shared object is modified.
For example, a call to SharedObject.getProperty returns the latest value and setting a new
value assigns a new value for the named slot and updates the object version. If you write a serverside script that modifies multiple properties, you can prevent other clients from modifying the
object during the update, by calling the SharedObject.lock method before updating the object.
Then you can call SharedObject.unlock to commit the changes and allow other changes to be
made. Any change to a shared object results in notification to all the clients that are currently
subscribed to the shared object.
When you get a reference to a shared object owned by a remote application instance, any changes
made to the object are sent to the instance that owns the object. The success or failure of any
changes are sent using the SharedObject.onSync event handler, if it is defined. Also, the
SharedObject.lock and SharedObject.unlock methods cannot be used to lock or unlock
proxied shared objects.
42
Method summary for the SharedObject object
Method
Description
SharedObject.clear
Deletes all properties of a persistent shared object.
SharedObject.close
Unsubscribes from a shared object.
SharedObject.flush
Causes the server to save the current state of a shared object.
SharedObject.get
Returns a reference to a shared object.
SharedObject.getProperty
Gets the value of a shared object property.
SharedObject.getPropertyNames
Returns an array of all the current valid properties in the shared object.
SharedObject.lock
Locks the shared object instance. Prevents any changes to this object by
clients until the SharedObject.unlock method is called.
SharedObject.purge
Causes the server to remove all deleted properties that are older than the
specified version.
SharedObject.send
Sends a message to the client subscribing to this shared object.
SharedObject.setProperty
Sets a new value for a shared object property.
SharedObject.size
Returns the number of valid properties in a shared object.
SharedObject.unlock
Unlocks a shared object instance that was locked with
SharedObject.lock.
Property summary for the SharedObject object
Property
Description
SharedObject.name
The name of a shared object.
SharedObject.resyncDepth
The depth that indicates when the deleted values of a shared object
should be permanently deleted.
SharedObject.version
The current version number of a shared object.
Event summary for the SharedObject object
Property
Description
SharedObject.handlerName
A placeholder for a property name that specifies a function object that is
invoked when a shared object receives a broadcast message whose
method name matches the property name.
SharedObject.onStatus
Reports errors, warnings, and status messages for a shared object.
SharedObject.onSync
Invoked when a shared object changes.
SharedObject.clear
Availability
Flash Communication Server MX.
Usage
SharedObject.clear()
Server-Side Communication ActionScript
43
Parameters
None.
Returns
Returns true if successful; false otherwise.
Description
Method; deletes all properties and sends a “clear” event to all clients that subscribe to a persistent
shared object. The persistent data object is also removed from persistent shared object. You can
use SharedObject.clear to detach from a shared object immediately after SharedObject.get
is invoked. You can use SharedObject.clear when you do not want to use a shared object
anymore and want to remove it from the server completely. This method lets you create shared
objects that persist only for a specified time.
Example
The following example calls the clear method on the shared object myShared:
var myShared = SharedObject.get("foo", true);
var len = myShared.clear();
SharedObject.close
Availability
Flash Communication Server MX.
Usage
SharedObject.close()
Parameters
None.
Returns
Nothing.
Description
Method; detaches a reference from a shared object. A call to the SharedObject.get method
returns a reference to a shared object instance. The reference is valid until the variable that holds
the reference is no longer in use and the script is garbage-collected. To destroy a reference
immediately, you can call SharedObject.close. You can use SharedObject.close when you
don’t want to proxy a shared object any longer.
Example
In this example, mySO is attached as a reference to shared object foo. When you call mySO.close
you detach the reference mySO from the shared object foo.
mySO = SharedObject.get("foo");
// insert code here
mySO.close();
See also
SharedObject.get
44
SharedObject.flush
Availability
Flash Communication Server MX.
Usage
SharedObject.flush()
Parameters
None.
Returns
A Boolean value of true if successful, false otherwise.
Description
Method; causes the server to save the current state of the shared object instance. The shared object
must have been created with the persistence option.
Example
The following example places a reference to the shared object foo in the variable myShared. It
then locks the shared object instance so that no one can make any changes to it, and then saves
the shared object by calling myShared.flush. After the shared object is saved, it is unlocked so
that further changes can be made.
var myShared = SharedObject.get("foo", true);
myShared.lock();
// insert code here that operates on the shared object
myShared.flush();
myShared.unlock();
SharedObject.get
Availability
Flash Communication Server MX.
Usage
SharedObject.get(name, boolPersist [, netConnection])
Parameters
name
Name of the shared object instance to return.
A Boolean value: true for a persistent shared object; false for a nonpersistent
shared object. If no value is specified, the default value is false.
boolPersist
A NetConnection object that represents a connection to an application
instance. You can pass this parameter to get a reference to a shared object on another server or a
shared object that is owned by another application instance. All update notifications for the
shared object specified by the name parameter are proxied to this instance, and the remote
instance notifies the local instance when a persistent shared object changes. The NetConnection
object that is used as the netConnection parameter does not need to be connected when you call
SharedObject.get. The server connects to the remote shared object when the NetConnection
state changes to connected. This parameter is optional.
netConnection
Returns
A reference to a shared object instance.
Server-Side Communication ActionScript
45
Description
Static method; returns a reference to a shared object instance. To perform any operation on a
shared object, the server-side script must get a reference to the named shared object using the
SharedObject.get method. If the object requested is not found, a new instance is created.
There are two types of shared objects, persistent and nonpersistent, and they are in separate name
spaces. This means that a persistent and a local shared object can have the same name, but they
are two distinct shared objects. Shared objects are scoped to the name space of the application
instance and are identified by a string name. The shared object names should conform to the URI
specification.
You can also call SharedObject.get to get a reference to a shared object that is in a name space
of another application instance. This instance can be on the same server or on a different server
and is called a proxied shared object. To get a reference to a shared object from another instance,
create a NetConnection object and use the NetConnection.connect method to connect to the
application instance that owns the shared object. Pass the NetConnection object as the
netConnection parameter of the SharedObject.get method. The server-side script must get a
reference to a proxied shared object before there is a request for the shared object from any client.
To do this, call SharedObject.get in the application.onAppStart handler.
If you call SharedObject.get with a netConnection parameter and the local application
instance already has a shared object with the same name, the shared object converts to a proxied
shared object. All shared object messages for clients connected to a proxied shared object are sent
to the master instance.
If the connection state of the NetConnection object that was used as the netConnection
parameter changes state from connected to disconnected, the proxied shared object is set to idle
and any messages received from subscribers are discarded. The NetConnection.onStatus
handler is called when a connection is lost. You can then re-establish a connection to the remote
instance and call SharedObject.get, which changes the state of the proxied shared object from
idle to connected.
If you call SharedObject.get with a new NetConnection object on a proxied shared object that
is already connected and if the URI of the new NetConnection object doesn’t match the current
NetConnection object, the proxied shared object unsubscribes from the previous shared object,
sends a “clear” event to all subscribers, and subscribes to the new shared object instance. When a
subscribe to a proxied shared object is successful, all subscribers are reinitialized to the new state.
This process lets you migrate a shared object from one application instance to another without
disconnecting the clients.
Updates received by proxied shared objects from subscribers are checked to see if the update can
be rejected based on the current state of the proxied shared object version and the version of the
subscriber. If the change can be rejected, the proxied shared object doesn’t forward the message to
the remote instance; the reject message is sent to the subscriber.
The corresponding client-side ActionScript method is SharedObject.getRemote.
46
Example
This example creates a shared object named foo inside the function onProcessCmd. The function
is passed a parameter, cmd, that is assigned to a property in the shared object.
function onProcessCmd(cmd){
// insert code here
var shObj = SharedObject.get("foo", true);
propName = cmd.name;
shObj.getProperty (propName, cmd.newAddress);
}
The following example uses a proxied shared object. A proxied shared object resides on a server or
in an application instance (called master) that is different than the server or application instance
that the client connects to (called proxy). When the client connects to the proxy and gets a remote
shared object, the proxy connects to the master and gives the client a reference to this shared
object. The following code is in the main.asc file:
application.appStart = function() {
nc = new NetConnection();
nc.connect("rtmp://" + master_server + "/" + master_instance);
proxySO = SharedObject.get("myProxy",true,nc);
// Now, whenever the client asks for a persistent
// shared object called myProxy they will receive myProxy
// shared object from the master_server/master_instance
}
SharedObject.getProperty
Availability
Flash Communication Server MX.
Usage
mySharedObject.getProperty(name)
Parameters
name
The name of the property in the shared object.
Returns
The value of a SharedObject property.
Description
Method; retrieves the value of a named property in a shared object. The returned value is a copy
associated with the property, and any changes made to the returned value do not update the
shared object. To update a property, use the SharedObject.setProperty method.
Example
The following example gets the value of the name property and passes it to the value variable:
value = sharedInfo.getProperty(name);
See also
SharedObject.setProperty
Server-Side Communication ActionScript
47
SharedObject.getPropertyNames
Availability
Flash Communication Server MX.
Usage
mySharedObject.getPropertyNames()
Parameters
None.
Returns
An array containing all the property names of a shared object.
Description
Method; enumerates all the property names for a given shared object. This method returns an
array of strings that refer to the current properties.
Example
This example calls getPropertyNames on the sharedInfo shared object and places the names
into the names variable. It then enumerates those property names in a for loop.
myInfo = SharedObject.get("foo");
var addr = myInfo.getProperty("address");
myInfo.setProperty("city", San Francisco");
var names = sharedInfo.getPropertyNames();
for (x in names){
var propVal = sharedInfo.getProperty(names[x]);
trace("Value of property " + names[x] + " = " + propVal);
}
SharedObject.handlerName
Availability
Flash Communication Server MX.
Usage
SharedObject.onBroadcastMsg = function([p1, ..., pN]){
// insert code here
};
Parameters
Optional parameters passed to the handler method if the message contains userdefined parameters. These parameters are the user-defined JavaScript objects passed to the
SharedObject.send method.
p1, ..., pN
Returns
Any return value is ignored by the server.
Description
Event handler; a placeholder for a property name (onBroadcastMsg in the Usage example above)
that specifies a function object that is invoked when the shared object receives a broadcast
message whose method name matches the property name.
48
The this keyword used in the body of the function is set to the shared object instance returned
by SharedObject.get.
If you don’t want the server to receive a particular broadcast message, do not define this handler.
Example
The following example defines a handler function called broadcastMsg:
var mySO = SharedObject.get("userList", false);
mySO.broadcastMsg = function(msg1, msg2){
trace(msg1 + " : " + msg2);
}
SharedObject.lock
Availability
Flash Communication Server MX.
Usage
SharedObject.lock()
Parameters
None.
Returns
An integer indicating the lock count: 0 or greater indicates success, -1 indicates failure. For
proxied shared objects, always returns -1.
Description
Method; locks the shared object instance. This method gives the server-side script exclusive access
to the shared object; when the SharedObject.unlock method is called, all changes are batched
and one update message is sent to all the clients subscribed to this shared object. If you nest the
SharedObject.lock and SharedObject.unlock methods, make sure there is an unlock for
every lock; otherwise, clients are blocked from accessing the shared object.
You cannot use the SharedObject.lock method on proxied shared objects.
Example
This example locks the myShared shared object, executes the code that is to be inserted, and then
unlocks the object:
var myShared = SharedObject.get("foo");
myShared.lock();
// insert code here that operates on the shared object
myShared.unlock();
SharedObject.name
Availability
Flash Communication Server MX.
Usage
SharedObject.name
Description
Property (read-only); the name of a shared object.
Server-Side Communication ActionScript
49
Example
This example outputs foo to the NetConnection Debugger:
mySO = SharedObject.get("foo");
trace(mySO.name);
SharedObject.onStatus
Availability
Flash Communication Server MX.
Usage
SharedObject.onStatus = function(info) {
// insert code here
};
Parameters
info An information object. For more information, see the Appendix, “Client-Side
Information Objects,” in the Client-Side Communication ActionScript Dictionary.
Returns
Nothing.
Description
Event handler; reports errors, warnings, and status messages associated with either a local instance
of a shared object or a persistent shared object.
Example
The following example defines an onStatus event handler for the shared object soInstance:
soInstance = SharedObject.get("foo", true);
soInstance.onStatus = function(infoObj){
//Handle SO status messages
}
SharedObject.onSync
Availability
Flash Communication Server MX.
Usage
SharedObject.onSync = function(list){
return;
};
Parameters
list An array of objects that contain information about the properties of a shared object that
have changed since the last time the onSync method was called. The notifications for proxied
shared objects are different than for shared objects that are owned by the local application
instance. The following tables list the descriptions for each type of shared object.
50
Local shared objects
Code
Meaning
change
A property was changed by a subscriber.
delete
A property was deleted by a subscriber.
name
The name of a property that has changed or been deleted.
oldValue
The old value of a property. This is true for both change and delete messages; on the client,
oldValue is not set for delete.
Note: Changing or deleting a property on the server side using the SharedObject.setProperty method always
succeeds, so there is no notification of these changes.
Proxied shared objects
Code
Meaning
success
A server change of the shared object was accepted.
reject
A server change of the shared object was rejected. The value on the remote instance was not
changed.
change
A property was changed by another subscriber.
delete
A property was deleted. This notification can occur when a server deletes a shared object or if
another subscriber deletes a property.
clear
All the properties of a shared object are deleted. This can happen when the server’s shared
object is out of sync with the master shared object or when the persistent shared object
migrates from one instance to the other. This event is typically followed by a change message
to restore all the server’s shared object properties.
name
The name of a property that has changed or been deleted.
oldValue
The old value of the property. This is only valid for the reject, change and delete codes.
Note: The SharedObject.onSync method is called when a shared object has been successfully synchronized
with the server. The list object may be empty if there is no change in the shared object.
Returns
Nothing.
Description
Event handler; invoked when a shared object changes. You should set this method to point to a
function you define in order to receive notification of changes made by other subscribers for
shared objects owned by the local application instance. You should also set this method to get the
status of changes made by the server as well as by other subscribers for proxied shared objects.
Server-Side Communication ActionScript
51
Example
The following example creates a function that is invoked whenever a property of the shared object
so changes:
// create a new NetConnection object
nc = new NetConnection();
nc.connect("rtmp://server1.xyx.com/myApp");
// create the shared object
so = SharedObject.get("MasterUserList", true, nc);
// the list parameter is an array of objects containing information
// about successfully of unsuccessfully changed properties
// from the last time onSync() was called
so.onSync = function(list) {
for (var i = 0; i < list.length; i++) {
if (list[i].code == "success") {
// deal with the success case
} else if (list[i].code == "change"){
// deal with the "change"
} else if (list[i].code == "reject"){
// deal with the "reject"
} else if (list[i].code == "delete"){
// deal with the "delete"
} else if (list[i].code == "clear"){
// deal with the "clear"
}
}
}
SharedObject.purge
Availability
Flash Communication Server MX.
Usage
SharedObject.purge(version)
Parameters
version
A version number. All deleted data that is older than this version is removed.
Returns
Nothing.
Description
Method; causes the server to purge all deleted properties that are older than the specified version.
Although you can also accomplish this task by setting the SharedObject.resyncDepth property,
the SharedObject.purge method gives the script more control over which properties to delete.
Example
This example deletes all properties of the myShared shared object that are older than the value of
SharedObject.version - 3.
var myShared = SharedObject.get("foo", true);
myShared.lock();
myShared.purge(myShared.version - 3);
myShared.unlock();
52
SharedObject.resyncDepth
Availability
Flash Communication Server MX.
Usage
SharedObject.resyncDepth
Description
Property; an integer that indicates when the deleted properties of a shared object should be
permanently deleted. You can use this property in a server-side script to resynchronize shared
objects and to control when shared objects are deleted. The default value is infinity.
If the current revision number of the shared object minus the revision number of the deleted
property is greater than the value of SharedObject.resyncDepth, the property is deleted. Also,
if a client connecting to this shared object has a client revision that, when added to the value of
SharedObject.resyncDepth is less than the value of the current revision on the server, all the
current elements of the client shared object are deleted and the valid properties are sent to the
client and the client receives a “clear” message.
This method is useful when you add and delete many properties and you don’t want to send too
many messages to the Flash client. Suppose a client is connected to a shared object that has 12
properties and then disconnects. After that client disconnects, other clients that are connected to
the shared object delete 20 properties and add 10 properties. When the client reconnects, it
could, for example, receive a delete message for the 10 properties it previously had and then a
change message on 2 properties. You could use SharedObject.resyncDepth to send a “clear”
message, followed by a change message for 2 properties, which saves the client from receiving 10
delete messages.
Example
The following example resynchronizes the shared object mySO if the revision number difference is
greater than 10:
mySo = SharedObject.get("foo");
mySo.resyncDepth = 10;
SharedObject.send
Availability
Flash Communication Server MX.
Usage
SharedObject.send(methodName, [p1, ..., pN])
Parameters
methodName The name of a method on a client shared object instance. For example, if you
specify doSomething, the client must invoke the SharedObject.doSomething method, with all
the p1, ..., pN parameters.
Parameters of any ActionScript type, including references to other ActionScript
objects. These parameters are passed to the specified methodName when it executes on the Flash
client.
p1, ..., pN
Server-Side Communication ActionScript
53
Returns
A Boolean value of true if the message was sent to the client; false otherwise.
Description
Method; executes a method in a client-side script. You can use SharedObject.send to
asynchronously execute a method on all the Flash clients subscribing to a shared object. The
server does not receive any notification from the client on the success, failure, or return value in
response to this message.
Example
This example calls the SharedObject.send method to execute the doSomething method in the
client-side ActionScript and passes doSomething the string "this is a test".
var myShared = SharedObject.get("foo", true);
myShared.send("doSomething", "this is a test");
The following example is the client-side ActionScript code that defines the doSomething method:
connection = new NetConnection();
connection.connect("rtmp://www.macromedia.com/someApp");
var x = SharedObject.getRemote("foo", connection.uri, true);
x.connect(connection);
x.doSomething = function(str) {
// process the str
};
SharedObject.setProperty
Availability
Flash Communication Server MX.
Usage
sharedInfo.setProperty(name, value);
Parameters
name
The name of the property in the shared object.
value
An ActionScript object associated with the property, or null to delete the property.
Returns
Nothing.
Description
Method; updates the value of a property in a shared object. A shared object property can be
modified by another user of the shared object between successive calls to
SharedObject.getProperty and SharedObject.setProperty. If you want to preserve
transactional integrity, call the SharedObject.lock method before operating on the shared
object; be sure to call SharedObject.unlock when the operations finish. If you don’t call
SharedObject.lock and the SharedObject.setProperty is called, the change is made to the
shared object, and all subscribers of the object are notified before SharedObject.setProperty
returns. If a call to the SharedObject.lock method precedes a call to
SharedObject.setProperty, all changes are batched and sent when the SharedObject.unlock
method is called.
54
If you call SharedObject.setProperty on the server side, it invokes a change message in the
SharedObject.onSync method on the client side for any Flash Player client that is using the
shared object. The name parameter on the server side is the same as an attribute of the data
property on the client side. For example, the following two lines of code are equivalent: the first
line is server-side ActionScript, and the second is client-side ActionScript:
sharedInfo.setProperty(nameVal, "foo");
clientSO.data[nameVal] = "foo";
Example
This example uses the SharedObject.setProperty method to create the property city with the
value San Francisco. It then enumerates all the property values in a for loop and prints out the
results in the Output window by using a trace action.
myInfo = SharedObject.get("foo");
var addr = myInfo.getProperty("address");
myInfo.setProperty("city", "San Francisco");
var names = sharedInfo.getPropertyNames();
for (x in names){
var propVal = sharedInfo.getProperty(names[x]);
trace("Value of property " + names[x] + " = " + propVal);
}
See also
SharedObject.getProperty
SharedObject.size
Availability
Flash Communication Server MX.
Usage
mySharedObject.size()
Parameters
None.
Returns
An integer indicating the number of properties.
Description
Method; returns the total number of valid properties in a shared object.
Example
This example gets the number of properties of a shared object and assigns that number to the
variable len:
var myShared = SharedObjecd.get(application, "foo", true);
var len = myShared.size();
SharedObject.unlock
Availability
Flash Communication Server MX.
Server-Side Communication ActionScript
55
Usage
mySharedObject.unlock()
Parameters
None.
Returns
An integer indicating the lock count: 0 or greater if successful, -1 otherwise. For proxied shared
objects, this method always returns -1.
Description
Method; unlocks a shared object instance. This causes the script to relinquish exclusive access to
the shared object and lets other clients update the instance. This method also causes the server to
commit all changes made after the SharedObject.lock method is called and sends an update
message to all clients.
You cannot use the SharedObject.unlock method on proxied shared objects.
Example
This example illustrates how easy it is to unlock a shared object.
var myShared = SharedObject.get("foo", true);
myShared.lock();
// insert code to manipulate the shared object
myShared.unlock();
See also
SharedObject.lock
SharedObject.version
Availability
Flash Communication Server MX.
Usage
SharedObject.version
Description
Property (read-only); the current version number of the shared object. Changes made to the
shared object either by the Flash Player client or by the server-side script using the
SharedObject.setProperty method increment the value of the version property.
Stream (object)
The Stream object lets you handle each stream in a Flash Communication Server application. A
stream is a one-way connection between the Flash Player and the Flash Communication Server, or
between two servers. The Flash Communication Server automatically creates a Stream object with
a unique name when NetStream.play or NetStream.publish are called in a client-side script.
You can also create a stream in server-side ActionScript by calling Stream.get. A user can access
multiple streams at the same time, and there can be hundreds or thousands of Stream objects
active at the same time.
You can use the property and methods of the Stream object to shuffle streams in a playlist, pull
streams from other servers, and play and record streams.
56
You can create other Stream properties of any legal ActionScript type, including references to
other ActionScript objects, for a particular instance of the Stream object. The properties are
available until the stream is removed from the application.
For more information about streams, see the NetStream (object) entry in the Client-Side
Communication ActionScript Dictionary.
Property summary for the Stream object
Property (read-only)
Description
Stream.bufferTime
Indicates how long to buffer messages before a stream is played.
Stream.name
The unique name of a live stream.
Method summary for the Stream object
Method
Description
Stream.clear
Deletes a stream previously recorded by the server.
Stream.get
Returns a reference to a Stream object. This is a static method.
Stream.length
Returns the length of a recorded stream in seconds. This is a static method.
Stream.play
Controls the data source of the Stream object.
Stream.record
Records all the data going into the stream.
Stream.send
Sends a call with parameters to all subscribers on a stream.
Stream.setBufferTime
Sets the length of the buffer time in seconds.
Event handler summary for the Stream object
Event handler
Description
Stream.onStatus
Called when there is a change in status.
Stream.bufferTime
Availability
Flash Communication Server MX.
Usage
Stream.bufferTime
Description
Property (read-only); indicates how long to buffer messages before a stream is played. This
property applies only when playing a stream from a remote server or when playing a recorded
stream locally.
A message is data that is sent back and forth between the Flash Communication Server and the
Flash Player. The data is divided into small packets (messages), and each message has a type
(audio, video, or data).
Server-Side Communication ActionScript
57
Stream.clear
Availability
Flash Communication Server MX.
Usage
Stream.clear()
Parameters
None.
Returns
A Boolean value of true if the call succeeds, false otherwise.
Description
Method; deletes a stream that uses previously recorded by the server.
Example
This example deletes a recorded stream called foo. Before the stream is deleted, the example
defines an onStatus handler that uses two information object error codes,
NetStream.Clear.Success and NetStream.Clear.Failure, to send status messages to the
Output window.
s = Stream.get("foo");
if (s){
s.onStatus = function(info){
if(info.code == "NetStream.Clear.Success"){
trace(info.description);
}
if(info.code == "NetStream.Clear.Failure"){
trace(info.description);
}
};
s.clear();
}
Note: The Stream information object is nearly identical to the client-side ActionScript NetStream information
object. For more information, see the Appendix, “Server-Side Information Objects,” on page 67.
Stream.get
Availability
Flash Communication Server MX.
Usage
Stream.get(name)
Parameters
name
The name of the stream instance to return.
Returns
A reference to a stream instance.
Description
Method (static); returns a reference to a Stream object. If the requested object is not found, a new
instance is created.
58
Example
This example gets the stream foo and assigns it to the variable playStream. It then calls the
Stream.play method from playStream.
function onProcessCmd(cmd){
var playStream = Stream.get("foo");
playStream.play("file1", 0, -1);
}
Stream.length
Availability
Flash Communication Server MX.
Usage
Stream.length(name)
Parameters
name
Name of a recorded stream.
Returns
The length of a recorded stream in seconds.
Description
Method (static); returns the length of a recorded stream in seconds. If the stream requested is not
found, the return value is 0.
Example
This example gets the length of the stream foo and assigns it to the variable streamLen:
function onProcessCmd(cmd){
var streamLen = Stream.length("foo");
trace("Length: " + streamLen + "\n");
}
Stream.name
Availability
Flash Communication Server MX.
Usage
Stream.name
Description
Property (read-only); contains a unique string associated with a live stream. You can also use this
as an index to find a stream within an application.
Stream.onStatus
Availability
Flash Communication Server MX.
Server-Side Communication ActionScript
59
Usage
myStream.onStatus = function([infoObject]) {
// Insert code here
};
Parameters
infoObject An optional parameter defined according to the status message. For details about
this parameter, see the Appendix, “Server-Side Information Objects,” on page 67.
Returns
Nothing.
Description
Event handler; invoked every time the status of a Stream object changes. For example, if you play
a file in a stream, Stream.onStatus is invoked. Use Stream.onStatus to check when play starts
and ends, when recording starts, and so on.
Example
This example defines a function that executes whenever the Stream.onStatus event is invoked:
s = Stream.get("foo");
s.onStatus = function(info){
// insert code here
};
Stream.play
Availability
Flash Communication Server MX.
Usage
Stream.play(streamName, [startTime, length, reset, remoteConnection])
Parameters
streamName
The name of any published live stream or recorded stream.
startTime The start time of the stream playback, in seconds. If no value is specified, it is set to
-2. If startTime is -2, the server tries to play a live stream with the name specified in
streamName. If no live stream is available, the server tries to play a recorded stream with the name
specified in streamName. If no recorded stream is found, the server creates a live stream with the
name specified in streamName and waits for someone to publish to that stream. If startTime is
-1, the server attempts to play a live stream with the name specified in streamName and waits for
a publisher if no specified live stream is available. If startTime is greater than or equal to 0, the
server plays the recorded stream with the name specified in streamName, starting from the time
given. If no recorded stream is found, the play method is ignored. If a negative value other than
-1 is specified, the server interprets it as -2. This is an optional parameter.
length The length of play, in seconds. For a live stream, a value of -1 plays the stream as long as
the stream exists. Any positive value plays the stream for the corresponding number of seconds.
For a recorded stream, a value of -1 plays the entire file, and a value of 0 returns the first video
frame. Any positive number plays the stream for the corresponding number of seconds. By
default, the value is -1. This is an optional parameter.
60
A Boolean value that flushes the playing stream. If reset is false, the server maintains a
playlist, and each call to Stream.play is appended to the end of the playlist so that the next play
does not start until the previous play finishes. You can use this technique to create a dynamic
playlist. If reset is true, any playing stream stops, and the playlist is reset. By default, the value is
true. This is an optional parameter.
reset
A reference to a NetConnection object that is used to connect to a remote
server. The requested stream plays from the remote server if this parameter is provided. This
parameter is optional.
remoteConnection
Returns
A Boolean value: true if the Stream.play call is accepted by the server and added to the playlist;
false otherwise. The Stream.play method can fail if the server fails to find the stream or if an
error occurs. To get information about the Stream.play call, you can define a Stream.onStatus
handler to catch the play status or error.
If the streamName parameter is false, the stream stops playing. A Boolean value of true is
returned if the stop succeeds; false otherwise.
Description
Method; controls the data source of a stream with an optional start time, duration, and reset flag
to flush any previously playing stream. The Stream.play method also has a parameter that lets
you reference a NetConnection object to play a stream from another server. The Stream.play
method allows you to do the following:
• Chain streams between servers.
• Create a hub to switch between live streams and recorded streams.
• Combine different steams into a recorded stream.
You can combine multiple streams to create a playlist for clients. The server-side Stream.play
method behaves a bit differently than the NetStream.play method on the client side. A play call
on the server is similar to a publish call on the client. It controls the source of the data that is
coming into a stream. When you call Stream.play on the server, the server becomes the
publisher. Because the server has a higher priority than the client, the client is forced to unpublish
from the stream if the server calls a play method on the same stream.
In general, if any recorded streams are included in a server playlist, you cannot play the server
stream as a live stream.
Note: A stream that plays from a remote server by means of the NetConnection object is a live stream.
If you require a value to begin a stream, you may need to change the Application.xml file’s
“Enhanced seeking” flag at the server. “Enhanced seeking” is a Boolean flag in the
Application.xml file. By default, this flag is set to false. When a play occurs, the server seeks to
the closest video keyframe possible and starts from that keyframe. For example, if you want to
play at time 15, and there are keyframes only at time 11 and time 17, seeking will start from time
17 instead of time 15. This is an approximate seeking method that works well with compressed
streams.
If the flag is set to true, some compression is invoked on the server. Using the previous example,
if the flag is set to true, the server creates a keyframe—based on the preexisting keyframe at time
11—for each keyframe from 11 through 15. Even though a keyframe does not exist at the seek
time, the server generates a keyframe, which involves some processing time on the server.
Server-Side Communication ActionScript
61
Example
This example illustrates how streams can be chained between servers:
application.myRemoteConn = new NetConnection();
application.myRemoteConn.onStatus = function(info){
trace("Connection to remote server status " + info.code + "\n");
// tell all the clients
for (var i = 0; i < application.clients.length; i++){
application.clients[i].call("onServerStatus", null,
info.code, info.description);
}
};
// Use the NetConnection object to connect to a remote server
application.myRemoteConn.connect(rtmp://movie.com/movieApp);
// Setup the server stream
application.myStream = Stream.get("foo");
if (application.myStream){
application.myStream.play("Movie1", 0, -1, true, application.myRemoteConn);
}
The following example shows Stream.play used as a hub to switch between live streams and
recorded streams:
// Set up the server stream
application.myStream = Stream.get("foo");
if (application.myStream){
// this server stream will play "Live1",
// "Record1", and "Live2" for 5 seconds each
application.myStream.play("Live1", -1, 5);
application.myStream.play("Record1", 0, 5, false);
application.myStream.play("Live2", -1, 5, false);
}
The following example combines different streams into a recorded stream:
// Set up the server stream
application.myStream = Stream.get("foo");
if (application.myStream){
// Like the previous example, this server stream
// will play "Live1", "Record1", and "Live2"
// for 5 seconds each. But this time,
// all the data will be recorded to a recorded stream "foo".
application.myStream.record();
application.myStream.play("Live1", -1, 5);
application.myStream.play("Record1", 0, 5, false);
application.myStream.play("Live2", -1, 5, false);
}
The following example uses Stream.play to stop playing the stream foo:
application.myStream.play(false);
Stream.record
Availability
Flash Communication Server MX.
Usage
Stream.record(flag)
62
Parameters
This parameter can have the value record, append, or false. If the value is record, the
data file is overwritten if it exists. If the value is append, the incoming data is appended to the end
of the existing file. If the value is false, any previous recording stops. By default, the value is
record.
flag
Returns
A Boolean value of true if the recording succeeds, false otherwise.
Description
Method; records all the data going through a Stream object.
Example
This example opens a stream s and, when it is open, plays sample and records it. Because no
value is passed to the record method, the default value, record, is passed.
// To start recording
s = Stream.get("foo");
if (s){
s.play("sample");
s.record();
}
// To stop recording
s = Stream.get("foo");
if (s){
s.record(false);
}
Stream.send
Availability
Flash Communication Server MX.
Usage
Stream.send(handlerName, [p1, ..., pN])
Parameters
Calls the specified handler in client-side ActionScript code. The handlerName
value is the name of a method relative to the subscribing Stream object. For example, if
handlerName is doSomething, the doSomething method at the stream level is invoked with all
the p1, ..., pN parameters. Unlike the method names in Client.call and
NetConnection.call, the handler name can be only one level deep (that is, it cannot be of the
form object/method).
handlerName
Note: Do not use a built-in method name for a handler name. For example, the subscribing stream will be closed if
the handler name is close.
Parameters of any ActionScript type, including references to other ActionScript
objects. These parameters are passed to the specified handler when it is executed on the Flash
client.
p1, ..., pN
Returns
A Boolean value of true if the message was sent to the client, false otherwise.
Server-Side Communication ActionScript
63
Description
Method; calls a method on all the clients subscribing to a stream. When you call Stream.send on
the server side, any client publishing to that stream is stopped from publishing. Therefore, the
best practice is to create a new stream before calling Stream.send. There should be one stream
for every communication call in a Flash Communication Server application.
Example
This example calls the method Test on the client-side Stream object and sends it the string
"hello world":
application.streams["foo"].send("Test", "hello world");
The following example is the client-side ActionScript that receives the Stream.send call. The
method Test is defined on the Stream object:
tStream.Test = function(str) {
// insert code to process the str
}
Note: Only the subscriber can send messages on a stream. Therefore, if you use the Stream.send method on the
server side to publish on a stream that is owned by a client, the server usurps the client’s ownership of the stream
and stops all play on that stream. Make sure that you safely own a stream before calling Stream.send on the server.
Stream.setBufferTime
Availability
Flash Communication Server MX.
Usage
Stream.setBufferTime()
Description
Method; increases the message queue length. When you play a stream from a remote server, the
Stream.setBufferTime method sends a message to the remote server that adjusts the length of
the message queue. The default length of the message queue is 2 seconds. You should set the
buffer time higher when playing a high-quality recorded stream over a low-bandwidth network.
When a user clicks a seek button in an application, buffered packets are sent to the server. The
buffered seeking in a Flash Communication Server application occurs on the server; the Flash
Communication Server doesn’t support client-side buffering. The seek time can be smaller or
larger than the buffer size, and it has no direct relationship to the buffer size. Every time the server
receives a seek request from the Flash Player, it clears the message queue on the server. The server
tries to seek to the desired position and starts filling the queue again. At the same time, the Flash
Player also clears its own buffer after a seek request, and the buffer is eventually filled after the
server starts sending the new messages.
64
trace
Availability
Flash Communication Server MX.
Usage
trace("Hello world");
trace("Value of i = " + i);
Returns
Nothing.
Description
Method (global); displays the value of an expression in the Output window. The trace message is
also published to the logs/application appname stream, which is available in the Administration
Console or in the Communication App inspector. The values in the trace expression are
converted to strings if possible before they are sent to the Output window. You can use the trace
method to debug a script.
Server-Side Communication ActionScript
65
66
APPENDIX
Server-Side Information Objects
The Application, NetConnection, and Stream objects provide an onStatus event handler that
uses an information object for providing information, status, or error messages. To respond to this
event handler, you must create a function to process the information object, and you must know
the format and contents of the information object returned.
You can define the following global function at the top of your main.asc file to display all the
status messages for the parameters that you pass to the function. You need to place this code in
the main.asc file only once.
function showStatusForClass(){
for (var i=0;i<arguments.length;i++){
arguments[i].prototype.onStatus = function(infoObj){
trace(infoObj.code + " (level:" + infoObj.level + ")");
}
}
showStatusForClass(Application, NetConnection, Stream)
For more information about information objects, see the appendix of the Client-Side
Communication ActionScript Dictionary.
An information object has the following properties: level, code, description, and details.
All information objects have level and code properties, but only some have the description
and/or details properties. The following tables list the code and level properties as well as the
meaning of each information object.
Application information objects
The following table lists the information objects for the Application object.
Code
Level
Meaning
Application.Script.Error
Error
The ActionScript engine has encountered a runtime error.
In addition to the standard infoObject properties, the
following properties are set:
filename: name of the offending ASC file.
lineno: line number where the error occurred.
linebuf: source code of the offending line.
Application.Script.Warning
Warning
The ActionScript engine has encountered a runtime warning.
In addition to the standard infoObject properties, the
following properties are set:
filename: name of the offending ASC file.
lineno: line number where the error occurred.
linebuf: source code of the offending line.
67
Code
Level
Application.Resource.LowMemory Warning
Meaning
The ActionScript engine is low on runtime memory. This
provides an opportunity for the application instance to free
some resources or take suitable action.
If the application instance runs out of memory, it is unloaded
and all users are disconnected. In this state, the server will not
invoke the Application.onDisconnect event handler or
the Application.onAppStop event handler.
Application.Shutdown
Status
This information object is passed to the onAppStop handler
when the application is being shut down.
Application.GC
Status
This information object is passed to the onAppStop event
handler when the application instance is about to be
destroyed by the server.
NetConnection information objects
The NetConnection object has the same information objects as the client-side NetConnection
object.
Code
Level
Meaning
NetConnection.Call.Failed
Error
The NetConnection.call method was not able to invoke
the server-side method or command.*
NetConnection.Connect.AppShutdown
Error
The application has been shut down (for example, if the
application is out of memory resources and must shut down
to prevent the server from crashing) or the server has shut
down.
NetConnection.Connect.Closed
Status
The connection was closed successfully.
NetConnection.Connect.Failed
Error
The connection attempt failed.
NetConnection.Connect.InvalidApp
Error
The application name specified during the connection
attempt was not found on the server.
NetConnection.Connect.Rejected
Error
The client does not have permission to connect to the
application, or the application expected different
parameters from those that were passed.**
NetConnection.Connect.Success
Status
The connection attempt succeeded.
*
This information object also has a description property, which is a string that provides a specific reason for
the failure.
**
This information object also has an application property, which contains the value that the
application.rejectConnection server-side method returns.
Stream information objects
The information objects of the Stream object are similar to those of the client-side
NetStream object.
68
Code
Level
Meaning
NetStream.Clear.Success
Status
A recorded stream was deleted successfully.
NetStream.Clear.Failed
Error
A recorded stream failed to delete.
NetStream.Publish.Start
Status
An attempt to publish was successful.
NetStream.Publish.BadName
Error
An attempt was made to publish a stream that is already being
published by someone else.
Appendix
Code
Level
NetStream.Failed
Error
An attempt to use a Stream method failed.*
NetStream.Unpublish.Success
Status
An attempt to unpublish was successful.
NetStream.Record.Start
Status
Recording was started.
NetStream.Record.NoAccess
Error
An attempt was made to record a read-only
stream.
NetStream.Record.Stop
Status
Recording was stopped.
NetStream.Record.Failed
Error
An attempt to record a stream failed.
NetStream.Play.Start
Status
Play was started.**
NetStream.Play.StreamNotFound
Error
An attempt was made to play a stream that does not exist.
NetStream.Play.Stop
Status
Play was stopped.
NetStream.Play.Failed
Error
An attempt to play back a stream failed.* **
NetStream.Play.Reset
Status
A playlist was reset.
NetStream.Play.PublishNotify
Status
The initial publish to a stream was successful. This message is
sent to all subscribers.
NetStream.Play.UnpublishNotify Status
Meaning
An unpublish from a stream was successful. This message is
sent to all subscribers.
*
This information object also has a description property, which is a string that provides a specific reason for
the failure.
**
This information object also has a details property, which is a string that provides the name of the streams
being played. This is useful for multiple plays. The details property shows the name of the stream when
switching from one element in the playlist to the next element.
Server-Side Information Objects
69