1
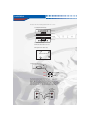
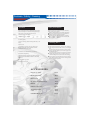
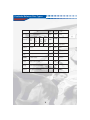
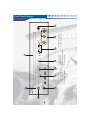
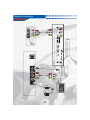
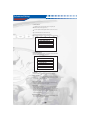
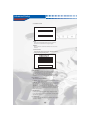
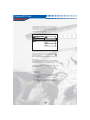
TRAY LOADED MULITI-FORMAT DVD
PLAYER WITH REMOTE
AVDVD10P
Table of Contents
Table of Contents
INTRODUCTION
3
WARNINGS
4
INSTALLATION
5
FEATURES
6
SAFETY INFORMATION
6
CLEANING DISCS
6
CONTRASTS BETWEEN DISC TYPES
7
SUPPORTING FUNCTIONS OF DISC
8
OPERATION AND USE
8
FRONT PANEL DIAGRAM
9
BACK PANEL DIAGRAM
10
SYSTEM CONNECTIONS
10
REMOTE CONTROL DIAGRAM
12
BUTTON LOCATIONS AND FUNCTIONS
13
ADVANCED SETUP
16
PLAYING MP3 FILES
19
VIEWING KODAK PICTURE CDs
20
TROUBLESHOOTING
21
SPECIFICATIONS
22
WARNING / DISCLAIMER
23
WARRANTY
24-25
2
Warnings
WARNING: DANGEROUS HIGH VOLTAGES ARE
PRESENT INSIDE THE ENCLOSURE.
TO REDUCE THE RISK OF FIRE OR
ELECTRIC SHOCK, DO NOT OPEN
THE CABINET. REFER SERVICING
TO QUALIFIED PERSONNEL ONLY.
ATTENTION: TO PREVENT ELECTRIC SHOCK,
MATCH WIDE BLADE OF PLUG TO
WIDE SLOT, FULLY INSERT.
LASER:
This Digital Video Disc Receiver employs
a Laser System. To ensure proper use of
this product, please read this owner ' s
manual carefully and retain for future
reference. Should the unit require maintenance, contact an authorized service
location-see service procedure.
Use of controls, adjustments or the performance of procedures other than those
specified may result in hazardous radiation
exposure.
To prevent direct exposure to laser beam,
do not try to open the enclosure.
Visible and invisible laser radiation when
open and interlocks defeated.
DO NOT STARE INTO BEAM
CAUTION
RISK OF ELECTRIC SHOCK. DO NOT OPEN
To reduce the risk of electric shock, do not remove cover (or back).
No user serviceable parts inside. Refer servicing to qualified
service personnel.
The lightning flash with arrowhead symbol, within
an equilateral triangle, is intended to alert user to
the presence of uninsulated dangerous voltage
within the product enclosure that may be of sufficient
magnitude to constitute a risk of electric shock to
persons.
The exclamation point within an equilateral triangle
is intended to alert the user to the presence of important operating and maintenance (servicing) instruction in the literature accompanying the appliance.
Special note regarding use of player in vehlclrs
We strongly advise against using the player while driving.
Most countries and states have laws which prohibit or severely restrict the use of the player in vehicles while driving.
4
Installation
The device has 2 Pcs mounting hardware and 4 Pcs screws.
1. Fix the unit horizontally.
The device
Fixed face
2. Hang the unit.
Fixed face
The device
3. Fix the 4 Pcs screws.
NOTE: Must attach the device well.
4. The positions of rubber foot.
Bottom of the device
5. Connecting with power.
DC+
NOT USED
DC+
GND˄-˅
Put the square plug into socket (note the direction of the lug when
connecting) and connect RED cable with VBAT 'S +, black cable
VBAT'S- or ACC'S- and yellow cable with ACC'S+.
NOTE: Must pay attention to power ' s polarity and connecting
cable colour to avoid damage the device or other equipment and
input power DC 12V-24V. If connected to power of alternator
only, when alternator off, the car DVD player will standby.
ACC
DC OUTPUT
˄12-24V˅
+
V BAT
DC OUTPUT
˄12-24V˅
YELLO W
+
RED
-
BLAC K
5
-
Features / Safety / Cleaning
Safety Information
Features
10-bit video D/A converter, 96KHz/24bit audio D/A
converter, Dolby AC-3 decoder, DTS digital Output.
Do not expose the system to excessive moisture,
rain, sand, or heat sources.
Place the CAR DVD Player on a firm, flat surface.
Keep the CAR DVD Player away from domestic
heating equipment and direct sunlight.
When placing the CAR DVD Player in a cabinet,
allow about one inch of space all around the CAR
DVD Player for ventilation.
Video output, Coaxial digital audio output,
2 channel stereo audio output.
Front L/R audio in, video in.
TV tuner.(option)
Last scene memory, Shock Memory(DVD/4sec, CD/
10sec).
Cleaning Discs
Parental lock
When a Disc becomes dirty, clean it with a cleaning
cloth. Wipe the Disc from the center out, in a straight
line.
Do not use solvents such as benzine, thinner, commercially available cleaners, or anti-static spray intended for analog discs.
Always keep the tray closed to avoid dust on the lens.
The lens may cloud over if you suddenly move the
CAR DVD Player from cold to warm surroundings.
Playing a Disc is not possible then. Leave the power
on for about one hour with no Disc in the Player until
normal playback is possible.
Compatibility of DVD, CD, VCD, Picture CD,
MP3 file, JPEG file and disc formats of CD-R,
CD-RW and CD-G(only audio).
DVD/Tuner/Aux Mode Select(tuner option).
NTSC/PAL compatibility
Playback functions of Multi-angle Multi-language
Pause, Fast Forward/Backward Search, Slow, Step,
Zoom, etc.
DC jack, Molex type jack.
Remote eye sensor jack.
ACCESSORIES:
Remote eye sensor
1PCS
RCA Cable(1.2m)
1 PCS
Rubber foot
4 PCS
DC Power Cable(Molex type)
1 PCS
Remote
1 PCS
Batteries(AAA1.5V)
2 PCS
Mounting brackets
screw
2 PCS
4 PCS
OWNER ' S MANUAL
1 PCS
6
Contrasts Between Disc Types
DVD
Recording
Capacity
Digital/MPEG2
One side,
mono
layer
4.7GB
Double
layer
Mono
layer,
Mono
side,
8.5GB
double
Side,
Double
sides,
double
layer,
9.4GB
17GB
242
min
266
min
484
min
SVCD
VCD
CD
LD
digital
digital
Analog
650MB
650MB
45min
74min
1side:60min
2side:102min
12cm
/8cm
30cm
/20cm
Play time
133
min
Disc
diameter
12cm/8cm
12cm
Horizontal
resolution
500 line or above
350
line
Picture
scale
Multi-scales
Subtitle
language
32 subtitle language
Sound
Dolby decoder/ linear PCM
Sound
quality
44.1KHz, 48KHz,96KHz16,20,24bit
channels
Dolby digital/linear PCM:8
Dolby digital/5+1 linear PCM:8
430
line
One
Utmost 16
8
Linear
Linear PCM,
PCM
FM
44.1KHz
/16bit
4
2
Linear
PCM:2
analog:2
Supporting Functions / Operation
Supporting function of disc
DVD discs can support many functions, different
makers, and different function support. Prevalent
marks of a few functions as follows:
ALL
NTSC zone code & TV system
N T S C
DOLBY digital surround sound
Numbers of sound language
2
16:9
R
Numbers of subtitle language
LB
RESTRICTED
Picture scale mode
Parental lock
4
View angle
CC
Close caption
(Only NTSC)
Operation and Use
1ǃConnect the DVD Player directly to the LED
or Monitor.
Turn on the LED or Monitor power and press the POWER key
of CAR DVD Player. Set the TV to the correct Video In channe
A/V cable between CAR DVD player and LED or Monitor set.
See your TV manual for details. Or, change TV
l
channels until you see the manufactory's LOGO
on the TV screen.
2. Play Discs
Press OPEN/CLOSE on either the remote or the front panel
to open and close the drawer.
If the disc is a DVD, the unit will play the MENU or TITLE
of the disc.
If the disc is VCD or SVCD, the unit will begin play as
authored.
If the disc is a music CD the unit will play sequentially from
track 1.
3. Playing An Auxiliary A/V Source:
Press the AV key on the remote. Shuffle to input to watching
the programs from other outside A/V devices.
1
2
1.
2.
3.
4.
3
4
PLAY/PAUSE
Power button
Earphone output jack
Infrared I.R.
Play/pause button
POWER
EARPHONE
10
5. Stop button
6. Skip button
7. External A/V input
8. Eject button
5
STOP
9
6
SKIP
7
AUDIO
9. DVD disc holder
10. Power indicatior
VIDEO
EJECT
8
Front Panel Diagram
6. Power jack
3. Left and right surround output jack
5
5. RF input(option)
4
2. Video output jack
3
4. Coaxial output jack
2
1. Remote eye in jack
1
6
Back Panel Diagram
YELLO W
VIDEO
WHITE
AUDIO
R
Connect with the
A/V devices that
have COAXIAL
input.
L
RE D
LCD or Monitor A/V input
O 3.5mm
STOP
O 3.5mm stereo earphone
PLAY/PAUSE
SKIP
WHITE
VIDEO
L
AUDIO
R
AUDIO
EJECT
RE D
EARPHONE
POWER
VIDEO
VCR A/V OUTPUT
System Connections
YELLO W
Remote Control Diagram
14.Title
15.Mute
16.FB, FF
17.PREV, Next
18.Stop, Pause
Play
19.Root
20.Zoom
21.A-B
22.Volume
23.Repeat
24.Angle
25.Subtitle
1. STANDBY
2. DVD
3. TV(option)
4. OSD
5. Shuffle
6. Numeral buttons
7.Goto
8. Clear
9. Step
10.Program
11.Slow
12.Setup
13.Curser Control/
ENTER
26.AV
27.PBC
28.Open/Close
29. Language
30 . Resume
31 . L/R
32 . N/P
Using the Remote Control
Unless stated otherwise, the remote control can operate
all the features of the DVD Player.
Always point the remote control directly at the remote
sensor on the front of the DVD Player.
Battery Installation
Remove the battery compartment lid on the rear of the
remote control by sliding the lid down, then off.
Place two AA batteries inside the battery compartment
with their + and ends aligned as indicated. Do not mix
old and new batteries or different types of batteries
Replace the battery compartment lid. Slide the lid until
you hear it click into place.
OPEN/CLOSE
STANDBY
28
DVD
TV
OSD
SHUFFLE
PBC
AV
27
26
ANGLE SUBTITLE
25
10+
GOTO
CLEAR
REPEAT
STEP
VOL.
SLOW
VOL.
PROGRAM
A-B
SETUP
ZOOM
ENTER
TITLE
29
ROOT
RESUME
LANGUAGE
L/R
N/P
MUTE
PAUSE
PLAY
STOP
FB
FF
PREV
NEXT
30
31
32
Button Locations and Functions
1. STANDBY : Use this to turn the CAR DVD player on
and off for normal use.
2. DVD˖Press DVD key, shuffle to DVD mode.
3. TV˖Press TV key, shuffle to TV mode.
4. OSD : When playing a DVD, p ress once to show an o nscreen d isplay of the current title and chapter, press
again to dispaly the remaining time. Press a third time
to display chapter elapsed time. Press a fourth time to
display chapter remaining time. A fifth pess will turn
the On Screen Display off.
For all CD, VCD, SVCD discs (PBC off), press once for
single track elapsed time. Press again for single track
remaining time. Press a third time for total elapsed
time. The fourth press displays total remaining time,
and the fifth press turns the OSD off.
For MP3 discs, press once for single track elapsed time.
Press again for single track remaining time and the third
press turns the OSD off.
5. SHUFFLE : When in STOP state, Selects CD AND MP3
music tracks in random order.
6.NUMERAL BUTTONS: Use for direct access to chapters,
titles, and tracks(not all discs allow direct access).You
may also start a disc from a particular title and chapter,
or at a particular time.
To skip to a track or chapter while playing a disc , press
GO TO, then select the track or chapter number desired
(use+10 key for tracks above 9), then press ENTER.
¡Ä
¡Å
¡Ä
¡Å
7.GO TO: To start playing a specific title at a specific chapter,
press GO TO, the n use the
keys to highlight the title.
Enter the desired title number using the number keys.Use the
keys to highlight the desired chapter and enter this using
the number keys.
Press ENTER and the disc will begin playing from the point
you selected.
¡Ä
¡Å
¡Ä
¡Å
To start playing a disc from a specific time, press GO TO twice.
Use the
keys to highlight Title and select a title number
using the number keys. Use the
keys to highlight Time
and enter it using the number keys. You must enter a 0 first
for hours less than 10. Press ENTER and play will begin from
your selected time.
8.CLEAR: Clears the last entry while programming.
9.STEP: Each press advances one frame in DVD mode.
10.PROGRAM: When in PBC OFF mode with the disc stopped,
you may program a playing sequence (for VCD/CD/MP3
/SVCD).
At stop state
Press Program button to go into program mode.
Use Numeral buttons to select the song.
When finished, press Stop button to stop program.
Button Locations and Functions
Press Play button to play in the turn that you program.
Press STOP and PROGRAM button to exit program play.
Press CLEAR button to last enter while programming.
MP 3 programming refers to page 15.
11.SLOW: Press SLOW button continually, the playing
mode will circle within SF 2X, SF 4X,SF 8X, SR 2X,
SR 4X, SR 8X and normal play(for DVD disc).
The playing mode will circle with in SF 1X, SF 2X,
SF 3X and normal play(for SVCD/VCD disc).
12. SETUP: Use to enter the unit main setup menus. Disc
play will stop when selected. Press the button again to
exit the menu when you are done.
13.Curser Control and ENTER: Press these buttons to
navigate through menus. Use the ENTER key to make
your selection.
14.TITLE: The unit will return to the disc title page. You
may navigate and make your selection using the
CURSOR, ENTER and PLAY keys.
15.MUTE: Press to toggle between muted and non- muted
state.
16.FB, FF: Press FF button continually, the playing
mode will circle within FF 2X, FF 4X, FF 8X, FF 16X ,
FF32, FF64 and n ormal play(for DVD disc).
The playing mode will circle within FF 2X, and normal
play(for MP3 disc).
The playing mode will circle within FF 1X,
FF 2X, FF 3X, FF 8X and normal play(for CD/VCD/
SVCD disc).
Press FB button continually, the playing mode
will circle within FR 2X, FR 4X, FR 8X,FR 16X, FB32,
FB64 and normal play(for DVD disc).
The playing mode will circle within FR 1X, FR 2X, FR
3X, FR 4X and normal play(for CD/VCD/SVCD disc).
17.PREW, NEXT: Disc play- Selects PREVIOUS or NEXT
track or Chapter.
18.TRANSPORT CONTROLS: Use to start, stop, or pause
disc playback.
For DVD press the STOP key once, the unit enters
Ā memory stop.āPlay resumes from the same point when
PLAY is pressed. Press STOP a second time to resume from
the discs beginning with the next press of PLAY.
19.ROOT: Press to select the disc menu for the current title.
This may vary depending on how the particular disc is
mastered. If there is no menu level, this button will select
the current title.
20.ZOOM: Each successive press zooms the image 1.5x, 2x,
and 3x. Press again to revert to normal size.
14
Button Locations and Functions
21.A-B: Repeats a user-defined section of a DVD, VCD, CD.
Press the button once at the start of the section you wish to
repeat, press it again at the end of the selection. Press the
button again to cancel A-B repeat.
22.VOLUME: Press to adjust volume level from 00 (Minimum)
to 16 (Maximum). The level is displayed on the OSD.
23.REPEAT: Press REPEAT button to select playing mode:
When playing DVD Press once to select chapter Repeat,
Press again to select title Repeat, press third Repeat OFF.
When playing CD Press REPEAT button to select REP ONE
or REP ALL.
When playing VCD, SVCD (PBC OFF) Press REPEAT
button to select REP ONE or REP ALL.
M P 3 REPEAT refers to page 15.
24.ANGLE: Selects different view angles. Very few DVDs
support this feature.
25.SUBTITLE: Selects different subtitles available on the
DVD. Not all DVDs support subtitle selection from this
key.
26.AV: Press AV key, shuffle to A/V input from outside
devices.
27.PBC: This key toggles the Playback Control state.
Normal default operation is PBC ON(for VCD2.0,
SVCD).
28.OPEN/CLOSE: Press to eject the disc tray, or to load the
disc tray.
29.LANGUAGE: This button selects one of the audio
streams available on a DVD. Some DVDs only allow
selection of the audio stream from the DVD menu.
30.RESUME: Resume SVCD, VCD, CD playing when it
is in memory stop.
31.L/R: Press L/R button continually the audio mode will
circle within AUDIO1, AUDIO2, AUDIO1 VOCAL,
AUDIO2 VOCAL (for DVD), within LEFT VOCAL,
RIGHT VOCAL, MONO LEFT, MONO RIGHT,
STEREO (for VCD). If the disc has two sound
languages, you can use this button to select one.
32.N/P: Press N/P to switch Video Output among PAL,
NTSC and MULTI TV type (at STOP state).
Advanced Setup
1. MAIN PAGE
In STOP mode, press the SETUP key to display the
MAIN PAGE of the setup menus.
Use the UP(¡Ä ) and Down(¡Å ) buttons to move the cursor.
Use ENTER buttons to enter the menu.
Cho ose EXIT SETUP and exit setup menu.
(Press the SETUP button at any time to exit the setup menu)
SETUP M E NU--MAIN PAGE
GENERAL SETUP
SPEAKER SETUP
AUDIO SETUP
PREFERENCES
EXIT SETUP
2. GENERAL PAGE
Select your TV type, Pic Mode, turn angle mark on/off , and
select the On Screen Display language.
GENERAL PAGE
PIC MODE
ANGELE MARK
OSD LANG
CAPTIONS
SCREEN SAVER
MAIN PAGE
PIC MODE:
Select AUTO, HI-RES and NON-FLICKER MODE.
ANGEL MARK:
Some DVDs feature scenes recorded with multiple camera
angels. With Angel mark on, the OSD will display the number indicating the angel selected.
OSD LANG(UAGE):
Select the language you prefer for the on screen Dispaly.
Language choices will vary by region.
CAPTIONS:
Set the default language for closed captions on those discs
which support it . If captions are set to OFF(DEFAULT),
you may turn them off or change them using the SUBTITLE
button on them on the remote control. Some discs do not
support this feature, or only support subtitle the selection
from DVD menu only.
SCREEN SAVER:
The CAR DVD automatically activates DVD VIDEO screen
saver after a few minutes of inactivity.
Advanced Setup
3. GENERAL PAGE
SPEAKER SETUP PAGE
DOWNMIX
MAIN PAGE
LT/RT:
Sends the Left and Right channels of the 5.1 channel
surround mix to the main left and right outputs.
STEREO:
Stereo remixes all of the main channels to the two stereo
channels.
4.AUDIO SETUP
Select the input and output formats, SPDIF OUTPUT
setting, and Compression options.
AUDIO SETUP
SPDIF OUTPUT
DUAL MONO
COMPERESSION
LPCM OUTPUT
MAIN PAGE
SPDIF OUTPUT:
Leave on Analog (default) to use the conventional 5.1 output.
Set to SPDIF/RAW to use the coaxial output to feed an external Dolby Digital or DTS surround processor.
Set to SPDIF/PCM (Linear Pulse code Modulation) to feed
an outboard stereo D to A converter Stereo-only digital input.
DUAL MONO:
The normal setting is STEREO.
L-MONO: sends only the left channel signal to both Left and
Right output channels.
R-MONO: sends only the right channel output to both channnels. These two selections are useful for some VCDs which
may have one language on each channel in mono.
MIX-MONO: mixes both left and right channnels, sending
the resulting mono mix to both output channels. Use this when
you are using a mono speaker/amplifier system, or older TV
with a single speaker.
COMPRESSION:
Controls the amount of dynamic range compression from
FULL compression to no compression (OFF). You may freely
adjust this to your taste.
LPCM OUTPUT:
Lets you set the optical digital output sampling rate to 48KHz
(default) or 96KHz.
Advanced Setup
4. PREFERENCES PAGE
This is where you can select language options, TV or LCD
standards, and Parental Controls.
AUDIO SETUP
TV DISPLAY
TV TYPE
AUDIO
SUBTITLE
DISC MENU
MAIN PAGE
TV DISPLAY:
If you have a widescreen TV or LCD (16:9 Aspect Ratio)
select WIDE . If you have a conventional 4:3 TV select
either of the NORMAL options.
Disc video
normal
TV set screen scale
4:3
pan scan
letter box
16:9
4:3
16:9
TV TYPE:
Set to match your TV. In the USA the TV standard is
NTSC (default).
AUDIO:
Selects the priority language (when available) for the disc
audio track. YOU may choose English (default), French,
Spanish, Chinese, Japanese, German, or Italian.
SUBTITLE:
Selects the priority language for subtitles when supported by
the disc.
DISC MENU:
Selects the priority language of the disc menus, when supported by the disc.
LOCALE:
Selects between the different parental lock standards of USA
(default), China, France, Hong Kong, Japan, Taiwan, and
Great Britain.
PARENTAL:
You may select a specific rating level which will require a
password to view. The Default is No Parental.
PASSWORD:
Use to set your own personal password for the parental control
settings. The default password is 3308.
DEFAULTS:
Restores the original factory settings.
SMARTNAVI:
With Menu -The contents of the disc are displayed in the
folder and file hierarchy as burned on the CD .
Playing MP3 Files
1.When figure below appears , you can use direction button
+ Enter button or numerical buttons to select the directory
or MP3 song file. If you can select a directory, or can enter
it, or select song file, you can play it. Also you can use
direction button to set play mode.
SMART NAVI
ROOT
MP3
PICTURE
MP3
MP3
MP3
MP3
MP3
0
1
2
3
4
5
2.If you to want change directory or set new play Mode, please
stop play , then select new directory or set new play mode.
Any time you select Root to enter root directory, select
to enter upper directory.
Notice: for different MP3 discs the display isn't the same.
When stop state:
Press Repeat button: You can set the play mode as REP-ONE,
FOLDER R,DISC,SINGLE,DISC REP, DISC SCAN, SINGLE,
FOLDER. The setting will determine the playing turn.
Press Random botton: You can set the play mode as RANDOM,
SHUFFLE, FOLDER.
3ˊProgram play˖
At stop state
A Press Program button to go into program mode.
B Use Numeral buttons to select the song. When finished,
Press Stop button to stop program.
C Press Play button to play in the turn that you program.
D Press STOP and PROGRAM button to exit program play.
E Press CLEAR button to last enter while programming.
Viewing Kodak Picture CDs
When a directory is selected in the play mode window, each
picture in the current directory will be displayed consecutively in a slide shpw fashion and will be scaled to fit in the
TV screen.
SMART NAVI
ROOT
MP3
PICTURE
0
1
2
3
4
5
Image Rotation
There are four modes to rotate a picture: Invert, Mirror,
Left, and Right. These operations are allowed only when
a picture is being displayed normally and will be cancelled
automatically when a new picture is displayed. The arrow
button is used to select the different rotation modes:
UP button: Invert/Normal
Down button: Mirror/Normal
Left button: Turn left
Right button: Turn right
Digest
The Root button is used to enable JPEG digest mode. After
it is enabled, up to nine scaled-down JPEG pictures will be
displayed on the screen. The next and prev buttons can be
used to display the next and prev. pictures in the current
directory. Each of the nine pictures will be numbered
from 1 to 9. By pressing a numeral button, the
corresponding picture will be enlarged to fill screen, and
the digest mode will be cancelled.
Troubleshooting
If you meet the following problems, you can try the
following methods first, if failure still exists, please
resort to professionals for repairing:
1.Please confirm to firm connection between the unit
& other systems such as amplifier & Tvor LCD set.
2.Please confirm that TV set & amplifier operate
regularly.
No picture
1. Please confirm a firm connection between the unit &
other systems such as TV set etc.
2. Please confirm that TV set is operating regularly.
Disc can not be played
Please confirm that disc has been correctly placed on disc
rack in direction (marks side up); Please confirm disc is
clean .
Remote controller doesn't work
Move away barrier between the remote controller & the
unit . Point the remote controller at the remote controller's
receiver in the unit.
Check whether battery power is still enough.
Picture separated
Please confirm that disc has no scraps or dirton it;
The DVD player is controlled by micro-computer; if a
failure occurs, please turn off power for a few seconds
and open it again; if no error appears at this moment, you
can use the unit regularly.
DVD player freezes
Please shut down but not, standby button, by pulling out the
power cable or turn off the power button and then power on
again.
Specifications
General
Voltage: DC12-24V
Power consumption: 10W
Dimensions:215mmX180mmX50mm
Weight:1.2Kg
Operation Temperature: 5-40 C
Operational relative humidity: 15-75%
DVD
Compatible with: DVD, SVCD VCD1.0/1.1/2.0, CDDA,
MP3, CD-G(only audio) CD-R, CD-RW
Kodark picture CD.
Composite input: CVBS 1.0Vp-p 75 ohms
Composite output: CVBS 1.0Vp-p 75 ohms
Audio Input:
0.5-2V
Audio output:
0.5-2V
Signal to Noise:
ı90
Dynamic Range:
ı80
23
24
Technical Assistance (800)488-8595 /[email protected]
Warranty Continued
How to receive warranty service: Contact your local Authorized Audiobahn Dealer, or call Audiobahn at
(800) 488-8595 between the hours of 9:00 AM and 5:00 PM PST.
If you are having problems with your system, we recommend you check the product carefully and
thoroughly to confirm that the product truly has a manufacturer defect; as opposed to abuse, or other
components in the system causing the failure. This might include having an Authorized Audiobahn
Dealer look at the product to confirm the source of the problem. Any product found to have a
manufacturer defect will be replaced with a new piece of the same or similar model, or repaired at the
discretion of Audiobahn. Any product found to have no manufacturer defect will be returned to the sender
at their cost.
You must acquire a Return Authorization Number (RA#) prior to returning ANY product to
Audiobahn. That Return Authorization Number (RA#) must be prominently and clearly marked on the
outside of the shipping carton, or product delivery will be refused (no exceptions will be made).
Please note: All shipping and handling (to and from) charges will be the sole responsibility of the
consumer.
Please record and keep your Return Authorization Number (RA#) in the event that further communication
is required.
Return Authorization Number (RA#):
______________________________
Date product was sent:
______________________________
Contact Information
Audiobahn Headquarters
114 South Berry St.
Brea, CA 92821
Phone (800)488-8595 Fax. (714)988-0433
Pacific Coast Time : 9am-5pm Mon. - Fri.
[email protected]
25