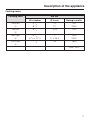
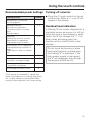
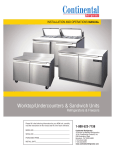
1
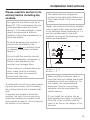
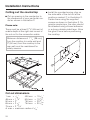
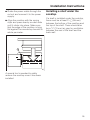
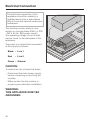
Operating Instructions
Ceramic Cooktop
KM 443
To prevent accidents and
machine damage,
read these instructions
before installation or use.
UV
M.-Nr. 04 776 091
Contents
IMPORTANT SAFETY INSTRUCTIONS . . . . . . . . . . . . . . . . . . . . . . . . . . . . . . . . . 3
Help protect our environment . . . . . . . . . . . . . . . . . . . . . . . . . . . . . . . . . . . . . . . . 9
Disposal of the packing materials . . . . . . . . . . . . . . . . . . . . . . . . . . . . . . . . . . . . . . 9
Disposal of an old appliance . . . . . . . . . . . . . . . . . . . . . . . . . . . . . . . . . . . . . . . . . . 9
Description of the appliance . . . . . . . . . . . . . . . . . . . . . . . . . . . . . . . . . . . . . . . . 10
Using the touch controls. . . . . . . . . . . . . . . . . . . . . . . . . . . . . . . . . . . . . . . . . . . 12
Residual heat indicators . . . . . . . . . . . . . . . . . . . . . . . . . . . . . . . . . . . . . . . . . . . . 13
Locking a burner . . . . . . . . . . . . . . . . . . . . . . . . . . . . . . . . . . . . . . . . . . . . . . . . . . 14
Automatic shut off . . . . . . . . . . . . . . . . . . . . . . . . . . . . . . . . . . . . . . . . . . . . . . . . . 14
Variable and extended burners . . . . . . . . . . . . . . . . . . . . . . . . . . . . . . . . . . . . . . . 16
Selecting cookware . . . . . . . . . . . . . . . . . . . . . . . . . . . . . . . . . . . . . . . . . . . . . . . 17
The cooking surface . . . . . . . . . . . . . . . . . . . . . . . . . . . . . . . . . . . . . . . . . . . . . . . 17
Cleaning and care . . . . . . . . . . . . . . . . . . . . . . . . . . . . . . . . . . . . . . . . . . . . . . . . 19
Frequently asked questions . . . . . . . . . . . . . . . . . . . . . . . . . . . . . . . . . . . . . . . . 21
After Sales Service . . . . . . . . . . . . . . . . . . . . . . . . . . . . . . . . . . . . . . . . . . . . . . . 22
Installation Instructions . . . . . . . . . . . . . . . . . . . . . . . . . . . . . . . . . . . . . . . . . . . 23
Electrical Connection . . . . . . . . . . . . . . . . . . . . . . . . . . . . . . . . . . . . . . . . . . . . . 26
2
IMPORTANT SAFETY INSTRUCTIONS
READ THE OPERATING
INSTRUCTIONS CAREFULLY
BEFORE USING THE
COOKTOP
WARNING This appliance is intended for
residential cooking only. The
manufacturer cannot be held
responsible for damage or
injury caused by improper use
or for uses other than those
for which the appliance is
intended.
When using your appliance, follow
basic safety precautions including
the following:
Installation
Be certain your appliance is
properly installed and grounded by
a qualified technician in strict accordance with national and local safety
regulations. The manufacturer cannot
be held responsible for damage
caused by incorrect installation or
connection.
To guarantee the electrical safety
of this appliance, continuity must
exist between the appliance and an
effective grounding system. It is imperative that this basic safety requirement
is met. If there is any doubt, have the
electrical system of the house checked
by a qualified electrician. The manufacturer cannot be held responsible for
damages caused by the lack, or
inadequacy of, an effective grounding
system.
Do not connect the appliance to
the main electrical supply using an
extension cord. Extension cords do not
meet the safety requirements of this
appliance.
Before servicing, disconnect the
power supply by either removing
the fuse, unplugging the unit or "tripping" the circuit breaker.
3
IMPORTANT SAFETY INSTRUCTIONS
Do not install the cooktop directly
above a dishwasher, refrigerator or
freezer. Heat radiated by the cooktop
may damage other appliances.
If the cooktop is installed above an
oven, keep the cooktop’s power
cord from contacting the oven.
Because of the heat radiated it is
not recommended to install the
cooktop above a drawer. It should only
be installed above a cabinet base unit
with a dummy drawer front and an
additional protective base between the
appliance and the cabinet.
This equipment has not been
designed for maritime use or for
use in mobile installations such as
aircraft or recreational vehicles.
However, under certain circumstances
it may be possible for an installation in
these applications. Please contact the
nearest Miele Dealer or the Miele
Technical Service Department with
specific requirements.
Use
Do not use the appliance until
properly installed in the countertop.
This appliance is equipped with an
overheating protection. For more
information, see "Overheating protection".
Never use the appliance to warm
or heat the room. Due to the high
temperatures radiated objects left near
the appliance could catch fire.
4
Protection from damage
Do not drop or rest anything on the
surface of the cooktop. Although
the ceramic glass is shock and scratch
resistant, it is not shock or scratch
proof.
Do not use pots or pans with pronounced edges or ridges on the
ceramic cooktop. These could scratch
the cooktop permanently. Grains of salt
and sand can also scratch. Make sure
that the bases of any pots and pans are
clean, free of any fat or oils and dry.
Do not allow solid or liquid sugar,
pieces of plastic or aluminium foil
to fall on the cooking zones when they
are hot. If these residues are allowed to
cool on the ceramic surface pitting or
even cracking could occur.
Any spills should be removed as
quickly as possible to prevent them
from burning on and becoming difficult
to remove.
Do not use a steam cleaner to
clean the appliance. Steam could
penetrate electrical components and
cause a short circuit.
Never place hot pots or pans over
the touch controls, as the electronics may be damaged.
In areas subject to infestation by
cockroaches or other vermin, keep
the appliance and its surroundings
clean at all times. Any damage caused
by pests will not be covered under
warranty.
IMPORTANT SAFETY INSTRUCTIONS
Injury prevention
Do not touch the cooktop or the
area surrounding it during or immediately after use. The cooktop may
be hot even though it is dark in color.
Areas near it may become hot enough
to cause burns. During or after use, do
not touch, or let clothing or other flammable materials touch the cooktop or
surface areas near it until they have
cooled. Wait for the residual heat
indicator lights go out.
CAUTION: Do not store toys or
items of interest to children in
cabinets above or behind the appliance. Children climbing onto the
cooktop to reach these items may be
injured.
Do not leave children alone Children should not be left alone in
the area where the appliance is in
use.They should never be allowed to sit
or stand on any part of the appliance.
Protect your hands with insulated
gloves or potholders when using
the appliance. Only use dry, heat
resistant potholders. Moist or damp
potholders used on hot surfaces can
result in steam burns. Do not let the
potholder touch the heating element.
Do not use towels or other bulky items
near the appliance.
Clean the cook top with caution If a wet sponge or cloth is used to
wipe spills off a hot cooking area, be
careful to avoid steam burns.
Also,some cleaners can produce
harmful fumes if applied to a hot
surface.
Keep all pans out of reach of
children. Danger of burns!
Pan handles should be turned in
and not extend over the area of a
burner to reduce risk of burns, ignition
of flammable materials, and spills due
to unintentionnal contact with the pan.
5
IMPORTANT SAFETY INSTRUCTIONS
Use proper pan size Select pans having flat bottoms
large enough to cover the surface unit
heating element. The use of undersized
pans will expose a portion of the heating element to direct contact and may
result in ignition of clothing. Proper
relationship to burner will also improve
efficiency.
Glazed cookware Only certain types of glass,
glass/ceramic, ceramic earthenware, or
other glazed pots and pans are suitable
for range-top service without breaking
due to sudden change in temperature.
Do not heat unopened food containers. Build-up pressure may
cause the container to burst and result
in injury.
Never leave surface units unattended at high heat settings. Boilovers cause smoking and greasy
spillovers may ignite.
Before removing pots and pans, be
sure to turn off the burners.
Do not store items on the appliance when not in use. Items could
melt or catch fire from residual heat or if
the cooktop is turned on inadvertently.
Never cover the cooktop with a
cloth. A fire could result.
6
Never leave the cooktop unattended when cooking with oil or fat.
Overheated fat could ignite. Always
heat oil slowly, monitoring it as it heats.
Do not use water on grease fires.
Smother any fire or flame, or use a
dry chemical or foam-type extinguisher.
When frying food, make sure that
the food is as dry as possible before placing it in the oil. Moisture can
cause hot oil to splatter and boil over.
Do not flambé under an exhaust
hood. Flames could be drawn up
into the hood by the suction and possibly cause the grease filters to ignite.
Do not let cooking grease or other
flammable materials accumulate
on the appliance.
Wear proper apparelLoose-fitting or hanging garments
should never be worn while using the
appliance.
Storage in or on applianceFlammable materials should not be
stored in a oven or near surface units.
If there is a drawer directly underneath the appliance without any
wooden base in between, ensure that
no aerosols, combustible liquids or
other easily flammable materials are
kept in it. If cutlery inserts are to be
placed in the drawer, they must be
made of heat-resistant material.
IMPORTANT SAFETY INSTRUCTIONS
Appliance safety
In the event of any damage to the
appliance, it must be turned off immediately and disconnected from the
electricity supply by either removing the
fuse or manually "tripping" the circuit
breaker.
Contact the Miele Technical Service
Department.
Do not use the appliance until it has
been repaired.
Ensure power is not supplied to the appliance until repair work is completed.
Repairs should only be performed
by qualified technicians to ensure
safety. Repairs and other work by unqualified persons could be dangerous.
Under no circumstances open the outer
casing of the appliance.
While the appliance is under warranty repairs should only be by a
Miele authorized service technician.
Otherwise the warranty is void.
Do not cook on a broken cooktop.
Any breaks or cracks in the
ceramic surface of the appliance are
hazardous.
If the cooktop should break, liquids
could penetrate the broken cooktop
and create a risk of electric shock.
Do not use the appliance until it has
been repaired. Contact a qualified
technicain immediately.
7
IMPORTANT SAFETY INSTRUCTIONS
Further safety notes
When using a portable appliance
near the cooktop, make sure that
its power cord does not come into contact with the cooktop. The insulation of
the power cord could be damaged.
Danger of electric shock!
Do not allow children to operate or
play with, or near, the cooktop.
If a pet hops onto the cooktop, a
touch control sensor could be activated and a burner turned on. Keep
pets away from the cooktop at all times
and activate the child safety lock.
Always make sure food is cooked
or reheated sufficiently. If in doubt,
select a longer cooking or reheating
time.
Before discarding an old appliance, remove the power cord to
prevent hazards.
Only use cookware suitable for the
cooktop. Unsuitable cookware may
break due to sudden temperature
changes.
SAVE THESE INSTRUCTIONS
Do not use plastic or aluminium
containers. They will melt at high
temperatures. Fire hazard!
Do not heat empty pots or pans,
they may be damaged.
8
Help protect our environment
Disposal of the packing
materials
The cardboard box and packing
materials protect the appliance during
shipping. They have been designed to
be biodegradable and recyclable.
Please recycle.
Ensure that any plastic wrappings,
bags etc. are disposed of safely and
kept out of the reach of children.
Danger of suffocation!
Disposal of an old appliance
Old appliances may contain materials
that can be recycled. Please contact
your local recycling authority about the
possibilty of recycling these materials.
Ensure that the appliance presents no
danger to children while being stored
for disposal. Before discarding an old
appliance, unplug it from the outlet and
cut off its power cord to prevent hazards.
9
Description of the appliance
KM 443
Burners
Touch controls
a
e Variable burner selector
Variable burner
bd Single burner
f Extended burner selector
c
g Left rear control and display
Extended burner
h Right rear control and display
i Right front control and display
j Left front control and display
k Control lock
l Cooktop On/Off control
10
Description of the appliance
Cooking zones
Cooking zone
KM 443
Ø in inches
Ø in cm
Rating in watts
front left
a
3
4 /4"
8 1/4"
12
21
750
2200
rear left
b
5 3/4"
14.5
1200
rear right
c
6 3/4"
6 /4 x 10 1/2
17
17 x 26.5
1500
2400
front right
d
7 1/8
18
1800
3
Total: 7600
11
Using the touch controls
This cooktop is equipped with electronic touch controls activated by a
light touch of the fingertip.
Only touch one control at a time. If
more than one control is pressed, the
entries will be ignored.
Keep the area around the touch
controls clean at all times. Dirt or
utensils placed on the controls may
activate them.
When cleaning the cooktop, make
sure the cooktop is "Off", and be
careful not to accidentally turn it
"On".
Never place hot pots or pans over
the touch controls, as the underlying
electronics may be damaged.
The cooktop is safe to clean when all
the displays, including the residual heat
indicators are "Off".
Before using for the first time
^ To avoid scratching the ceramic
glass, clean the cooktop before the
first use in order to remove any dust
or fine particles left over from the installation process (see "Cleaning and
care"). An odor may be noticeable
during the first use of each burner as
the residual moisture left in the heating element insulation dries out. This
is normal.
12
Turning on the cooktop
^ Place your finger on the "On / Off"
button (l) for about 2 seconds until
a dot lights up above it. A "–" will appear in each of the 4 displays.
Individual burners and power settings
can now be selected. If a selection is
not made within a few minutes, the
cooktop will turn itself off.
Selecting a burner
^ Press the "s" touch control for the
desired burner. A "0" will appear in its
display.
The zone has now been selected.
It will not heat until a power setting is
entered.
Choosing or changing a power
setting
^ Use the "_" touch control to
select one of the 9 available power
settings. Hold your finger over the
touch control until the desired power
value is reached. Pressing "&" will
increase the setting, while pressing
"$" will decrease it.
Recommended settings for different
types of cooking can be found in the
table on the following page.
Using the touch controls
Recommended power settings
Cooking process
Melting butter or chocolate
Dissolving gelatin
Setting
1
Turning off a burner
^ Press the s touch control for the desired burner. Either a "–" or an "H" will
appear in the display.
Keeping food warm
Warming small quantities
Thickening sauces or making
gravy
Making omelets
1-2
Residual heat indicators
Defrosting
Cooking rice, pasta or oatmeal
Steaming fish or vegetables
Cooking light soups or broth
2-3
Braising meat, fish or vegetables
Cooking dumplings, potatoes or
soups
Preparing jams, jellies or stewed
fruit
3-5
A flashing "H" will remain displayed for a
particular burner as long as it is still hot.
Once the zone is cool enough to safely
touch, the "H" will change to a "–". If no
other zones are being used, the
cooktop will turn itself off after a few
minutes.
Frying fish or cutlets
5-6
Making pancakes
Frying liver, sausages or eggs
6-7
Searing large quantities of meat
Frying steaks or potatoes
7-9
Boiling large quantities of food
Do not touch the burners or place
heat sensitive items on them when
the flashing "H" is displayed. If the
main power supply is interrupted,
the "H" will disappear, even though
the burners will still be hot!
9
These settings are intended as a guide only.
When using large pans or cooking large quantities, a higher setting may be required. When
cooking smaller quantities, use a lower setting.
13
Using the touch controls
Locking a burner
Once selected, the burners can be
"locked" in order to prevent accidental
changing of the settings.
All burners can be shut off simultaneously, even if the Control Lock has
been activated.
^ Press the main "s" touch control (l)
until the dot above it goes out.
To lock the burners:
^ Press the "a" touch control (k) until
a dot lights up above it.
To turn the lock off:
^ Press the "a" touch control (k) until
the dot goes out.
Automatic shut off
If the cooktop is left "On" longer than
normal cooking generally requires, it
will turn itself off automatically. The
amount of time required, between 1
and 10 hours for this feature to activate
depends on the power setting selected.
The lower the setting, the longer it will
take to shut off. In addition, each burner
is equipped with a safety thermostat
that will shut it off if the ceramic surface
should overheat.
14
Keep the area around the touch
controls clean at all times. Clean up
boilovers and spills as soon as possible. Dirt or utensils placed on the
controls may activate them.
Never place hot pots or pans over
the touch controls, as the underlying
electronics may be damaged.
When cleaning the cooktop, make
sure the cooktop is "Off", and be
careful not to accidentally turn it
"On".
Using the touch controls
Automatic pre-heat
This feature is separately available for
each burner, allowing it to reach the
desired cooking temperature quickly
without manual intervention. If the automatic pre-heat function is selected, the
burner will heat up using its maximum
power for a pre-set time (see table)
before automatically switching to the
selected cooking temperature.
A dot will appear behind the power setting display when this feature is active.
Length of pre-heating
The length of the pre-heat cycle depends upon the cooking power that is
set. When using Settings 1 - 5, food is
usually placed in the pot before setting
it on the cooktop. To compensate for
the added mass of the food, the preheat time is increased as the cooking
power is increased.
Settings 6 - 8 are generally used for frying or roasting where the pan needs to
be brought up to temperature before
the food is introduced. For this reason
the pre-heat times are shorter.
Setting
Approximate pre-heat
time (min)
1
1.5
2
2.5
3
4
4
5.5
5
7
6
1.5
7
2.5
8
2.5
9
-
To Turn on "automatic pre-heat":
^ Turn on the cooktop by pressing the
"s" touch control (l) until a dot
lights up above it. A "–" will appear in
the display.
^ Turn on the desired burner by pressing its "s" touch control. A "0" will appear in its display.
^ Press the "$" control once. A "9" will
appear in the display.
^ Press the "&" control once. A "9." will
be displayed. The automatic pre-heat
feature is now selected. You now
have 1 second to select the desired
cooking temperature. If time elapses
before a temperature is set, the
"automatic pre-heat" feature will be
canceled.
^ Use the "$" touch control to set the
desired cooking temperature. Once
the burner has stabilized at this temperature, the dot will disappear from
the display.
15
Using the touch controls
Variable and extended burners
Variable burner
The left front burner of the KM 443 is a
variable burner. Selection of a large or
standard size cooking area is possible.
The standard size burner will be used
unless the large burner has been
selected.
^ Touch the variable burner selector
"e" to turn on the large burner. A dot
will appear above the touch control
once it has been selected.
16
Extended burner
The KM 443 right rear burner can be
extended from its normal size to a
larger, oval cooking surface.
^ Touch the extended burner selector,
"f", to increase the size of the cooking surface. A dot will appear above
the touch control once it has been
selected.
Selecting cookware
The cooking surface
Pots and pans
Your ceramic cooktop is made of an
extremely hard and durable material
that should give you many years of use
under normal conditions. The surface is
scratch resistant, not scratch proof.
Avoid using cookware with ridged bottoms. Ridged pots with dirty or chipped
enamel bottoms may scratch the
cooktop if they are pulled across the
ceramic surface.
Special cookware is not required, but
as is true with all types of cooking appliances, the better the cookware, the
better the performance.
Make sure the cooktop and pot bottoms
are clean before cooking. Certain
items, particularly sugar grains or
crystallized liquids such as molasses or
syrups are actually harder than ceramic
and can scratch the surface if they are
not cleaned off immediately. Small or
light scratches will not affect the safety
or performance of the cooktop however.
The burner rings and touch controls are
fused into the ceramic glass and are resistant to wear if properly maintained.
Do not use abrasive cleaners or pads,
as they may eventually wear off the
rings.
Any melted solids (e.g. sugar, plastic, syrup, aluminium foil, etc.)
should be removed as quickly as
possible and while the burner is still
warm. If they are allowed to harden,
the cooktop may become pitted.
Scrape the melted item off the
cooktop using a razor blade scraper.
Once the cooktop has cooled,
remove any remaining residue using
a ceramic cooktop cleaner.
Following these tips will allow you to
make the most of your ceramic
cooktop.
– For the most even and energy efficient cooking, the diameter of the
pots should match the diameter of
the burners as closely as possible.
– Use cookware with thick, flat, smooth
bottoms. Slightly concave bottoms
will also work adequately. Pans with
convex bottoms will not cook well.
17
Selecting cookware
– Sometimes what appear to be
scratches are not. Metallic lines such
as those left by copper or aluminum
pans can be removed using a
non-abrasive ceramic cooktop
cleaner. Let the cooktop cool before
cleaning.
– Using a lid while cooking will minimize the loss of heat and decrease
the cooking time.
18
– Cast iron, glass or stoneware should
not be used because they have poor
heat transfer and may scratch the
surface.
Cleaning and care
Use a product suitable for cleaning
ceramic cooking surfaces. If you have
difficulty locating a suitable product,
contact Miele’s Technical Service
Department. Do not use glass cleaners
on the cooktop. They leave a residue
that can fuse onto and stain the
cooktop when cooking at high temperatures.
Never use abrasive cleaners, scouring pads, steel wool or caustic
(oven) cleaners. They will damage
the cooktop surface.
Do not clean the joints between the
cooktop frame and countertop or
cooktop frame and glass with a
pointed or sharp object. You may
damage the seal.
^ Clean the cooktop after each use.
Using a fresh paper towel will avoid
the possibility of transferring grit from
the countertop to the cooktop surface. Clean cloths or sponges can
also be used.
^ Some spilt liquids (soups, sauces,
etc.) may leave a light blue stain on
the cooktop surface. These stains
can be removed using a ceramic
cooktop cleaner. They can be stubborn and may require several applications of cleaner.
^ Baked on or hardened spills can be
carefully scraped off using a razor
blade scraper. Once removed, wipe
off the cooktop with a damp sponge.
^ Metallic lines such as those left by
copper or aluminum pans can be removed using a non-abrasive ceramic
cooktop cleaner. Let the cooktop cool
before cleaning.
^ Lime deposits or spots caused by
pots boiling over can sometimes be
removed by using a cloth or sponge
and white vinegar. Cooktop cleaners
can also be used.
When cleaning the cooktop, make
sure the cooktop is "Off", and be
careful not to accidentally turn it
"On". Placing items on the touch
controls or rubbing a cloth across
them may accidentally activate a
burner.
19
Cleaning and care
Removing melted sugar, syrup,
plastic or aluminum foil
These items should be removed as
soon as possible while the cooktop is
still warm. Scrape the melted item off
the cooktop using a razor blade
scraper. Once the cooktop has cooled,
remove any remaining residue using a
ceramic cooktop cleaner.
Using cooktop cleaners
Some cleaners incorporate a silicon
agent that will leave a protective coating on the cooktop. Although not required, they can also be used. High
temperatures reduce the effectiveness
of these coatings, so they will have to
be reapplied occasionally.
Always follow the manufacturer’s
instructions on the cleaner label. Do
not use the cleaner on hot surfaces.
Remove any cleaner residues with a
damp sponge before turning on the
burner. Failure to do so may cause
scratches.
20
Frequently asked questions
Repairs to the electrical components
of this appliance should only be
performed by a trained technician.
Repairs by unauthorized personnel
could cause personal injury or
damage the cooktop.
Some minor problems can be resolved
as follows:
What if . . .
. . . you notice a slight odor when using the cooktop for the first time?
This is normal. The residual moisture in
the internal insulation is drying out. The
odor should disappear after one or two
uses.
. . . a burner will not turn on?
Check to see if the cooktop has been
"locked" (see "Locking a burner").
^ Make sure the cooktop is connected
to the main power supply and that
the circuit breaker has not tripped.
. . . a burner shuts off during use and
"H" flashes in the display?
If a burner has been on for an extended
period of time, it will automatically shut
itself off and flash an "H" in the display.
This time will range from 1 to 10 hours
depending on the setting selected.
To reset the burner:
^ Select "0" first, then select the desired
cooking setting.
An "H" flashing in the display after the
burner has been manually shut off is
normal. This is the residual heat indicator telling you that the burner is still hot.
. . . food does not cook satisfactorily
when using the automatic pre-heat
feature?
^ Check that the cooking setting is
correct for the pans being used and
the items being cooked.
^ If the pots have poor or slow heat
transfer qualities, they will take longer
to reach cooking temperature than
the burners. In this case, the pots
should be allowed to heat up before
placing the food in them, or a higher
cooking setting should be chosen.
21
After Sales Service
In the event of a fault which you cannot correct yourself please contact:
your Miele Dealer
or
the Miele Technical Service Department
USA 1-800-999-1360
[email protected]
CDN 1-800-565-6435
[email protected]
When contacting the Technical Service Department please quote the model and
serial number of your appliance. These are shown on the data plate.
Please paste the copy of the unit’s data plate here.
22
Installation Instructions
Please read this section in its
entirety before installing the
cooktop.
As a general rule there must be at
least 30" (760 mm) between the top
of the appliance and any object
above it. If the manufacturer of said
object recommends a different
distance, follow that manufacturer’s
recommendation.
The rated load and voltage are
printed on the data plate. Make sure
they match those of the main power
supply.
Ideally, the cooktop should be installed
with no walls (other than the rear wall)
or tall cabinets directly adjacent to it. It
can be installed next to one wall,
however, as long as the spacings listed
below are maintained.
To avoid damaging the cooktop, it
should only be placed in the
countertop after any exhaust hood
or cabinetry have been installed
above it.
Do not install the cooktop directly
above a dishwasher, refrigerator or
freezer. Heat radiated by the
cooktop may damage them.
If the cooktop is installed above an
oven, make sure the cooktop’s
power cord does not come into
contact with the oven.
To reduce the risk of burns when reaching over the cooktop, avoid installing
the cooktop below wall mounted cabinets.
If cabinets are installed above the
cooktop, the risk of burns can be reduced by installing an exhaust hood
that extends at least 5" (13 cm) beyond
the bottom of the cabinet.
40 mm = 1 1/2"
50 mm = 2"
When installing cooktops, keep in
mind that they will radiate some heat
sideways as well as straight up. For
this reason, the recommended
distances from the surrounding
cabinets must be maintained for
safety reasons.
Do not install the cooktop into an
area between two walls or cabinets.
One side of the cooktop must be
open to air flow or the danger of fire
will exist.
23
Installation Instructions
Cutting out the countertop
^ Cut an opening in the countertop to
the dimensions of your particular model as shown in illustration 2.
Please note:
There must be at least 2 5/8" (65 mm) of
usable depth at the right rear corner of
the cut out for the connection cable.
Minimum distances of 1 1/2" (38 mm)
from the cooktop to a side wall and
2" (50 mm) from the cooktop to the
rear wall must be maintained for
safety reasons.
Cut out dimensions
1 mm =
48 mm =
50 mm =
65 mm =
75 mm =
r4 max.=
24
1
/16"
490 mm = 19 5/16"
7
1 / 8"
504 mm = 19 7/8"
2"
750 mm = 29 9/16"
5
2 / 8"
764 mm = 30 1/16"
15
2 /16"
maximum radius of 3/16"
^ Install the provided spring clips on
the side walls of the cut out at the
positions marked a in illustration 2.
Fasten them using the supplied
screws as shown in illustration 3. On
granite countertops, the clips should
be attached using silicone adhesive
or a strong double-sided tape. Allow
the glue to cure before positioning
the cooktop.
Installation Instructions
^ Guide the power cable through the
cut out and connect it to the power
supply.
^ Align the cooktop with the spring
clips and press evenly on each side
until it clicks into place. Make sure
that the edge of the cooktop is lying
flat against the countertop around its
whole perimeter.
Installing a shelf under the
cooktop.
If a shelf is installed under the cooktop,
there must be at least 2 1/4" (55 mm)
between the bottom of the cooktop and
the top of the shelf. There should also
be a 1/2" (10 mm) air gap for ventilation
between the rear of the shelf and the
back wall.
A special tool is needed to safely
remove the cooktop once it has been
installed.
25
Electrical Connection
The electrical connection of this
appliance should be made by a
qualified electrician in accordance
with all local and national codes and
ordinances.
This cooktop comes ready for connection to a single phase 208 V, or 220
- 240 V, 60 Hz, 50A power supply.
The operating voltage of your model
can be found on the data plate of the
appliance.
The power cord should be connected
to the supply as follows:
Black – Live 1
Red
– Live 2
Green – Ground
CAUTION:
To reduce the risk of electrical shock:
– Disconnect the main power supply
before connecting or servicing the
cooktop
– Make certain that the cooktop is
properly grounded after installation.
WARNING:
THIS APPLIANCE MUST BE
GROUNDED.
26
27
Alterations rights reserved / 2502
M.-Nr. 04 776 091 / V04
This paper consists of cellulose which has been bleached without the use of chlorine.