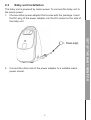
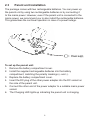
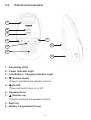
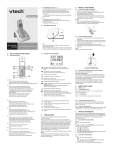
1
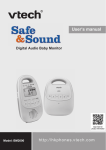
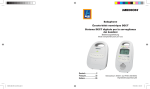
User’s manual
Digital Audio Baby Monitor
Model: BM1000
ht t p: // hk phones.v tec h.c om
TABLE OF CONTENTS
1.
Important safety instructions.............................1
2.
SET UP THE baby monitor...........................................4
3.
GET TO KNOW the baby monitor...............................7
4.
USING YOUR BABY MONITOR........................................11
5.
TROUBLESHOOTING.......................................................12
6.
TECHNICAL SPECIFICATIONS........................................15
2.1
2.2
2.3
3.1
3.2
3.3
3.4
4.1
4.2
4.3
Package Contents................................................................4
Baby unit installation............................................................5
Parent unit installation..........................................................6
Baby unit overview...............................................................7
Parent unit overview.............................................................8
Parent unit lights..................................................................9
Positioning and operating range........................................10
3.4.1 Position the audio monitor....................................10
3.4.2 Test your audio monitor before use.......................10
Power the baby unit on or off.............................................11
Power the parent unit on or off...........................................11
Adjust speaker volume.......................................................11
1.
Important safety instructions
IMPORTANT SAFETY INSTRUCTIONS
When using your equipment, basic safety precautions should always be
followed to reduce the risk of fire, electric shock and injury, including the
following:
1. Follow all warnings and instructions marked on the product.
2. Adult setup is required.
3. This product is intended as an aid. It is not a substitute for
responsible and proper adult supervision and should not be used as
such.
4. This product is not intended for use as a medical monitor.
5. Do not use this product near water. For example, do not use it next
to a bath tub, wash bowl, kitchen sink, laundry tub or swimming pool,
or in a wet basement or shower.
6. CAUTION: Use only the batteries indicated in this manual. There
may be a risk of explosion if a wrong type of battery is used for the
parent unit. Use only the supplied rechargeable battery.
7. Use only the adapters included with this product. Incorrect adapter
polarity or voltage can seriously damage the product.
Baby unit power adapter: Input 100-240V AC 50/60 Hz; output: 6V
DC 450 mA; Parent unit power adapter: Input 100-240V AC 50/60
Hz; output: 6V DC 450 mA.
8. The power adapters are intended to be correctly oriented in a
vertical or floor mount position. The prongs are not designed to hold
the plug in place if it is plugged into a ceiling, under-the-table or
cabinet outlet.
9. Unplug this product from the wall outlet before cleaning. Do not use
liquid or aerosol cleaners. Use a damp cloth for cleaning.
10. Unplug the power cords before replacing batteries.
11. Do not cut off the power adapters to replace them with other plugs,
as this causes a hazardous situation.
12. Do not allow anything to rest on the power cords. Do not install this
product where the cords may be walked on or crimped.
13. This product should be operated only from the type of power source
indicated on the marking label. If you are not sure of the type of
power supply in your home, consult your dealer or local power
company.
14. Do not overload wall outlets or use an extension cord.
15. Do not place this product on an unstable table, shelf, stand or other
unstable surfaces.
16. This product should not be placed in any area where proper
ventilation is not provided. Slots and openings in the back or bottom
of this product are provided for ventilation. To protect them from
overheating, these openings must not be blocked by placing the
product on a soft surface such as a bed, sofa or rug. This product
should never be placed near or over a radiator or heat register.
17. Never push objects of any kind into this product through the slots
because they may touch dangerous voltage points or create a short
circuit. Never spill liquid of any kind on the product.
18. To reduce the risk of electric shock, do not disassemble this product,
but take it to an authorized service facility. Opening or removing parts
of the product other than specified access doors may expose you to
dangerous voltages or other risks. Incorrect reassembling can cause
electric shock when the product is subsequently used.
19. You should test the sound reception every time you turn on the units
or move one of the components.
20. Periodically examine all components for damage.
21. Be aware of possible loss of privacy while using public airwaves.
Conversations may be picked up by other nursery monitors, cordless
phones, scanners, etc.
22. Children should be supervised to ensure that they do not play with the
product.
23. The product is not intended for use by persons (including children)
with reduced physical, sensory or mental capabilities, or lack of
experience and knowledge, unless they have been given supervision
or instruction concerning use of the appliance by a person responsible
for their safety.
SAVE THESE INSTRUCTIONS
Cautions
1.
2.
3.
4.
7.
DISPOSAL WARNING
1.
2.
3.
When this crossed-out wheeled bin symbol is attached
to a product, it means the product is covered by the
European Directive 2002/96/EC.
All electrical and electronic products/battery should be
disposed of separately from the municipal waste stream
via designated collection facilities appointed by the
government or the local authorities.
The correct disposal of your old appliance/battery will
help prevent potential negative consequences for the environment
and human health.
For more detailed information about disposal of your old appliance/
battery, please contact your city office, waste disposal service or The
Shop where you purchased the product.
If you have questions about this product, or having difficulty with setup or
operation, call our Customer Service Centre.
Customer Service Hotline: (852) 2666 5558
Technical Inquiry Hotline: (852) 2667 7433
IMPORTANT SAFETY INSTRUCTIONS
5.
6.
Use and store the product at a temperature between 10oC and 39oC.
Do not expose the product to extreme cold, heat or direct sunlight.
Do not put the product close to a heating source.
Batteries should not be exposed to excessive heat such as bright
sunshine or fire.
Make sure the baby unit(s) and the adapter cord(s) are always out
of reach of the baby, at least 1 metre away from the baby or crib, to
avoid a possible strangulation hazard.
Never place the baby unit(s) inside the baby’s crib or playpen.
Never cover the baby unit(s) or parent unit with anything such as a
towel or a blanket.
Other electronic products may cause interference with your audio
monitor. Try installing your audio monitor as far away from these
electronic devices as possible: wireless routers, radios, cellular
telephones, intercoms, room monitors, televisions, personal
computers, kitchen appliances and cordless telephones.
2.
SET UP THE baby monitor
2.1
Package Contents
The package contains the following items:
•
1 Parent unit (BM1000 PU)
•
1 Baby unit (BM1000 BU)
•
1 Parent unit battery compartment cover
•
2 Batteries for parent unit
•
2 Power adapters
•
1 English user manual
•
1 Chinese user manual
2.2
Baby unit installation
The baby unit is powered by mains power. To connect the baby unit to
the mains power:
1. Choose either power adapter that comes with the package. Insert
the DC plug of the power adapter into the DC socket on the side of
the baby unit.
Connect the other end of the power adapter to a suitable mains
power socket.
SET UP THE BABY MONITOR
2.
2.3
Parent unit installation
The package comes with two rechargeable batteries. You can power up
the parent unit by using two rechargeable batteries or by connecting it
to the mains power. However, even if the parent unit is connected to the
mains power, we recommend you to also install the rechargeble batteries.
This guarantees the continual operation in case of a power outage.
To set up the parent unit:
1. Remove the battery compartment cover.
2. Install the supplied rechargeable batteries into the battery
compartment, matching the polarity markings (+ and -).
3. Replace the battery compartment cover.
4. Insert the DC plug of the other power adapter into the DC socket on
the side of the parent unit.
5. Connect the other end of the power adapter to a suitable mains power
socket.
6. The Charging LED lights up indicating the parent unit is charging.
3.
GET TO KNOW the baby monitor
3.1
Baby unit overview
2
3
1 _ Power indicator
On when the baby unit is switched on.
2_
Off when the baby unit is switched off.
(On/off)
Press and hold to turn on/off the baby unit.
3 _ Microphone
GET TO KNOW THE BABY MONITOR
1
3.2
Parent unit overview
1
2
3
7
4
8
5
6
9
1 _ Sensitivity LEDs
2 _ Power Indicator Light
3 _ Low Battery / Charging Indicator Light
4 _ (Volume down)
5_
Press to decrease the speaker volume.
(On/off)
Press and hold to turn on or off.
6 _ Speakerphone
7 _ (Volume up)
Press to increase the speaker volume.
8 _ Belt Clip
9 _ Battery Compartment Cover
3.3
Parent unit lights
3 green lights and 2 red lights indicating the sound
level detected by the baby unit.
Green lights indicate a moderate level of sound is
detected.
Red lights indicate a higher level of sound is
detected.
Off when the parent unit is off.
On in green steadily when the parent unit is on and is
linked to the baby unit.
Flashes in green when there is no link between the
baby unit and parent unit.
On in red steadily when the parent unit is charging.
Flashes in red when the battery is low.
GET TO KNOW THE BABY MONITOR
More lights turn on when the sound level detected
increases.
3.4
Positioning and operating range
3.4.1
Position the audio monitor
Place the parent unit within the operating range of the baby unit. We
recommend the parent unit is at least 1.5 metres away from the baby unit
to avoid audio feedback. If you still experience audio feedback, move the
parent unit and the baby unit farther apart.
NOTES
•
If the signal is poor, try moving the parent and/or the baby unit to different
positions in the rooms.
•
It is the caregiver’s responsibility to stay close enough to take care of any
eventuality.
3.4.2
Test your audio monitor before use
It is important to test the audio monitor when it is installed initially, and at
regular times thereafter. Test your parent unit and baby units if they have
not been used for a long time or you suspect they are defective.
To test your audio monitor:
1. Place the parent unit and the baby unit in the same room to test the
product. Make sure the baby unit is at least 1.5 metres away from the
parent unit.
2. Press and hold
on the baby unit until the Power indicator light turns
on.
on the parent unit until the Power indicator turns
3. Press and hold
on steadily. The parent unit plays sound detected from the baby unit.
Your audio monitor is now ready for use.
Note
If no connection can be established, the Power indicator light on the parent unit
flashes in green.
10
4.
USING YOUR BABY MONITOR
4.1
Power the baby unit on or off
•
Press and hold
for 2 seconds to turn on the baby unit. The Power
indicator light turns on.
•
Press and hold
for 2 seconds again to turn off the baby unit. The
Power indicator light turns off.
4.2
Power the parent unit on or off
Press and hold
for 2 seconds to turn on the parent unit. The
Power indicator light turns on.
•
Press and hold
for 2 seconds again to turn off the parent unit.
The Power indicator light turns off.
4.3
Adjust speaker volume
There are five volume levels (Level 1 to Level 5) plus volume off on
parent unit. When adjusting speaker volume, the sensitivity indicator
LED(s) light(s) up briefly to indicate the current volume level. To adjust
the speaker volume:
Press
to increase and
to decrease the volume of the parent unit.
NOTE
You will hear two beeps when the volume level has reached the minimum or
maximum level.
11
USING YOUR BABY MONITOR
•
5.
TROUBLESHOOTING
If you have difficulty with your audio monitor, please try the suggestions
below.
My audio monitor does not work at all.
•
Make sure the baby unit, parent unit and the batteries are installed
and charged correctly. For optimum daily performance, charge the
parent unit when it is not in use.
•
Make sure the power adapters are securely plugged into the outlet not
controlled by a wall switch.
•
Make sure the adapter cords are plugged firmly into the baby unit and
parent unit.
•
Make sure the baby unit and the parent unit are turned on.
•
The parent unit may be too far away from the baby unit. Move the
parent unit closer to the baby units (but not less than 1.5 metres).
•
Unplug the electrical power to the baby unit and parent unit. Wait for
approximately 15 seconds, then plug it back in. Turn on the baby unit
and the parent unit. Allow up to one minute for the baby unit and the
parent unit to synchronise.
•
Charge the batteries in the parent unit for up to 12 hours.
•
If the parent unit batteries are completely depleted, they may take up
to 30 minutes to charge the parent unit before it can be used for a
short time.
•
Remove the batteries and then install them again. If that still does not
work, it may be necessary to purchase new batteries.
•
Large obstructions may impact the reception. Try to relocate the baby
unit, away from large obstructions such as walls and doors.
•
Other electronic products may cause interference with your audio
monitor. Try installing your audio monitor as far away from these
electronic devices as possible: wireless routers, radios, cellular
telephones, intercoms, room monitors, televisions, personal
computers, kitchen appliances and cordless telephones.
The audio monitor produces high-pitched noise.
•
The parent unit may be too close to the baby unit. Make sure the
parent unit and the baby unit are at least 1.5 metres away from one
another.
12
The parent unit plays any sounds from the baby unit and I think it is
too noisy.
•
You may need to adjust the speaker volume on the parent unit.
The parent unit does not play any sound when there is noise from
the baby unit.
Make sure the parent unit is powered up by connecting it to mains
power or to the rechargeable batteries provided.
•
Make sure the parent unit is turned on and the speaker volume is
not set to off.
•
The parent unit may be too far away from the baby unit. Move the
parent unit closer to the baby unit (but not less than 1.5 metres).
•
If the parent unit is powered by the provided batteries, make sure
there is sufficient charge. Charge the battery in the parent unit for up
to 12 hours.
•
Large obstructions may impact the reception. Try to relocate the
baby unit, away from large obstructions such as walls and doors.
•
Remove the batteries and then install it again. Turn on the baby unit
and the parent unit. Allow up to one minute for the parent unit and
the baby unit to synchronise.
•
Other electronic products may cause interference with your audio
monitor. Try installing your audio monitor as far away from these
electronic devices as possible: wireless routers, radios, cellular
telephones, intercoms, room monitors, televisions, personal
computers, kitchen appliances and cordless telephones.
Battery low at the Parent Unit.
•
Charge the battery in the parent unit for up to 12 hours.
•
The volume level of the parent unit may be set too high which
consumes power. Decrease the volume level of the parent unit.
Refer to Adjust speaker volume (p. 8) for volume level settings.
•
Remove the battery and then install it again. Use it until fully
depleted, then recharge it in the parent unit for up to 12 hours.
•
If the above measures do not correct the problem, replace the
battery.
13
TROUBLESHOOTING
•
The battery does not charge in the parent unit or the parent unit
battery does not accept charge.
•
Make sure the batteries are installed in the parent unit battery
compartment correctly. The Charging indicator light on the parent unit
should be on when charging.
•
Remove the battery and then install it again, then charge for up to 12
hours.
•
If the battery is completely depleted, it may take up to 30 minutes to
charge the parent unit before it can be used for a short time.
•
Purchase new batteries. Refer to Parent unit battery installation and
Parent unit battery charging.
The parent unit beeps.
•
Move the parent unit closer to the baby units (but not less than 1.5
metres). The parent unit may be out of range.
•
The batteries may be running low, Connect the parent unit to the
mains power with the supplied power adaptor for recharging.
•
The baby unit may be switched off. Press and hold
on the baby unit.
key to switch
Common cure for electronic equipment.
•
If the audio monitor is not responding normally, try the following (in the
order listed):
1. Disconnect the power to the baby unit and the parent unit.
2. Remove the batteries in the parent units and then install the
batteries again.
3. Wait a few minutes before connecting power back to the baby unit
and the parent unit.
4. Turn on the baby unit and the parent unit.
5. Wait for the parent unit to synchronise with the baby unit. Allow up
to one minute for this to take place.
14
6.
TECHNICAL SPECIFICATIONS
No. of channels:
120
Frequency:
1881.792 - 1897.344 MHz
Power supply
Electrical power:
Baby unit: Ten Pao - S004LS0600045
Input: 100 - 240VAC 50/60Hz 150mA
Output: 6VDC 450mA
Battery Information:
Parent unit: GPI - VTHC043C00,
2 x 1.2V AAA size 400mAh NiMH
CORUN - Ni-MHAAAJ400,
2 x 1.2V AAA size 400mAh NiMH
Transmitting
power:
Max. 250mW
Operating
temperature:
10°C to 39°C
15
TECHNICAL SPECIFICATIONS
Parent unit: Ten Pao - S004LS0600045
Input: 100 - 240VAC 50/60Hz 150mA
Output 6VDC 450mA
Customer Service Centre
Suite 1601, Lever Tech Centre, 69-71 King Yip Street,
Kwun Tong, Kowloon, Hong Kong.
Customer Service Hotline: (852) 2666 5558
Technical Inquiry Hotline: (852) 2667 7433
VTECH TELECOMMUNCATIONS LTD.
A member of THE VTECH GROUP OF COMPANIES.
© 2013 VTech Telecommunications Ltd. All Rights Reserved.