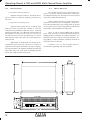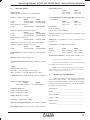
1
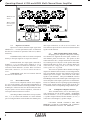
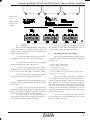
6125A
4200A
Multi-channel power amplifiers
Altec Lansing Pr
ofessional
Professional
1000 W. Wilshire Blvd. Suite 362
Oklahoma City, OK 73116 USA
A division of Altec Lansing Technologies Inc, Milford PA 18337-0277 Made In USA
Operating Manual 6125A and 4200A Multi-Channel Power Amplifier
Table Of Contents
2
1
INTRODUCTION . . . . . . . . . . . . . . . . . . . . . . . . . . . . . . . . . . . . . . . . . . . . . . . . . . . 4
2
UNPACKING . . . . . . . . . . . . . . . . . . . . . . . . . . . . . . . . . . . . . . . . . . . . . . . . . . . . . . . 4
3
AC
3.1
3.2
3.3
4
CABLE REQUIREMENTS . . . . . . . . . . . . . . . . . . . . . . . . . . . . . . . . . . . . . . . . . . . . 5
4.1 Input Cables . . . . . . . . . . . . . . . . . . . . . . . . . . . . . . . . . . . . . . . . . . . . . . . . . . 5
4.2 Output Cables . . . . . . . . . . . . . . . . . . . . . . . . . . . . . . . . . . . . . . . . . . . . . . . . 5
5
RACK-MOUNTING REQUIREMENTS . . . . . . . . . . . . . . . . . . . . . . . . . . . . . . . . . .
5.1 Mechanical . . . . . . . . . . . . . . . . . . . . . . . . . . . . . . . . . . . . . . . . . . . . . . . . . . .
5.2 Cooling . . . . . . . . . . . . . . . . . . . . . . . . . . . . . . . . . . . . . . . . . . . . . . . . . . . . . .
5.3 Grounding . . . . . . . . . . . . . . . . . . . . . . . . . . . . . . . . . . . . . . . . . . . . . . . . . . . .
6
FRONT PANEL FEATURES . . . . . . . . . . . . . . . . . . . . . . . . . . . . . . . . . . . . . . . . . . . 6
7
REAR PANEL FEATURES . . . . . . . . . . . . . . . . . . . . . . . . . . . . . . . . . . . . . . . . . . .
7.1 Input Connectors . . . . . . . . . . . . . . . . . . . . . . . . . . . . . . . . . . . . . . . . . . . . . .
7.2 Input Ground Switch . . . . . . . . . . . . . . . . . . . . . . . . . . . . . . . . . . . . . . . . . . .
7.3 Multi-Channel Operation . . . . . . . . . . . . . . . . . . . . . . . . . . . . . . . . . . . . . .
7.4 50Hz Low Cut Switches . . . . . . . . . . . . . . . . . . . . . . . . . . . . . . . . . . . . . . . .
7.5 Input Level Controls . . . . . . . . . . . . . . . . . . . . . . . . . . . . . . . . . . . . . . . . . . .
7.6 Stereo/Mono Switches . . . . . . . . . . . . . . . . . . . . . . . . . . . . . . . . . . . . . . . . .
7.7 Dual Channel Mode/Bridge Mode Switches . . . . . . . . . . . . . . . . . . . . . .
7.8 Loudspeaker Output Connectors . . . . . . . . . . . . . . . . . . . . . . . . . . . . . . . .
7.9 AC Inlet . . . . . . . . . . . . . . . . . . . . . . . . . . . . . . . . . . . . . . . . . . . . . . . . . . . . . .
8
SELF-PROTECTION FEATURES . . . . . . . . . . . . . . . . . . . . . . . . . . . . . . . . . . . . . . . 9
8.1 Power Supply Undervoltage . . . . . . . . . . . . . . . . . . . . . . . . . . . . . . . . . . . 10
8.2 Power Supply Overvoltage . . . . . . . . . . . . . . . . . . . . . . . . . . . . . . . . . . . . 10
8.3 Output Overcurrent . . . . . . . . . . . . . . . . . . . . . . . . . . . . . . . . . . . . . . . . . . 10
8.4 Heat Sink Overtemperature . . . . . . . . . . . . . . . . . . . . . . . . . . . . . . . . . . . 10
8.5 Unacceptable DC or High Frequency Output Content . . . . . . . . . . . . 10
8.6 AC Power Interruption . . . . . . . . . . . . . . . . . . . . . . . . . . . . . . . . . . . . . . . . 10
9
TYPICAL APPLICATIONS . . . . . . . . . . . . . . . . . . . . . . . . . . . . . . . . . . . . . . . . . . .
9.1 Six Channel Setup . . . . . . . . . . . . . . . . . . . . . . . . . . . . . . . . . . . . . . . . . . . .
9.2 Dual Mono Setup . . . . . . . . . . . . . . . . . . . . . . . . . . . . . . . . . . . . . . . . . . . . .
9.3 Bridged Mono Setup . . . . . . . . . . . . . . . . . . . . . . . . . . . . . . . . . . . . . . . . . .
9.4 Typical PA Setup . . . . . . . . . . . . . . . . . . . . . . . . . . . . . . . . . . . . . . . . . . . . .
POWER REQUIREMENTS . . . . . . . . . . . . . . . . . . . . . . . . . . . . . . . . . . . . . . .
Voltage Requirements . . . . . . . . . . . . . . . . . . . . . . . . . . . . . . . . . . . . . . . . .
Current Requirements . . . . . . . . . . . . . . . . . . . . . . . . . . . . . . . . . . . . . . . . .
AC Grounding & Earth Grounding . . . . . . . . . . . . . . . . . . . . . . . . . . . . . . .
4
4
4
5
5
5
5
5
7
7
7
7
8
8
8
8
9
9
10
11
11
12
12
Operating Manual 6125A and 4200A Multi-Channel Power Amplifier
10 DESIGN THEORY . . . . . . . . . . . . . . . . . . . . . . . . . . . . . . . . . . . . . . . . . . . . . . . . . . 13
11 TROUBLESHOOTING TIPS . . . . . . . . . . . . . . . . . . . . . . . . . . . . . . . . . . . . . . . . . .
11.1 No Audio Output . . . . . . . . . . . . . . . . . . . . . . . . . . . . . . . . . . . . . . . . . . . .
11.2 Distorted Sound . . . . . . . . . . . . . . . . . . . . . . . . . . . . . . . . . . . . . . . . . . . . .
11.3 Hum or Buzz Noise . . . . . . . . . . . . . . . . . . . . . . . . . . . . . . . . . . . . . . . . . .
13
13
14
14
12 DIMENSIONS . . . . . . . . . . . . . . . . . . . . . . . . . . . . . . . . . . . . . . . . . . . . . . . . . . . . . 14
13 SPECIFICATIONS . . . . . . . . . . . . . . . . . . . . . . . . . . . . . . . . . . . . . . . . . . . . . . . . . . 15
14 WARRANTY INFORMATION . . . . . . . . . . . . . . . . . . . . . . . . . . . . . . . . . . . . . . . . 15
Caution:
This power amplifier can pr
oduce danger
ous output voltage levels, high
produce
dangerous
der to minie levels in loudspeakers. In or
order
pre
power levels, and high sound pr
e s s u rre
mize the risk of injury
ead the entir
e owner’
injury,, damage, or hearing loss, please rread
entire
owner’ss
manual befor
e connecting to a sound system.
before
CAUTION
RISK OF ELECTRIC SHOCK
DO NOT OPEN
The lightning flash with arrowhead symbol,
within an equalateral triangle, is intended to alert
the user to the presence of uninsulated "dangerous voltage" within the product's enclosure that
may be of sufficient magnitude to constitute a risk
of electric shock to persons.
The exclamation point within an
equalateral triangle is intended to alert the user
to the presence of important operating and maintenance instructions in the literature accompanying the device.
TO REDUCE THE RISK OF ELECTRIC SHOCK, DO NOT REMOVE COVER. NO USER SERVICEABLE P
AR
TS INSIDE. REFER SER
VICING TO QUALIFIED SER
VICE PERSONNEL.
PA
RTS
SERVICING
SERVICE
TO REDUCE THE RISK OF FIRE OR ELECTRICAL SHOCK, DO NOT EXPOSE THIS
APPLIANCE TO RAIN OR MOISTURE.
TO REDUCE THE RISK OF FIRE, REPLACE ONL
Y WITH SAME TYPE FUSE.
ONLY
REFER REPLACEMENT TO QUALIFIED SER
VICE PERSONNEL.
SERVICE
WARNING: THIS APP
ARA
TUS MUST BE EAR
THED THROUGH THE SUPPLIED
APPA
ATUS
EARTHED
POWER LINE CORD
3
Operating Manual 6125A and 4200A Multi-Channel Power Amplifier
1.
INTRODUCTION
The 6125A and 4200A power amplifiers combine
the efficiency of a MOSFET high-speed switching output
stage with the sophistication of modern microprocessor and
DSP technology to produce a multi-channel amplifier with
unprecedented versatility and power in a single 3RU package.
The right to any claim against a public carrier can
be forfeited if the carrier is not notified promptly and if
the shipping carton and packing materials are not available for inspection by the carrier. Save all packing materials until the claim has been settled.
3.
AC POWER REQUIREMENTS
3.1
Although similar to other amplifiers with class D
output stages, the 6125A and 4200A amplifiers employ
internal microprocessor and DSP algorithms to optimize
output switching characteristics and eliminate the usual
harshness associated with high-frequency audio in standard class D amplifiers. This optimization results in a
spread-spectrum switched output that varies with input
amplitude and frequency, and minimizes radiated emissions
by eliminating the single-frequency high-energy radiated
interference normally associated with switching outputs.
The use of a simple linear power supply removes another
potential source of radio-frequency interference, an important consideration as racks become more and more
heavily populated with digital signal processing equipment.
A small switching supply using flyback topology provides
an efficient power source for logic, protection, pre-amplifier and indicator circuits.
To assure reliable operation, the usual protection
from excessive high-frequency, DC offset, and thermal
overload is supplemented by power supply undervoltage,
power supply overvoltage, and output overcurrent detection, all monitored and controlled by the latest in miniaturized microprocessor technology.
In sum, 6125A and 4200A amplifiers combine the
best of the new digital technologies with the best of the
traditional analog technologies to provide a product that
will supply clean sound at full output from every channel
while generating minimal heat, thus increasing the reliability of every other piece of equipment in a rack as well
as preserving its own.
2.
UNPACKING
As a part of our system of quality control, every
Altec Lansing product is carefully inspected before leaving the factory to ensure flawless appearance. After unpacking, please inspect for any physical damage. Save
the shipping carton and all packing materials, as they were
carefully designed to reduce to minimum the possibility
of transportation damage should the unit again require
packing and shipping. In the event that damage has occurred, immediately notify your dealer so that a written
claim to cover the damages can be initiated.
4
Voltage Requirements
The 6125A and 4200A amplifiers can be operated
from nominal 120VAC or 240VAC, 50/60Hz mains. This
is user-configurable by changing the insert in the AC Inlet
(See section 7.9). The power connector on the amplifier
accepts a standard IEC-320 receptacle.
For nominal 120VAC operation, the power cord
should be three-conductor, rated for at least 13A (16AWG).
The line fuse should be type MDA, 12A.
For nominal 240VAC operation, the power cord
should be three-conductor, rated for at least 10A (18AWG).
The line fuse should be type MDA, 10A.
3.2
Current Requirements
1.) Idle (no audio):
6125A
120V: 0.81A
240V: 0.42A
4200A
120V: 0.9A
240V: 0.5A
2.) With typical audio inputs:
8Ω loads on all channels
120V: 4A
240V: 2A
120V: 4.6A
240V: 2.3A
4Ω loads on all channels
120V: 6.5A
240V: 3.3A
120V: 7.0A
240V: 3.5A
6125A and 4200A amplifiers consume less than
12 amps when all channels operate at 1/8 power into rated
(4 ohm) loads. This condition satisfies the UL, CSA and
building electrical code requirements for a piece of audio
equipment not to consume more than 80% of the current
available when plugged into a grounded 15 amp outlet and
operated at 1/8 of maximum power.
3.3
AC Grounding and Earth Grounding
To reduce the risk of ground loop hum, all system
ground references should originate at the same point in
your AC power distribution. Do not remove the amplifier’s
ground pin, as it creates a potential shock hazard.
Operating Manual 6125A and 4200A Multi-Channel Power Amplifier
4.
CABLE REQUIREMENTS
5.
4.1
Input Cables
Be sure to use shielded cable whether balanced or
unbalanced. Shielding which is properly grounded will
protect the signal from outside electrical interference such
as RF, fluorescent lighting, and computer/display emissions. As a general rule, unbalanced or single-ended (tipsleeve) lines of less than 10 feet are satisfactory, but greater
distances or noisy field environments require a balanced
signal. Avoid running input lines in close proximity or
parallel to long speaker lines, AC power cables, or power
transformers, as this may generate hum or oscillation.
4.2
Output Cables
These amplifiers are capable of delivering high
levels of output current, therefore the wire gauge used for
speaker cables is particularly important. Inadequate wire
gauge can add significant resistance to the speaker’s own
impedance, especially over long distances, reducing the
power which is actually delivered to the speaker. It could
also result in a decreased damping factor and possible fire
hazard. Since power at the speaker load is of primary concern in system design, we have included a table to best
determine appropriate wire gauge for your application. The
following table lists the resistance per 100 feet of common copper wire gauges, and also gives the percentage of
the speaker load power which would be lost in an arbitrary
100 ft run of different gauges of 2-conductor copper
speaker wire.
Wire Gauge Ω/100ft
#8
#10
#12
#14
#16
#18
.0605Ω
.1018Ω
.1619Ω
.2575Ω
.4094Ω
.6510Ω
8Ω load
4Ω load
0.8%
1.3%
2.0%
3.2%
5.1%
8.1%
1.5%
2.5%
4.0%
6.4%
10.2%
16.3%
RACK-MOUNTING REQUIREMENTS
5.1
Mechanical
The 6125A and 4200A amplifiers are designed to
fit in standard 19-inch equipment racks. The front panel
rack-mount ears are sufficiently strong for most applications, however if you desire further integrity for mobile
racks, we recommend using the four additional holes in
the back of the chassis for supplemental rear-mounting (see
dimensional drawing for details).
5.2
Cooling
Be certain that both the front and back of the rack
have unhindered access to free air flow. Fan direction is
from front to back. It is not necessary to leave empty space
above or below.
5.3
Grounding
In some installations where the sound system is
sensitive to RF noise or system-induced oscillation, it may
be necessary to ground the amplifier’s chassis to the rack
enclosure. This is accomplished using star type
lockwashers on the four rack mounting screws. These star
washers will penetrate through the amplifier’s paint to adequately ground the chassis to the rack.
Table 4.1: Wire gauge resistance/power loss
This table expresses the power loss as a percentage of the load’s power rather than the total amplifier output power in order to accurately determine power loss at
other cable lengths. For example, if you plan to deliver
150 watts to an 8Ω load through 50 ft of 14 ga. cable, the
power loss in the cable would be half that of a 100 ft run
of #14 wire as shown in the table, or 1.6% of 150W, which
is an insignificant 2.4 watts. However, if you were to run
200 ft of 18 ga. cable to a 4Ω load, the loss would be twice
that of the 100 ft run shown in the table, or 32.6% of 250W,
which is 81.5 watts lost as heat. Always be sure to use
adequate gauge speaker wire.
5
Operating Manual 6125A and 4200A Multi-Channel Power Amplifier
6.
FRONT PANEL FEATURES
6.1
Power Switch
When the unit is switched on there is a five second delay, during which time the PROTECT circuit will
activate, disconnecting the speakers from the amplifier
output. When turning off the amplifier, the load is removed
instantly, and the protect LED will briefly turn on as the
power supply discharges.
6.2
Signal Indicator
The signal present LEDs illuminate at an input
level of about 13mVrms (-35.5dBu).
6.3
Clip Indicator
The clipping LEDs illuminate at an input level of
about 870mVrms (+1.0dBu), with all channels driven by
1KHz into 8Ω. This indicates that the signal processing
circuitry has determined output levels to be approaching
the available power supply rails and has begun to “soften”
signal peaks. Actual onset of “hard” clipping depends on
audio program and total load impedance and does not occur until the signal processing circuitry can no longer compensate, which means that signal integrity can be
maintained even if the clipping indicators illuminate for
short periods of time.
6.4
Thermal Status Indicator
The thermal LEDs illuminate when the temperature of any one of the heat sink extrusions reaches 85 to
90°C. Both channels of the affected amplifier module will
shut off until the measured temperature drops below about
70°C. The amplifier should be able to maintain proper
6
operation at an ambient room temperature of 50°C (122°F)
or less with typical audio program and all channels driven
into 4Ω.
6.5
Protect Indicator
The protect LEDs illuminate when the fault monitoring microprocessor has determined that one of the following conditions exists:
- Power supply undervoltage
- Power supply overvoltage
- Output overcurrent
- Heat sink overtemperature
- Unacceptable DC output content
- Unacceptable high frequency output content
- AC power interruption
Because the signal processing module used in the
6125A and 4200A amplifiers processes two channels simultaneously, a fault in one channel will result in a protect condition for both channels processed by the same
module, ex. channels 1-2, 3-4, and 5-6 (6125A only). Thus
there will never be a case where only one of the amplifier
channels is shown in protect mode. When a pair of protect
LED's are illuminated, internal relays have removed the
channel pair's speaker loads from the amplifier output and
connected the speakers to ground. If the fault is isolated
to one module (channel pair), the other channels will remain unaffected.
Operating Manual 6125A and 4200A Multi-Channel Power Amplifier
* Model 6125A shown - Model 4200A only
has channels 1-4.
7.
REAR PANEL FEATURES
7.1
Input Connectors
The 6125A and 4200A inputs use balanced two
piece "Euroblock" style connectors. It is recommended
that balanced input connections be used whenever possible
to take full advantage of the amplifier's common mode
rejection properties, and to reduce ground-loop problems.
If a hum problem persists even though balanced inputs are
used, try connecting a balanced signal to the Euroblock
input with the input cable's shield lifted at the amplifier
end of the cable (ie. no ground connection), but connected
to ground at the signal source. This eliminates potential
ground currents through the input cable yet preserves the
benefits of shielding. If connecting an unbalanced signal
to the Euroblock input, connect the signal wire to (+) and
the cable shield to both (-) and ground.
+ -
G
Euroblock
Connector
System
+-
G
7.2
Input Ground Switch
This switch separates the input signal ground from
the chassis ground on all inputs. Ground connections from
an incoming signal float from the chassis ground when the
switch is out. Unless there are special circumstances which
require the input signal ground and chassis ground to be
disconnected, it is best to leave this switch in.
7.3
Multi-Channel Operation
The 6125A is essentially three stereo amplifiers
in one chassis, for a total of up to six separate channels.
The 4200A is essentially two stereo amplifiers in one chassis, for a total of up to four separate channels. Thus, the
following references to Stereo, Mono, or Bridged operation is with regard to each of three or two pairs of channels in the amplifier. For example, Channel 1 and Channel
2 together can provide stereo, mono, or bridged operation,
completely independent of Channels 3-4 or Channels 5-6
settings.
7.4
50Hz Low Cut Switch
Each pair of channels has a 50Hz second order
(12 dB per octave) low-cut filter option which is applied
to both channels within the pair. When the switch is
pressed, the audio signal is -3dB at 50Hz, -15dB at 25 Hz,
-27dB at 12.5Hz, etc.
7
Operating Manual 6125A and 4200A Multi-Channel Power Amplifier
Model 6125A
shown.
Model 4200A
has only four
channels.
7.5
Input Level Controls
Input Level Controls attenuate input signal from
0dB down to -∞. For best performance, Altec recommends
that the level controls be operated at full level (0 dB attenuation).
In STEREO mode, each level control corresponds
directly to the input signal on its respective channel.
In MONO Mode, the input signal connected to
channels 1, 3, or 5 are used to drive channels 2, 4, or 6
respectively, and the level controls for channels 1, 3, and
5 likewise control channels 2, 4, and 6. When switched to
Mono mode, channels 2, 4, or 6 level controls become inactive.
In BRIDGED mode, the level controls function
the same as in mono mode.
7.6
Stereo/Mono Switch
The 6125A is comprised of three stereo amplifiers (two on the 4200A), each operating independently of
the others, with Stereo/Mono switching available for each
channel pair. If this switch is set to Stereo mode, the channel pair operates as two discrete amplifiers, each with its
own input connection and level control.
Switching to Mono mode allows one input (channel 1, 3, or 5) to drive both channels of a stereo channel
pair. Pressing the Mono switch disables the channel pair's
other input connection, as well as its level control. The
first channel's input and level control now determines the
signal to both channels.
7.7
Dual Channel/Bridge Mode Switch
Bridging a power amplifier is the process whereby
two channels are supplied the same signal, with the second channel's phase inverted 180°. The speaker is then
connected across the (+) output connections of each channel, resulting in twice the power to the speaker that either
channel could deliver by itself. Since in Bridge Mode both
connections have voltage present, never connect or touch
either speaker wire to ground.
The 6125A is capable of three channels of bridged
output (two channels on the 4200A). To use bridged mode,
first press MONO from the Stereo/Mono switch on the
channel pair to be bridged. This sends the same audio
signal to both channels. Then press BRIDGE from the
Dual/Bridge switch on the channel pair to be bridged. This
inverts the phase of the input signal to the second channel.
These two channels are now operating together in Bridged
Mono mode, and the output must be taken from the two
(+) terminals of the corresponding bridged channel pair
7.8
Loudspeaker Output Connectors
Three terminal blocks (two on the 4200A) provide connections for the speaker outputs. In BRIDGE
mode, the channel 1, 3, or 5 (+) connection is the Bridged
(+) speaker output terminal, and the channel 2, 4, or 6 (+)
connection is the Bridged (-) speaker output.
CAUTION! NEVER CONNECT THE TWO
BRIDGED OUTPUTS TOGETHER OR CONNECT
EITHER BRIDGED OUTPUT TO GROUND.
8
Operating Manual 6125A and 4200A Multi-Channel Power Amplifier
Model 6125A
shown.
Model 4200A
has only four
channels.
Outputs
7.9
AC Inlet
The 6125A and 4200A amplifiers can be configured by the customer for operation at either 115VAC or
230VAC mains. Switching from one to the other simply
requires the following steps:
If the mains voltage is 220-250VAC, the required
fuse is MDA 10, 250V, and the required power cord is 3wire grounded, 10 Amp (18AWG) minimum.
1.) Unplug the amplifier from the wall and remove the power cord from the rear of the amplifier.
The 6125A and 4200A amplifiers contain circuitry
to self-protect during extreme fault conditions. These fault
conditions are:
2.) Using a small screwdriver as a lever, unlatch
the fuse holder in the AC inlet and remove it.
3.) Remove the voltage selection insert and rotate until the new nominal mains voltage level indication
(115 or 230) is on top and properly oriented for reading.
4.) Replace the voltage selection insert in the AC
inlet, making sure that it is plugged in all the way.
5.) Replace the fuse with the appropriate size (see
#6 below), and press the fuseholder back into the AC inlet
until it latches.
6.) Using a power cord of the appropriate size
and with the appropriate terminations, plug the cord into
the rear of the amplifier and then into the wall. The amplifier is now ready for use at the new mains voltage.
If the mains voltage is 110-125VAC, the required
fuse is MDA 12, 250V, and the required power cord is 3wire grounded, 13 Amp (16AWG) minimum.
8.
1.)
2.)
3.)
4.)
5.)
6.)
SELF-PROTECTION FEATURES
Power supply undervoltage
Power supply overvoltage
Output overcurrent
Heat sink overtemperature
Unacceptable DC or high frequency output content
AC power interruption
Except for AC power interruption, the detection
of any fault will result in the activation of protection circuitry on a particular module, which consists of two channels. That is, a short circuit on the output of channel 1
will result in both channel 1 and channel 2 entering protect mode. This is because the signal processing module,
which processes both channels simultaneously, does not
distinguish between the two channels within a channel pair
when processing a fault.
An AC power interruption will result in all channels entering protect mode simultaneously, just as if the
amplifier is being turned off.
9
Operating Manual 6125A and 4200A Multi-Channel Power Amplifier
In all cases, the amplifier will restart the signal
processing module after a short delay and will reconnect
the speakers after several seconds if no further fault conditions exist. This allows the servo circuitry to bring any
residual DC offsets to zero before speakers are connected.
Specific conditions resulting in a fault are as follows:
8.1 Power supply undervoltage - less than about
55 volts on the either supply rail. Possible causes would
be total load on the outputs exceeding recommendations
(remove some speakers - 4Ω load min, 8Ω min bridged),
low AC mains voltage (reduce extension cord length or
increase wire size, or switch to an AC mains circuit more
capable of supporting the amplifier's power requirements),
or improper AC inlet mains voltage setting (make sure
nominal AC mains voltage matches the number in the viewing window on the AC inlet).
8.2 Power supply overvoltage - more than about
92 volts on either supply rail. Possible causes would be
high AC mains voltage (change to an AC mains circuit with
voltage within the amplifier's stated requirements) or improper AC inlet mains voltage setting (make sure nominal
AC mains voltage matches the number in the viewing window on the AC inlet).
8.3 Output overcurrent - more than 15 to 20 amps
being drawn from any output. Possible causes would be
total load on the affected output exceeding recommendations (disconnect some speakers), or a short circuit on one
of the outputs driven by the affected module (inspect
speaker wiring for proper connection).
8.4 Heat sink overtemperature - a measured heat
sink extrusion temperature of more than 85 to 90 degrees
C. The three-speed fan will switch to medium speed at an
extrusion temperature of 45 to 50 degrees C, and to high
speed at a temperature of 70 to 75 degrees C. The
overtemperature fault will clear itself when the measured
temperature is below about 70 degrees C. The fan will
operate at low speed below about 50 degrees C.
8.5 Unacceptable DC or high frequency output
content - a DC offset in the output signal of more than a
few hundred millivolts indicates module failure, and will
trigger a DC protect fault. High frequency (20kHz to
100kHz) in the output at high amplitudes can cause speaker
damage and causes a fault condition more or less rapidly
as frequency and amplitude vary.
These two conditions (DC and HF) are tested by
the same circuit so the exact cause cannot be isolated. If
the fault condition persists after disconnecting all inputs
and outputs from the amplifier, there is probably a module
failure requiring service. Note: the self-testing circuit may
take as long as 30 seconds to recover from this fault, so be
sure to give the amplifier enough time to reset itself. If
after 30 seconds the module has recovered, begin plugging in one input and output at a time in an effort to isolate a system high-frequency or oscillation problem.
8.6 AC power interruption - a dropout (or brownout of sufficient magnitude) of more than one half mains
line cycle and less than one whole cycle in duration.
9.
The above conditions are checked by the signal
processing module on a switching cycle by switching cycle
basis and are therefore monitored as often as a million or
more times a second, allowing protection well before destructive conditions have time to cause part failure.
10
TYPICAL APPLICATIONS
The 6125A is essentially three stereo amplifiers
in one chassis, each with dual stereo, dual mono, and
bridged mono capabilities, while the 4200A is two stereo
amplifiers (four channels), but with more power per channel than the 6125A. Input connections are hard-wired with
two-piece Euroblock connectors, while speaker outputs are
wired to four position screw terminal blocks. Note: The
6125A is used for the following application details, but
the 4200A is used in a similar fashion, to a maximum of
four channels.
Operating Manual 6125A and 4200A Multi-Channel Power Amplifier
9.1 Six Channel Setup
Six Channel Setup (dual stereo)
Possible Applications:
Multiple Zone Systems
Three Pairs Of Studio Monitors
Multiple Stage Monitors
25V Distributed Systems (6125A Only)
Input Section:
Up to Six Different Inputs
Stereo/Mono Switches - Out
Dual Bridge Switches - Out
Levels Controls - Used Per Input Channel
Multi-Media Systems
Surround Sound
Three Way Biamplification
Stereo Triamplification
Outputs
! "
# $
!
"
#
$
Speaker Outputs - Up To Six Different Outputs
Minimum Speaker Load Per Channel = 49
Up To Six Different Amplifier Inputs
9.2 Dual Mono Setup
Dual Mono Setup
Input Section:
Up to Three Different Inputs
Stereo/Mono Switches - In
Dual Bridge Switches - Out
Levels Controls - Only Channels 1, 3, or 5 Used
Possible Applications:
Multiple Zone Systems
Three Different Stage Monitor Mixes
Dual-Mono FOH Tri-Amplification
Outputs
!
#
Amplifier Inputs
(An Input Can Be Parallel Connected
To Other "Non-Partner" Channels by
Hard-Wire Jumping the Euroblock Connectors)
!
"
#
$
Channels 1 & 2
Channels 3 & 4
Channels 5 & 6
From Channel 1 Input From Channel 3 Input From Channel 5 Input
Minimum Speaker Load Per Channel = 49
11
Operating Manual 6125A and 4200A Multi-Channel Power Amplifier
9.3 Bridged Mono Setup
Bridged Mono Setup
Possible Applications:
70 Volt Constant Voltage Systems (6250 Only)
Subwoofers
High Powered Monitors
High Powered Full Range PA Speakers
Input Section:
Up to Three Different Inputs
Stereo/Mono Switches - In
Dual/Bridge Switches - In
Levels Controls - Only Channels 1, 3, or 5 Used
Outputs
!
#
Amplifier Inputs
Bridged Channels 1 & 2
From Channel 1 Input
Bridged Channels 3 & 4
From Channel 3 Input
Bridged Channels 5 & 6
From Channel 5 Input
Minimum Speaker Load Per Bridged Channel Pair = 89
9.4 Typical PA Setup
Typical PA Setup
Outputs
! "
#
Subwoofer
Full Range
Monitor
Input
Inputs
Input
(Bridged Mono) (Dual Stereo) (Dual Mono)
12
Subwoofer
Bridged Output
89 Minimum
Dual Full Range
Outputs
49 Min/Channel
Separate Monitor
Outputs
49 Min/Channel
Operating Manual 6125A and 4200A Multi-Channel Power Amplifier
10.
DESIGN THEORY
11.
TROUBLESHOOTING TIPS
The 6125A and 4200A amplifiers are based on
stereo driver modules that use digital processing to generate a spread-spectrum switching pattern between about
200KHz and 1.5MHz, depending on input signal amplitude and frequency. This overcomes the self-limiting and
inherent weakness in traditional class D fixed-frequency
PWM amplifiers, and produces an output with THD+N
numbers comparable to class A and class AB linear amplifiers. (see Specification Notes at end of this section)
11.1
No Audio Output
In the 6125A and 4200A, the input signal is received by a single operational amplifier configured as a
difference amplifier to reduce common-mode effects from
sources located at a distance. This difference amplifier has
a gain of 2.74 which allows the use of less gain later in the
system, improving overall system noise performance.
Amp module is in protect mode. Speakers have
been disconnected from amplifier output and connected to
ground until the protect fault is corrected. See section 8
for a complete explanation of protect fault conditions. Output overcurrent, overvoltage and undervoltage faults will
reset in about eight seconds once the fault condition is removed, while excessive DC offset or high frequency faults
take about 30 seconds to reset.
The amplified signal, based on the position of various selector switches, either bypasses or is processed by a
two-pole high-pass filter with rolloff at 50Hz, and then
passes through the attenuating potentiometer. The attenuated signal is buffered and passed to the amplifier module
along with a zero-volt reference.
The amplifier module receives the attenuated signal with a unity gain differential amplifier to eliminate common-mode interference picked up within the amplifier
chassis. The signal is then added to a small DC offset signal opposite in polarity to any DC offset on the output
bridge and adjusted by the digital processing module as
described above. The digital processing module, which
also generates FET drive signals, has a voltage gain of 11.7
for a total system voltage gain of 32. The drive signals
generated by the processing module are fed to a pair of
high-current MOSFET transistors, and the switched output of these transistors is filtered and applied to the speaker
outputs. Fault conditions such as overvoltage,
undervoltage, and output overcurrent are measured by the
module and therefore affect a stereo pair of channels regardless of whether the fault actually exists on both channels processed in the module. Since every action applied
to protect the digital processing module affects both channels being processed, other fault conditions are not separated by channel, but rather by amplifier module.
Specification Notes: Due to its spread spectrum output switching pattern, the output signal of a 6125A or 4200A
amplifier contains significant dynamic frequency content* far
outside the audio band, which makes no difference to audible
performance, but which makes heavily bandwidth-limited** measurement of amplifier noise and distortion characteristics mandatory.
1.) Power LED not lit:
Line fuse is blown or power outlet is dead.
IF LINE FUSE IS BLOWN, REPLACE ONLY
WITH SAME TYPE AND RATING FUSE.
2.) Power LED is lit but Protect LEDs stay on:
Speaker Impedance: The 6125A or 4200A may
go into self-protect at high output levels if the actual
speaker load impedance is much less than 4 ohms. To calculate speaker impedance for a given combination of direct-coupled speakers, use Ohm's law as applied to series
and/or parallel resistor networks, where each speaker (for
this purpose) can be thought of as a single resistor, using
DC resistance measurements.
Simply stated, speakers connected in series will add
together their impedance. Conversely, two speakers connected in parallel will result in half the impedance, three
parallel speakers a third the impedance, four speakers a
fourth, and so on, assuming the speaker impedances are all
the same. Don't use mismatched impedances in parallel.
When using paralleled speakers, the available amplifier
power for that channel is evenly divided among speakers,
so 100 watts driving two parallel speakers of equal impedance provides 50 watts to each speaker, etc.
3.) Thermal LED and Protect LEDs stay on:
Amp module is in thermal protect mode and needs
to cool. The fan will continue to run while in thermal protect, and other modules will continue to function. See section 8.4 for details.
4.) Power LED lit but no Signal LED activity
There is no input signal applied or input level controls are turned down.
*variable 200KHz to 1.5MHz
**greater than 48dB/octave above 22kHz
13
Operating Manual 6125A and 4200A Multi-Channel Power Amplifier
11.2
Distorted Sound
11.3
1.) Clip LED is flashing regularly
Amplifier is being overdriven. Turn down the input level control, or reduce the output level from the signal source.
2.) Clip LED is not flashing at all
Amplifier input signal may be exceeding input
headroom, which is greater than +12dBu, or 3.4V rms
(measured using continuous 1kHz sine wave). Incoming
signal level higher than +12.8 dBu will cause distortion in
the amplifier. Turning down the input level controls will
not eliminate distortion if the input headroom is exceeded.
Turn down the output level of the device driving the amplifier instead.
Additionally, an input signal may already be distorted before it gets to the amp. Check to see if a piece of
equipment in the signal chain before the amp is clipping.
For best performance, the amplifier should be operated with
input levels fully CW. Also check for damaged speaker
drivers that could cause distorted sound.
12.
Hum or Buzz Noise
Be sure that the power cord’s 3-prong plug is connected to a properly earth-grounded outlet. Lifting the
grounding third prong may not improve hum or buzz and
can create a potential shock hazard.
Hum is usually caused by ground currents flowing between different pieces of equipment. Ground currents can be minimized by using a single point AC ground
for the sound system, and by using balanced connections
with quality cable throughout the audio path.
Buzz, as well as certain audible high frequency
tones, can be caused by environmental emissions such as
lighting dimmers, neon lights, or computer equipment. Use
balanced connections, and try moving the amplifier, wiring, lighting, or other equipment to different locations to
isolate the source of the noise.
Sections 3.3, 5.3, 7.1, and 7.2 further discuss issues related to grounding and noise problems.
DIMENSIONS
2.25"
(57.2)
1.25"
(31.8)
13.2" (335)
13.5" (344)
16.9" (430)
2.25"
(57.2)
4.75" (121)
5.19" (132)
18.5" (470)
19" (483)
14
Operating Manual 6125A and 4200A Multi-Channel Power Amplifier
13.
SPECIFICATIONS
Typical Idle Current
6125A
120V: 0.81A
240V: 0.42A
*Power Output
(Maximum Average Power, 0.1% THD, 1KHz)
Rated Per Channel, Two Channels Driven
6125A
4200A
4 ohm:
250 Watts RMS 400 Watts RMS
8 ohm:
150 Watts RMS 275 Watts RMS
Mono Bridged (1 Channel)
8 ohm:
500 Watts RMS 800Watts RMS
Rated Per Channel, All Channels Driven
6125A
4200A
4 ohm:
250 Watts RMS† 400 Watts RMS†
8 ohm:
150 Watts RMS
275 Watts RMS
Mono Bridged (3 channels)
8 ohm:
500 Watts RMS
800Watts RMS
(Maximum Average Power, 0.2% THD, 20Hz-20KHz)
Rated Per Channel, All Channels Driven
6125A
4200A
8 ohm:
130 Watts RMS 230 Watts RMS
Input Impedance: 10K ohm balanced, 37K ohm unbalanced
4200A
120V: 0.9A
240V: 0.5A
Current with Typical Audio Program Material (4 ohm load
- all Channels)
6125A
4200A
120V: 6.5A
120V: 7.0A
240V: 3.3A
240V: 3.5A
Connections
Input: Euroblock
Output: Screw Terminal Block
Cooling: Forced Air, Thermal Sensitive 3-Speed Fan, Front
Inlet/Rear Outlet
Dimensions: 19” (483mm) L x 5.25” (133mm) H x 16.5”
(419mm) D
Construction: 14 Gauge All-Steel Chassis
Weight
Shipping
Net
6125A
56lbs. (25.5Kg)
49lbs. (22.3Kg)
4200A
53lbs. (24Kg)
46lbs. (21Kg)
Specification conditions: 120VAC mains at 60Hz, 25° C
High Pass Filter: 50Hz, 12dB/octave
* Continuous power limited by power line capacity
**Total Harmonic Distortion (20Hz - 20KHz @ 8 ohms):
<0.2%
**IMD
(SMPTE 60Hz/7KHz 4:1)
@ 8 ohms: <0.2% (throughout power range)
(IHF) @ 8 ohms: <0.1% (throughout power range)
**Hum and Noise: -100dB from full output (A-weighted)
Full Power Input Sensitivity:
6125A
4200A
1.08V RMS (2.9dBu) 1.47V RMS (5.6dBu)
Frequency Response:
8 ohm: ±0.5dB 20Hz-20kHz
4 ohm: ±1.5dB 20Hz-20kHz
Voltage Gain: 32X (30.1dB)
**Non-conventional amplifiers require bandwidth limiting
for all distortion and noise measurements.
† Signal peaks in audio programming may trigger protection circuitry at low line voltages. Specifications are subject to
change or improvement without notice.
14.
WARRANTY INFORMATION
The unit you have just purchased is protected by
a limited five-year warranty . For warranty service or to
obtain a return RMA number, please call Altec Lansing
technical services at 405-848-3108. Fill out the information below for your records.
Serial Number _________________________________
Dealer ________________________________________
Date of Purchase _______________________________
Dealer’s Address _______________________________
Crosstalk: < -80dB (20Hz - 1KHz)
Signal Present Signal Sensitivity: 13mV RMS (-35.5dBu)
Dealer’s Phone ________________________________
Salesperson ___________________________________
Power Requirement: 110-125VAC, 220 - 250VAC 50-60Hz
15
Operating Manual 6125A and 4200A Multi-Channel Power Amplifier
Altec Lansing Pr
ofessional
Professional
1000 W. Wilshire Blvd. Suite 362
Oklahoma City, OK 73116 USA
A division of Altec Lansing Technologies Inc, Milford PA 18337-0277 Made In USA
Printed in USA
6125A-0 0503