1
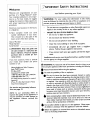
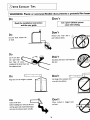
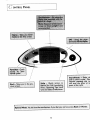
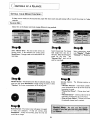
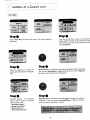
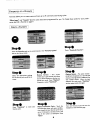
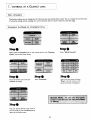
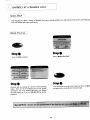
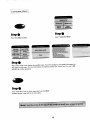
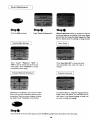
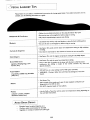
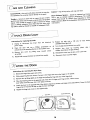
ABLE
OF CONTENTS
SafetyInstructions.................................................
I-2
Dryer ExhaustTips...................................................
3
OperatingTips.............................................
•..............4
Control Panel...............................................................
5
Controls at a Glance..........................................
6-14
SpecialLaundryTips ...............................................
15
Care & Cleaning......................................................
16
BeforeYou Call........................................................
17
Accessories...............................................................
18
Warranty ...................................................................
19
Guide de I'Utilisateur.............................................
20
Guiadel Usuario .....................................................
40
J
our obtenir unaffichageen franc_ais
ou en espagnol,appuyersur latouche Help (Aide),puissurla zone (S61ectiondes preferences)et s_lectionnerla languede vots_
J
ara cambiarel idiomade la pantallaa espa_olo franc_s,oprimala teclaHelp (Ayuda),optima SelectPreferences(SeleccionarPreferencias)yse|eccioneel idioma pr
6 34011 I0
A/08/O0
MCS pin 33002551
Bringing innova
f_X
Welcome
Welcome and congratulations on your
purchase of a Maytag Neptune® dryer!
Your complete satisfactionis very impor-
....
!/MPORTANT
SAFETY INSTRUCTIONS
..................................................................................................
read before operating your dryer
'................................................................................................................................
rant to us. For best results, we suggest
I WARNING:
For your safety, the information in this manual
with
proper operating and maintenance
readingthis
procedures.material to help acquaintyou
personal
injury
or death.
I prevent
must be property
followed damage,
to minimize
the risk
of fire
or explosion or to
Shouldyou need assistancein the future,
it is helpful to:
-
Do not store or use gasoline or other flammable vapors and
liquids in the vicinity of this or any other appliance.
I) Have complete model and serial
number identificationof your dryer.
This is locatedon a data plate in the
lower center of the door opening.
-
WHATTO
DO IFYOU SMELL GAS
• Do not try to light any appliance.
• Do not touch any electrical switch.
Date of Purchase
• Do not use any phone in your building.
Model Number
SerialNumber
• Clear the room, buildingor area of all occupants.
• Immediately call your gas supplier from a neighbor's
phone. Follow the gas supplier's instructions.
2) IMPORTANT: Keep this guide and
the sales receipt in a safe place for
future reference. Proof of original
purchase date is needed for war-
• If you cannot reach your gas supplier, call the fire depart.
ment.
ranty service.
If you have questions, write us (include
your model, serial number and phone
number) or call:
MaytagAppliancesSalesCompany
Attn:
CAIR®Center
P.O.Box
2370
Cleveland,TN 37320-2370
1-888-462-9824USA and CANADA
1-800-688-2080USATTY
(for deaf,hearingimpaired or speech
impaired)
(Mon.-Fri., 8am-Spm EasternTime)
http://www.maytag.com
Installation and service must be performed by a qualified installer
service agency or the gas supplier.
_WARNING:
To reduce the risk of fire, electric shockor injury to per
when usingthe appliance,follow basicprecautions,including the following:
_
Readall instructions before usingthe appliance.
To avoid the possibilityof fire or explosion:
O
For service and warranty information, see page 19.
NOTE: In our continuing effort to
improve the quality of our appliances,it
may be necessaryto make changesto
the appliance without revising this
guide.
IL
O
Do not dry items that have been previously cleaned in, washed
soaked in,or spotted with gasoline,dry-cleaningsolvents,other fla
mable or explosive substancesasthey give off vapors that could igr
or explode. Any material on which you have useda cleaningsolve
or which is saturated with flammableliquids or solids,should not
placedin the dryer, until all traces of these flammableliquids or so
and their fumes havebeenremoved.There are manyhighlyflamm_
items used in homes,such as:acetone, denatured alcohol,gasol
kerosene,some liquidhouseholdcleaners,some spot removers,1
pentine,waxes andwaxremovers.
simil;
Itemscontainingfoam rubber (maybe labeledlatex foam)or
textured rubber-like materialsmust not be dried on a heat sect
Foamrubbermaterialswhenheated,canundercertaincircumstan
producefire by spontaneouscombustion.
(1_ Do not allow childrento playon or in the appliance,Close suP.ervis
of childrenisnecessarywhen the applianceis usednear children.
Beforethe applianceis removedfrom serviceor discarded,remove
door to the dryingcompartment.
,MPORTANT
(_
SAFETY INSTRUCTIONS CONT.
Do not reachinto the applianceif the drum is moving.
1_1 Do not installor storethis appliancewhere it will be exposedto the weather.
i
Do not tamper with controls.
Do not repair or replaceany part of the applianceor attempt any servicingunlessspecificallyrecommendedin
publisheduser-repairinstructionsthat you understandandhavethe skillsto carry out.
i
Do not use fabricsoftenersor productsto eliminatestatic unlessrecommendedfor dryer useby the manufacturer of the fabric softeneror product.
Cleanthe lint screenbeforeor after eachload.
Keep_theareaaroundthe exhaustopeningand surroundingareasfree from lint accumulation,
dust anddirt.
1_
6
The interior of the dryer and exhaustduct shouldbe cleanedperiodicallybyqualifiedservicepersonnel.
This appliancemustbe properlygrounded.Never plugthe appliancecord into a receptaclewhichis not grounded
adequatelyand in accordancewith localand nationalcodes. See installationinstructionsfor groundingthisappliance.
Do not sit on top of the clothes dryer.
WARNING:
Do not place into your dryer items that have been spotted or soaked with vegetable oil or
cooking oil. Even after being washed, these items may contain significant amounts of these oils. The
remaining oil can ignite spontaneously. The potential for spontaneous ignition increaseswhen the items
containing vegetableoil or cooking oil are exposed to heat. Heat sources, such as your clothes dryer, can
warm these items, allowing an oxidation reaction in the oil to occur. Oxidation creates heat. If this heat
cannot escape,the items can become hot enough to catch fire. Piling,stacking or storing these kinds of
items may prevent heat from escapingand can create a fire hazard.
All washed and unwashed fabrics that contain vegetable oil or cooking oil can be dangerous. Washing
these items in hot water with extra detergent will reduce, but will not eliminate, the hazard. Always use
the "cool down" cyclefor these items to reduce the items' temperature. Never remove these items from
the clothes dryer hot or interrupt the drying cycle until the items haverun through the "cool down" cycle.
Never pile or stack these items when they are hot.
SAVE THESE INSTRUCTIONS
2
_
t
RYER EXHAUST TIPS
WARNING:
Plastic or nonmetal flexible duct presents a potential fire hazarC
Do
DON'T
I
Read the installation instructions
l
and the user guide,
1
Let a poor exhaust system
cause slow drying.
DON'T
Do
Restrict your dryer with a
poor exhaustsystem.
Let your dryer exhaust the
air easily.
Do
Use 4 inch diam-
DON'T
eter rigid metal
Useplastic,thin foil,or non-metalflex-
duct. Tape all joints,
includingat the dryer. Never use
lint-trappingscrews.
ibleduct.
_lll_J__
O
I
Do
(t
I
i "
Keep duct runs asstraight as possible.
DON'T
(I
Use longer than necessaryduct
runs with many elbows.
=__
m
Clean all old ducts
Allow crushed or clogged ducts
before installingyour new dryer. Besure
and vent.
vent flapopens and closesfreely.Inspect
and cleanthe exhaust system annually.
DO
DON'T
I
I
t_
ONTROL
PANEL
J
...
.,
....
/
/
i
...'
."
i
.."
/
\
....
/ONTROLS AT A GLANCE
.SETTING
YOUR DRYER CONTROLS i
If there are no words on the touchscreen, open the door, touch any pad (except off), or touch the screen to "wake"
controls.
SENSORDRY
Sensor dry is the fastest and most energy efficient drying method.
Step •
Step •
Step •
Select "Sensor Dry". The next screen will be the
Review Screen. If the selections are correct, press
Start/Pause. If changesneed to be made,follow the
next steps,
Selectdryness level.The dryness
level ranges from very dry to
dampdry. Selectthe levelappropriate for the load.
The
"Normal Dry" level will be
usedfor most loads.
Select appropriate tempm
ture; "Regular", "Mediurr
"Delicate" or "Extra Lo_
Step •
Step •
Review Screen -The ReviewScreenliststhe selected settings. At this
point you may press Start/Pause to begin drying the load or select
"Options" for further customization of the drying cycle.
Selecting Options. The following options are
available:
• "Wrinkle Prevent" - Intermittent tumble in
room temperature air for up to two hours following the dry cycle.
• "Damp Dry Chime" - Chimes when load is
damp.
cycle every 5 minutesfor up to two hours.
• "End of Cycle Chime" - Chimesonce when
the selecteddryness levelis reached.
• "Remind Chime" - Chimes at the end of the
O
StepO
Review Screen -The review screenwill appear once again
to verify your selections. If they are correct, press
Start/Pause. If they are incorrect, press the area you
would liketo change.
6
_K
r
TIME
ONTROLS AT A GLANCE CONT.
DRY
Step •
Select "Time
45 minutes,
Step
Dry" from the Home screen. The control defaults to
Press the up and down arrows to set the appropriate number of minutes to dry the load. The time
will increase or decrease in five minute increments.
Press"Continue".
Step •
Step •
Select the temperature. Choose the
appropriate temperature for drying the
load.
Review Screen -The ReviewScreenlists the selected settings.At this point
you may press Start/Pause to begin drying the load or select "Options"
for further customization of the drying cycle.
stepO
stepO
Selecting Options.
The following
options may be added to customize
yourTime Dry Cycle:
• "Wrinkle Prevent"
Review Screen -The review screenwill appear once againto verify your
selections. If they are correct, press Start/Pause. If they are incorrect,
press the area you would like to change.
• "Damp Dry Chime"
• "Remind Chime"
• "End of Cycle Chime"
7
Favoritesallows you to create, nameand saveup to 24 commonly used drying cycles.
"Blue jeans" and "towels" favorite cycles have been programmed for you. To changethese cycles for your preferences,seeEdit a Favoriteon page9.
I CREATE
AFAVORITE
i
Step •
Step •
Touchthe Favoritespadon the controlpanelor the "Favorite Cycles"
Touch"Create A Favorite".
area on the Home screen.
Step •
Step •
Step •
Selectthe appropriatesettings
for the favoriteyouwouldliketo
create,
Review Screen - This screen
reviewsyour cyclechoices,andallows
youto chooseOptionsto further customizeyour cycle. Press"Options"
if desired,or press"Continue".
OptionsScreen-The optionchoiceso
theleftturntheoptionsonor off.Theoptic
choicesontherightshowanadditional
scre_
with multiplechoices.When the desin
selections
aremade,touch"Continue"
seethe reviewscreenonceagain.
Step _
Step Q
Step
Press"Continue" to nameyour
favoritecycle,
Name A Favorite Cycle - Touchthe
corresponding
letter andspacecombinationto spelloutyourfavoritecyclename,
upto 12characters.Usethe arrowat the
top of the screento backspace.Press
Your newFavoriteCyclewill now be
displayed
on theFavorites
page.
"Save".
8
i
_i
ONTROLS AT A GLANCE
CONT.
;
.............
1
EDIT A FAVORITE
This function allows you to change part of a favorite cycle you already have named. You can change the current
of a favorite, change certain settings of a current favorite cycle or move a favorite to the first page.
I CHANGING THE NAME OF A FAVORITECYCLE
Step •
Step •
Either touch the Favorites pad on the control panel or the "Favorite
Cycles" area on the Home screen.
Touch "Edit A Favorite".
Step Q
Step •
Step •
Touch the favorite cycle name you
would like to change.
Touch "Continue".
Type in the new name and press
"Save". Use the arrow at the
top of the screen to backspace.
StepO
Press the desired favorite cycle name to
start the cycle, or press the Home pad to
return to the Home screen.
name
I
[
CHANGING
SETTINGS OF A CURRENT
FAVORITE
!
StepO
StepO
Either touch the Favorites pad on the control panel or the "Favorite
Cycles" area on the Home screen.
Touch "EditA
Step Q
Step •
Step Q
Touch the favorite cycle you
would like to edit.
Make the needed changes to the cycle by
touching the appropriatesetting. Once you have
madethe adjustments,touch "Continue".
If the current favorite cycle name
still applies,just touch "Save". If
you prefer a new name,type in the
new name and press "Save".
Favorite".
MOVEA FAVORITE
CYCLE'
StepQ
StepQ
Either touch the Favorites pad on the control panel or the "Favorite
Cycles" area on the Home screen.
Touch "Edit A Favorite".
Step •
Step •
Touch the area entitled "Move Favorite to First Page".
Usingthe arrow at the top, scroll through the pagesuntil you
get to the favorite you would like to move to the first page.
Touch that favorite cycle,
The favorite cycle you selected to move will now be ir
upper lef'cpositionof the touchscreen.The other favoritec
moved backone position with the sixthfavorite cyclemovi_
the next pageof favorites.
I0
,, ONTROLS AT A GLANCE CONT.
The Help feature offers a variety of detailed information including before you call, laundry hints, dryer operating tips,
lock out feature and select preferences.
st o
sto
Touchthe Help touchpad.
Select"BeforeYou Call".
Step •
Step Q
Here you will seeheadingsfor commontrouble-shooting
topics. Touchone of the displayedareasto seespecific
information. For more detailedinformation,see"Before
YouCall" section,pg.17,or call 1-888-462-9824
for further
assistance.
If youwouldliketo seethe other topics,just pressthe Back
touchpadbutton to get backto the maintopics.
II
!_LAUNDERING HINTS I
Step •
Step •
Touchthe Help touchpad.
Select"Laundry Hints".
StepO
TheLaundryHintsscreendisplaysthe available
topics.Touchthe headings
to seespecificinformationfor
eachtopic andsub-topic.Formore information,see"SpecialLaundryTips" section,pg.15,or call 1-888462-9824for further assistance.
StepQ
If youwould liketo seethe other topics,just pressthe Back
touchpadbutton to get backto the maintopics.
12
_i
ONTROLS AT A GLANCE CONT.
OPERATINGTIPS
I
Step •
Step •
Step Q
Touch the Help touchpad.
Select"OperatingTips".
"Operating Tips" provides information
on maximizingthe touchscreencontrols
anduseof your dryer, Touchthe headings
to seespecificinformation for eachtopic.
StepO
If you would like to see the other topics,
press the Back touchpad button to get
back to the main topics.
i_LOCK.....................................
OUT
FEATURE
_ii
Step •
Step •
Step Q
Touchthe Help touchpad.
Select"Lock Out Feature".
The "lock Out Feature" deactivates thq
touchscreenandtouchpads. Use this featurefo_
cleaning the control panel or to preven
unwanteduseof the dryer.
StepO
If you would like to see the other topics,
just press the Back touchpad button to
get back to the main topics.
13
I
SELECT PREFERENCES
i
Step •
Step Q
Step Q
Touch the Help touchpad.
Select "Select Preferences".
TOUCHSCREENVOLUME___!
AUTO START l
Touch "Loud", "Medium",
"Soft" or
"Off" to set the volume levelof the touchscreenbeeps.Touch"Continue" to accept
the selectedvolumesetting.
_CHANGE
"Select Preferences" allowsyou to selectthe volumeof 1
touchscreenbeeps,set the intensityof the screendisplay,
ac
rate Auto Startandchangethe displaylanguage
from English
Frenchor Spanish.Touch
the headingsto changethe setting_
When 'Auto Start On" ischosen,the dryer
will automatically start when the cycle is
selected.
MONITOR CONTRAST _
L CHANGE LANGUAGE_
Depending on the lighting in your home and other
factors, you may want to adjust the intensity of your
touchscreen. Touch the arrows to lighten or darken
the display.Touch "Continue" when finished,
You have the ability to change the language between
English, French and Spanish. You will always see the
next screen in the selected language to make sure
you want to changethe language.
StepQ
If you would like to seethe other topics, just pressthe Back touchpad button to get backto the main topics.
14
...................................................................................
PECIAL LAUNDRY TIPS
Pleasefollow the care label or manufacturer'sinstructions for drying special items. If care label instructions are not
available,usethe following information as a guide.
• Follow the care label instructions or dry usingthe Sensor Dry cycle.
• Be sure the item is thoroughly dry before using or storing.
Bedspreads & Comforters
• May require repositioning to ensure even drying.
• Use Sensor Dry and dry only one blanket at a time for best tumbling action.
• Be sure the item is thoroughly dry before usingor storing.
Blankets
• Use Sensor Dry cycle and the extra low temperature setting to help minimize
Curtains & Draperies
wrinkling.
• Dry these in small loads for best results and remove as soon as possible.
Cloth Diapers
• Use Sensor Dry and the regular temperature setting for soft, fluffy diapers.
Down-filled
• Use Sensor Dry and the extra low temperature setting.
• Placea clean pair of sneakersin the dryer with the item to fluff the down
comforters, etc. Adding a couple of dry towels shortens dry time and
absorbs moisture•
Items
(jackets_ sleeping bags,comforters, etc.)
• DO NOT dry on a heat setting. UseAir Fluff option (no-heat).
Foam Rubber
• WARNING - Drying a rubber item with heat may damageit or be a fire
hazard.
(rug backs, stuffed toys, shoulder
pads, etc.)
• Use Sensor Dry.
Pillows
• Add a couple of dry towels and a pair of clean sneakersto help the tumbling action and to fluff the item.
• DO NOT dryer-dry kapok or foam pillows.
Plastics
• Use Air Fluff orTime Dry and the extra low temperature setting depending on
(shower curtains, outdoor
furniture covers, etc.)
!
AVOID DRYER DRYING
•
the care label instructions.
,
FiberglassItems (curtains, draperies, etc.)
Woolens, unlessrecommended on the label.
Vegetableor cooking oil soakeditems. (Seepg.2)
15
Control Panel - cleanwith a soft, dampcloth.Do not useabrasivesubstances.Do not spraycleaner directly on the panel.
Tumbler - remove any stains such as crayon,ink pen or fabric
dye (from new items suchastowels or jeans) with an all-purpose
cleaner. Then tumble old towels or rags to remove any excess
stain or cleaning substance.Once these steps are done, stains
may still be visible, but should not transfer to subsequentloads.
Cabinet - wipe off anymarks with soapandwater.
Dryer Exhaust System - should be inspected and cleane
once a year to maintain optimum performance. The outsid
exhaust hood should be cleaned more frequently to ensur
proper operation. (Refer to the Installation Instructions for mor
information.)
DRUM LIGHT
Instructions for replacing the bulb:
I)
Unplug or disconnect the dryer from the electrical
power supply,
2) Open the door
and use a Phillips screwdriver
to
remove the screw attaching the lens to the tumbler front.
3) Remove lens cover by pulling cover toward center
4)
5) Replace the bulb with a 120 volt, 10 watt maxim_
candelabrabase light bulb.
6)
Turn the light bulb clockwise into socket.
7) Replace lens cover by hooking plastic tabs i
tumbler front below the light housing.
of tumbler.
8)
Reinstallthe screw into the lens cover screw hole.
Rotate bulb counter-clockwise to remove from socket.
9)
Reconnect dryer to power supply.
i EVERSE
THE
DOOR
Instructions for reversing the dryer door.
I)
Removethe hingehole covers and screws.
2) While supporting the door, remove 2 screws in the hingesthat secure the hingesto the cabinet.
3) Removedoor by li_ing slightlyat the hingesand pullingthe hingetabs out of the hinge slots.
4) Move the following parts to the opposite sideof the door: 2 hingesand 4 hinge screws,4 door screws,
door strike and screw,inner door cover plate and screw.
5) Attach the door to the opposite side of the cabinet usingthe 2 counter sunk hinge screws.(Seebelow). Screwthe Iowe
hinge screw in first.This will help to alignthe door and hinges.
6) Replacethe hinge hole covers to the opposite side.
16
EFORE YOU
CALL
• Be sure the door is latched shut.
Doesn't
Run
• Be sure the power cord is plugged into a live electrical outlet.
• Check the home's circuit breaker and fuses.
• Pressthe Start/Pause button again if the door is opened during the cycle.
• Check the home's circuit breaker and fuses.
Doesn't Heat
• Select a heat setting, not air fluff.
• On a gasdryer, check that the gassupply is on.
• Clean the lint filter and exhaust duct.
• Dryer may have moved into the cool-down portion of the cycle.
• Check all of the above,plus...
• Be sure the exhaust hood at the outside of the home can open and close freely.
• Check exhaust system for lint build-up.Ducting should be inspected and cleanedannually.
Doesn't Dry
•
•
•
•
•
•
Use 4" rigid metal exhaust duct.
Do not overload. I Wash load = I Dryer load.
Sort heavy items from lightweight items.
Large,bulky items like blanketsor comforters may require repositioning to ensure even drying.
Check that the washer is drainingproperly to extract adequatewater from the load.
Clothes load too small to tumble properly. Add a few towels.
• Check the load for objects such as coins,loose buttons, nails,etc. Remove promptly.
• It is normal to hear the dryer gas valve or heating element cycle on and off during the drying
cycle.
• Be sure the dryer is leveledproperly as outlined in the installation manual.
• Be sure the rubber feet are installed on the levelinglegs.
Is Noisy
• It is normal for the dryer to hum due to the high velocity of air moving through the dryer drum
and exhaust system•
Dries Unevenly
•...............................................
Has an Odor
I
• Seams,pockets and other similar heavyareasmay not be completely dry when the rest of the load
has reachedthe selected dryness level. This is normal•Selectthe "Very Dry" setting if desired.
• If one heavyitem is dried with a lightweight load,such asone towel with sheets,it is possible that
the heavyitem will not be completely dry when the rest of the load hasreachedthe selected dryness level.Sort heavy items from lightweight items for best drying results.
•..................................................
°....................................................
•................
•.................
°.................
•..................................
_................
, ..............
• Household odors such as from painting,varnishing,strong cleaners,etc. may enter the dryer with
the surrounding room air.This is normal as the dryer draws the air from the room, heats it, pulls
it through the tumbler and exhausts it to the outside.When these odors are present in the air,
ventilate the room completely before usingthe dryer.
U.S. customers usingTTY for deaf, hearing impaired or speech impaired, call 1-800-688-2080.
For further assistance, call Maytag Customer Service toll-free at 1-888-4-MAYTAG (I-888-462-9824).
17
!
' I
RYING ACCESSORIES
i
A dryingrackis available
for itemsthat you don'twantto tumbledry;suchas
sneakers,
washablesweaters,stuffedtoysor pillows,etc.Seeyour Maytag
dealerfor details,or call 1-800-688-8408
to order.
Part No. HAL I O00AXX
D MAYrA
rlEP FUI'IEo
18
Full One Year Warranty
For one (I) year from the date of original retail purchase, any part which fails In normal home use will be repaired or replaced
free of charge.
Limited Warranty
After the first year from date of original retail purchase, through the time periods listed below, the parts designated below which
fail in normal home use will be repaired or replaced free of charge for the part itself, with the owner paying all other costs,
including labor, mileage and transportation.
Second
Third
Year - All parts.
Through
Fifth Year
- Dryer tumbler, electronic controls.
Additional
Limited Warranty
Against
Rust-Through
Should an exterior cabinet, including the door, rust through during the one year period starting from the date of retail purchase,
repair or replacement will be made free of charge. After the first and through the tenth year, repair or replacement will be made
free of charge for the part itself, with the owner paying all other costs, including labor, mileage and transportation.
Please Note: This full warranty and the limited warranties apply when the dryer is located in the United States or Canada.
Dryers located elsewhere are covered by the limited warranties only, including parts which fail during the first two years.
Canadian
Residents
This warranty covers only those dryers installed in Canada that have been listed with Canadian Standards Association unless the
dryers are brought into Canada due to transfer of residence from the United States to Canada.
The specific warranties expressed above are the ONLY warranties provided by the manufacturer.This
cific legal rights, and you may also have other rights that vary from state to state.
warranty gives you spe-
To ReceiveWarranty Service
To locate an authorized servicecompanyin your area contact the Maytagdealer from whom your appliancewas purchased;or call Maytag
Appliances SalesCompany,MaytagCustomer Assistance at the number listed below. Should you not receivesatisfactory warranty service,pleasecall or write:
MaytagAppliancesSalesCompany
Attn: CAIR® Center
P.O.Box 2370
Cleveland,TN 37320-2370
U.S. or Canada (toll-free) 1-888-462-9824
U.S. customers usingTTY for deaf, hearing impaired or speech impaired, call 1-800-688-2080.
When contacting MaytagAppliances SalesCompany,MaytagCustomer Assistanceabout a serviceproblem, please includethe following:
(a) Your name,addressand telephone number.
(b) Model number and serial number (found on the lower center of the door opening) of your appliance.
(c) Name and addressof your dealer and the date the appliancewas purchased.
(d) A clear description of the problem you are having.
(e) Proof of purchase.
What
is not
covered
by these
warranties:
I. Conditions and damagesresultingfrom any of the following:
a. Improper installation,delivery,or maintenance.
b.Any repair,modification,alteration or adjustment not authorized by the manufacturer or an authorized servicen
c. Misuse,abuse,accidents,or unreasonableuse.
d. Incorrect electric current, voltage or supply.
e. Improper setting of any control.
2. Warranties are void if the original serial numbers havebeen
removed, altered, or cannot be readily determined.
3. Light bulb
4. Products purchasedfor commercial or industrial use.
5. The cost of service or service call to:
a. Correct installation errors.
b. Instruct the user on proper use of the product.
c.Transport the applianceto the servicer.
6. Consequential or incidental damagessustained by any person
asa result of any breach of these warranties.
Some states do not allow the exclusion or limitation of consequential or incidental damages,so the aboveexclusion may not
apply.
User's Guides,service manualsand parts catalogsare availablefrom MaytagAppliances SalesCompany, MaytagCustomer Assistance.
Playtag
• 403 West Fourth
Street
North
• P.O. Box 39 • Newton,
Iowa 50208