1
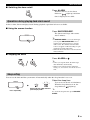
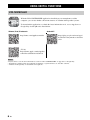
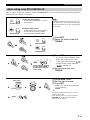
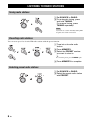
OWNER'S MANUAL
AB
CAUTION: READ THIS BEFORE OPERATING YOUR UNIT.
1
2
3
4
5
6
7
8
9
10
11
12
13
14
To assure the finest performance, please read this
manual carefully. Keep it in a safe place for future
reference.
Install this unit in a well ventilated, cool, dry, clean
place - away from direct sunlight, heat sources,
vibration, dust, moisture and cold. For proper
ventilation, allow the following minimum clearances.
Top: 15 cm (6 in)
Rear: 10 cm (4 in)
Sides: 10 cm (4 in)
Locate this unit away from other electrical
appliances, motors, or transformers to avoid
humming sounds.
Do not expose this unit to sudden temperature
changes from cold to hot, and do not locate this unit
in an environment with high humidity (i.e. a room
with a humidifier) to prevent condensation inside this
unit, which may cause an electrical shock, fire,
damage to this unit, and/or personal injury.
Avoid installing this unit where foreign object may
fall onto this unit and/or this unit may be exposed to
liquid dripping or splashing. On the top of this unit,
do not place:
– Other components, as they may cause damage
and/or discoloration on the surface of this unit.
– Burning objects (i.e. candles), as they may cause
fire, damage to this unit, and/or personal injury.
– Containers with liquid in them, as they may fall
and liquid may cause electrical shock to the user
and/or damage to this unit.
Do not cover this unit with a newspaper, tablecloth,
curtain, etc. in order not to obstruct heat radiation. If
the temperature inside this unit rises, it may cause
fire, damage to this unit, and/or personal injury.
Do not plug in this unit to a wall outlet until all
connections are complete.
Do not operate this unit upside-down. It may
overheat, possibly causing damage.
Do not use force on switches, knobs and/or cords.
When disconnecting the power cable from the wall
outlet, grasp the plug; do not pull the cable.
Do not clean this unit with chemical solvents; this
might damage the finish. Use a clean, dry cloth.
Only voltage specified on this unit must be used.
Using this unit with a higher voltage than specified is
dangerous and may cause fire, damage to this unit,
and/or personal injury. Yamaha will not be held
responsible for any damage resulting from use of this
unit with a voltage other than specified.
To prevent damage by lightning, keep the power
cable disconnected from a wall outlet or this unit
during a lightning storm.
Do not attempt to modify or fix this unit. Contact
qualified Yamaha service personnel when any
service is needed. The cabinet should never be
opened for any reasons.
15 When not planning to use this unit for long periods of
time (i.e. vacation), disconnect the AC power plug
from the wall outlet.
16 Be sure to read the “TROUBLESHOOTING” section
on common operating errors before concluding that
this unit is faulty.
17 Before moving this unit, press
to set the system to
off, and disconnect the AC power plug from the wall
outlet.
18 Condensation will form when the surrounding
temperature changes suddenly. Disconnect the power
cable from the outlet, then leave this unit alone.
19 When using this unit for a long time, this unit may
become warm. Turn the system off, then leave this
unit alone for cooling.
20 Install this unit near the wall outlet and where the AC
power plug can be reached easily.
21 Be sure to use the AC adaptor supplied with this unit.
Using an AC adaptor other than the one provided
may cause fire or damage to this unit.
This unit is not disconnected from the AC power source
as long as it is connected to the wall outlet, even if this
unit itself is turned off by . In this state, this unit is
designed to consume a very small quantity of power.
WARNING
TO REDUCE THE RISK OF FIRE OR ELECTRIC
SHOCK, DO NOT EXPOSE THIS UNIT TO RAIN OR
MOISTURE.
There is a chance that placing this unit too close to a
CRT-based (Braun tube) TV set might impair picture
color. Should this happen, move this unit away from the
TV set.
Do not use this unit within 22 cm (9 inches) of persons
with a heart pacemaker implant or defibrillator implant.
Radio waves may affect electro-medical devices.
Do not use this unit near medical devices or inside
medical facilities.
We, Yamaha Music Europe GmbH hereby
declare that this unit is in compliance with the
essential requirements and other relevant
provisions of Directive 1999/5/EC.
Yamaha Music Europe GmbH
Siemensstr. 22-34 25462 Rellingen, Germany
Tel: +49-4101-303-0
i En
Information for Users on Collection and Disposal of Old Equipment
This symbol on the products, packaging, and/or accompanying documents means that used electrical and
electronic products should not be mixed with general household waste.
For proper treatment, recovery and recycling of old products, please take them to applicable collection
points, in accordance with your national legislation and the Directives 2002/96/EC.
By disposing of these products correctly, you will help to save valuable resources and prevent any potential
negative effects on human health and the environment which could otherwise arise from inappropriate
waste handling.
For more information about collection and recycling of old products, please contact your local
municipality, your waste disposal service or the point of sale where you purchased the items.
[Information on Disposal in other Countries outside the European Union]
This symbol is only valid in the European Union. If you wish to discard these items, please contact your
local authorities or dealer and ask for the correct method of disposal.
AVEEA71102B
Important Notice: Guarantee Information for customers in EEA* and Switzerland
English
For detailed guarantee information about this Yamaha product, and Pan-EEA* and Switzerland warranty service, please
either visit the website address below (Printable file is available at our website) or contact the Yamaha representative
office for your country. * EEA: European Economic Area
http://europe.yamaha.com/warranty/
ii En
PREPARATION
CONTENTS
NAMES OF PARTS AND THEIR FUNCTIONS .................................................................................... 2
BASIC FUNCTIONS................................................................................................................................... 4
USING USEFUL FUNCTIONS ................................................................................................................. 6
LISTENING TO RADIO STATIONS ....................................................................................................... 8
CHARGING WITH THE USB PORT ...................................................................................................... 9
LISTENING TO EXTERNAL SOURCES ............................................................................................... 9
LISTENING TO MUSIC FROM YOUR Bluetooth COMPONENT ................................................... 10
TROUBLESHOOTING ............................................................................................................................ 13
SPECIFICATIONS ................................................................................................................................... 15
■ Features
– High quality playback of Bluetooth enabled smartphone/tablet computer, and radio and external devices.
One touch pairing enabled by NFC technology.
– Firm bass sound and spacious stereo sound from 2.1 ch powered speaker (tweeter × 2, woofer × 1),
SR-Bass™ (Yamaha Swing Radiator Bass technology) and DSP in a compact unit.
– Easy user-intuitive interface by buttons with Guide LED and knob dials.
– Convenient operability enabled by using iPhone/Android smartphone as a remote control.
Supports the dedicated application, “DTA CONTROLLER.”
– USB port for supplying power.
• Note indicates precautions for use of the unit and its feature limitations.
•
y
indicates supplementary explanations for better use.
■ Supplied accessories
AC adaptor
Power cable
USB cap
Note
(DC 15 V, 2.56A,
model number:
EADP-38EB A)
Keep the USB cap out of reach
of children so as to ensure that
it is not mistakenly swallowed.
1 En
NAMES OF PARTS AND THEIR FUNCTIONS
■ Front panel
1 Front panel display
2 SOURCE: Bluetooth, AUX, RADIO
3 VOLUME: Volume control
4 PRESET: Stores up to five favorite FM radio
stations (☞ P. 8).
■ Top panel
5 Illumination sensor: Measures surrounding
illuminance. Do not cover this sensor when
DIMMER (d) is set to A (auto).
6 CHARGING: Supplies 5V/2.1A to a portable
device, such as a smartphone, when it is connected
with a USB cable (☞ P. 9).
7
(Bluetooth): Press this button:
– to terminate Bluetooth connection when it is
established (☞ P. 12).
– to establish connection with the component that
was most recently connected via Bluetooth
(☞ P. 12).
2 En
8
: Press to turn the system on/off.
Time is displayed even when the system is off.
y
• Press and hold
for more than 3 seconds to set the
system to standby mode. All the information on the
front panel display is not displayed in standby mode.
This can reduce power consumption. To cancel standby
mode, press .
• Even in system off/standby mode, the alarm function is
available.
NAMES OF PARTS AND THEIR FUNCTIONS
9 ALARM: Alarm on/off (☞ P. 5)
0 SET: Alarm setting (☞ P. 4)
A
NFC mark: Allows easy pairing with NFC
technology (☞ P. 11).
B SNOOZE/SLEEP (☞ P. 5)
C MEMORY (☞ P. 8)
D DIMMER: Sets the brightness of the top and front
panel
A (auto) 3 (brightest) 2 1 (darkest)
back to A
y
When A (auto) is set, the brightness of the top and front
panel is adjusted automatically according to the
brightness of the room.
E TUNING (☞ P. 8)
■ Rear panel
15V
: Connect the supplied
AC adaptor and power cable.
ALARM TYPE switch (☞ P. 4)
FM Rod Antenna
(See below.)
AUX: Connect an external
device. (☞ P. 9)
CLOCK switch (☞ P. 4)
■ Extending rod antenna
Notes
• When you listen to FM, extend the
antenna.
• If FM reception is poor, change the
height or direction of the antenna, or
relocate the unit.
FM Rod Antenna
3 En
OPERATION
BASIC FUNCTIONS
Adjusting the clock
A Set CLOCK to SET.
B Set the time with TUNING.
C Set CLOCK to LOCK.
Rear panel
Front panel display
flashes.
Notes
• Time appears in 12-hour notation (AM/PM),
depending on the model.
For example, “4:00PM”.
• The time settings are lost approximately one
week after unplugging the unit.
Alarm setting
This unit can play back radio and/or beep sound at the set time.
■ Setting the time and sound
A Press SET.
B Set the alarm time with
TUNING.
Alarm indicator (
)
flashes and the front
panel display indicates
alarm mode.
Rear panel
An alarm will sound only once at the
specified time.
C Set ALARM TYPE.
• SOURCE+BEEP: radio (played
back from 3 minutes before the
alarm time) and beep sound (played
back at the alarm time)
• SOURCE: this unit plays back the
radio station you listened to last
time.
• BEEP: beep sound only
D Set the alarm volume.
E Press SET.
Alarm is set and the alarm indicator
(
) lights up.
4 En
BASIC FUNCTIONS
■ Switching the alarm on/off
Press ALARM.
When the alarm is on, the alarm
indicator (
) lights up and alarm
time is displayed for a while.
Operations during playing back alarm sound
At the set time, alarm sound plays back. During playback, operations below are available.
■ Using the snooze function
Press SNOOZE/SLEEP.
The alarm sound stops and resumes
after 5 minutes.
y
• If SOURCE+BEEP is set as the alarm type,
you can press SNOOZE/SLEEP once to
stop the beep sound, and twice to stop the
audio source. Five minutes after the audio
source is stopped, it will start fading in again
and the beep sound will resume.
• When the snooze function is activated, alarm
indicator flashes.
■ Stopping the alarm
Press ALARM or
.
y
• Unless you stop the alarm, the alarm stops
after 60 minutes automatically.
• When you stop the alarm, the alarm time
setting, etc., is saved for convenient use next
time.
Sleep setting
You can set the time until the system turns off automatically when the sleep function is set to on.
Select the sleep time.
You can set 30, 60, 90 or 120 minutes.
When the sleep function is on, the
sleep indicator (
) lights up.
Press repeatedly.
Sleep indicator (
) and front
panel display flash.
y
To cancel the sleep function, press SNOOZE/
SLEEP.
5 En
OPERATION
USING USEFUL FUNCTIONS
DTA CONTROLLER
With the DTA CONTROLLER application installed on your smartphone or tablet
computer, you can use further convenient features of Yamaha desktop audio systems.
To download the application, or obtain the latest information on it, access App Store or
Google Play via the QR codes listed below.
iPhone, iPad, iPod touch
http://itunes.com/app/dtacontroller
Android™
https://play.google.com/store/apps/
details?id=com.yamaha.av.dtacontr
oller
(U.S.A.)
https://itunes.apple.com/us/app/dtacontroller-us/id549333293?mt=8
Notes
• If you cannot access the above information, search for “DTA CONTROLLER” on App Store or Google Play.
• iPad, iPhone, and iPod touch are trademarks of Apple Inc., registered in the U.S. and other countries.
• Android and Google Play are trademarks of Google, Inc.
6 En
USING USEFUL FUNCTIONS
Alarm setting using DTA CONTROLLER
Once you have set Weekly Alarm by “DTA CONTROLLER”, you can select the Weekly Alarm mode in the
alarm mode select display of this unit.
1d (One Day Alarm mode):
An alarm that sounds only once at the
specified time.
One Day Alarm
Weekly Alarm
Note
The Weekly Alarm mode cannot be selected
when all the days of the Weekly Alarm setting
are turned off. Turn on any day of the Weekly
Alarm setting.
7d (Weekly Alarm mode):
An alarm whose time can be specified
for each day of the week (settable
only using “DTA CONTROLLER”).
A Press SET.
B Select the alarm mode with
TUNING.
One Day Alarm
Weekly Alarm
C Press SET.
Alarm indicator (
)
flashes and the front
panel display indicates
alarm mode.
Rear panel
• If you have chosen Weekly Alarm
mode, this completes the alarm
setting. The alarm indicator (
)
and the Weekly Alarm indicator
(
) will light up.
D Set the alarm time with
TUNING.
E Set ALARM TYPE.
F Set the alarm volume.
G Press SET.
Alarm is set and the alarm indicator
(
) lights up.
y
The alarm setting will be saved even if the
alarm is turned off.
If the alarm is turned on again by pressing
ALARM, the alarm will sound with the
previous alarm settings.
7 En
LISTENING TO RADIO STATIONS
Tuning radio stations
A Set SOURCE to RADIO.
B For automatic tuning, press
and hold TUNING.
For manual tuning, press
TUNING repeatedly.
Note
If you tune to a station manually during FM
reception, the sound is monaural.
Presetting radio stations
You can store up to five favorite FM radio stations with the preset function.
A Tune into a favorite radio
station.
B Press MEMORY.
C Select the PRESET number
you want to store to.
y
To cancel the preset, press TUNING again.
D Press MEMORY to complete.
Selecting preset radio stations
A Set SOURCE to RADIO.
B Select the preset radio station
with PRESET.
8 En
CHARGING WITH THE USB PORT
Connecting a portable device such as a smartphone or tablet computer to the USB port on this unit charges the
connected device (power supply of up to 5V/2.1A is supported).
Prepare a USB cable that is compatible with the portable device and confirm that the device is supported for
charging via USB connection before use. In addition, read the documentation provided with the portable
device.
A Connect your portable device
to the USB port on this unit
using a commercially available
USB cable.
USB cable from portable device
Charging automatically starts.
B Disconnect the USB cable
from the unit when charging
completes.
Check the charging status on the
portable device.
Top panel
Notes
• Charging may not be possible depending on
the portable device.
• The USB port is for charging use only. The
USB port does not support audio playback.
• In standby mode, power supply stops, and
charging is not available.
• This unit does not function as memory
storage.
• Yamaha will not be held responsible for any
damage to the portable device or data loss
occurred while using this unit.
• Disconnect the USB cable immediately after
charging completes, since power continues to
be supplied to the connected device.
LISTENING TO EXTERNAL SOURCES
Playing back external sources
■ Playing back
Rear panel
A Connect your portable audio
device to AUX using a
commercially available 3.5 mm
(1/8 in) mini plug cable.
Note
Turn down the volume of this unit and your
portable audio device before connection.
B Set SOURCE to AUX.
C Start playback on the connected
portable audio device.
9 En
LISTENING TO MUSIC FROM YOUR Bluetooth COMPONENT
This unit provides Bluetooth functionality. You can enjoy wireless music playback from your Bluetooth
component (smartphone, digital audio player, etc.). Please also refer to the owner’s manual of your Bluetooth
component.
Installation
Install in a stable place, being careful of the following points:
• Do not place on top of steel or other metal plates.
• Do not cover with a cloth, etc.
• Install in the same room as the device with which signals are to be exchanged (Bluetooth profile A2DP
compatible portable music player, mobile phone, etc.) within a direct, line-of-sight distance of 10 m (33 ft).
• Make sure there are no obstacles between this unit and the Bluetooth component.
Within 10 m (33 ft)
Pairing this unit with your Bluetooth component
Pairing is an operation that registers the communicating component (subsequently called “the other
component”) with this unit. You will need to perform the pairing operation the first time you use your
Bluetooth component with this unit, or if the pairing settings have been deleted. Once pairing has been
completed, subsequent reconnection will be easy even after the Bluetooth connection is disconnected. If pairing
is not successful, refer to the item “Bluetooth” in “TROUBLESHOOTING” (☞ P. 13).
y
• This unit can be paired with up to eight other components. When pairing with the ninth component has succeeded, pairing
data for the component with the oldest connection date will be deleted.
• If this unit is connected via Bluetooth to another component, press
(Bluetooth) on this unit to disconnect the Bluetooth
connection before you perform the pairing operation.
■ If using an iPhone/iPad/iPod touch
A
B
C
A Set SOURCE to (Bluetooth).
B On your iPhone/iPad/iPod
touch, turn [Settings]
[Bluetooth] on.
The Bluetooth connection list will
appear in [Devices].
(This procedure or display may differ
depending on the type of your iPhone/
iPad/iPod touch.)
Bluetooth indicator
C From the Bluetooth connection
list of the other component,
choose this unit (TSX-B72
Yamaha).
When pairing has been completed,
your iPhone/iPad/iPod touch will
indicate “Connected”.
The Bluetooth indicator on the front
panel display of this unit will light.
10 En
LISTENING TO MUSIC FROM YOUR Bluetooth COMPONENT
■ If using other than an iPhone/iPad/iPod touch
A Set SOURCE to (Bluetooth).
B Perform Bluetooth pairing on the other component.
For details, refer to the owner’s manual of the other component.
C From the Bluetooth connection list of the other component, choose this unit (TSX-B72
Yamaha).
When pairing has been completed, the Bluetooth indicator on the front panel display of this unit will light
for about 1 second.
y
If you are prompted for a passkey, enter the numerals “0000”.
■ Easy pairing
For the smartphone with NFC (Near Field Communication) function, you can easily perform the pairing
operation just by touching the NFC mark on this unit with your smartphone (you need to turn the system on and
turn on the NFC function of the connecting component beforehand).
A Press to turn the system on.
B Perform the pairing operation
at the connecting component
(for details, please read the
owner’s manual of the
connecting component).
This unit is indicated as “TSX-B72
Yamaha” on the connecting
component.
NFC
mark
y
• If you are prompted for a passkey, enter the
numerals “0000”.
• If the connection fails, move the
smartphone slowly on the NFC mark.
• If the smartphone is equipped with a case,
remove the case.
11 En
LISTENING TO MUSIC FROM YOUR Bluetooth COMPONENT
Listening to a Bluetooth component
A Set SOURCE to (Bluetooth).
B Connect this unit and your other
component via Bluetooth.
C Play back music from your Bluetooth
component.
Bluetooth
indicator
Note
Take care that the volume setting of this unit is not too high. We
recommend that you adjust the volume on the other component.
y
• While the system is turned off, if you connect a Bluetooth
component to the unit and play back music, the system will
automatically turn on.
• If you disconnect the Bluetooth connection from your other
component while the playback source is set to Bluetooth, this
unit will automatically turn off the system.
• If Bluetooth is selected as the playback source, this unit will
automatically turn off the system when 60 minutes have
elapsed without any Bluetooth connection nor any operation
performed.
Connecting an already-paired component via Bluetooth
Once pairing with a component has been completed, connecting with that component via Bluetooth will be
easy next time.
■ Connecting from this unit
Set SOURCE to (Bluetooth).
The Bluetooth indicator will blink on the front panel display; this unit will search for the other component
that was most recently connected via Bluetooth, and will then establish a connection (You must first turn on
the Bluetooth setting of the other component).
When the Bluetooth connection has been established, the Bluetooth indicator will light.
Note
Yamaha does not guarantee all connections between this unit and Bluetooth component.
y
Pressing
(Bluetooth) on the top panel of this unit also establishes connection with the component that was most recently
connected via Bluetooth; however, SOURCE is not automatically set to
(Bluetooth).
■ Connecting from the other component
A In the Bluetooth settings of the other component, turn Bluetooth on.
B From the Bluetooth connection list of the other component, choose this unit (TSX-B72
Yamaha).
The Bluetooth connection will be established, and the Bluetooth indicator on the front panel display of this
unit will light.
Note
Bluetooth connections cannot be established from the other component when this unit is in standby mode. Turn the system on.
Disconnecting a Bluetooth connection
If any of the following operations are performed while a Bluetooth connection is being used, the Bluetooth
connection will be disconnected.
• Press (Bluetooth) on the top panel of this unit.
• Turn the system off.
• Turn off the Bluetooth setting of the other component.
12 En
TROUBLESHOOTING
Refer to the table below if the unit does not operate properly. If the problem you are experiencing is not listed
below, or if the instruction below does not help, turn off the unit, disconnect the power cable, and contact the
nearest authorized Yamaha dealer or service center.
General
Problem
The speakers make no
sound.
Cause
Solution
The volume may be set to the minimum
level.
Adjust the volume level.
The source may be incorrect.
Select the correct source.
Sound suddenly turns off. The sleep function (☞ P. 5) may be set.
Turn on the system and play the source again.
Sound is cracked/
distorted or there is
abnormal noise.
Input source volume is excessive, or
volume of this unit is excessive.
Adjust the volume with VOLUME, or adjust
the sound with the tone control of DTA
CONTROLLER.
The unit does not operate
properly.
The unit may have received a strong
electrical shock such as lightning or
excessive static electricity, or power
supply may have dropped.
Set the system to off, and disconnect the
power cable. Wait about 30 seconds,
reconnect the power cable, and turn on the
system.
The system turns on but
immediately shuts off.
The power cable may be connected
improperly.
Make sure the power cable is plugged into the
wall outlet firmly.
The unit may have received a strong
electrical shock such as lightning or
excessive static electricity.
Set the system to off, and disconnect the
power cable. Wait about 30 seconds,
reconnect the power cable, and turn on the
system.
A digital or high-frequency The unit may be placed too close to the
digital or high-frequency equipment.
equipment produces
noises.
Place the unit farther away from the
equipment.
The clock setting has been The unit is left more than one week after
you disconnect the power cable from the
cleared.
Plug the power cable into the wall outlet
firmly, and set the clock again (☞ P. 4).
wall outlet.
RADIO does not play at
the alarm time.
ALARM TYPE is set to BEEP.
Clock flashes and the unit CLOCK on the rear panel is set to SET,
and this unit is in clock setting mode.
cannot be operated.
Set ALARM TYPE to SOURCE+BEEP or
SOURCE (☞ P. 4).
Set CLOCK to LOCK.
Radio reception
Problem
Too much noise during
stereo broadcast.
Cause
Solution
The radio station you selected may be far Try manual tuning to improve the signal
from your area, or the radio wave
quality (☞ P. 8) or change the height or
reception is weak in your area.
direction of the antenna, or relocate the unit
(☞ P. 3).
13 En
TROUBLESHOOTING
Bluetooth
Problem
Cannot make this unit
paired with the other
component.
Cause
The other component does not support
A2DP.
Solution
Perform pairing operations with a component
which supports A2DP.
A Bluetooth adaptor, etc. that you want to Use a Bluetooth adaptor, etc. whose password
pair with this unit has a password other
is “0000”.
than “0000”.
This unit and the other component are too Move the other component closer to this unit.
far apart.
There is a device (microwave oven,
Move this unit away from the device that is
wireless LAN, etc.) that outputs signals in emitting radio-frequency signals.
the 2.4 GHz frequency band nearby.
Cannot establish a
Bluetooth connection.
This unit is not registered on the other
component’s Bluetooth connection list.
No sound is produced or
the sound is interrupted
during playback.
The Bluetooth connection of this unit with Perform Bluetooth connection operations
the other component is disconnected.
again (☞ P. 12).
Perform pairing operations again (☞ P. 10).
This unit and the other component are too Move the other component closer to this unit.
far apart.
There is a device (microwave oven,
Move this unit away from the device that is
wireless LAN, etc.) that outputs signals in emitting radio-frequency signals.
the 2.4 GHz frequency band nearby.
The other component’s Bluetooth
function is off.
Turn on the Bluetooth function of the other
component.
The other component is not set to send
Bluetooth audio signals to this unit.
Check that the Bluetooth function of the other
component is set properly.
The pairing setting of the other
component is not set to this unit.
Set the pairing setting of the other component
to this unit.
The other component’s volume is set to
the minimum.
Increase the volume level.
USB port charging
Problem
Cannot charge the
connected portable USB
device.
Cause
Solution
An incompatible USB device is connected Turn off the system and reconnect the USB
to the unit. Or the USB device is not
device to the unit. If it does not resolve the
connected to this unit properly.
problem, the USB device is not chargeable
with the unit.
■ Resetting the unit
If the unit does not function properly, resetting the unit may solve the problem. To reset the unit, press and hold
for more than 10 seconds.
14 En
SPECIFICATIONS
■ PLAYER SECTION
■ CHARGING CONNECTOR SECTION
AUX IN
• Connector type.................................................. USB type A
• Output rating .........................................................5 V/2.1 A
• Input connector
............STEREO L/R: 3.5 mm (1/8 in) STEREO mini Jack
■ AMPLIFIER SECTION
■ NFC (Near Field Communication)
SECTION
• Maximum output power .......................... 4 W + 4 W + 8 W
(6 Ω 1 kHz, 10% THD)
• Driver unit ...................4 cm (1 5/8 in) full-range driver × 2
5.5 cm (2 1/8 in) woofer + SR-Bass × 1
• Supported model
.............................NFC-ready Android device Ver. 4.1, 4.2
* Some models may not work or be different in the required
distance for connection.
■ Bluetooth SECTION
■ GENERAL
•
•
•
•
•
•
•
•
•
•
■ TUNER SECTION
Specifications are subject to change without notice.
Bluetooth version...........................................Ver. 2.1+EDR
Supported protocols.....................................A2DP, AVRCP
Supported codecs................................................SBC, AAC
Wireless output.........................................Bluetooth Class 2
Maximum communication distance
...................................... 10 m (33 ft) (without obstructions)
• Supported contents protection .................. SCMS-T method
Power Supply........................... AC 100 to 240 V, 50/60 Hz
Power consumption .....................................................22 W
System off consumption .............................................1.9 W
Standby consumption...................................... 0.5 W or less
Dimensions (W × H × D)....................210 × 110 × 144 mm
(8 1/4 × 4 3/8 × 5 5/8 in)
• Weight......................................................... 1.4 kg (3.1 lbs.)
• Tuning range
FM....................................................87.5 to 108.0 MHz
Bluetooth
• Bluetooth is a technology for wireless communication
between devices within an area of about 10 meters (33 ft)
employing the 2.4 GHz frequency band, a band which can
be used without a license.
• Bluetooth is a registered trademark of the Bluetooth SIG
and is used by Yamaha in accordance with a license
agreement.
Handling Bluetooth communications
• The 2.4 GHz band used by Bluetooth compatible devices
is a radio band shared by many types of equipment. While
Bluetooth compatible devices use a technology
minimizing the influence of other components using the
same radio band, such influence may reduce the speed or
distance of communications and in some cases interrupt
communications.
• The speed of signal transfer and the distance at which
communication is possible differs according to the
distance between the communicating devices, the
presence of obstacles, radio wave conditions and the type
of equipment.
• Yamaha does not guarantee all wireless connections
between this unit and devices compatible with Bluetooth
function.
■ For U.K. customers
If the socket outlets in the home are not suitable for the plug
supplied with this appliance, it should be cut off and an
appropriate 3 pin plug fitted. For details, refer to the
instructions described below.
Note
The plug severed from the mains lead must be destroyed, as a
plug with bared flexible cord is hazardous if engaged in a live
socket outlet.
■ Special Instructions for U.K.
Model
IMPORTANT
THE WIRES IN MAINS LEAD ARE COLOURED
IN ACCORDANCE WITH THE FOLLOWING
CODE:
Blue: NEUTRAL
Brown: LIVE
As the colours of the wires in the mains lead of this
apparatus may not correspond with the coloured
markings identifying the terminals in your plug,
proceed as follows:
The wire which is coloured BLUE must be connected
to the terminal which is marked with the letter N or
coloured BLACK. The wire which is coloured
BROWN must be connected to the terminal which is
marked with the letter L or coloured RED.
Make sure that neither core is connected to the earth
terminal of the three pin plug.
15 En
© 2013 Yamaha Corporation
Printed in China ZJ05650