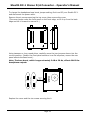
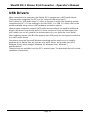
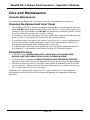
1
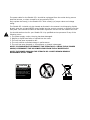
Important Safety Precautions and Explanation of Symbols
!
The exclamation point within an equilateral triangle is intended to alert the user to the
presence of important installation, operation, and service instructions in this manual.
The lightning flash with arrowhead symbol within an equilateral triangle is intended to alert the
user to the presence of uninsulated dangerous voltages within the enclosure that may be of
sufficient magnitude to constitute a risk of electrical shock to the user.
Please read this manual thoroughly before attempting to install, configure, or operate the
Stealth DC-1. After successful installation and configuration of the Stealth DC-1, be sure to
retain this manual in a safe place for future reference.
Safety is a key component to a long lasting and trouble free installation. Please read and
follow all instructions and heed all warnings on the DC-1 and in this manual. The vast majority
of the subsequent safety precautions are common sense. If you are not comfortable with the
installation of professional audio/video equipment, you should seek the services of a qualified
installation professional or call us for help.
!
WARNING: To REDUCE the risk of fire or electric shock, do not use the
STEALTH DC-1 near water or in wet locations, do not expose it to rain
or moisture, DO NOT EXPOSE IT TO DRIPPING OR SPLASHING FROM OTHER
SOURCES, AND ENSURE THAT NO OBJECTS FILLED WITH LIQUIDS (SUCH AS VASES)
ARE PLACED ON IT. Doing so may result in damage to the unit and the risk
of electric shock, which may result in bodily injury or death.
WARNING: To reduce the risk of electric shock, do not DISASSEMBLE the
STEALTH DC-1. There are no user-serviceable parts inside the unit. Refer
all service to qualified service personnel.
Do not install the Stealth DC-1 near or above any heat sources such as radiators, heating
vents, or other apparatus that produce heat. Do not block any ventilation openings or heat
sinks. Avoid installing the unit directly above other heat-producing equipment unless sufficient
ventilation or forced-air cooling is provided.
Do not install the Stealth DC-1 in locations without proper ventilation. The Stealth DC-1 should
not be operated on a bed, sofa, rug, or similar surface that may block air flow to the heat
sinks. The unit should not be mounted against a surface or in an enclosed location such as a
bookcase, cabinet, or closed equipment rack unless sufficient ventilation is provided.
Always install your Stealth DC-1 according to the manufacturer’s instructions and only use
attachments or accessories specified by the manufacturer.
Connect the Stealth DC-1 only to power sources of the correct voltage (as shown in this
manual and on the Stealth DC-1 unit).
Protect power supply cables from being pinched, walked on, or otherwise damaged. Be
especially careful where the power cable enters the power outlet and the unit.
Only connect the Stealth DC-1 to an electrical outlet or extension cord of appropriate type and
rating.
DO NOT defeat the safety purpose of a grounding or polarized plug by removing ground pins
or using unsafe adapters. A polarized plug has two blades - one wider than the other.
A grounding plug has a third ground prong in addition to the two main conductors. The wide
blade or third groundling prong is provided for your safety. If the provided plug does not fit
your outlet, consult an electrician to replace your obsolete outlet. If you replace the power
cord, only use one of similar type and equal or greater current rating.
The power cable for the Stealth DC-1 should be unplugged from the outlet during severe
electrical storms, or when unused for a long period of time.
Only replace the fuse(s) in the Stealth DC-1 with a fuse(s) of proper value and voltage
rating.
The Stealth DC-1 should only be cleaned as directed in the manual. Avoid spraying liquids
directly onto the unit and NEVER spray liquids into the vents or controls, or directly onto the
face plate. Care should be taken so that small objects do not fall into the inside of the unit.
!
You should seek service for your Stealth DC-1 by qualified service personnel if any of the
following occur:
1.
2.
3.
4.
5.
The power-supply cord or the plug has been damaged.
Objects or liquid have fallen or spilled into the vents.
The unit has been exposed to rain.
The unit exhibits a marked change in performance.
The unit has been dropped, or its enclosure or chassis is damaged.
NOTE: TO COMPLETELY DISCONNECT THE STEALTH DC-1 FROM THE AC POWER
MAINS, DISCONNECT THE AC POWER CORD FROM THE AC RECEPTACLE.
NOTE: THE POWER CORD ON THE STEALTH DC-1 MUST REMAIN READILY
ACCESSIBLE AT ALL TIMES.
CAUTION
CAUTION: TO REDUCE THE RISK
OF ELECTRICAL SHOCK, DO
NOT REMOVE COVER. NO USER
SERVICEABLE PARTS INSIDE.
REFER SERVICING TO QUALIFIED
SERVICE PERSONNEL.
Stealth DC-1 Stereo D/A Converter - Operator’s Manual
Contents
Important Safety Precautions and Explanation of Symbols
Introduction.................................................................. 3
About This Manual......................................................... 4
Features....................................................................... 5
Quick Start................................................................... 7
Hardware Configuration................................................ 13
USB Drivers................................................................ 15
Setup Menu................................................................ 16
Care and Maintenance.................................................. 18
Specifications.............................................................. 19
Troubleshooting........................................................... 20
Emotiva Professional Systems LLC
Five-Year Limited Warranty........................................... 23
Notes......................................................................... 25
Page 1
Stealth DC-1 Stereo D/A Converter - Operator’s Manual
Page 2
Stealth DC-1 Stereo D/A Converter - Operator’s Manual
Introduction
Thank you for purchasing the new Stealth DC-1 Stereo 24-192 Balanced DAC.
The Stealth DC-1 is a reference quality stereo PCM DAC (digital-to-analog converter)
designed for use in professional and pro/am audio mixing and mastering studios. The
Stealth DC-1 offers the features that really matter in a professional studio product:
superb sound quality (and accuracy), flexible input options, professional level balanced
and consumer level unbalanced line outputs, dual high-quality headphone outputs,
a powerful yet simple to use configuration menu system, an informative blue OLED
display - which is bright enough to read from across the studio, and control of basic
functions via a convenient remote control.
Of course, the Stealth DC-1’s excellent sound quality, flexibility, convenient half-rack
form factor, and feature set also make it right at home in an audiophile sound system
- where its stereo analog input lets you connect the output of a phono preamp or other
legacy analog source without needing to add a separate analog preamp.
The Stealth DC-1 finally brings the features and sound quality of DACs costing many
times its price within reach of both the home and small studio recording engineer as
well as the audiophile digital music enthusiast.
Happy listening!
The Emotiva Professional Team
Page 3
Stealth DC-1 Stereo D/A Converter - Operator’s Manual
About This Manual
This manual will provide you with all the information you need to get great
performance, accurate sound, and many years of reliable service from your
Stealth DC-1.
Many of you are experienced studio professionals and are probably familiar with studio
and audiophile D/A converters. We suggest that you read through the entire manual as
we kept things as short and direct as possible. Even if you’re an expert user, you might
find some interesting information and useful suggestions.
You may wish to record serial numbers or other purchase information on the Notes
page at the back of this manual.
Page 4
Stealth DC-1 Stereo D/A Converter - Operator’s Manual
Features
The Stealth DC-1 is a full featured 24-192 stereo PCM DAC which combines unerringly
accurate sound with flexible input and output options and a sophisticated menu and
control system.
Support for all popular sample rates. The Stealth DC-1 supports 44.1k, 48k, 88.2k,
96k, 176.4k, and 192k sample rates, at both 16 bit and 24 bit word lengths, from ALL
of its inputs - including USB.
A full complement of digital inputs. The Stealth DC-1 has a full selection of digital
inputs, including: AES/EBU (XLR), Toslink (optical), Coax S/PDIF (RCA), BNC S/PDIF,
and high performance USB.
Analog inputs. The Stealth DC-1 has one unbalanced stereo analog input, which can
be used to attach legacy gear - like the output of a phono preamp or tuner.
High performance Asynchronous USB. The C-Media CM-6631A high performance
USB interface chip provides enhanced jitter immunity and excellent audio performance.
Advanced ASRC (asynchronous sample rate converter) reduces jitter, yet
preserves original sample rate. The advanced ASRC implementation in the DC-1
eliminates jitter on all inputs (not just USB), yet lets you hear your music unaltered at its original sample rate.
Dual fully differential AD1955 DACs. The Stealth DC-1 is fully differential, and uses
dual independent Analog Devices AD1955 precision multi-bit delta-sigma DACs, each
operated in their highest-quality internal differential monaural mode, for exceptionally
low noise and distortion.
Precision LM4562 op amps. The DC-1 uses all high quality LM4562 op amps in the
output signal path for excellent audio performance.
Dual Muses 72320 digitally controlled analog ladder volume control chips.
The volume for each fully differential channel is controlled by a separate Muses 72320
precision volume control IC, operated in our unique and proprietary dual gain control
mode
(by simultaneously controlling both signal level and the gain of the gain stage itself,
this technique optimizes the signal handling at various gain levels to achieve the
absolute best noise and distortion performance at any given setting).
Galvanically isolated digital inputs. The AES/EBU and electrical S/PDIF inputs on
the DC-1 are all transformer isolated to ensure signal purity and stability and help
eliminate signal ground noise.
Intelligent headphone outputs. The headphone outputs on the DC-1 are driven by
independent high current, low distortion BUF634 buffers - driven by our proprietary
input buffer circuitry; their low output impedance ensures accurate frequency response
and low distortion into real world headphone loads. Output levels for main and
headphone outputs are independently controlled and retained in memory.
Page 5
Stealth DC-1 Stereo D/A Converter - Operator’s Manual
Sophisticated menu system and high visibility OLED display. The menu system
on the Stealth DC-1 is controlled via a front panel digital encoder. Sample rate, level,
and menu options are clearly displayed on a bright, easy to read, blue OLED display.
The display can be dimmed to five different brightness levels, and is intelligent enough
to return temporarily to full brightness when the Setup Menu is engaged.
Pro output levels. The DC-1 delivers professional output levels via its balanced
outputs - so it can interface properly with other pro equipment, and consumer levels on
its unbalanced outputs - to avoid overloading legacy unbalanced inputs.
High quality, tightly regulated, linear power supply. Power for the precision
circuitry in the Stealth DC-1 is provided by a linear power supply, with a hefty toroidal
power transformer, and multiple stages of filtering and linear regulation.
Solid steel case. The solid steel case on the Stealth DC-1 provides excellent noise
shielding, protection from mechanical damage, and a soild “no nonsense” feel.
Convenient 1U half-width case with “Stealth” styling. The Stealth DC-1 has a
convenient half-rack width form factor, which allows two units to be placed side by side
on a standard rack shelf, and makes it easy to install the DC-1 in a small audio rack
or next to (or on top of) a computer. The DC-1’s “stealth” styling is right at home in a
studio or high-end home audiophile sound system.
High quality construction. Inside, the DC-1 uses four layer FR4 circuit boards,
precision film resistors, and other top quality parts to ensure years of trouble-free
operation.
You can find more information about the Stealth DC-1 on our website at
www.emotivapro.com.
Page 6
Stealth DC-1 Stereo D/A Converter - Operator’s Manual
Quick Start
Even though you may be eager to try out your Stealth DC-1 right away, there are a few
important details you need to check first:
1) Verify that the proper AC line voltage is selected on the red switch on the bottom of
your Stealth DC-1 unit. (See Configuring the proper AC line voltage in the Hardware
Configuration section.)
2) Remove the insulator tab from the batteries in the remote control. (See Inserting or
changing batteries in the remote control in the Hardware Configuration section.)
3) If you are connecting a Windows computer to the DC-1 using the USB input,
download and install the Windows USB drivers (See the USB Drivers section).
4) Verify that your source components are all delivering stereo PCM signals to the DC-1
(some Blu-Ray players, digital recorders, cable boxes, or other digital player
components may need to be configured for this option).
5) If you plan to use the volume control on the DC-1, verify that the DC-1 is configured
to provide a variable level output.
6) Remember to turn on your Stealth DC-1 using the front panel Volume / Standby
knob after activating the rear panel AC Main Power switch.
Page 7
Stealth DC-1 Stereo D/A Converter - Operator’s Manual
The Stealth DC-1 Stereo 24-192 Balanced DAC (Front Panel)
INPUT/MENU
1
VOLUME/STANDBY
2
3
4
1. Input / Menu encoder knob
In normal operation, rotating this knob selects between connected inputs.
As the knob is rotated, the currently selected input and current Volume setting are
displayed in the OLED display. After a few seconds the Volume display changes to show
the current sample rate of the selected input.
Note: Even when the ASRC (asynchronous sample rate converter) is engaged,
the Stealth DC-1 always delivers the input to the DAC at its original sample
rate - so you always get an accurate rendition of your source material.
Pressing this knob enters the Setup Menu.
See the section entitled Setup Menu for more details.
2. Display (high visibility blue OLED)
In normal operation, this display shows the selected input and the sample rate of the
input signal. (If there is no input signal, then the current Volume setting is displayed.)
The display can be dimmed (in five steps). When the Input / Menu encoder or the
Volume / Standby knobs are in use, the display will temporarily switch to show menu
entries or status (and temporarily return to full brightness).
3. Headphone jacks (2)
Both headphone jacks are active at all times. The main outputs are disabled when a
headphone is plugged into either headphone jack.
Note: The headphone level on the Stealth DC-1 is intelligent. When no
headphone is plugged in, the Volume knob controls the main output level;
when a headphone is plugged in, the Volume knob controls headphone level.
Each is stored independently, and the DC-1 will return to its previously
set main or headphone output level when a headphone is plugged in or
unplugged.
Page 8
Stealth DC-1 Stereo D/A Converter - Operator’s Manual
Note: While the two headphone outputs share the same level setting, each is
driven by its own BUF634 high current buffer. This ensures a clean
low-impedance signal for each pair of headphones you connect, and prevents
interactions between them.
Note: By default, the headphone output of the Stealth DC-1 will have a very
slight boost applied to the low bass (about 2 dB @ 20 Hz). This “bump” is
common with many headphone amplifiers and headphone outputs, and is
intended to compensate for the slight loss in very low bass encountered with
many headphones. If you prefer an absolutely flat headphone response, you
may eliminate the bump by moving two internal jumpers. (See details in the
Hardware Configuration section.)
4. Volume / Standby knob
After turning on the rear panel Main AC Power switch, press this knob once to switch
the DC-1 from Standby to On. After a brief delay the OLED display will illuminate,
display a welcome message, and then switch to normal operating mode.
Note: After turning on the rear panel Main AC Power switch, you MUST press
the Volume / Standby knob, or the On button on the remote control, to turn
the DC-1 on and start using it.
Note: The Stealth DC-1 will not respond to the Volume / Standby knob, or the
On button on the remote control, unless the rear panel Main AC Power switch
is first turned On.
When no headphones are plugged in, turn this knob to adjust the Stealth DC-1 main
output level. When headphones are plugged in, turn it to adjust the headphone level.
Both levels are independently retained, and each will return to its previous setting
when you plug in or unplug headphones.
When the Stealth DC-1 is On, press this knob momentarily to toggle Mute on and off
(Mute will flash in the display when Mute is engaged).
When the Stealth DC-1 is On, press and HOLD this button for approximately five
seconds to return the DC-1 to Standby mode.
Page 9
Stealth DC-1 Stereo D/A Converter - Operator’s Manual
The Stealth DC-1 Stereo 24-192 Balanced DAC (Rear Panel)
1
2
L
3
4
5
6
7
POWER
L
COAX
BNC
UN BALANCED
R
R
R
ANALOG INPUT
BALANCED
OUTPUTS
L
AES/EBU
OPT
USB
DIGITAL INPUTS
1. Unbalanced Analog Inputs (one stereo pair)
These inputs accept a stereo analog signal, and may be used to connect the output of a
phono preamp or other piece of legacy equipment to the Stealth DC-1.
2. Unbalanced Outputs (analog, one stereo pair, consumer level)
These outputs deliver a standard unbalanced analog output signal. Outputs may
be either fixed or variable level, depending on the setting you have chosen in the
Configuration Menu. See the section entitled Setup Menu for details.
3. Balanced Outputs (analog, one stereo pair, pro level)
These outputs deliver a standard “pro level” balanced analog output signal. Outputs
may be either fixed or variable level, depending on the setting you have chosen in the
Configuration Menu. See the section entitled Setup Menu for details.
Note: Both unbalanced and balanced outputs are active at the same time and
are governed by the same Volume setting.
Digital Inputs
The Stealth DC-1 is a stereo PCM DAC. DO NOT connect multi-channel PCM,
DSD, or bitstream (digital surround) sources to any input on the Stealth DC-1.
Connecting any signal other than a stereo PCM signal to any input on the DC-1
may produce unpredictable results.
All digital inputs on the Stealth DC-1 (including USB) can accept 44.1k, 48k,
88.2k, 96k, 176.4k, and 192k sample rates, at both 16 bit and 24 bit word
lengths.
Page 10
Stealth DC-1 Stereo D/A Converter - Operator’s Manual
4. AES/EBU Digital Input
This input accepts a standard AES/EBU digital audio signal.
Note: A standard balanced audio cable may be used, but cables intended
to carry digital audio signals may provide better shielding and enhanced
reliability.
5. USB and S/PDIF Digital Inputs (Coax, BNC, Optical, and USB)
The Coax and BNC inputs accept standard S/PDIF digital audio signals.
Note: Use only cables intended for use with digital audio signals. Standard
unbalanced audio cables may not be of the correct impedance, and may
compromise performance.
The Optical input accepts a standard Toslink optical digital S/PDIF signal.
The USB input accepts a digital USB audio input via a standard USB “type B” connector
(standard PC printer or device cable). The DC-1 will appear as an “external speaker”
or “USB sound device” to the host computer. (The Stealth DC-1 will appear to player
programs on the computer as an “external USB sound card.” Please see the section
entitled USB Drivers for more information.)
Note: Use a standard USB cable of reasonable length (with certain source
computers, USB cables over six feet may not be reliable).
Note: Some “audiophile” USB cables do NOT meet basic USB data cable
technical requirements, and so may not work with the DC-1. We recommend
using a standard USB data cable from a reputable vendor.
6. IEC AC power inlet
Use this connection to provide AC power to the Stealth DC-1. A high-quality commerical
AC power cord is provided with the DC-1. You may substitute any IEC power cable of
your choice.
7. Main AC Power switch
This switch controls the main AC power to the Stealth DC-1. Turning this switch On
places the DC-1 into Standby Mode; turning it off switches the DC-1 Off. This switch
must be in the On position before you can turn the DC-1 On using the
Volume / Standby knob or the On button on the repote control.
Note: Ensure that the line voltage selector switch (on the bottom of the DC-1)
is set for your proper line voltage before operating the DC-1 for the first time,
and if you use the DC-1 at a remote location. Operating the DC-1 with this
switch in the incorrect position may result in inproper operation or damage.
Page 11
Stealth DC-1 Stereo D/A Converter - Operator’s Manual
The Stealth DC-1 Stereo 24-192 Balanced DAC (Remote)
ON
OFF
DIM
1
2
Note: You must remove the insulator tab
from the batteries in the Stealth DC-1 remote
control before using it for the first time.
(See the Hardware Configuration section for
details.)
VOL+
1. On and Off buttons
MUTE
The On button turns the DC-1 On (from Standby);
the Off button returns the DC-1 to Standby mode.
3
VOL-
AES/EBU
USB
OPT
ANALOG
COAX
BNC
4
Note: The Stealth DC-1 will not respond to the
Volume / Standby knob, or the On button on
the remote control, unless the rear panel Main
AC Power switch is first turned On.
2. Dim button
This button controls the brightness of the
DC-1’s OLED display. The display has five levels of
brightness - ranging from dim to bright. Each time
you press the button, the display will get one step
brighter; when the display is at full brightness, the
next press will return it to its dimmest setting.
3. Mute and Volume buttons
The Vol+ and Vol- buttons control the output level
of the Stealth DC-1.
Note: The headphone level on the Stealth DC-1
is intelligent. When no headphone is plugged
in, the Volume buttons control the main
output level; when a headphone is plugged
in, the Volume buttons control headphone
level. Each is stored independently, and the
DC-1 will return to its previously set main or
headphone output level when a headphone is
plugged in or unplugged.
Pressing the Mute button sets both the main and headphone output levels to the
Mute Level that you have configured in the Configuration Menu (the default is Silent).
Pressing Mute a second time returns you to your previous Volume setting.
Note: If your configured Mute level is louder than your current Volume
setting, pressing Mute will RAISE the Volume to the configured Mute Level.
4. Input Selector buttons
These buttons select which input is active.
Page 12
Stealth DC-1 Stereo D/A Converter - Operator’s Manual
Hardware Configuration
Inserting or changing batteries in the remote control
The Stealth DC-1 remote control is opened by removing the two small screws in the
bottom end cap (the end without the LED).
Once the screws are removed, the end cap will come off, freeing the back plate to slide
out. Carefully slide the back plate all of the way out and remove it.
Insert two AAA batteries into the battery holder - observing proper polarity.
(We recommend alkaline batteries.)
Replace the cover, being careful to engage the edges in the slots in the side pieces, and
keep the end with the rubber pads towards the battery holder.
Replace the end cap and the screws.
Note: The remote control ships with batteries installed, but with a small
insulator strip between the batteries and battery terminal to prevent
discharge during shipping. Before using the remote control for the first time,
you must open the remote control and remove (pull out) the small insulator
strip between the end of one of the batteries and the battery terminal.
Note: The screws securing the end cap of the Stealth DC-1 remote control are
tiny. A screw driver of the correct size is included with your DC-1.
Configuring the proper AC line voltage
The Stealth DC-1 can be configured to operate off either 115 VAC or 230 VAC
(+/- 10%). Operating voltage is selected using the red slide switch on the bottom panel
of the DC-1.
The number visible through the slot shows you the operating voltage currently
selected. Verify that the appropriate line voltage for your local area is currently
selected. If not, using a pointed object (like a screwdriver blade), reach through the
slot and slide the switch to the correct position.
Note: Operating your DC-1 with the Line Voltage selector in the wrong
position may result in permanent damage.
Configuring the headphone frequency response
By default, the headphone output of the Stealth DC-1 is configured to have a very
slight boost applied to the low bass (about 2 dB @ 20 Hz). This “bump” is common with
many headphone amplifiers and headphone outputs, and is intended to compensate
for the slight loss in very low bass encountered with many headphones. If you prefer
an absolutely flat headphone response, you may eliminate the bump by moving two
internal jumpers.
Page 13
Stealth DC-1 Stereo D/A Converter - Operator’s Manual
To change the headphone bass boost jumper setting, first turn Off your Stealth DC-1
and disconnect the power cable.
Remove the six screws securing the top cover, then remove the cover.
(The cover hooks under the front panel on the front edge, so lift it up from the back
edge and tilt it forward to remove it.)
FRONT
Using tweezers or long nosed pliers, carefully move the two jumpers shown into the
correct position. (Nearer the front panel selects a true flat response; nearer the rear
panel selects the bass boost.)
Note: The bass boost, which is approximately 2 dB at 20 Hz, affects ONLY the
headphone outputs.
Headphone
Amp EQ
Bass Boost
Enabled
Flat
Jumper
Settings
Replace the cover and the six screws securing the it.
Page 14
Stealth DC-1 Stereo D/A Converter - Operator’s Manual
USB Drivers
When connected to a computer, the Stealth DC-1 operates as a UAC2 audio device.
(The computer recognizes the DC-1 as an “external USB sound card”.)
UAC2 (short for “USB audio class 2”) refers to the way in which the operating system
recognizes the DC-1. It has nothing to do with USB 1.1 or USB 2.0, which refer to the
speeds available using various USB hardware connection options.
Modern Apple computers support UAC2 audio devices without the need for additional
drivers (the drivers are already built-in). Some versions of Linux include support for
UAC2 audio, but not all (consult the documenation for your particular Linux build).
Most hardware players (like Blu-Ray players with USB ports) do not support connection
to a UAC2 audio device.
Computers using the Microsoft Windows operating system require you to install a
separate driver before they will connect to a UAC2 device. We provide free UAC2
Windows drivers which support Windows XP, Windows Vista, Windows 7,
and Windows 8.
These drivers are available from the DC-1 product page. The download files will include
installation instructions.
Page 15
Stealth DC-1 Stereo D/A Converter - Operator’s Manual
Setup Menu
The advanced features on the Stealth DC-1 are accessed via the Setup Menu, which is
accessed by pressing the Input / Menu encoder knob.
Press the knob once to enter the menu system; the top line of the display will change
to “SETUP” (the bottom line will display the current Setup Menu item).
Turn the knob to select the item you wish to configure, then press the knob to select it.
The top line of the display will change to the name of the item you selected, and the
bottom line will display the available options - one at a time. A bright triangle will
appear to the left of the option that is currently selected. To change the selection, press
the knob when the choice you want is showing (the bright triangle will appear to the
left of it).
At this point you may turn the knob again until “RETURN” is displayed and press the
knob - or simply wait (the menu will time out and return to the standard operating
display after several seconds).
Note: The bright triangle to the left indicates the currently active option. Once
you press the knob and the bright triangle appears to the left of your choice,
your change is “committed” (it will take effect whether you exit the menu
actively or simply allow the menu to time out).
Here’s an example:
We’ll change the Mute Level to Silent.
1) Press the Menu knob once; “SETUP” is displayed on the top line of the display.
2) Turn the knob until “MUTE LEVEL” is displayed on the bottom line of the display.
3) Press the knob; “MUTE LEVEL” is now displayed on the top line of the display.
4) Turn the knob until “SILENT” is displayed on the bottom line of the display.
5) Press the knob; a bright triangle appears to the left of “SILENT” indicating that it is
the active choice (if SILENT was already the active choice, then the bright triangle was
already next to it).
At this point we can either turn the knob until “RETURN” is displayed on bottom line
of the display, then press the knob again - which will bring us back to the main menu
level where we can select something else to change - or simply wait for the menu to
leave setup mode after a few seconds. From the main menu level, simply select “EXIT”
and press enter to leave the Setup Menu.
Page 16
Stealth DC-1 Stereo D/A Converter - Operator’s Manual
SETUP: SRC
Enables and disables the ASRC (asynchronous sample rate converter) in the
Stealth DC-1. The advanced ASRC implementation in the DC-1 re-clocks the incoming
data to a clean clock without changing the sample rate, so you get to hear your original
music - bit perfect - but minus the jitter.
You might wish to disable the ASRC in order to hear what the original source signal
sounds like - including the jitter that is present.
Options are: Asynchronous (ASRC Enabled), Synchronous (ASRC Disabled)
SETUP: MUTE LEVEL
When you press the Mute button on the DC-1 remote control, the main and headphone
levels are changed to a fixed (configurable) mute level. This option lets you configure
that level.
Options are: Silent (the default), -20 dB, and -40 dB
Note: The mute function changes the output level to a fixed - preset - level
(the -20 and -40 dB settings are relative to full Volume), if you engage Mute
while playing the DC-1 at a very low level, the result may actually be an
increase in output level.
SETUP: OUTPUT MODE
When used as a preamp, the DC-1 is normally configured to have a variable output
level; when configured as a DAC, you may wish to configure a fixed output level.
Options are: Variable, Fixed
SETUP: USB MODE
The USB input on the DC-1 can be configured to operate in USB 1.1 or USB 2.0 mode.
Selecting USB 1.1 mode may enable the DC-1 to connect to some legacy devices, but
is not recommended for best performance. [This is NOT the same as USB Audio Class 1
(UAC1) and USB Audio Class 2 (UAC2).]
Options are: USB 2.0, USB 1.1
SETUP: INFO
This option displays the current version number of the main firmware on the DC-1
(there are no options).
SETUP: EXIT
This option allows you to manually exit the Setup Menu.
Page 17
Stealth DC-1 Stereo D/A Converter - Operator’s Manual
Care and Maintenance
Periodic Maintenance
Your Emotiva Pro Stealth DC-1 requires no periodic maintenance or calibration.
Cleaning the Cabinet and Front Panel
• The cabinet of the DC-1 should normally be cleaned with a rag dampened with plain
water. DO NOT spray water directly onto or into the DC-1, or into the connectors or
volume control and encoder, and DO NOT use abrasive or chemical cleaners. Gently
dry the surface with a clean soft rag after cleaning.
• If necessary, use a mild detergent, wipe the surface with a rag dampened with plain
water to rinse it, then gently dry the surface with a clean soft rag.
• If something nasty does get on the sides or top of your DC-1, use a rag dampened
with a weak solution of dish detergent or other mild cleaning liquid, followed by a
rag dampened with plain water, and dry with a clean rag.
• If it appears that liquid may have spilled into the vents, plese disconnect power to
the Stealth DC-1 immediately and contact Emotiva Pro Technical Support.
Changing the Fuse
• If the fuse blows, ALWAYS REPLACE IT WITH ONE OF THE SAME SIZE,
RATING, AND TYPE; NEVER USE A FUSE OF HIGHER RATING.
• If the fuse blows repeatedly CONTACT EMOTIVA PRO TECHNICAL SUPPORT.
(If there is any doubt, first verify that your AC power source is the correct voltage.)
• The fuse is located on the AC inlet filter board (which is attached to the IEC power
cord receptacle). Replace the fuse with one of the same size, rating, and type (be
sure to press firmly so it locks into place).
Instructions for opening and closing the DC-1 case can be found in the Hardware
Configuration section (in the section entitled Configuring the headphone frequency
response).
Page 18
Stealth DC-1 Stereo D/A Converter - Operator’s Manual
Specifications
Frequency Response:
20 Hz to 20 kHz + / - 0.1 dB @ 44.1k sample rate.
20 Hz to 40 kHz + / - 0.1 dB @ 96k sample rate.
20 Hz to 70 kHz + / - 0.1 dB @ 192k sample rate.
THD+N:
0.00033% or less @ all sample rates.
IMD (SMPTE):
0.0025% typical.
S/N Ratio:
> 95 dB @ all sample rates; 16 bit word length.
> 115 dB @ all sample rates; 24 bit word length.
Input Connectors:
One pair unbalanced analog audio (consumer level); gold plated solid machined RCA.
One AES/EBU digital audio (XLR).
Three S/PDIF digital audio (1 x RCA, 1 x BNC, 1 x Toslink optical).
One USB digital audio input (“type B” USB connector; UAC2).
Output Connectors:
One pair unbalanced analog audio (consumer level); gold plated solid machined RCA.
One pair balanced analog audio (pro level; +6 dBV); XLR.
Two headhone connectors, front panel (2 x 1/8” stereo “mini”, individually amplified).
USB Audio:
Stealth DC-1 appears to computer as “USB audio device”.
UAC2 drivers required (provided) for computers running Windows (XP, Vista, 7, 8);
uses internal O/S drivers for Apple computers and some Linux devices.
Power Source:
115 VAC or 230 VAC; manually switched (switch on bottom of chassis).
Power consumption: approximately 15 watts.
Standard IEC AC power inlet on rear panel.
(Removable / interchangeable power cord; included.)
Main AC Power rocker switch on rear panel.
Fuse: 20mm x 5mm; 1 A / 250 V fast acting; T1AL250V (internal).
Size and Weight:
Size: 1.75” high x 8.5” wide x 10” deep (including connectors and knobs).
Weight: 2.2 pounds (1 kg)
Page 19
Stealth DC-1 Stereo D/A Converter - Operator’s Manual
Troubleshooting
Your Emotiva Pro Stealth DC-1 has been carefully designed and manufactured from
high-quality precision components to ensure years of trouble free operation. The
troubleshooting section describes some common problems and how to eliminate them.
If this doesn’t solve your problem, please contact Emotiva Pro Technical Support, where
a real person will be glad to help you get up and running.
Please remember to power down your Stealth DC-1 and all connected equipment
before changing or disconnecting cables.
Problem: No audio output; display does NOT show
sample rate (Toslink, S/PDIF or AES/EBU input).
Reason: You do NOT have a valid input signal.
• Check your connections.
• Verify that you have the correct input selected on the DC-1.
• Verify that your source component is providing a TWO CHANNEL PCM signal.
(The DC-1 does not accept multi-channel or “bitstream” signals.)
• If your source is a computer, verify that you have the correct output selected on the
computer, that you have the correct drivers for your sound card or output device
installed and properly configured, and that you have it configured for two-channel
PCM output.
• If your source is an SACD player or other “media player”, verify that it is configured
to put out PCM audio when playing SACDs. (Note that most players will NOT output
digital audio when playing SACDs due to copy protection mechanisms and copyright
restrictions. Note that Blu-Ray players may not output digital audio, or may output
digital audio at a reduced sample rate due to copy protection mechanisms and
copyright restrictions.)
• Try a different cable. (Audio unbalanced cables are NOT usually appropriate for
carrying S/PDIF digital audio - especially if longer than a few feet.)
Page 20
Stealth DC-1 Stereo D/A Converter - Operator’s Manual
Problem: No audio output; display does NOT show
sample rate (USB input).
Reason: You do NOT have a valid input signal; you may be missing drivers.
• Check your connections.
• Verify that you have the correct input selected on the DC-1.
• Verify that your source component is providing a TWO CHANNEL PCM signal.
(The DC-1 does not accept multi-channel or “bitstream” signals.)
• Verify that you have the correct USB drivers installed, and that they are configured
correctly. Recent Apple computers should work with the built-in UAC2 drivers (part
of the O/S). For Windows computers, you must download the drivers from the
Stealth DC-1 product page on the Emoriva Pro website and install them.
(Some Linux implementations support UAC2, others do not.)
• Try a different USB cable. (USB cables over two meters may not work. Many
“audiophile” USB cables may not work - because some fail to meet basic USB data
standards. A standard two meter commercial USB cable should work well.)
• Confirm that your “source device” is intended to be used with a USB DAC.
(Many media players and other devices have USB ports that are intended to be
connected to USB sticks or hard drives, or that are intended for firmware updates.
Most of these are NOT intended to be connected to a “USB sound device” and will
NOT work when connected to a DAC. Consult the documentation for your device if
you aren’t sure.) The DC-1 will appear to a computer as an “external USB sound
card” or “S/PDIF audio device”. It cannot be connected via USB to devices that are
not designed to work with external USB sound devices.
Problem: Distorted sound, occasional “clicks and pops”
or dropouts - possibly at only certain sample rates
(USB input).
Reason: Dropouts in your source signal.
• Check your connections.
• Try a different cable (especially try a shorter, good quality, commercial USB cable).
• Verify that your source component has enough processing power to deliver
the audio data. (Some computers may be unable to deliver USB audio without
dropouts and errors. This is especially likely if the problem is worse at higher
sample rates, or if it happens with video but not audio files. Some computers may
be able to play simple audio via USB, but be unable to play videos with audio
- because the video processing leaves too little processing power to deliver the
audio without interruption. Sometimes disabling unnecessary programs will fix
this; common causes include antivirus programs, and any program that operates
in the background, such as updaters, streaming news applications, and animated
wallpaper). This is really a computer issue, but feel free to contact Technical
Support at Emotiva Pro; we will be glad to help you try to locate and solve the
problem.
Page 21
Stealth DC-1 Stereo D/A Converter - Operator’s Manual
Problem: No audio output; display shows proper sample
rate (any input).
Reason: You have a valid input signal, but no audio.
• Check your output connections.
• Verify that you don’t have Mute turned on.
• Verify that you don’t have the Volume all the way down.
• Check for conflicting sound card drivers. (Conflicts with other sound card drivers
may cause your computer to output a valid audio signal which contains only
silence.)
Problem: No volume control (audio always plays at full
volume).
Reason: You have configured the Output Mode on the DC-1 to Fixed (volume).
• In the Setup Menu, change the Output Mode setting to Variable.
Problem: Incorrect sample rate is displayed.
Reason: The display on the DC-1 reliably displays the sample rate it is receiving.
If the display on the DC-1 shows a different sample rate than you expect (or different
than what your file claims to be), then your file is almost certainly being re-sampled by
your computer or player device.
Check the configuration of your source device. Most computers by default re-sample
digital audio files as they play them. Only certain player programs, and certain
configuration settings on the computer, allow you to play files in their original sample
rate (bit perfect).
For Windows and Apple computers, the default behavior is to re-sample all audio to a
specific single sample rate (which is configured in the Midi Panel on Apple computers
and in Control Panel on a Windows computer).
Page 22
Stealth DC-1 Stereo D/A Converter - Operator’s Manual
Emotiva Professional Systems LLC
Five-Year Limited Warranty
What does this warranty cover? Emotiva Professional Systems, LLC (“Emotiva”)
warrants its products against defects in materials and workmanship.
How long does this coverage last? This warranty commences on the date of retail
purchase by the original retail purchaser and runs for a period of five years thereafter.
This warranty is transferrable to any person that owns the warranted product during
the Term. Emotiva warrants any replacement product or part furnished hereunder
against defects in materials and workmanship for the longer of the following: (i) the
amount of time remaining under the original warranty, or (ii) 120 days from your
receipt of the repaired or replaced product. The duration described in the previous
2 sentences is hereinafter referred to as the “Term”. TO THE FULLEST EXTENT
PERMITTED BY LAW, ALL IMPLIED WARRANTIES RELATED TO THE ORIGINAL PRODUCT
AND ANY REPLACEMENT PRODUCT OR PARTS (INCLUDING IMPLIED WARRANTIES
OF MERCHANTABILITY AND FITNESS FOR A PARTICULAR PURPOSE) ARE EXPRESSLY
LIMITED TO THE TERM OF THIS LIMITED WARRANTY. SOME STATES DO NOT
ALLOW LIMITATIONS ON HOW LONG AN IMPLIED WARRANTY LASTS, SO THE ABOVE
LIMITATION MAY NOT APPLY TO YOU. A claim under this warranty must be made by
you within the Term. A claim shall not be valid (and Emotiva has no obligation related
to the claim) if it is not made within the Term and if it is not made in strict compliance
with the requirements of the “How do you get service?” section.
What will Emotiva do? Emotiva will, at its option, either: (i) repair the product, or
(ii) replace the product with a new consumer product which is identical or reasonably
equivalent to the product. Emotiva may provide you with a refund of the actual
purchase price of the product in the event (i) Emotiva is unable to provide replacement
and repair is not commercially practicable or cannot be timely made, or (ii) you agree
to accept a refund in lieu of other remedies hereunder. When a product or part is
repaired or replaced, any replacement item becomes your property and the replaced
item becomes Emotiva’s property. When a refund is given, the product for which the
refund is provided must be returned to Emotiva and becomes Emotiva’s property.
What is not covered by this warranty? This warranty does not apply: (i) to
damage caused by use with non-Emotiva products, where the non-Emotiva product is
the cause of the damage; (ii) to damage caused by service or maintenance performed
by anyone who is not a representative of Emotiva; (iii) to damage caused by accident,
abuse, misuse, flood, fire, earthquake or other external causes; (iv) to a product or
part that has been modified after its retail purchase, where the modification caused or
contributed to the damage; (v) to consumable parts, such as batteries; or (vi) if any
Emotiva serial number has been removed or defaced and Emotiva cannot otherwise
confirm that you are the original retail purchaser. EMOTIVA SHALL NOT BE LIABLE FOR
ANY INCIDENTAL OR CONSEQUENTIAL DAMAGES ARISING FROM OR RELATED TO ANY
DEFECTS IN OR DAMAGES TO ITS PRODUCTS. SOME STATES DO NOT ALLOW THE
EXCLUSION OR LIMITATION OF INCIDENTAL OR CONSEQUENTIAL DAMAGES, SO THE
ABOVE LIMITATION OR EXCLUSION MAY NOT APPLY TO YOU.
Page 23
Stealth DC-1 Stereo D/A Converter - Operator’s Manual
How do you get service?
In order to make a claim under the warranty, you must:
1.
Call a customer service representative (“CSR”) of Emotiva at
(1-877-EMO-TECH / 1-877-366-8324). Provide the CSR with a description of your
problem and the serial number of the product for which the warranty claim is being
made.
2.
The CSR will provide you with a returned material authorization
number (“RMA”).
3.
Ship the product to Emotiva at the following address, with the RMA written
in large, bold numbers on the outside of the box, and with the letters “RMA” written
before the number. Parcels arriving without a RMA number on the outside of the box
will be refused.
Emotiva Professional Systems, LLC
Attn: Repair Department
131 Southeast Parkway Court
Franklin, TN
37064
How does state law apply? This warranty gives you specific legal rights, and you
may also have other rights which vary from state to state.
Page 24
Stealth DC-1 Stereo D/A Converter - Operator’s Manual
Notes
Windows™, and other trademarked names, are the property of their respective owners.
All information contained in this manual is accurate to the best of our knowledge at the
time of publication. In keeping with our policy of ongoing product improvement, we reserve
the right to make changes to the design and features of our products without prior notice.
Operator’s Manual Revision 1.4
Page 25
June 2013
Stealth DC-1 Stereo D/A Converter - Operator’s Manual
Page 26
Stealth DC-1 Stereo D/A Converter - Operator’s Manual
Page 27
131 SE Parkway Court
Franklin, TN 37064
www.emotivapro.com