1
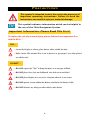
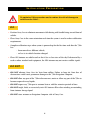
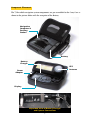
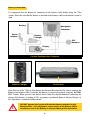
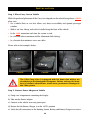
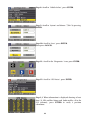
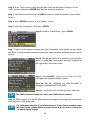
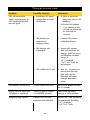
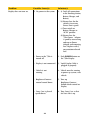
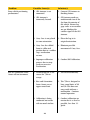
Vehicle Navigation System
Installation & Reference Addendum
Vehicle Navigation Made Portable
TABLE
OF
C ONTENTS
The Magellan 750M
™
Vehicle Navigation Made Portable™
Precautions . . . . . . . . . . . . . . . . . . . . . . . . . . . . . . . . . . . . . 2
Important Information: Please Read This First!
DO . . . . . . . . . . . . . . . . . . . . . . . . . . . . . . . . . . . . . . . . . . .
DO NOT . . . . . . . . . . . . . . . . . . . . . . . . . . . . . . . . . . . . . . .
Battery Precautions . . . . . . . . . . . . . . . . . . . . . . . . . . . . . . .
Components . . . . . . . . . . . . . . . . . . . . . . . . . . . . . . . . . . . .
Installation Preparation . . . . . . . . . . . . . . . . . . . . . . . . . . .
DO . . . . . . . . . . . . . . . . . . . . . . . . . . . . . . . . . . . . . . . . . . .
DO NOT . . . . . . . . . . . . . . . . . . . . . . . . . . . . . . . . . . . . . . .
Component Placement . . . . . . . . . . . . . . . . . . . . . . . . . . . .
Battery Connection . . . . . . . . . . . . . . . . . . . . . . . . . . . . . . .
Moving from Fixed Vehicle Mount . . . . . . . . . . . . . . . . . . . .
Installation . . . . . . . . . . . . . . . . . . . . . . . . . . . . . . . . . . . . .
Initialization . . . . . . . . . . . . . . . . . . . . . . . . . . . . . . . . . . . .
Calibration . . . . . . . . . . . . . . . . . . . . . . . . . . . . . . . . . . . .
Full Calibration . . . . . . . . . . . . . . . . . . . . . . . . . . . . . . . . . .
Quick Calibration . . . . . . . . . . . . . . . . . . . . . . . . . . . . . . . .
Operations . . . . . . . . . . . . . . . . . . . . . . . . . . . . . . . . . . . . .
Battery Charger . . . . . . . . . . . . . . . . . . . . . . . . . . . . . . . . . .
Battery Operation / Stand-Alone Mode . . . . . . . . . . . . . . . . .
Map Area Switching . . . . . . . . . . . . . . . . . . . . . . . . . . . . . .
Preparing Navigation Computer for 750 NAV
In-Vehicle Fixed Installation . . . . . . . . . . . . . . . . . . . . . . . .
Storage . . . . . . . . . . . . . . . . . . . . . . . . . . . . . . . . . . . . . . . .
Troubleshooting . . . . . . . . . . . . . . . . . . . . . . . . . . . . . . . .
750M Care and Maintenance . . . . . . . . . . . . . . . . . . . . . . .
750M Replacement Parts . . . . . . . . . . . . . . . . . . . . . . . . . .
Battery Replacement & Disposal . . . . . . . . . . . . . . . . . . . .
Map Area Illustration . . . . . . . . . . . . . . . . . . . . . . . . . . . . .
1
2
2
3
4
6
6
6
7
8
9
10
13
15
15
17
18
18
18
19
19
20
21
25
25
26
27
PREC AUTIONS
This symbol is intended to alert the user to the presence of
important operating instructions. Failure to heed the
instructions can result in injury or material damage.
!
This symbol indicates information which can be helpful in
the use of the 750 M Navigation System.
TIP
Important Information: Please Read This First!
To reduce the risk of personal injury, please follow these important Dos
and Do Nots.…
DO…
! • Secure the Display to ashtray, glove box or other suitable location.
! • Make certain GPS Antenna Wire is not in driver’s or passengers’ way when placed
on vehicle roof.
DO NOT…
! • DO NOT expose the 750M to damp locations or to any type of fluids.
TM
! • DO NOT place Carry Case on dashboard, rear deck or in truck bed.
! • DO NOT place Display on a seat or in a location where it is not secure.
! • DO NOT operate system without the Battery attached to the Battery Cable.
! • DO NOT obstruct any airbag or other vehicle safety device.
2
BATTERY PRECAUTIONS
DO…
! • Only charge the Battery using the Battery Charger supplied to avoid damage.
! • The Battery contains diluted sulfuric acid, a very toxic substance. If sulfuric acid
contacts skin or clothing, immediately wash with plenty of clean water. If the acid
splashes into eyes, immediately flush with plenty of clean water and consult a
physician. Sulfuric acid in the eyes may cause a loss of eyesight and acid on the
skin will cause burns.
! • Check the Battery for any sign of irregularities in appearance. If any cracks or
deformities are noticed, replace the Battery with a new one. Call Magellan
Customer Service center at 1-877-4CARNAV (1-877-422-7628) for a replacement.
! • Avoid mechanical shock to Battery such as dropping which may cause damage
and/or deterioration to the Battery.
DO NOT…
! • DO NOT connect the Battery to direct power; use the specified Battery Charger.
! • DO NOT use a dry cloth or duster to clean the Battery. Avoid static electricity that
could cause the Battery to explode. If the Battery requires cleaning, disconnect the
Battery from the Battery Cable and clean with a slightly damp cloth only.
! • DO NOT expose the Battery to extremely hot temperatures or leave in direct sunlight, in front of a stove, or near a fire.
! • DO NOT use the Battery in a dusty environment which may short the battery.
! • DO NOT throw the Battery in a fire or extreme heat which may cause the Battery to
emit toxic gas or explode.
! • DO NOT attempt to disassemble or destroy the Battery, as injury may result.
! • DO NOT allow metallic objects or liquids to contact or short-circuit the Battery
terminals, as burns or injuries may result.
! • DO NOT apply organic solvents such as paint thinner, gasoline, kerosene, or liquid
detergents to the Battery which may cause leakage.
3
C OMPONENTS
If any part is missing, please contact a Magellan retailer or Magellan’s
customer service department at 1-877-4-CARNAV (1-877-422-7628).
Upon purchasing the 750M verify that the product box contains both a Carry Case (which
contains all of the 750M components) and the Battery.
Carry Case with Shoulder Strap
Battery
Before installation, please verify that the pre-assembled 750M system in the Carry Case includes
the following components:
Docking Station with Navigation Computer
4
Display
Antenna and
Antenna Spool
Quick Mount Bracket
Power Adapter
Battery Cable
Battery Charger
The 750M Carry Case has been designed to provide Magellan’s Portable Vehicle Navigation
system with expandable functionality and user friendliness.
Special features include the Air Vents and a Communication Port Access Flap. Additionally, the
system is pre-assembled and fits neatly into specialized compartments for ease of use.
The Air Vents are designed to allow proper airflow to the 750M Navigation Computer,
therefore, must not become obstructed. The Access Flap is designed for accessibility to the
750M Communication Ports. As future developments of the 750M occur, such as software
updates, map changes, etc., these ports will allow the user to make changes easily.
Display,
Antenna,
Power
Adapter,
and Battery
Charger
Compartment
Air Vent
Air Vent
Computer
and Battery
Compartment
Expansion Ports
Access Flap
5
I NSTALLATION P REPARATION
To optimize 750M operation and to reduce the risk of damage to
vehicle or the 750M …
!
DO…
• Position Carry Case to eliminate movement while driving with handle facing toward front of
vehicle.
• Place Carry Case in the same orientation each time the system is used to reduce calibration
requirements.
• Complete calibration steps when system is powered up for the first time and after the 750M
has:
- been moved to a different vehicle;
- or has its in-vehicle location changed.
• Place GPS Antenna on vehicle roof so that it has a clear view of the sky. If obstructed by a
rack or other attached roof equipment, the GPS Antenna may not receive satellite signals.
DO NOT…
• DO NOT obstruct Carry Case Air Vents from airflow. Failure to keep Air Vents free of
obstructions could cause permanent damage to the 750M Navigation Computer.
• DO NOT allow any part of the 750M to become wet, moist or allow any part of the 750M to
become exposed to any liquids.
• DO NOT expose any 750M part to extreme heat or cold for extensive periods of time.
• DO NOT tangle, kink, or excessively twist GPS Antenna Wire when winding or unwinding
from Antenna Storage Spool.
• DO NOT store antenna on Navigation Computer side of Carry Case.
6
Component Placement
The 750M vehicle navigation system components are pre-assembled in the Carry Case as
shown in the picture below with the exception of the Battery.
Navigation
Computer &
Docking
Station
Battery
Battery
Charger
GPS
Antenna
Power
Adapter
Display
Expanded View of Battery Charger
and System Connections
7
Battery Connection
It is important that the Battery be connected to the Battery Cable before using the 750M
system. Please be sure that the Battery is attached to the Battery Cable each time the system is
used.
Battery
Navigation
Computer
Power
Adapter
Battery
Charger
GPS
Antenna
Display
System Configuration Diagram
Test Button
Battery Charger
Upon first use of the 750M or if the Battery has become disconnected, be sure to connect the
Battery to the Battery Cable. Verify that the Battery is connected correctly using the ‘BATTERY
TEST’ button. When pressed, the Battery Status Indicator should illuminate indicating the
charge of the battery. A reading of 70% or greater is preferred. Refer to ‘Battery Charger’ in
the ‘Operations’ section for further details.
!
DO NOT operate the system without the Battery attached to the
Battery Cable. A 12-volt power source exists at the Battery Cable
conductors even if the Battery is removed during 750M operation.
8
!
!
When unpacking Battery, check that it is free of cracks, deformities
and leakage. Replace if necessary by calling Magellan Customer
Service at 1-877-4CARNAV (1-877-422-7628).
Mount the Battery only in the upright position.
Battery in Upright Position
Correctly Installed Battery
Open the Navigation Computer side of the Carry Case and locate the Battery Cable . Place the
Battery in the Carry Case, conductor side up, under the elastic strap, and secure the
fasteners. Connect the Battery Cable to the exposed metal electrodes of the Battery.
Moving from Fixed Vehicle Mount to
Carry Case
Red Locking
Tab
To remove the Navigation Computer from the
fixed vehicle mount to the 750M Carry Case,
follow these simple steps:
1. Pull the red locking tab on Docking Station
in vehicle.
2. Grasp the Navigation Computer and pull
outward.
3. Open the Navigation Computer side of the
Carry Case.
4. Ensure the red locking tab is pulled out.
5. Insert the Navigation Computer into
Docking Station inside the Carry Case.
6. Lock the 750M into place by pressing the
red locking tab.
7. Close the Carry Case.
Navigation Computer Removal
Installation in Carry Case
9
I NSTALLATION
Step 1: Place Carry Case in Vehicle
While the preferred placement of the Carry Case depends on the vehicle being driven, ALWAYS
place case:
• On a vehicle floor or seat that allows easy driver accessibility and optimal passenger
comfort;
• With its Air Vent side up and with its handle facing the front of the vehicle;
• In the SAME orientation each time the system is used;
• In a location where movement will be eliminated while driving;
• In a location that minimizes stress on cables.
Please refer to the examples below.
Correct
!
Correct
Incorrect
The 750M Carry Case is equipped with Air Vents that deliver air
circulation to the Navigation Computer. Failure to keep Air Vents
free of airflow obstructions could cause permanent damage to
the 750M system.
Step 2: Connect Power Adapter to Vehicle
a) Unzip case compartment containing the Display
b) Take out the Power Adapter
c) Connect to the vehicle accessory power port
d) Ensure that the Battery Charger is in the ‘AUTO’ position
e) Verify that all connections to the Docking Station, Battery and Battery Charger are secure.
10
TIP
When the Power Adapter is connected to the vehicle accessory power
port, and the Battery Charger switch is in the ‘AUTO’ position, the
750M will automatically power up when vehicle is started and will
automatically shutdown when vehicle is turned off.
Step 3: Antenna Setup
The GPS Antenna is located inside the Display compartment of the Carry Case.
a) Unwind GPS Antenna Wire from the Antenna Storage Spool.
b) Place the GPS Antenna on the vehicle roof.
c) Verify that the end of the GPS Antenna Wire is securely attached to the rear of the Docking
Station.
TIP
When placing the GPS Antenna on the roof, ensure that the GPS
Antenna Wire will not be severely pinched.
TIP
It is important that the GPS Antenna is in complete view of the sky and
that it is not blocked by a rack or other equipment attached to the roof
of the vehicle.
!
!
!
When placing GPS Antenna on the vehicle roof be certain that
the GPS Antenna Wire does not interfere with vehicle operation
and that it does not impede driver’s or passengers’ safety.
Avoid tangling, kinking, or excessive twisting of the GPS Antenna
Wire when winding or unwinding from the Antenna Storage
Spool. While unwinding and routing the Antenna Wire, inspect it
for damage. If the Antenna Wire shows signs of extreme kinking or
insulation damage, call Magellan Customer Service department
for replacement parts at 1-877-4CARNAV (1-877-422-7628).
Do not pass antenna through door window to prevent damage to
vehicle finish and/or antenna.
Step 4: Mount Display
The 750M is designed to be used in virtually any vehicle. Each user will need to find a safe,
comfortable location to temporarily mount the Display. The Display should be mounted in a
location that is easily viewed at a glance. With the specially designed Quick Mount Bracket
attached to its back, the Display can be held in place by attaching it to an ashtray, glove compartment or other suitable location.
11
!
When mounting the Display take care to ensure that it is clear of
vehicle operation, airbags and function controls.
!
Avoid excessive force in operation! Damage may result if excessive
force or leverage is applied.
!
Take care when removing or replacing the Quick Mount Bracket
and be aware that heavy accidental impacts may result in damage.
!
!
!
Do not mount display in a place or manner where driver or
passengers are likely to have an impact with the display in a
collision or during heavy braking.
Securely mount the display in a manner which will not allow the
display to become a projectile in a collision or during heavy
braking.
Do not install display mount bracket into vehicle air vents as
damage will occur!
To temporarily attach the Display, follow these simple steps:
a) Locate the center (smaller) tab of the Quick Mount Bracket and bend it outward at
approximately a 45 degree angle.
b) Select a location that will provide optimum Display viewing.
c) Gently insert the center tab and push downward until the Quick Mount Bracket grips the
surface. The Display should be held snugly against the surface and face horizontally or
slightly upward.
d) If the Display faces too far down and is difficult to view, bend the center tab outward
further and bend both side (larger) tabs out as well. Try to maintain the approximate 45
degree angle between the center tab and side tabs. The angles between the Display back
and the side tabs may need to be adjusted for optimum fit.
12
I NITIALIZATION
Initialization must be conducted prior to the first use of the 750M or when the Navigation
Computer has been moved from a fixed vehicle installation in order to achieve maximum
performance. Before using the 750M for the first time conduct Steps 1 through 15.
Step 1: Move the vehicle to an open area away from buildings, trees, and other obstructions.
The vehicle must remain in an open area throughout the entire GPS initialization process.
Step 2: Ensure the 750M is powered on.
Step 3: After the system starts, the "Warning" screen will
appear, select "User 1", press ENTER button on the
Display.
Step 4: If not done previously, Select a Temporary Map
Area by following these steps, otherwise proceed to Step 6:
a. Determine desired Map Area by referring to Map Area
illustration on page 27.
b. Press ENTER.
c. Scroll down to highlight desired map Area.
d. Press ENTER.
The system will restart itself. If unable to determine the correct Map Area or to register the
system and obtain a permanent unlock code, please call Magellan Customer Service at
1-877-4CARNAV (1-877-422-7628). Refer to the 750NAV manual for complete details.
Step 5: Select ‘User 1’ again, press ENTER.
Step 6: Press the OPTION button.
Step 7: Using the 8 position cursor on the Display, scroll
to and select the ‘Configuration’ icon, press ENTER.
13
Step 8: Scroll to ‘Vehicle-Select’, press ENTER.
Step 9: Scroll to ‘System’ and choose ‘750M’ by pressing
ENTER.
Step 10: Scroll to ‘Save’, press ENTER.
Then press CANCEL.
Step 11: Scroll to the ‘Diagnostics’ icon, press ENTER.
Step 12: Scroll to ‘GPS Status’, press ENTER.
Step 13: When information is displayed showing at least
four (4) GPS satellites being used (indicated by a U in the
U/N column), press ENTER to verify a position
calculation.
14
Step 14: Check the latitude and longitude information and
ensure that the data reads anything other than zeroes. If the
system does not show GPS satellite data or a vehicle
position is not generated in several minutes, go to the
‘Troubleshooting’ section, otherwise, GPS initialization is
complete.
Step 15: Press the CANCEL key three (3) times to return to ‘Select Destination’ (Main Menu) screen.
C ALIBRATION
The 750M utilizes two calibration processes to maximize ease of use and accuracy of
vehicle positioning. Full calibration offers maximum accuracy. Quick calibration requires
minimal time but does not give maximum accuracy until the 750M has been driven
several miles.
Complete the Full Calibration Procedure when the 750M:
• is powered up for the first time.
• has its in-vehicle location or orientation changed.
Complete the Quick Calibration Procedure when the 750M is moved from vehicle to vehicle.
No Calibration is needed if 750M system has not been moved.
TIP
To reduce calibration time when moving the 750M among vehicles,
Magellan suggests developing calibration profiles for the different
vehicles in which the 750M will be used. To do this, press the OPTION key
on the Display, select ‘Configuration’ icon, then scroll to ‘Vehicle-Edit’
and press ENTER. Now input the vehicle types. For detailed instructions,
please refer to the User Guide provided with the 750NAV Owner’s Packet.
TIP
If the 750M has not been used in two weeks or more, the satellite information
will no longer be current and it may take from 12–24 minutes for the 750M to
download the correct satellite information.
Full Calibration
Step 1: Move the vehicle to a safe area with reasonably flat, level terrain. Locate an area
where the vehicle can be driven as straight as possible for approximately 2 blocks and
where accelerating and stopping the vehicle can be done safely.
15
Step 2: If the 750M is not on, verify that the slide switch on the Battery Charger is in the
‘AUTO’ position then press POWER and allow the system to power up.
Step 3: Select desired user and press ENTER to arrive at ‘Select Destination’ screen (Main
Menu).
Step 4: Press OPTION to arrive at ‘User Options’ screen.
Step 5: Select the ‘Diagnostics’ icon, press ENTER.
Step 6: Scroll to ‘Sensor Status’, press ENTER.
Step 7: Vehicles with automatic transmission, place foot firmly on the brake and put vehicle
into drive. If using manual transmission, place foot firmly on brake and keep transmission in
neutral.
Step 8: Wait for the vehicle to be motionless and verify that
there is a green ZMD (zero motion detected) displayed on
the right center side of the screen.
Step 9: Press LOCATE. ‘Computing new ZMD threshold’
will appear on bottom of Display screen.
Step 10: Wait for ‘Computing new ZMD threshold’ to
disappear (approximately 10 seconds).
Step 11: Accelerate to 10-15 miles per hour, then stop.
TIP The ZMD indicator disappears when the 750M detects motion.
Step 12: While stopped, wait for the ZMD indicator to reappear. Now repeat the acceleration
and stop process four more times.
TIP
For verification, the Bias LC and Orientation LC (Learn Count) numbers must
increment as the system calibrates to the vehicle. If this is not true, refer to the
‘Troubleshooting’ section.
16
Step 13: Press CANCEL three (3) times to get to ‘Select
Destination’ screen and then press VIEW to get to the
‘Map’ screen.
Verify that the Direction and Signal Strength Indicator
located at the bottom left corner of the Display, is green,
indicating that the system has located GPS satellites. If this
is not true, refer to the ‘Troubleshooting’ section.
Ensure vehicle icon is correctly displayed on the Map or press LOCATE to check current
location.
The ‘Full Calibration’ procedure is now complete and the 750M is ready for inputting a
destination. For further instructions, consult the 750NAV User Manual.
Quick Calibration
After initialization, the ‘Quick Calibration’ function is activated upon power up. To utilize this
feature, simply follow the instructions on the Display when prompted. The steps required for
a ‘Quick Calibration’ are as follows:
Step 1: If the 750M is not on while the vehicle is running, turn it on by pressing the POWER
button.
Step 2: Select desired user and press ENTER to arrive at the ‘Quick Calibration’ screen.
Step 3: Highlight ‘Calibrate’, press ENTER.
Step 4: Follow on-screen instructions.
Step 5: Press VIEW button.
Step 6: Verify that the Direction and Signal Strength
Indicator located at the bottom left corner of the Display, is
green, indicating that the system has located GPS satellites.
If this is not green, refer to the ‘Troubleshooting’ section.
The ‘Quick Calibration’ procedure is now complete and the 750M is ready for inputting a
destination. For further instructions, consult the 750NAV User Manual.
17
O PERATIONS
Battery Charger
The Battery Charger provides power to the 750M and charges the Battery only during 750M
operation. It also incorporates a Battery Test Circuit that allows the user to check the charge
on the Battery. Using the ‘BATTERY TEST’ Button and reading the five (5) multi-colored Battery
Status Indicators, a user can determine the state of the Battery, from ‘LOW’ to ‘100%’. To
determine true Battery power level, either disconnect the Power Adapter or place the Charger
switch in ‘OFF’, otherwise charging voltage will be displayed. Be cautious of leaving the Battery
in an automobile exposed to extreme heat or cold. In these situations take the 750M into a
home or office when not in use. Extreme temperature may cause the Battery to fail.
Battery charge time varies with age, initial battery power, and temperature and can take up to
12 hours from fully depleted to ‘100% charge. Operating the750M does not require the Battery
to be at 100%, but operating the750M with the Battery power level below ‘LOW’ may
prevent automatic backup of destination address and last location information.
To test the Battery simply locate and push the ‘BATTERY TEST’ Button which is recessed on the
bottom of the Battery Charger and read the corresponding Battery Status Indicator.
The Battery Charger has a switch with three selections:
AUTO:
In the ‘AUTO’ position, the charger will power the 750M, trickle charge the Battery,
and store addresses and last location information during shutdown.
BATTERY: In the ‘BATTERY’ position, no charging occurs. The ‘BATTERY’ position allows the
750M to be used in a stand-alone mode without the Power Adapter. If the 750M is
used in the ‘BATTERY’ position until the battery power is depleted, address book
and last location information may be lost.
OFF:
In the ‘OFF’ position, the Battery is not charged when used with the Power Adapter
connected to the vehicle’s power accessory port, but will allow the750M to
operate. The ‘OFF’ position is used to shutdown the750M when in a stand-alone
mode, or to check Battery power with the Power Adapter connected and 750M in
use.
Battery Operation / Stand-Alone Mode
The 750M Battery is a lightweight, 12 volt, sealed lead acid type that is pre-charged to be ready
for operation. Its sealed construction makes it leak resistant. The Battery has an optimum discharge time of 2 amp hours that should be sufficient to operate the 750M for up to one hour
if necessary.
18
TIP
Battery capacity degrades at low temperatures and over the life of the system.
In the event that the vehicle power port is unusable, such as a blown fuse, or if required for
an airport security check, the 750M can be used solely from a new, fully charged Battery for
periods up to 1 hour. To do so, simply slide the Battery Charger switch to ‘BATTERY’. Be
certain to slide the Battery Charger switch back to ‘OFF’ or ‘AUTO’ when finished to avoid
depleting the Battery.
Map Area Switching
The 750M incorporates a feature called ‘Auto Map Switching’. When the 750M is transported
from one Map Area to another, it will automatically sense the change and then switch to the
correct Map Area within several minutes if other Map Areas have been purchased and
unlocked. In the event that the 750M needs to be manually switched to a different Map Area, it
can be easily done as follows:
Step 1: Refer to Map Area illustration on page 27.
Step 2: Press OPTION to arrive at the ‘User Options’ screen.
Step 3: Scroll to the ‘Configuration’ icon, press ENTER.
Step 4: Scroll to ‘Map Selection’, press ENTER.
Step 5: Scroll to the desired Map Area and confirm that map is unlocked. If not, call
Magellan Customer Service at 1-877-4CARNAV (1-877-422-7628), otherwise, press
ENTER.
Step 6: The 750M will ask “Confirm Map Change”. Highlight ‘Yes’, press ENTER.
The 750M will power down to save this change and will restart automatically. Select desired
user and continue enjoying the 750M.
Preparing Navigation Computer for 750NAV In-Vehicle Fixed Installation
After use of 750NAV Navigation Computer in a 750M configuration, the Vehicle Type must be
returned to the 750NAV mode. This is done as follows:
Step 1: Proceed to the “User Options” Menu, press OPTION.
Step 2: Scroll to the ‘Configuration’ icon, press ENTER.
Step 3: Scroll to ‘Vehicle Select’, press ENTER.
Step 4: Scroll to and highlight ‘System’ and choose 750NAV by pressing ENTER.
Step 5: Scroll to and highlight, ‘Save’, press ENTER.
Step 6: Shutdown, press POWER.
The Navigation Computer is ready for return to the 750NAV In-Vehicle Fixed Installation.
19
S TORAGE
The 750M will automatically shutdown when the vehicle ignition is turned to off. If the 750M
needs to be removed while the vehicle is still running, simply press the POWER button to
shutdown the system manually. Return the Display, Power Adapter, and GPS Antenna to the
Carry Case. Store the GPS Antenna on the Antenna Storage Spool by winding the Antenna Wire
around the Antenna Storage Spool and placing the GPS Antenna on the Antenna Storage Spool
top where it is magnetically retained.
!
Avoid tangling, kinking, or excessive twisting of the GPS
Antenna Wire when winding or unwinding from the Antenna
Storage Spool. While unwinding and routing the Antenna
Wire, inspect it for damage. If the Antenna Wire shows signs
of extreme kinking or insulation damage, call Magellan
Customer Service department for replacement parts at
1-877-4CARNAV (1-877-422-7628).
Be certain that the Battery Charger switch is in either the ‘AUTO’ or the ‘OFF’ position when
the 750M will not be in use. Failure to do so will drain the Battery and pre-empt use in the
Stand-Alone Mode.
When the 750M will not be used for extended periods, remove the Battery and store in upright,
dry, dimly lit location.
20
T ROUBLESHOOTING
Problem
Possible Cause(s)
Solution(s)
GPS will not initialize
within several minutes or
GPS Signal Indicator did
not turn green.
1. Insufficient GPS signal
strength due to nearby
obstructions.
1. a) Move to open area
away from trees or tall
buildings.
b) Ensure GPS Antenna
is on exterior of vehicle and not obstructed
by roof racks or
antennas.
2. GPS Antenna not
connected to
Docking Station.
2. Connect GPS Antenna
to Docking Station.
3. GPS Antenna wire
is damaged.
3. Inspect GPS Antenna
Wire and connector for
damage, and if necessary
call Magellan Customer
Service at
1-877-4CARNAV
(1-877-422-7628) for
replacement.
4. GPS satellite data is old.
4. Wait 12 – 24 minutes to
receive new data and
then verify that the
Direction and Signal
Strength Indicator is
green.
Push-Buttons will not react.
Systems needs to be reset.
Push Power Button and hold
for 15 seconds .
Display stays on when vehicle ignition is turned off.
Switch on Battery Charger
is in BATTERY position.
Slide switch on Battery
Charger to AUTO position.
Temporary map expired.
Database has not been
registered and unlocked.
Register the 750M and obtain
an unlock code by calling
1-877-4CARNAV
(1-877-422-7628).
21
Problem
Possible Cause(s)
Solution(s)
Display does not turn on.
1. No power to the system.
1. a) Verify all connections
to the Docking Station,
Battery Charger, and
Battery.
b) Ensure fuse for the
vehicle’s Accessory
Power Port is good.
c) Turn switch on
Battery Charger to
‘AUTO’ position.
d) Ensure fuse for
750M Power Adapter
is good by unscrewing
endcap on Power
Adapter and removing
fuse. Replace with 3
amp miniature barrel
fuse.
2. Power to the 750M is
turned off.
2. Push POWER button on
the 750M Display.
3. Display is not connected.
3. Verify Display Cable is
plugged in properly.
4. Vehicle is not
running.
4. Vehicle must be running
to power up system; start
vehicle.
5. Brightness/Contrast
control turned down.
5. Turn up
Brightness/Contrast
thumb wheel control on
Display.
6. Carry Case is placed
upside down.
6. Turn Carry Case so that
Air Vent side is up.
22
Problem
Possible Cause(s)
Solution(s)
Will not save last position.
1. Battery or Battery
Charger is not properly
connected.
1. Verify all connections
to Battery and Battery
Charger
2. Back-up Battery has no
power
2. Check Battery voltage by
pressing button on side
of the Battery Charger. If
indicator reads low after
charging, replace battery.
No roads are displayed.
1. a) Refer to Map Area
1. Incorrect map area has
illustration on page 27
been selected or
and manually select
Automatic Map switching
the proper map
has not occurred.
b) If unsure of correct
map selection, call
customer service at
1-877-4CARNAV
(1-877-422-7628).
2. Map view scale is too
large.
2. Press the zoom key ‘ - ‘
to change the Map scale.
3. Map Area not purchased. 3. Purchase desired Map
Area by calling
1-877-4CARNAV
(1-877-422-7628)
4. Vehicle is in an area
where the road or street
data is not contained in
the 750M map database.
4. Not every city in the U.S.
and Canada is included in
the 750M map database.
Magellan continues to
add new cities, streets,
and roads. Check availability and schedule for
new Map Area coverage
by calling Magellan
Customer Service
1-877-4CARNAV
(1-877-422-7628).
5. User has panned to an
area where there are no
roads.
5. Press CANCEL to return
the vehicle icon to the
correct location.
23
Problem
Possible Cause(s)
Solution(s)
Poor vehicle positioning
performance.
1. GPS Antenna is not
connected.
1. Connect GPS Antenna to
Docking Station.
2. GPS Antenna is
incorrectly located.
2. GPS Antenna needs an
unobstructed view of the
sky from the exterior of
the vehicle. Ensure luggage racks or accessories
are not blocking the
satellite signal to the GPS
Antenna.
3. Carry Case is not placed
in same orientation.
3. Place the bag in its
original orientation.
4. Carry Case has shifted
from its calibrated
position due to a sudden
stop, acceleration
or turn.
4. Eliminate possible
movement of Carry Case.
5. Improper calibration
process due to steep
grade or excessive
acceleration.
5. Conduct Full Calibration.
1. Acceleration rate is too
severe for 750M to
accept.
1. Accelerate moderately.
2. Bias and Orientation
Learn Counts are at
upper count limit.
2. The 750M is designed to
have count limits of 20
and 50. This does not
necessarily indicate a
malfunction. Continue
normal operation.
3. Calibration is being
conducted on terrain
with too much incline.
3. Conduct calibration on
terrain that is as level as
possible, less than 2%
grade.
Bias or Orientation Learn
Count will not increment.
24
750 M C ARE & M AINTENANCE
Designed to provide years of trouble-free use, the Magellan 750M system requires little or no
maintenance. As with all electronic equipment, care should be taken to avoid system damage.
Following the suggestions below will ensure maximum functionality and enjoyment of the
750M.
• Most common multi-purpose cleaners will not harm the Display or Navigation Computer
unit. DO NOT spray cleaner directly onto the Display; apply cleaner to a cloth first and then
wipe the Display with dampened cloth. Harsh chemicals such as those found in hair spray,
insect repellent and nail polish can damage the Display lens. Do not spray or use these near
the Display.
• Refrain from getting any part of the 750M wet with water or any other liquid.
• The system is designed to be rugged, but can be damaged if dropped. Use caution when
removing and transferring the system from one location to another.
• Do not expose the 750M system to extreme heat or cold temperatures for extensive periods
of time.
• Roads, addresses, business, and service locations change from time to time. The 750M can
be updated with the latest road and Points of Interest data. Visit a local dealer or call
toll-free 1-877-4CARNAV (1-877-422-7628) for product information upgrades.
750 M R EPLACEMENT PARTS
• Antenna Storage Spool
• Display
• Battery
• Docking Station
• Battery Cable
• GPS Antenna
• Battery Charger
• Navigation Computer
• Carry Case
• Power Adapter
• Carry Case Shoulder Strap
• Quick Mount Bracket
25
B AT TERY R EPLACEMENT & D ISPOSAL
Replacement
Replace the Battery when:
1. Charge or discharge characteristics of the Battery change.
2. The Battery no longer holds a charge as indicated by the Battery Status Indicator consistently
showing ‘LOW’ after charging.
3. Any time there is an indication of Battery leakage.
4. The Battery case is deformed or cracked.
When the original Battery included with the 750M system needs to be replaced, be sure to
contact Magellan to purchase a replacement. Only use batteries and chargers approved by
Magellan, otherwise the warranty may be voided. To purchase a new Battery or Battery Charger
contact the Magellan Customer Service department at 1-877-4CARNAV (1-877-422-7628).
Disposal
The proper disposal of 750M system Battery is critical, both from the viewpoint of environmental stewardship and from compliance with federal and state environmental laws. The
owner of the 750M is responsible for the proper disposal of the Battery included with the
system as well as all replacement batteries purchased.
The 750M system Battery is a sealed lead acid type. It is chemically identical to common automotive starter batteries and must be recycled. To recycle the 750M system Battery, please take
it to any site that accepts automotive lead acid batteries for recycling. Examples include retailers of automotive batteries, automotive service centers, scrap metal dealers, etc.
26
Magellan 750M Map Areas
27
W
elcome to the Magellan 750M portable vehicle
navigation and information system. The 750M
provides 750NAV functionality without the need for
permanent installation. Pre-assembled in a convenient Carry Case, the 750M offers on-the-go
vehicle navigation and information. The included Power Adapter, Battery and Battery Charger
provide system power. Simply attach the Battery
to the system, plug the system into the Accessory
Power Port, place the Antenna on the roof, and go!
2950 Waterview
Rochester Hills, MI 48309
Toll Free Number: 1-877-4 CAR NAV
www.magellangps.com