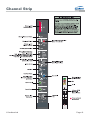
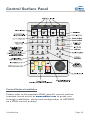
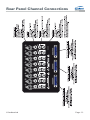
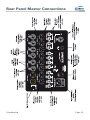
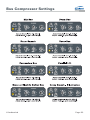
1
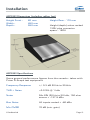
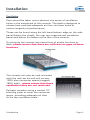
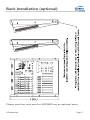
QUICK START
GUIDE
Version: 1.00
Contents
ASP2802 Installation...................................................Page 3
Warning
Safety & Mains (Fuse Information)
Dimensions & Specification
Ventilation
Optional Rack Ear Installation
3
4
5
6
7
Channel Strip Controls................................................ Page
8
Master Section Controls..............................................Page
9
Control Surface Panel..................................................Page 10
Rear Panel Channel Connections.................................Page
11
DB25 (D-Sub) Wiring Specification............................. Page 12
Rear Panel Master Connections...................................Page
13
DAW Ethernet Connection (Mac).................................Page 14
Manual IP Address Assign
Using DHCP
15
18
DAW Ethernet Connection (PC)...................................Page
19
Manual IP Address Assign
Automatic IP Address Assign
21
24
Firmware Updates........................................................Page
25
Example Systems.........................................................Page 26
8 Channel DAW System
Hybrid Production System
16 Channel Recording System
24 Channel Mixdown System
28
29
30
31
Bus Compressor Example Settings..............................Page
32
Contact Information.................................................... Page
33
© Audient Ltd
Page -2-
Installation
© Audient Ltd
Page -3-
Installation
Package Contents
Your ASP2802 Console has been carefully and meticulously
tested and inspected before dispatch.
Please check for any signs of transit damage. If any signs of
mishandling are found please notify the carrier and inform your
dealer immediately.
Your 2802 packaging should include the console, an IEC power
cord, this quick start guide and a CD containing the full manual,
signal flow block diagrams and drivers.
Important Safety Instructions
Please read all of these instructions and save them for later
reference before connecting to the mains and powering up the
console. To prevent electrical shock and fire hazard follow all
warnings and instructions marked on the rear of the console.
This unit is connected via its IEC power cord to the mains safety
earth.
NEVER OPERATE THIS CONSOLE WITH THIS EARTH
CONNECTION REMOVED.
Internal Switch Mode Power Supply & Mains Fuse
2802 utilises an internal switch-mode power supply that is very
quiet and passively cooled with plenty of current capability and
headroom. This switch-mode design will accept any A.C line
voltage from 90v to 264v. Therefore 2802 will work happily
anywhere in the world but please ensure your A.C mains line
voltage is within this specification. Consult a qualified technician
if you suspect difficulties. Do NOT attempt to tamper with the
power supply or mains voltages - HAZARDOUS TO HEALTH.
Always replace the mains fuse with the correct value - T2A slow
blow.
© Audient Ltd
Page -4-
Installation
ASP2802 Dimensions (including rubber feet)
Height Front - 60 mm
Width - 450 mm
Depth - 550 mm
Height Rear - 170 mm
Height (depth) when racked 13RU plus connector space - 15RU
ASP2802 Specifications
Some general performance figures from the console - taken with
Prism D-Scope test equipment.
Frequency Response
+/- 0.3 dB 20 Hz to 20 kHz
THD + Noise
<0.015% @ 1 kHz
Noise
Mic EIN (20 Hz to 20 kHz, 150 ohm
source < -127.5 dBu
Bus Noise All inputs routed < -80 dBu
Mic CMRR
70 dB (min. gain)
© Audient Ltd
Page -5-
Installation
Ventilation
Care should be taken not to obstruct the series of ventilation
holes in the metalwork of the console. The desk is designed to
release heat and take adequate air flow via these holes to
ensure longevity of performance.
These can be found along the left hand bottom edge on the side
panel (below the cheek), the rear top wrap-around ventilation
panel and below the faders at the foot of the console.
If mounting the console into some form of studio furniture or
desk, please ensure that there are sufficient air gaps at these
locations.
The console can also be rack mounted
with the rack ear kit and will occupy
13RU plus connector space (suggest
15RU total) - please ensure that these
ventilation holes are not restricted.
Perhaps consider using a vented 19”
blanking plate to cover the connector
space, providing adequate air flow
to the top ventilation plate.
© Audient Ltd
Page -6-
Rack Installation (optional)
Please note that rack ears for ASP2802 are an optional extra.
© Audient Ltd
Page -7-
Channel Strip
© Audient Ltd
Page -8-
Master Section
© Audient Ltd
Page -9-
Control Surface Panel
Control Surface Installation
Please refer to the separate DAW specific control surface
manuals found online at www.audient.com to guide you
through installation, setup and configuration of ASP2802
as a DAW control surface.
© Audient Ltd
Page -10-
Rear Panel Channel Connections
© Audient Ltd
Page -11-
DB25 Wiring Specification
The following table provides channel counts for each DB25
connector:
Summing Input
DAW Inputs
DIRECT Outputs
Input 1L (24, 12, 25)
DAW Input 1 (24, 12, 25)
DIR Out 1 (24, 12, 25)
Input 2R (10, 23, 11)
DAW Input 2 (10, 23, 11)
DIR Out 2 (10, 23, 11)
Input 3L (21, 9, 22)
DAW Input 3 (21, 9, 22)
DIR Out 3 (21, 9, 22)
Input 4R (7, 20, 8)
DAW Input 4 (7, 20, 8)
DIR Out 4 (7, 20, 8)
Input 5L (18, 6, 19)
DAW Input 5 (18, 6, 19)
DIR Out 5 (18, 6, 19)
Input 6R (4, 17, 5)
DAW Input 6 (4, 17, 5)
DIR Out 6 (4, 17, 5)
Input 7L (15, 3, 16)
DAW Input 7 (15, 3, 16)
DIR Out 7 (15, 3, 16)
Input 8R (1, 14, 2)
DAW Input 8 (1, 14, 2)
DIR Out 8 (1, 14, 2)
© Audient Ltd
Page -12-
Rear Panel Master Connections
© Audient Ltd
Page -13-
DAW Ethernet Connection (Mac)
You can use standard Cat-5e Ethernet cable to connect
ASP2802 to your studio DAW computer. The interface in
ASP2802 is compatible whether you use a straight through
or cross-over cable.
Please ensure that you have downloaded and installed
the latest version of our AuNet.dmg application from
www.audient.com.
On Apple computers please ensure that AuNet is
added to your applications folder via drag and drop.
Macintosh HD > Applications
You can enable the application to always boot upon user log-in,
therefore preventing any forgetfulness!
To achieve this, do the following:
System Preferences > Accounts > (select the account you wish to alter on the left hand side) > Login Items Tab > Add New Application (+ Button) > Browse and select AuNet
Everytime this user
account opens,
AuNet should now
boot.
© Audient Ltd
Page -14-
Networking (Mac)
Once you have connected ASP2802 to your studio computer
via either a direct Ethernet link or through a router and installed
AuNet you are ready to set up the networking side of the
console.
IP Address Setup for Direct Connection
Unless you have a router in your studio, it is most likely that you
will directly connect ASP2802 to your DAW via a direct Ethernet
link.
First you must set your DAW IP address (please note if you do
have a router, this should not be adjusted and you should skip to
the next section).
On Apple computers please do the following:
System Preferences > Network > Ethernet Tab > Locations > Edit Locations > Add New Location (+ Button) > Name ASP2802 > Select this Location > Set Configure to Manually > Set IP Address to 192.168.0.1 > Set Subnet Mask to 255.255.255.0
© Audient Ltd
Page -15-
Networking (Mac)
Moving across to ASP2802, power up the console
and once booted, press the SETUP button. The OLED
displays will show the first page of console setup.
First set the application you are using with ASP2802.
The options at the time of release include:
• Apple Logic 9
• Avid Pro Tools 8
• Steinberg Cubase 5 (Nuendo)
Use the first rotary encoder to
select the required DAW application.
Note that once a change has been
made, the setup switch LED will flash
to indicate that a setting has changed.
If you exit setup by pressing the
switch once more and then return by
entering setup again, you will notice
that your setting has been automatically
saved.
Using the page keys, page to the right
and ensure that Use DHCP is set to NO.
Page right again to reach the IP address
screen and set the IP address to 192.168.0.100
(default) using the encoders, then move to the
fourth page, and check that the subnet mask is
set to 255.255.255.0.
© Audient Ltd
Page -16-
Networking (Mac)
Subnet Mask set to 255.255.255.0:
Port set to 1212:
Press the setup key to exit setup and your setting will be saved.
Now power down the console and restart your Apple computer.
Once booted, ensure that the AuNet application is running and
open on your DAW machine. Finally power up the console.
After the console boots, it should be picked up by AuNet (you
may have to repeat the power down / restart process if you are
experiencing difficulties).
AuNet should indicate
detection of the console
and should also show
you the serial number
of the console.
Select the console
and click on the
connect button to
the bottom right >>
© Audient Ltd
Page -17-
Networking (Mac)
Your console should now be connected to your studio
DAW computer and ready for configuration as a HUITM
control surface and analogue automation platform.
Setting up the console with DHCP (for use with routers)
If you have more than one device connected to your DAW
computer, you will most likely be using a network router to
talk to all of these devices.
If you have connected ASP2802 to your DAW computer
via a network router, you will need to use DHCP to enable
automatic configuration of IP address, providing fast and
smarter networking.
Ensure that you
enable DHCP in
your DAW computer
system preferences
(you should already
know how to do this
if you are running an
exisiting network).
You will most likely
be running DHCP
with automatic IP
hand out.
Ensure that the console is set to use DHCP on the second page
of the setup menu, once set reboot the console and follow the
same AuNet connection procedure as outlined previously
once the console is detected.
© Audient Ltd
Page -18-
DAW Ethernet Connection (PC)
You can use standard Cat-5e Ethernet cable to connect
ASP2802 to your studio DAW computer. The interface in
ASP2802 is compatible whether you use a straight through
or cross-over cable.
Please ensure that you have downloaded and installed
the latest version of our AuNet.msi application from
www.audient.com.
On PC computers please ensure that AuNet is
installed using the provided .msi package. The
program will be added to your local system drive
(C:) and a folder will be created under:
C:\ Program Files \ Audient
You can enable the application to always boot upon user log-in
using the Windows Start Up folder in XP. To do this create a new
shortcut for AuNet by right clicking on the application icon and
selecting ‘Create Shortcut’.
Drag and drop this shortcut into the
following location:
C:\ Documents and Settings \
All Users \ Start Menu \
Programs \ Startup
© Audient Ltd
Page -19-
Networking (PC)
Once you have connected ASP2802 to your studio computer
via either a direct Ethernet link or through a router and installed
AuNet you are ready to set up the networking side of the
console.
Until your console is connected (or any other LAN device to your
PC), the LAN status indicated in Control Panel > Network
Connections will be unplugged.
Right click on the Local Area Connection icon and select
Properties.
© Audient Ltd
Page -20-
Networking (PC)
In the Local Area Connections
properties dialogue window
scroll down and select Internet
Protocol TCP/IP and then open
the properties dialogue box with
the button to the right.
Here select the ‘use the following
IP address’ radio button.
Set the IP address of your
PC to 192.168.0.1
Set the subnet mask to
255.255.255.0
Leave the default gateway
blank and click OK.
Your PC
may take
some time
to apply
the settings
so please
be patient.
Power the console on and once booted, check that a connection
has been opened in the Network Connections window via the
Control Panel.
© Audient Ltd
Page -21-
Networking (PC)
Moving across to ASP2802, press the SETUP button.
The OLED displays will show the first page of console
setup.
First set the application you are using with ASP2802.
The options for PC at the time of release include:
• Avid Pro Tools 8
• Steinberg Cubase 5 (Nuendo)
Use the first rotary encoder to
select the required DAW application.
Note that once a change has been
made, the setup switch LED will flash
to indicate that a setting has changed.
If you exit setup by pressing the
switch once more and then return by
entering setup again, you will notice
that your setting has been automatically
saved.
Using the page keys, page to the right
and ensure that Use DHCP is set to NO.
Page right again to reach the IP address
screen and set the IP address to 192.168.0.100
(default) using the encoders, then move to the
fourth page, and check that the subnet mask is
set to 255.255.255.0.
© Audient Ltd
Page -22-
Networking (PC)
Subnet Mask set to 255.255.255.0:
Port set to 1212:
Press the setup key to exit setup and your setting will be saved.
Now power down the console and restart your PC. Once booted,
ensure that the AuNet application is running and open on your
DAW machine. Finally power up the console.
After the console boots, it should be picked up by AuNet (you
may have to restart your computer if experiencing difficulties
and repeat).
AuNet should indicate
detection of the console
and should also show
you the serial number
of the console.
Select the console
and click on the
connect button to
the bottom right >>
© Audient Ltd
Page -23-
Networking (PC)
Your console should now be connected to your studio
DAW computer and ready for configuration as a HUITM
control surface and analogue automation platform.
If you need to exit the AuNet program it will still run in the
systray until you manually quit by right clicking on the icon in
the system tray and select quit.
Setting Up Automatic IP Assign (for use with routers)
If you have more than one device connected to your DAW
computer, you will most likely be using a network router to
talk to all of these devices.
If you have connected
ASP2802 to your DAW
computer via a network router,
you will need to use DHCP to
enable automatic configuration
of IP address, providing fast
and smarter networking.
Ensure that you enable ‘obtain
IP addresses automatically’
in Network Connections >
Local Area Connections >
Internet Protocol TCP/IP
Properties (you should already
know how to do this if you are
running an exisiting network).
© Audient Ltd
Page -24-
Networking (PC)
You will most likely be running DHCP with automatic IP hand
out.
Ensure that the console is set to use DHCP on the second page
of the setup menu, once set reboot the console and follow the
same AuNet connection procedure as outlined previously
once the console is detected.
Firmware Updates
When updates are released for your console to improve control
surface workflow, bug fixes and add new features, you will need
to update the console firmware.
To do this please visit www.audient.com to obtain the latest
firmware from the ASP2802 webpage and follow the simple
instructions provided along with the firmware download to
flash the new upgrade to the console memory.
If you experience any issues please read the ASP2802 FAQ
found online at www.audient.com.
© Audient Ltd
Page -25-
Example Systems
Example System 1 - 8 Channel DAW Platform
The first example system shown on the next page illustrates a
basic system with a typical 8-in and 8-out soundcard / interface
as commonly available. In this example there are 8 microphone
channels, some basic outboard processing, one set of monitors
and a single reverb unit hooked up to the aux sends.
To print back your final mix, a stand-alone CD recorder is used,
however this could be a tape machine or achieved by feeding
back the mix outputs to your soundcard / interface inputs upon
mixdown.
Example System 2 - Hybrid Production Platform
As example 1, however a standalone sampler / synth is fed into
the channel line inputs to enable monitoring and recording of its
outputs.
Also the cue outputs now feed a headphone distribution system,
useful for feeding multiple performers a mix.
Example System 3 - 16 Channel Tracking Platform
In this example a second pair of monitors are added to
provide a useful reference for judging midrange and balances.
In order to provide 16 microphone inputs for tracking, an
extra Audient ASP008 preamplifier is used. This is routed
digitally to a 16 channel capable soundcard / interface.
These 8 feeds are sent back to the 8-channel summing
input on ASP2802, allowing monitoring of these channels
and access to the cue section.
In this example, the analogue line outputs of the ASP008
are also routed to the ASP2802 line inputs, allowing optional
access to the direct output system here (note that they would
override the console microphone inputs at that point).
© Audient Ltd
Page -26-
Example Systems
Example System 3 cont.
If you wish to work it another way, an all analogue, zero-latency
monitor mix could be formed by feeding the analogue output of
ASP008 (or whatever standalone preamplifiers you are using)
into the DB25 DAW Input connection. Using the alternative cue
input, you could balance these extra 8 inputs using the cue pan
and level controls accessing both the cue output section and
main mix bus for headphone and control room monitoring.
Note that in this arrangement, actual recording of the extra 8
channels (9-16) must either happen via a mult at the output of
the preamplifiers or via a preamplifier with a digitial output fitted
such as an ASP008.
Example System 4 - 24 Channel Mixing Platform
The final example illustrates a heavily connected ASP2802
ready for medium to large scale mixdown purposes.
There are 24 outputs from the DAW interfaces which are
used for mixing / line-level summing with a few useful tricks.
The first 8 channels feed the standard DAW Inputs and can
be used to access the main automation channels on ASP2802
when selecting DAW input mode. These 8 channels can also
access the outboard selection via the switched insert points.
The following 8 outputs (9-16) feed the ASP2802 line inputs
and will feed the alternative cue input.
Here these do not go directly to the main mix bus via the cue
assign control, instead they are fed into a subgroup compressor
via the main cue outputs (channels 9-16), which is then
returned into the DAW Mix Input to re-join the main mix bus.
Here you could compress your drum mix for example.
The remaining channels (17-24) feed the summing input
which routes directly into the main mix bus.
© Audient Ltd
Page -27-
Example System 1
© Audient Ltd
Page -28-
Example System 2
© Audient Ltd
Page -29-
Example System 3
© Audient Ltd
Page -30-
Example System 4
© Audient Ltd
Page -31-
Bus Compressor Settings
© Audient Ltd
Page -32-
www.audient.com
Audient Ltd
1 Stable Court
Herriard Park
Herriard
Hampshire
RG25 2PL
UK
Phone: Fax: +44 (0) 1256 381944
+44 (0) 1256 381906