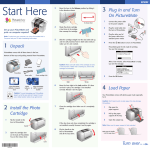
1
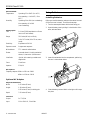
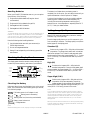
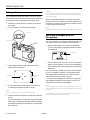
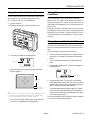
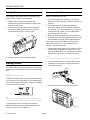
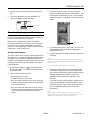
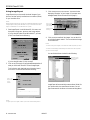
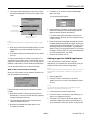
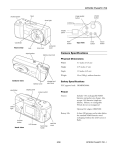
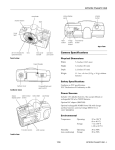
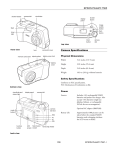
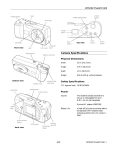
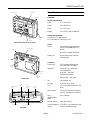
EPSON PhotoPC 550 shutter button Specifications viewfinder Camera timer light Physical Dimensions Width 4.2 in (106.5 mm) Height 2.6 in (66.8 mm) Depth 1.5 in (37.2 mm) Weight 5.4 oz (153 g), without batteries Safety Specifications lens cover connector cover lens macro switch Conforms to FCC specifications. FCC Declaration of Conformity on file. front view (lens cover is open) Power Sources display panel viewfinder 3 AA batteries (single-use alkaline, lithium or rechargeable NiCd or NiMH) Optional AC adapter (B867038) Battery Life At least 300 pictures, including download time. microphone Technical Product type CCD (charged coupled device) still frame fixed focus camera Image size Super high, 640 × 480 pixels (low compression) status light storage card slot cover Standard, 320 × 240 pixels hand strap holder back view TITLE image quality button display panel voice recording button shutter button S-Hi / Hi / S VOICE ERASE SELF TIMER erase button timer button top view High, 640 × 480 pixels (standard compression) DPI 144 pixels per inch Bit depth 16 million colors, 24-bit CCD 1/3 inch progressive scan 640 × 480 pixels Serial interface 2.5 mm mini terminal (to camera) RS-232C compatible (to computer) Serial communication speed Up to 115Kbps Internal memory 1MB flash memory Optional expansion 3.3V SSFDC (solid state floppy disk memory cards) or SmartMedia cards 10/8/97 PhotoPC 550 - 1 EPSON PhotoPC 550 Environmental Temperature Humidity Using Batteries Operating: 32 to 104°F (0 to 40°C) Non-operating: –4 to 140°F (–20 to 60°C) Installing Batteries Operating: 30 to 90% (non-condensing) Before you install the batteries, make sure the camera is turned off (the lens cover is closed). Then follow these steps: Non-operating: 10 to 90% (non-condensing) 1. Turn the camera upside down with the back facing you. 2. Open the battery cover by sliding it in the direction of the arrow, as shown below: Photographic Lens f = 6 mm F2.8/8 (equivalent to a 43 mm lens on a 35 mm camera) Range 23.6 inches (60 cm) to infinity 3.9 to 21.7 inches (10 to 55 cm, macro mode) Sensitivity Equivalent to ISO 100 Exposure control Program auto exposure White balance TTL automatic white balance Shutter Automatic electric iris with mechanical shutter, 1/4 second to 1/1000 second Viewfinder Optical, with centering crosshairs and edge border Focus Fixed focus Aperture F2.8/8.0 3. Insert all three batteries into the compartment, positioning the + and - ends as shown below: Microphone Frequency response 200Hz to 2.3Hz at –30DB 400Hz to 1.3Hz at –20DB battery positions Optional AC Adapter Physical Dimensions Width 1.97 inches (50 mm) Height 1.18 inches (30 mm) 1.85 inches (47 mm) including pins Depth 3.74 inches (95 mm) 4. Close the battery cover and slide it to the right until it snaps into place. Technical Output DC 7V/2.0A Input 110 to 120V AC, 50 to 60Hz 2 - PhotoPC 550 10/8/97 EPSON PhotoPC 550 The battery icon flashes when your battery power is completely out. At this point, you can’t take pictures until you replace the batteries or use the optional AC adapter. Handling Batteries When your PhotoPC 550 batteries wear out, you can replace them with any of the following: You should use the battery icon only as a guide to estimate remaining power. Several factors can affect battery life, including the surrounding temperature and the type of batteries you use. Low temperatures—especially below 50 °F (10 °C)—drain your batteries faster. ❏ Single-use AA alkaline batteries (Energizer brand recommended) ❏ Single-use AA lithium batteries (longer life) ❏ Rechargeable AA NiCd batteries ❏ Rechargeable AA NiMH batteries WARNING To avoid the danger of fire or explosion, do not mix different types of batteries. Do not allow the battery contacts to touch metal objects such as coins or keys, which could short out the battery’s circuits. Read all safety and handling instructions before using batteries. ❏ Use the batteries that came with your camera only in EPSON digital cameras. Standard (S) ❏ Do not use manganese batteries. Produces color images at 320 × 240 pixels, with standard compression. The image size is smaller and includes less detail when enlarged. This is ideal for web pages and walletsize pictures (the picture size is approximately 2.2 × 1.7 inches [43.2 × 55.8 mm]). The camera holds at least 24 pictures in this mode. ❏ Battery life varies depending on the battery type and the manufacturer. Checking the Display Panel The display panel shows the camera’s current settings, the number of pictures remaining, and status of your batteries. High (Hi) Produces color images at 640 × 480 pixels with standard compression. Pictures include greater detail and are snapshot size (approximately 3.3 × 4.4 inches [83.8 × 111.8 mm]). The camera holds at least 12 pictures in this mode. . voice recording macro mode pictures remaining self timer erase Super High (S-Hi) battery status Checking the Battery Before you take pictures, check the battery icon on the control panel. The icon shows how much battery power you have left, in the following stages. Full battery power (or AC adapter in use) to Battery power is decreasing Battery power low (time to buy new batteries) Battery power is almost out Change batteries NOTE When the battery power is low, image processing is less reliable. PhotoPC 550 has three image quality (resolution) settings: Standard, High, and Super High. Press the image quality button on top of the camera to cycle from one setting to the other. The image quality icons (shown below) appear on the display panel. Note the following when handling batteries: image quality Setting Image Quality Produces color images at 640 × 480 pixels with low compression. With less compression, Super High images are better for pictures that will be enlarged. The camera holds at least 6 snapshot size (approximately 3.3 × 4.4 inches [83.8 × 111.8 mm]) pictures in this mode. NOTE You can switch between the settings and mix pictures of varying quality in the camera. The camera’s capacity for storing images will vary accordingly. Depending on the content of your pictures, your camera may hold more than the numbers shown. As long as the display panel shows a number other than zero, you can continue taking pictures. When you turn the camera off and back on, the image quality setting is the last setting used. When you replace the batteries, the image quality setting defaults to High. 10/8/97 PhotoPC 550 - 3 EPSON PhotoPC 550 Taking a Picture You can capture an image with PhotoPC 550 as you would with any point-and-shoot camera: look through the viewfinder and snap the shutter. Follow these steps to take a picture: 1. Make sure you are at least 23.6 inches (60 cm) away from your subject. 2. Turn the camera on; the status light turns green. CAUTION If you set the camera down while it is processing a picture, make sure you handle it carefully. The camera may lose your image if you set it down too hard. When the light stops flashing and turns green, the image is saved and you can take another picture. Saved images remain in memory for at least a year, even when the camera is turned off and the batteries are removed. NOTE Remember that the camera shuts off automatically after 60 seconds. status light Recording Messages With the Microphone viewfinder You can use the built-in microphone to annotate your pictures with sound or record a voice message. Follow these steps: shutter button 1. Press the VOICE button until you hear the camera beep. The voice icon appears on the display panel and the status light flashes red. voice recording icon 2. Hold the camera 4 to 6 inches (10.2 to 15.2 cm) away and speak into the microphone. You can record a message up to six seconds long. When the recording time is up, the camera beeps twice. 3. Look straight through the viewfinder and center your subject within the cross-hairs. cross-hairs After you record your message, the picture counter decreases by one. The message is “attached” to the last picture taken. Each message uses the same amount of memory as a highresolution picture and is stored as a .wav file. macro crop marks (see page 5) If you don’t like the message you recorded, you can record a new message by pressing the VOICE button. PhotoPC 550 automatically records over the last message. 4. Hold the shutter button halfway down to lock the focus. The status light changes from green to orange. NOTE You cannot erase a message only; you can only record over it. If you press the ERASE button, you erase both the image and the attached message. NOTE If you do not lock the focus, your pictures may be blurry. 5. Press the shutter button the rest of the way down to take the picture. If your camera is connected to your computer, you must use the computer’s microphone to record messages. Hold the camera still until it beeps and the status light starts flashing red. The flashing red light indicates that the camera has captured the image and is processing it. Processing takes about 8 seconds. 4 - PhotoPC 550 10/8/97 EPSON PhotoPC 550 Using Macro Mode to Take Close-ups Taking Pictures in Low Light Conditions You can use the camera’s macro mode to take pictures as close as 3.9 inches (10 cm). The macro range is from 3.9 to 21.7 inches (10 to 55 cm). Follow these steps: 1. Turn the camera on. 2. Slide the macro switch so it is above the macro icon. You can use PhotoPC 550 in most indoor or low light settings. There is no need for a flash because of the camera’s highly light sensitive CCD. A good rule of thumb is if you can read a book in the available light, you can take a picture with PhotoPC 550. When taking pictures in low light conditions, be sure to hold the camera still until you hear it beep. The shutter speed may be as slow as 1/4 of a second in low light conditions. You can use a tripod to hold the camera steady. See “Using a Tripod” on page 6. Taking Pictures With the Self Timer Setting the self timer adds about a 10-second delay between the time you press the shutter button and when the picture is taken. macro switch macro icon Follow these steps to take a picture with the timer: 1. Secure the camera on a flat surface or on a tripod. (See the next section for information on attaching the camera to a tripod.) 3. The macro icon appears on the display panel. 2. Turn on the camera and wait until the status light turns green. macro icon 3. Press the SELF TIMER button. The timer icon appears on the display panel. 4. Center the image in the viewfinder and press the shutter button to capture it. self timer icon macro crop marks 4. Press the shutter button. The timer icon on the display panel flashes slowly for about 8 seconds. Then the icon and the timer light (on the front of the camera) flash rapidly for about 2 seconds before the shutter is released. actual image area captured TIP When centering your image, be sure to leave space around the image to compensate for any parallax shift (the difference between what you see in the viewfinder and the actual image captured). 5. To turn off macro mode, slide the macro switch to the left. The macro icon disappears from the display panel. The camera beeps when the image is captured. The status light continues to flash red as PhotoPC 550 processes the image. When the status light stops flashing and turns green, you can take another picture. The timer automatically turns off after the image is processed or if you turn the camera off and back on. 10/8/97 PhotoPC 550 - 5 EPSON PhotoPC 550 Using a Tripod Connecting the Camera For portraits or other studio pictures, you can attach your PhotoPC 550 to a tripod. Follow these steps: Note the following before you start: ❏ If you have the optional AC adapter, you can conserve battery life by using it when you connect the camera to your computer. 1. Assemble and set up the tripod by following the manufacturer’s instructions. Make sure the tripod is wellbalanced on a flat surface. ❏ The camera’s auto shut-off feature takes place after 5 minutes of inactivity when the camera is connected to your computer. To turn the camera back on, close the lens cover and then open it again. (You can change the auto shut-off time period if you want.) 2. Find the opening for the tripod screw on the bottom of your camera. Carefully place the camera on the tripod. Screw the camera on until it is firmly in place. ❏ When you connect the camera, make sure your system is not exposed to sources of electromagnetic interference, such as stereo speakers or the base units of cordless telephones. tripod socket Make sure you have the serial cable that came with your camera. Before you start, turn off the camera and your computer. Then follow these steps: 1. Locate a serial port on the back of your computer. You may have two serial ports labeled COM1 and COM2, or the ports may be labeled with icons. If you have two serial ports available, use COM1 (port 1) to connect your camera. 3. Adjust the tripod to view your subject as desired. NOTE If you have a 25-pin serial port, you can use a 9- to 25-pin adapter. Erasing Pictures 2. Line up the serial connector on the cable with one of the serial ports on your computer, and insert the connector. Then tighten the screws. You erase the last picture taken (along with any accompanying message); you can also erase all the pictures in the camera at once. NOTE You cannot erase a message only. To erase the last picture taken, hold down the ERASE button for 2 seconds until you see the erase icon on the display panel. The icon flashes and the status light on the back of the camera is red while the picture is erased. 3. Open the connector cover on the side of the camera. erase icon TIP Be sure to press the indentation in the center of the ERASE button. You may need to press it with your fingernail instead of your finger. serial port To erase all the pictures in the camera, hold down the ERASE button and then press the SELF TIMER button for 2 seconds or until you see the erase icon. 6 - PhotoPC 550 DC port 10/8/97 EPSON PhotoPC 550 3. If you chose Copy all images, click OK to copy your pictures to an album named with the current date. Or, type a new name for the album and click OK. Your pictures are transferred one by one. They appear in a strip of thumbnail images. 4. Insert the other end of the cable into the camera’s serial port. 5. Turn on the camera and your computer system. The connect icon appears on the display panel. connect icon Downloading Images and Sounds PhotoPC 550 provides several different ways to transfer your pictures from the camera to your computer. Make sure you’ve installed the PhotoPC 550 software, following the instructions in the User’s Guide. Then connect the camera to your computer as described in the previous section. You can download your images using Camio Viewer, Image Expert, or the TWAIN driver. Using Camio Viewer The Camio Viewer, which runs only under Windows 95 and Windows NT 4.0, is a quick and easy way to get pictures from the camera. You can transfer all images and sounds to your computer, or just display the pictures in the camera. Then you can drag a picture directly into a presentation or document. Follow these steps: indicates audio 4. If you chose View images in the Camera, click OK. Your pictures appear in a strip of thumbnail images (see the illustration for step 3). 5. Open the application and document where you want to use the picture. NOTE Dragging and dropping an image with the Camio Viewer works only with OLE 2.0-compliant applications running under Windows 95 and Windows NT 4.0. You cannot drag and drop sound into your document. 1. Double-click the camera icon on the right end of the Windows 95 Taskbar. You see the Camio Viewer Startup Options dialog box. 2. Choose one of the following options: ❏ View images in the Camera Displays a filmstrip of your pictures. 6. Click the picture you want to use. Without releasing the mouse button, drag the picture to your document. When your pointer is over the location where you want the picture to appear, release the mouse button. The picture is downloaded from the camera, and it appears in your document. ❏ Copy all images from the Camera to the Computer Transfers your pictures and sounds to an album (folder) on your hard disk drive. ❏ Copy all images and delete them from the Camera Transfers your pictures and sounds to an album (folder) on your hard disk drive and deletes them from the camera. If you want to edit or modify the picture, double-click it to bring up the Image Expert menus and toolbar. For more information about the Camio Viewer, choose Quick Tour from the Image Expert Help menu in Window 95 or Windows NT. NOTE When you drag and drop with the Camio Viewer, your picture is embedded into your document and also automatically saved to the default Image Expert directory under the current date. 10/8/97 PhotoPC 550 - 7 EPSON PhotoPC 550 3. Click View Pictures in the Camera. You see a window displaying “filmstrips” of your images. (If you see an error message instead, follow the instructions on page 9.) Using Image Expert Image Expert lets you view small thumbnail images of your pictures, and then quickly transfer them to an album (folder) on your hard disk drive. NOTE Although these instructions and the accompanying illustrations show Image Expert running under Windows 95, you can follow the same steps on a Windows 3.1 or Windows NT system. Click to start downloading your pictures. indicates audio message 1. Start Image Expert. Under Windows 95, click Start, and then point to Programs, PhotoPC 550, Image Expert. If you’re using Windows 95 and Windows NT, you see a Quick Tour screen like the following: 4. Click Get All to transfer all the images. You can also click an individual image to select it. The Get All button changes to Get Selected. NOTE To select a range of images, hold down the Shift key while you click. To select several images individually, hold down the Ctrl key while you click on the images. You see a Select Album window like the following: Type here if you want to rename your album. If you’re using Windows 3.1, skip to step 3. 2. Click on any of the topics for an animated demonstration of what you can do with PhotoPC 550 and Image Expert. To skip the tour and download your pictures and sound, click Close. You see a window like the following: Click to see the pictures in your camera. Image Expert will automatically create an album (folder) for your pictures with the current date as its name. You can type a new name for the album or choose an existing album. NOTE To open Quick Tour again, select Quick Tour from the Help menu. 8 - PhotoPC 550 10/8/97 EPSON PhotoPC 550 5. Click Open to begin transferring your pictures. A window like the following appears to show you the progress of each image. 4. Click Retry. If you see the Connection Failed message again, click Setup. You see the following dialog box: download status of current picture 5. Select another port if necessary. In most cases, it is best to leave the Port setting at Auto because Image Expert can detect the camera connection automatically. download status of all pictures selected If you have a serial device connected to one port and an internal modem on the other, you can try setting the Port to COM3 or COM4. Click if you want to stop transferring images. NOTE If you select only one picture to download, there is only one status bar. 6. When you’re finished, close the filmstrip window. You see a message asking if you want to delete all the files in the camera. 7. If you want to make room for more pictures in your camera, click Yes. Your pictures are displayed in an album of thumbnails. You can double-click an image to open it in Image Expert. You can display your images one by one; edit, print, and copy them to diskettes; or place them in your documents and presentations. You can also use the Help menu for more information. What To Do if You See an Error Message When you click the button to view images in the camera, you may see a message like the following: 6. Select a slower speed. Image Expert automatically chooses the fastest speed that works with your system, but this may actually be too fast for the configuration of your port. If you are using Windows 95 or Windows NT, try lowering the speed to 57600. If you are using Windows 3.1, try lowering the speed to 57600 or 38400. You may need to experiment to choose the best speed for your system. 7. When you are finished, click OK. Getting Images Into TWAIN Applications If you use Photoshop or other TWAIN-compliant applications, you can transfer your pictures directly into your program from the camera. Follow the steps below. NOTE If your images have audio messages attached to them, you must use Image Expert to download them. TWAIN does not support audio transfer. 1. Start your application. 2. From the File menu, choose Import, then Select TWAIN_32 Source (or Acquire, then TWAIN_32 Select Source). NOTE You may need to select TWAIN instead of TWAIN_32 in some applications, especially those in Windows 3.1. Follow these steps to make sure your camera is connected correctly: 3. Choose PhotoPC 550 as the TWAIN source. 1. Make sure the camera is turned on and has not shut off automatically. If it has, turn it off and then back on again by closing and opening the lens cover. 2. Check the cable and make sure the connections to the camera and computer are secure. 4. From the File menu, choose Import, then TWAIN_32 (or Acquire, then TWAIN_32 Acquire). 5. The PhotoPC 550 Twain Driver window appears, with “thumbnail” images of your pictures, as shown below. (If you do not see the Twain Driver window, it may be in the 3. Make sure your batteries have enough power or your AC adapter is connected. 10/8/97 PhotoPC 550 - 9 EPSON PhotoPC 550 background. Minimize your application window to see the Twain Driver window. If you see a message that says The Camera Is Not Responding, see the following section.) Click to transfer your picture(s). 6. Select a slower speed. You may need to experiment to choose the best speed. 7. Click Test Connection again. If you still don’t see your pictures, see your User’s Guide for more troubleshooting tips. Using SmartMedia Cards SmartMedia cards increase the camera’s picture storage capacity as shown in the following table. Number of pictures (minimum capacity) 6. Select the picture you want and click Get Selected to transfer the picture. Or, click Get All to transfer all the pictures. NOTE Some applications import only one picture at a time. Image Quality Internal Memory 2MB Card 4MB Card Standard 24 73 147 High 12 36 73 Super High 6 18 36 NOTE When a SmartMedia card is installed in the camera, images are stored on the card instead of the camera’s internal memory. 7. If you want to delete images from your camera, select the . image and then click Delete Installing a Storage Card 8. If necessary, click Close to exit and return to your application. Before you start, make sure the camera is turned off. Then follow these steps: You see the imported picture or pictures in the work area. 1. Open the storage card slot cover on the side of the camera. What To Do if the Camera Is Not Responding When you try to acquire pictures from the camera, you may see a screen like the following: Follow these steps to fix your camera connection: 1. Make sure the camera is turned on and has not shut off automatically. If it has, turn it off and then back on again by closing and opening the lens cover. 2. Insert the card all the way into the storage card slot. 2. Check the cable and make sure the connections to the camera and computer are secure. 3. Make sure your batteries have enough power, or your AC adapter is connected. 4. Click Test Connection. If you see the same screen, continue with step 5. 5. Select another port if necessary. In most cases, it is best to leave the Port setting at Auto. If you have a serial device connected to one port and an internal modem on the other, you can try COM3 or COM4. 10 - PhotoPC 550 3. Close the storage card slot cover. 10/8/97 EPSON PhotoPC 550 4. Turn the camera on. The card icon and the number of pictures you can store in the storage card appears on the camera’s display panel. Using a PCMCIA Adapter To use the PCMCIA adapter, your computer must be equipped with a PCMCIA slot. Refer to the instructions that came with your adapter or follow these steps to use an adapter: 1. Insert the storage card all the way into the adapter: storage card icon NOTE When a storage card is installed, you may notice a delay between the time you press the shutter button and when the camera beeps. To avoid blurring, make sure you hold the camera still until it beeps. Removing a Storage Card Make sure the camera is turned off. Then open the cover to the storage card slot and gently pull out the storage card. 2. Insert the adapter into your computer’s PCMCIA slot: When you are not using your SmartMedia card, always store it in its case or inside the camera to avoid damaging it. CAUTION Never remove the card while the camera is accessing it. Data in the card may be lost or damaged. Avoid using or storing the card in dusty places, in direct sunlight, or in places that become extremely hot or humid. To remove the storage card from the adapter, press the eject tab at the end of the card. eject tab Getting Images and Sound From a Card to Your Computer There are two ways you can transfer the pictures on a SmartMedia card to your computer: ❏ Use the serial port on your computer (this is the same method as transferring pictures stored in the camera’s memory; see the User’s Guide) ❏ Use a PCMCIA adapter A PCMCIA adapter allows you to access images stored on SmartMedia cards directly from your computer. Formatting a Storage Card Most SmartMedia cards are already formatted when you buy them. If you are unable to add images to your SmartMedia card, you may need to format the card. Follow these steps: 1. Install the storage card in the camera. 2. Hold down the ERASE button and then press the S-Hi/Hi/S button for 2 seconds or until the pictures remaining number changes. NOTE If you are unable to format a Simple Technology card, contact the Technical Support Department at (800) 4-SIMPLE. 10/8/97 PhotoPC 550 - 11 EPSON PhotoPC 550 Maintenance Optional Accessories Cleaning the Camera EPSON offers several options for the PhotoPC 550. ❏ Use a clean, dry cloth to wipe the camera free of dust. ❏ PhotoPC AC adapter (B867038) for use with any 110/120V electrical outlet ❏ Don’t use harsh or abrasive cleaners. Don’t use liquid or aerosol cleaners. ❏ PhotoPC NiMH power pack (B818051) ❏ To clean the lens, first blow off any loose dust or dirt. Then breathe on the lens and wipe off all moisture with a soft, lint-free cloth or lens cleaning tissue. To avoid scratching the lens, don’t press too hard. ❏ If necessary, clean the battery contacts with a dry cloth. ❏ PhotoPC NiMH battery pack (B818061) ❏ 3.3V SSFDC or SmartMedia storage cards You can contact EPSON Accessories at (800) 873-7766 (U.S. sales only). In Canada, please call (800) 873-7766 for dealer referral. SmartMedia storage cards and adapters are also available from Simple Technology at (800) 4-SIMPLE. Storing the Camera ❏ Keep the lens covered (power turned off) and store the camera in a carrying case or bag when you’re not using it. Related Documentation ❏ Avoid sudden temperature changes, which can cause moisture to condense on the camera. Keep the camera in a case or bag if you need to move it from a cold environment to a warm one. Allow time for the camera and its optional accessories to adjust to temperature changes before using them. CPD4370 ❏ When the camera is not used for long periods of time, remove the batteries and store them at a low temperature in a dry location. This prevents camera damage from battery leaks or corrosion. Do not store the camera in the following locations: ❏ Where it will be exposed to direct sunlight, for example, on a car dashboard ❏ Near bright sources of light or high humidity ❏ Near heat sources or in a closed car or trunk ❏ In areas of excessive dirt or dust ❏ Where it will be exposed to strong vibrations or magnetic fields 12 - PhotoPC 550 10/8/97 PhotoPC 550 User’s Guide