1
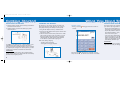
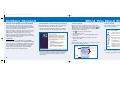
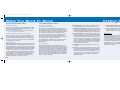
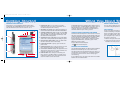
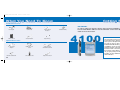
PPC4100 Quick Start Guide 4/27/04 3:35 PM Page 1
PPC4100
AUDIOVOX PPC4100 POCKET PC
QUICK START GUIDE
IMPORTANT - READ THIS FIRST
This Guide is designed to get you quickly up and running
with your Audiovox PPC4100 Pocket PC.
It will provide information on:
• Getting Started
• Key Functions
• What You Need to Know About
Your Audiovox PPC4100 Pocket PC Phone
© 2004 Audiovox Communications Corp. • 555 Wireless Boulevard • Hauppauge, New York 11788 • USA • www.audiovox.com
All rights reserved. Audiovox is a registered trademark of Audiovox Corp.
For more detailed information, please refer to the Audiovox User’s Guide
booklet and the User’s Guide on the product CD, both of which are located
in the Audiovox PPC4100 packaging.
PPC4100 Quick Start Guide 4/27/04 3:35 PM Page 3
W hat You Need To Know
PPC
1
Technical Specifications:
Battery Specifications:
Network Frequency:
Dimensions:
Weight:
Display:
Standard Battery:
Standby time:*†
Talk time:*†
Data usage time:*†
PDA:†
Tri-band GSM 850/1800/1900
4.29" h x 2.69" w x .85" d
Less than 5.6 ounces
3.5" TFT LCD, 240 x 320
QVGA Screen with 65K color
1480mAh Li Ion Removable Battery
Up to 100 hours stand by time
Up to 3 hours talk time
Up to 5 hours data usage time
Up to 12 hours PDA usage only
*Depends on network configuration, signal strength, and usage
patterns. Network- and subscription-dependent feature. Not
available in all areas.
†Battery performance is approximate.
Minimum PC System Requirements:
Microsoft® Windows NT®
Workstation 4.0 with SP 6 or later
Microsoft® Windows® 98 or higher
Microsoft® Internet Explorer 4.01 SP 1 or later
12 to 65 MB available hard disk space
USB or infrared interface and CD ROM drive
18
PPC4100 Quick Start Guide 4/27/04 3:36 PM Page 5
Getting Star t e d
W hat You Need To Know
Included Accessories:
IMPORTANT
AC Adapter
USB Cradle
Single Earbud
Headset
Leather Pouch
Stereo Headset
Stylus Pen (1)
Vehicle Power
Adapter
USB Data Sync
Cable
Stereo Headset
and Remote Control
Remote Control Unit
SD Camera Card
Stylus Pen 3-Pack
Optional Accessories:
17
Standard Battery
In order to utilize your device’s wireless data and voice capabilities, you must
have an AT&T Wireless SIM card. See the “SIM Card” section of this Quick Start
Guide for more information.
4100
The first thing you’ll need to do is follow the
instructions in the “Getting Started” section.
Once you’ve completed the basics, you’ll
be ready to access all of the features and
functions that will enhance your communication
capabilities on the go. And, once you’re
familiar with how your favorite features and
functions work—accessing the information
that matters most will be fast and simple.
So get going today and discover all of the
benefits of your Audiovox PPC4100 with
AT&T Wireless.
2
PPC4100 Quick Start Guide 4/27/04 3:36 PM Page 7
W hat You Need To Know
Key Functions
MICROSOFT OUTLOOK
Application
1. Today
How To Start
Benefit and Use
Tap
, Today
Today’s information that users want to see at a glance.
2. ActiveSync
Tap
, ActiveSync
Monitor the status of information transfer between the device and the PC.
3. Calendar
Tap
, Calendar
View, edit, and create calendar entries.
View, edit, and create contact information, or make a call directly from contacts.
4. Contacts
Tap
, Contacts
5. Inbox
Tap
, Inbox
View, edit, create, and send e-mails with or without attachments.
6. Pocket Internet Explorer
Tap
, Pocket Internet Explorer
Browse the Internet wirelessly.
7. Notes
Tap
, Notes
Enter digitally-transcribed handwritten notes.
8. Phone
Tap
, Phone
View phone dialer.
9. Tasks
Manage active and completed tasks.
With this method, your Inbox is updated each time you
sync with your PC or corporate e-mail server. Upon
each sync, any messages you have composed are sent
and your Inbox will be updated with any new messages
you have received. See the Inbox section of the User’s
Guide for more information.
POP3/IMAP4
This method includes e-mail from providers such as
Quest, Earthlink and attbi/Comcast. These e-mail
services can be managed remotely using a wireless
connection. Visit www.attwireless.com/pocketpcsolutions
for configuration instructions.
Tap
, Tasks
10. Windows Media Player
Tap
, Windows Media Player
Play audio or video files locally on the device or storage card, or streamed from the web.
11. Games
Tap
, Programs, Games
Users can play their favorite games.
12. Calculator
Tap
, Programs, Calculator
Access an easy-to-use calculator.
13. File Explorer
Tap
, Programs, File Explorer
Manage the files on the device.
14. Pictures
Tap
, Programs, Pictures
View pictures on the device.
• Tap , then Inbox. Inbox will open to the Inbox folder
navigator.
TO OPEN INBOX
15. MSN Messenger
Tap
, Programs, MSN Messenger
Send MSN instant messages.
Synchronizing e-mail messages:
16. Pocket Excel
Tap
, Programs, Pocket Excel
View, create, and edit spreadsheets.
17. Pocket Word
Tap
, Programs, Pocket Word
View, create, and edit documents.
18. WiBackup
Tap
, Programs, WiBackup
Create backup files of datafiles and applications stored in your device.
E-mail messages can be synchronized as part of the
general synchronization process. You will need to
enable Inbox synchronization in ActiveSync.
19. SIM Manager
Tap
, Programs, SIM Manager
Manage the data on the SIM card.
3
Tap to select
which folder
to display.
Tap to create a
new email or
SMS message.
Tap to select
which account
to use.
FOR MORE INFORMATION:
Go to www.attwireless.com/pocketpcsolutions for more
information on your Audiovox PPC4100.
16
PPC4100 Quick Start Guide 4/27/04 3:36 PM Page 9
Getting Star t e d
W hat You Need To Know
HARD RESET
TRANSFER YOUR CONTACT INFORMATION
A hard reset will cut off power to your device. This will
erase all records and entries, delete all programs you
have added, and restore the device default factory settings.
Never perform a hard reset unless a soft reset does
not correct your problem. When you perform your next
ActiveSync operation, you can restore any data that you
previously synchronized to your computer or you can
restore data that you have backed up to a storage card.
Use the SIM Manager program on your device if you
would like to transfer contact information from an
existing GSM SIM. See the Sharing Contacts In SIM
Manager section of the User’s Guide.
To perform a hard reset:
1. Press and hold the power button on the front panel of
your device.
2. While holding down the power button, gently press the
tip of the stylus to the reset button. The Confirmation
message box appears.
3. Press the volume key up.
NOTE: When you perform a hard reset, the current date and time will
not be retained. Formats, preferences, and other settings are
restored to their factory default settings.
USING THE INBOX
Use Inbox to send and receive e-mail messages by
doing either of the following:
• Synchronize e-mail messages with Microsoft Exchange
or Microsoft Outlook on your computer.
• Send and receive e-mail messages by connecting directly
to an e-mail server through an Internet service provider
(ISP) or a network. You also can use Inbox to send and
receive SMS; it supports 8 bits data with class 0, 1, 2, 3,
as well as USSD (Unstructured Supplementary Service
Data).
You can compose both e-mail and SMS from the Inbox of
your PPC4100. Messages addressed to a mobile phone
number will be sent via SMS; messages addressed to an
e-mail address will be sent via e-mail. There are two types
of e-mail that can be managed on your device. If you prefer
to use both types, the Inbox supports multiple folders.
PPC4100
PACKAGE CONTENTS
Thank you for purchasing the PPC4100.
The device’s giftbox contains all of the items listed below:
• PPC4100 Pocket PC with Built-in Phone
• AC Adapter
• USB Cradle
• Single Earbud Headset
• Standard Battery
• Leather Pouch
• Stereo Headset
• Stylus Pen (1)
• Quick Start Guide
• Companion CD
• User’s Guide Booklet
15
NOTE: Report any product defects to the place
of purchase immediately.
4
PPC4100 Quick Start Guide 4/27/04 3:36 PM Page 11
W hat You Need To Know
Getting Star t e d
RESET YOUR DEVICE
HANDSET DESCRIPTION
1. EARPHONE JACK: 2.5 mm jack for use with a
hands-free device or to listen to audio files. Has a
non-detachable protective covering.
This phone is a tri band Pocket PC with built-in phone
functionality. The PPC4100 weighs less than 5.6 ounces
and the dimensions are 4.29" h x 2.69" w x .85" d.
4.
2. INFRARED (IR) PORT: Uses infrared technology to
transmit and receive data from other IR-enabled devices.
5.
6.
3. SD/MMC EXPANSION SLOT: Accepts an SD or MMC
card, allowing you to add more memory. The slot also
supports SDIO (Secure Digital Input Output) cards
for added connectivity options.
3.
2.
1.
14.
13.
7.
4. ANTENNA/STYLUS HOLDER: The non-extendable
antenna has a neatly hidden slot for holding the stylus.
8.
15.
5. NOTIFICATION INDICATOR: Lights up solid amber
for alarm reminders and e-mail receipt.
6. PHONE INDICATOR: Lights up green to indicate
phone status.
7. POWER BUTTON: Press to turn the device on or off.
Press and hold to turn the backlight on or off.
8. LCD TOUCHSCREEN: Displays the applications and
data stored in your device. It is touch-sensitive and
responds to the stylus or your finger.
16.
12.
9.
11.
5
10.
9. END BUTTON: Press to reject an incoming call.
Press to end a call. When dialing a number, press
to delete the number input. Press and hold to turn
on/off the mobile service connection.
To add Office Online Pro or Office Online Premier service
to your data plan, call AT&T Wireless Customer Care at
866-293-4634. If you are already an AT&T Wireless
customer, simply go to attwireless.com/officeonline to
add Office Online to your existing account.
USING POCKET INTERNET EXPLORER
Use Pocket Internet Explorer to view internet or intranet
sites from your device. During synchronization with your
computer, download your favorite links and mobile favorites
that are stored in the Mobile Favorites subfolder of
Internet Explorer on your computer. Pocket IE includes
support for XHTML Basic, Cascading Style Sheets,
WML2.0, JScript 5.5 IPv6.
You may have to perform a reset if the device freezes
(i.e., device no longer responds to the buttons on the screen).
SOFT RESET
A soft reset allows your device to get a fresh start,
similar to rebooting a computer. This will restart your
device and adjust memory allocation. All records and
entries are retained after a soft reset. Unsaved data in
open programs may in some cases be lost.
To perform a soft reset:
1. Remove the stylus from its holder.
2. Lightly press the tip of the stylus to the reset button
located on the rear panel of the device.
To open Pocket Internet Explorer
• Tap
, then Internet Explorer.
BROWSE THE INTERNET
Your Audiovox PPC4100 has the Pocket Internet Explorer
browser that will allow you to access Internet sites.
You will be directed to the default home page. Type in a
specific URL, select a URL that is currently in Favorites
or choose one of the banners on the home page to
start browsing.
If your address bar is not visible, click view in the bottom
toolbar and select Address Bar.
14
PPC4100 Quick Start Guide 4/27/04 3:36 PM Page 13
Getting Star t e d
W hat You Need To Know
USE YOUR PERSONAL E-MAIL
USE YOUR BUSINESS E-MAIL
WEB-BASED (HTTP)
MICROSOFT OUTLOOK
CRADLE SYNCHRONIZATION
10. MICROPHONE: Inputs audio into your device when
receiving/making a call or recording voice notes.
15. VOLUME ROCKER KEY: Press the key up to
increase volume, press down to decrease volume.
You can keep your Pocket Outlook data up-to-date by
synchronizing the device with your Outlook data on your
PC. Once the ActiveSync software is installed on your
PC, connect the cradle to your PC through the USB port.
Once your PC has detected the cradle, insert your
device into it. The ActiveSync Setup Wizard will walk
you through setting up a partnership between your
device and your PC. See the System Procedures section
in the User’s Guide for more information.
11. UNIVERSAL CONNECTOR: Connects your device to
the cradle. This allows you to recharge your device and
perform an ActiveSync operation. You can also use it
to connect peripheral hardware devices to your device.
16. HOLD SWITCH: Slide up to lock all buttons from
being accidentally pressed when the device is
placed in pocket or in a bag.
12. SEND BUTTON: Press to accept an incoming call.
During an outgoing call, press and hold to turn on/off
the speakerphone. From Speed Dial, press to call the
currently selected number. From Call History. press to
call the currently selected log item. In mailbox, press
to send a composed e-mail/SMS message or display
options for a received e-mail/SMS. From an application,
press to display the Dialer screen or press twice to
redial the last called number.
IMPORTANT:
You can use the Pocket Internet Explorer from the Start
Menu to get on the Internet and access Web-based e-mail
accounts like Hotmail or Yahoo.
Note: To access the Internet, just follow the directions in the Browse
the Internet section in the User’s Guide.
INTERNET SERVICE PROVIDER (POP3/IMAP4)
You can send and receive your POP3 or IMAP4 e-mail
messages with the inbox on your device. This would
include ISP providers like Earthlink, attbi/Comcast and Qwest.
You may need your account and mail server information
to configure the connection.
OFFICE ONLINE
Office Online software allows you to wirelessly access your
Microsoft® Outlook® or Lotus Notes office e-mail, calendar and
contacts when you're on the go. This convenient service comes
in two versions: Pro and Premier. Everything you do with Office
Online while you are mobile is reflected back on your desktop,
so there's no need to sync up when you return home.
To add Office Online Pro or Office Online Premier service
to your data plan, call AT&T Wireless Customer Care at
866-293-4634. If you are already an AT&T Wireless
customer, simply go to attwireless.com/officeonline to
add Office Online to your existing account.
13
For AT&T Wireless E-Mail Business Solutions, contact
your AT&T Wireless Sales Representative or call
866-429-7222.
OFFICE ONLINE
Office Online software allows you to wirelessly access
your Microsoft® Outlook® or Lotus Notes office e-mail,
calendar and contacts when you're on the go. This convenient
service comes in two versions: Pro and Premier. Everything
you do with Office Online while you are mobile is reflected
back on your desktop, so there's no need to sync up when
you return to the office. Office Online is easy to install
and use – set-up takes just minutes. Once the software is
on your office PC, accessing information on your wireless
device is easy and intuitive.
13. SPEAKER: Listen to audio media or a phone call
from here.
This device’s phone component can be used with the
Earphone Microphone or as a speakerphone. Unlike
conventional cell phones, the PPC4100 is not designed
to be held against the head during a conversation. Holding
the unit against your head during phone use is contrary
to the design of this product and is not recommended. For
instructions on how to use the phone with the Earphone
Microphone or as a speakerphone, please refer to the
device’s User’s Guide.
14. JOG DIAL: Pressing the jog dial results to an action
similar to pressing the Enter key in a regular keyboard.
For example, to open any of the application in the
Start menu simply select that application then press
the jog dial; or in using a Help menu, simply select
a hyperlink then press the jog dial to display the
linked information.
6
PPC4100 Quick Start Guide 4/27/04 3:36 PM Page 15
W hat You Need To Know
Getting Star t e d
INSTALLING THE BATTERY
CHARGING THE BATTERY
1. Align the battery marker on the battery pack with the
one located on the device.
For initial use, you need to charge your device for
about eight (8) hours. After that, you can charge it
everyday to recharge the battery to full capacity.
2. Slide the battery pack into the battery bay until it
clicks into place.
ACCESS YOUR VOICE MAIL
TO MUTE A CALL
• During a call, tap
and off.
to toggle the mute function on
1. Plug the AC Adapter into any standard outlet.
Your voice mail access number will be programmed into
your device upon registration. To access voice mail:
• Tap the Speed Dial button on the phone dialer screen.
Your voice mail number will be in position #1.
• Tap the #1 position to dial out of your voice mail account
(your initial password is 1111). Then follow the directions
in the voice mail system.
2. Connect the AC Adapter to the power socket at the
back of the cradle.
3. Slide the device into the front pocket of the cradle
until it clicks into place. The connection is secure
when the bottom edge of the device is aligned
smoothly with the cradle and the LED indicator
on the device’s power button lights green.
• If you have voice mail waiting for you, you may also
access it by tapping on the Voice Mail Icon in the top
toolbar. You will get a New Voice Message bubble. By
clicking on Voice Mail, your voice mail number will be
automatically dialed for you.
LED status during charging:
IMPORTANT:
• Flashing green: Charging
In addition to the battery pack, a backup battery cell is
embedded into your device to prevent data loss in
instances when the removable battery pack is removed
or completely discharged. This backup battery cell will
support the system for a maximum of 30 minutes.
If your voice mail access number is not programmed in your
Speed Dial List, dial your 10-digit wireless phone number.
• Solid green: Charging complete
IMPORTANT:
To enable the internal battery cell to provide backup
power supply, charge your device with the main battery
pack for at least eight (8) hours.
7
The mute icon
is displayed on the Dialer screen’s
entry area to indicate that the mute function is enabled.
12
PPC4100 Quick Start Guide 4/27/04 3:36 PM Page 17
Getting Star t e d
W hat You Need To Know
MAKING A CALL
ANSWERING A CALL
The integrated nature of your device’s phone function
lets you make calls in a variety of ways across different
applications. You can make a call by:
Tap Answer or press the Send button.
To ignore an incoming call, tap Ignore or press the End button.
• Entering a phone number using the Dialer keypad.
ENDING A CALL
• Accessing numbers using Speed Dial, Call History,
Microsoft Contacts or SIM Manager.
Tap
Once a call has been initiated, this icon
navigation bar changes to .
, on the
MAKING A CALL FROM DIALER
1. On the Dialer keypad, tap the phone number you
want to call.
2. Tap
or press the Send button.
MAKING A CALL USING MICROSOFT CONTACTS
You can make a call in two ways using Contacts.
On the Contacts window, find the contact, then:
1. Press the Send button twice—once to launch Phone
and another to make the call.
- or2. Tap and hold the “w” in the right column next to the
contact you want to call.
On the pop-up menu, phone numbers for this contact
are displayed with a dot next to the priority number.
Tap the number you wish to call.
11
or press the End button.
USING THE SPEAKERPHONE
Your device’s speakerphone function allows you to talk
hands-free and/or let other people listen to the caller.
To enable the speakerphone mode:
Press and hold the Send button until the speakerphone
comes on indicated by the appearance of the Speakerphone
icon on the navigation bar.
To disable speakerphone mode:
Press and hold the Send button again until the Speakerphone
icon is no longer visible on the navigation bar.
MUTING A CALL
During a call you can mute the microphone so that the
person with whom you are speaking cannot hear you,
but you can still hear him or her. This is useful if, for
example, you do not want the other person to hear a
conversation or background noise on your side of the
call.
If the battery level becomes low during the course of
normal use, a status icon appears on the device screen
indicating low or very low battery status. When the
battery level is low, perform an ActiveSync operation to
back up your data, then recharge your device as soon
as possible. If the battery level reaches low status, the
device will enter sleep mode; if the battery level
reaches very low status, the device will enter deep
sleep mode. In this case, you have about 72 hours to
recharge your device afterwhich you risk losing all data
on your device’s internal memory.
NOTE: 1. It is more efficient to charge the battery with the handset off.
2. If the LED flickers while charging, the battery contacts may
need cleaning.
3. Battery operating time gradually decreases over time.
4. If the battery fails to perform normally, you may need to
replace the battery.
5. Make sure that the SIM card holder is closed before
charging the device.
REMOVING THE BATTERY
When removing the battery follow the steps below.
1. With one hand, press and hold the battery release switch.
2. Slide out the battery pack from its bay.
NOTE: Do not remove the battery pack for more than 30 minutes.
The embedded backup battery cell can only provide power for
this period of time after which you risk losing all data stored
on the internal memory of your device.
TURN ON YOUR DEVICE
• To turn on your Audiovox PPC4100, hold down the
power button on the top of your device.
• Tap the stylus on the screen to activate the Welcome
Wizard.
• Follow the Welcome Wizard instructions to align the
screen and to learn about the tap-and-hold capability.
• Set the time and date on your device from the Today
screen by tapping on the clock icon. Tap onto the
time zone, clock and date settings and adjust each
setting by tapping the increase and decrease arrows
on the right-hand side of the screen.
8
PPC4100 Quick Start Guide 4/27/04 3:36 PM Page 19
W hat You Need To Know
Getting Star t e d
RECORD YOUR WIRELESS PHONE NUMBER
SYNCHRONIZE YOUR DEVICE WITH YOUR PC
TODAY SCREEN
STATUS ICONS
Your account was set up when you purchased your
device, but your device must register with the network
before it can operate. It will automatically register when
you turn on your device for the first time.
Using the ActiveSync application, you can synchronize
information between your PC and your device.
When you turn on your device for the first time each
day (or after a preset period of inactivity), you'll see the
Today screen. You can also display it by tapping , then
Today. To define a preset period of inactivity after which
the Today screen is displayed:
The list below describes some of the status icons you
may see on your device.
• First you will need to install the ActiveSync software
that was included in the CD package of your device.
While your battery is charging, turn on your device and
leave it on. This registers your phone number on the
AT&T Wireless network allowing you to receive a
welcome message, which displays your new wireless
phone number. You are now ready to make and receive
calls and conduct a data session.
1. Tap
2. Tap the Today icon
You must be within the AT&T Wireless GSM/GPRS
service area when registering your Audiovox PPC4100.
Main battery is low
Main battery is very low
5. Tap OK.
Synchronization is beginning or ending
Tap to view
Start Menu.
Indicates the mobile
connection status.
Connection is active
Synchronization is occurring
Notification that one or more instant
messages were received
Notification that one or more
email/SMS messages were received
Tap to adjust volume
or mute all sounds.
Your day at a glance.
• Once the ActiveSync software is installed on your PC,
connect the cradle to your PC through the USB port.
Once your PC has detected the cradle, insert the
device into it.
9
Backup battery is low
4. Tap the pick list below the check box to set the
period of inactivity.
On the Today screen, you can see, at a glance, a list of
important reminders for the day.
When your device is attempting to register, you should
see a welcome message which displays your wireless
phone number. If you do not receive this message,
within the first day of operation, please call AT&T
Wireless Customer Care at 866-293-4634.
Description
Turns all sounds on and off
.
3. On the Items tab, select the Display Today screen
check box.
IMPORTANT:
Icon
, then Settings, then Personal.
If more notification icons need to be displayed than
there is room to display them, the Notification icon
appears. Tap the icon to view all notification icons.
Tap to create
a new item.
10
PPC4100 Quick Start Guide 4/27/04 3:36 PM Page 17
Getting Star t e d
W hat You Need To Know
MAKING A CALL
ANSWERING A CALL
The integrated nature of your device’s phone function
lets you make calls in a variety of ways across different
applications. You can make a call by:
Tap Answer or press the Send button.
To ignore an incoming call, tap Ignore or press the End button.
• Entering a phone number using the Dialer keypad.
ENDING A CALL
• Accessing numbers using Speed Dial, Call History,
Microsoft Contacts or SIM Manager.
Tap
Once a call has been initiated, this icon
navigation bar changes to .
, on the
MAKING A CALL FROM DIALER
1. On the Dialer keypad, tap the phone number you
want to call.
2. Tap
or press the Send button.
MAKING A CALL USING MICROSOFT CONTACTS
You can make a call in two ways using Contacts.
On the Contacts window, find the contact, then:
1. Press the Send button twice—once to launch Phone
and another to make the call.
- or2. Tap and hold the “w” in the right column next to the
contact you want to call.
On the pop-up menu, phone numbers for this contact
are displayed with a dot next to the priority number.
Tap the number you wish to call.
11
or press the End button.
USING THE SPEAKERPHONE
Your device’s speakerphone function allows you to talk
hands-free and/or let other people listen to the caller.
To enable the speakerphone mode:
Press and hold the Send button until the speakerphone
comes on indicated by the appearance of the Speakerphone
icon on the navigation bar.
To disable speakerphone mode:
Press and hold the Send button again until the Speakerphone
icon is no longer visible on the navigation bar.
MUTING A CALL
During a call you can mute the microphone so that the
person with whom you are speaking cannot hear you,
but you can still hear him or her. This is useful if, for
example, you do not want the other person to hear a
conversation or background noise on your side of the
call.
If the battery level becomes low during the course of
normal use, a status icon appears on the device screen
indicating low or very low battery status. When the
battery level is low, perform an ActiveSync operation to
back up your data, then recharge your device as soon
as possible. If the battery level reaches low status, the
device will enter sleep mode; if the battery level
reaches very low status, the device will enter deep
sleep mode. In this case, you have about 72 hours to
recharge your device afterwhich you risk losing all data
on your device’s internal memory.
NOTE: 1. It is more efficient to charge the battery with the handset off.
2. If the LED flickers while charging, the battery contacts may
need cleaning.
3. Battery operating time gradually decreases over time.
4. If the battery fails to perform normally, you may need to
replace the battery.
5. Make sure that the SIM card holder is closed before
charging the device.
REMOVING THE BATTERY
When removing the battery follow the steps below.
1. With one hand, press and hold the battery release switch.
2. Slide out the battery pack from its bay.
NOTE: Do not remove the battery pack for more than 30 minutes.
The embedded backup battery cell can only provide power for
this period of time after which you risk losing all data stored
on the internal memory of your device.
TURN ON YOUR DEVICE
• To turn on your Audiovox PPC4100, hold down the
power button on the top of your device.
• Tap the stylus on the screen to activate the Welcome
Wizard.
• Follow the Welcome Wizard instructions to align the
screen and to learn about the tap-and-hold capability.
• Set the time and date on your device from the Today
screen by tapping on the clock icon. Tap onto the
time zone, clock and date settings and adjust each
setting by tapping the increase and decrease arrows
on the right-hand side of the screen.
8
PPC4100 Quick Start Guide 4/27/04 3:36 PM Page 15
W hat You Need To Know
Getting Star t e d
INSTALLING THE BATTERY
CHARGING THE BATTERY
1. Align the battery marker on the battery pack with the
one located on the device.
For initial use, you need to charge your device for
about eight (8) hours. After that, you can charge it
everyday to recharge the battery to full capacity.
2. Slide the battery pack into the battery bay until it
clicks into place.
ACCESS YOUR VOICE MAIL
TO MUTE A CALL
• During a call, tap
and off.
to toggle the mute function on
1. Plug the AC Adapter into any standard outlet.
Your voice mail access number will be programmed into
your device upon registration. To access voice mail:
• Tap the Speed Dial button on the phone dialer screen.
Your voice mail number will be in position #1.
• Tap the #1 position to dial out of your voice mail account
(your initial password is 1111). Then follow the directions
in the voice mail system.
2. Connect the AC Adapter to the power socket at the
back of the cradle.
3. Slide the device into the front pocket of the cradle
until it clicks into place. The connection is secure
when the bottom edge of the device is aligned
smoothly with the cradle and the LED indicator
on the device’s power button lights green.
• If you have voice mail waiting for you, you may also
access it by tapping on the Voice Mail Icon in the top
toolbar. You will get a New Voice Message bubble. By
clicking on Voice Mail, your voice mail number will be
automatically dialed for you.
LED status during charging:
IMPORTANT:
• Flashing green: Charging
In addition to the battery pack, a backup battery cell is
embedded into your device to prevent data loss in
instances when the removable battery pack is removed
or completely discharged. This backup battery cell will
support the system for a maximum of 30 minutes.
If your voice mail access number is not programmed in your
Speed Dial List, dial your 10-digit wireless phone number.
• Solid green: Charging complete
IMPORTANT:
To enable the internal battery cell to provide backup
power supply, charge your device with the main battery
pack for at least eight (8) hours.
7
The mute icon
is displayed on the Dialer screen’s
entry area to indicate that the mute function is enabled.
12
PPC4100 Quick Start Guide 4/27/04 3:36 PM Page 13
Getting Star t e d
W hat You Need To Know
USE YOUR PERSONAL E-MAIL
USE YOUR BUSINESS E-MAIL
WEB-BASED (HTTP)
MICROSOFT OUTLOOK
CRADLE SYNCHRONIZATION
10. MICROPHONE: Inputs audio into your device when
receiving/making a call or recording voice notes.
15. VOLUME ROCKER KEY: Press the key up to
increase volume, press down to decrease volume.
You can keep your Pocket Outlook data up-to-date by
synchronizing the device with your Outlook data on your
PC. Once the ActiveSync software is installed on your
PC, connect the cradle to your PC through the USB port.
Once your PC has detected the cradle, insert your
device into it. The ActiveSync Setup Wizard will walk
you through setting up a partnership between your
device and your PC. See the System Procedures section
in the User’s Guide for more information.
11. UNIVERSAL CONNECTOR: Connects your device to
the cradle. This allows you to recharge your device and
perform an ActiveSync operation. You can also use it
to connect peripheral hardware devices to your device.
16. HOLD SWITCH: Slide up to lock all buttons from
being accidentally pressed when the device is
placed in pocket or in a bag.
12. SEND BUTTON: Press to accept an incoming call.
During an outgoing call, press and hold to turn on/off
the speakerphone. From Speed Dial, press to call the
currently selected number. From Call History. press to
call the currently selected log item. In mailbox, press
to send a composed e-mail/SMS message or display
options for a received e-mail/SMS. From an application,
press to display the Dialer screen or press twice to
redial the last called number.
IMPORTANT:
You can use the Pocket Internet Explorer from the Start
Menu to get on the Internet and access Web-based e-mail
accounts like Hotmail or Yahoo.
Note: To access the Internet, just follow the directions in the Browse
the Internet section in the User’s Guide.
INTERNET SERVICE PROVIDER (POP3/IMAP4)
You can send and receive your POP3 or IMAP4 e-mail
messages with the inbox on your device. This would
include ISP providers like Earthlink, attbi/Comcast and Qwest.
You may need your account and mail server information
to configure the connection.
OFFICE ONLINE
Office Online software allows you to wirelessly access your
Microsoft® Outlook® or Lotus Notes office e-mail, calendar and
contacts when you're on the go. This convenient service comes
in two versions: Pro and Premier. Everything you do with Office
Online while you are mobile is reflected back on your desktop,
so there's no need to sync up when you return home.
To add Office Online Pro or Office Online Premier service
to your data plan, call AT&T Wireless Customer Care at
866-293-4634. If you are already an AT&T Wireless
customer, simply go to attwireless.com/officeonline to
add Office Online to your existing account.
13
For AT&T Wireless E-Mail Business Solutions, contact
your AT&T Wireless Sales Representative or call
866-429-7222.
OFFICE ONLINE
Office Online software allows you to wirelessly access
your Microsoft® Outlook® or Lotus Notes office e-mail,
calendar and contacts when you're on the go. This convenient
service comes in two versions: Pro and Premier. Everything
you do with Office Online while you are mobile is reflected
back on your desktop, so there's no need to sync up when
you return to the office. Office Online is easy to install
and use – set-up takes just minutes. Once the software is
on your office PC, accessing information on your wireless
device is easy and intuitive.
13. SPEAKER: Listen to audio media or a phone call
from here.
This device’s phone component can be used with the
Earphone Microphone or as a speakerphone. Unlike
conventional cell phones, the PPC4100 is not designed
to be held against the head during a conversation. Holding
the unit against your head during phone use is contrary
to the design of this product and is not recommended. For
instructions on how to use the phone with the Earphone
Microphone or as a speakerphone, please refer to the
device’s User’s Guide.
14. JOG DIAL: Pressing the jog dial results to an action
similar to pressing the Enter key in a regular keyboard.
For example, to open any of the application in the
Start menu simply select that application then press
the jog dial; or in using a Help menu, simply select
a hyperlink then press the jog dial to display the
linked information.
6
PPC4100 Quick Start Guide 4/27/04 3:36 PM Page 11
W hat You Need To Know
Getting Star t e d
RESET YOUR DEVICE
HANDSET DESCRIPTION
1. EARPHONE JACK: 2.5 mm jack for use with a
hands-free device or to listen to audio files. Has a
non-detachable protective covering.
This phone is a tri band Pocket PC with built-in phone
functionality. The PPC4100 weighs less than 5.6 ounces
and the dimensions are 4.29" h x 2.69" w x .85" d.
4.
2. INFRARED (IR) PORT: Uses infrared technology to
transmit and receive data from other IR-enabled devices.
5.
6.
3. SD/MMC EXPANSION SLOT: Accepts an SD or MMC
card, allowing you to add more memory. The slot also
supports SDIO (Secure Digital Input Output) cards
for added connectivity options.
3.
2.
1.
14.
13.
7.
4. ANTENNA/STYLUS HOLDER: The non-extendable
antenna has a neatly hidden slot for holding the stylus.
8.
15.
5. NOTIFICATION INDICATOR: Lights up solid amber
for alarm reminders and e-mail receipt.
6. PHONE INDICATOR: Lights up green to indicate
phone status.
7. POWER BUTTON: Press to turn the device on or off.
Press and hold to turn the backlight on or off.
8. LCD TOUCHSCREEN: Displays the applications and
data stored in your device. It is touch-sensitive and
responds to the stylus or your finger.
16.
12.
9.
11.
5
10.
9. END BUTTON: Press to reject an incoming call.
Press to end a call. When dialing a number, press
to delete the number input. Press and hold to turn
on/off the mobile service connection.
To add Office Online Pro or Office Online Premier service
to your data plan, call AT&T Wireless Customer Care at
866-293-4634. If you are already an AT&T Wireless
customer, simply go to attwireless.com/officeonline to
add Office Online to your existing account.
USING POCKET INTERNET EXPLORER
Use Pocket Internet Explorer to view internet or intranet
sites from your device. During synchronization with your
computer, download your favorite links and mobile favorites
that are stored in the Mobile Favorites subfolder of
Internet Explorer on your computer. Pocket IE includes
support for XHTML Basic, Cascading Style Sheets,
WML2.0, JScript 5.5 IPv6.
You may have to perform a reset if the device freezes
(i.e., device no longer responds to the buttons on the screen).
SOFT RESET
A soft reset allows your device to get a fresh start,
similar to rebooting a computer. This will restart your
device and adjust memory allocation. All records and
entries are retained after a soft reset. Unsaved data in
open programs may in some cases be lost.
To perform a soft reset:
1. Remove the stylus from its holder.
2. Lightly press the tip of the stylus to the reset button
located on the rear panel of the device.
To open Pocket Internet Explorer
• Tap
, then Internet Explorer.
BROWSE THE INTERNET
Your Audiovox PPC4100 has the Pocket Internet Explorer
browser that will allow you to access Internet sites.
You will be directed to the default home page. Type in a
specific URL, select a URL that is currently in Favorites
or choose one of the banners on the home page to
start browsing.
If your address bar is not visible, click view in the bottom
toolbar and select Address Bar.
14
PPC4100 Quick Start Guide 4/27/04 3:36 PM Page 9
Getting Star t e d
W hat You Need To Know
HARD RESET
TRANSFER YOUR CONTACT INFORMATION
A hard reset will cut off power to your device. This will
erase all records and entries, delete all programs you
have added, and restore the device default factory settings.
Never perform a hard reset unless a soft reset does
not correct your problem. When you perform your next
ActiveSync operation, you can restore any data that you
previously synchronized to your computer or you can
restore data that you have backed up to a storage card.
Use the SIM Manager program on your device if you
would like to transfer contact information from an
existing GSM SIM. See the Sharing Contacts In SIM
Manager section of the User’s Guide.
To perform a hard reset:
1. Press and hold the power button on the front panel of
your device.
2. While holding down the power button, gently press the
tip of the stylus to the reset button. The Confirmation
message box appears.
3. Press the volume key up.
NOTE: When you perform a hard reset, the current date and time will
not be retained. Formats, preferences, and other settings are
restored to their factory default settings.
USING THE INBOX
Use Inbox to send and receive e-mail messages by
doing either of the following:
• Synchronize e-mail messages with Microsoft Exchange
or Microsoft Outlook on your computer.
• Send and receive e-mail messages by connecting directly
to an e-mail server through an Internet service provider
(ISP) or a network. You also can use Inbox to send and
receive SMS; it supports 8 bits data with class 0, 1, 2, 3,
as well as USSD (Unstructured Supplementary Service
Data).
You can compose both e-mail and SMS from the Inbox of
your PPC4100. Messages addressed to a mobile phone
number will be sent via SMS; messages addressed to an
e-mail address will be sent via e-mail. There are two types
of e-mail that can be managed on your device. If you prefer
to use both types, the Inbox supports multiple folders.
PPC4100
PACKAGE CONTENTS
Thank you for purchasing the PPC4100.
The device’s giftbox contains all of the items listed below:
• PPC4100 Pocket PC with Built-in Phone
• AC Adapter
• USB Cradle
• Single Earbud Headset
• Standard Battery
• Leather Pouch
• Stereo Headset
• Stylus Pen (1)
• Quick Start Guide
• Companion CD
• User’s Guide Booklet
15
NOTE: Report any product defects to the place
of purchase immediately.
4
PPC4100 Quick Start Guide 4/27/04 3:36 PM Page 7
W hat You Need To Know
Key Functions
MICROSOFT OUTLOOK
Application
1. Today
How To Start
Benefit and Use
Tap
, Today
Today’s information that users want to see at a glance.
2. ActiveSync
Tap
, ActiveSync
Monitor the status of information transfer between the device and the PC.
3. Calendar
Tap
, Calendar
View, edit, and create calendar entries.
View, edit, and create contact information, or make a call directly from contacts.
4. Contacts
Tap
, Contacts
5. Inbox
Tap
, Inbox
View, edit, create, and send e-mails with or without attachments.
6. Pocket Internet Explorer
Tap
, Pocket Internet Explorer
Browse the Internet wirelessly.
7. Notes
Tap
, Notes
Enter digitally-transcribed handwritten notes.
8. Phone
Tap
, Phone
View phone dialer.
9. Tasks
Manage active and completed tasks.
With this method, your Inbox is updated each time you
sync with your PC or corporate e-mail server. Upon
each sync, any messages you have composed are sent
and your Inbox will be updated with any new messages
you have received. See the Inbox section of the User’s
Guide for more information.
POP3/IMAP4
This method includes e-mail from providers such as
Quest, Earthlink and attbi/Comcast. These e-mail
services can be managed remotely using a wireless
connection. Visit www.attwireless.com/pocketpcsolutions
for configuration instructions.
Tap
, Tasks
10. Windows Media Player
Tap
, Windows Media Player
Play audio or video files locally on the device or storage card, or streamed from the web.
11. Games
Tap
, Programs, Games
Users can play their favorite games.
12. Calculator
Tap
, Programs, Calculator
Access an easy-to-use calculator.
13. File Explorer
Tap
, Programs, File Explorer
Manage the files on the device.
14. Pictures
Tap
, Programs, Pictures
View pictures on the device.
• Tap , then Inbox. Inbox will open to the Inbox folder
navigator.
TO OPEN INBOX
15. MSN Messenger
Tap
, Programs, MSN Messenger
Send MSN instant messages.
Synchronizing e-mail messages:
16. Pocket Excel
Tap
, Programs, Pocket Excel
View, create, and edit spreadsheets.
17. Pocket Word
Tap
, Programs, Pocket Word
View, create, and edit documents.
18. WiBackup
Tap
, Programs, WiBackup
Create backup files of datafiles and applications stored in your device.
E-mail messages can be synchronized as part of the
general synchronization process. You will need to
enable Inbox synchronization in ActiveSync.
19. SIM Manager
Tap
, Programs, SIM Manager
Manage the data on the SIM card.
3
Tap to select
which folder
to display.
Tap to create a
new email or
SMS message.
Tap to select
which account
to use.
FOR MORE INFORMATION:
Go to www.attwireless.com/pocketpcsolutions for more
information on your Audiovox PPC4100.
16
PPC4100 Quick Start Guide 4/27/04 3:36 PM Page 5
Getting Star t e d
W hat You Need To Know
Included Accessories:
IMPORTANT
AC Adapter
USB Cradle
Single Earbud
Headset
Leather Pouch
Stereo Headset
Stylus Pen (1)
Vehicle Power
Adapter
USB Data Sync
Cable
Stereo Headset
and Remote Control
Remote Control Unit
SD Camera Card
Stylus Pen 3-Pack
Optional Accessories:
17
Standard Battery
In order to utilize your device’s wireless data and voice capabilities, you must
have an AT&T Wireless SIM card. See the “SIM Card” section of this Quick Start
Guide for more information.
4100
The first thing you’ll need to do is follow the
instructions in the “Getting Started” section.
Once you’ve completed the basics, you’ll
be ready to access all of the features and
functions that will enhance your communication
capabilities on the go. And, once you’re
familiar with how your favorite features and
functions work—accessing the information
that matters most will be fast and simple.
So get going today and discover all of the
benefits of your Audiovox PPC4100 with
AT&T Wireless.
2
PPC4100 Quick Start Guide 4/27/04 3:35 PM Page 3
W hat You Need To Know
PPC
1
Technical Specifications:
Battery Specifications:
Network Frequency:
Dimensions:
Weight:
Display:
Standard Battery:
Standby time:*†
Talk time:*†
Data usage time:*†
PDA:†
Tri-band GSM 850/1800/1900
4.29" h x 2.69" w x .85" d
Less than 5.6 ounces
3.5" TFT LCD, 240 x 320
QVGA Screen with 65K color
1480mAh Li Ion Removable Battery
Up to 100 hours stand by time
Up to 3 hours talk time
Up to 5 hours data usage time
Up to 12 hours PDA usage only
*Depends on network configuration, signal strength, and usage
patterns. Network- and subscription-dependent feature. Not
available in all areas.
†Battery performance is approximate.
Minimum PC System Requirements:
Microsoft® Windows NT®
Workstation 4.0 with SP 6 or later
Microsoft® Windows® 98 or higher
Microsoft® Internet Explorer 4.01 SP 1 or later
12 to 65 MB available hard disk space
USB or infrared interface and CD ROM drive
18
PPC4100 Quick Start Guide 4/27/04 3:35 PM Page 1
PPC4100
AUDIOVOX PPC4100 POCKET PC
QUICK START GUIDE
IMPORTANT - READ THIS FIRST
This Guide is designed to get you quickly up and running
with your Audiovox PPC4100 Pocket PC.
It will provide information on:
• Getting Started
• Key Functions
• What You Need to Know About
Your Audiovox PPC4100 Pocket PC Phone
© 2004 Audiovox Communications Corp. • 555 Wireless Boulevard • Hauppauge, New York 11788 • USA • www.audiovox.com
All rights reserved. Audiovox is a registered trademark of Audiovox Corp.
For more detailed information, please refer to the Audiovox User’s Guide
booklet and the User’s Guide on the product CD, both of which are located
in the Audiovox PPC4100 packaging.