1
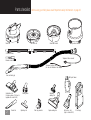
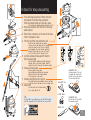
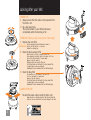
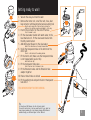
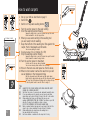
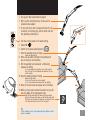
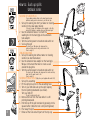
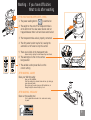
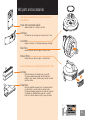
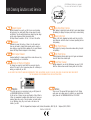
R
C
C
O
L
L
T
E
H
E
T
I
O
N
CANISTER
FOR QUICK AND EASY USE OF YOUR
DRY VACUUMS - WASHES CARPETS & UPHOLSTERY - PICKS UP SPILLS
DRY VACUUMS - WASHES CARPETS & UPHOLSTERY - PICKS UP SPILLS
Parts checklist
Before using your VAX, please read ‘Important safety information’ on page 10
Cone filter unit
Motor unit
Clean water bucket
Dirty water bucket
2 Extension tubes
Transparent tube connector
Extension tube adaptor
Transparent solution tube
(For use with Extension tube adaptor)
Hose and Hand grip
Combination tool
(A deluxe version of this tool is
supplied with model 5120)
2
Crevice tool
VAX Carpet Cleaner
Upholstery
washing tool
Dusting brush
Upholstery tool
Dust bag connector
Carpet washing tool
Spill pick up tool
(only on model 5120)
2 Dust bags
8 steps for easy vacuuming
1 Fit a dust bag by pushing it firmly onto the
black knob on the dust bag connector.
Push the shutter down so the hole is open
The Dust bag has diagrams showing exactly how to fit it.
2 Push the connector into the slot in the dirty
water bucket
3 Push in the connector on the end of the hose.
Turn it clockwise to lock
4 Fit the cone filter unit and motor unit
Ensure the two retaining clips are secured.
You may have to push down hard on the edges of the
motor unit above the clips. They are a tight fit.
The transparent tube is not used for vacuuming.
However, fitting it will keep it out of the way.
Push it in firmly and turn clockwise to lock.
5 Join the extension tubes and fit them to
the hose hand grip
The tab should be twisted around after joining the
extension tubes, to lock them together. Close the
regulator hole on the hand grip for maximum suction.
6 Choose suction power
Vacuum carpets on high power.
Vacuum fabrics and upholstery on low power.
Make sure that the cable is fully unwound.
Put the plug into a wall socket.
COMBINATION TOOL
(A deluxe version of this tool
is supplied with model 5120)
Use with lever in this position
for vacuuming hard floors
7 Choose the right tool for the job
The smaller tools and the extension tubes can be fitted
to the back of your VAX when you are not using them.
UPHOLSTERY TOOL
8 Switch ON
Push the button on the handle marked
for on, push again for off.
Tip
DUSTING BRUSH
COMBINATION TOOL
Use with lever in this position
for vacuuming carpets.
As your VAX is very powerful, you may find that the dust
bag fills up quickly the first time that you use your VAX.
CREVICE TOOL
3
Looking after your VAX
BEFORE USE
1 Always ensure that the cable is fully unwound from
the motor unit
2 Do a dust bag check.
The suction power of your VAX will decrease
considerably when the dust bag is full
REGULARLY (when you buy a new pack of 3 dust bags)
1 Replace the cone filter
Turn the retaining ring anti-clockwise and remove it.
Lift out the filter and put in a new one.
Replace the retaining ring.
2 Clean the black exhaust filter
Slide the catch to the left to release the filter lock.
Push upwards on the plastic grille, it will release. Pull it out.
Take out the filter and wash it in warm water.
Squeeze it dry and replace it.
Replace the grille and close the filter lock.
Your VAX will work more efficiently if the black exhaust filter
is replaced with a new one occasionally.
Replacement filters are available from your VAX Service Agent.
3 Clean the blue filter
The blue filter is on the bottom of the motor unit.
Pull it out and wash it in warm water.
Squeeze it dry and replace it.
Your VAX will work more efficiently if the blue exhaust filter
is replaced with a new one occasionally.
Replacement filters are available from your VAX Service Agent.
ALWAYS AFTER USE
Re-wind the power cable around the motor unit
Always re-wind in a clockwise direction. This will avoid kinks and
strains on the inner wires which could cause damage to the cable.
4
Getting ready to wash
1 Vacuum the area you intend to wash
2 Remove the motor unit, cone filter unit, hose, dust
bag connector with bag attached and vacuuming tool
Stop the dust coming out of the dust bag by closing the
shutter on the dust bag connector and leaving it on the bag.
3 Push in the connector on the end of the hose
Turn it clockwise to lock.
4 Fill the clean water bucket with warm water, to the
level marked on it. Fit the clean water bucket into
the dirty water bucket.
5 Add VAX Carpet Cleaner to the clean water
Refer to the instructions on the carpet cleaner bottle.
6 Unclip the transparent tube on the bottom of the
motor unit
Place it in the bottom of the washing solution.
7 Fit the motor unit (make sure the transparent tube
is not trapped when you do this)
Secure both side clips.
8 Fit the transparent tube valve
Push it hard and turn it clockwise to lock.
9 Fit the Extension tubes and the Extension tube
adaptor together
10 Ensure that all tabs are locked
11 Fit the washing tool and push the short transparent
tube into it
YOU ARE NOW READY TO START WASHING
Tip
You should pour VAX Defoamer into the dirty water bucket
(through the central hole in the clean water bucket) if your carpet has
been previously washed with a high foaming shampoo. VAX Defoamer is
available through your VAX Service Agent or from VAX direct.
5
How to wash carpets
1. Set up your VAX as described on page 5
2 Switch ON
3 Switch on the power washing button
FOR LONG PILE
FOR SHORT PILE
4 Turn the suction power to the wash setting
5 Start the washing solution flowing
Squeeze the large button in and at the same time pull the small
button backwards to lock the large button.
2 Metres (6 feet)
6 When you see water swirling in the washing tool
you are ready to start washing
7 Keep the bottom of the washing tool flat against the
carpet. Push it backwards and forwards
You are now washing the carpet.
8 Cover an area of 2 x 2 metres (6 x 6ft)
9 Stop the washing solution flowing
Squeeze the large button in and at the same time push the small
button forwards to release the large button.
10 Turn the suction power to maximum
Go back over the area you have just washed.
You are now removing excess moisture from the carpet.
11 Move to the next area and repeat as from 4 above
12 When no more water reaches the wash tool you will
see air bubbles in the transparent tube
Refill the clean water bucket with water and VAX carpet cleaner
Empty the dirty water bucket when you refill the clean water bucket.
The ‘sound’ your VAX makes will change and the suction will drop
if the dirty water bucket is over-full. Time to empty it!
Tips
✪
✪
✪
✪
✪
6
✪
✪
ALWAYS TEST FOR COLOUR FASTNESS, WITH SOME UNDILUTED CARPET
CLEANER ON A HIDDEN AREA FIRST.
Start from the corner of a room and work backwards towards the door.
If you are washing very dirty carpets, you may have to wash them
several times over a period of time to bring all the dirt to the surface.
When washing stairs, place your VAX above the area you are
washing. ALWAYS ENSURE YOUR VAX IS STABLE. The castors on your VAX
will pull off, giving it extra stability on stairs or slopes.
DO NOT PULL EXCESSIVELY ON THE BLACK WASHING HOSE.
Metal or wooden furniture legs may mark a wet carpet. Wait until the
carpet is dry or place aluminium foil under the feet of furniture.
When washing deep pile carpets, move the washing tool in
the same direction as the pile lays.
Don’t allow children or animals onto the carpet until it is dry.
1 Set up your VAX as described on page 5
2 Don’t use the extension tubes, but do use the
extension tube adaptor
3 Fit one end of the short transparent tube into the
connector on the hose grip, and the other end into
the upholstery washing tool
4
5
6
7
Turn the suction power to the wash setting
Switch ON
Switch on the power washing button
Start the washing solution flowing
Squeeze the large button in.
8 When you see water swirling in the washing tool
you are ready to start washing
9 Pull the washing tool backwards, continuing to
squeeze the button
You are now washing the upholstery. Cover a small area at a
time. Don’t push the tool backwards and forwards as this may
stretch the fabric.
10 Stop the washing solution flowing
Release the large button.
Go back over the area you have just washed.
You are now removing excess moisture from the upholstery.
11 Move to the next area and repeat as from 6 above
12 When no more water reaches the wash tool you will
see air bubbles in the transparent tube
Refill the clean water bucket with water and VAX carpet cleaner
Empty the dirty water bucket when you refill the clean water bucket.
The ‘sound’ your VAX makes will change and the suction will drop
if the dirty water bucket is over-full. Time to empty it!
Tip
Use the upholstery tool for spot cleaning small dirty patches on either
carpet or upholstery.
7
How to: Suck up spills
Unblock sinks
SUCKING UP LARGE SPILLS
If your washing machine floods or the deep freeze has been
defrosted, leaving pools of water about, your VAX can help.
1 Set up for washing, but don’t put water or cleaning
solution in the clean water bucket
If the spill is soapy, VAX Defoamer will be required in the dirty
bucket. VAX Defoamer is available from your VAX Service Agent.
2 Use the extension tubes or connect the
washing tool to the hand grip via the extension
tube adaptor
3 Turn the suction power to maximum and switch on
4 Suck up the spill
The ‘sound’ your VAX makes will change and the
suction will drop when the dirty water bucket is full.
Time to empty it!
UNBLOCKING SINKS
1 Set up for washing, but without water or cleaning
solution (as described above)
2 Use the extension tube adaptor on the hand grip.
Wrap a cloth around the tube to create a seal
around the plug hole
3 Turn the suction power to maximum and switch on
The ‘sound’ your VAX makes will change and the suction will drop
when the dirty water bucket is full.
Time to empty it!
SUCKING UP SMALL SPILLS (Spill pick up not supplied with model 5110)
1 Set up for vacuuming
2 Fit the spill pick up tool to the vacuuming hose
3 Turn on your VAX and suck up the spill, keeping
the tool pointing downwards (as shown).
Turn your VAX off
The spill is held inside the tool
8
4 Remove the tool from the hose while it is still
pointing downwards
5 Pull the top off the spill container by pressing on the
square button (while the tool is still pointing down)
6 Pour away the spill
7 Rinse out the tool and all 3 parts of the top cap
Washing : If you have difficulties
What to do after washing
IF YOU HAVE WASHING DIFFICULTIES, CHECK..
1 The power washing button
is switched on
2 The weight on the end of the transparent tube is
at the bottom of the clean water bucket and not
trapped between motor unit and clean water bucket
3 The transparent tube valve is properly connected
4 The dirty water bucket may be full, causing the
automatic cut off valve to stop the suction
5 There are no kinks in the transparent tube
Remove kinks by rubbing the tube between finger and thumb.
6 The washing tool is flat on the surface
being washed
7 The variable suction power dial is on the
correct setting
FOR LONG PILE
FOR SHORT PILE
AFTER WASHING - ALWAYS
Clean your VAX thoroughly
Keep your VAX assembled.
Clean the washing tool, extension tubes and hose, by sucking up
some clean warm water.
After sucking up the water, leave your VAX switched on, air
flowing through the hose will help dry it out.
AFTER WASHING - REGULARLY
Clean out the washing tool
Turn it upside down and wash it out under warm running
tap water.
9
Important safety information
This ‘easy guide’ should be read completely and
referred to at all times before using your VAX.
●
Avoid sucking up hot items, hazardous liquids or any other material which
could damage your VAX.
This ‘easy guide’ should be retained with your VAX for future reference.
If your VAX is sold or transferred to a new owner, this guide should be passed on
so that the new owner can become acquainted with the machine and this
information. The following information is provided in the interest of safety.
Please read it before using your VAX.
●
Never leave your VAX running unattended.
●
Never use without a dust bag except when washing or sucking up spills.
●
If your VAX fails to operate, never attempt to repair it yourself as repairs
carried out by an unauthorised or inexperienced person may cause injury
to you or damage to your VAX.
Never alter the specification or modify your VAX in any way.
Do’s
●
Ensure the mains cable is fully unwound and straightened before use.
●
●
Ensure the mains cable is kept well away from the revolving brushes
(where fitted) of your VAX, when it is turned on and running.
●
Keep the mains cable away from heat, oil, sharp edges and rough surfaces
and avoid damage in any other way.
●
Exercise extreme care when cleaning stair carpets. Ensure that your VAX is
in a stable position at either the top or bottom of the stairs without
over-stretching the hose or cable. When cleaning the stair treads, always
keep a hand firmly on your VAX. You may prefer to remove the castors.
EXTENSION CABLE
If using an extension cable always ensure that the insulation sheath is in good
condition and is not damaged in any way.
Make sure that the plug and socket are fitted to the extension cable
correctly, if in doubt have it checked by a qualified electrician.
Always use the cable in accordance with the manufacturer’s instructions.
●
Follow the instructions in this user guide when fitting accessories or tools.
●
Remove the plug from the wall socket before carrying out any maintenance
specified in this guide.
●
Change dust bags and filters at regular intervals as specified in this guide.
●
Store your VAX in a dry place.
●
Have your VAX serviced by an authorised VAX Service Agent only using genuine
VAX spare parts. Refer to the section ‘Service’ on the back cover of this guide.
●
Always use VAX carpet cleaner. Other products may damage your carpet and/or
machine.
Don’ts
THE POWER SUPPLY CORD IN YOUR VAX HAS 2 INNER WIRES.
IT SHOULD BE CONNECTED TO THE PLUG AS INDICATED BELOW.
WARNING: THIS APPLIANCE MUST NOT BE EARTHED
IMPORTANT: When carrying out any maintenance or cleaning operations on this product, it
is essential that the plug is removed from the wall socket.
The wires in the mains lead are coloured in accordance with the following code:
BLUE - NEUTRAL
BROWN - LIVE
If the plug provided is unsuitable for your socket outlets, the plug must be cut off and a
suitable plug fitted. The cut-off plug should be disposed of and must not be inserted into
any 13 amp socket as this can result in electric shock. The plug or adaptor or the
distribution panel should be provided with a 13 amp fuse. As the colours of the wires in
the mains lead of this appliance may not correspond with coloured markings identifying the
terminals in your plug, proceed as follows. The wire which is coloured blue MUST be
connected to the terminal which is marked with the letter N or coloured black. The wire
which is coloured brown MUST be connected to the terminal which is marked with the
letter L or coloured red. DO NOT CONNECT EITHER WIRE TO THE EARTH TERMINAL OF A
THREE PIN PLUG (TH1S 1S MARKED ‘E’ OR BY THE EARTH SYMBOL
OR COLOURED
GREEN OR GREEN AND YELLOW).
●
Never allow children to tamper or play with your VAX.
●
Avoid dragging your VAX by the mains cable.
●
Never tug at the mains cable to remove the plug from the wall socket.
●
Never allow the complete coiled mains cable to drop on the floor as this
may result in kinks or knots occurring in the cable, causing
premature failure.
Only 13 amp fuses approved to B.S. 1362 A.S.T.A. should be used. This appliance conforms
with the requirements of EEC Directive No. 82/499/EEC relating to radio interference.
●
Don’t let anyone touch the rotating brush bar (where fitted) unless your
VAX is disconnected from the mains.
In the interests of product improvement, the Company reserve the right to
introduce modifications or alterations without notice.
●
Never use your VAX in the presence of flammable gases.
NOTE: After replacing or changing a fuse, the fuse cover in the plug must be replaced with
a fuse cover which corresponds to the colour of the insert in the base of the plug or the
word that is embossed on the base of the plug, and the appliance must not be used
without a fuse cover. If lost, replacement fuse covers can be obtained from VAX Ltd.
10
VAX parts and accessories
Items below are available from your Vax Service Agent or
from VAX Direct
Paper dust bag (double walled)
Available in packs of 3, including 1 cone filter.
Cloth bag
For heavy duty use, these bags can be cleaned up to 5 times.
Cone filters
Supplied in each pack of 3 VAX double walled paper dust bags.
Blue filters
Available from your VAX Service Agent or from VAX Direct
Exhaust filters
Available from your VAX Service Agent or from VAX Direct
Accessories below are not supplied with models 5110 or 5120
Automop
Attach the Automop to the extension tubes of your VAX.
The Automop cleaning head, washes and dries hard floors.
Suitable for vinyl, ceramics, terrazzos, quarry tiles and most other
hard floor surfaces.
Powerbrush
Attach the Powerbrush vacuuming tool to the extension tubes of
your VAX. Switch on and the brush bar inside will rotate
at high speed dislodging trapped dust from within the carpet pile.
The automatic air adjustment feature allows air to drive the
brush bar for effective cleaning on light or heavy pile carpets.
11
All VAX Cleaning Solutions are approved
for use on wool and wool rich carpets
VAX Cleaning Solutions and Service
Carpet Cleaner
Specially formulated for use with your VAX its colour care formulation
will keep colours true, whilst gently lifting out deep down dirt quickly
and efficiently. The anti-resoiling system ensures carpets stay clean longer
and the unique fragrance will leave them smelling fresh.
VAX Carpet Cleaner is available in 500 ml, 1 litre and 2 litre bottles.
Defoamer
Formulated to prevent the build up of foam in the dirty water tank.
Foam may be caused by cleaning fluids previously used on carpets, or
when clearing up soapy spills. Routine washing will not require Defoamer
because VAX Carpet Cleaner is designed to be low foaming.
Wool Carpet Cleaner
Developed specifically for cleaning carpets that are made from wool only
or are predominantly wool in construction.
Sponge or Brush-in Shampoo
For cleaning your carpets by hand. Whilst this process will clean the
surface of the carpet it will not remove deep down dirt as effectively as
washing your carpets with your VAX.
Spill Absorbing Crystals
Super absorbent crystals which provide fast aid for water based spillages.
By absorbing the spillage, this unique product helps to reduce staining.
Deep Action Gel
Features a soft bristle, dispensing head which works the gel into the
carpet fibres and controls the area to be cleaned, preventing the stain
from spreading.
High Foam Mousse
With a gentle ‘dry cleaning’ action avoids excessive wetting of carpets
and upholstery.
High Foam Spray
A mild anti-bacterial formula which helps to kill germs and eliminate
odours left behind from accidental spills.
Hard Floor Cleaner
Specially developed for use with the VAX Automop (see page 11), VAX
Hard Floor Cleaner achieves excellent cleaning results on hard floors.
ALL VAX CARPET CARE PRODUCTS HAVE BEEN INDEPENDENTLY TESTED AND APPROVED AS SAFE FOR USE ON WOOL/WOOL RICH AND MAN MADE FIBRE CARPETS.
THEY ARE AVAILABLE FROM SUPERMARKETS AND MANY ELECTRICAL STORES
Service
Helpline
If you have any queries or concerns about using your VAX, please call
our FREEPHONE HELPLINE on 0500 005987.
All calls are free of charge. Lines are open Monday to Friday 9.00am to
5.30pm. An answerphone is available outside these hours to receive your
message. Please make a note of the serial number and model number
of your VAX before calling. They can be found on the label on the
handle of your VAX.
There are over 700 approved VAX Service Agents in the UK offering
quality repair and a spares service. For details of your nearest Service
Agent, please call the FREEPHONE HELPLINE on 0500 005987.
VAX Ltd., Kingswood Road, Hampton Lovett, Droitwich, Worcestershire, WR9 OQH, UK. - Telephone (01905) 795959
Part No: 1-2-26-01-102