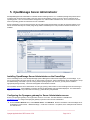
1
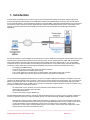
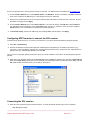
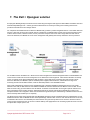
APPLICATION NOTE
Using SDTConnector
with Dell PowerEdge Servers
Rev: 1.0
May 16, 2007
1.
2.
Introduction
2
Connecting to BMC services
3
Console redirection and serial over LAN (SOL)
Enabling console redirection on the PowerEdge
Configuring the BMC
Installing the SOL proxy on the PC running SDTConnector
Enable your operating system's console on the PowerEdge
Configuring the Opengear SSH gateway to permit SOL
Configuring SDTConnector to connect the SOL session
Connecting the SOL session
3.
4.
3
3
4
4
5
5
6
6
BMC & SOL Troubleshooting FAQ
7
Connecting to DRAC services
8
Configuring the DRAC
Configuring the Opengear gateway for DRAC access
Configuring SDTConnector to access the DRAC
Connecting to the DRAC
5.
8
8
9
9
OpenManage Server Administrator
10
Installing OpenManage Server Administrator on the PowerEdge
Configuring the Opengear gateway for Server Administrator access
Configuring SDTConnector to connect to Server Administrator
Connecting to Server Administrator
6.
7.
10
10
11
11
Connecting to OpenManage IT Assistant server
11
Installing IT Assistant on the PowerEdge
Configuring the Opengear gateway for IT Assistant access
Configuring SDTConnector to connect to IT Assistant
Connecting to IT Assistant
12
12
12
13
The Dell + Opengear solution
14
_____________________________________________________________________
Opengear Application Note: SDTConnector + Dell
Page 1 of 14
1. Introduction
Currently Dell’s PowerEdge servers include a range of system management hardware and software support components
functions including Dell OpenManage Server Administrator (OMSA), Dell OpenManage IT Assistant (ITA), the Dell Remote
Access Controller (DRAC), and the baseboard management controller (BMC). Opengear’s IM4200 gateways are preconfigured
with support for these components and this Application Note explores how Opengear’s SDTConnector client enables you to
securely access and control the Dell embedded service processors and interface with the OpenManage management
applications.
For basic management, Dell PowerEdge servers all include an on-board baseboard management controller (BMC) that complies
with the industry standard IPMI specification. Newer ninth generation servers (PowerEdge 1950, 2950, 2900 and the Blade
1955) support IPMI2.0 while the eighth-generation servers (PowerEdge 1850, 28xx) support IPMI1.5. The on-board BMC
monitors the server for critical events by communicating with various sensors on the system board, and sends alerts and log
events when certain parameters exceed their preset thresholds and performs the following management functions:
-
Fault logging and SNMP alerting
Access to the system event log (SEL) and sensor status information
Control of system functions, including power cycling
Text console redirection for system setup, text based utilities, and operating system (OS) consoles
Access to the EMS, SAC and Linux serial console interfaces using serial over LAN (SOL)
For more advanced management Dell servers have the option to integrate a Dell Remote Assistant Card (DRAC), a PCI card
containing the Dell's proprietary service processor. Dell's service processor product has evolved rapidly. The current model is
DRAC 5 which ships with newer ninth generation servers and there are many DRAC 4s still shipping with eighth generation
servers. The DRAC interfaces with the BMC chip on the server motherboard. It supports IPMI 2.0 (or IPMI1.5 for DRAC 4) and
provides an extensive list of management services:
-
OS-independent console, keyboard, and mouse redirection (virtual KVM) functionality
Virtual floppy and virtual CD media functionality
IPMI out-of-band interfaces
Enhanced connectivity using the SMASH CLI
Dell OpenManage applications software, which ships with Dell PowerEdge servers, provides a range of system management
functions. It supports monitoring for single and multiple servers, and communicates with the BMC and DRAC processors.
-
OpenManage’s monitoring agent, called Server Administrator, is deployed on servers to be monitored so that alerts
and other event information can be seen directly through its Web-based GUI and/or sent to a central console used to
monitor Dell hardware. Server Administrator provides views of a single system’s configuration, health, and
performance. It can be used to configure BIOS settings or server actions, and it provides online diagnostics to help
isolate problems or shut down and restart the server.
_____________________________________________________________________
Opengear Application Note: SDTConnector + Dell
Page 2 of 14
-
OpenManage’s IT Assistant provides support for network monitoring and can discover servers attached to IP networks.
IT Assistant’s console provides views of all managed systems, including health and alert status. Working in conjunction
with Server Administrator, IT Assistant provides robust discovery, inventory, and monitoring of Dell servers. It can also
monitor clients and network hardware, in addition to servers. Dell provides remote management of servers and blades
through a combination of hardware facilities, such as on-board management controllers, and supporting management
software capabilities, such as server console redirection; virtual keyboard, video, and mouse (KVM); Active Directory
authentication; and virtual boot media.
Opengear IM4200 gateways and SDTConnector client ship preconfigured with support for Dell's BMCs and DRAC cards and
associated OpenManage tools. They provide a reliable secure solution for accessing and controlling these service processors
and Dell servers and storage devices.
2. Connecting to BMC services
All PowerEdge servers contain a baseboard management controller (BMC), the service processor integrated into the
motherboard, designed to provide access to the PowerEdge server independently of the operating system. The BMC does not
have its own Ethernet NIC and shares one with the operating system. This NIC is configured with two IP addresses, one for the
operating system production network communications, and one for communication with the BMC.
Console redirection and serial over LAN (SOL)
The BMC can be used to redirect input and output of the serial port through its shared NIC. When coupled with console
redirection, it allows you to remotely access BIOS configuration and see the boot messages as your PowerEdge boots or
reboots.
If you also run an operating system console on the redirected serial port, after the system has booted you also have out-of-band
access to the operating system for disaster recovery, monitoring, rebooting the system, etc. There are several steps for setting
up SDTConnector and your operating system for SOL:
-
Configure the PowerEdge BMC and BIOS to enable console redirection
-
Install the Dell solproxy program on the client PC that will be running SDTConnector
-
Enable your operating system's serial console on the PowerEdge
-
Configure the Opengear SSH gateway to permit SOL
-
Configure SDTConnector to access the BMC using solproxy
-
Connect to the BMC using SOL
Enabling console redirection on the PowerEdge
This process is detailed in the document entitled "Optimizing Console Redirection" published in Dell Power Solution magazine,
and available online at www.dell.com/downloads/global/power/ps4q05-20040205-Hoke-OE.pdf. Below is a brief walk
through. Refer to the Dell document for a more thorough guide:
Ensure you have a suitable Telnet client. For Windows users, download the HyperTerminal Private Edition (6.3) and install
it of the client PC that will be running SDTConnector. The built is Windows telnet command and built in HyperTerminal
client are not suitable. Otherwise, your operating system's built in Telnet client should be suitable
Enable console redirection in the BIOS by rebooting the PowerEdge and pressing F2 during POST to enter BIOS setup:
o
o
o
Select Integrated Devices and press Enter
Select Serial Port 1 (or just Serial Port if only one is present) and press Spacebar until BMC NIC is selected
Press Escape to return
_____________________________________________________________________
Opengear Application Note: SDTConnector + Dell
Page 3 of 14
o
o
Select Console Redirection and press Enter. For Console Redirection, set Serial Port 1 (or just Serial Port if
only one is present). For Failsafe Baud Rate, set 19200. For Remote Terminal Type, set VT100/VT220. For
Redirection after boot, set Enabled
Press Escape, then Escape again to save changes and exit
Configuring the BMC
When the BMC banner is displayed, press Ctrl-E. Select IPMI Over LAN and set it to ON
Select IPMI LAN Channel and press Enter. This network configuration is specific to your management network. If you have
a DHCP server, set IP Address Source to DHCP. Otherwise, set it to Static and select a unique IP address on your
management network for the BMC. In this example we use 192.168.0.200. Enter the Subnet Mask of your management
network, in this example we use 255.255.255.0. Select Default Gateway and enter the IP address of your Opengear unit, in
this example the Opengear unit resides at 192.168.0.1
Press Escape to return. Select User Configuration. Ensure the administrator account (root) is enable. The default
password for root is calvin, you may change this if you wish
Press Escape, then Escape again to save changes and exit
Installing the SOL proxy on the PC running SDTConnector
Connecting to the BMC requires the use of a SOL proxy service. The SOL proxy runs on the client PC running SDTConnector,
and allows you to use a Telnet client to communicate with the redirected serial port. The SOL proxy is used in loopback mode,
as SDTConnector takes care of securely transporting the SOL traffic across the network or Internet.
For Windows:
On the PC running SDTConnector, insert the OpenManage Systems Management CD that shipped with your PowerEdge
and follow the prompts until you reach Select Components. Select OSA SOL Manager, accept the default settings, and
install
The Systems Management is also available from the Dell FTP site ftp://ftp.dell.com/sysman/OM-MgmtStat-Dell-Web-WIN440_A00.exe
Once installed, check the SOL proxy is running by clicking Start -> Run and typing telnet 127.0.0.1 623. If the SOL Proxy
menu is displayed, it has installed correctly.
For Linux:
On the PC running SDTConnector, Insert the OpenManage Systems Management CD that shipped with your PowerEdge
and locate the solproxyd-*.rpm package and install it
The Systems Management software is also available from the Dell FTP site: ftp://ftp.dell.com/sysman/OM-MgmtStat-DellWeb-LX-440_A00.tar.gz
If you are using a distribution other than Redhat, use a tool such as alien to rpm2targz to convert the package. The
important files are /etc/solproxy.cfg and /usr/sbin/solproxyd
Start solproxyd by running as root: /etc/init.d/solproxy start If this fails, you can run the following command as root:
/usr/sbin/solproxyd -f /etc/solproxy.cfg
Check the SOL proxy is running by opening and terminal and typing telnet 127.0.0.1 623. If the SOL Proxy menu is
displayed, it has installed correctly
_____________________________________________________________________
Opengear Application Note: SDTConnector + Dell
Page 4 of 14
Enable your operating system's console on the PowerEdge
In order to access your operating system using SOL, you must tell it to run a console on the serial port when the OS starts.
For Windows 2003 Server:
Use the bootcfg command to start Emergency Administration Services (EMS) on the serial port
From a command prompt (Start -> Run -> cmd.exe), type:
bootcfg /ems ON /port COM1 /baud 19200 /id 1
This enables EMS if you only have one Windows operating system installed, or for the first operating system in the
Windows boot menu. Otherwise use /id 2 for the second operating system, /id 3 for the third, and so on
This also assumes that you are using the first serial port (COM1) as per the step Enabling console redirection in the BIOS
Reboot your system to enable console redirection.
(Emergency Administration Services (EMS) and the Special Administration Console (SAC) are discussed at length in articles
available at Microsoft's MSDN site.)
For Linux:
This process is detailed in the document entitled "Enabling Serial Port Console Redirection on Linux-based Dell Servers"
published in Dell Power Solutions magazine, and available at the Dell web site.
http://www.dell.com/content/topics/global.aspx/power/en/ps1q03_stanton?c=us&cs=555&l=en&s=biz
Warning: It is not recommended you rely solely on this document to complete this step. The following is an example only to give
you an example of what is involved. Following these steps verbatim may render your system unable to boot. So refer to the Dell
documentation and your Linux distribution's documentation for a more thorough guide.
Configure your bootloader to redirect to the serial port. Using GRUB, you would add the following lines to the top of your
grub.conf or menu.lst file:
serial --unit=0 --speed=19200
terminal --timeout=10 console serial
Find the entry for the kernel image you are using, and add the kernel options: console=tty0 console=ttyS0,19200, e.g.:
title Linux
root (hdx,x)
kernel /vmzlinux-x.y.z ro root=/dev/hdxx console=ttyS0 console=tty0
This also assumes that you are using the first serial port (/dev/ttyS0) as per the step Enabling console redirection in the
BIOS
Modify the boot scripts to automatically spawn a login prompt on the serial port once Linux has booted. This varies from
distribution to distribution. You may be able to add the following line to the top of /etc/inittab:
0:12345:/sbin/agetty ttyS0 19200
Also ensure ttyS0 is listed in /etc/securetty to allow root to login through the serial console.
Reboot your system to enable console redirection.
Configuring the Opengear SSH gateway to permit SOL
_____________________________________________________________________
Opengear Application Note: SDTConnector + Dell
Page 5 of 14
Ensure your Opengear unit is running firmware version 2.2.3 or later. The latest firmware is available from ftp.opengear.com
From the Serial & Network menu, select Network Hosts. Click Add Host. Enter the IP Address of the BMC as detailed
above in the Configuring the BMC step (i.e. in this example we used 192.168.0.200)
Remove any Permitted Services you do not require, select the UDP radio button and enter Port 623. Click Add. Scroll to
the bottom of the page and click Apply
From the Serial & Network menu, select Users & Groups. If you have not already, click Add User, otherwise Edit the
user and skip to the next paragraph. Enter a Username for the new user, e.g. delladmin. Enter and confirm a gateway
Password for this user. Note that this is separate from the BMC password
In Accessible Host(s), select the IP address for the PowerEdge BMC (192.168.0.200). Click Apply.
Configuring SDTConnector to connect the SOL session
Install and launch SDTConnector (1.2.x or later) on the client PC. If you haven't previously added the Opengear gateway:
Select File -> New Gateway
Enter the IP address through which the Opengear unit/management LAN gateway is accessible to this client PC (e.g.
192.168.0.1). Enter the gateway username (e.g. delladmin) and password you set in the previous step. Optionally enter a
gateway name (e.g. USA Gateway IM4248-2 ) and click OK
Once you have an Opengear gateway connection in place you need to establish a connection to the PowerEdge through that
gateway:
Right click on the Opengear gateway and select New Host. Enter the BMC’s IP address (192.168.0.200) in Host Address.
Select the Dell SOL Proxy (or just SOL) service, optionally enter a Descriptive Name (e.g Dell 2003 Server BMC) and click
OK. Install and launch SDTConnector (1.2.x or later) on the client PC
Connecting the SOL session
Select the newly created host and click the SOL button. A Telnet window with the SOL proxy menu is displayed:
BMC Management Utility
_____________________________________________________________________
Opengear Application Note: SDTConnector + Dell
Page 6 of 14
OSA SOL Manager, Version 1.2 Build 1
Copyright (c) 2004 - OSA Technologies, an Avocent Company. All Rights Reserved.
1:Connect to the Remote Server's BMC
2:Configure the Serial-Over-LAN for the Remote Server
3:Activate Console Redirection
4:Reboot and Activate Console Redirection
5:Help
6:Exit
Please select the item (press 1,2,3,4,5,6):
-
Select option 3.
For Server Address enter: 127.0.0.1 (remember we are using the SOL proxy in loopback mode only).
Enter the BMC user name (the default is root) and password (the default is calvin).
The serial over LAN session is now connected.
3. BMC & SOL Troubleshooting FAQ
Why do I need to run the SOL Proxy?
The SOL Proxy converts TCP based Telnet traffic into UDP based SOL traffic and vice versa, so you can talk to the BMC using
a standard Telnet client. The SOL Proxy listens on local TCP port 623.
How does SDTConnector transport the UDP based SOL traffic to the BMC?
In order to transport the UDP traffic over the SSH tunnel, it must convert it into TCP traffic at the SDTConnector end of the
tunnel, then convert it back into UDP at the Opengear end of the tunnel.
The SDTConnector end of this tunnel is listening on local UDP port 623, so when you connect to 127.0.0.1 (localhost) from the
SOL Proxy menu, it converts and transports it down the tunnel, converts it back, and forwards it to the BMC.
When I click the SOL button or type telnet localhost 623, the Telnet window closes immediately.
Ensure there are no other Telnet sessions to SOL Proxy already running on the client PC.
When I click the SOL button or type telnet localhost 623, I get a connection refused error or the Telnet window closes
immediately.
First, ensure the SOL proxy is running.
Under Windows, click Start -> Run -> and type services.msc. Scroll down to find OSA SOL Proxy. If the status is not Started,
right click it and click Start.
Under Linux, as root type /etc/init.d/solproxy start or run: /usr/sbin/solproxyd -f /etc/solproxy.cfg
Ensure your firewall settings aren't preventing you from connecting to TCP port 623.
Also ensure there are no other running programs using TCP port 623.
When I click the SOL button or when I click Start -> Run -> and type telnet localhost 623, it appears to connect but I
never see the SOL Proxy menu.
Ensure your firewall settings aren't preventing you from communicating on TCP port 623.
Under Windows, this problem can occur when the TCP/IP stack has become corrupted. Follow the steps at this link to reset the
TCP/IP stack:
http://support.microsoft.com/kb/299357
_____________________________________________________________________
Opengear Application Note: SDTConnector + Dell
Page 7 of 14
Also ensure there are no conflicting services running on TCP port 623.
When I select Activate Console Redirection from the SOL Proxy menu, the connection times out.
Ensure the Opengear SSH gateway is configured to allow SOL for the gateway user you are using with SDTConnector (e.g.
delladmin), as per the section Configuring the Opengear SSH gateway to permit SOL.
You can confirm this is working by checking the Opengear system logs, search for output by udpgw and ensure UDP port 623 is
being allowed for your user.
If this is working, the problem is with your BMC or network configuration. To troubleshoot this, install the SOL Proxy on a
system local to the BMC (e.g. on the management LAN itself) and ensure you can connect directly to the BMC by clicking Start > Run -> and type telnet localhost 623, then select 3, then type the IP address of the BMC, in the example above we used
192.168.0.200 (do not type 127.0.0.1 as you would when using SDTConnector).
When I click the SOL button SDTConnector displays the error, Couldn't redirect port ... ?
Ensure UDP port 623 is not in use by another running program.
In Linux, ensure you are running SDTConnector with super user privileges, as port 623 is a privileged port and you will be
unable to bind it otherwise.
4. Connecting to DRAC services
PowerEdge servers may be configured with an optional remote access card (Dell RAC or DRAC) that contains a systems
service processor. As detailed earlier it provides out of band and remote access and control of the PowerEdge server,
independent of the operating system.
So the DRAC is similar to the onboard BMC, however the add-on remote access cards are more full featured and powerful.
Advantages over the BMC include providing remote graphical access to the PowerEdge using a virtual KVM, and remote server
monitoring via a web page. The DRAC also has its own Ethernet network port, while the BMC shares a port with the system.
The instructions below are for interfacing to the DRAC version 4.
Configuring the DRAC
The default IP address of the DRAC Ethernet port is 192.168.0.120 with a default gateway of 192.168.0.1. These are the
addresses we will use in this example, as they are compatible with the Opengear's default network settings.
To change the DRAC's network settings, reboot the PowerEdge server. When the DRAC banner is displayed, press Ctrl-D.
Select Network Interface Properties. We suggest you use a static IP address rather than relying on a DHCP server, as this
eliminates a possible point of failure.
Enter 192.168.0.120 as the IP Address, 255.255.255.0 as the Netmask, 192.168.0.1 for the Gateway. Ensure the DRAC
NIC is set to Enabled. Enter 192.168.0.1 as the first DNS Server, the rest of the settings may be left at their factory
defaults.
Press r to save your changes and reboot the DRAC to apply the new settings.
Refer to the Dell documentation for other setup tasks such as configuring DRAC users. In this example we use the default
username/password, root/calvin.
Configuring the Opengear gateway for DRAC access
Ensure your Opengear unit is running firmware version 2.2.3 or later. The latest firmware is available from ftp.opengear.com
_____________________________________________________________________
Opengear Application Note: SDTConnector + Dell
Page 8 of 14
From the Serial & Network menu, select Network Hosts. Click Add Host. Enter the IP Address of the DRAC as detailed
above in the Configuring the DRAC step (i.e. in this example we used 192.168.0.120)
Remove any Permitted Services you do not require, but do not remove HTTPS (TCP port 443) and VNC (TCP port 5900).
Scroll to the bottom of the page and click Apply
From the Serial & Network menu, select Users & Groups. If you have not already, click Add User, otherwise Edit the
user and skip to the next paragraph. Enter a Username for the new user, e.g. delladmin. Enter and confirm a gateway
Password for this user. Note that this is separate from the DRAC password
In Accessible Host(s), select the IP address for the DRAC (192.168.0.10). Click Apply.
Configuring SDTConnector to access the DRAC
Install and launch SDTConnector (1.2.x or later) on the client PC. If you haven't previously added the Opengear gateway:
Select File -> New Gateway
Enter the IP address through which the Opengear unit/management LAN gateway is accessible to this client PC (e.g.
192.168.0.1). Enter the gateway username (e.g. delladmin) and password you set in the previous step. Optionally enter a
gateway name (e.g. USA Gateway IM4248-2 ) and click OK
Once you have an Opengear gateway connection in place you need to establish a connection to the PowerEdge through that
gateway:
Right click on the Opengear gateway and select New Host. Enter the DRAC’s IP address (192.168.0.120) in Host
Address optionally enter a Descriptive Name (e.g. Dell 2003 Server DRAC) . Select the Dell RAC service and click OK.
Connecting to the DRAC
Select the newly created Host and click the Dell RAC button. A browser window is launched.
Login to the DRAC using your DRAC username and password (root/calvin). From this page you can monitor you system,
power it on and off, and access the virtual KVM.
_____________________________________________________________________
Opengear Application Note: SDTConnector + Dell
Page 9 of 14
5. OpenManage Server Administrator
Dell OpenManage Server Administrator is included with all PowerEdge servers. It is a software package that provides server
monitoring and control functions similar to the some of the functions DRAC, however it runs as a service under the server
operating system. So it an in-band software management tool, unlike the BMC and DRAC tools, and is not useful for access
when the operating system has crashed or become unavailable.
Server Administrator can be accessed remotely using its web browser based interface, and with an Opengear gateway it can
also be accessed remotely out-of-band (using dial up, ISDN or broadband) if the main production network connection is not
available
Installing OpenManage Server Administrator on the PowerEdge
On the PowerEdge server, insert the OpenManage Systems Management CD that was shipped with your PowerEdge. If you
are running Windows, follow the prompts until you reach Select Components. Select OpenManage Server Administrator, accept
the default settings, and install. If you are running another operating system such as Linux, you may have to install the
appropriate package manually. Check the Dell supplied documentation for details.
Once installed, check the Server Administrator is running by opening a web browser on the PowerEdge server and browsing to
https://localhost:1311/ If the installation succeeded, the Server Administrator login page will be displayed. The credentials for
logging in are the same as your Windows username (e.g. Administrator) and password.
Configuring the Opengear gateway for Server Administrator access
Ensure your Opengear gateway is running firmware version 2.2.3 or later. The latest firmware is available from
ftp.opengear.com. To configure the Opengear gateway to permit access to Server Administrator:
From the Serial & Network menu, select Network Hosts. Click Add Host. Enter the IP Address of the PowerEdge server
as displayed in Control Panel -> Network Settings -> Local Area Connection -> Properties, in this example we will assume it
is at 192.168.0.10
_____________________________________________________________________
Opengear Application Note: SDTConnector + Dell
Page 10 of 14
Remove any Permitted Services you do not require, select the TCP button and enter Port 1311 and click Add. Enter Port
3668 and click Add. Scroll to the bottom of the page and click Apply
From the Serial & Network menu, select Users & Groups. If you have not already, click Add User, otherwise Edit the
user and skip to the next paragraph. Enter a Username for the new user, e.g. delladmin. Enter and confirm a gateway
Password for this user. Note that this is separate from the operating system password
In Accessible Host(s), select the IP address for the PowerEdge (192.168.0.10). Click Apply.
Configuring SDTConnector to connect to Server Administrator
Install and launch SDTConnector (1.2.x or later) on the client PC. If you haven't previously added the Opengear gateway:
Select File -> New Gateway
Enter the IP address through which the Opengear unit/management LAN gateway is accessible to this client PC (e.g.
192.168.0.1). Enter the gateway username (e.g. delladmin) and password you set in the previous step. Click OK
Once you have an Opengear gateway connection in place you need to establish a connection to the PowerEdge through that
gateway:
Right click on the Opengear gateway and select New Host. Enter the PowerEdge's IP address (192.168.0.10) in Host
Address. Select the Dell Server Administrator (or Dell OpenManage if it doesn't exist) service and click OK.
Connecting to Server Administrator
Select the newly created host and click the Dell Server Administrator button. A browser window with the Server Administrator
login is displayed. Login using your operating system username (e.g. Administrator) and password.
6. Connecting to OpenManage IT Assistant server
IT Assistant is Dell's tool for monitoring the status of systems on your network. It is designed to help administrators efficiently
manage their IT environments, and can automatically recognize warnings, critical alerts, and other events sent by Dell
PowerEdge servers and generate notifications based on configurable event filters.
The IT Assistant software may be installed on any system on the management network, or on the PowerEdge server itself, as in
the example below. IT Assistant can be accessed remotely using its web browser based interface.
_____________________________________________________________________
Opengear Application Note: SDTConnector + Dell
Page 11 of 14
Installing IT Assistant on the PowerEdge
To install IT Assistant on the PowerEdge server:
Insert the OpenManage Systems Management CD that was shipped with your PowerEdge. If you are running Windows,
follow the prompts until you reach Select Components. Select OpenManage IT Assistant, accept the default settings, and
install. In order to satisfy the IT Assistant installation requirements, you may have to install additional software. The on
screen instructions provide detailed information as to what is required.
If you are running another operating system such as Linux, you may have to install the appropriate package manually.
Check the Dell supplied documentation for details.
Once installed, check the Server Administrator is running by opening a web browser on the PowerEdge server and
browsing to: https://localhost:2607/ If the installation succeeded, a browser window with the IT Assistant login is displayed.
Login using your operating system username (e.g. Administrator) and password.
Configuring the Opengear gateway for IT Assistant access
Ensure your Opengear unit is running firmware version 2.2.3 or later. The latest firmware is available from: ftp.opengear.com
From the Serial & Network menu, select Network Hosts. (If you have previously added the PowerEdge as a host, Edit this
host and skip to the next step). Otherwise click Add Host. Enter the IP Address of the PowerEdge server as displayed in
Control Panel -> Network Settings -> Local Area Connection -> Properties, in this example we will assume it is at
192.168.0.10
Remove any Permitted Services you do not require, select the TCP button and enter Port 2607 and click Add. Scroll to the
bottom of the page and click Apply
From the Serial & Network menu, select Users & Groups. If you have not already, click Add User, otherwise Edit the
user and skip to the next paragraph. Enter a Username for the new user, e.g. delladmin. Enter and confirm a gateway
Password for this user. Note that this is separate from the operating system password
In Accessible Host(s), select the IP address for the PowerEdge (192.168.0.10). Click Apply.
Configuring SDTConnector to connect to IT Assistant
Install and launch SDTConnector (1.2.x or later) on the client PC. If you haven't previously added the Opengear gateway:
_____________________________________________________________________
Opengear Application Note: SDTConnector + Dell
Page 12 of 14
Select File -> New Gateway
Enter the IP address through which the Opengear unit/management LAN gateway is accessible to this client PC (e.g.
192.168.0.1). Enter the gateway username (e.g. delladmin) and password you set in the previous step. Click OK
Once you have an Opengear gateway connection in place you need to establish a connection to the PowerEdge through that
gateway:
If you have already added the PowerEdge as a host, right click it and select Edit. Otherwise, right click on the newly
created Opengear gateway and select New Host
Enter the PowerEdge's IP address (192.168.0.10) in Host Address. Select the Dell IT Assistant service and click OK
Connecting to IT Assistant
Select the PowerEdge host and click the Dell IT Assistant button. A browser window with the IT Assistant login is displayed.
Login using your operating system username (e.g. Administrator) and password.
The IT Assistant applet may take a few minutes to load the first time you access it. For details on IT Assistant operation refer
Dell OpenManage IT Assistant User’s Guide: http://support.dell.com/support/edocs/software/smitasst
The recent Using Dell OpenManage IT Assistant for Effective Systems Management article describes some of the best
practices administrators can follow to efficiently utilize IT Assistant capabilities in enterprise data centers.
_____________________________________________________________________
Opengear Application Note: SDTConnector + Dell
Page 13 of 14
7. The Dell + Opengear solution
So Opengear IM4200 gateways and SDTConnector client ship preconfigured with support for Dell's BMCs and DRAC cards and
associated OpenManage tools – and they provide the ideal solution for securely accessing and controlling these service
processors and Dell servers and storage devices.
For enterprises with distributed branch offices the IM4200 family provides a powerful integrated solution. In the smaller branches
with only a few racks of servers and network devices to administer, the IM4200 offers a single point of local and remote access
to all the serial consoles, network consoles, service processors and power units at the site. In larger branches with racks of
servers to administer, the IM4200 can serve as the management LAN gateway that securely isolates the service processors.
For the SMB customer the IM4216-25 + SDTConnector offers integrated out-of-band management fabric for DRACs/BMCs and
remote access to Dell tools as well as management of non-Dell serial console equipment. It also delivers alternate connectivity
for the out of band access with broadband and dial-up support. And for data center customers with racks of serial console
devices to administer, the IM4248-2 (with its redundant power supplies, Ethernet failover, authentication and logs of all
accesses) provides a most reliable solution, while the CM4148 provides a most affordable solution.
When locally administering a Dell server the OpenManage and IT Assistant applications address the server at one TCP/IP
address on the LAN, the RAC Services tools address the DRAC at another IP address and the BMC is access for SOL and for
IPMI connection using yet other UDP and TCP IP address. A selection of authentication and encryption options will then have
been configured for each of these accesses. Administering this server remotely requires all the firewalls and routers in the
enterprise network to be configured to allow communications through all these ports. Administering a distributed network of such
servers remotely adds another layer of complexity.
The SDTConnector client that is supplied with each IM/CM4000 provides a simple centralized solution for administration of such
distributed networks. With an IM4200 solution all the OpenManage, IPMI and SOL access to each remote Dell server is securely
tunneled thru SSH over the one selectable port. SDTConnector then gives the sys admin secure access to all these local and
remote servers and sites from the one screen on his/her desktop, and appropriate tool for accessing a particular server can then
be opened with a simple point-n-click
_____________________________________________________________________
Opengear Application Note: SDTConnector + Dell
Page 14 of 14