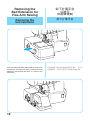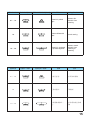
1
HANDBOOK FOR COMPACT
OVERLOCK MACHINE
小型包缝机说明书
Product Code: 884-345
Product Code (产品型号):
884-345
5
4
Please visit us at
http://support.brother.com where you
can get product support and answers to
frequently asked questions (FAQs).
欢迎访问
http://support.brother.com,在这里
可以得到产品的支持和常见问题解答
(FAQs)。
6
6
6
6
5
4
5
4
5
4
IMPORTANT SAFETY INSTRUCTIONS
When using the sewing machine, basic safety precautions should always be followed, including the following.
Read all instructions before using.
DANGER
To reduce the risk of electric shock.
1. The sewing machine should never be left unattended when plugged in. Always unplug this sewing machine
from the electrical outlet immediately after using and before cleaning.
2. Always unplug before replacing the light bulb. Replace the light bulb with same type rated 15 watts.
WARNING
To reduce the risk of burns, fire, electric shock, or injury to persons.
1. Do not allow to be used as a toy. Close attention is necessary when the sewing machine is used by or near
children.
2. Use this sewing machine only for its intended use as described in this manual. Use only accessories recommended by the manufacturer as contained in this manual.
3. Never operate this sewing machine if it has a damaged cord or plug, if it is not working properly, if it has been
dropped or damaged, or dropped into water. Return the sewing machine to the nearest authorized dealer or
service center for examination, repair, electrical or mechanical adjustment.
4. Never operate the sewing machine with any air openings blocked. Keep ventilation openings of the sewing
machine and foot controller free from the accumulation of lint, dust, and loose cloth.
5. Never drop or insert any object into any openings.
6. Do not use outdoors.
7. Do not operate where aerosol (spray) products are being used or where oxygen is being administered.
8. To disconnect, turn the main switch to the symbol "O" position which represents off, then remove plug from
outlet.
9. Do not unplug by pulling on cord. To unplug, grasp the plug, not the cord.
10. Keep fingers away from all moving parts. Special care is required around the sewing machine needle.
11. Always use the proper needle plate. The wrong plate can cause the needle to break.
12. Do not use bent needles.
13. Do not pull or push fabric while stitching. It may deflect the needle causing it to break.
14. Switch the sewing machine to the symbol "O" position when making any adjustments in the needle area, such
as threading needle, changing needle, or changing presser foot, etc.
15. Always unplug the sewing machine from the electrical outlet when removing covers, lubricating, or when making any other user servicing adjustments mentioned in the instruction manual.
16. This sewing machine is not intended for use by young children or infirm persons without supervision.
17. Young children should be supervised to ensure that they do not play with this sewing machine.
18. Do not disassemble the machine.
CAUTION
To use the machine safely
1. (For U.S.A. only)
This appliance has a polarized plug (one blade wider than the other) to reduce the risk of electric shock, this
plug is intended to fit in a polarized outlet only one way.
If the plug does not fit fully in the outlet, reverse the plug. If it still does not fit, contact a qualified electrician to
install the proper outlet.
Do not modify the plug in any way.
2. Make sure you watch the needles carefully while you are sewing. Do not touch the hand wheel, needles,
knives, or other moving parts.
3. Turn off the main power and unplug the cord in the following circumstances:
- When you have stopped using the machine
- When you are replacing or removing the needle or any other part
- If there is a power failure while you are using the machine
- If you are checking or cleaning the machine
- Leaving the machine unattended
4. Do not store anything on the foot controller.
5. Fully plug the machine directly into the wall. Do not use extension cords.
6. If water is dropped on the machine, unplug the machine immediately, and contact your local authorized dealer.
7. Do not put furniture on the cord.
8. Do not bend the cord, or pull on the cord to unplug.
9. Do not touch the cord with wet hands.
10. Place the machine near to the wall outlet.
11. Do not place the machine on an unstable surface.
12. Do not put on the soft cover.
13. If you notice any abnormal sound or condition, consult your local authorized dealer.
I
To give your machine a longer life
1. Do not store this machine in direct sunlight or in high humidity conditions. Do not use or store the machine near
a heater, iron, halogen lamp or other hot object.
2. Use only mild soaps or detergents to clean the case. Benzene, thinner, and scouring powders can damage the
case and machine, and should never be used.
3. Do not drop or hit the machine.
4. Always consult this manual before you replace or fit the presser foot, needle, or any other parts to make sure
you fit them correctly.
To repair or adjust the machine
If the machine breaks down or needs adjustment, first follow the troubleshooting table to inspect and adjust
the machine yourself. If the problem persists, consult your local authorized dealer.
"SAVE THESE INSTRUCTIONS"
"This sewing machine is intended for household
use."
CAUTION
When leaving this sewing machine unattended, the main power and light switch of the machine must be
switched off or the plug must be removed from the socket-outlet.
When servicing the sewing machine, or when removing covers or changing the light bulb, the machine or the
electrical set must be disconnected from the supply by removing the plug from the socket-outlet.
FOR USERS IN THE UK, EIRE,
MALTA AND CYPRUS ONLY
IMPORTANT
- In the event of replacing the plug fuse, use a fuse approved by ASTA to BS 1362, i.e. carrying the ASA mark,
rating as marked on plug.
- Always replace the fuse cover. Never use plugs with the fuse cover omitted.
- If the available electrical outlet is not suitable for the plug supplied with this equipment, you should contact
your authorized dealer to obtain the correct lead.
FOR USERS IN AC INPUT 220-240V
COUNTRIES AND MEXICO
This appliance is not intended for use by persons (including children) with reduced physical, sensory or mental capabilities, or lack of experience and knowledge, unless they have been given supervision or instruction
concerning use of the appliance by a person responsible for their safety. Children should be supervised to
ensure that they do not play with the appliance.
II
安全须知
当使用缝纫机时,必须遵守基本安全注意事项,这些事项包括:
使用之前请务必阅读使用说明书。
危险
为了降低触电的危险。
1.
2.
缝纫机在无人看管时,切勿将电源线插头插入电源插座。使用后和清洁前请务必从电源插座中拔出缝纫机的电源
线插头。
更换照明灯泡前,请务必拔出电源线插头。 请更换额定功率为 15W 的同类型照明灯泡。
警告
为了降低灼伤、火灾、触电或人身伤害的危险。
1.
2.
3.
4.
5.
6.
7.
8.
9.
10.
11.
12.
13.
14.
15.
16.
17.
18.
请勿将本机作为玩具使用。 当儿童使用本缝纫机或使用缝纫机时附近有儿童时,请务必悉心看护。
本缝纫机只能用于本说明书规定的用途。 只能使用厂商在本说明书中推荐的配件。
当电源线或插头破损、缝纫机不能正常工作、发生过跌落或损坏或曾掉入水中时,切勿继续使用。 请将缝纫机
送到就近的授权代理经销商或维修服务中心,请专业人员对其进行检修、对电气或机械进行调整。
操作缝纫机时切勿堵塞任何通风口。 确保缝纫机的通风口和脚踏控制器中不堆积任何飞绒、灰尘或碎布。
切勿让任何物体掉进开口或将异物插入任何开口。
请勿在室外使用。
请勿在使用喷雾剂或易氧化的场所使用本缝纫机。
若要断开,请将主电源开关置于“O”位置(表示关闭),然后再从电源插座拔出插头。
拔插头时请勿直接拉拔电源线。 请握住插头部分(而不是电源线)将其拔出。
请勿用手指触碰任何运动部件。 在机针附近时应特别小心。
请务必使用合适的针板。 使用不合适的针板会引起断针。
请勿使用弯曲的针。
缝制过程中请勿推或拉布料。 否则可能造成针弯曲或断针。
在针附近位置进行穿针线、更换针或更换压脚等调整操作时,请务必先将缝纫机的电源开关置于“O”位置关闭
电源。
在打开机盖、上润滑油或进行其他本说明书中提到的用户维护、调整操作时,请务必从电源插座中拔出缝纫机的
电源线插头。
在没有监护的情况下,本缝纫机不适合年幼儿童或残疾人使用。
应妥善看护年幼儿童,不要让他们玩耍缝纫机。
请勿拆卸缝纫机。
小心
安全使用本缝纫机须知
1.
2.
3.
4.
5.
6.
7.
8.
9.
10.
11.
12.
13.
(仅对美国用户)
本缝纫机采用极性插头(其中一个插头片比另一个更宽),以减少触电危险,该插头只适合以对应的方式插入极
性插座。
如果插头与插座不完全配合,应调转插头重新插入。 如果仍不相配,请联系专业的电工安装合适的插座。
切勿以任何方式改装插头。
进行缝制时,请务必仔细看着针。 请勿触碰手轮、针、切刀或其它运动部件。
在遇到下列情况时,请关闭主电源并拔下电源插头:
- 机器已经停止使用时
- 更换或卸下针或任何其他部件时
- 使用缝纫机过程中发生断电时
- 检查或清洁机器时
- 机器无人值守时
请勿在脚踏控制器上存放任何物品。
请务必将电源线插头直接插入墙壁中的电源插座。 请勿使用拖线板接插电源。
如果水滴到缝纫机上,请立即拔出缝纫机电源,并咨询当地的授权经销商。
请勿将家具压在电源线上。
请勿弯折电源线,或者通过拉拽电源线拔出插头。
请勿用湿手触摸电源线。
将缝纫机放在靠近墙壁电源插座的地方。
请勿将缝纫机放在不稳定的平面上。
请勿放在软盖上。
如果注意到异常声音或状况,请咨询当地的授权经销商。
III
如何延长缝纫机的使用寿命
1.
2.
3.
4.
请勿将缝纫机存放在阳光直射或湿度高的场所。 请勿在加湿器、熨斗、卤素灯或其它高温物体附近使用或存放
缝纫机。
清洁外壳时只能使用中性肥皂或洗涤剂。 苯、稀释剂和洗涤粉等可能会损伤缝纫机外壳,切勿使用。
请勿让缝纫机从高处跌落或使之受到撞击。
更换或安装压脚、针或其它部件之前,请务必参考本说明书以确保正确安装。
如何修理或调整缝纫机
当缝纫机发生故障或需要进行调整时,请首先参考故障排除表,自己检查和调整缝纫机。 如果自己无法解决
问题,请咨询当地的授权经销商。
“请妥善保管本说明书”
“本缝纫机适合于家庭使用。”
小心
当本缝纫机无人看管时,请务必关闭缝纫机主电源开关和照明灯开关,或将插头从电源插座中拔出。
当维修缝纫机,移除外壳或更换照明灯泡时,必须从电源插座中拔出插头,使缝纫机或电气组件与电源断开。
仅针对英国、爱尔兰、马耳他
和塞浦路斯用户
重要信息
- 更换插头保险丝时,请使用经 ASTA 和 BS 1362 核准的保险丝,例如插头上带有 ASA 标记、额定功率标记
等。
- 请务必更换保险丝盖。 切勿使用无保险丝盖的插头。
- 如果可用的电气插座与随设备提供的插头不相配,请与授权经销商联系以获取正确的指导。
针对 AC 输入220-240V 的国家
和墨西哥的用户
此设备不适合残疾、感应欠佳或智障、经验和知识不足的人士(包括儿童)使用,除非负责其安全的人员从旁
监督或指导其使用设备。 应妥善看护儿童,不要让他们玩耍设备。
IV
CONGRATULATIONS ON
CHOOSING THIS COMPACT
OVERLOCK MACHINE
恭喜您选择了
本款小型包缝机
Your machine is a high quality, easy-to-use
product.To fully enjoy all the features, we suggest
that you study this booklet.
If you need more information regarding the use
of your machine, your nearest authorized dealer
is always happy to be of service.
Enjoy yourself!
本机是一款质量优良、便于使用的产品。 为
了充分利用所有功能,我们建议您先阅读本说
明书。
如果需要有关缝纫机使用方面的详细信息,距
您最近的经销商将随时乐于为您服务。
愿您使用开心!
CAUTION!
小心!
WHEN THREADING, REPLACING NEEDLE
OR LIGHT BULB, BE SURE TO TURN
OFF THE MAIN POWER SWITCH OF THE
MACHINE.
WHEN THE MACHINE IS NOT IN USE, IT
IS RECOMMENDED THAT THE ELECTRIC
SUPPLY PLUG IS DISCONNECTED FROM
THE WALL SOCKET TO AVOID ANY
POSSIBLE HAZARDS.
在穿线、更换针或灯泡时,请务必关闭缝纫机
的主电源开关。
不使用缝纫机时,建议从墙壁上的电源插座断
开电源插头,以避免任何可能的危险。
V
Notes on the motor
关于电机的注意事项
• The normal operating speed of this sewing
• 本缝纫机的正常运行速度为每分钟 1300 针,与
machine is 1,300 stitches per minute, which is
quite fast compared to the normal operating speed
of 300 to 800 stitches per minute for the ordinary
foot-operated sewing machine.
• The bearings in the motor are made of a special
sintered, oil-impregnated alloy mounted in oilsoaked felt to withstand long hours of continuous
operation.
• Continuous operation of the sewing machine can
cause heat to build in the motor area, but not
enough to adversely affect its performance.
It is important to keep fabric and paper away from
the ventilating holes on the back and sides of the
machine so air can get to these holes.
• When the motor is running, sparks can be seen
through the ventilating hole in the motor bracket
on the side opposite the hand wheel. These
sparks are produced by the carbon brushes and
the commutator, and are part of the machines
normal operation.
普通操作压脚的缝纫机的每分钟300到800针相比
非常快。
• 电机中的轴承采用特殊烧结、浸油合金制造,安
装在浸油带中,可承受数小时的连续操作。
• 缝纫机连续操作可能会造成热量积蓄在电机区域
中,但不足以对性能造成负面影响。
必需使布料和纸张远离缝纫机背面和侧面上的通
风口,以便空气可以从这些通风口流通。
• 电机正在运行时,通过通风口可以看到手轮对面
的电机支架上的火花。 这些火花由碳刷和整流器
产生,并且是缝纫机正常操作的一种现象。
CAUTION
WHEN THREADING THE MACHINE,
REPLACING A NEEDLE, OR WHEN
THE MACHINE IS NOT IN USE, WE
RECOMMEND DISCONNECTING THE
ELECTRIC SUPPLY PLUG TO AVOID ANY
POSSIBLE HAZARDS.
VI
小心
在为机器穿线、换针或不使用机器时,我们建
议断开电源插头,以避免产生任何可能的危
险。
TABLE OF CONTENTS
IMPORTANT SAFETY INSTRUCTIONS ...................................................................................................I
TABLE OF CONTENTS . .............................................................................................................................1
Chapter 1 Names of parts and their functions . ...............................................................................4
Accessories included with your serger.......................................................................................6
Needle........................................................................................................................................8
Turning direction of motor.........................................................................................................10
Opening and closing the front cover.........................................................................................10
Chapter 2 Operating . ............................................................................................................................11
Powering the machine..............................................................................................................11
Removing the Bed Extension for Free-Arm Sewing ............................................ 12
Removing the bed extension....................................................................................................12
Chapter 3 Stitch Length .......................................................................................................................13
Stitch Width . ........................................................................................................................13
Chapter 4 Instructions for the Differential Feed Mechanism
(Models with Differential Feed) . .....................................................................................14
Chapter 5 Before Threading ................................................................................................................17
Preparation before threading....................................................................................................17
How to use the thread spool cap..............................................................................................18
How to use the thread net.........................................................................................................18
Tension release button..............................................................................................................18
Before threading.......................................................................................................................19
Threading the upperlooper.......................................................................................................20
Threading the lowerlooper........................................................................................................22
Threading the right needle (on Two-needle models).................................................................24
Threading the left needle..........................................................................................................26
Chapter 6 Comparison Chart of Sewing Materials, Threads and Needles .............................28
Chapter 7 Thread Tension ...................................................................................................................30
Chapter 8 Chart of Thread Tension Adjustment ...........................................................................32
Chapter 9 Test-sewing ..........................................................................................................................36
Chaining-off..............................................................................................................................37
Chapter 10 Sewing . .................................................................................................................................38
To start sewing..........................................................................................................................38
To remove work........................................................................................................................39
If threads break during sewing ................................................................................................39
To sew heavy materials............................................................................................................40
To sew fine materials................................................................................................................40
Presser foot pressure...............................................................................................................41
Chapter 11 Troubleshooting . ................................................................................................................42
Chapter 12 Stitch Selection . .................................................................................................................44
Narrow overlock stitch/rolled edge stitch..................................................................................45
Chapter 13 Chart of Narrow Overlock/Rolled Edge Stitch ............................................................48
Chapter 14 Examples of Sewing Applications for this Serger . ...................................................50
Blind stitching with blind stitch presser foot..............................................................................51
Flatlock stitching with blind stitch presser foot..........................................................................53
Pin tuck stitching with blind stitch presser foot..........................................................................55
Decorative stitching..................................................................................................................57
Chapter 15 Upper Knife and Lower Knife ..........................................................................................58
Retracting upper knife . ............................................................................................................58
Replacing the knives.................................................................................................................59
Chapter 16 Oiling .....................................................................................................................................60
Chapter 17 Changing the Light Bulb ..................................................................................................61
Chapter 18 Machine Specifications ....................................................................................................62
SETTING RECORD . ..................................................................................................................................63
1
目录
安全须知 ........................................................................................................................................................................ III
目录 ................................................................................................................................................................................... 2
第1章
各部件名称及其功能 .......................................................................................................................... 4
第2章
第3章
第4章
第5章
第6章
第7章
第8章
第9章
第 10 章
第 11 章
第 12 章
第 13 章
第 14 章
第 15 章
第 16 章
第 17 章
第 18 章
设置记录
2
锁边器包含的配件 ................................................................................................................................... 6
针 ............................................................................................................................................................... 8
电机的旋转方向 ..................................................................................................................................... 10
打开及关闭前盖 ..................................................................................................................................... 10
操作 ....................................................................................................................................................... 11
接通缝纫机电源 ..................................................................................................................................... 11
卸下扩展平台以进行自由臂缝制 ........................................................................................ 12
卸下扩展平台 ......................................................................................................................................... 12
针迹长度 .............................................................................................................................................. 13
针迹宽度 .............................................................................................................................................. 13
差动送料装置说明(带差动送料的型号) ................................................................................ 14
穿线之前 .............................................................................................................................................. 17
穿线前的注意事项 ................................................................................................................................. 17
如何使用线筒盖 ..................................................................................................................................... 18
如何使用线网 ......................................................................................................................................... 18
张力释放按钮 ......................................................................................................................................... 18
穿线之前 ................................................................................................................................................. 19
为上弯针穿线 ......................................................................................................................................... 20
为下弯针穿线 ......................................................................................................................................... 22
为右针穿线(双针型号) ..................................................................................................................... 24
为左针穿线 ............................................................................................................................................. 26
缝制布料、线、针对比表 ............................................................................................................... 29
线张力 ................................................................................................................................................... 30
线张力调整表 ..................................................................................................................................... 32
试缝 ....................................................................................................................................................... 36
链缝 ......................................................................................................................................................... 37
缝制 ....................................................................................................................................................... 38
开始缝制 ................................................................................................................................................. 38
取下布料 ................................................................................................................................................. 39
如果在缝制过程中断线 ......................................................................................................................... 39
缝制重质布料 ......................................................................................................................................... 40
缝制轻质布料 ......................................................................................................................................... 40
压脚压力 ................................................................................................................................................. 41
故障排除 .............................................................................................................................................. 43
针迹选择 .............................................................................................................................................. 44
窄包缝针迹/卷边针迹 ............................................................................................................................ 45
窄包缝/卷边针迹表 ........................................................................................................................... 49
本锁边器的缝制应用实例 ............................................................................................................... 50
采用暗缝针迹压脚的暗缝针迹 ............................................................................................................. 51
采用暗缝针迹压脚的平式锁缝针迹 ..................................................................................................... 53
采用暗缝针迹压脚的双螺纹针迹 ......................................................................................................... 55
装饰针迹 ................................................................................................................................................. 57
上切刀和下切刀 ................................................................................................................................. 58
收回上切刀 ............................................................................................................................................. 58
更换切刀 ................................................................................................................................................. 59
加机油 ................................................................................................................................................... 60
更换照明灯泡 ...................................................................................................................................... 61
机器规格 .............................................................................................................................................. 62
........................................................................................................................................................................ 63
3
Names of parts and
their functions
各部件名称及其功能
1
B
A
4
3
C
F G
2
5
4
6
6
6
6
5
4
5
5
E
4
4
J
D
5
0
6
7
E
8
L
K
T
P
O
9
R S
I
Q
H
M
N
4
1Thread tree
1 线架
2Handle
2 提手
3Presser foot pressure adjustment screw
3 压脚压力调整螺丝
4Spool pin
4 线筒轴
5Spool support
5 线筒架
6Thread take-up cover
6 挑线杆封盖
7Needles
7针
8Upper knife
8 上切刀
9Presser foot
9 压脚
0Material plate cover
0 布料板盖
ASpool stand (thread tree support)
A 线架支架
BLeft needle thread tension dial
B 左针线张力转盘
CRight needle thread tension dial
C 右针线张力转盘
DPresser foot lifting lever
D 压脚抬杆
EHand wheel
E 手轮
FUpperlooper thread tension dial
F 上弯针线张力转盘
GLowerlooper thread tension dial
G 下弯针线张力转盘
HFront cover
H 前盖
IMaterial slide plate (for overlock stitch)
I 布料滑盘(用于包缝针迹)
JMain power switch and light switch
J 主电源开关和照明开关
KStitch length adjustment dial
K 针迹长度调整转盘
LDifferential feed ratio adjustment lever
L 差动送料比例调整杆
MLowerlooper threading lever
M 下弯针穿线杆
NStitch finger
N 针迹指针
OStitch width lever
O 针迹宽度控制杆
PUpperlooper
P 上弯针
QLowerlooper
Q 下弯针
RFree-arm cover
R 自由臂盖板
SBed extension
S 扩展平台
TKnife lever
T 切刀杆
5
Accessories included
with your serger
1 X77871-000
锁边器包含的
配件
3 XB1618001
6 X75906001
4 X75904000
7 X77128002
5 X77260000
8 X75917001
2 122991052
OPTION / 选购件
9 X76590002
9, 0, A OPTION
6
0 XB0958001
A X76663001
SA212 (U.S.A., CANADA)
(美国、加拿大)
9, 0, A 选购件
The number represents the parts code
数字代表部件号
1Soft cover
1 防尘罩
2Accessory bag
2 配件包
3Tweezers
3 镊子
4Thread net
Two-needle models (4)
One-needle models (3)
4 线网
双针型号 (4)
单针型号 (3)
5Thread spool cap
Two-needle models (4)
One-needle models (3)
5 线筒盖
双针型号 (4)
单针型号 (3)
6Cleaning brush
6 清洁刷
7Hexagonal (Allen) wrench (on Two-needle
models)
7 六角(阿伦)扳手(用于双针型号)
8 针组:
SCHMETZ 130/705M
80/12: 2 件
90/14: 2 件
8Needle set:SCHMETZ 130/705M
80/12: 2 pcs.
90/14: 2 pcs.
9 暗缝针迹压脚(可选)
9Blind stitch foot (Option)
0 收纳盒(可选)
0Trim trap (Option)
A 镶边压脚(可选)
ATape presser foot (Option)
脚踏控制器: XC7359021(110/120V 区域)
Foot controller: XC7359021 (110/120V Area)
XC7438421(220/240V 区域)
XC7438421 (220/240V Area)
XC7456421(英国)
XC7456421 (UK)
XE0629001(澳大利亚、新西兰)
XE0629001 (Australia New Zealand)
XD0852121(韩国)
XD0852121 (Korea)
XD0112121(阿根廷)
XD0112121 (Argentina)
XD0105021(中国)
XD0105021 (China)
XF2826001(巴西)
XF2826001 (Brazil)
7
Needle
针
This machine uses a standard home sewing machine
needle.
The recommended needle is SCHMETZ
130/705H.
To remove the needle
(1)Turn the main power switch to the OFF position.
(2)Turn the hand wheel counter-clockwise by hand
until the needle is at its highest position.
(3)Loosen the needle set screw with hexagonal
wrench and remove the needle.
本机使用标准的家用缝纫机针。
建议使用的针为 SCHMETZ 130/705H。
卸下针
(1) 将主电源开关置于 OFF 位置。
(2) 用手逆时针旋转手轮直至针到达最高位置。
(3) 用六角扳手松开针组螺丝并卸下针。
1 后部
2 前部
3 平面侧
4 凹槽
1Back
2Front
3Flat side
4Groove
To insert the needle
(1)Turn the main power switch to the OFF position.
(2)Turn the hand wheel until the needle bar is at its
highest position.
(3)Hold the needle with its flat side away from you
and insert it up as far as it will go.
(4)Tighten the needle set screw securely with the
hexagonal wrench.
插入针
(1) 将主电源开关置于 OFF 位置。
(2) 旋转手轮直至针杆到达最高位置。
(3) 抓住针,使其平面侧远离自身方向,然后尽可能
向上插。
(4) 用六角扳手拧紧针组螺丝。
5 将针的平面侧朝下摆放并确认间距是否平
行。
6 平面侧
7 (针板、玻璃等)
5Place the needle on its flat side and check
to see if the space is parallel.
6Flat side
7
(needle-plate, glass, etc.)
5
2
1
6
4
3
7
8
NOTE:
Two-needle models
• On two-needle models, we suggest you hold the
two needles with one hand and then insert them
both at the same time.
• If the needles have been inserted correctly, the
right needle should be set slightly lower than the
left one.
注意:
双针型号
• 对于双针型号的机器,我们建议您用一只手抓住
双针,然后将其同时插入。
• 如果正确地将针插入,右针应设置比左针低一
些。
CAUTION
The needle set screw holds both needles.
Keep this in mind when you loosen the set
screw to exchange one or both needles.
小心
针组螺丝可同时固定两根针。 当您松开针组螺
丝以更换单根或两根针时,请谨记这一点。
8 针组螺丝
9 拧紧
0 松开
A 六角扳手
8Needle set screw
9Tighten
0Loosen
AHexagonal wrench
9
8
0
A
One-needle models
单针型号
BNeedle set screw
CTighten
DLoosen
EHexagonal wrench
B 针组螺丝
C 拧紧
D 松开
E 六角扳手
C
B
D
E
9
Turning direction of motor
电机的旋转方向
• The motor and hand wheel of this machine turn in
• 本缝纫机的电机和手轮以逆时针方向转动(箭头
方向)。 这与普通家用缝纫机的方向相同。
a counterclockwise direction (direction of arrow).
This is the same direction as an ordinary home
sewing machine.
1 手轮
1Hand wheel
1
Opening and closing the
front cover
It is necessary to open the front cover when threading
this machine.
NOTE:
For your safety, make sure that the front cover is
closed when operating the machine.
10
打开及关闭前盖
为本机穿线时需要打开前盖。
注意:
为了安全起见,操作缝纫机时应确保前盖已合上。
Operating
操作
Powering the machine
接通缝纫机电源
Preparation
• Insert the three-pin plug into the socket on the
bottom right side of the machine. Insert the power
supply plug into a power outlet.
Main Power and Sewing Light Switch
This switch turns the power and sewing light on or
off. To turn on push toward “1” mark. To turn off push
toward “0” mark.
准备工作
• 将三孔插头插入缝纫机右侧底部的插座。 将电源
线插头插入电源插座。
主电源和工作照明开关
本开关可以打开或关闭主电源和缝纫灯。 将开关朝
标记“1”的方向按下时即可接通电源。 将开关朝
标记“0”的方向按下时即可断开电源。
1Main Power and Sewing Light Switch
Operation
When the pedal is pressed lightly, the machine runs
at a low speed. As the pedal is pressed further, the
machine will increase speed. When the pedal is
released, the machine stops.
2Foot Controller
Note (For U.S.A. only):
Foot controller: Model KD-1902
This foot controller can be used on the machine with
product code 884-345.The product code is mentioned
on the machine rating plate.
1 主电源和工作照明开关
操作
轻踩脚踏时,缝纫机低速转动。 继续踩下脚踏时,
缝纫机将增大转速。 松开脚踏时,缝纫机停止。
2 脚踏控制器
注意(仅适用于美国):
脚踏控制器: 型号 KD-1902
产品号为 884-345 的缝纫机可使用本脚踏控制器。
产品型号标示在缝纫机的铭牌上。
1
2
11
Removing the
Bed Extension for
Free-Arm Sewing
卸下扩展平台
以进行
自由臂缝制
Removing the
bed extension
卸下扩展平台
Free-arm sewing enables tubular pieces to be sewn
more easily. For free-arm sewing, remove the bed
extension and position the fabric as shown in the
illustration.
自由臂缝制可以更加轻松地缝制管状布料。 进行自
由臂缝制前,应卸下扩展平台并按图示放置布料。
12
Stitch Length
针迹长度
To change the stitch length,
(1)Locate the stitch length adjustment dial on the
left side of the machine.
(2)Turn the stitch length adjustment dial forward
to lengthen the stitch to a maximum of 4 mm
(5/32 inch).
Turn the stitch length adjustment dial backwards
to shorten the stitch length to a minimum of 2 mm
(1/8 inch).
(3)The normal stitch length setting is 2.5 mm to
3 mm.
若要更改针迹长度
(1) 请旋转机身左侧的针迹长度调整转盘。
(2) 向前转动针迹长度调整转盘可将针迹增长到最大
4 毫米(5/32 英寸)。
向后转动针迹长度调整转盘可将针迹长度最小缩
短到2毫米(1/8 英寸)。
(3) 正常的针迹长度为 2.5 毫米到 3 毫米。
R
3
2
4
Stitch Width
针迹宽度
Two-needle models
To change the stitch width.
(1)Move the stitch width lever (located on the left side
of the machine toward the front) up to reduce the
stitch width or down to increase the width.
The stitch width can be set between R4.5 mm
(11/64 inch) and 7 mm (9/32 inch).
The normal stitch width setting for regular overlock
stitch is 5mm (13/64 inch).
One-needle models
• The width is factory set to 3.5mm (9/64 inch).
ATwo-needle models
BOne-needle models
双针型号
若要更改针迹宽度
(1)请移动针迹宽度控制杆(位于缝纫机左前侧):
向上可减小针迹宽度,向下可增大针迹宽度。
针迹宽度可设定在 R4.5 毫米(11/64 英寸)到
7 毫米(9/32 英寸)之间。
普通包缝针迹的正常针迹宽度为 5 毫米(13/64 英
寸)。
单针型号
• 针迹宽度的出厂设置为 3.5 毫米(9/64 英寸)。
A 双针型号
B 单针型号
1 针迹宽度控制杆
2 普通针板
1Stitch width lever
2Regular needle plate
A
6
5
R
7
2
B
2
3.5
R
1
1
13
Instructions for the
Differential Feed
Mechanism (Models
with Differential Feed)
This serger is equipped with two sets of feed dogs
under the presser foot to move the fabric through the
machine.The differential feed controls the movement
of both the front and the rear feed dogs. When set
at 1, the feed dogs are moving at the same speed
(ratio of 1). When the differential feed ratio is set
at less than 1, the front feed dogs move slower
than the rear feed dogs, stretching the fabric as it
is sewn. This is effective on lightweight fabric that
may pucker. When the differential feed ratio is set
at greater than 1, the front feed dogs move faster
than the back feed dogs, gathering the fabric as it is
sewn. This function assists in removing the rippling
when serging stretch fabrics.
• To adjust the differential feed.
(1)Locate the differential feed adjustment lever on
the left side of the machine.
(2)The normal setting is 1.0 on the differential feed
adjustment lever.
(3)To set less than 1.0, move the lever back.
(4)To set greater than 1.0, move the lever forward.
1.0
14
差动送料装置说明
(带差动送料的型号)
这种锁边器在压脚下具有两套送布牙来让缝纫机移
动布料。 差动送料可控制前后送布牙的移动。 设
置为 1 时,送布牙以相同的速度移动(比例为 1)
。 差动送料比例设置小于 1 时,前部送布牙比后部
送布牙移动速度慢,在缝制时会将布料伸展。 这对
于容易褶皱的轻质布料有效。 差动送料比例设置大
于 1 时,前部送布牙比后部送布牙移动速度快,在
缝制时会使布料收缩。 该功能可在伸缩布料锁边时
去除褶皱。
• 调整差动送料。
(1) 请找到机身左侧的差动送料调整杆。
(2) 差动送料调整杆的正常设置为 1.0。
(3) 若要设置为小于 1.0,则向后移动调整杆。
(4) 若要设置为大于 1.0,则向前移动调整杆。
Feed ratio
Main feed (rear) Differential feed (front)
Effect
Application
Material is pulled
tight.
Prevents thin
materials from
puckering
1.0
Without differential
feed.
Normal sewing
1.0 – 2.0
Material is gathered
or pushed together.
Prevents stretch
materials from
stretching or
puckering
0.7 – 1.0
送料比例
主送料(后部)
差动送料(前部)
效果
应用
0.7 – 1.0
布料已拉紧。
防止薄布料褶皱
1.0
无差动送料。
正常缝制
布料褶皱或推在一
起。
防止伸缩布料拉伸或
褶皱
1.0 – 2.0
15
• An example where adjustment is required
• 需要进行调整的示例
When stretch material is sewn without using the
differential feed, the edge will be wavy.
不使用差动送料缝制伸缩布料时,会发生卷边。
To make the edge more smooth, adjust the feed ratio
from 1.0 toward 2.0.
(The feed ratio required depends on the elasticity
of the material.)
若要使边缘更流畅,请将差动送料比例从 1.0 调整
到 2.0。
(所需的送料比例取决于布料弹性。)
The more elastic the material, the further toward 2.0
the differential feed ratio should be set. Test sew with
a scrap of the fabric to find the correct adjustment.
CAUTION
When sewing thick non-stretchable material
such as denim, do not use the differential
feed as it may damage the fabric.
1.0
16
布料弹性越大,就越应该将差动送料比例设置到接近
2.0。 用一块布进行试缝以得到正确的调整。
小心
缝制厚的非伸缩布料如斜纹棉布时,请勿使用
差动送料否则可能会损坏布料。
Before Threading
穿线之前
Preparation before
threading
穿线前的注意事项
Raise the telescoping thread tree to its highest
position. Make sure that the thread holders are
in alignment above the spool pins as illustrated
below.
1Thread holder on thread tree
2Spool pin
3On Two-needle models
4Correct position
将伸缩式线架向上拉到最高位置。 如下图所示,确
保过线孔与每个线筒轴一一对齐。
1 线架上的过线孔
2 线筒轴
3 线筒套
4 正确位置
4
1
2
3
CAUTION
When threading, always thread in this order:
upperlooper, lowerlooper, right needle and
then the left needle.
小心
穿线时,务必按照以下顺序进行:上弯针、下
弯针、右针和左针。
17
How to use the thread
spool cap
When using sewing thread spools, the thread spool
cap should be used as illustrated below.
Make sure that the spool notch is on the bottom.
(See fig. A)
如何使用线筒盖
使用卷线筒时,线筒盖应按下图所示使用。
确保线筒上用来固定线头的切槽位于底部。
(请参见图 A)
1 线筒盖
1Thread spool cap
How to use the thread net
如何使用线网
If you are sewing with loosely spun nylon thread,
we recommend that you cover the spool with the
net supplied to prevent the thread from slipping off
the spool.
Adapt the net to the shape of the spool. (See fig. B)
如果使用缠绕较松的尼龙线缝制,建议用附带线网
套住线筒,防止线从线筒上滑落。
将线网调整为线筒的形状。 (请参见图 B)
1 线网
1Net
A
B
1
1
Tension release button
张力释放按钮
This serger is equipped with a thread tension release
button. When threading, be sure to:
(1)Hold the tension release button directly above the
tension adjustment wheel to the right.
(2)Pass the thread through the tension disc which
is in the channel next to the tension adjustment
dial.
(3)Release the button.
本锁边器配有线张力释放按钮。 穿线时,应确保:
(1) 将位于张力调整轮正上方的张力释放按钮保持在
右侧。
(2) 将线从位于张力调节旋钮旁边通道中的张力盘穿
过。
(3) 松开按钮。
1Thread tension release button
2Thread tension dial
3Slide to the right.
3
1
6
6
5
5
4
18
1 线张力释放按钮
2 线张力转盘
3 滑动到右侧。
2
4
Before threading
穿线之前
(1) 为安全起见,请关闭主电源开关。
(2) 用压脚抬杆抬起压脚。
(1)Turn off the main power switch for safety.
(2)Raise the presser foot using presser foot lever.
CAUTION
When threading the needle, always be sure
to lift the presser foot lever, and also take
care to thread in the proper order.
小心
穿线时,务必抬起压脚抬杆,同时还应注意以
正确的顺序穿线。
(3)Set the needle bar in its highest position by turning
the handwheel toward you.
Turn the handwheel to find the easiest position for
threading, and then thread the upperlooper thread,
lowerlooper thread, right needle thread and then
the left needle thread. The proper threading order
for this serger is upperlooper, lowerlooper, right
needle, and then the left needle.
(3) 朝自身方向转动手轮,以便将针杆设置在最高位
置。
转动手轮以寻找最佳穿线位置,然后按照上弯
针、下弯针、右针和左针的顺序进行穿线。 本
锁边器的正确穿线顺序为上弯针、下弯针、右针
和左针。
1 滑动到右侧
2 线张力转盘
3 正确
4 错误
1Slide to the right
2Thread tension discs
3Correct
4Wrong
2
1
6
6
6
5
5
5
4
4
4
4
6
3
5
4
19
Threading the
upperlooper
为上弯针穿线
• 按如图所示顺序走线,遵照每个穿线点旁的绿色
标记和编号。
• Run the thread in the sequence illustrated,
1 将前盖滑到右侧并且朝自身方向拉将其打
开。
2 将线从线筒上拉出,然后直接从后至前穿
过线架上的导线槽。
3 将线从线架前端额外拉出 15 厘米(6 英
寸)。
4 将线穿过正确的导线槽。
5 滑动线张力释放按钮并将其保持在右侧,
然后将线从位于绿色张力调节旋钮旁边通
道中的张力盘穿出。 松开按钮。
6 顺着通道将线导入并按照附带插图的编号
顺序中绿色标记旁的穿线点穿线。
following the green color and the numbers next
to each threading point.
1Open the front cover by sliding to the right
and guiding the top toward you.
2Pull the thread off the spool and directly
up through the thread guide on the thread
tree from back to front.
3Pull the thread about an extra 15cm (6
inches) through the front of the thread
tree.
4Pass the thread through the proper thread
guide.
5Slide and hold the thread tension release
button to the right, then pass the thread
through the tension disc which is in
the channel next to the green tension
adjustment dial. Release the button.
6Guide the thread down the channel and
pass the thread through the threading
points next to the green color marks
following the numerical order in the
accompanying illustration.
1
2
2
3
4
8
2
7
6
6
5
20
5
3
4
8
8
7
7
6
5
NOTE:
If the upperlooper thread breaks during sewing
This may be caused by the lowerlooper thread getting
caught on the upperlooper. If this happens, lower
the upperlooper by turning the hand wheel, remove
the lowerlooper thread from the upperlooper, and
re-thread the upperlooper from at least the tension
disc.
注意:
如果在缝制过程中上弯针折断
这可能是由于下弯针线挂在上弯针上造成的。 如果
发生这种情况,请旋转手轮来放低上弯针,从上弯
针上取下下弯针线,并至少从张力盘位置为上弯针
重新穿线。
21
Threading the
lowerlooper
为下弯针穿线
• 按如图所示顺序走线,走线顺序应遵照每个穿线
点旁的蓝色标记和编号。
• Run the thread in the sequence illustrated,
following the blue color and the numbers next to
each threading point.
1
2
2
3
4
6
2
5
3
4
B
9
0
A
5
8
7
6
1Open the front cover by sliding to the right
and guiding the top toward you.
2Pull the thread off the spool and directly
up through the thread guide on the thread
tree from back to front.
3Pull the thread about an extra 15cm (6
inches) through the front of the thread
tree.
4Pass the thread through the proper thread
guide.
22
1 将前盖滑到右侧并且朝自身方向拉将其打
开。
2 将线从线筒上拉出,然后直接从后至前穿
过线架上的导线槽。
3 将线从线架前端额外拉出 15 厘米(6 英
寸)。
4 将线穿过正确的导线槽。
5Slide and hold the thread tension release
button to the right, then pass the thread
through the tension disc which is in the
channel next to the blue tension adjustment
dial. Release the button.
6Guide the thread down the channel and
pass the thread through the threading
points next to the blue color marks following
the numerical order in the accompanying
illustration up to the lowerlooper threading
lever.
NOTE:
If the lowerlooper thread breaks during sewing,
cut and remove thread from both of the needles.
Before re-threading the lowerlooper, make sure
that the lowerlooper re-threading is done exactly
as diagrammed above. The machine will not operate
properly if the threading is not done in the proper
sequence.
Lowerlooper Easy Threading Operation
(Illustrated on page 24)
(1)Slide the lowerlooper threading lever to the
right.
(2)Position the thread under the hook (left end) of
the threading lever.
(3)Place the thread through the eye of the
lowerlooper.
(4)Holding the end of the thread, slide the lowerlooper
threading lever to the left which returns it to its
standard position.
(5)Make sure that the pink triangular marks line
up.
CAUTION
When sliding the lowerlooper threading lever
to the left, always make sure that the two pink
triangular marks line up as illustrated.
5 滑动线张力释放按钮并将其保持在右侧,
然后将线从位于蓝色张力调整旋钮旁边通
道中的张力盘穿出。 松开按钮。
6 顺着通道将线导入并按照附带插图的编号
顺序中蓝色标记旁的穿线点穿线,使其到
达下弯针穿线杆。
注意:
如果缝制过程中下弯针线断裂,请裁切并清除两根
针上的线。 在为下弯针重新穿线前,确保下弯针的
重新穿线严格按照上图所示完成。 如果未按照正确
顺序穿线,缝纫机则无法正确运行。
下弯针便捷穿线操作
(如第 24 页的图所示)
(1)将下弯针穿线杆滑动到右侧。
(2) 将线置于穿线杆的钩(左端)下面。
(3) 将线穿过下弯针针眼。
(4) 抓住线头,将下弯针穿线杆滑动到左侧,这会使
下弯针穿线杆回到其标准位置。
(5) 确保粉色的三角形标记对齐。
小心
在将下弯针穿线杆滑动到左侧时,务必确保两个
粉色三角形标记按图中所示的方式对齐。
1 下弯针
2 下弯针穿线杆
小心
为下弯针和上弯针穿线后请为针穿线。
小心
仅按照箭头所示方向滑动穿线杆。 以任何方向
用力移动穿线杆均可能会使其损坏。
1Lowerlooper
2Lowerlooper threading lever
CAUTION
Thread the needles after the lowerlooper and
upperlooper have been threaded.
CAUTION
Slide the threading lever only in the directions
shown by the arrow. Forcefully moving the
threading lever in any other direction may
damage it.
23
(1)
(2) (3)
1
7
8
2
(5)
(4)
Threading the right
needle (on Two-needle
models)
• Run the thread in the sequence illustrated on page
25, following the pink color and the numbers next
to each threading point.
1Pull the thread off the spool and directly
up through the thread guide on the thread
tree from back to front.
2Pull the thread about an extra 15cm (6
inches) through the front of the thread
tree.
3Pass the thread through the proper thread
guide.
4Slide and hold the thread tension release
button to the right, then pass the thread
through the tension disc which is in the
channel next to the pink tension adjustment
dial. Release the button.
5Guide the thread down the channel and
across through the threading points next to
the pink color marks following the numerical
order in the accompanying illustration.
6Bring the thread down through the guide
7 above the needle and through the right
needle from front to back.
24
为右针穿线
(双针型号)
•按第 25 页图示中的顺序走线,遵照每个穿线点旁
的粉色标记和编号。
1 将线从线筒上拉出,然后直接从后至前穿
过线架上的导线槽。
2 将线从线架前端额外拉出 15 厘米(6 英
寸)。
3 将线穿过正确的导线槽。
4 滑动线张力释放按钮并将其保持在右侧,
然后将线从通道中粉色张力调节转盘旁边
的张力转盘中穿出。 松开按钮。
5 顺着通道将线导入并按照附带插图的编号
顺序中粉色标记旁的穿线点穿线。
6 将线从针上方的导线槽 7 穿过,然后按从
前到后的顺序从右针穿过。
1
2
2
3
5
2
6
4
5
6
3
4
7
6
7
25
Threading the left needle
为左针穿线
• Run the thread in the sequence illustrated,
• 按如图所示顺序走线,遵照每个穿线点旁的黄色
following the yellow color and the numbers next
to each threading point.
1Pull the thread off the spool and directly
up through the thread guide on the thread
tree from back to front.
2Pull the thread about an extra 15cm
(6 inches) through the front of the thread
tree.
3Pass the thread through the proper thread
guide.
4Slide and hold the thread tension release
button to the right, then pass the thread
through the tension disc which is in
the channel next to the yellow tension
adjustment dial. Release the button.
5Guide the thread down the channel and
across through the threading points next
to the yellow color marks following the
numerical order in the accompanying
illustration.
6Bring the thread down through the guide
7 above the needle and through the left
needle from front to back.
26
标记和编号。
1 将线从线筒上拉出,然后直接从后至前穿
过线架上的导线槽。
2 将线从线架前端额外拉出 15 厘米(6 英
寸)。
3 将线穿过正确的导线槽。
4 滑动线张力释放按钮并将其保持在右侧,
然后将线从通道中黄色张力调节转盘旁边
的张力转盘中穿出。 松开按钮。
5 顺着通道将线导入并按照附带插图的编号
顺序中黄色标记旁的穿线点穿线。
6 将线从针上方的导线槽 7 穿过,然后按从
前到后的顺序从左针穿过。
1
2
2
6
2
5
3
3
4
5
4
3
4
6
7
6
7
6
7
27
Comparison Chart of Sewing Materials,
Threads and Needles
Material
Light
materials
Stitch
Crepe de chine
Georgette
Lawn
Overlock stitch
Organdy
Tricot
Light
materials
Crepe de chine
Georgette
Narrow/rolled
Lawn
Hem stitch
Organdy
Medium
materials
Poplin
Gingham
Seersucker
Gabardine
Serge
Knitted
Heavy
materials
Cashmere
Tweed
Denim
Jersey
Overlock stitch
Overlock stitch
Stitch Length
(mm)
Needle
2.0-3.0
Spun :#80
Cotton :#80·100
Silk
:#80·100
SCHMETZ
130/705H
#70
#80
Smaller than 2.0
Needle thread
Polyester : #80
Nylon
: #80
Looper thread
Polyester : #80
Nylon
: #80
Woolly nylon thread
SCHMETZ
130/705H
#70
#80
2.5-3.5
Spun
Cotton
Silk
Nylon
Polyester
: #60·80
: #60·80
: #50·80
: #50·80
: #50·80
SCHMETZ
130/705H
#80
#90
3.0-4.0
Cotton
Silk
Polyester
Nylon
: #40·60
: #40·60
: #30·60
: #30·60
SCHMETZ
130/705H
#90
NOTE:
Decorative thread will work best in the upperlooper for fashion sewing.
28
Thread
缝制布料、线、针对比表
布料
轻质
布料
双绉
乔其纱
上等细布
奥甘迪丝
经平织物
轻质
布料
双绉
乔其纱
上等细布
奥甘迪丝
中质
布料
府绸
条格平布
泡泡纱
华达呢
哔叽
针织物
重质
布料
山羊绒
粗呢粗斜
棉布
平针织物
针迹
包缝针迹
窄包缝/卷边
针迹
包缝针迹
包缝针迹
针迹长度
(毫米)
2.0-3.0
小于 2.0
线
纤维
棉
丝
: #80
: #80·100
: #80·100
穿针线
涤纶 : #80
尼龙 : #80
弯针线
涤纶 : #80
尼龙 : #80
羊毛尼龙线
针
SCHMETZ
130/705H
#70
#80
SCHMETZ
130/705H
#70
#80
2.5-3.5
纤维
棉
丝
尼龙
涤纶
:
:
:
:
:
#60·80
#60·80
#50·80
#50·80
#50·80
SCHMETZ
130/705H
#80
#90
3.0-4.0
棉
丝
涤纶
尼龙
:
:
:
:
#40·60
#40·60
#30·60
#30·60
SCHMETZ
130/705H
#90
注意:
缝制时,上弯针使用装饰线缝制效果最佳。
29
Thread Tension
线张力
线张力转盘
Thread tension dial
From the left to right:
1Yellow marked tension disc is for left
needle.
2Pink marked tension disc is for right
needle.
3Green marked tension disc is for
upperlooper.
4Blue marked tension disc is for
lowerlooper.
5Tension selection mark.
6Dial up to decrease tension.
7Dial down to increase tension.
1
2
3
从左至右:
1 黄色标记的线张力盘供左针使用。
2 粉色标记的线张力盘供右针使用。
3 绿色标记的线张力盘供上弯针使用。
4 蓝色标记的线张力盘供下弯针使用。
5 张力选择标记。
6 向上转动可以减小张力。
7 向下转动可以增大张力。
4
6
6
5
5
4
CAUTION
Make sure that the thread is properly seated
in the tension discs by holding the tension
release button to the right while passing the
thread through the tension discs.
30
7
小心
在线穿过张力盘时,将张力释放按钮保持在右侧
位置可确保线位于张力转盘中的正确位置。
Tension control
Sewing is possible at position “4” for most
circumstances. If improper stitching occurs, adjust
the tension according to the drawing below.
(Standard: SPAN 60/3Z)
Afor heavy tension
(set from 4 to 7)
B for light tension
(set from 4 to 2)
A
C
B
Cfor medium tension
(set from 5 to 3)
张力控制
在大部分情况下可以在位置“4”进行缝制。 如果发
生针迹不正常的情况,则可按下图所示调整张力。
(标准: SPAN 60/3Z)
A 较大张力
(设置为 4 到 7)
B 较小张力
(设置为 4 到 2)
C 中等张力
(设置为 5 到 3)
• There is a thread tension adjustment dial for each
• 每种针线都有线张力调整转盘,包括下弯针线和
needle thread, the lowerlooper thread and the
upperlooper thread. The correct thread tension
may vary according to the type and thickness of
the fabric and the type of thread used. Thread
tension adjustments may be necessary for any
change in sewing materials.
If the stitch quality is insufficient, select a different
tension setting from the illustration on the previous
or following pages.
上弯针线。 正确的线张力根据布料类型和厚度以
及所使用的线而有所不同。 缝制布料时的任何更
改可能都需要进行线张力调整。
如果针迹质量达不到要求,则应从上页或下页的
配图中选择不同的张力设置。
调整线张力
(1) 若要选择正确的张力,请参照上页中的插图。
(2) 如果无法找到正确的张力,请参见下列各页上
的“这种情况下”插图。
Adjusting the thread tension
(1)To select the correct tension, refer to the illustration
on the previous page.
(2)If you cannot find the correct tension, refer to the
illustrations “In this case” on following pages.
31
Chart of Thread Tension Adjustment
Two-needle (Four-thread)
C
A
A Reverse 反面
B Surface 正面
C Left needle thread 左针线
D Right needle thread 右针线
E Upperlooper thread 上弯针线
F Lowerlooper thread 下弯针线
B
A
D
Left needle thread is loose.
左针线太松。
Right needle thread is loose.
右针线太松。
B
C
A
D
Left needle thread is tight.
左针线太紧。
B
A
F
Right needle thread is tight.
右针线太紧。
E
Upperlooper thread is tight.
上弯针线太紧。
Lowerlooper thread is loose.
下弯针线太松。
B
A
F
E
Upperlooper thread is loose.
上弯针线太松。
Lowerlooper thread is tight.
下弯针线太紧。
B
A
F
E
B
32
Upperlooper thread is loose.
上弯针线太松。
Lowerlooper thread is loose.
下弯针线太松。
线张力调整表
双针(四线)
Tighten left needle thread. (yellow)
拉紧左针线。 (黄色)
Tighten right needle thread. (pink)
拉紧右针线。 (粉色)
NOTE:
Order of thread tension adjustment
When you adjust the thread tension, do it in the
following order:
(1)Left needle thread
(2)Right needle thread
(3)Upperlooper thread
(4)Lowerlooper thread
This is the easiest way to obtain the correct
thread tension.
Loosen left needle thread. (yellow)
松开左针线。 (黄色)
Loosen right needle thread (pink)
松开右针线(粉色)
Loosen upperlooper thread (green)
松开上弯针线(绿色)
Tighten lowerlooper thread (blue)
拉紧下弯针线(蓝色)
Tighten upperlooper thread (green)
拉紧上弯针线(绿色)
Loosen lowerlooper thread (blue)
松开下弯针线(蓝色)
注意:
线张力调整顺序
调整线张力时,请按照下列顺序执行:
(1) 左针线
(2) 右针线
(3) 上弯针线
(4) 下弯针线
这是获得正确线张力的最简单方法。
Tighten upperlooper thread (green)
拉紧上弯针线(绿色)
Tighten lowerlooper thread (blue)
拉紧下弯针线(蓝色)
33
One-needle (Three-thread)
C
A
A Reverse 反面
B Surface 正面
C Needle thread 针线
D Upperlooper thread 上弯针线
E Lowerlooper thread 下弯针线
B
E
Needle thread is loose.
针线太松。
Fabric puckers
布料褶皱
A
Upperlooper thread is tight.
上弯针线太紧。
D
B
Lowerlooper thread is loose.
下弯针线太松。
E
A
Upperlooper thread is loose.
上弯针线太松。
D
Lowerlooper thread is tight.
下弯针线太紧。
B
E
Upperlooper thread is loose.
上弯针线太松。
A
D
B
34
Lowerlooper thread is loose.
下弯针线太松。
单针(三线)
Tighten needle thread. (yellow)
拉紧针线。 (黄色)
NOTE:
Order of thread tension adjustment
When you adjust the thread tension, do it in
the following order:
(1)Needle thread
(2)Upperlooper thread
(3)Lowerlooper thread
This is the easiest way to obtain the correct
thread tension.
Loosen needle thread. (yellow)
松开针线。 (黄色)
Loosen upperlooper thread (green)
松开上弯针线(绿色)
Tighten lowerlooper thread (blue)
拉紧下弯针线(蓝色)
Tighten upperlooper thread (green)
拉紧上弯针线(绿色)
Loosen lowerlooper thread (blue)
松开下弯针线(蓝色)
注意:
线张力调整顺序
调整线张力时,请按照下列顺序执行:
(1) 针线
(2) 上弯针线
(3) 下弯针线
这是获得正确线张力的最简单方法。
Tighten upperlooper thread (green)
拉紧上弯针线(绿色)
Tighten lowerlooper thread (blue)
拉紧下弯针线(蓝色)
35
Test-sewing
• Test-sew after threading.
(1)Place a piece of scrap material under the presser
foot for test sewing.
NOTE:
Always lift the presser foot before placing the fabric
under it. Just running the fabric under the foot without
lifting the presser foot may cause an uneven seam.
(2)Holding the needle threads with your left hand,
turn the pulley slowly a few times in the counter
clockwise direction with your right hand, and check
to see that the threads entwine themselves before
using the foot pedal to sew.
36
试缝
• 穿线完成后进行试缝。
(1) 在压脚下放一块废布料进行试缝。
注意:
在压脚下面放布料之前请务必将其抬起。 在走布时
如果不抬起压脚可能会造成缝边不均匀。
(2) 使用脚踏控制器缝制之前,用左手按住针线,用
右手逆时针方向慢慢旋转几次手轮,然后确认线
已自行缠绕。
Chaining-off
链缝
• After test-sewing, continue to depress the foot
• 试缝后,继续轻轻踩下脚踏控制器并链缝 4 英
controller slightly and chain off 4 inches. The
threads will entwine themselves into a chain
automatically.
NOTE:
If the thread tension is not correctly balanced, the
chaining-off result will be uneven.
If this happens, pull the threads slightly. Check the
threading order and adjust the thread tension to
create an even chain. (See page 28.)
寸。 线将自动缠成链式线迹。
注意:
如果线张力未正确平衡,则链缝会不均匀。
如果发生这种情况,请略微将线拉出。 确认穿线顺
序并调整线张力使其产生出均匀的链式线迹。 (请
参见第 29 页。)
37
Sewing
缝制
To start sewing
开始缝制
• Thread the machine and pull the threads out about
• 为缝纫机穿线并将所有的线拉至压脚后,拉出约
•
•
•
•
15 cm (6 inches) behind the presser foot.
Lift the presser foot and place the material well
underneath the presser foot before starting to sew.
Slowly sew a few stitches by turning the pulley by
hand.
The fabric will be fed automatically. You need only
guide it in the required direction.
Check the stitch formation (stitch chain) to see if
it is uniform. If the stitch is not uniform, re-check
that the threading has been done properly and
in sequence.
Follow the Seam Allowance Guide (3/8, 1/2, 5/8,
1”) for consistent cutting of the fabric seams.
15厘米(6 英寸)。
• 开始缝制之前,请抬起压脚并将布料在压脚下放
好。 手动旋转手轮慢慢缝制几针。
• 布料将被自动送入。 只需要按所需方向将其导
入。
• 确认针迹形状(链式线迹)是否均匀。 如果针迹
不均匀,请重新确认是否已正确并按照顺序完成
穿线。
• 顺着缝边导线(3/8、1/2、5/8 和 1 英寸)对布料
缝边进行统一裁切。
1 压脚
2 上切刀
1Presser foot
2Upper knife
2
1
38
To remove work
取下布料
• When the seam is finished, keep the machine
• 缝制完缝边时,使缝纫机保持以低速运转以进行
running at a low speed to obtain chaining-off.
Then cut the stitches 5 cm (2 inches) from the
work. If feeding for chaining-off is not enough, pull
the thread gently.
If threads break during
sewing
• Remove the material and re-thread in the correct
order. Upperlooper, Lowerlooper, right needle
and then the left needle. Replace the material
under the presser foot and sew 3-5 cm (1-1/8 to
2 inches) over the previous stitches.
CAUTION
Do not leave straight pins in the fabric when
sewing as they will damage the needles and
knives.
链缝。 然后在离加工品 5 厘米(2 英寸)处将链
缝剪断。 如果链缝长度不足,请轻轻拉出线。
如果在缝制过程中断线
• 取出布料并按正确的顺序重新穿线。 穿线顺序依
次为上弯针、下弯针、右针和左针。 移动压脚下
的布料并在原有的针迹上缝 3-5 厘米(1-1/8 到
2 英寸)。
小心
缝制时不要将大头针忘在布料中,否则会损坏
针和切刀。
39
To sew heavy materials
缝制重质布料
• Place the material underneath the presser foot
• 将布料置于压脚下面直至其接触上切刀的前端。
until it touches the front of the upper knife.
Start sewing.
• Do not lift the presser foot while sewing.
• 在缝制过程中不得抬起压脚。
然后开始缝制。
To sew fine materials
缝制轻质布料
(1)Adjust the presser foot to prevent the material
from puckering and to allow sewing of curves.
(See next page.)
(2)Loosen the thread tension, but remember that
if the tension is too loose, the thread may break
and stitches may be skipped.
(3)Dull knives will not cut a clean seam, and will also
cause the fabric to pucker.The cutting knives need
to be replaced if you notice the fabric puckering
while sewing.
(1) 调整压脚可以防止布料褶皱也可以进行曲线缝
制。(参见下页。)
(2) 放松线张力,但请记住如果张力太松,可能会发
生断线和跳针。
(3) 使用钝刀不仅无法切割出齐整美观的缝边,还会
使布料产生褶皱。 如果您在缝制过程中发现布料
褶皱,请更换切刀。
40
Presser foot pressure
压脚压力
• The pressure of the presser foot can be adjusted
• 转动缝纫机左上方的压力调整螺丝可调整压脚压
by turning the pressure adjustment screw at the
top left of this machine. Since this machine has
already been adjusted to a pressure suitable for
light to medium fabrics, no further adjustment is
necessary except when sewing on very heavy or
very light materials. Usually, when sewing on very
light materials, the presser foot pressure should
be loosened. When sewing very heavy materials,
the presser foot pressure should be tightened.
力。 由于本机已经将压力调整至适合轻质到中
质布料的范围,因此,除非缝制质地极重或极轻
的布料,否则无需做进一步的调整。 通常在缝制
质地极轻的布料时,应减小压脚压力。 在缝制质
地极重的布料时,应增大压脚压力。
1 压力调整螺丝
2 较小的压力
3 较大的压力
4 压力调整螺丝
5 (适用于中质布料的标准高度)
1Pressure adjustment screw
2Less pressure
3More pressure
4Pressure adjustment screw
5(Standard height for medium material)
1
2
3
4
8mm
(5/16 inch)
5
41
Troubleshooting
This sewing machine is designed for trouble-free operation. However, the following chart indicates trouble which
may occur if basic adjustments are not made properly.
Trouble
1. Does not feed
2. Needles break
3. Threads break
4. Skipped stitches
5. Stitches are not
uniform
Cause
Presser foot pressure too loose
1. Needles bent, or needle tip
blunt
Replace with new needle.
2. Needles incorrectly installed
Install needles correctly.
(See page 8.)
3. Material pulled forcibly
Do not press or pull material too hard when
sewing.
1. Improper threading
Thread correctly.
(See pages 17~27.)
2. Thread tangled
Check spool pin, thread holders, etc. and
remove tangled thread.
3. Thread tension too tight
See pages 30~35, “Thread tension”.
4. Needles incorrectly installed
Install needles correctly.
(See page 8.)
5. Wrong needle used
Use correct needle
Schmetz 130/705H – suggested
1. Needle bent, or needle tip
blunt
Replace with new needle.
2. Needle incorrectly installed
Install needle correctly.
(See page 8.)
3. Wrong needle used
Use correct needle.
Schmetz 130/705H – suggested
4. Improper threading
Thread correctly.
(See pages 17~27.)
5. Presser foot pressure too
loose
Turn the pressure adjustment screw
clockwise to increase the presser foot
pressure.
Thread tensions are not adjusted
See pages 30~35, “Thread tension”.
properly
1. Thread tension too tight
Decrease thread tension when sewing
lightweight or fine material.
(See pages 30~35.)
2. Improper threading or thread
tangled
Thread correctly.
(See pages 17~27.)
6. Fabric is puckered
42
Remedy
Turn the pressure adjustment screw
clockwise to increase the presser foot
pressure.
故障排除
本缝纫机可保证无故障操作。 但是,如果未正确进行基本调整,可能会发生下表中所示的问题。
故障
1. 无法送布
2. 断针
3. 断线
4. 跳针
5. 针迹不一致
原因
压脚压力过小
解决方法
顺时针旋转压力调整螺丝,增大压脚压力。
1. 针弯曲或针尖钝
更换新针。
2. 针未正确安装
正确安装针。
(请参见第 8 页。)
3. 用力拉拽布料
缝制时,请勿用力按压或拉拽布料。
1. 穿线不正确
请正确穿线。
(请参见第 17~27 页。)
2. 缠线
检查线筒轴、线支架等并且排除缠线。
3. 线张力太紧
请参见第 30~35 页,“线张力”。
4. 针未正确安装
正确安装针。
(请参见第 8 页。)
5. 使用了错误的针
使用正确的针
Schmetz 130/705H – 建议使用
1. 针弯曲或针尖钝
更换新针。
2. 针未正确安装
正确安装针。
(请参见第 8 页。)
3. 使用了错误的针
使用正确的针。
Schmetz 130/705H – 建议使用
4. 穿线不正确
请正确穿线。
(请参见第 17~27 页。)
5. 压脚压力过小
顺时针旋转压力调整螺丝,增大压脚压力。
线张力未正确调节
请参见第 30~35 页,“线张力”。
1. 线张力太紧
缝制轻质或精细布料时,请降低线张力。
(请参见第 30~35 页。)
2. 穿线不正确或缠线
请正确穿线。
(请参见第 17~27 页。)
6. 布料褶皱
43
Stitch Selection
针迹选择
Two-needle models
• This sewing machine can sew five different stitches
by following the simple steps below:
双针型号
• 本缝纫机按照下面简单步骤可缝制五种不同的针
迹:
(1)Four-thread overlock stitch
Use all four threads and two needles for producing
four-thread overlock stitches.
Use:Ideal for sewing knits and wovens.
(1) 4 线包缝针迹
使用所有 4 根线、2根针缝制 4 线包缝针迹。
用途: 非常适用于缝制针织和机织布料。
(2)Three-thread overlock stitch (5 mm/3/16
inch)
Use three threads and the left needle, producing
5 mm seams, which works with all kinds of
materials.
Use:For overlock stitching on suits, blouses,
slacks, etc.
NOTE:
Remove the right needle when sewing this overlock
stitch.
(3)Three-thread overlock stitch (2.8 mm/1/8
inch)
Use three threads and the right needle, producing
2.8 mm (1/8 inch) seams.
Use:For overlock stitching on suits, blouses,
slacks, etc.
NOTE:
Remove the left needle when sewing this overlock
stitch.
(2) 3 线包缝针迹( 5 毫米/3/16 英寸)
用 3 根线和左针,缝制 5 毫米缝边,适用于所有
质地的布料。
用途: 适用于套装、女士衬衫、便服等的包缝
针迹。
注意:
缝制这种包缝针迹时请卸下右针。
(3) 3 线包缝针迹(2.8 毫米/1/8 英寸)
用 3 根线和右针,缝制 2.8 毫米(1/8 英寸)缝
边。
用途: 适用于套装、女士衬衫、便服等的包缝
针迹。
注意:
缝制这种包缝针迹时请卸下左针。
(4) 窄包缝/卷边针迹(2.0 毫米/1/32 英寸)
作为装饰或修饰针迹使用。
(4)Narrow/rolled hemming stitches (2.0mm/1/32
inch)
Use as decorative or finishing stitch.
(1)
(3)
(2)
(4)
One-needle models
• This sewing machine can sew two different
stitches.
(1)Three-thread overlock stitch (3.5 mm/9/64
inch)
Use:For overlock stitching on suits, blouses,
slacks, etc.
(2)Narrow/rolled hemming stitches (2.0mm/1/32
inch)
Use as decorative or finishing stitch.
(1)
44
单针型号
• 本缝纫机可缝制两种不同的针迹。
(1) 3 线包缝针迹(3.5 毫米/9/64 英寸)
用途: 适用于套装、女士衬衫、便服等的包缝
针迹。
(2) 窄包缝/卷边针迹 2.0 毫米(1/32 英寸)
作为装饰或修饰针迹使用。
(2)
Narrow overlock stitch/
rolled edge stitch
窄包缝针迹/
卷边针迹
The Narrow overlock/Rolled edge stitch is a decorative
finish for lightweight to midweight fabrics. It is often
used to complete the edge of a fabric. This stitch
is sewn by removing the left needle and using the
3-thread overlock stitch.
窄包缝/卷边针迹是轻质到中质布料的装饰针迹。 经
常用来给布料边缘包缝。 卸下左针并使用 3 线包缝
针迹即可缝制这种针迹。
Instructions for both Narrow overlock/Rolled
edge Stitches
(1)Remove the left needle (on Two-needle models).
窄包缝/卷边针迹的说明
(1) 卸下左针(双针型号)。
(2)It is recommended that a #80 Nylon or Polyester
thread be used on the following fabric:
(2) 建议在缝制下列布料时采用 #80 尼龙或涤纶线:
Georgette
Rayon
Linen/Light Cotton
Broad Cloth
(3)Thread the machine for a three thread overlock,
using the right needle.
(4)Remove the stitch finger.
1Raise the presser foot lever.
2Pull all threads toward the back of the machine.
3Check to make sure that the thread is no longer
wrapped around the stitch finger.
4Open the front cover.
5Turn the hand wheel until the upperlooper is
at its lowest position.
乔其纱
人造纤维
亚麻/轻质棉布
阔幅布
(3) 使用右针为缝纫机穿线以进行 3 线包缝。
(4) 卸下针迹指针。
1 抬起压脚抬杆。
2 将所有线拉向缝纫机后部。
3 确保线不再缠绕在针迹指针上。
4 打开前盖。
5 旋转手轮直到上弯针处于最低位置。
45
6Press the stitch finger release lever to remove
the stitch finger.
7Storage for the stitch finger is provided on the
inside of the front cover illustrated.
NOTE:
Make sure to install stitch finger when sewing regular
overlock stitches.
6 按下针迹指针释放杆以卸下针迹指针。
7 针迹指针的存放位置如图所示在前盖内。
注意:
缝制正常包缝针迹时请务必安装针迹指针。
1 上弯针
2 针迹指针
3 针迹指针释放杆
4 前盖
5 针迹指针支架
6 针迹指针
1Upperlooper
2Stitch finger
3Stitch finger release lever
4Front cover
5Stitch finger holder
6Stitch finger
1
5
2
6
4
3
(5)Adjust the stitch width for rolled hemming.
Move the stitch width lever (located on the left
side of the machine toward the front) up to the
“R” position.
7Stitch width lever
8Needle plate with stitch finger removed
6
5
R
8
B
8
3.5
R
7
46
7
7 针迹宽度控制杆
8 取下针迹指针的针板
A 双针型号
B 单针型号
ATwo-needle models
BOne-needle models
A
(5) 调整卷边针迹的针迹宽度。
将针迹宽度控制杆(位于缝纫机左前方)向上移
动至“R”位置。
7
(6) 调整针迹长度。
将针迹长度调整杆设置到如图所示的“R”位置。
这种调整适用于窄包缝针迹或卷边针迹。
(6)Adjust the stitch length.
Set the stitch length adjustment lever to “R” position
as shown in the illustration. This adjustment is
suitable for either Narrow Overlock stitch or Rolled
Edge stitch.
R
2
3
4
To Do Rolled Edge Stitch
This application rolls the edge of the fabric inside of
the hem stitch. The lowerlooper tension should be
tightened. This pulls the upperlooper thread causing
the edge of the fabric to fold around the remaining
stitch finger. After completing steps (1) through (6)
above, adjust your machine to these recommended
thread tension settings:
缝制卷边针迹
这种应用是将针迹内侧的布料边卷起来。 下弯针张
力应拉紧。 这样就会牵拉上弯针线,使布料边缘围
绕针迹指针的剩余部分形成褶皱。 在完成上述步
骤 (1) 至 (6) 后,将缝纫机调整为下面推荐的线张
力设置:
Upperlooper thread tension at 1-4
Lowerlooper thread tension at 5-7
Right needle thread tension at 4
Tension may vary slightly according to the fabric
and thread used.
上弯针线张力为 1-4
下弯针线张力为 5-7
右针线张力为 4
根据使用的布料及缝线情况,张力可能会略有不
同。
To Do Narrow Overlock Stitch
This is a decorative application used for finishing the
edge of the fabric. After completing steps (1) through
(6) above, adjust the thread tension to achieve a
normal 3-thread overlock stitch.
Recommended thread tension settings are:
缝制窄包缝针迹
该针迹是用于修饰布料边缘的一种装饰性应用。 在
完成上述步骤 (1) 至 (6) 后,调整线张力以进行正常
的 3 线包缝针迹缝制。
推荐的线张力设置为:
All thread tensions should be set at 4
Tension may vary slightly according to the fabric
and thread used.
所有的线张力应设置为 4
根据使用的布料及缝线情况,张力可能会略有不
同。
47
Chart of Narrow Overlock/Rolled Edge Stitch
Rolled edge stitch
Stitch Style
Fabrics
Needle thread
Upperlooper thread
Narrow overlock stitch
Underside of material
Underside of material
Top of material
Top of material
Light material
Light material
Crepe de chine
Crepe de chine
Georgette
Georgette
Lawn
Lawn
Organdie
Organdie
Nylon thread #80
Nylon thread #80
Polyester thread #80
Polyester thread #80
Wooly nylon thread
Wooly nylon thread
Decorative thread
Nylon thread #80
Polyester thread #80
Lowerlooper thread
Nylon thread #80
Nylon thread #80
Polyester thread #80
Polyester thread #80
Stitch Length
R
R
Stitch Width
R.5 (Two-needle models)
R.5 (Two-needle models)
R (One-needle models)
R (One-needle models)
Removed
Removed
Needle Thread
4 (3 – 5)
4 (3 – 5)
Upperlooper Thread
3 (1 – 4)
4 (3 – 5)
Lowerlooper Thread
6 (5 – 7)
4 (3 – 5)
Stitch Finger
Thread Tension
48
窄包缝/卷边针迹表
卷边针迹
针迹风格
布料
穿针线
上弯针线
窄包缝针迹
布料下面
布料下面
布料上面
布料上面
轻质布料
轻质布料
双绉
双绉
乔其纱
乔其纱
上等细布
上等细布
奥甘迪丝
奥甘迪丝
尼龙线 #80
尼龙线 #80
涤纶线 #80
涤纶线 #80
羊毛尼龙线
羊毛尼龙线
装饰线
尼龙线 #80
涤纶线 #80
尼龙线 #80
尼龙线 #80
涤纶线 #80
涤纶线 #80
针迹长度
R
R
针迹宽度
R.5(双针型号)
R.5(双针型号)
R(单针型号)
R(单针型号)
卸下
卸下
针线
4 (3 – 5)
4 (3 – 5)
上弯针线
3 (1 – 4)
4 (3 – 5)
下弯针线
6 (5 – 7)
4 (3 – 5)
下弯针线
针迹指针
线张力
49
Examples of Sewing
Applications for this
Serger
本锁边器的缝制
应用实例
Features
• When using the blind stitch presser foot
(multipurpose foot), you can sew blind stitches
and overlock at the same time. This is ideal
when sewing cuffs, trouser bottoms, pockets,
and hemming skirts etc.
• The stitch guide on this foot is also useful when
sewing special stitches like flatlock, pin tuck and
other decorative stitches.
• This stitch guide is easily adjustable without using
any tool.
功能
• 使用暗缝针迹压脚(多功能压脚)时,可以同时
缝制暗缝针迹和包缝。 缝制袖口、裤子底部、
口袋和卷边裙子等时非常理想。
• 这种压脚的针迹导线杆在缝制特殊针迹时也非常
有用,如平式锁缝针迹、双螺纹针迹和其它装饰
针迹。
• 这种针迹导线杆易于调整且无需使用任何工具。
如何更换压脚
How to change feet
• 关闭主电源开关或者断开电源插头。
• Turn off the main power switch or disconnect the
(1) 抬起压脚抬杆。 1
(2) 逆时针旋转手轮 2 将针设置在最高位置。
(3) 按压脚支架的按钮,然后可松开标准压脚。
34
(4) 向上推压脚抬杆抬起压脚。 然后卸下压脚并将其
存放在安全的地方。
(5) 再次向上推压脚抬杆抬起压脚。 然后将暗缝针迹
压脚(多功能压脚)放在压脚支架 A 的正下方,
这样压脚支架 B 底部中的凹槽便能对齐并且刮到
压脚 C上方的杆。然后放下压脚抬杆以连接压
脚。
electric supply plug.
(1)Raise the presser foot lever. 1
(2)Set the needle to its highest position by turning
the hand wheel 2 counter clockwise.
(3)Push the button on the presser foot holder and
the standard foot will be released. 3 4
(4)Raise the presser foot farther by pushing the
presser foot lever upward. Then remove the
presser foot and store it in a safe location.
(5)Again, raise the presser foot farther by pushing
the presser foot lever upward.Then place the blind
stitch presser foot (multipurpose foot) just under
the presser foot holder A so that the groove in
the bottom of the presser foot holder B is aligned
and catches the bar on the top of the foot C. Then
lower the presser foot lever to attach the foot.
A
41
2
50
1
3
B
2
C
4
Blind stitching with blind
stitch presser foot
采用暗缝针迹压脚的
暗缝针迹
The Blind hem stitch is used for putting a near-invisible
hem in garments or home decoration projects. Use
it to hem pants, skirts, or draperies.
暗缝针迹用于在衣服或家庭装饰物内缝制不明显的暗
缝。 用来为裤子、裙子或帏帐缝制暗缝。
aReplace the presser foot with a blind stitch presser
foot (multipurpose presser foot). (Refer to page
50.)
bSet up the machine for 3 thread overlock stitch
with one needle in the left position (on Two-needle
models).
• The right needle should be removed.
cTurn the wrong side of the fabric out, fold the
fabric once and then back to the required width,
as illustrated.
• Sewing will be easier if a crease is ironed into the
folded fabric before sewing.
dTurn the handwheel counter clockwise and set
the needle at its highest position.
eLift the presser foot lever and insert the fabric with
the folded edge on the left in such a way that the
needle pierces just the folded edge as it sews.
fLower the presser foot lever, adjust the fabric
guide toward the folded edge.
gAdjust the guide position of the presser foot with
the adjusting screw so that the needle is lightly
touching the crease in the fabric. In this case, the
thickness of the fabric is the criterion.
By turning the screw forward (toward you) the
fabric guide will go to the right. By turning the
screw backward (away from you) the fabric guide
will go to the left.
• To adjust the position of the fabric guide, a piece
of the same fabric should be used to do a sewing
test.
hWhile folding the fabric by hand, sew so that the
needle just catches the edge of the crease.
iOpen the fabric as shown in the illustration.
• For best results, use a fine thread in a color that
matches the fabric.
When done correctly, this stitch will be very hard
to see on the right side of the fabric.
a 将压脚更换为暗缝针迹压脚(多功能压脚)。
(参见第 50 页。)
b 将缝纫机设置为 3 线包缝针迹,保留左侧位置的
针(在双针型号机器上)。
• 应卸下右针。
c 如图所示,将布料的反面朝外翻转,折叠布料一
次,然后再恢复到所需宽度。
• 如果在缝制前将折叠布料熨烫出折缝,缝制就会
变得容易些。
d 逆时针转动手轮,使针处于最高位置。
e 抬起压脚拨杆并插入布料,让左侧折叠边恰好处
于缝制时针可以穿透折叠边的位置。
f 放低压脚抬杆,朝折叠边方向调整布料导杆。
g 使用调整螺丝调整压脚导线杆位置,使针刚好碰
到布料的折缝。 在此种情况下,布料的厚度是调
整时的依据。
向前旋转螺丝(朝向自身方向),布料导杆移动
到右侧。 向后旋转螺丝(远离自身方向),布料
导杆移动到左侧。
• 若要调整布料导杆的位置,应使用同一块布料进
行试缝。
h 用手折叠布料使针恰好落在折缝的边缘,然后进
行缝制。
i 请按图中所示打开布料。
• 为了获得最佳效果,请使用与布料颜色相匹配的
细线。
选好线后,很难在布料正面上分辨出这种针迹。
51
NOTE:
The following are the recommended setting.
Stitch Width :5 mm (Two-needle models)
3.5 mm (One-needle models)
Stitch Length :3 ~ 4 mm
Needle Thread Tension :Slightly Slackened (0-2)
Upper Looper Thread Tension :Slightly Tightened
(5-7)
Lower Looper Thread Tension :Slightly Slackened
(2-4)
注意:
下面所列为推荐设置。
针迹宽度:5 毫米(双针型号)
3.5 毫米(单针型号)
针迹长度:3 - 4 毫米
针线张力:略微松弛 (0-2)
上弯针线张力:略微拉紧 (5-7)
下弯针线张力:略微松弛 (2-4)
找一块布进行试缝,以调整布料导杆及线张力。
Test sew on a scrap of the fabric to adjust the fabric
guide and the thread tension.
1Reverse
2Needle path
3Adjusting screw
4Fabric guide
a
1 反面
2 针通道
3 调整螺丝
4 布料导杆
c
2
A
41
2
1
3
C
4
gh
i
3
4
52
1
B
2
Flatlock stitching with
blind stitch presser foot
采用暗缝针迹压脚的平式锁
缝针迹
The Flatlock stitch is primarily used as a decorative
finish on a project. The finished stitch can look like
a ladder or small parallel lines when the fabric is
pulled flat. Either stitch finish can be used on the right
side of the fabric. If you sew with the wrong sides
together, the upper looper thread will decorate the
right side when pulled flat. If you sew with the right
sides together, the needle thread ladder will decorate
the right side when pulled flat.
平式锁缝针迹主要用于衣物上的装饰。 在拉直布料
后装饰针迹看上去像是梯形或平行线。 两种针迹装
饰均可用于布料正面。 如果你将布料反面缝制在一
起,在拉直布料后,布料正面会出现上弯针装饰线。
如果你将布料正面缝制在一起,在拉直布料后,布料
正面将出现梯形线迹。
aReplace the presser foot with a blind stitch presser
foot (multipurpose presser foot). (Refer to page
50.)
bSet up the machine for 3 thread overlock with
one needle in the left position (on Two-needle
models).
• The right needle should be removed.
cFold the fabric as shown in the illustration.
dTurn the handwheel counter clockwise to set the
needle at its highest position.
eLift the presser foot lever and insert the fabric with
the folded edge in such a way that the needle
pierces just on the fold.
fLower the presser foot lever, adjust the fabric
guide toward the folded edge.
gAdjust the guide position of the presser foot with
the adjusting screw so that the needle moves
down to a position 1/8 inch (2.5–3.0 mm) inside
the folded edge of the fabric, so that some of the
stitching loops over the edge.
By turning the screw forward (toward you) the
fabric guide will go to the right. By turning the
screw backward (away from you) the fabric guide
will go to the left.
• To adjust the position of the fabric guide, a piece
of the same fabric can be used to do a sewing
test.
hWhile holding the fabric pieces together, sew at
a constant speed down the fold.
iWhen stitching is finished, pull the fabric open
(flat) as shown in the illustration.
a 将压脚更换为暗缝针迹压脚(多功能压脚)。
(参见第 50 页。)
b 将缝纫机设置为 3 线包缝针迹,保留左侧位置的
针(在双针型号机器上)。
• 应卸下右针。
c 请按照图中所示折叠布料。
d 逆时针转动手轮,使针处于最高位置。
e 抬起压脚抬杆并放入布料,让折叠边恰好处于针
可以穿透折叠边的位置。
f 放低压脚抬杆,朝折叠边方向调整布料导杆。
g 使用调整螺丝调整压脚上布料导杆的位置,使针
向下移动到布料折叠边内 1/8 英寸(2.5-3.0 毫米)
的位置,这样缝制时针迹会刚好包住布边。
向前旋转螺丝(朝向自身方向),布料导杆移动
到右侧。 向后旋转螺丝(远离自身方向),布料
导杆移动到左侧。
• 若要调整布料导杆的位置,可使用相同的一块布
进行试缝。
h 将布料折叠,以稳定的速度沿折叠边缝制。
i 在完成缝制后,按图中所示的方法拉开(拉平)
布料。
53
• This method is not suitable for thin fabrics.
• 这种方法不适用于薄布。
The following are the recommended setting.
Stitch Width :5 mm (Two-needle models)
3.5 mm (One-needle models)
Stitch Length :2 ~ 4 mm
Needle Thread Tension :0-3
Upper Looper Thread Tension :2-5
Lower Looper Thread Tension :6-9
下面所列为推荐设置。
针迹宽度:5 毫米(双针型号)
3.5 毫米(单针型号)
针迹长度:2 - 4 毫米
针线张力:0-3
上弯针线张力:2-5
下弯针线张力:6-9
Test sew on a scrap of the fabric to adjust the fabric
guide and the thread tension.
找一块布进行试缝,以调整布料导杆及线张力。
1 反面
2 调整螺丝
3 布料导杆
1Reverse
2Adjusting screw
3Fabric guide
a
c
A
41
2
1
3
4
C
gh
i
i
2
3
54
1
B
2
Pin tuck stitching with
blind stitch presser foot
采用暗缝针迹压脚的
双螺纹针迹
The Pin tuck stitch uses a rolled edge to add shape
and decoration to any sewing project. Fold the fabric
on a line where the pin tuck is to be located and guide
the fold through the serger. Contrasting thread in the
upper looper adds an accent to your project.
双螺纹针迹采用卷边为缝制衣物增添外形和装饰。
沿双螺纹针迹所在的线上折叠布料,并将折缝导入锁
边器。 上弯针的对比缝线可以增添衣物的韵味。
Use the blind stitch presser foot to make narrow
overlock stitches to produce seams in the form of
tucks at equal distances from each other.
For thin fabrics, it’s a good idea to choose a fine
thread which will run smoothly.
aReplace the presser foot with a blind stitch presser
foot (multipurpose presser foot). (Refer to page
50.)
bSet up the machine for narrow overlock stitching.
(Refer to pages 45–48.)
cDraw equally spaced lines on the fabric with a
fabric pencil as guides for pin tuck placement.
Fold the fabric along one of the lines and press
in place lightly with an iron.
dTurn the handwheel counterclockwise to set the
needle at its highest position.
eLift the presser foot lever and insert the fabric with
the folded edge in such a way that the needle
pierces just the folded edge.
fLower the presser foot lever, adjust the fabric
guide toward the folded edge.
gAlign the blind stitch presser foot guide with the
line on the right side of the stitch finger.
By turning the screw forward (toward you) the
stitch guide will go to the right. By turning the
screw backward (away from you) the stitch guide
will go to the left.
hAlign the fold with the guide and insert the fabric
up to the needle position.
iGuide the fold in the fabric to sew half way between
the needle and the upper knife.
jContinue sewing until all marked lines have been
sewn.
• Correct minor contractions by hand.
Test sew on a scrap of the fabric to adjust the fabric
采用暗缝针迹压脚缝制窄包缝针迹可形成彼此间距
离相同的螺纹缝边。
对于薄布料,最好选择易于走线的细线。
a 将压脚更换为暗缝针迹压脚(多功能压脚)。
(参见第 50 页。)
b 将缝纫机设置为缝制窄包缝针迹。 (参见第 45-49
页。)
c 用铅笔在布料上画等距线作为双螺纹针迹的辅助
线。 沿其中一条线折叠布料并用熨斗轻轻按压使
之贴服。
d 逆时针转动手轮,使针处于最高位置。
e 抬起压脚抬杆并放入布料,让折叠边恰好处于针
可以穿透折叠边的位置。
f 放低压脚抬杆,朝折叠边方向调整布料导杆。
g 将暗缝针迹压脚布料导杆对准针迹指针的右侧。
向前旋转螺丝(朝向自身方向),针迹导线杆移
动到右侧。 向后旋转螺丝(远离自身方向),针
迹导线杆移动到左侧。
h 将折叠布边对准导杆并将布料正面朝上插入针所
在的位置。
i 将布料的折叠边放在针落下距上切刀之间一半的
位置缝制。
j 继续缝制直到缝制完所有标记的线。
• 用手将轻微收缩的部分抚平。
55
找一块布进行试缝,以调整布料导杆及线张力。
guide and the thread tension.
1 双针型号上
2 上弯针
3 针迹指针
4 针迹指针释放杆
5 针迹宽度控制杆
6 普通针板
7 针迹长度调整杆
8 划线
9 对折
0 调整螺丝
A 布料导杆
1On Two-needle models
2Upperlooper
3Stitch finger
4Stitch finger release lever
5Stitch width lever
6Regular needle plate
7Stitch length adjustment lever
8Making lines
9Fold in two
0Adjusting screw
AFabric guide
a
A
1
3
41
2
b
B
2
C
4
1
6
2
5
R
5
3
2
3
4
4
c
R
6
8
7
9
j
ghi
j
0
A
56
7
Decorative stitching
装饰针迹
Attractive decorative stitches can be made through
different combinations of fabric and thread. Decorative
thread with a high thread count or extremely fine
thread can be used in the upperlooper to produce
decorative stitches to make any project more
exciting.
漂亮的装饰针迹可通过不同的布料和缝线组合实现。
高密度织物的装饰线或极细的线可用于上弯针以缝制
装饰针迹,使衣物更显精美。
Other special purpose presser feet that are
available
(1)Tape presser foot
For all models: LT5
Parts No. X76663001
SA212 (U.S.A., CANADA)
(2)Pearlsequence presser foot
Presser foot: LS
Parts No. XB0537001
(3)Piping presser foot
Presser foot: LP
Parts No. XB0241101
还可使用其他特殊用途的压脚
(1) 镶边压脚
适用于所有型号: LT5
部件号 X76663001
SA212(美国、加拿大)
(2) 珠带压脚
压脚: LS
部件号 XB0537001
(3) 滚边压脚
压脚: LP
部件号 XB0241101
(1)
(2)
(3)
LP
57
Upper Knife and
Lower Knife
上切刀和
下切刀
Worn or blunt knives will cause the material to
pucker or stitches to be uneven.
• If one strand of thread can be cut off in front of or at
the rear of the knife, the knife is sharp enough.
• When the knives are blunt, replace them as
described on the next page. Be sure to unplug
the power supply cord from the wall outlet before
removing the knives.
使用磨损或变钝的切刀会使布料产生褶皱或使针
迹不平整。
• 如果切刀的前端或后端可以切断线束,则说明该
切刀足够锋利。
• 当切刀变钝时,应按下页所述更换切刀。 卸下切
刀前,请务必从墙壁电源插座上拔下电源线。
Retracting upper knife
收回上切刀
Move the knife lever to the left when the upper knife
is not being used.
1
The top part of the upper knife will stick out above
the needle plate.
• Use the projecting part of the upper knife as a
guide for the fabric.
Adjust the stitch width lever to move the upper knife
to the desired guide position.
在不使用上切刀时,应将切刀杆移到左侧。
2
上切刀的上部将突出于针板上方。
• 上切刀的突出部分可以用作布料导向件。
调整针迹宽度控制杆,以便将上切刀移动到所需的
导向位置。
6
7
5
R
CAUTION
Move the knife lever only while the needle is
at its lowest point.
58
小心
只有针处于最低点时才能移动切刀杆。
Replacing the knives
更换切刀
Replacing the upper knife
(1)To remove the knife, loosen the upper knife set
screw and pull up the upper knife.
(2)Insert the new knife into the upper knife holder.
(3)Then turn the pulley by hand until the upper knife
is in the down position. Check that the upper
knife is in front of the lower one and adjust the
clearance between it and the edge of the lower
knife to between 0.5 mm and 1.0 mm.
(4)Retighten the upper knife securely.
更换上切刀
(1) 若要卸下切刀,应松开上切刀固定螺丝并向上拉
出上切刀。
(2) 将新的切刀插入上切刀支架中。
(3) 用手转动手轮,直到上切刀处于下位。 检查上切
刀是否位于下切刀的前方,并将其与下切刀边缘
之间的距离调整到 0.5 至 1.0 毫米。
(4) 重新拧紧上切刀。
1Upper knife set screw
2Needle plate
3Upper knife
4Lower knife
2
1 上切刀固定螺丝
2 针板
3 上切刀
4 下切刀
3
1.2~1.7mm
4
1
Replacing the lower knife
(1)Loosen the lower knife set screw and pull down
the lower knife.
(2)Insert the new knife into the lower knife holder.
(3)Position the lower knife so that its edge is flush
with the needle plate.
(4)Tighten the lower knife set screw.
• It is important to adjust the alignment of the upper
and lower knives for sharp cutting.
0.5~1.0mm
更换下切刀
(1) 松开下切刀固定螺丝并向下拉出下切刀。
(2) 将新的切刀插入下切刀支架中。
(3) 将下切刀放在适当位置,使其边缘与针板对齐。
(4) 拧紧下切刀固定螺丝。
• 调整上、下切刀的对正情况对于实现锋利的切割
功能非常重要。
59
Oiling
For smooth and silent operation, the moving parts
of the machine should be oiled periodically. (See
diagram below.)
REMARKS:
Be sure to oil your sewing machine before use. Always
clean the lint off your machine before you apply oil.
OIL THE MACHINE ONCE OR TWICE A MONTH
FOR NORMAL USE. IF THE MACHINE IS USED
MORE OFTEN, OIL IT ONCE A WEEK.
➡ Suggested Oiling Points
60
加机油
若要实现流畅、无噪音操作,应定期为缝纫机的活
动部件加机油。 (参见下列图表。)
备注:
使用缝纫机前请务必加机油。 加机油前请务必清洁
缝纫机上的毛绒。
每个月加机油 1 次或 2 次可保证正常使用。 如果缝
纫机使用更为频繁,请每周加机油 1 次。
➡ 推荐的机油加注点
Changing the Light
Bulb
更换照明灯泡
CAUTION
Always be sure to turn off the power before
carrying out the following operation.
小心
在进行下列操作前,请务必先关闭电源开关。
Changing the light bulb.
• Remove the lamp cover as shown in the
illustration.
• Loosen the light bulb cover set screw pull up the
light bulb cover and remove it.
• Take out the light bulb and replace it with a new
one.
更换照明灯泡
• 请按照图中所示拆下灯罩。
• 松开灯泡外壳固定螺丝、向上拉出灯泡外壳。
• 取出灯泡并换成新灯泡。
1 螺丝
2 灯罩
3 螺丝
4 灯泡外壳
5 灯泡
1Screw
2Lamp cover
3Screw
4Light bulb cover
5Light bulb
4
2
3
1
5
4
61
Machine Specifications
机器规格
Use
Light- to heavy-weight materials
用途
轻质到重质布料
Sewing speed
1,300 stitches per minute
缝制速度
每分钟 1300 针
Stitch width
2.3 mm to 7 mm (5/64 to 9/32 inch) (Two-needle
models)
3.0 mm to 3.5 mm (1/8 to 9/64 inch) (One-needle
models)
针迹宽度
2.3 毫米到 7 毫米(5/64 到 9/32 英寸)
(双针型号)
3.0 毫米到 3.5 毫米(1/8 到 9/64 英寸)
(单针型号)
Stitch length (pitch)
2 mm to 4 mm (5/64 to 5/32 inch)
针迹长度(针距)
2 毫米到 4 毫米(5/64 到 5/32 英寸)
Needle bar stroke
25 mm (1 inch)
针杆行程
25 毫米(1 英寸)
Presser foot
Free presser type
压脚
自由压脚类型
Presser foot lift
5 mm to 6 mm (3/16 to 15/64 inch)
压脚抬杆
5 毫米到 6 毫米(3/16 到 15/64 英寸)
Needle
SCHMETZ 130/705H
针
SCHMETZ 130/705H
No. of needles and threads
Three/Four threads convertible
Two needles or single needle
针数和线数
可进行 3/4 线转换
单针或双针
Machine net weight
7.0 kgs.
缝纫机净重
7.0 公斤
Needle set SCHMETZ 130/705H.
#80 (2)
#90 (2)
针组 SCHMETZ 130/705H.
#80 (2)
#90 (2)
62
SETTING RECORD / 设置记录
FABRIC
布料
THREAD
线
NEEDLE
针
THREAD TENSION
线张力
left
right upper- lowerneedle needle looper looper
左针
右针
上弯针 下弯针
❈
NOTE
注意
STITCH
TYPE
针迹类型
❈ on Two-needle models
双针型号上
63
English
Chinese-simp
884-345
XB2456-001
Printed in Taiwan