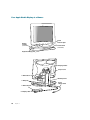
1
Studio Display User’s Manual K Apple Computer, Inc. © 1998 Apple Computer, Inc. All rights reserved. 1 Infinite Loop Cupertino, CA 95014-2084 408-996-1010 http://www.apple.com Under the copyright laws, this manual may not be copied, in whole or in part, without the written consent of Apple. Your rights to the software are governed by the accompanying software license agreement. The Apple logo is a trademark of Apple Computer, Inc., registered in the U.S. and other countries. Use of the “keyboard” Apple logo (Option-Shift-K) for commercial purposes without the prior written consent of Apple may constitute trademark infringement and unfair competition in violation of federal and state laws. Every effort has been made to ensure that the information in this manual is accurate. Apple is not responsible for printing or clerical errors. Apple Computer, Inc. 1 Infinite Loop Cupertino, CA 95014-2084 408-996-1010 http://www.apple.com Apple, the Apple logo, ColorSync, Mac, Macintosh, PowerBook, PowerBook Duo, and Power Macintosh are trademarks of Apple Computer, Inc., registered in the U.S. and other countries. Adobe, Adobe Illustrator, Adobe Photoshop, and PostScript are trademarks of Adobe Systems Incorporated or its subsidiaries and may be registered in certain jurisdictions. The Energy Star logo is a service mark of the U.S. Environmental Protection Agency. Helvetica is a registered trademark of Linotype-Hell AG and/or its subsidiaries. NuBus is a trademark of Texas Instruments. PANTONE® and other Pantone, Inc. trademarks are the property of Pantone, Inc. Portions © Pantone, Inc. 1995. PowerPC is a trademark of International Business Machines Corporation, used under license therefrom. VESA Display Data Channel (DDC) is a trademark of the Video Electronics Standards Association. Simultaneously published in the United States and Canada. Mention of third-party products is for informational purposes only and constitutes neither an endorsement nor a recommendation. Apple assumes no responsibility with regard to the performance or use of these products. Contents Communications Regulation Information 6 1 Setting Up 7 Important Safety Instructions 7 What About Electromagnetic Emissions? 8 Using the Display 9 Do You Need to Install a Graphics Card? 10 Getting Ready to Set Up 12 Choosing a Good Location for Your Display 12 Positioning the Display 12 Using More Than One Display 14 Your Apple Studio Display at a Glance 16 Before You Set Up 17 Connecting the Display to Your Computer 17 Plugging In the Display 18 Connecting the Display Cable to a Mac OS–Based Computer 19 Connecting the Display Cable to a Windows-Based Computer 20 Connecting a Mac OS–Based Computer Keyboard and Mouse to the Desktop Stand 20 Turning the Display On 21 Turning the Display Off 22 Storing the Keyboard 22 Finding Answers 23 What’s Next 23 2 Installing and Using the Apple Displays Software 25 What’s Included in the Apple Displays Software? 25 3 Installing the Apple Displays Software on Mac OS–Based Computers 25 Installing Setup Information on Windows-Based Computers 27 Learning About the Apple Displays Software With Mac OS Help 28 Using the Monitors & Sound Control Panel 29 Using the Control Strip 31 About DigitalColor Meter 32 Specifying Colors Using the PANTONE Color Picker 32 Using ColorSync 32 Conserving Energy 32 What Happens After You Turn On the Energy-Saving Feature? 33 Setting Up Energy Saver 33 Using Energy Saver With a Screen Saver 34 Information About Copying Software 34 3 Using Manual Controls and the On-Screen Display 35 Using Manual Controls on Your Display 35 Accessing and Adjusting Controls in the On-Screen Display 37 Using the On-Screen Display in Computer Mode 38 Using the On-Screen Display in Video Mode 40 4 Attaching and Removing the Desktop Stand and Flip-Out Stand Removing the Desktop Stand Attaching the Flip-Out Stand Removing the Flip-Out Stand Attaching the Desktop Stand 5 43 45 46 47 Using Your Display for Video and Image Playback 49 About Video Formats 49 Connecting Video Equipment to Your Display 49 Connecting External Speakers 50 Connecting Video Equipment 51 Connecting to a Television Signal 52 Viewing Images and Making Adjustments to the Picture and Sound 52 6 Tips and Troubleshooting Care and Cleaning 55 4 Contents 55 43 Cleaning the Case 55 Cleaning the Screen 55 Protecting Your Display From Theft 56 Using Mac OS Help 56 Troubleshooting 57 Monitor Power or Screen Appearance 57 Sound 59 Control Strip 60 Monitors & Sound Control Panel for Mac OS–Based Computers 60 Appendix Technical Information 63 General Specifications 63 Flat Panel Display 63 Desktop Stand 63 Flip-Out Stand 63 Power-Saving and Environmental Features 63 Weight 64 Dimensions of Display (with Desktop Stand) 64 Dimensions of Display (with Flip-Out Stand) 64 Temperature 64 Humidity (noncondensing) 65 Altitude 65 Active Video Image Area 65 Power Adapter Input Electrical Requirements 66 Interfaces 66 Display Cable Specifications 66 VGA Adapter Specifications 67 Contents 5 Communications Regulation Information FCC Statement This equipment has been tested and found to comply with the limits for a Class B digital device in accordance with the specifications in Part 15 of FCC rules. See instructions if interference to radio or television reception is suspected. Radio and Television Interference The equipment described in this manual generates, uses, and can radiate radio-frequency energy. If it is not installed and used properly—that is, in strict accordance with Apple’s instructions—it may cause interference with radio and television reception. This equipment has been tested and found to comply with the limits for a Class B digital device in accordance with the specifications in Part 15 of FCC rules. These specifications are designed to provide reasonable protection against such interference in a residential installation. However, there is no guarantee that interference will not occur in a particular installation. You can determine whether your computer system is causing interference by turning it off. If the interference stops, it was probably caused by the computer or one of the peripheral devices. If your computer system does cause interference to radio or television reception, try to correct the interference by using one or more of the following measures: m Turn the television or radio antenna until the interference stops. m Move the computer to one side or the other of the television or radio. m Move the computer farther away from the television or radio. m Plug the computer into an outlet that is on a different circuit from the television or radio. (That is, make certain the computer and the television or radio are on circuits controlled by different circuit breakers or fuses.) If necessary, consult an Apple-authorized service provider or Apple. See the service and support information that came with your Apple product. Or, consult an experienced radio/television technician for additional suggestions. Important Changes or modifications to this product not authorized by Apple Computer, Inc., could void the FCC Certification and negate your authority to operate the product. This product was tested for FCC compliance under conditions that included the use of Apple peripheral devices and Apple shielded cables and connectors between system components. It is important that you use Apple peripheral devices and shielded cables and connectors between system components to reduce the possibility of causing interference to radios, television sets, and other electronic devices. You can obtain Apple peripheral devices and the proper shielded cables and connectors through an Apple-authorized dealer. For non-Apple peripheral devices, contact the manufacturer or dealer for assistance. Industry Canada Statement This Class B device meets all requirements of the Canadian interference-causing equipment regulations. Cet appareil numérique de la Class B respecte toutes les exigences du Règlement sur le matériel brouilleur du Canada. VCCI Class 2 Statement 6 Communications Regulation Information C H A P T E R 1 1 Setting Up Read this chapter for important safety information and to set up and connect the display to your computer. Important Safety Instructions For your own safety and that of your equipment, always take the following precautions. Warning Use only the power adapter that came with your display. Adapters for other computer equipment may look similar, but they may damage your display. Disconnect the power plug (by pulling the plug, not the cord) if any of the following conditions exists: m the power cord or plug becomes frayed or otherwise damaged m you spill something into the case m your display is exposed to rain or any other excess moisture m your display has been dropped or the case has been otherwise damaged m you suspect that your display needs service or repair m you want to clean the case or screen (use only the recommended procedures described in “Care and Cleaning” on page 55) The only way to disconnect power completely is to unplug the power cord and the Apple Desktop Bus (ADB) cable. Make sure at least one end of the power cord is within easy reach so that you can unplug the display when you need to. Important Be sure that you always follow these instructions: m Keep your display away from sources of liquids and moisture. m Keep the display’s vents free from obstruction. m Don’t set anything on top of the display. m Read all the setup instructions carefully before you plug your display into a power source. 7 m Keep these instructions handy for reference by you and others. m Follow all instructions and warnings dealing with your system. Never remove the case from the display! You could come in contact with hazardous voltage. Warning Electrical equipment may be hazardous if misused. Operation of this product, or similar products, must always be supervised by an adult. Do not allow children access to the interior of any electrical product and do not permit them to handle any cables. What About Electromagnetic Emissions? There has been recent public discussion of the possible health effects of prolonged exposure to extremely low frequency (ELF) and very low frequency ( VLF) electromagnetic fields. Such fields are associated with electromagnetic sources such as television sets, electrical wiring, and some household appliances—as well as computer monitors. Apple has reviewed scientific reports and sought the counsel of government regulatory agencies and respected health organizations. Based on the prevailing evidence and opinions, Apple believes that the electric and magnetic fields produced by computer monitors do not pose a health risk. In response to those customers who wish to reduce their exposure to electromagnetic fields, Apple has lowered the emission levels of our products. We are also actively encouraging further scientific research so we can continue to promote the health and safety of our customers and employees. 8 Chapter 1 Using the Display You can use your display in several ways. m You can connect your display to a Power Macintosh computer or a Windows-based computer. m You can use the flip-out stand if you want the display to be more portable, such as when you are giving presentations. Note: You won’t be able to adjust the tilt or height of the display. To use any of the controls on the underside of the display, you’ll need to lift the display up slightly. Setting Up 9 m You can connect a videocassette recorder ( VCR), camcorder, or digital camera to the display and view videos or images. Do You Need to Install a Graphics Card? To use your display, you need compatible video circuitry built into your computer, or a compatible graphics or video card installed in your computer. The display works with the built-in video circuitry of Power Macintosh computers and PowerPC™-based PowerBook computers that have an external monitor port. If you have another Mac OS–based computer or a Windows-based computer, check to see that its video circuitry operates at the resolutions specified here. If you are not sure whether your computer or graphics card has the appropriate built-in video capability, check with an Apple-authorized dealer if you have a Mac OS–based computer, the computer’s manufacturer, or a service provider. Note: If you’re using more than one display, you may need a graphics card for each additional display you are using. The display supports 14 predefined resolutions. Your computer or graphics card must support at least one of these resolutions for the display to work with your computer. Note: Apple recommends that your graphics card support the optimum resolutions. 10 Chapter 1 The actual resolutions and vertical refresh rates that are available to you depend on the video circuitry of your computer or graphics card. See the documentation that came with your computer or graphics card for more information. Resolution Vertical refresh rate (Hertz) 640 x 480 640 x 480 640 x 480 640 x 480 60 67 72 75 720 x 400 70 800 x 600 800 x 600 800 x 600 800 x 600 56 832 x 624 75 1024 x 7681 1024 x 7681 1024 x 7681 60 70 74.9/75 1 60 72 75 These are the optimal modes for the display—the resolutions that don’t require zoom and provide the sharpest image. If your computer does not support these, you may want to get a graphics card Note: The Apple 8•24, Apple 8•24GC, Apple 24AC, some NuBus™ graphics cards, and some third-party PCI cards are not fully compatible with your display. If a card is not fully compatible, the software cannot be used to adjust the screen image or change resolutions, but the controls on the underside of the display can be used to adjust some settings. If you are using a graphics card, install it before you connect the display to your computer. To install a graphics card in one of the expansion slots inside your computer, see the documentation that came with the computer or graphics card. Setting Up 11 Getting Ready to Set Up As you begin to set up your display system, make sure you have easy access to the following items. VGA adapter (only if you are connecting the display to a Windows-based computer) Apple Displays Software CD-ROM disc Power cord Power adapter Choosing a Good Location for Your Display Consider these factors when determining where to place your display: m Make sure the power adapter cable, power cord, and display cables will easily reach from the back of the display to your computer and an electrical outlet or power strip. m All cables should be unobstructed when you adjust the display. If you don’t allow enough clearance, the connectors might be damaged when the cables hit an obstruction. Positioning the Display If you’re using the display with the desktop stand, you can adjust it for your greatest comfort. Note: If you’re using the flip-out stand, move the display on the desk or table until you can see the screen clearly; there are no height adjustments. Before you adjust the display, make sure there is enough slack in the cables. If you don’t allow enough clearance, the cables or connectors might be damaged. Important 1 12 Chapter 1 Place the display so the screen faces you. 2 Adjust the height of the display by pulling up or pushing down on the display. 3 Adjust the viewing angle of the monitor by tilting it up or down and turning it left or right on the desktop stand. Setting Up 13 Position the display so that when you use it, no bright light is behind the display or reflected on the screen. Your eyes should be about level with the top edge of the screen and between 18 and 28 inches (45 and 70 cm) away. Take occasional breaks when using your computer to focus your eyes on a distant object. Use the following illustration to help you in positioning your monitor. 45–70 cm (18–28 in.) Shoulders relaxed Top of the screen at or slightly below eye level (You may need to adjust the height of your display, if you use the desktop stand.) Forearms and hands in a straight line Forearms level or tilted up slightly Tilt screen to avoid reflected glare Lower back supported Clearance under work surface Thighs horizontal Feet flat on the floor Using More Than One Display If your computer has expansion slots, you can use your display with one or more additional displays connected to your computer. You may need a graphics card for each additional display you are using. See the manual that came with your computer for more information. Note: If you’re connecting the display to a PowerBook computer, you must use the adapter that came with the computer, not the display. If your Mac OS–based computer has only one ADB port, you can still connect two displays. You may need a special cable to split the ADB connector cable into two parts. 14 Chapter 1 Note: Some displays don’t require the use of an ADB connection. For these displays, you only need to connect the display cable to a monitor port on your computer. Display cable (includes monitor connector and ADB connector) Display cable (includes monitor connector and ADB connector) Shielded connector cable (Apple part number M5556LL/A) Make sure you use an Apple shielded connector cable. Most third-party ADB splitter cables are not shielded and will not work properly with your display. You may experience more radio interference with an unshielded connector cable. Important Setting Up 15 Your Apple Studio Display at a Glance Display controls ¤ ® Power indicator light p (underneath) ® Power button (underneath) Keyboard storage pads Carrying handle AV port cover V ADB cable Desktop stand V ADB ports Power adapter cable V ADB connector ™ Display cable 16 Chapter 1 Before You Set Up Consider these factors when you connect cables: m For easier management of the cables when you’re using the desktop stand, use the cable guide. The ADB cable, display cable, and power adapter cable should go through the cable guide. Cable guide m The ADB cable has a plastic cable capture in the middle of the cable. This capture allows slack in the ADB cable so the cable won’t get damaged when you adjust the display. Connecting the Display to Your Computer Follow these steps to connect your display to your computer. Before you connect any cords or cables, make sure that your computer is turned off but plugged in to provide proper grounding. Important m m m m Plug in the display Connect the display cable to your computer Connect your Mac OS–based keyboard and mouse to the desktop stand Turn the display on Setting Up 17 Plugging In the Display Warning Use only the power adapter that came with your display. Adapters for other computer equipment may look similar, but they will damage your display. 1 Plug the power adapter cable from the display into the power adapter. Power adapter cable Power cord Power adapter 2 Plug one end of the power cord into the power adapter and the other end into a three-hole grounded outlet or power strip. If you have a different type of power cord, plug it into the power socket on the back of your computer. Warning This equipment is intended to be electrically grounded. The power adapter that came with your display is equipped with a three-wire grounding plug—a plug that has a third (grounding) pin. This plug will fit only a grounded AC outlet. This is a safety feature. If you are unable to insert the plug into the outlet, contact a licensed electrician to replace the outlet with a properly grounded outlet. Do not defeat the purpose of the grounding plug! 18 Chapter 1 Connecting the Display Cable to a Mac OS–Based Computer The display cable is a split cable with two connectors, one for the display and one for the Apple Desktop Bus (ADB). V ADB connector ™ Display connector 1 Plug the display connector on the display cable into the monitor port (marked with ™) on the back of the computer. Monitor port icon Connector on display cable If you’re connecting the display to a PowerBook computer, connect the adapter that came with the computer to the display connector on the display cable. You must use the adapter that came with your computer, not the one that came with this display. If you installed a graphics card in your computer, connect the display connector to the graphics card’s port. If your computer has more than one monitor port, see the documentation that came with your computer for information on choosing the correct port. 2 Tighten the thumbscrews on the connector. You can prevent bad connections and accidental damage by tightening the thumbscrews. Do not overtighten the thumbscrews; you might strip the threads. 3 If necessary, unplug the keyboard or mouse cable from the ADB connector on the back of your computer. 4 Plug the ADB connector on the display cable into the ADB port (marked with V) on the back of your computer. Align the symbol on the ADB connector with the same symbol on the port. If you force a connector the wrong way, you will damage it. Make sure the ADB connector is attached firmly. The ADB connector is not optional; it’s needed for your Mac OS–based computer to work correctly with your display. If the ADB connector on the display cable is not connected properly, the maximum number of resolutions and software controls will not be available. Important Setting Up 19 Connecting the Display Cable to a Windows-Based Computer Although the display cable is a split cable with two connectors, you will use only the display connector with your computer. 1 Connect the VGA adapter to the display connector on the display cable. Monitor port on Windows-based computer VGA adapter Connector on display cable 2 Tighten the thumbscrews on the connector. You can prevent bad connections and accidental damage by tightening the thumbscrews. Do not overtighten the thumbscrews; you might strip the threads. 3 Connect the VGA adapter end of the display cable to the monitor port on the back of your computer. If you installed a graphics card in your computer, connect the display cable (with the VGA adapter attached to it) to the graphics card’s port. For more information about installing graphics cards, see the documentation that came with your computer or graphics card. 4 Tighten the thumbscrews on the connector. 5 Leave the ADB connector on the display cable unplugged. The ADB connector is for Mac OS–based computers only. Connecting a Mac OS–Based Computer Keyboard and Mouse to the Desktop Stand There is one ADB port on each side of the desktop stand for your keyboard and mouse (or any other ADB input device). Always be sure your computer is shut down before you plug in or disconnect ADB cables to prevent damage to the display. Important 1 Make sure the ADB connector on the display cable is plugged into the ADB port (marked with V) on the back of your computer. For more information, see “Connecting the Display Cable to a Mac OS–Based Computer” on page 19. 20 Chapter 1 2 Decide how you want to connect the keyboard and mouse. For example, you can connect your mouse cable to your keyboard and then connect the keyboard to one of the ADB ports (marked with V) on either side of the desktop stand. Or, if you prefer, you can plug both your keyboard and mouse into the ADB ports (marked with V) on the desktop stand. Note: If you have a USB keyboard and mouse, see the documentation that came with your computer for instructions on connecting your keyboard and mouse to your computer. 3 Connect your keyboard and mouse cables to ADB ports (marked with V) on the desktop stand, according to your preference. ADB port on the desktop stand When connecting ADB cables, make sure you align the symbol on the connector with the same symbol on the port. If you force a connector the wrong way, you will damage it. Make sure the ADB connector is attached firmly. Turning the Display On To turn on the display, follow these steps: 1 Make sure the display’s power cord is plugged into a grounded electrical outlet or power strip. If you plugged the display into the back of your computer, make sure the computer’s power cord is plugged into a grounded electrical outlet or power strip. 2 Start up your computer. After a few seconds, the power indicator light on the display turns amber and then green. If you don’t see an amber light, press the power (®) button on the right underside of the display. If the power indicator light doesn’t turn green, shut down and unplug your computer and make sure you’ve connected the display cable, power adapter cable, and power cord properly. Setting Up 21 Note: The backlight gets darker over time, depending on individual use. There are several ways you can extend the life of the backlight: m Turn off your computer when you’re not using it. m Don’t use a screen saver program. m Have the display go to sleep after a specified period of time (see “Conserving Energy” on page 32). Turning the Display Off If you won’t be using the display for a while—for example, overnight or over the weekend— you may want to turn the display off. To turn off the display, shut down your computer. (From the Special menu, select Shut Down.) Storing the Keyboard When the display is attached to the desktop stand, you can place the keyboard on the keyboard holders, small rubber indentations on the desktop stand. This places the keyboard conveniently out of the way so that you have more desktop space. Keyboard storage pads 22 Chapter 1 Finding Answers When you have questions about your display, there are several places to look for answers. In this manual Use this manual to find out how to set up and use your display, install and use the software, use the On-Screen Display, connect video and image equipment to the display, and find solutions to common problems. In Mac OS Help for Mac OS–based computers If you need help or experience a problem while using the Apple Displays Software, open the Help menu and choose Help, or open the Guide (h) menu and choose Mac OS Guide or Macintosh Guide. See Chapter 2 for more information. On the Internet Apple maintains a number of sites on the World Wide Web that provide product information, software updates, and technical support information. To view Apple’s home page, use this URL (Uniform Resource Locator): http://www.apple.com Over the telephone If you can’t find answers in any of the materials provided, call the Apple Assistance Center. (See the service and support information that came with this display.) What’s Next Congratulations—you’ve finished setting up your display. Next, you need to install the software that came with your display. If you don’t, you won’t be able to set controls, such as white point and tracking, for optimal screen performance. Important Once you install the software, make sure you set the tracking so you get a clear, crisp image. m To learn how to install and use the software, see Chapter 2, “Installing and Using the Apple Displays Software.” Setting Up 23 C H A P T E R 2 2 Installing and Using the Apple Displays Software This chapter explains how to install the Apple Displays Software on your computer and provides an overview of the software’s features. Mac OS–based and Windows-based computers can also use manual controls on the display and the On-Screen Display to adjust settings that the Apple Displays Software does not affect. For more information, see Chapter 3, “Using Manual Controls and the On-Screen Display.” What’s Included in the Apple Displays Software? The Apple Displays Software consists of several files for adjusting basic picture and sound settings and adjusting the color on your display. These files include m Monitors & Sound control panel software, which you use to adjust monitor settings m Control Strip software, which you use to easily change screen resolution and color depth m DigitalColor Meter, which you use to obtain RGB values and magnify pixels m PANTONE® Color Picker, which allows you to set PANTONE values for colors using the Color Picker control panel m ColorSync, which helps you achieve accurate colors onscreen and in print For a complete list of files, see the Apple Displays Read Me file on the Apple Displays Software CD. Installing the Apple Displays Software on Mac OS–Based Computers You need the following to be able to install and use the Apple Displays Software: m a PowerPC-based Macintosh computer The display is not fully compatible with the PowerBook Duo 2300 series computers. 25 m Mac OS version 8.0 or later If you don’t have System 8.0 or later, contact an Apple-authorized dealer or service provider. m a CD-ROM drive If you do not have a CD-ROM drive, see the service and support information that came with your display for information on how to contact Apple. Important Use the Installer to install the software. Do not install the software by dragging files. To install the Apple Displays Software, follow these steps: 1 Insert the Apple Displays Software CD into your computer’s CD-ROM drive. The CD icon appears on the desktop. 2 Double-click the CD icon. The Apple Displays Software window opens. 3 Double-click the folder that contains the language you want to use. 4 Double-click the Apple Displays Software folder. 5 Double-click the Apple Displays Read Me file and read the document that appears. The Read Me file contains important information about the files included with your Apple Displays Software. It also provides a list of the Apple Displays Software files. 6 Choose Quit from the File menu when you’re finished reading. 7 Double-click the Installer icon to start the Installer program. A Welcome screen appears. 8 Click Continue. The software license agreement dialog box appears. Be sure you’re acting within the terms of the software license agreement before you agree to install this software on your computer. The license agreement specifies how many copies of the program you can make for yourself and others. Important 9 Click Agree once you’ve read and agreed to the terms in the license agreement. The Install Apple Displays Software dialog box appears. 26 Chapter 2 10 Make sure the destination disk named is the startup disk of your computer. If it isn’t, click Switch Disk until you see the name of your startup disk. 11 Click Install. The Installer takes a few moments to determine what needs to be done and then begins to copy files. If other applications are open, a message asks you to quit them. Click Continue to quit the applications and continue with the installation. 12 Follow the instructions on the screen until the installation is complete. The Installer checks to make sure you have the system software you need to use the display. If anything is missing, a message tells you what you need. You won’t be able to install the software until you correct the problem. If a message says you don’t have the correct system software, you can purchase a new version from an Apple-authorized dealer. After the installation, the Installer tells you to restart your computer. 13 Click Restart. The software is now installed and the display is ready for use. If you ever reinstall system software on your computer, you must also reinstall the Apple Displays Software. Important 14 If necessary, adjust the settings for the display. For more information, see “Learning About the Apple Displays Software With Mac OS Help” on page 28 and “Using the Monitors & Sound Control Panel” on page 29. Installing Setup Information on Windows-Based Computers On Windows-based computers, a new device is usually detected automatically when it is connected to your computer. To determine that Windows has correctly identified your display, check Monitor Type in the Display Properties dialog box. If the display is not listed, you need to install setup information; otherwise, some resolutions and refresh rates may not be available on your display. To see whether Windows has identified your display, follow these steps: 1 Open the Start menu and choose Settings. 2 Open the Control Panel and double-click the Display icon. The Display Properties dialog box appears. 3 Click the Settings tab at the top of the dialog box. The Settings panel appears. 4 Click the Change Display Type button in the lower-right corner to display the current Monitor Type. m If the Monitor Type shown is your display, your computer has correctly identified your display. You are ready to use your display with your computer. Installing and Using the Apple Displays Software 27 m If the Monitor Type shown is not your display, continue with step 5. 5 Press the Change button next to the Monitor Type field; then select your display and click OK. If your display is not in the list shown, the setup information file needs to be installed. Continue with step 6. 6 Insert the Apple Displays Software CD into your CD-ROM drive. If you do not have a CD-ROM drive, see the service and support information that came with your display for information on how to contact Apple. 7 Click the Have Disk button. 8 Choose the CD-ROM disc drive and click OK. If an error occurs, make sure you’ve selected the correct disc drive. 9 10 Choose your display in the Monitor Type field and click OK. If necessary, adjust the settings for the display. For more information, see Chapter 3, “Using Manual Controls and the On-Screen Display.” You’re now ready to use the display with your computer. Learning About the Apple Displays Software With Mac OS Help If you’re using a Mac OS–based computer, this section explains how to open Mac OS Help to get information about using the Apple Displays Software with your display. To use Mac OS Help, follow these steps: 28 Chapter 2 1 Do one of the following: m Open the Help menu and choose Help. m Open the Guide (h) menu and choose Mac OS Guide or Macintosh Guide. 2 Click the Topics Button. The Topic areas window appears. Depending on the topic shown here, you may see different information in the right window. 3 Click an item to see information about it. In the right window, click the item you want information about, then click OK. If necessary, use the scroll arrows to move up and down in the list. 4 If you don’t find the information you want, you can do one of the following: m Click the Look For button, type the term you want help on, then click Search. m Click the Index button, click a letter, then click the item for which you want information. Using the Monitors & Sound Control Panel If the display is connected to a Mac OS–based computer, you use the Monitors & Sound control panel to control basic settings that affect the way your computer displays images and processes sound. Monitors & Sound automatically adjusts itself to the capabilities of the computer and display you’re using. That’s why the Monitors & Sound control panel shown in this book may look slightly different on your computer. If you have more than one monitor attached to your computer, a separate Monitors & Sound control panel appears on each one so you can customize your settings for each monitor separately. To open and use the Monitors & Sound control panel, follow these steps: 1 Choose Control Panels from the Apple (K) menu and open the Monitors & Sound control panel. After a moment, the Monitors & Sound control panel appears on your screen. You use the large buttons across the top of the control panel to select the options described below. See Mac OS Help for detailed information. Installing and Using the Apple Displays Software 29 m Monitor—Use this button to adjust color depth, resolution, color, and brightness settings. When you click the Monitor button, the settings shown here are displayed. When you change resolutions, the screen will go dark for a few seconds, then switch to the new resolution. You may need to adjust the tracking. m Sound—Use this button to adjust your computer system’s sound. You can also set the volume for speakers attached to your computer, choose sound input devices such as a microphone or CD player, and select sound output quality. m Alerts—Use this button to change your computer’s alert sound. m Flat Panel—Use this button to adjust the position of the picture, white and black levels, white point, sharpness, and tracking. When you click the Flat Panel button, the settings shown here are displayed. m Color—Use this button to access ColorSync controls. 30 Chapter 2 2 To view current settings, click the appropriate button. The button’s window appears. 3 If necessary, change the desired settings. Changes you make take effect immediately. When you change resolutions, the screen will go dark for a few seconds, then switch to the new resolution. Important 4 For additional help, open the Help menu and choose Help or open the Guide (h) menu and choose Mac OS Guide or Macintosh Guide. 5 When you’re finished, click the close box to close the Monitors & Sound control panel. Using the Control Strip The Control Strip is a quick and easy way to access the settings of the Monitors & Sound control panel you are likely to adjust most often. When you turn on your display, the Control Strip appears in the lower-left corner of the screen. Click the pull tab once to open it. Scroll arrows let you view Control Strip items that are not visible. Pull tab Close box For changing color depth For changing screen resolution. ( When you change resolutions, the screen will go dark for a few seconds, then switch to the new resolution.) The Control Strip may look slightly different depending on the options on your computer. Move the pointer over the item you want to use and hold down the mouse button. Choose a setting from the pop-up menu that appears. If you want to change the position of the Control Strip on your desktop, hold down the Option key and drag the Control Strip by the pull tab up or down the left or right side of the desktop. Release the Option key and mouse button when the Control Strip is located where you want it. Installing and Using the Apple Displays Software 31 About DigitalColor Meter You can use DigitalColor Meter to obtain the RGB (red, green, and blue) values your computer uses to create colors and to magnify the pixels on your screen. To begin working with DigitalColor Meter, follow these steps: 1 Choose DigitalColor Meter from the Apple (K) menu. The DigitalColor Meter window opens. 2 For information on how to use DigitalColor Meter, click the Help (h) button in the DigitalColor Meter window. Specifying Colors Using the PANTONE Color Picker In some application programs, such as the Color Picker or Appearance control panels, you can use the PANTONE Color Picker to specify PANTONE colors, often used in producing professionally printed documents. In these applications, the PANTONE Color Picker is opened when a new color needs to be specified. After the PANTONE Color Picker is selected (for example, in the System Color Picker control panel), you can click a PANTONE color to select it, or type a PANTONE number in the text box, and click OK. Using ColorSync ColorSync is Apple’s unique color-matching software that ensures the most accurate color possible from input (scanner or camera) to display, and display to output (printer). If you’re using a Mac OS–based computer, see Mac OS Help for information about color accuracy and ColorSync. To open Mac OS Help, open the Help menu and choose Help or open the Guide (h) menu and choose Mac OS Guide or Macintosh Guide. Conserving Energy You can use the Energy Saver control panel that came with your computer to tell the display whether to conserve energy after a specified period of inactivity. Note: You can save even more energy by turning the computer off if you won’t be using it for a while—for example, overnight or over the weekend. You can use Energy Saver with any Apple monitor that complies with the United States Environmental Protection Agency’s Energy Star program. (Look for the EPA Energy Star logo on the monitor box.) 32 Chapter 2 For more information about power-saving and environmental features, see the document named “TCO 95 Information” on the Apple Displays Software CD. What Happens After You Turn On the Energy-Saving Feature? When Energy Saver detects that you’re not using the computer, it darkens the display screen and reduces the amount of energy it consumes. While the display is darkened, your computer is still working, but to avoid accidental changes, Energy Saver won’t let any typing or mouse movement affect your work. To “wake up” the display, press any key on the keyboard. Your computer may beep while the display is waking up. If you use Energy Saver, make sure you turn it off when you’re doing diskintensive tasks such as copying a large number of files, downloading large files from an online service, or printing a very large file. If Energy Saver is activated during a disk-intensive task, the task may be terminated prematurely and you may need to recopy or reprint a file. Important Setting Up Energy Saver To use the Energy Saver control panel, follow these steps: 1 Open the Apple (K) menu and choose Energy Saver from the Control Panels folder. (On some PowerBooks, this control panel is called the PowerBook control panel.) The Energy Saver control panel appears. 2 To have the display sleep (so the screen becomes dim) when the computer has been idle for a specified period of time, make sure this checkbox is blank. Make your choices in the control panel: Slide this control to determine how long Energy Saver will wait without activity before putting the system to sleep. Installing and Using the Apple Displays Software 33 The Energy Saver control panel on your system may look slightly different from the one shown here. Note: If you don’t have the monitor dimming feature, you can purchase monitor dimming software that dims the monitor when it’s not being used. For more information, see your Apple-authorized dealer or retailer. 3 Click the close box in the upper-left corner of the control panel. Using Energy Saver With a Screen Saver Screen savers are applications you can purchase that put moving patterns on your display when you’re not using your mouse or keyboard. Screen savers and Energy Saver both help prevent screen “burn-in.” Energy Saver also conserves energy. If you wish, you can use Energy Saver and a screen saver program. Set the screen saver to turn on before Energy Saver. If your screen saver program includes its own energy-saving feature, you can turn off Energy Saver. To extend the life of the backlight, use Energy Saver to turn off your display when it’s not in use. Don’t use a screen saver program. Important Information About Copying Software If you want more information about when it’s OK to copy software and when it isn’t, or about related consumer issues, you can contact the Software Publishers Association (SPA) and ask for their free brochure. Call or write: Software Publishers Association 1730 M Street NW, Suite 700 Washington, DC 20036-4510 800-338-7478 http://www.spa.org/ 34 Chapter 2 C H A P T E R 3 3 Using Manual Controls and the On-Screen Display Controls on the front underside of the display allow you to use the On-Screen Display (OSD) to adjust the screen image, choose the video source, set the brightness of the backlight, and reset the display. In most cases, you won’t need to make any adjustments to your picture. But if you do, follow the instructions in this chapter. You can use the On-Screen Display if the display is connected to a Windows-based computer or if you are using the display in video mode. If the display is connected to a Mac OS–based computer and you are using the display in computer mode, you use the Monitors & Sound control panel to adjust the screen image. For more information, see Chapter 2, “Installing and Using the Apple Displays Software.” Using Manual Controls on Your Display You use the buttons on the underside of the front of your display to choose settings and control the On-Screen Display (OSD). Power indicator light p p Reset button ¤ OSD navigation On-Screen Display (OSD) on/off Video source OSD adjustment ® ® Power button ¤ Brightness control 35 The following is a description of each control. Icon p ¤ 36 Chapter 3 Control Function Reset Use this control to reset the settings to the factory default. (If you’re in computer mode, this refers to the resolution; if you’re in video mode, this refers to standards such as NTSC, PAL, and SECAM.) To reset the settings for all formats, not just the current format, use a ballpoint pen to press and hold the Reset control for approximately 3 seconds. The power indicator flashes amber. When the amber light stops flashing, release the reset control. On-Screen Display (OSD) on/off Use this button to turn the On-Screen Display on and off when the display is connected to a Windows-based computer or in video playback mode. If the display is connected to a Mac OS–based computer, pressing this button will open the Monitors & Sound control panel. OSD navigation Use these buttons to navigate through the On-Screen Display window. Press ø on the right to select the icon to the right; press o on the left to select the icon to the left. If the display is connected to a Mac OS–based computer, pressing this button will open the Monitors & Sound control panel. OSD adjustment Use these buttons to make adjustments to the selected icon in the On-Screen Display window. Press + on the right to increase or select the next option; press – on the left to decrease or select the previous option. If the display is connected to a Mac OS–based computer, pressing this button will open the Monitors & Sound control panel. Video source Press this button to switch between computer and video modes. Brightness Press this button to change the brightness of the backlight. If you’re using a Mac OS–based computer, the brightness dialog box appears. If you’re using a Windows-based computer or are in video mode, a similar brightness window appears. Press + on the right to increase the brightness; press – on the left to decrease the brightness. Icon Control Function ® Power Press this button to turn the display on or off. Power indicator light A green light indicates the display is on. An amber light indicates the display is in sleep mode. A blinking amber light indicates that you’ve pressed the Reset control to reset the settings for all formats. If there is no light, the display is off. Accessing and Adjusting Controls in the On-Screen Display To access controls in the On-Screen Display, follow these steps: 1 Press the OSD on/off button on the left underside of the display. The On-Screen Display appears. Note: If the display is connected to a Mac OS–based computer and you are using the display in computer mode, the Monitors & Sound control panel opens. For more information, see Mac OS Help. 2 Use the OSD navigation buttons to highlight the icon you want to change. (Press ø to move to the right; press o to move to the left.) The icons represent controls that you use to adjust the picture and the On-Screen Display window. As each control icon is highlighted, a description of the control appears in the window. Description of highlighted control Control icons Note: The On-Screen Display disappears after approximately 10 seconds if you haven’t pressed the OSD navigation buttons or OSD adjustment buttons. 3 Use the OSD adjustment buttons to adjust the setting. (Press + to increase the setting or move to the next option; press – to decrease the setting or move to the previous option.) 4 After you finish adjusting a control, the setting is saved when the OSD window disappears. Using Manual Controls and the On-Screen Display 37 5 When you’re finished with the On-Screen Display, press the OSD on/off button. The On-Screen Display window disappears. The controls for each mode—computer ( Windows-based computer) and video—are slightly different. If you’re using the display in computer mode, see “Using the On-Screen Display in Computer Mode” on page 38. If you’re using the display for video playback or to display images, see “Using the On-Screen Display in Video Mode” on page 40. Using the On-Screen Display in Computer Mode When the display is connected to a Windows-based computer, you see the following control icons. Description of highlighted control Control icons The following table describes the function of each control. Icon 38 Chapter 3 Control Function Horizontal position Use this control to adjust the horizontal position of the screen image. Press + on the right to move the screen image to the right; press – on the left to move the screen image to the left. Vertical position Use this control to adjust the vertical position of the screen image. Press + on the right to move the screen image up; press – on the left to move the screen image down. Tracking-Coarse Use this control to adjust the pixel frequency, also known as the clock. You may need to adjust tracking if the screen image is blurry or wavy. Press + on the right to increase the clock; press – on the left to decrease the clock. Tracking-Fine Use this control to adjust the subclock range, also known as the phase. You may need to adjust tracking if the screen image is blurry or wavy. Press + on the right to increase the phase; press – on the left to decrease the phase. Icon Control Function Black level Use this control to adjust the level of black in the screen image. White level Use this control to adjust the level of white in the screen image. Sharpness Use this control to adjust the sharpness of text. (Only available when the screen resolution is set to 1024 x 768.) White point Use this control to adjust the white point of the screen. The white point affects the warmth and coolness of colors. OSD horizontal position Use this control to adjust the horizontal position of the OSD window. OSD vertical position Use this control to adjust the vertical position of the OSD window. Information Provides information on the screen resolution and the horizontal and vertical frequency. Language Use this control to select the language used in the On-Screen Display. Press + on the right to select the next language in the list. Press – on the left to go back in the list. Using Manual Controls and the On-Screen Display 39 Using the On-Screen Display in Video Mode When you use the display in video playback mode, you see the following control icons. Description of highlighted control Control icons The following table describes the function of each control. Icon 40 Chapter 3 Control Function Horizontal position Use this control to adjust the horizontal position of the screen image. Press + on the right to move the screen image to the right; press – on the left to move the screen image to the left. Vertical position Use this control to adjust the vertical position of the screen image. Press + on the right to move the screen image up; press – on the left to move the screen image down. Hue Use this control to adjust the hue value of the screen image from red to green. Press + on the right to move the hue to the green end of the spectrum; press – on the left to move the hue to the red end. Color Use this control to adjust the color intensity of the screen image. Press + on the right to increase the intensity of the color; press – on the left to decrease the intensity of the color. Video brightness Use this control to adjust the brightness of the video image. Video contrast Use this control to adjust the contrast of the video image. Volume Use this control to adjust the volume of the audio-out port on the back of the display. This doesn’t affect the volume of the computer. If the sound is muted, changing this setting turns the sound back on. Muting Use this control to turn the sound on or off. Press + on the right or – on the left to move back and forth between the two options. Icon Control Function OSD horizontal position Use this control to adjust the horizontal position of the OSD window. OSD vertical position Use this control to adjust the vertical position of the OSD window. Format Use this control to choose the video format mode you want to use—NTSC/PAL or SECAM. If you choose NTSC/PAL, the format you need to use—NTSC or PAL—is automatically determined and selected. If you want to use SECAM, you may need to select it specifically. Press + on the right or press – on the left to move back and forth between the two options. (For more information on video formats, see “About Video Formats” on page 49.) Language Use this control to select the language used in the On-Screen Display. Press + on the right to select the next language in the list. Press – on the left to go back in the list. Using Manual Controls and the On-Screen Display 41 C H A P T E R 4 4 Attaching and Removing the Desktop Stand and Flip-Out Stand You can use the display with the desktop stand or with the smaller flip-out stand. If you use the desktop stand, you’ll need more space on a desk or table for the display and stand. You can use the display with the flip-out stand when you want to move the display easily, such as when you’re giving presentations or playing videos, and when you don’t need to use the height adjustments. Removing the Desktop Stand Before you start, make sure there is a clean, flat surface where you can place the display once it’s removed from the stand. To protect the screen, place a towel or cloth on the surface. Important 1 Pull the display up so that the desktop stand is at its maximum height. If you don’t do this, the desktop stand will automatically rise to its highest position when you remove the display from the stand. 2 Press the power (®) button to turn the display off. 3 Turn off your computer and any video equipment attached to the display. 4 If necessary, remove the locking cable from the security slot on the back of the display. 5 Remove the ADB cable that’s attached to the desktop stand from the ADB port on the back of the display (marked with V). 6 Unplug any ADB cables that are attached to the ADB ports on either side of the desktop stand. 7 Remove any cables from the cable guides on the desktop stand. 43 8 Use a coin or flathead screwdriver to unscrew the two plastic thumbscrews on the back cover of the display. Plastic thumbscrews 9 Pull the display slightly up and away from the stand. Warning The desktop stand will automatically rise to its highest position, if it’s not already at its maximum height. 10 Place the display on a clean, flat surface. Make sure the surface is clean and flat or you may damage the screen. 11 44 Chapter 4 Store the stand in a safe place. Attaching the Flip-Out Stand 1 If necessary, remove the desktop stand. (See “Removing the Desktop Stand” on page 43.) 2 Hook the three plastic tabs on the top cover of the flip-out stand into the three openings on the back center area of the display. First, hook the flip-out stand on to the back of the display. Then tighten the thumbscrews. 3 Place the bottom part of the cover against the display and screw in the two plastic thumbscrews. Use a coin or flathead screwdriver to tighten the screws. Don’t overtighten the screws; you might strip the threads. 4 Flip out the stand and place the display with the stand on a flat surface, such as a table or desk. 5 For Mac OS–based computers, connect the ADB cable on your keyboard or other type of input device into the ADB port (marked with V) on the back of the display. 6 Lift the display up slightly and press the power (®) button on the right underside of the display to turn it on. 7 Turn your computer on. 8 If desired, attach a locking cable to the security slot on the back of the display. For more information, see the documentation that came with the locking cable. Note: To use any of the controls on the underside of the display, you need to lift the display up slightly. Attaching and Removing the Desktop Stand and Flip-Out Stand 45 Removing the Flip-Out Stand Before you start, make sure there is a clean, flat surface where you can place the display once it’s removed from the stand. To protect the screen, place a towel or cloth on the surface. Important 1 Lift the display up slightly and press the power (®) button to turn the display off. 2 Turn off your computer and any video equipment attached to the display. 3 If necessary, remove the locking cable from the security slot on the back of the display. 4 For Mac OS–based computers, remove the ADB cable from the ADB port (marked with V) on the back of the display. 5 Use a coin or flathead screwdriver to unscrew the two plastic thumbscrews connecting the flip-out stand to the display. Plastic thumbscrews 6 46 Chapter 4 With one hand holding the display, use your other hand to move the flip-out stand slightly downward to disconnect the three plastic tabs from the three openings on the back center area of the display. 7 Place the display on a clean, flat surface. Make sure the surface is clean and flat or you may damage the screen. 8 Store the flip-out stand in a safe place. Attaching the Desktop Stand 1 If necessary, remove the flip-out stand. (See “Removing the Flip-Out Stand” on page 46.) 2 Lift the display up and hook the three plastic tabs on the top of the desktop stand into the three openings on the back center area of the display. First, hook the display on to the desktop stand. Then tighten the thumbscrews. 3 Screw in the two plastic thumbscrews on the bottom of the cover. Use a coin or flathead screwdriver to tighten the screws. Don’t overtighten the screws; you might strip the threads. 4 Place the display cable, power adapter cable, and ADB cables through the cable guides. Important Make sure you leave some slack in the cables so you can tilt, swivel, and turn the display. 5 Connect the ADB cable that’s attached to the desktop stand inside the cable guide to the ADB port (marked with V) on the back of the display. 6 Decide how you want to connect the keyboard and mouse. For example, you can connect your mouse cable to your keyboard and then connect the keyboard to one of the ADB ports (marked by V) on either side of the desktop stand. Or, if you prefer, you can plug both your keyboard and mouse into the ADB ports (marked by V) on the desktop stand. Attaching and Removing the Desktop Stand and Flip-Out Stand 47 7 Connect your keyboard and mouse cables to ADB ports (marked by V) on the desktop stand, according to your preference. ADB port on the desktop stand When connecting ADB cables, make sure you align the symbol on the connector with the same symbol on the port. If you force a connector the wrong way, you will damage it. Make sure the ADB connector is attached firmly. Note: If you have a USB keyboard and mouse, see the documentation that came with your computer for instructions on connecting your keyboard and mouse to your computer. 48 Chapter 4 8 If you’re using a locking cable, attach it to the security slot on the back of the display. 9 Press the power (®) button on the right underside of the display to turn the display on. 10 Turn your computer on. 11 If desired, use the height, tilt, and swivel adjustments to position the display the way you want. C H A P T E R 5 5 Using Your Display for Video and Image Playback This chapter explains how to use your display to play videocassettes and view television (TV ) and digital camera images. It also tells you how to connect video and camera equipment to the display. About Video Formats There are three technical standards for television and video that are supported by your display: m NTSC—National Television System Committee, used by most countries in North America and Asia, including Japan m PAL—Phase Alternating Line, used in most European countries (except France) and Australia m SECAM—Sequential Couleur Avec Memoire, or Sequential Color with Memory, used in France When you are using the display in video mode, you can select which standard you are using. For more information, see “Using the On-Screen Display in Video Mode” on page 40. Connecting Video Equipment to Your Display You can connect several types of video equipment to the display. The equipment must have either Super VHS video (S-video) ports or composite video (C-video) ports. m You can connect a VCR (videocassette recorder) or camcorder to the display and play video. m You can connect cable TV directly to your VCR, connect the VCR to the display, and view television on the display. m You can connect a digital camera with a video output and view images on the screen. 49 m To hear sound from a video, you can connect external speakers that have an internal amplifier to the display or to the VCR. The video and audio connections are on the back of the display. Open the cover on the back right side to access these ports. The audio and video ports are as follows: - Audio output - Audio input left - Audio input right ˜ C-video input S-video input Connecting External Speakers If you’re using the display to play a video or view television images, you need to connect external speakers to the display or to your VCR in order to hear any sound. You must use speakers that have an internal amplifier. To connect speakers to the display, see the documentation that came with your speakers. For information on connecting speakers to your VCR, see the documentation that came with the VCR. Note: The audio output port works only when the display is in video mode, not computer mode. 50 Chapter 5 Connecting Video Equipment Note: To hear sound from videocassettes, you need to connect external speakers to the display or to your VCR. For information on connecting speakers, see “Connecting External Speakers” on page 50. Once you’re ready to connect the video equipment to the display, follow these steps: 1 Make sure that the video equipment has a Super VHS (S-video) connector or a Composite video (C-video) connector. 2 Place the video equipment near your computer system and display. 3 Shut down the computer and turn off the video equipment and the display. 4 Do one of the following: m If you’re using composite video, or C-video, plug one end of an RCA cable into the C-video out port on the video equipment. (The RCA cable used for C-video is yellow.) m If you’re using Super VHS video, or S-video, plug one end of the S-video cable into the S-video out port on the video equipment. 5 Do one of the following: m For C-video, plug the other end of the RCA cable into the C-video input port on the display. m For S-video, plug the other end of the S-video cable into the S-video input port on the display. If you’re using a VCR or camcorder, do the following to hear sound: 1 Plug one end of an audio cable with RCA plugs into the left audio out port on the VCR or camcorder. (The RCA cable used for left audio is typically white.) 2 Plug the other end of the audio cable into the left audio input port on the display. 3 Plug one end of an audio cable with RCA plugs into the right audio out port on the VCR or camcorder. (The RCA cable used for right audio is typically red.) 4 Plug the other end of the audio cable into the right audio input port on the display. Note: If you’re using mono sound, connect one end of an audio cable with RCA plugs into the audio out port on the VCR or camcorder, and plug the other end of the audio cable into one of the audio input ports on the display. Using Your Display for Video and Image Playback 51 Your finished S-video connections should look like this: Audio output port Video output port Audio output ports (left and right) Audio input ports (left and right) Speakers S-video input port VCR If you use C-video connections, your finished connections will be similar. Connecting to a Television Signal The display doesn’t have a tuner. To view television on the display, you need to do one of the following: m Connect the cable TV or television antenna to your VCR, then connect the VCR to the display. m If you have a TV tuner card in your computer, connect the cable TV or television antenna to the TV tuner card port on your computer and connect the computer to the display. For information on how to connect cable TV to your VCR, see the documentation that came with your VCR. For information on how to connect cable TV to the TV tuner card in your computer, see the documentation that came with the TV tuner card or your computer. For information on how to connect a VCR to the display, see “Connecting Video Equipment” on page 51. Note: To change channels, you need to use the VCR controls or remote control. Viewing Images and Making Adjustments to the Picture and Sound 1 Make sure you properly connected the video equipment to the display. For more information, see “Connecting Video Equipment” on page 51. 52 Chapter 5 2 Turn the video equipment on. 3 If necessary, start up your computer. 4 Do one of the following: m To view a video, insert a videocassette into the VCR or camcorder and use the controls on your VCR or camcorder to play the video. m To view television, use the controls on your VCR to switch to television mode and choose the channel you want to watch. m To view images from a digital camera, see the documentation that came with your digital camera. For detailed information, see the documentation that came with your video equipment. 5 Press the video source button on the underside of the display. If the message “No video signal” appears, no video signal is being sent. Make sure the video or camera equipment is properly connected to the display and the equipment is on. If a computer image appears, press the video source button again to have the display search for a video signal. Note: If you can’t hear any sound, make sure you have external speakers connected to the display or to your VCR. For information on connecting speakers to the display, see “Connecting External Speakers” on page 50. 6 To adjust the image, press the OSD on/off button. The On-Screen Display (OSD) appears. 7 Make adjustments to the screen image. For more information, see Chapter 3, “Using Manual Controls and the On-Screen Display.” 8 When you’re finished, press the OSD on/off button. Using Your Display for Video and Image Playback 53 C H A P T E R 6 6 Tips and Troubleshooting This chapter includes information on the care and cleaning of your display, securing your display, and solutions to common problems. Care and Cleaning m Do not block the display’s vents. m Do not let liquid get on or into the display. m Do not press on the surface of the display screen. m Do not write on the screen or touch the screen with a sharp object. m If you will not be using your display and computer for a day or more, make sure you turn off the computer and display or use Energy Saver. Cleaning the Case 1 Turn your computer and display off. 2 Disconnect the display’s power cord from the electrical outlet or power strip, or from the back of your computer. (Pull the plug, not the cord.) 3 Disconnect the ADB cable from the back of the display. 4 Wipe the surfaces lightly with a clean, soft cloth dampened with water. Don’t use aerosol sprays, solvents, or abrasives that might damage the finish on the case. Cleaning the Screen 1 Turn your computer and display off. 2 Disconnect the display’s power cord from the electrical outlet or power strip, or from the back of your computer. (Pull the plug, not the cord.) 3 Disconnect the ADB cable from the back of the display. 55 4 Clean the screen with soft, lint-free paper or cloth and mild soap and water. Do not spray liquid directly onto the display screen. Liquid could drip inside the display and cause electrical shock. Warning Protecting Your Display From Theft The back of the display has a built-in slot for connecting a security lock. This lets you attach a narrow, flexible cable that you can use to secure your display to prevent theft. Security locks are available from an Apple-authorized dealer or computer retailer. F Security slot Follow the instructions that came with the locking cable to secure it to your display. When you attach a locking cable, make sure you leave enough slack in other cables attached to the display (power adapter cable, display cable, and ADB cable). If you don’t, you may damage the cables or the connectors when you adjust the position of the display. Important Using Mac OS Help If you’re using a Mac OS–based computer and you want to know how to do a particular task with your display, refer to Mac OS Help. Open the Help menu and choose Help, or open the Guide (h) menu and choose Mac OS Guide or Macintosh Guide. For detailed instructions on using Mac OS Help, see Chapter 2, “Installing and Using the Apple Displays Software.” 56 Chapter 6 Troubleshooting This section contains descriptions of problems you might experience with your display, as well as solutions to try. Problems related to the computer are covered in the manuals that came with your computer. Never remove the case from the display! You could come in contact with hazardous voltage. Warning If you have a problem with your display and nothing presented in this manual solves it, consult the service and support information that came with your display for instructions on how to contact an Apple-authorized service provider or Apple for assistance. If you attempt to repair the display yourself, any damage you may cause to the display will not be covered by the limited warranty on your display. Contact an Apple-authorized dealer or service provider for additional information about this or any other warranty question. Monitor Power or Screen Appearance Detailed instructions for the Apple Displays Software are provided in Mac OS Help and in the Help (h) for the Monitors & Sound control panel. For Windows users, detailed instructions about onscreen controls are provided in Chapter 3, “Using Manual Controls and the On-Screen Display.” Important The display’s power indicator light doesn’t come on. m Make sure the display’s power button is turned on. m Make sure the computer is turned on. m Make sure the power cord is plugged in properly. If the display power cord is plugged into your computer, make sure your computer is on and the cord is firmly plugged in. If the display power cord is plugged into a grounded wall outlet or power strip, make sure the cord is firmly plugged in. Check to see whether power to the outlet has been interrupted. You can test the outlet by plugging in something that you know works—like a desk lamp or radio. If the test appliance works, but the display doesn’t, contact an Appleauthorized dealer or service provider. No image appears on the screen and the power indicator light is amber. m Make sure the display cable is connected to your computer properly. m Make sure the thumbscrews on the display cable are tightened securely. m Make sure your computer is not off or in sleep mode. Tips and Troubleshooting 57 No image appears on the screen and the display’s power indicator light is green. m Make sure the display cable is connected correctly to the computer. m Make sure the thumbscrews on the display cable are tightened securely. m Make sure the brightness is set properly. The brightness control (marked by ¤) is on the front of the display. m Press the video source button on the underside of the display to make sure the display is picking up the computer’s signal and not a video signal. The screen image is wavy, appears dim, or flickers. m Adjust the brightness setting. The brightness control (marked by ¤) is on the front of the display. m Adjust the white level and black level. If you’re using a Mac OS–based computer, you can also click Optimize in the Monitor window to optimize the white level and black levels for the display. m Adjust the tracking. m The flickering could be caused by interference from a nearby power line, a fluorescent light, or an electrical device—for example, a radio, a microwave oven, or another computer. Try relocating nearby electrical devices, or moving your computer and display. The screen image is blurry. m Adjust the tracking. m Switch the resolution for the display to the optimal resolution—1024 x 768. m If the display is set to 1024 x 768 resolution, adjust the sharpness. No colors appear on the screen or the colors don’t look right. m Make sure the display cable is connected firmly to the correct ports on the back of the computer. If you do not have a graphics card installed in your computer, the display cable should be plugged into the monitor port on the back of your computer. If you have a graphics card installed in your computer, the display cable should be plugged into the port on the graphics card. m Some graphics cards have sync on color, which may cause a single color hue (red, green, or blue) to be predominant or a washed-out white image. This display is not compatible with graphics cards that have sync on color. Contact the graphics card manufacturer for information. m For more information on color and your display, see Mac OS Help. The screen image is off-center. m Adjust the vertical or horizontal position of the screen image. 58 Chapter 6 After you change the screen resolution, desktop icons move. m Changing the screen resolution affects how information can be displayed on your screen. The operating system may automatically reposition icons after you change the screen resolution. You select a different resolution and a message appears saying the signal is out of range. m When you change resolutions, the screen will go dark for a few seconds, then switch to the new resolution. m The display may show the message “Signal Out-of-Range” for 10 seconds, then switch back to the original resolution if you select a resolution that does not work with your computer. Try selecting another resolution. m Some graphics cards may show a resolution that is not used by this display. If the “Signal Out-of-Range” message doesn’t go away, restart your computer holding the Shift key down to turn extensions off. Open the Preferences folder in the System Folder and throw the Display Preferences file in the Trash. Then restart your computer again. The energy-saving (sleep) mode is not working properly. m Some computers and graphics cards do not support the Energy Saver feature. See the documentation that came with your computer and graphics card for more information. The screen freezes. m If you are using both Energy Saver and a screen saver program, the screen saver program may be conflicting with Energy Saver. Turn off either the screen saver program or Energy Saver. Over time, you experience eyestrain. m Adjust the brightness setting. The brightness control (marked by ¤) is on the front of the display. m Be sure to take occasional breaks to focus your eyes on a distant object. Sound You can’t hear any sound when you’re using the display to play videos. m Make sure you’ve connected external speakers properly to the display or the VCR. (See “Connecting External Speakers” on page 50.) m Turn up the volume in the On-Screen Display window. m Make sure the Muting option is off in the On-Screen Display window. Tips and Troubleshooting 59 Control Strip You can’t find the Control Strip. m You may have hidden the Control Strip. Open the Control Strip control panel in the Apple (K) menu and click the button labeled Show Control Strip.” Monitors & Sound Control Panel for Mac OS–Based Computers Note: Detailed instructions on the Monitors & Sound control panel are provided in Mac OS Help. To see Mac OS Help, open the Help menu and choose Help, or open the Guide (h) menu and choose Mac OS Guide or Macintosh Guide. The name of your display doesn’t appear in the Monitors & Sound control panel. m Make sure the ADB connector on the display cable is plugged directly into your computer’s ADB port. m Make sure you’ve installed the Apple Displays Software that came with your display. For more information, see Chapter 2, “Installing and Using the Apple Displays Software.” m You may be using a graphics card that’s not compatible with your display. Contact the manufacturer of the graphics card for information. A message appears, “This version of system software is not supported by the Apple Displays Software.” m Make sure you’re using System 8.0 or later. m If this message appears in the Apple Displays Software Installer, make sure you select the startup hard disk in the Installation dialog box. A message appears, “An error has occurred reading from or writing to a file.” m Make sure you are not starting up from a non-writable disk, such as a CD, a locked hard disk, or a floppy disk. A message appears, “This monitor is not supported by this version of the Apple Displays Software.” m Make sure you have installed the Apple Displays Software that came with your display. For more information, see Chapter 2, “Installing and Using the Apple Displays Software.” The Monitors & Sound control panel opens, but does not include the Flat Panel button. m Make sure the ADB connector on the display cable is plugged directly into your computer’s ADB port. m Reinstall the software that came with your display. For more information, see Chapter 2, “Installing and Using the Apple Displays Software.” 60 Chapter 6 ColorSync profiles are not updated when ColorSync software is installed. m Profiles created with older versions of ColorSync are still supported with the new version of ColorSync that came with your software. m Out-of-date profiles in the ColorSync Profiles folder are not removed automatically. If you want to remove a ColorSync profile, you must do so manually. For more information about ColorSync, see Mac OS Help. Changes in the Monitors & Sound control panel don’t appear on the display. m Each display connected to your computer has its own Monitors & Sound window. Use the window that displays the name of your display in the top-left corner. m Make sure you have installed the Apple Displays Software that came with your display. For more information, see Chapter 2, “Installing and Using the Apple Displays Software.” When you open the Monitors & Sound control panel, only one resolution is available. m Make sure you’ve connected the ADB connector on the display cable to the ADB port on your computer. You cannot use many of the features of the Apple Displays Software without an ADB connection. For more information, see Chapter 1, “Setting Up.” m If the Apple Displays Software is installed and you start up your computer holding the Shift key down, the Display Enabler extension will not load and the software will not run. Restart your computer without disabling extensions to use the software. m Reinstall the software that came with your display. For more information, see Chapter 2, “Installing and Using the Apple Displays Software.” Tips and Troubleshooting 61 A P P E N D I X Technical Information General Specifications Flat Panel Display m 15.1-inch (38.4 centimeters) viewable diagonal image, 307 millimeters(mm) (horizontal) x 230 mm (vertical) m 1024 (horizontal) x 768 (vertical) active pixels m Color depth: 8 bit/color, 24 bit Desktop Stand m Tilt adjustment: –10˚ downward and +45˚ upward m Swivel adjustment: ±45˚ m Height adjustment: 4.4 inches (110 mm) Flip-Out Stand m Tilt: +15˚ Power-Saving and Environmental Features The color of the power indicator light on the front of the monitor indicates the operating mode: DPMS Mode Mac OS Energy Saver mode Power consumption Power indicator On Normal <40 W Green Standby/ Suspend Monitor sleep <10 W Amber Off System sleep <8 W Amber 63 For instructions on adjusting the system and display sleep settings and additional energyconservation information, see “Conserving Energy” on page 32. You can also see Mac OS Help. m TCO 95: This product has been certified by TCO (the Swedish Confederation of Professional Employees) to meet global standard safety tests and have energy-saving features such as automatic power-saving mode and reduced electromagnetic fields. m MPR II: This product has reduced electromagnetic and electrostatic emissions. m Energy Star: This product complies with the United States Environmental Protection Agency’s Energy Star criteria for energy-efficient office products. The EPA Energy Star Office Equipment program is a partnership program to promote energy-efficient personal computers, monitors, printers, fax machines, and copiers. Reducing the energy consumption from this equipment can help reduce smog, acid rain, and climate change by decreasing emissions from electricity generation. m DPMS: This product’s power-saving features comply with the Video Electronics Standards Association’s ( VESA) Display Power Management Standard (DPMS). (The computer must also be VESA DPMS compliant to use DPMS features.) m VESA Display Data Channel (DDC)™ Standard: This display supports VESA DDC 1 and DDC 2B. Weight m Display: 6 pounds (2.7 kilograms) m Desktop stand: 4.6 pounds (2.08 kilograms) Dimensions of Display (with Desktop Stand) m m m m Height/minimum: 15.0 inches (in.) ± 0.2 in. (375 mm ± 5 mm) Height/maximum: 19.3 inches (in.) ± 0.2 in. (483 mm ± 5 mm) Width: 15.7 in. ± 0.2 in. (393.6 mm ± 5 mm) Depth: 9.8 in. ± 0.2 in. (249 mm ± 5 mm) Dimensions of Display (with Flip-Out Stand) m Height: 11.6 inches (in.) ±0.2 in. (297 mm ± 5mm) m Width: 15.7 in. ±0.2 in. (393.6 mm ± 5 mm) m Depth: 6.9 in. ±0.2 in. (184.5 mm ± 5 mm) Temperature m Operating: 50˚ to 95˚ F (10˚ to 35˚ C) m Storage (up to 6 months): –4˚ to 140˚ F (–20˚ to 60˚ C) m Shipping (up to 72 hours): –40˚ to 149˚ F (–40˚ to 65˚ C) 64 Appendix Humidity (noncondensing) m Operating: 10% to 80% m Storage (up to 6 months): 5% to 95% m Shipping (up to 72 hours): 5% to 95% Altitude m Operating: 0 to 10,000 feet (ft.) (0 to 3,000 meters [m]) m Shipping: 0 to 35,000 ft. (0 to 10,500 m) Active Video Image Area Resolutions supported for computer input: Resolution Vertical refresh rate (Hertz) 640 x 480 640 X 480 640 X 480 640 X 480 59.9 66.7 72.8 75.0 720 x 400 70.1 800 x 600 800 x 600 800 x 600 800 x 600 56.3 60.3 72.2 75.0 832 X 624 74.6 1024 x 768 1024 x 768 1024 x 768 60.0 70.1 74.9/75.0 Formats supported for video input: m NTSC M m PAL B, D, G, H, I m SECAM Technical Information 65 Power Adapter Input Electrical Requirements m Line voltage: 100–240 volts ( V ) AC m Frequency: 50–60 hertz (Hz) Interfaces m One Apple Desktop Bus (ADB) port on the display supporting an ADB input device (such as a keyboard, mouse, or trackball) or the ADB cable connected to the desktop stand m Two ADB ports on the desktop stand supporting ADB input devices (such as a keyboard, mouse, or trackball) m Audio output port m RCA audio input ports, left and right m Super VHS video (S-video) input port m Composite video (C-video) input port Display Cable Specifications m 15-pin miniature D-type connector 8 7 6 5 4 3 2 1 15 14 13 12 11 10 9 66 Appendix Pin Output signal 1 Red video ground 2 Red video signal 3 Not used 4 ID 1 5 Green video signal 6 Green video ground 7 ID 2 8 DDC +5 V 9 Blue video signal 10 ID 3 11 Vertical Sync return 12 Vertical Sync signal 13 Blue video ground Pin Output signal 14 Horizontal Sync return 15 Horizontal Sync signal Shell Shield ground VGA Adapter Specifications m Standard 15-pin VGA connector 1 6 2 5 10 11 12 13 14 15 7 3 8 4 9 Pin Signal 1 Red video 2 Green video 3 Blue video 4 Monitor ID 2 5 DDC return 6 Red return 7 Green return 8 Blue return 9 DDC 5 V 10 Sync return 11 Monitor ID 0 12 SDA (ID 1) 13 Horizontal sync 14 Vertical sync 15 SCL (ID 3) Shell Shield ground Technical Information 67