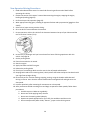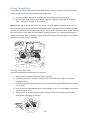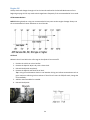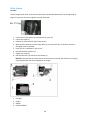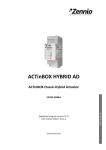
1
SPARTAN 600 EFI SPARTAN XT 600 EFI OWNER’S MANUAL INTRODUCTION Congratulations on the purchase of your Chironex Spartan side‐by‐side. With the purchase of the Spartan, you can now appreciate the high degree of craftsmanship. This manual will provide you with a good basic understanding of the features and operation of this side‐by‐side. This manual includes important safety information. It provides information about special techniques and skills necessary to ride your Spartan. It also includes basic maintenance and inspection procedures. If you have any questions regarding the operation or maintenance of your Spartan, please consult you dealer. AN IMPORTANT SAFETY MESSAGE: READ THIS MANUAL CAREFULLY AND COMPLETELY BEFORE OPERATING YOUR SPARTAN. MAKE SURE YOU UNDERSTAND ALL INSTRUCTIONS. PAY CLOSE ATTENTION TO THE WARNING LABELS ON THE SPARTAN. NEVER OPERATE A SPARTAN WITHOUT PROPER TRAINING OR INSTRUCTION. THE SPARTAN SHOULD NOT BE RIDDEN BY ANYONE UNDER 16 YEARS OF AGE. INFORMATION FAILURE TO FOLLOW THE WARNINGS CONTAINED IN THIS MANUAL CAN RESULT IN SERIOUS INJURY OR DEATH. Particularly important information is distinguished in this manual by the following symbols: The Safety Alert Symbol means ATTENTION! BECOME ALERT! Failure to follow WARNING instructions could result in severe injury or death to the machine operator, a bystander or a person inspecting or repairing the machine. A CAUTION sign indicates that special precautions must be taken to avoid damage to the machine. NOTE: A NOTE sign provides key information to simplify procedures. IMPORTANT NOTICE The Spartan is designed and manufactured for OFF‐ROAD use only. It is illegal and unsafe to operate the Spartan on any public street, road or highway. The Spartan complies with all applicable OFF‐ROAD noise level and spark arrester laws and regulations in effect at the time of manufacture. Please check your local riding laws and regulations before operating the Spartan. 2 TableofContents INTRODUCTION ............................................................................................................................................. 6 Identification number records .................................................................................................................. 6 SAFETY ........................................................................................................................................................... 7 Equipment Modifications .......................................................................................................................... 7 Safe Riding Gear ........................................................................................................................................ 7 Safety Warnings ........................................................................................................................................ 8 Operating Without Instruction ................................................................................................................. 8 Age Restrictions ........................................................................................................................................ 8 Rider Height .............................................................................................................................................. 8 Failure to Inspect Before Operating .......................................................................................................... 9 Accessories ................................................................................................................................................ 9 Protective Apparel .................................................................................................................................... 9 Seat Belts ................................................................................................................................................... 9 Using Alcohol or Drugs .............................................................................................................................. 9 Carrying a Passenger ............................................................................................................................... 10 Carrying Multiple Passengers.................................................................................................................. 10 Operating on Pavement .......................................................................................................................... 10 Operating on Public Roads ...................................................................................................................... 10 Operating at Excessive Speeds ................................................................................................................ 10 Turning Improperly ................................................................................................................................. 11 Physical Control of the Vehicle ............................................................................................................... 11 Jumps and Stunts .................................................................................................................................... 11 Driving Downhill Improperly ................................................................................................................... 11 Improper Hill Climbing ............................................................................................................................ 12 Stalling While Climbing a Hill .................................................................................................................. 12 Crossing Hillsides ..................................................................................................................................... 12 Operating in Unfamiliar Terrain .............................................................................................................. 12 Operating on Sand or Slippery Terrain ................................................................................................... 12 Operating Improperly in Reverse ............................................................................................................ 13 Driving Over Obstacles ............................................................................................................................ 13 Skidding or Sliding ................................................................................................................................... 13 Operating Through Water ....................................................................................................................... 13 3 Overloading the Vehicle .......................................................................................................................... 14 Operating a Damaged Vehicle ................................................................................................................ 14 Operating on Frozen Bodies of Water .................................................................................................... 14 Handling Gasoline ................................................................................................................................... 14 Exposure to Exhaust ................................................................................................................................ 15 Hot Exhaust Systems ............................................................................................................................... 15 Unauthorized Use of the Vehicle ............................................................................................................ 15 Safety Labels and Locations .................................................................................................................... 15 Warning Labels ........................................................................................................................................ 15 FEATURES AND CONTROLS ......................................................................................................................... 17 Component Locations ............................................................................................................................. 17 Indicator and Warning Lights .................................................................................................................. 18 Switches .................................................................................................................................................. 19 Seats ........................................................................................................................................................ 20 Fuel Cap ................................................................................................................................................... 21 Ignition Switch......................................................................................................................................... 21 Gear Shifter ............................................................................................................................................. 22 Parking Brake .......................................................................................................................................... 22 Brake Pedal ............................................................................................................................................. 22 Throttle Pedal ......................................................................................................................................... 22 OPERATION ................................................................................................................................................. 23 Vehicle Break‐in Period ........................................................................................................................... 23 Pre‐Ride Inspection ................................................................................................................................. 24 Safe Operation Practices ......................................................................................................................... 24 Starting the Engine .................................................................................................................................. 25 Stopping the Engine ................................................................................................................................ 25 Braking .................................................................................................................................................... 25 Parking the Vehicle ................................................................................................................................. 25 New Operator Driving Procedures .......................................................................................................... 26 Driving with a Passenger ......................................................................................................................... 27 Driving on Slippery Surfaces ................................................................................................................... 28 Driving Uphill ........................................................................................................................................... 29 Driving Sideways on a Hill ....................................................................................................................... 29 4 Driving Downhill ...................................................................................................................................... 29 Driving Through Water ........................................................................................................................... 30 Driving Over Obstacles ............................................................................................................................ 30 Driving in Reverse ................................................................................................................................... 31 Parking on an Incline ............................................................................................................................... 31 MAINTENANCE ............................................................................................................................................ 32 Periodic Maintenance Chart ................................................................................................................... 32 Engine Oil ................................................................................................................................................ 34 Transmission (Main Gear case) ............................................................................................................... 36 Spark Plugs .............................................................................................................................................. 36 CVT System.............................................................................................................................................. 37 Filter System ........................................................................................................................................... 38 Cooling System ........................................................................................................................................ 39 Throttle System ....................................................................................................................................... 39 EFI System ............................................................................................................................................... 40 Steering Wheel Inspection ...................................................................................................................... 40 Brakes ...................................................................................................................................................... 41 Tires ......................................................................................................................................................... 42 Vehicle Immersion .................................................................................................................................. 43 Battery ..................................................................................................................................................... 43 Cleaning and Storage .............................................................................................................................. 45 Malfunction Analysis and Elimination .................................................................................................... 46 WARRANTY ................................................................................................................................................. 53 SPECIFICATIONS .......................................................................................................................................... 54 WIRING DIAGRAM ....................................................................................................................................... 56 5 INTRODUCTION Failure to follow the warnings and safety precautions contained in this manual can result in severe injury or death. Your vehicle is not a toy and can be hazardous to operate. This vehicle handles differently than cars, trucks or other off‐road vehicles. A collision or rollover can occur quickly, even during routine manoeuvres like turning, driving on hills or over obstacles, if you fail to take the proper precautions. Read this owner’s manual. Understand all safety warnings, precautions and operating procedures before driving the vehicle. Keep this manual with the vehicle. Never operate this vehicle without proper instruction. Always follow the age guidelines for your vehicle. Operation is prohibited for anyone age 16 and under. Never operate with a passenger age 12 and under. Identificationnumberrecords Record the vehicle identification number and engine number in the spaces provided below for assistance when ordering spare parts from your dealer or for reference in case the vehicle is stolen. NOTE: The vehicle identification number (VIN) is used to identify your machine. VIN: _________________________________________________ ENGINE NUMBER: ______________________________________ 6 SAFETY EquipmentModifications Your vehicle is designed to provide safe operation when used as directed. Modifications to your vehicle may negatively impact vehicle stability. Failure of critical machine components may result from operation with any modifications, especially those that increase speed or power. This vehicle may become less stable at speeds higher than those for which it is designed. Loss of control may occur at higher speeds. Do not install on a vehicle any equipment that may increase the speed or power of the vehicle, or make any other modifications to the vehicle for these purposes. Any modifications to the original equipment of the vehicle create a substantial safety hazard and increase the risk of bodily injury. The warranty on your vehicle becomes void if any equipment has been added to the vehicle, or if any modifications have been made to the vehicle that increase its speed or power. The addition of certain accessories may change the handling characteristics of the vehicle. Use only our company approved accessories, and familiarize yourself with their function and effect on the vehicle. SafeRidingGear Always wear appropriate clothing when riding this vehicle. Wear protective clothing for comfort and to reduce the chance of injury. Helmet: Wearing a helmet can prevent a severe head injury. Whenever riding this vehicle, always wear a helmet that meets or exceeds established safety standards. Approved helmets in the USA and Canada bear a U.S. Department of Transportation (DOT) label. Eye Protection: Do not depend on eyeglasses or sunglasses for eye protection. Whenever riding a vehicle, always wear shatterproof goggles or use a shatterproof helmet face shield. Gloves: Wear gloves for comfort and for protection from sun, cold weather and other elements. Boots: Wear sturdy footwear. Do not ride a vehicle with bare feet. Clothing: Wear long sleeves and long pants to protect arms and legs. 7 SafetyWarnings Failure to operate this vehicle properly can result in a collision, loss of control, accident or overturn which may result in serious injury or death. Be sure to read all of the following warnings about driving hazards and how to avoid them. These warnings are provided for your safety. OperatingWithoutInstruction Operating this vehicle without proper instruction increases the risk of an accident. The operator must understand how to operate the vehicle properly in different situations and on different types of terrain. AgeRestrictions Operation is prohibited for anyone less than 16 years of age. Never operate with a passenger under 12 years of age. Make sure any passenger is tall enough to comfortably and safely reach the hand holds and place feet flat on the floor. RiderHeight Some riders may be too tall to ride safely in this vehicle. Do not operate or ride in this vehicle if the clearance between the top of your helmet and the roof is less than 2 inches (5 cm). 8 FailuretoInspectBeforeOperating Failure to inspect and verify that the vehicle is in safe operating condition before operating increases the risk of an accident. Always inspect the vehicle before each use to make sure it's in safe operating condition. Always follow the inspection and maintenance procedures and schedules described in the owner's manual. Accessories Installing non‐approved accessories may seriously affect vehicle handling and stability, which could result in loss of control or an accident. Never install accessories not approved by our company for use on this vehicle. ProtectiveApparel Riding in this vehicle without wearing an approved helmet and protective eyewear increases the risk of serious injury in the event of an accident. The operator and passenger must always wear an approved helmet that fits properly, as well as eye protection (goggles or face shield). SeatBelts Riding in this vehicle without wearing the seat belt increases the risk of serious injury or death in the event of an accident or sudden stop. Riders must wear seat belts at all times. Seat belts reduce the severity of injury in the event of a sudden stop or accident. Always make sure the seat belts are secured for both the operator and passenger before riding. UsingAlcoholorDrugs Riding in this vehicle after consuming alcohol or drugs could adversely affect operator judgment, reaction time, balance and perception. Never consume alcohol or drugs before or while operating or riding in this vehicle. 9 CarryingaPassenger Never carry a passenger until you have operated this vehicle for at least four hours. CarryingMultiplePassengers Carrying more than the stipulated number of passengers can affect the operator’s ability to steer and operate the controls, which increases the risk of loss of control and accidents. Never carry more than the stipulated number of passengers. OperatingonPavement Operating this vehicle on paved surfaces (including sidewalks, paths, parking lots and driveways) may seriously affect handling and may cause the vehicle to go out of control. This vehicle's tires are designed for off‐road use only. Avoid operating the vehicle on pavement. If you must operate on a paved surface, travel slowly and do not make sudden turns or stops. OperatingonPublicRoads Operating this vehicle on public streets, roads or highways could result in a collision with another vehicle. Never operate this vehicle on any public street, road or highway, including dirt and gravel roads. In many areas it's illegal to operate vehicles of this type on public streets, roads and highways. OperatingatExcessiveSpeeds Operating this vehicle at excessive speeds increases the operator's risk of losing control. Always operate at a speed that's appropriate for the terrain, the visibility and operating conditions, your skills and your passenger’s skills. 10 TurningImproperly Turning improperly could cause loss of traction, loss of control, an accident or overturn. Never turn abruptly or at sharp angles. Never turn at high speeds. Practice turning at slow speeds before attempting to turn at faster speeds. PhysicalControloftheVehicle Removing hands from the steering wheel or hand holds or removing feet from the floor while riding increases the risk of loss of control and accident or overturn. The operator should always keep both hands on the steering wheel during operation. A passenger should always be seated in the passenger seat with both feet on the floor and with both hands securely grasping the hand holds. Always keep hands and feet inside the vehicle at all times. JumpsandStunts Stunt driving increases the risk of an accident or overturns. DO NOT perform power slides, “donuts”, jumps or other driving stunts. Avoid stunt driving. DrivingDownhillImproperly Driving downhill improperly could cause loss of control or overturn. Always follow proper procedures for driving down a hill as described in the owner's manual. Always drive down a hill with the transmission in forward gear. Never drive down a hill with the transmission in neutral. Never operate the vehicle on hills steeper than 15 degrees. Always check the terrain carefully before driving down a hill Never travel downhill at high speed. Avoid travelling downhill at an angle, which could cause the vehicle to lean sharply to one side. 11 ImproperHillClimbing Improper hill climbing could cause loss of control or overturn. Use extreme caution when operating on hills. Always follow proper procedures for hill climbing as described in the owner's manual. StallingWhileClimbingaHill Stalling or rolling backwards while climbing a hill could cause an overturn. Maintain a steady speed when climbing a hill. If you lose all forward speed: Apply the brakes gradually until the vehicle is fully stopped. Place the transmission in reverse and slowly reverse the vehicle straight downhill while applying light brake pressure to control speed. CrossingHillsides Driving on an angle on a hill is not recommended. Improper procedure could cause loss of control or overturn. Avoid crossing the side of any hill unless absolutely necessary. OperatinginUnfamiliarTerrain Failure to use extra caution when operating on unfamiliar terrain could result in an accident or overturn. Unfamiliar terrain may contain hidden rocks, bumps, or holes that could cause loss of control or overturn. Travel slowly and use extra caution when operating on unfamiliar terrain. Always be alert to changing terrain conditions. OperatingonSandorSlipperyTerrain Operating on sand or on excessively rough, slippery or loose terrain could cause loss of traction, loss of control, an accident or overturn. Always use extra caution when operating on sand or on rough, slippery or loose terrain. Do not operate on excessively rough, slippery or loose terrain. 12 OperatingImproperlyinReverse Improperly operating in reverse could result in a collision with an obstacle or person. Always follow proper operating procedures as outlined in this manual. Before shifting into reverse gear, always check for obstacles or people behind the vehicle. When it's safe to proceed, reverse slowly. DrivingOverObstacles Improperly driving over obstacles could cause loss of control or overturn. Before operating in a new area, check for obstacles. Never attempt to drive over large obstacles such as rocks or fallen trees. Always follow the proper procedures outlined in this manual when driving over obstacles. SkiddingorSliding Skidding or sliding can cause loss of control or overturn (if tires regain traction unexpectedly). Always follow proper procedures for operating on slippery surfaces as described in the owner's manual. When operating on slippery surfaces such as ice or loose gravel, reduce your speed and use extra caution to reduce the chance of skidding or sliding. Do not operate on excessively slippery surfaces. OperatingThroughWater Operating through deep or fast‐flowing water can cause loss of traction, loss of control, overturn or an accident. Never operate in fast‐flowing water or in water that exceeds the floor level. Always follow proper procedures for operating in water as described in the owner's manual. Wet brakes may have reduced stopping ability. After leaving water, test the brakes. Apply them lightly several times while driving slowly. The friction will help dry out the pads. 13 OverloadingtheVehicle Overloading the vehicle or carrying/towing loads may cause changes in stability and handling, which could cause loss of control or an accident. Never exceed the maximum tow capacity for this vehicle. Never exceed the maximum weight capacity for this vehicle. OperatingaDamagedVehicle Operating a damaged vehicle can result in serious injury or death. After any overturn or accident, have a qualified service dealer inspect the entire vehicle for possible damage, including (but not limited to) brakes, throttle and steering systems. OperatingonFrozenBodiesofWater Operating on frozen bodies of water can result in the vehicle and riders falling through the ice. Never operate this vehicle on a frozen body of water. HandlingGasoline Gasoline is highly flammable and is explosive under certain conditions. Always exercise extreme caution whenever handling gasoline. Never allow a child to refuel or handle gasoline. Always stop the engine when refuelling. Always refuel outdoors or in a well‐ventilated area. Do not smoke or allow open flames or sparks in or near the refuelling area or where gasoline is stored. Never refuel while a person is in the vehicle. Do not over fill the tank. Do not fill the tank neck. If gasoline spills on your skin or clothing, immediately wash it off with soap and water and change clothing. Turn the fuel valve off whenever the vehicle is stored or parked. 14 ExposuretoExhaust Engine exhaust fumes are poisonous and can cause loss of consciousness or death in a short time. Never start the engine or let it run in an enclosed area. Operate this vehicle only outdoors or in well‐ventilated areas. HotExhaustSystems Exhaust system components are very hot during and after use of the vehicle. Hot components can cause burns and fire. Do not touch hot exhaust system components. Always keep combustible materials away from the exhaust system. Use caution when traveling through tall grass, especially dry grass. Always inspect the underside of the vehicle and areas near the exhaust system after driving through tall grass, weeds, brush and other tall ground cover. Promptly remove any grass or debris clinging to the vehicle. UnauthorizedUseoftheVehicle Leaving the keys in the ignition can lead to unauthorized use of the vehicle, which could result in an accident or overturn. Always remove the ignition key when the vehicle is not in use. SafetyLabelsandLocations Warning labels have been placed on the vehicle for your protection. Read and follow the instructions on each label carefully. If any of the labels shown in this manual differ from the labels on your vehicle, always read and follow the instructions of the labels on the vehicle. If an informational or graphic label becomes illegible or comes off, contact your dealer to purchase a replacement. WarningLabels WARNING Improper vehicle use can result in SEVERE INJURY or DEATH. NEVER allow vehicle to be operated: Without all occupants first viewing and understanding safety warning labels. With more than the stipulated number of passengers. On hills steeper than 15 degrees On paved surfaces ‐ pavement may seriously affect handling and control. With non‐approved accessories. They may seriously affect stability. At speeds that are too fast for the operator’s skills, the conditions and/or the terrain. ALWAYS require operator and passenger to: Wear seat belts; grab hand holds (passenger) and plant feet firmly on the floor. Keep hands and feet inside vehicle. Avoid quick turns and driving stunts such as jumps, donuts or power slides. Reduce speed and use extra caution when carrying a passenger. Watch for branches or other hazards that could enter the vehicle. 15 WARNING Operation of this vehicle by persons aged 16 and under increases the risk of severe injury or death. NEVER permit someone aged 16 or under to operate or ride in this vehicle. WARNING VEHICLE OVERTURN could cause severe injury or death. The cab frame is not designed or intended to provide rollover protection. MAXIMUM WEIGHT CAPACITY: 660 lbs. (300 Kg) THIS INCLUDES THE WEIGHT OF THE OPERATOR, PASSENGER AND ACCESSORIES. REFER TO THE OWNER’S MANUAL. FOLLOW ALL INSTRUCTIONS AND WARNINGS. IF OWNER’S MANUAL IS MISSING, CONTACT YOUR DEALER FOR A REPLACEMENT. 16 FEATURESANDCONTROLS ComponentLocations 17 IndicatorandWarningLights 1. 2. 3. 4. 5. 6. 7. 8. 9. 10. 11. 12. 13. 14. 15. Thermometer Left turning indicator Right turning indicator Fuel indicator High beam indicator Odometer Speedometer 2WD/4WD/4WD locked indicator Low brake fluid indicator Reverse speed override indicator Parking brake indicator Low engine oil indicator Check engine indicator Check battery indicator Tachometer 18 Switches 1. Reverse over‐speed over‐ride switch: The engine is equipped with a speed limiter which is activated when the vehicle is in reverse gear and/or in 4WD locked mode. When this button is pressed, this speed limiter is switched off. 2. Windshield wiper switch: When the vehicle is equipped with our windshield with electric wiper, this switch is used to activate the electric wiper. 3. Low beams / High Beams switch 4. Light switch 5. Warning indicator light switch (four way flashers) 6. Turning light switch (flashers) 7. 2WD/4WD/4WD locked switch: The vehicle must be completely stopped before you can use this switch. When the switch is in the 2WD position, power will go to the 2 rear wheels. When in the 4WD position, power will go to all 4 wheels. When in the 4WD locked position, power will go to all 4 wheels and the front differential will lock. 8. Radio and MP3 Player control: This is used to control the Radio and USB MP3 player. The USB socket used to plug in your USB device is located under the dashboard. 9. Cigarette lighter: The socket can also be used as an external power supply. 10. Winch and dump box circuit switch: The winch and dump box have their dedicated circuit. This switch must be turned on before using the winch or dump box. When you are not using the winch or dump box, please ensure that this switch is turned off. 11. Winch switch: This switch is used to control the winch. 12. Dump box switch: This switch is used to control the electric dump box. 19 Seats Driver’s Seat Adjustment If you want to adjust the backrest of the seat forward or rearward, rotate the knob (1) which is located at the inner edge of the seat in clockwise or anticlockwise direction. Seat Belts This vehicle is equipped with three‐point lap seat belts for the operator and passenger. Always make sure the seat belts are secured for both the operator and passenger before riding. To wear the seat belt properly, follow this procedure: 1. Pull the seat belt latch downward and across your chest toward the buckle at the inner edge of the seat. The belt should fit snugly across your hips and diagonally across your chest. Make sure the belt is not twisted. 2. Push the latch plate into the buckle until it clicks. 3. Press the red release button on the buckle to release the seat belt. Seat Belt Inspection Inspect all seat belts for proper operation before each use of the vehicle. 1. Push the latch plate into the buckle until it clicks. The latch plate must slide smoothly into the buckle. A click indicates that it's securely latched. 2. Push the red release latch in the middle of the buckle to make sure it releases freely. 3. Inspect the full length for any damage, including cuts, wear, fraying or stiffness. If any damage is found, or if the seat belt does not operate properly, have the seat belt system checked and/or replaced by an authorized dealer. 4. To clean dirt or debris from the seat belts, sponge the straps with mild soap and water. Do not use bleach, dye or household detergents. 20 FuelCap Never allow a child to refuel or handle gasoline. The fuel tank filler cap is located on the left‐hand side of the vehicle behind the operator seat. When refuelling, always use unleaded gasoline. IgnitionSwitch The ignition switch has four positions: 1. “OFF” (close) position: All circuits are turnoff except emergency light, electric fan and cigarette lighter. 2. “ACC” position: lights, MP3, horn, windshield wiper 3. “ON” (open) position: All circuits except engine are connected, and they could start at any moment or make engine keep running status. 4. “ST” (start) position:Connect engine and ignition circuit, and start engine. Handle returns to “ON” position automatically after engine starts. Note: You can start the engine when gear is in “N” position or step down the brake pedal when gear is in “H”, “L” and “R” positions. 21 GearShifter R: Reverse N: Neutral L: Low gear H: High gear The gear shifter is located between the seats. To change gears, stop the vehicle, and with the engine idling, move the lever to the desired gear. Do not attempt to shift gears with the engine speed above idle or while the vehicle is moving. Tip: Maintaining gear linkage is important to assure proper transmission function. See your dealer if you experience any shifting problems. NOTICE: Do not attempt to shift gears while the vehicle is moving or damage to the transmission could result. Always shift when the vehicle is stationary and the engine is at idle. ParkingBrake 1. Apply the brakes. 2. When the vehicle is fully stopped, pull the parking brake lever upward as far as possible to set the parking brake. 3. Stop the engine. 4. To release the parking brake, apply the brakes and push the lever toward the passenger seat and downward. Tip: Always engage the parking brake whenever the vehicle is left unattended. Operating the vehicle while the parking brake is engaged could cause an accident resulting in serious injury or death. It could also result in driveline or engine damage. Always be sure to disengage the parking brake before operating the vehicle. BrakePedal Apply the brake pedal to slow or stop the vehicle. Apply the brakes while starting the engine. ThrottlePedal Push the pedal down to increase engine speed. Spring pressure returns the pedal to the rest position when released. Always check that the throttle pedal returns normally before starting the engine. Make sure there's adequate throttle pedal play. See page 39 for throttle pedal adjustment procedures. If the throttle cable should stick in an open position when the operator releases the throttle pedal, the engine will stop and power to the rear wheels will cease. 22 OPERATION Failure to operate the vehicle properly can result in a collision, loss of control, accident or overturn, which may result in serious injury or death. Read and understand all safety warnings outlined in the safety section of this owner’s manual. Vehicle Break‐in Period The break‐in period for your new vehicle is defined as the first ten hours of operation, or the time it takes to use the first two full tanks of gasoline. No single action on your part is as important as a proper break‐in period. Careful treatment of a new engine and drive components will result in more efficient performance and longer life for these components. Perform the following procedures carefully. NOTICE: Excessive heat build‐up during the first three hours of operation will damage close‐fitted engine parts and drive components. Do not operate at full throttle or high speeds during the first three hours of use. Mixing brands or using non‐recommended oil may cause serious engine damage. Always use the recommended oil. Never substitute or mix oil brands. VehicleBreak‐inPeriod Engine and Drivetrain Break‐in 1. Fill the fuel tank with gasoline. Always exercise extreme caution whenever handling gasoline. Never allow a child to handle gasoline. 2. Check the oil level. See page 34. Add the recommended oil as needed to maintain the oil level in the safe operating range. 3. Complete the New Operator Driving Procedures outlined on page 26. 4. Avoid aggressive use of the brakes. See Brake System Break‐in below. 5. Vary throttle positions. Do not operate at sustained idle. 6. Perform regular checks on fluid levels, controls and areas outlined on the daily pre‐ride inspection checklist. See page 24. 7. Change the engine oil at 10 hours or one month. Brake System Break‐in Apply only moderate braking force for the first 50 stops. Aggressive or overly forceful braking when the brake system is new could damage brake pads and rotors. CVT Break‐in (Clutches/Belt) A proper break‐in of the clutches and drive belt will ensure a longer life and better performance. Break in the clutches and belt by operating at slower speeds during the break‐in period as recommended. Avoid aggressive acceleration and high speed operation during the break‐in period. 23 Pre‐RideInspection Failure to inspect and verify that the vehicle is in safe operating condition before operating increases the risk of an accident. Always inspect the vehicle before each use to make sure it's in safe operating condition. Item Brake Steering Engine oil Air filter Seat Belts Remarks Ensure proper operation Ensure free operation Ensure proper levels Inspect, clean Check length of belt for damage, check latches for proper operation Brake fluid Ensure proper level Tires Inspect condition Throttle system Ensure proper operation Gear case fluid Ensure proper levels Spark plug Inspect condition Page 41 40 34 38 20 41 42 39 36 36 SafeOperationPractices 1. Complete the New Operator Driving Procedures outlined on page 26. 2. Do not ride at night or when visibility is poor (rain, fog, dusk). Your vehicle doesn't have lights that are designed for driving in these conditions. 3. Engine exhaust fumes are poisonous. Never start the engine or let it run in an enclosed area. 4. Never install accessories not approved by our company for use on this vehicle. 5. Never operate the vehicle on pavement or on any public street, road or highway, including dirt and gravel roads. 6. Drive in a manner appropriate for your skills and operating conditions. Never operate at excessive speeds. DO NOT attempt to do power slides, “donuts”, jumps or other driving stunts. Keep both hands on the steering wheel at all times. 7. Never consume alcohol or drugs before or while operating this vehicle. 8. Always use the size and type of tires specified for your vehicle. Always maintain proper tire pressure. 9. Never operate a damaged vehicle. After any overturn or accident, have a qualified service dealer inspect the entire machine for possible damage. 10. Never operate the vehicle on a frozen body of water. 11. Do not touch hot exhaust system components. Always keep combustible materials away from the exhaust system. 12. Always remove the ignition key when the vehicle is not in use to prevent unauthorized use. 24 StartingtheEngine 1. 2. 3. 4. 5. Sit in the driver's seat and fasten the seat belt. Place the transmission in neutral. Set the parking brake. Apply the brakes. Do not press the throttle pedal while starting the engine. Turn the ignition key to the “ST” position. Engage the starter for a maximum of five seconds. Release the key when the engine starts. NOTICE: Operating the vehicle immediately after starting could cause engine damage. Allow the engine to warm up for several minutes before operating the vehicle. 6. If the engine does not start within five seconds, return the ignition switch to the “ON” position and wait five seconds. Repeat steps 5 and 6 until the engine starts. 7. Vary the engine RPM slightly with the throttle to aid in warm‐up until the engine idles smoothly. 8. Release the parking brake before driving. StoppingtheEngine 1. 2. 3. 4. Release the throttle pedal completely and brake to a complete stop. Place the transmission in neutral. Set the parking brake. Stop the engine. Braking 1. Release the throttle pedal completely. (When the throttle pedal is released completely and engine speed slows to near idle, the vehicle has no engine braking.) 2. Press on the brake pedal evenly and firmly. Practice starting and stopping (using the brakes) until you're familiar with the controls. ParkingtheVehicle 1. Stop the vehicle on a level surface. When parking inside a garage or other structure, be sure that the structure is well ventilated and that the vehicle is not close to any source of flame or sparks, including any appliance with pilot lights. 2. Place the transmission in neutral. 3. Set the parking brake. 4. Stop the engine. 5. Remove the ignition key to prevent unauthorized use. 25 NewOperatorDrivingProcedures 1. Read and understand the owner's manual and all warning and instruction labels before operating this vehicle. 2. Review the section of this owner’s manual about starting the engine, stopping the engine, braking and parking (page 25). 3. Perform the pre‐ride inspection (page 23). 4. Wear appropriate riding gear, including an approved helmet and eye protection (goggles or face shield). 5. Select a level, open area to practice driving. 6. Sit in the driver's seat and fasten the seat belt. 7. Do not operate or ride in this vehicle if the clearance between the top of your helmet and the roof is less than 2 inches (5 cm). 8. Do not carry a passenger until you have at least four hours of driving experience with this vehicle. See page 26. 9. Set the parking brake. 10. Place the transmission in neutral. 11. Start the engine. 12. Apply the brakes and shift into gear. 13. Release the parking brake. 14. Check your surroundings. Make sure the area is clear of people and obstacles. 15. Keeping both hands on the steering wheel, slowly release the brakes and press the throttle with your right foot to begin driving. 16. Drive slowly at first. Practice starting, stopping, turning, using the throttle and brakes and driving in reverse. Learn how the vehicle handles when making both left and right turns at a slow speed. 17. Increase speed only after mastering all manoeuvres at a slow speed. 18. After you become skilled at making turns and begin to operate at faster speeds, follow these precautions: a. Avoid sharp turns. Make turns gradually. b. Never turn while applying heavy throttle. c. Never turn the steering wheel abruptly. d. Operate at speeds appropriate for your skills, the conditions and the terrain. e. Do not attempt to do power slides, “donuts”, jumps or other driving stunts. 26 DrivingwithaPassenger 1. Complete the New Operator Driving Procedures outlined on page 25. 2. Perform the pre‐ride inspection. See page 24. 3. Do not carry a passenger until you have at least four hours of driving experience with this vehicle. 4. Never operate with a passenger under 12 years of age. Make sure the passenger is tall enough to comfortably and safely sit in the passenger seat with the seat belt secured, both feet on the floor and hands grasping the hand holds. 5. Make sure the passenger has at least 2 inches (5 cm) of clearance between his helmet and the roof. 6. Never carry more than one passenger in this vehicle. 7. Never allow a passenger to ride on the back of the vehicle. Allow a passenger to ride only in the passenger seat. 8. Make sure the passenger is wearing appropriate riding gear, including an approved helmet and eye protection. See page 7. 9. Make sure the passenger secures the seat belt. 10. Tell your passenger to always keep hands and feet inside the vehicle at all times. 11. Drive slowly. Vehicle handling may change with a passenger on board. Always travel at a speed appropriate for your skills, your passenger's skills, and operating conditions. Avoid unexpected or aggressive manoeuvres that could cause discomfort or injury to a passenger. 12. Always follow all operating guidelines as outlined on safety labels and in this manual. 27 DrivingonSlipperySurfaces When driving on slippery surfaces such as wet trails, loose gravel, sand or ice, be aware of the possibility of skidding and sliding. Skidding or sliding can cause loss of control or overturn, especially if the tires regain traction unexpectedly. When operating on slippery surfaces such as ice or loose gravel slow down and use extra caution to help prevent skidding or sliding. Always use extra caution when operating on sand or on rough, slippery or loose terrain. Do not operate on excessively rough, slippery or loose terrain. Follow these precautions when driving in slippery conditions: 1. Slow down before entering slippery areas. 2. Be alert, watch the path ahead and avoid quick turns, which can cause skids. 3. Correct a skid by turning the steering wheel in the direction of the skid. Never apply the brakes during a skid. 28 DrivingUphill Whenever traveling uphill, follow these precautions: 1. 2. 3. 4. 5. 6. 7. Always check the terrain carefully before ascending a hill. Avoid steep hills(15° maximum). Drive straight uphill. Never climb hills with excessively slippery or loose surfaces. Drive at a steady rate of speed. Never press the throttle suddenly. Avoid unnecessary changes in speed or direction. Never go over the crest of a hill at a high speed. An obstacle, a sharp drop, or another vehicle or person could be on the other side of the hill. 8. If the vehicle stalls while climbing a hill, apply the brakes. Place the transmission in reverse and slowly reverse the vehicle downhill while applying the brakes lightly to control speed. DrivingSidewaysonaHill Driving sideways on a hill is not recommended. This could cause loss of control or an overturn. If crossing a hill is unavoidable, follow these precautions: 1. Drive slowly and use extreme caution. 2. If the vehicle begins to overturn, or if it feels as if it may overturn, immediately turn downhill. 3. Avoid obstacles and changes in terrain that may lower or raise one side of the vehicle or cause the vehicle to slide. 4. If the vehicle begins to slide downhill, immediately turn downhill to stop the slide. DrivingDownhill Whenever driving downhill, follow these precautions: 1. 2. 3. 4. Avoid steep hills (15° maximum). Slow down. Never travel downhill at high speeds. Always check the terrain carefully before driving down a hill. Always drive down a hill with the transmission in forward gear. Never “coast” or drive down a hill with the transmission in neutral. 5. Avoid driving downhill at an angle, which would cause the vehicle to lean sharply to one side. Always drive straight downhill. 6. Apply the brakes lightly to keep speed slow. 29 DrivingThroughWater Your vehicle can drive through shallow water. Make sure the water is no deeper than the floor of the vehicle. Follow these precautions when driving through water: 1. Check water depth. Never drive through water that is deeper than the floor level. 2. After driving through water, test the brakes. Apply them lightly several times while driving slowly. The friction will help dry out the pads. NOTICE: Major engine damage can result if the vehicle is not thoroughly inspected after operation in water. Perform the services outlined in the maintenance chart. See pages 32‐33. Give special attention to engine oil, transmission oil and all grease fittings. If your vehicle is operated in water deeper than the floor level, take it to your dealer for service before starting the engine. If it's impossible to bring the vehicle to your dealer before starting the engine, perform the service outlined on page 43, and take the vehicle to your dealer as soon as possible. DrivingOverObstacles Follow these precautions when driving over obstacles: 1. Always check for obstacles before driving in a new area. 2. Look ahead and watch the terrain. Always be alert for hazards such as logs, rocks and low hanging branches. 3. Drive slowly and use extra caution when driving on unfamiliar terrain. Obstacles are not always clearly visible. 4. Do not drive over large obstacles such as rocks and fallen trees. If it’s unavoidable, use extreme caution and drive slowly. 5. Always have a passenger dismount and move away from the vehicle before driving over an obstacle that could cause an overturn. 30 DrivinginReverse Follow these precautions when driving in reverse: 1. 2. 3. 4. 5. Always check for obstacles or people behind the vehicle. Apply the throttle lightly. Never apply the throttle suddenly. Reverse slowly. Apply the brakes lightly to stop. Avoid making sharp turns. ParkingonanIncline A rolling vehicle can result in serious injury. Avoid parking on an incline. If parking on an incline is unavoidable, follow these precautions: 1. 2. 3. 4. Place the transmission in neutral. Set the parking brake. Stop the engine. Always block the rear wheels on the downhill side. 31 MAINTENANCE PeriodicMaintenanceChart Careful periodic maintenance will help keep your vehicle in the safest, most reliable condition. Inspection, adjustment and lubrication of important components are explained in the periodic maintenance chart. Inspect, clean, lubricate, adjust and replace parts as necessary. When inspection reveals the need for replacement parts, use genuine parts available from your dealer. Service and adjustments are important for proper vehicle operation. If you're not familiar with safe service and adjustment procedures, have a qualified dealer perform these operations. Maintenance intervals in the following chart are based upon average riding conditions and an average vehicle speed of approximately ten (10) miles per hour. Vehicles subjected to severe use must be inspected and serviced more frequently. Severe Use Is Defined As: Frequent immersion in mud, water or sand Racing or high RPM use Prolonged low speed operation Extended idle Short trip cold weather operation Pay special attention to the oil level. A rise in oil level during cold weather can indicate contaminants collecting in the oil sump or crankcase. Change oil immediately if the oil level begins to rise. Monitor the oil level, and if it continues to rise, discontinue use and determine the cause or see your dealer. 32 Perform all services at whichever maintenance interval is reached first. Item Steering Tires Brake fluid level Brake system Brake pedal travel Engine oil level Maintenance Interval (whichever comes first) Hours Calendar KM (miles) Daily - - Daily - - Daily - - Daily - - Daily - - Daily - - Remarks Check each day before driving the vehicle. Make adjustments as needed. See the Pre‐Ride Checklist on page 24. Perform a break‐in oil change at one month Air filter, main element Weekly Inspect; replace as needed - - Brake pad wear 10 Monthly 160 (100) Inspect periodically Idle speed 10 Monthly 160 (100) Check; adjust as needed Front Suspension 50 6 months 800 (500) Lubricate Rear Suspension 50 6 months 800 (500) Lubricate Spark plugs 100 12 months 1000 (600) Inspect; replace as needed Wheel bearings 100 12 months 1000 (600) Inspect; replace as needed Shift Linkage 50 6 months 800 (500) Inspect, lubricate, adjust Battery 25 Monthly 400 (250) Check terminals; clean; test CVT system 100 12 months 1000 (600) Inspect; replace as needed Main gear case oil 25 Monthly 400 (250) Inspect level; change yearly Inspect periodically; adjust Toe adjustment - when parts are replaced Headlight aim Adjust as needed - WARNING: If your vehicle is subjected to severe use, perform services at shorter intervals. Engine oil change 30 6 months 33 480 (300) EngineOil Always check and change the engine oil at the intervals outlined in the Periodic Maintenance Chart beginning on page 32. Oil may need to be changed more frequently if the recommended oil is not used. Oil Recommendations NOTICE: Mixing brands or using non‐recommended oil may cause serious engine damage. Always use the recommended oil. Never substitute or mix oil brands. Oil Check Maintain the oil level within the safe range on the dipstick. Do not overfill. 1. 2. 3. 4. Position the vehicle on a level surface. Remove the dipstick. Wipe it dry with a clean cloth. Reinstall the dipstick completely. Remove the dipstick and check the oil level. Tip: A rising oil level between checks in cool weather driving can indicate contaminants such as gas or moisture collecting in the crankcase. If the oil level is over the full/safe mark, change the oil immediately. 5. Add the recommended oil as needed. 6. Reinstall the dipstick. 34 Oil and Filter Change Always change the oil and filter at the intervals outlined in the Periodic Maintenance Chart beginning on page 32. Always change the oil filter whenever changing oil. The engine drain plug is located on the bottom of the crankcase. 1. Position the vehicle on a level surface. Set the parking brake. 2. Start the engine. Allow it to idle for two to three minutes, Stop the engine. 3. Clean the area around the drain plug. CAUTION: Hot oil can cause burns to skin. Do not allow hot oil to contact skin. 4. Place a drain pan under the engine crankcase. 5. Remove the drain plug. Allow the oil to drain completely. NOTE: The sealing area on the drain plug and crankcase should be clean and free of burrs or scratches. 6. Using a cap‐style oil filter wrench, turn the oil filter cartridge to remove it. 7. Using a clean dry cloth, clean the filter sealing surface on the crankcase. 8. Lubricate the O‐ring on the new filter with a film of fresh engine oil. Check to make sure the O‐ ring is in good condition. 9. Install the new oil filter cartridge with an oil filter wrench, and then tighten it to the specific torque with a torque wrench. Oil filter cartridge tightening torque: 20N•m (20m•kgf, 14ft•lbf). 10. Reinstall the sealing washer on the drain plug. 11. Reinstall the drain plug. Add the recommended engine oil. 12. Place the transmission in PARK. Apply the brakes. 13. Start the engine. Allow it to idle for one to two minutes. 14. Stop the engine. Inspect for leaks. 15. Re‐check the oil level on the dipstick and add oil as necessary to bring the level to the upper mark on the dipstick. 16. Dispose of used filter and oil properly. 35 Transmission(MainGearcase) Fluid Check The fill plug is located on the rear of the gear case. Access the fill plug through the right rear wheel well. Maintain the fluid level at the bottom of the fill plug hole. 1. 2. 3. 4. 5. Position the vehicle on a level surface. Remove the fill plug. Check the fluid level. Add the recommended fluid as needed. Reinstall the fill plug. Fluid Change 1. 2. 3. 4. 5. 6. 7. The drain plug is located on the bottom of the gear case. Remove the fill plug. Place a drain pan under the drain plug. Remove the drain plug. Allow the fluid to drain completely. Clean the drain plug. Reinstall the drain plug with a new O‐ring. Add the recommended fluid to the fill plug hole. Maintain the fluid level at the bottom of the fill plug hole. Do not overfill. 8. Reinstall the fill plug. 9. Check for leaks. 10. Discard used fluid properly. SparkPlugs Spark Plug Gap/Torque Spark Plug Gap 0.8‐0.9 mm (0.032–0.035 in.) Plug Tightening Torque 12.5 ft. lbs. (17.5 Nm) Specified Spark Plug DPR7EA‐9 (NGK) NOTICE: Using non‐recommended spark plugs can result in serious engine damage. Always use our company recommended spark plugs. Spark plug condition is indicative of engine operation. The spark plug firing end condition should be checked after the engine is warmed up and the vehicle is driven at higher speeds. Immediately check the spark plug for correct color. A hot exhaust system and engine can cause burns. Wear protective gloves when removing a spark plug for inspection. Spark Plug Removal and Replacement 1. Remove the spark plug cap. 2. Using the spark plug wrench provided in the tool kit, remove the plug by rotating it counter clockwise. 3. Reverse the procedure for spark plug installation. 36 CVTSystem Cleaning: The CVT rotates at high speeds. Ensure no dirt, dust, rocks etc. enter the CVT. This will reduce the operating life of the system. This is especially true of the belt. So before performing any work on the CVT assembly, ensure the system is free of any dirt, rocks, etc…. CVT Maintenance: Every 1000 kilometers, 12 months, or 100 hours (whichever comes first), the primary and secondary pulleys as well as the belt should be checked for wear and abrasion. Replace if necessary. WARNING: The primary and secondary pulleys of the CVT have been dynamically balanced. Any disassembly will require them to be rebalanced again after reassembly by a qualified technician. Failure to do so will cause an imbalance that will shorten the life of the CVT, engine, and transmission. Belt Assembly: After installing or replacing the belt, check for up and down free play. CVT Drying 1. There may be some instances when water enters the CVT system. Use the following instructions to dry it out before operating. 2. Remove the CVT cover. Allow the water to drain. Reinstall the CVT cover. 3. Shift the transmission to neutral. Set the parking brake. 4. Start the engine. Apply varying throttle for 10‐15 seconds to expel the moisture and air‐dry the belt and clutches. Do not hold the throttle wide open for more than 10 seconds. 5. Allow the engine RPM to settle to idle speed. 6. Test for belt slippage. If the belt slips, repeat the process. 7. Take the vehicle to your dealer for service as soon as possible. NOTICE: Exposure to salt water will cause corrosion to metal components. If your vehicle is operated in salt water areas, rinse it off frequently with fresh water. 37 FilterSystem Air Filter Always change the air filter at the intervals outlined in the Periodic Maintenance Chart beginning on page 32. Access the air box through the rear left wheel well. 1. 2. 3. 4. 5. 6. 7. 8. Loosen the air filter latches (1) and remove the cover (2). Loosen the screw (3). Remove the filter element (4) from the air box. Wash the filter element in warm soapy water, then rinse and let dry. If the filter element is damaged, install a new filter. Clean any oil or sediments in the air box. Reinstall the filter element (4). Tighten the screw (3). Reinstall the cover (2) and secure the latches (1). NOTICE: Never operate the vehicle with the filter element removed. Dirt will enter the engine, causing rapid wear and severe damage to the engine. 1. 2. 3. 4. LATCHES COVER SCREW FILTER ELEMENT 38 CoolingSystem 1. Place the vehicle on a levelled surface. 2. Check the coolant level in the coolant reservoir. The engine must be cold as the coolant level will vary with engine temperature. 3. If the coolant is at or below the minimum level mark, remove the reservoir cap, add coolant to the maximum level mark, and install the reservoir cap. NOTE: The coolant should be between the minimum and maximum level marks. Don’t remove the radiator cap when the engine and radiator are still hot. It could result in burn related injuries. Wait for the engine to cool before removing the radiator cap. Always use a thick rag over the cap. Allow any remaining pressure to escape before completely removing the cap. ThrottleSystem Failure to check or maintain proper operation of the throttle system can result in an accident and lead to serious injury or death if the throttle pedal sticks during operation. Never start or operate this vehicle if it has a sticking or improperly operating throttle pedal. Immediately contact your dealer for service if throttle problems arise. Always check the pedal for free movement and return before starting the engine. Throttle Free play If the throttle pedal has excessive play or maladjustments, it will cause a delay in throttle response, especially at low engine speed. If the throttle pedal has no free play, the throttle may be hard to control and the idle speed may be erratic. Check the throttle pedal free play at the intervals outlined in the Periodic Maintenance Chart beginning on page 32. Adjust the freeplay if necessary. Throttle Free play Inspection 1. Place the transmission in neutral. Set the parking brake. 2. Start the engine. Allow it to warm up thoroughly. 3. Measure the distance the throttle pedal moves before the engine begins to pick up speed. Free play should be 1/16 to 1/8 inches (1.5‐3 mm). 39 EFISystem The throttle body controls the engine’s cylinder air intake volume which controls engine's rotational speed and the load. The throttle body consists of two channels: the main channel and the by‐pass channel. The air intake valve of the EFI throttle body is controlled by a cable from the accelerator pedal. A throttle position sensor (TPS) in the throttle body transmits the position of the air intake to the ECU. The ECU utilizes the throttle position information as well as rpm to provide the correct fuel air ratio. NOTE: The idle speed limit screw does not allow the adjustment, the engine idle speed depend on the EFI system adjustment completely, does not hand adjust the idle speed limit screw. SteeringWheelInspection 1. 2. 3. 4. Position the vehicle on level ground. Lightly turn the steering wheel left and right. There should be 0.8"‐1.0" (20‐25 mm) of free play. If there is excessive free play or strange noises, or the steering feels rough or catchy, have the steering system inspected by an authorized dealer. 40 Brakes Always check brake pedal travel and the brake fluid reservoir level before the use of the vehicle. When applied, the brake pedal should feel firm. Any sponginess would indicate a possible fluid leak or low brake fluid level. This must be corrected before riding. See below for brake fluid information. If you discover any irregularities in brake system operation, contact your dealer for proper diagnosis and repairs. Operating the vehicle with a spongy brake pedal can result in loss of braking, which could cause an accident resulting in severe injury or death. Never operate the vehicle with a spongy‐feeling brake pedal. Brake Inspection 1. 2. 3. 4. 5. Check the brake system for fluid leaks. Check the brake pedal for excessive travel or a spongy feel. Check the friction pads for wear, damage and looseness. Inspect the brake pad wear surface for excessive wear. Change pads when worn to 3/64" (1 mm). Brake Fluid Inspect the level of the brake fluid before each operation. If the fluid level is low add DOT 3 or DOT 4 brake fluid. After opening a bottle of brake fluid, always discard any unused portion. Never store or use a partial bottle. Brake fluid is hygroscopic, meaning it rapidly absorbs moisture from the air. The moisture causes the boiling temperature of the brake fluid to drop, which can lead to early brake fade and the possibility of accident or severe injury. Change the brake fluid every two years, any time the fluid becomes contaminated, the fluid level is below the minimum, or if the type and brand of the fluid in the reservoir are unknown. Access the brake fluid reservoir through the left front wheel well. 1. Position the vehicle on a level surface. 2. Place the transmission in neutral. Set the parking brake. 3. View the brake fluid level in the display mirror. The level should be between minimum and maximum. If the level is below minimum, add brake fluid. 4. Apply the brake forcefully for a few seconds and Check for fluid leakage around the fittings. 41 Tires Operating your vehicle with worn tires will increase the possibility of skidding, loss of control and an accident, which could result in serious injury or death. Always replace tires when the tread depth measures 1/8" (3 mm) or less. Improper tire inflation or the use of non‐standard size or type of tires may adversely affect vehicle handling, which could result in vehicle damage or personal injury. Always maintain proper tire pressure. When replacing tires, always use original equipment size and type. Tire Tread Depth: Always replace tires when tread depth is worn to 1/8" (3 mm) or less. Front Wheel Hub Tightening: Front wheel bearing tightness and spindle nut retention are critical component operations. All service must be performed by your authorized dealer. Wheel Removal: 1. 2. 3. 4. 5. Position the vehicle on a level surface. Place the transmission in neutral. Set the parking brake. Stop the engine. Loosen the wheel nuts slightly. Elevate the side of the vehicle by placing a suitable stand under the frame. Remove the wheel nuts. Remove the wheel. 42 VehicleImmersion NOTICE: If your vehicle becomes immersed, major engine damage can result if the machine is not thoroughly inspected. Take the vehicle to your dealer before starting the engine. If it's impossible to take your vehicle to a dealer before starting it, follow the steps outlined below. 1. Move the vehicle to dry land. 2. Check the air box. If water is present, dry the air box and replace the filter with a new filter. Thoroughly dry the air filter. See page 38. 3. Remove the spark plugs. 4. Turn the engine over several times. 5. Dry the spark plugs and reinstall them, or install new plugs. 6. Attempt to start the engine. If necessary, repeat the drying procedure. 7. Take the vehicle to your dealer for service as soon as possible. 8. If water has entered into the transmission follow the procedure on page 37 for drying. Battery This machine is equipped with a sealed‐type battery. Therefore it is not necessary to check the electrolyte or add distilled water in the battery. If the battery seems to have discharged, consult your dealer. CAUTION: Do not try to remove the sealing caps of the battery cells. You may damage the battery. Failure to handle batteries or battery electrolyte carefully could result in severe burns. Batteries produce explosive gases. Contact with skin, eyes or clothing must be avoided. Always shield eyes when working near batteries. Keep out of reach of children. Keep batteries away from sparks, flames, cigarettes or other sources of ignition. Ventilate when charging or using in a closed environment. If there is a contact with your body, take the following measures: EXTERNAL: Flush with water INTERNAL: Drink large quantities of water or milk. Get prompt medical attention. EYES: Flush with water for 15 minutes and get prompt medical attention. 1. Negative battery terminal 2. Positive battery terminal CAUTION: A special battery charger (constant voltage/ampere or constant voltage) is required for recharging a sealed type battery. Using a conventional battery charger may shorten the battery life. 43 Fuse replacement The fuses are under the meter cover. If a fuse is blown, turn off the main switch and the switch of the circuit in question. Then, install a new fuse of the specified amperage. Turn on the main switch. If the fuse immediately blows again, consult your dealer. Specified fuses: 1. 2. 3. 4. 5. 6. 7. 8. 9. 10. 11. 12. 13. 14. 15. Battery fuse: 30A Fan fuse: 10A Brake light fuse: 10A Light power fuse: 15A Ignition fuse: 10A Cigarette lighter fuse: 15A Winch/dump box fuse: 10A Turn light fuse: 5A Horn fuse: 5A 2WD/4WD fuse: 5A Fuel pump fuse: 10A High beam fuse: 10A Low beam fuse: 10A Windshield wiper fuse: 15A MP3 player fuse: 5A When the machine is not used for a month or longer, removes the battery and stores it in a cool, dark place. Completely recharge the battery before reinstallation. Always make sure the connections are correct when putting the battery back in the machine. WARNING: Do not use an improper fuse, because an improper fuse can cause damage to the electrical system which could lead to a fire. Always use a fuse of the specified rating. Never use a material in place of the proper fuse. CAUTION: To prevent accidental short‐circuiting, turn off the main switch when checking or replacing a fuse. 44 CleaningandStorage Washing the Vehicle Keeping your vehicle clean will not only improve its appearance but it can also extend the life of various components. Before washing the vehicle, you must pay attention in order to prevent the water from entering inside the CTV system from the CVT inlet and outlet ducts. NOTICE: Water in the CVT system could cause the drive belt to become wet and slip in the clutches. Always avoid spraying water directly toward the CVT inlet and outlet ducts when washing the vehicle. High water pressure may damage components. We recommend washing the vehicle by hand or with a garden hose, using mild soap. Certain products, including insect repellents and chemicals, will damage plastic surfaces. Do not allow these types of products to contact the vehicle. The best and safest way to clean your vehicle is with a garden hose and a pail of mild soap and water. 1. Use a professional‐type washing cloth, cleaning the upper body first and the lower parts last. 2. Rinse with clean water frequently. 3. Dry surfaces with a chamois to prevent water spots. Storage Long term storage (60 days or more) of your machine will require some preventive procedures to guard against deterioration. After thoroughly cleaning the machine, prepare for storage as follows: 1. Drain the fuel system. 2. Remove the spark plug, pour about one tablespoon of SAE 10W30 or 20W40 motor oil in the spark plug hole and reinstall the spark plug. Ground the spark plug wire and turn the engine over several times to coat the cylinder wall with oil. 3. Block up the frame to raise all wheels off the ground. 4. Tie a plastic bag over the exhaust pipe outlet to prevent moisture from entering. 5. If storing in a humid or salt‐air atmosphere, coat all exposed metal surfaces with a light film of oil. Do not apply oil to any rubber parts or the seat cover. 6. Remove the battery and charge it. Store it in a dry place and recharge it once a month. Do not store the battery in an excessively warm or cold place (less than 0 °C (30 °F) or more than 30 °C (90 °F)). 45 MalfunctionAnalysisandElimination (I)Engine malfunction Malfunction phenomenon Starting difficultly or failure to start Malfunction system Low compression No ignition generated from plug No fuel in Throttle body Reason 1. 2. 3. 4. 5. 6. 7. 8. 1. 2. 3. 4. 5. 6. 1. 2. 3. 4. 5. Erratic idle or won’t idle. Miscellaneous Mechanical reasons Electric parts problem Poor mid to high rpm performance Blue exhaust smoke Mechanical problem Mechanical fault 1. 2. 3. 4. 1. 2. 3. 4. 5. 1. 2. 3. 4. 5. 6. 7. 8. 1. 2. 3. 4. 5. Cylinder worn out Piston worn out Worn or broken piston rings Valve leak Plug is loose Starting motor is too slow Air circulation is not right Gap of valve is incorrect Dirt on spark plug Wet or fouled spark plug Ignition coil problem Faulty ignition switch Magneto problem ECU problem Vent plugged on fuel tank Plugged injector Fuel pump failure Low fuel pressure Plugged fuel filter Gear is not in neutral Valve gap is incorrect Worn or leaking valve Blocked exhaust Incorrect idle adjustment Fouled or dirty spark plug Gap of plug not correct Ignition switch problem ECU problem Magneto problem Weak valve spring Worn camshaft Dirty spark plug Gap of plug is too small. Air circulation is not right. Air filter is dirty. Fuel line restriction Low fuel pressure Oil over filled Piston ring worn out Valve worn or burned Cylinder wall scratched Worn valve seal 46 Solving method Change Change Change Repair or change Tighten Check battery adjust Adjust Clean or change Clean, dry or change Change Change Change Change Clean Clean or change Clean or change Clean or change fuel pump Clean or change Put gear on neutral Adjust Repair or replace Replace Adjust Clean or change Change or adjust Change Change Change Change Change Change or clean Gap properly Adjust or change Change Clean or change Change fuel pump Drain the extra oil Change Change Repair or change as necessary Change (I)Engine malfunction Malfunction phenomenon Poor engine power Malfunction system Fuel supply system fault Reason 1. Throttle body inlet blockage 2. Air filter is dirty 3. Intake manifold leak 4. Too much oil 5. Blocked injector 6. Low fuel pressure Electrical parts problem 1. 2. 3. 4. 5. 1. 2. 3. 4. 5. 6. 7. 1. 2. 3. 1. 2. Mechanical problem Engine overheats Fuel system fault Electric System problem Intake, combustion, or exhaust problems Dirty spark plug Incorrect spark plug gap Ignition switch problem ECU problem Magneto problem Incorrect valve adjustment Weak valve spring Faulty exhaust Cylinder worn out Piston Ring worn out Burned or leaking valve Worn rocker arm or camshaft Octane rating is too low Fuel passage blocked Fuel pump problem Incorrect ignition timing Spark is weak or no spark 1. Compression leak 2. Air filter is dirty 3. Cylinder, piston, or rings worn out 4. Intake manifold leak Engine cooling system Miscellaneous 5. Block age in exhaust system 1. Blockage in cooling system 2. Air in Cooling system or coolant is low 3. Water pump problem 4. Improper coolant 5. Faulty thermostat 6. Faulty fan motor or fan thermostat switch 1. Carbon build up on piston 2. Improper oil level 3. Incorrect oil used 47 Solving method Clean Clean or change Tighten or change gasket Drain extra oil Clean or change Adjust or change fuel pump Clean or change Change or adjust Change Change Change Adjust valves Change Change Change Change Change Change Use the correct fuel Clean the fuel passage Change Adjust ignition timing Check ignition components Repair Clean or change filter Repair or change Tighten or replace gasket Repair or replace Clear Release air and add coolant Change Change Change Change Clean Add Drain and refill (I)Engine malfunction Malfunction phenomenon Noise from engine Malfunction system Noisy valves Reason Noise from timing chain Noise from clutch Noise from Crankshaft Noise from CVT Noise from transmission system Engine lacks power Fuel system Clutch slipping Transmission system Gear shifting difficult Gear box or gear shift Throttle body problems Starting problem Idle and low speed not stable Adjust Change Change Change Change Clean Change Change 4. Change 5. Change chain & 1. sprocket Change chain & 2. sprocket Repair or change 3. Chain adjuster problem 1. Spline of crankshaft damaged Change crankshaft 2. Spline of clutch damaged Change clutch Change 1. Bearing noise Change 2. Needle bearing damaged Change 3. Gap too big 1. Belt loose or worn out Change 2. Driving portion of CVT damaged Change Change 1. Gear damaged Change 2. Input and output shaft damaged Change 3. Bearing worn out Change 4. Bushing worn out Use minimum 1. Octane rating is too low recommended octane Clean fuel lines and 2. Fuel flow restriction system 1. Pulley faces worn Change 2. Spring on clutch is weak Change 3. Belt worn out & loose Change Change 1. Operating gear damaged Change 2. Shift rod twisted Change 3. Shift drum worn out 4. Shift rod not adjusted correct Adjust Clean 1. Blockage in air intake Clean 2. Blockage in intake manifold Tighten 3. Loose electrical connector Replace 4. Throttle cable broken Correct 1. Low fuel pressure Clean 2. Air inlet channel blocked Clean 3. Air inlet bypass blocked Adjust 4. Throttle valve not closing fully 5. Idle screw adjustment incorrect Adjust 1. 2. 3. 1. 2. 3. Noise from piston Gap on valve is too big Spring on valve is broken Rocker arm is worn or broken Piston worn out Cylinder worn out Carbon build up in combustion chamber Piston pin or pin hole worn out Piston rings worn out Chain stretched Chain worn out 48 Solving method (I)Engine malfunction Malfunction phenomenon Low coolant temperature Malfunction phenomenon Cooling System Spark weak Ignition System Malfunction phenomenon 1. Faulty heat sensor switch on fan Change Partially cover radiator 2. Cold weather Change 3. Temperature gauge problem Change 1. Faulty starter Change 2. Bad spark plug Change 3. Magneto problem Change or charge 4. Low battery voltage Change 5. Ignition switch problem Malfunction phenomenon (II)Malfunction in transmission system Malfunction Malfunction phenomenon system Vehicle speed does not Transmission increase with engine system speed Gear shift problems Gear Box or Gear shifting system Reason 1. Belt slipping 2. Worn pulley faces 3. Moveable pulley side of CVT is binding 4. Weak spring in primary part of CVT 1. Gear selector cam worn 2. Bent shift rods 3. Worn transmission gears 49 Solving method Change Change Repair or change Repair or Change Change Change (III)Malfunction in running system, suspension and steering organization Malfunction Malfunction Reason phenomenon system Uneven ride Running system 1. Uneven tire pressures 2. Uneven load 3. Uneven shock spring adjustment 4. Improper wheel alignment 5. Uneven braking or locked brake 6. Front and rear suspension parts have been loosened, bent or damaged Abnormal tire wear Steering running 1. Worn or weak shocks or springs system, suspension 2. Tires are out of balance or a wheel is bent 3. Improper wheel alignment 4. Vehicle is over‐loaded 5. Wheel hub bearing has been damaged or adjustment is wrong 6. Loose tie rods or ball joints 7. Improper tire pressure Front wheel s vibrate or Steering, running 1. Bent wheel, or tires are out of shake system, suspension balance 2. Wheel hub bearing has been damaged or adjustment is wrong 3. Worn ball joint on swinging arm 4. Worn tie rods 5. Improper alignment 6. Improper front wheel toe 7. Tire bulge 8. Loose steering components Steering is heavy Steering , running 1. Worn ball joints system, suspension 2. Improper alignment 3. Steering shaft is bent or rubbing 50 Solving method Adjust air pressure in tires Adjust load Adjust or Change Check or adjust Repair or replace caliper Tighten or change suspension parts Adjust or Change Balance, or replace wheel Adjust and align Remove weight Adjust or replace Check or adjust Tighten or replace Correct Change wheel or balance tires Change or adjust Adjust or change Replace Replace Align Adjust Change tire Tighten and adjust Change Adjust Check and adjust (IV)Malfunction in brake system Malfunction Malfunction phenomenon system Brake is not firm Brake system Brakes are pulling to one side or the other Steering, running system, suspension Reason 1. 2. 3. 4. 5. 6. 7. 8. 1. 2. 3. 4. 5. 6. 7. 8. 9. 10. Brakes do not release Brake system 1. 2. 3. 4. 5. 6. Leaking brake line Excessive dirt on pads or rotors Worn rotor or pads Brake master cylinder is faulty Brake callipers are faulty Brake fluid is low Brake system has air in it Rotors and callipers are hot from excessive brake use. Oil on pads or calipers Leaking caliper Uneven tire pressure Front wheel adjustment is wrong Vehicle frame is bent Bent or crushed brake line Worn brake pads or rotors Suspension parts loose Vehicle is leaning Left and right side tires have uneven tread wear Brake master cylinder faulty Brake pedal return spring is too soft Parking brake adjustment is incorrect Parking brake cable sticks Worn brake pads or calipers Brake line is bent or damaged 51 Solving method Repair Repair or clean Replace Change Repair or replace Add fluid Bleed the system Allow to cool Clean or Change Replace Correct Adjust Repair Replace Replace Repair or adjust Check and correct Correct Repair or replace Replace Adjust Lubricate or Change Repair or Change Change (V)Malfunction in lights, instrument panel, starter system Malfunction Malfunction Reason phenomenon system Front headlight does not Lighting system 1. Bulb has been damaged illuminate 2. Fuse has been burned 3. Headlight relay not working 4. Faulty ground wire 5. Faulty switch 6. A short has occurred in the circuit Headlamp does not light Lighting system 1. Bulb has been damaged 2. Poor ground or short circuit Parking light does not 1. Faulty relay illuminate 2. Bulb is burned out 3. Grounding is bad 4. Fuse burned out 5. Switch damaged Starter failure 1. Starter has been damaged 2. Starter relay has been damaged 3. Grounding of starter is bad 4. Ignition switch has been damaged Complete electrical Circuit system 1. Fused circuit burned out failure 2. Ignition switch has been damaged 3. Loose or broken ground wire Instrument panel Panel and wire 1. Fuse has been burned. malfunction 2. Loose connector or broken wire 3. Instrument has been damaged 4. Sensor has been damaged 52 Solving method Change bulb Replace Replace Tighten or replace Check or replace Repair circuit Change Repair circuit Change Change Correct Change Repair or replace Repair or replace Change Correct Repair or replace Replace Change Tighten or replace Change Repair Change Change WARRANTY All warranty information can be obtained through your dealer or online at www.chironex.com. 53 SPECIFICATIONS MODEL Engine: Engine type Cooling system Fuel system Cylinder arrangement Displacement Power Starting system Lubrication system Engine oil: Type Recommended engine oil classification Without oil filter cartridge replacement With oil filter cartridge replacement Final gear case oil: Type Periodic oil change Front differential oil: Type Periodic oil change Fuel: Type Fuel tank capacity Spark plug: Type Spark plug gap Drivetrain: Final drive Transmission Drive system Operation High gear Low gear Reverse gear SPARTAN / SPARTAN XT 4‐stroke, EFI Liquid cooled Electronic fuel injection (EFI) One cylinder 594 cc 38 hp Electric Pressure spray 1.8 L (1.90 US qt) 1.9 L (2.01 US qt) SAE 80W‐90/GL‐4 0.25 L (0.26 US qt) SAE 80W‐90/GL‐4 0.28 L (0.30 US qt) UNLEADED GASOLINE 93 OCTANE OR ABOVE 20 litres (5.28 gallons) DPR7EA‐9 (NGK) 0.8‐0.9 mm (0.032–0.035 in.) Shaft Automatic CVT, HI/LO range plus reverse 2x4, 4x4, 4x4 locked Right hand operation 3.514 5.857 3.828 54 MODEL Tires: Type Size front rear Brakes: Front brake type operation type operation Rear brake Suspension: Front suspension Rear suspension Front shock absorber Rear shock absorber Dimensions: Overall length Overall width Overall height Wheelbase Ground clearance Weight Capacities: Top speed Towing capacity Weight capacity Electrical: Ignition system Generator system Battery Headlight Tail/brake light SPARTAN / SPARTAN XT Tubeless 25x8‐12 25x10‐12 Dual disc brake Foot pedal Dual disc brake Foot pedal Independent, MacPherson Independent, double wishbone Coil over shock Coil over shock 2690 mm (105.9 in.) / 3345 mm (131.7 in.) 1270 mm (50 in.) / 1290 mm (50.8 in.) 1820 mm (71.7 in.) / 1865 mm (73.4 in.) 1730 mm (68.1 in.) / 2450 mm (96.5 in.) 229 mm (9.02 in.) 590 kg (1298 lbs.) / 620 kg (1367 lbs.) 80 km/h (50 mph) 680 kg (1500 lbs.) 300 kg (660 lbs.) ECU A.C. magneto 12V 36Ah 12 V 35 W/35.0 W × 2 12 V 5 W/21.0 W × 2 55