1
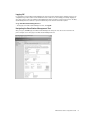
MN-500 Base Station
Configuration Guide
Contents
Opening the Base Station Management Tool ................................................................................................................2
Logging Off.......................................................................................................................................................................3
Navigating the Base Station Management Tool ............................................................................................................3
Configuring the Base Station..........................................................................................................................................4
Configure Network Computers ....................................................................................................................................5
Using the Base Station as a Bridge................................................................................................................................6
Home Page ......................................................................................................................................................................7
Wide Area Network ......................................................................................................................................................7
Local Area Network......................................................................................................................................................8
DHCP Client List ...........................................................................................................................................................8
Base Station Information ............................................................................................................................................8
Management Settings.....................................................................................................................................................9
Reset the Base Station................................................................................................................................................9
Restore Factory Default Settings ................................................................................................................................9
Back Up Base Station Settings .................................................................................................................................10
Restore Base Station Settings from a Backup .........................................................................................................10
Upgrade Base Station Firmware ...............................................................................................................................10
Establish Base Station Time Zone ............................................................................................................................11
Synchronize Time to Internet Time Server................................................................................................................11
Change the Base Station Password..........................................................................................................................12
Local Area Network Settings.........................................................................................................................................13
IP Address and Subnet Mask ....................................................................................................................................13
DHCP Server...............................................................................................................................................................13
Wide Area Network Settings .........................................................................................................................................14
Dynamic Internet Connection....................................................................................................................................14
Static Internet Connection.........................................................................................................................................14
PPPoE Internet Connection .......................................................................................................................................14
Disabled Connection..................................................................................................................................................15
MAC Addresses ..........................................................................................................................................................15
Wireless Settings...........................................................................................................................................................16
Wireless Network Name (SSID).................................................................................................................................16
Wireless Channel .......................................................................................................................................................16
Security Settings ...........................................................................................................................................................16
Wireless Security (WEP).............................................................................................................................................16
Firewall Settings.........................................................................................................................................................17
Block Ping Commands...............................................................................................................................................17
Network Mode............................................................................................................................................................18
Port Forwarding..........................................................................................................................................................18
Virtual Demilitarized Zone .........................................................................................................................................20
MAC Filtering..............................................................................................................................................................21
Association Control .......................................................................................................................................................22
Client Filtering ............................................................................................................................................................22
Base Station Log........................................................................................................................................................22
Index ..............................................................................................................................................................................23
Customizing the Microsoft Wireless Base Station (MN-500)
The Base Station Management Tool is a Web-based utility that you can use to manage network settings and
customize security options on the Microsoft® Broadband Networking Wireless b-Base Station (MN-500).
You can establish many base station settings when you run the Setup Wizard. However, if you want to change a
setting, such as your base station password, or if you have special network requirements (for example, if you want
to establish a Web server on your network), you can use the Base Station Management Tool to configure the
necessary settings.
If you do not run the Setup Wizard when you set up your network, you must use the Base Station Management Tool
to configure your network settings.
This guide explains how to perform the following tasks:
O
Open the Base Station Management Tool and view the current configuration of your base station.
O
Configure the base station with the settings provided by your Internet service provider (ISP) so that your
networked computers can connect to the Internet.
O
Manage network time settings, base station password, and firmware upgrades.
O
Create a backup file of the base station settings.
O
Change the wireless channel and wireless network name (also known as Service Set Identifier, or SSID) for your
network.
O
Customize security features, such as media access control (MAC) filtering and wireless security (also known as
Wired Equivalent Privacy, or WEP) settings.
O
Change the base station configuration from routing mode to bridging mode.
O
Limit access to the Internet or to particular applications on one or more of your networked computers by setting
up client filtering.
O
Set up the network to allow unrestricted access to the Internet from one computer by establishing a virtual
demilitarized zone (DMZ).
O
Configure port forwarding to run applications with special network requirements.
Opening the Base Station Management Tool
You can open the Base Station Management Tool from the Microsoft Broadband Network Utility or open it directly
from a Web browser, such as Microsoft Internet Explorer 5 or later, or Netscape Navigator 4.7 or later. To use the
Base Station Management Tool, you must have a Java-enabled browser installed on your computer.
To open the Base Station Management Tool
1. In the Broadband Network Utility, on the Tools menu, click Base Station Management Tool.
-orOpen your Web browser, and then type the IP address of the base station in the address field. By default, this
address is http://192.168.2.1. However, you can change this address in the Base Station Management Tool.
2. To log on, type the base station password that you created when you ran the Setup Wizard. The base station
password is case sensitive. If you did not run the Setup Wizard, use the default base station password, admin.
If you do not remember the base station password that you set when you ran the Setup Wizard, you will need to
restore the factory default settings on the base station and use the default base station password, admin. When
you restore the original settings, you lose your ISP settings and must reconfigure these settings from the Wide Area
Network page in the Base Station Management Tool.
For information about restoring factory default settings by using the Reset button on the base station, see
“Restoring the Base Station” in Chapter 1 of your printed User’s Guide.
MN-500 Base Station Configuration Guide
2
Logging Off
It is important to log off the Base Station Management Tool after you have finished using it. Logging off protects the
configuration of your base station so that unauthorized users cannot access and change your settings. Logging off
also ensures that you can open the Base Station Management Tool from another computer if you need to. The Base
Station Management Tool cannot be opened simultaneously on two different networked computers.
To log off the Base Station Management Tool
O On any page of the Base Station Management Tool, click Log Off.
Navigating the Base Station Management Tool
After you log on, the Home page of the Base Station Management Tool opens. You can use the menu in the left
pane to navigate to the other pages of the Base Station Management Tool.
MN-500 Base Station Configuration Guide
3
The following table lists the menu items in the Base Station Management Tool and describes the tasks that you can
perform from the pages that those menu items open.
Menu Item
Tasks
Home
View current network settings and activity.
Management
Reset the base station, back up and restore base station settings, upgrade firmware, establish time
settings, and change the base station password. For more information, see “Management Settings.”
Local Area Network
Enable the Dynamic Host Configuration Protocol (DHCP) server on your base station and set the IP address
range and lease time. For more information, see “Local Network Settings.”
Wide Area Network
Specify and configure the type of Internet connection that your base station uses. For more information,
see “Wide Area Network Settings.”
Wireless
Set up or modify the connection between your base station and the wireless computers on your network.
For more information, see “Wireless Settings.”
Security
Configure a variety of specialized security functions, including:
O Firewall
O Wireless security (WEP)
O Port forwarding, including virtual servers and special applications
O Client filtering
O MAC filtering
You can also view the base station log from the Security section. For more information, see “Security Settings.”
If you need help at any time, click the Help button available on each page of the Base Station Management Tool.
Configuring the Base Station
Typically, when you run the Setup Wizard, you establish the settings required for your base station to connect to the
Internet. If you completed the Setup Wizard, you only need to use the Base Station Management Tool when you
want to modify your network settings.
You must use the Base Station Management Tool to establish the initial settings if any of the following are true:
O
You did not run the Setup Wizard when you connected your network hardware and installed the network software.
O
You are trying to configure the base station from a computer running Microsoft Windows® 2000 or from a
computer not running Windows (for example, a Macintosh).
O
You want to set the base station to bridging mode to extend the capabilities of an existing wired or wireless network.
If any of these situations apply to you, you must initially configure the base station from the Base Station
Management Tool. Before you configure the base station, you must connect it to a computer.
To connect the base station to a computer
1. Position the base station close to your modem and computer, and near the center of your intended
network area.
2. Unplug your modem cable from the Ethernet port on the back of your computer. Leave the other end of the cable
plugged in to the modem. Plug the cable into the port labeled To Modem on the back of the base station.
3. Plug one end of the blue Ethernet cable that came with your base station into the Ethernet port labeled 1 on the
back of the base station and plug the other end into the Ethernet port on the back of your computer.
4. Plug one end of the power supply that came with your base station into the Power Port on the back of the base
station, and plug the other end into an electrical outlet. The Power light on the front of the base station should
illuminate.
MN-500 Base Station Configuration Guide
4
To configure the base station from the Base Station Management Tool
1. Configure the TCP/IP properties of each computer that you want to connect to your network. For information
about how to do this, see “Configure Network Computers” in this chapter.
2. On the computer connected to the base station, open your Web browser, and then type 192.168.2.1 in the
address field.
3. In the logon box, type your password. The default password is admin.
4. On the Management menu, click Change Password, and then create a new base station password.
5. Click Wide Area Network. On the Wide Area Network page, select the type of Internet connection you have, and
then enter the settings provided by your ISP. If you do not know the type of Internet connection you have, contact
your ISP for assistance.
6. If you are replacing an existing base station, router, or gateway with the Microsoft base station, specify the MAC
address of that device in the MAC Address box, and then click Clone MAC Address. Otherwise, specify the
MAC address of the adapter that was connected to the modem in the MAC Address box, and then click
Clone MAC Address. For more information, see “MAC Addresses.”
7. On the Security menu, click Wireless Settings, and then create your wireless security settings. For information
about wireless security settings, see “Wireless Security (WEP)” in this chapter.
8. Turn on your broadband modem, and then check the status of the Broadband Connection on the Home page of
the Base Station Management Tool. If the status is Disconnected, click Renew or Connect. If the status is still
Disconnected, confirm the ISP settings with your ISP, and then try to configure the base station again.
Configure Network Computers
When you manually configure the base station, you must configure the TCP/IP properties of each computer that you
connect to your network.
Before you configure the TCP/IP properties for each computer, you should establish the computer name and the
workgroup name on each computer. Each computer name must be unique, while the workgroup name should be
the same for all computers in the workgroup.
The procedure for establishing the computer and workgroup names on a computer varies depending on which
version of Windows you are using. For information about how to establish these names, consult Windows Help or
Broadband Network Utility Help.
To configure the TCP/IP properties of a computer running Windows 98, Windows 2000, or Windows Me
1. Click Start, point to Settings, and then click Control Panel.
2. Double-click the Network icon.
3. In the Configuration dialog box, select the TCP/IP protocol line that is associated with your network adapter.
4. Click the Properties button, click the IP Address tab, and then select Obtain an IP address automatically.
5. Click the Gateway tab and make sure that all fields are empty, and then click OK. When the Network Properties
dialog box appears, click OK again.
6. If you are prompted to supply the original Windows installation files, insert your Windows CD-ROM into the
CD-ROM drive, and then browse to the location of your CD-ROM drive.
7. When you are prompted to restart your computer, click OK.
To configure the TCP/IP properties of a computer running Windows XP
1. Click Start, click Control Panel, and then double-click Network Connections.
2. Double-click the icon for the connection you want to configure, and then in the Connection Status dialog box,
click Properties.
3. On the General tab, under This connection uses the following items, click Internet Protocol (TCP/IP), and then
click Properties.
4. Click Obtain IP address automatically, and then click Obtain DNS server address automatically.
5. Click OK to close the TCP/IP Properties dialog box, and then click OK to close the Connection Properties
dialog box.
MN-500 Base Station Configuration Guide
5
Using the Base Station as a Bridge
If you already have a functioning network in your home or office, you can use the base station to add wireless
connectivity to your wired network or to extend the wireless range of an existing wireless network. This is called
bridging because the base station acts as a bridge between two networks or segments of a network.
Before you change the base station to bridging mode, make sure that the following conditions are true:
O
A device on your network, such as your modem, is providing router capabilities, or a device on your network is
providing a Network Address Translation (NAT) service.
O
There is an existing DHCP server on your network
-orEach device on your network uses a static (fixed) IP address.
To configure the base station as a bridge
1. Connect the base station to a computer on your network. For information about how to do this, see “To connect
the base station to a computer.”
2. On the computer connected to the base station, open your Web browser, and then type 192.168.2.1 in the
address field.
3. In the logon box, type your password. The default password is admin.
4. On the Management menu, click Change Password, and then create a new base station password.
5. On the Security menu, click Network Mode.
6. Select the Bridging Mode check box, and then click Yes to confirm your selection. When you switch from routing
mode to bridging mode, the base station resets. While the reset is in progress, the power light on the base
station blinks and then turns orange. When the light is solid green, the reset is complete.
7. After the reset is complete, turn off the computer and the base station. Remove the cable from the base station
Ethernet port and insert it into the To Modem port. Leave the other end of the cable connected to the Ethernet
port of the computer.
8. Turn on the base station and restart your computer.
MN-500 Base Station Configuration Guide
6
Home Page
You can view current base station and Internet connection settings from the Home page of the Base Station
Management Tool. The following sections describe these settings.
Wide Area Network
The wide area network (WAN) settings provide a summary of the Internet settings provided by your ISP. The settings
that appear will vary depending on whether your ISP account provides a static (fixed) IP address, a dynamic Internet
connection, or a Point-to-Point Protocol over Ethernet (PPPoE) connection. If your Internet connection is disabled,
the WAN settings will be unavailable.
The following table describes the WAN settings and how to modify them.
Setting
Description
Notes
Broadband
Connection
Appears as
Connecting,
Connected,
Disconnecting, or
Disconnected.
If the Base Station Management Tool shows that your broadband connection is
disconnected when you expect it to be connected, try clicking Release and then
Renew to change the base station IP address. If you have a PPPoE connection, try
clicking Disconnect and then Connect. You can also try resetting the base station
and your broadband modem. If you complete these steps and the Broadband
Connection is still disconnected, contact your ISP for assistance.
WAN IP address
Shows the IP
address provided by
your ISP.
This is the external (public) IP address that connects your network to the Internet.
If your ISP provides you an IP address dynamically (by using a DHCP server), this
address may change periodically. You can click the Release button and then the
Renew button to get a new IP address. Releasing your IP address is a good idea if
you are having trouble accessing the Internet and you have determined that the
computer is not the source of the problem. If renewing the IP address does not
resolve the problem, contact your ISP for assistance.
Subnet mask
Your ISP
establishes the
WAN subnet mask.
If you are using a static Internet connection, you can change the subnet mask for
your wide area network, but you should use the subnet mask provided by your ISP.
The subnet mask does not appear when you are using a PPPoE Internet connection.
Default gateway
The IP address that
the base station
uses to send data
from your network
to the Internet.
The gateway setting is automatically generated when you have a dynamic or
PPPoE connection. If you have a static (fixed) IP address, your ISP should provide
the gateway setting, and you can enter the setting on the Wide Area Network page
of the Base Station Management Tool. If you have a dynamic connection and your
Gateway setting is blank, you should click Release and then Renew.
Primary Domain
Name System (DNS)
and Secondary DNS
Your ISP provides
the DNS addresses.
In some cases, these settings may be automatically filled in. Otherwise, you
can enter them on the Wide Area Network page of the Base Station
Management Tool.
MN-500 Base Station Configuration Guide
7
Local Area Network
The Local Area Network (LAN) settings relate to your local network—that is, how the base station is configured in
relation to the devices on your network.
The following table describes the LAN settings and how to modify them.
Setting
Description
Notes
Local IP
address
The default IP address of your base
station is 192.168.2.1.
You can change the local IP address on the Local Area Network page of
the Base Station Management Tool, but this is not recommended.
Subnet mask
The subnet mask for your local
network is 255.255.255.0.
You cannot change the subnet mask of your LAN.
DHCP server
Appears as Enabled or Disabled.
You can change this setting on the Local Area Network page of the Base
Station Management Tool.
Firewall
Appears as Enabled or Disabled.
You can change this setting in the Security section of the Base Station
Management Tool.
DHCP Client List
When a DHCP server is enabled on a network, each device (also called a client, which can be a desktop computer,
notebook computer, or another connected device) leases an IP address for a specified period of time. The DHCP
client list shows all the clients that have an active lease on an IP address, including the IP address and MAC
address of each client. The list includes any device with an active lease, even if that device is no longer actively
connected to the network. A client is removed from the DHCP client list when its lease has expired. The network can
support up to 253 clients at one time.
You can specify the IP address lease time from the Local Area Network page of the Base Station Management
Tool. For information about how to do this, see “Local Network Settings.”
The DHCP client list is relevant to your network only if you have the DHCP server enabled on the base station.
For information about how to enable or disable the DHCP server, see “DHCP Server.”
Base Station Information
You can view current network status in the Base Station Management Tool, under Network Information. The
following table describes this network information.
Setting
Description
Notes
Runtime code version
and Boot code version
These settings show the version
numbers of your firmware.
When you check for firmware upgrades at
www.microsoft.com/broadbandnetworking you should download
the version on the Web only if it is later than the version shown here.
LAN MAC address
This is the MAC address of the
base station.
For information about MAC addresses, see “MAC Addresses.”
MAC address
This is the MAC address that
your ISP sees.
For information about MAC addresses, see “MAC Addresses.”
Serial number
This is the serial number of your
base station.
If you need to call Product Support Services for assistance, you
might need to provide the serial number.
MN-500 Base Station Configuration Guide
8
Management Settings
When you want to change the settings related to the management of your base station (for example, resetting the
base station, backing up or restoring settings, establishing time settings, or changing the password), use the
Management menu in the Base Station Management Tool. The following sections describe how to perform
management-related tasks.
Reset the Base Station
You can reset the base station when you experience any of the following problems:
O
You have DHCP enabled on the base station, but the base station is not assigning IP addresses.
O
The computers on the network are no longer able to connect to the Internet.
O
The base station is not performing as expected.
When you reset the base station, you are forcing it to reinitialize and restart all of its functions. The base station
settings will not change when you reset the base station.
Note You can also reset the base station by using the reset button on the base station itself. For more information
about how to perform a hardware reset, see Chapter 1 of your printed User’s Guide.
To reset the base station
1. Open the Base Station Management Tool, and then click Management.
2. On the Management menu, click Reset.
3. On the Reset Base Station page, click Reset. While the reset is in progress, the Power light on the base station
blinks and then turns orange. When the light is solid green, the reset is complete.
If you want to open the Base Station Management Tool after the reset is complete, type your base station password
on the Logon page. Do not attempt to log on until the reset is complete and the power light on the base station is
solid green.
Restore Factory Default Settings
You can restore the base station to its factory default settings if absolutely necessary. When you restore factory
default settings, you clear any special base station configurations that you have established. You will need to
reconfigure your base station settings or restore these settings from a backup file.
You should restore the original factory default settings only under the following circumstances:
O
You are experiencing serious problems with your base station, and resetting the base station does not fix the
problem.
O
You cannot remember your base station password.
If you cannot remember your base station password, you will not be able to open the Base Station Management
Tool. In this situation, you must restore the factory default settings from the base station, and then use the default
password admin to log on to the Base Station Management Tool and reconfigure your settings. For more
information about how to restore factory default settings from the base station itself, see Chapter 1 of your printed
User’s Guide.
To restore factory default settings
1. Open the Base Station Management Tool, and then click Management.
2. On the Management menu, click Back Up and Restore.
3. Under Restore Factory Default Settings, click Restore Settings. While the original factory default settings are
being restored, the power light on the base station blinks and then turns orange. When the light is solid green,
the settings have been restored.
To open the Base Station Management Tool after the settings are restored, type admin as the password on the
Logon page. Do not attempt to log on to the base station until the settings are restored and the Power light on the
base station is solid green.
After you restore the factory default settings, you should navigate to each page of the Base Station Management
Tool and reestablish the network settings you want, or restore the base station settings by using a backup file. For
information about creating a backup file of your settings, see the following section.
MN-500 Base Station Configuration Guide
9
Be sure to establish your unique base station password as soon as possible after restoring the factory default
settings to prevent unauthorized users from logging on. For information about changing the base station password,
see “Change the Base Station Password.”
Back Up Base Station Settings
You can create a backup file of all your base station settings from the Base Station Management Tool. The backup
file can include settings that you established when you completed the Setup Wizard and the settings that you
modified from the Base Station Management Tool.
It is a good idea to create a backup file after you have the base station set up and operating normally. If for some
reason the base station malfunctions, you can restore the factory default settings to the base station, and then use
the backup file to reconfigure your base station and resume normal operations.
It is recommended that you back up settings whenever you change settings, such as your base station password.
To back up base station settings
1. Open the Base Station Management Tool, and then click Management.
2. On the Management menu, click Back Up and Restore.
3. Click Back Up Settings.
4. If you receive a message asking you whether to open or save the file, click Save.
5. Type a name for the file that contains your base station settings (or use the default name Config.bin), browse to
the folder or disk where you want to save the file, and then click Save.
Restore Base Station Settings from a Backup
If you have created a backup file of your base station settings, you can restore settings from the backup file at any
time. This capability is particularly useful if the base station malfunctions and you must restore the factory default
settings. Instead of manually reconfiguring each of your network settings from the Base Station Management Tool,
you can restore all of your saved settings from the backup file.
To restore base station settings from a backup file
1. On the computer where you saved the backup file of your base station settings, open the Base Station
Management Tool.
2. Type the current base station password. If you have just restored the factory default settings to the base station,
the password will be admin.
3. On the Management menu, click Back Up and Restore.
4. Under Restore Base Station Settings from a Backup, type the path and name of the backup settings file, or
click Browse to search for the file that contains your network settings.
5. Click Restore Settings. While the settings are being restored, the power light on the base station blinks and then
turns orange. When the light is solid green, the settings have been restored.
If you want to open the Base Station Management Tool after the settings are restored, type your base station
password on the Logon page. Do not attempt to log on until the settings are restored and the power light on the
base station is solid green.
Upgrade Base Station Firmware
Occasionally, Microsoft may provide upgrades to the base station firmware to improve the performance of your
base station. You can upgrade the firmware from the Base Station Management Tool.
You can perform a firmware upgrade from any of your network computers, but it is recommended that you use a
computer with a wired (Ethernet) connection to the base station.
During an upgrade, all users connected to the network will lose network functionality.
MN-500 Base Station Configuration Guide
10
To upgrade the base station firmware
1. Open the Base Station Management Tool, and then click Management.
2. On the Management menu, click Upgrade Firmware.
3. Follow the directions on the screen to upgrade your firmware. While the firmware is being saved to your base
station, the power light on the base station blinks and then turns orange. When the light is solid green, the
update is complete. If the upgrade fails, the power light will continue to blink slowly until you successfully
upgrade the firmware. In this situation, you can try to upgrade the firmware again, or you can reset the
base station.
If you want to open the Base Station Management Tool after a successful firmware update, type your base station
password on the Logon page. Do not attempt to log on until the firmware upgrade is complete and the power light
on the base station is solid green.
Certain programs do not allow pop-up windows from Web browsers. If you have one of these programs installed on
your computer, you might experience problems when you click the Microsoft Broadband Networking Web site link
on the Upgrade Firmware page. If you do experience problems, you can open the Microsoft Broadband Networking
site by typing http://www.microsoft.com/broadbandnetworking/ in the address field of your Web browser and
browsing to the update page, or by turning off the software that prevents pop-up windows.
For information about how to upgrade network software and drivers from the Broadband Network Utility, see
Broadband Network Utility Help.
Establish Base Station Time Zone
The base station uses the date and time for client filtering and to timestamp entries to the base station log.
The base station system clock is set to the Pacific time zone by default. You can change the base station time zone
from the Base Station Management Tool.
To change the base station time zone
1. Open the Base Station Management Tool, and then click Management.
2. On the Management menu, click Set Time.
3. Under Base Station Time Zone, in the drop-down list box, click the time zone you want.
4. Select the Adjust for daylight saving time check box if you want the base station to adjust for daylight-saving time.
5. If you selected the Adjust for daylight saving time check box, type the date that you want daylight-saving time to
start and the date that you want daylight-saving time to end. You must update these dates each year to
correspond with daylight-saving time.
6. Click Update Time Settings to ensure that the changes that you made are saved.
Synchronize Time to Internet Time Server
The base station automatically attempts to synchronize with one of a set of Simple Network Time Protocol (SNTP)
servers when it is connected to the Internet. If you want to synchronize the base station to a specific SNTP server,
you can do so from the Base Station Management Tool. Before you can set the SNTP server, you must identify the
IP address for the server that you want to use.
To locate an SNTP server
1. Open your Web browser, and go to your favorite search engine (for example, www.msn.com).
2. Type Time synchronization on the Internet as a search term.
3. Review the search results, and browse to the SNTP server site that you want to use.
4. Write down the IP address for the SNTP server that you have accessed.
MN-500 Base Station Configuration Guide
11
To synchronize the base station with an SNTP server
1. Open the Base Station Management Tool, and then click Management.
2. On the Management menu, click Set Time.
3. Under Synchronize Time to Internet Time Server, type the IP address for the specific SNTP server that you want
to use, and then click Add.
4. Repeat step 3 for any additional backup SNTP servers that you want to specify.
Change the Base Station Password
Access to the Base Station Management Tool is password protected to help ensure that only users who know the
base station password can change your network configuration. If you ran the Setup Wizard, you were prompted to
establish a password. This is your base station password. If you did not run the Setup Wizard, your default
password is admin. You can change the base station password from the Base Station Management Tool.
It is a good idea to change your password every two to three months, or more frequently if you are concerned that
an unauthorized person has administrative access to the base station.
If at any point you restore the factory default settings for the base station, the default password admin is also
restored. You can use this password to access the base station, and then create a new password at the earliest
opportunity.
When you change your base station password, be sure to update your backup file.
To change the base station password
1. Open the Base Station Management Tool, and then click Management.
2. On the Management menu, click Change Password.
3. In the Current password box, type your current password.
4. In the New password box, type a new password. Use a minimum of 6 characters, but no more than 16
characters. The base station password is case sensitive.
5. In the Retype new password box, retype the new password.
6. If you want, in the Log out inactive user in box, type a time interval. After the specified time interval elapses
without activity, you will need to log on to the Base Station Management Tool again in order to view or change
settings.
7. To save the new password, click Apply.
Be sure to store your password in a safe place. If you forget or misplace your password and cannot log on to the
Base Station Management Tool, you can restore the base station to the factory default settings from the base
station itself, and then use the default password admin to open the Base Station Management Tool. For more
information about restoring factory default settings on the base station, see “Resetting the Base Station” in
Chapter 1 of your printed User’s Guide.
MN-500 Base Station Configuration Guide
12
Local Area Network Settings
You can configure settings for your local network on the Local Area Network page of the Base Station Management
Tool. This configuration includes the following:
O
Changing the IP address of your base station and viewing the subnet mask assigned to your local network.
O
Enabling or disabling a DHCP server on the base station.
O
Setting the IP address range and lease time for the DHCP server.
O
Entering the local domain name for the DHCP server if necessary.
Before you configure your local network, take some time to learn about the options available. The following sections
describe each of the local area network settings.
IP Address and Subnet Mask
The default IP address of your local network is 192.168.2.1. This address is reserved for private local networks; it is
not visible to the Internet.
You do not need to change the IP address unless you have a specific reason to do so—for example, if your modem
IP address overlaps with the base station IP address. If you want to change the IP address of your base station, be
sure to change it to another non-routable (private) IP address.
The IP addresses assigned to the computers on your local network by the DHCP server are derived from the base
station IP address. If you change the base station IP address, the DHCP IP address range will also change.
The subnet mask for your local network is 255.255.255.0. You cannot change the subnet mask assigned to your
local network.
To modify the base station IP address
1. Open the Base Station Management Tool, and then click Local Area Network.
2. Type a new IP address for the base station.
3. To save the changes, click Apply.
DHCP Server
The base station DHCP server allocates IP addresses to the computers on your local network from a specific range
of IP addresses. Each time a computer on your network requests an IP address, it receives one within the specified
IP address range. Typically, the DHCP server will assign the same IP address to a client computer each time the
client logs on to the network.
The base station provides a default IP address range for the DHCP server to use. If you want, you can select a
specified IP address range when you enable the DHCP server.
To enable the DHCP server on the base station
1. Open the Base Station Management Tool, and then click Local Area Network.
2. If it is not already selected, select Enabled from the DHCP server list to enable the DHCP server on the
base station.
3. If you do not want to use the IP address pool specified by the DHCP server, type a starting IP address and an
ending IP address for the pool. Do not include the base station IP address in the IP address pool. For example, if
you are using the default base station IP address (192.168.2.1), the address range must be between
192.168.2.2 and 192.168.2.254.
4. Select a lease time for the assigned IP addresses. The default time is two hours.
5. Type a local domain name if your ISP provided one for you.
6. To save your changes, click Apply.
MN-500 Base Station Configuration Guide
13
Wide Area Network Settings
The WAN settings on your network depend on your ISP account. ISPs provide broadband customers with one of
three different types of Internet connections:
O
Dynamic
O
Static
O
PPPoE
The Setup Wizard helps you configure your Internet connection. If you did not run the Setup Wizard, the Broadband
Networking Wireless Base Station selects a dynamic connection by default. If you have a static Internet connection
or a PPPoE connection, you can change the WAN setting from the Wide Area Network page of the Base Station
Management Tool.
You also have the option to disable your network Internet connection, if necessary. The following sections describe
each type of Internet connection and how to configure your base station for that option.
Dynamic Internet Connection
If your ISP provides a DHCP server, you should select a dynamic Internet connection for the WAN. This connection
enables your ISP to assign the IP address to your base station dynamically based on the IP addresses available in
the ISP’s subnet.
When you select a dynamic Internet connection, you might be required to enter the host name and the DNS
addresses, if your ISP provided this information.
To establish a dynamic Internet connection
1. Open the Base Station Management Tool, and then click Wide Area Network.
2. Under Internet Connection Type, click Dynamic.
3. Specify a host name if your ISP provided one to you.
4. Specify a MAC address, and click Clone MAC Address, if necessary. For information about this option, see
“MAC Addresses.”
5. Specify the DNS primary and secondary addresses, if your ISP provided you with this information and it has not
been obtained automatically.
6. To save the WAN settings, click Apply.
Static Internet Connection
If your ISP account provides a static (fixed) IP address, you should configure the WAN settings on your base station
for a static Internet connection.
To establish a static Internet connection
1. Open the Base Station Management Tool, and then click Wide Area Network.
2. Under Internet Connection Type, click Static.
3. Under Static Connection, type the information provided by your ISP, including the IP address, subnet mask,
default gateway IP address, and DNS addresses (if provided).
4. Specify a MAC address, and click Clone MAC Address, if necessary. For information about this option, see
“MAC Addresses.”
5. To save the WAN settings, click Apply.
PPPoE Internet Connection
If your ISP uses a PPPoE connection, you should configure the WAN settings on your base station for a PPPoE
connection.
A PPPoE Internet connection functions like a dial-up connection in that your user name and password are passed to
the ISP for authentication to establish an Internet connection. This interaction happens automatically when the
base station is turned on.
Unlike a dial-up connection, a PPPoE Internet connection is persistent unless any of the following occurs: you
disable the connection; the base station is turned off or loses power; or you specify a maximum idle time, and this
time elapses.
MN-500 Base Station Configuration Guide
14
To establish a PPPoE Internet connection
1. Open the Base Station Management Tool, and then click Wide Area Network.
2. Under Internet Connection Type, click PPPoE.
3. Under Point-to-Point Protocol over Ethernet (PPPoE), type your user name and password.
4. Type a service name if your ISP supplied it.
5. Type a maximum idle time, if your ISP instructs you to. You will be disconnected from the Internet if the time that
you specify elapses without activity.
6. Type the DNS primary and secondary addresses, if your ISP provided you with this information.
7. Specify a MAC address, and click Clone MAC Address, if necessary. For information about this option, see
“MAC Addresses.”
8. To save the WAN settings, click Apply.
Disabled Connection
You can disable your Internet connection at any time. You might want to disable your Internet connection in the
following situations:
O
When you suspect that an unauthorized individual is accessing your network.
O
When you want to limit your children’s access to the Internet.
O
When you want to limit the exposure of your local network to the WAN.
Disabling your Internet connection does not affect your Internet connection settings in any way. When you
reestablish your connection, your original settings are intact.
To disable the Internet connection
1. Open the Base Station Management Tool, and then click Wide Area Network.
2. Under Internet Connection Type, click Disabled.
3. To disable your Internet connection, click Apply.
MAC Addresses
A MAC address is a unique numerical identifier for a hardware device, such as a base station or adapter. Your base
station has two MAC addresses, one for the local area network and one for the wide area network. Each network
adapter that you use also has a MAC address that is assigned at the time of manufacture and printed on the label.
Some ISPs record the MAC address of the adapter that you use when you first connect to the Internet. Depending
on your ISP account, you might experience problems if you later use the base station’s default MAC address to
connect to the Internet.
One way to avoid this problem is to clone the MAC address of the adapter installed in the computer where you
initially connected to the Internet. When you clone the adapter MAC address, it replaces the base station WAN MAC
address, so that each device on your network, including the base station, appears to have that MAC address.
To clone a MAC address
1. Open the Base Station Management Tool, and then click Wide Area Network.
2. In the MAC address box, type the MAC address of the adapter installed in the computer that is connected to
your base station. The MAC address appears on the label on the underside of your adapter.
3. Click Clone MAC address.
It is a good idea to record the MAC address of the adapter that you clone, so that if you lose your settings or no
longer have the adapter, you do not lose your ability to connect to the Internet.
MN-500 Base Station Configuration Guide
15
Wireless Settings
You can enable or disable wireless access from the Wireless page of the Base Station Management Tool. When
you enable wireless access, you must establish the following base station settings:
O
Wireless network name (SSID)
O
Wireless channel
It is likely that you already established the wireless network name (SSID) and wireless channel when you ran the
Setup Wizard. If you did not run the Setup Wizard, or if for some reason you want to modify these settings, you must
update the wireless network name (SSID) on all the devices that connect wirelessly to your network. For information
about how to update the wireless network name and wireless channel on specific devices, see the Broadband
Network Utility Help.
When you enable wireless access on your network, you should also enable wireless security (WEP) to prevent users
of unauthorized wireless clients from joining your wireless network. For information about wireless security (WEP),
see “Wireless Security (WEP)” in this chapter.
If you know the MAC addresses of all the wireless clients that you want to access your network, you can also
use MAC filtering to prevent unauthorized access. For information about MAC filtering, see “MAC Filtering” in
this chapter.
Wireless Network Name (SSID)
The wireless network name, also known as the Service Set Identifier (SSID), identifies your network. Because the
network name is broadcast by the base station, any user of a wireless device that supports the Institute of Electrical
and Electronics Engineers (IEEE) 802.11b or 802.11g standards could attempt to join your wireless network when
that device is in range.
Wireless Channel
The wireless channel is a path through which signals flow to and from your network. If you are having difficulty
sending or receiving information on a wireless client, try changing the wireless channel.
To enable wireless access
1. Open the Base Station Management Tool, and then click Wireless.
2. If you want to change the wireless channel, click a number in the Wireless channel number drop-down list box.
3. If you want to change the network name, type a new network name in the Wireless network name (SSID) box.
The network name is case sensitive and cannot exceed 32 characters.
4. To apply these settings, click Apply.
Security Settings
The Broadband Networking Wireless Base Station is configured to protect your network from the most common
hacker attacks and other security risks. If necessary, you can change the default base station settings or establish
special services from the Security section of the Base Station Management Tool.
The following sections describe the security features of the base station and how to customize them.
Be aware that changing security settings might affect whether the computers on your LAN are able to connect to
the LAN and Internet. You should not change the default security settings unless you are absolutely clear about
your objective in doing so.
Wireless Security (WEP)
The Broadband Networking Wireless Base Station uses wireless security (WEP) to prevent unauthorized users from
accessing data that is being transmitted over the network. From the Base Station Management Tool, you can:
O
Enable wireless encryption.
O
Change the network key or modify the encryption settings that you established in the Setup Wizard.
O
Disable wireless encryption.
When data is encrypted, it is rendered unreadable by a network key—called a WEP key—before being transmitted
between wireless nodes. The data is readable only by computers that have the network key to decrypt the data.
MN-500 Base Station Configuration Guide
16
The WEP key that you establish is stored with all of your network settings on each networked computer so that data
can be encrypted and decrypted as it is transmitted over the network. If you change the WEP key that the base
station uses, you must ensure that each computer on your wireless network uses the same WEP key so that it can
communicate with the base station. For information about how to change the WEP key on each computer, see the
Broadband Network Utility Help.
When you enable wireless encryption, you can choose between 64-bit or 128-bit encryption. The number defines
the strength of the data encryption. The higher the number, the more difficult the data is to decrypt.
After you select the wireless encryption strength, you can type the WEP keys. For 64-bit encryption, you can type up
to four WEP keys, each of which consists of ten hexadecimal digits. For 128-bit encryption, you must type one WEP key
that consists of 26 hexadecimal digits. A hexadecimal digit is a number or letter in the range 0–9 or A–F.
Although encryption may slow down the speed at which data is transmitting, you will not observe any noticeable
changes to network behavior as a result of data encryption and decryption.
To enable wireless security
1. Open the Base Station Management Tool, and then click Security.
2. On the Security menu, click Wireless Security.
3. Click Enable wireless security.
4. In the Encryption strength drop-down list box, click 128-bit or leave the default setting of 64-bit.
5. Type an encryption key in the Key box.
6. To enable the wireless encryption, click Apply.
7. Update the WEP keys stored on each wireless device on your network.
You can update wireless encryption settings for each network device from the Broadband Network Utility. If you are
using a non-Microsoft adapter, use the software installed with that adapter to update wireless encryption settings.
Firewall Settings
The Broadband Networking wireless Base Station provides a firewall to protect your network against malicious
transmissions. Just as the name implies, a firewall acts as a barrier or buffer zone between your local network and
the Internet. It checks data packets that are being transmitted to your network and discards any suspicious data.
The firewall is enabled by default, but you can choose to disable it from the Base Station Management Tool. Do not
disable the firewall unless you have a good reason to do so.
To change the firewall settings
1. Open the Base Station Management Tool, and then click Security.
2. On the Security menu, click Firewall Settings.
3. Do one of the following:
O
To enable the firewall, select the Enable the integrated firewall check box.
O
To disable the firewall, clear the Enable the integrated firewall check box.
4. To save your changes, click Apply.
Block Ping Commands
You can configure the firewall to discard network ping commands. A ping command is like a short conversation
between a device on the WAN and your base station. When a device on the WAN sends a ping command, the base
station responds.
When you block ping commands, you are telling the base station not to respond to a ping initiated from the WAN.
This security mechanism hides your network from hackers who might be pinging random IP addresses to see where
they get a response. A response verifies your network location, and a hacker can then use this information to send
malicious communications to your network.
In general, it is a good idea to discard ping commands sent from the WAN. The only circumstances in which
blocking ping commands might present a problem are:
O
When your ISP needs to ping your network to ensure that the connection is still valid.
O
When you or another person needs to check your Internet connection from an external network. For example,
you might want to do this to make sure that you can access your Web server.
O
When you are playing games on the Internet, and other players need to verify your network location and
connection speed.
MN-500 Base Station Configuration Guide
17
To block ping commands
1. Open the Base Station Management Tool, and then click Security.
2. On the Security menu, click Firewall Settings.
3. Select the Discard pings check box.
4. To save your changes, click Apply.
Network Mode
You have the option to use the base station for routing services or as a bridge between two networks. The
Broadband Networking Wireless Base Station is set to routing mode by default.
When you change the base station to bridging mode, you disable network address translation (NAT), which is an
important feature of your network. When NAT is enabled, you can use the single IP address supplied by your ISP to
connect multiple computers to the Internet. Ordinarily, if you wanted to connect multiple computers, you would
need to arrange additional addresses (for example, by purchasing additional accounts). NAT enables multiple
clients to share a single connection to the Internet.
If you choose to use the base station as a bridge between two networks or segments of a network, make sure that
another device on your network (such as a base station, gateway, or router) is providing NAT service. If you do not
have a NAT service on your network, you should lease an IP address for each computer on your network. Be aware
that each of these IP addresses will be exposed to the Internet.
To change the base station network mode
1. Open the Base Station Management Tool, and then click Security.
2. On the Security menu, click Network Mode.
3. Select the Bridging Mode check box.
4. To save your changes, click Apply.
Port Forwarding
You can configure the ports on your base station to establish virtual servers or run applications with special
network requirements on your network. This is called port forwarding. Port forwarding involves the configuration of
data ports, which are logical programmatic elements. Do not confuse data ports with the physical ports on your
base station.
To understand how port forwarding works, you must first understand ports and their role in data transmission.
About Ports
Information passes from the Internet to computers on your network across ports. In any network communication,
there is an outbound (destination) port and an inbound (source) port. These ports are used in conjunction with the
source and destination IP addresses to establish a connection between two networked computers.
There are many different types of data transmitted across a network, and certain types of data must pass out of
certain ports. The data type is recognized by the protocol, or rules, that it follows. For example, the e-mail messages
that you send might follow one type of protocol, whereas the games that you play might follow another protocol.
Typically, the data protocol determines the ports to which the data is passed.
The Broadband Networking Wireless Base Station opens the ports for certain applications automatically when a
client on your local network transmits data to the WAN. This enables transmission of some of the more common
data sent to and from the Internet, such as e-mail messages and Web browser data.
To run applications with special network requirements or to establish a virtual server, however, you might need to
change the port configuration on the base station. You can configure, or forward, ports from the Base Station
Management Tool.
MN-500 Base Station Configuration Guide
18
Application-Triggered Port Forwarding
Some applications, such as Internet games and videoconferencing, require multiple ports for data transmission.
File Transfer Protocol (FTP) data, for example, is sent from your computer to one port and returns to another port.
These multiple port transmissions might cause problems when the base station is set to routing mode so that NAT
is enabled on your base station, because the NAT service anticipates that data sent to one port will return to the
same port.
The Broadband Networking Wired Base Station has already been configured to accommodate some common
application protocols that require multiple ports, including FTP, Simple Mail Transfer Protocol (SMTP), and Post
Office Protocol 3 (POP3).
To configure port forwarding for other applications that require multiple ports, you must specify the outbound
(destination) port to which data following a particular protocol will be sent, and the inbound (source) port or ports to
which related data will return. Essentially, you are telling the base station how to direct traffic across the networks.
The inbound ports that you specify will open only when data is sent to the corresponding outbound port. These
ports will close again after a certain amount of time has elapsed with no data sent to the inbound port.
You can set ranges of ports, multiple ports, and combinations of single and multiple ports for the inbound ports.
You can configure the base station to accommodate up to 50 applications. To identify the protocol that an
application uses and the ports to which the data should be sent, see the documentation for that application.
To establish application-triggered port forwarding
1. Open the Base Station Management Tool, and then click Security.
2. On the Security menu, click Port Forwarding, and then click Set up application-triggered port forwarding.
3. In the Description box, type a description of the application that you want to enable.
4. In the Outbound port box, type the number of the outbound port. The outbound port should be one number from
0 through 65535. To determine which port the application uses, consult the documentation for the application.
5. In the Trigger type drop-down list box, click the trigger type. The trigger type should be specified in the
documentation for the application.
6. In the Inbound port(s) box, type the inbound port. The inbound port can be a single port or a comma-separated
list of ports or port ranges. For example, you could type 4-25, or 243, or 10, 24-50, 74. You are limited to 256
characters.
7. In the Public type drop-down list box, click the public type. The public type should be specified in the
documentation for the application.
8. Select the Enable check box.
9. To save the changes you have made, click Apply, or to delete the changes, click Cancel.
If an application does not function correctly after you enable multiple ports, check the documentation for the
application to verify that you are enabling the correct ports to open. If you have set the correct ports to open and
the application still does not function properly, you might need to establish a virtual demilitarized zone (DMZ) on
one of the client computers on your network to run the application. For information about establishing a DMZ, see
“Virtual Demilitarized Zone.”
Persistent Port Forwarding
When you host a server on your network—for example, a Web or FTP server—you must configure the base station to
perform persistent port forwarding.
Persistent port forwarding is similar to application-triggered port forwarding in that you are opening inbound ports to
allow particular types of data or data requests to be sent from the Internet to one of the networked computers. The
difference is that you are opening these inbound ports permanently, rather than configuring them to open only
when there is data sent to an outbound port. In addition, you are directing the data sent to that port to a particular
computer on your local network.
For example, if you set up a Web server on one of the computers on your network, you must direct unsolicited
requests sent to Transmission Control Protocol (TCP) Port 80, which handles Hypertext Transfer Protocol (HTTP) or
Web data, to that computer. An unsolicited request is any data communication that is not initiated by a computer
on your local network.
Although not required, it is recommended that you have a static (fixed) IP address to host any type of server on your
network.
MN-500 Base Station Configuration Guide
19
To establish persistent port forwarding, you will need the following information:
O
The IP address of the server computer on your local network. To determine the IP address assigned to the
computer that you will use as a server, check the DHCP client list on the Home page of the Base Station
Management Tool.
O
The inbound and private port numbers and protocol that correspond to the type of data that your server handles.
Some of the common TCP inbound ports include:
O
HTTP Port 80
O
FTP Port 21
O
Telnet Port 23
O
POP3 Port 110
To configure persistent port forwarding
1. Open the Base Station Management Tool, and then click Security.
2. On the Security menu, click Port Forwarding, and then click Set up persistent port forwarding.
3. In the Description box, type a description of the server field. (This step is optional.)
4. In the Inbound port box, type the inbound port to which data packets sent from the Internet to the server will be
passed. The inbound port can be a single port or a comma-separated list of ports or port ranges. For example,
you could type 4-25, or 243, or 10, 24-50, 74. You are limited to 256 characters.
5. In the Type box, select the protocol (UDP or TCP) for the port.
6. In the Private IP address box, type the private IP address of the client computer that is hosting the server.
7. In the Private port boxes, type the private port on the server that the data will be sent to. To identify the private
port number, consult the documentation for your server software.
8. To save the changes you have made, click Apply, or to delete the changes, click Cancel.
Virtual Demilitarized Zone
In certain situations, you might want to set up a virtual demilitarized zone (DMZ) on one of the clients on your
network. When you establish a DMZ, you essentially open all inbound ports and direct the base station to forward
certain inbound data packets (those that are not in response to a transmission initiated by a LAN client and not
handled through application-triggered or persistent port forwarding) to a particular computer on your LAN. This
computer becomes the DMZ host.
A DMZ host is useful for experimenting with new games on the Internet or for setting up a server on your network
before you know which ports to open for that server. A DMZ, however, should be used only in very specific and finite
situations. The computer that hosts the DMZ is fully exposed to the Internet, and is thus susceptible to malicious
attacks and unauthorized access.
Because the computer is a virtual DMZ behind the base station, as opposed to a real DMZ out on the Internet, it
has access to the other computers on your LAN. If a hacker were to upload a virus to the virtual DMZ, the virus
could spread to all the computers on your network.
Because the virtual DMZ that you establish is behind the base station NAT, the IP address for the DMZ is not public.
This means that the DMZ can resolve most, but not all, connection problems.
To establish a virtual DMZ
1. Open the Base Station Management Tool, and then click Security.
2. On the Security menu, click Virtual DMZ (Demilitarized Zone).
3. Select the Enable check box.
4. In the text box, type the IP address assigned to the computer that will host the virtual DMZ. To determine the IP
address, see the DHCP client list on the Home page of the Base Station Management Tool.
5. To save the changes you have made, click Apply, or to delete the changes, click Cancel.
MN-500 Base Station Configuration Guide
20
MAC Filtering
You can increase the security on your network by using MAC filtering. MAC filtering enables you to control access to
network resources, including your Internet connection and shared files and printers. You can configure the base
station to permit or deny a client access to network resources based on the MAC address of the adapter that the
client uses.
If you want to use MAC filtering, the first step is to enable connection control.
Connection Control
You can use connection control to control which wired clients will be able to connect to the base station and have
access to the Internet and all network resources.
When a wired client cannot connect to the base station, it can communicate with other clients on the wired local
network, but it cannot:
O
Connect to the Internet.
O
Communicate with wireless clients on the network.
To enable connection control
1. Open the Base Station Management Tool, and then click Security.
2. On the Security menu, click MAC Filtering.
3. Select the Enable connection control check box.
4. If you do not want unspecified clients to connect to the base station, in the drop-down list box, click Deny. In this
case, any client whose MAC address is not listed in the MAC Address table will not be able to connect to the base
station or access the Internet.
5. If you clicked Deny in step 4, in the MAC Address table, specify the MAC address of any clients that you want to
connect to the base station, and then select the Allow Connection check box.
6. To save your changes, click Apply.
When you enable connection control, be sure you do not prohibit your own computer from connecting to the base
station. If you deny unspecified MAC addresses from connecting, type the MAC address of your adapter into the
MAC Address table and select the connection control check box.
If you do block your own access to the base station, you must restore the factory default settings by using the reset
button on the base station itself, and then reconfigure the base station. For information about how to do this, see
“Resetting the Base Station” in Chapter 1 of your printed User’s Guide.
For more information about MAC filtering options, see Broadband Network Utility Help.
MN-500 Base Station Configuration Guide
21
Association Control
You can use association control to control which wireless clients can establish a wireless connection to the
base station. Association control does not apply to wired clients, so if you have the Microsoft Ethernet Wired Base
Station, association control is not available as an option.
To enable association control
1. Open the Base Station Management Tool, and then click Security.
2. On the Security menu, click MAC Filtering.
3. Select the Enable association control check box.
4. If you do not want unspecified clients to associate with the base station, in the drop-down list box, click Deny. In
this case, any client whose MAC address is not listed in the MAC Address table will not be able to associate with
the base station or access the Internet.
5. If you clicked Deny in step 4, in the MAC Address table, specify the MAC address of any clients that you want to
connect to the base station, and then select the Allow Association check box.
6. To save your changes, click Apply.
Client Filtering
You can use client filtering to control the Internet access of each client on your network. This feature is particularly
useful if, for example, you want to restrict the time that your children spend surfing the Web.
To configure client filtering, you must have the following information:
O
The private IP address assigned to the client computer. To determine the IP address assigned to the client
computer, check the DHCP client list on the Home page of the Base Station Management Tool.
O
The ports for the type of application data to which you want to control access.
For example, if you want to control Web browsing, specify TCP Port 80 on client 192.168.2.XX.
It is recommended that you assign static IP addresses to each of the client devices whose access to the Internet
you want to control.
To enable client filtering
1. Open the Base Station Management Tool, and then click Security.
2. On the Security menu, click Client Filtering.
3. In the appropriate box, type the IP address of the client device whose access to the Internet you want to control.
4. In the Outbound port(s) boxes, type the outbound port protocol and port number for the data that you want
to control.
5. In the appropriate boxes, specify the date and time range when you want to block access to this data. If you want
to filter access on a particular day, for example, every Sunday, enter the same time and the same date for the
start and end period. If you want to block access all the time, click Always.
6. Select the Block check box, and then click Apply to activate the client filtering.
Base Station Log
You can access the base station log for your network from the Security section of the Base Station Management
Tool. This log records general base station activity and time stamps each log file entry. If you have any concerns
about unusual activity on your network, review the base station log.
The base station log can maintain up to 127 lines of data. When the base station log reaches maximum capacity,
the base station deletes the oldest log entries.
To view the base station log
1. Open the Base Station Management Tool, and then click Security.
2. On the Security menu, click Base Station Log.
MN-500 Base Station Configuration Guide
22
Index
access point, 6, 18
application-triggered port forwarding, 19
association control, 22
back up settings
restoring, 10
storing, 10
base station
backing up settings, 10
bridge configuration, 6, 18
configuring with Base Station Management Tool, 5
connecting to computer, 4
firmware, upgrading, 10
IP address, default, 8
log, 22
password, 12
resetting, 9
restoring back up settings, 10
restoring factory default settings, 9
serial number, 8
SNTP server synchronization, 11
time zone settings, 11
Base Station Management Tool
about, 2
backing up settings, 10
configuring base station, 5
DMZ hosts, 20
firewall settings, 17
help, 4
Home page, 7
LAN settings, 8, 13
log, 22
logging off, 3
MAC addresses, 15
menus, 3
opening, 2
password, changing, 12
port forwarding, 18
resetting base station, 9
restoring back up settings, 10
restoring factory default settings, 9
security settings, 16
settings, 4
SNTP server synchronization, 11
time zone settings, 11
WAN settings, 7
wireless access settings, 16
blocking ping commands, 17
bridging mode, 6, 18
browsers supported, 2
channel, wireless, 16
child Internet access, restricting, 22
client filtering, 22
client lists, DHCP, 8
clock settings, 11
cloning MAC addresses, 15
computers
connecting to base station, 4
TCP/IP properties, 5
connecting base station to computer, 4
connection status, 7
daylight savings time, 11
default settings, restoring, 9
demilitarized zone (DMZ), 20
devices, DHCP client lists, 8
DHCP
client lists, 8
IP address range, 13
disabling Internet connection, 15
disconnecting, 7
DMZ (virtual demilitarized zone), 20
DNS, 7
dynamic Internet connections, 14
encryption, 16
Explorer, versions supported, 2
factory default settings, restoring, 9
File Transfer Protocol (FTP), 19
filtering
client, 22
MAC addresses, 21
firewalls, 17
firmware
upgrading, 10
version number, 8
FTP (File Transfer Protocol), 19
games
DMZ (demilitarized zone), 20
port forwarding, 19
gateway, 7
help, Base Station Management Tool, 4
Home page, Base Station Management Tool, 7
hosting servers, 19, 20
Internet connection
disabling, 15
dynamic, 14
filtering, 22
PPPoE, 14
static, 14
Internet Explorer, versions supported, 2
IP addresses
changing, 13
DHCP server range, 13
DHCP servers, 8
dynamic, 14
LAN, 8, 13
static, 14
WAN, 7
LAN (local area network) settings, 8, 13
local area network (LAN) settings, 8, 13
log, base station, 22
logging off Base Station Management Tool, 3
MAC addresses
cloning, 15
filtering, 21
settings, 8
NAT (Network Address Translation), 18, 19
Netscape Navigator, versions supported, 2
MN-500 Base Station Configuration Guide
23
Network Address Translation (NAT), 18, 19
parental controls, 22
password
changing, 12
restoring default, 9
persistent port forwarding, 19
ping commands, blocking, 17
POP3 protocol, 19
port forwarding
about, 18
application-triggered, 19
persistent, 19
PPPoE Internet connection, 14
resetting base station, 9
restoring settings
back ups, 10
factory defaults, 9
security
association control, 22
base station log, 22
blocking ping commands, 17
DMZ hosts, 20
firewalls, 17
logging off Base Station Management Tool, 3
MAC address filtering, 21
settings, changing, 16
SSID (wireless network name), 16
WEP, 16
serial number, base station, 8
servers, hosting, 19, 20
Service Set Identifier (SSID), 16
settings
backing up, 10
Base Station Management Tool, 2, 4
firewalls, 17
IP address, 13
LAN, 8, 13
MAC addresses, 15
password, 12
restoring back ups, 10
restoring factory defaults, 9
security, 16
TCP/IP properties, 5
time zone, 11
WAN, 7, 14
wireless access, 16
SMTP protocol, 19
SNTP server synchronization, 11
SSID (wireless network name), 16
static IP addresses, 14
status, connection, 7
subnet mask
LAN, 8, 13
WAN, 7
synchronization, SNTP server, 11
TCP/IP properties, 5
time zone settings, 11
upgrading firmware, 10
virtual demilitarized zone (DMZ), 20
virtual servers, 18
WAN (wide area network)
blocking ping commands, 17
MAC address, 15
settings, 7, 14
Web access, restricting, 22
Web server, hosting, 19
WEP (Wireless Equivalent Privacy), 16
wide area network (WAN)
blocking ping commands, 17
MAC address, 15
settings, 7, 14
wireless access point, 6, 18
wireless access settings, 16
wireless network name (SSID), 16
MN-500 Base Station Configuration Guide
24