1
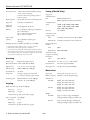
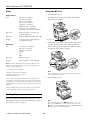
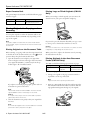
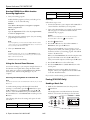
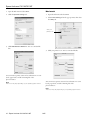
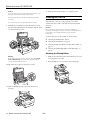
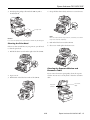
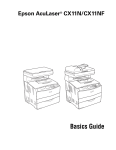
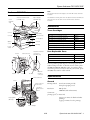
Epson AcuLaser CX11N/CX11NF
Note:
The CX11N instructions also apply to the CX11NF unless otherwise
indicated.
AcuLaser CX11N Parts
Auto Document Feeder
(CX11NF only)
Cover
(CX11NF
only)
The illustrations in this guide show the Epson AcuLaser CX11NF, but
the instructions are the same as the CX11N unless otherwise
indicated.
Paper stopper
(CX11NF only)
Accessories
Toner Cartridges
Cover C
Output tray
Cover B
Cartridge
Extension tray
Control panel
Cover A
Option
cover
MP tray
Power
switch
Cover F
Handle
USB connector
Cover E
High Capacity Toner Cartridge (Yellow)
S050187
High Capacity Toner Cartridge (Magenta)
S050188
High Capacity Toner Cartridge (Cyan)
S050189
High Capacity Toner Cartridge (Black)
S050190
Standard Capacity Toner Cartridge (Yellow)
S050191
Standard Capacity Toner Cartridge (Magenta)
S050192
Standard Capacity Toner Cartridge (Cyan)
S050193
User Replacable Parts
Telephone interface
connectors
(CX11NF only)
Part
Part number
Photoconductor
S051104
Fuser
2090470
Power cord
2093853
You can purchase genuine Epson® toner and paper from an
authorized Epson reseller. To find the nearest reseller, please
call 800-GO-EPSON (800-463-7766). To purchase online,
visit www.epsonstore.com (U.S. sales only). In Canada, please
call (800) 463-7766 for reseller referral.
Network
interface
connector
AC inlet
Part number
Specifications
Photoconductor
Fuser
General
Photoconductor
access lever
Cleaning
knob access
lever
Printing method
Laser beam scanning and dry
electrophotographic process
Resolution
600 dpi base
2400 RIT (with enhancement)
Continuous
printing speed1 (on Letter/A4)
25 pages per minute for black-and-white
printing3
5 pages per minute for color printing3
Paper guides
(MP tray)
Toner cartridge
8/05
Epson AcuLaser CX11N/CX11NF - 1
Epson AcuLaser CX11N/CX11NF
First print speed1
Warm-up time2
About 37.0 seconds at normal temperature
Paper feed
Automatic or manual feed
Paper feed
alignment
Center alignment for all sizes
MP tray
Paper output
capacity
Faxing (CX11NF Only)
9.0 seconds for black-and-white printing
on A4 or Letter size paper
17.0 seconds for color printing on A4 or
Letter size paper
Supported
communications
lines
Communication
speed
Up to 180 sheets of plain paper (80 g/m²)
Up to 20 envelopes
Up to 75 sheets of transparencies
Up to 75 sheets of labels
Protocol
33600, 31200, 28800, 26400, 24000,
21600, 19200, 16800, 14400, 12000,
9600, 7200, 4800, 2400 bps
G3, G3ECM
Transmission and
reception mode
Up to 250 sheets of plain paper
(80 g/m²)
Color
Transmits and receives 8 bits each for RGB
Monochrome
Transmits and receives 1 bit monochrome
Image compression
method
RAM (proprietary) 128 MB, expandable up to 576 MB
1 Printing speed varies by paper source or other conditions.
2 Warm-up time varies with optional configurations.
3 The product may automatically calibrate during printing to improve
printing quality. This may reduce the printing speed to below that
of the value described. Also, depending on paper size, the product
may stop momentarily to protect the fuser unit.
Color
JPEG
Monochrome
MH, MR, MMR
Transmission and
reception of scanning
line density
Scanning
Scanner type
PSTN (subscriber lines)
PBX (independent premises internal lines)
Flatbed color image scanner
Color
200 × 200 dpi
Monochrome
8 × 15.4, 8 × 7.7, 8 × 3.85 dot/mm
Photoelectric device 4-lines CCD (R, G, B, B/W)
Document size
A4, Letter, Legal (with ADF)
Effective area
8.3 × 11.7 in. (211 × 297 mm)
Print paper size
A4, B5, Letter, Legal (with ADF)
Effective pixels
9600 × 9600 pixels at 600 dpi
Document size
A4, Letter
Image data
16 bits per pixel per color internal
1 to 8 bits per pixel per color external
Scanning speed
Mechanical
Black and white: 2 sec/A4 (300 dpi)
Full color: 11 sec/A4 (300 dpi)
Paper path
Sheet feeder, front entry, top out
MP tray capacity
180 sheets of 24 lb (90 g/m2) paper
Dimensions
CX11NF
Width: 18.1 inches (460 mm)
Depth: 18.4 inches (467 mm)
Height: 26.1 inches (667 mm)
CX11N
Width: 18.1 inches (460 mm)
Depth: 18.4 inches (467 mm)
Height: 23.4 inches (593 mm)
Copying
Black and white copy mode A4/ 300 dpi
First copy
12 sec
Multi-copy
25 ppm
Weight
Continuous copy (Fax model only): 25 ppm
Color copy mode A4/ 300 dpi
First copy
29 sec
Multi-copy
5 ppm
Continuous copy (Fax modely only): 5 ppm
2 - Epson AcuLaser CX11N/CX11NF
8/05
CX11NF
Approx. 73 lb (33.1 kg), excluding the
imaging cartridge and photoconductor uni
CX11N
Approx. 68.1 lb (30.9 kg), excluding the
imaging cartridge and photoconductor unit
Epson AcuLaser CX11N/CX11NF
Interfaces
Toner Cartridges
USB Interface
Colors
Standard
Cyan, magenta, yellow, black
Cartridge life
Based on Universal Serial Bus
Specifications Revision 1.1, Universal
Serial Bus Device Class Definition for
Printing Devices Version 1.1
Black
Standard Capacity1: 1,500 pages,
High Capacity: 4,000 pages
Yellow
Standard Capacity: 1,500 pages,
High Capacity: 4,000 pages
Bit rate
12 Mbps (Full speed device)
Data encoding
NRZI
Magenta
Adaptable
connector
Standard Capacity: 1,500 pages,
High Capacity: 4,000 pages
USB Series B 2.0
Cyan
Recommended
cable length
Standard Capacity: 1,500 pages,
High Capacity: 4,000 pages
Under 2 meters
1 Standard black included with the product.
Temperature
Electrical
Rated voltage
120 V
Rated frequency
range
50 to 60 Hz
Rated current
7.5 A
Storage
Humidity
Storage
Approx. 189 W (color printing), 287 W (black and white)
Approx. 58 W in standby mode
Approx. 15 W in sleep mode
Photoconductor Unit
Environmental
Temperature
Storage
Temperature
50 to 89.6 °F (10 to 32 °C)
Storage
32 to 95 °F (0 to 35°C)
–4 to 104 °F (–20 to 40°C) for 120 hours
or less
15 to 80% RH
Storage
10 to 15%, 80 to 90% RH
Storage
Unit life
Safety Approvals
Safety standards
UL 60950, CSA C22.2 No. 60950-00
EMC
FCC part 15 subpart B class B
EMI
CSA C108.8 Class B
EU-96
FCC part 68
Memory Modules (Proprietary)
Memory size
32 to 95°F (0 to 35°C)
Humidity
Humidity (without condensation)
Operation
15 to 80% RH (unopened)
Caution:
To ensure good results, use genuine Epson toner cartridges and do
not refill them. Other products may cause damage to the printer not
covered by Epson’s warranty. Do not use a toner cartridge if the date
on the package has expired.
Power consumption
Operation
32 to 95°F (0 to 35°C)
15 to 80% RH
14,000 pages under conditions of 5%
printing ratio, color and black have a
proportion of two to one per page, and two
pages per job.
42,000 pages of continuous printing, under
conditions of 5% printing ratio and blackand-white printing.
20,900 pages under conditions of 5%
printing ratio, black-and-white printing,
and one page per job.
10,500 pages of continuous printing, under
conditions of 5% printing ratio and color
printing.
10,500 pages under conditions of 5%
printing ratio, color printing, and one page
per job.
Standard memory: 128 MB
Expansion memory: up to 576 MB
8/05
Epson AcuLaser CX11N/CX11NF - 3
Epson AcuLaser CX11N/CX11NF
Paper
Using the MP Tray
Single sheets
1. Open the MP tray cover.
Size
A4 (8.3 × 11.7 inches)
A5 (5.8 × 8.3 inches)
A6 (4.1 × 5.8 inches)
Letter (8.5 × 11 inches)
Legal (8.5 × 14 inches)
Half-letter (5.5 × 8.5 inches)
Executive (7.3 × 10.5 inches)
User Defined up to 8.66 × 14 inches
Paper type
Plain bond paper or special paper
distributed by Epson
Thickness
0.003 to 0.004 inch (0.08 to 0.11 mm)
Weight
17 lb (64 g/m²) to 24 lb (90 g/m²)
(for plain bond paper)
2. Pinch the knob and paper guide together, then slide the
right paper guide outward.
MP tray cover
3. Load a stack of paper in the center of the tray with the short
edge first and the printable surface facing up. Pinch the
knob and the paper guide together and slide them against
the right side of the stack for a snug fit.
Envelopes
Size
No. 10 (4.1 × 9.5 inches)
DL (4.3 × 8.7 inches)
C6 (4.5 × 6.4 inches)
MON
C5
IB5
Paper type
Plain bond paper
Weight
20 lb (75 g/m²) to 24 lb (90 g/m²)
Note: Poor quality paper may reduce the print quality and cause
paper jams or other problems. If you have print quality problems,
switch to a higher grade paper.
Do not load curled or folded paper.
Note:
When loading paper, do not exceed the maximum stack height
marker inside the paper guide.
Use paper only under these conditions:
Temperature: 59 to 77 °F (15 to 25 °C)
Humidity: 40 to 60% RH
4. Close the MP tray cover.
Since the quality of any particular brand or type of paper may be
changed by the manufacturer at any time, Epson cannot guarantee
the quality of any non-Epson brand or type of paper. Always test a
sample of paper stock before purchasing large quantities or printing
large jobs.
Always load paper into the sheet feeder with the short edge first.
Load envelopes flap edge left with the printable side up.
Loading Paper
You can load paper in the MP (multi-purpose) tray or the
optional paper cassette tray. All printed materials are output to
the output tray, shown on page 5.
4 - Epson AcuLaser CX11N/CX11NF
Note:
After loading paper, press the
Setup button on the control
panel, press the r button to select Printer Settings, press the
d button to select Tray Menu, and match the MP Tray Size and
MP Type settings to the loaded paper size.
8/05
Epson AcuLaser CX11N/CX11NF
Removing Printouts from the Output Tray
The available paper types for copying are not the same as those
for printing. Depending on the paper source, available paper
types differ. When copying, you can only use the following
paper types:
The output tray is located on the top of cover B and can hold
up to 250 sheets.
Paper source
Paper type
MP tray
Plain paper, Semi-thick, Letterhead, Recycled
paper, Colored paper, Transparencies, Labels
Optional paper cassette
Plain paper, Letterhead, Recycled paper,
Colored paper
Note:
You cannot copy onto coated paper, thick paper, or special paper
such as postcards or envelopes.
Stopper
MP Tray
The MP tray can hold the following types and sizes of paper.
Note:
If your printouts do not stack neatly, open the stopper on the
extension tray.
Paper type
Paper size
Capacity
Plain paper
A4, A5, B5, Letter (LT),
Government Letter (GLT), Half
Letter (HLT), Legal (LGL),
Government Legal (GLG), F4,
Executive (EXE)
Custom-size paper:
3.54 in. × 4.33 in. (minimum) to
8.66 in. × 14 in. (maximum)
Up to 180 sheets
(Total stack
thickness: 0.8 in.)
Semi-thick
paper
A4, A5, B5, Letter (LT),
Government Letter (GLT),
Half Letter (HLT), Legal (LGL),
Government Legal (GLG), F4,
Executive (EXE)
Custom-size paper:
3.54 in. × 4.33 in. (minimum) to
8.66 in. × 14 in. (maximum)
Total stack thickness:
0.8 in.
Envelopes
C5, C6, C10, DL, Monarch,
ISO-B5
Up to 20 sheets
(Total stack
thickness: 0.8 in.)
Selecting a Paper Source
You can specify a paper source manually or set up automatic
paper source detection.
❏ To manually select a paper source for Windows, access the
printer driver, click the Basic Settings tab, and select the
paper source that you want to use from the Paper Source
list. Then click OK.
❏ To manually select a paper source for Macintosh, access the
printer driver, select Printer Settings from the drop-down
list, and click the Basic Settings tab. Then select the paper
source that you want to use from the Paper Source list and
click OK.
❏ To set up automatic paper source detect, select Auto
Selection from the Paper Source list as described above.
The product will search for a paper source containing the
specified paper size in the MP tray. If the optional 500Sheet Paper Cassette Unit is installed, then it will also
search its cassette.
Note:
If you select paper size or paper source settings in your application,
these settings may override the printer driver settings.
Selecting a Paper Tray
Before you load paper you need to select a paper tray based on
whether you’re printing or copying and the size of paper your
printing or copying onto.
8/05
Labels
A4, Letter (LT)
Up to 75 sheets
Thick paper
A4, A5, B5, Letter (LT),
Government Letter (GLT),
Half Letter (HLT), Legal (LGL),
Government Legal (GLG), F4,
Executive (EXE)
Custom-size paper:
3.54 in. × 4.33 in. (minimum) to
8.66 in. × 14 in. (maximum)
Total stack thickness:
0.8 in.
Extra thick
paper
3.54 in. × 4.33 in. (minimum) to
8.66 in. × 14 in. (maximum)
Total stack thickness:
0.8 in.
Coated paper
A4, A5, B5, Letter (LT),
Government Letter (GLT),
Half Letter (HLT), Legal (LGL),
Government Legal (GLG), F4,
Executive (EXE)
Custom-size paper:
3.54 in. × 4.33 in. (minimum) to
8.66 in. × 14 in. (maximum)
Total stack thickness:
0.8 in.
Epson AcuLaser CX11N/CX11NF - 5
Epson AcuLaser CX11N/CX11NF
Paper Cassette Unit
Placing Large or Thick Originals (CX11N
Only)
The optional Paper Cassette Unit can hold the following types
and sizes of paper.
Paper Type
Paper Size
Capacity
Plain paper
A4, Letter (LT)
Up to 500 sheets in a cassette
Total stack thickness: 2.2 in.
When you scan large or thick originals, you can remove the
document cover. Just open it and pull it straight up.
Placing Originals for Copying and
Scanning
You can place originals on either the document table or the
Auto Document Feeder (CX11NF only), depending on the
type of the original.
If you need to press the document flat while you copy or scan
it, do not press too hard and be careful not to move it.
Note:
If you place originals on both the Auto Document Feeder and the
document table, only the documents in the Auto Document Feeder
are scanned.
Caution:
Do not use excessive force on the document cover, and do not twist
it diagonally. You may damage the document cover.
Placing Originals on the Document Table
Before scanning or copying, make sure the transportation lock
on the left side of the document table is set to the
unlock
position. Always keep the document table clean.
When you are done, replace the document cover by inserting
the tabs back into the slots.
1. Open the document cover and place your original facedown on the glass as shown, in the upper left corner. Move
your original about 0.06 in. (1.5 mm) away from the top
and left edges so all of it will be scanned.
Placing Originals in the Auto Document
Feeder (CX11NF Only)
The ADF can hold the following types and sizes of paper.
Paper Type
Paper Size
Capacity
Plain paper, Recycled
paper
B5, A4, Letter (LT),
Legal (LGL)
Up to 50 sheets (Total
stack thickness: 0.4 in.)
1. Slide the edge guides all the way outward.
2. Arrange your originals so the page you want scanned or
copied first is on the top of the stack.
Note:
Pages are fed from the top and ejected face-down.
3. Insert up to 50 originals short edge first and face-up in the
Auto Document Feeder until it meets resistance. Slide the
edge guides inward against the edges of your originals.
If you plan to scan multiple photographs, position each one
at least 0.8 in. apart from the others.
Note:
The area with a width of maximum 0.06 in. from the horizontal
edge and 0.06 in. from the vertical edge is not scanned.
Caution:
Do not place heavy objects on the document table or press the
glass surface with too much force.
2. Close the document cover gently so that your original does
not move.
Note:
Do not leave photographs on the document table for an extended
period of time as they may stick to the glass.
6 - Epson AcuLaser CX11N/CX11NF
8/05
Epson AcuLaser CX11N/CX11NF
Home Mode is best when you want to preview images of
photos before scanning them. You can size the image as you
scan, adjust the scan area, and adjust many image settings,
including color restoration.
Copying
Follow these steps to make a basic copy:
❏ Office Mode lets you quickly scan multi-page documents of
the same size using the Auto Document Feeder. Office
Mode is available only with the CX11NF.
1. Make sure the product is turned on and paper is loaded. For
instructions on loading paper, see page 4.
2. Place your original on the document table or in the Auto
Document Feeder (CX11NF only). For instructions, see
page 6.
3. Press the
❏ Professional Mode gives you total control of your scanning
settings and lets you check their effects with a preview
image.
Copy button on the control panel.
Professional Mode is best when you want to preview your
image and make extensive, detailed corrections to it before
scanning. You can sharpen, color correct, and enhance your
image with a full array of tools, including color restoration.
The Copy light turns on. The LCD panel displays Copy
Mode for a few seconds, then changes to the copy mode
screen.
Starting EPSON Scan as a Standalone
Program
If you just want to save scanned images without editing them,
start EPSON Scan directly. Scanned images are automatically
saved as files in your system.
1. Do one of the following to start EPSON Scan:
4. Specify your copy settings as necessary.
Windows:
Double-click the EPSON Scan icon on your desktop.
5. Press the x B&W Start (to make a black-and-white copy)
or x Color Start button (to make a color copy).
Or select Start > All Programs or Programs > EPSON
Scan > EPSON Scan.
Scanning
Mac OS X:
Open the Applications folder and click the EPSON Scan
icon.
The EPSON Scan window appears:
You can use your CX11N to scan a photo or document and
save it on your computer or fax it to someone else.
If you want to scan an image and save it directly to a file, you
can start EPSON Scan as a “standalone” program. You can
also scan using the control panel (Push Scan). For details, see
page 8.
Change scan
mode here
You can also access EPSON Scan from any application that
supports the TWAIN standard. When you are finished, the
scanned image opens in your scanning program so you can
modify, print, and save it. For details, see page 8.
Note:
In this section, the operation of EPSON Scan is explained using
Windows examples.
EPSON Scan offers three scanning modes that let you control
all aspects of scanning:
2. The default mode when you first start Epson Scan is Home
Mode. If you want to change to Office or Professional
Mode, select the mode from the Mode menu. The EPSON
Scan window changes.
❏ Home Mode lets you customize scanning settings and check
their effects with a preview image.
8/05
Epson AcuLaser CX11N/CX11NF - 7
Epson AcuLaser CX11N/CX11NF
Starting EPSON Scan With Another
Scanning Application
Scan modes
Available settings
Items
Manual scan
File Format
PDF, TIFF, JPG
Paper Size
A4, B5, Letter, Legal
1. Start your scanning program.
Double-click the program icon from your desktop, if it is
available, or do one of the following:
Scanning
Windows:
Select Start > All Programs or Programs > program
folder > program icon.
1. Connect the CX11N to your computer with a USB cable or
a network cable as described in your Setup Guide.
Follow these steps to scan:
2. Turn on the CX11N. Place your originals on the document
table (see page 6) or in the Auto Document Feeder
(CX11NF only; see page 6).
Mac OS X:
Open the Applications folder, select the program folder,
and click the program icon.
Caution:
Make sure the transportation lock on the left side of the
document table is set in the
unlock position.
2. Select your program’s scanning option. (See your scanning
program help for instructions.)
Note:
In some programs, you must select the Epson AL-CX11 as the
“source” first. If you see a Select Source option, choose it and
select your Epson AL-CX11 there first.
3. Press the
Scan button.
4. Press the u or d button to select either Local PC or
Network PC, then press the r button.
When you select Local PC, you see a message on your
computer screen. Select your scanning program, scan your
document, and close your scanning program. The CX11N
returns to the Print mode.
3. Select your EPSON AL-CX11.
Note:
For Windows XP users, do not choose WIA-EPSON from the
menu to select the product. If you select it, you cannot use the
Epson scanner function fully.
When you select Network PC, the network computer name
appears in the LCD screen. Press the u or d button to
select your network computer, and then press the r button.
EPSON Scan starts immediately.
5. Press the l or r button to select a file format.
Using the Control Panel Buttons
6. Press the x B&W Start or x Color Start button on the
control panel.
You can scan an image to your computer using the buttons on
the CX11N control panel. Before using this feature (Push
Scan), make sure you have installed EPSON Scan, EPSON
Creativity Suite, and Presto! PageManager® on your
computer.
EPSON Scan starts scanning. When the scanning is
complete, remove your originals from the document table
or the Auto Document Feeder.
If you need to cancel scanning, press the y Cancel button.
Selecting a Scanning Mode for a Network PC
Faxing (CX11NF Only)
Note:
You cannot use Push Scan over a Macintosh network, only on a local
Macintosh.
Sending a Basic Fax
To make scanning settings other than file format while
scanning to a network PC, press the
Scan button, press
the u or d button to select Network PC, press the u or d
button to select the PC Name, then press the Menu button.
Press the d button to select Manual Scan and then press the
r button.
1. Make sure the CX11NF is turned on, then press the
Fax button.
The Fax light turns on and the LCD screen shows Fax
Mode for a few seconds, then changes to the fax menu.
The following table shows the settings and options for each
scan mode.
Scan modes
Available settings
Items
Automatic scan
File Format
PDF, TIFF, JPG
8 - Epson AcuLaser CX11N/CX11NF
8/05
Epson AcuLaser CX11N/CX11NF
The Setup light turns on and the Setup menu appears in the
LCD screen.
Note:
Do not turn off the power or press any other button while faxing.
If no button is pressed for more than 3 minutes, any changes
made are canceled and the mode returns to the Print mode.
2. Place your original either on the document table or in the
Auto Document Feeder. For details, see page 6.
3. Enter the recipient’s fax number directly from the numeric
keypad on the control panel. Keep these points in mind:
❏ You can enter a maximum of 50 characters.
❏ To re-enter the last number used, press the Redial
button.
2. Press the d button twice to select Fax Settings, then press
the r button.
❏ If you press the Pause button while entering the
recipient number, a “-” is displayed for the pause.
3. Press the d button twice to select Reception Settings,
then press the r button.
❏ If you enter an incorrect number, press the
Reset
button to delete a character to the left of the cursor.
Pressing the l or r button moves the cursor left or
right.
4. Press the d button twice to select Incoming Mode, then
press the r button.
The Reception Settings menu appears.
❏ You can also enter a fax number using the One Touch
Dial button or the Speed Dial button.
4. Specify any settings if necessary. You can specify the
Document Size, Density, Image Quality, Polling reception,
and Overseas transmission mode settings.
5. Press the x B&W Start button (for a black and white fax)
or x Color Start button (for a color fax) to start the
transmission.
5. Press the u or d button to select the reception mode you
want, then press the r button.
Note:
When the recipient’s fax machine supports only black-and-white
fax, a color fax is received as a black-and-white fax even if you
press the x Color Start button.
6. To exit the settings, press the l button several times or press
one of the mode buttons.
Receiving a Fax
Checking Toner and Photoconductor
Levels
There are four modes for receiving faxes. The default setting is
Fax only.
Item
Description
Auto switching
The call is received by the attached phone and the
CX11NF automatically answers after the phone
rings for a certain duration specified by the
Attached Phone Timeout setting.
Fax only
The CX11NF automatically answers and receives
the fax.
Phone only
The call is received by the attached phone. Fax
reception is not performed.
TAM
When an attached phone detects a fax/phone signal
while answering an incoming call, the CX11NF
automatically receives the fax.
Epson Status Monitor 3 lets you monitor printing and
displays information about your paper and toner status.
Windows
Note:
Windows XP users
To change Incoming Mode settings, follow these steps.
1. Press the
❏
Shared Windows XP LPR connections and shared Windows
XP Standard TCP/IP connections with Windows clients do not
support the Job Management function.
❏
EPSON Status Monitor 3 is not available when printing from a
Remote Desktop connection.
Setup button.
8/05
Epson AcuLaser CX11N/CX11NF - 9
Epson AcuLaser CX11N/CX11NF
1. Open the File menu and select Print.
Macintosh
2. Click the Optional Settings tab.
1. Open the File menu and select Print.
2. Select Printer Settings from the pop-up menu, then select
the Utility tab.
Click your
printer’s icon
3. Click EPSON Status Monitor 3. You see a window like
this:
3. Click your printer’s icon. You see a window like this:
You can monitor printer status and see information on toner
levels, paper levels, and the remaining life of the
photoconductor.
You can monitor printer status and see information on toner
levels, paper levels, and the remaining life of the
photoconductor.
Note:
This screen may vary depending on your operating system version.
Note:
This screen may vary depending on your operating system version.
10 - Epson AcuLaser CX11N/CX11NF
8/05
Epson AcuLaser CX11N/CX11NF
Handling Precautions
Consumable Replacement Messages
Always follow these precautions when replacing a toner
cartridge:
When you see the following messages in the LCD screen or in
the EPSON Status Monitor 3 window, you need to replace
the indicated unit. You can continue printing for a short time
after a message appears, but Epson recommends replacement
to maintain print quality and extend the life of your product.
LCD screen message
Description
Worn Photoconductor
The photoconductor is near the end of its
service life. Replace the photoconductor with
a new one.
Worn Fuser
The fuser has reached the end of its service
life.
Worn uuuu Dev Unit
The developer has reached the end of its
service life.
❏ Install a genuine Epson toner cartridge. Using a non-Epson
toner cartridge may affect print quality. Other products
may cause damage to your printer not covered by Epson’s
warranty.
❏ When handling toner cartridges, always place them on a
clean smooth surface.
❏ If you move a toner cartridge from a cool to a warm
environment, wait for at least one hour before installing it
to prevent damage from condensation.
Warning:
Do not touch the toner and keep it away from your eyes. If toner gets
on your skin or clothes, wash it off with soap and water immediately.
Note:
To clear the message, press the
Setup button on the control
panel, select Reset from Printer settings, then select Clear All
Warnings.
The CX11N stops printing if the worn consumable might damage the
CX11N. You must replace the consumable product to continue.
If a consumable product reaches the end of its service life, the
product stops printing and displays the following messages on
the LCD screen or in the EPSON Status Monitor 3 window.
LCD screen message
Replace Toner
uuuu1
Replace Photocondctr2
❏
Keep toner cartridges out of the reach of children.
❏
Do not dispose of toner cartridges in fire, as they may explode
and cause injury. Dispose of them according to local
regulations.
❏
If toner spills, use a broom and dustpan or a damp cloth with
soap and water to clean it up. Because the fine particles can
cause a fire or explosion if they come into contact with a
spark, do not use a vacuum cleaner.
Description
Changing a Low Toner Cartridge
The indicated toner cartridge is empty.
1. Make sure the CX11N is turned on, then press the
Setup button.
The photoconductor is at the end of its
service life.
The Setup light turns on and the LCD screen displays
1 The letters C, M, Y, and K appear in this position, indicating the
color of the empty toner cartridge.
Setup Mode for a few seconds, then changes to the Setup
menu screen.
2 Even if this message is displayed in the LCD screen, you can
continue to print for a short time by pressing the x B&W Start or
x Color Start button on the control panel. The message in the
LCD screen changes from Replace Photocondctr to Worn
Photoconductor.
2. Use the u or d button to select Printer Settings, then
press the r button.
3. Use the u or d button to select Reset Menu, then press the
r button.
Messages appear for one consumable product at a time. After
replacing a part, check the LCD screen for replacement
messages for other parts.
4. Use the u or d button to select Change Toner C/M/Y/K
for the color of the toner cartridge you want to change, then
press the r button.
Replacing a Toner Cartridge
5. Continue with the steps in the next section to remove and
replace the toner cartridge.
When a toner cartridge is empty, a message appears on the
LCD screen indicating which toner cartridge needs to be
replaced. If you are going to print a large document or make a
large number of copies and one of the toner cartridges is low,
you can change that cartridge so you won’t run out of toner in
the middle of the job. See:
❏ “Changing a Low Toner Cartridge” (next column)
❏ “Removing and Replacing a Toner Cartridge” on page 12
8/05
Epson AcuLaser CX11N/CX11NF - 11
Epson AcuLaser CX11N/CX11NF
Removing and Replacing a Toner
Cartridge
Warning:
Do not touch the toner. Keep the toner away from your eyes. If
toner gets on your skin or clothes, wash it off with soap and
water immediately.
1. Make sure the CX11N is turned on.
2. Check the color of the low or empty toner cartridge in the
LCD screen, then open cover A.
6. Hold the tag and gently pull the toner seal upward and
remove it.
7. Insert the toner cartridge with the arrow mark facing you.
Push it all the way into its slot, pushing on both sides
evenly, until it stops securely.
3. Push up the lock lever on the right to unlock the toner
cartridge.
8. Push down the right lever to lock the toner cartridge.
4. Pull out the toner cartridge.
Note:
The toner cartridge is installed securely when the lock lever is at
the lock position.
9. Close cover A.
5. Remove the new toner cartridge from its package and gently
shake it as shown below.
12 - Epson AcuLaser CX11N/CX11NF
10. Check for toner messages on the LCD screen. If another
toner cartridge needs to be replaced, you see another error
message. Repeat steps 2 to 9 to replace the other cartridges.
8/05
Epson AcuLaser CX11N/CX11NF
5. Lift up cover B.
Replacing the Photoconductor
Handling Precautions
Always follow these precautions when replacing the
photoconductor:
❏ The photoconductor weighs 6.16 lb (2.8 kg). Be sure to
hold it firmly by the handle when carrying it.
❏ Avoid exposing the photoconductor to light any longer than
necessary.
❏ Be careful not to scratch the surface of the drum and belt.
Also, avoid touching the drum; oil from your skin may
permanently damage its surface and affect print quality.
6. Pull up the orange lever inside cover B.
❏ Do not store the photoconductor in an area subject to direct
sunlight, dust, salty air, or corrosive gases (such as
ammonia). Avoid locations subject to extreme or rapid
changes in temperature or humidity.
❏ Do not tilt the photoconductor.
Warning:
Keep the photoconductor out of the reach of children.
Do not dispose of a used photoconductor in fire, as it may explode
and cause injury. Dispose of it according to local regulations.
Removing and Replacing the
Photoconductor
1. Make sure the CX11N is turned on.
7. Lift out the photoconductor using its handle.
2. Remove any paper loaded in the ADF (CX11NF only).
3. Slowly flip back the scanner until it stops.
4. Close the output tray extension.
8. Remove the new photoconductor from its package and pull
off the protective sheet.
8/05
Epson AcuLaser CX11N/CX11NF - 13
Epson AcuLaser CX11N/CX11NF
12. Slowly push down the scanner to its original position.
Caution:
Do not touch the belt on the top of the photoconductor or the
blue area; otherwise, print quality may decrease.
Cleaning the CX11N
Avoid exposing the photoconductor to light any longer than
necessary.
If the CX11N’s outer case is dirty or dusty, turn off the
CX11N and clean it with a soft cloth moistened with mild
detergent.
Do not touch any other components inside the CX11N.
9. Hold the photoconductor by its handle and insert it into
the slots marked with blue arrows inside the CX11N. Push
it in until it clicks into place.
Caution:
Never use alcohol or paint thinner to clean the CX11N; these
chemicals can damage the components and the case. Be careful not
to get water on the CX11N mechanisms or any electrical
components.
To clean other parts of the CX11N, see these sections:
❏ “Cleaning the Pickup Roller” (below)
❏ “Cleaning the Print Head” on page 15
❏ “Cleaning the Exposure Window and Document Table” on
page 15
❏ “Cleaning the ADF Pickup Rollers (CX11NF Only)” on
page 16
Cleaning the Pickup Roller
1. Make sure the CX11N is turned off and that the power cord
is not plugged into an outlet.
Warning:
Be careful not to touch the fuser, which is marked CAUTION
HIGH TEMPERATURE. If you have been using the CX11N
recently, the fuser may be very hot.
2. Open the MP tray cover and remove any loaded paper.
10. Flip down the orange lever, then close cover B.
11. Slide out and flip open the output tray extension, if
necessary.
14 - Epson AcuLaser CX11N/CX11NF
8/05
Epson AcuLaser CX11N/CX11NF
4. Grasp the blue cleaner slowly and move it out and in once.
3. Gently wipe the pickup roller inside the MP tray with a
moistened cloth.
Pickup roller
Note:
Move the cleaner all the way out and in; otherwise, the CX11N
may not be cleaned completely.
Caution:
Do not turn the pickup roller; otherwise the CX11N may be damaged.
5. Push in the blue lever inside the CX11N.
Cleaning the Print Head
6. Close cover A and replace the cleaner cover.
If there are white vertical lines on your printout, you will need
to clean the print head.
1. Pull off the cleaner cover from the right side of the CX11N.
Cleaning the Exposure Window and
Document Table
If you notice a decrease in print quality, clean the exposure
window. You can use a soft dry cloth to clean the document
table.
2. Open cover A.
3. Pull forward on the blue lever inside of the CX11N.
Exposure
window
8/05
Document
table
Epson AcuLaser CX11N/CX11NF - 15
Epson AcuLaser CX11N/CX11NF
Cleaning the ADF Pickup Rollers (CX11NF
Only)
6. Attach the protective materials onto the product, then
repack the product in its original box.
If the Auto Document Feeder fails to feed paper, open the
ADF cover on the left side. Then close the cover and and wipe
the rollers with a soft dry cloth to remove paper dust.
Caution:
After transporting the product, set the transportation lock on the
left side of the document table in the
unlocked position
before using the product.
For Short Distances
If you are moving the product on its own, two people should
lift and carry the product.
Pickup
rollers
1. Turn off the CX11N and remove the following items.
❏ Any loaded paper
❏ Paper cassette unit (if installed)
❏ Photoconductor
❏ USB cable
❏ Power cord
2. Be sure to lift the product by the correct positions as shown
below.
Transporting the CX11N
For Long Distances
If you need to transport your product for long distances,
carefully repack it using the original box and packing
materials.
1. Make sure the CX11N is turned on, then press the
Setup button.
The Setup light turns on and the LCD screen displays Setup
Mode for a few seconds, then changes to the Setup menu
screen.
Warning:
The back side of the product is heavier than the front, so prepare
for this difference as you lift. Two people should lift the product
from the correct positions.
2. Use the u or d button to select Scan Settings, the press
the r button.
3. Use the u or d button to select Carriage Lock, then press
the r button.
3. When moving the product, always keep it horizontal.
4. Set the transportation lock on the left side of the document
table to the
locked position.
Related Documentation
5. Turn off the CX11N and remove the following items:
CPD-19581R1
Epson AcuLaser CX11N/CX11NF Setup
Guide
CPD-20021R1
Epson AcuLaser CX11N/CX11NF Basics
Guide
❏ Photoconductor
CPD-19582R1
Epson AcuLaser CX11NF Fax Guide
❏ USB cable
CPD-19583R1
Epson AcuLaser CX11N/CX11NF
CD-ROM with electronic User’s Guide and
Network Guide
❏ Any loaded paper
❏ Paper cassette unit (if installed)
❏ Power cord
16 - Epson AcuLaser CX11N/CX11NF
8/05