1
QUALCOMM Globalstar
Data User Guide
This guide is based on the production version of the QUALCOMM Globalstar
GSP-1600 Tri-Mode Phone. Software changes may have occurred after this printing.
QUALCOMM reserves the right to make changes in technical and product specifications
without prior notice.
QUALCOMM Incorporated
5775 Morehouse Drive, San Diego, CA 92121-1714 U.S.A.
Document Number 80-99126-1EN Rev. B
Copyright © 2001 QUALCOMM Incorporated
All rights reserved
This technology was exported from the United States Government. Diversion contrary to
U.S. law prohibited.
QUALCOMM® is a registered trademark of QUALCOMM Incorporated
Smart Key™ is a trademark of QUALCOMM Incorporated
Globalstar™ is a trademark of Loral Qualcomm Satellite Services, Incorporated
All other trademarks and registered trademarks are the property of their
respective owners.
Printed in the United States of America
Cautions and Warnings
Caution
Avoid exposing QUALCOMM Globalstar Tri-Mode Phones and
accessories to rain or other liquids. If the phone gets wet, turn the
power off immediately and remove the battery pack.
Note
When using a QUALCOMM Globalstar Tri-Mode Phone for
Globalstar data (packet or asynchronous), observe the same safety
guidelines that apply when making voice calls. For complete details,
see the “Cautions and Warnings” and “Safety Information” sections
of the QUALCOMM Globalstar GSP-1600 Tri-Mode Phone User
Guide (document number 80-98153-1).
iii
iv
Contents
Getting Started ..........................................................................................1
What Is QUALCOMM Globalstar Data Service? ................................. 1
What Does Packet Data Let Me Do? ............................................. 1
What Does Asynchronous Data Let Me Do? ................................. 1
How Does It Work? ................................................................................ 2
What Do I Need to Use Data Service? .................................................. 3
Compatible Computer Systems ..................................................... 3
Positioning Your Computer ...........................................................4
Cables and Accessories for the Tri-Mode Phone ...........................4
Working with Your Service Provider ............................................. 5
Using Your Tri-Mode Phone for Data ...................................................7
General Tips ........................................................................................... 7
Tips for Globalstar Satellite Service ..................................................... 7
Setting Mode Preferences for Data ....................................................... 7
Auto Mode Selection .......................................................................8
Manual Mode Selection ..................................................................8
Viewing Data Call Information ............................................................. 9
Windows Computers ..............................................................................11
Connecting Windows Components ..................................................... 11
Configuring Your Windows PC ........................................................... 13
Quick Start Installation ...................................................................... 14
Manually Configuring Windows 95, 98, and NT ................................ 14
Setting Up a New Modem Driver (95, 98, NT) ............................ 15
Setting Up Dial-Up Networking (95, 98, NT) ............................. 22
Manually Configuring Windows 2000 ................................................ 33
Setting Up a New Modem Driver (Windows 2000) ..................... 34
Setting Up a New Connection (Windows 2000) .......................... 41
Making a Data Connection .................................................................. 53
Making Packet Data Connections ...............................................53
Making Asynchronous Data Connections ...................................54
Macintosh Computers ............................................................................57
Connecting Macintosh Components ................................................... 57
Connecting a Macintosh Using USB ........................................... 57
Connecting a Macintosh Using Mini-DIN 8 ................................ 59
Configuring Your Macintosh ............................................................... 62
How Do I Set Up a Networking Configuration? .........................63
Copying Modem Script Files to Your Macintosh ........................ 63
Creating a Networking Configuration ........................................63
Establishing a Data Connection .........................................................73
Establishing PPP Data Connections ........................................... 73
Establishing Asynchronous (non-PPP) Data Connections ......... 75
Palm Handhelds .......................................................................................77
Connecting Palm Components ............................................................ 77
Configuring Your Palm Handheld ...................................................... 79
Setting Up a Modem .....................................................................80
Setting Up Your Network Connection ......................................... 82
v
Making a Data Connection .................................................................. 85
Making Packet Data Connections ...............................................85
Making Asynchronous Data Connections ...................................87
UNIX Computers ......................................................................................89
Connecting UNIX Components ........................................................... 89
Configuring Your Solaris UNIX Computer ........................................91
Setting Up the PPP Client ........................................................... 91
Checking the GS Packet Data Setup ........................................... 94
Making a Data Connection .......................................................... 94
Configuring Your Linux Computer ..................................................... 97
Setting Up the Modem and PPP Connection ..............................97
Configuring the PPP Connection ...............................................100
Configuring the Name Server ....................................................103
Saving Your Settings ..................................................................104
Making a Data Connection ........................................................105
QUALCOMM Globalstar Hands-Free Car Kit .................................107
Connecting Car Kit Components ......................................................107
Commercially Available Accessories ................................................109
Indoor/Outdoor Extension Cable ......................................................109
Palm Cable and Null Modem Adapter ..............................................109
Macintosh Adapters and Modem Cable ............................................109
QUALCOMM Globalstar Hands-Free Car Kit Cable ......................110
Troubleshooting ....................................................................................111
Supported AT Commands ...................................................................117
vi
Getting Started
What Is QUALCOMM Globalstar Data Service?
QUALCOMM Globalstar data service allows your QUALCOMM Globalstar
GSP-1600 Tri-Mode phone to serve as a wireless modem, sending data from
or receiving data to a computer such as a laptop or Palm handheld.
QUALCOMM Globalstar data service handles both packet and
asynchronous data.
What Does Packet Data Let Me Do?
QUALCOMM Globalstar data service lets you access the Internet or other
TCP/IP packet-switched networks.
Depending on your preferences and service availability, your packet data
connection can use either the Globalstar Satellite Communications System,
or a terrestrial digital cellular network.
Once you have connected, you can use familiar software applications such
as Eudora, Netscape Navigator, or Microsoft Internet Explorer for anything
you would normally do through your network provider or Internet Service
Provider (ISP). For example, you could
■
■
■
■
■
Browse the Internet
Access e-mail
Transmit information
Use telnet (for example to connect with host applications at work)
Transfer files using FTP (File Transfer Protocol)
And you can do all of these wherever Globalstar Data Service is available,
at over-the-air data rates of up to 9600 bits per second (bps) for Globalstar
service or up to 14400 bps for cellular service, with no additional modem or
dedicated telephone circuits required.
What Does Asynchronous Data Let Me Do?
QUALCOMM Globalstar data service lets you connect asynchronously to
another modem, using the Globalstar Satellite Communications System
only, at over-the-air data rates of up to 9600 bits per second (bps). For
example, you could dial into an electronic Bulletin Board System (BBS)
using HyperTerminal. Or you could dial into a corporate intranet behind a
firewall (in this case, you would be receiving packet data over your
asynchronous connection).
Tip
QUALCOMM Globalstar packet data service data has a lower
overhead and faster throughput than asynchronous data. If you
do not specifically need asynchronous data (such as for a BBS
connection), use packet data instead.
1
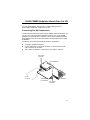
How Does It Work?
Here’s a quick overview of how Globalstar data service works.
Cable
■
Connect your QUALCOMM Globalstar Tri-Mode Phone to the
computer or Palm handheld, using a QUALCOMM serial data cable
and any optional accessories.
Configure
■
Configure your computer or Palm handheld organizer to use Globalstar
data service (you need to do this only once for packet data, and once for
asynchronous data).
Connect
■
■
Click a data connection icon or menu on your computer.
The QUALCOMM Globalstar phone establishes a data connection to
the Globalstar Satellite Communications System or, for packet data
only, to a digital cellular network, using Point-to-Point Protocol (PPP).
Cruise a packet-switched network (packet data)
■
■
■
Open the application you want to use, for example an Internet browser
where you type in a Web address.
Your computer or Palm handheld sends data to the QUALCOMM
Globalstar phone, which transmits them either to a satellite and
Gateway in the Globalstar Satellite Communications System, or to a
digital cellular network.
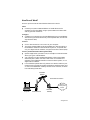
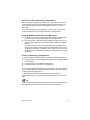
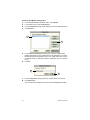
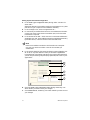
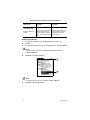
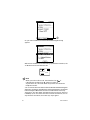
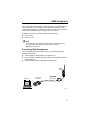
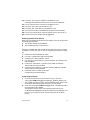
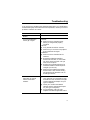
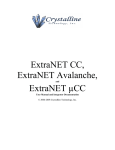
For a Globalstar packet data call, packets are routed to and from your
network service provider through the Globalstar Satellite System, and
a router in the Globalstar Gateway connects to the Internet, as shown
in the following illustration.
Globalstar
Satellite
Packet Data Connection
Internet /
TCP/IP packet
network
i
Computer
2
Tri-Mode Phone
Globalstar
Gateway
Getting Started
Or contact a modem (asynchronous data)
■
■
Your computer or Palm handheld sends asynchronous data to the
QUALCOMM Globalstar phone, which transmits them to a satellite
and Gateway in the Globalstar Satellite Communications System.
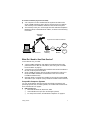
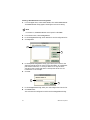
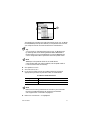
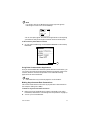
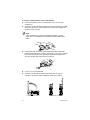
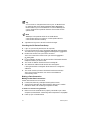
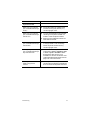
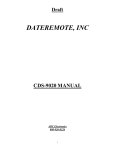
The Gateway routes your call through the Public Switched Telephone
Network (PSTN) to the destination modem, as shown in the following
illustration.
Globalstar
Satellite
Asynchronous Data Connection
Intranet
i
PSTN
Computer
Tri-Mode Phone
Globalstar
Gateway
BBS
Modem
What Do I Need to Use Data Service?
To use data service, you need:
■
■
■
■
A QUALCOMM Globalstar GSP-1600 Tri-Mode phone with mode
preferences set for data (for information, see “Using Your Tri-Mode
Phone for Data” on page 7)
A computer or Palm handheld with installed communications software
for PPP and/or asynchronous data
QUALCOMM serial data cable (included, along with this manual, in
the QUALCOMM Globalstar Packet Data Kit: For the Tri-Mode
Portable Satellite Phone)
Optional cables or accessories as needed, to connect the QUALCOMM
data cable to your computer (using a TIA/EIA-574 DTE serial interface)
Compatible Computer Systems
You can use Globalstar data service with the following computers and
operating systems (OS); for cabling details, see “Cables and Accessories for
the Tri-Mode Phone” on page 4:
■
IBM-compatible PCs
❑
❑
❑
Microsoft Windows 95, 98, NT 4.0, 2000
One available serial port (for connecting the phone)
For setup instructions, see “Windows Computers” on page 11
Getting Started
3
■
Apple Macintosh computers
❑
❑
■
Palm handheld organizers
❑
❑
❑
■
MacOS 7.6 or higher
For setup instructions, see “Macintosh Computers” on page 57
Palm OS
Palm handheld organizer with a serial port
For setup instructions, see “Palm Handhelds” on page 77
UNIX Computers
❑
❑
❑
Red Hat Linux
Solaris UNIX
For setup instructions, see “UNIX Computers” on page 89
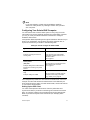
Positioning Your Computer
You have several options for positioning a computer to use Globalstar data
service:
■
■
■
■
In a vehicle, use a QUALCOMM Globalstar Hands-Free Car Kit (and
serial cable) to connect a computer to a Tri-Mode Phone.
For Globalstar satellite connections, take a portable computer (laptop
or Palm handheld) outdoors and connect it near the Tri-Mode Phone,
for example on a picnic table.
For Globalstar satellite connections, connect an optional extension
cable (see “Commercially Available Accessories” on page 109) between
a computer inside a building and the Tri-Mode Phone outdoors.
For digital cellular packet data connections, you may be able to make
calls from inside a building, if there is a strong cellular signal.
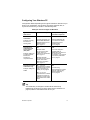
Cables and Accessories for the Tri-Mode Phone
Cables or accessories connect your QUALCOMM Globalstar Tri-Mode
Phone to your computer. They vary depending on the computer type:
Computer
Cables and accessories needed for the Tri-Mode
Phone
IBMcompatible PC
(Windows)
■
■
■
4
QUALCOMM serial data cable (included in the
QUALCOMM Globalstar Packet Data Kit)
optional USB-to-serial adapter, if your PC uses
USB (Universal Serial Bus) connectors
optional extension cable, if desired
Getting Started
Computer
Cables and accessories needed for the Tri-Mode
Phone
Apple
Macintosh
■
■
QUALCOMM serial data cable (included in kit)
optional extension cable, if desired
For systems with USB (Universal Serial Bus) ports:
USB adapter with software
■
For non-USB systems with mini-DIN 8 ports:
Macintosh modem cable
■
adapter (female 25-pin to male 9-pin)
■
Palm handheld
■
■
■
■
Red Hat
Linux,
Solaris UNIX
■
QUALCOMM
Globalstar
Hands-Free
Car Kit
■
■
■
QUALCOMM serial data cable (included in kit)
Palm HotSync cable (or appropriate Palm cable)
null modem adapter, male 9-pin on both ends
optional extension cable, if desired
QUALCOMM serial data cable (included in kit)
optional extension cable, if desired
serial cable with a male 9-pin connector on one end
and a female 9-pin connector on the other
other cables or adapters as listed above for your
specific computer (for setup instructions, see
“QUALCOMM Globalstar Hands-Free Car Kit” on
page 107)
Note
For more information about optional accessories, see
“Commercially Available Accessories” on page 109.
Working with Your Service Provider
When you use Globalstar data service to access the Internet, your Internet
service is supplied by one or both of the following:
■
■
For Globalstar Satellite connections — a network provider or Internet
Service Provider (ISP), through the Globalstar Gateway
For cellular connections — your cellular phone service provider (SP)
Check with your service provider(s) for details about their service features.
Getting Started
5
6
Getting Started
Using Your Tri-Mode Phone for Data
For data connections (packet or asynchronous), your QUALCOMM
Globalstar GSP-1600 Tri-Mode Phone works much as it would for a voice
call.
Note
For complete details about how to use your QUALCOMM
Globalstar Tri-Mode Phone, see the QUALCOMM Globalstar
GSP-1600 Tri-Mode Phone User Guide (document number
80-98153-2).
General Tips
Here are some general tips for using your Tri-Mode Phone for data:
■
■
Make sure the Tri-Mode Phone battery is charged and properly
installed.
Never hold the Tri-Mode Phone by the Globalstar Satellite Antenna.
Tips for Globalstar Satellite Service
Here are some tips for using your Tri-Mode Phone for Globalstar satellite
service:
■
■
■
■
■
Position the Tri-Mode Phone outdoors where its Globalstar Satellite
Antenna has an unimpeded view of the sky (or mount it in a vehicle
using a QUALCOMM Globalstar Hands-Free Car Kit).
Make sure that tall obstacles, such as buildings and trees, do not block
sky (satellite) access.
Extend the Globalstar Satellite Antenna to point straight up to the sky.
Lay the Tri-Mode Phone on its side on a convenient surface such as a
table for hands-free operation.
Remember, for Globalstar satellite service the Tri-Mode Phone will not
work inside a building, nor will it work in a vehicle unless you are using
a car kit.
Setting Mode Preferences for Data
Your Tri-Mode Phone can operate in three different modes:
■
■
■
Globalstar satellite mode — supports packet and asynchronous data
Digital cellular mode — supports packet data only
Analog cellular mode — does not support data
To make a Globalstar satellite or digital cellular data connection, an
appropriate mode preference must be set on your Tri-Mode Phone. The
mode preference tells the phone what type of service it can look for
(Globalstar satellite, digital, or analog), in order of priority.
7
Tip
The calling mode preference has probably been preset on your
phone. You can change the Auto Mode preferences or manually
override them for a particular call.
For example, your phone could be set to look for Globalstar satellite service
only. In that case, if you try to make a digital cellular packet data
connection, your computer will report “No dial tone,” and your Tri-Mode
Phone screen will say “Check mode preferences” or “Mode mismatch.”
Auto Mode Selection
Auto Mode sets mode preferences (Globalstar satellite, digital, or analog)
that the Tri-Mode Phone uses automatically to look for service, in order of
priority.
For more information, see “Auto Mode” in your QUALCOMM Globalstar
GSP-1600 Tri-Mode Phone User Guide.
To set your Auto Mode selection
1.
2.
Under menu, select System, then AutoMode.
Select Data to select modes for data connections.
or
Select Voice to select modes for voice calls.
Make sure “Analog only” is not selected under menu > System >
AutoMode > Voice > Cell Pref. Data service is not available for analog
cellular connections.
For asynchronous connections, make sure “Cell Only” is not selected
under menu > System > AutoMode > Data. Asychronous data service is not
available for cellular connections.
Note
For data service, the phone mode set under Data must be
compatible with the mode set under Voice. For example, if your
Data preference is set to “GStar Only,” but your Voice preference
is set to “Cell Only,” you will not be able to make a data
connection.
Manual Mode Selection
Manual Mode manually selects the mode that the Tri-Mode Phone uses to
look for service (Globalstar satellite, digital, analog, or Auto Mode). A
manual mode selection remains in effect until you turn the phone off. When
you turn on the phone again, it uses the Auto Mode setting.
For more information, see “Manual Mode” in your QUALCOMM Globalstar
GSP-1600 Tri-Mode Phone User Guide.
8
Using Your Tri-Mode Phone for Data
To set a Manual Mode selection
1.
2.
Under menu, select System, then Manual Mode.
Select AutoMode, Globalstar, or Digital.
For data service, make sure that “Analog” is not selected. Data service
is not available for analog cellular connections.
Viewing Data Call Information
Your Tri-Mode Phone can display information about your data connections,
including the number of bytes received or transmitted and the duration of
calls.
To display data call information
1.
2.
Under menu, select Call Info, then Data Calls.
Scroll to view the number of bytes received or transmitted and duration
of the calls.
Using Your Tri-Mode Phone for Data
9
10
Using Your Tri-Mode Phone for Data
Windows Computers
This chapter tells how to configure a computer running Windows 95, 98,
NT, or 2000 to use Globalstar data service. To do this, you physically
connect the computer to your QUALCOMM Globalstar Tri-Mode Phone,
then, in most cases, configure a “modem” driver and a new Dial-Up
Networking connection.
Your QUALCOMM Globalstar Packet Data Kit CD contains a modem
installation wizard, which can help you quickly configure both the driver
and Dial-Up Networking.
Note
Physically connecting hardware components is similar for all
Windows versions. However, modem/networking configuration
differs significantly for Windows 2000. The wizard on your CD
handles all versions; see “Quick Start Installation” on page 14.
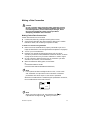
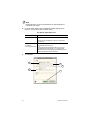
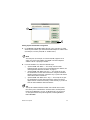
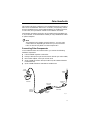
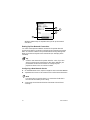
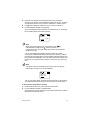
Connecting Windows Components
To use Globalstar data service with Windows, you connect the following
hardware components:
■
■
■
A PC or laptop running Microsoft Windows
QUALCOMM serial data cable (included in the QUALCOMM
Globalstar Packet Data Kit)
QUALCOMM Globalstar GSP-1600 Tri-Mode Phone
Tri-Mode
Phone
i
Computer
9-pin serial
connector
Globalstar
QUALCOMM
data
cable
Data
Cable
718AA_00
11
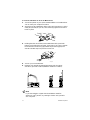
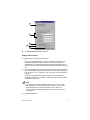
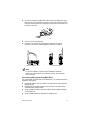
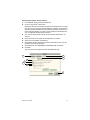
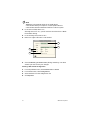
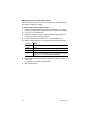
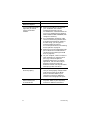
To connect a Windows PC to the Tri-Mode Phone
1.
2.
3.
Turn off the power on your QUALCOMM Globalstar Tri-Mode Phone.
You can leave your computer turned on.
Attach the QUALCOMM data cable’s 9-pin serial connector to a serial
COM port (RS-232) on your PC, then manually tighten the screws to
hold it in place.
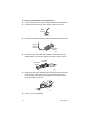
Holding the other end of the QUALCOMM data cable, press both
buttons on the side of the connector, then insert it into your Tri-Mode
Phone with the arrow facing up (toward the phone’s keypad). The
connector should snap into place for a secure fit.
723AA_00
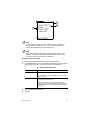
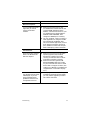
4.
5.
Turn on your Tri-Mode Phone.
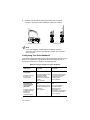
Rotate or fully extend the appropriate antenna for the type of
connection you wish to make (Globalstar satellite or cellular).
90°
i
GLOBALSTAR
Info
9
+ 0
3
#
Pwr
1
2
jkl
5
tuv
8
*
+ 0
Clr
Send
3
End
abc
2
4
jkl
5
9
pqrs 7
tuv
8
#
*
+ 0
def
1
mno 6
wxyz
ghi
3
def
mno 6
9
wxyz
#
*
End
def
mno 6
8
wxyz
5
Clr
2
jkl
tuv
abc
Info
1
4
ghi
pqrs 7
Send
i
| menu | | book |
GLOBALSTAR
Info
End
abc
4
pqrs 7
ghi
| menu | | book |
Clr
Send
i
GLOBALSTAR
| menu | | book |
Pwr
Pwr
724AA_00
Globalstar Satellite Antenna
Cellular Antenna
Note
If you cannot obtain a signal with the Globalstar Satellite
Antenna in a 90o position, try rotating it further until you feel it
click into place.
12
Windows Computers
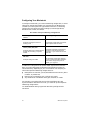
Configuring Your Windows PC
Configuration differs depending on the type of Globalstar data service you
want to use: packet data, asynchronous connection with PPP data, or
asynchronous data only, as shown in the following table.
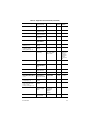
What you need to configure for Windows
Type of Globalstar
data service:
Modem driver required?
Dial-Up Networking
Connection required?
Packet data
connections
Yes
Yes
A modem driver lets your
QUALCOMM Globalstar
Tri-Mode Phone act as a
wireless modem.
Go to: page 14
Dial-Up Networking lets
you access the Internet
using Point-to-Point
Protocol (PPP).
Go to: page 14
Yes
Yes
Windows 95/98:
You can use the same
modem driver you
configure for packet data.
Go to: page 14
You must configure a
separate Dial-Up
Networking connection for
an asynchronous
connection—if you will use
it to access packet data.
Go to: page 14
Example: browsing
the Internet or
sending email
Asynchronous
connections that
access packet
(PPP) data
Example: dialing into
a modem behind a
firewall, then
accessing a
corporate intranet
Asynchronous data
connections only
Example: dialing into
a BBS
Windows NT/2000:
You must set up a second
modem driver with a
different AT command.
Go to: page 14
No — If you use
HyperTerminal or a similar
program and just connect
using a serial port (e.g.,
COM1). Go to: page 54
Yes — If you use
HyperTerminal or a similar
program and connect by
selecting a modem driver.
See modem driver details
above.
No
Connect using
HyperTerminal or a similar
program, without using
Dial-Up Networking.
Go to: page 54
Tip
The easiest way to configure a modem driver and Dial-Up
Networking connection is to use the “Quick Start Installation” on
page 14, where a wizard does most of it for you.
Windows Computers
13
Note
To configure a Windows NT or 2000 PC to use Globalstar data
service, you must have “Admin” rights for that computer.
Quick Start Installation
Your packet data kit CD contains a Quick Start Wizard, which can help you
configure your computer to use a Tri-Mode Phone as a wireless modem. It
can also set up a Dial-Up Networking connection for you.
Note
To manually configure your computer without using the wizard
from the kit’s CD, see “Manually Configuring Windows 95, 98,
and NT” on page 14 or “Manually Configuring Windows 2000” on
page 33.
Running the Quick Start Wizard
1.
2.
3.
4.
5.
Before you begin, make sure the following are installed on your
computer: TCP/IP protocol and Dial-Up Networking for 95/98 or
Remote Access Service (RAS) for NT/2000. (For help, see your Windows
documentation.)
Insert the kit’s CD into your computer’s CD-ROM drive.
From the Start menu, run D:\gstarmi.exe (substitute another drive
letter for D, if necessary).
Follow screen instructions and prompts in the modem installation
wizard.
For Windows, the CD contains a gstardata.inf modem file to simplify
setting up a QUALCOMM Globalstar Phone Modem.
You will select a driver from this file during modem installation.
Manually Configuring Windows 95, 98, and NT
Tip
Your packet data kit CD contains a Quick Start Wizard, which
can help you configure your computer to use a Tri-Mode Phone as
a wireless modem. It can also set up a Dial-Up Networking
connection for you. If you use the kit’s wizard, you do not
have to read this section. For details, see “Quick Start
Installation” on page 14.
This section applies to Windows 95, 98, and NT. It shows how to manually
configure a “modem” driver and a Dial-Up Networking connection. You
need to do this if you want to make:
14
Windows Computers
■
■
Packet data connections (for example: browse the Internet)
Asynchronous connections that access packet data (for example: dial
into a modem behind a firewall, then access a corporate intranet)
The following table shows a quick overview of the process in each case.
Overview: Configuring Windows 95/98/NT
For:
Do this:
Packet data
1. Set up a new modem driver.
Go to: “Setting Up a New Modem Driver (95, 98,
NT)” on page 15
2. Configure a new Dial-Up Networking connection.
Go to: “Setting Up Dial-Up Networking (95, 98,
NT)” on page 22
Asynchronous
connection for PPP data
(if desired)
3. Use the same modem driver as for packet data.
Windows NT requires a second modem driver.
Go to: “Setting Up a New Modem Driver (95, 98,
NT)” on page 15
4. Configure a second Dial-Up Networking
connection.
Go to: “Making a New Connection” on page 23
Note
If you are using Windows 2000, go to “Manually Configuring
Windows 2000” on page 33.
Sample screens in this section use Windows 98, but only minor differences
exist between versions.
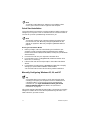
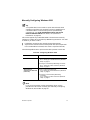
Setting Up a New Modem Driver (95, 98, NT)
The procedures in this section set up a modem driver so your QUALCOMM
Globalstar Tri-Mode Phone can act as a wireless modem.
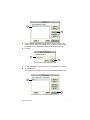
1.
2.
Go to the Windows Control Panel, then double-click Modems.
In the Modem Properties dialog, click Add to add your new “modem.”
Windows Computers
15
2
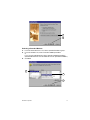
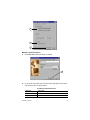
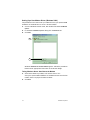
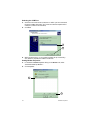
Windows’ Install New Modem wizard appears. Follow the procedures
below to enter appropriate information in the wizard dialogs.
Selecting the Type of Modem
1.
2.
In the Install new Modem dialog, select “Other.”
Click Next.
1
2
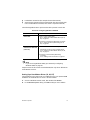
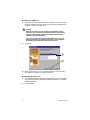
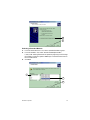
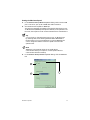
Telling Windows Not to Auto-Detect the Modem
1.
2.
Select “Don’t detect my modem; I will select it from a list.”
Since your QUALCOMM Globalstar Tri-Mode Phone acts as a wireless
modem, there is no physical modem to detect.
Click Next.
16
Windows Computers
1
2
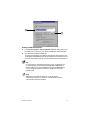
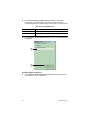
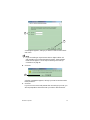
Selecting a Standard Modem
1.
2.
3.
From the “Manufacturers:” list, select “(Standard Modem Types).”
From the “Models” list, select “Standard 33600 bps Modem.
or
If you are using Windows NT, select “Standard 19200 bps Modem.”
(Windows NT does not include modem drivers for speeds above 28800.)
Click Next.
1
2
3
Windows Computers
17
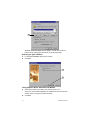
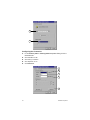
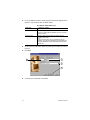
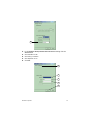
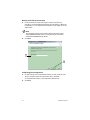
Selecting the COM Port
1.
Select the Communications (COM) Port to which you have connected
the QUALCOMM data cable. This must be an RS-232-capable serial
COM port (COM1 is the standard).
Caution
Windows NT allows only one modem to be assigned to a given
COM port. If you connect your Globalstar phone on a port where
a modem has already been installed, Windows NT deletes the
setting for the previous modem.
If you need to install two modems under Windows NT, you can
either install them on two different COM ports or uninstall the
first modem and install the second on the same port.
2.
Click Next.
1
2
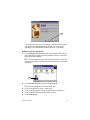
3.
When the wizard says, “Your modem has been set up successfully,”
click Finish to complete the modem installation.
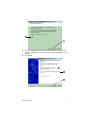
Setting Modem Properties
1.
2.
18
In the Modems Properties dialog, on the General tab, select the modem
you previously selected (“Standard 33600 bps Modem” or “Standard
19200 bps Modem”).
Click Properties.
Windows Computers
1
2
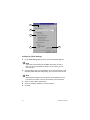
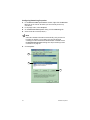
Setting the Maximum Speed
1.
2.
In the Standard [33600 or 19200 bps] Modem Properties dialog, make sure
the COM port is correct for your QUALCOMM data cable connection.
Set “Maximum Speed” to 38400 bps.
The maximum speed for the modem must match the baud rate on your
Tri-Mode Phone (38400 bps is the phone’s default). If the speeds are not
the same, the computer cannot communicate with the Tri-Mode Phone.
Tip
You can check or change the baud rate on your Tri-Mode Phone
by selecting menu, then selecting Features > Data > Baud Rate. If
the baud rate on your Tri-Mode Phone is not set to 38400 bps, be
sure to change the modem’s maximum speed so that the two
speeds match.
Note
38400 bps is the speed at which the Tri-Mode Phone
communicates with your computer, not the speed at which it
communicates with the Gateway.
Windows Computers
19
1
2
Configuring the Connection
1.
2.
3.
4.
5.
In the Standard [33600 or 19200 bps] Modem Properties dialog, click the
Connection tab.
Set “Data bits” to “8.”
Set “Parity” to “None.”
Set “Stop bits” to “1.”
Click Advanced.
1
2
3
4
5
20
Windows Computers
Configuring Flow Control and Hardware Settings
1.
2.
3.
In the Advanced Connection Settings dialog, select “Use flow control.”
Select “Hardware (RTS/CTS).”
Click OK.
1
2
3
Closing the Connection Tab
1.
In the Standard [33600 or 19200 bps] Modem Properties dialog, click OK.
1
Windows Computers
21
Completing Modem Setup
1.
In the Modem Properties dialog, click Close to complete your modem
setup.
1
You have finished setting up the modem driver for Windows 95, 98, or
NT. Now you must set up Dial-Up Networking.
Setting Up Dial-Up Networking (95, 98, NT)
The procedures in this section configure Dial-Up Networking for:
Packet data connections (for example, browse the Internet)
Asynchronous connections that access packet data (for example, dial
into a modem behind a firewall, then access a corporate intranet).
To make strictly asynchronous connections using HyperTerminal, you do
not need to set up Dial-Up Networking; see “Making a Data Connection” on
page 53 instead.
■
■
Note
This section applies to Windows 95, 98, and NT. For Windows
2000, do not use this section. Instead, go to “Setting Up a New
Connection (Windows 2000)” on page 41.
22
Windows Computers
Making a New Connection
The following procedures create a new Dial-Up Networking Connection,
represented by an icon on your Windows desktop.
You must create separate icons for packet data and asynchronous data, if
you want to use both types of connections for PPP data. “At a Glance” tables
in the procedures show the key settings that differ for packet and
asynchronous connections (for example, phone numbers).
Tip
Create a new connection for packet data first. Then, if you also
want an asynchronous connection for PPP data, copy your packet
data connection icon (right-click, copy), paste it (right-click,
paste), and rename it. Change only the properties shown in the
“At a Glance” tables.
1.
2.
3.
4.
On your Windows desktop, double-click My Computer.
In the My Computer window, double-click Dial-Up Networking.
If a Dial-Up Networking window containing a Make New Connection icon
appears, Dial-Up Networking is already installed on your computer;
go to Step 4.
If a Dial-Up Networking wizard containing an Install button appears,
Dial-Up Networking is not installed. Click Install, then follow the
wizard dialogs to install it. You may need your Windows installation
disks. When installation is complete, go to Step 4.
In the Dial-Up Networking window, double-click the Make New Connection
icon.
or
If you are using Windows NT, double-click New.
4
Windows Computers
23
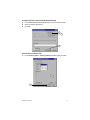
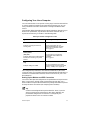
Configuring the New Connection
1.
In the Make New Connection dialog, in the “Type a name for the
computer you are dialing:” field, type a name for your connection. In the
examples that follow, the connection is called “GS Packet Data.” For an
asynchronous connection, you might call it “GS Async Data.”
Note
The wizard on the kit’s CD creates a packet connection called
“GSP-1600/1620 Packet Data” or an asynchronous connection
called “GSP-1600/1620 Async Data.”
Note
On Windows NT, the Make New Connection dialog is called New
Phonebook Entry.
2.
3.
In the “Select a device” drop-down list, select the modem you previously
installed (“Standard 33600 bps Modem” or “Standard 19200 bps
Modem”).
Click Configure.
1
2
3
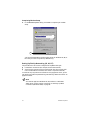
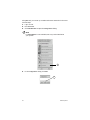
Configuring Modem Properties
1.
In the Standard [33600 or 19200 bps] Modem Properties dialog, on the
General tab, make sure the port and maximum speed (38400 bps) match
what you set for the modem (under “Setting the Maximum Speed” on
page 19).
24
Windows Computers
1
Note
On Windows NT, “Maximum speed” is called “Initial speed.”
2.
3.
On the Connection tab, make sure the “Connection preferences” are set
to “8,” “None,” “1.”
Click Advanced.
2
3
Windows Computers
25
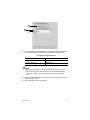
4.
In the Advanced Connection Settings dialog, make sure “Use flow
control” and “Hardware (RTS/CTS)” are selected.
4
5
6
5.
In the Extra settings field, type the AT (modem attention) command
appropriate to packet or asynchronous data, as shown below:
At a Glance: Data Differences
6.
7.
8.
9.
26
Data Type:
AT Command:
Packet
None (leave the field blank)
Asynchronous
$QCPKND=2
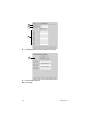
Click OK to close the Advanced Communication Settings dialog.
On the Options tab, make sure that none of the check boxes under
“Connection Control” are selected.
Under “Status control,” select “Display modem status.”
Click OK to return to the Make New Connection dialog.
Windows Computers
7
8
9
Making a New Connection
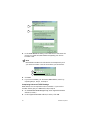
1.
In the Make New Connection dialog, click Next.
1
2.
In the “Area code:” field, enter the information appropriate to packet or
asynchronous data, as shown below:
At a Glance: Data Differences
Data type:
Area code:
Packet
Make sure the Area code field is empty.
Asynchronous
Type the Area code for the modem you wish to dial.
Windows Computers
27
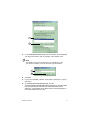
3.
In the “Telephone number:” field, type the information appropriate to
packet or asynchronous data, as shown below:
At a Glance: Data Differences
Data Type:
Telephone number:
Packet
#777
The #777 number tells the Gateway to set up a packet
data connection.
Asynchronous
4.
5.
Phone number of the modem you wish to dial (for
example, 555-1212).
-orA phone book entry from your Tri-Mode Phone (for
example, 05). The phone will attempt to make a data call
using the telephone number associated with that phone
book entry.
In the “Country Code” field, select any country (for example, your home
country).
Click Next.
2
3
4
5
6.
28
To create your connection, click Finish.
Windows Computers
6
Your packet data connection (for instance, “GS Packet Data”) should
now appear in the Dial-Up Networking window. You can drag your
connection icon to the desktop to create a shortcut, if you prefer.
Setting Connection Properties
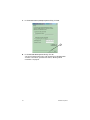
1.
In the Dial-Up Networking window (or on your desktop), right-click the
data connection icon that you have created (for instance, “GS Packet
Data”) and select Properties.
or
If you are using Windows NT, under “Phone entry to dial,” select the
connection you created, click More, then select “Edit entry and modem
properties....”
1
2.
3.
4.
5.
6.
In the GS Packet Data dialog, click the Server Types tab.
or
If you are using Windows NT, click the Server tab.
Under “Type of Dial-Up Server,” select “PPP.”
Under “Advanced options,” select “Enable software compression.”
Under “Allowed network protocols,” select “TCP/IP.”
Click TCP/IP Settings.
Windows Computers
29
2
3
4
5
6
Configuring TCP/IP Settings
1.
In the TCP/IP Settings dialog, select “Server assigned IP address.”
Note
Some ISPs automatically set the DNS information in Step 2.
(Ask your Service Provider for details.) If yours does, you can
skip to Step 3.
2.
Select “Specify name server addresses,” then enter the primary and
secondary DNS addresses assigned by your Service Provider or ISP.
Note
DNS address numbers in the illustration are examples only. Ask
your Service Provider or ISP for the numbers you should enter.
3.
4.
5.
30
Select “Use IP header compression.”
Select “Use default gateway on remote network.”
Click OK.
Windows Computers
1
2
3
4
5
6.
In the GS Packet Data dialog, click OK.
Setting Dial Properties
1.
2.
Double-click your data connection icon.
or
If you are using Windows NT, make sure “Phone number preview”
shows the telephone number you want to dial. At this point, for
Windows NT, you have finished setting up Dial-Up Networking. To
make a connection, skip ahead to “Making a Data Connection” on page
53.
In the Connect To dialog, check the “Phone number” field to make sure
that, for a Globalstar packet data connection, the “#” character appears
in front of the “777”. If it does not, you must add it to the next dialog,
in Step 6.
Some versions of Windows may not retain the “#” as part of the
telephone number, even though you entered it under “Making a New
Connection” on page 23.
Note
For asynchronous data and digital cellular calls, a “User name”
and “Password” are required to make a connection. You can enter
that information here or be prompted for it later when you
connect. Globalstar packet data calls do not require a user name
or password.
3.
Click Dial Properties.
Windows Computers
31
2
3
4.
5.
6.
7.
In the Dialing Properties dialog, make sure you select the same country
that you selected earlier, under “Making a New Connection” on page
27.
Under “When dialing from here,” select “Dial using: Tone dial.”
If the “#” character did not appear in front of the “777” in Step 2., then
in the “For local calls, dial” field, type #.
Click OK.
4
6
5
7
You have finished setting up Dial-Up Networking for Windows 95 or
98. To make a connection, skip ahead to “Making a Data Connection”
on page 53.
32
Windows Computers
Manually Configuring Windows 2000
Tip
Your packet data kit CD contains a Quick Start Wizard, which
can help you configure your computer to use a Tri-Mode Phone as
a wireless modem. It can also set up a Dial-Up Networking
connection for you. If you use the kit’s wizard, you do not
have to read this section. For details, see “Quick Start
Installation” on page 14.
This section applies only to Windows 2000. It shows how to manually
configure a “modem” driver and Dial-Up Networking connection. You need
to do this if you want to make:
■
■
Packet data connections (for example: browse the Internet)
Asynchronous connections that access packet data (for example: dial
into a modem behind a firewall, then access a corporate intranet).
The following table shows a quick overview of the process in each case.
Overview: Configuring Windows 2000
For:
Do this:
Packet data
1. Set up a new modem driver.
Go to: “Setting Up a New Modem Driver (Windows
2000)” on page 34
2. Configure a new Dial-Up Networking connection.
Go to: “Setting Up a New Connection (Windows
2000)” on page 41
Asynchronous
connection for PPP data
(if desired)
3. Set up a second modem driver.
Go to: “Setting Up a New Modem Driver (Windows
2000)” on page 34
4. Configure a second Dial-Up Networking
connection.
Go to: “Setting Up a New Connection (Windows
2000)” on page 41
Note
If you are using another version of Windows, do not use the
procedures in this section. Instead, go to “Manually Configuring
Windows 95, 98, and NT” on page 14.
Windows Computers
33
Setting Up a New Modem Driver (Windows 2000)
The procedures in this section set up a modem driver so your QUALCOMM
Globalstar Tri-Mode Phone can act as a wireless modem.
1.
2.
3.
Go to the Windows Control Panel, then double-click Phone and Modem
Options.
In the Phone and Modem Options dialog, click the Modems tab.
Click Add.
2
3
Windows’ Add/Remove Hardware Wizard appears. Follow the procedures
below to enter appropriate information in the wizard dialogs.
Telling Windows Not to Auto-Detect the Modem
1.
2.
Select “Don’t detect my modem; I will select it from a list.”
Since your QUALCOMM Globalstar Tri-Mode Phone acts as a wireless
modem, there is no physical modem to detect.
Click Next.
34
Windows Computers
1
2
Selecting a Standard Modem
1.
2.
3.
From the “Manufacturers:” list, select “(Standard Modem Types).”
From the “Models:” list, select “Standard 19200 bps Modem.”
Later (under “Setting the Maximum Speed” on page 37) you will change
the modem’s maximum speed to 38400 bps, to match the baud rate on
the Tri-Mode Phone.
Click Next.
1
2
3
Windows Computers
35
Selecting the COM Port
1.
2.
Select the Communications (COM) Port to which you have connected
the QUALCOMM data cable. This must be an RS-232-capable serial
COM port (COM1 is the standard).
Click Next.
1
2
3.
When the wizard says, “Your modem has been set up successfully,”
click Finish to complete the modem installation.
Setting Modem Properties
1.
2.
In the Phone and Modem Options dialog, on the Modems tab, select
“Standard 19200 bps Modem.”
Click Properties.
1
2
36
Windows Computers
Setting the Maximum Speed
1.
2.
In the Standard 19200 bps Modem Properties dialog, make sure the COM
port is correct for your QUALCOMM data cable connection.
Set “Maximum Port Speed” to 38400 bps.
The maximum speed for the modem must match the baud rate on your
Tri-Mode Phone (38400 bps is the phone’s default). If the speeds are not
the same, the computer cannot communicate with the Tri-Mode Phone.
Tip
You can check or change the baud rate on your Tri-Mode Phone
by selecting menu, then selecting Features > Data > Baud Rate. If
the baud rate on your Tri-Mode Phone is not set to 38400 bps, be
sure to change the modem’s maximum speed so that the two
speeds match.
Note
38400 bps is the speed at which the Tri-Mode Phone
communicates with your computer, not the speed at which it
communicates with the Gateway.
3.
In the Standard 19200 bps Modem Properties dialog, click the Advanced
tab.
1
3
2
Windows Computers
37
4.
In the Standard 19200 bps Modem Properties dialog, in the “Extra
initialization commands” field, type the AT (modem attention)
command appropriate to packet or asynchronous data, as shown below:
At a Glance: Data Differences
Data Type:
AT Command:
Packet data
None (leave the field blank)
Asynchronous data
$QCPKND=2
5.
In the Standard 19200 bps Modem Properties dialog, click Change Default
Preferences.
4
5
Configuring the Connection
1.
38
In the Standard 19200 bps Modem Default Preferences dialog, make sure
“Flow control” is set to “Hardware.”
Windows Computers
1
2.
3.
4.
5.
6.
In the Standard 19200 bps Modem Default Preferences dialog, click the
Advanced tab.
Set “Data bits” to “8.”
Set “Parity” to “None.”
Set “Stop bits” to “1.”
Click OK.
2
3
4
5
6
Windows Computers
39
Completing the Modem Setup
1.
In the Standard 19200 bps Modem Properties dialog, click OK.
1
2.
In the Phone and Modem Options dialog, click OK.
2
You have finished setting up the modem driver for Windows 2000.
Now you must set up a new connection.
40
Windows Computers
Setting Up a New Connection (Windows 2000)
Note
This section applies only to Windows 2000. Before you create a
new connection in Windows 2000, you must set up the modem
driver. See “Setting Up a New Modem Driver (Windows 2000)”
on page 34.
The following procedures create a new Dial-Up Networking Connection,
represented by an icon on your desktop.
You must create separate icons for packet data and asynchronous data, if
you want to use both types of connections for PPP data. “At a Glance” tables
in the procedures show the key settings that differ for packet and
asynchronous connections (for example, phone numbers).
Tip
Create a new connection for packet data first. Then, if you also
want an asynchronous connection for PPP data, copy your packet
data connection icon (right-click, copy), paste it (right-click,
paste), and rename it. Then change only the properties shown in
the “At a Glance” tables.
Opening Network and Dial-up Connections
1.
Go to the Windows Control Panel, then double-click Network and Dial-Up
Connections.
Configuring the Connection
1.
2.
In the Network and Dial-Up Connections window, double-click the Make
New Connection icon.
In the Network Connection Wizard dialog, click Next.
2
Windows Computers
41
3.
4.
Select “Dial-up to the Internet.”
Click Next.
3
4
5.
6.
Select “I want to set up my Internet connection manually, or I want to
connect through a local area network (LAN).”
Click Next.
5
6
7.
8.
Under “How do you connect to the Internet?” select “I connect through
a phone line and a modem.”
Click Next.
42
Windows Computers
7
8
Providing Account Information
1.
Under “Internet account connection information,” make sure that the
“Use area code and dialing rules” check box is set appropriately for
packet or asynchronous data, as shown below:
At a Glance: Data Differences
Data type:
2.
Use area code and dialing rules:
Packet
Not checked
Asynchronous
Checked
In the “Telephone number:” field, type the information appropriate to
packet or asynchronous data, as shown below:
At a Glance: Data Differences
Data type:
Telephone number:
Packet
#777
The #777 number tells the Gateway to set up a packet data
connection
Asynchronous
Windows Computers
Phone number of the modem you wish to dial (for example,
555-1212).
-orA phone book entry from your Tri-Mode Phone (for
example, 05). The phone will attempt to make a data call
using the telephone number associated with that phone
book entry.
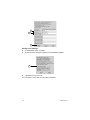
43
3.
Click Next.
2
1
3
4.
For packet data calls, under “Internet account logon information,”
leave the “User name” and “Password” fields blank.
Note
For asynchronous data and digital cellular calls, a “User name”
and “Password” are required to make a connection. You can enter
that information here or be prompted for it later when you
connect. Globalstar packet data calls do not require a user name
or password.
5.
44
Click Next.
Windows Computers
4
5
A message box appears, asking if you want to continue with a blank
user name.
Note
If you are making an asynchronous data or digital cellular call
and entered a user name and password in Step 4., these message
boxes will not appear. You can skip to “Naming Your Dial-Up
Connection” on page 46.
6.
Click Yes.
6
7.
A similar message box appears, asking if you want to continue with a
blank password.
Click Yes.
If you have a user name and password for connecting to your ISP, you
will be prompted for these later when you make a data connection.
Windows Computers
45
Naming Your Dial-Up Connection
1.
In the “Connection name” field, type a name for your dial-up
connection. In the examples that follow, the connection is called “GS
Packet Data.” For an asynchronous connection, you might call it “GS
Async Data.”
Note
The wizard on the kit’s CD creates a packet connection called
“GSP-1600/1620 Packet Data” or an asynchronous connection
called “GSP-1600/1620 Async Data.”
2.
Click Next.
1
2
Completing the Configuration
1.
2.
46
On the “Set Up Your Internet Mail Account” screen, under “Do you
want to set up an Internet mail account now?”, select No.
An Internet mail account is not required for data service.
Click Next.
Windows Computers
1
2
3.
4.
On the “Completing the Internet Connection Wizard” screen, make
sure the check box for “To connect to the Internet immediately” is not
selected.
Click Finish.
3
4
Windows Computers
47
Configuring Networking Properties
1.
2.
3.
4.
In the Network and Dial-up Connections window, right-click the GS Packet
Data icon (or the icon for whatever you have named your dial-up
connection).
In the popup menu, select Properties.
On the GS Packet Data Properties dialog, click the Networking tab.
Select “Internet Protocol (TCP/IP).”
Note
Some ISPs set DNS information automatically (ask your Service
Provider for details). If yours does, you have now finished
creating your new connection for Windows 2000. Click OK to close
the GS Packet Data Properties dialog, then skip to “Making a Data
Connection” on page 53.
5.
Click Properties.
3
4
5
48
Windows Computers
Configuring TCP/IP Properties
Note
Some ISPs set DNS information automatically (ask your Service
Provider for details). If yours does, skip to “Making a Data
Connection” on page 53.
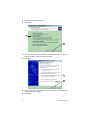
1.
On the Internet Protocol (TCP/IP) Properties dialog, make sure “Obtain an
IP address automatically” is selected.
Note
In this dialog, Windows 2000 selects “Obtain DNS server address
automatically” by default, but this will change after you add DNS
addresses later.
2.
Click Advanced.
1
2
3.
4.
On the Advanced TCP/IP Settings dialog, click the DNS tab.
Under “DNS server addresses, in order of use,” click Add.
Windows Computers
49
3
4
5.
In the TCP/IP DNS Server dialog, in the “DNS server” field, enter the
primary (or “preferred”) DNS address assigned by your Service
Provider or ISP.
Note
DNS address numbers in the illustration are examples only. Ask
your Service Provider or ISP for the numbers you should enter.
5
6
6.
7.
Click Add.
If you have a secondary (or “alternate”) DNS address, enter it by
repeating Step 4., Step 5., and Step 6.
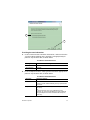
Completing Advanced TCP/IP Settings
DNS suffixes are not required to make a connection. If your Service
Provider did not give you a DNS suffix, skip to Step 6.
1.
2.
50
On the Advanced TCP/IP Settings dialog, select “Append these DNS
suffixes (in order).”
Under “Append these DNS suffixes (in order),” click Add.
Windows Computers
1
2
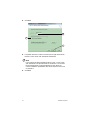
3.
In the TCP/IP Domain Suffix dialog, enter the domain name assigned by
your Service Provider or ISP (for example, “abc.company.com”).
Note
The domain name in the illustration is an example only. Ask
your Service Provider or ISP for the name you should enter.
3
4
4.
5.
6.
Click Add.
If you have a secondary domain name (suffix), repeat Step 2., Step 3.,
and Step 4.
On the Advanced TCP/IP Settings dialog, click OK.
The Internet Protocol (TCP/IP) Properties dialog appears. Windows 2000
has now automatically selected “Use the following DNS server
addresses,” and the DNS server address that you entered appears in
the “Preferred DNS server” field.
Windows Computers
51
7.
In the Internet Protocol (TCP/IP) Properties dialog, click OK.
7
8.
52
In the GS Packet Data Properties dialog, click OK.
You have finished creating your new connection for Windows 2000.
To make a connection, go to the next section, “Making a Data
Connection” on page 53.
Windows Computers
Making a Data Connection
Caution
On your computer, make sure that no other application is using
the serial port (e.g., COM1) assigned for Globalstar data service.
If another application, such as Palm HotSync Manager, blocks
the serial port, disable its control over the port before
attempting a Globalstar data connection.
Making Packet Data Connections
Packet data connections can be either
■
■
Packet (PPP) data only (example: browsing the Internet)
Asynchronous data with PPP data (example: dialing into a modem
behind a firewall, then accessing a corporate intranet)
To make a connection using PPP data
1.
2.
3.
4.
5.
Make sure the Tri-Mode Phone is properly connected to your PC or
laptop (as described in “Connecting Windows Components” on page 11).
Turn on your Tri-Mode Phone.
Rotate or fully extend the appropriate antenna for the type of
connection you wish to make (Globalstar satellite or cellular, as shown
on page 12) and make sure you have a Globalstar or cellular signal.
On your computer, double-click the icon you created for your data
connection (for instance, “GS Packet Data”).
When the Connect To dialog opens, click Connect.
or
For Windows 2000: Click Dial.
(Leave the User name and Password fields blank.)
Note
For asynchronous data and digital cellular calls, a “User name”
and “Password” are required to make a connection. Globalstar
packet data calls do not require a user name or password.
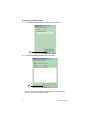
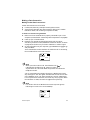
While the Tri-Mode Phone is establishing the packet data connection,
the Tri-Mode Phone screen looks like this:
Connecting..
PPP Data
#777
| menu |
Note
When you make a cellular call, the Globalstar icon
replaced with the digital icon D . When you make an
Windows Computers
is
53
asynchronous call, the screen reads “Async Data” and shows the
telephone number.
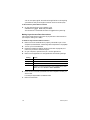
You are connected to the network when the Verifying Username and
Password window on your computer minimizes and the Tri-Mode Phone
screen says “PPP @ 9.6.” The “PPP @ 9.6” indicates that the over-theair data rate is 9600 bps. (The “T R” status stands for Transmit and
Receive.) For an asynchronous connection, the screen says “Async @
9.6.”
Note
For cellular calls the Tri-Mode Phone screen says “PPP @ 14.4,”
indicating an over-the-air rate of 14400 bps.
Time: 0:12
PPP @ 9.6
Status: T R
| menu |
You can now open typical communication applications to do anything
you would normally do through an Internet Service Provider (ISP).
To disconnect a packet data connection
1.
2.
Double-click the packet data connection (or the connection icon in the
right-hand bottom corner of the screen).
Click Disconnect.
Using Typical Communication Applications
Once you have established a packet data connection, you can use any
communication applications using IP network protocol, for instance
Internet Web browsers, e-mail, FTP, or telnet applications.
The CD that came with your QUALCOMM Globalstar Packet Data Kit may
include some typical communication applications for Windows, such as
Eudora, Netscape Navigator, or Microsoft Internet Explorer.
Making Asynchronous Data Connections
This section shows how to make a strictly asynchronous data connection
(for example: dialing into a BBS).
To make an asynchronous data connection
1.
4.
Make sure the Tri-Mode Phone is properly connected to your PC or
laptop (as described in “Connecting Windows Components” on page 11).
Turn on your Tri-Mode Phone.
Rotate the Globalstar satellite antenna (as shown on page 12) and
make sure you have a Globalstar signal.
On your computer, open HyperTerminal (or a similar application).
54
Windows Computers
2.
3.
5.
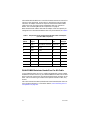
Make sure the application is configured with the following settings:
Setting:
6.
7.
8.
Value:
Data bits
8
Parity
none
Stop bit
1
Baud rate
Must match the baud rate on your Tri-Mode Phone (default:
38400). To check the baud rate on your Tri-Mode Phone, select
menu, then select Features > Data > Baud Rate.
Enter the telephone number you want to dial.
Enter the $QCPKND=1 command as part of the modem initialization
string.
Click Dial.
To disconnect an asynchronous data connection
1.
From the HyperTerminal pulldown menu, select Call and Disconnect.
or
Click the Disconnect button.
Windows Computers
55
56
Windows Computers
Macintosh Computers
This chapter tells how to configure an Apple Macintosh computer to use
Globalstar data service. To do this, you physically connect the Macintosh to
your QUALCOMM Globalstar Tri-Mode Phone. Then, for data using Pointto-Point Protocol (PPP), you select a modem script and configure remote
access.
Note
To use a terminal emulator application for asynchronous data
without PPP data, connect your Macintosh to your Tri-Mode
Phone, then skip to “Establishing Asynchronous (non-PPP) Data
Connections” on page 75.
You can use Globalstar data service with a Macintosh running MacOS 7.6
or higher.
Note
The following examples use MacOS 9. Setup for other MacOS
versions and PPP applications may vary.
Connecting Macintosh Components
You can use Globalstar data service with a Macintosh computer that has
either USB or round mini-DIN 8 ports (If you are not sure which you have,
refer to these illustrations: “Hardware Setup for a Macintosh with USB” on
page 58 and “Hardware Setup for a Macintosh with Mini-DIN 8” on page
60).
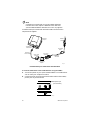
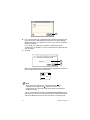
Connecting a Macintosh Using USB
For a Macintosh computer with one or more USB ports, you need the
following hardware components:
■
■
■
USB adapter (with associated software installed on your Macintosh)
QUALCOMM serial data cable (included in QUALCOMM Globalstar
Packet Data Kit)
QUALCOMM Globalstar GSP-1600 Tri-Mode Phone
Note
Connecting your Macintosh to a QUALCOMM Globalstar
Hands-Free Car Kit requires a different serial cable. See
“QUALCOMM Globalstar Hands-Free Car Kit” on page 107.
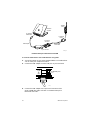
“Hardware Setup for a Macintosh with USB” on page 58 shows how the
components fit together.
57
Tri-Mode
Phone
i
Macintosh
computer
To USB port
of Macintosh
To Tri-Mode
Phone
9-pin serial
connector
USB adapter
QUALCOMM
Data Cable
9-pin connector
256AC_00.
Hardware Setup for a Macintosh with USB
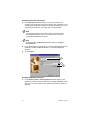
To connect a Macintosh to the Tri-Mode Phone using USB
1.
2.
Turn off the power on your QUALCOMM Globalstar Tri-Mode Phone.
You can leave your computer turned on.
Connect the USB adapter to either USB port on your Macintosh.
USB ports
258AC_00
3.
58
Connect the USB adapter to the 9-pin serial connector of the
QUALCOMM data cable, as shown in “Hardware Setup for a
Macintosh with USB”.
Macintosh Computers
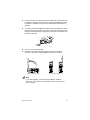
4.
To connect the QUALCOMM data cable to the Tri-Mode Phone, press
both buttons on the side of the connector, then insert it with the arrow
facing up (toward the phone’s keypad). The connector should snap into
place for a secure fit.
723AA_00
5.
6.
Turn on your Tri-Mode Phone.
Rotate or fully extend the appropriate antenna for the type of
connection you wish to make (Globalstar satellite or cellular).
90°
i
GLOBALSTAR
Info
9
Pwr
3
#
End
def
mno 6
8
wxyz
5
Clr
2
+ 0
*
tuv
pqrs 7
jkl
abc
Info
1
4
ghi
Send
i
| menu | | book |
GLOBALSTAR
Info
End
abc
2
4
jkl
5
pqrs 7
1
tuv
8
*
+ 0
ghi
| menu | | book |
Clr
Send
i
GLOBALSTAR
| menu | | book |
Clr
Send
3
End
abc
2
4
jkl
5
9
pqrs 7
tuv
8
#
*
+ 0
def
1
mno 6
wxyz
ghi
Pwr
3
def
mno 6
9
wxyz
#
Pwr
724AA_00
Globalstar Satellite Antenna
Cellular Antenna
Note
If you cannot obtain a signal with the Globalstar Satellite
Antenna in a 90o position, try rotating it further until you feel it
click into place.
Connecting a Macintosh Using Mini-DIN 8
For a Macintosh computer with a mini-DIN 8 port, you need the following
hardware components:
■
■
■
■
Macintosh modem cable. See Table 1 on page 110 for required pinout
configurations.
Adapter (25-pin female to 9-pin male). See Table 1 on page 110 for
required pinout configurations.
QUALCOMM serial data cable (included in QUALCOMM Globalstar
Packet Data Kit).
QUALCOMM Globalstar GSP-1600 Tri-Mode Phone.
Macintosh Computers
59
Note
Connecting your Macintosh to a QUALCOMM Globalstar
Hands-Free Car Kit requires a different serial cable. See
“QUALCOMM Globalstar Hands-Free Car Kit” on page 107.
“Hardware Setup for a Macintosh with Mini-DIN 8” shows how the
components fit together.
Macintosh
computer
Tri-Mode
phone
i
To modem port
of Macintosh
Macintosh
modem cable
To Tri-Mode
phone
25-pin serial
connector
9-pin serial
connector
Globalstar
data cable
25-pin to 9-pin
adapter
255AC_00
Hardware Setup for a Macintosh with Mini-DIN 8
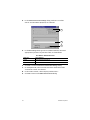
To connect a Macintosh to the Tri-Mode Phone using mini-DIN 8
1.
2.
Turn off the power on your QUALCOMM Globalstar Tri-Mode Phone.
You can leave your computer turned on.
Connect the 8-pin end of the Macintosh modem cable to the modem/
printer port on your Macintosh.
Modem/printer port
(for mini-DIN 8)
257AC_00
60
Macintosh Computers
3.
Connect the other end of the Macintosh modem cable, the 25-pin-to-9pin adapter, and 9-pin serial connector of the QUALCOMM data cable,
as shown in “Hardware Setup for a Macintosh with Mini-DIN 8” on
page 60.
4.
To connect the QUALCOMM data cable to the Tri-Mode Phone, press
both buttons on the side of the connector, then insert it with the arrow
facing up (toward the phone’s keypad). The connector should snap into
place for a secure fit.
723AA_00
5.
6.
Turn on your Tri-Mode Phone.
Rotate or fully extend the appropriate antenna for the type of
connection you wish to make (Globalstar satellite or cellular).
90°
i
GLOBALSTAR
Info
9
Pwr
3
#
End
def
mno 6
8
wxyz
5
Clr
2
+ 0
*
tuv
pqrs 7
jkl
abc
Info
1
4
ghi
Send
i
| menu | | book |
GLOBALSTAR
Info
End
abc
2
4
jkl
5
pqrs 7
1
tuv
8
*
+ 0
ghi
| menu | | book |
Clr
Send
i
GLOBALSTAR
| menu | | book |
Clr
Send
3
End
abc
2
4
jkl
5
9
pqrs 7
tuv
8
#
*
+ 0
def
mno 6
wxyz
1
ghi
Pwr
3
def
mno 6
9
wxyz
#
Pwr
724AA_00
Globalstar Satellite Antenna
Cellular Antenna
Note
If you cannot obtain a signal with the Globalstar Satellite
Antenna in a 90o position, try rotating it further until you feel it
click into place.
Macintosh Computers
61
Configuring Your Macintosh
To configure a Macintosh, you create a networking configuration, a stored
collection of settings that enables your computer and Tri-Mode Phone
(“modem”) to make a particular type of data connection. A networking
configuration includes three types of settings (or sub-configurations):
Remote Access, modem, and TCP/IP.
Do I need to set up a networking configuration?
For this type of Globalstar data
service:
Networking configuration needed?
Packet data (PPP) connections
Yes
Example: browsing the Internet or
sending e-mail
A networking configuration is required to
make a packet data connection.
Asynchronous connections that
access packet (PPP) data
Yes
Example: dialing into a modem behind a
firewall, then accessing a corporate
intranet
Asynchronous connections with no
PPP data
Example: dialing into a BBS
A separate networking configuration is
required to make an asynchronous
connection—if you will use it to access
PPP data.
No
No networking configuration required —
just use a terminal emulator application
and connect using a serial port. For
details, go to: page 75.
In addition to configurations for packet and/or asynchronous-with-PPP
data, you could create optional networking configurations to help you
connect efficiently, depending on your circumstances. For example, you
could make separate networking configurations for
■
■
■
Multiple SPs or ISPs that you use (with different name servers, phone
numbers, or preferences)
Making calls in Globalstar-only or cellular-only mode
Any combination of Globalstar data types, SPs/ISPs, or modes
For example, to use packet data service with two different SPs and
asynchronous/PPP data with a third SP, you could set up three separate
networking configurations.
You decide whether setting up optional networking configurations is
convenient.
62
Macintosh Computers
How Do I Set Up a Networking Configuration?
Before setting up a networking configuration, copy modem script files to
your Macintosh from the QUALCOMM Globalstar Packet Data Kit (you
need to do this only once). See “Copying Modem Script Files to Your
Macintosh”.
Then, for each networking configuration you wish to set up, follow the
sequence of steps under “Creating a Networking Configuration”.
Copying Modem Script Files to Your Macintosh
1.
2.
Locate the CD included in the QUALCOMM Globalstar Packet Data
Kit, then insert it into the CD-ROM drive of your Macintosh.
Using the Finder, locate the “drag into Modem Scripts” folder on the
CD, and copy all the files in it to: System Folder > Extensions > Modem
Scripts.
These files contain scripts with modem settings for Globalstar data
service. One is a basic script that uses the mode preferences set on your
Tri-Mode Phone. Others, included for your convenience, can force your
Tri-Mode Phone to make data connections using Globalstar or cellular
modes only.
Creating a Networking Configuration
Creating a networking configuration consists of the following sequence:
■
■
■
Create and set up a new Remote Access configuration, including setting
up the protocol
Create and set up a new Modem configuration
Create and set up a new TCP/IP configuration
To use Globalstar packet data service with a single SP, follow this sequence
once. To set up additional networking configurations, repeat the sequence,
changing settings as appropriate.
Create separate networking configurations for packet data and
asynchronous data, if you want to use both types of connections for PPP
data.
Tip
If you create multiple networking configurations, you can use the Location
Manager that came with your MacOS to store and manage them.
Macintosh Computers
63
Creating a New Remote Access Configuration
1.
From the Apple menu, select Control Panels, then select Remote Access.
The Remote Access dialog appears showing the last active setting.
Note
In MacOS 7.6, the Remote Access control panel is called PPP.
2.
3.
4.
From the File menu, select Configurations.
In the Configurations dialog, select “Default” from the configuration list.
Click Duplicate.
3
4
5.
6.
In the Duplicate Configuration dialog, type a descriptive name for the
duplicate configuration, for instance “GS Packet Data” for a Globalstar
packet data connection, or “GS Async Data” for an asynchronous
connection that accesses PPP data. The steps that follow use “GS
Packet Data” as an example.
Click OK.
5
6
7.
8.
In the Configurations dialog, select your new configuration from the list.
Click Make Active.
This activates the configuration and closes the Configurations dialog.
64
Macintosh Computers
7
8
Setting Up the Remote Access Configuration
1.
In the Remote Access (“your configuration name”) dialog, click “Setup” to
see all the fields.
1
2.
3.
4.
5.
Select “Registered User” or “Guest,” as instructed by your Internet
Service Provider (ISP).
Some ISPs allow you to connect as a guest, while others may require
you to connect as a registered user with a user name and possibly a
password.
If you select “Guest,” skip to Step 6.
If your ISP requires you to connect as a registered user, type your user
name in the “Name” field.
As a registered user, you must fill in this field to activate the Connect
button.
If you are connecting as a registered user, fill in the “Password” field or
leave it blank, as desired. If you fill it in, also select “Save Password.”
Macintosh Computers
65
Note
Registered users can enter a password here or be prompted for it
later when connecting.
6.
In the “Number” field, type the telephone number appropriate to
packet or asynchronous data, as shown below:
At a Glance: Data Differences
Data Type:
Telephone number:
Packet
#777
The #777 tells the Gateway to set up a packet data
connection.
Asynchronous
connection
accessing PPP data
7.
Phone number of the modem you wish to dial
(for example, 303-555-1212).
-orA one-digit or two-digit phone book entry from your
Tri-Mode Phone (for example, 12). The phone will
attempt to make a data call using the telephone number
associated with that phone book entry.
Click Options.
2
4
5
6
7
66
Macintosh Computers
Setting Up the Remote Access Protocol
1.
2.
3.
4.
5.
6.
7.
8.
In the Options dialog, click the Protocol tab.
Under “Use protocol,” select “PPP.”
Globalstar data service uses Point-to-Point Protocol (PPP) to carry data
packets from your computer to the Globalstar Gateway. Asynchronous
connections with PPP data normally use PPP protocol also; however, in
some cases the network you wish to access might use something else,
such as Appletalk Remote Access Protocol.
Set “Connect automatically when starting TCP/IP applications” as
desired.
Select “Allow error correction and compression in modem.”
Select “Use TCP header compression.”
Set all other fields as desired, according to information from your SP.
(Probably none will be selected.)
Set preferences on the Redialing and Connection tabs as desired.
Click OK.
This activates the changes and closes the Options dialog.
1
7
2
3
4
5
6
8
Macintosh Computers
67
Creating a New Modem Configuration
1.
2.
3.
4.
From the Remote Access pulldown menu, select Modem.
From the File menu, select Configurations.
In the Configurations dialog, select “Default” from the configuration list.
Click Duplicate.
3
4
5.
6.
In the Duplicate Configuration dialog, type a name for the duplicate
modem configuration. This example uses “GS Packet Data,” to match
the Remote Access configuration name. You could also choose a name
to identify the SP or mode (for example, “Globalstar only” or “Cellular
only”).
Click OK.
5
6
7.
8.
68
In the Configurations dialog, select your configuration from the list.
Click Make Active.
This activates the configuration and closes the Configurations dialog.
Macintosh Computers
7
8
Setting Up the New Modem Configuration
1.
In the Modem (“your modem name”) dialog, in the “Connect via” field,
select the port to which you connected the USB adapter or modem cable
(for example, “Printer port/USB” or “Modem Port”).
Note
The USB port (for example, “Printer Port/USB”) appears as an
option only if the USB adapter is plugged in and the adapter’s
software driver is properly installed.
2.
From the “Modem” list, select the desired script:
“QUALCOMM GSP-16XX” — This script uses the mode
preferences that are set on your Tri-Mode Phone (for details, see
“Setting Mode Preferences for Data” on page 7).
❑
“QUALCOMM GSP-16XX SAT only” — This script forces your
Tri-Mode Phone to make data connections using the Globalstar
satellite system exclusively. Select this only if you do not want to
make cellular data connections.
❑
“QUALCOMM GSP-16XX CELL only” — This script forces your
Tri-Mode Phone to make data connections using a terrestrial
digital cellular network exclusively. Select this only if you do not
want to make Globalstar data connections.
❑
Tip
The QUALCOMM Globalstar modem uses a baud rate to match
the rate on your Tri-Mode Phone. For best results, set the phone’s
baud rate to 38400 bps. On your Tri-Mode Phone, you can check
or change the baud rate by selecting menu, selecting Features >
Data > Baud Rate.
Macintosh Computers
69
Note
38400 bps is the speed at which the Tri-Mode Phone
communicates with your computer, not the speed at which it
communicates with the Globalstar satellite or cellular system.
3.
4.
5.
In the “Sound” field, select “On.”
Although “Sound” is “on,” you will not hear tones from the Tri-Mode
Phone while dialing.
In the “Dialing” field, select “Tone.”
Make sure “Ignore dial tone” is not checked.
1
2
3
4
5
6.
Close the Modem (“your modem name”) dialog, answering “Yes” when
asked if you want to save your changes.
Creating a New TCP/IP Configuration
1.
2.
3.
4.
70
From the pulldown menu, select Remote Access > TCP/IP.
From the File menu, select Configurations.
Select “Default” from the configuration list.
Click Duplicate.
Macintosh Computers
3
4
5.
6.
In the Duplicate Configuration dialog, type a name for the duplicate
TCP/IP configuration. This example uses “GS Packet Data” to match
the Remote Access and modem configurations previously set up.
Click OK.
5
6
7.
8.
In the Configurations dialog, select your new configuration in the list.
Click Make Active.
This activates the configuration and closes the Configurations dialog.
7
8
Macintosh Computers
71
Setting Up the New TCP/IP Configuration
1.
2.
3.
4.
In the TCP/IP (“your configuration name”) dialog, under “Connect via:”
select “PPP.”
Globalstar data service uses Point-to-Point Protocol (PPP) to carry data
packets from your computer to the Globalstar Gateway.
In the “Configure” list, select “Using PPP Server.”
In most cases you should allow the server to set addresses and masks.
Contact your SP or Internet Service Provider (ISP) to find out what
information is required.
In the “Name server addr.:” field, enter one or more DNS addresses if
supplied by your ISP. These addresses are often supplied automatically
by the PPP server, in which case this field can be left blank.
Note
Name server address numbers in the illustration are examples
only. Ask your Service Provider or ISP for the numbers you
should enter.
5.
In the “Search domains” field, enter the domain name assigned by your
SP or ISP or any other domain names you would like appended to
incomplete host names when searching. This field can be left blank if
you will only be entering complete (fully qualified) host names in your
applications.
1
2
3
4
5
6.
7.
72
Close the TCP/IP (“your configuration name”) dialog, answering “Yes”
when asked if you want to save your changes.
Close Remote Access, answering “Yes” when asked if you want to save
your changes.
Macintosh Computers
Establishing a Data Connection
Caution
On your computer, make sure that no other application is using
the modem port assigned for Globalstar data (you will see a
warning box in this case). If another application such as the
Palm HotSync Manager blocks the port, close the application or
disable its control over the port before attempting a Globalstar
data connection.
Establishing PPP Data Connections
PPP data connections can be either
■
■
Packet (PPP) data only (example: browsing the Internet)
Asynchronous data with PPP data (example: dialing into a modem
behind a firewall, then accessing a corporate intranet)
To establish a connection using PPP data
Tip
Applications that use TCP/IP service (for example, a browser or
e-mail application) may connect automatically when you open
them, if you have selected “Connect automatically when starting
TCP/IP applications” (as shown in “Setting Up the Remote
Access Protocol” on page 67).
1.
2.
3.
4.
Make sure the Tri-Mode Phone is properly connected to your Macintosh
computer (as described in “Connecting Macintosh Components” on
page 57).
Turn on your Tri-Mode Phone.
Rotate or fully extend the appropriate antenna for the type of
connection you wish to make (Globalstar satellite or cellular, as shown
on page 61) and make sure you have a Globalstar or cellular signal.
From the Apple menu, select Control Panel > Remote Access.
or
From the Apple menu, select Remote Access Status.
If you select Control Panel > Remote Access, the Remote Access dialog
appears, showing the last active configuration. If that is not the
configuration you wish to use for your connection, select File >
Configurations, then select a configuration from the list and click Make
Active.
Note
Remote Access Status is an alternate method available after
MacOS 7.6. You could also establish a connection from the
Control Strip, if you prefer.
5.
In the Remote Access or Remote Access Status dialog, click Connect.
Macintosh Computers
73
5
6.
7.
If you are connecting as a registered user (instead of a guest) and you
chose not to enter a password during Remote Access setup, Remote
Access prompts for your password. If you use one, enter it; otherwise,
leave the box blank.
If you saved your password in “Setting Up the Remote Access
Configuration” on page 65, or if you are connecting as a guest, this box
will not appear.
Click OK.
6
7
While the Tri-Mode Phone is establishing the packet data connection,
the Tri-Mode Phone screen looks like this:
Connecting..
PPP Data
#777
| menu |
Note
When you make a cellular call, the Globalstar icon
is
replaced with the digital icon D . When you make an
asynchronous call, the screen reads “Async Data” and shows the
telephone number.
You are connected to the network when Remote Access Status on your
Macintosh says “Connected,” the Connect button changes to Disconnect,
and the Tri-Mode Phone screen says “PPP @ 9.6.” The “PPP @ 9.6”
74
Macintosh Computers
indicates that the over-the-air data rate is 9600 bps. (The “T R” status
stands for Transmit and Receive.) For an asynchronous connection, the
screen shows the “Async” rate (usually 9.6).
Note
For cellular calls the Tri-Mode Phone screen says “PPP @ 14.4”or
“PPP @ 9.6,” indicating an over-the-air rate of 14400 or 9600 bps.
Time: 0:12
PPP @ 9.6
Status: T R
| menu |
You can now open typical communication applications to do anything
you would normally do through an ISP.
To disconnect a PPP data connection
1.
In the Remote Access or Remote Access Status dialog, click Disconnect.
Note
Remote Access Status is an alternate method available after
MacOS 7.6.
Using Typical Communication Applications
Once you have established a packet (PPP) data service connection, you can
use any communication applications based on IP network protocol, for
instance Internet Web browsers, e-mail, FTP, or telnet applications.
The CD that came with your QUALCOMM Globalstar Packet Data Kit may
include some typical communication applications for Macintosh, such as
Eudora and Netscape Navigator.
Establishing Asynchronous (non-PPP) Data Connections
This section shows how to make a strictly asynchronous (non-PPP) data
connection, using a terminal emulator application (for example: dialing into
a BBS).
To establish an asynchronous (non-PPP) data connection
1.
2.
3.
4.
Make sure the Tri-Mode Phone is properly connected to your Macintosh
computer (as described in “Connecting Macintosh Components” on
page 57).
Turn on your Tri-Mode Phone.
Rotate the Globalstar satellite antenna (as shown on page 61) and
make sure you have a Globalstar signal.
On your computer, open a terminal emulator application.
Macintosh Computers
75
5.
Make sure the application is configured with the following settings:
Setting:
Value:
Data bits
8
Parity
none
Stop bit
1
Baud rate
Must match the baud rate on your Tri-Mode Phone (default:
38400). To check or change the baud rate on your Tri-Mode
Phone, select menu, then select Features > Data > Baud
Rate.
6.
Enter the AT command $QCPKND=1 and the AT command “D” (“dial”)
followed by the telephone number of the system or modem you want to
connect to.
For example: AT$QCPKND=1;D3035551212 <Enter>
Pressing <Enter> establishes the connection.
76
Macintosh Computers
Palm Handhelds
This chapter tells how to configure a Palm handheld organizer running the
Palm OS to use Globalstar data service. To do this, you physically connect
the Palm handheld to your QUALCOMM Globalstar Tri-Mode Phone, then,
in most cases, set up a wireless “modem” and a network connection.
Configuration procedures are similar for all models of Palm handhelds (III,
V, VII). However, to connect different models you may need different cables
or optional adapters.
Note
The examples in this chapter use Palm OS 3.1.1. You may need
a newer Palm OS, depending on which Palm you use, and newer
Palm OS versions may differ from the examples here.
Connecting Palm Components
To use Globalstar data service with a Palm, you connect the following
hardware components:
■
■
■
■
■
Palm handheld organizer or PalmPilot
HotSync cable (be sure you have the correct cable for your Palm model)
Null modem adapter, male 9-pin on both ends
QUALCOMM serial data cable (included in QUALCOMM Globalstar
Packet Data Kit)
QUALCOMM Globalstar GSP-1600 Tri-Mode Phone
Serial
connector
Tri-Mode
Phone
i
Palm
handheld
To Tri-Mode
Phone
9-pin serial
connector
HotSync
cable and
connector
QUALCOMM
Data Cable
Null modem
adapter
725AA_00
77
To connect a Palm handheld to the Tri-Mode Phone
1.
2.
Turn off the power on your QUALCOMM Globalstar Tri-Mode Phone.
Connect the serial connector on the HotSync cable to your Palm.
Serial
connector
726AA_00
3.
Connect the null modem adapter to the other end of the HotSync cable.
HotSync
cable and
connector
Null modem
adapter
730AA_00
4.
Connect the 9-pin serial end of the Globalstar data cable to the null
modem adapter, and manually tighten the screws to hold it in place.
Null modem
adapter
9 pin serial
connector
Globalstar
data cable
731AA_00
5.
Holding the other end of the data cable, press both buttons on the side
of the connector, then insert it into your Tri-Mode Phone with the
arrow facing up (toward the phone’s keypad). The connector should
snap into place for a secure fit.
723AA_00
6.
78
Turn on your Tri-Mode Phone.
Palm Handhelds
7.
Rotate or fully extend the appropriate antenna for the type of
connection you wish to make (Globalstar satellite or cellular).
90°
i
GLOBALSTAR
Info
9
+ 0
3
#
Pwr
abc
2
4
jkl
5
tuv
8
*
+ 0
Clr
Send
End
1
3
abc
2
4
jkl
5
9
pqrs 7
tuv
8
#
*
+ 0
def
mno 6
wxyz
ghi
3
def
mno 6
9
wxyz
#
*
End
def
mno 6
8
wxyz
5
Clr
2
jkl
tuv
abc
Info
1
4
ghi
pqrs 7
Send
i
| menu | | book |
GLOBALSTAR
Info
End
1
pqrs 7
ghi
| menu | | book |
Clr
Send
i
GLOBALSTAR
| menu | | book |
Pwr
Pwr
724AA_00
Globalstar Satellite Antenna
Cellular Antenna
Note
If you cannot obtain a signal with the Globalstar Satellite
Antenna in a 90o position, try rotating it further until you feel it
click into place.
Configuring Your Palm Handheld
Configuration differs depending on the type of Globalstar data service you
want to use: packet data, asynchronous connection with PPP data, or
asynchronous data only, as shown in the following table.
What you need to configure for Palm Handhelds
Type of Globalstar
data service:
Modem Preferences
required?
Network Preferences
required?
Packet data
connections
Yes
Yes
A modem preference lets
your QUALCOMM
Globalstar Tri-Mode
Phone act as a wireless
modem.
Go to: page 80
A network preference lets
you access the Internet
using Point-to-Point
Protocol (PPP).
Go to: page 82
Yes
Yes
You must set up a second
modem with a different AT
command.
Go to: page 80
You must configure a
separate network
preference for an
asynchronous
connection—if you will use
it to access packet data.
Go to: page 82
Example: browsing
the Internet or
sending email
Asynchronous
connections that
access packet
(PPP) data
Example: dialing into
a modem behind a
firewall, then
accessing a
corporate intranet
Palm Handhelds
79
What you need to configure for Palm Handhelds
Type of Globalstar
data service:
Modem Preferences
required?
Network Preferences
required?
Asynchronous data
connections only
No
No
Not if you use Online or a
similar program and just
connect using a serial port
(e.g., COM1). Go to: page
87
Connect using Online or a
similar program, without
using Remote Access.
Go to: page 87
Example: dialing into
a BBS
Setting Up a Modem
1.
2.
3.
On your Palm handheld, tap the Applications (or Home) icon.
Tap Prefs.
On the Preferences screen, tap the Categories menu and select Modem.
Note
For some Palm OS versions, Preferences/Connection replaces
Preferences/Modem.
4.
Tap Modem and select Standard.
3
4
Note
For some Palm OS versions, tap New instead of Modem.
5.
80
Tap Speed and select 38,400 bps.
Palm Handhelds
5
The speed for the modem must match the baud rate on your Tri-Mode
Phone (38400 bps is the phone’s default). If the speeds are not the same,
your computer cannot communicate with the Tri-Mode Phone.
Tip
You can check or change the baud rate on your Tri-Mode Phone
by selecting menu, then selecting Features > Data > Baud Rate. If
the baud rate on your Tri-Mode Phone is not set to 38400 bps, be
sure to change the modem’s speed so that the two speeds match.
Note
38400 bps is the speed at which the Tri-Mode Phone
communicates with your Palm handheld, not the speed at which
it communicates with the Gateway.
6.
7.
8.
Set “Speaker” to “Off.”
Set “Flow Ctl” to “On.”
In the “String” field, type the AT (modem attention) command
appropriate to packet or asynchronous data, as shown below:
At a Glance: Data Differences
Data Type:
AT Command:
Packet
None (leave the field blank)
Asynchronous
$QCPKND=2
Note
Make sure the “String” field does not include any AT commands
that the Tri-Mode Phone does not support for packet data.
See “Supported AT Commands” on page 117.
9.
Make sure “TouchTone™” is highlighted.
Palm Handhelds
81
6
7
8
9
Wireless modem setup is complete. Next you set up the network
connection.
Setting Up Your Network Connection
You must create separate network connections for packet data and
asynchronous data, if you want to use both types of connections for PPP
data. “At a Glance” tables in the procedures show the key settings that
differ for packet and asynchronous connections (for example, phone
numbers).
Tip
Create a new connection for packet data first. Then, if you also
want an asynchronous connection for PPP data, duplicate your
packet data connection and rename it. Change only the
properties shown in the “At a Glance” tables.
Configuring a New Network Service
1.
2.
On the Preferences screen, tap the Categories menu and select Network.
Tap Service and create a new network service called “GS Packet Data.”
Note
For some Palm OS versions there is a “Connection” field that is
the name of the modem you are using.
3.
82
“User Name” should remain blank and “Password” should read
“-Prompt-”.
Palm Handhelds
1
2
3
Note
In the “Password” field, “-Prompt-” indicates that if a password
is required for connecting to your e-mail or other applications,
you will be prompted for it at connection time.
Note
When making asynchronous data or digital cellular calls, a “User
Name” is required to make a connection. Globalstar packet data
calls do not require a user name or password.
Configuring Phone Setup
1.
2.
On the Preferences/Network screen, tap the “Phone” field.
On the Phone Setup screen, in the “Phone #” field, enter the information
appropriate to packet or asynchronous data, as shown below:
At a Glance: Data Differences
Data Type:
Telephone number:
Packet
#777
The numbers #777 tell the Gateway to set up a packet
data connection.
Asynchronous
3.
4.
Phone number of the modem you wish to dial
(for example, 303-555-1212).
-orA phone book entry from your Tri-Mode Phone (for
example, 05). The phone will attempt to make a data call
using the telephone number associated with that phone
book entry.
Clear all the other checkboxes.
Tap OK.
Palm Handhelds
83
2
3
4
Configuring Network Details
1.
2.
3.
On the Preferences/Network screen, tap Details....
On the Details screen, make sure the “Connection type” is “PPP.”
Globalstar packet data service uses Point-to-Point Protocol (PPP) to
carry data packets from your computer to the Globalstar Gateway.
Make sure “Idle timeout” is set to “Power Off.”
Note
Some ISPs automatically set the DNS information in Step 4. and
Step 5. If yours does, you can skip to Step 6. Ask your Service
Provider for details.
4.
5.
Make sure “Query DNS” is not checked, so that the “Primary DNS” and
“Secondary DNS” fields appear.
In the “Primary DNS” and “Secondary DNS” fields, enter the DNS
addresses assigned by your Service Provider or ISP.
Note
DNS address numbers in the illustration are examples only. Ask
your Service Provider or ISP for the numbers you should enter.
6.
7.
84
Make sure “IP Address” is checked (“Automatic”).
Tap OK.
Palm Handhelds
2
3
4
5
6
7
Making a Data Connection
Making Packet Data Connections
Packet data connections can be either
■
■
Packet (PPP) data only (example: browsing the Internet)
Asynchronous data with PPP data (example: dialing into a modem
behind a firewall, then accessing a corporate intranet)
To make a connection using PPP data
1.
2.
3.
4.
Make sure the Tri-Mode Phone is properly connected to your Palm
handheld (as described in “Connecting Palm Components” on page 77).
Power up your Tri-Mode Phone.
Rotate or fully extend the appropriate antenna for the type of
connection you wish to make (Globalstar satellite or cellular, as shown
on page 79) and make sure you have a Globalstar or cellular signal.
On your Palm handheld, go to the Preferences/Network screen and tap
Connect.
Note
When making asynchronous data or digital cellular calls, a “User
Name” is required to make a connection. Globalstar packet data
calls do not require a user name or password.
Palm Handhelds
85
4
On your Palm handheld, the Service Connection Progress dialog
appears.
While the Tri-Mode Phone is establishing a packet data connection, the
Tri-Mode Phone screen looks like this:
Connecting..
PPP Data
#777
| menu |
Note
When you make a cellular call, the Globalstar icon
is
replaced with the digital icon D . When you make an
asynchronous call, the screen reads “Async Data” and shows the
telephone number.
You are connected to the network when the Service Connection Progress
dialog says “Signing on, Established,” and then disappears, the Connect
button changes to Disconnect, and the Tri-Mode Phone screen says
“PPP @ 9.6.” The “PPP @ 9.6” indicates that the over-the-air data rate
is 9600 bps. (The “T R” status stands for Transmit and Receive.) For an
asynchronous connection, the screen says “Async @ 9.6.”
86
Palm Handhelds
Note
For cellular calls the Tri-Mode Phone screen says “PPP @ 14.4,”
indicating an over-the-air rate of 14400 bps.
Time: 0:12
PPP @ 9.6
Status: T R
| menu |
You can now open typical communication applications to do anything
you would normally do through an Internet Service Provider (ISP).
To disconnect a packet data connection
1.
On your Palm handheld, go to the Preferences/Network screen and tap
Disconnect .
1
Using Palm Communication Applications
Once you have established a Globalstar packet data service connection, you
can use any communication applications based on IP network protocol. For
instance, Eudora Internet Suite provides e-mail and Web browsing
applications for Palm handhelds.
Note
Some Web sites may not format pages for a Palm browser.
Making Asynchronous Data Connections
This section shows how to make a strictly asynchronous data connection
(for example: dialing into a BBS).
To make an asynchronous data connection
1.
2.
Make sure the Tri-Mode Phone is properly connected to your Palm
handheld (as described in “Connecting Palm Components” on page 77).
Turn on your Tri-Mode Phone.
Palm Handhelds
87
3.
4.
5.
Rotate the Globalstar satellite antenna (as shown on page 79) and
make sure you have a Globalstar signal.
On your Palm handheld, open a terminal application (such as Online).
Make sure the application is configured with the following settings:
Setting:
6.
7.
88
Value:
Data bits
8
Parity
none
Stop bit
1
Baud rate
Must match the baud rate on your Tri-Mode Phone (default:
38400). To check the baud rate on your Tri-Mode Phone, select
menu, then select Features > Data > Baud Rate.
Enter the AT command $QCPKND=1 and the telephone number you
want to dial.
For example: $QCPKND=1;T303-555-1212
Make the connection.
Palm Handhelds
UNIX Computers
This chapter tells how to configure a UNIX computer to use Globalstar data
service. To do this, you physically connect the UNIX computer to your
QUALCOMM Globalstar Tri-Mode Phone, then, in most cases, configure a
“modem” and a packet data or an asynchronous connection.
Globalstar data service has been tested with the following:
■
■
Solaris UNIX
Red Hat Linux
Note
The examples in this chapter use Solaris version 2.6 and Red Hat
Linux 6.1. Setup for other UNIX OS versions and PPP
applications may vary.
Connecting UNIX Components
To use Globalstar data service with UNIX, you connect the following
hardware components:
■
■
■
UNIX computer running Solaris or Red Hat Linux
QUALCOMM serial data cable (included in QUALCOMM Globalstar
Packet Data Kit)
QUALCOMM Globalstar GSP-1600 Tri-Mode Phone
Tri-Mode
Phone
i
Computer
9-pin serial
connector
Globalstar
QUALCOMM
data
cable
Data
Cable
718AA_00
89
To connect a UNIX computer to the Tri-Mode Phone
1.
2.
Turn off the power on your Tri-Mode Phone. You can leave your
computer on.
Attach the QUALCOMM data cable’s 9-pin serial connector to a COM
serial port (RS-232) on your workstation, and manually tighten the
screws to hold it in place.
Note
Some computers may require an additional adapter if a 9-pin
serial port is not available for connecting the QUALCOMM data
cable.
3.
Holding the other end of the QUALCOMM data cable, press both
buttons on the side of the connector, then insert it into your Tri-Mode
Phone with the arrow facing up (toward the phone’s keypad). The
connector should snap into place for a secure fit.
723AA_00
4.
5.
Turn on your Tri-Mode Phone.
Rotate or fully extend the appropriate antenna for the type of
connection you wish to make (Globalstar satellite or cellular).
90°
i
GLOBALSTAR
Info
9
1
2
jkl
5
tuv
8
*
+ 0
Pwr
3
#
End
def
mno 6
8
wxyz
5
Clr
2
+ 0
Clr
Send
3
End
abc
2
4
jkl
5
9
pqrs 7
tuv
8
#
*
+ 0
def
mno 6
wxyz
1
ghi
Pwr
*
jkl
tuv
abc
Info
1
4
ghi
pqrs 7
Send
i
| menu | | book |
GLOBALSTAR
Info
End
abc
4
pqrs 7
ghi
| menu | | book |
Clr
Send
i
GLOBALSTAR
| menu | | book |
3
def
mno 6
9
wxyz
#
Pwr
724AA_00
Globalstar Satellite Antenna
90
Cellular Antenna
UNIX Computers
Note
If you cannot obtain a signal with the Globalstar Satellite
Antenna in a 90o position, try rotating it further until you feel it
click into place.
Configuring Your Solaris UNIX Computer
You can interact with a Solaris UNIX system in many ways, from the
command line to various graphical interfaces. No matter which interface
you use, you must provide the same basic information to configure
Globalstar data service.
Configuration differs depending on the type of Globalstar data service you
want to use: packet data, asynchronous connection with PPP data, or
asynchronous data only, as shown in the following table.
What you need to configure for Solaris UNIX
Type of Globalstar data service:
PPP Client required?
Packet data connections
Yes
Example: browsing the Internet or
sending email
PPP Client lets your QUALCOMM
Globalstar Tri-Mode Phone act as a
wireless modem.
Go to: page 91
Asynchronous connections that
access packet
(PPP) data
Yes
Example: dialing into a modem behind a
firewall, then accessing a corporate
intranet
Asynchronous data connections
only
Example: dialing into a BBS
You must set up a second PPP Client
with a different AT command.
Go to: page 91
No
Not if you use tip or a similar program
and just connect using a serial port
(e.g., COM1). Go to: page 96
The configuration procedures in this section use Solstice PPP 3.0.1 as an
example. A license and software for Solstice PPP is included with your
purchase of the Solaris media. To install Solstice PPP, see the instructions
in your Solaris documentation.
Setting Up the PPP Client
You must create separate remote server icons for packet data and
asynchronous data, if you want to use both types of connections for PPP
data. “At a Glance” tables in the procedures show the key settings that
differ for packet and asynchronous connections (for example, phone
numbers).
UNIX Computers
91
Tip
Create a new connection for packet data first. Then, if you also
want an asynchronous connection for PPP data, duplicate your
packet data remote server icon and rename it. Change only the
properties shown in the “At a Glance” tables.
1.
2.
3.
4.
5.
6.
7.
8.
Log in as root or become superuser.
From the command line, type /usr/bin/pppinit and press Enter.
Select “[1] - Asynchronous client.”
Select “Modem Configuration.”
Select “[19] - Standard Hayes modem.”
Press Enter to set the serial port to default.
For the “Name of the remote server,” type gs_packet_data and
press Enter.
For “Phone number for this server,” type the information appropriate
to packet or asynchronous data, as shown below:
At a Glance: Data Differences
Data Type:
Phone number:
Reason:
Packet
T#777
The #777 tells the Gateway to set up
a packet data connection.
Asynchronous
$QCPKND=2;T303555-1212
$QCPKND=2 AT command, plus:
Area code and phone number of the
modem you wish to dial.
-orA phone book entry from your
Tri-Mode Phone (for example, 05).
The phone will attempt to make a
data call using the telephone
number associated with that phone
book entry.
9. Press Enter .
10. For “Filename of the chat script” press Enter to accept the default.
This confirms the name of the script but does not create one.
11. When asked to create a template file, press n for no.
Globalstar data does not use chat scripts. Selecting no means no script
will be created.
Note
Some PPP software may require that a chat script exist. After
finishing this setup, you will need to “touch” the script named in
Step 10.
12. For “Enter your IP address” press Enter for none.
92
UNIX Computers
13. For “Enter your Server IP address” press Enter for none.
Leaving these fields blank allows the server to set the addresses.
14. For “IP netmask for this interface” press Enter for none.
15. For “Enter your PAP Id” press Enter for none.
16. For “Enter your CHAP Name” press Enter for none.
17. For “Inactivity timeout” press Enter for the default of 120 seconds.
18. For “Do you want to add an access to another server?” press n for no.
19. Press E to save your changes and exit pppinit.
Enabling Domain Name Service
Before you can enable Domain Name Service (DNS), your ISP must provide
the following information:
■
■
The domain name of the subnetwork
The IP addresses of your name servers
Some ISPs set DNS information automatically (ask your Service Provider
for details). If yours does, you can skip to “Completing the Setup” on page
93.
1.
2.
3.
4.
5.
6.
7.
Edit the file /etc/nsswitch.conf.
For “hosts,” type files dns and press Enter.
Create the file /etc/resolv.conf.
For “domain,” type the domain name (for example, abc.company.com)
and press Enter.
For the first “nameserver,” type the primary DNS (for example,
123.123.123.123) and press Enter .
For the second “nameserver,” type the secondary DNS (for example,
122.122.122.122) and press Enter .
Press Enter twice to invoke the changes.
Changes take place automatically.
Completing the Setup
1.
From the command line, “touch” the chat script, in this case
/etc/opt/SUMWconn/ppp/script/gs_packet_data.scr.
2.
This creates an empty script file. If the file already exists, open it with
a text editor and make sure that it contains no lines of text.
Check the /etc/opt/SUMWconn/ppp/link.conf file and make
sure the speed is set to 38400.
The speed for the PPP client must match the baud rate on your
Tri-Mode Phone (38400 bps is the phone’s default). If the speeds are not
the same, your computer cannot communicate with the Tri-Mode
Phone.
UNIX Computers
93
Tip
You can check or change the baud rate on your Tri-Mode Phone
by selecting menu, then selecting Features > Data > Baud Rate. If
the baud rate on your Tri-Mode Phone is not set to 38400 bps, be
sure to change the line speed for the PPP client so that the two
speeds match.
Note
38400 bps is the speed at which the Tri-Mode Phone
communicates with your computer, not the speed at which it
communicates with the Gateway.
3.
Type exit to log out as root and invoke the changes.
Checking the GS Packet Data Setup
1.
2.
3.
4.
5.
6.
7.
Log in as you normally would (root not required).
From the command line, type /usr/bin/ppptool and press Enter.
The information you provided to pppinit now appears in ppptool.
Double-click the host icon you want to connect to.
This is the name of the remote server you entered in pppinit:
gs_packet_data.
In the Connection window, the “Phone number” field should show the
telephone number you want to dial.
The “Local IP address” field should read “unassigned.”
The “Remote IP address” field should read “unassigned.”
Leaving these fields “unassigned” allows the server to assign the
addresses.
The “Local inactivity timeout” field should read “120 second(s).”
This is the time the connection can remain unused before it
automatically closes.
Making a Data Connection
Making Packet Data Connections
Packet data connections can be either
■
■
Packet (PPP) data only (example: browsing the Internet)
Asynchronous data with PPP data (example: dialing into a modem
behind a firewall, then accessing a corporate intranet)
To make a connection using PPP data
1.
2.
Make sure the Tri-Mode Phone is properly connected to your UNIX
computer (as described in “Connecting UNIX Components” on page 89).
Power up your Tri-Mode Phone.
94
UNIX Computers
3.
4.
5.
Rotate or fully extend the appropriate antenna for the type of
connection you wish to make (Globalstar satellite or cellular, as shown
on page 90) and make sure you have a Globalstar or cellular signal.
In ppptool, double-click the host icon you want to connect to.
In the Connection window, click Connect.
The Tri-Mode Phone makes the data call. While the call is connecting,
the Tri-Mode Phone screen looks like this:
Connecting..
PPP Data
#777
| menu |
Note
When you make a cellular call, the Globalstar icon
is
replaced with the digital icon D . When you make an
asynchronous call, the screen reads “Async Data” and shows the
telephone number.
You are connected to the network when the Status line reads
“Connected,” the Disconnect button become active, and the Tri-Mode
Phone screen says “PPP @ 9.6.” The “PPP @ 9.6” indicates that the overthe-air data rate is 9600 bps. (The “T R” status stands for Transmit and
Receive.) For an asynchronous connection, the screen says “Async @
9.6.”
Note
For cellular calls the Tri-Mode Phone screen says “PPP @ 14.4,”
indicating an over-the-air rate of 14400 bps.
Time: 0:12
PPP @ 9.6
Status: T R
| menu |
You can now open typical communication applications to do anything
you would normally do through an Internet Service Provider (ISP).
To disconnect a packet data connection
1.
2.
Double-click the host icon you want to disconnect from.
In the Connection window, click Disconnect.
The connection is closed, the Status line reads “Disconnected,” and the
Connect button becomes active.
UNIX Computers
95
Making Asynchronous Data Connections
This section shows how to make a strictly asynchronous data connection
(for example: dialing into a BBS).
To make an asynchronous data connection
1.
2.
3.
4.
5.
Make sure the Tri-Mode Phone is properly connected to your UNIX
computer (as described in “Connecting UNIX Components” on page 89).
Turn on your Tri-Mode Phone.
Rotate the Globalstar satellite antenna (as shown on page 90) and
make sure you have a Globalstar signal.
On your computer, open Solaris tip (or a similar application).
Make sure the application is configured with the following settings:
Setting:
6.
7.
96
Value:
Data bits
8
Parity
none
Stop bit
1
Baud rate
Must match the baud rate on your Tri-Mode Phone (default:
38400). To check the baud rate on your Tri-Mode Phone, select
menu, then select Features > Data > Baud Rate.
Enter the AT command $QCPKND=1 and the telephone number you
want to dial.
For example: $QCPKND=1;T303-555-1212
Make the connection.
UNIX Computers
Configuring Your Linux Computer
You can interact with Linux systems in many ways, from the command line
to various graphical interfaces. No matter which interface you use, you
must provide the same basic information to configure Globalstar data
service.
Configuration differs depending on the type of Globalstar data service you
want to use: packet data, asynchronous connection with PPP data, or
asynchronous data only, as shown in the following table.
What you need to configure for Linux
Type of Globalstar data service:
PPP configuration required?
Packet data connections
Yes
Example: browsing the Internet or
sending email
A PPP configuration lets your
QUALCOMM Globalstar Tri-Mode
Phone act as a wireless modem.
Go to: page 97
Asynchronous connections that
access packet
(PPP) data
Yes
Example: dialing into a modem behind a
firewall, then accessing a corporate
intranet
Asynchronous data connections
only
Example: dialing into a BBS
You must set up a second PPP
configuration with a different AT
command.
Go to: page 97
No
Not if you use Minicom or a similar
program and just connect using a serial
port (e.g., COM1). Go to: page 106
The configuration procedures in this section use Netconf, a part of the
LinuxConf suite, as an example and assume that both Netconf and PPP are
installed. To install Netconf and PPP, see the instructions in your Linux
documentation.
Setting Up the Modem and PPP Connection
You must create separate configurations for packet data and asynchronous
data, if you want to use both types of connections for PPP data. “At a
Glance” tables in the procedures show the key settings that differ for packet
and asynchronous connections (for example, phone numbers).
Tip
Create a new configuration for packet data first. Then, if you also
want an asynchronous connection for PPP data, duplicate your
packet data configuration and rename it. Change only the
properties shown in the “At a Glance” tables.
UNIX Computers
97
Using Netconf, you can set up a modem and a PPP connection in the same
series of steps.
1.
2.
3.
Log in as root.
Run netconf.
Click PPP/SLIP/PLIP to open the Configurations dialog.
Note
If “PPP/SLIP/PLIP” is not available, PPP may not be installed on
your system.
3
4.
In the Configurations dialog, click Add.
4
98
UNIX Computers
5.
Select PPP and click Accept.
5
6.
In the “Phone number” field, type the information appropriate to
packet or asynchronous data, as shown below:
At a Glance: Data Differences
Data Type:
Telephone number:
Packet
#777
The #777 tells the Gateway to set up a packet data
connection.
Asynchronous
7.
8.
9.
Phone number of the modem you wish to dial (for
example, 303-555-1212).
-orA phone book entry from your Tri-Mode Phone (for
example, 05). The phone will attempt to make a data call
using the telephone number associated with that phone
book entry.
Select the modem port you have connected the Tri-Mode Phone to.
In most cases it should be the default port.
Leave the “Use PAP authentication” and the “Login name” and
“Password” fields blank unless your ISP tells you to fill them in.
Click Accept.
6
7
8
9
The Configurations dialog now has a new entry, “ppp0.”
UNIX Computers
99
Configuring the PPP Connection
1.
In the Configurations dialog, double-click ppp0.
1
2.
3.
On the Hardware tab, select all of the checkboxes except “Escape control
characters.”
Set “Line speed” to 38400.
The line speed for the PPP connection must match the baud rate on
your Tri-Mode Phone (38400 bps is the phone’s default). If the speeds
are not the same, your computer cannot communicate with the
Tri-Mode Phone.
Tip
You can check or change the baud rate on your Tri-Mode Phone
by selecting menu, then selecting Features > Data > Baud Rate. If
the baud rate on your Tri-Mode Phone is not set to 38400 bps, be
sure to change the line speed for the PPP connection so that the
two speeds match.
Note
38400 bps is the speed at which the Tri-Mode Phone
communicates with your computer, not the speed at which it
communicates with the Gateway.
4.
100
The modem port should be set to the port you chose previously.
UNIX Computers
2
3
4
5.
On the Communication tab, make sure that “Modem init string” has the
ATZ command plus an additional AT command, as shown below:
At a Glance: Data Differences
Type of Globalstar data service:
AT Command:
Packet data
No additional command required
Asynchronous data
$QCPKND=2
Note
Make sure that “Modem init string” and “Modem dial command”
do not include any AT commands that the Tri-Mode Phone does
not support for data. (See “Supported AT Commands” on page
117.)
6.
7.
Make sure that the telephone number you want to dial appears in the
“Phone number” field.
Clear all fields in the “Chat” section.
UNIX Computers
101
5
6
7
8.
The Networking tab should not require any changes.
8
9. Leave the PAP tab blank.
10. Click Accept.
102
UNIX Computers
9
10
Configuring the Name Server
Some ISPs set DNS information automatically. If yours does, you can skip
to “Saving Your Settings” on page 104. Ask your Service Provider for
details.
1.
2.
3.
4.
In the Configurations dialog, click Quit.
On the Netconf screen, click Name Server Specification (DNS).
In the “default: domain” field, enter the domain name assigned by your
Service Provider or ISP.
In the “nameserver 1” and “nameserver 2” fields, enter the DNS
addresses assigned by your Service Provider or ISP.
Note
The domain name and DNS addresses in the illustration are
examples only. Ask your Service Provider or ISP for the numbers
you should enter.
5.
Click Accept.
UNIX Computers
103
3
4
5
Saving Your Settings
1.
2.
On the Netconf screen, click Quit.
On the activation dialog that appears, click Activate the changes.
2
3. Type exit to log out as root.
Your computer is now ready to make a data connection.
104
UNIX Computers
Making a Data Connection
Making Packet Data Connections
Packet data connections can be either
■
■
Packet (PPP) data only (example: browsing the Internet)
Asynchronous data with PPP data (example: dialing into a modem
behind a firewall, then accessing a corporate intranet)
To make a connection using PPP data
1.
2.
3.
4.
Make sure the Tri-Mode Phone is properly connected to your Linux
computer (as described in “Connecting UNIX Components” on page 89).
Power up your Tri-Mode Phone.
Rotate or fully extend the appropriate antenna for the type of
connection you wish to make (Globalstar satellite or cellular, as shown
on page 90) and make sure you have a Globalstar or cellular signal.
On the command line of your computer, type usernetctl ppp0 up
and press Enter.
The Tri-Mode Phone makes the data call. While the call is connecting,
the Tri-Mode Phone screen looks like this:
Connecting..
PPP Data
#777
| menu |
Note
When you make a cellular call, the Globalstar icon
is
replaced with the digital icon D . When you make an
asynchronous call, the screen reads “Async Data” and shows the
telephone number.
You are connected to the network when the Tri-Mode Phone screen
says “PPP @ 9.6.” The “PPP @ 9.6” indicates that the over-the-air data
rate is 9600 bps. (The “T R” status stands for Transmit and Receive.)
For an asynchronous connection, the screen says “Async @ 9.6.” When
the connection is made, the status is logged to the system log.
Note
For cellular calls the Tri-Mode Phone screen says “PPP @ 14.4,”
indicating an over-the-air rate of 14400 bps.
Time: 0:12
PPP @ 9.6
Status: T R
| menu |
UNIX Computers
105
You can now open typical communication applications to do anything
you would normally do through an Internet Service Provider (ISP).
To disconnect a packet data connection
1.
On the command line of your computer, type
usernetctl ppp0 down and press Enter.
The connection is closed and the status is logged to the system log.
Making Asynchronous Data Connections
This section shows how to make a strictly asynchronous data connection
(for example: dialing into a BBS).
To make an asynchronous data connection
1.
2.
3.
4.
5.
Make sure the Tri-Mode Phone is properly connected to your Linux
computer (as described in “Connecting UNIX Components” on page 89).
Turn on your Tri-Mode Phone.
Rotate the Globalstar satellite antenna (as shown on page 90) and
make sure you have a Globalstar signal.
On your computer, open Minicom (or a similar application).
Make sure the application is configured with the following settings:
Setting:
6.
7.
106
Value:
Data bits
8
Parity
none
Stop bit
1
Baud rate
Must match the baud rate on your Tri-Mode Phone (default:
38400). To check the baud rate on your Tri-Mode Phone, select
menu, then select Features > Data > Baud Rate.
Enter the AT command $QCPKND=1 and the telephone number you
want to dial.
For example: $QCPKND=1;T303-555-1212
Make the connection.
UNIX Computers
QUALCOMM Globalstar Hands-Free Car Kit
You can use Globalstar data service in a vehicle equipped with a
QUALCOMM Globalstar Hands-Free Car Kit.
Connecting Car Kit Components
To use Globalstar data service with a QUALCOMM Globalstar Hands-Free
Car Kit, the car kit should be installed as usual for your QUALCOMM
Globalstar Tri-Mode Phone. For details, see the QUALCOMM Globalstar
GCK-1400 Hands-Free Car Kit Installation/User Guide (document number
80-98438-1).
In addition, you connect the following hardware components:
■
■
■
A laptop or handheld computer
A serial cable with a male 9-pin connector on one end and a female
9-pin connector on the other
Other cables or adapters, if required for your specific computer
9-pin serial
connector
Car Kit GEM box
to rest
of Car Kit
Serial cable
(not included)
Computer
9-pin serial
connector
107
To connect a computer or Palm handheld to the car kit
1.
2.
108
Attach the 9-pin connector of the serial cable to the 9-pin serial port on
the GEM (Globalstar Electronic Module) box of the car kit.
Attach the other end of the serial cable to a 9-pin COM port (RS-232)
on your Windows or UNIX computer.
or
Attach the other end of the serial cable to adapters or additional cables,
as required, for your Macintosh computer or Palm handheld. See
“Connecting Macintosh Components” on page 57 or “Connecting Palm
Components” on page 77 for details.
QUALCOMM Globalstar Hands-Free Car Kit
Commercially Available Accessories
The QUALCOMM Globalstar Packet Data Kit includes the following
accessories:
QUALCOMM serial data cable
Compact Disc (CD-ROM) that includes this User Guide
This chapter describes optional accessories that you may need to complete
your hardware setup, depending on which computer you use. These
accessories are readily available from commercial retail outlets that carry
computer supplies, for example electronics, computer, or office supply
stores such as (but not limited to) Radio Shack, CompUSA, Staples, or
Office Depot.
■
■
Indoor/Outdoor Extension Cable
An extension cable lets you place the Tri-Mode Phone outdoors and connect
it to a computer inside a building, to avoid sun glare and make the computer
screen easier to read. The cable should have a 9-pin male connector on one
end and a 9-pin female on the other, with a maximum length of 30 meters.
Palm Cable and Null Modem Adapter
If you are using a Palm handheld without a built-in 9-pin D serial port, you
need a cable and adapter to interface with the QUALCOMM data cable for
the Tri-Mode Phone (TIA/EIA-574 DTE serial interface).
A Palm cable connects a Palm handheld to a null modem adapter, which
attaches to the QUALCOMM data cable. Depending on the Palm model,
this may be a HotSync cable or other type of Palm cable. For connection
details, see “Connecting Palm Components” on page 77.
The null modem adapter (for a TIA/EIA-574 DTE serial interface) should
have 9-pin male connectors on each end. Alternatively, you could use a 9pin male-to-female null modem adapter and a gender-changer adapter to
connect to the Palm. (Most commercially available null modem adapters are
male-to-female.)
Macintosh Adapters and Modem Cable
If you are using an Apple Macintosh, you need accessories to interface with
the QUALCOMM data cable for the Tri-Mode Phone (TIA/EIA-574 DTE
serial interface).
If your Macintosh has USB (Universal Serial Bus) ports, you need a USB
adapter to connect your Macintosh to the QUALCOMM data cable.
Associated software for the USB adapter must be installed on your
Macintosh.
If your Macintosh has mini-DIN 8 (non-USB) ports, you need a Macintosh
modem cable and an adapter.
109
The modem cable should have a round mini-DIN 8 connector on one end, to
connect to your Macintosh. On the other, it should have a 25-pin female
connector. An adapter connects the 25-pin end of the Macintosh modem
cable to the 9-pin end of the QUALCOMM data cable. For connection
details, see “Connecting Macintosh Components” on page 57.
Both the Macintosh modem cable and the adapter must have specific pin
configurations to work with Globalstar data. For pinout details, see Table 1.
Table 1. Required Pinouts for Macintosh Modem Cable and Adapter
(for Non-USB Computers)
MiniDIN-8
Apple
Signal
EIA-232 Signal
DB-25
pin
EIA-574
DE-9 pin
1
HSKo
RTS/RFR and DTR
4 and 20
7 and 4
2
HSKi
CTS
5
8
3
TxD–
TxD
2
3
4
GND
GND
7
5
5
RxD–
RxD
3
2
6
TxD+
NC
NC
NC
7
GPi
RLSD (DCD)
8
1
8
RxD+
GND
7
5
QUALCOMM Globalstar Hands-Free Car Kit Cable
To use Globalstar data service in a vehicle equipped with a QUALCOMM
Globalstar Hands-Free Car Kit, you need one additional cable: a serial cable
with a male 9-pin connector on one end and a female 9-pin connector on the
other. This is the same type of cable as the optional extension cable, only
shorter.
This cable connects the GEM (Globalstar Electronic Module) box of the car
kit to a laptop computer. For connection details, see “Connecting Car Kit
Components” on page 107.
110
Accessories
Troubleshooting
If you are having a problem with Globalstar data service, try the following
troubleshooting tips. If that does not solve the problem, contact your service
provider’s customer care center.
Problem
Solution
General
Your Tri-Mode Phone
cannot get a signal.
General:
■
Make sure the Tri-Mode Phone’s
battery is charged and properly
installed.
Cellular:
■
Fully extend the cellular antenna.
■
Make sure you are clear of any objects
that could block the signal.
Globalstar:
■
Make sure the Tri-Mode Phone is
outdoors.
■
Extend the Globalstar Satellite
Antenna at least 90o, or, if that does
not work, rotate it further until you
feel it click into place.
■
Position the Tri-Mode Phone so the
Globalstar Satellite Antenna points
straight up to the sky.
■
Make sure the Globalstar Satellite
Antenna has a clear view of the sky,
not blocked by tall obstacles such as
buildings and trees.
Your Tri-Mode Phone has a
signal but you cannot
connect to the data
network.
■
■
■
Make sure the Tri-Mode Phone and
your computer are connected correctly
and make sure all connectors are tight
(see the appropriate chapter for your
type of computer).
Check your modem and network
settings (see the appropriate chapter
for your type of computer).
For packet data, make sure the
telephone number being dialed is #777.
111
Problem
Solution
Nothing happens on the
Tri-Mode Phone when you
try to connect, a message
says “No dial tone,” or a
message says “hardware
failure.”
■
■
When you try to connect,
your computer says “No
dial tone” and the screen on
your Tri-Mode Phone says
“Check mode preferences”
or “Mode mismatch.”
■
■
■
You have a PPP connection
but your Internet
applications cannot
connect to your ISP.
112
■
Make sure the baud rate in your
“Globalstar data modem” settings
matches the baud rate on your TriMode Phone (default: 38400). Check
the baud rate on your Tri-Mode Phone
by selecting menu > Features > Data >
Baud Rate, then change it if necessary.
Make sure the battery for the laptop or
Palm handheld is charged, or that the
laptop or Palm is properly plugged into
a power supply. It is possible to have a
low battery charge that will run the
laptop but will not drive the serial port.
Make sure the data mode preferences
(Globalstar satellite, digital cellular)
on your Tri-Mode Phone are
compatible with those set for voice
service. Check the preferences on your
phone by selecting menu > System >
AutoMode > Data or Voice. See “Setting
Mode Preferences for Data” on page 7
for more information.
Make sure “Analog only” is not
selected under menu > System >
AutoMode > Voice > Cell Pref. Data
service is not available for analog
cellular connections.
Make sure “Analog” is not selected
under menu > System > Manual Mode.
Data service is not available for analog
cellular connections.
Your Internet applications must be set
up for your ISP. Check these settings
and contact your ISP for further
information.
Troubleshooting
Problem
Solution
Asynchronous Data
When you try to connect,
your Tri-Mode Phone says
“Busy.”
■
The target modem (or modem pools
used for routing) may be busy. Try
connecting again later.
When you try to connect,
your Tri-Mode Phone says
“No carrier.”
■
You may have dialed a wrong number,
reaching a voice phone instead of a
modem. Check the phone number.
Make sure the Globalstar antenna is
extended at least 90o.
■
When you try to connect,
your Tri-Mode Phone says
“No answer.”
■
The target modem is not answering, or
a wrong number is not answering.
Check the phone number and try
connecting again later.
When you try to connect,
your Tri-Mode Phone says
says “No dial tone.”
■
Make sure “Cell Only” is not selected
under menu > System > AutoMode > Data
or menu > System > AutoMode > Voice.
Asychronous data service is not
available for cellular connections. See
“Setting Mode Preferences for Data” on
page 7 for more information.
Your asynchronous call
takes a long time to
connect.
■
This may be normal. Asynchronous
connections have higher overhead and
thus are slower than packet data calls.
Troubleshooting
113
Problem
Solution
Windows Computers
Your Tri-Mode Phone has a
signal but you cannot
connect to the data
network.
■
■
■
■
Make sure that Maximum Speed for
your “Globalstar data modem”
matches the baud rate on your
Tri-Mode Phone. Check the baud rate
on your Tri-Mode Phone by selecting
menu > Features > Data > Baud Rate, then
change it if necessary.
For a packet data connection, make
sure the number being dialed is #777.
If the # character does not appear in
the dial string, you can type it in
manually before connecting.
For a more permanent fix, see “Setting
Dial Properties” on page 31.
Make sure you have selected the COM
port to which the Tri-Mode Phone is
connected. (See “Selecting the COM
Port” on page 18.)
On your computer, make sure that no
other application is using the serial
port (e.g., COM1) assigned for
Globalstar data service. If another
application, such as Palm HotSync
Manager, blocks the serial port,
disable its control over the port before
attempting a data connection.
Your serial mouse does not
function properly.
■
A COM port conflict may exist. Make
sure you have properly configured the
COM port to which the Tri-Mode
Phone is attached. Refer to your
computer’s manual for additional
assistance on managing COM ports.
Your computer locks up
when accessing the
Tri-Mode Phone.
■
A conflict with COM ports and IRQs
may exist. Refer to your computer’s
manual for additional assistance.
114
Troubleshooting
Problem
Solution
Macintosh Computers
Your Tri-Mode Phone has a
signal but you cannot
connect to the data
network.
■
■
Make sure the baud rate on your
Tri-Mode Phone matches that for the
“QUALCOMM Globalstar Phone
Modem.” Check the baud rate on your
Tri-Mode Phone by selecting menu >
Features > Data > Baud Rate, then
change it to 38400 bps if necessary.
On your computer, make sure that no
other application is using the modem
port assigned for Globalstar data
service. If another application, such as
Palm HotSync Manager, blocks the
port, disable its control over the port
before attempting a data connection.
Palm Handhelds
The Palm tries to connect
but the Tri-Mode Phone
does not respond.
■
■
You have a connection but
your browser cannot access
a Web page, or you are
having authentication
problems not due to user
name/password errors.
Troubleshooting
■
Make sure you have a current Palm
operating system (OS) installed.
Sometimes a newer Palm model
running an older OS version cannot
make data connections properly.
Make sure the String field under
Preferences/Modem does not include
any AT commands that the Tri-Mode
Phone does not support for data. (See
“Setting Up a Modem” on page 80 and
“Supported AT Commands” on page
117.)
If Web pages use CHAP (Challenge
Handshake Authentication Protocol),
you may need to upgrade your Palm
OS to work with them.
115
Problem
Solution
UNIX Computers
The computer tries to
connect but the Tri-Mode
Phone does not respond.
■
■
■
116
Make sure the PPP daemon is running
(see the PPP documentation).
Make sure the modem initialization
string and dial commands do not
include any AT commands that the
Tri-Mode Phone does not support for
data. (See “Supported AT Commands”
on page 117.)
Make sure the baud rate for your
“Globalstar data modem” matches the
baud rate on your Tri-Mode Phone.
Check the baud rate on your Tri-Mode
Phone by selecting menu > Features >
Data > Baud Rate, then change it if
necessary.
Troubleshooting
Supported AT Commands
For data service, your QUALCOMM Globalstar phone works as a wireless
modem. In other words, it functions as Data Communications Equipment
(DCE) that communicates with your computer, or Data Terminal
Equipment (DTE).
In the process, your computer sends AT (modem attention) commands to
the phone. Table 2 shows the AT (Hayes modem compatible) commands
that the phone supports for data. For many commands, the entries for
“Value Range,” “No Value Range,” “No Value Definition,” or “Power ON
Definition” have no valid value. These entries have different symbols in
place of values:
A dash “-” character means that, for this command, the value is either
not present or not allowed.
■
A caret “^” character means that no current value state (or Power-ON
state) is kept internally.
■
An asterisk “*” character means you should consult a footnote for this
entry.
The command syntax uses the following conventions:
■
■
■
■
■
■
■
Words enclosed in <angle brackets> identify parameters that can be
specified as part of the command.
Syntactical elements enclosed in [square brackets] are optional and
may be omitted from the command line.
Syntactical elements enclosed in {brackets} are required and must be
specified as part of the command.
The use of | between syntactical elements indicates only one of the
elements may be specified as part of the command. For example, the
command syntax for S3{=<value>|?} must be either S3=<value> or
S3?.
The “+” and “$” characters are used to identify extended AT commands.
“+” and “$” denote standard and manufacturer-specific extended
commands respectively.
A semicolon (“;”) is used to concatenate additional commands (basic or
extended) after an extended command.
Table 2. Supported AT Commands
AT Command and Syntax
AT Command
Description (brief)
Value Range
No Value
Definition
Power ON
Definition
E[<value>]
Echo OFF|ON
[0-1]
0
1
I[<value>]
Request Identification
Information
[0-2]
0
^
L[<value>]
Monitor Speaker
Loudness
[0-3]
0
^
117
Table 2. Supported AT Commands (continued)
AT Command and Syntax
AT Command
Description (brief)
Value Range
No Value
Definition
Power ON
Definition
M[<value>]
Monitor Speaker
Mode
[0-2]
0
^
P
Select Pulse Dialing
-
-
^
Q[<value>]
Result Code
Suppression
[0-1]
0
0
T
Select Tone Dialing
-
-
^
V[<value>]
DCE Response
Format
[0-1]
0
1
X[<value>]
Result Code Selection
Command
[0-4]
0
4
Z[<value>]
Reset Default
Configuration
0
0
^
&C[<value>]
DCE RLSD (DCD)
Behavior
[0-2]
0
1
&D[<value>]
DTE DTR Behavior
[0-2]
0
2
&F[<value>]
Set to QUALCOMMDefined Default
Configuration
0
0
^
A
Answer Command
-
-
-
A/1
Repeat Last
Command
-
-
^
D<dial string>[;]
Dial
Dial strings =
#*0123456789ABCD
String modifiers =
W,!@$TP
^
^
H[<value>]
Hook Control
[0, 777]
0
^
O[<value>]
Return to Online
State
0
0
^
S0{=<value>|?}
Automatic Answer
[0-255]
-
0
S3{=<value>|?}
Command Line
Termination
Character
[0-127]
-
13
S4{=<value>|?}
Response Format
Character
[0-127]
-
10
S5{=<value>|?}
Command Edit
Character
[0-127]
-
8
S6{=<value>|?}
Pause Before Blind
Dialing Time
[2-10]
-
2
S7{=<value>|?}
Connection
Completion Timeout
in seconds
[1-255]
-
50
118
AT Commands
Table 2. Supported AT Commands (continued)
AT Command and Syntax
AT Command
Description (brief)
Value Range
No Value
Definition
Power ON
Definition
S8{=<value>|?}
Comma Dial Modifier
Time
[0-255]
-
2
S9{=<value>|?}
Carrier Detect
Threshold Timeout
[0-255]
-
6
S10{=<value>|?}
Carrier Loss to
Disconnect Timeout
[1-255]
-
14
S11{=<value>|?}
DTMF Tone Duration
and Spacing
[50-255]
-
95
S777{=<value>|?}
Silent Retry Timeout
(QUALCOMMspecific command)
[0-255]
-
150
+ICF[=<format>|=[<format>],
[<parity>]|?|=?]
Character Framing
Settings
(0-3)
3,3
3,3
+IFC[=<DCE_by_DTE>|
=[<DCE_by_DTE>],
[<DTE_by_DCE>]|?|=?]
Local Flow Control
Settings
(0-3)
2,2
2,2
+IPR[=<rate>|?|=?]
Rm Interface Baud
Rate Setting
300, 1200, 2400, 4800,
9600, 19200, 38400,
57600, 115200
*2
The power-on
default baud
rate is set
through the
phone’s user
interface
([menu}|<4>|
<3>).
+CRM[=<value>|?|=?]
Rm Interface Protocol
Setting
(1-1)
1
1
~+++~ 3
Direct the DCE to
change from online to
online-command
mode.
-
-
-
+CFG[=<string>|?]
Set Remote Config
String Command
*4
*4
*4
+GSN[=<value>|?]
Read Phone ESN
-
-
-
+DS[=[<dir>[,<comp_neg>
[,<max_dict>[,<max_string>]]]]
|?|=?]
IWF (Interworking
Function) Data
Compression Control
(0-3), (0-1), (51265535), (6-250)
3, 0, 2048,
6
3, 0, 2048, 6
+ES[=[<orig_rqst>[,<orig_fbk>
[,<ans_fbk>]]]|?|=?]
IWF Error Control
Selection
(0-4), (0-4), (0-6)
3, 0, 2
3, 0, 2
+MS[=[<carrier>[,<automode>
[,<min_rate>[,<max_rate>
[,<min_rx_rate>
[,<max_rx_rate>]]]]]]|?|=?]
IWF Modulation
Selection
*4
*4
*4
$QCMODE[=<mode>|?|=?]
Set Mode: Auto,
Globalstar, Digital,
Analog
(1-4)
1=Auto-detect
2=Globalstar
3=Digital
4=Analog
1
15
$QCERR
Send formatted Error
Log info to DTE
-
-
-
AT Commands
119
Table 2. Supported AT Commands (continued)
AT Command and Syntax
AT Command
Description (brief)
Value Range
No Value
Definition
Power ON
Definition
$QCCLR
Clear Error Log
-
-
-
$QCSA[=<alert>|?|=?]
Set Alert on Service
change
(0-1)
0=Service Alert OFF
1=Service Alert ON
1
0
$QCSTATUS
Send formatted
Service Status to DTE
-
-
-
$QCTOD[=<tformat>|=?]
Send formatted Timeof-Day to DTE
(0-1)
0=<YYY>:<DOY>
<HH:MM:SS>
1=<DD> <MM>
<YYY> <HH:MM:SS>
0
-
$QCPLS[=<position type>
|=[<position type>],
[<tformat>]|=?]
Send formatted
Position info to DTE
(0-1)
0=Request Current
1=Get last
0, 0
-
(0-1)
0=TOD format 0
1=TOD format 1
$QCMSTATS
Send formatted
Markov statistics to
DTE
-
-
-
$QCQNC[=<value>|?|=?]
Set Packet Data call
Service Option
(0-1)
0=disabled
1=enabled
1
1
+CMUX[=<mux>|?|=?]
Set Forward MUX
Option
(1-2)
1=rateset 1
2=rateset 2
2
2
$QCPKND[=<mode>|?|=?]
Set Data Packet
Reconnect Methods
(0-2)
0=Packet data
1=Asynchronous data
2=Selective mode:
uses same mode as
last data call
0
0
$QCSMSA[=<alert>|?|=?]
Set Alert on new SMS
message arrival
(0-1)
1
0
$QCSMSI
Send SMS message
counts info to DTE
-
-
-
$QCSMSL[=<lock>|=?]
Lock current SMS
message
(0-1)
0
-
$QCSMSM[=<move>|=
[<move>],[<del>]|=?]
SMS list traversal
and manipulation
(0-3), (0-1)
0, 0
-
$QCSMSP[=<tformat>|=?]
Print formatted info
for current SMS
message
[0-1]
0
-
120
AT Commands
Table 2. Supported AT Commands (continued)
AT Command and Syntax
AT Command
Description (brief)
Value Range
6$QCTCP[=<tcpmod>|[=
TCP Stack Changes
(0-1)7
(0-1500)
(0-1500)
(0-1500)
(0-120000)
(0-120000)
(0-1000)
(0-6000)
(0, 1-100)
Use Van Jacobsen
Header Compression
(0-1)
<tcpmod>[,<lowertxmss>[,
<uppertxmss>[,<rxmss>[,
<minrto>[,<maxrt>[,<minato>[,
<maxato>[,<maxtcpbackoff>]]]]
]]]]]|?|=?]
6$QCVJ[=<usevj>|?|=?]
No Value
Definition
Power ON
Definition
0
536
536
536
500
6000
100
6000
0
1
1
1
A/ command is a special function that does not require the AT command header or the S3 command
terminator character and causes the execution of the previously entered AT command.
2When
no parameter value is sent with the +IPR command, the default baud rate is
assumed.
3The
~ character represents “guard-time” before and after the +++ escape sequence.
4
This parameter is a quoted string, saved in the phone, and downloaded to the Gateway
Interworking Function modem when establishing an Asynchronous Data call.
5
The phone will always Power-On in Auto mode, using the service based on the user’s preferences.
6This
is an advanced AT command. Do not use it if you do not understand what it does.
7If <tcpmod> is equal to one, the values in the rest of the variables will be put into effect. If <tcpmod>
is set to zero, the rest of the values entered into the AT command will be ignored, and the default
values will be restored to the internal variables.
AT Commands
121
122
AT Commands
Index
A
accessories 4, 109
account information 43
adapters
25-pin to 9-pin 5, 59, 110
null modem 5, 77, 109
USB 57
addresses 30, 50, 72, 84, 93
Admin rights 14
advanced connection settings,
Windows 20
analog cellular mode 7
Analog only 8, 112
antenna
extending 12, 53, 54, 59, 61, 73,
75, 79, 85, 88, 90, 95,
96, 105, 106, 111
positioning 7
Apple computers 57
Area code 27
asynchronous data
Globalstar routing 3
Globalstar satellite mode 7
overview 1
troubleshooting 113
AT commands 81, 101, 115, 116
list of supported 117
Auto Mode 8, 112, 113
setting selection 8
B
battery
laptop 112
phone 7, 111
baud rate 19, 37, 69, 81, 93, 100,
112, 114, 115, 116
changing on phone 19, 37, 55, 76,
88, 96, 106
BBS 1, 62, 75
Bulletin Board System 1
Busy 113
bytes
received 9
transmitted 9
C
cables 4, 11, 59, 77, 89, 107, 109
call information 9
displaying 9
car kit 4, 7, 57, 60, 107, 110
CD-ROM, inserting 14
Cell Only 8, 113
Cell Pref 112
cellular
analog 7, 8, 9
antenna 12, 59, 61, 79, 90
data calls 1
digital 1, 7
modes 7
OTA data rates 1
Challenge Handshake
Authentication Protocol 115
CHAP 115
Name 93
chat script 92, 93
Check mode preferences 8, 112
COM port 12, 53, 90, 108, 114
conflict 114
Windows 18, 19
Windows 2000 36, 37
computers
data compatible 3
locking up 114
Macintosh 57
positioning 4
UNIX 89
Windows 11
connecting
car kit 107
from Linux 105
from Macintosh 73
from Palm 85
from Solaris 94
from Windows 53
Macintosh to phone 58, 60
Palm handheld to phone 78
UNIX computer to phone 90
Windows PC to phone 12
Index-1
connection
configuring for Windows 20
configuring for Windows 2000 38
configuring PPP 100
new for Dial-Up Networking 23
setting up for Palm 82
Control Strip 73
country code 28
D
data bits 20, 39
data cable 4, 11, 57, 58, 59, 61, 77,
78, 89, 90, 109
Data Communications Equipment
117
data service, see Globalstar data
service
Data Terminal Equipment 117
DCE 117
dial properties 31
Dial-Up Networking 22
installing 23
required for wizard 14
Windows 2000 41
digital
cellular connections 4
cellular mode 7
icon 53, 74, 86, 105
DIN-8 59, 60, 110
disconnecting
Linux 106
Macintosh 75
Palm 87
Solaris 95
Windows 54
displaying call information 9
DNS addresses 30, 50, 72, 84, 93,
103
domain
name 51, 72, 93, 103
suffix 51
Domain Name Service
Linux 103
UNIX 93
drivers 15, 34
DTE 117
duration of calls 9
E
Echo 117
EIA-232 Signal 110
EIA-574 110
Index-2
EIS, see Eudora Internet Suite
e-mail 1, 54, 62, 75, 87
Eudora 1, 54, 75
Eudora Internet Suite 87
extension cable 4, 109
F
Finder 63
firewall 62
flow control 21, 26, 119
FTP 1, 54, 75
G
Gateway 2, 5, 19, 37
GEM 108, 110
Globalstar
data service
defined 1
overview 2
Electronic Module 108, 110
OTA data rates 1
Satellite Antenna 12, 53, 54, 59,
61, 73, 75, 79, 85, 88,
90, 95, 96, 105, 106,
111
Satellite Communications
System 1, 2, 3
satellite mode 7
signal 111, 114
GS Async Data 24, 46
GS Packet Data 24, 46
GSP-1600 Tri-Mode Phone, see
QUALCOMM Globalstar GSP1600 Tri-Mode Phone
GSP-1600/1620 Async Data 24, 46
GSP-1600/1620 Packet Data 24, 46
GSP-16XX 69
GSP-16XX CELL only 69
GSP-16XX SAT only 69
GStar Only 8
gstardata.inf 14
gstarmi.exe 14
H
Hardware (RTS/CTS) 21, 26
hardware components
car kit 107
Macintosh 57
Palm 77
UNIX 89
Windows 11, 77
hardware failure 112
Hayes modem 92, 117
host icon 94
HotSync
cable 5, 77, 78, 109
Manager 53, 73, 114, 115
HyperTerminal 1
I
IBM-compatible PCs 3, 4
Idle timeout 84
Ignore Dial Tone 70
initialization string 101, 116
interface 3, 109
Internet 1
applications 112
mail account 46
protocol 48
Service Provider, see ISP
Windows 2000 connection 42
Interworking Function 119, 121
intranet 1, 62
IP address 30, 49, 84, 92, 93
IP Header Compression 30
IP network protocol 54, 75, 87
IRQs 114
ISP 1, 5, 30, 50, 51, 54, 72, 75, 87,
95, 103, 106, 112
IWF 119
K
kits
car kit 7, 107, 110
packet data 3, 4, 11, 54, 63, 75,
77, 89
L
LAN 42
line speed, PPP connection 100
Linux
computers 97
configuring 97
disconnecting 106
making connections 105
Red Hat 89
LinuxConf suite 97
Location Manager 63
Login name 99
M
Macintosh 57
disconnecting 75
making connections 73
modem cable 59, 60, 61, 109
pinouts 110
troubleshooting 115
MacOS 7.6 57, 64, 73, 75
MacOS 9 57
mail account 46
Manual Mode 8, 112
setting selection 9
manually configuring
Windows 2000 33
Windows 95, 98, NT 14
masks 72
maximum speed 24, 114
modem 19, 37
Microsoft Internet Explorer 1, 54
mini-DIN-8, see DIN-8
modem
19200 bps 35
33600 bps 17
adapter 109
asynchronous calls to 1
AT commands 117
cable 109
file 14
for Palm 80
hardware failure 112
initialization string 101, 116
Macintosh 61
port 69
port conflicts, Macintosh 73
port conflicts, Windows NT 18
properties 18
script, Macintosh 63, 69
setting up driver 15, 34
setting up for Linux 98
setting up for Windows 15
wizard 11, 14
modes
auto 8
cellular 7, 90
manual 8
mismatch 8, 112
phone 7
preferences 7, 8
satellite 7
mouse 114
N
name server
Linux 103
Solaris 93
Netconf 97
Index-3
Netscape Navigator 1, 54, 75
network
connection, Palm 82
protocols, Windows 29
provider 1, 5
No answer 113
No carrier 113
No dial tone 8, 112, 113
null modem adapter 5, 77, 78, 109
O
overhead 1
over-the-air data rates 1
P
packet data
Globalstar routing 2
Globalstar satellite mode 7
overview 1
packet data connections
for Linux 105
for Macintosh 73
for Palm 85
for Solaris 94
for Windows 53
Palm 77
browser 87
cable 109
configuring 79
disconnecting 87
handheld organizers 77
making connections 85
models 77
operating system 115
OS 77
troubleshooting 115
PalmPilot 77
PAP
authentication 99
Id 93
parity 20, 39
password 44, 54, 74, 82, 99, 115
required for cellular calls 31, 44,
53, 66
phone
connecting to Macintosh 58, 60
connecting to Palm 78
connecting to UNIX computer 90
connecting to Windows PC 12
modes 7
tips for using 7
Index-4
phone book entry 28, 43, 66, 83, 92,
99
Phone number preview 31
pinouts, Macintosh 110
Point-to-Point Protocol 13, 57, 67,
72, 79, 84
positioning computers, for data
service 4
PPP 29, 67, 84
connection for Linux 98
daemon 116
see also Point-to-Point Protocol
Solaris client 91
PPP/SLIP/PLIP 98
pppinit 94
ppptool 94
preferences, call mode 8, 112
priority, call mode 8
problems 111
protocol 48, 67
PSTN 3
Public Switched Telephone
Network 3
Pulse Dialing 118
Q
QC commands, AT 119
QCPKND 26, 38, 81, 92, 101, 120
QCPKND=1 76
QUALCOMM
Globalstar GSP-1600 Tri-Mode
Phone 1, 11, 57, 59,
77, 89
see also phone
using for data 7
Globalstar Hands-Free Car Kit
4, 7, 107, 110
Globalstar Packet Data Kit 3, 4,
11, 54, 63, 75, 77, 89,
109
Globalstar Phone Modem 69,
115
serial data cable 11, 57, 58, 59,
61, 77, 89, 90, 109
Query DNS 84
Quick Start Wizard 14, 33
Quick Start, for Windows 14
R
RAS 14
Remote
Access Service 14
Access Status 73, 74, 75
server 94
routing
asynchronous data 3
packet data 2
RS-232 12, 90, 108
S
S commands, AT 118
satellite 2, 3
antenna 111
mode 7
unobstructed access 7
scripts, Macintosh modem 63, 69
serial
data cable, see QUALCOMM
serial data cable 4
port conflicts, Windows 53
service provider 5
signal 114, 115
obtaining 12, 59, 61, 79, 91, 111
SMS messages 120
software compression 29
Solaris 89
disconnecting 95
making connections 94
Solstice PPP 91
SP 5
speed
Palm modem 81
see also maximum speed, baud
rate
standard modem 17
Windows 2000 35
stop bits 20, 39
syntax, AT command 117
T
TCP/IP 1, 29, 48, 67, 70, 72, 73
protocol 14
Windows settings 30
telephone number 28, 43, 66, 83,
92, 101, 111
telnet 1, 54, 75
terminal emulator 57, 62, 75
terrestrial, see cellular
throughput 1
TIA/EIA-574 DTE serial interface
3, 109
Tone Dialing 32, 118
touch command 93
TouchTone 81
troubleshooting 111
U
Universal Serial Bus 4
UNIX computers 89
configuring 91
troubleshooting 116
USB 4, 57, 58, 109
user name 44, 54, 82
required for cellular calls 31, 44,
53
usernetct command 105
using
computers 3
Globalstar data service 2
Tri-Mode Phone 7
V
vehicles 7, 107
W
Windows
also see Windows 2000,
Windows NT
configuration instructions 14
connecting components 11
Dial-Up Networking 22
disconnecting 54
making packet data connection
53
modem installation wizard 11,
14, 33
setting up modem driver 15
TCP/IP settings 30
troubleshooting 114
Windows 2000
configuration instructions 33
configuring networking
properties 48
driver speeds 35
Internet connection 42
making packet data connection
53
naming dial-up connection 46
setting up a new connection 41
setting up modem driver 34
Index-5
Windows NT
Admin rights 14
configuration instructions 14
one modem per port 18
wireless modem 1, 13, 15, 34, 79,
82, 91, 97, 117
wizard 11, 14, 33
wrong number 113
Index-6