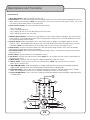
1
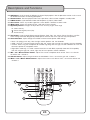
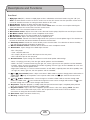
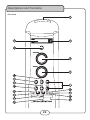
������������ Sonic Station All-In-One Surround Sound Tower ��� ������ ����� ����� ���� ������ �������� ���� ���� ������ Owner’s Manual �������� ������ ������ ���� ��� ������ ������ ���� ���������� ����� ����� ���� ����� Safety WARNING TO PREVENT FIRE OR SHOCK HAZARD. DO NOT EXPOSE THIS APPLIANCE TO RAIN OR MOISTURE. THIS APPLIANCE SHALL NOT BE EXPOSED TO DRIPPING OR SPLASHING WATER AND THAT NO OBJECT FILLED WITH LIQUIDS SUCH AS VASES SHALL BE PLACED ON APPARATUS. IMPORTANT SAFETY INSTRUCTIONS 1) 2) 3) 4) 5) 6) 7) 8) 9) 10) 11) 12) Read these instructions. Keep these instructions. Heed all warnings. Follow all instructions. Do not use this apparatus near water. Clean only with dry cloth. Do not block any ventilation openings. Install in accordance with the manufacturer’s instructions. Do not install near any heat sources such as radiators, heat registers, stoves, or other apparatus (including amplifiers) that produce heat. Do not defeat the safety purpose of the polarized or grounding-type plug. A polarized plug has two blades with one wider than the other. A grounding type plug has two blades and a third grounding prong. The wide blade or the third prong are provided for your safety. If the provided plug does not fit into your outlet, consult an electrician for replacement of the obsolete outlet. Protect the power cord from being walked on or pinched particularly at plugs, convenience receptacles, and the point where they exit from the apparatus. Only use attachments/accessories specified by the manufacturer. Use only with the cart, stand, tripod, bracket, or table specified by the manufacturer, or sold with the apparatus. When a cart is used, use caution when moving the cart/apparatus combination to avoid injury from tip-over. Safety 13) Unplug this apparatus during lightning storms or when unused for long periods of time. 14) Refer all servicing to qualified service personnel. Servicing is required when the apparatus has been damaged in any way, such as power-supply cord or plug is damaged, liquid has been spilled or objects have fallen into the apparatus, the apparatus has been exposed to rain or moisture, does not operate normally, or has been dropped. 15) Grounding or Polarization – This product may be equipped with a polarized alternatingcurrent line plug (a plug having one blade wider than the other). This plug will fit into the power outlet only one way. This is a safety feature. If you are unable to insert the plug fully into the outlet, try reversing the plug. If the plug should still fail to fit, contact your electrician to replace your obsolete outlet. Do not defeat the safety purpose of the polarized plug. 16) Ventilation – Slots and openings in the cabinet are provided for ventilation and to ensure reliable operation of the product and to protect it from overheating, and these openings must not be blocked or covered. The openings should never be blocked by placing the product on a bed, sofa, rug, or other similar surface. This product should not be placed in a built-in installation such as a bookcase or rack unless proper ventilation is provided or the manufacturer’s instructions have been adhered to. 17) The MAINS plug or an appliance coupler is used as the disconnect device, the disconnect device shall remain readily operable. Class 1 Laser Product CAUTION: USE OF ANY CONTROLS, ADJUSTMENTS, OR PROCEDURES OTHER THAN THOSE SPECIFIED HEREIN MAY RESULT IN HAZARDOUS RADIATION EXPOSURE. PRODUCT COMPLIES WITH DHHS RULE 21 CFR SUBCHAPTER J IN EFFECT AT DATE OF MANUFACTURE. CAUTION: Invisible laser radiation when open. Do not stare into beam. Welcome And Thank you for purchasing the Sonic Station from VocoPro, your ultimate choice in Karaoke entertainment! With years of experience in the music entertainment business, VocoPro is a leading manufacturer of Karaoke equipment, and has been providing patrons of bars, churches, schools, clubs and individual consumers the opportunity to sound like a star with full-scale club models, in-home systems and mobile units. All our products offer solid performance and sound reliability, and to reinforce our commitment to customer satisfaction, we have customer service and technical support professionals ready to assist you with your needs. We have provided some contact information for you below. VocoPro 1728 Curtiss Court La Verne, CA 91750 Toll Free: 800-678-5348 TEL: 909-593-8893 FAX: 909-593-8890 VocoPro Company Email Directory Customer Service & General Information [email protected] Tech Support [email protected] Remember Our Website Be sure to visit the VocoPro website www.vocopro.com for the latest information on new products, packages and promos. And while you're there don't forget to check out our Club VocoPro for Karaoke news and events, chat rooms, club directories and even a KJ Service directory! We look forward to hearing you sound like a PRO, with VocoPro, your ultimate choice in Karaoke entertainment. FOR YOUR RECORDS Please record the model number and serial number below, for easy reference, in case of loss or theft. These numbers are located on the rear panel of the unit. Space is also provided for other relevant information Model Number Serial Number Date of Purchase Place of Purchase Table of Contents FCC Information.......................................... 6 Getting Started........................................... 7 - Accessories - Installing Microphone Clips Getting Connected....................................... 8 - Connecting Power Powering another Device Connecting to a TV / Video Monitor Connecting to an Audio Mixer Connecting the Microphones Connecting an Mp3 Player........................... 11 - Powering /Charging an Mp3 Player General Operations..................................... 12 - Power and Standby Input Channels Adjusting the Master Music Volume Changing the Video Mode Choosing the Right Surround Sound Setting Operations (Disc Mode)............................... 14 - Loading a Disc Playing a Disc Stopping a Disc Pausing a Disc Skipping Tracks/Chapters Searching through Tracks/Chapters Subtitles Viewing Multiple Angles Slow-Motion Viewing One Frame at at Time (Step) Selecting Repeat Options Creating a Loop (A-B) Cancelling Vocals Zooming In and Out Jumping to a Specific Time on a Disc Setting the OSD Operations (Mp3 and AVI / DivX)................. 18 - Play file - Repeat Options Microphone Operations............................... 19 - Turning on the Microphones Setting the Speakers for Vocals Adjusting the Master Mic Volume Adjusting the Tone Using Digital Echo AM/FM Tuner Operations............................. 21 - Choosing a Band - Searching - Programming Presets Descriptions and Functions............................ 22 - Remote Control - Front - Rear System Setup Menu...................................... 28 - General Setup - Audio Setup - Video Setup Troubleshooting............................................ 33 FCC information (U.S.A.) 1. IMPORTANT NOTICE: DO NOT MODIFY THIS UNIT!: This product, when installed as indicated in the instructions contained in this manual, meets FCC requirements. Modifications not expressly approved by Vocopro may void your authority, granted by the FCC, to use this product. 2. IMPORTANT: When connecting this product to accessories and/or another product use only high quality shielded cables. Cable(s) supplied with this product MUST be used. Follow all installation instructions. Failure to follow instructions could void your FCC authorization to use this product in the U.S.A. 3. NOTE: This product has been tested and found to comply with the requirements listed in FCC Regulations, Part 15 for Class "B" digital devices. Compliance with these requirements provides a reasonable level of assurances that your use of this product in a residential environment will not result in harmful interference with other electronic devices. This equipment generates/uses radio frequencies and, if not installed and used according to the instructions found in the owner's manual, may cause interference harmful to the operation of other electronic devices. Compliance with FCC regulations does not guarantee that interference will not occur in all installations. If this product is found to be the source of interference, which can be determined by turning the unit "Off" and "On", please try to eliminate the problem by using one of the following measures: Relocate either this product or the device that is being affected by the interference. CAUTION: READ THIS BEFORE OPERATING YOUR UNIT 1. To ensure the finest performance, please read this manual carefully. Keep it in a safe place for future reference. 2. Install your unit in a cool, dry, clean place - away from windows, heat sources, and too much vibration, dust, moisture or cold. Avoid sources of hum (transformers, v motors). To prevent fire or electrical shock, do not expose to rain and water. 3. Do not operate the unit upside-down. 4. Never open the cabinet. If a foreign object drops into the set, contact your dealer. 5. Place the unit in a location with adequate air circulation. Do not interfere with its proper ventilation; this will cause the internal temperature to rise and may result in a failure. 6. Do not use force on switches, knobs or cords. When moving the unit, first turn the unit off. Then gently disconnect the power plug and the cords connecting to other equipment. Never pull the cord itself. 7. Do not attempt to clean the unit with chemical solvents: this might damage the finish. Use a clean, dry cloth. 8. Be sure to read the "Troubleshooting" section on common operating errors before concluding that your unit is faulty. 9. This unit consumes a fair amount of power even when the power switch is turned off. We recommend that you unplug the power cord from the wall outlet if the unit is not going to be used for a long time. This will save electricity and help prevent fire hazards. To disconnect the cord, pull it out by grasping the plug. Never pull the cord itself. Use power outlets that are on different branch (circuit breaker or fuse) circuits or install AC line filter(s). In the case of radio or TV interference, relocate/reorient the antenna. If the antenna lead-in is 300-ohm ribbon lead, change the lead-in to coaxial type cable. If these corrective measures do not produce satisfactory results, please contact your local retailer authorized to distribute Vocopro products. If you can not locate the appropriate retailer, please contact Vocopro, 1728 Curtiss Court, La Verne, CA 91750. 10. To prevent lightning damage, pull out the power cord and remove the antenna cable during an electrical storm. 11. The general digital signals may interfere with other equipment such as tuners or receivers. Move the system farther away from such equipment if interference is observed. NOTE: Please check the copyright laws in your country before recording from records, compact discs, radio, etc. Recording of copyrighted material may infringe copyright laws. CAUTION The apparatus is not disconnected from the AC power source so long as it is connected to the wall outlet, even if the apparatus itself is turned off. To fully insure that the apparatus is indeed fully void if residual power, leave unit disconnected from the AC outlet for at least fifteen seconds. Voltage Selector (General Model Only) Be sure to position the voltage selector to match the voltage of your local power lines before installing the unit. 110V 6 Getting Started Make sure none of the following accessories are missing from the Sonic Station’s packaging: • • • • • • • • • • 1 AC Power Cord 1 A/V RCA cable 2 AAA batteries 1 Remote Control 2 XLR to ¼” microphone cables 1 AM radio band antenna 1 FM radio band antenna 2 VocoPro MARK 11.5 vocal microphones 2 microphone clips 10 microphone clip screws Clip Screws AM Antenna A/V RCA Cable XLR Mic Cable Batteries Microphone Clip Remote Control AC Power Cord Mark 11.5 Mics Installing the Microphone Clips The Sonic Station comes with two microphone clips intended to safely hold the microphones when they are not in use. What you will need • Phillips head screwdriver (not included) • 4 mounting screws for each clip (included) • 2 microphone clips (included) 1. Line up the four holes on the clip with the holes on the rear panel of the Sonic Station. See figure below. 2. Screw in each screw until the clip is securely attached 3. Follow steps one and two for the second clip 7 FM Antenna Getting Connected Because the Sonic Station has built-in speakers, DVD/CD/CD+G player, and AM/FM Tuner there is not a lot of additional setup necessary. Additional setup options include connecting to a TV / monitor (RCA, S-VIDEO, Component) or another audio input device (RCA or Coaxial). The sonic station can also be used to play an Mp3 Player such as an Ipod and up to two additional audio/video output devices such as CD and DVD players (RCA). Connecting Power [Fig. B] To power the Sonic Station: ����� ������������������ What you will need • 1 AC power cord (included) • Surge-protector (recommended) or a power outlet �������������������������� ���������������� NOTE: Before turning on the power make sure the red voltage selector [Fig. A] under the AC INPUT is set to the proper voltage. It should be set to 115V for North America and 220V for most European countries. Make sure you know the proper voltage for your region before turning on the Sonic Station. ������������������ ����������������� Fig. A 1. Connect the AC end of the power cord into the AC INPUT on the rear panel of the Sonic Station 2. Connect the other end to a surge-protector or available power outlet ����� ������������������ �������������������������� ���������������� ������������������ ����������������� Fig. B Powering another Device [Fig. C] The sonic station can be used to power a second device such as Mp3 player or DVD player. Simply connect the device’s power cord to the power outlet labeled OUTLET UNSWITCHED on the rear panel of the Sonic Station. ����� ������������������ �������������������������� ���������������� ������������������ ����������������� Fig. C 8 Getting Connected Connecting to a TV / Video Monitor with an RCA input [Fig. D] What you will need • 1 RCA-style video cable (included) • TV / video monitor with an RCA video input 1. Connect one end of the RCA video cable to the yellow Video Out on the rear panel of the Sonic Station 2. Connect the other end of the RCA video cable to the Video Input on a TV / video monitor Fig. D Sonic Station Connected to VocoPro’s LTV-5 Connecting to a TV / Video Monitor with an S-Video input [Fig. E] What you will need • 1 S-VIDEO cable (not included) • TV / video monitor with an S-VIDEO input 1. Connect one end of the S-VIDEO cable to the S-VIDEO out on the rear panel of the Sonic Station 2. Connect the other end of the S-VIDEO cable to the S-VIDEO input on a TV / video monitor Fig. E Connecting to a TV / Video Monitor with Component inputs [Fig. F] What you will need • 1 Component (Y/Cb/CR) cable (not included) • TV / video monitor with a Component video input TV 1. Connect each end of the Component video cables to the Y Cb/Pb Cr/Pr outputs on the rear panel of the Sonic Station 2. Connect the other ends of the S-VIDEO cables to the Component inputs on a TV / video monitor Fig. F 9 � �� �� Getting Connected Connecting to an Audio Mixer or TV with RCA Audio Inputs [Fig. G] What you will need • 1 RCA L/R (red & white) stereo RCA cable (included) • 1 audio mixer or TV with RCA audio inputs Fig. G 1. Connect one end of the L/R (red & white) RCA cable to the red and white audio outputs labeled MIXED OUTPUT on the rear panel of the Sonic Station 2. Connect the other end of the L/R (red & white) RCA cable to the audio input on an audio mixer or TV AC 117/230V 60/50Hz 200W MIC INSERT ON REC OUT MIC OUT 120V OFF 240V VOLTAGE SELECT PROFESSIONAL EQUIPMENT NO USER SERVICEABLE PARTS INSIDE ECHO EFFECT OUTLET UNSWITCHED A CDG LD DVD VIDEO INPUT WIRELESS INPUT 1 2 AC 117/230V 50/60Hz 3 VIDEO OUTPUT B VARIABLE SPEED FAN DO NOT BLOCK R CD Connecting to a Digital Audio Input Device [Fig. H] CDG LD AUDIO INPUT DVD PRE OUTPUT SPEAKERS L FUSE AC 6.3A 250V A OR B 6 MIN/SPEAKER A+B 12 MIN/SPEAKER OUT IN EFFECT LOOP Sonic Station Connected to VocoPro’s DA-8909RV What you will need • 1 digital coaxial cable (not included) • 1 audio input device (digital receiver, mixer, etc.) with a digital coaxial input Fig. H 1. Connect one end of the coaxial cable to the coaxial output labeled DIGITAL on the rear panel of the Sonic Station 2. Connect the other end of the coaxial cable to the coaxial input on an audio input device Digital Receiver Connecting the Microphones [Fig. I] What you will need • 2 microphones (included) • 2 XLR to ¼” microphone cables (included) ��������������������������������������������� ������������������������������������������������ ����������������������������������������������� 1. Connect the XLR end to the microphone 2. Connect the ¼” end into one of the ¼” mic inputs on the rear panel 3. Repeat steps 1 and 2 for the second microphone ��� ������� ��� ������� ������ ������������������������������� � ��������� ����������������������������������������� ������ ������ ���� ���� ���������������� � ����� ������������������ �������������������������� ���������������� ������������������ ����������������� Fig. I 10 Connecting an Mp3 player An Mp3 player or other audio device with an 1/8” output jack can be connected to the Sonic Station and played through the speakers. Connecting an Mp3 Player [Fig. J] 1. Pull out the 1/8” cord located in the Mp3 Player slot and connect it to the Mp3 player’s 1/8” output jack 2. Set the sonic station to the AV 1 channel using either the AV1 button on the remote control or the SELECT button on the front panel. The Sonic Station’s display screen will indicate which channel is currently set 3. Make sure the Mp3 player’s volume is turned up completely and the Music volume on the Sonic Station is turned up enough ������������ ��� ������ ����� �������� ���� �������� ������ ����� ���� ������ ���� ������ ������ ���� ��� ������ ������ ���� ���������� ����� ����� ���� ����� Fig. J Powering / Charging an Mp3 Player [Fig. K] An Mp3 Player can be powered and charged using the OUTLET UNSWITCHED jack on the rear panel of the Sonic Station. What you will need • An Mp3 Player • A charger for the Mp3 player 1. Connect the charger to the OUTLET UNSWITCHED jack on the rear panel of the Sonic Station 2. Run the other end through the opening on the back of the Mp3 player slot 3. Connect it to the Mp3 player ����� ������������������ �������������������������� ���������������� ������������������ ����������������� Fig. K 11 General Operations Turning the Sonic Station On, Off and to Standby Press the Power button on the Sonic Station to turn the unit ON or OFF Standby mode Once the Sonic Station is already on: 1. Press the POWER button on the remote control to enter Standby Mode 2. Press it again to return to On Mode Input Channels The Sonic Station has 4 available input channels: • Disc: Turns on the Sonic Station’s disc player for playing DVD, CD, CD+G, Mp3 and other discs • Tuner: Turns on the AM/FM tuner for radio listening • AV1: For playing a device that is connected to the 1/8” Mp3 player jack on the top of the sonic station or the AV1 RCA audio/video inputs on the rear panel • AV2: For playing a device that is connected to the AV2 RCA audio/video inputs on the rear panel Selecting an Input Channel [Fig. L] 1. Use the input select buttons on the remote control (DVD, TUNER, AV1, and AV2) to directly select the desired input channel or use the SELECT button on the front panel to cycle through the input channels 2. Once the desired input channel is selected, playback can begin �������������������� ��� �� ����� ���� ������ �������� ���� ���� ������ �������������� �������� ��� ��� ������ ������� ������ ������ ���� ���������� ����� ����� ���� ����� ������������� Fig. L 12 General Operations Adjusting the master Music Volume The master Music Volume for the disc player, radio and AV input channels can be adjusted using either the front panel control or the remote control Front Panel Turn the MUSIC VOLUME control clockwise to raise the volume and counter-clockwise to lower the volume ������������ Remote Control Press the MUSIC button to raise the volume and the MUSIC button to lower the volume -- + ��� ������ ��������������������� ����� �������������� ������ �������� ������������� Changing the Video Mode (PAL / NTSC) Use the P/N button on the remote control to switch between the regional PAL and NTSC video modes. NTSC - North America PAL - Europe and Asia Choosing the Right Surround Sound Setting The SURROUND button on the remote control and front panel cycles through four available speaker configurations: • Music Music mode is great for CDs, Mp3 players and radio. This mode plays music in true stereo through the left, right and center speakers and bass through the subwoofer. • Surround (SURR) Surround mode provides analog 5.1 surround sound or virtual surround sound. In this mode sound will come out of the right, left, center, right rear, left rear speakers and the sub woofer. NOTE: This mode is not recommended for music-only as the right and left rear speakers may give an unwanted reverby sound to the music. This is best used for movies and sports. • Karaoke In Karaoke mode, the music comes out of the left and right speakers and the subwoofer and the microphone vocals are reserved for the center speaker. In karaoke mode the music is not as loud to provide for clearer vocals. • Digital (Disc mode only) This option is only available when the Sonic Station is in Disc Mode. Digital Mode provides true digital 5.1 surround sound and is most recommended for DVDs that are AC-3 equipped. In Digital mode, the signal bypasses the Sonic Station’s internal analog board and is purely digital. 13 Operations (Disc Mode) Access DISC mode by either pressing DVD on the remote control or by pressing the SELECT button on the front panel until the display screen says disc. Loading a Disc 1. Press the OPEN/CLOSE button on the remote control or the EJECT button on the front panel of the Sonic Station to open the disc tray 2. Insert a disc 3. Press the OPEN/CLOSE button on the remote control or the EJECT button on the front panel of the Sonic Station to close the disc tray Playing a Disc 1. Load a disc 2. Press PLAY on the remote control or on the front panel Stopping a Disc 1. Press the STOP button on the remote control or front panel once to enter pause mode 2. Press the STOP button again to completely stop the disc Pausing a Disc 1. Press the PAUSE button on the remote control or front panel Skipping Tracks/Chapters 1. Use the 2. Press the 3. Press the and buttons on the remote control or front panel to skip tracks/chapters button to skip to the previous track/chapter button to skip to the next track/chapter Searching Through a Track/Chapter 1. Use the 2. Press the 3. Press the and buttons on the remote control or front panel to search through tracks/chapters button to search forwards through the current track/chapter button to search backwards through the current track/chapter Subtitles Some DVDs have subtitles available and some also include multiple languages. If you are using a DVD with subtitles available, simply press the SUBTITLE button on the remote control to cycle through the available subtitles. Viewing Multiple Angles Some DVDs have multiple viewing angles available. Press the ANGLE button on the remote control to change the viewing angle and cycle through the available angles. 14 Operations (Disc Mode) Slow-motion Playback using the SLOW button Use the SLOW button on the remote control to cycle between 4 slow-forward modes and 4 slow-reverse modes: 1/2 - Forwards at 1/2 the actual time 1/4 - Forwards at 1/4 the actual time 1/8 - Forwards at 1/8 the actual time 1/16 - Forwards at 1/16 the actual time 1/2 - Reverse at 1/2 the actual time 1/4 - Reverse at 1/4 the actual time 1/8 - Reverse at 1/8 the actual time 1/16 - Reverse at 1/16 the actual time Viewing One Frame at a Time Using the STEP Button 1. Press the STEP button on the remote control to enter Step mode 2. Every time the STEP button is pressed, when in Step mode, the movie will advance one frame 3. Press the PLAY button on the remote control or front panel to exit Step mode and return to normal playback Selecting Repeat Options Press the REPEAT button on the remote control to cycle through the available repeat modes: Track - Repeats the current track Chapter - Repeats the current chapter on a DVD Title - Repeats the current title on a DVD All - Repeats the entire disc once it has played through Creating a Loop Using the A-B Button The A-B feature allows you to loop a certain part of a disc. While the disc is playing: 1. Press the A-B button once at the desired starting point for the loop 2. Press it again at the desired ending point for the loop 3. Press it a third time to end the loop and return to normal playback Canceling Vocals using the L/R button Multiplex CD+G discs are designed to have vocals on one side and music on the other. The L/R button allows you to play only one of these sides and cancel out the other in order to have music-only or vocals-only. Press the L/R button to cycle through the available settings: • • • • Mono Left - Left channel only (no vocals) Mono Right - Right channel only (no music) Mix-Mono - Virtual stereo Stereo - Left and Right in true stereo NOTE: This feature is only for use with specifically Multiplex formatted CD+G discs. 15 Operations (Disc Mode) Zooming in and Out The Sonic Station lets you zoom in and out on the video screen. Press the ZOOM button on the remote control to cycle through the available zoom settings. Zoom in • 2X - Zooms in 2X the original size • 3X - Zooms in 3X the original size • 4X - Zooms in 4X the original size Zoom out • 1/2X - Zooms out at 1/2X the original size • 1/3X - Zooms out at 1/3X the original size • 1/4X - Zooms out at 1/4X the original size Jumping to Specific Time on a Disc Press the TIME button on the remote control to cycle through the available jump-to options: CD/CD+G disc • Disc Go To (CD/CD+G only) - Jump to a specific time on the current disc • Track Go To (CD/CD+G only) - Jump to a specific time on the current track • Select Track (CD/CD+G only) - Jump directly to a specific track Example: Jumping to 1:35 in the current track 1. Press the TIME button until “TRACK GO TO - - | - -” appears on the TV screen 2. Press 0, 1, 3, 5 3. Playback will begin at 1:35 on the current track DVD disc NOTE: Not all discs have multiple titles. A title refers to the different sections including the movie, special features, etc. • Title / Chapter (DVD only) - Select the title and then jump to a chapter within that title • Title / Time (DVD only) - Select a title and then jump to a specific time within that title • Chapter / Time (DVD only) - Select a chapter and then jump to a specific time within that chapter Example: Selecting a Title and Chapter Jumping to title 2 and chapter 2 1. 2. 3. 4. Press the TIME button until TITLE “__ / __ CHAPTER __ / __ “ appears on the top of the TV screen Press 2 on the number pad to select Title 1. Now chapter will be highlighted Press 2 on the number pad to select Chapter 2 Playback will begin at that on Title 2 and Chapter 2 16 Operations (Disc Mode) Viewing and Setting the On Screen Display (OSD) Press the OSD button on the remote control to cycle through the available OSD viewing options CD/CD+G discs • • • • • Single Remain - The time remaining on the current track Single Elapsed - The time elapsed on the current track Total Remain - The time remaining on the entire disc Total Elapsed - The time elapsed on the entire disc Display Off - Turns the OSD off DVD discs • • • • Title Remain - The time remaining on the current title Title Elapsed - The time elapsed on the current title Chapter Remain - The time remaining on current chapter Chapter Elapsed - The time elapsed on the entire chapter Last Memory Function The Last Memory function remembers the last played moment on a disc before the Sonic Station is set to Standby and returns to that moment when the Sonic Station is turned back on. Turning on the Last Memory function: 1. 2. 3. 4. 5. Press SETUP on the remote control. The General Setup page will show. Use the down arrow button on the remote control to scroll down to Last Memory If Last Memory is set to off, press enter when Last Memory is highlighted and press up so that On is highlighted Press ENTER on the remote control to confirm the selection Press SETUP again on the remote control to close the Setup menu Using the Last Memory Function: 1. When a disc is playing and the Last Memory function is on, press stop. 2. Press the red POWER button on the remote to enter Standby mode. NOTE: Do not press the main power button on the Sonic Station itself, as this will turn the unit completely off. 3. Press the red POWER button on the remote control to turn the Sonic Station back on. 4. Playback on the DVD will begin at the same spot that it left off. On CDs and CD+Gs, playback will begin on the last track that was playing. 17 Operations (Mp3 and AVI / DivX) When playing Mp3 and DivX files, the Sonic Station must be connected to a TV in order to see and navigate through the file menu. Use the arrow buttons on the remote control to navigate through the file menu and the ENTER button to select a file to play. To play a file: 1. Use the arrow buttons on the remote control to scroll to the desired file 2. Press ENTER on the remote control to begin playing the file 3. The file will begin playing or 1. Use the number buttons on the remote control and enter the file number 2. Press ENTER 00: 00 00:00 3. The file will begin playing 001/ 083 Arovane-Tide Asche-Spence Brian WilsonChrist-Melam Cinematic Orch David Sylvian Repeat Options There are six repeat options when playing Mp3 and Divx Files. Use the REPEAT button on the remote control to cycle through these repeat options: • • • • • • Random - Plays songs randomly from the entire disc Single - Playback stops after a single track finishes playing Repeat One - Repeats the current song continuously Repeat Folder - Repeats the entire folder after it has played through Folder - Playback stops after all of the songs in the current folder have played Shuffle - Plays songs randomly within the current folder 18 Microphone Operations Turning on the Microphones Each microphone has a power switch on it. 1. Flip the microphone’s power switch UP to turn the microphone on 2. Flip the microphone’s power switch DOWN to turn the microphone off Setting the Speakers for Vocals [Fig. M] When using the microphones, make sure the speakers are set to Karaoke mode for optimal vocal sound. �������������� Press the SURROUND button on the remote control or front panel until the display screen says KARAOKE. ������������� ������������ Adjusting the master Microphone Volume The master Microphone Volume can be adjusted using either the front panel control or the remote control ��� ������ Front Panel Turn the MIC MASTER control clockwise to raise the volume and counter-clockwise to lower the volume ��� �� ����� ���� ������ �������� ���� �������� ��� ��� ���� ������ ������ ���� ��� ������ ������ ���� ����� Remote Control + button to raise the volume -- button to lower the volume Press the MIC and the MIC Fig. M �������������� ������������� ������������ ��� ������ ���������� ��������������� 19 ����� ������ �������� � Microphone Operations Adjusting the Individual Microphone Volume controls Each microphone channel has its own volume control located on the front panel of the Sonic Station. Each one can be adjusted separately, providing a great sounding vocal mix. Turn the MIC 1 VOL and/or MIC 2 VOL control clockwise to raise the volume and counter-clockwise to lower the volume. Adjusting the Microphone Tone The Sonic Station has microphone tone controls on the front panel, allowing you to create clearer and more professional vocals. • MIC HI (treble) - Try increasing the HI tone if the sound is to bassy or muddy and decreasing it if it is too hi-pitched or if there is a lot of feedback. • MIC LOW (bass) - Try increasing the bass if the sound is not deep enough and decreasing it if the sound is too muddy or muffled. NOTE: There is no correct tone setting. There are many factors that affect the tone including the singer’s own vocal tone, the room, etc. Adjust the HI and LOW controls until you are pleased with the sound. Using Digital Echo Digital Echo gives vocals a more professional, studio-produced sound and is a great way to make any singer sound like a seasoned professional. There are two controls, located on the front panel, for adjusting the Echo effect: • ECHO - This controls the amount of Echo effect that will be heard. Turn clockwise to increase the amount of echo and counter-clockwise to decrease it. Turn the ECHO control fully counter-clockwise to turn the echo effect off. • DELAY - This control adjusts the amount of time between each echo repeat. Turn clockwise to make the time shorter and counter-clockwise to make the time longer. ������������ ��� ������ ����� ����� ���� ������ �������� ���� ���� ������ ���� �������� ������ ������ ���� ��� ������ ������ ���� ���������� ����� ����� ���� ����� ����� 20 AM / FM Tuner Operations Turn on the AM/FM tuner by either pressing TUNER on the remote control or by pressing the SELECT button on the front panel until the display screen shows the radio. Choosing a Band (AM/FM) Press the AM/FM (also the STOP) button on the remote control or front panel to switch between AM and FM. Searching Through the Radio Stations Use the and SEARCH buttons on the remote control or front panel to search through all the radio stations. Searching Through Preset Radio Stations Use the and PRESET buttons on the remote control or front panel to search through radio stations that have been programmed into your preset list. Programming Preset Radio Stations The Sonic Station allows you to program up to 40 radio stations (20 in FM and 20 in AM) as presets for instant access. 1. Use the and search buttons to find the desired radio station 2. Press and hold down a button on the remote control’s number pad for two seconds to set the station to that number. 3. That number will appear next to the station number in the display screen, indicating that it has been programmed for example: Setting 93.1FM to preset number 1: 1. Turn the radio to 93.1FM 2. Hold down 1 on the remote control for two seconds 3. The number 1 will appear to the left of 93.10 on the display screen 4. The preset has been programmed Setting 106.7 to present number 20 1. 2. 3. 4. 5. Turn the radio to 106.7FM Press +10 on the remote control Press and hold down 0 on the remote control for two seconds The number 20 will appear to the left of 106.70 on the display screen The preset has been programmed 21 Descriptions and Functions Remote Control 1. Open/Close button - Opens and closes the disc tray. 2. Power button - Turns the Sonic Station On or to Standby mode. To turn the Sonic Station completely off, use the power button on the front panel. NOTE: The main power must be on in order to use this power button. Turn on the main power with the power button on the front panel. 3. Input selector buttons - Use these to select the input channel. • • • • Disc - Disc player Tuner - AM/FM radio tuner AV1 - Mp3 1/8” jack or the AV1 RCA inputs on the rear panel AV2 - AV2 RCA inputs on the rear panel 4. Number/Preset buttons - Use these to jump directly to a track in Disc mode or to program and access preset radio stations in Tuner mode. See the Disc and Tuner Operations sections of this manual for detailed instructions on using the Number/Preset buttons. 5. Program button - Opens the program menu. The Sonic Station can program the playback order of up to 20 tracks on a disc. See the Operations section of this manual for detailed instructions on programming a custom track order. NOTE: The Sonic Station must be in DISC mode in order to access the Program menu. 6. Setup button - Accesses the System Setup menu. See the System Setup section in this manual for detailed instructions on changing the system setup options. 7. Directional buttons - Use these buttons for navigating through menus (i.e. DVD menu, Program menu, System Setup menu, etc.). 8. Enter button - Use this button to make selections in menus. 9. Title button - Accesses the title screen on a DVD. NOTE: For use on DVDs with title screens. Some DVDs may not have a title screen. 10. Menu button - Accesses the main menu on a DVD and other discs with main menus. 11. Return button - Accesses the main menu on a VCD 2.0 disc. NOTE: PBC must be turned on and the VCD must be a VCD 2.0 disc. 12. Stop/AM/FM button - Stops disc playback in standby mode when pressed once and completely stops disc playback when pressed twice. Also switches between AM/FM when in TUNER mode. 13. Play/Auto button - Plays a disc that is stopped or paused and auto-scans the radio station when in TUNER mode. See the Operations section in this manual for detailed instructions on auto-scanning. 14. Pause/ST/MO button - Pause a disc that is playing and switches between Stereo and Mono radio output when in TUNER mode. � � � � � � � � � �� �� �� �� �� 22 Descriptions and Functions 15. 16. 17. 18. 19. 20. 21. 22. 23. 24. 25. 26. 27. 28. and (B-Scan - F-Scan) buttons - Scans through a track when in DISC mode or searches through radio stations in TUNER mode: scans backwards through the current track or through radio stations and scans forwards through the current track or through radio stations. and (prev and next) buttons - Skip tracks when in DISC mode or searches through preset radio stations in TUNER mode: jumps to the previous track or preset radio station and skips ahead to the next track or radio station. Audio button - Cycle through caption languages on a disc with multiple caption languages available. Subtitle button - Cycles through the available subtitle languages on a DVD with subtitles available. NOTE: Not all DVDs will have subtitles available. Angle button - Cycles through the available viewing angles on DVDs with multiple viewing angles available. NOTE: Not all DVDs will have multiple viewing angles available. PBC button - Turns on Playback Control (PBC). For use with VCD 2.0 discs, PBC allows you to navigate more conveniently through VCD 2.0 discs. Slow button - Cycles through the different slow motion options while in DISC mode. See the Operations section in this manual for detailed instructions on using slow motion. Step button - Allows you to view a disc step-by-step, one frame at a time. See the Operations section in this manual for detailed instructions on using the Step feature. Repeat button - Cycles through the available repeat options. Repeat options vary from type of disc so see the Operations section of this manual for detailed instructions on using the repeat function for every kind of disc. A-B (loop) button - Allows you to set a section on a disc for continuous looping. See the Operations section in this manual for detailed instructions on using the A-B loop feature. L/R button - Cycles through the different multiplex CD+G output modes for canceling the vocals: MONO-LEFT, MONO-RIGHT, MIX-MONO and STEREO. See the Operations section in this manual for detailed instructions on canceling vocals on multiplex CD+G discs. P/N button - Switches between PAL and NTSC video modes. Time button - Accesses the Time menu which allows you to jump directly to a specific time on a disc. See the Operations section in this manual for detailed instructions on jumping to a specific time on a disc. Zoom button - Allows you to zoom in 2X, 3X and 4X and zoom out 1/2X, 1/3X and 1/4X on the video during disc playback. �� �� �� �� �� �� �� �� �� �� �� �� 23 �� �� Descriptions and Functions 29. OSD button - Cycles through the different On Screen Display options. See the Operations section in this manual for detailed instructions on selecting OSD options. 30. Resume button - Resumes playback from exact spot where a disc has been stopped in standby mode. 31. V-Mode button - Cycles between S-video and Component (Y/Cb/Cr) video modes. 32. Clear button - Clears any numbers typed into a menu before a selection has been made. 33. Mute button - Mutes the sound from disc, radio and AV input channels. 34. Digital Key Control - Changes the key of disc music to fit any singers vocal range • b - Lowers the key • - Resets the original (natural) key • # - Raises the key 35. Tone button - Cycles through different preset EQ tones: Rock, Pop, Jazz, Classic, Disco, Extra Bass, and Flat. These settings have been designed to provide optimal sound for the music style that they correspond to. 36. Surround button - Cycles through the available surround sound speaker audio settings: • Music - For playing music only. Uses the right and left speakers and the subwoofer. • SURR - Virtual 5.1 surround sound using the right, left, center, right rear, left rear speakers and the subwoofer. • Karaoke - When using the microphones for karaoke sing-along. Uses the right, left and subwoofer for music and the center speaker for microphone vocals. • Digital (Disc mode only) - 5.1 AC-3 surround sound for use with DVDs, especially those with AC-3 capability. Uses the using the right, left, center, right rear, left rear speakers and the subwoofer. 37. Mic + and -- Master Volume buttons - Adjusts the master microphone vocals volume. Press + to raise the the volume and -- to lower it. 38. Sub Gain button - Adjusts the gain level for the Sub Woofer. Press + to raise the gain and - to lower it. 39. Music + and -- Master Volume buttons - Adjusts the master music volume. Press + to raise the volume and -- to lower it. �� �� �� �� �� �� �� �� �� �� 24 �� Descriptions and Functions Front Panel 1. Mp3 player slot (AV1) - Connect an Mp3 player or other audio device to the Sonic Station using the 1/8” jack. NOTE: The Sonic Station must be set to AV1 mode to turn on the AV1 channel. See the Operations section of this manual for detailed instructions on setting the Sonic Station to AV1 mode. 2. Display Screen - Displays the Sonic Station’s operating status 3. Remote sensor - Receives the signal from remote control. NOTE: Make sure there are no objects blocking the signal path between the remote control and this remote sensor 4. Power button - Turns the Sonic Station on and off 5. Music Volume control - Adjusts the master music volume of the disc player, AM/FM tuner and AV input channels 6. Mic Master control - Adjusts the master microphone vocals volume 7. Mic Hi control - Adjusts the Hi tone (treble) of the microphone vocals 8. Mic Low control - Adjusts the Low (bass) of the microphone vocals 9. Echo level control - Controls the amount of digital echo that is present in the microphone signal. Turn clockwise to increase the echo level and counter-clockwise to decrease the echo level. 10. Echo Delay control - Controls the amount of delay time in the echo effect. Turn clockwise to shorten the delay time and counter-clockwise to lengthen the delay time. 11. MIC 1 & 2 Volume controls - Individual volume controls for each microphone channel. 12. Select button - Cycles through the available input channels: • • • • Disc - Disc player Tuner - AM/FM radio tuner AV1 - Mp3 1/8” jack or the AV1 RCA inputs on the rear panel AV2 - AV2 RCA inputs on the rear panel 13. Surround button - Cycles through the available surround sound speaker audio settings: • Music - For playing music only. Uses the right and left speakers and the subwoofer. • SURR - Virtual 5.1 surround sound using the right, left, center, right rear, left rear speakers and the subwoofer. • Karaoke - When using the microphones for karaoke sing-along. Uses the right, left and subwoofer for music and the center speaker for microphone vocals. • Digital (Disc mode only) - 5.1 AC-3 surround sound for use with DVDs, especially those with AC-3 capability. Uses the right, left, center, right rear, left rear speakers and the subwoofer. 14. 15. 16. 17. 18. 19. and (prev and next) buttons - Skips tracks when in DISC mode or searches through preset radio stations in TUNER mode: jumps to the previous track or preset radio station and skips ahead to the next track or radio station. and (B-Scan - F-Scan) buttons - Scans through a track when in DISC mode or searches through radio stations in TUNER mode: scans backwards through the current track or through radio stations and scans forwards through the current track or through radio stations. Stop button - Stops disc playback in standby mode when pressed once and stops it completely when pressed twice. Also switches between AM/FM when in TUNER mode. Play/Pause button - Plays a disc that is stopped or paused. Pauses a disc that is playing. NOTE: The Sonic Station must be set to DISC mode to play a disc. See the Operations section of this manual for detailed instructions on setting the Sonic Station to DISC mode. Eject button - Opens and closes the disc tray Disc Tray - Insert discs here 25 Descriptions and Functions Front Panel 26 Descriptions and Functions Rear panel 1. Charger slot - An Mp3 player or other device’s power cord/charger can be slid through this slot. 2. Handle - Use this handle when moving the Sonic Station 3. Component (Y, Cb/Pb, Cr/Pr) video output jacks (video only) - Connect to a TV with Component video input. NOTE: The Sonic Station must be set to Component (V/Pb/Pr) video mode when using the component outputs. Use the V-MODE button on the remote control to set the Sonic Station to Component video mode. 4. Digital Coaxial (audio-only) - Connects to a receiver/mixer with a Digital Coaxial input. 5. S-Video output jack (video only) - Connects to a TV with an S-Video input. NOTE: The Sonic Station must be set to S-Video mode when using the S-Video output. Use the V-MODE button on the remote control to set the Sonic Station to S-Video mode. 6. Mixed A/V RCA outputs - Connects to a TV with RCA L/R (red & white) audio inputs and a RCA (yellow) video input. 7. FM Antenna jack - Connect the FM antenna here. See the Getting Connected section of this manual for detailed instructions on connecting the FM antenna. 8. AM Antenna jack - Connect the AM antenna here. See the Getting Connected section of this manual for detailed instructions on connecting the AM antenna. 9. AV 1 & 2 RCA input channels - Connect up to two RCA audio/video devices here. NOTE: The Sonic Station must be set to AV1 if using the AV1 input or AV2 if using the AV2 input. See the Operations section of this manual for detailed instructions on setting the Sonic Station’s input channel to either AV1 or AV2. 10. Headphone Output jack (1/8”) - Connect a set of headphones with a 1/8” plug here. 11. Microphone 1 & 2 inputs - Connect the microphones here using the included microphone cables. 12. AC power cord input - Connect the included power cord here. 13. Power outlet - Power a second device (Mp3 player, Disc player, etc.) by connecting it here. 27 System Setup Menu To access the System Setup Menu, Press MENU on the remote control. The menu will appear on the TV screen. Use the arrow buttons on the remote control to navigate through the menu and use the ENTER button to make selections. General Setup Page General Setup Page TV Display PS 1. TV Display This menu actually refers to TV display mode. Choose between 4:3PS for Panoramic Screen, 4:3LB for Letterbox, or 16:9 based on your viewing preference. To view the standard 4:3 picture or the cut standard 4:3 picture Angle Mark On OSD Lang ENG Captions Off Screen Saver Off Last Memory On 4:3 subtitle block to view the full width of the widescreen mode 16:9 To view widescreen picture with a widescreen TV set Widescreen TV set Standard TV set 2. Angle Mark For use when using the ANGLE feature on DVD discs with multiple angles available. ON: Will display a mark on the screen when using the ANGLE feature. OFF: There will be no mark on the screen when using the ANGLE feature. 3. OSD LANG Select the On Screen Display (OSD) language 4. Captions Turns captions on or off 5. Screen saver The DVD screen saver can be toggled ON/OFF to suit your preference for display during extended periods of player inactivity when power remains on. Use DIRECTION keys to make your selection. 6. Last Memory ON: Last Memory remembers the last spot played on a disc and returns to it when the Sonic Station is turned back on from Standby mode. OFF: Last memory is off 28 System Setup Menu Audio Setup Page 1. Speaker Setup Opens up the Speaker Setup page Audio Setup Page Speaker Setup SPDIF Setup Dolby Digital Setup 1.1 Downmix LT/RT - Sound output is divided with the Left coming out of the Left speaker and the Right coming out of the Right speaker. STEREO - Sound output is in Stereo Mode. V SURR - Virtual Surround Sound 5.1 CH - For 5.1 Channel surround sound Equalizer 3D Processing 1.2 Front Speaker Set this based on the size of your front speaker 1.3 Center Speaker ON: If you have a center speaker OFF: If you do not have a center speaker 1.4 Rear Speaker ON: If you have a rear speaker(s) OFF: If you do not have a rear speaker(s) 1.5 Subwoofer ON: If you have a subwoofer OFF: If you do not have a subwoofer 1.6 Post DRC This option compresses audio signal with a wide dynamic range proportionally to reduce intense impact to speakers. 2. SPDIF Setup SPDIF OFF: No digital audio output SPDIF/ RAW: Digital audio output in RAW format. Normally used for DTS and Dolby Digital 5.1 signals SPDIF/ PCM: Digital audio output in PCM format. Normally used for audio CD signal 3. Dolby Digital Setup page 3.1 Dual Mono NOTE: Can also be changed using the L/R button on the remote control • Mono Left - Left channel only (no vocals) • Mono Right - Right channel only (no music) • Mix-Mono - Virtual stereo • Stereo - Left and Right in true stereo 29 System Setup Menu 3.2 Dynamic Sets the linear compression ratio to get different compression results. Optional settings: Off, 1/4, 1/2, 3/4, Full. 4. Equalizer page 4.1 EQ Type Choose the EQ type that is most similar to the kind of music you are playing 4.2 Bass boost ON: Boosts the bass frequency OFF: Bass boost is off 4.3 Super Bass ON: Turns on Super Bass, enhancing the bass quality OFF: Super Bass is off 4.4 Treble Boost ON: Boosts the treble frequency OFF: Treble boost is off 5. 3D Processing page 5.1 PRO LOGIC II page Select to open the PRO LOGIC II options. 5.1.1 PRO LOGIC II Turn PRO LOGIC II surround sound on and off. When it is turned on, more options are available 5.1.2 MODE Select the PRO LOGIC II mode that best fits how you are using the Sonic Station 5.1.3 Panorama Turns Panorama effect on or off 5.1.4 Dimension Size Select the PRO LOGIC II dimension size 5.1.5 Center Width Select the PRO LOGIC II center width 5.2 Reverb Mode Select a specific reverb sound or turn reverb off 30 System Setup Menu Video Setup page 1. Component Select the digital video output Video Setup Page Component TV Mode Quality • If using the S-Video output • If using the Component output and connected to a High-Definition Y/Cb/Cr TV • If using the Component output and connected to a Progressive scan Y/Pb/Pr TV 2. TV Mode Only accessible when Y/Cb/Cr is selected in the COMPONENT option Select P-Scan for progressive scan or Interlace, depending on your TV. Consult your HD-TV’s instruction manual to find the correct setting. 3. Video Quality page 3.1 Sharpness Adjust the sharpness of the picture 3.2 Brightness Adjust the brightness of the picture 3.3 Contrast Adjust the contrast of the picture Preference Page NOTE: The Preference Page will not be accessible while a disc is playing. Stop the disc to before entering the preference page. 1. TV Type Set the video output to match you TV’s system format: • NTSC - North America • PAL - Europe, Asia • Multi - Automatically detects the TV’s format Preference Page T V Ty p e PBC Audio Subtitle Disc Menu Parental Default 2. PBC Turns Playback Control on and off. PBC is only for use on VCD 2.0 discs. 31 NTSC Off ENG ENG System Setup Menu 3. AUDIO Select the audio caption language for DVDs with multiple caption languages available. 4. Subtitle Select the subtitle language for DVDs with multiple subtitle languages available. NOTE: not all DVDs have multiple subtitle languages available. 5. Disc Menu Select the disc menu language for discs with multiple disc menu languages available NOTE: not all discs have multiple disc menu languages available. 6. Parental Set the parental safety settings 7. Default Restores all the system settings back to the original factory settings Password Setup Page The factory preset password is 8888 1. Password Mode Turns password mode on and off. Password Setup Page Password Mode Off Password 2. Password change To change the password 1. 2. 3. 4. Enter the current password Enter your new password Enter the new password again to confirm The new password is set 32 Troubleshooting There is no power • Make sure the power cord is firmly connected to the back of the Sonic Station and to the power outlet • If using a power strip/surge-protector, make sure that it is plugged in and switched on • Make sure the Power button on the front panel is pushed in to the on position There is no sound • Make sure everything is connected firmly and properly • Make sure all of your components are turned on • Make sure the Sonic Station is set to the right input • Make sure the proper volume controls are turned up high enough No picture • Make sure • Make sure • Make sure • Make sure • Make sure • Make sure everything is connected firmly and properly there are no defective cables all of your components are turned on the Sonic Station is set to the right input the TV or monitor is working correctly the correct video mode is set using V-MODE button on the remote control The disc does not play • Make sure the disc is inserted correctly (label-side up) • Make sure the disc is clean and not scratched • If using a CD/DVD R/RW, try using a different brand as some brands might not be compatible • Clean the CD lens using a CD lens cleaner Remote control does not work • Make sure the batteries are inserted, inserted correctly, and not out of power • Point the remote control directly at the remote sensor on the machine • Move closer to the machine The picture is unclear • Make sure the disc is not dirty or damaged • Make sure that the TV TYPE (P/N button on the remote) is set correctly: NTSC: In North America, Japan and many other Asian countries PAL: In Europe • Try restarting the Sonic Station The Music from an Mp3 player or CD sounds hollow or very reverby • Make sure the surround sound quality, using the SURROUND button on the remote control or front panel, is set to MUSIC 33 Featured VocoPro Products Here are some of the other great VocoPro products featured in this manual. You can find more information at our website: www.vocopro.com. LTV-5 5” LCD Monitor with Digital Tuner DA-8909RV World’s First Digital Karaoke Amplifier/ Mixer with Vocal Enhancer Notes ���������������������������������� ���������������