1
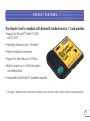
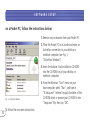
BLUETOOTH PDA
ADAPTER CARD
USER MANUAL
F8T020
2
TABLE OF CONTENTS
Introduction . . . . . . . . . . . . . . . . . . . . . . . . . . . . . . . . . . . . . . . . . . . . . . . . . . . . . . . . . . . .4
Product Features . . . . . . . . . . . . . . . . . . . . . . . . . . . . . . . . . . . . . . . . . . . . . . . . . . . . . . . . .5
Specifications . . . . . . . . . . . . . . . . . . . . . . . . . . . . . . . . . . . . . . . . . . . . . . . . . . . . . . . . . . .6
System Requirements . . . . . . . . . . . . . . . . . . . . . . . . . . . . . . . . . . . . . . . . . . . . . . . . . . . . . .7
Product Contents . . . . . . . . . . . . . . . . . . . . . . . . . . . . . . . . . . . . . . . . . . . . . . . . . . . . . . . . .7
Supported Profiles . . . . . . . . . . . . . . . . . . . . . . . . . . . . . . . . . . . . . . . . . . . . . . . . . . . . . . . .8
Software Setup . . . . . . . . . . . . . . . . . . . . . . . . . . . . . . . . . . . . . . . . . . . . . . . . . . . . . . . . .10
Installing the Adapter Card . . . . . . . . . . . . . . . . . . . . . . . . . . . . . . . . . . . . . . . . . . . . . . . . .13
Software Overview . . . . . . . . . . . . . . . . . . . . . . . . . . . . . . . . . . . . . . . . . . . . . . . . . . . . . . .14
Device Discovery . . . . . . . . . . . . . . . . . . . . . . . . . . . . . . . . . . . . . . . . . . . . . . . . . . . . . . . .21
Device Groups . . . . . . . . . . . . . . . . . . . . . . . . . . . . . . . . . . . . . . . . . . . . . . . . . . . . . . . . . .41
Configuration and Settings . . . . . . . . . . . . . . . . . . . . . . . . . . . . . . . . . . . . . . . . . . . . . . . . .44
System Diagnostics . . . . . . . . . . . . . . . . . . . . . . . . . . . . . . . . . . . . . . . . . . . . . . . . . . . . . .53
Uninstalling the Software . . . . . . . . . . . . . . . . . . . . . . . . . . . . . . . . . . . . . . . . . . . . . . . . . .55
Troubleshooting . . . . . . . . . . . . . . . . . . . . . . . . . . . . . . . . . . . . . . . . . . . . . . . . . . . . . . . . .56
Glossary . . . . . . . . . . . . . . . . . . . . . . . . . . . . . . . . . . . . . . . . . . . . . . . . . . . . . . . . . . . . . .59
FCC/CE Statement . . . . . . . . . . . . . . . . . . . . . . . . . . . . . . . . . . . . . . . . . . . . . . . . . . . . . . .60
Warranty . . . . . . . . . . . . . . . . . . . . . . . . . . . . . . . . . . . . . . . . . . . . . . . . . . . . . . . . . . . . . .63
3
INTRODUCTION
Bluetooth PDA Adapter Card
Thank you for purchasing the Bluetooth PDA Adapter Card (the Adapter Card) featuring wireless
technology from Belkin. Now you can connect your PDA to peripherals and other computing
devices from up to 10 meters away without cables. Establish ad-hoc connections between devices
in your home, office, or while on the road. Print cable-free to a printer enabled with Bluetooth
technology without having to configure a network.
Bluetooth wireless technology provides fast, reliable, and secure wireless communication in a
small space, and enables you to synchronize your Pocket PC with your desktop. Bluetooth wireless
technology eliminates the need for cables between electronic devices such as desktop computers,
printers, and local area networks (LANs).
Before you install and start using your new Adapter Card, please take a few minutes to review
some of the terms that you will be seeing throughout the document. You will find a brief glossary
on page 59 of this manual.
4
PRODUCT FEATURES
The Adapter Card is compliant with Bluetooth standard version 1.1 and provides:
• Support for Microsoft® Pocket PC 2000
and PC 2002
• Operating distance of up to 10 meters*
• Point-to-multipoint connections
• Support for data rates up to 721Kbps
• Built-in security: up to 128-bit encryption
and authentication
• Compatibility with Pocket PC handheld computers
* 10m range is dependent upon environment, number of users, and other wireless devices within immediate proximity.
5
SPECIFICATIONS
Adapter Card Specifications
Bluetooth Compliance:
Physical Interface:
Operating Frequency:
Output Power:
Sensitivity:
Data Rate:
Operating Range:
Network Topology:
Packet Support:
Operation:
Frequency Stability:
LED Indicator:
Antenna Type:
Dimensions:
Weight:
Operating Temp:
Storage Temp:
Humidity:
Supply Voltage:
Nominal Current:
Support Profiles:
6
OS Support:
Version 1.1
CompactFlash™ Type II
2.4 to 2.4835GHz
0 dBm (1mW), Class 2
-80 dBm @ 1E-3 BER
723/57.6Kbps
10-meter radius indoors
Point-to-Multipoint
1/3/5 Slots Packet
Master/Slave
+/- 10PPM
Power On, Data Traffic
Integrated
52mm (L) x 43mm (W) x 5mm (H)
0.9oz.
-5 to 55 degrees Celsius
-33 to 55 degrees Celsius
93% (non-condensing)
3.3 & 5.0VDC
70mA
Service Discovery, File Transfer, Serial Port, DUN, LAN,
Generic Object Exchange, Business Card, Push, Pull & Exchange
Microsoft Pocket PC 2000 and PC 2002
Specifications subject to change without notice
SYSTEM REQUIREMENTS
System Requirements
• Genuine Intel® StongARM SA-1110 processor
• One available CompactFlash Type II slot
• Microsoft Pocket PC 2000 and PC 2002
Product Contents
• Bluetooth PDA Adapter Card
• CD-ROM for installation software and documentation
• User Manual
• Quick Installation Guide
7
SUPPORTED PROFILES
The services supported by your Adapter Card are defined as “Profiles”.
Available profiles include:
• Generic Access
• Service Discovery
• Serial Port
• LAN Access
• Dial-Up Networking
• Generic Object Exchange
• Object Push
• File Transfer
• Synchronization
8
SUPPORTED PROFILES (CONT’D)
Your Adapter Card gives you the ability to do the following—without cables:
• Transfer files
• Access dial-up networks
• Connect to local area networks
• Perform an ActiveSync® session
• Connect to serial ports
• Exchange PIM data
• Send or exchange business cards
The basic functions of the Bluetooth Neighborhood include:
• Device Discovery
• Service Discovery
• Establishing links with remote devices
To install the Bluetooth software required to use your new Adapter Card
9
SOFTWARE SETUP
on a Pocket PC, follow the instructions below:
1. Remove any accessories from your Pocket PC.
2. Place the Pocket PC in its cradle and make an
ActiveSync connection to your desktop or
notebook computer (see Fig. 1,
“ActiveSync Window”).
3. Insert the Adapter Card installation CD-ROM
into the CD-ROM tray of your desktop or
notebook computer.
Fig. 1—ActiveSync Window
10
5. Follow the on-screen instructions.
4. From the Windows “Start” menu on your
base computer, select “Run”, and type in
“X:Setup.exe” (where X equals the letter of the
CD-ROM drive) or browse your CD-ROM to the
“Setup.exe” file, then tap “OK”.
SOFTWARE SETUP (CONT ’D)
Fig. 2—InstallShield Wizard
Fig. 3—Bluetooth Device Name
Note: If you are prompted to
uninstall files, follow the on-screen
instructions. Once you have
uninstalled, begin again with
Step 1 of this procedure.
6. If you cannot successfully load
Fig. 4—Application Downloading Complete
11
SOFTWARE SETUP (CONT ’D)
the application, then perform a factory reset of
the Pocket PC. Refer to your Pocket PC user
guide for more information on performing a
factory reset.
Note: Ensure that your desktop or notebook
computer and Pocket PC have completed all
operations before exiting the setup.
Fig. 5—InstallShield Wizard Complete
12
7. After installing the software, remove the
Pocket PC from its cradle and conduct a soft
reboot by inserting the stylus in the hole in the
bottom of the Pocket PC. Refer to your Pocket
PC user guide for more information on
rebooting the Pocket PC.
INSTALLING THE ADAPTER CARD
Insert the Adapter Card into the Pocket PC. A Bluetooth
Radio icon should display at the bottom of the “Today”
screen and the LED at the top of the Adapter Card
should blink.
1. The Bluetooth Radio
icon is initially dark
when the Pocket PC
is inserted into the
Compact Flash
Expansion pack and
becomes brighter
when it recognizes
the software.
Fig. 7—Inserting the Adapter Card
2. If you do not see a new icon, conduct the soft reboot of
the Pocket PC again.
Fig. 6—Bluetooth Radio icon
13
SOFTWARE OVERVIEW
Launching the Application
The Bluetooth application is launched from the Pocket PC “Today” screen. Select “Bluetooth
Manager” either from the “Start” menu (see Fig. 8 below, “Launching the Bluetooth Manager
from the Start Menu”) or from the
Bluetooth Radio menu (see Fig. 9,
“Launching the Bluetooth Manager
from the Bluetooth Radio Menu
Icon”). Access the Bluetooth Radio
menu by tapping on the Bluetooth
Radio icon at the bottom
of the “Today” screen.
Fig. 8—Launching the Bluetooth
Manager from the Start Menu
14
Fig. 9—Launching the Bluetooth Manager
from the Bluetooth Radio Menu Icon
SOFTWARE OVERVIEW (CONT ’D)
If you have no devices saved to your Pocket PC, a dialog box will prompt you to search for
Bluetooth devices (see Fig. 10, “Initial Search Prompt”).
Choose “Yes” to display the search screen and the Adapter Card will begin searching for
Bluetooth devices in the area.
Choose “No” to jump to the main
window without conducting a search.
When the search is complete, the screen
will display all devices that were found
(see Fig. 11, “Search Screen”).
Fig. 10—Initial Search Prompt
Fig. 11—Search Screen
15
SOFTWARE OVERVIEW (CONT ’D)
You will now want to assign these devices to a “Device Group”. For information on Device
Groups, see the “Device Groups” section.
1. Select those devices that you want to keep by selecting the individual check boxes.
2. Tap “Save”. The “Device Groups” screen will appear (see Fig. 12, “Device Groups”).
Note: Only “All Devices”, “Home”, and “Work” will appear until you
add other groups to the list (see the “Modifying Groups” section). The
“All Devices” group is automatically checked and always dimmed; it
cannot be unchecked.
3. Tap “OK” to save selected device(s) to the selected group(s) and
to return to the search screen.
4. Repeat for additional devices and/or groups.
5. Tap “OK” to return to the main window.
Fig. 12—Device Groups
16
SOFTWARE OVERVIEW (CONT ’D)
The Main Window
Following this initial device discovery session, the “Main”
window will appear (see Fig. 13, “Main Window
Controls”), listing saved Bluetooth devices. Following
your initial search, it will display “All Devices”.
• The Main window does NOT necessarily show all devices
within range of the user’s device at the time of viewing.
It is possible that NONE of the devices displayed are
currently within range. The display provides an indication
of which devices are in or out of range.
Fig. 13—Main Window Controls
17
SOFTWARE OVERVIEW (CONT ’D)
Device Group Drop-Down Menu
The “Device Group” drop-down menu allows you to display devices found in a particular device
group or in all groups (“All Devices”). This drop-down menu also includes a selection for
adding, editing, or deleting a group (see the “Modifying Groups” section).
Device List
The “Device List” displays those devices (for example, other Pocket PCs, laptops, etc.) recognized
by your Pocket PC. The availability of each device is displayed in the status column of the list view
or indicated by the display of the icon.
View Menu
The “View” menu allows you to toggle your view of devices from “Icons” to “List” format.
This menu also allows you to refresh the status of devices being viewed (see the “Viewing
Devices” section).
18
SOFTWARE OVERVIEW (CONT ’D)
Tools Menu
The “Tools” menu allows access to dialog screens for group settings (see the “Group Settings”
section) and system diagnostics (see the “System Diagnostics” section).
Search
Tapping “Search” launches the
“Search” screen (see the “The
Search Screen” section).
Bluetooth Radio Icon
Once the Bluetooth application has
been started, you can view the Bluetooth
Radio icon at the bottom of the “Today”
screen (see Fig. 14, “Today Screen”)
or at the bottom of the main “Bluetooth
Application” window (see Fig. 15,
“Bluetooth Application Window”).
Fig. 14—Today Screen
Fig. 15—Bluetooth Application Window
19
SOFTWARE OVERVIEW (CONT ’D)
From the bottom of the “Today” screen you can:
1. Turn the radio on or off—select to toggle the radio.
2. Launch the “Bluetooth Manager” application.
3. Initiate a wireless ActiveSync session (see the
“Perform an ActiveSync Session” section).
4. View the current status of the radio and current connections
(see Fig. 16, “Bluetooth Status”).
Tap and hold any device in the current connections list of the
“Current Status” window to open a menu that allows you to close
the connection and obtain version information about the
“Bluetooth Manager”.
Fig. 16—Bluetooth Status
20
DEVICE DISCOVERY
The Search Screen
The “Search” screen (see Fig. 17, “Search Screen”) allows you to search for devices and assign
them to device groups. To open the “Search” screen, tap “Search” at the bottom of the main
window. The Adapter Card will automatically begin searching for Bluetooth devices. When it
finishes searching, the screen will display a device list.
Device List
Presented in tabular format, the “Device List” displays devices
found during the search. The list can be sorted by either “Device
Name” or “Type” by tapping the respective header.
1. Device Name is presented on the left.
2. Device Type is presented on the right.
3. A check box is provided to allow selection of individual or
multiple devices for saving to groups.
4. The “New” column will be marked with an asterisk “*” if the
found device is not already located in your database.
Fig. 17—Search Screen
21
DEVICE DISCOVERY
Search Button
Launches the search for devices (see the “Searching for Devices” section).
Save Button
Allows you to save devices to device groups (see the “Saving Devices” section).
Filter Button
Launches the search filter screen (see Fig. 18, “Search Filter”).
Allows you to tailor your search to specific devices. “Find all
devices” is initially selected by default. This screen also allows you
to specify the duration of a search.
Note: If “Stop searching after” is left unchecked, searches will continue
until you terminate the search by tapping “Stop”.
Fig. 18—Search Filter
22
DEVICE DISCOVERY (CONT’D)
Search Status Line
Text string located at the bottom of the search screen that displays the status of the search.
This status line also tells you how many devices were found during the search.
Searching for Devices
Your initial search was conducted when you first launched the
application (see the “Getting Started” section). It is always possible
to conduct a new search for Bluetooth devices. This search has no
effect on any devices that you have previously saved to any of your
Device Groups.
At the bottom of the main window, tap “Search”. The “Search”
screen appears and the Adapter Card begins to search for Bluetooth
devices in the area. The devices appear on the screen as they are
found (see Fig. 19, “Searching for Bluetooth Devices”).
Fig. 19—Searching for Bluetooth Devices
23
DEVICE DISCOVERY (CONT’D)
The “Search” button changes to “Stop” while the search is in progress and changes back to
“Search” when the search is complete (times out) or when you tap “Stop”.
Saving Devices
Once a device is discovered and you decide that you want to save it for future use, it should be
saved to a Device Group. The procedure is identical to that used
when you conducted your initial search except that you may now
have more Device Groups to choose from.
1. From the “Search” screen, select those devices that you want to
keep by tapping the respective check boxes.
2. Tap “Save”. The “Device Groups” screen appears
(see Fig. 20, “Device Groups”).
Fig. 20—Device Groups
24
DEVICE DISCOVERY (CONT’D)
3. Check the box next to any of the groups that you want to save these devices to.
a) You can check one or several groups. You can modify the groups prior to making your
selection by tapping the “Add Group” button (see the “Modifying Groups” section).
4. Tap “OK” to save the devices to the indicated groups and return to the “Search” screen.
5. Repeat for additional devices.
a) Whenever you save a device to any group, it is also saved to the “All Devices” group.
25
DEVICE DISCOVERY (CONT’D)
Device Information Dialog
Access the “Device Information” dialog from the main window by clicking on a device icon
(see Fig. 21, “Device Information”).
26
Device Name
Name assigned by owner of selected device.
Device Address
Unique Bluetooth address used to identify the device.
Device Type
Identifies the type of device (for example, PDA, Cell Phone, etc.)
Device Bonded
Displays “Yes” if a bond has been established. Bonding allows the
device to bypass authorization and authentication. A bond can be created
or broken via the “Actions” menu located at the bottom of the “Device
Information” screen.
Last Seen
Indicates the last date and time the device was discovered near
your device.
DEVICE DISCOVERY (CONT’D)
ActiveSync Partner
Check Box
Active only for laptop or desktop computers. Check this box to indicate that
you wish to use this device as an ActiveSync partner.
Show Device Groups Tap here to review or specify which groups this device belongs to
(see “Moving and Removing Devices”, page 40).
Actions Menu
Allows you to initiate an action with the
selected device (for example, send a business
card). (See “Communicating With Other
Devices”, page 29).
Fig. 21—Device Information
27
DEVICE DISCOVERY (CONT’D)
View Menu
Devices can be viewed in two different formats, “Icons” and “List”. The “View” menu
(see Fig. 22, “View Menu (Icon View)”) allows you to select either of these views. It also
allows you to refresh the screen.
• Icon View (see Fig. 22, “View Menu (Icon View)”) Presents
you with a graphical representation of the device (for example,
Computer, Access Point, Cell Phone, etc.). The device name,
assigned by the owner of the device, appears below the icon.
Fig. 22—View Menu (Icon View)
28
DEVICE DISCOVERY (CONT’D)
• List View (see Fig. 23, “List View”) Provides the same information as the Icon View, only in
tabular form. The left column displays the device name and type. The right column tells you the
current status of the device (for example, Connected, Available, Unavailable).
• Refresh Updates the status and availability of each displayed device.
Communicating with Other Devices
Once you have established contact with a device, you can use your
installed radio to exchange data.
You can:
1. Send a file.
2. Send or exchange contacts, calendar, and tasks.
3. Perform an ActiveSync session.
4. Connect for dial-up or LAN access.
5. Connect to serial port.
6. Create or remove bonds.
You can establish communication from the main window or the
“Device Information” dialog window.
Fig. 23—List View
29
DEVICE DISCOVERY (CONT’D)
From the main window, tap and hold the device icon you want to communicate with. You are presented with a list of services that the selected device supports (see Fig. 24, “Communicating with
Other Devices”).
Or from the “Device Information” dialog window, select the “Actions” menu (see Fig. 25, “The
Actions Menu”). Services will only be displayed if the selected device is discoverable.
Send File
Allows you to send a file to
another device.
1. Discover the available services of
the device that you want to send
a file to.
2. In the main window, tap and hold
the device icon. In the “Device
Information” dialog window, select
via the “Actions” menu.
Fig. 24—Communicating With Other Devices Fig. 25—The Actions Menu
30
DEVICE DISCOVERY (CONT’D)
3. Select “Send File”. The “Send a File” screen appears (see Fig. 26, “Send a File”).
4. Specify the file that you want to send by entering its location and name in the window
or by selecting the file from the “Browse...” menu.
5. Tap “Send” to transfer the file or “Cancel” to abort the operation. Transfer progress is
displayed (see Fig. 27, “Send a File
(Transmitting)”). Send button is
dimmed initially and it is enabled
only when the user selects the file to
be sent.
Fig. 26—Send a File
Fig. 27—Send a File (Transmitting)
31
DEVICE DISCOVERY (CONT’D)
Send Business Cards
Allows you to send your business card information to another device.
From main window:
1. Discover the available services of the device that you want to send a business card to. In the
main window, tap and hold the device icon. In the “Device Information” dialog
window, select via the “Actions” menu.
2. Select “Send Business Card”. If you have not set up your business card information, you will be prompted to select a contact
name from your contact database (see Fig. 28, “Please Select a
Contact”). Select a contact name and tap “OK” or tap “Cancel”
to set up your business card information.
3. Once you select a contact name for business card transfer, that
contact will remain the default until changed.
4. The success or failure of the transfer will be displayed.
Fig. 28—Please Select a Contact
32
DEVICE DISCOVERY (CONT’D)
From the “Contacts” Dialog window:
Business cards can also be sent directly from the Contacts list.
In the “Start” menu, select “Contacts”:
1. Tap and hold on the Contacts item that you want to send to another device (see Fig. 29,
“Contacts Dialog”) or select the Contacts item and tap “Tools”
(see Fig. 30, “Contacts Tools Menu”).
2. Select “Send Via Bluetooth”. A search dialog appears on
the screen.
a) The “Detail” button in the “Search” dialog gives the details
of the transaction.
b) The “Refresh” button in the “Search” dialog refreshes the
device list.
3. Select the device to which you want to send the business card
and tap “Send”.
Note: The success or failure of the transfer will be displayed.
Note: The above steps mentioned are true for “Calendar” and “tasks” also.
Fig. 29—Contacts Dialog
33
DEVICE DISCOVERY (CONT’D)
Exchange Business Cards
Allows you to exchange business card information with another device. This function works the
same as when sending your business card with the exception that, if available, you will also
receive the other device’s information directly into your contacts database.
Connect to Serial Port
Allows you to connect to another device’s virtual Bluetooth serial
port to utilize certain applications and hardware.
Fig. 30—Contacts Tools Menu
34
DEVICE DISCOVERY (CONT’D)
Connect for Dial-Up Access
1. When viewed on Pocket PC 2002, this menu item is titled “Set as Internet
Dial-Up connection”.
2. Allows you to connect wirelessly to cell phones and modems equipped with
Bluetooth technology. You will first be prompted to choose or
create a dial-up connection with basic dialing information
(see “Dial-Up Information”, Fig. 31). Once connected to a device
with dial-up capability, you may be requested to provide
additional information. Refer to your Pocket PC user guide for
more information on dial-up connections.
Fig. 31—Dial-Up Information
35
DEVICE DISCOVERY (CONT’D)
Connect for LAN Access
1. When viewed on Pocket PC 2002, this menu item is titled “Set as Internet LAN connection”.
2. Allows you to connect to Bluetooth devices that are already participating in a local area network (LAN). Once connected, you will be able to participate in the LAN for accessing services
like the Internet.
Perform an ActiveSync Session
Allows you to connect to, and automatically update, information with a Bluetooth device that has
been designated as an ActiveSync partner.
Setting Up the Host Computer for Active Sync
Only a laptop or desktop computer (host PC) can be designated as an ActiveSync partner.
1. Using the serial or USB connection, manually establish an ActiveSync partnership as described
in your Pocket PC user guide.
Note: You can establish a partnership with more than one device, however, your device will
initiate an ActiveSync function with the first partnered device that is discovered.
36
DEVICE DISCOVERY (CONT’D)
2. Run the Bluetooth configuration utility on the host PC to determine which COM port is
configured for local serial service. Refer to the Bluetooth user documentation that came
with your host PC for information on running the configuration utility.
3. Open the ActiveSync window on the host PC. Select “File/Connection Settings...”
and configure it only to monitor the COM port identified in Step 2
above. Disable USB and Ethernet.
Wireless ActiveSync:
1. Discover and save the host PC to one or more of your groups.
2. Tap on the ActiveSync host PC to display “Device Information”
and check the “ActiveSync Partner” box (see Fig. 32,
“ActiveSync Partner”).
3. Initiate ActiveSync via the Bluetooth Radio icon located at the
bottom of the “Today” screen (see Fig. 6 on page 13).
4. Follow the on-screen instructions.
Fig. 32—ActiveSync Partner
37
DEVICE DISCOVERY (CONT’D)
Create bond with this device:
Found only in the “Actions” menu; allows you to establish a bond with another device to allow
uninterrupted exchange of data.
1. Tap on the device that you want to bond with to display the “Device Information” dialog.
2. Select “Create bond with this device” from the “Actions” menu.
A screen will appear asking you to enter a PIN code (See Fig. 33,
“Pincode Requested”).
3. Enter the PIN code that you and the owner of the selected device
have agreed to.
4. Tap “OK.” The owner of the selected device will be prompted to
enter the same PIN code.
5. A status screen will appear indicating the success of the bond.
Fig. 33—Pincode Requested
38
DEVICE DISCOVERY (CONT’D)
Remove bond with device:
Found only in the “Actions” menu; allows you to remove a bond.
1. Tap on the device that you want to remove the bond from to display the “Device Information”
dialog.
2. Select “Remove bond with device” from the “Actions” menu.
Remove this device:
Allows you to remove a device from your database of discovered devices.
1. Tap on the device that you want to remove to display the “Device Information” dialog.
2. Select “Remove this device” from the “Actions” menu. A warning dialog prompts you to
confirm your action. You are returned to the main window. The selected device no longer
exists in any of your groups.
39
DEVICE DISCOVERY (CONT’D)
Moving and Removing Devices
You can move a device between groups or remove a device from any group except “All Devices”.
You can only remove a device from “All Devices” by removing the device from your database.
1. Tap on the device to display the “Device Information” window.
2. Tap the “Show Device Groups” button to display the “Device Groups” screen.
3. Check those groups where you want the device to appear and uncheck those where
you do not.
40
DEVICE GROUPS
Working with Device Groups
Three empty device groups named “All Devices”, “Home”, and “Work” are provided when you
install the Bluetooth software. All discovered Bluetooth devices are stored in the “All Devices”
group when saved. “All Devices” cannot be renamed or deleted.
Modifying Groups
It is possible to add, rename, or delete
items on your “Group List”. From
the main window, select
“Add/Rename/Delete” from the “Group
List” pull-down menu (see Fig. 34,
“Modifying Groups”). Or from the
“Device Information” screen, tap the
“Show Device Groups” button and then
the “Add Group” button. The “Edit
Device Groups” screen appears (see
Fig. 35, “Edit Device Groups”),
displaying all current Device Groups.
Fig. 34—Modifying Groups
Fig. 35—Edit Device Groups
41
DEVICE GROUPS (CONT’D)
To add a group:
1. Tap the “Add” button. Another group titled “New Group” is appended to the list.
2. Select the “New Group” text and type in the desired group name.
3. Tap “Enter”.
To rename a group:
1. Select the text of the group you want to rename and tap the “Rename” button.
2. Type in the desired group name.
3. Tap “Enter”.
To delete a group:
1. Select the group you want to delete.
2. Tap the “Delete” button. A warning dialog prompts you to confirm your action.
3. Tap “Yes” to delete the group or “No” to abort.
42
DEVICE GROUPS (CONT’D)
Group Settings
Access “Group Settings” by selecting “Settings for <group>” from the “Tools” menu in the main
window (see Fig. 36, “Selecting Settings for <group>”).
These settings provide the group certain information about your device, as well as specify how it
interacts with the rest of the group.
The group settings are distributed
among six different tabs (see Fig. 37,
“General Tab”). You can change the
group that you are modifying from
any tab. Shifting groups or tabs
automatically saves data.
Fig. 36—Selecting Settings for <group>
Fig. 37—General Tab
43
CONFIGURATION AND SETTINGS
General Tab
Device Name
This is the name that other Bluetooth device users see when they discover your device.
Default Passkey (blank by default)
Used for authenticating connections requested by other devices for transactions that need a
“passkey” (see other service tabs for passkey requirements). The other user must know your
passkey to complete the transaction. If left blank, you will be requested to enter a passkey every
time that one is required.
Delete Inactive Devices (found only under “All Devices”)
Determines how long any device remains in the group between discoveries. You can specify the
number of days that the system uses (the default is 30 days). If the check box is left unchecked,
devices are never automatically deleted from the group.
44
CONFIGURATION AND SETTINGS (CONT ’D)
Connections Tab
Let other devices see me (checked by default)
Check this box to allow other devices to locate your device in a search. This will not prevent
devices that have previously discovered your device from conducting a transaction since they
already know your Bluetooth address.
Let other devices connect to me
(checked by default)
Check this box to allow other devices
to connect and conduct transactions. If
unchecked, no other device can initiate
a connection with your device. This
check box has no affect on outgoing
connection requests. Use the “Choose
devices...” dialog (see Fig. 38, “Choose
Devices”) to specify what kind of
devices you want to allow to connect
to your device.
Fig.38—Choose Devices
Fig.38b—Choose Devices Dialog
45
CONFIGURATION AND SETTINGS (CONT ’D)
Transmission power for this group
Allows you to choose the transmission power level that is used whenever the group is selected.
Selection of this power level determines the transmission range (and therefore power
consumption) of your device.
File Sharing Tab
Let other devices use this service (checked by default)
Check this box to allow other devices to connect for file sharing.
If unchecked, you can still connect with other devices and send
them files (see Fig. 39, “File Sharing Tab”).
Authorization required (checked by default)
Check this box if you want to screen any unbonded devices prior to
allowing a transaction. If checked, you will be prompted to “accept”
or “reject” transactions by any unbonded devices (see Fig. 40,
“Authorization Dialog”).
Fig. 39—File Sharing Tab
46
CONFIGURATION AND SETTINGS (CONT ’D)
Passkey is required (unchecked by default)
Check this box to require authentication for file sharing. If checked, you will be prompted to
“accept” or “reject” transactions by any unbonded devices (see Fig. 41, “Passkey Required”).
Unbonded devices will be required to supply a matching passkey.
Encryption is required
Enabled only when you check
“Passkey is required”. Check this box
to enable data encryption when
transmitting data.
Shared Directory
Displays the name and the path of the
folder used to store files received from
other devices.
Fig. 40—Authorization Dialog
Fig. 41—Passkey Required
47
CONFIGURATION AND SETTINGS (CONT ’D)
PIM Objects Tab
Let other devices use this service (checked by default)
Check this box to allow other devices to connect for transferring PIM objects (see Fig. 42, “PIM
Objects Tab”). If unchecked, you can still connect with other devices and send them files.
Authorization required (checked by default)
Check this box if you want to screen any unbonded devices prior to
allowing a transaction. If checked, you will be prompted to “accept”
or “reject” transactions by any unbonded devices (see Fig. 40,
“Authorization Dialog”).
Passkey is required (unchecked by default)
Check this box to require authentication for transferring PIM objects.
If checked, you will be prompted to “accept” or “reject” transactions by any unbonded devices (see Fig. 41, “Passkey Required”).
Unbonded devices will be required to supply a matching passkey.
Fig. 42—PIM Objects Tab
48
CONFIGURATION AND SETTINGS (CONT ’D)
Encryption is required
Enabled only when you check “Passkey is required”. Check this box to enable data encryption
when transmitting data.
Send my business card on request
Allows other devices that are able to connect to “pull” your business card information.
Accept all PIM objects sent to me
Allows other devices that are able to connect to send you PIM objects.
Use this contact for my business card
Displays the name being used when you transfer a business card to other Bluetooth devices. The
“Browse” button allows you to change business card information by selecting from the full list of
contacts in your Pocket PC Outlook database. If an Outlook contact is not available, then the data
found in “My Information” of the device is used to form contact information. If the user deletes
the contact entry, a runtime message appears the next time you attempt to send a business card.
49
CONFIGURATION AND SETTINGS (CONT ’D)
Serial Port Tab
Let other devices use this service (checked by default)
Check this box to allow other devices to connect via the serial port. If unchecked, you can still
connect with other devices (see Fig. 43, “Serial Port Tab”).
Authorization required (checked by default)
Check this box if you want to screen any unbonded devices prior to
allowing a connection via the serial port. If checked, you will be
prompted to “accept” or “reject” transactions by any unbonded
devices (see Fig. 40, “Authorization Dialog”).
Passkey is required (unchecked by default)
Check this box to require authentication for connections via the
serial port. If checked, you will be prompted to “accept” or “reject”
transactions by any unbonded devices (see Fig. 41, “Passkey
Required”). Unbonded devices will be required to supply a
matching passkey.
Fig. 43—Serial Port Tab
50
CONFIGURATION AND SETTINGS (CONT ’D)
Encryption is required
Enabled only when you check “Passkey is required”. Check this box to enable data encryption
when transmitting data.
COM ports
Identify the virtual COM (communications) ports associated with a
Bluetooth serial port connection. The “Inbound COM” port is used
when other devices initiate a serial connection to the Adapter Card.
The “Outbound COM” port is used when you initiate a serial
connection to other devices.
Dial-Up Tab (See Fig. 44, “Dial-Up Tab”)
Passkey is required (unchecked by default)
Check this box to require authentication for connections via
dial-up. If checked, you will be prompted to “accept” or “reject”
transactions by any unbonded devices (see Fig. 41, “Passkey
Required”). Unbonded devices will be required to supply a
matching passkey.
Fig. 44—Dial-Up Tab
51
CONFIGURATION AND SETTINGS (CONT ’D)
Encryption is required
Enabled only when you check “Passkey is required”. Check this box to enable data
encryption when transmitting data.
Using COM Port
Identifies the virtual BTC (Bluetooth Communications) port
that will be used when you initiate a dial-up connection with
another device.
Fig. 45—Tools Menu
52
SYSTEM DIAGNOSTICS
You can conduct basic checks of the hardware utilizing either the “Loopback Test” or
the “Reset BC01 Test”. Both can be accessed via the “Diagnostics” screen.
Loopback Test
Tests the way that your device internally processes data. If you select to run the “Loopback Test”
or any other diagnostic test, the Pocket PC will soft reset.
1. Select “Diagnostics” from the “Tools” menu at the bottom of the
main window (see Fig. 45, “Tools Menu”).
2. Select “Local Loopback Test” from the pull-down menu and tap the
“Run” button (see Fig. 46, “Local Loopback Test”).
3. The Diagnostics screen will display the result of the test
(Pass or Fail).
Fig. 46—Local Loopback Test
53
SYSTEM DIAGNOSTICS
Reset BC01 Test
Re-initializes (resets) the radio circuitry used to transmit and
receive data.
1. Select “Diagnostics” from the “Tools” menu at the bottom of the main window (see Fig. 45,
“Tools Menu”).
2. Select “Reset BC01 Test” from the pull-down menu and tap the
“Run” button (see Fig. 47, “Reset BC01 Test”).
3. The “Diagnostics” screen will display the result of the test (Pass
or Fail).
Versions
Version information about your device’s hardware, firmware, and
software can be viewed by tapping on the “Versions” tab at the
bottom of the “Diagnostics” screen.
Fig. 47—Reset BC01 Test
54
UNINSTALLING THE SOFTWARE
This section contains instructions for uninstalling the software required
to use your Adapter Card.
1. If inserted, remove the Adapter Card from your Pocket PC.
2. Place the Pocket PC in its cradle and make an ActiveSync connection to your desktop or
notebook computer.
3. Insert the Adapter Card installation CD-ROM into the CD-ROM tray of your desktop or
notebook computer.
4. From the Windows “Start” menu on your base computer, select “Run” and type in “X:
Setup.exe” (where X equals the letter of the CD-ROM drive) or browse to the “Setup.exe file”.
Click “OK”.
5. Follow the on-screen instructions. When requested if you would like the wizard to
uninstall the Bluetooth device, select “Yes” and then click on “Next”.
6. Follow the on-screen instructions.
55
TROUBLESHOOTING
The application fails to install properly.
Make sure that you have uninstalled any existing Bluetooth software. If necessary, conduct
a factory reset of the Pocket PC.
Bluetooth Radio icon does not appear in the “Today” screen.
Make sure that you have inserted the Adapter Card properly.
I cannot discover other devices.
1. Try moving closer to a known device.
2. Check to make sure your radio is turned “ON” (see Bluetooth Radio icon, page 13). Check to
make sure you have not limited your ability to see devices via the “Search Filter” (see “Filter
Button”, page 22).
My range seems to be degraded in certain groups.
Check to ensure you have not restricted the transmission power
(see “Connections Tab”, page 45).
56
TROUBLESHOOTING
Other devices cannot discover my device.
1. Try moving closer to a known device.
2. Check to make sure your radio is turned “ON” (see Bluetooth Radio icon, page 13).
3. Check to make sure you have not restricted other devices from discovering yours (see
“Connections Tab”, page 45).
Other devices can discover my device, but they cannot connect.
Check to make sure you have not restricted other devices from connecting (see “Connections
Tab”, “File Sharing Tab”, “PIM Objects Tab”, and “Serial Port Tab”, pages 45-51).
Other devices do not receive my correct business card information.
Make certain that you have properly set up your business card information
(see “PIM Objects Tab”, page 48).
I saved a device, or devices, to a group, but now I cannot find them.
Check to see if they may have expired (see “General Tab”, page 44).
My device will not automatically stop searching.
Check to make sure you have selected a search period (see “Search Button”, page 22).
57
TROUBLESHOOTING
My device is always prompting me to supply a password.
Check your passkey settings (see “File Sharing Tab”, “PIM Objects Tab”, “Serial Port Tab”,
and “Dial-Up Tab”, pages 46-52).
My device will not let me delete the “All Devices” group.
The “All Devices” group cannot be renamed or deleted.
I cannot conduct certain transactions with one device that I can perform
with another.
Not all devices offer the same Bluetooth profiles.
58
GLOSSARY
Authentication
Security feature that requires users to verify a numeric password
before exchanging data.
Authorization
Security feature that requires user approval before another user
is allowed to share data.
Bluetooth Neighborhood A collection of Bluetooth devices.
Bonded Device
Recognized by your device so as not to require authentication or
authorization.
Device
Bluetooth device.
Device Address
Unique electronic address of a Bluetooth device.
Device Discovery
The location and recognition of one Bluetooth device by another.
Device Group
Compilation of several Bluetooth devices into a group, normally
to conduct related tasks.
Device Name
Name that a Bluetooth device provides when discovered by
another device.
Service Discovery
Determines which applications other devices have in common
with yours.
59
FCC/CE STATEMENT
DECLARATION OF CONFORMITY WITH FCC RULES FOR
ELECTROMAGNETIC COMPATIBILITY
We, Belkin Components, of 501 West Walnut Street, Compton, CA 90220, declare under our sole
responsibility that the product,
F8T020
to which this declaration relates, complies with Part 15 of the FCC Rules. Operation is subject to the following
two conditions: (1) this device may not cause harmful interference, and (2) this device must accept any
interference received, including interference that may cause undesired operation.
Caution: Exposure to Radio Frequency Radiation.
The radiated output power of this device is far below the FCC radio frequency exposure limits. Nevertheless, the device shall be used
in such manner that the potential for human contact normal operation is minimized.
When connecting an external antenna to the device, the antenna shall be placed in such a manner to minimize the potential for
human contact during normal operation. In order to avoid the possibility of exceeding the FCC radio frequency exposure limits, human
proximity to the antenna shall not be less than 20cm (8 inches) during normal operation.
Federal Communications Commission Notice
This equipment has been tested and found to comply with the limits for a Class B digital device, pursuant to Part 15 of the FCC Rules.
These limits are designed to provide reasonable protection against harmful interference in a residential installation.
This equipment generates, uses, and can radiate radio frequency energy. If not installed and used in accordance with the instructions,
60
FCC/CE STATEMENT
it may cause harmful interference to radio or television reception, which can be determined by turning
the equipment off and on, the user is encouraged to try and correct the interference by one or more of the following measures:
• Reorient or relocate the receiving antenna.
• Increase the distance between the equipment and the receiver.
• Connect the equipment to an outlet on a circuit different from that to which the receiver is connected.
• Consult the dealer or an experienced radio/TV technician for help.
Modifications
The FCC requires the user to be notified that any changes or modifications to this device that are not expressly approved by Belkin
Components may void the user’s authority to operate the equipment.
Canada-Industry Canada (IC)
The wireless radio of this device complies with RSS 139 & RSS 210 Industry Canada. This Class B digital complies with Canadian
ICES-003.
Cet appareil numérique de la classe B conforme á la norme NMB-003 du Canada.
Europe-European Union Notice
Radio products with the CE 0682 or CE alert marking comply
with the R&TTE Directive (1995/5/EC) issued by the Commission
of the European Community.
61
FCC/CE STATEMENT
Compliance with this directive implies conformity to the following European Norms
(in brackets are the equivalent international standards).
• EN 60950 (IEC60950) – Product Safety
• EN 300 328 Technical requirement for radio equipment.
• ETS 300 826 General EMC requirements for radio equipment.
To determine the type of transmitter, check the identification label on your Belkin product.
Products with the CE marking comply with the EMC Directive (89/336/EEC) and the Low Voltage Directive
(72/23/EEC) issued by the Commission of the European Community. Compliance with these directives implies
conformity to the following European Norms (in brackets are the equivalent international standards).
• EN 55022 (CISPR 22) – Electromagnetic Interference
• EN 55024 (IEC61000-4-2,3,4,5,6,8,11) – Electromagnetic Immunity
• EN 61000-3-2 (IEC610000-3-2) – Power Line Harmonics
• EN 61000-3-3 (IEC610000) – Power Line Flicker
• EN 60950 (IEC60950) – Product Safety
Products that contain the radio transmitter are labeled with CE 0682 or CE alert marking and may also carry the CE logo.
62
WARRANTY
Belkin Components Limited One Year Product Warranty
Belkin Components warrants this product against defects in materials and workmanship for its warranty period. If a defect is
discovered, Belkin will, at its option, repair or replace the product at no charge provided it is returned during the warranty
period, with transportation charges prepaid, to the authorized Belkin dealer from whom you purchased the product. Proof of
purchase may be required.
This warranty does not apply if the product has been damaged by accident, abuse, misuse, or misapplication; if the product has
been modified without the written permission of Belkin; or if any Belkin serial number has been removed or defaced.
THE WARRANTY AND REMEDIES SET FORTH ABOVE ARE EXCLUSIVE IN LIEU OF ALL OTHERS, WHETHER ORAL OR WRITTEN,
EXPRESSED OR IMPLIED. BELKIN SPECIFICALLY DISCLAIMS ANY AND ALL IMPLIED WARRANTIES, INCLUDING, WITHOUT
LIMITATION, WARRANTIES OF MERCHANTABILITY AND FITNESS FOR A PARTICULAR PURPOSE.
No Belkin dealer, agent, or employee is authorized to make any modification, extension, or addition to this warranty.
BELKIN IS NOT RESPONSIBLE FOR SPECIAL, INCIDENTAL, OR CONSEQUENTIAL DAMAGES RESULTING FROM ANY BREACH OF
WARRANTY, OR UNDER ANY OTHER LEGAL THEORY, INCLUDING BUT NOT LIMITED TO, LOST PROFITS, DOWNTIME,
GOODWILL, DAMAGE TO OR REPROGRAMMING, OR REPRODUCING ANY PROGRAM OR DATA STORED IN, OR USED WITH,
BELKIN PRODUCTS.
Some states do not allow the exclusion or limitation of incidental or consequential damages or exclusions of implied warranties,
so the above limitations of exclusions may not apply to you. This warranty gives you specific legal rights, and you may also have
other rights that vary from state to state.
63
belkin.com
Belkin Components
501 West Walnut Street
Compton • CA • 90220 • USA
Tel: 310.898.1100
Fax: 310.898.1111
Belkin Components, Ltd.
Express Business Park
Shipton Way • Rushden • NN10 6GL
United Kingdom
Tel: +44 (0) 1933 35 2000
Fax: +44 (0) 1933 31 2000
Belkin Components B.V.
Starparc Building • Boeing Avenue 333
1119 PH Schiphol-Rijk • The Netherlands
Tel: +31 (0) 20 654 7300
Fax: +31 (0) 20 654 7349
Belkin Components, Ltd.
7 Bowen Cresent • West Gosford
NSW 2250 • Australia
Tel: +61 (2) 4372 8600
Fax: +61 (2) 4325 4277
P74074
© 2002 Belkin Components. All rights reserved. All trade names are registered trademarks of respective manufacturers listed.
The Bluetooth name and the Bluetooth trademarks are owned by Bluetooth SIG, Inc., and are used by Belkin Components under license.