1
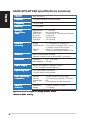
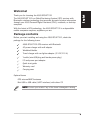
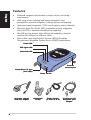
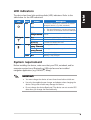
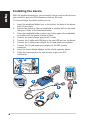
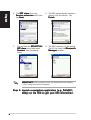
Q2021
®
GPS-BT100
GPS Receiver with Bluetooth®
Quick Start Guide
Copyright © 2005 ASUSTeK COMPUTER INC. All Rights Reserved.
ASUS GPS-BT100 specifications summary
English
Chipset
SiRF Star Ile/LP
Channels
12 parallel satellite-tracking channels
Frequency
1575.42 MHz
Receiver
L1, C/A code
Average
Acquisition
Time
Reacquisition
Update rate
Snap Start
Hot start
Warm start
Cold start
Receiver
accuracy
Normal
: 5 ~ 25 meters CEP without SA
EGNOS/WAAS : <2.2 meters, horizontal 95% of time
<5 meters, vertical 95% of time
Velocity
: within 0.1 meters per second
Time
: 1 microsecond synchronized GPS time
Antenna
Built-in passive patch antenna
Optional external active antenna (MMCX connector)
Bluetooth
Frequency
: 2.4 ~ 2.48 GHz
Input sensitivity : -80 dbm
Power supply
Built-in rechargeable Lithium-ion battery
5 V DC (through the mini-USB port)
Operating time
150 hours when in idle mode*
14 hours when in active mode
Ideal operating
conditions
Altitude
Velocity
Acceleration
Jerk
:
:
:
:
Physical
features
Dimensions
Weight
: 52 mm x 85 mm x 21 mm
: < 75 grams
:
:
:
:
:
:
0.1 seconds
every one second
<3 seconds at <25 minutes off period
<8 seconds
<38 seconds
<45 seconds
<18,000 meters (60,000 feet)
<515 meters per second (700 knots)
4 G.
20 meters per second (maximum)
Specifications are subject to change without notice.
*Based on ASUS testing.
2
Welcome!
English
Thank you for choosing the ASUS GPS-BT100!
The ASUS GPS-BT100 is a Global Positioning System (GPS) receiver with
Bluetooth® wireless technology that provides accurate location information
through your ASUS Personal Digital Assistant (PDA), notebook, or desktop
computer.
With the latest in GPS technology, the ASUS GPS-BT100 is a dependable
mobile companion anytime, anywhere you are.
Package contents
Before you start installing and using the ASUS GPS-BT100, check the
package for the following items.
ASUS GPS-BT100 GPS receiver with Bluetooth
AC power charger with wall adapter
Windshield holder
Travel charger with car lighter adapter (5 V DC/2.0 A)
Y-cable (mini-USB plug and female power plug)
I/O and power port adapter
Quick start guide
Warranty card
Carrying case
Optional items:
GPS external MMCX antenna
Mini-USB to USB cable (UART interface) with driver CD
N O T E . Contact your retailer if any of the items is damaged or missing.
3
Features
English
•
Enhanced navigation performance in urban, canyon, and foliage
environments
•
Wide range of use including land/marine navigation, fleet
management, personal navigation, tracking system, and mapping
•
High-speed signal acquisition (1920 time/frequency search channels)
•
Bluetooth Serial Port Profile (SPP)-compatible for easy integration
with your PDA or notebook with Bluetooth capability
•
Mini-USB port for devices with no Bluetooth capability (using the
optional mini-USB port to USB port cable)
•
Built-in Wide Area Augmentation System (WAAS)/European
Geostationary Navigation Overlay Service (EGNOS) demodulator
Power LED
GPS signal LED
Bluetooth LED
External
antenna port
Power/data I/O port
(mini-USB)
Power switch
AC power charger
with wall adapter
4
Windshield
holder
Travel charger
(5 V DC/ >
=2 . 0 A )
Y-cable and I/O
and power port
adapter
LED indicators
LED
Color
Bluetooth
Blue
GPS signal Green
Power
Status
English
The device has three light-emitting diode (LED) indicators. Refer to the
table below for the LED indications.
Description
On
The device is waiting for connection to another
Bluetooth device ( e.g. PDA, notebook)
Off
•
•
•
Blinking once
every 3 seconds
The device is connected to another Bluetooth
device
On
The device is searching for satellite data
Off
The device GPS function is in power saving mode
Blinking
The GPS coordinates are fixed
The device is off
The device Bluetooth is in power saving mode
The device is connected via the mini-USB port
Orange Blinking once
Battery power is low
every 3 seconds
Green
Blinking
every second
Battery power is too low to perform a function
On
Battery is charging
On
Battery is fully charged
System requirement
Before installing the device, make sure that your PDA, notebook, and/or
computer system has a Bluetooth or USB interface and an installed
navigation application (e.g. PaPaGO!® , eMap).
IMPORTANT!
•
You must charge the device at least three hours before initial use.
•
Use only the supplied power charger and adapter when charging the
device. Using other models may damage the device.
•
Do not change the device Baud rate! The device can not receive GPS
data when you change the Baud arbitrarily.
5
Installing the device
English
With the supplied accessories, you can install, charge, and use the device in
your vehicle to get your GPS information while on the road.
To use and charge the device inside your car:
1.
2.
3.
4.
5.
6.
7.
8.
9.
Insert the windshield holder foot to the hole at the back of the device
until it fits in place.
Position the device on the car windshield or window with its top panel
facing out. Refer to the illustration below.
Press the windshield holder suction caps firmly against the windshield
or window until the device is firmly in place.
Connect the travel charger plug to the Y-cable.
Connect the Y-cable mini-USB plug to the mini-USB port on the device.
Connect the Y-cable power plug to the I/O and power port adapter.
Connect the I/O and power port adapter to the PDA system
connector.
Insert the travel charger adapter to the vehicle cigarette lighter.
Follow the instructions in the next section to get your GPS
information.
2
1
4
2
5
7
3
6
8
9
0
#
ASUS >> GPS
1
1
4
7
2
5
8
0
5
6
9
#
7
6
4
6
3
8
English
Getting GPS information
Step 1: Install the device inside your vehicle following
the instructions in the previous section.
I M P O R T A N T ! Do not leave the device under the sun or inside a warm
compartment for a long period of time. High temperatures may damage
the device battery or affect its performance.
Step 2: Turn on the device.
Step 3: Turn on the PDA Bluetooth function.
To turn on the PDA Bluetooth function:
1. Tap the Bluetooth icon on the
bottom right corner of the display,
then select Bluetooth Manager
from the menu.
2. Tap N e w
w, then select C o n n e c t
from the pop-up menu. The
Bluetooth Connection Wizard
window appears.
3. Tap the option E x p l o r e a
Bluetooth device
e.
4. The display shows the detected
Bluetooth device(s). Tap the
GPS-BT icon.
7
English
5. Tap S P P s l a v e from the
S e r v i c e s e l e c t i o n field, then
tap N e x tt.
6. The PDA automatically creates a
shortcut for the device. Tap
Finish
h.
Tap and hold the GPS-BT100:
SPP slave icon, then select
Connect from the pop-up
menu.
8. The PDA connects to the device.
Tap (X) to close the B l u e t o o t h
M a n a g e r window.
7.
I M P O R T A N T ! When prompted, enter the default Bluetooth passkey
(1234) using the onscreen keyboard.
Step 4: Launch a navigation application (e.g. PaPaGO!®,
eMap) on the PDA to get your GPS information.
8
Problem
T h e ““Search
Search GPS
automatically” feature of
m y n a v i g a t i o n application
cannot detect the ASUS
GPS-BT100 or t h e
navigation application
fails to receive GPS data.
English
Troubleshooting
Solution
•
Check if another device or application is using
the virtual COM port which the ASUS
GPS-BT100 is trying to use. Turn off the
device or application that uses the same
virtual COM port as that of the ASUS
GPS-BT100.
•
Reset the PDA or close other software
applications running on the PDA.
•
Check whether the navigation application
and the ASUS GPS-BT100 has the same
virtual COM port Baud rate.
•
The device power is low. Fully discharge the
device battery, then recharge.
When using a navigation
•
application such as
PaPaGo!, I need to click the •
GPS-BT100 device twice
when using the “Search
GPS automatically” feature.
Disable the “Search GPS automatically”
feature of the navigation application.
The n a v i g a t i o n application
closes automatically or
performs c o n t i n u o u s G P S
d e v i c e s c a n n i n g when
using the “Search GPS
automatically” feature.
•
Use the latest version of the navigation
application, then try again.
•
Disable the auto-search GPS function of the
PDA navigation application, then establish
connection to the ASUS GPS-BT100
manually.
The GPS-BT100 device
can not fix my position
for more than five
minutes.
•
The car windshield tint is blocking the ASUS
GPS-BT100 view of the sky. Try installing
the device on another location inside your
car. You can also install an external antenna
(optional) for better GPS signal.
•
Heavy foliage, vegetation, or structures are
blocking the ASUS GPS-BT100 view of the
sky. Try moving to an open space.
•
The device usually takes more time to
acquire GPS data during first time use. Data
acquisition also takes time when you use
the device after charging it from a full
discharge.
•
The device memory data may be corrupted.
Fully discharge the device, then recharge.
Determine the virtual COM port where the
ASUS GPS-BT100 is connected to, then
establish connection to the device manually.
9
Troubleshooting
English
Problem
Solution
The GPS signal LED turns
off after a period of
time
e..
When the ASUS GPS-BT100 is not connected to
another device (e.g. PDA), the GPS function
automatically turns off to save power. The GPS
function is automatically restored when another
device connects to the ASUS GPS-BT100.
The Bluetooth LED turns
The ASUS GPS-BT100 is in idle mode. Turn off,
o f f a f t e r a p e r i o d o f t i m e . then turn on the device to activate the
Bluetooth function.
The battery is not yet
fully charged after more
than five hours of
charging.
10
The device features a high temperature
protection mechanism that prevents the
battery from charging on hot places. Try
charging the device at a cooler location.