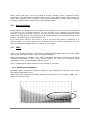
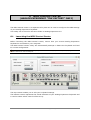
1
USER’S MANUAL
PROGRAMMING :
Robert Bocquier (version 2.x)
Nicolas Bronnec
Fabrice Bourgeois
Jean–Michel Blanchet
Christian De Jong
INDUSTRIALIZATION :
Frédéric Brun (Arturia)
Zhao Yitian (CME)
MANUAL :
Houston Haynes
Scott Stafiej
Richard Phan (French version)
Jean-Michel Blanchet (French version)
Antoine Back (French version)
Franck Blaszczyk (French version)
Tomoya Fukushi (Japanese version)
Nori Ubukata (Japanese version)
Kenta Sasano (Japanese version)
DESIGN :
Yannick Bonnefoy (Beautifulscreen)
Elisa Noual
Morgan Perrier
© ARTURIA SA – 1999-2010 – All rights reserved.
4, Chemin de Malacher
38240 Meylan
FRANCE
http://www.arturia.com
Information contained in this manual is subject to change without notice and does not represent a commitment on
the part of Arturia. The software described in this manual is provided under the terms of a license agreement or
non-disclosure agreement. The software license agreement specifies the terms and conditions for its lawful use. No
part of this manual may be produced or transmitted in any form or by any purpose other than purchaser’s personal
use, without the express written permission of ARTURIA S.A.
All other products, logos or company names quoted in this manual are trademarks or registered trademarks of
their respective owners.
2
ARTURIA – Analog Factory EXPERIENCE 2.5 – USER’S MANUAL
Thank you for purchasing Arturia’s
Analog Factory 2.5 /
Analog Experience “The Factory”!
This manual concerns two distinctive products:
Analog Factory 2.5, a software allowing to play and modify 3500 synthesizer sounds.
Analog Experience “The Factory”, a bundle of Analog Factory 2.5 along with a
dedicated control keyboard, the Analog Factory Keyboard.
In this package you will find:
A CD-ROM containing the Analog Factory 2.5 installer for Mac OS X and Windows
XP/Vista/Seven
A registration card (credit card format) including the Soft-eLicenser activation code
and Arturia’s online registration code (license number).
The User’s Manual for the Analog Factory 2.5 software and the Analog Factory
Keyboard.
An Analog Factory Keyboard (Analog Experience “The Factory” only)
An USB cable (Analog Experience “The Factory” only)
Carefully store your registration card !
In order to actually use the software, you have to register, then authorize, your
virtual instrument. By registering, you identify yourself as the legitimate owner
and thus will be sure to receive the latest news and updates for your instrument.
The Serial Number and Unlock Code are required to register & authorize Analog
Factory 2.5, so these codes are the real value of your product.
See chapter 3 for more information about the authorization process.
ARTURIA – Analog Factory EXPERIENCE 2.5 – USER’S MANUAL
3
Special Message Section
The MIDI keyboard uses USB or an external power adapter. Do not connect this product
with any power supply or adapter than the one described on this manual specifically
recommended by Arturia. (See Power supply for more details)
WARNING:
Do not place this product in a place or position where one might walk on, trip over or roll
anything over power or connecting cords.
The use of an extension cord is not recommended! If you must use one, make sure that the
cord has the ability to handle maximum current needed by this product. Please consult a
local electrician for more information on your power requirements.
This product should be used only with the components supplied or recommended by Arturia.
When used with any components, please observe all safety markings and instructions that
accompany the accessory products.
SPECIFICATIONS SUBJECT TO CHANGE:
The information contained in this manual is believed to be correct at the time of printing.
However, Arturia reserves the right to change or modify any of the specifications without
notice or obligation to update existing units.
IMPORTANT:
Always follow the basic precautions listed below to avoid the possibility of serious injury or
even death from electrical shock, damages, fire or other risks.
The product used either alone or in combination with an amplifier, headphones or speakers,
may be able to produce sound levels that could cause permanent hearing loss. DO NOT
operate for long periods of time at a high level or at a level that is uncomfortable.
If you encounter any hearing loss or ringing in the ears, you should consult an audiologist.
NOTICE:
Service charges incurred due to a lack of knowledge relating to how a function or feature
works (when the unit is operating as designed) are not covered by the manufacturer’s
warranty, and are therefore the owners responsibility. Please study this manual carefully
and consult your dealer before requesting service.
PRECAUTIONS INCLUDE, BUT ARE NOT LIMITED TO, THE FOLLOWING:
1. Read and understand all the instructions.
2. Always follow the instructions on the instrument.
3. Before cleaning the instrument, always remove the electrical plug from the outlet, as
well as the USB cable. When cleaning, use a soft and dry cloth. Do not use gasoline,
alcohol, acetone, turpentine or any other organic solutions; do not use liquid cleaner,
spray or cloth that's too wet.
4
ARTURIA – Analog Factory EXPERIENCE 2.5 – USER’S MANUAL
4. Do not use the instrument near water or moisture, such as a bathtub, sink,
swimming pool or similar place.
5. Do not place the instrument in an unstable position where it might accidentally fall
over.
6. Do not place heavy objects on the instrument. Do not block openings or vents of the
instrument; these locations are used for air circulation to prevent the instrument
from overheating. Do not place the instrument near heat vent or any place of poor
air circulation.
7. Only use the recommended specified AC adaptor (12V DC 500mA)
8. Make sure the line voltage in your location matches the input voltage specified on
the AC power adaptor.
9. Do not open and insert anything into the instrument which may cause a fire or
electrical shock.
10. Do not spill any kind of liquid onto the instrument.
11. Always take the instrument to a qualified service center. You will invalidate your
warranty if you open and remove the cover, and improper assembly may cause
electrical shock or other malfunctions.
12. Do not use the instrument with thunder and lightening present; otherwise it may
cause long distance electrical shock.
13. Do not expose the instrument to hot sunlight.
14. Do not use the instrument when there is a gas leak nearby.
15. Arturia is not responsible for any damage or data loss caused by improper operations
to the instrument.
HANDLING CD-ROMS:
Avoid touching or scratching the shiny underside (encoded surface) of the disc. Damaged or
dirty CD-ROM disc may not be read properly. Keep your CD-ROMs clean, using a
commercially available CD cleaner.
ARTURIA – Analog Factory EXPERIENCE 2.5 – USER’S MANUAL
5
Table of Contents
1
INTRODUCTION ...............................................................................................................................................8
1.1
HISTORY .........................................................................................................................................................8
1.2
HERE AND NOW ..............................................................................................................................................9
1.3
TAE® .............................................................................................................................................................9
1.3.1
Aliasing-free oscillators.........................................................................................................................9
1.3.2
A better reproduction of analog oscillator waveforms ........................................................................10
1.3.3
Direct Filter Circuit Modeling.............................................................................................................11
2
INSTALLATION...............................................................................................................................................13
2.1
2.2
WINDOWS INSTALLATION (XP/VISTA/7) ....................................................................................................13
MAC OS X INSTALLATION...........................................................................................................................15
3
AUTHORIZATION ..........................................................................................................................................17
4
USING ANALOG FACTORY 2.5 ...................................................................................................................23
4.1
PREFERENCES ...............................................................................................................................................23
4.2
TOOL BAR ....................................................................................................................................................24
4.3
USING THE PRESET MANAGER ......................................................................................................................25
4.3.1
Instrument ............................................................................................................................................25
4.3.2
Type .....................................................................................................................................................26
4.3.3
Characteristics.....................................................................................................................................27
4.3.4
Entries Found ......................................................................................................................................27
4.3.5
Filter Options.......................................................................................................................................28
4.3.6
Current Preset Information .................................................................................................................28
4.3.7
Organization ........................................................................................................................................29
4.4
KEYBOARD VIEW .........................................................................................................................................30
4.4.1
Virtual keyboard ..................................................................................................................................30
4.4.2
The wheels ...........................................................................................................................................30
4.4.3
Filter ....................................................................................................................................................31
4.4.4
LFO......................................................................................................................................................31
4.4.5
Key parameters....................................................................................................................................32
4.4.6
FX MIX (Effects Mix)...........................................................................................................................32
4.4.7
ADSR faders.........................................................................................................................................33
4.4.8
SNAPSHOTS buttons ...........................................................................................................................33
4.4.9
MIDI control........................................................................................................................................34
5
MODES OF OPERATION ...............................................................................................................................35
5.1
STANDALONE AND MIDI CONFIGURATION ...................................................................................................35
5.1.1
Launching the standalone application.................................................................................................35
5.1.2
Preferences configuration....................................................................................................................35
5.2
VST..............................................................................................................................................................36
5.2.1
Installation...........................................................................................................................................36
5.2.2
Instrument use in the VST mode...........................................................................................................36
5.3
AUDIO UNIT (MAC OS X ONLY)...................................................................................................................38
5.3.1
Installation...........................................................................................................................................38
5.3.2
Use in Logic Pro..................................................................................................................................38
5.3.3
Use in Digital Performer .....................................................................................................................39
5.4
PRO TOOLS ...................................................................................................................................................39
5.4.1
Installation...........................................................................................................................................39
5.4.2
Utilization of the plug-in......................................................................................................................39
6
ANALOG FACTORY KEYBOARD (ANALOG EXPERIENCE “THE FACTORY” ONLY)....................42
6
ARTURIA – Analog Factory EXPERIENCE 2.5 – USER’S MANUAL
6.1
FRONT PANEL OVERVIEW .............................................................................................................................42
6.1.1
The keyboard .......................................................................................................................................43
6.1.2
Shift button...........................................................................................................................................43
6.1.3
Level/search rotary encoder ................................................................................................................43
6.1.4
Preset/octave buttons...........................................................................................................................43
6.1.5
Snapshot/save buttons..........................................................................................................................44
6.2
WHEELS .......................................................................................................................................................44
6.2.1
Pitch wheel...........................................................................................................................................44
6.2.2
Modulation wheel ................................................................................................................................44
6.3
AFTERTOUCH................................................................................................................................................45
6.4
SYNTHESIS SECTION .....................................................................................................................................45
6.4.1
Filter setting rotary encoders ..............................................................................................................45
6.4.2
LFO setting rotary encoders................................................................................................................46
6.4.3
Key Parameter rotary encoders...........................................................................................................46
6.4.4
FX Mix rotary encoders.......................................................................................................................46
6.4.5
Envelope Sliders ..................................................................................................................................46
6.5
REAR PANEL OVERVIEW ...............................................................................................................................46
6.5.1
MIDI connections ................................................................................................................................47
6.5.2
Power supply .......................................................................................................................................47
6.6
BASIC MIDI CONTROL..................................................................................................................................47
7
MIDI IMPLEMENTATION (ANALOG EXPERIENCE “THE FACTORY” ONLY) .................................48
7.1
7.2
7.3
7.4
7.5
8
USING THE KEYBOARD .................................................................................................................................48
WHAT IS MIDI?............................................................................................................................................48
MIDI IMPLEMENTATION CHART ...................................................................................................................49
MIDI CONTROLLERS LIST .............................................................................................................................50
SYSTEM EXCLUSIVE MESSAGES DETAIL........................................................................................................51
MIDI CONTROL CENTER (ANALOG EXPERIENCE “THE FACTORY” ONLY) .................................52
8.1
LAUNCHING THE MIDI CONTROL CENTER ...................................................................................................52
8.2
CHANGING MIDI SETTINGS ..........................................................................................................................53
8.2.1
Global settings .....................................................................................................................................53
8.2.2
Individual control settings ...................................................................................................................53
8.2.3
Saving settings to the keyboard............................................................................................................54
9
ARTURIA ANALOG FACTORY 2.5 – LEGAL INFORMATION .............................................................55
9.1
9.2
9.3
9.4
SOFTWARE LICENSE AGREEMENT ................................................................................................................55
FCC INFORMATION (USA)......................................................................................................................59
CANADA ....................................................................................................................................................59
EUROPE......................................................................................................................................................60
ARTURIA – Analog Factory EXPERIENCE 2.5 – USER’S MANUAL
7
1
INTRODUCTION
1.1 History
In early 2001, Arturia began working on advanced algorithms for the digital emulation of
analog circuit audio characteristics. They are known as TAE®, standing for True Analog
Emulation. In non-technical language, this is an unprecedented way of creating the very
unique sound one finds in a synthesizer such as the Moog Modular. Nearly a year after they
began work on the algorithms, Arturia was ready for feedback. At the 2002 NAMM show in
California, Arturia shared an early version of what would later be the Moog Modular V with
the renowned maker of the original Moog synthesizer, Doctor Bob Moog.
In seeking insight from sound production experts, such as Dr. Moog, as well as avid
synthesizer users, Arturia was able to ensure the quality of the instruments they made; so
well in fact the Dr. Moog himself endorsed the Moog Modular V. The launch of this sound
powerhouse was an instant success, winning awards from several top magazines, and
leading to the development of other synth recreations.
Shortly thereafter, Arturia started receiving many requests from musicians, producers and
bands. Many of them explained how they were planning to replace their original hardware
synthesizers by virtual instruments. Artists around the globe were beginning to see the
advantages of a software alternative to hardware-based synthesizers.
The CS-80V emulated the legendary Yamaha CS-80, considered by many as "the ultimate
polyphonic" synthesizer, and was launched at the AES 2003 in New York. Imagine some of
your favorite music from diverse artists such as Keith Emerson or Stevie Wonder, and you'll
get an idea of what the CS-80V is capable of.
Released at the NAMM 2004, the Minimoog V was our recreation of the Minimoog, quite
possibly the most famous synthesizer ever. The original Minimoog has been big on the
music scene since the 70’s; still today the Minimoog has a large following thanks to its
many sound capabilities.
The ARP 2600 V was launched at the NAMM 2005 in Anaheim. This is a faithful reproduction
of the ARP 2600 and is great for just about any sound one might wish to create: everything
from drum n’ bass stabs to Star Wars’ R2-D2 sounds have been made with the Arp.
At the Winter NAMM Show 2006, ARTURIA announced the release of its seventh product:
the Prophet V. This powerful hybrid gives you two instruments in one: it combines the
warmth of the legendary Prophet 5 programmable analog synth with the unique Vector
Synthesis textures of the digital Prophet VS.
And finally, at the summer 2007 NAMM Show, Arturia launched the Jupiter-8V. In terms of
sonic possibilities, it complemented its “Arturia siblings” by bringing something different.
The Jupiter-8 V was capable of creating very versatile sounds. You could easily make 'fat' or
‘Crystal’ sounds with it. In fact, the Jupiter-8 sounded the way it looked, ‘sleek and
polished’.
The electro-pop community became quickly convinced by the qualities of the original
Jupiter-8. 'Relax', by Frankie Goes to Hollywood was produced incorporating a Jupiter 8, and
players such Vince Clarke, John Foxx, and Martyn Ware also used it abundantly. The path to
classic status of the Jupiter started there.
8
ARTURIA – Analog Factory EXPERIENCE 2.5 – USER’S MANUAL
Other artists that have used The Jupiter-8 include: Howard Jones, Tangerine Dream,
Underworld, Jean Michel Jarre, Depeche Mode, Prince, Gary Wright, Adrian Lee, Heaven 17,
Kitaro, Elvis Costello, Tears for Fears, Huey Lewis and the News, Journey, Moog Cookbook,
Yes, Devo, Freddy Fresh, Simple Minds, Jan Hammer and BT.
1.2
Here and Now
Analog Factory 2.5 brings you the full spectrum of sounds from all of the above instruments
in an easy to use, no-hassle interface. As you will soon see in exploring the instrument
yourself, a single instrument gives you your pick from the most complete synthesis sound
palette one could ask for: the great bass of the Moog Modular, the brass and strings of the
Prophet, the pads and FX of the ARP 2600, etc.
If you have never played a real synth, or even if you don’t know what a synthesizer is, it
doesn't matter; you will be glad to have invested in such a powerful instrument once you
hear the difference Analog Factory 2.5 makes in your studio.
1.3
TAE®
TAE®, True Analog Emulation, is Arturia's outstanding technology dedicated to the digital
reproduction of analog circuits used in vintage synthesizers.
When implemented in software code, TAE®’s algorithms guarantee authentic emulation of
hardware specifications. This is why Analog Factory 2.5, and all of Arturia’s virtual
synthesizers, offer an unparalleled quality of sound.
TAE® combines three major advances in the domain of synthesis:
1.3.1 Aliasing-free oscillators
Standard digital synthesizers produce aliasing in high frequencies, and also when using
Pulse Width Modulation or FM.
TAE® allows the production of totally aliasing-free oscillators in all contexts (PWM, FM…),
and at no extra CPU cost.
Aliasing
Linear frequency Spectrum of an existing well-known software synthesizer
ARTURIA – Analog Factory EXPERIENCE 2.5 – USER’S MANUAL
9
Linear frequency spectrum of the Analog Factory 2.5 oscillator made with TAE®
1.3.2 A better reproduction of analog oscillator waveforms
The waveforms produced by the oscillators in analog synthesizers are marked by the
presence of a capacitor in the circuits. The discharge of the capacitor results in a light bend
in the original waveform (notably for saw tooth, triangular and square waveforms). TAE®
reproduces the result of this capacitor discharge in software. This is the analysis of a
waveform from one of the 5 original instruments that Arturia’s software emulates, followed
by one made by Analog Factory 2.5. They are both equally deformed by the low-pass and
high—pass filtering.
Temporal representation of a “saw tooth” waveform of a hardware synthesizer
10
ARTURIA – Analog Factory EXPERIENCE 2.5 – USER’S MANUAL
Temporal representation of a “saw tooth” waveform reproduced by TAE®
What’s more, the hardware analog oscillators were unstable. In fact, their waveform varies
slightly from one period to another. If we add to this the fact that the starting point for each
period (in Trigger mode) can vary with the temperature and other environmental conditions,
we see why vintage synthesizers have such a typical sound.
TAE® reproduces the instability of oscillators, bringing a fatter and “bigger” sound.
1.3.3 Direct Filter Circuit Modeling
Due to advances in computer processing power, Analog Factory 2.5 can now employ direct
filter modeling techniques to achieve unprecedented accuracy in the emulation of a
hardware synthesizer’s filter. By modeling the operation of the individual hardware
components of the filter circuit, the warm nuances synonymous with analog sounds are
recreated. This graph is a frequency domain plot as just a single example of direct circuit
modeling in action; it shows the generation of harmonics at multiples of the resonant
frequency when the filter is in self oscillation mode, for both one of Arturia’s virtual
instruments and what it is emulating. These harmonics are characteristic of hardware
synthesizer filters and are due to the non-linear behavior inherent to its analog circuitry.
The harmonics generated add to the richness and warmth of the sound produced by the
filter. As a result of the direct recreation of this analog circuitry, the same characteristics of
the sound are present, thus giving the user a truly analog sound.
ARTURIA – Analog Factory EXPERIENCE 2.5 – USER’S MANUAL
11
Comparison of harmonics generated by the filter circuits in self oscillation
of Analog Factory 2.5 and a hardware synthesizer
12
ARTURIA – Analog Factory EXPERIENCE 2.5 – USER’S MANUAL
2
2.1
INSTALLATION
Windows installation (XP/VISTA/7)
Insert the CD-ROM into the drive. Explore the contents of the CD-ROM, double click on the
icon named Analog Factory 2.5 Setup.exe.
At the first step of the installation, choose the destination folder for the Analog Factory 2.5
installation. By default, it will be installed in this location:
C:\Program Files\Arturia\Analog Factory 2.5
You can change the destination with the Browse button.
If you own a previous version, this version will be overwritten.
Choose the installation folder
Analog Factory 2.5 will be installed as a standalone application. The following stage will let
you choose to install Analog Factory 2.5 as a plug-in. To do this, choose the protocol(s) that
you wish to use (VST or RTAS). For more information on these protocols, go to Chapter 9.
ARTURIA – Analog Factory EXPERIENCE 2.5 – USER’S MANUAL
13
Choice of protocols
For the VST protocol, you must choose an installation folder in order for the host application
to use Analog Factory 2.5 as a plug-in. If you do not know how to make this choice, go to
Chapter 8.
14
ARTURIA – Analog Factory EXPERIENCE 2.5 – USER’S MANUAL
Choice of VST plug-in installation folder
The installation program now has enough information to complete the installation. When the
installation process is completed, please proceed to authorization step (Chapter 3).
2.2
MAC OS X installation
Insert the CD-ROM into the drive. Explore the content of the CD-ROM, then double-click on
the icon named Analog Factory 2.5 Setup Mac.
Follow these steps:
•
read and accept the End User License Agreement,
•
select a destination.
When prompted, enter the administrator name and password of your computer in the
authentication window.
ARTURIA – Analog Factory EXPERIENCE 2.5 – USER’S MANUAL
15
Authentication window
Analog Factory 2.5 will next be installed as a standalone application, but also as VST, AU
and RTAS plug-ins.
The installation program now has enough information to complete the installation. When the
installation process is completed, please proceed to authorization step (Chapter 3).
16
ARTURIA – Analog Factory EXPERIENCE 2.5 – USER’S MANUAL
3
AUTHORIZATION
Now that your Analog Factory 2.5 has been installed, you have to authorize the synthesizer.
This doesn’t apply to owners of the previous 1.x version, who may use the software right away using their USBeLicenser hardware dongle.
Contrary to 1.x versions that used the USB-eLicenser protection scheme, Analog Factory 2.x
uses the “Soft-eLicenser” virtual dongle solution by default. Avoiding the use of a USB port,
this system allows using the synthesizer on one machine which must be connected to the
Internet during the authorization process.
To transfer your license on another computer, or simply use Analog Factory 2.5 on several computers (one
instance at a time), you will need:
- to use one USB-eLicenser hardware dongle (sold separately, also used by many other software editors);
- in the eLicenser Control Center, to drag-and-drop your license from Soft-eLicenser to USB-eLicenser.
This transfer, requiring a valid Internet connection, can be done both ways:
- from Soft-eLicenser to USB-eLicenser;
- from USB-eLicenser to Soft-eLicenser.
Please check the eLicenser documentation installed on your computer for any further technical details.
The first step is to register your software in order to obtain the activation code that will
enable you to actually use the software.
You should have handy the license serial number of Analog Factory 2.5 and the unlock code
(these are integral part of the software and are printed on a small plastic card)
Connect your computer to the Internet, and go to this web page:
http://www.arturia.com/login
If you don’t have any Arturia account yet, please create one now:
ARTURIA – Analog Factory EXPERIENCE 2.5 – USER’S MANUAL
17
This will take you to this form:
If you already have an account made, simply log in:
Once you are logged into your account, you can register your Analog Factory 2.5 and
request your activation code.
Go to the “My Registered Products” section of your account and click on the “Add” button:
18
ARTURIA – Analog Factory EXPERIENCE 2.5 – USER’S MANUAL
In the form that appears, select “Analog Factory” from the drop down menu, and key in
your synthesizer serial number and unlock code (as written on the registration card):
You should then see the confirmation screen:
ARTURIA – Analog Factory EXPERIENCE 2.5 – USER’S MANUAL
19
And finally there is a screen from which you can copy the eLicenser activation code. The
very same information is sent to you by email as a backup.
Now that you have retrieved the activation code, launch the eLicenser Control Center. This
application has been automatically installed on your computer along the Analog Factory 2.5,
it is accessible there:
•
•
Windows: Start > Programs > eLicenser > eLicenser Control Center
Mac OS X: Finder > Applications > eLicenser Control Center
The hereunder screenshots have been taken under a Mac OS X running computer; however the process is
strictly identical under a machine running Windows XP/Vista/7. The same functions apply, only the graphical user
interface differs, and possibly also the language used. These small details should not prevent you from
understanding the full process.
In the eLicenser Control Center main window you should see a “SeL” virtual dongle installed
onto your computer.
20
ARTURIA – Analog Factory EXPERIENCE 2.5 – USER’S MANUAL
The eLicenser Control Center main window, showing an empty Soft-eLicenser
In the eLicenser Control Center menu, click on the “Enter Activation Code” button, and enter
the code when prompted. Simply paste in the 32-digit code you’ve just copied from your
account on the ARTURIA website:
Analog Factory 2.0
Enter the activation code
ARTURIA – Analog Factory EXPERIENCE 2.5 – USER’S MANUAL
21
The eLicenser Control Center is now ready to download the software license that will allow
you to use Analog Factory 2.5. Click on Start, the progress bar should advance until
downloading is complete. A popup window will confirm completion, just click “Close”.
Now the main eLicenser Control Center window should show your Analog Factory 2.5 license
installed and activated.
Analog Factory 2.0
License is installed and activated
It’s now time to launch Analog Factory 2.5.
22
ARTURIA – Analog Factory EXPERIENCE 2.5 – USER’S MANUAL
4
USING ANALOG FACTORY 2.5
4.1 Preferences
The “Preferences” window
Preferences are set by clicking on the Analog Factory 2.5 logo on the virtual keyboard.
The following options are available:
LCD COLOR
This function offers a choice between several available
colors/combinations on the Preset Manager screen.
SHOW ANIMATION
Choose to activate or deactivate the animation (keyboard
and Preset Manager folding).
SHOW CONTROL POPUP
WHEN MOUSE
CLICKS ON CONTROL
A small popup window appears each time that the mouse
clicks on a modifiable parameter in order to give
information about the parameter and modifiable values.
Choose ON to activate this preference, or OFF to deactivate
it. Default is ON.
SHOW CONTROL POPUP
WHEN MOUSE
RESTS ON CONTROL
A popup window will appear when the mouse remains idle
on a modifiable parameter, giving information about the
parameter and the modifiable values. Choose ON to
activate this preference, or OFF to deactivate it. Default is
ON.
SHOW ASSIGNATION LCDS
Toggles the display of the small label screens showing the
current key parameter knob assignments.
ARTURIA – Analog Factory EXPERIENCE 2.5 – USER’S MANUAL
23
4.2 Tool Bar
Tool Bar
The tool bar consists of a set of essential icons, organized from left to right, allowing the
user to see or have access to:
PRESET NAME
INSTRUMENT TYPE
Name of the current preset, name of the Instrument, and the Type
of instrument.
SAVE AS
Saving Presets (sound programming). This function allows the user
to save a preset which has been modified, including giving it a new
name. This new preset will be a USER Preset and not a FACTORY
Preset (which cannot be modified). When one chooses the “Save As”
function, a window opens allowing the user to name and classify the
new preset according to TYPE and CHARACTERISTICS).
So that the foundations of the instrument remain intact, it is not possible to save
or delete a Factory Preset (Presets that come installed with the software). However,
the Save As function allows the modification and saving of a Preset under another
name that the user chooses.
SAVE
DELETE
IMPORT
EXPORT
Save changes to the current USER Preset.
You can delete any USER preset with this function.
Permits the user to import a document containing the USER Presets
for Analog Factory (allowing you to add Presets to your personal
collection). The document referred to is called “*.afpresets”. To
import, click on IMPORT and then the local “*.afpresets” document
in your computer. If the document(s) being imported have the same
name as existing Presets, the following options will appear:
“Duplicate” leaves two presets with the same name listed in the
Preset Manager.
“Replace” will replace the current preset with the same name
with that of the one being imported.
“Skip” will stop the new preset from being imported.
Choose this function to export USER Presets. Click on “Export”,
choose the destination of the “*.afpresets” document which will be
created, and give it a name.
So that the foundation of Analog Factory remains intact, it is not possible to
Import/Export Factory Presets.
MIDI IN
24
Light signaling MIDI activity (will illuminate when a note from an
external MIDI controller or keyboard is pushed)
ARTURIA – Analog Factory EXPERIENCE 2.5 – USER’S MANUAL
MIDI CH.
This drop-down menu offers the channel choice from which Analog
Factory receives MIDI information. Default is OMNI (responds to
data on all MIDI channels).
TUNE
General settings for the tuning of Analog Factory. This allows the
user to finely tune the global tuning of the instrument.
VIEW
Choose the view of the interface. The selection buttons offer the
choice to View all of Analog Factory, only the Preset manager, or
only the Keyboard.
4.3 Using the Preset Manager
Presets account for the various sounds of Analog Factory: there are 3500 of them! A preset
contains all the setting information of the different controllers necessary to reproduce a
sound. In Analog Factory, there are various ways in which the Presets are classified and
filtered in order to simplify preset management and find the appropriate sounds for a song;
one won’t have to search 3500 presets to find the desired sound. These filters are listed on
the left of the Preset Manager Menu and presented as follows: Instrument, Type, and
Characteristics. Let us take a moment to look at each.
Preset Manager
4.3.1 Instrument
“Instrument” refers to one of the 7 instruments from which Analog Factory draws its sound.
The instruments include:
•
Moog Modular V
•
CS-80 V
•
Minimoog V
•
ARP 2600 V
•
Prophet V
ARTURIA – Analog Factory EXPERIENCE 2.5 – USER’S MANUAL
25
•
Prophet VS
•
Jupiter-8V
If, for example, one clicks on CS-80 V, the Preset Manager will provide a list of presets
uniquely from the CS-80 V. But one can also chose to browse for more than one
Instrument; that means the user can look for sounds from CS-80 V and ARP 2600 V at the
same time by selecting both instruments in the “Instrument” frame. When no Instruments
are selected for preset filtering, then the Manager will either automatically list all presets or
list presets based on other filters.
All presets are listed to the immediate right of the filters under Preset Name.
4.3.2 Type
“Type” refers to instrument type being synthesized. Just as in the above example, one may
select “Type” only in order to have access to the list below:
•
Bass
•
Pad
•
Lead
•
EFX (sound effect)
•
FM
•
Brass
•
Percussive
•
Sequence
•
Strings
•
Guitar
•
Organ
•
Piano
As with the Instrument filter, one can choose one or more Types of presets. By selecting
only BASS, the user will be given a list that contains only bass presets, and if one chooses
BASS and STRINGS both Types will be provided.
The user may also search deeper by selecting and combining the different filters. For
example, one may choose BASS, PAD, and STRINGS under the Type filter and MOOG
MODULAR V and ARP 2600 V in the Instruments filter. The Preset Manager will then offer a
list fulfilling only the above criteria.
26
ARTURIA – Analog Factory EXPERIENCE 2.5 – USER’S MANUAL
4.3.3 Characteristics
To further filter choices, there is a third filter offered. “Characteristics” allows the user to
choose presets according to a mood or ambiance. The choices available are as follows:
•
Bright
•
Dark
•
Aggressive
•
Quiet
•
Hard
•
Soft
•
Complex
•
Simple
•
Short
•
Long
•
Bizarre
•
Acid
•
Ambient
•
Digital
•
Ensemble
•
Noise
•
SoundTrack
•
Funky
Once again, these filters can be applied either individually or in any combination that the
user wishes in order to find the ideal presets.
4.3.4 Entries Found
This number, found at the bottom right of the Preset Manager, indicates the number of
Presets that correspond to a preset search.
ARTURIA – Analog Factory EXPERIENCE 2.5 – USER’S MANUAL
27
4.3.5 Filter Options
Above the filters are three buttons: Reset, Favorites, and User. These buttons function as
follows:
RESET
Removes any filters that the user may have applied to the presets so that a
new search may be started.
FAVORITES
Presents only the favorites that the user has checked in the favorites list
(see 3.2.7). When the favorites Filter Option is selected, then the filters
(Instrument, Type, and Characteristics) will be applied only to the list of
favorites.
USER
An abbreviation of USER PRESETS. Since the user can modify and create
new presets, he may also choose the Filter Option “USER” in order to view
and search exclusively among presets created by the user.
4.3.6 Current Preset Information
Identity Card
Information on the current preset, or an “Identity Card”, is found to the right of the Preset
Manager. An image of the original instrument which the preset is based upon is presented
along with the following information:
PRESET
INSTRUMENT
AUTHOR
POLYPHONY
28
The name of the current preset
The name of the virtual instrument
The name of the sound designer who created the preset
The number of available voices for the current preset.
ARTURIA – Analog Factory EXPERIENCE 2.5 – USER’S MANUAL
EDIT
If the selected preset is a USER Preset, it is possible to edit its
information. By clicking on this option, a window similar to that of the
Save As function appears. It is possible to change the Preset Name, Type
(Bass, Brass, Pad, Lead, etc …) and the Characteristics (one must simply
click in the boxes corresponding to the 18 possible options: Bright, Dark,
Aggressive, Quiet, Hard, Soft, etc.).
EDIT Preset window
4.3.7 Organization
In addition to the Preset Filters that help the user easily search and select among the 3500
various presets, there are also view options within the Preset Manager that allows the user
to choose how the presets are listed.
When the user selects the filter criteria, the list of Presets appears in a vertical column in
the middle of the screen under Preset Name. By default, the presets will be listed
automatically in alphabetical order from A to Z under Preset Name. However, if the user
prefers, the presets can be arranged on the screen according to other criteria in the
adjacent columns:
INSTRUMENT
In this column, the name of the original instrument that produced the
sound is offered for each preset. Therefore, it will list among the
following instruments: Minimoog V, Moog Modular V, ARP 2600 V, CS-80
V, Prophet 5, Prophet VS or Jupiter-8V. When the user clicks on the title
bar labelled Instrument, the columns will reorganize alphabetically under
the Instrument column.
TYPE
In this column, the TYPE of instrument appears corresponding to each
preset. By clicking at the top of the column on the TYPE title bar, the
presets presented will be listed alphabetically according to TYPE in the
same column.
CPU
In this column, the CPU usage rate appears for each preset. By clicking
the title bar labelled CPU at the top of this column, the presets will be
arranged on a scale from 1 to 5. 1 represents a low CPU usage rate while
5 represents a high CPU usage rate.
ARTURIA – Analog Factory EXPERIENCE 2.5 – USER’S MANUAL
29
FAVORITES
(FAV)
Allows the user to classify presets according to usage or general
preference as one does in popular media players. Simply check one’s
Favorite presets and access them by clicking the title bar at the top of
the column. One may also easily access the Favorites with the Favorites
Filter Option.
4.4 Keyboard View
The Keyboard view of Analog Factory 2.5 (accessed either by the “Keyboard” or “All” view in
the toolbar) gives the user access to both the virtual keyboard and all the controls with
which the user can modify the sounds of the presets. We will take a moment now to look at
these controls.
4.4.1 Virtual keyboard
The LEVEL knob controls the general volume of Analog Factory 2.5. The more the knob is
turned to the right the higher the output level is raised.
The virtual keyboard visually presents 32 keys and allows one to produce the sounds of
Analog Factory 2.5 without the need for an external master MIDI keyboard. With the aid of
the TRANSPOSE function found on the left of the virtual keyboard, above the pitch and
modulation wheels, the user may scroll up or down the keyboard for notes in higher or
lower ranges than is visually presented.
Virtual Keyboard
4.4.2 The wheels
The wheels found on the left side of the virtual keyboard give the user control over the
frequency of the sound (“PITCH”) and the modulation rate (“MOD”).
30
ARTURIA – Analog Factory EXPERIENCE 2.5 – USER’S MANUAL
Wheels
PITCH WHEEL
MOD
Wheel controlling the pitch of the sound. When pushed in the up
direction, the sound “bends” and becomes higher in tune. When pushed
in the Down direction, the sound “bends” and becomes lower in tune.
Wheel controlling modulation (MIDI controller #1)
The modulation wheel is not necessarily connected on every preset! It will depend on
the preset being used.
4.4.3 Filter
Filter
CUTOFF
Modifies the cut-off frequency (this filter has the ability to make the
sound more or less bright by controlling the amount of high frequencies)
RESO
modifies the resonance of the filter (the sound becomes more “cutting”
when the parameter is pushed)
4.4.4 LFO
The LFO, Low Frequency Oscillator, is used as a modulation source for Analog Factory 2.5’s
sound. It allows the user to create variations in a sound parameter to generate diverse
effects such as a vibrato, “wahwah” effect, etc. The two parameters that may be modulated
within the LFO are:
LFO
ARTURIA – Analog Factory EXPERIENCE 2.5 – USER’S MANUAL
31
RATE
AMOUNT
Sets the LFO rate/speed
Sets the amount of LFO modulation
4.4.5 Key parameters
The key parameters section will prove to be particularly useful. This section is found in the
middle of the Keyboard View and labeled with the aforementioned name (Key Parameters).
Key parameters
Each preset offers the four most pertinent parameters unique to that preset. Our sound
designers have taken the greatest care to assign parameters that will enrich and give depth
to the sound of each preset. In this way, only the parameters that are the most beneficial
when modifying/tweaking a given sound are available, facilitating the production process.
To know which 4 parameters have been selected for each preset, one can simply point the
mouse over a Key Parameter knob and an information block will appear specifying the
parameter name.
4.4.6 FX MIX (Effects Mix)
Analog Factory 2.5 also carries a simple yet efficient effects section. The two effects, Chorus
and Delay, are automatically synchronized to the tempo of a piece in the user’s sequencer.
If in spite of this the user wishes to access more advanced effects, they are available in
most sequencer programs (Cubase, Garage Band, Pro Tools, to name just a few).
FX MIX
CHORUS
The Chorus effect permits one to double and detune the sound in order to make
it deeper and richer. The Chorus MIX controls the amount of Chorus applied to
the original sound, making it more wet or dry.
DELAY
The Delay carries an echo effect (repetition of the sound) that gives space to the
tone. The speed of these repetitions is automatically synchronized to MIDI
tempo (the tempo of a song in the host sequencer). The user can simply adjust
the Delay MIX knob to control the quantity of the effect.
32
ARTURIA – Analog Factory EXPERIENCE 2.5 – USER’S MANUAL
4.4.7 ADSR faders
The “ADSR” envelope is composed of four successive sequential periods in the life of a note:
Attack time, Decay time, Sustain time, and the Release time.
ATTACK
Begins when a note is activated. The Attack time may be short and dry (as in
percussion) or long and ascending (as with a pad sound)
DECAY
Follows the Attack. The Decay is a period in which the amplitude of the sound
is reduced to the sustain level.
SUSTAIN
The sustain of the note, as long as the note is active/held
RELEASE
The end of the sound. The release can be short or stretch out over a longer
duration
Thanks to these 4 faders (A, D, S, and R) one can very simply edit the amplitude curve
envelope of each sound within Analog Factory. If, for example, one finds a sound pleasant
but the attack is too long, he can use the A fader to reduce it.
ADSR envelope
As will be described in the following paragraphs, the diverse parameters of Analog Factory
2.5 can be controlled from an external MIDI keyboard making the manipulation of the
instrument much more practical and quicker than manipulations with a mouse. It is in this
spirit that the instrument was created. It is recommended to use Analog Factory 2.5 with an
external MIDI keyboard.
4.4.8 SNAPSHOTS buttons
Snapshots buttons
The Snapshots buttons are found at the top left hand corner of the Keyboard view. These
eight buttons allow the user to quickly save any preset being used, along with modifications
that may have been made to it, for easy access. These 8 snapshots are automatically saved
when Analog Factory 2.5 closes and will be automatically available when the program is
reopened.
This feature is especially useful when an artist plays live because these 8 snapshots can
then be easily accessed from a MIDI interface. This means that the user can stock 8 of his
favorite presets along with any modifications previously made, and have everything they
ARTURIA – Analog Factory EXPERIENCE 2.5 – USER’S MANUAL
33
need at the touch of a button on a MIDI interface during a live session without referencing
the computer screen.
It can also be useful for comparing modifications to sound in order to choose which fits best
into a musical production. For example one could store 8 different states of the same
preset: first state or original, second with the Cutoff applied, third state using the delay,
etc.
To take a snapshot:
Simply [Shift]+click (
currently being used.
+click on Mac) on one of the buttons in order to save the preset
Then, later, to recall the preset along with any modifications that may have been made
to it, click on the same button.
If the same [Shift]+click ( +click on Mac) operation is done on the same button, then
the current Snapshot will be replaced without prompting the user.
4.4.9 MIDI control
Most of the knobs, sliders, and switches on the Analog Factory 2.5 can be manipulated with
external MIDI controllers, and this is ideally the way they should be controlled, in order to
get a high level of usability. Before anything else, the user should make sure that the MIDI
device being used is correctly connected to the computer, and that the sequencer or the
Analog Factory 2.5 application is correctly configured to receive MIDI events coming from
the device.
Every instance of the Analog Factory 2.5 receives MIDI events transmitted on a given
channel. This reception channel is defined in a global manner for the synthesizer, either in
the sequencer, or in the standalone Analog Factory 2.5 application. On the reception
channel, the Analog Factory 2.5 can receive different MIDI controls.
It is possible to choose a reception control for each knob, which means assigning an
external controller to a given parameter. For this, one should click on the knob being
used while holding down the Control key. A configuration window appears and offers
the choice of a MIDI control number. The user can also click on the “Learn” button and
move one of the physical MIDI controllers. In this case, the control number will be detected
and configured automatically. To deactivate the MIDI control of a knob, simply uncheck the
“Active” option in the MIDI control window.
Assigning an external MIDI controller
34
ARTURIA – Analog Factory EXPERIENCE 2.5 – USER’S MANUAL
5
MODES OF OPERATION
5.1 Standalone and MIDI configuration
The stand-alone application allows the use of Analog Factory 2.5 outside of any host
application. You can open the instrument from its location in the start menu or on your
desktop, and play directly with the help of a master MIDI keyboard or external sequencer
on a separate computer.
5.1.1
Launching the standalone application
To launch the Stand-alone application on your PC, go into the Start menu > Programs >
Arturia > Analog Factory 2.5, and choose Analog Factory 2.5.
On a Macintosh, open the folder /Applications/ Arturia Analog Factory 2.5 / and double click
on the application icon called Analog Factory 2.5.
5.1.2 Preferences configuration
In order to access the preferences window, click on the menu File > Audio & MIDI
Preferences. This window allows you to configure the global preferences of the Analog
Factory 2.5 application. These are saved automatically.
The preferences window
ARTURIA – Analog Factory EXPERIENCE 2.5 – USER’S MANUAL
35
audio device
Select the driver corresponding to the sound menu that you wish to
use.
sample rate
Choose the sampling frequency among those proposed by your
sound menu. Note that higher sampling frequency rate settings will
demand increased processor performance from your computer.
audio buffer size
Configure the optimal audio latency as it relates to performance of
your sound card. Be careful with this setting, as a latency setting
lower than your system can support can cause unwanted artifacts in
the sound.
output channels
Select the audio output channel. If the sound menu offers several
outgoing channels, choose the pair of output channels that you wish
to use.
active MIDI inputs
Select the MIDI devices you want to use to control the synthesizer.
5.2 VST
5.2.1
Installation
5.2.1.1 Under Windows
During installation, select the box “VST” among the proposed format choices of plug-ins.
The installer will automatically detect the VST folder of the instruments used by Cubase or
Nuendo. In the case of another compatible VST sequencer, such as Logic Audio, you will
have to manually copy the plug-in file in the appropriate folder. You will be able to find this
file after the installation in:
C:\Program\Files\Arturia\Analog Factory 2.5\Analog Factory.dll
5.2.1.2 Under Mac OSX
The VST plug-in is automatically installed in the folder of the system corresponding to the
VST instruments: /Library/Audio/Plug-Ins/VST/. The VST plug-in will be usable by all
your VST host applications.
5.2.2
Instrument use in the VST mode
The opening of VST Analog Factory plug-ins is the same as opening all other VST plug-ins.
Please consult the instruction manual of your host sequencer for more specific information.
Under Cubase SX, open the menu “VST Instruments”, and choose Analog Factory in the
rack.
36
ARTURIA – Analog Factory EXPERIENCE 2.5 – USER’S MANUAL
Using Analog Factory in Cubase SX3
5.2.2.1 Connection to a MIDI track
In order for Analog Factory 2.5 to play information coming from a MIDI track, you have to
choose a MIDI track and select Analog Factory as MIDI output of this track. See the picture
below for more detail on how this is accomplished.
Connection of a MIDI track to Analog Factory
The events played on a MIDI keyboard are recorded by your host sequencer, and now you
can use the MIDI editing possibilities of the sequencer to control any parameter in Analog
Factory 2.5.
5.2.2.2 Saving presets
When the session/project is saved, Analog Factory is saved in its last mode of operation,
with all modifications intact. For instance, if you are working on a “P1” preset in which you
have modified parameters (without saving this as a separate preset in the plug-in itself), at
the next opening of the piece, Analog Factory will load the “P1” preset and the modifications
as well.
The drop-down menu with the VST sequencer allowing you to save a new preset is of course
usable with Analog Factory 2.5. However, it is highly advised to use the Analog Factory
internal menu: the presets saved in this way are usable in any other mode (standalone or
with another sequencer), they can be exported and exchanged more easily, and they will
remain compatible with the future Analog Factory versions.
ARTURIA – Analog Factory EXPERIENCE 2.5 – USER’S MANUAL
37
5.2.2.3 Automation
The automation works the same with Analog Factory as with any VST plug-in (for more
detail about automation, refer to the VST sequencer documentation).
5.3 Audio Unit (Mac OS X only)
5.3.1
Installation
The Audio Unit plug-in is automatically installed in the folder reserved for this purpose, in
/Library/Audio/Plug-Ins/Components/.
5.3.2
Use in Logic Pro
Select an instrument track. On the slice of the mixer corresponding to the selected track,
click on the button “I/O” to obtain the list of plug-ins, then select Stereo > AU Instruments
> Arturia Analog Factory.
Analog Factory opening in Logic
Since version 7, there has been an Audio Unit plug-in manager in Logic. To launch it, click
on the menu Preferences > Start Logic AU Manager.
Launching the Audio Unit Manager in Logic Pro
38
ARTURIA – Analog Factory EXPERIENCE 2.5 – USER’S MANUAL
This Manager allows us to see the list of the available plug-ins, to test their compatibility
with Logic, and to activate or de-activate them.
If it happens that one of the Arturia plug-ins poses a problem in Logic, start by checking
that this plug-in has passed the compatibility test, and that it is actually selected for use.
5.3.3 Use in Digital Performer
To add an instrument, choose the menu Project > Add Track > Instrument Track > Analog
Factory.
Opening of Analog Factory in the Digital Performer
Once you have added this instrument, it’s possible to assign a MIDI track to it. In the
connection menu of the MIDI track, select the instrument and the MIDI channel that you
want to use.
Connection from a MIDI track to Analog Factory
5.4 Pro Tools
5.4.1
Installation
On Mac OSX, the plug-in is directly installed in the folder reserved for the Pro Tools plugins, in /Library/Application Support/Digidesign/Plug-Ins/.
On Windows, at the time of the installation procedure, select the RTAS plug-in among the
proposed choices of plug-ins. Then, when the system asks, indicate the folder in which the
other RTAS plug-ins are located.
Usually, its access path is: C:\Program Files\Common Files\Digidesign\DAE\Plug-Ins\
5.4.2 Utilization of the plug-in
5.4.2.1 Opening the plug-in
Access to the Analog Factory plug-in is like all other plug-ins, via an audio track insert:
ARTURIA – Analog Factory EXPERIENCE 2.5 – USER’S MANUAL
39
Opening Analog Factory 2.5 in Pro Tools
Analog Factory must be loaded on an audio stereo track. We can now make Analog Factory
2.5 sounds by playing with the mouse on the virtual keyboard.
5.4.2.2 Connection to a MIDI channel
So that Analog Factory 2.5 can play the information coming from a MIDI track, you have to
associate it to a MIDI channel via the appropriate menu. (See the Pro Tools menu for more
information on plug-in connection).
Connecting a MIDI track to Analog Factory
5.4.2.3 Saving the presets
When the session is saved, the status of Analog Factory 2.5 is saved as it is, even if its
programming does not correspond to the preset. For example, if you are working on a
preset P1 in which you have modified the parameters (without saving them in the plug-in
itself), the next time you open the session, Analog Factory 2.5 will charge the P1 preset plus
the modifications.
The Librarian Menu of Pro Tools can be used with Analog Factory 2.5 like with all other plugins. Nevertheless, it is highly recommended to use the internal Analog Factory 2.5 menu:
with the presets saved like this, they are usable no matter which mode (standalone or other
sequencer), and they can be exported, exchanged more easily, and will stay compatible
with the future versions of Analog Factory 2.5.
40
ARTURIA – Analog Factory EXPERIENCE 2.5 – USER’S MANUAL
5.4.2.4 Automation under Pro Tools
The automation functions with Analog Factory like with all RTAS/HTDM plug-ins (make
reference to the Pro Tools documentation for more details on the plug-in automations).
ARTURIA – Analog Factory EXPERIENCE 2.5 – USER’S MANUAL
41
6 ANALOG FACTORY KEYBOARD
(ANALOG EXPERIENCE “THE FACTORY” ONLY)
6.1 Front panel overview
The Analog Factory Keyboard is a 32 key velocity sensitive keyboard including a control
surface that is identical to the Analog Factory 2.5 software interface.
Front panel interface of the Analog Factory Keyboard overview from left to right:
1)
2)
3)
4)
5)
6)
7)
8)
9)
10)
11)
12)
13)
14)
42
Pitch bend wheel
Modulation wheel
Level knob or navigation knob (pushable rotary encoder)
Octave +/- or Preset up/down buttons
Shift button
Cutoff knob
Resonance knob
LFO rate knob
LFO amount knob
4 key parameter knobs
8 snapshot buttons
Chorus mix knob
Delay mix knob
4 ADSR envelope sliders
ARTURIA – Analog Factory EXPERIENCE 2.5 – USER’S MANUAL
6.1.1 The keyboard
The Analog Factory Keyboard is a 32-key velocity sensitive keyboard controller, with
channel aftertouch.
6.1.2 Shift button
The Shift button can set the Analog Factory Keyboard in ‘Shift’ mode. When the button is
pushed it will call a secondary function you can’t get in the initial mode. This button lights
up when the ‘Shift’ mode is activated.
It will operate on the features:
Preset/Octave
Snapshot/save buttons
Level/search rotary encoder
See the following chapters for more details about their features.
6.1.3 Level/search rotary encoder
The “Level/Search” rotary encoder works either to set the volume of Analog Factory 2.5 or
to select synth types or characteristic criteria of the presets. It works in combination with
the Shift button.
When the ‘Shift’ mode is disabled, the “Level/Search” rotary encoder will set the volume
of the synth.
When the ‘Shift’ mode is enabled, the “Level/Search” rotary encoder will select synth
types or characteristics.
When you push on the encoder, it validates the search criteria for preset browsing using the
convenient preset managing system of Analog Factory 2.5.
It is important to realize that this encoder is different from the others as it offers a switch option. Clicking on
the encoder when in “Search” Mode allows selecting or unselecting search criteria.
6.1.4 Preset/octave buttons
These buttons have two functions (in combination with the shift button): the octave
transpose and the preset selection.
When the ‘Shift’ mode is disabled, the Preset/Octave buttons “+/-“will work as “Octave
up/down” buttons. You can increase (or decrease) by up to three octaves.
Pushing the minus or plus button makes the software transpose up to three octaves up or
down to set the preferred octave section.
Seven states of leds will help you to visually locate the current octave setting:
Octave -3 : led- blinks at speed 3, led+ does not blink
Octave -2 : led- blinks at speed 2, led+ does not blink
Octave -1 : led- blinks at speed 1, led+ does not blink
Octave 0 : led– and led+ don’t blink
ARTURIA – Analog Factory EXPERIENCE 2.5 – USER’S MANUAL
43
Octave +1 : led+ blinks at speed 1, led- does not blink
Octave +2 : led+ blinks at speed 2, led- does not blink
Octave +3 : led+ blinks at speed 3, led- does not blink
When the ‘Shift’ mode is enabled, these two buttons function as “Preset up/down”
buttons for convenient browsing through the huge library of presets Analog Factory has to
offer.
6.1.5 Snapshot/save buttons
The snapshot/save button enables one to recall or save a snapshot. It works in combination
with the Shift button.
When the ‘Shift’ mode is disabled, the “Snapshot/Save” buttons will recall a snapshot.
When the ‘Shift’ mode is enabled, the “Snapshot/Save” buttons will save a snapshot. All
editable functions of Analog Factory 2.5 are saved within the snapshot.
6.2
Wheels
These two controllers are used for real time pitch shift and modulation amount settings.
6.2.1 Pitch wheel
Moving the Pitch Wheel up or down alters the pitch of the played sound. The octave range of
the pitch wheel depends on which preset is selected.
6.2.2 Modulation wheel
Moving the Modulation Wheel up or down alters the modulation amount of the played
sound. The level of modulation introduced by moving the modulation wheel depends on
which preset is selected.
The modulation wheel is not necessarily connected on every preset! It will depend on the preset being used.
44
ARTURIA – Analog Factory EXPERIENCE 2.5 – USER’S MANUAL
6.3
Aftertouch
This keyboard can transmit channel aftertouch (that is a pressure value common to all
pressed keys).
Aftertouch (AT) can be calibrated to your liking this way:
1. Turn power off, press both “Shift” button and the push button on the left most knob,
then turn power on
2. The keyboard enters the after touch calibration mode. LEDs will light up, showing the
current configuration. The 11 leds from all buttons are used in this mode. The
leftmost LED (“Octave 1”) shows the first block of AT values, while the rightmost one
(“Snap #8”) shows the highest AT values. The actual range used for aftertouch will
be highlighted (one LED represents about 12 aftertouch steps so the range shown
below is about “24..96”) :
3. Press a key using a force that will not generate any aftertouch effect (aftertouch 0).
The LEDs will show its approximate position. Pressure lower than that is used for
normal playing.
Please note that the highest aftertouch value issued between note on and note off
will be taken into account. In other words, if you are going too far, you have to
release the note and try again by pressing another note.
4. Press the push button on the left most encoder to confirm.
5. Press a key using a force that will generate the maximum aftertouch effect
(aftertouch 127). The LEDs will show its approximate position.
Please note that the pressure must be higher than the one used at step #3.
6. Press both Shift button and the push button on the leftmost knob to confirm your
settings and exit.
7. Your setting will be saved in non-volatile memory.
This setting will however revert to its default value if the keyboard is re-initialized.
6.4
Synthesis section
This part presents all the synthesis parameters for Analog Factory 2.5.
6.4.1
Filter setting rotary encoders
There are two rotary encoders available to alter the filter settings of the selected preset.
These two encoders are ‘Cutoff’ and “Resonance”.
ARTURIA – Analog Factory EXPERIENCE 2.5 – USER’S MANUAL
45
6.4.2
LFO setting rotary encoders
There are two rotary encoders available to alter the LFO settings of the selected preset.
These two encoders are “Rate” and “Amount”.
6.4.3
Key Parameter rotary encoders
There are four ‘Key Parameter’ rotary encoders available on the Analog Factory keyboard.
Tweaking these parameters can alter the sound of the preset in various ways. Which
parameters are affected depends on the selected preset.
6.4.4
FX Mix rotary encoders
There are two ‘FX Mix’ rotary encoders available on the Analog Factory keyboard. These two
encoders are for ‘Chorus’ and ‘Delay’. Both encoders set the Dry/wet level of the effect.
6.4.5
Envelope Sliders
The four sliders that can be found on the top right part of the controller’s interface affect the
envelope generator of Analog Experience “The Factory” VCA. The four sliders marked A, D,
S, R, correspond to the Attack, Decay, Sustain and Release of the VCA envelope.
6.5
Rear panel overview
Back panel interface of the Analog Factory Keyboard overview from right to left:
1)
2)
3)
4)
5)
6)
Power on/off switch
DC in connection. (DC power adaptor requirement: 12V 500mA
USB connection
Sustain pedal connection
Expression pedal connection
MIDI out connection
)
Setting up the Analog Factory Keyboard is fast and simple. First Install the Analog Factory
program on your computer. After unpacking the keyboard it is time to connect it to the
computer. As the Analog Factory Keyboard is bus powered by USB, connecting it by only
one simple USB cable to your computer is all you have to do. If you wish to use an adapter
instead of the bus power, connect a 12V DC 500mA adapter to the back of the Analog
Experience “The Factory” Keyboard.
46
ARTURIA – Analog Factory EXPERIENCE 2.5 – USER’S MANUAL
The DC adapter is not included on the Analog Experience pack. Before connecting an external DC adapter, make
sure you are connecting a compatible adapter. See the technical specifications for compatibility details!
It is not necessary to install the driver for the Analog Factory Keyboard in order to get it to
function with your computer. Analog Experience “The Factory” is “plug and play”
compatible. The driver is automatically installed when you install Analog Experience “The
Factory”.
6.5.1 MIDI connections
The Analog Factory Keyboard sends and receives MIDI via USB. Furthermore the Analog
Factory Keyboard can function as a MIDI interface. A ‘MIDI out’ connector is located on the
back of the keyboard. This connector lets you send MIDI data to anything that has a MIDI in
connector. This could be a sound module, synthesizer, sequencer or drum computer for
instance.
6.5.2 Power supply
Although the Analog Factory Keyboard is USB bus powered, it is also possible to use a DC
adapter when this is required. If you wish to use an adapter instead of the bus power, it is
adapter to the back of the Analog
possible to connect an optional 12V DC 500mA
Experience “The Factory” Keyboard.
6.6 Basic MIDI control
Every parameter of Analog Factory 2.5 is controllable by the included keyboard controller.
Once the software is started and the keyboard controller is connected, the software can be
totally controlled without the use of mouse or a computer keyboard.
ARTURIA – Analog Factory EXPERIENCE 2.5 – USER’S MANUAL
47
7 MIDI IMPLEMENTATION
(ANALOG EXPERIENCE “THE FACTORY” ONLY)
7.1 Using the keyboard
Your Analog Factory Keyboard can be used independently of Analog Factory 2.5. It can be
used as a standard MIDI controller.
The following information allows you to benefit from your MIDI keyboard, and to help you
use it with other software or instruments.
7.2 What is MIDI?
MIDI (for Musical Instrument Digital Interface) is a universal standard that allows electronic
musical instruments and computers to exchange performance data.
MIDI makes it possible to convey to another musical instrument, an ongoing description of
exactly what’s happening during performance. For example, a C key played on your Analog
Factory MIDI keyboard has been pressed using a certain amount of velocity, the instrument
(Analog Factory 2.5 launched on your computer, itself provided with a MIDI interface) will
exactly answer to these MIDI messages.
In other words, MIDI is a language that musical instruments can use to communicate with
each other.
The MIDI standard includes 127 MIDI parameters that are pre-assigned to synthesis or
sound parameters used by all the MIDI sound modules or software.
Some MIDI specific messages – SysEx, or System Exclusive messages – can also be used
by the MIDI-based sound modules or music software to control some specific parameters.
48
ARTURIA – Analog Factory EXPERIENCE 2.5 – USER’S MANUAL
7.3 MIDI implementation chart
Arturia Analog Experience “The Factory” USB MIDI Master Keyboard.
Model : AFE32
Version : 1.1
Function
Basic Channel
Transmitted
Recognized
Default
1
1~16
Changed
1~16
1~16
0~127
X
Default
Mode
Messages
Altered
Note Number
Velocity
True Voice
Note On
*******
O v=0~127
X
Note Off
O
X
Key's
X
X
Channel
O
X
O
X
Control Change
O v=0~127
X
Program Change
X
X
After Touch
Pitch Bend
System Exclusive
Song position
System common
System Real time
Aux Messages
O
O
X
X
Song select
X
X
Tune request
X
X
Clock
X
X
Commands
X
X
Local on/off
X
X
All notes off
X
X
Active sensing
X
X
System reset
X
X
ARTURIA – Analog Factory EXPERIENCE 2.5 – USER’S MANUAL
49
7.4 MIDI controllers list
Item id
0x01
0x02
0x03
0x04
0x05
0x06
0x07
0x08
0x09
0x0A
0x0B
0x0C
0x0D
0x0E
0x10
0x11
0x12
0x13
0x14
0x15
0x16
0x17
0x18
0x19
0x22
0x23
0x24
0x25
0x26
0x27
0x28
0x29
0x30
0x31
0x32
0x40
0x50
0x51
50
Description
Filter Cutoff
Filter Reso
LFO Rate
LFO Amount
Key param 1
Key param 2
Key param 3
Key param 4
Fx Chorus
Fx Delay
Envelope Attack
Envelope Decay
Envelope Sustain
Envelope Release
Preset down
Preset Up
Recall snap 1
Recall snap 2
Recall snap 3
Recall snap 4
Recall snap 5
Recall snap6
Recall snap 7
Recall snap 8
Save snap 1
Save snap 2
Save snap 3
Save snap 4
Save snap 5
Save snap 6
Save snap 7
Save snap 8
Volume
Search
Select
Modulation wheel
Sustain pedal
Exp pedal
CC number
74
71
76
77
18
19
16
17
93
91
73
75
79
72
20
21
22
23
24
25
26
27
28
29
104
105
106
107
108
109
110
111
7
112
113
1
64
11
Value
0..127
0..127
0..127
0..127
0..127
0..127
0..127
0..127
0..127
0..127
0..127
0..127
0..127
0..127
0 or 127
0 or 127
0 or 127
0 or 127
0 or 127
0 or 127
0 or 127
0 or 127
0 or 127
0 or 127
0 or 127
0 or 127
0 or 127
0 or 127
0 or 127
0 or 127
0 or 127
0 or 127
0..127
+/- 1
0 or 127
0..127
0 or 127
0..127
ARTURIA – Analog Factory EXPERIENCE 2.5 – USER’S MANUAL
7.5 System Exclusive messages detail
SysEx
F000206B02 0101 nn F7
F000206B02 0102 nn cc F7
F000206B02 0103 nn cc F7
Description
Item config request
Item config response
Item config Set
T
F000206B02 0201 nn F7
F000206B02 0202 nn vv F7
F000206B02 0203 nn vv F7
Item value request
Item value response
Item value set
F000206B02 0301 F7
F000206B02 0302 0c F7
F000206B02 0303 0c F7
MIDI channel request
MIDI channel response
MIDI channel set
c: MIDI channel(0 to F)
F000206B02 0401 F7
F000206B02 0402 ss F7
F000206B02 0402 ss F7
Octave shift request
Octave shift reponse
Octave shift set
ss: octave shift (-3 to 3)
F000206B02 0501 F7
F000206B02 0502 nn F7
F000206B02 0503 nn F7
velo curve request
velo curve response
velo curve set
nn: curve index
F000206B02 0601 F7
F000206B02 0602 nn F7
F000206B02 0603 nn F7
aft-touch curve request
aft-touch curve response
aft-touche curve set
nn: curve index
F000206B02 0701 F7
F000206B02 0702 nn F7
F000206B02 0703 nn F7
acc mode request
acc mode response
acc mode set
nn: mode index
F000206B02 0801 nn F7
F000206B02 0802 nn 0v F7
F000206B02 0803 nn 0v F7
led state request
led state response
led state set
nn:item 0x63 to 0x6A
vv: value (0 or 1)
F000206B02 0901 nn F7
F000206B02 0902 nn 0v F7
F000206B02 0903 nn 0v F7
global param. request
global param. response
global param. set
nn:parameter (*)
vv: value (0 or 1)
nn:item
cc:cc number
R
O
O
O
nn:item(0x01 to 0x0A)
vv: value
O
O
O
O
O
O
O
O
O
O
O
O
O
O
O
O
O
O
O
O
O
O
O
O
(*) Global parameter:
nn = 2
Relative mode: 1 = absolute, 127 = relative
Values that could be negative are coded this way: absolute value is coded on the 6 less
significant bits; the sign is coded on the 7th bit.
ARTURIA – Analog Factory EXPERIENCE 2.5 – USER’S MANUAL
51
8 MIDI CONTROL CENTER
(ANALOG EXPERIENCE “THE FACTORY” ONLY)
The MIDI Control Center is a separate utility that can be used to configure the MIDI settings
of your Analog Experience keyboard.
This utility can be found in the same folder as Analog Experience 2.5.
8.1
Launching the MIDI Control Center
Before launching the MIDI Control Center, ensure that your Arturia Analog Experience
keyboard is connected to your computer.
The MIDI Control Center utility will automatically attempt to detect the keyboard and load
its current configuration.
The MIDI Control Center is specifically designed to drive the Analog Experience keyboard; trying to use it with
another MIDI device will inevitably fail.
The top sections enable you to edit your keyboard settings.
The bottom section represents the actual elements of your Analog Experience keyboard and
is used to select which control will be set up.
52
ARTURIA – Analog Factory EXPERIENCE 2.5 – USER’S MANUAL
8.2
Changing MIDI settings
8.2.1 Global settings
The settings that can be set globally (i.e. for the entire keyboard) are:
MIDI CHANNEL
KNOB MODE
MIDI channel that the keyboard will use to send all MIDI events.
Absolute: default mode for Analog Factory. Knobs send absolute
values.
Relative: knobs send 63 and below for negative values, 65 and
above for positive values.
The relative mode is not compatible with Analog Factory, this setting is only
available for an increased compatibility with other MIDI devices or softwares.
DEFAULT VALUES
Pressing this button will reload all factory default settings for the
keyboard.
8.2.2 Individual control settings
To configure the MIDI CC used for a specific control on your keyboard:
Click on the control you wish to select. The selected control will be highlighted in Red.
Its settings will be automatically displayed in the “Selected Control” section.
Change the CC number assigned to this control by selecting the appropriate line in the
drop-down list:
ARTURIA – Analog Factory EXPERIENCE 2.5 – USER’S MANUAL
53
8.2.3 Saving settings to the keyboard
Changes done in the utility are not saved to the keyboard until you press the “Send to
Keyboard” button.
When you are ready to save the entire configuration, press “Send to Keyboard”.
54
ARTURIA – Analog Factory EXPERIENCE 2.5 – USER’S MANUAL
9
9.1
ARTURIA ANALOG FACTORY 2.5 – LEGAL INFORMATION
Software License Agreement
In consideration of payment of the Licensee fee, which is a portion of the price you paid,
Arturia, as Licensor, grants to you (hereinafter termed “Licensee”) a nonexclusive right to
use this copy of the Analog Factory program (hereinafter the “SOFTWARE”).
All intellectual property rights in the software belong to Arturia SA (hereinafter: “Arturia”).
Arturia permits you only to copy, download, install and use the software in accordance with
the terms and conditions of this Agreement.
The product contains product activation for protection against unlawful copying. This system
is known as eLicenser and permits a permanent use of the software only after the activation
process has been totally completed. The software can be used only together with the
eLicenser dongle (dongle) and/or the Soft-eLicenser; the OEM software can be used only
following registration.
Internet access is required for the activation process. The terms and conditions for use of
the software by you, the end-user, appear below. By installing the software on your
computer you agree to these terms and conditions. Please read the following text carefully
in its entirety. If you do not approve these terms and conditions, you must not install this
software. In this event give the product back to where you have purchased it (including all
written material, the complete undamaged packing as well as the enclosed hardware)
immediately but at the latest within 30 days in return for a refund of the purchase price.
1. Software Ownership
Arturia shall retain full and complete title to the SOFTWARE recorded on the enclosed disks
and all subsequent copies of the SOFTWARE, regardless of the media or form on or in which
the original disks or copies may exist. The License is not a sale of the original SOFTWARE.
2. Grant of License
•
Arturia grants you a non-exclusive license for the use of the software according to
the terms and conditions of this Agreement. You may not lease, loan or sublicense the
software.
•
If the software is protected by the eLicenser dongle alone, you may install a license
for the software on one or at most 3 computers which are in your possession. The software
may be used only on one of the computers at the same time by using the Arturia key.
•
If the software is protected by the Soft-eLicenser (alone or together with the Arturia
key) or has been sold to the first end user together with other software and/or hardware
(hereinafter: “OEM software”), you may install and use a license for the software only on
one computer which is in your possession. Purchasing a eLicenser dongle makes it easily
possible to use the software on three computers if needs occur.
•
The use of the software within a network is illegal where there is the possibility of a
contemporaneous multiple use of the program.
ARTURIA – Analog Factory EXPERIENCE 2.5 – USER’S MANUAL
55
•
You are entitled to prepare a backup copy of the software which will not be used for
purposes other than storage purposes.
•
You shall have no further right or interest to use the software other than the limited
rights as specified in this Agreement. Arturia reserves all rights not expressly granted.
3. Activation of the Software
•
Arturia may use a compulsory activation of the software and a compulsory
registration of the OEM software for license control to protect the software against unlawful
copying. If you do not accept the terms and conditions of this Agreement, the software will
not work.
•
In such a case the product including the software may only be returned within 30
days following acquisition of the product. Upon return a claim according to § 11 shall not
apply.
4. Support, Upgrades and Updates after Product Registration
•
You can only receive support, upgrades and updates following the personal product
registration. Support is provided only for the current version and for the previous version
during one year after publication of the new version. Arturia can modify and partly or
completely adjust the nature of the support (hotline, forum on the website etc.), upgrades
and updates at any time.
•
The product registration is possible during the activation process or at any time later
through the Internet. In such a process you are asked to agree to the storage and use of
your personal data (name, address, contact, email-address, and license data) for the
purposes specified above. Arturia may also forward these data to engaged third parties, in
particular distributors, for support purposes and for the verification of the upgrade or
update right.
5. License module (eLicenser Key and/or Soft eLicenser)
•
Arturia uses a hardware device connected through the USB connection of a
computer, the “eLicenser dongle” and/or a protection scheme, the “Soft eLicenser” for
license control (hardware and/or virtual dongle). The eLicenser dongle and/or Soft eLicenser
permanently saves the license information and regulates access to the software. If a
eLicenser dongle is required for the use of the software, then the eLicenser dongle must be
connected physically to the computer through the USB interface.
•
For the activation of the software, updates or upgrades of the software the computer
which is connected to the Arturia key and/or using the Soft eLicenser or using the OEM
software must be connected to the server of SIA eLicenser through the Internet. If the
product was delivered with the eLicenser dongle, the license information was already
transferred to the eLicenser dongle. If the product was delivered with a product card
(without the eLicenser dongle), the activation codes of the enclosed product card must be
entered manually by the user upon installation and the license information must be
exchanged with the server of SIA eLicenser.
•
In the event of OEM software, the activation codes will be sent to an email-address
submitted by you during a registration and must be entered manually by the user upon
installation and the license information must be exchanged with the server of SIA eLicenser.
56
ARTURIA – Analog Factory EXPERIENCE 2.5 – USER’S MANUAL
•
The reinstallation of the software - on the same or another computer - is permitted
only in case the already installed software cannot be used any more (e.g. following
deinstallation). If the software does not use an eLicenser dongle, the new activation codes
may be obtained from the user’s online account for support created during the personal
product registration. Further, the activation codes must be entered manually by the user
upon installation and the license information must be exchanged with the server of SIA
Steinberg. Arturia may require for the provision of further activation codes e.g. your proof
of purchase (invoice, receipt) and a signed assurance by fax or letter stating your name,
address and that the already installed software cannot be used any more.
•
You can also use another computer other than the one on which the software is to be
installed for the activation and transfer of license data to the eLicenser dongle, if the
software is using an eLicenser dongle. However, in such a case a corresponding access
software (eLicenser Control Center, “eLC”) must be installed on the computer connected to
the Internet, which is subject to a separate licensing agreement.
6. Defect and loss of the eLicenser dongle
•
In the case of a defect or damage to the eLicenser dongle Arturia or a third party
engaged by Arturia will check the eLicenser dongle. In the case of a legitimate claim the
eLicenser dongle and the licenses included shall be replaced in return for a handling fee. The
licenses will only be replaced provided that they are licenses issued by Arturia. Further
claims against Arturia are excluded.
•
Arturia assumes no liability or obligation if the eLicenser dongle is mislaid as a result
of loss, theft or otherwise. Arturia reserves the right to block the licenses saved on the
eLicenser dongle upon being notified by the registered user of the loss. The licenses saved
on the eLicenser dongle cannot be replaced.
7. No Unbundling
•
The software usually contains a variety of different files which in its configuration
ensure the complete functionality of the software. The software may be used as one product
only. It is not required that you use or install all components of the software. You must not
arrange components of the software in a new way and develop a modified version of the
software or a new product as a result. The configuration of the software may not be
modified for the purpose of distribution, assignment or resale.
•
You may also not sell the eLicenser dongle separately as a license; the usage rights
always remain with the software, in particular with the original software data carrier (e.g.
CD).
8. Assignment of Rights
•
You may assign all your rights to use the software to another person subject to the
conditions that (a) you assign to this other person (i) this Agreement and (ii) the software
or hardware provided with the software, packed or preinstalled thereon, including all copies,
upgrades, updates, backup copies and previous versions, which granted a right to an update
or upgrade on this software, (b) you do not retain upgrades, updates, backup copies und
previous versions of this software and (c) the recipient accepts the terms and conditions of
this Agreement as well as other regulations pursuant to which you acquired a valid software
license.
ARTURIA – Analog Factory EXPERIENCE 2.5 – USER’S MANUAL
57
•
A return of the product due to a failure to accept the terms and conditions of this
Agreement, e.g. the product activation, shall not be possible following the assignment of
rights.
9. Upgrades and Updates
•
You must have a valid license for the previous or more inferior version of the
software in order to be allowed to use an upgrade or update for the software. Upon
transferring this previous or more inferior version of the software to third parties the right
to use the upgrade or update of the software shall expire.
•
The acquisition of an upgrade or update does not in itself confer any right to use the
software.
•
The right of support for the previous or inferior version of the software expires upon
the installation of an upgrade or update.
10. Limited Warranty
Arturia warrants that the disks on which the software is furnished to be free from defects in
materials and workmanship under normal use for a period of thirty (30) days from the date
of purchase. Your receipt shall be evidence of the date of purchase. Any implied warranties
on the software are limited to thirty (30) days from the date of purchase. Some states do
not allow limitations on duration of an implied warranty, so the above limitation may not
apply to you. All programs and accompanying materials are provided “as is” without
warranty of any kind. The complete risk as to the quality and performance of the programs
is with you. Should the program prove defective, you assume the entire cost of all
necessary servicing, repair or correction.
11. Remedies
Arturia's entire liability and your exclusive remedy shall be at Arturia's option either (a)
return of the purchase price or (b) replacement of the disk that does not meet the Limited
Warranty and which is returned to Arturia with a copy of your receipt. This limited Warranty
is void if failure of the software has resulted from accident, abuse, modification, or
misapplication. Any replacement software will be warranted for the remainder of the original
warranty period or thirty (30) days, whichever is longer.
12. No other Warranties
The above warranties are in lieu of all other warranties, expressed or implied, including but
not limited to, the implied warranties of merchantability and fitness for a particular purpose.
No oral or written information or advice given by Arturia, its dealers, distributors, agents or
employees shall create a warranty or in any way increase the scope of this limited warranty.
13. No Liability for Consequential Damages
Neither Arturia nor anyone else involved in the creation, production, or delivery of this
product shall be liable for any direct, indirect, consequential, or incidental damages arising
out of the use of, or inability to use this product (including without limitation, damages for
loss of business profits, business interruption, loss of business information and the like)
58
ARTURIA – Analog Factory EXPERIENCE 2.5 – USER’S MANUAL
even if Arturia was previously advised of the possibility of such damages. Some states do
not allow limitations on the length of an implied warranty or the exclusion or limitation of
incidental or consequential damages, so the above limitation or exclusions may not apply to
you. This warranty gives you specific legal rights, and you may also have other rights which
vary from state to state.
9.2
FCC INFORMATION (USA)
Important notice: DO NOT MODIFY THE UNIT!
This product, when installed as indicate in the instructions contained in this manual, meets
FCC requirement. Modifications not expressly approved by Arturia may avoid your authority,
granted by the FCC, to use the product.
IMPORTANT: When connecting this product to accessories and/or another product, use
only high quality shielded cables. Cable (s) supplied with this product MUST be used. Follow
all installation instructions. Failure to follow instructions could void your FFC authorization to
use this product in the USA.
NOTE: This product has been tested and found to comply with the limit for a Class B Digital
device, pursuant to Part 15 of the FCC rules. These limits are designed to provide a
reasonable protection against harmful interference in a residential environment. This
equipment generate, use and radiate radio frequency energy and, if not installed and used
according to the instructions found in the users manual, may cause interferences harmful to
the operation to other electronic devices. Compliance with FCC regulations does not
guarantee that interferences will not occur in all the installations. If this product is found to
be the source of interferences, witch can be determined by turning the unit “OFF” and “ON”,
please try to eliminate the problem by using one of the following measures:
Relocate either this product or the device that is affected by the interference.
Use power outlets that are on different branch (circuit breaker or fuse) circuits or
install AC line filter(s).
In the case of radio or TV interferences, relocate/ reorient the antenna. If the
antenna lead-in is 300 ohm ribbon lead, change the lead-in to coaxial cable.
If these corrective measures do not bring any satisfied results, please the local
retailer authorized to distribute this type of product. If you cannot locate the
appropriate retailer, please contact Arturia.
The above statements apply ONLY to those products distributed in the USA.
9.3
CANADA
NOTICE: This class B digital apparatus meets all the requirements of the Canadian
Interference-Causing Equipment Regulation.
AVIS: Cet appareil numérique de la classe B respecte toutes les exigences du Règlement
sur le matériel brouilleur du Canada.
ARTURIA – Analog Factory EXPERIENCE 2.5 – USER’S MANUAL
59
9.4
EUROPE
This product complies with the requirements of European Directive 89/336/EEC
60
ARTURIA – Analog Factory EXPERIENCE 2.5 – USER’S MANUAL