1
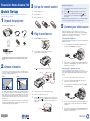
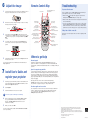
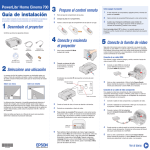
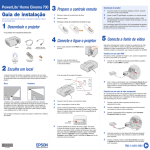
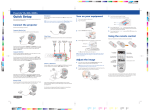
PowerLite Home Cinema 700 ® Quick Setup Before using the projector, read these instructions and the safety instructions in the User’s Guide on your projector CD-ROM. 1 Unpack the projector 3Set up the remote control 1 Remove the battery cover. 2 Insert the batteries. 3 Replace the battery cover. Power cord Component-to-VGA adapter 2 3 1 Projector remote control For the best image and sound quality, connect your video equipment to the HDMI port, if possible. 2 Connect the power cord to the projector and plug the other end into an electrical outlet. 2 power light on the projector turns orange. Power light Shelf If your video equipment has component video connectors (three connectors labeled either Y/Cb/Cr or Y/Pb/Pr), you can use a component video cable (not included) along with the included component-to-VGA adapter. 1 Power button The distance between the projector and the screen generally determines the size of the image, but the size can also vary depending on the aspect ratio (image shape), how you zoom into the image, and whether you’ve adjusted other image settings. Depending on the image settings you’ve chosen, you can place the projector anywhere from 33 to 407 inches (84 to 1035 cm) from the screen. Use the tables in the User’s Guide, or the Image Size or Projection Distance calculator on the Multimedia Projectors page on Epson’s website to help you determine the proper projection distance. 3 Connect your video source, as described to the right. 4 Turn on your computer or video source. 5 ress the P power button on the projector or remote control. The projector beeps, the power light flashes green, and the projector warms up. When the power light stays green, the projector is ready for use. Power button *411537000* *411537000* Start your video or presentation. Use the Source Search button on the projector or the Search button on the remote control to select the HDMI source, if necessary. Connecting with a component video cable The easiest way to set up your projector is to place it on a table in front of your screen or wall, or on a high shelf behind you. See the User’s Guide for other ways of setting up the projector. Table The 2 Connect an HDMI cable (not included) to the HDMI port on your video player and the HDMI port on the projector. Canada only: For French speakers, remove sticker(s) from the interface label backing sheet and place over corresponding text on the control panel. 2Choose a location Follow these instructions to connect the projector to your video equipment using an HDMI cable or component video cable and adapter. For instructions on using other connection options, or connecting to a computer, see the User’s Guide on your CD-ROM. 1 hen you see the confirmation message, press the W power button again. The projector beeps twice and the power light turns orange. Connecting with an HDMI cable Open the A/V Mute slide (lens cover). Batteries Interface label stickers (Included for Canada only) power button on the projector or remote control. 5Connect your video source User’s Guide CD-ROM Press the W ith Epson’s Instant Off® technology, there’s no cool-down period. When you’re done, just unplug the projector and it’s ready to travel. 4Plug in and turn on see the display. You should have the following items: Projector Turning off the projector 1 If you’re using a computer, shut it down first, while you can still 3 4 5 Connect your component video cable to your video device. Connect the component-to-VGA adapter that came with your projector to the component video cable. Connect the VGA end of the adapter to the projector’s Computer (Component Video) port. You can connect an optional audio cable if you want to play sound through the projector. See the User’s Guide on your CD-ROM for instructions. Start your video or presentation. Use the Source Search button on the projector or the Search button on the remote control to select the video source, if necessary. Turn over PowerLite Home Cinema 700 ® Quick Setup Before using the projector, read these instructions and the safety instructions in the User’s Guide on your projector CD-ROM. 1 Unpack the projector 3Set up the remote control 1 Remove the battery cover. 2 Insert the batteries. 3 Replace the battery cover. Power cord Component-to-VGA adapter 2 3 1 Projector remote control For the best image and sound quality, connect your video equipment to the HDMI port, if possible. 2 Connect the power cord to the projector and plug the other end into an electrical outlet. 2 power light on the projector turns orange. Power light Shelf If your video equipment has component video connectors (three connectors labeled either Y/Cb/Cr or Y/Pb/Pr), you can use a component video cable (not included) along with the included component-to-VGA adapter. 1 Power button The distance between the projector and the screen generally determines the size of the image, but the size can also vary depending on the aspect ratio (image shape), how you zoom into the image, and whether you’ve adjusted other image settings. Depending on the image settings you’ve chosen, you can place the projector anywhere from 33 to 407 inches (84 to 1035 cm) from the screen. Use the tables in the User’s Guide, or the Image Size or Projection Distance calculator on the Multimedia Projectors page on Epson’s website to help you determine the proper projection distance. 3 Connect your video source, as described to the right. 4 Turn on your computer or video source. 5 ress the P power button on the projector or remote control. The projector beeps, the power light flashes green, and the projector warms up. When the power light stays green, the projector is ready for use. Power button *411537000* *411537000* Start your video or presentation. Use the Source Search button on the projector or the Search button on the remote control to select the HDMI source, if necessary. Connecting with a component video cable The easiest way to set up your projector is to place it on a table in front of your screen or wall, or on a high shelf behind you. See the User’s Guide for other ways of setting up the projector. Table The 2 Connect an HDMI cable (not included) to the HDMI port on your video player and the HDMI port on the projector. Canada only: For French speakers, remove sticker(s) from the interface label backing sheet and place over corresponding text on the control panel. 2Choose a location Follow these instructions to connect the projector to your video equipment using an HDMI cable or component video cable and adapter. For instructions on using other connection options, or connecting to a computer, see the User’s Guide on your CD-ROM. 1 hen you see the confirmation message, press the W power button again. The projector beeps twice and the power light turns orange. Connecting with an HDMI cable Open the A/V Mute slide (lens cover). Batteries Interface label stickers (Included for Canada only) power button on the projector or remote control. 5Connect your video source User’s Guide CD-ROM Press the W ith Epson’s Instant Off® technology, there’s no cool-down period. When you’re done, just unplug the projector and it’s ready to travel. 4Plug in and turn on see the display. You should have the following items: Projector Turning off the projector 1 If you’re using a computer, shut it down first, while you can still 3 4 5 Connect your component video cable to your video device. Connect the component-to-VGA adapter that came with your projector to the component video cable. Connect the VGA end of the adapter to the projector’s Computer (Component Video) port. You can connect an optional audio cable if you want to play sound through the projector. See the User’s Guide on your CD-ROM for instructions. Start your video or presentation. Use the Source Search button on the projector or the Search button on the remote control to select the video source, if necessary. Turn over PowerLite Home Cinema 700 ® Quick Setup Before using the projector, read these instructions and the safety instructions in the User’s Guide on your projector CD-ROM. 1 Unpack the projector 3Set up the remote control 1 Remove the battery cover. 2 Insert the batteries. 3 Replace the battery cover. Power cord Component-to-VGA adapter 2 3 1 Projector remote control For the best image and sound quality, connect your video equipment to the HDMI port, if possible. 2 Connect the power cord to the projector and plug the other end into an electrical outlet. 2 power light on the projector turns orange. Power light Shelf If your video equipment has component video connectors (three connectors labeled either Y/Cb/Cr or Y/Pb/Pr), you can use a component video cable (not included) along with the included component-to-VGA adapter. 1 Power button The distance between the projector and the screen generally determines the size of the image, but the size can also vary depending on the aspect ratio (image shape), how you zoom into the image, and whether you’ve adjusted other image settings. Depending on the image settings you’ve chosen, you can place the projector anywhere from 33 to 407 inches (84 to 1035 cm) from the screen. Use the tables in the User’s Guide, or the Image Size or Projection Distance calculator on the Multimedia Projectors page on Epson’s website to help you determine the proper projection distance. 3 Connect your video source, as described to the right. 4 Turn on your computer or video source. 5 ress the P power button on the projector or remote control. The projector beeps, the power light flashes green, and the projector warms up. When the power light stays green, the projector is ready for use. Power button *411537000* *411537000* Start your video or presentation. Use the Source Search button on the projector or the Search button on the remote control to select the HDMI source, if necessary. Connecting with a component video cable The easiest way to set up your projector is to place it on a table in front of your screen or wall, or on a high shelf behind you. See the User’s Guide for other ways of setting up the projector. Table The 2 Connect an HDMI cable (not included) to the HDMI port on your video player and the HDMI port on the projector. Canada only: For French speakers, remove sticker(s) from the interface label backing sheet and place over corresponding text on the control panel. 2Choose a location Follow these instructions to connect the projector to your video equipment using an HDMI cable or component video cable and adapter. For instructions on using other connection options, or connecting to a computer, see the User’s Guide on your CD-ROM. 1 hen you see the confirmation message, press the W power button again. The projector beeps twice and the power light turns orange. Connecting with an HDMI cable Open the A/V Mute slide (lens cover). Batteries Interface label stickers (Included for Canada only) power button on the projector or remote control. 5Connect your video source User’s Guide CD-ROM Press the W ith Epson’s Instant Off® technology, there’s no cool-down period. When you’re done, just unplug the projector and it’s ready to travel. 4Plug in and turn on see the display. You should have the following items: Projector Turning off the projector 1 If you’re using a computer, shut it down first, while you can still 3 4 5 Connect your component video cable to your video device. Connect the component-to-VGA adapter that came with your projector to the component video cable. Connect the VGA end of the adapter to the projector’s Computer (Component Video) port. You can connect an optional audio cable if you want to play sound through the projector. See the User’s Guide on your CD-ROM for instructions. Start your video or presentation. Use the Source Search button on the projector or the Search button on the remote control to select the video source, if necessary. Turn over 6 1 Troubleshooting Remote Control Map Adjust the image o raise the image, press the foot release lever and lift the front of T the projector. Release the lever to lock the foot in position. Power button Search and individual Source selection buttons If you see a blank screen If you see a blank screen or the No signal message after turning on your computer or video source, check the following: M ake sure the power light on the projector is green and not flashing and the A/V Mute slide (lens cover) is open. 2 Rotate the focus ring to sharpen the image. To reduce or enlarge the image, rotate the zoom ring. Focus ring Zoom ring 3 4 your image looks like If or , first make sure the projector is facing the screen squarely. Then, if necessary, press the and buttons on the projector’s control panel until the image looks correct. select the best color mode, press the Color Mode button To on the remote control. Press it repeatedly to move through the options. Aspect button 5 If the image is stretched or cut off, press the Aspect button until the image looks correct. 7Install User’s Guide and register your projector 1 2 Select English. 3 Follow the instructions on the screen to register. NOTE You 5 Auto button Resets tracking, sync, and position Aspect button Changes screen size Page Up/Down buttons Control PowerPoint® slides (USB cable required) E-Zoom +/– buttons Zoom into image details Menu button Accesses menus Color Mode button Changes display mode If you’ve connected more than one video source, you may need to press the Source Search button on the projector or the Search button on the remote control to select the one you want to watch. (Allow a few seconds for the projector to sync up after pressing it.) Num button Activates number buttons If the picture is taller on one side Help button Displays help menus he projector is set at an angle to the screen. Face it squarely toward T the screen. Freeze button Stops image Volume buttons Adjust volume Esc button Exits menus Menu navigation buttons and Enter button Color Mode button ee your User’s Guide on the CD-ROM for more information about S image adjustments. 4 A/V Mute button Turns off image M ake sure the cables are connected correctly. (See the User’s Guide for more information.) Insert the projector CD-ROM in your drive. If the installer doesn’t open automatically, double-click the Epson CD-ROM icon, then double-click the Epson installer icon. Where to get help Internet support isit Epson’s support website at epson.com/support and select your V product for solutions to common problems. You can download utilities and documentation, get FAQs and troubleshooting advice, or e-mail Epson with your questions. Speak to a support representative o use the Epson PrivateLine® Support service, call (800) 637-7661 and enter T the PIN on the Epson PrivateLine Support card that came with your projector. This service is available 6 AM to 6 PM, Pacific Time, Monday through Friday, for the duration of your warranty period. You may also speak with a projector support specialist by dialing one of the following numbers. (Toll or long distance charges may apply.) U.S.: (562) 276-4394, 6 AM to 6 PM, Pacific Time, Monday-Friday Canada: (905) 709-3839, 6 AM to 6 PM, Pacific Time, Monday-Friday Days and hours of support are subject to change without notice. Purchase supplies and accessories ou can purchase screens and other accessories from an Epson authorized Y reseller. To find the nearest reseller, call 800-GO-EPSON (800-463-7766). Or you can purchase online at www.epsonstore.com (U.S. sales) or www.epson.ca (Canadian sales). can also register at www.epson.com/webreg. fter you register the projector, click User’s Guide to install it. A (If you are using Windows and don’t already have Adobe® Reader®, click Adobe Reader and follow the on-screen instructions to install it.) When you’re done, click Exit. To open your User’s Guide, double-click the PL HC700 User’s Guide icon on your desktop. Epson and Instant Off are registered trademarks and Epson Exceed Your Vision is a registered logomark of Seiko Epson Corporation. PowerLite and PrivateLine are registered trademarks of Epson America, Inc. General Notice: Other product names used herein are for identification purposes only and may be trademarks of their respective owners. Epson disclaims any and all rights in those marks. This information is subject to change without notice. © 2008 Epson America, Inc. 7/08 Printed in XXXXXX CPD-26345 6 1 Troubleshooting Remote Control Map Adjust the image o raise the image, press the foot release lever and lift the front of T the projector. Release the lever to lock the foot in position. Power button Search and individual Source selection buttons If you see a blank screen If you see a blank screen or the No signal message after turning on your computer or video source, check the following: M ake sure the power light on the projector is green and not flashing and the A/V Mute slide (lens cover) is open. 2 Rotate the focus ring to sharpen the image. To reduce or enlarge the image, rotate the zoom ring. Focus ring Zoom ring 3 4 your image looks like If or , first make sure the projector is facing the screen squarely. Then, if necessary, press the and buttons on the projector’s control panel until the image looks correct. select the best color mode, press the Color Mode button To on the remote control. Press it repeatedly to move through the options. Aspect button 5 If the image is stretched or cut off, press the Aspect button until the image looks correct. 7Install User’s Guide and register your projector 1 2 Select English. 3 Follow the instructions on the screen to register. NOTE You 5 Auto button Resets tracking, sync, and position Aspect button Changes screen size Page Up/Down buttons Control PowerPoint® slides (USB cable required) E-Zoom +/– buttons Zoom into image details Menu button Accesses menus Color Mode button Changes display mode If you’ve connected more than one video source, you may need to press the Source Search button on the projector or the Search button on the remote control to select the one you want to watch. (Allow a few seconds for the projector to sync up after pressing it.) Num button Activates number buttons If the picture is taller on one side Help button Displays help menus he projector is set at an angle to the screen. Face it squarely toward T the screen. Freeze button Stops image Volume buttons Adjust volume Esc button Exits menus Menu navigation buttons and Enter button Color Mode button ee your User’s Guide on the CD-ROM for more information about S image adjustments. 4 A/V Mute button Turns off image M ake sure the cables are connected correctly. (See the User’s Guide for more information.) Insert the projector CD-ROM in your drive. If the installer doesn’t open automatically, double-click the Epson CD-ROM icon, then double-click the Epson installer icon. Where to get help Internet support isit Epson’s support website at epson.com/support and select your V product for solutions to common problems. You can download utilities and documentation, get FAQs and troubleshooting advice, or e-mail Epson with your questions. Speak to a support representative o use the Epson PrivateLine® Support service, call (800) 637-7661 and enter T the PIN on the Epson PrivateLine Support card that came with your projector. This service is available 6 AM to 6 PM, Pacific Time, Monday through Friday, for the duration of your warranty period. You may also speak with a projector support specialist by dialing one of the following numbers. (Toll or long distance charges may apply.) U.S.: (562) 276-4394, 6 AM to 6 PM, Pacific Time, Monday-Friday Canada: (905) 709-3839, 6 AM to 6 PM, Pacific Time, Monday-Friday Days and hours of support are subject to change without notice. Purchase supplies and accessories ou can purchase screens and other accessories from an Epson authorized Y reseller. To find the nearest reseller, call 800-GO-EPSON (800-463-7766). Or you can purchase online at www.epsonstore.com (U.S. sales) or www.epson.ca (Canadian sales). can also register at www.epson.com/webreg. fter you register the projector, click User’s Guide to install it. A (If you are using Windows and don’t already have Adobe® Reader®, click Adobe Reader and follow the on-screen instructions to install it.) When you’re done, click Exit. To open your User’s Guide, double-click the PL HC700 User’s Guide icon on your desktop. Epson and Instant Off are registered trademarks and Epson Exceed Your Vision is a registered logomark of Seiko Epson Corporation. PowerLite and PrivateLine are registered trademarks of Epson America, Inc. General Notice: Other product names used herein are for identification purposes only and may be trademarks of their respective owners. Epson disclaims any and all rights in those marks. This information is subject to change without notice. © 2008 Epson America, Inc. 7/08 Printed in XXXXXX CPD-26345 6 1 Troubleshooting Remote Control Map Adjust the image o raise the image, press the foot release lever and lift the front of T the projector. Release the lever to lock the foot in position. Power button Search and individual Source selection buttons If you see a blank screen If you see a blank screen or the No signal message after turning on your computer or video source, check the following: M ake sure the power light on the projector is green and not flashing and the A/V Mute slide (lens cover) is open. 2 Rotate the focus ring to sharpen the image. To reduce or enlarge the image, rotate the zoom ring. Focus ring Zoom ring 3 4 your image looks like If or , first make sure the projector is facing the screen squarely. Then, if necessary, press the and buttons on the projector’s control panel until the image looks correct. select the best color mode, press the Color Mode button To on the remote control. Press it repeatedly to move through the options. Aspect button 5 If the image is stretched or cut off, press the Aspect button until the image looks correct. 7Install User’s Guide and register your projector 1 2 Select English. 3 Follow the instructions on the screen to register. NOTE You 5 Auto button Resets tracking, sync, and position Aspect button Changes screen size Page Up/Down buttons Control PowerPoint® slides (USB cable required) E-Zoom +/– buttons Zoom into image details Menu button Accesses menus Color Mode button Changes display mode If you’ve connected more than one video source, you may need to press the Source Search button on the projector or the Search button on the remote control to select the one you want to watch. (Allow a few seconds for the projector to sync up after pressing it.) Num button Activates number buttons If the picture is taller on one side Help button Displays help menus he projector is set at an angle to the screen. Face it squarely toward T the screen. Freeze button Stops image Volume buttons Adjust volume Esc button Exits menus Menu navigation buttons and Enter button Color Mode button ee your User’s Guide on the CD-ROM for more information about S image adjustments. 4 A/V Mute button Turns off image M ake sure the cables are connected correctly. (See the User’s Guide for more information.) Insert the projector CD-ROM in your drive. If the installer doesn’t open automatically, double-click the Epson CD-ROM icon, then double-click the Epson installer icon. Where to get help Internet support isit Epson’s support website at epson.com/support and select your V product for solutions to common problems. You can download utilities and documentation, get FAQs and troubleshooting advice, or e-mail Epson with your questions. Speak to a support representative o use the Epson PrivateLine® Support service, call (800) 637-7661 and enter T the PIN on the Epson PrivateLine Support card that came with your projector. This service is available 6 AM to 6 PM, Pacific Time, Monday through Friday, for the duration of your warranty period. You may also speak with a projector support specialist by dialing one of the following numbers. (Toll or long distance charges may apply.) U.S.: (562) 276-4394, 6 AM to 6 PM, Pacific Time, Monday-Friday Canada: (905) 709-3839, 6 AM to 6 PM, Pacific Time, Monday-Friday Days and hours of support are subject to change without notice. Purchase supplies and accessories ou can purchase screens and other accessories from an Epson authorized Y reseller. To find the nearest reseller, call 800-GO-EPSON (800-463-7766). Or you can purchase online at www.epsonstore.com (U.S. sales) or www.epson.ca (Canadian sales). can also register at www.epson.com/webreg. fter you register the projector, click User’s Guide to install it. A (If you are using Windows and don’t already have Adobe® Reader®, click Adobe Reader and follow the on-screen instructions to install it.) When you’re done, click Exit. To open your User’s Guide, double-click the PL HC700 User’s Guide icon on your desktop. Epson and Instant Off are registered trademarks and Epson Exceed Your Vision is a registered logomark of Seiko Epson Corporation. PowerLite and PrivateLine are registered trademarks of Epson America, Inc. General Notice: Other product names used herein are for identification purposes only and may be trademarks of their respective owners. Epson disclaims any and all rights in those marks. This information is subject to change without notice. © 2008 Epson America, Inc. 7/08 Printed in XXXXXX CPD-26345