1
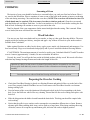
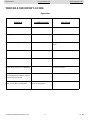
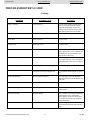
800.423.0698
www.cookshack.com
[email protected]
Cookshack, Inc.
OPERATOR'S
MANUAL
Models 075 & 076
SmartSmoker® Oven
Version 06.2
Model 075/076
Serial No: ___________
Cookshack Model 075/076 SmartSmoker Oven
1
Ver. 06.2
800.423.0698
www.cookshack.com
[email protected]
Dear Cookshack Customer:
Your Model 075 or 076 Cookshack SmartSmoker® oven will produce great barbecue and smoked foods. It is easy
to operate, clean, and maintain. Use this Operator's Manual to familiarize yourself with the smoker and its operation.
If you have a question or problem not covered in the book, call us at 1.800.423.0698 Monday through Friday, 9am to
4 pm or e-mail us at [email protected]. You can also join the Cookshack Barbecue Forum on our website at
www.cookshack.com which has high participation by both Cookshack customers and staff.
You must observe safe operating practices when using the smoker. It is an electrical appliance, and is therefore potentially dangerous! Cookshack, Inc., assumes no responsibility for
results of careless and dangerous operation of Cookshack smokers or other products. All
warranties are null and void if the practices described in the Operator's Manual are not observed.
Read the following instructions thoroughly and completely before using your smoker!! Observe the instructions
carefully. Be certain that you understand completely how it operates before attempting to operate it.
This smoker oven is intended for use as a food smoker. It generates heat from an electric heating element. It is not
intended for any use not specifically described in this manual. Misuse of this smoker can result in serious injury and a
fire hazard.
With those cautions in mind, enjoy your smoker and the delicious foods it will produce.
The Folks at Cookshack
Sales & Customer Service: 580-765-3669
Toll Free Orders: 800-423-0698
24Hr. Fax: 580-765-2223
Cookshack Model 075/076 SmartSmoker Oven
2
Ver. 06.2
800.423.0698
www.cookshack.com
[email protected]
TABLE OF CONTENTS
Cookshack SmartSmoker® Oven
Model 075 and 076
Version 06.2
SETTING UP
Choosing a Location ............................................................................................................ 4
Ventilation ........................................................................................................................... 4
Electrical Power Connections............................................................................................... 4
COOKING
Seasoning of Oven ................................................................................................................ 5
Wood Selection.................................................................................................................... 5
Preparing the Oven for Cooking ........................................................................................... 5
Smoker Oven Maximum Load Capacity............................................................................... 6
Loading the Oven With Meat ............................................................................................... 6
Setting the Cooking Temperature ......................................................................................... 7
Holding................................................................................................................................ 8
SHUTDOWN
Safety First ........................................................................................................................... 9
CLEANUP
Procedures ........................................................................................................................... 9
MAINTENANCE
Procedures ......................................................................................................................... 10
Troubleshooting Guide
Operation ........................................................................................................................... 11
Cooking ............................................................................................................................. 12
APPENDICES
A. Two Year Limited Warranty.......................................................................................... 13
B. Warranty Procedures ..................................................................................................... 14
C. National Service Policy ................................................................................................. 15
D. Wiring Diagram ............................................................................................................ 16
E. Smoker Oven Illustration ............................................................................................... 17
F. Items Shipped ................................................................................................................ 18
Cookshack Model 075/076 SmartSmoker Oven
3
Ver. 06.2
800.423.0698
www.cookshack.com
[email protected]
SETTING UP
Choosing a Location
Your smoker must be operated inside. Placement will be determined by convenience to the rest of the
cooking operation, ventilation, wiring connection, and clearance from flammable materials.
Do not place flammable or combustible materials on or adjacent to the smoker.
Ventilation
A small amount of smoke will escape from the vent hole in the top of the oven, and from around the door.
The oven should be placed under a hood or near a door or window with an outside exhaust.
A simple wall vent fan is adequate in many locations. Fasten no pipes to oven vent.
Electrical Power Connections
Cookshack Models 075 and 076 have a single burner system using 120V AC power. Connect these ovens to
the power supply by plugging the power cord into a 120V receptacle which is protected by a breaker or fuse
rated at 15 amperes.
WARNING: All warranties are null and void if the installation of the power receptacle is not done
in strict compliance with these instructions, NEMA codes, and any other applicable electrical
codes.
Cookshack Model 075/076 SmartSmoker Oven
4
Ver. 06.2
800.423.0698
www.cookshack.com
[email protected]
COOKING
Seasoning of Oven
The interior of your oven should be broken in or seasoned before you cook your first load of meat. Place 6
oz. wood in the Wood Box. Place a container of water on one of the grills in the smoker to insure even heating
of the unit during seasoning. Close and latch the oven door. (NOTE: The oven door will be hard to close. Use
of both hands may be required. This is necessary in order to obtain a good seal.) Turn the oven on and
push the Brisket pre-set button. Push Start. Let the oven run this way for 4 to 6 hours before cooking the first
load of food. Seasoning will continue to occur as you cook in the oven.
Don't be alarmed if the oven temperature climbs somewhat higher than the setting. This is normal. When
oven is loaded, the meat will absorb the extra heat.
Wood Selection
You may use any fruit or nut hardwood in your smoker, as long as it has good flavoring abilities. The most
popular woods for smoking are hickory, mesquite and apple. Any of these will work in your smoker and are
available from Cookshack.
Other regional favorites are alder, beech, cherry, apple, pecan, maple, oak, buttonwood, and mangrove. Use
local woods only if logs are selected and sized properly and if you are satisfied with their flavoring abilities.
CAUTION: The maximum amount of wood to be used in your Cookshack Model 075 and 076 smoker
oven is 6 ounces (approximately 3 chunks). Do not overload the Wood Box.
Use only dry wood. You will get the best results in finished product with dry wood. Wet wood will release
acids that may damage heating elements and reduce the length of their life.
Operation of a dirty oven may create a fire hazard. Do not allow debris to accumulate in oven interior or
on oven grills. Such debris may create a fire hazard. Follow all shutdown and cleaning instructions
carefully.
Do not operate oven without Wood Box Housing and Wood Box in proper position.
Preparing the Oven for Cooking
♦
Check that Wood Box Housing is placed over Heating Element and pushed all the way to the back of the
oven. Place properly loaded Wood Box in oven. Do not remove the Wood Box from the oven bottom
during cooking cycle.
♦
Line the bottom of the oven with aluminum foil and punch a hole in the foil corresponding to the drain
hole. Cover the Deflector with foil for easy cleaning. Discard the foil after each cooking and replace with
fresh foil.
♦
Slide the drip pan into the holder located beneath the drain holes. This drip pan should be emptied after
each cooking.
♦
Notice that the grills in your smoker can be rearranged to accommodate different sizes of meat. Remove
alternate grills when smoking thick items, such as turkeys or large hams. When hang-smoking ribs using
rib hooks, remove all except the top and bottom grills, and raise side racks to highest position.
Cookshack Model 075/076 SmartSmoker Oven
5
Ver. 06.2
800.423.0698
www.cookshack.com
[email protected]
Smoker Oven Maximum Load Capacity
IMPORTANT: Do not overload your smoker. Use the Smoker Oven Maximum Load Capacity chart
below to determine the maximum capacity of your smoker. This chart shows maximum cooking capacities, per
load, of the Model 075 and 076 smoker ovens.
Capacities are based on 3 lb. ribs, 8 - 10 lbs. heavy cuts, and 3 lb. chickens. Capacities are specifically
limited by the amount of heat available.
Model
075/076
Ribs
Lbs.
20
Brisket
Lbs.
35
Pork Butts
Each
40
Chickens
Each
8
Jerky
Lbs.
6
Loading The Oven With Meat
•
Keep meat approximately 1" away from the back and side oven walls at all times.
•
Arrange meat with fewer cuts on lower grills. Heavy loading of bottom grills will block heat and prevent
smoke from traveling to the top of the oven. This will result in undercooked meat on upper grills.
(Allowances are made for loading arrangements when oven capacities are calculated.)
•
Monitor closely to determine what cooking time and load amount produce the results you desire. We
recommend keeping a journal.
•
When the oven is loaded according to the instructions above, close and latch the oven door. Fasten the door
latches securely.
Close the oven door using all latches when the oven is on. Failure to close door may result in release of
large amounts of smoke and may result in smoke damage to your building interior.
Cookshack Model 075/076 SmartSmoker Oven
6
Ver. 06.2
800.423.0698
www.cookshack.com
[email protected]
Setting the Cooking Temperature
Your Cookshack Model 075/076 has the new Cookshack IQ3 control system. This controller has the same
great cook & hold features as the previous models of the IQ controller, but with an additional feature that allows
you to cook with a meat probe. This optional probe plugs into the unit and allows you to set the internal
temperature to which you want the product cooked. If you did not purchase the meat probe with your unit, call
Cookshack Customer Service at (800) 423-0698 to order your probe.
Directions for using the Controller
1. Turn Master Switch ON.
2. Choose the desired mode by pressing the MODE button while
simultaneously pushing the up or down arrow until the desired
mode flashes: Cook Mode for standard operation, which
automatically drops into the preset hold temperature after the
preset cooking time is reached; Probe Mode if cooking with the
optional meat probe. The default mode is Cook Mode.
3. Set cooking temperature by pressing and holding the COOK
TEMP button while using the ADJUST TIME OR TEMP
buttons to change settings.
4. Set holding temperature by pressing and holding the HOLD
TEMP button while using the ADJUST TIME OR TEMP
buttons to change settings.
5. If using the Cook Mode, set cooking time by pressing and
holding the COOK TIME button while using the ADJUST
TIME OR TEMP buttons to change settings.
6. If using the Probe Mode, set probe temperature by pressing and holding the PROBE TEMP button while
using he ADJUST TIME OR TEMP buttons to change settings.
7. Press START.
To use the meat probe, simply insert the jack into the covered RCA receptacle on the controller panel. Place
the probe end through the vent hole on the oven top and press into the largest piece of meat in the smoker oven.
The oven will cook at the set cooking temperature until the internal temperature of the meat reaches the
temperature at which the probe is set. At that point the controller will change to the set holding temperature and
remain there until the unit is manually shut down. An audible signal indicates that the cook cycle is complete
and that the oven is going to the Hold Temp Mode.
If cooking in the default Cook Mode the smoker will cook the product at the selected cooking temperature
for the selected cooking time and then change to the selected holding temperature until it is shut off manually.
During both cooking modes the LCD display of the IQ continually displays oven status after the cook cycle
has been started. Using these features any kitchen staff can easily determine the status of the load in progress.
Please note that the oven temperature displayed while the oven is running is the actual air temperature inside
the oven. The probe temperature displayed is the internal temperature of the product. In order to see the set
cooking temperature, probe temperature, or holding temperature, briefly press the corresponding button.
Cookshack Model 075/076 SmartSmoker Oven
7
Ver. 06.2
800.423.0698
www.cookshack.com
[email protected]
The IQ controller is equipped with two preset buttons for easy selection of common settings for popular
foods. Pressing the button marked Ribs and Chickens will make the following settings”
Cook Temp
225° F
Hold Temp
140° F
Cook Time
3:00 hours
Pressing the button marked Briskets will make the following settings:
Cook Temp
225 F
Hold Temp
140° F
Cook Time
12 hours
Once one of these preset buttons has been pushed you may start a Cook cycle using these settings by simply
pressing Start.
The IQ controller is equipped with a power backup system to prevent your Smoker from ‘forgetting’ what it
is doing in the case of a power failure. The IQ will wait out power failures of up to 2 minutes and resume
normal cooking. This backup system means that turning off the Master Switch will not cause the IQ to forget its
current instructions. The Reset button may be used to clear these current instructions and cause the IQ to start
over from the beginning.
When you think the product is finished, turn the switch to the OFF position. Wait ten minutes before opening
the oven door to check the product for doneness. When the product is done to your satisfaction, remove from
the smoker.
Holding
Meat should always be wrapped or sealed immediately upon removal from your smoker. However, if it is
held in the oven it is not necessary to wrap it.
To minimize the danger of food becoming contaminated, follow a few key steps.
• The most important step is hand washing. Employees can easily transmit germs to clean food if they don't
follow basic personal hygiene. It is very important to wash after touching raw meat, fish, poultry, or dirty
utensils.
• Refrigerated cases should keep food at 38oF or below. Hot display cases should keep food at 140oF or
above.
• Some microorganisms, which can cause disease when present in low numbers, don't require temperature
abuse to be dangerous. To avoid these diseases, exclude infected personnel from foodservice operations,
use clean utensils when handling food, practice good personal hygiene, and use the proper containers when
covering food.
• Remember, these are basic guidelines only and are not intended to replace laws, regulations, or restrictions
concerning the handling and processing of food products. For further information, use your local health
department guidelines to determine the best method for holding product, hot or cold.
Cookshack Model 075/076 SmartSmoker Oven
8
Ver. 06.2
800.423.0698
www.cookshack.com
[email protected]
SHUTDOWN
Safety First
IMPORTANT! If oven is to be left unattended with the door open remove the Wood Box from the
oven using the Wood Box Handle and douse the contents with water.
FAILURE TO FOLLOW THESE INSTRUCTIONS MAY RESULT IN A FIRE HAZARD!
•
•
•
Turn On/Off switch to OFF position
Wait at least 10 minutes before opening door.
Open door slowly. This allows the wood and element to cool sufficiently so that a fire will not occur when
the cold air rushes into the oven.
CLEAN UP
Procedures
Always disconnect the oven from its electrical supply before cleaning or servicing.
Your Cookshack smoker must be kept clean. Loose grease and scale should be removed regularly to prevent
buildup, which may cause strong fumes. It is desirable to allow seasoned coating, such as that found on a wellseasoned cast iron skillet, to remain on the oven walls. For this reason we do not recommend attempting to
restore the oven walls to a "like new" state after each cooking. The use of detergent, chemical cleaners or oven
cleaner is not advised.
IMPORTANT! Caustic oven cleaners may damage heating element and grills. Use of oven cleaners or other caustic cleaners will void the warranty on heating elements and grills.
Follow this procedure after each load:
1. Disconnect the oven from power supply.
HEAT DEFLECTOR
2. Allow the oven to cool.
3. Remove the grills and racks; wash with soap and water.
The easiest way to do this is in a dishwasher.
PM304-Wood Box Housing
PM300-Wood Box
PM324-HEATING ELEMENT
4. Empty the Wood Box. It is hot, use caution! Use the
Wood Box handle supplied with the oven.
5. Discard the aluminum foil.
6. Remove all grease from the interior of oven.
7. Empty the drip pan.
8. Refer to safety precautions above.
IMPORTANT! Reverse these instructions after each
cleaning to reassemble the oven correctly. Do not operate
oven without Wood Box Housing and Wood Box in
proper position.
9. Replace Wood Box to correct position.
Cookshack Model 075/076 SmartSmoker Oven
9
Ver. 06.2
800.423.0698
www.cookshack.com
[email protected]
Follow this procedure every 4 - 5 loads:
1. Remove grills and racks; scrape and wash.
2. Empty Wood Box. Use caution, it is hot!
3. Remove Wood Box Housing and brush clean. Use caution, it is hot!
4. Scrape loose grease and scale from walls with flat edge scraper.
5. Replace racks and grills.
6. Return Wood Box Housing and Wood Box to correct position.
Bottom of oven must be kept clean. Change foil in bottom of oven and on top of Wood Box after each
cooking and remove all excess grease from interior of oven. Drain hole must be open at all times. If drain
becomes plugged, oven bottom can fill with grease and a fire hazard may occur!
MAINTENANCE
Procedures
1. Periodically check electrical plug and wire for any type of wear or damage.
2. Twice annually put two drops of lightweight oil on the hinge pins of the oven door to prevent binding.
3. Check casters for free movement.
Cookshack Model 075/076 SmartSmoker Oven
10
Ver. 06.2
800.423.0698
www.cookshack.com
[email protected]
TROUBLE SHOOTER'S GUIDE
Operation
PROBLEM
POSSIBLE CAUSE
SOLUTION
Uneven cooking
Improper meat loading
See loading instructions
Strong grease fume "charcoal" flavor
Excessively dirty oven
See cleaning instructions
Meat sticks to lower grill
Heavy "blanket" loading
Load with ample room for upward passage
of heat
Direct burner heat in center of grill Place foil under meat on bottom grill
Smoke coming from top of door
Normal
Product gets too done on the bottom grills, Improper loading
product on top grills is raw or underdone
Load lighter at the bottom for efficient heat
and smoke circulation
Although smoker is set with the same
Malfunctioning heating element
time and temperature as always, product
is now taking longer to cook
Have electrician change element
Actual oven temperature reads 5 to 20°
higher or lower than set temperature
Cookshack Model 075/076 SmartSmoker Oven
This is normal! You do not need to
monitor the temperature!
11
Ver. 06.2
800.423.0698
www.cookshack.com
[email protected]
TROUBLESHOOTER'S GUIDE
Cooking
PROBLEM
POSSIBLE CAUSE
SOLUTION
Poultry is too dark
Too much wood
Use less wood. (Poultry absorbs smoke
easily so start with minimum amount
suggested and gradually increase the
quantity of wood with successive loads
until desired smoke flavor is reached.)
Bitter skin on poultry
Too much wood
Use less wood
Fish too dark
Too much wood
Use less wood
No smoke taste
Not enough wood
Use more wood
Product too dry
Oven humidity too low
Increase cooking temperature and decrease cooking time. Use Cookshack Water Magazine to increase humidity. Purchase product with fat on.
Skin cracks on poultry
Oven humidity too low
Rub with vegetable oil, butter, or mayonnaise before smoking. Use a Cookshack
Water Magazine to increase oven humidity.
Fish falls through grills
Overcooking
Reduce cooking time
Grill spacing too large to support fish
Use Cookshack Seafood Grills or equivalent
Ribs not securely fastened
Insert the longest end of the RibHook
under the second bone of the thickest end
of the slab
Overcooking
Reduce cooking time
Poultry not getting done
Overloading
Review loading and capacity instructions
in this manual
Load cooks unevenly
Improper loading
Follow smoker oven loading instructions
in this manual; always load bottom
shelves lighter. Do not use sheet pans in
the smoker; they block even circulation
of heat and smoke.
Brisket on bottom cooks too fast
Improper loading
Load bottom grill with fewer briskets.
Load bottom grill with fat side of brisket
down.
Ribs fall off RibHooks
Cookshack Model 075/076 SmartSmoker Oven
12
Ver. 06.2
800.423.0698
www.cookshack.com
[email protected]
APPENDIX A
Two Year Limited Warranty
Cookshack Smoker Ovens are guaranteed to be free from defects in material and workmanship under
normal use and when installed in accordance with factory recommendations.
This limited warranty includes parts and labor for the first 90 days. Following the 90 day period, the
two (2) year limited warranty is for parts only.
Cookshack, Inc.’s obligation under this warranty shall be to repair and replace at its option any part
deemed defective upon examination by Cookshack, Inc., or its authorized agent, for a period of two (2)
years from the date of sale.
PROCEDURES
1. Customer must obtain approval from Cookshack, Inc. before performing any service. Cookshack,
Inc. is not responsible for any unauthorized service work.
2. The Limited Warranty extends to the original purchaser only.
3. To make claim or request for the Limited Warranty, the original purchaser must notify Cookshack,
Inc. Customer Service for instructions as to the repair or replacement of the defective merchandise
prior to attempting or contracting for repair of the oven. (See Appendix B for additional information regarding this procedure.).
4. The Limited Warranty shall not apply if the merchandise has been improperly installed, damaged
due to abuse, misuse, misapplication, accident, or as a result of service or modification by any
other than an authorized Cookshack, Inc. service agent.
5. There are no express warranties other than the limited warranty stated herein above. No warranties
whether express or implied, including, but not limited to, any implied warranties of
merchantability of fitness for a particular purpose, shall extend beyond the respective warranty
periods described above.
6. Cookshack, Inc. shall not be liable for any direct, indirect, special, consequential, incidental, or
punitive damages; lost profits or loss of use or interruption of business regardless of the form of
action or theory of liability resulting from any defect in or use of the Cookshack smoker oven,
accessories and/or heating elements.
Additional information on obtaining service under this Limited Warranty is available on the following
page or by contacting a Cookshack, Inc. Customer Service Representative directly at (580)765-3669.
Cookshack Model 075/076 SmartSmoker Oven
13
Ver. 06.2
800.423.0698
www.cookshack.com
[email protected]
APPENDIX B
Warranty Procedures
If you have merchandise that you believe is defective please call Cookshack, Inc., at (580) 7653669 and ask to speak to a Customer Service Representative (CSR). Have your smoker oven model
and serial number available, if applicable. The CSR will take the information you provide and make
a determination regarding the solution to the problem. It is Cookshack, Inc.’s, option whether to replace or repair defective merchandise. If you are told that your merchandise will be repaired or replaced under warranty, the following actions will be initiated:
1. The CSR will issue a Return Merchandise Authorization (RMA). This authorization is assigned a
number which is used to track the merchandise being returned. Please do not return any merchandise to Cookshack, Inc. without first obtaining this authorization and RMA number. To do so will
delay the appropriate resolution of the issue(s) in question. In some cases the CSR may mail you
a form with an RMA number included. This form will ask you to detail why it is felt that the merchandise needs to be repaired or replaced. This merchandise much be received by Cookshack,
Inc. within 30 days of the issue date of the RMA.
2. All returned merchandise must have a RMA number. Do not return merchandise without this
number.
3. Package the merchandise in its original packaging, if possible. If this is not feasible, use equivalent packaging to ensure the safe return of the items. You assume the risk of any loss or damage
that occurs during transit due to improper packaging of the merchandise being returned.
4. Using a permanent magic marker clearly write the RMA number on the outside of the packaging.
This enables personnel in Receiving to identify the merchandise and initiate the repair or replacement procedures authorized by the CSR.
5. Ship the merchandise to Cookshack, Inc., 2304 N. Ash St., Ponca City, OK 74601, shipping prepaid, F.O.B. destination. At the discretion of the CSR, Cookshack, Inc. may issue a UPS Call
Tag. In this case the return freight will be paid by Cookshack.
6. In some cases, at Cookshack Inc.’s option, replacement merchandise may be shipped to you prior
to our receipt of the defective merchandise. In this instance you will be invoiced for the replacement merchandise upon shipment. Credit for this charge will be issued to you upon our receipt of
the defective product.
7. Credit may be denied if the returned merchandise is not found to be defective by Cookshack,
Inc.; if it is not under warranty; if it is not received at Cookshack, Inc. 30 days after the RMA is
issued; if it is damaged due to abuse, misuse, misapplication, or accident; if it has been serviced
or modified by any other than an authorized Cookshack, Inc. service agent; is not returned with
an RMA number; is not in clean condition; is not complete; is damaged or lost in transit. Inspection performed upon receipt of the product can override the initial decision regarding repair or
replacement made by the CSR.
8. Replacement merchandise is sent to you via UPS Ground or common carrier. If you request replacement merchandise be sent by faster service than UPS Ground or common carrier you shall
incur the cost of shipping in excess of normal ground service.
Cookshack Model 075/076 SmartSmoker Oven
14
Ver. 06.2
800.423.0698
www.cookshack.com
[email protected]
APPENDIX C
National Service Policy
Cookshack, Inc.’s National Service Policy is to build quality equipment with easy serviceability. Because
of the ease in serviceability, Cookshack does not have National Service Companies to repair our equipment.
This allows each restaurant to use the service company of their choice.
If your unit needs repairs, please contact your preferred local service company. If warranty work is
deemed necessary, equipment owners should have their local service company contact Cookshack, Inc. at
(580) 765-3669.for authorization to perform the repairs.
Cookshack Model 075/076 SmartSmoker Oven
15
Ver. 06.2
800.423.0698
www.cookshack.com
[email protected]
APPENDIX D
GREEN
Wiring Diagram
Cookshack Model 075/076 SmartSmoker Oven
16
Ver. 06.2
800.423.0698
www.cookshack.com
[email protected]
APPENDIX E
Smoker Oven Illustration
PV531-MEAT PROBE, OPTIONAL
LA306-LABEL, MADE IN USA
PV685-IQ3 CONTROL BOARD
PV696-MASTER ON/OFF SWITCH
PV146 VENT (SM076)
PV145 VENT (SM075)
PV535-MEAT PROBE RECEPTACLE
PV536-COVER MEAT PROBE RECEPTACLE
INSIDE ELECTRICAL COVER
PV625-TRANSFORMER
PV682-RELAY
PV683-HEAT SINK
NOT SHOWN
PA124-HALL SENSOR SWITCH
PV169 DOOR LATCH (SM076)
PV168 DOOR LATCH (SM075)
PA122-HANDLE ASSEMBLY
& MAGNET
PV011-GRILL
PM023-GRILL SIDE RACK
PV720-TEMPERATURE SENSOR
PV551-HI-LIMIT THERMOSTAT
HEAT DEFLECTOR
PM304-WOODBOX HOUSING
PM305-WOODBOX HOUSING
PM324-HEATING ELEMENT
PV170-SWIVEL CASTER, BACK
PV171-BRAKE CASTER, FRONT
GREASE DEFLECTOR
PV701-DRIP PAN
Cookshack Model 075/076 SmartSmoker Oven
17
Ver. 06.2
800.423.0698
www.cookshack.com
[email protected]
APPENDIX F
Additional Items Shipped With The Smoker
5# Hickory Wood
3 Pak Spice Kit. Includes 10oz Rib Rub, 10 oz Chicken Rub, 18
oz Spicy BBQ Sauce. Operator’s Manual, Cookbook, and
Registration Card also included.
RibHooks— Hang ribs with 4 easy steps.
• Remove grills from the side racks.
• Move side racks to the highest position.
• Replace the top grill only.
• Hook large end of RibHook through slabs and
hook the small end to the grill.
• Hang slabs starting on left side of smoker from
the back to the front and repeat on the right side.
Woodbox Handle—Use this tool to remove the
Woodbox from the oven when it is still hot.
In addition to these items most Cookshack smokers are shipped with a drip pan designed to collect the grease that comes out of the bottom of the unit during cooking.
Cookshack Model 075/076 SmartSmoker Oven
18
Ver. 06.2