1
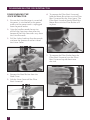
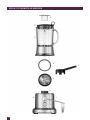
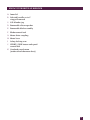
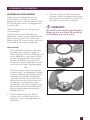
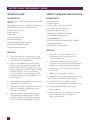
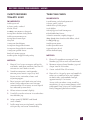
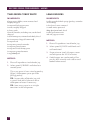
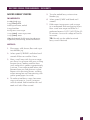
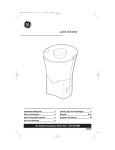
The Juice & Blend
Instruction Booklet
Juice & Blend
Instruction Book
BJB840
CONGRATULATIONS
On the purchase of your new
Breville Juice & Blend
Contents
4
Breville recommends safety first
7
8
10
13
17
20
22
How to Use as a Juice Extractor
Know your Breville Juice Extractor
Assembling the Juice Extractor
Operating the Juice Extractor
Disassembling the Juice Extractor
Cleaning the Juice Extractor
Juice Extractor Troubleshooting
27
28
30
33
37
39
41
43
How to Use as a Blender
Know your Breville Blender
Assembling the Blender
Operating the Blender
Disassembling the Blender
Cleaning the Blender
Blending tips
Blender Troubleshooting
47
69
Recipes
One year limited warranty
3
Breville recommends safety first
At Breville we are very safety conscious. We design and manufacture consumer products with
the safety of you, our valued customer, foremost in mind. In addition we ask that you exercise
a degree of care when using any electrical appliance and adhere to the following precautions.
Important safeguards
Read all instructions
BEFORE USE AND SAVE FOR
FUTURE REFERENCE
• Carefully read all instructions before
operating the appliance for the first time
and save for future reference.
• Remove and safely discard any
packaging materials and promotional
labels before using the appliance for the
first time.
• To eliminate a choking hazard for young
children, remove and safely discard the
protective cover fitted to the power plug
of this appliance.
• To protect against electrical shock, do not
immerse the power cord, power plug or
motor base in water or any other liquid.
• Always use the appliance on a dry,
level surface.
• Do not use the appliance on a sink
drain board.
• Do not place the appliance near the
edge of a bench or table during
operation. Vibration during operation
may cause the appliance to move.
• Do not place the appliance on or near
a hot gas or electric burner, or where it
could touch any other source of heat.
• Unwind the power cord fully before use.
• Do not allow the power cord to hang
over the edge of a table or counter, touch
hot surfaces or become knotted.
4
• Always ensure the appliance is
completely assembled before
connecting to the power outlet and
operating. The appliance will not turn on
unless properly assembled. Follow the
instructions provided in this book.
• Always make sure the safety locking
bar is securely in place before the motor
is turned on. Do not unfasten the safety
locking bar while the appliance is
in operation.
• Always avoid contact with moving parts.
• Strictly follow the care and cleaning
instructions described in this book.
• This appliance is for household use only.
Do not use the appliance for anything
other than its intended purpose as
described in this book. Do not use
outdoors. Do not use in moving
vehicles or boats.
• The use of attachments not sold or
recommended by Breville may cause fire,
electric shock or injury.
• Do not leave the appliance unattended
when in use.
Breville recommends safety first
When using the
appliance as a
Juice Extractor
When using the
appliance as a Blender
• Do not operate the juice extractor
without the pulp container in place
• Do not place hands in the blending jug
unless the appliance is disconnected
from the power outlet. A spatula may
be used but only when the blender is
not running.
• Do not use the juice extractor if the
rotating filter basket is damaged.
• Do not touch the small sharp teeth and
blades in the center of the filter basket.
• Do not touch the blade in the feed chute.
• Do not push produce into the feed chute
with your fingers. Always use the food
pusher provided.
• Do not load feed chute with food before
the motor is running.
• Do not juice stone fruit unless seeds
and/or stones have been removed.
• Always switch the juice extractor off
after each use. Ensure the motor stops
completely and unplug the power cord
from the wall outlet before attempting
to move the appliance, before cleaning,
disassembling, assembling and when
storing the appliance.
WARNING
• Always operate the blender with the
blender jug lid in place.
• Do not use the blender for any purpose
other than food or beverage preparation.
• Do not process boiling liquids. Let the
liquid cool slightly before placing in the
blending jug.
• Always switch the blender off after
each use. Ensure the motor stops
completely and unplug the power cord
from the wall outlet before attempting
to move the appliance, before cleaning,
disassembling, assembling and when
storing the appliance.
WARNING
Blender blades are sharp.
Handle carefully.
Super wide feed chute. Do not place
hands or foreign objects down feed
chute, always use food pusher provided.
5
5
Breville recommends safety first
IMPORTANT SAFEGUARDS FOR
ALL ELECTRICAL APPLIANCES
• Fully unwind the power cord before use.
• Do not let the power cord hang over
the edge of a bench or table, touch hot
surfaces or become knotted.
• To protect against electric shock do not
immerse the power cord, power plug or
appliance in water or any other liquid.
• The appliance is not intended for use
by persons (including children) with
reduced physical, sensory or mental
capabilities, or lack of experience and
knowledge, unless they have been given
supervision or instruction concerning
use of the appliance by a person
responsible for their safety.
• Children should be supervised to ensure
that they do not play with the appliance.
• It is recommended to regularly inspect
the appliance. To avoid a hazard do not
use the appliance if power cord, power
plug or appliance becomes damaged in
any way. Return the entire appliance to
the nearest authorised Breville Service
Centre for examination and/or repair.
• Any maintenance other than cleaning
should be performed at an authorised
Breville Service Centre.
• This appliance is for household use only.
Do not use this appliance for anything
other than its intended use. Do not use
in moving vehicles or boats. Do not use
outdoors. Misuse may cause injury.
• The installation of a residual current
device (safety switch) is recommended
to provide additional safety protection
when using electrical appliances. It
is advisable that a safety switch with
a rated residual operating current
not exceeding 30mA be installed in
the electrical circuit supplying the
appliance. See your electrician for
professional advice.
6
SAVE THESE
INSTRUCTIONS
HOW TO USE AS A
JUICE EXTRACTOR
KNOW YOUR BREVILLE JUICE EXTRACTOR
A
B
N
c
E
L
D
F
M
G
H
I
J
K
8
KNOW YOUR BREVILLE JUICE EXTRACTOR
A. Food pusher
B. Juicer cover with extra wide
feed chute
C. Pulp container with integrated handle
D. Juicing speed guide (not shown)
E. Filter basket
F. Filter bowl surround
G. Motor drive coupling
H. Motor base
I. Safety locking arm
J. START | STOP button and speed
control dial
K. Overload protection reset button
(underside of the motor base)
L. Juicing jug lid
M. 1.2L juicing jug
N. Nylon cleaning brush
9
ASSEMBLING
your Breville Juice Extractor
PAge header.....
ASSEMBLING
THE JUICE EXTRACTOR
Assembling the
Juice Extractor
Before using the Juice Extractor for the
first time, remove and safely discard any
packaging material and promotional labels.
Ensure the power cord is unplugged from
the wall outlet.
3. Align the arrows on the Filter Basket
with the arrows on the Motor Drive
Coupling and push down until it clicks
into place. Ensure the Filter Basket is
fitted securely inside the Filter Bowl
Surround and onto the Motor Base.
Wipe the Motor Base with a damp cloth.
Dry thoroughly.
Wash the Filter Bowl Surround, Filter Basket,
Juicer Cover, Food Pusher, Juice Jug, Juice
Jug Lid and Pulp Container in warm soapy
water with a soft cloth or nylon brush. Rinse
and dry thoroughly. Alternatively, place
these parts, excluding the Food Pusher, in
the dishwasher.
1. Place the Motor Base on a flat dry
surface such as a bench top. Ensure
the power cord is unplugged from the
wall outlet.
4. Lower the Juicer Cover, positioning the
rim within the Filter Bowl Surround.
2. Place the Filter Bowl Surround on top
of the Motor Base.
11
PAge header.....
ASSEMBLING
THE JUICE EXTRACTOR
5. Raise the Safety Locking Arm and lock
into the two grooves on either side of the
Juicer Cover. The Safety Locking Arm
should now be in a vertical position.
7. Place the Pulp Container into position
by tilting slightly.
TIP
To minimize clean up, place a plastic
freezer bag (or plastic grocery bag)
into the Pulp Container to collect
the pulp.
6. Slide the Food Pusher down the Feed
Chute by aligning the groove in the
Food Pusher with the small protrusion
on the inside top of the Feed Chute.
8. Place the provided Juice Jug under
the spout on the right hand side.
Ensure the Juice Jug Lid is used to
avoid any splatter.
NOTE
A glass could also be used to
collect juice.
12
OPERATING
your Breville Juice Extractor
OPERATING THE JUICE EXTRACTOR
Operating the Juice Extractor
FOOD TO BE JUICED
Speed
1. Wash and prepare your selection of fruit
and/or vegetables :
Apples
5
Fruits with hard or inedible skins such as
citrus fruit, melons and kiwi fruit should
be peeled before juicing. Pineapple
can be juiced with or without the rind
removed.
Apricots (stone removed)
2
Beetroot (cleaned, trimmed)
5
Blueberries
1
Broccoli
4
Fruits with pits, hard seeds or stones
such as nectarines, peaches, mangoes,
apricots, plums and cherries must be
pitted before juicing.
Brussel sprouts (trimmed)
5
Cabbage
4
Carrot
5
Cauliflower
4
Celery
5
Cucumber, soft skinned
4
Fennel
5
NOTE
Grapes (seedless)
1
As a safety precaution, the Juice
Extractor will not operate if the Safety
Locking Arm is not securely locked
into the vertical position.
Kiwi fruit (peeled)
2
Mangoes (peeled, stone removed)
2
Melons (peeled)
1
Nectarines (stone removed)
2
Oranges (peeled)
3
Peaches (stone removed)
2
Pears hard (stalks removed)
5
Pears soft (stalks removed)
2
NOTE
Pineapple
5
The button surround will illuminate
for 2 minutes before entering standby mode. To re-activate the Juice
Extractor out of stand-by mode, press
or turn the START | STOP button.
Plums (stone removed)
2
Raspberries
1
Tomatoes
1
Watermelon (peeled)
1
2. Ensure the Juice Extractor is correctly
assembled with the Safety Locking Arm
securely locked into the vertical position
and the Juice Jug under the spout.
3. Plug the power cord into a 230V/240V
power outlet. Then turn the power on at
the outlet. The START | STOP button
surround will illuminate.
14
OPERATING THE JUICE EXTRACTOR
4. Rotate the speed control dial to
the desired speed. Use the speed
selector table on page 14 as a guide for
juicing different fruit and vegetables.
For your convenience, a juicing speed
guide is also printed on the inside of
the Pulp Container.
NOTE
The SMOOTHIE, ICE and PULSE
settings can only be selected when
the appliance is assembled as a blender.
5. Push the START | STOP button. With
the motor running and while the
Food Pusher, gently guide food down
the Feed Chute. Do not exert excess
pressure. To extract the maximum
amount of juice, always push the Food
Pusher down slowly.
IMPORTANT:
Do not load the Feed Chute with food
until the motor is running.
TIPS
• A small amount of lemon juice
can be added to the fruit and/or
vegetables to inhibit browning.
• When juicing herbs, sprouts or
leafy green vegetables, either wrap
them together to form a bundle
or juice them in the middle of a
combination of ingredients on low
speed to obtain the best extraction.
If only juicing herbs or leafy green
vegetables, the juice yield will be
low due to the nature of centrifugal
juicing. It is advised to juice them
with a combination of other fruits
and vegetables.
• When juicing different ingredients
of varying textures, start with the
softer textured ingredients on low
speed then change to high speed for
harder textured ingredients. This
assists in extracting the maximum
amount of juice by clearing the
Filter Basket between ingredients.
6. As fruits and vegetables are processed,
juice will flow into the Juice Jug and the
separated pulp will accumulate in the
Pulp Container.
NOTE
The Pulp Container can be emptied
during juicing by turning the Juice
Extractor off and then carefully
removing the Pulp Container. Replace
the empty Pulp Container into
position before continuing to juice.
Do not allow the Pulp Container
to over-fill as this may affect the
operation of the appliance.
15
OPERATING THE JUICE EXTRACTOR
7. Immediately after each use, use the
provided nylon brush to thoroughly
clean the fine mesh holes of the Filter
Basket and rinse the remaining
removable parts under running water.
For more cleaning information, refer
to ‘Cleaning the Juice Extractor’ on
page 20.
The Breville Juice & Blend is fitted with
protection devices as a safety precaution to
prevent both personal injury and damage to
the appliance.
OVERLOAD PROTECTION
This protection device safeguards against
overloading the motor with excessive loads.
If overloading occurs, the Overload
Protection will automatically de-activate
the motor. When this occurs, unplug the
power cord from the wall outlet and press
the OVERLOAD RESET button found on the
underside of the Motor Base. This will reset
the Overload Protection, enabling you to
reconnect the power cord to the wall outlet
and recommence normal use.
OVERHEAT PROTECTION
This protection device safeguards
against overheating of the motor with
excessive loads.
If overheating occurs, the START | STOP
button surround will flash red and the
Overheat Protection will automatically
de-activate the motor. When this occurs,
unplug the power cord from the wall outlet
and allow the appliance to cool for at least 15
minutes. Then reconnect the power cord to
the wall outlet and recommence normal use.
16
ELECTRONIC PROTECTION
This protection device will automatically
de-activate the motor if the motor is stalled.
If the motor stalls, the START | STOP button
surround will flash red and the Electronic
Protection will automatically de-activate
the motor. When this occurs, unplug the
power cord from the wall outlet and clear the
Feed Chute. Either too much food is being
processed at one time or the pieces are not
small enough. Try trimming food, cutting
food into smaller pieces of even size and/
or processing a smaller amount per batch.
Then reconnect the power cord to the wall
outlet and recommence normal use.
DISASSEMBLING
your Breville Juice Extractor
PAge header..... THE JUICE EXTRACTOR
DISASSEMBLING
Disassembling the
Juice Extractor
1. Ensure the Juice Extractor is turned off,
the power is switched off at the power
outlet and the power cord is unplugged
from the power outlet.
6. To remove the Filter Bowl Surround,
hold the Motor Base then turn the Filter
Bowl Surround by the Juice Spout. The
Filter Bowl Surround should lift off the
Motor Base with the Filter Basket still
in place.
2. Grip the handle around the top rim
of the Pulp Container, then pivot the
bottom of the Pulp Container away from
the Juice Extractor.
3. Pull the Safety Locking Arm downwards
and over the grooves on either side of
the Juicer Cover.
7. To remove the Filter Basket from the
Filter Bowl Surround, turn the Filter
Bowl Surround upside down over
the sink.
4. Remove the Food Pusher from the
Feed Chute.
5. Lift the Juicer Cover off the Filter
Bowl Surround.
18
PAge header..... THE JUICE EXTRACTOR
DISASSEMBLING
WARNING
The Filter Basket contains a titanium
reinforced cutting disc with ultra
sharp blades and teeth. Do not touch
blades and teeth when handling the
Filter Basket.
19
CLEANING
your Breville Juice Extractor
PAge header.....
CLEANING
THE JUICE EXTRACTOR
Always ensure that the juicer is switched off,
the power is switched at the power outlet
and the power cord is unplugged from the
power outlet before cleaning, disassembling
or assembling and storing the appliance.
1. Immediately after each use, use the
provided nylon brush to thoroughly
clean the fine mesh holes of the Filter
Basket. Brush the inside of the Filter
Basket under running water, holding
it up towards a light to ensure the fine
mesh holes are not blocked. If the holes
are blocked, soak the Filter Basket
in hot water with 10% lemon juice to
loosen the blocked holes. Alternatively,
immediately after each use, wash the
Filter Basket in the dishwasher then
allow to air dry.
TIP
If the Filter Basket cannot be cleaned
immediately after use, soak the Filter
Basket in hot soapy water immediately
after juicing is complete. If pulp is
left to dry on the Filter Basket, it may
clog the fine mesh holes, thereby
lessening the effectiveness of the
Juice Extractor.
Do not soak the Filter Basket in bleach.
WARNING
2. Wash the Filter Bowl Surround, Juicer
Cover, Food Pusher, Juice Jug, Juice
Jug Lid and Pulp Container in warm
soapy water with the provided nylon
brush or a soft cloth. Rinse and dry
thoroughly. Alternatively, place these
parts, excluding the Food Pusher, in the
dishwasher.
NOTE
Do not wash the Food Pusher in
the dishwasher.
TIP
Discoloration of the plastic parts may
occur with strongly colored fruit and
vegetables. To help prevent this, wash
parts immediately after use.
If discoloration does occur, the plastic
parts can be soaked in 10% lemon
juice and water or they can be cleaned
with a non abrasive cleaner.Do not
soak the Filter Basket in bleach.
3. Wipe the Motor base with a soft damp
cloth and dry thoroughly. Do not use
abrasive scouring pads or cleaners when
cleaning the Motor Base as these may
scratch the surface. Wipe any excess
food particles from the power cord.
The Filter Basket contains a titanium
reinforced cutting disc with ultra
sharp blades and teeth. Do not touch
blades and teeth when handling the
Filter Basket.
21
TROUBLESHOOTING
your Breville Juice Extractor
JUICE EXTRACTOR TROUBLESHOOTING
Problem
Easy Solution
Juice Extractor will not
work or suddenly switches
off during juicing
• Check that the power plug is securely inserted into
wall outlet.
• Insert the power plug into an independent outlet.
• Insert the power plug into a different outlet.
• Reset the circuit breaker if necessary.
• Ensure the Safety Locking Arm is in the upright
position and is securely locked into the two grooves
on either side of the Juicer Cover (see page 12).
• The Overload Protection may have automatically
de-activated the motor. Unplug the power cord from
the wall outlet and press the OVERLOAD RESET
button found on the underside of the Motor Base.
This will reset the Overload Protection, enabling you
to reconnect the power cord to the wall outlet and
recommence normal use (see page 16).
• The Overheat Protection may have automatically
de-activated the motor. Unplug the power cord from
the wall outlet and allow the appliance to cool for at
least 15 minutes. Insufficient cooling time may result
in the motor de-activating again. After sufficient
cooling time, reconnect the power cord to the wall
outlet and recommence normal use (see page 16).
• The Electronic Protection may have automatically
de-activated the motor. Unplug the power cord from
the wall outlet and clear the Feed Chute. Either too
much food is being processed at one time or the
pieces are not small enough. Try trimming food,
cutting food into smaller pieces of even size and/
or processing a smaller amount per batch. Then
reconnect the power cord to the wall outlet and
recommence normal use (see page 16).
23
JUICE EXTRACTOR TROUBLESHOOTING
Problem
Easy Solution
Motor appears to stall
when juicing
• The Electronic Protection device will automatically
de-activate the motor if the motor is stalled. Unplug
the power cord from the wall outlet and clear the
Feed Chute. Either too much food is being processed
at one time or the pieces are not small enough. Try
trimming food, cutting food into smaller pieces of
even size and/or processing a smaller amount per
batch. Then reconnect the power cord to the wall
outlet and recommence normal use (see page 16).
• Ensure the motor is running before loading the Feed
Chute with food.
• Wet pulp can build up under the Juicer Cover if
the juicing action is too vigorous. Stop the juicing
process and remove the power cord from the wall
outlet. Clean the Juicer Cover, Filter Bowl Surround
and Filter Basket. Reconnect the power cord to the
wall outlet and recommence juicing with a slower
juicing action by pushing the Food Pusher down
more slowly.
• Hard fruits and vegetables will put excess strain
onto the motor if a low speed is selected. Refer to
the speed selector table on page 14 to determine
the recommended speed for the selected fruits and
vegetables.
Excess pulp building up in
the mesh of the Filter Basket
24
• Stop the juicing process and remove the power
cord from the wall outlet. Clean the Juicer Cover,
Filter Bowl Surround and Filter Basket. Reconnect
the power cord to the wall outlet and recommence
juicing. Try alternating soft and hard fruits and
vegetables, starting with the softer textured
ingredients on low speed then changing to high
speed for harder textured ingredients. This assists in
extracting the maximum amount of juice by clearing
the Filter Basket between ingredients.
JUICE EXTRACTOR TROUBLESHOOTING
Problem
Easy Solution
Very wet pulp and reduced
juice extraction
• Juice with a slower juicing action by pushing the
Food Pusher down more slowly.
• Stop the juicing process and remove the power
cord from the wall outlet. Use the provided nylon
brush to thoroughly clean the fine mesh holes of the
Filter Basket. Brush the inside of the Filter Basket
under running water, holding it up towards a light
to ensure the fine mesh holes are not blocked. If
the holes are blocked, soak the Filter Basket in hot
water with 10% lemon juice to loosen the blocked
holes. Alternatively, wash the Filter Basket in the
dishwasher. Cleaning the Filter Basket will remove
excess fiber build up (from juicing the fruit or
vegetables) which could be inhibiting the juice flow.
I cannot select the
SMOOTHIE, ICE or
PULSE settings
• These settings can only be selected when the
appliance is assembled as a blender.
Juice leaks between the rim
of the Juicer Cover and the
Filter Bowl Surround
• Juice with a slower juicing action by pushing the
Food Pusher down more slowly.
• Fruit and vegetables with a high water content, for
example tomatoes and watermelon, should be juiced
on low speed.
• Ensure the Juice Extractor is correctly assembled
(see page 12). The rim of the Juicer Cover should be
securely positioned within the Pulp Container and
Filter Bowl Surround.
Juice sprays out too fast
from the Juice Spout
• Juice with a slower juicing action by pushing the
Food Pusher down more slowly.
25
JUICE EXTRACTOR TROUBLESHOOTING
Problem
Easy Solution
Red light flashing
• The Overheat Protection may have automatically
de-activated the motor. If this occurs, the START
| STOP button surround will flash red. Unplug
the power cord from the wall outlet and allow the
appliance to cool for at least 15 minutes. Insufficient
cooling time may result in the motor de-activating
again. After sufficient cooling time, reconnect the
power cord to the wall outlet and recommence
normal use (see page 16).
• The Electronic Protection may have automatically
de-activated the motor. If this occurs, the START
| STOP button surround will flash red. Unplug the
power cord from the wall outlet and clear the Feed
Chute. Either too much food is being processed at
one time or the pieces are not small enough. Try
trimming food, cutting food into smaller pieces of
even size and/or processing a smaller amount per
batch. Then reconnect the power cord to the wall
outlet and recommence normal use (see page 16).
26
USE AS A BLENDER
KNOW YOUR BREVILLE BLENDER
A
B
C
D
F
E
G
H
I
J
K
28
KNOW YOUR BREVILLE BLENDER
A. Inner lid
B. Lid with breville assist™
ring-pull removal
C. 1.5L blender jug
D. Removable silicone gasket
E. Removable blade assembly
F. Blade removal tool
G. Motor drive coupling
H. Motor base
I. Safety locking arm
J. START | STOP button and speed
control dial
K. Overload reset button
(underside of the motor base)
29
ASSEMBLING
your Breville Blender
ASSEMBLING THE BLENDER
Assembling the BLENDER
Before using the Blender for the first
time, remove and safely discard any
packaging material and promotional labels.
Ensure the power cord is unplugged from
the wall outlet.
Wipe the Motor Base with a damp cloth.
Dry thoroughly.
Wash the Lid, Inner Lid, Blender Jug,
Removable Silicone Gasket and Removable
Blade Assembly (see Disassembling the
Blender, page 37) in warm, soapy water with
a soft cloth. Rinse and dry thoroughly.
2. With the raised rim of the Removable
Silicone Gasket facing downwards, place
the Gasket onto the Blade Assembly and
push down until it clicks into place.
WARNING
Be careful when handling the blending
blades as they are sharp. Mishandling
of the blades may cause injury.
Place raised rim downwards into Blade Assembly.
Alternatively:
• Fill the Blender Jug halfway with warm
(not hot) water and add 1-2 drops of
dishwashing liquid. Place the Blender Jug
on the Motor Base. Select speed 1/MIX
and run the Blender for 10-20 seconds.
Remove the Blender Jug and discard
the contents. Rinse the Blender Jug with
warm water until clean. Dry thoroughly.
OR
• Place these parts in the dishwasher on
a normal cycle. The Removable Silicone
Gasket and Removable Blade Assembly
should be removed from the Blender
Jug and placed on the top shelf of the
dishwasher with the Lid and Inner Lid.
The Blender Jug should be turned
upside down (with the jug spout facing
downwards) to prevent the dishwasher’s
heating element from damaging the
Blender Jug base.
1. Place the Motor Base on a flat dry
surface such as a bench top. Ensure
the power cord is unplugged from the
wall outlet.
31
ASSEMBLING THE BLENDER
3. Insert the Blade Assembly into the
Blender Jug base and turn clockwise
until securely locked into position.
4. With the Blender Jug handle to the left,
place the Blender Jug on top of the
Motor Base.
5. Raise the Safety Locking Arm and lock
into the two grooves on either side of
the Blender Jug base. The Safety
Locking Arm should now be in a
vertical position.
32
6. Place the Lid firmly into position on top
of the Blender Jug and insert the Inner
Lid by turning clockwise until securely
locked into position.
OPERATING
your Breville Blender
OPERATING THE BLENDER
Operating the BLENDER
1. Ensure the Blender is correctly
assembled with the Safety Locking
Arm securely locked into the vertical
position.
NOTE
As a safety precaution, the Blender
will not operate if the Safety Locking
Arm is not securely locked into the
vertical position.
3. Place the Lid firmly into position on top
of the Blender Jug and insert the Inner
Lid by turning clockwise until securely
locked into position.
NOTE
The Lid features a patented ringpull removal. The ring-pull design
allows the Lid to be easily removed
with a simple leverage action, yet fit
tightly onto the Blender Jug to avoid
displacement during operation.
2. Add food or liquid to the Blender Jug
ensuring not to exceed the ‘MAX’ line.
When filled at or near the ‘MAX’ line,
ensure to place one hand on the Lid to
avoid displacement during operation.
NOTE
If any liquid appears around the top
of the Motor Base, ensure the Blender
is turned off before removing the
Blender Jug from the Motor Base.
Immediately dry the Motor Base
with a soft cloth or paper towel to
absorb the liquid and check that
the Removable Silicone Gasket and
Removable Blade Assembly are
correctly assembled (see Assembling
the Blender, page 31 step 2).
4. Plug the power cord into a 230V/240V
power outlet. The START | STOP button
surround will illuminate..
NOTE
The button surround will illuminate
for 2 minutes before entering standby mode. To re-activate the Blender
out of stand-by mode, press or turn
the START | STOP button.
5. Rotate the START | STOP button to the
desired speed. For your convenience, a
blending speed guide is printed on the
stainless steel collar of the Blender Jug.
34
OPERATING THE BLENDER
6. Push the START | STOP button. If
necessary, the 30ml (1oz) Inner Lid can
be used to measure and add ingredients
while blending. Remove the Inner Lid
and add ingredients while on speeds
1/MIX, 2/CHOP or 3/BLEND. When
operating at higher speeds; with a
Blender Jug filled at or near the ‘MAX’
line; or with hot contents; stop the
Blender before adding ingredients.
In addition to the 5 speed settings, the
Blender features 3 additional settings:
SMOOTHIE and ICE settings
• These are pre-programmed cycles which
automatically adjust the blending times
and speeds to optimize blending results.
Rotate the speed control dial to the
SMOOTHIE or ICE setting. The preprogrammed cycle will commence then
automatically switch off. You may notice
the blending speed change mid-cycle,
this is normal.
• Process up to one standard ice cube
tray or 12-14 standard ice cubes at one
time. The type of ice used will affect the
consistency of the crushed ice. To create
even, powdery snow for icy drinks and
cocktails, use the ICE setting and large,
solid, dry ice that has come straight
from the freezer (-5.6ºC/22ºF, or below).
Small, slightly melted or hollow ice may
result in a coarser ice, perfect for use as a
base for fresh oysters.
7. To stop blending at any time, press the
START | STOP button. Lower the Safety
Locking Arm and ensure the blades have
completely stopped before removing the
Blender Jug from the Motor Base.
NOTE
If necessary, turn the Blender off and
ensure the blades have completely
stopped before using a plastic spatula
to occasionally stir or scrape down the
sides of the Blender Jug. Replace the
Lid before recommencing blending.
Do not use metal utensils as these may
damage the blades or Blender Jug.
8. After each use, remove the Blade
Assembly with the Silicone Gasket
still in place, from the Blender Jug.
Disassemble the Silicone Gasket from
the Blade Assembly. Wash the Blender
Jug, Lid, Inner Lid, Removable Silicone
Gasket and Removable Blade in warm
soapy water or in the dishwasher
(see Cleaning the Blender, page 39).
Alternatively, immediately fill the
Blender Jug halfway with warm (not hot)
water and add 1-2 drops of dishwashing
liquid. Place the Blender Jug on the
Motor Base. Select speed 1/MIX and
run the Blender for 10-20 seconds.
Remove the Blender Jug and discard
the contents. Rinse the Blender Jug with
warm water until clean.
PULSE setting
• For ingredients that require short
bursts of power, such as thick or coarse
mixtures, select the PULSE setting.
Rotate the speed control dial to the
PULSE setting. Press the START | STOP
button each time you want to pulse
the mixture.
35
OPERATING THE BLENDER
The Breville Juice & Blend is fitted with
protection devices as a safety precaution to
prevent both personal injury and damage to
the appliance.
OVERLOAD PROTECTION
This protection device safeguards against
overloading the motor with excessive loads.
If overloading occurs, the Overload
Protection will automatically de-activate
the motor. When this occurs, unplug the
power cord from the wall outlet and press
the OVERLOAD RESET button found on the
underside of the Motor Base. This will reset
the Overload Protection, enabling you to
reconnect the power cord to the wall outlet
and recommence normal use.
OVERHEAT PROTECTION
This protection device safeguards
against overheating of the motor with
excessive loads.
If overheating occurs, the START | STOP
button surround will flash red and the
Overheat Protection will automatically
de-activate the motor. When this occurs,
unplug the power cord from the wall outlet
and allow the appliance to cool for at least 15
minutes. Then reconnect the power cord to
the wall outlet and recommence normal use.
36
ELECTRONIC PROTECTION
This protection device will automatically
de-activate the motor if the motor is stalled.
If the motor stalls, the START | STOP button
surround will flash red and the Electronic
Protection will automatically de-activate
the motor. When this occurs, unplug the
power cord from the wall outlet. Either too
much food is being blended at one time
or the pieces are not small enough. Try
removing a portion of the mixture, cutting
food into smaller pieces of even size and/or
processing a smaller amount per batch. For
best results the food should be chopped into
pieces no larger than 2cm (¾ inch). Then
reconnect the power cord to the wall outlet
and recommence normal use.
DISASSEMBLING
your Breville Blender
DISASSEMBLING THE BLENDER
DISASSEMBLING the BLENDER
1. Ensure the Blender is turned off, the
power is switched off at the power outlet
and, the power cord is unplugged from
the power outlet.
2. Pull the Safety Locking Arm downwards
and over the grooves on either side of
the Blender Jug base.
3. Remove the Blender Jug from the
Motor Base.
4. Remove the Blade Assembly (with
the Silicone Gasket still in place)
from the Blender Jug base by turning
counterclockwise. The stainless
steel collar of the Blender Jug is not
removable.
38
NOTE
If the Blade Assembly is difficult
to remove by hand, insert the
included Blade Removal Tool into
the Blade Assembly base and turn
counterclockwise.
WARNING
Be careful when handling the blending
blades as they are sharp. Mishandling
of the blades may cause injury.
5. Remove the Silicone Gasket from the
Blade Assembly.
CLEANING
your Breville Blender
CLEANING THE BLENDER
Always ensure that the power cord is
unplugged from the wall outlet before
cleaning, disassembling or assembling and
storing the appliance. Pull the Safety Locking
Arm downwards and over the grooves on
either side of the Blender Jug base.
1. Immediately after each use, wash the
Lid, Inner Lid, Blender Jug, Removable
Silicone Gasket and Removable Blade
Assembly (see Disassembling the
Blender, page 37) in warm, soapy water
with a soft cloth. To remove strong odors,
for example, from garlic, fish and some
vegetables, soak the disassembled parts
for 10 minutes in warm soapy water.
Then wash with a mild detergent and a
cleaning brush. Rinse and dry thoroughly.
Alternatively:
• Immediately fill the Blender Jug halfway
with warm (not hot) water and add 1-2
drops of dishwashing liquid. Place the
Blender Jug on the Motor Base. Select
speed 1/MIX and run the Blender for
10-20 seconds. Remove the Blender
Jug and discard the contents. Rinse the
Blender Jug with warm water until clean.
Dry thoroughly.
OR
• Immediately place these parts in the
dishwasher on a normal cycle. Remove
the Blade Assembly with the Silicone
Gasket still in place, from the Blender
Jug. Disassemble the Silicone Gasket
from the Blade Assembly and place both
parts on the top shelf of the dishwasher
with the Lid and Inner Lid. The Blender
Jug should be turned upside down (with
the jug spout facing downwards) to
prevent the dishwasher’s heating element
from damaging the Blender Jug base.
40
WARNING
Be careful when handling the blending
blades as they are sharp. Mishandling
of the blades may cause injury.
2. Wipe the Motor base with a soft damp
cloth and dry thoroughly. Do not use
abrasive scouring pads or cleaners when
cleaning the Motor Base as these may
scratch the surface. Wipe any excess
food particles from the power cord.
BLENDING TIPS
for your Breville Blender
BLENDING TIPS
• Use low speeds (1-3 – MIX, CHOP
and BLEND) for emulsions such as
mayonnaise, dressings and marinades.
• Use high speeds (4-5 – LIQUIFY and
PUREE) for pureeing soups and
aerating liquids.
• Use the SMOOTHIE setting for
drink making using both liquid
and solid ingredients.
• Use the ICE setting for ice crushing.
Process up to one standard ice cube
tray or 12-14 standard ice cubes at one
time. The type of ice used will affect
the consistency of the crushed ice. To
create even, powdery snow for icy drinks
and cocktails, use large, solid, dry ice
that has come straight from the freezer
(-5.6ºC/22ºF, or below). Small, slightly
melted or hollow ice may result in a
coarser ice, perfect for use as a base for
fresh oysters.
• Do not use the Blender to mix dense,
heavy mixtures like dough or mash
potatoes. Other, less thick but heavy
mixtures may be blended, however
depending on the foods being processed,
may activate one of the motor protection
devices as a safety precaution (see page
36). For this reason, we recommend that
heavy mixtures are only blended for 30
second intervals before turning off the
Blender and stirring the ingredients with
a plastic spatula. For normal blending
tasks, we recommend only blending
for up to 1 minute intervals to prevent
overprocessing.
• Do not operate the Blender without the
Lid in position.
• Do not fill the Blender Jug above the
'MAX' line. When filled at or near the
‘MAX’ line, ensure to place one hand on
the Lid to avoid displacement during
operation.
• Use the PULSE setting for foods that
only require short bursts of power such
as chopping nuts.
• Do not place any objects, other than food
or liquid, into the Blender Jug while the
motor is running.
• Use the 30ml (1oz) Inner Lid to
measure and add ingredients while
blending. Remove the Inner Lid and add
ingredients while on speeds 1/MIX, 2/
CHOP or 3/BLEND. When operating
at higher speeds; with a Blender Jug
filled at or near the ‘MAX’ line; or with
hot contents - stop the Blender before
adding ingredients.
• Do not place boiling ingredients into
the Blender Jug. Allow ingredients
to cool slightly. Select speed 1/MIX
initially, then increase to a higher speed
if necessary.
• Make sure all foods are cut into cubes,
approx. 2cm (¾ inch squares) to achieve
an even result.
• Thick mixtures puree more efficiently if
the Blending Jug is 1/4 to 1/2 full.
• When using several ingredients, place
liquid ingredients in the Blender Jug
before solid ingredients, unless specified
in the recipe.
42
• Do not use the Blender Jug to store food.
TROUBLESHOOTING
your Breville Blender
BLENDER TROUBLESHOOTING
Problem
Easy Solution
Blender will not work or
suddenly switches off
during juicing
• Check that the power plug is securely inserted into
wall outlet.
• Insert the power plug into an independent outlet.
• Insert the power plug into a different outlet.
• Reset the circuit breaker if necessary.
• Ensure the Safety Locking Arm is in the upright
position and is securely locked into the two grooves
on either side of the Blender Jug base (see page 32).
• The Overload Protection may have automatically
de-activated the motor. Unplug the power cord from
the wall outlet and press the OVERLOAD RESET
button found on the underside of the Motor Base.
This will reset the Overload Protection, enabling you
to reconnect the power cord to the wall outlet and
recommence normal use (see page 36).
• The Overheat Protection may have automatically
de-activated the motor. Unplug the power cord from
the wall outlet and allow the appliance to cool for at
least 15 minutes. Insufficient cooling time may result
in the motor de-activating again. After sufficient
cooling time, reconnect the power cord to the wall
outlet and recommence normal use (see page 36).
• The Electronic Protection may have automatically
de-activated the motor. Unplug the power cord
from the wall outlet. Either too much food is being
blended at one time or the pieces are not small
enough. Try removing a portion of the mixture,
cutting food into smaller pieces of even size and/
or processing a smaller amount per batch. For best
results the food should be chopped into pieces no
larger than 2cm (¾ inch). Then reconnect the power
cord to the wall outlet and recommence normal use
(see page 36).
44
BLENDER TROUBLESHOOTING
Problem
Easy Solution
Motor appears to stall
• One of the protection devices will be activated if
the motor stalls from overloading or overheating.
Unplug the power cord from the wall outlet. Either
too much food is being blended at one time or the
pieces are not small enough. Try trimming food,
cutting food into smaller pieces of even size and/
or processing a smaller amount per batch. You may
even need to remove a portion of the mixture from
the Blender Jug before reconnecting the power cord
to the wall outlet and recommencing normal use (see
page 36).
Food is unevenly chopped
• Either too much food is being chopped at one time
or the pieces are not small enough. Try cutting food
into smaller pieces of even size and/or processing a
smaller amount per batch. For best results the food
should be chopped into pieces no larger than 2cm
(¾ inch).
Food is chopped too fine
or is watery
• The food has been over-processed. Use the PULSE
setting or process for a shorter time.
Food sticks to blade
• Too much food is being blended at one time. Unplug
the power cord from the wall outlet and remove a
portion of the mixture with a plastic spatula before
recommencing normal use.
• The mixture being blended is very thick. Thick
mixtures blend more efficiently if the Blending Jug
is 1/4 to 1/2 full. You may need to unplug the power
cord from the wall outlet and use a plastic spatula
to occasionally stir or scrape down the sides of the
Blender Jug.
Ice is not chopping to
desired consistency
• Use the ICE setting for ice crushing. Process up to
one standard ice cube tray or 12-14 standard ice
cubes at one time. The type of ice used will affect
the consistency of the crushed ice. To create even,
powdery snow for icy drinks and cocktails, use large,
solid, dry ice that has come straight from the freezer
(-5.6ºC/22ºF, or below). Small, slightly melted or
hollow ice may result in a coarser ice, perfect for use
as a base for fresh oysters.
45
BLENDER TROUBLESHOOTING
Problem
Easy Solution
Blender Jug is leaking
• Unplug the power cord from the wall outlet before
removing the Blender Jug from the Motor Base.
Check that the Removable Silicone Gasket is
securely attached to the Blade Assembly. Then insert
the Blade Assembly into the Blender Jug base and
turn clockwise until securely locked into position
(see Assembling the Blender, page 31)
Blender Jug smells
• To remove strong odors, for example, from garlic,
fish and some vegetables, disassemble the Blender
Jug (see Disassembling the Blender, page 37) and
soak the parts for 10 minutes in warm soapy water.
Then wash with a mild detergent and a cleaning
brush. Rinse and dry thoroughly.
• Always ensure the Blender Jug is thoroughly
cleaned immediately after each use (see Cleaning
the Blender, page 39).
Red light flashing
• The Overheat Protection may have automatically
de-activated the motor. If this occurs, the START
| STOP button surround will flash red. Unplug
the power cord from the wall outlet and allow the
appliance to cool for at least 15 minutes. Insufficient
cooling time may result in the motor de-activating
again. After sufficient cooling time, reconnect the
power cord to the wall outlet and recommence
normal use (see page 36).
• The Electronic Protection may have automatically
de-activated the motor. If this occurs, the START
| STOP button surround will flash red. Unplug the
power cord from the wall outlet. Either too much
food is being blended at one time or the pieces are
not small enough. Try removing a portion of the
mixture, cutting food into smaller pieces of even size
and/or processing a smaller amount per batch. For
best results the food should be chopped into pieces
no larger than 3/4 inch (2cm). Then reconnect
the power cord to the wall outlet and recommence
normal use (see page 36).
46
RECIPES
using the Breville Juice & Blend
RECIPES USING THE JUICER AND BLENDER - SMOOTHIES
Pineapple and mango shake
Fruit Salad Smoothie
Makes 4 servings
Makes 4 servings
Ingredients
Ingredients
250g (8oz) pineapple chunks
2 oranges, peel and pith removed, cut in half
2 oranges, peel and pith removed, cut in half
500g (1lb), cubed watermelon, rind and
seeds removed
1 large ripe mango (about 375g/12oz), peeled,
stoned and cubed
250g (8oz), cubed cantaloupe
½ ripe banana, peeled and cut in pieces
1 kiwi fruit, peeled and cut in half
½ cup (125ml/4 fl oz) milk or soy milk
16 seedless green grapes
6 ice cubes
4 ripe strawberries, hulled
6 ice cubes
Method
1. Using the juicer attachment, feed the
pineapple chunks and oranges through
the juice extractor’s feed tube.
2. Using the blender attachment,
process the pineapple/orange juice,
mango, milk and ice for about 1
minute on the SMOOTHIE setting
or until mixture is smooth.
3. Pour the shake evenly into 4 chilled
glasses. Serve immediately.
Method
1. Using the juicer attachment, feed the
oranges, watermelon, cantaloupe, kiwi
fruit and grapes through the juice
extractor’s feed tube.
2. Using the blender attachment, process
the mixed fruit juice, strawberries
and ice for about 1 minute on the
SMOOTHIE setting or until mixture is
smooth.
3. Pour the smoothie evenly into 4 chilled
glasses. Serve immediately.
48
RECIPES USING THE JUICER AND BLENDER - SMOOTHIES
Blueberry and
Coconut Smoothie
Makes 3 servings
Ingredients
250g (8oz) ripe strawberries, hulled and cut half
125g (4oz) fresh or defrosted frozen blueberries
½ ripe banana, peeled and roughly chopped
½ cup (125ml/4 fl oz) coconut milk
½ cup (125g/4oz) coconut or vanilla ice cream
½ cup (125g/4oz) cold water
Method
1. Using the juicer attachment, feed the
strawberries through the juice extractor’s
feed tube.
2. Using the blender attachment, process
the strawberry juice, blueberries, banana,
coconut milk, ice cream and water for
about 2 minutes on speed 4/LIQUIFY
or until mixture is smooth.
3. Pour the smoothie evenly into 3 chilled
glasses. Serve immediately.
49
RECIPES USING THE JUICER AND BLENDER - COCKTAILS
Watermelon Martini
Watermelon ice cubes
Makes 28 ice cubes
Ingredients
500g (1lb) watermelon, rind and seeds removed
and cut in pieces
½ lemon, peel and pith removed
Method
1. Using the juicer attachment, feed
watermelon and lemon through the juice
extractor’s feed tube.
2. Pour juice into ice cube trays. Freeze
juice for 3 to 4 hours.
Watermelon Martini
Makes 1 serving
Ingredients
7 watermelon ice cubes
2 shots (60ml/2 fl oz) vodka (optional)
1 teaspoon fresh lemon juice
Fresh mint, chopped for garnish
3 watermelon ice cubes, for serving
Method
1. Using the blender attachment, process
the watermelon ice cubes, vodka
(optional) and lemon juice for about
1 minute on speed 3/BLEND or until
mixture is slushy.
2. Serve immediately in an ice cold glass
garnished with chopped mint and extra
watermelon ice cubes.
50
Frozen Pomegranate and
Strawberry Margarita
Makes 2 servings
INGREDIENTS
2 ripe pomegranates, cut in half, seeds removed
carefully from pulp making 250g (8oz) seeds
250g (8oz) ripe strawberries, hulled
12 ice cubes
4 shots (125ml/4 fl oz) tequila (optional)
2 shots (60ml/2 fl oz) Triple sec (optional)
2 teaspoons concentrated sweet lime juice
½ teaspoon caster sugar
8 ice cubes, for serving
Method
1. Using the juicer attachment, feed
pomegranate seeds and strawberries
through the juice extractor’s feed tube.
2. Using the blender attachment, process
pomegranate/strawberry juice, ice cubes,
tequila (optional), Triple sec (optional),
concentrated sweet lime juice and sugar
for about 1 minute on the SMOOTHIE
setting or until mixture is well blended.
3. Pour Margarita evenly into 2 chilled
glasses over ice. Serve immediately.
RECIPES USING THE JUICER AND BLENDER - COCKTAILS
Homemade Tomato Crush
with Vodka (Bloody Mary)
Makes 2 servings
Homemade Tomato Crush
INGREDIENTS
6 large (about 685g/1½lb) vine-ripened
tomatoes, cored and quartered
1 teaspoon superfine sugar
Few drops Tabasco
1 teaspoon fresh lemon juice
2 shots (60ml/2 fl oz) vodka (optional)
Salt to taste
Crushed ice, for serving
2 lemon wedges, for serving
2 sticks celery with leaves, for serving
Method
1. Using the juicer attachment, feed
tomatoes through the juice extractor’s
feed tube.
Frozen Raspberry Colada
Makes 2 servings
INGREDIENTS
250g (8oz) pineapple chunks
250g (8oz) frozen raspberries, defrosted
½ cup (125ml/4 fl oz) coconut milk
2 shots Malibu (60ml/2 fl oz) (optional)
8 ice cubes
Method
1. Using the juicer attachment, feed
pineapple and raspberries thought the
juice extractor’s feed tube.
2. Using the blender attachment, process
pineapple/raspberry juice, coconut
milk, Malibu (optional) and ice cubes
for about 1 minute on the SMOOTHIE
setting or until mixture is smooth.
3. Pour Frozen Raspberry Colada
evenly into 2 chilled glasses and
serve immediately.
2. Using the blender attachment, process
the tomato juice, sugar, Tabasco, lemon
juice and vodka (optional) for about 1
minute on the SMOOTHIE setting or
until mixture is well blended. Taste and
add salt if needed.
3. Pour Bloody Mary evenly into 2 chilled
glasses over crushed ice and garnish
with lemon wedges and celery sticks.
Serve immediately.
51
RECIPES USING THE JUICER AND BLENDER - COCKTAILS
Mango, Raspberry and Pear
Layered Cocktail
Makes 2 serving
Layering, also known as floating or
stacking, uses the different densities of
various liquids to create an attractive
array of colored layers. Pouring these
drinks is easier than you might think:
you just need to know the specific
gravity of each liquid you’re working
with, and pour them in order from
heaviest to lightest. Liqueurs with the
most dissolved sugar and the least
alcohol are densest and are put at the
bottom. These include fruit juices and
cream liqueurs. Those with the least
water and the most alcohol, such as
rum with 75% alcohol by volume, are
floated on top
Mango Layer
OR
3. For the cocktail version, using the
blender attachment, process mango and
Malibu for about 1 minute on speed
5/ PUREE or until mixture is smooth.
Raspberries Layer
Ingredients
250g (8oz) frozen raspberries, defrosted
1 shot (30ml/1 fl oz) Grenadine
2 shots Crème de Cassis (60ml/2 fl oz)
(optional)
Method
1. Using the juicer attachment, feed
raspberries through the juice extractor’s
feed tube.
2. Mix raspberry juice with Grenadine and
Crème de Cassis (optional).
Ingredients
1 large ripe mango (about 375g/12oz), peeled,
stoned and cubed
Pear Layer
125g (4oz) pineapple chunks (for mocktail only)
Ingredients
2 shots Malibu (60ml/2 fl oz) (optional)
1 pear, cored and cut in half
Shot Vodka (1fl oz/30ml) (optional).
Method
1. For the mocktail version of this cocktail,
using the juicer attachment, feed
pineapple pieces through the juice
extractor’s feed tube.
2. Using the blender attachment, process
pineapple juice and mango for about
1 minute on speed 5/PUREE or until
mixture is smooth.
Method
1. Using the juicer attachment, feed pear
through the juice extractor’s feed tube.
2. For the mocktail version, using the
blender attachment, process pear juice
with ice cubes for about 1 minute on
speed 3/BLEND or until mixture is
slushy.
OR
3. For the cocktail version, mix pear juice
with vodka.
52
RECIPES USING THE JUICER AND BLENDER - COCKTAILS
Constructing Mango, Raspberry
and Pear Layered Cocktail
1. Pour mango mixture into a glass.
2. Insert the bowl of a spoon into the glass,
with the rounded side of the spoon
facing up. Place the tip of the spoon as
far as it will go into the glass without
touching the mango layer, very near or
even touching the side of the glass.
3. Very gently, pour the raspberry layer
over the bowl of the spoon so that it
floats on the surface of the mango layer.
Pour in a steady stream but a very slow
stream, almost a trickle, to keep the
layers from mixing.
4. Clean the spoon then repeat with the
pear juice layer. Serve immediately.
53
RECIPES USING THE JUICER AND BLENDER
Peach and Mango
Yogurt Pops
Spicy Butternut pumpkin
and Apple Soup
Makes 8 yogurt pops
Makes 4 to 6 servings
Ingredients
Ingredients
2 ripe peaches, stone removed and cut in half
3-4 medium Granny Smith apples, peeled, cored,
cut in half
2 oranges, peeled and cut in half
1 large ripe mango (375g/12oz), peeled, stone
removed and cubed
5g (¼ oz) fresh peeled ginger
1 tablespoon (15ml/½ fl oz) olive oil
4 tablespoons (60ml/2oz) low-fat peach-mango
yogurt or fruit soy yogurt
2 medium onions, diced
1 tablespoon (15ml/½ oz) honey
¼-½ teaspoon chili powder
Method
1. Using the juicer attachment, feed the
peaches and oranges through the juice
extractor’s feed tube.
2. Using the blender attachment, process
the peach/orange juice with mango,
yogurt and honey for about 1 minute on
speed 4/LIQUIFY or until mixture is
smooth.
3. Pour mixture into ice pop trays or ice
cube trays until frozen
3 cloves garlic, crushed
c butternut squash (pumpkin), skinned, seeded
and cubed
1 Gala apple (baking apple), peeled, cored and
diced
2 cups (500ml/16 fl oz) vegetable stock
2 teaspoons fresh lemon juice
Salt and pepper to taste
Light sour cream
Chopped fresh chives
Method
1. Using the juicer attachment, feed
the Granny Smith apples and ginger
through the juice extractor’s feed tube.
There should be approximately 1 cup
(8oz/250ml) freshly squeezed apple
juice.
2. Heat olive oil in a large saucepan over
high heat. Add onions and sauté for 3
to 4 minutes, until they begin to brown.
Add garlic and chilli powder and sauté
10 seconds. Add pumpkin and Gala
apple and sauté for 3 minutes. Add apple
juice and vegetable stock, bring to a boil
and simmer uncovered until squash and
apple are tender, about 25 to 30 minutes.
54
RECIPES USING THE JUICER AND BLENDER
3. Allow mixture to cool slightly.
4. Using the blender attachment, carefully
transfer slightly cooled mixture in two
batches into blender jug. Process for
about 2 minutes on speed 3/BLEND or
until soup is smooth.
5. Return soup to saucepan, add lemon
juice and season with salt and pepper.
Bring soup to a simmer before serving.
Garnish with sour cream and chives
and serve.
55
RECIPES USING THE JUICER
Apple, carrot and
celery juice
CANTALOPE, MINT AND
MANGO JUICE
Makes approximately 2 cups
Makes approximately 2¼ cups
Ingredients
Ingredients
4 small Granny Smith apples
½ small cantaloupe, peeled, seeded and
quartered
3 medium sized carrots, trimmed
4 sticks celery
Method
Using the juicer attachment, feed apples,
carrots and celery through the juice
extractor’s feed tube. Serve immediately.
TOMATO, CARROT, CELERY AND
LIME JUICE
3 sprigs fresh mint leaves
1 mango, halved, seeded and peeled
Method
Using the juicer attachment, feed the
cantaloupe, mint and mango through
the juice extractor’s feed tube. Serve
immediately.
Makes approximately 3 cups
TOMATO, CUCUMBER, PARSLEY
AND CARROT JUICE
Ingredients
Makes approximately 3 cups
2 medium tomatoes
1 large carrot, trimmed
2 celery stalks, trimmed
1 lime, peeled
Method
Using the juicer attachment, feed
tomatoes, carrot, celery and lime
through the juice extractor’s feed tube.
Serve immediately.
56
Ingredients
3 medium tomatoes
1 large cucumber
1 large bunch fresh parsley
3 medium carrots, trimmed
Method
Using the juicer attachment, feed the
tomatoes, cucumber, parsley and carrots
through the juice extractor’s feed tube.
Serve immediately.
RECIPES USING THE JUICER
SWEET POTATO, CELERY,
GINGER AND ORANGE JUICE
TOMATO, CARROT AND RED Red
capsicum JUICE
Makes approximately 3 cups
Makes approximately 3 cups
Ingredients
Ingredients
1 small sweet potato, peeled and halved
2 small red red capsicum, trimmed,
seeds removed
4 sticks celery, trimmed
2.5cm (1”) piece fresh ginger
4 oranges, peeled
Method
Using the juicer attachment, feed the
sweet potato, celery, ginger and oranges
through the juice extractor’s feed tube.
Serve immediately.
PARSNIP, CELERY AND PEAR
JUICE
Makes approximately 3 cups
Ingredients
2 parsnips, trimmed
4 sticks celery, trimmed
4 medium pears, stalks removed
Method
Using the juicer attachment, feed the
parsnips, celery and pears through
the juice extractor’s feed tube. Serve
immediately.
3 medium tomatoes
3 carrots, trimmed
4 sprigs parsley
Method
Using the juicer attachment, feed the red
capsicum, tomatoes, carrots and parsley
through the juice extractor’s feed tube.
Serve immediately.
BLACKBERRY, PEAR AND
GRAPEFRUIT JUICE
Makes approximately 3 cups
Ingredients
225g (½ lb) blackberries
3 ripe pears
2 grapefruits, peeled
Method
Using the juicer attachment, feed the
blackberries, pears and grapefruits
through the juice extractor’s feed tube.
Serve immediately.
57
RECIPES USING THE JUICER
BEETROOT, APPLE AND
CELERY JUICE
CUCUMBER, CELERY, FENNEL
AND BEAN SPROUT JUICE
Makes approximately 2 cups
Makes approximately 3 cups
Ingredients
Ingredients
4 medium sized beetroot, trimmed
1 large cucumber
2 medium Granny Smith apples
3 sticks celery
4 sticks celery
1 bulb fennel, trimmed
2 cups bean sprouts
Method
Using the juicer attachment, feed the
beetroot, apples and celery through
the juice extractor’s feed tube. Serve
immediately.
BLUEBERRY, BLACKBERRY,
STRAWBERRY AND LIME JUICE
Makes approximately 3½ cups
Ingredients
Method
Using the juicer attachment, feed
cucumber, celery, fennel and bean
sprouts through the juice extractor’
feed tube. Serve immediately.
APRICOT, APPLE AND
PEAR SPARKLE
Makes 4 servings
500g (1lb) blueberries
Ingredients
500g (1lb) blackberries
4 large apricots, halved and seeded
500g (1lb) strawberries, hulled
4 small red apples
1 lime, peeled
3 medium pears
250ml (8oz) sparkling mineral water
Method
Using the juicer attachment, feed
blueberries, blackberries, strawberries
and lime through the juice extractor’s
feed tube. Serve immediately.
½ cup crushed ice
Method
1. Using the juicer attachment, feed
apricots, apples and pears through the
juice extractor’s feed tube.
2. Stir in mineral water and ice. Serve
immediately.
58
RECIPES USING THE JUICER
GAZPACHO
Ingredients
Makes 4 servings
3 teaspoons butter
Ingredients
1 ham hock
4 medium tomatoes
4 sprigs fresh parsley
1 large clove garlic, peeled
1 small onion, peeled and trimmed
2 carrots
2 stalks celery
1 red red capsicum, base removed and seeded
1 Lebanese cucumber
2 tablespoons red wine vinegar
1 onion, finely chopped
350g (12oz) beetroot pulp, strained and juice
reserved
40g (1.5oz) potato pulp, strained and juice
reserved
40g (1.5oz) carrot pulp, strained and juice
reserved
85g (3oz) tomato pulp, strained and juice
reserved
30g (1oz) cabbage pulp, strained and juice
reserved
Freshly ground black pepper
Reserved juices and enough water to make 2
extra liters
1 cup crushed ice
4 bacon rashers, chopped
3 tablespoons chopped fresh basil
1 tablespoon lemon juice
½ cup sour cream
Method
1. Using the juicer attachment, feed
tomatoes, parsley, garlic, onion, carrots,
celery, red red capsicum and cucumber
through the juice extractor’s feed tube.
2. Stir in vinegar and black pepper.
3. Arrange ice in four soup bowls. Pour in
extracted juice, sprinkle with basil and
serve immediately.
VEGETABLE AND BACON SOUP
Serves 4
The remaining pulp left after juicing
fruit or vegetables is mostly fiber and
cellulose which, like the juice, contains
vital nutrients necessary for the daily
diet. However, like the juice, pulp
should be used that day to avoid loss of
vitamins. Some of the uses of pulp are
to thicken casseroles or soups or in the
case of fruit, simply placed in a bowl
topped with meringue and baked for
a simple dessert. Quite apart from the
consumption use, pulp is great used in
the garden for compost.
Method
1. Melt butter in a large saucepan, cook
onion over a medium heat for 2-3
minutes or until golden.
2. Add ham hock to pan, stir in beetroot
pulp, potato pulp, carrot pulp, tomato
pulp, cabbage pulp, reserved juices and
water, bacon and lemon juice.
3. Bring to the boil, reduce heat and
simmer for 30-40 minutes.
4. Remove ham bone, discard bone, finely
chop meat and return to the pan.
5. Serve topped with sour cream.
59
RECIPES USING THE BLENDER - COCKTAILS
Margarita
Sunset Cooler
Ingredients
Ingredients
¼ cup (60ml) tequila
375ml (1½ cups) sauternes
¼ cup (60ml) cointreau
2 cups frozen pears, peeled, cored and diced
1
⁄3 cup (80ml) lime juice
1 cup frozen apricots, de-seeded and diced
12 ice cubes
1 tablespoon lemon juice
Method
Method
1. Place tequila, cointreau, lime juice and
ice cubes into blender jug.
1. Place all ingredients into blender jug.
2. Use the ICE setting or speed 2/CHOP
and blend until well combined and ice is
crushed. Serve in salt rimmed glasses.
Daiquiris
Basic Recipe:
Ingredients
2. Use the ICE setting or speed 2/CHOP
and blend until well combined and ice is
crushed.
TIP: Sauternes is a sweet dessert wine.
TIP: Place diced fruit in a plastic bag
and freeze until firm.
Pina Colada
Fruit (approximately 1 cup)
Ingredients
½ cup (125ml) white spirits (white rum, vodka or
kirsch)
2 tablespoons white rum
¼ cup (60ml) sugar syrup
1 cup ice
Method
2 tablespoons coconut cream
2 teaspoons sugar
¾ cup (190ml) unsweetened pineapple juice
10 ice cubes
1. Place all ingredients into blender jug.
Method
2. Use the ICE setting or speed 2/CHOP
and blend until well combined and ice
is crushed.
1. Place all ingredients into blender jug.
60
2. Use the ICE setting or speed 2/CHOP
and blend until well combined and ice is
crushed.
RECIPES USING THE BLENDER - SHAKES
Passionfruit Milkshake
Ingredients
Chocolate Malted
Smoothie
1 punnet strawberries, hulled
Ingredients
Pulp of 4 passionfruit
2 cups (500ml) milk, chilled
2 cups (500ml) milk, chilled
3 tablespoons malted milk powder
4 scoops passionfruit ice-cream
4 scoops vanilla ice-cream
2 tablespoons strawberry topping
4 scoops chocolate ice cream
4 tablespoons caramel sauce
Method
1. Place strawberries into blender jug.
2. Select speed 2/CHOP and puree until
smooth.
3. Add half the passionfruit pulp, milk, and
two ice-cream scoops.
4. Select speed 3/BLEND and blend until
smooth and thick.
5. Pour into two glasses then top with
remaining ice-cream and passionfruit
pulp and strawberry topping. Serve
immediately.
Chocolate curls, for garnish (optional)
Method
1. Place milk, malted milk powder and
vanilla ice-cream into blender jug.
2. Use the SMOOTHIE setting and blend
until well combined.
3. Divide between 2 glasses and add
chocolate ice cream. Top with caramel
sauce and garnish with chocolate curls.
61
RECIPES USING THE BLENDER - SAUCES
Pesto
Mayonnaise
Ingredients
Ingredients
1 bunch basil leaves
2 egg yolks
2 cloves garlic
1 teaspoon dry mustard
2 tablespoons lemon juice
1 tablespoon vinegar
125g (4oz) pine nuts
Salt and white pepper, to taste
125ml (4 fl oz) olive oil
½ cup (125ml) vegetable oil
60g (2oz) grated parmesan cheese
Method
Method
1. Place all ingredients into blender jug.
1. Place egg yolks, mustard, vinegar, salt
and pepper into blender jug.
2. Select speed 2/CHOP and blend until
smooth.
2. Select speed 1/MIX and blend for 10-15
seconds until light and fluffy.
3. Transfer mixture to a serving bowl. Chill
until ready to use. Serve with toasted
Turkish bread.
3. With blender running on speed 3/
BLEND, slowly pour oil through the
inner measuring lid. Blend until
mixture thickens. This should take
about 1 minute.
Mayonnaise variations:
Raspberry: replace 1 tablespoon vinegar
with 1 tablespoon raspberry vinegar.
Garlic: add 2 cloves garlic, peeled and
chopped to the egg yolk mixture.
Herb: add ½ cup chopped mixed fresh
herbs (such as basil, chives, parsley,
thyme) to the prepared mayonnaise.
62
RECIPES USING THE BLENDER - SAUCES
Satay Sauce
Ingredients
2 cloves garlic, peeled
1 small onion, peeled and quartered
2 teaspoons peanut oil
½ cup roasted peanuts
1 small chilli, halved and seeded
2/3 cup (165ml) water
2 tablespoons lemon juice
1 tablespoon dark soy sauce
2 tablespoons coconut milk
1 teaspoon brown sugar
Method
1. Place garlic and onion into blender jug.
Pulse until chopped.
2. Heat peanut oil in a saucepan and cook
garlic and onion mixture until lightly
browned.
3. Place remaining ingredients into
blender jug.
4. Select speed 3/BLEND and blend until
smooth.
5. Pour combined mixture over garlic and
onion mixture and stir over a gentle heat
to warm through. Serve immediately or
cover and store in the refrigerator.
TIP: Satay sauce may thicken on
standing, if this happens, stir in a little
more warm water.
63
RECIPES USING THE BLENDER - MAINS
Wonton Soup
Sweet Corn and Bacon Soup
Ingredients
Ingredients
125g (4oz) lean pork meat, trimmed and roughly
chopped
1 tablespoon oil
125g (4oz) green prawns, shelled and deveined
2.5cm (1”) piece ginger, peeled and sliced
1 tablespoon soy sauce
½ teaspoon salt
1 clove garlic
¼ teaspoon sesame oil
16 wonton wrappers
1 x 60g (2oz) egg, lightly beaten
4 cups (1 liter) chicken stock
2 shallots, finely chopped
Method
1. Place pork, prawns, ginger, soy sauce,
salt, garlic and sesame oil into blender
jug. Pulse to a smooth paste.
2. Place a teaspoon of mixture slightly
below center of wonton wrapper and
brush edges of the wrapper with egg.
Fold wrapper in half to make a triangle
and press edges to seal, excluding
any air. Moisten the two edges of the
triangle with egg, bring together and
pinch to seal.
1 onion, chopped
4 cloves garlic, peeled and crushed
2 teaspoons ground coriander
1 teaspoon Cajun seasoning
2 cups frozen corn kernels, thawed
3 cups (750ml) chicken stock
1 cup (250ml) milk
3 bacon rashers, rinds removed and chopped
½ cup (125ml) cream
2 tablespoons snipped chives
Method
1. Heat oil in a large saucepan and
add onion, garlic, coriander and
Cajun seasoning.
2. Cook over a medium heat, stirring
constantly until onion is soft. Add corn,
stock and milk. Bring to the boil then
reduce heat and simmer, covered for
30 minutes.
3. Allow mixture to cool slightly.
4. Cook bacon in a separate pan until crisp,
drain on absorbent kitchen paper.
3. Drop wontons into boiling salted water
and cook for 10 minutes.
5. Carefully transfer slightly cooled
mixture in two batches into blender jug.
4. Meanwhile, bring chicken stock to the
boil in a saucepan, reduce heat and
simmer 2-3 minutes.
6. Select speed 5/PUREE and blend
until smooth.
5. Lift out wontons from boiling water
and place four wontons each in four
individual bowls, spoon over chicken
stock. Garnish with chopped shallots.
64
7. Return soup to pan, add cream, bacon
and chives, heat through gently.
Serve immediately.
RECIPES USING THE BLENDER - MAINS
Sweet Peppered
Tomato Soup
Thai Fish Cakes
Ingredients
1 small onion, peeled and quartered
1 tablespoon oil
2 cloves garlic, peeled
2 cloves garlic, crushed
2 thick slices peeled ginger
2 leeks, sliced
2 red chillies
2 x400g can tomatoes, chopped
2.5cm (1”) piece fresh lemongrass
2 teaspoons chicken stock powder
6 fresh kaffir lime leaves
1 tablespoon tomato paste
¼ bunch coriander, roughly chopped
2 teaspoons brown sugar
350g (12oz) white boneless fish fillets, cubed
1 bay leaf
1 x 60g (2oz) egg
¼ teaspoon dried thyme
2 tablespoons water
1 teaspoon chopped fresh mint
1 tablespoon fish sauce
1 teaspoon chopped fresh coriander
8 green beans, sliced
¼ teaspoon ground cloves
Oil for shallow frying
Ingredients
Pinch of cayenne pepper
2 tablespoons chopped fresh parsley
Method
Method
1. Place all ingredients except oil into
blender jug. Pulse until well combined.
1. Heat oil in a large saucepan, add garlic
and leeks, cook over medium heat for 2-3
minutes or until leeks are soft.
2. Remove mixture from blender jug and
shape into 24 fish cakes.
2. Combine tomatoes, stock powder,
tomato paste, brown sugar, bay leaf,
thyme, mint, coriander, cloves and
cayenne pepper.
3. Pour into pan with leek mixture, bring
to boil, then reduce heat and simmer,
uncovered for 20 minutes or until liquid
has reduced by one third.
4. Allow mixture to cool slightly.
3. Cover and chill for 30 minutes.
4. Heat oil in a large fry pan and cook fish
cakes on a medium heat until golden
on both sides and cooked through,
approximately 10 minutes.
Serve with cucumber sauce made by
combining ¼ cup warmed honey with 1
tablespoon lime juice and 1 tablespoon
finely chopped, peeled cucumber.
5. Carefully transfer mixture in two batches
into blender jug.
6. Select speed 5/PUREE and blend
until smooth.
7. Ladle soup into serving bowls, sprinkle
with parsley and serve immediately.
65
RECIPES USING THE BLENDER - MAINS
Thai Green Curry Paste
Lamb Burgers
Ingredients
Ingredients
4 large green chillies, stems removed and
roughly chopped
1 tablespoon fresh herb sprigs (parsley, coriander
or rosemary)
1 teaspoon black peppercorns
1 slice bread, crusts removed
1 onion, roughly chopped
½ small onion, quartered
2 cloves garlic
250g (8oz) trim lamb, diced
1 bunch coriander, including root, washed and
chopped
1 tablespoon mint sauce
1 stem lemongrass, trimmed and thinly sliced
(or 2 teaspoons chopped lemon rind)
1 teaspoon salt
Salt and pepper, to taste
Method
2 teaspoons ground coriander
1. Place all ingredients into blender jug.
1 teaspoon ground cumin
2. Select speed 2/CHOP and blend until
well combined.
2 teaspoons dried shrimp paste
1 teaspoons ground turmeric
1 cup (250ml) oil
3. Shape mixture into 3-4 burgers, cover
and refrigerate for 20-30 minutes.
Method
4. Cook burgers on a preheated grill or
pan fry for 5 minutes each side or until
cooked when tested.
1. Place all ingredients into blender jug.
2. Select speed 3/BLEND and blend to a
smooth paste.
This curry paste is best suited to poultry.
Allow 2 tablespoons paste per 16oz
(500g) poultry.
TIP: Scrape sides of blender jug with
a spatula and add a little extra oil or
tablespoon of water if necessary.
TIP: Store curry paste in an airtight
container in the refrigerator.
66
RECIPES USING THE BLENDER - DESSERTS
Mixed Berry Crepes
Ingredients
2 x 60g (2oz) eggs
1 cup (250ml) milk
1 tablespoon butter, melted
1 cup plain flour
2 teaspoons caster sugar
¼ cup (60ml) caster sugar, extra
¼ cup (60ml) water
250g (8oz) mixed fresh berries (strawberries,
raspberries, blueberries), washed and hulled
5. Transfer cooled berry mixture into
blender jug.
6. Select speed 1/MIX and blend until
smooth.
7. Fold crepes into quarters and arrange
in an ovenproof dish overlapping layers.
Pour sauce over crepe and bake in a
preheated oven at 200ºC (400ºF) for 1015 minutes. Serve with scoops of vanilla
ice cream.
TIP: Brandy can be added to mixed
berry sauce if desired.
Method
1. Place eggs, milk, butter, flour and sugar
into blender jug.
2. Select speed 3/BLEND and blend until
smooth. Allow to stand for 1 hour.
3. Heat a small non stick fry pan or crepe
pan. Pour ¼ cup batter into pan, swirling
to cover base. Cook on medium heat
until underside is golden, approximately
1 minute. Turn crepe to cook other side.
Remove from pan and place on a plate.
Repeat with remaining batter, stacking
crepes onto plate and interweaving with
grease proof paper. Set aside.
4. To make mixed berry sauce, heat extra
sugar and water in a small saucepan
until dissolved. Add mixed berries and
cook until soft. Allow to cool.
67
RECIPES USING THE BLENDER - DESSERTS
Chilled Cheesecake with
Raspberry Puree
Whipped cream
Ingredients
1 x 300ml thickened or pure cream
Ingredients
250g (8oz) packet plain sweet biscuits, broken
125g (4oz) butter, melted
250g (8oz) cream cheese, cubed and softened
1 x 300ml can sweetened condensed milk
½ cup (125ml) cream
1 tablespoon grated lemon zest
⁄3 cup lemon juice
1
1 punnet raspberries, washed
Method
1. Place biscuits into blender jug.
2. Select speed 2/CHOP and blend until
finely crushed. Add melted butter to
blender jug and continue to blend until
well combined.
3. Press biscuit mixture over base and
sides of a greased 20cm (8”) spring form
pan. Chill until firm.
4. Place cream cheese, condensed milk,
cream, lemon zest and juice into
blender jug.
5. Select speed 3/BLEND and blend
until smooth.
6. Pour into prepared crumb crust, cover
and refrigerate for at least 24 hours
before serving.
7. Place raspberries into blender jug.
8. Select speed 1/MIX and blend until
smooth. If desired, sweeten raspberry
puree with a little icing sugar. Serve with
whipped cream and raspberry puree.
68
Method
1. Place cream into blender jug.
2. Select speed 1/MIX and blend for
approximately 20 seconds. Check
thickness. Pulse once or twice if
thickening is required. Do not
over blend.
NOTES
69
NOTES
70
NOTES
71
Breville Customer Service Centre
Australian Customers
New Zealand Customers
Mail:
Mail:
PO Box 22
Botany, NSW, 2019
AUSTRALIA
Private Bag 94411
Greenmount, Auckland
NEW ZEALAND
Phone: 1300 139 798
Phone: 0800 273 845
Fax:
Fax:
(02) 9384 9601
Email: Customer Service:
[email protected]
0800 288 513
Email: Customer Service:
[email protected]
www.breville.com.au
Breville is a registered trademark of Breville Pty. Ltd. A.B.N. 98 000 092 928.
Copyright Breville Pty. Ltd. 2010.
Due to continued product improvement, the products illustrated/photographed
in this brochure may vary slightly from the actual product.
Model BJB840 Issue - A10