1
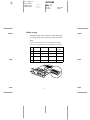
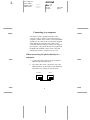
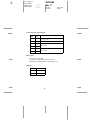
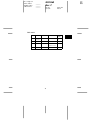
®
EPSON
C82372* Type B
Interface Card
User’s Guide
L
Proof Sign-off:
tanto name
leader name
editorname
_______
_______
_______
R4C0460
Rev. C
A5 size
10/4/99
COVER.FM
Pass 0
FCC Compliance Statement
For United States Users
This equipment has been tested and found to comply with the limits for a Class
B digital device, pursuant to Part 15 of the FCC Rules. These limits are designed
to provide reasonable protection against harmful interference in a residential
installation. This equipment generates, uses and can radiate radio frequency
energy and, if not installed and used in accordance with the instructions, may
cause harmful interference to radio or television reception. However, there is no
guarantee that interference will not occur in a particular installation. If this
equipment does cause interference to radio and television reception, which can
be determined by turning the equipment off and on, the user is encouraged to try
to correct the interference by one or more of the following measures:
❏
Reorient or relocate the receiving antenna
❏
Increase the separation between the equipment and receiver
❏
Connect the equipment into an outlet on a circuit different from that to which
the receiver is connected
❏
Consult the dealer or an experienced radio/TV technician for help.
This device complies with Part 15 of the FCC Rules. Operation is subject to the
following two conditions: (1) this device may not cause harmful interference, and
(2) this device must accept any interference received, including interference that
may cause undesired operation.
WARNING
The connection of a non-shielded equipment interface cable to this equipment
will invalidate the FCC Certification of this device and may cause interference
levels which exceed the limits established by the FCC for this equipment. It is the
responsibility of the user to obtain and use a shielded equipment interface cable
with this device. If this equipment has more than one interface connector, do not
leave cables connected to unused interfaces.
Changes or modifications not expressly approved by the manufacturer could
void the user’s authority to operate the equipment.
For Canadian Users
This Class B digital apparatus meets all requirements of the Canadian
Interference- Causing Equipment Regulations.
Cet appareil numérique de la classe B respecte toutes les exigences du Règlement
sur le matériel brouilleur du Canada.
Proof Sign-off:
tanto name
leader name
editorname
R
R4C0460
Rev. C
_______
_______
_______
A5 size
10/4/99
FRONT.FM
Pass 0
®
All rights reserved. No part of this publication may be reproduced,
stored in a retrieval system, or transmitted in any form or by any means,
electronic, mechanical, photocopying, recording, or otherwise, without
the prior written permission of SEIKO EPSON CORPORATION. No
patent liability is assumed with respect to the use of the information
contained herein. Neither is any liability assumed for damages
resulting from the use of the information contained herein.
Neither SEIKO EPSON CORPORATION nor its affiliates shall be liable
to the purchaser of this product or third parties for damages, losses,
costs, or expenses incurred by purchaser or third parties as a result of:
accident, misuse, or abuse of this product or unauthorized
modifications, repairs, or alterations to this product.
SEIKO EPSON CORPORATION and its affiliates shall not be liable
against any damages or problems arising from the use of any options
or any consumable products other than those designated as Original
EPSON Products or EPSON Approved Products by SEIKO EPSON
CORPORATION.
EPSON is a registered trademark of SEIKO EPSON CORPORATION.
General Notice: Other product names used herein are for identification
purposes only and may be trademarks of their respective companies.
Copyright © 1999 by SEIKO EPSON CORPORATION, Nagano, Japan.
L
Proof Sign-off:
tanto name
leader name
editorname
_______
_______
_______
R4C0460
Rev. C
A5 size
10/4/99
FRONT.FM
Pass 0
Declaration of Conformity
According to ISO/IEC Guide 22 and EN 45014
Manufacturer:
SEIKO EPSON
CORPORATION
Address:
3-5, Owa 3-chome, Suwa-shi,
Nagano-ken 392-8502 Japan
Representative:
EPSON EUROPE B.V.
Address:
Prof. J. H. Bavincklaan 5 1183
AT Amstelveen
The Netherlands
Declares that the Product:
Product Name:
Type B IEEE 1394
Interface Card
Model:
C82372
Conforms to the following Directive(s) and Norm(s):
Directive 89/336/EEC: EN 55022 Class B
EN 50082-1
IEC 801-2
IEC 801-3
IEC 801-4
June 1999
H. Horiuchi
President of EPSON EUROPE B.V.
Proof Sign-off:
tanto name
leader name
editorname
_______
_______
_______
R
R4C0460
Rev. C
A5 size
10/4/99
FRONT.FM
Pass 0
Declaration of Conformity
According to 47CFR, Part 2 and 15 for Class B Personal
Computers and Peripherals and/or CPU Boards and
Power Supplies used with Class B Personal Computers:
We:
EPSON AMERICA, INC.
Located at:
20770 Madrona Avenue
MS: B2-11
Torrance, CA 90503
Telephone : (310)782-5254
Declare under sole responsibility that the product
identified herein, complies with 47CFR, Part 2 and 15 of
the FCC rules as a Class B digital device. Each product
marketed is identical to the representative unit tested,
and found to be compliant with the standards. Records
maintained continue to reflect the equipment being
produced and can be expected to be within the variation
accepted, due to quantity production and testing on a
statistical basis as required by 47CFR §2.909. Operation
is subject to the following two conditions: (1) this device
may not cause harmful interference, and (2) this device
must accept any interference received, including
interference that may cause undesired operation.
Trade Name:
EPSON
Type of Product:
Type B IEEE 1394 Interface Card
Model:
C82372
Proof Sign-off:
tanto name
leader name
editorname
_______
_______
_______
R
R4C0460
Rev. C
A5 size
10/4/99
PARA.FM
Pass 0
Contents
Introduction . . . . . . . . . . . . . . . . . . . . . . . . . 2
Unpacking . . . . . . . . . . . . . . . . . . . . . . . . . . . 4
System Requirements . . . . . . . . . . . . . . . . . 5
Installing the Card . . . . . . . . . . . . . . . . . . . . 7
Connecting to a computer. . . . . . . . . . . . . . 8
Installing the Printer Software . . . . . . . . . . 10
Selectiing a Printer Driver. . . . . . . . . . . . . . 11
About EPSON Monitor 3 . . . . . . . . . . . . . . 12
Technical Specifications . . . . . . . . . . . . . . . 13
Testing the Card . . . . . . . . . . . . . . . . . . . . . . 16
1
L
Proof Sign-off:
tanto name
leader name
editorname
R4C0460
Rev. C
_______
_______
_______
A5 size
10/4/99
PARA.FM
Pass 0
Introduction
This guide explains how to use the Type B IEEE 1394
Interface Card when attached to a printer.
Features
This interface complies with the IEEE 1394 standard,
and is equipped with the following features:
❏
It can be connected to Macintosh® FireWire®
ports. The required printer driver is supplied with
the interface card. The EPSON Monitor 3 utility
can also be used to display the printer status on
the computer.
Note:
DIP switch 10 must be set to ON (advanced mode)
when connecting the printer to a Macintosh. See
page 15.
❏
High-speed data transfer is possible with IEEE
1394, which supports a peak data transfer rate of
400 Mbps.
❏
The cable can be attached or detached without
switching off the power to the computer or
printer.
2
Proof Sign-off:
tanto name
leader name
editorname
❏
_______
_______
_______
R
R4C0460
Rev. C
A5 size
10/4/99
PARA.FM
Pass 0
Multiple IEEE 1394 devices can be connected
simultaneously in a daisy-chain configuration. In
addition to connecting the printer to the computer
as an IEEE 1394 device via the interface card, you
can also use the same interface card to connect
other IEEE 1394 devices.
3
L
Proof Sign-off:
tanto name
leader name
editorname
R4C0460
Rev. C
_______
_______
_______
A5 size
10/4/99
PARA.FM
Pass 0
Unpacking
The C82372✽ option package contains an IEEE 1394
interface card, an interface cable, a printer software
CD-ROM and this user’s guide.
C82372✽ IEEE 1394 interface card
Interface cable
Printer software CD-ROM
User’s Guide
4
Proof Sign-off:
tanto name
leader name
editorname
_______
_______
_______
R
R4C0460
Rev. C
A5 size
10/4/99
PARA.FM
Pass 0
System Requirements
Supported printers
The following printers are available for use with your
interface card:
EPSON Stylus™ PRO 5000, EPSON Stylus PRO 9000,
EPSON Stylus COLOR 900, EPSON Stylus COLOR
1520, EPSON Stylus COLOR 3000 (Jan 1999)
Note:
Consult your dealer for the most up-to-date information on
supported printers.
Required computer environments
Hardware: Power Macintosh G3 equipped with the
IEEE 1394 (FireWire) port as a standard
part, for which operation is guaranteed by
Apple® Computer, or Power Macintosh
G3 equipped with an IEEE 1394 (FireWire)
PCI card, for which operation is
guaranteed by Apple Computer.
OS:
Mac OS 8.5.1 or higher
Note:
DIP switch 10 must be set to ON (advanced mode) when
connecting the printer to a Macintosh. See page 15.
5
L
Proof Sign-off:
tanto name
leader name
editorname
R4C0460
Rev. C
_______
_______
_______
A5 size
10/4/99
PARA.FM
Pass 0
Mode setting
The IEEE 1394 operational mode is set with DIP switch
10. Change the position of the DIP switch as needed.
Note:
The DIP switch 10 must be set to ON (advanced mode)
when connecting the printer to a Macintosh. See page 15.
SW
No.
Function
ON
OFF
Factory
setting
1
Reserved
—
—
ON
2–8
Reserved
—
—
OFF
9
Self test
Self test mode
Nomal operation
mode
OFF
10
Mode
Advanced
Standard
ON
6
Proof Sign-off:
tanto name
leader name
editorname
_______
_______
_______
R
R4C0460
Rev. C
A5 size
10/4/99
PARA.FM
Pass 0
Installing the Card
Follow these steps to attach the interface card to the
printer.
1.
Switch the printer power off, and remove the
power plug from the socket.
2.
If an interface cable is already attached to the
printer, disconnect it.
3.
Attach the interface card to the printer. Refer to
the printer manual for details on attaching the
card.
c
Caution:
Make sure that the printer power plug is removed
from the socket; damage to the printer or interface
card may result.
7
L
Proof Sign-off:
tanto name
leader name
editorname
R4C0460
Rev. C
_______
_______
_______
A5 size
10/4/99
PARA.FM
Pass 0
Connecting to a computer
The interface card is equipped with two cable
connectors. One is used to connect the card to the
computer, and the other is used to connect other IEEE
1394 devices in a daisy chain. Use the cable supplied
when making the connection. The cable can be
connected without switching off the power supply to
the computer or the printer because it complies with
the IEEE 1394 standard. Cables can be connected
whether the printer or computer are on or off.
When connecting the printer directly to a
computer
1.
Connect the cable connector to the computer's
IEEE 1394 port (FireWire port).
2.
The other cable can be connected to any of the
IEEE 1394 ports on the interface card attached to
the printer (any of the ports may be used).
Computer
Printer
8
Proof Sign-off:
tanto name
leader name
editorname
_______
_______
_______
R
R4C0460
Rev. C
A5 size
10/4/99
PARA.FM
Pass 0
When connecting the printer to a computer
with other IEEE 1394 devices
If IEEE 1394 devices are already connected to the
computer, connect the printer so that it is the last IEEE
1394 device in the chain.
Computer
IEEE 1394 device
Printer
Note:
Both ends of the cable supplied have six pins. If IEEE 1394
devices with four-pin connectors are used, a different cable
must be used (a 6:4 converter cable).
Computer
Printer
IEEE 1394 device
Note:
Connect the cable to a vacant IEEE 1394 connector if
additional IEEE 1394 devices are to be connected to the
printer.
9
L
Proof Sign-off:
tanto name
leader name
editorname
R4C0460
Rev. C
_______
_______
_______
A5 size
10/4/99
PARA.FM
Pass 0
Installing the Printer Software
Macintosh printer software in six different languages
are stored in separate folders on the CD-ROM. Install
the printer software for the language you prefer.
1.
Make sure your Macintosh and printer are
connected, and that both are turned on.
2.
Insert your printer software CD-ROM.
3.
Double-click the folder with the language you
want to select.
4.
Double-click the icon for your printer model.
5.
Double-click the Installer icon.
6.
Click Continue to begin the software installation
and then follow the on-screen instruction.
7.
Restart your Macintosh.
10
Proof Sign-off:
tanto name
leader name
editorname
R
R4C0460
Rev. C
_______
_______
_______
A5 size
10/4/99
PARA.FM
Pass 0
Selectiing a Printer Driver
1.
Open the Chooser.
2.
Click the icon for your printer.
3.
Select the FireWire port by clicking on it.
4.
Turn background printing on or off, as
neccessary.
5.
Close the Chooser.
You are now ready to print.
11
L
Proof Sign-off:
tanto name
leader name
editorname
R4C0460
Rev. C
_______
_______
_______
A5 size
10/4/99
PARA.FM
Pass 0
About EPSON Monitor 3
If EPSON Monitor 2 is being used with the printer, it
will automatically be upgraded to EPSON Monitor 3
when the printer software is installed.
The following features have been added:
❏
The Paper Size, Paper Type and Printer Name
can now be confirmed in the printer queue.
❏
Print time can be set from the Specify Print Time
popup window.
❏
Detailed printer driver setting information is now
available.
Note:
You can turn background printing on or off and specify the
print time from the print dialog box.
12
Proof Sign-off:
tanto name
leader name
editorname
R
R4C0460
Rev. C
_______
_______
_______
A5 size
10/4/99
PARA.FM
Pass 0
Technical Specifications
IEEE 1394 Interface
Basic specifications
Data transfer method:
Half-duplex Data/Strobe
differential serial
Synchronization method: Clock synchronization
with DS-Link
Encoding/decoding:
DS-Link
Logic level:
3.3 V
Compatible connectors:
IEEE 1394-1995 compatible
13
L
Proof Sign-off:
tanto name
leader name
editorname
R4C0460
Rev. C
_______
_______
_______
A5 size
10/4/99
PARA.FM
Pass 0
Connector pin signal layout
Pin
number
Signal
name
Function
1
VP
Cable power supply
2
VG
Cable ground
3
TPB*
Strobe during receipt, data during transmission
(differential pair)
4
TPB
5
TPA*
6
TPA
Data during receipt, strobe during transmission
(differential pair)
Power class
Power class code 100
No power supply from external sources
Fitted with a repeat function with bus power
Jumper
Jumper
Default position
JP1
2–3
JP2
2–3
14
Proof Sign-off:
tanto name
leader name
editorname
R
R4C0460
Rev. C
_______
_______
_______
A5 size
10/4/99
PARA.FM
Pass 0
DIP switch
SW No.
Function
ON
OFF
Factory
setting
1
Reserved
—
—
ON
2–8
Reserved
—
—
OFF
9
Self test
Self test mode
Normal
operation mode
OFF
10
Mode
Advanced
Standard
ON
15
L
Proof Sign-off:
tanto name
leader name
editorname
R4C0460
Rev. C
_______
_______
_______
A5 size
10/4/99
PARA.FM
Pass 0
Testing the Card
Run a self test on the card if the printer is not working
normally, or if the interface cannot be connected to
determine if the card is functioning normally.
When you run the self test, the printer prints the
current card settings and the data from addresses
<30>H to <39>H.
Follow these steps to run a self test:
1.
Switch off the printer power and remove the
power plug from the socket.
2.
If an interface cable is connected to the printer,
disconnect it.
3.
Remove the interface card from the printer. Refer
to the printer manual for details.
4.
Set DIP switch 9 on the card’s circuit board to ON.
5.
Reconnect the interface card to the printer. See
your printer manual for details.
6.
Load paper in the printer.
7.
Plug in the power cable and switch the power on
to start the self test.
8.
Switch off the power and remove the power plug
from the socket when self test is complete.
16
Proof Sign-off:
tanto name
leader name
editorname
9.
_______
_______
_______
R
R4C0460
Rev. C
A5 size
10/4/99
PARA.FM
Pass 0
Remove the interface card from the printer. Set
DIP switch 9 on the card’s circuit board to OFF.
10. Reconnect the interface card to the printer.
17