1
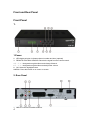
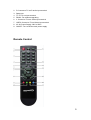
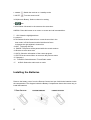
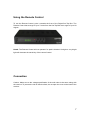
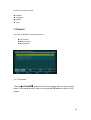
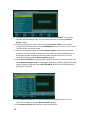
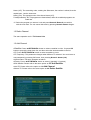
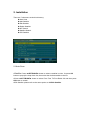
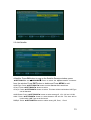
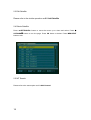
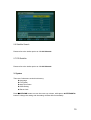
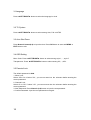
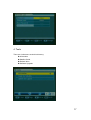
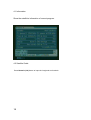
User Manual of Digital Set Top Box
DREAMSAT F210
Please read this User Manual carefully to ensure proper use of this product and keep this
manual for future reference
Important Safety Instructions:
1) Read these instructions, follow all instructions and heed all warnings, also keep these
instructions.
2) The apparatus shall not be exposed to dripping or splashing and that no objects filled
with liquids, such as vase, shall be placed on the apparatus.
3) Turn off the power when you do not use this unit, pull out the plug from outlet if this
apparatus during lighting storms or when unused for long periods of time. When the mains
plug or a coupler is used as the device to cut off power, they shall be removed from power
easily.
4) Do not block any ventilation openings, install in accordance with the instructions.
5) Do not install near any heat sources stoves, or other apparatus (including amplifiers)
that produce heat.
6) Do not defeat the safety purpose of the polarized plug. If the Provided plug does not fit
into your outlet, consult an electrician for replacement of the obsolete outlet.
7) Protected the power cord from being walked on or pinched particularly at plugs, and the
point where it exits from the apparatus.
8) Only use attachments / accessories specified by the manufacturer.
9) Refer all servicing to qualified service personnel. Servicing is required when the
apparatus has been damaged in anyway. Such as power supply cord or plug is damaged,
liquid has been spilled or objects have fallen into the apparatus, the apparatus has been
exposed to rain or moisture, does not operate normally, or has been dropped.
10) The ventilation should not be impeded by covering the ventilation openings with items:
such as newspapers, table-cloth, curtains, etc.
11) No naked flame sources, such as lighted candles, should be placed on the apparatus.
12) Attention should be drawn to the environmental aspects of battery disposal.
13) The use of apparatus in moderate climate.
WARNING: To reduce the risk of fire or electric shock, do not expose this apparatus to rain
or moisture.
WARNING: The batteries shall not be exposed to excessive heat such as sunshine, fire or
the like.
1
The symbol indicates that dangerous voltages constituting a risk of electric shock
are present within this unit.
The symbol indicates that there are important operating and maintenance
instructions in the literature accompanying this unit.
This symbol indicates that this product incorporates double insulation between
hazardous mains voltage and user accessible parts. When servicing use only identical
replacement parts.
CAUTION:
When the apparatus was in electrostatic circumstance, it may be malfunction and need to
reset by user.
2
Content
Important Safety Instructions:.......................................................................................................1
Front and Rear Panel ....................................................................................................................4
Remote Control...............................................................................................................................5
Installing the Batteries ...................................................................................................................6
Using the Remote Control.............................................................................................................7
Connection ......................................................................................................................................7
Main Menu.......................................................................................................................................8
1. Channel ...............................................................................................................................9
1.1 TV Channel ...............................................................................................................9
1.2 Radio Channel........................................................................................................11
1.3 Add Channel ...........................................................................................................11
2. Installation .........................................................................................................................12
2.1Auto Scan.................................................................................................................12
2.2 Add Satellite............................................................................................................13
2.3 Edit Satellite............................................................................................................14
2.4 Delete Satellite .......................................................................................................14
2.5 NIT Search..............................................................................................................14
2.6 Satellite Search ......................................................................................................15
2.7 PID Satellite ............................................................................................................15
3. System...............................................................................................................................15
3.1 Language ................................................................................................................16
3.2 TV System...............................................................................................................16
3.3 Auto Shut Down .....................................................................................................16
3.4 OSD Setting............................................................................................................16
3.5 Parental Lock..........................................................................................................16
4. Tools...................................................................................................................................17
4.1 Information ..............................................................................................................18
4.2 Satellite Guide ........................................................................................................18
4.3 Default Value ..........................................................................................................19
4.4 Software Upgrade..................................................................................................19
Troubleshooting ............................................................................................................................20
Technical Specifications:.............................................................................................................21
3
Front and Rear Panel
Front Panel
1.
1.Power
2. LED display window: Indicates channel number and time (optional)
3. REMOTE CONTROL SENSOR: Receive the signal from the remote control.
4/5. ∧/∨: Navigate through the Menu and change Channel.
6.7. </>: Navigate through the Menu and adjust the volume.
8. OK: Select the highlighted item
9.MENU: Press this button to run menu on screen
2. Rear Panel
1. LNB IN: Connect to satellite antenna.
4
2.
3.
4
5
6
7
8
9
R: Connect to TV set R audio input terminal
Spare port
TV: To TV set input terminal.
RS232: For software upgrading.
L: Conned to TV set L audio input terminal
VIDEO: Conned to TV set Video input terminal.
AC IN: Power Supply 100V to 250V.
ON/OFF: Turn on/off the main power supply.
Remote Control
5
1 .POWER-
:Switch the receiver on / standby mode
2. MUTE -
: Turn the sound on/off.
3.0-9(Numeric Button): Select a channel or setting.
4.
Back
5. 9PIC:Show 9 channels in the screen at the same time.
6.MENU: Press this button to run menu on screen and call command box.
.
7..OK: Select the highlighted item.
8. volume+/9.FAV Selects favorite channel list or current channel list in the
view mode. In Edit Channel mode’s“Add favorite”menu
it changes the right window’s channel list.
10.SAT To display SAT list.
11. PAUSE: The picture will be paused while the sound continue
12.Shortcut to enter auto scan
13. INFO: Show the information of the current program.
14. EXIT: Exit the current Menu or returns to the previous menu
15. Channel+/16.TV/RADIO: Switch between TV and Radio mode
17. AUDIO: Select the audio track or mode.
Installing the Batteries
Remove the battery cover from the Remote Control and put 2xAAA size batteries inside
the compartment. The diagram inside the Battery Compartment shows the correct way to
install the batteries.
6
Using the Remote Control
To use the Remote Control, point it towards the front of the Digital Set Top Box. The
Remote Control has a range of up to 7 meter from the Set Top Box at an angle of up to 60
degree.
Noted: The Remote Control will not operate if its path is blocked. Sunlight or very bright
light will decrease the sensitivity of the remote Control.
Connection
Caution: Make sure to the voltage specification of the wall outlet is the same rating with
the receiver. To prevent the risk of electric shock, do not open the cover or the back of the
receiver
7
Note: When connecting the receiver to other equipment, e.g., TV, VCR and amplifier,
make sure to refer to relevant user manual for instruction. Also, make sure you disconnect
all the equipments from the power before connecting.
Main Menu
Press MENU button to bring up the Main Menu that includes 4 submenus. Press
◄LEFT/RIGHT► button to select the submenu and Press ▲UP/DOWN▼
▼ button to
8
move the cursor up or down .
◆
◆
◆
◆
Channel
Installation
System
Tools
1 Channel
There are 3 submenus under this directory:
TV Channel
Radio Channel
Add Channel
1.1 TV Channel
1.Press ▲UP/DOWN▼
▼ button to select the program that you want to play,
view it in the small window. And you could press OK button to view it in full
screen.
9
9. Select the program you want to Delete and press Numeric Button 1 to mark this
program with the deletion mark. You can cancel this mark by pressing Numeric
Button 1 again.
10. Select the program you want to Move and press Numeric Button 2 to mark this
program with the move mark. Press ▲UP/DOWN▼ button to move the cursor to the
position where you want to locate.
11. Select the preferred program and press Numeric Button 3 to pop up the favorite
group list. In the list, select the group you want to add into and press OK button. A
heart shape symbol will appear and the program is marked as favorite. You can
cancel this mark by pressing Numeric Button 3 again.
12. Press Numeric Button 4 to pop up WWTV window. Move the cursor up or down and
Press Numeric Buttons (0-9) to enter the[TP Frequency], [Symbol Rate], [Video PID],
[Audio PID],[PCR PID] and Press ◄LEFT/RIGHT► button to select [Polarity] as H
(parallel) or V(vertical)
13. Press Numeric Button 5 to mark all programs with the deletion mark. You can
cancel these marks by pressing Numeric Button 5 again.
14. Press Numeric Button 6 to pop up the Sort drop-down list.
10
Name (A-Z): The ascending order, omitting the $character, the number is ahead, then the
capital letter , last the lowercase.
Name (Z-A): The opposite order of the above Name (A-Z).
Free/$(Scramble): All FTA programs are listed ahead, while all scrambled programs are
listed last.
15. Select the program you want to Lock and press Numeric Button 8 to mark this
with the lock mark. You can cancel this mark by pressing Numeric Button 8 again.
1.2 Radio Channel
The same operation as 1.1 TV Channel List.
1.3 Add Channel
●Satellite: Press ◄LEFT/RIGHT► button to select a satellite in circle. Or press OK
button to pop up the drop-down list, and then select the desired satellite in the list.
●TP: Press ◄LEFT/RIGHT► button to select a satellite in circle.
●TP Frequency: This parameter changed when different TP selected. You could enter a
new parameter by pressing OK button, then pressing Numeric button (0-9).
●Symbol Rate: The same operation as above.
●Polarity: Press ◄LEFT/RIGHT► button to select H (parallel) / V(vertical)
●Edit Satellite: Please refer to the same option as 2.2 Add Satellite.
●Add TP: Please refer to the option as 1.3 Add Channel
●Delete TP: Please refer to the same option as 2.4 Delete Satellite
11
2. Installation
There are 7 submenus under this directory:
Auto Scan
Add Satellite
Edit Satellite
Delete Satellite
NIT Search
Satellite Search
PID Satellite
2.1Auto Scan
●Satellite: Press ◄LEFT/RIGHT► button to select a satellite in circle. Or press OK
button to pop up the drop-down list, then select the desired satellite in the list.
●Press ◄LEFT/RIGHT► button to select Free/ Free TV/Free Radio /All and then press
OK button to search.
●Edit Satellite: please refer to the same option as 2.3 Edit Satellite.
12
2.2 Add Satellite
●Satellite: Press OK button to pop up the Satellite Rename window, press
◄LEFT/RIGHT► and ▲UP/DOWN▼
▼ button to select the alphanumeric characters
from the window. Press EXIT button to delete and Press MENU to exit.
●LNB Type: Press ◄LEFT/RIGHT► button to select Standard/Universal/User.
●Freq1: Press ◄LEFT/RIGHT► button to select.
●Freq 2: Press ◄LEFT/RIGHT► button to select .This item will be invalid when LNB Type
set as Standard
●LNB Power: Press ◄LEFT/RIGHT► button to select among off, 13V, 18V and 13/18V.
●22K: Press ◄LEFT/RIGHT► button to select between Off and On. This item will be
invalid when LNB Type set as Universal.
DiSEqC: Press ◄LEFT/RIGHT► button to select among Off, Port1,…Port4.
13
2.3 Edit Satellite
Please refer to the similar operation as 2.2 Add Satellite
2.4 Delete Satellite
Press ◄LEFT/RIGHT► button to move the cursor up or down and select. Press ▲
UP/DOWN▼
▼ button to turn the page. Press OK button to delete. Press MENU/EXIT
button to exit.
2.5 NIT Search
Please refer to the same option as 1.3 Add Channel.
14
2.6 Satellite Search
Please refer to the similar option as 1.3 Add Channel.
2.7 PID Satellite
Please refer to the similar option as 1.3 Add Channel.
3. System
There are 5 submenus under this directory:
Language
TV System
Auto Shut Down
OSD Setting
Parent Lock
Press ▲UP/DOWN button to move the cursor up or down, while press ◄LEFT/RIGHT►
button to change the setting and the setting will take effect immediately.
15
3.1Language
Press ◄LEFT/RIGHT► button to select the language in circle
3.2 TV System
Press ◄LEFT/RIGHT► button to select among Auto, PAL or NTSC
3.3 Auto Shut Down
Press Numeric button(0-9) to input the time. Press OK button to save and MENU or
EXIT button to exit.
3.4 OSD Setting
Menu Color: Press ◄LEFT/RIGHT► button to select among style 1,….,style 5.
Transparence: Press ◄LEFT/RIGHT► button to select among 0%,…,80%.
3.5 Parental Lock
The default password is 0000.
1. Menu Lock:
Select Off or On. If select "On", you can not enter into the submenu before entering the
correct password.
2. Channel Lock:
Select On or Off. If select "On", you can not enter into the submenu before entering the
correct password.
3. New Password: Press Numeric (0-9) button to input the new password.
4. Confirm Password: Input the new password once again.
16
4. Tools
There are 4 submenus under this directory:
Information
Satellite Guide
Default Value
Software Upgrade
17
4.1 Information
Show the satellite’s information of current program.
4.2 Satellite Guide
Press Numeric (0-9) button to input the Longitude and Latitude.
18
4.3 Default Value
If you select OK, all the parameters of this receiver will reset to the default value.
Note: please use this function carefully.
4.4 Software Upgrade
Press ◄LEFT/RIGHT► button to select the upgrade type and mode.
19
Troubleshooting
Problem
No picture
Screen shows “ No
Signal”
No sound from
Speaker
Potential Reasons
Power isn’t connected
The power switch is not on
Connect the power
Switch on the power
Not connect DVB cable
Incorrect setting
Plug in the DVB cable
Set up correct parameter
No or incorrect connection with
audio cable
Mute the sound
Connect the audio cable
correctly
Switch on the correct
Volume control
Try another sound track
Incorrect sound track
Only sound ,no
Image on the screen
Remote control is
not workable
The image stop
suddenly or mosaic
20
What to do
No or Incorrect connection with
AV cable
The program is a radio program
Connect the video cable
correctly
Press TV/Radio button to
shift into TV mode
The battery is exhausted.
Remote control unit is not in
the right opposite of the front
panel or too far from it.
Change new battery.
Adjust the way of holding
remote control unit and get
near to the panel.
The signal is too weak
Strengthen the signal
Technical Specifications:
Item
Sub Item
Parameter
Tuner
Input Frequency
RF Input level
IF Bandwidth
Modulation
950-2150MHz
-65~-25dBm
7MHz,8MHz
QPSK,
Video
Decoder Format
MPEG 2 [email protected]
Audio
Decoder Format
Audio output
MPEG-1(layer1&2)
Digital audio: RCA-L/R
Power
Voltage
Power
100-240V~50 / 60Hz
Max 30W
This symbol on the product or in the instructions means that your electronic equipment
should be disposed at the end of life separately from your Household waste. There are
separate collection systems to recycling. For more information, please contact the local
authority or your retailer where you purchased the product.
21