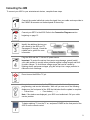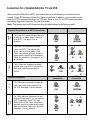
1
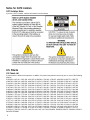
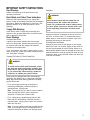
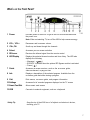
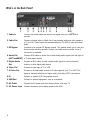
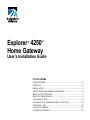
Explorer 4250™
Home Gateway
®
User’s Installation Guide
In This Guide
Safety Information ................................................................................. 2
Safety First ............................................................................................ 6
Explorer eClub ...................................................................................... 6
Explorer 4250 Home Gateway Serial Number ...................................... 6
What’s On the Front Panel? .................................................................. 7
What’s On the Back Panel? .................................................................. 8
Connecting the 4250 ............................................................................ 9
Connections for a Standard-Definition TV and VCR ............................ 10
Performance Tips ............................................................................... 11
Connection Diagrams ........................................................................ 12
Compliance Information ..................................................................... 15
1
Notice for CATV Installers
CATV Installers Notice
If you are a CATV installer, read the information in the box below.
U.S. Patents
U.S. Patents List
A patent notice is affixed to this product. In addition, the product may also be covered by one or more of the following
patents:
4,636,852; 4,641,181; 4,651,208; 4,691,353; 4,698,598; 4,719,642; 4,748,667; 4,829,569; 4,866,770; 4,885,775;
4,888,799; 4,890,319; 4,922,532; 4,965,534; 5,012,510; 5,029,207; 5,045,816; 5,053,883; 5,058,160; 5,142,690;
5,146,526; 5,214,390; 5,225,902; 5,225,925; 5,237,610; 5,239,540; 5,241,610; 5,255,086; 5,257,403; 5,267,071;
5,270,809; 5,271,041; 5,272,752; 5,282,028; 5,285,497; 5,287,351; 5,309,514; 5,319,709; 5,341,425; 5,347,388;
5,347,389; 5,361,156; 5,367,571; 5,379,141; 5,379,145; 5,381,481; 5,390,337; 5,400,401; 5,406,558; 5,418,782;
5,428,404; 5,430,568; 5,434,610; 5,436,749; 5,442,472; 5,455,570; 5,471,492; 5,477,199; 5,477,370; 5,481,389;
5,485,221; 5,493,339; 5,500,758; 5,502,499; 5,506,904; 5,519,780; 5,550,825; 5,579,055; 5,579,057; 5,583,562;
5,596,606; 5,600,378; 5,602,933; 5,640,388; 5,657,414; 5,675,575; 5,715,515; 5,724,525; 5,740,300; 5,742,677;
5,754,940; 5,757,416; 5,771,064; 5,774,859; 5,825,829; 5,826,167; 5,850,305; 5,854,703; 5,870,474; 5,892,607;
5,920,626; 5,923,755; 5,930,024; 5,930,515; 5,937,067; 5,963,352; 5,966,163; 5,982,424; 5,991,139; 5,999,207;
6,005,631; 6,005,938; 6,016,163; 6,028,941; 6,029,046; 6,052,384; 6,055,244; 6,072,532; 6,105,134; 6,148,039;
6,157,719; 6,188,729; 6,195,389; 6,212,278; 6,215,530; 6,219,358; 6,240,103; 6,243,145; 6,246,767; 6,252,964;
6,272,226; 6,292,081; 6,292,568; 6,320,131; 6,374,275; 6,405,239; 6,411,602; 6,417,949; 6,424,714; 6,424,717;
6,433,906; 6,438,139; 6,463,586; 6,467,091; 6,476,878; 6,493,876; 6,510,519; 6,516,002; 6,516,412; 6,526,508;
6,538,595; 6,546,013; 6,560,340; 6,567,118; 6,570,888; 6,622,308; 6,629,227; 6,664,984; 6,667,994; 6,671,879;
6,674,967; 6,678,891; 6,714,598; 6,721,352; 6,721,956; 6,725,459; 6,738,982; 6,744,892; 6,744,967; 6,751,271;
6,760,918; 6,795,972; 6,802,077; 6,804,708; 6,811,447; 6,817,028; D348065; D354959; D359737; D363932; D390217;
D434753; RE36988
2
IMPORTANT SAFETY INSTRUCTIONS
Heed Warnings
Adhere to all warnings on the product and in the
operating instructions.
Read, Retain, and Follow These Instructions
Read all of the instructions before you operate this
product. Follow all operating instructions that accompany
this product. Retain the instructions for future use. Give
particular attention to all safety precautions. Power
Warnings
Comply With Warnings
Avoid electric shock. Comply with all warnings and
cautions in the operating instructions, as well as those
that are affixed to this product.
Power Warnings
Providing a Power Source
A label on this product indicates the correct power
source for this product. Operate this product only from
an electrical outlet with the voltage and frequency
indicated on the product label.
If you are uncertain of the type of power supply to your
home or business, consult your cable service provider or
your local power company.
Grounding This Product (U.S.A. and Canada Only)
Overloading
WARNING:
Avoid electric shock and fire hazard! Do not
overload mains AC outlets and extension
cords. For products that require battery power
or other power sources to operate them, refer
to the operating instructions for those products.
Do not overload electrical outlets, extension cords, or
integral convenience receptacles as this can result in a
risk of fire or electric shock. For products that require
battery power or other sources to operate, refer to the
operating instructions for that product.
Preventing Power Cord Damage
Arrange all power cords so that people or pets cannot
walk on the cords. Do not place objects on the cords. Do
not lean objects against the cords. Placing objects on or
leaning objects against cords can damage the cords. Give
particular attention to cords at the point at which the cord
connects to plugs, at the electrical outlets, and where the
cords exit the product.
WARNING:
To avoid electric shock and fire hazard, match
the plug and outlet connections carefully, then
fully insert. If the plug and outlet do not match,
or you cannot fully insert the plug, contact an
electrician to update your power outlets.
If this product is equipped with either a three-prong
(grounding pin) safety plug or a two-prong (polarized)
safety plug, follow these safety guidelines to properly
ground this product:
• For a 3-prong plug (one prong on this plug is a
protective grounding pin), insert the plug into a
grounded mains, 3-prong outlet.
Note: This plug fits only one way. If you are unable to
insert this plug fully into the outlet, contact your
electrician to replace your obsolete outlet.
• For a 2-prong plug (a polarized plug with one wide
blade and one narrow blade), insert the plug into a
polarized mains, 2-prong outlet in which one socket is
wider than the other.
Note: If you are unable to insert this plug fully into the
outlet, try reversing the plug. If the plug still fails to fit,
contact an electrician to replace your obsolete outlet.
3
IMPORTANT SAFETY INSTRUCTIONS, continued
Providing Ventilation
This product has openings for ventilation that protect it
from overheating. To ensure the reliability of this product,
do the following:
• Do not block or cover these openings.
• Do not place entertainment devices (such as VCRs or
DVDs), lamps, books, vases with liquids, or other
objects on top of this product.
• Do not place this product in any of the following
locations:
- On a bed, sofa, rug, or similar surface
Protecting This Product From Foreign Objects and Water or Moisture
Damage
WARNING:
Avoid electric shock and fire hazard! Never
push objects through the openings in this
product. Foreign objects can cause electrical
shorts that can result in electric shock or fire.
Do not expose this product to rain or moisture.
Do not place objects filled with liquid, such as
vases, on this product.
- Near heat sources such as radiators, heat registers,
stoves, or other products (including amplifiers) that
produce heat
Never push objects of any kind into this product through
openings as they may touch dangerous voltage points or
short out parts that could result in a fire or electric shock.
- In an enclosure, such as a bookcase or rack, unless
the installation provides proper ventilation
Do not expose this product to liquids or moisture. Do not
place this product on a wet surface. Do not spill liquids on
or near this product.
Selecting a Proper Location
WARNING:
Do not use this product near water (such as a bathtub,
washbowl, sink, or laundry tub), in a wet basement, or
near a swimming pool.
Accessories Warnings
Avoid personal injury and damage to this
product! An unstable surface may cause this
product to fall.
Place this product in a location that is close enough to an
electrical outlet and where the power cord is easily
accessible to be disconnected from the wall outlet or from
the rear panel of the product.
Important: The power cord is the mains power supply
disconnect device.
Place this product on a stable surface. The surface must
support the size and weight of this product.
Cleaning This Product
WARNING:
Avoid electric shock! Unplug this product
before cleaning.
Before cleaning this product, unplug it from the electrical
outlet. Use a damp cloth to clean this product. Do not use
a liquid cleaner or an aerosol cleaner. Do not use a
magnetic/static cleaning device (dust remover) to clean
this product.
4
WARNING:
Avoid any potential for electric shock or fire.
Do not use accessories with this product
unless recommended by your cable service
provider.
Do not use accessories with this product unless
recommended by your cable service provider.
IMPORTANT SAFETY INSTRUCTIONS, continued
Service Warnings
Servicing This Product
WARNING:
Avoid electric shock! Opening or removing the
cover may expose you to dangerous voltages.
This product contains no user-serviceable
parts. Refer all servicing to qualified service
personnel.
Do not open the cover of this product. If you open the
cover, your warranty will be void. Refer all servicing to
qualified personnel only. Contact your cable service
provider for instructions.
Obtaining Service for Product Damage
For damage that requires service, unplug this product
from the AC outlet. Then, contact your cable service
provider or qualified service personnel to obtain service
for the following conditions:
• If there is damage to the power-supply cord or plug
• If liquid enters this product
• If you expose this product to rain or water
• If you drop this product, a heavy object falls on this
product, or damage occurs to the cover of this product
• If this product does not operate normally by following
the operating instructions
• If this product exhibits a distinct change in performance
Lightning
For added protection for this product during a lightning
storm, or when it is left unattended and unused for long
periods of time, unplug it from the wall outlet and
disconnect the antenna or cable system. This will prevent
damage to the product due to lightning and power-line
surges. Plugging this product into a surge protector may
reduce the risk of damage.
Note: Unplugging this product for an extended period of
time can result in loss of authorization. For reauthorization, contact your cable service provider.
Power Lines
WARNING:
Checking Product Safety
Upon completion of any service or repairs to this product,
the service technician must perform safety checks to
determine that this product is in proper operating
condition.
Outdoor Grounding System
If this product connects to an outdoor antenna or cable
system, be sure the antenna or cable system is grounded
(earthed). This provides some protection against voltage
surges and built-up static charges.
Article 810 of the National Electric Code (NEC) ANSI/NFPA
No. 70-1990, provides the following information:
* Grounding of the mast and supporting structure
To avoid electric shock, do not locate an
outside antenna system in the vicinity of
overhead power lines or power circuits.
Do not locate an outside antenna system in the vicinity of
overhead power lines or power circuits. When installing
an outside antenna system, take extreme care to keep
from touching power lines or circuits, as contact might be
fatal.
20050719STBD
* Grounding the lead-in wire to an antenna discharge unit
* Size of the grounding conductors
* Location of the antenna-discharge unit
* Connection to grounding electrodes
* Requirements for the grounding electrodes (see the
following antenna grounding diagram as recommended
by NEC ANSI/NFPA 70)
5
Safety First
Before using the Explorer® 4250™ Home Gateway, read the Important Safety Instructions
section of this guide. Follow the instructions to install the 4250, to become familiar with the
buttons on the front panel, and to access your cable services. Then, enjoy the features of the
4250!
Explorer eClub
(www.scientificatlanta.com/explorerclub)
Get more information about the 4250 and see additional connection diagrams on the online
Explorer eClub. On the Explorer eClub site you can get “how to” tips on using the 4250, such
as setting up your favorite channels, blocking programs that are inappropriate for children, and
using the remote control to turn on more than one of your electronic devices. There is also a
section with answers to frequently asked questions. To join and access the online Explorer
eClub enter the model number shown on the front panel (4250).
Explorer 4250 Home Gateway Serial Number
If the 4250 requires troubleshooting in the future, your cable service provider may ask for the
serial number. The serial number is on the back panel; it begins with “SA” and is located in the
lower left corner of the bar code. Use the space provided here to record the serial number:
____________________________________________
6
What’s on the Front Panel?
1 Power
Provides power to the 4250. A light in the LED area illuminates when
the power is on
Note: When not watching TV, turn off the 4250 to help conserve energy.
2 VOL-, VOL+
Decreases and increases volume
3 CH+, CH-
Scrolls up and down through the channels
4 Select
Accesses your on-screen selection
5 IR Sensor
Receives the infrared signal from the remote control
6 LED Display
Displays the selected channel number and time of day. The LED also
displays the following:
)
• Message (
• BYPASS - Indicates when the optional RF Bypass module is activated
• Power (
)
7 Guide
Accesses on-screen services, such as the on-screen guide,
video-on-demand, or pay-per-view
8 Info
Displays a description of the selected program. Available from the
on-screen guide and while viewing a program
9 Exit
Exits menus, on-screen guide, and program information
10 Settings
Accesses list of recorded programs displayed on the TV screen
11 Smart Card Slot
Allows smart card access
12 USB
Connects to external equipment, such as a keyboard
Safety Tip
Keep the top of the 4250 free of all objects and electronic devices,
including your TV.
7
What’s on the Back Panel?
1 Cable In
Connect the coaxial cable that delivers the signal from your cable service
provider.
2 Cable Out
Connect a coaxial cable to Cable Out to send analog audio and video signals to
a TV or VCR. These signals are standard-definition TV (SDTV) video and stereo
audio.
3 RF Bypass
Connects to an optional RF Bypass module. This module allows you to view one
channel while recording another. Contact your cable service provider to see if
this service is available.
4 Audio Out
Connect RCA cables to Audio Out to send analog audio signals (left and right) to
(LEFT and RIGHT) a TV with stereo outputs.
5 Digital Audio
Out
Connect an RCA cable to send a digital audio signal to a surround-sound
receiver or other digital audio device.
6 Video Out
Connect to video input of TV or VCR.
7 S-Video Out
Connect an S-Video cable to send an S-Video signal to your TV or VCR. This
signal is standard definition but higher quality than other SDTV connections.
8 IR
Connect to optional VCR Commander service.
9 USB Port
Connect to external equipment, such as a keyboard.
10 AC Outlet
Connect the AC power cord from another device, such as a TV.
11 AC Power Input
Connect the power cord to deliver power to the 4250.
8
Connecting the 4250
To connect your 4250 to your entertainment devices, complete these steps.
Connect the coaxial cable that carries the signal from your cable service provider to
the CABLE IN connector on the back panel of the set-top.
1
2
3
Connect your SDTV to the 4250. Refer to the Connection Diagrams section
beginning on page 12.
Identify the additional devices you
will connect to the 4250 and TV.
See pages 12 through 14 and the
related user’s guides for more
information.
VCR
Home Theater
DVD
Other
Plug the 4250 and the TV into an AC power source.
4
POWER
Important: To protect the set-top from power surge damage, ground (earth)
your cable product to provide some protection against voltage surges and builtup static charges. To avoid these voltage surges that can be caused by
lightning storms and power outages, plug the set-top into a surge protector to
reduce the risk of damage.
Do not turn on the 4250 or TV yet.
5
It may take several minutes for the 4250 to receive the latest software,
programming, and service information. Wait until you see one of the following
displays on the front panel of the 4250 that indicates that the update is complete:
6
•
Current time
•
Four dashes (- - - -)
Note: If four dashes are displayed, your 4250 is not authorized. Call your cable
service provider.
To begin watching TV, turn the TV on, and press POWER on the front panel of the
4250 or on the remote control.
7
9
Connections for a Standard-Definition TV and VCR
When using the 4250 with an SDTV, you must make one of the following connections to view
content. Some SDTVs may not have all of these connections. In addition, you can make connections to a VCR to archive recordings to a VCR tape. Refer to your TV and VCR user’s guide and
the cabling diagrams in this guide for more information.
Note: The labeling on your 4250 may vary from the labels shown in the following table.
Cable
Out
The Video Out connection provides
video to an SDTV. The left and right
audio outputs provide stereo sound.
These connections generally provide a
higher-quality signal than the standard
Cable Out connection. See page 12 for
an example.
S-Video
The Cable Out connection provides both
a video and a stereo audio connection
to an SDTV. See page 12 for an
example.
Video
Required Connections to an SDTV (choose one)
The S-Video out connection provides
optimal video to an SDTV. The left and
right audio outputs provide stereo
sound.
VCR
Optional Connections
The Cable Out connection provides the
video and stereo audio connection to
the VCR. See page 13 for an example.
4250
Connections
CABLE
CABLE
OUT
OUT
OUT 2
LA
L U
D
RI
RO
VIDEO
VIDEO
OUT
SDTV
Connections
CABLE/
CABLE
IN/
ANT IN
ANTENNA
L
L
R
R
AUDIO 1 VIDEO
AUDIO
VIDEO
OUT
IN
IN
IN
L
L
L
L
R
R
AUDIO
OUT
S-VIDEO
S-VIDEO
OUT
OUT
4250
Connections
CABLE
CABLE
OUT
OUT
R
S-VIDEO
R
S-VIDEO
OUT
IN
AUDIO 1
AUDIO
OUT
IN
VCR
Connections
CABLE/
CABLE
IN/
ANT IN
ANTENNA
Stereo
VCR
OUT 2
10
For VCRs that have Video and Left and
Right audio connectors, you can use the
OUT 2 connectors (Video, Left, and
Right) on the 4250. These connections
generally provide a higher-quality signal
than the standard Cable Out connection.
See page 13 for an example.
LA
L U
D
RI
RO
VIDEO
VIDEO
OUT
L
R
VIDEO AUDIO
AUDIO
VIDEO
IN
IN
IN
IN
Performance Tips
If the 4250 does not perform as expected, the following tips may help. If you need further assistance,
contact your cable service provider.
No Picture
•
Verify that the power to your TV is turned on.
•
If the 4250 is plugged into a wall switch, verify the wall switch is in the ON position.
•
Verify that all cables are properly connected.
•
If your system includes a VCR or stereo, verify that you have properly connected them to the 4250.
Note: You should avoid plugging the 4250 into an outlet that is controlled by a wall switch.
No Color
•
Verify that the current TV program is broadcast in color.
•
Adjust the TV color controls.
•
Verify that the TV is set to the proper input channel.
No Sound
•
If your setup includes a stereo, verify that you have properly connected it to the 4250.
•
Verify that the volume is turned up.
•
Verify that the mute function is not engaged.
•
Check your secondary audio programming (SAP) settings.
Automatic Software Updates
The TV screen may display a message that indicates the 4250 is automatically updating its software.
Should this occur, wait for the time to display on the front panel of your 4250 before continuing. When
the front panel displays the time, the update is complete.
Frequently Asked Questions
Where Are the Connection Diagrams?
The diagrams are on pages 12 through 14 of this guide. The diagrams show examples of common
ways to connect the 4250 to your TV, VCR, and home theater receiver. However, these diagrams do not
show every possible combination of devices. Refer to the user’s guides that came with your other
electronic devices for further information.
The online Explorer eClub also provides connection diagrams for the 4250. See The Explorer eClub on
page 6 for more information.
What Cables Do I Need?
The connection diagrams in this guide indicate which kind of cables are required for each connection.
Some of the cables and adaptors shown in the diagrams may not be included with the 4250.
11
Connection Diagrams
Connecting the 4250 to a TV
WARNING:
Electric shock hazard!
Unplug all electronic
devices before
connecting or disconnecting any device
cables for the 4250.
Connecting the 4250 to a TV Using Video Out and Audio Out
WARNING:
Electric shock hazard!
Unplug all electronic
devices before
connecting or disconnecting any device
cables for the 4250.
12
Connecting the 4250 to a TV and VCR
WARNING:
Electric shock hazard!
Unplug all electronic
devices before
connecting or disconnecting any device
cables for the 4250.
Connecting the 4250 to a TV and VCR Using Video Out and Audio Out
WARNING:
Electric shock hazard!
Unplug all electronic
devices before
connecting or disconnecting any device
cables for the 4250.
13
Connecting the 4250 to a Home Theater Receiver and TV
WARNING:
Electric shock hazard!
Unplug all electronic
devices before
connecting or disconnecting any device
cables for the 4250.
14
Compliance Information
United States FCC Compliance
Canada EMI Regulation
This equipment has been tested and found to comply
with the applicable limits of Part 15 of the FCC Rules.
These limits are designed to provide reasonable
protection against harmful interference in a residential
installation. This equipment generates, uses, and can
radiate radio frequency energy and, if not installed and
used in accordance with the instructions, may cause
harmful interference to radio or TV reception, which can
be determined by turning the equipment off and on. The
user is encouraged to try to correct the interference by
one or more of the following measures:
• Increase the separation between the
equipment and receiver
• Connect the equipment into an outlet on a circuit
different from that to which the receiver is connected
• Consult your cable company or an experienced radio/
TV technician for help
Any changes or modifications not expressly
approved by Scientific-Atlanta could void the user’s
authority to operate the equipment.
Important: The information shown in the FCC
Declaration of Conformity paragraph below is a requirement of the FCC and is intended to supply you with
information regarding the FCC approval of this device.
The phone numbers listed are for
FCC-related questions only and not intended for
questions regarding the connection or operation for this
device. Please contact your cable service provider for
any questions you may have regarding the operation or
installation of this device.
This Class B digital apparatus complies with
Canadian ICES-003.
Cet appareil numérique de la class B est conforme à la
norme NMB-003 du Canada.
Software and Firmware Use
Scientific-Atlanta, Inc. owns copyrights to the software
included in your set-top and furnishes the software to
your cable service provider under a license agreement.
You may only use or copy this software in accordance
with the terms of your cable service provider.
Scientific-Atlanta, Inc. owns copyrights to the firmware
in this equipment. You may only use the firmware in the
equipment in which it is provided. Any reproduction or
distribution of this firmware, or any portion of it, without
the express written consent of Scientific-Atlanta, Inc. is
prohibited.
Trademarks
Scientific-Atlanta, the Scientific-Atlanta logo, and
Explorer are registered trademarks of Scientific-Atlanta,
Inc. 4250 is a trademark of Scientific-Atlanta, Inc. All
other trademarks shown are trademarks of their
respective owners.
Disclaimer
Scientific-Atlanta, Inc. assumes no responsibility for
errors or omissions that may appear in this guide.
Scientific-Atlanta reserves the right to change this guide
at any time without notice.
FCC Declaration of Conformity
This device complies with Part 15 of the FCC Rules.
Operation is subject to the following two conditions:
1) this device may not cause harmful interference, and
2) this device must accept any interference received,
including interference that may cause undesired
operation.
EXPLORER® 4250
Digital Home Communications Terminal:
Model 4250
Manufactured by: Scientific-Atlanta, Inc.;
5030 Sugarloaf Parkway;
Lawrenceville, Georgia 30044; USA
Telephone 770-236-1077
15
United States: Scientific-Atlanta, Inc.
5030 Sugarloaf Parkway, Box 465447
© 2005 Scientific-Atlanta, Inc. All rights reserved. Printed in USA
October 2005
16
Lawrenceville, GA 30042
www.scientificatlanta.com
Part Number 4009374 Rev A