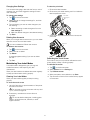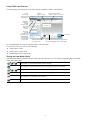
1
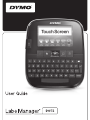
Copyright © 2011 Sanford, L.P. All rights reserved. No part of this document or the software may be reproduced or transmitted in any form or by any means or translated into another language without the prior written consent of Sanford, L.P. Trademarks DYMO, DYMO Label, and LabelManager are registered marks in the US and other countries. All other trademarks are the property of their respective holders. “Sans” is a DejaVu font. The DejaVu fonts are based on Vera fonts copyright © by Bitstream, Inc. Glyphs in the DejaVu fonts imported from Arev fonts are copyright © by Tavmjong Bah. All Rights Reserved. Contents About Your New Label Maker . . . . . . . . . . . . . . . . . . . . . . . . . . . . . . . . . . . . . . . . . . . . . . . . . . . . . . . 6 Registering Your Label Maker . . . . . . . . . . . . . . . . . . . . . . . . . . . . . . . . . . . . . . . . . . . . . . . . . . . . . . . . . . . . . . . . . . . . . . . . . 6 Getting Started . . . . . . . . . . . . . . . . . . . . . . . . . . . . . . . . . . . . . . . . . . . . . . . . . . . . . . . . . . . . . . . . . . 6 Connecting the Power . . . . . . . . . . . . . . . . . . . . . . . . . . . . . . . . . . . . . . . . . . . . . . . . . . . . . . . . . . . . . . . . . . . . . . . . . . . . . . 6 Inserting the Battery Pack . . . . . . . . . . . . . . . . . . . . . . . . . . . . . . . . . . . . . . . . . . . . . . . . . . . . . . . . . . . . . . . . . . . . . . . . 6 Removing the Battery Pack . . . . . . . . . . . . . . . . . . . . . . . . . . . . . . . . . . . . . . . . . . . . . . . . . . . . . . . . . . . . . . . . . . . . . . . 6 Charging the Battery Pack . . . . . . . . . . . . . . . . . . . . . . . . . . . . . . . . . . . . . . . . . . . . . . . . . . . . . . . . . . . . . . . . . . . . . . . 6 Inserting the Label Cassette . . . . . . . . . . . . . . . . . . . . . . . . . . . . . . . . . . . . . . . . . . . . . . . . . . . . . . . . . . . . . . . . . . . . . . . . . . 6 Using the Label Maker for the First Time . . . . . . . . . . . . . . . . . . . . . . . . . . . . . . . . . . . . . . . . . . . . . . 7 Getting to Know the Label Maker . . . . . . . . . . . . . . . . . . . . . . . . . . . . . . . . . . . . . . . . . . . . . . . . . . . . 7 Power . . . . . . . . . . . . . . . . . . . . . . . . . . . . . . . . . . . . . . . . . . . . . . . . . . . . . . . . . . . . . . . . . . . . . . . . . . . . . . . . . . . . . . . . . . 7 Home . . . . . . . . . . . . . . . . . . . . . . . . . . . . . . . . . . . . . . . . . . . . . . . . . . . . . . . . . . . . . . . . . . . . . . . . . . . . . . . . . . . . . . . . . . . 7 Touch Screen Display . . . . . . . . . . . . . . . . . . . . . . . . . . . . . . . . . . . . . . . . . . . . . . . . . . . . . . . . . . . . . . . . . . . . . . . . . . . . . . . 7 Navigation Keys . . . . . . . . . . . . . . . . . . . . . . . . . . . . . . . . . . . . . . . . . . . . . . . . . . . . . . . . . . . . . . . . . . . . . . . . . . . . . . . . . . . 7 Caps Lock . . . . . . . . . . . . . . . . . . . . . . . . . . . . . . . . . . . . . . . . . . . . . . . . . . . . . . . . . . . . . . . . . . . . . . . . . . . . . . . . . . . . . . . 7 Shift . . . . . . . . . . . . . . . . . . . . . . . . . . . . . . . . . . . . . . . . . . . . . . . . . . . . . . . . . . . . . . . . . . . . . . . . . . . . . . . . . . . . . . . . . . . . 7 Backspace . . . . . . . . . . . . . . . . . . . . . . . . . . . . . . . . . . . . . . . . . . . . . . . . . . . . . . . . . . . . . . . . . . . . . . . . . . . . . . . . . . . . . . . 8 Delete . . . . . . . . . . . . . . . . . . . . . . . . . . . . . . . . . . . . . . . . . . . . . . . . . . . . . . . . . . . . . . . . . . . . . . . . . . . . . . . . . . . . . . . . . . 8 Using the Touch Screen . . . . . . . . . . . . . . . . . . . . . . . . . . . . . . . . . . . . . . . . . . . . . . . . . . . . . . . . . . . 8 Making a Selection . . . . . . . . . . . . . . . . . . . . . . . . . . . . . . . . . . . . . . . . . . . . . . . . . . . . . . . . . . . . . . . . . . . . . . . . . . . . . . . . . 8 Selecting Text . . . . . . . . . . . . . . . . . . . . . . . . . . . . . . . . . . . . . . . . . . . . . . . . . . . . . . . . . . . . . . . . . . . . . . . . . . . . . . . . . . . . 8 Scrolling a List . . . . . . . . . . . . . . . . . . . . . . . . . . . . . . . . . . . . . . . . . . . . . . . . . . . . . . . . . . . . . . . . . . . . . . . . . . . . . . . . . . . . 8 Editing Your Label . . . . . . . . . . . . . . . . . . . . . . . . . . . . . . . . . . . . . . . . . . . . . . . . . . . . . . . . . . . . . . . 8 Selecting the Font . . . . . . . . . . . . . . . . . . . . . . . . . . . . . . . . . . . . . . . . . . . . . . . . . . . . . . . . . . . . . . . . . . . . . . . . . . . . . . . . . 8 Changing the Font Type . . . . . . . . . . . . . . . . . . . . . . . . . . . . . . . . . . . . . . . . . . . . . . . . . . . . . . . . . . . . . . . . . . . . . . . . . 9 Changing the Font Size . . . . . . . . . . . . . . . . . . . . . . . . . . . . . . . . . . . . . . . . . . . . . . . . . . . . . . . . . . . . . . . . . . . . . . . . . . 9 Changing the Font Style . . . . . . . . . . . . . . . . . . . . . . . . . . . . . . . . . . . . . . . . . . . . . . . . . . . . . . . . . . . . . . . . . . . . . . . . . 9 Inserting Special Characters, Auto-Text, and Barcodes . . . . . . . . . . . . . . . . . . . . . . . . . . . . . . . . . . . . . . . . . . . . . . . . . . . . . 9 Inserting Symbols . . . . . . . . . . . . . . . . . . . . . . . . . . . . . . . . . . . . . . . . . . . . . . . . . . . . . . . . . . . . . . . . . . . . . . . . . . . . . . 9 Inserting Clip Art . . . . . . . . . . . . . . . . . . . . . . . . . . . . . . . . . . . . . . . . . . . . . . . . . . . . . . . . . . . . . . . . . . . . . . . . . . . . . . . 9 Using Auto-Numbering . . . . . . . . . . . . . . . . . . . . . . . . . . . . . . . . . . . . . . . . . . . . . . . . . . . . . . . . . . . . . . . . . . . . . . . . . . 9 Inserting the Date and Time . . . . . . . . . . . . . . . . . . . . . . . . . . . . . . . . . . . . . . . . . . . . . . . . . . . . . . . . . . . . . . . . . . . . . . 9 Inserting Barcodes . . . . . . . . . . . . . . . . . . . . . . . . . . . . . . . . . . . . . . . . . . . . . . . . . . . . . . . . . . . . . . . . . . . . . . . . . . . . 10 Inserting Days, Months, or Quarters . . . . . . . . . . . . . . . . . . . . . . . . . . . . . . . . . . . . . . . . . . . . . . . . . . . . . . . . . . . . . . . 10 Inserting International Characters . . . . . . . . . . . . . . . . . . . . . . . . . . . . . . . . . . . . . . . . . . . . . . . . . . . . . . . . . . . . . . . . . 11 Using Word Suggestions . . . . . . . . . . . . . . . . . . . . . . . . . . . . . . . . . . . . . . . . . . . . . . . . . . . . . . . . . . . . . . . . . . . . . . . . . . . 11 Editing the Label Layout . . . . . . . . . . . . . . . . . . . . . . . . . . . . . . . . . . . . . . . . . . . . . . . . . . . . . . . . . . . . . . . . . . . . . . . . . . . . 11 Adding Borders . . . . . . . . . . . . . . . . . . . . . . . . . . . . . . . . . . . . . . . . . . . . . . . . . . . . . . . . . . . . . . . . . . . . . . . . . . . . . . . 11 Aligning the Text . . . . . . . . . . . . . . . . . . . . . . . . . . . . . . . . . . . . . . . . . . . . . . . . . . . . . . . . . . . . . . . . . . . . . . . . . . . . . . 11 Using Mirror Text . . . . . . . . . . . . . . . . . . . . . . . . . . . . . . . . . . . . . . . . . . . . . . . . . . . . . . . . . . . . . . . . . . . . . . . . . . . . . . 11 Using Vertical Text . . . . . . . . . . . . . . . . . . . . . . . . . . . . . . . . . . . . . . . . . . . . . . . . . . . . . . . . . . . . . . . . . . . . . . . . . . . . 12 Creating Fixed-Length Labels . . . . . . . . . . . . . . . . . . . . . . . . . . . . . . . . . . . . . . . . . . . . . . . . . . . . . . . . . . . . . . . . . . . . 12 Using the Label Maker Memory . . . . . . . . . . . . . . . . . . . . . . . . . . . . . . . . . . . . . . . . . . . . . . . . . . . . 12 Saving a Label . . . . . . . . . . . . . . . . . . . . . . . . . . . . . . . . . . . . . . . . . . . . . . . . . . . . . . . . . . . . . . . . . . . . . . . . . . . . . . . . . . . 12 Downloading Labels . . . . . . . . . . . . . . . . . . . . . . . . . . . . . . . . . . . . . . . . . . . . . . . . . . . . . . . . . . . . . . . . . . . . . . . . . . . . . . . 12 Using Saved Labels . . . . . . . . . . . . . . . . . . . . . . . . . . . . . . . . . . . . . . . . . . . . . . . . . . . . . . . . . . . . . . . . . . . . . . . . . . . . . . . 12 Managing Labels on Your Label Maker . . . . . . . . . . . . . . . . . . . . . . . . . . . . . . . . . . . . . . . . . . . . . . . . . . . . . . . . . . . . . . . . . 12 Viewing Saved Labels . . . . . . . . . . . . . . . . . . . . . . . . . . . . . . . . . . . . . . . . . . . . . . . . . . . . . . . . . . . . . . . . . . . . . . . . . . 12 Creating New Folders . . . . . . . . . . . . . . . . . . . . . . . . . . . . . . . . . . . . . . . . . . . . . . . . . . . . . . . . . . . . . . . . . . . . . . . . . . 12 Deleting Labels and Folders . . . . . . . . . . . . . . . . . . . . . . . . . . . . . . . . . . . . . . . . . . . . . . . . . . . . . . . . . . . . . . . . . . . . . 12 Clearing Recently Printed Labels . . . . . . . . . . . . . . . . . . . . . . . . . . . . . . . . . . . . . . . . . . . . . . . . . . . . . . . . . . . . . . . . . . 13 Managing Custom Clip Art . . . . . . . . . . . . . . . . . . . . . . . . . . . . . . . . . . . . . . . . . . . . . . . . . . . . . . . . . . . . . . . . . . . . . . . . . . 13 Printing Options . . . . . . . . . . . . . . . . . . . . . . . . . . . . . . . . . . . . . . . . . . . . . . . . . . . . . . . . . . . . . . . . 13 Printing a Series of Labels . . . . . . . . . . . . . . . . . . . . . . . . . . . . . . . . . . . . . . . . . . . . . . . . . . . . . . . . . . . . . . . . . . . . . . . . . . 13 Printing Multiple Copies . . . . . . . . . . . . . . . . . . . . . . . . . . . . . . . . . . . . . . . . . . . . . . . . . . . . . . . . . . . . . . . . . . . . . . . . . . . . 13 Turning off Auto-Cut . . . . . . . . . . . . . . . . . . . . . . . . . . . . . . . . . . . . . . . . . . . . . . . . . . . . . . . . . . . . . . . . . . . . . . . . . . . . . . . 14 Printing Cut Marks Between Labels . . . . . . . . . . . . . . . . . . . . . . . . . . . . . . . . . . . . . . . . . . . . . . . . . . . . . . . . . . . . . . . . . . . 14 Customizing Your Label Maker . . . . . . . . . . . . . . . . . . . . . . . . . . . . . . . . . . . . . . . . . . . . . . . . . . . . 14 Changing the Language . . . . . . . . . . . . . . . . . . . . . . . . . . . . . . . . . . . . . . . . . . . . . . . . . . . . . . . . . . . . . . . . . . . . . . . . . . . . 14 Changing the Units of Measure . . . . . . . . . . . . . . . . . . . . . . . . . . . . . . . . . . . . . . . . . . . . . . . . . . . . . . . . . . . . . . . . . . . . . . 14 Changing the Label Width . . . . . . . . . . . . . . . . . . . . . . . . . . . . . . . . . . . . . . . . . . . . . . . . . . . . . . . . . . . . . . . . . . . . . . . . . . 14 Changing the Default Font . . . . . . . . . . . . . . . . . . . . . . . . . . . . . . . . . . . . . . . . . . . . . . . . . . . . . . . . . . . . . . . . . . . . . . . . . . 14 Changing the Screen Settings . . . . . . . . . . . . . . . . . . . . . . . . . . . . . . . . . . . . . . . . . . . . . . . . . . . . . . . . . . . . . . . . . . . . . . . 14 Working with User Accounts . . . . . . . . . . . . . . . . . . . . . . . . . . . . . . . . . . . . . . . . . . . . . . . . . . . . . . 14 Creating User Accounts . . . . . . . . . . . . . . . . . . . . . . . . . . . . . . . . . . . . . . . . . . . . . . . . . . . . . . . . . . . . . . . . . . . . . . . . . . . . 14 Changing User Settings . . . . . . . . . . . . . . . . . . . . . . . . . . . . . . . . . . . . . . . . . . . . . . . . . . . . . . . . . . . . . . . . . . . . . . . . . . . . 15 Deleting User Accounts . . . . . . . . . . . . . . . . . . . . . . . . . . . . . . . . . . . . . . . . . . . . . . . . . . . . . . . . . . . . . . . . . . . . . . . . . . . . 15 Maintaining Your Label Maker . . . . . . . . . . . . . . . . . . . . . . . . . . . . . . . . . . . . . . . . . . . . . . . . . . . . . 15 Cleaning Your Label Maker . . . . . . . . . . . . . . . . . . . . . . . . . . . . . . . . . . . . . . . . . . . . . . . . . . . . . . . . . . . . . . . . . . . . . . . . . . 15 Calibrating the Touch Screen . . . . . . . . . . . . . . . . . . . . . . . . . . . . . . . . . . . . . . . . . . . . . . . . . . . . . . . . . . . . . . . . . . . . . . . . 15 Using the Label Maker with Your Computer . . . . . . . . . . . . . . . . . . . . . . . . . . . . . . . . . . . . . . . . . . 16 Installing DYMO Label Software . . . . . . . . . . . . . . . . . . . . . . . . . . . . . . . . . . . . . . . . . . . . . . . . . . . . . . . . . . . . . . . . . . . . . . 16 Connecting the Label Maker to Your Computer . . . . . . . . . . . . . . . . . . . . . . . . . . . . . . . . . . . . . . . . . . . . . . . . . . . . . . . . . . 16 Using DYMO Label Software . . . . . . . . . . . . . . . . . . . . . . . . . . . . . . . . . . . . . . . . . . . . . . . . . . . . . . . . . . . . . . . . . . . . . . . . 17 Viewing the Label Maker Status . . . . . . . . . . . . . . . . . . . . . . . . . . . . . . . . . . . . . . . . . . . . . . . . . . . . . . . . . . . . . . . . . . . . . . 17 Troubleshooting . . . . . . . . . . . . . . . . . . . . . . . . . . . . . . . . . . . . . . . . . Documentation Feedback . . . . . . . . . . . . . . . . . . . . . . . . . . . . . . . . . Safety Precautions for Lithium Polymer Rechargeable Battery Pack Environmental Information . . . . . . . . . . . . . . . . . . . . . . . . . . . . . . . . . ....... ....... ....... ....... ......... ......... ......... ......... ....... ....... ....... ....... 18 18 19 19 1 2 3 20 19 18 4 17 5 16 6 7 15 8 14 9 10 13 11 12 Figure 1 LabelManager 500TS label maker 1 USB connector 8 Return 15 Symbols - Punctuation 2 Power connector 9 Symbols - Currency 16 Home 3 Touch screen 10 Delete 17 On/Off 4 OK 11 Accented characters 18 Cutter 5 Print 12 Space bar 19 Label exit slot 6 Print preview 13 Shift 20 Navigation 7 Backspace 14 Caps Lock 5 About Your New Label Maker Charging the Battery Pack With the DYMO LabelManager 500TS label maker, you can create a wide variety of high-quality, self-adhesive labels. You can choose to print your labels in many different font sizes and styles. The label maker uses DYMO D1 label cassettes in widths of 6 mm (1/4”), 9 mm (3/8”), 12 mm (1/2”), 19 mm (3/4”), or 24 mm (1”). Labels are available in a wide range of colors. Use the charging adapter included with your label maker to recharge the battery pack. Charging the battery pack will take approximately three hours. The charging adapter is only used for recharging the battery pack. To recharge the battery pack 1 Turn the label Visit www.dymo.com for information on obtaining labels and accessories for your label maker. maker over. 2 Plug the charging Registering Your Label Maker adapter into the power connector at the top of the label maker. Visit www.dymo.com/register to register your label maker online. During the registration process, you will need the serial number, which is located inside the back cover of the label maker. 3 Plug the other end of the charging adapter into a power outlet. Getting Started Make sure to read the LiPo Safety Precautions found on page 19. Follow the instructions in this section to set up your label maker. Inserting the Label Cassette Connecting the Power Your label maker uses DYMO D1 label cassettes. The label maker is powered by a rechargeable, Lithium Polymer (LiPo) battery pack. To insert the label cassette 1 Lift the back cover of the label maker to open the label compartment. Inserting the Battery Pack The battery pack included with your label maker comes partially charged. 2 Make sure the tape Make sure the charging adapter is disconnected before handling the LiPo battery pack. and ribbon are taut across the mouth of the cassette and that the tape passes between the label guides. To insert the battery pack 1 Lift the back cover of the label maker. 2 Insert the battery pack into If necessary, turn the ribbon rewind spool clockwise to tighten the ribbon. the battery compartment as shown. 3 Close the back cover of the label maker. 3 Insert the cassette Make sure to read the LiPo Safety Precautions on page 19. and press firmly until the cassette clicks into place. Removing the Battery Pack 4 Close the back Remove the battery pack when the label maker will not be used for a long period of time. cover of the label maker. Make sure the charging adapter is disconnected before handling the LiPo battery pack. To remove the battery pack 1 Unplug the charging adapter. 2 Lift the back cover of the label maker. 3 Remove the battery pack from the battery compartment. Make sure to read the LiPo Safety Precautions on page 19. 6 Ribbon rewind spool Label guides Using the Label Maker for the First Time When the label maker power is turned off automatically, the current label text and formatting are remembered and will be displayed when power to the label maker is turned back on. The first time you turn on the power, you are asked to select the language, units of measure, and label width. These selections remain set until you change them. When the label maker power is turned off manually or when the battery pack is removed and the power adapter is disconnected, the current label text and formatting are lost. To set up the label maker 1 Press to turn on the label maker. The first time you turn on the label maker, the system may take a few moments to start up. Home 2 Select the language and tap Next. The key displays the Home screen or cancels any dialog box or pop-up message. 3 Select the units of measure and the label width, and then tap Done. Touch Screen Display You are now ready to print your first label. You can create and format labels using the touch screen display. To print a label 1 Using the keyboard, enter text to create a simple label. 2 Press . The label prints and is automatically cut. To turn off the auto-cut feature, see Turning off Auto-Cut on page 14. Split backing 3 Remove the backing from the label to expose the adhesive, and then attach the label. Congratulations! You printed your first label. Continue reading to learn more about the features available for creating labels. Create a new label. Getting to Know the Label Maker Edit the current label. Become familiar with the location of the function keys on your label maker. Refer to Figure 1 on page 5. The following sections describe each feature in detail. Open a saved or recently printed label. View downloaded labels. Power The key turns the label maker power on and off. To save power, the label maker goes into standby mode after two minutes of inactivity. Pressing the key once exits standby mode. Change the label maker settings. To turn the power completely off, press and hold the key for five seconds. Displays the status of the battery pack. Select a user, create new users, and manage user settings. Navigation Keys When the charging adapter is connected, a clock appears in the display while the label maker is in standby mode. You can review and edit your label using the left and right navigation keys. You can move through menu selections using all four navigation keys, and then press to make a selection. When the charging adapter is not connected, the clock does not appear and the label maker remains in standby for two additional minutes before the power is turned off. Caps Lock The key toggles capitalization on or off. When Caps Lock is on, the Caps Lock key is illuminated and all the letters entered are in uppercase. When Caps Lock is off, all the letters entered are in lowercase. The default setting is Caps Lock off. Shift The key toggles Caps mode on or off for a single alpha character. 7 Backspace Scrolling a List The key deletes the selected objects or characters. If no objects or characters are selected, the character to the left of the cursor is deleted. Dragging a scroll bar moves you quickly through a menu or list. Delete Similar to the backspace key, the key deletes the selected objects or characters. However, if no objects or characters are selected, the character to the right of the cursor is deleted. Using the Touch Screen You can make selections and control the touch screen by using your fingers to tap, double-tap, and swipe. Drag to scroll through a list. Do not press on the touch screen with any hard object, such as a fingernail. Making a Selection Editing Your Label You can make selections on the touch screen by tapping an item. You can choose from several format options to enhance the appearance of your labels. Selecting the Font Tap to select a tab, menu item, or check box. You can choose from several format options to enhance the appearance of your labels. You can change the formatting for all or part of the text on your label. Selecting Text You can quickly select text to edit or delete. You can change the font type, size, and style. Double-tap to select a word. 1 Drag the handles to select more or less text. Tap to select all text on the label. 2 3 4 5 6 1 Font type 5 Font size 2 Bold 6 Strikethrough 3 Italic 7 Outline 4 Underline 8 Auto-fit text To format your label text 1 If necessary, tap 2 Select the Font tab. 8 on the Home screen. 7 8 Changing the Font Type Inserting Symbols You can change the font type for some or all of the text on your label. The label maker supports a variety of useful symbols that you can quickly add to your labels. To change the font type To insert a symbol 1 If necessary, select the existing text to change. 1 Select Symbols on the Insert tab. To change the font type for new text only, you do not need to select any existing text. 2 Select the symbol to insert on your label. You can quickly access the punctuation symbols by pressing or the currency symbols by pressing on the keypad. 2 Select the desired font type from the font type list. Changing the Font Size Inserting Clip Art The font sizes available depend on the label width selected. The label maker includes a variety of clip art images for use on your labels. To change the font size You can also download your own custom clip art to the label maker. See Using the Label Maker with Your Computer on page 16 for information about downloading clip art. 1 If necessary, select the existing text to change. To change the style for new text only, you do not need to select any existing text. 2 Select the desired font size from the font size list. To insert clip art Changing the Font Style 1 Select Clip Art on the Insert tab. Five font styles are available for your labels: bold, italic, underline, strikethrough, and outline. All styles can be combined. 2 Select the image to insert on your label. A label can only contain one clip art image. To change the font style Using Auto-Numbering You can print a series of up to 50 labels at a time using auto-numbering. 1 If necessary, select the existing text to change. To change the style for new text only, you do not need to select any existing text. To use auto-numbering 2 Tap the button for each desired style. 1 Select Auto-fields and Barcodes on the Insert tab. Inserting Special Characters, Auto-Text, and Barcodes 2 Tap Numbering. From the Insert tab, you can quickly add symbols, clip art, barcodes, several types of auto-text, and international characters. 3 Select the numbering style to use. The Insert Numbering dialog box appears. 4 Select the start value for the auto-numbering. 5 Select the amount to increment each label. 6 Select the number of labels to create. 7 Optionally, select the Add leading zeros check box to include leading zeros before numbers. 8 Tap OK. The auto-number field is inserted on the label. The auto-number field is treated as a single character on the label. You can delete this field just as you would any other character. See Printing a Series of Labels on page 13 for information about printing labels with auto-numbering. Recently used clip art and symbols are automatically added to the Favorites category. Favorites is located at the top of the Insert list. Inserting the Date and Time You can insert the current date and time on your label. Before inserting the date and time, you must set the current date and time in the label maker settings To access the insert tab 1 If necessary, tap on the Home screen. 2 Select the Insert tab. To set the date 1 Tap on the Home screen. 2 Select Date from the settings list. 3 Select the current year, month, and day. 4 Select the desired date format, and then tap Done. 9 To insert a barcode To set the time 1 Tap on the Home screen. 1 Select Auto-fields and Barcodes on the Insert tab. 2 Select Time from the settings list. 2 Tap Barcode. The Insert Barcode dialog box appears. 3 Select the current hour and minutes. 4 Do one of the following: 3 Select a barcode type from the Barcode type list. • To use 24-hour time format, select the Use 24hour time check box. 4 Enter the data for the barcode in the Barcode data box. • To use 12-hour time format, clear the Use 24hour time check box, and then select AM or PM from the list. To insert a symbol, tap Add symbol and select the desired symbol. 5 From the Show barcode data list, select one of the following: 5 Tap Done. • Below barcode -to place the barcode text below the barcode. To insert the date and time 1 Select Auto-fields and Barcodes on the Insert tab. • Above barcode - to place the barcode text above the barcode. 2 Tap Date and Time. The Insert Date and Time dialog box appears. • Not displayed - to not print the barcode text. 3 To insert the date, do the following: a 6 Tap Choose layout, and then do the following: Select the Date check box. • Select a size for your barcode from the Barcode size list. b Select the desired date format from the list. 4 To insert the time, do the following: a For best results, select Medium. Select the Time check box. • Select the desired barcode position relative to other text on the label. b Optionally, select the Use 24-hour time check box. 7 Tap OK. 5 To automatically update the date and time each time The barcode is inserted on the label. the label is printed, select the Auto-update date and time check box. The barcode is treated as a single character on the label. You can delete the barcode just as you would any other character. 6 Tap OK. The date and time fields are inserted on the label. Inserting Days, Months, or Quarters The date and time fields are each treated as a single character on the label. You can delete these fields just as you would any other character. You can automatically insert the names of days, months, or quarters on your label. When you choose to insert days, months, or quarters, a label is created for each day, month or quarter you select. Inserting Barcodes Days, months, and quarters cannot be combined on a single label. Only one of these names can be used at a time. You can print the following types of barcodes: UPC-A UPC-E Code 128 B Code 39 EAN 13 EAN 8 To insert days, months, or quarters You can choose whether or not to print the barcode text and you can choose to print the barcode text either above or below the barcode. 1 Select Auto-fields and Barcodes on the Insert tab. 2 Tap Days, Months, or Quarters. Optionally, you can add text before, after, above, or below the barcode. The corresponding dialog box appears. 3 Select the day, month, or quarter names to use. This User Guide assumes that you already understand the differences between barcode types and have a plan in place to incorporate barcodes into your organization. If you need to learn more about barcodes, many excellent how-to books are available at local libraries and book stores. A label is created for each day, month, or quarter you selected. 4 To abbreviate day, month, or quarter names, select the Abbreviate check box. 5 Tap OK. The selected field is inserted on the label. The field is treated as a single character on the label. You can delete this field just as you would any other character. See Printing a Series of Labels on page 13 for information about printing labels with day, month, or quarter names. 10 Inserting International Characters Editing the Label Layout The label maker supports the extended Latin character set. Several layout options are available to enhance the appearance of your labels. You can add a border to your label, change the alignment and direction of the text, and create fixed-length labels. Pressing followed by a letter displays all of the available variations of that letter. For example, if you press and then the letter a, you will see à á â ã ä and so on for all the variations available. To insert accented characters 1 Press and then press an alpha character. The accent variations for that alpha character are displayed. 2 Use the left and right navigation keys to select the character you want and press . Notes To edit your label layout • You can also access the accent variations for a letter by pressing and briefly holding the corresponding alpha key. 1 If necessary, tap on the Home screen. 2 Select the Layout tab. • You can also access International characters by selecting Diacritics on the Insert tab. Adding Borders You can choose from several border types to enhance your label. Using Word Suggestions Five borders are available: The label maker remembers words longer than five characters that you use for labels. As you enter new words on your label, words that you have previously used are automatically suggested. To use suggested words 1 Enter text on your label. When you add a border to a label, the border surrounds the entire label. If a word suggestion is available, the suggested word appears below the label in the Label Edit screen. To add a border 2 Tap the suggested word to insert that word on your label. 1 Select Border on the Layout tab. If you do not want to use the suggested word, continue typing or click to close the word suggestion box. 2 Select a border to use. Aligning the Text You can align the text to print left, centered, or right justified. The default alignment is centered. To turn off word suggestions 1 Tap on the Home screen. To align the text 2 Select Word Suggestion from the Settings list. 1 Select Alignment on the Layout tab. 3 Clear the Use word suggestion check box. 2 Select desired text alignment option. To delete available word suggestions 1 Tap Using Mirror Text on the Home screen. 2 Select Word Suggestion from the Settings list. The mirror format allows you to print text which reads from right to left, as you would see the text in a mirror. 3 Tap Manage words. To use mirror text The Manage words dialog box appears and all available word suggestions are displayed. 1 Select Direction on the Layout tab. 2 Tap 4 (Optional) Enter some text in the Filter box to filter The mirror format is visible in the display. the list of words. 5 Do one of the following: • To delete a single word from the list, tap to a word. . next • To delete all words from the list, tap Delete all, and then tap Delete all again when prompted. 11 To use a saved label Using Vertical Text You can print labels with the text running vertically. Labels with multiple lines of text will print as multiple columns of text. 1 Tap 2 Navigate to and select the label to use, and then tap Open. To use vertical text The selected label is displayed in the Label Edit screen and can be edited and printed. 1 Select Direction on the Layout tab. 2 Tap on the Home screen. . Managing Labels on Your Label Maker The vertical format is visible in the display. You can view, organize, and delete saved and downloaded labels stored on your label maker. Creating Fixed-Length Labels Viewing Saved Labels Normally, the length of a label is determined by the length of the text. However, you can choose to set the length of the label for a specific application. You can choose a fixed length label up to 999 mm (40”) long. You can quickly view all saved labels on your label maker. To view saved or downloaded labels 1 Tap To set a fixed length on the Home screen. 2 Select Manage Files from the Settings list. 1 Select Length and width on the Layout tab. 3 Tap one of the following: 2 Select Fixed, and then select the label length. • Saved labels - to view all saved labels. Using the Label Maker Memory • Downloaded labels - to view all downloaded labels. The label maker has a powerful memory feature that allows you to save and organize your frequently used labels, store downloaded labels, and manage your custom clip art images. Creating New Folders You can create folders to keep your saved and downloaded labels organized. To create a new folder You can create folders to keep your saved and downloaded labels organized. 1 Tap New folder. Saving a Label The Create new folder dialog box appears. When you save a label, the text and all formatting are saved. 2 Enter a name for the folder in the Folder name box, and then tap Create folder. To save a label 1 Tap Deleting Labels and Folders on the Label Edit screen. You can delete saved or downloaded labels and folders at any time. 2 (Optional) Select the folder to save your label to. 3 To create a new folder for your label, do the following: a To delete labels and folders Tap New folder. 1 Select the check box next to each label or folder you The Create new folder dialog box appears. want to delete. b Enter a name for the folder in the Folder name 2 Tap Delete. box, and then tap Create folder. A message appears asking if you want to delete the selected items. The folder is added and selected on the Save label screen. 3 Tap Yes. 4 Enter a name for your label in the Label name box, The selected labels and folders are permanently deleted. and then tap Save. Downloading Labels Using DYMO Label™ software on your computer, you can create labels from a database file and download the labels to the label maker. See Using the Label Maker with Your Computer on page 16 for more information about creating and downloading labels. Using Saved Labels You can use any saved, recently printed, or downloaded labels. 12 To delete custom clip art Editing Labels and Folders You can rename, cut, copy, and paste labels and folders to keep your labels organized. 1 Tap To rename a label or folder 3 Tap Downloaded Clip Art. on the Home screen. 2 Select Manage Files from the Settings list. 1 Select the check box next to the label or folder you The Manage downloaded Clip Art screen is displayed. want to rename. 2 Tap Edit, and then tap Rename. 4 Select the images to delete. The Rename dialog box appears. To select all images, tap Select all. 3 Enter a new name for the label or folder in the New 5 Tap Delete. name box, and then tap Rename. A message appears asking if you want to delete the selected images. To cut or copy labels and folders 6 Tap Delete. 1 Select the check box next to each label or folder you want to cut or copy. Printing Options 2 Tap Edit, and then tap one of the following: You can choose to print multiple copies of the same label. • Cut - to cut the labels and folders 1 Cut or copy the labels or folders you want to paste. By default, each label is automatically cut after printing. However, you can choose to turn this auto-cut feature off. If you turn off the auto-cut feature, you can also choose whether or not to print cut marks between each label. 2 Navigate to the folder where you want to paste the Printing a Series of Labels • Copy - to copy the labels and folders To paste labels and folders labels or folders. You can create a series of labels by using autonumbering or by inserting day, month, or quarter names on your labels. 3 Tap Edit, and then tap Paste. The labels or folders are pasted to the selected location. For more information about using these features, see Using Auto-Numbering and Inserting Days, Months, or Quarters on page 10. Clearing Recently Printed Labels You can quickly clear all recently printed labels from the label maker memory. You cannot print multiple copies of a series of labels. To print a series of labels Clearing recently printed labels clears this list of labels for all users. 1 Create a series of labels by using auto-numbering or by inserting day, month, or quarter names on your label. To clear recently printed labels 1 Tap on the Home screen. 2 Press 2 Select Manage Files from the Settings list. . The Print preview screen appears. 3 Tap Clear recently printed. 3 Swipe to the left or right to view each label in the A message appears asking if you want to delete recently printed labels for all users. series. 4 Tap Print. 4 Tap Yes. Printing Multiple Copies Managing Custom Clip Art You can print up to 49 copies of a single label at one time. You can delete custom clip art images that you previously downloaded to your label maker. To print multiple copies 1 Press See Using the Label Maker with Your Computer on page 16 for more information about downloading clip art. . The Print preview screen appears. 2 Select the number of copies to print in the Number of copies box. 3 Tap Print. 13 Turning off Auto-Cut To change the label width When the auto-cut feature is turned on, each label is automatically cut after printing. This feature is on by default. However, you can turn off auto-cut. 1 Tap 2 Select Label from the Settings list. 3 Select the width of the label currently inserted in the To turn off auto-cut 1 Tap printer from the Label width list, and then tap Done. on the Home screen. The label in the Label Edit screen changes to the new width. 2 Select Label from the Settings list. Changing the Default Font 3 Clear the Cut each label after printing check box. You can select the default font type, size, and style to use for all your labels. You can easily change the font for individual labels from the Label Edit screen. Printing Cut Marks Between Labels When auto-cut is off, you can choose to print a label separator cut mark between each label to indicate where the labels should be cut. To change the default font 1 Tap To print cut marks between labels 1 Tap on the Home screen. on the Home screen. 2 Select Font from the Settings list. on the Home screen. 3 Select the font type, size, and style to use as the 2 Select Label from the Settings list. default font, and then tap Done. 3 If necessary, clear the Cut each label after printing Changing the Screen Settings check box. 4 Select the Print cut marks between labels check You can adjust the screen brightness and choose whether or not to show the clock when the label maker is in standby mode and the charging adapter is connected. box. Customizing Your Label Maker To change the screen brightness Several options are available for customizing your label maker. You can choose the display language, units of measure, label width, default font, and screen settings. 1 Tap on the Home screen. 2 Select Screen from the Settings list. Changing the Language 3 Under Screen brightness, move the slider right or You can change the display language for the label maker so that you can work in a language that is most familiar to you. 4 Tap Done. left to increase or decrease the screen brightness. To turn off the clock To change the language 1 Tap 1 Tap on the Home screen. on the Home screen. 2 Select Screen from the Settings list. 2 Select Language from the Settings list. 3 Clear the Show clock while charging check box, and then tap Done. 3 Select the desired language from the Set language list, and then tap Done. Working with User Accounts Changing the Units of Measure You can choose to work in English (Inches) or Metric units. Metric is selected by default. You can create user accounts on the label maker for different users. Each user can then select their own default settings for the label maker. To change the units of measure Creating User Accounts 1 Tap on the Home screen. You can create up to five user accounts. 2 Select Units of Measure from the Settings list. To create a user account 3 Select Metric (mm) or Inches, and then tap Done. 1 Tap Changing the Label Width 2 Tap on the Home screen. New user. The User settings dialog box appears. Each time you insert a label cassette into the label maker, you are prompted to set the label width so the label maker knows what size label you are currently using. Some of the features available for designing labels depend on the width of the label. You can change the label width setting at any time, regardless of what label cassette is actually inserted in the label maker. 3 Enter a name for the new user in the User name box. 4 Select the settings for the new user. See Changing User Settings on page 15 for information about selecting user settings. 5 Tap Save. 14 Changing User Settings To clean the print head You can set the language, date and time format, units of measure, font, and word suggestion settings for each user individually. 1 Remove the label cassette. 2 Remove the print head cleaning tool from inside the label compartment cover. To change user settings 1 Tap Print head cleaning tool on the Home screen. 2 Select the user to change the settings for, and then tap Settings. 3 For each setting you want to make changes to, do the following: a Select the setting to make changes to from the User settings list. b Make the desired changes to the selected setting. 4 Tap Save. 3 Gently wipe the padded side of the tool across the print head. Deleting User Accounts When you no longer need a user account, you can delete that user account from the label maker. You cannot delete the Default user account. Print head To delete a user account 1 Tap on the Home screen. 2 Select the user to delete. 3 Tap Delete. A message appears asking if you want to delete the user. Calibrating the Touch Screen 4 Tap Yes. From time to time you may need to calibrate the touch screen display to keep it working properly. Maintaining Your Label Maker To calibrate the screen Your label maker is designed to give you long and trouble-free service, while requiring very little maintenance. 1 Tap on the Home screen. 2 Select Screen from the Settings list. Clean your label maker and calibrate the screen regularly to keep your label maker working properly. 3 Tap Calibrate screen. Cleaning Your Label Maker 5 Tap the center of each of the crosses as they appear 4 When prompted to start calibration, tap Start. on the screen. Clean your label maker regularly to keep it working properly. To clean the touch screen 1 Use a lint-free cloth to wipe the exterior of the printer and the touch screen. Do not press on the touch screen with any hard object, such as a fingernail. 2 If necessary, use ethanol to remove dirt and smudges. Do not use alkaline detergents, including glass cleaner, nail polish remover, benzene, or other organic solvents. 15 Using the Label Maker with Your Computer Connecting the Label Maker to Your Computer The label maker connects to your computer using the USB connector located on the top of the label maker. Your label maker can be used as a standalone label printer or you can print labels directly from your computer using DYMO Label™ software (requires DYMO Label v.8.4 or later). Do not connect the label maker to your computer until prompted by the installer. To connect the label maker to your computer You can also use DYMO Label software to do the following: 1 Plug the USB cable into the USB connector at the top of the label maker. Create and download labels by importing data from a number of standard database formats. Download your own custom clip art to your label maker. Manage labels and clip art on the label maker. Installing DYMO Label Software Do not connect the label maker to your computer until prompted by the installer. 2 Plug the other end of the USB cable into an available To install the software on a Windows® system USB port on your computer. 1 Download the latest version of DYMO Label software 3 If necessary, press from the Support section of the DYMO Web site at www.dymo.com. to turn on the label maker. 4 If you have more than one DYMO label printer installed, do the following: 2 Close all open Microsoft Office applications. a 3 Double-click the Installer icon. After a few seconds, the installation screen appears. Click the printer image in the DYMO Label software Print area. 4 Click Install and follow the instructions in the installer. To install the software on a Mac OS® system 1 Download the latest version of DYMO Label software All of the label printers that are installed on your computer are displayed. from the Support section of the DYMO Web site at www.dymo.com. b Select the LabelManager 500TS label maker. 2 Double-click the Installer icon and follow the on- screen instructions. 16 Using DYMO Label Software The following figure shows some of the major features available in DYMO Label software. Visually choose your label type and apply layouts. Apply a layout to a label. Capture an area of the screen to insert on your label. Insert text, addresses, images, shapes, lines, barcodes, dates, and counters. Store your favorite addresses or other data in the Address Book; automatically insert the data on your label. Print a label. Select a label maker to print your labels. Import and download labels, download clip art, and manage files on your label maker. For complete details on using the software, refer to the online Help. From the Help menu, you can view the following: DYMO Label v.8 Help DYMO Label v.8 User Guide LabelManager 500TS User Guide Viewing the Label Maker Status The label maker status is displayed in the DYMO Label software Print area. The following table describes the possible states of the label maker. Label maker is connected and battery pack is charging Label maker is connected and battery pack is charging; printing is not possible Label maker is connected and battery pack is not charging Label maker is connected and battery pack is not charging; printing is not possible Label maker is not connected or is turned off Label maker is connected and there is a problem with the battery pack 17 Troubleshooting Review the following possible solutions if you encounter a problem while using your label maker. Problem/Error Message Solution No display Ensure the label maker is turned on. Attach the charging adapter to the label maker to recharge the battery pack. See Charging the Battery Pack. Poor Print Quality Attach the charging adapter to the label maker to recharge the battery pack. See Charging the Battery Pack. Clean the print head. See Cleaning Your Label Maker. Ensure the label cassette is installed properly. Replace the label cassette. No label cassette inserted Text exceeds printable area Battery level is low Label jam Cutter jam Unable to print How do I remove the backing from the label? Insert a label cassette. Delete some or all of the buffer text. Ensure the battery pack is inserted correctly. See Inserting the Battery Pack. Decrease the font size. Select the Auto-fit text check box on the Font tab of the Label Edit screen. Delete lines to fit on the label width. Insert a wider label cassette. Attach the charging adapter to the label maker to recharge the battery pack. See Charging the Battery Pack. Replace the battery pack. Remove jammed label; replace label cassette. Clean cutter blade. Remove jammed label; replace label cassette. Clean cutter blade. Insert the battery pack and try again. See Inserting the Battery Pack. DYMO labels have an easy-to-peel split back. Split label 1 Locate the split on the label backing. 2 Gently pinch the label lengthwise, folding toward the printed side of the label. The label backing will separate. 3 Carefully peel away the backing from the label. If you need further assistance, visit the DYMO Web site at www.dymo.com. Documentation Feedback We are constantly working to produce the highest quality documentation for our products. We welcome your feedback. Send us your comments or suggestions about our user guides. Please include the following information with your feedback: Product name, model number, and User Guide page number Brief description of instructions that are inaccurate or unclear, areas where more detail is needed, and so on We also welcome your suggestions about additional topics you would like to see covered in the documentation. Send email messages to: [email protected] Please keep in mind that this email address is only for documentation feedback. If you have a technical question, please contact Customer Support. 18 Safety Precautions for Lithium Polymer Rechargeable Battery Pack Inaccurate handling of a Lithium Polymer rechargeable battery may cause leakage, heat, smoke, an explosion, or fire. This could cause deterioration of performance or failure. This may also damage the protection device installed in the battery pack. This could damage equipment or injure users. Thoroughly follow the instructions below. While Charging the Battery Pack Danger When charging the battery pack, use dedicated chargers and follow the specified conditions. Do not connect directly to an electric outlet or cigarette lighter charger. Do not use or store battery pack close to fire or inside the car where temperature may be over 60°C (140°F). Warning Stop charging the battery pack if charging is not completed within the specified time. Caution Thoroughly read this User Guide before charging the battery pack. Do not charge in a place that generates static electricity. Battery pack can only be charged within 0°C~45°C (32°F~113°F) temperature range. When Discharging the Battery Pack Danger Use the battery pack only in the specified equipment. Do not use or store battery pack close to fire or inside the car where temperature may be over 60°C (140°F). Caution Do not charge in a place that generates static electricity. Battery pack can only be used within -20°C~60°C (-4°F~140°F) temperature range. Environmental Information The equipment that you have bought requires the extraction and use of natural resources for its production. It may contain substances that are hazardous to health and the environment. In order to avoid the dissemination of those substances in our environment, and to diminish the pressure on natural resources, we encourage you to use the appropriate take-back systems. These systems will reuse or recycle most of the materials of your end-of-life equipment in an environmentally sound way. The crossed-bin symbol marked on your device indicates you should use these systems. If you need more information on the collection, reuse, and recycling of this product, please contact your local or regional waste administration. You can also contact DYMO for more information on the environmental performance of our products. 19