1
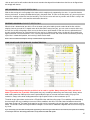
1
BEST KITEBOARDING
USER MANUAL
Thank you for purchasing a Best kite. Please read this manual carefully and in its entirety before using your new Best
kite.
WARNING
Kiteboarding/kitesurfing/snowkiting are extreme sports. They have numerous inherent risks and dangers, and pose
substantial risk of cuts, scrapes, bruises, broken bones, loss of limbs, loss of vision, paralysis, and other serious,
permanent and disabling injuries and death to the rider and others. Some of the sources of these risks include but are not
limited to:
•
•
•
•
•
•
•
•
Being lifted by the kite and then dropped or slammed into the ground, snow, trees, rocks, buildings, piers, jetties
and/or other structures or surfaces.
Being dropped or slammed into other people and/or property.
Contact with kite lines under tension, and/or watercraft.
Drowning.
Underwater conditions and/or objects such as sharp shells, broken glass, sand bars, shoals, reefs, oyster beds,
and/or concrete.
Contact with sea life such as sting rays, sharks, sea turtles, jelly fish, etc.
Weather conditions and/or changes in weather conditions such as increasing or decreasing wind, waves,
updrafts, lightning and/or water spouts.
Equipment performance. Kiteboarding is a new sport. Kiteboarding equipment and safety gear are NOT 100%
reliable. Safety designs and features are often new and unproven. Kites may behave unfavorably and
unpredictably. Lines can twist, tangle, or break, resulting in serious injury and/or loss of control of the kite.
When using this product, you are responsible for your own safety and the safety of others around you. Never use this
product as a flying device. Never touch flying lines when the kite is in use.
RELEASE OF LIABILITY AND ASSUMPTION OF RISK
DO NOT USE THIS PRODUCT UNLESS YOU AGREE WITH THE
FOLLOWING TERMS AND CONDITIONS:
Before using this product, the purchaser/user has carefully reviewed, understood and agrees to comply with the terms of
this User Manual. Use of this product and any of its components involves certain inherent risks, dangers and hazards,
which can result in serious personal injury or death. The purchaser/user of this product understands that the seller is not
responsible for any damage to property or injury caused by negligent operation of this product by the purchaser/user, and
the purchaser/user releases the seller from all such liability. In the event of your death or incapacity, this Agreement shall
be effective and binding upon your heirs, next of kin, executors, administrators, assigns and representatives.
The purchaser/user of this product expressly assumes the risk of any and all bodily injury, death and/or liability which may
result from the purchaser or user’s participation in kiteboarding. The purchaser/user agrees to hold Ride Best, LLC
harmless from any and all liability, and waive and release any and all claims or potential claims against Ride Best, LLC
and any of its respective agents, affiliates, subsidiaries, employees, instructors, officers, directors, shareholders, suppliers
and manufacturers in the event of any such bodily injury or death which may result from the purchase and/or use of Ride
Best LLC (d/b/a Best Kiteboarding) products.
© 2011 RIDE BEST, LLC, d/b/a BEST KITEBOARDING
2
INTRODUCTION:
Best Kiteboarding would like to thank you for choosing one of the new v3 kites from our 2011 line up. These represent the
current state of the art in kitesurfing equipment design and manufacture; we know that it will provide you with huge
amounts of enjoyment.
Should you at any time need to take advantage of our Fair and Reasonable timeframe warranty please read the notes
attached at the end of the FAQ section for further information or check the warranty policy information online at
http://www.bestkiteboarding.com/Guarantee
Full details of both the Kahoona v3 and Nemesis HP v3 kites are included in this manual.
KAHOONA V3:
The Kahoona v3 delivers the perfect mix of freeride, new school and wave riding performance. The v3 combines rock
solid stability, smooth power delivery, endless depower and precise handling, making it the perfect kite for advancing your
riding level, regardless of your preferred riding style.
The first two generations of Kahoona were praised for their surprising hang-time and great low end power. In this third
generation, we’ve been able to extract additional high wind stability and turning speed, while reducing bar pressure. To
do so, the Kahoona v3 is made with new, specially developed high performance materials and improved profiling which
have energized its performance.
When wave riding, the Kahoona v3 serves up its best attributes, combining incredible downwind drift, precise steering
response and huge depower, whether you’re going down the line or being chased by the white foam close out. The
Kahoona v3 allows you to perform the latest unhooked new school tricks. The effortless re-launch motivates you to learn
new moves and gives supreme confidence to wave riders who simply have to be able to re-launch their kites before the
next set comes in… it’s the perfect partner to use with any of our surfboards.
The construction of the Kahoona v3 is both bomb-proof and lightweight at the same time. The introduction of a new 3.5m
size makes building the perfect quiver of kites for all riders and all conditions easier than ever before. With exceptional
handling, performance and practical safety features, the Kahoona v3 is the perfect kite for improving your riding level,
regardless of your preferred riding style and your current riding level.
Kahoona v3: Advanced progression.
KAHOONA KITE PACKAGE:
The Kahoona v3 comes packaged in its shipping box, the kite comes complete with a telescopic Ripstop kitetube, an over
the shoulder backpack, aluminium shafted high volume green-pump and a Kitefix repair kit.
KAHOONA V3 PERFORMANCE FEATURES:
When unpacking your kite for the first time, we recommend that you take some time to familiarize yourself with the product
and design features that make your kite unique. This will help you set up the kite correctly the first time, ensuring you gain
the maximum potential from its high-performance design.
AIR-AID, ADVANCED INFUSION RIPSTOP AND DACRON MATERIALS:
New high performance fiber coatings on both Ripstop and Dacron materials maximize strength and
increase handling responsiveness. With reduced material elongation under load, the Kahoona v3 is
the crispest handling and most responsive Kahoona we’ve ever designed.
3
SWEPT WINGTIPS:
The Swept Wingtip design of the Kahoona V3 allows for a unique combination of exceptional low end
power, high depower and maximum stability. The Kahoona blends favorable traits from both C-kites
and SLE kites to provide an exceptional riding experience for kitesurfers of all skill levels.
QUAD-STRUT DESIGN:
The leading edge shape and highly swept back wingtips of the Kahoona allowed the R&D team to
remove the centre strut from the airframe: with one less strut in the air the Kahoona is able to turn
faster, with less drag, and fly in less wind than would be possible with a five-strut layout.
MINI VP2 BRIDLE:
A short leading edge bridle provides exceptional shape support and effective distribution of canopy
loads across the entire kite: the Kahoona V3 has stability that will encourage you to push your limits.
VP2's innovative pivoting design provides maximum depower from minimum bar travel making kite
control simpler than ever.
NEW NEEDLE LEADING EDGE:
The leading edge of every Kahoona is stitched with a new needle, one needle per leading edge.
Replacing the needle for every new Kahoona LE ensures a more accurate stitch with smaller needle
holes and a stronger final construction. It might cost a little more to do it this way but it's the best
way to build a kite.
3D SCUFF PADS:
The Kahoona canopy receives 3D injection moulded scuff pads to provide maximum protection in
self launch situations.
HIDDEN BRIDLE REINFORCEMENT:
The Kahoona v3 has multiple layer LE attachment point reinforcements, which are applied to the
inside of the LE. This reinforcement provides the best possible load distribution and eliminates any
risk of fraying Dacron edges.
CANOPY FRAMING TECHNOLOGY:
Crashing your kite is a fact of life. That's why the perimeter of each canopy segment in every Best
kite is supported with a unique reinforcement zone, isolating the canopy from impact and crash
loads. CFT now uses an even stronger mark cloth reinforcement directly between the struts and the
canopy, enhancing the strength of your kite without adding unnecessary weight. CFT is a unique
approach to distributing shock loads, and the effective transfer of TE tension, across the canopy of
your kite - and you'll only find it on Best kites.
4
LOAD FLEX SEAM:
The tip-to-tip leading edge seam on all of our kites is triple stitched with a full length tape closure on the
outside. The inside is fully taped with a full length Mark cloth strip for maximum strength with all internal
seams being smooth-taped to protect the bladders from any ridges of stitching. The Load Flex seam
design provides additional support to the leading edge helping to provide maximum strength and
stability to your kite.
FLAT PACK LE BARREL SEAMS:
Our Flat Pack LE barrel seams contribute to the strongest LE construction we've ever made. Removing
the overlap between segments has created a stronger and lighter LE construction with enhanced
stiffness and torsion load handling for even greater responsiveness and durability.
3D KEVLAR AIRFRAME:
All the leading edge and the strut joints on your kite are 3D shaped and constructed with a Kevlar
material. There is no better way to connect the leading edge to the struts. Our construction gives the
lightest and most durable inflatable kite structure available, yielding a kite with exceptional performance
and easy handling for riders of all abilities.
KEVLAR ELBOWS:
Kevlar reinforced, abrasion resistant leading edge elbow patches provide greater resistance against
handling and launch/land damage.
AB/CUSTOM TUNE:
AB/Custom Tune gives you the control to rig your kite to suit your personal riding style and wind
condition. With multiple back line positions on the wingtips, you have the option to adjust the depower
settings, back line pressure and the turning speed of your kite.
REINFORCED TRAILING EDGE:
The back of your kite takes as much abuse as the front, so we reinforce the trailing edge of all of our
kites either with Canopy Framing or our new Dacron reinforcement for even greater durability and the
ultimate crash protection.
SURF TOUGH:
Surf Tough describes how we build-in the absolute highest quality with every kite that we make. There
are no short cuts to great performance and lasting durability. We take pride in each and every kite that
we make and that’s why you will find Surf Tough features on every one of our inflatable kites.
NEMESIS HP V3:
The wait is finally over: the Nemesis HP is back. Back with all the unique design features and performance attributes that
helped create its legendary reputation for performance, and its incredibly loyal customer following.
5
The HP v3 design improves upon all previous incarnations. Advancements in canopy shaping and a revised bridle design
have allowed us to enhance stability and unhooked performance while removing all canopy battens. New material
choices and aerodynamic refinements mean that when you pull the trigger, the HP v3 will rip you off the water with
explosive vertical lift and keep you airborne with a hangtime sensation that is simply unique.
With our exclusive Cuben-equipped leading edge, the HP v3 delivers outstanding aerodynamic efficiency. A reduced
diameter Cuben leading edge minimizes drag, giving increased lift and hangtime, faster flying and greater upwind ability.
Cuben fiber’s unique Zero-stretch characteristics allow us to create a kite with a thinner and stiffer leading edge,
providing a previously impossible mix of performance and stability.
With Twister Techtm integrated into the HP v3, you can use more of the canopy to generate effective turning force.
Twister Techtm delivers faster turn initiation and tighter turning with reduced bar pressure, maximizing responsiveness
and usability in low wind conditions and serving up insane freestyle potential when ridden overpowered.
The HP v3 benefits from our latest external EZ-Pump design, new-needle construction, Air-Aid Materials, hidden bridle
patches, Cuben fibre and Twister Tech. It’s the most advanced HP we’ve made to date and it defies easy categorization.
Nemesis HPV3: Surface to air missile.
NEMESIS KITE PACKAGE:
The Nemesis HP v3 comes packaged in its shipping box with an extendable Ripstop kitetube and Kitefix repair kit. The
Nemesis HP is priced on the web and at retailers to include the high volume pump and deluxe messenger bag, by opting
to take the basic package, without pump and deluxe messenger bag you can make significant savings on the list price.
NEMESIS HP V3 PERFORMANCE FEATURES:
When unpacking your kite for the first time, we recommend that you take some time to familiarize yourself with the product
and design features that make your kite unique. This will help you set up the kite correctly the first time, ensuring you gain
the maximum potential from its high-performance design.
TM
TWISTER TECH :
tm
Twister Tech brings C-kite turning response and handling characteristics to our high performance
tm
Cuben Nemesis HP. The unique twisting ability of a Twister Tech equipped leading edge allows you
to use much more of the kite canopy to generate turning response, not just the wingtip sections.
Greater turning response equals faster and tighter turning, greater boosting ability and freestyle
performance like you never imagined.
CUBEN EQUIPPED:
The Nemesis HP uses a unique zero-stretch, Cuben Fiber leading edge cloth. Our exclusive use of
Cuben Fiber allows us to design a faster flying, more aerodynamic and stiffer kite than can be
achieved with any standard material. This translates directly into unmatched upwind efficiency, huge
depower and, of course, amazing boosting and hang-time ability.
AIR-AID, ADVANCED INFUSION RIPSTOP AND DACRON MATERIALS:
New high performance fiber coatings on both Ripstop and Dacron materials maximize strength and
increase handling responsiveness. With reduced material elongation under load, the Nemesis HP v3
is the crispest handling and most responsive Nemesis we’ve ever designed.
6
EZ-PUMP
tm
:
tm
Our EZ-Pump system is the simplest, fastest and most reliable rapid inflation system on the
market. Developed for the Taboo with all new molded parts and reduced component count, this is by
tm
far the best EZ-Pump system yet.
NEW NEEDLE LEADING EDGE:
As simple as it sounds, using a brand new needle every time you start to build a new leading edge
isn’t standard practice in the industry - but it’s the best way to build the strongest kite possible and
that’s why we build the Nemesis HP this way.
VP3 BRIDLE:
A short leading edge bridle provides exceptional shape support and effective distribution of canopy
loads across the entire kite. The HP-V3 will encourage you to push your limits as you find out what
you and your kite are truly capable of achieving.
3D SCUFF PADS:
The Nemesis HP v3 canopy receives 3D injection moulded scuff pads to provide maximum
protection in self launch situations.
HIDDEN BRIDLE REINFORCEMENT:
The Nemesis HP v3 has multiple layer LE attachment point reinforcements, which are applied to the
inside of the LE. This reinforcement provides the best possible load distribution and eliminates any
risk of fraying Dacron edges.
CANOPY FRAMING TECHNOLOGY:
Crashing your kite is a fact of life. That's why the perimeter of each canopy segment in every Best
kite is supported with a unique reinforcement zone, isolating the canopy from impact and crash
loads. CFT now uses an even stronger mark cloth reinforcement directly between the struts and the
canopy, enhancing the strength of your kite without adding unnecessary weight. CFT is a unique
approach to distributing shock loads, and the effective transfer of TE tension, across the canopy of
your kite - and you'll only find it on Best kites.
LOAD FLEX SEAM:
The tip-to-tip leading edge seam on all of our kites is triple stitched with a full length tape closure on the
outside. The inside is fully taped with a full length Mark cloth strip for maximum strength with all internal
seams being smooth-taped to protect the bladders from any ridges of stitching. The Load Flex seam
design provides additional support to the leading edge helping to provide maximum strength and
stability to your kite.
7
FLAT PACK LE BARREL SEAMS:
Our Flat Pack LE barrel seams contribute to the strongest LE construction we've ever made. Removing
the overlap between segments has created a stronger and lighter LE construction with enhanced
stiffness and torsion load handling for even greater responsiveness and durability.
3D KEVLAR AIRFRAME:
All the leading edge and the strut joints on your kite are 3D shaped and constructed with a Kevlar
material. There is no better way to connect the leading edge to the struts. Our construction gives the
lightest and most durable inflatable kite structure available, yielding a kite with exceptional performance
and easy handling for riders of all abilities.
KEVLAR ELBOWS:
Kevlar reinforced, abrasion resistant leading edge elbow patches provide greater resistance against
handling and launch/land damage.
AB/CUSTOM TUNE:
AB/Custom Tune gives you the control to rig your kite to suit your personal riding style and wind
condition. With multiple back line positions on the wingtips, you have the option to adjust the depower
settings, back line pressure and the turning speed of your kite.
REINFORCED TRAILING EDGE:
The back of your kite takes as much abuse as the front, so we reinforce the trailing edge of all of our
kites either with Canopy Framing or our new Dacron reinforcement for even greater durability and the
ultimate crash protection.
SURF TOUGH:
Surf Tough describes how we build-in the absolute highest quality with every kite that we make. There
are no short cuts to great performance and lasting durability. We take pride in each and every kite that
we make and that’s why you will find Surf Tough features on every one of our inflatable kites.
SETUP AND PRE-FLIGHT CHECKS:
Riders should perform a thorough inspection of their kites each time they set-up, and prior to launching, to ensure that the
kites have sustained no damage during use. Any damage should be repaired by a professional kite or sail loft to ensure
continued safety and usability.
It is worthwhile inspecting all flying line attachments, bridle sections and pigtails before each flight. Damage to any of
these areas may well render your kite unsafe to fly.
PACKING AND STORING YOUR KITE:
When packing your kite away for any period of time please ensure that it is completely dry and free from contaminants.
Wherever possible rinse your kite down with clean water immediately after use and leave it to dry thoroughly before
packing it away. Brightly colored Ripstop materials can be prone to color leaching if stored when wet, particular when
new. Best Kiteboarding will not replace a kite on the basis that it has suffered from color leaching in the fabric.
8
SELF-LAUNCHING:
All Best kites can be self-launched. Connect the flying lines of the bar to the kite following the line convention, centerlines
from the bar to the front bridle attachment points and color coordinated rear flying lines to the matching rear pigtails.
Check and double check that your flying lines are free from twists before proceeding any further. If your lines are twisted
disconnect them and 'walk' out your lines from the bar to the kite to ensure you have removed any twists.
Secure the kite by folding and sanding a wing tip with sufficient weight to safely hold it in place. Walk the bar out to the
side of the kite so that the flying lines are at ninety degrees to the wind direction.
Pulling the bar back towards you and stepping backwards will flick the sand off the wingtip, releasing the kite and allowing
it to self launch.
If it is possible to have someone experienced assist in the launch, this is always the preferred method.
ASSISTED LANDING OF THE KITE:
When landing your kite with an assistant, simply fly the kite to the edge of the window and down to ground level slowly.
Have your assistant take hold of the kite firmly in the middle of the leading edge. Both you and your assistant should walk
towards each other to remove all tension from the flying lines. Your assistant can either lay the kite down, with the nose of
the kite facing into the wind and sand the upper canopy, or hold the kite until you are unhooked from the bar and safely
able to take over the kite.
SELF LANDING KITES:
We always recommend that riders attempt to gain an assisted landing. In circumstances where this is not possible you can land the kite
using the rear OSR handles.
You must detach the bypass/handlepass leash before attempting to land the kite via the rear line OSR handles. Fly your
kite to the side of the window leaving the kite at an angle of about fifteen degrees to the ground, which equates to the
lowest wingtip being about 5m from the ground.
With the kite at the edge of the window and the retaining Velcro on the OSR handle already loosened, sheet-out, reach up
and grab the lower of the two OSR handles. With the webbing loop firmly in your grasp, unhook while holding onto the
webbing handle and proceed to drop the bar. Your kite will fly slightly to the edge of the window, and then loop under
itself, coming to rest on the beach in the dead downwind position, facing into the wind with the leading edge facing up.
This method is only recommended if you have more than two line-lengths of downwind space and it is impossible to seek assistance.
WATER RELAUNCHING:
The Kahoona v3 requires no special technique to relaunch. Due to its swept wingtips and LE profile, it has auto-relaunch
properties, which means that it is incredibly easy to relaunch. The curved canopy and deep center chord makes it easy for
the Kahoona v3 to catch the wind and be maneuvered around to the edge of the window.
The larger sizes of the Nemesis HP v3 require an appropriate relaunch technique due to their high aspect ratio and
shallow draft. The 12m and 14m sizes should be re-launched using a similar technique to most SLE kites. Pulling in the
9
slack on one back line will enable to the kite to taxi around to the edge of the window where the kite can be flipped onto
one wingtip with the bar.
HOT LAUNCHING: ADVANCED RIDERS ONLY
With the kite resting on its trailing edge in the water, with its weight partly supported by the struts, it is possible that the
kite may ‘hot launch’ at some point downwind of you in the power zone. As soon as the kite powers up, you must push out
on the bar, sheeting out the kite, front-line load only. The rear lines must not have any tension until the kite is safely in the
neutral zone, which, in this case would be overhead at the zenith.
REVERSE LAUNCHING: ADVANCED RIDERS ONLY
When the kite is downwind of you with its LE on the water (and you’re looking into the underside of the kite, with the
wingtips closer to you and the c-shaped center of the kite farthest away from you), you can create a reverse draft using
the rear lines on the trailing edge, which causes the kite to hover up backwards. If both rear lines are pulled with even
tension, the kite will hover up, evenly balanced. If one rear line is released a few inches, the kite will spin around in the
opposite direction and start to redirect. In this case be prepared to flip the bar and sheet-out the kite to reduce powering
up the kite in a downwind position, and crashing it back into the water.
Both of these are advanced techniques and only recommended for experienced riders.
WIND RANGES AND PERFORMANCE CHARACTERISTICS:
The suggested wind range chart for each kite is to be used as a guide. Always know your limits, and when in
doubt rig a smaller kite, if possible. Wind speeds may vary according to where they were measured. Always take a
wind reading more than 100m past the nearest upwind object to get an accurate maximum reading. If flying in the
mountains, always take a wind reading towards the highest point of land as wind accelerates up hill.
The wind ranges given above are based on a 75kg/165lbs rider and kitesurfing usage. For snowkiting and landboarding
the wind ranges will vary according to snow and surface conditions but will be 3-5 knots lower for bottom end and 4-6
knots lower for top end. The lower wind range for any kite can be increased by the use of a larger surface area or volume
board. To estimate usable wind range for different weights assume that an additional 10kg/22lbs moves the wind range up
by 1 knot.
If you cannot keep your kite stable at wind speeds approaching or above the upper stated limits for each size kite, then please do not attempt
to exceed your skill level. We strongly advise riders to stay within the stated wind speeds.
10
V3 KITES FAQ:
HOW CAN I REPAIR MY KAHOONA V3 IF IT BECOMES DAMAGED?
For small areas of damage to your kite we recommend the range of products made by Kitefix.com. Their range of sail
tapes, repair cloths and Gluefix kits are easy to use and ideal for working repairs.
For larger repairs requiring professional attention your Best Kiteboarding retailer can point you towards your best,
approved, local repair facility.
HOW SHOULD I CARE FOR MY KITE?
Inflate and deflate your kite with care. Follow proper inflation techniques and pack your kite when it is completely deflated
and dry. Do not roll up your kite with the deflate prongs still in the strut valves as this can damage the internal valve
membranes.
Do not leave the kite inflated and sitting in the wind unused for long periods of time, as this accelerates wear to the
canopy cloth. Inspect the kite periodically for small holes or tears and patch when detected to eliminate costly repairs.
When packing your kite away for any period of time please ensure that it is completely dry and free from contaminants.
Wherever possible rinse your kite down with clean water immediately after use and leave it to dry thoroughly before
packing it away. Brightly coloured Ripstop materials can be prone to color leaching if stored when wet, particularly when
new. Best Kiteboarding will not replace a kite on the basis that it has suffered from color leaching in the fabric.
CAN I USE A BAR FROM OTHER KITES ON MY KITE?
Yes, however, certain precautions need to be taken into consideration when using other bars. It is best to seek technical
assistance before rigging a ‘non-Best bar’ to the kite. Never self launch when using an untested bar for the first time.
The current Best bar range all use an equal flying line calibration where the front and rear line lengths is equal with the bar
pulled to the max power position and the trim strap fully extended- this has become the accepted standard for most major
kite manufacturers.
The Redline Performance Bar is the ideal choice for your new v3 kite. Its range of safety features has been designed with
the v3 kites in mind and it is perfectly calibrated for your new kite.
WHAT SAFETY SYSTEMS ARE BUILT INTO MY KITE?
Any Best kite flown with any Best bar has multiple redundant safety systems. First and foremost, pushing the bar away
and forcing it to slide up to the trim strap will depower the kite to its depower limit. Unhooking the kite and dropping the bar
when attached to the bypass leash ring will result in the same maximum depower state being achieved.
Where flying lines are equipped with OSR handles these can be used to completely flag the kite out to a powerless
position by unhooking and then dropping the bar when attached to an OSR handle via the leash.
When attaching to the OSR handles with the bypass leash always ensure that the tension of the leash on the flying lines
does not cause the kite to fly at an angle. Always ensure that the retaining Velcro is unfastened before clipping into
webbing handles. Failure to do so may compromise the function of the safety system. Note: clip only to the webbing
handle; never clip directly into the stainless rings to ensure safe function.
HOW DO I RIG MY v3 KITE WHICH REAR BRIDLE ATTACHMENT KNOTS SHOULD I USE?
The Kahoona and Nemesis HP v3 kites come with multiple knot attachment points on the rear bridle. We recommend that
the first time you fly your kite that you connect to the bottom most knot on the rear pigtails and move up a knot at a time
until you have the perfect balance of turning control, power and back line pressure.
11
When the kite is trimmed correctly, you should be comfortable enough to steer the kite and still have enough reach left to
depower the kite by pushing the bar away from you. As an additional passive depower adjustment, the trim strap allows
further depowering on the fly.
If you intend on riding unhooked for performing tricks it is important that you trim your kite so it does not backstall when
unhooked. To check this, once you think you have found your preferred rear knot setting, unhook the chicken loop from
your spreader bar and fly the kite overhead. If the kite sits directly above you without backing down into the window, then
you have the perfect trim. If you find the kite wants to back down towards the beach, you have too much rear line tension
and the kite is over-sheeted. To fix this, simply pull down on the depower strap in small increments until the kite flies
happily overhead with the bar unhooked. If the kite continues to backstall then loosen the back lines at the kite by moving
one knot towards the end of the rear bridle.
Please note that flying unhooked is not recommended unless you are already comfortable with the increased level of kite control required.
Never try to assess the correct trim for unhooking in high winds and never unhook without using a rated handlepass leash designed for this
purpose.
HOW DO I ADJUST THE TURNING SPEED AND DEPOWER CHARACTERISTICS OF MY V3 KITE?
The wingtips of your v3 kites have two rear flying
line attachment locations that can be used to tune
the turning speed and bar travel/depower ratio of
your kite. The two attachment locations A and B
each have a short pigtail line attached to them,
(The Kahoona can attach to either A or B only)
while the Nemesis has a short V-line that can be
positioned in either AA, AB or BB settings.
For the fastest/easiest turning we recommend the
AA setting; this is most suitable for wave-riding,
particularly with the larger bar sizes. For general
Freeriding we recommend the AB setting on the
Nemesis; this gives a blend of easy depower
along with a more moderated turning speed that
will allow you to develop your flow. For unhooked
riding, BB gives the slowest turning speedparticularly in combination with the 45cm bar- and
also more back line pressure, which is favored by
many wakestyle riders.
HOW DO I PERFORM A SELF-RESCUE WITH MY KITE?
Opinions on the best method to self rescue vary. If you believe that you stand a good chance of being seen with your kite
and retrieved either by another kiter or by boat, then you may feel happier keeping your kite fully inflated. An inflated kite
is highly visible on the water and will act as a visual marker for any potential rescue.
If the wind has switched to an offshore direction having your kite inflated at this point will only drag you further out to sea,
so it is not recommended in this instance that you leave your kite inflated. If you intend to swim back to shore under your
own power, then you need to pack down your kite as follows.
If possible, release the OSR handle to flag the kite and wind the lines onto the end posts. If the OSR handle cannot be
used then you can still wind a full kite-spans worth of one flying line around the bar to ensure the kite remains depowered.
With the lines wound in and any flying lines secure, release the LE deflate bladder and taking the kite by the wingtips, roll
it to the center, expelling air from the LE as you progress. Be careful that you do not allow water to seep into the LE.
Once the LE is deflated, re-secure the LE valve, secure the kite to your board with your bar leash, and paddle back in.
HOW DO I PACK MY KAHOONA AND NEMESIS HP V3 ?
When packing your kite away for any period of time please ensure that it is completely dry and free from contaminants.
Wherever possible rinse your kite down with clean water immediately after use and leave it to dry thoroughly before
packing it away. Brightly colored Ripstop materials can be prone to color leaching if stored when wet, particular when
new. Best Kiteboarding will not replace a kite on the basis that it has suffered from color leaching in the fabric.
12
To pack your v3 kite first completely deflate the struts. Then release the deflate valve on the LE of the kite. Roll up each
strut from the bottom to the top to expel all the air. Repeat this until all the struts are deflated. Roll the LE from tip to center
to expel all the air from one half of the kite, then repeat with the other side of the kite being careful not to squeeze air from
one half of the leading edge into the other during deflation.
Kites equipped with our external EZ-pump system require that you open the clicker valve, located on the short hose that
links each strut to the LE bladder before deflating each strut.
With your fully deflated kite now lying on the ground with the struts visible, fold the kite so that the tips touch where the
center strut is/would be. Fold the kite in towards the middle again then fold the LE back on itself and continue folding the
kite in towards the middle until it is the width of your kite bag. Finally fold the kite leading edge to trailing edge in either 2
or 3 sections until it is small enough to fit inside your bag.
REPLACING/REPAIRING EZ-PUMP STRUT BLADDERS:
All v3 kites come with an accessory repair kit provided by KiteFix. In addition to the standard Ripstop and bladder material
pack, the HP kit comes with replacement zip ties for the strut hoses and a valve plug for sealing strut valves to pressure
check them during repair. To remove the strut valve, follow the diagram below to remove the zip-tie, and then unseat the
strut bladder valve prior to withdrawing the strut bladder from the strut casing.
Don’t forget to tie some line to the valve before you pull it all the way out of the strut casing!
HOW HARD SHOULD I INFLATE MY KITE?
We recommend that you use the new high-volume, dual-action 'Green' pump available from Best or your local dealer. We
selected these pumps because it is very difficult to over inflate the kite with a manual pump. Your Kahoona v3 should be
inflated to around 10 PSI. The Nemesis HP can take higher inflation pressure in the leading edge due to its Cuben
construction; we recommend that you inflate the HP a little more than you would a normal kite.
Due to the hugely increased risk of impact damage when flying on land, we recommend that land-boarders and
snowkiters do not exceed the recommended inflation pressure of 10 PSI. Do not store your kite with inflated struts inside a
vehicle during the summer, as in-car temperatures can rise rapidly, leading to a catastrophic increase in strut pressure.
We recommend that when storing the kite for any period of time, all the valve plugs be removed from the LE valves.
Best Kiteboarding will not be responsible for any damage that occurs due to the use of a pressure
hose/compressor when inflating your kite.
WHERE DO I GO FOR EXTRA INFORMATION ON MY KITES?
Your local Best Kiteboarding retailer has been trained in all aspects of the products they sell and can help you with any
queries you may have regarding all Best Kiteboarding products. You may also contact Best Kiteboarding customer
support via our website. For any general questions about using Best Kiteboarding products, or to chat with other
kitesurfers and to find out all the latest info about everything Best, visit the website http://www.bestkiteboarding.com or
log onto the online user forums at http://forum.bestkiteboarding.com
WARRANTY INFO:
FAIR AND REASONABLE TIMEFRAME WARRANTY
13
In addition to our thirty (30) days 100% Performance Satisfaction Guarantee for direct online purchases from Best
Kiteboarding, we also guarantee everything we sell to be free from defects in materials and workmanship under our “Fair
and Reasonable Timeframe” warranty. This Fair and Reasonable Timeframe warranty also extends to any product
purchased from our extensive retailer network across the world.
We understand that every kiter is different and that we all use and care for our equipment in different ways. A kiter who
kites several times every week might be satisfied with a typical six-month warranty, while a kiter who only kites once a
month can reasonably expect his equipment to last much longer than the duration of a standard warranty, and we agree.
We see no reason why you should have to pay extra for extended warranty support, especially if you take good care of
your gear.
The thinking behind our Fair and Reasonable Timeframe warranty is simple: it is the same quality of service that we would
expect for our own gear. If we think it is Fair and Reasonable to replace or repair your kite, then that's what we will do. If
you take good care of your gear and don't abuse it, then you deserve to be taken care of as well. Please see the online
information for a list of exclusions from the warranty terms.
So you think you've got a legitimate request? Get in touch with the shop where you bought the gear (the original
point of purchase), and the warranty investigation process will begin from there. If you bought the gear from Best
online, call us or email us directly. If you bought the gear at one of our Authorized Best dealers, get in touch with them.
The warranty ONLY applies to new products bought directly from Best Kiteboarding or from an Authorized Best dealer.
Purchases from the “Pre-Owned” section of the Best Kiteboarding website, secondhand purchases, or E-Bay purchases
(and the like) are not covered under warranty, even if the products were listed as “new” or appear to be sold via a shop.
This Fair and Reasonable Timeframe Warranty gives you specific legal rights. You may also have other rights that may
vary from state to state or jurisdiction. If you have any questions about our limited warranty or would like to schedule a
return, simply contact our Customer Service by phone at 1-866-700-BEST, or 1-252-489-2959 if you are outside the US or
Canada, 9:00 AM to 5:00 PM, EST.
Request for additional information and updates to the product manuals should be sent to [email protected]
14