1
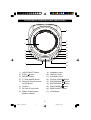
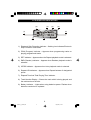
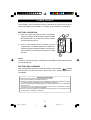
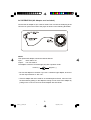
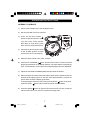
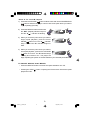
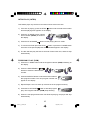
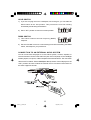
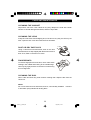
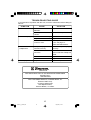
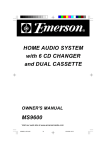
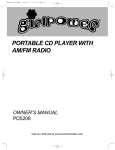
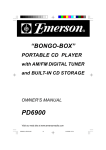
PERSONAL CD PLAYER
with 40 SECOND ELECTRONIC
ANTI-SKIP PROTECTION
OWNER’S MANUAL
HD9971
Visit our web site at www.emersonradio.com
HD9971_ib_drafts.p65
18
19/4/2002, 15:52
Thank you.........
For purchasing this Emerson Personal CD Player. The CD player has a 22 track
programmable memory so you can listen to the songs on your favorite CD's in any
order you choose. Or you can use the Random playback feature and let the player
select the playback order for you. Use the 3-way Repeat feature to repeat a single
track, the entire disc, or a programmed sequence of tracks, indefinitely. We've
also included a 40 Second Electronic
Anti-Skip Memory which makes this player virtually skip-free during most active
uses. There's a Dynamic Bass Boost Control that increases and enhances the
bass response.
Please read this instruction manual completely and carefully to make sure you
understand the proper operation of this product, and get the maximum enjoyment
out of all the features of this state-of-the-art CD player.
Once again, thanks for purchasing this Emerson product.
The serial number of your CD player can be found on the bottom cabinet. We
suggest that you record the serial number of your unit in the space below for future
reference.
Model Number: HD9971
Serial Number:
1
HD9971_ib_drafts.p65
1
19/4/2002, 15:52
IMPORTANT NOTES
WARNING: TO PREVENT FIRE OR SHOCK HAZARD,
DO NOT EXPOSE THIS UNIT TO RAIN OR MOISTURE.
Avoid installing the unit in locations described below:
• Places exposed to direct sunlight or
• Dusty places.
lose to heat radiating appliances such
• P l ac e s s u b j ec t t o c o n s t an t
as electric heaters.
vibration.
• Humid or moist places.
CLASS 1 LASER PRODUCT
CLASS 1 LASER PRODUCT
APPAREIL Á LASER DE CLASSE 1
PRODUCTO LASER DE CLASE 1
CAUTION
INVISIBLE LASER RADIATION
WHEN OPEN AND INTERLOCKS
DEFEATED.
AVOID EXPOSURE TO BEAM
This product contains a low power Laser Device.
CAUTION
THIS LASER COMPACT DISC PLAYER FUNCTIONS BY HELP OF INVISIBLE
LASER LIGHT AND IS EQUIPPED WITH SAFETY SWITCHES TO AVOID
EXPOSURE W HEN DOOR IS OPEN AND SAFETY INTERLOCKS ARE
DEFEATED. IT IS DANGEROUS TO DEFEAT OR BYPASS SAFETY SWITCHES.
DANGEROUS VOLTAGE
Uninsulated Dangerous Voltage, that may be of sufficient
magnitude to constitute a risk of electric shock to persons is
present within this product's enclosure.
!
ATTENTION
The Owner's Manual contains important operating and
maintenance instructions.
For your safety, it is necessary to refer to the manual.
This device complies with part 15 of the FCC rules. Operation is subject to the
condition that this device does not cause harmful interference.
2
HD9971_ib_drafts.p65
2
19/4/2002, 15:52
LOCATION OF CONTROLS AND INDICATORS
8
7
9
6
10
11
5
12
4
13
3
2
14
15
1
16
17
1.)
2.)
3.)
4.)
5.)
HOLD ON/OFF Switch.
STOP Button.
REPEAT Button.
P. (Play) MODE Button.
Electronic Skip Protection
On/Off Button.
6.) CD Door.
7.) DC IN 4.5V Input Jack.
8.) Battery Compartment.
(Bottom cabinet)
9.) Headphone Jack.
10.) LINE OUT Jack.
11.) VOLUME Control.
12.) CD Door OPEN
13.) SKIP/SEARCH
Button.
Button.
14.) SKIP/SEARCH
15.) PLAY/PAUSE
Button.
Button.
16.) DBBS ON/OFF Switch.
17.) LCD Display.
3
HD9971_ib_drafts.p65
3
19/4/2002, 15:52
LCD DISPLAY INDICATORS
(3)
(2)
(4)
(5)
(6)
(1)
(9)
(8)
(7)
1.) Electronic Skip Protection Indicator – flashing icon indicates Electronic
Skip Protection is activated.
2.) PGM (Program) Indicator – Appears when programming tracks or
playing programmed tracks.
3.) RPT Indicator – Appears when the Repeat playback mode is selected.
4.) RND (Random) Indicator – Appears when Random playback mode is
selected.
5.) INTRO Indicator – Appears when Intro playback mode is selected.
6.) Repeat A-B Indicators – Appears when Repeat between 2 designated
points.
7.) Elapsed Time And Total Playing Time Indicator.
8.) Track Number Display – Shows the track which is being played, and
the total tracks on the disc.
9.) Battery Indicator – Lights when using batteries power. Flashes when
batteries needed to be replaced.
4
HD9971_ib_drafts.p65
4
19/4/2002, 15:52
POWER SOURCE
This CD player can be operated on either 120V 60Hz AC house current with an
optional AC adapter (not included) or on 3V DC (2 "AA" batteries, not included).
BATTERY OPERATION
1.) Open the battery compartment door on the bottom
cabinet by sliding it in the direction of the arrow and
then lifting it open. To prevent loss, the door cannot
be removed from the unit.
2.) Insert 2 "AA" batteries (not included) into the
compartment. Use alkaline batteries for longest life.
Follow the polarity markings inside the compartment.
If the batteries are inserted incorrectly the unit will
not work.
NOTE:
In order to operate the player on batteries the AC adapter must be disconnected
from the DC IN jack.
BATTERY REPLACEMENT
When the batteries become too weak the battery level indicator “
” flashes
s
and operation may become erratic. When this occurs replace the batteries
immediately.
BATTERY PRECAUTIONS
Follow these precautions when using batteries in this device:
1. Use only the size and type of batteries specified.
2. Be sure to follow the correct polarity when installing the batteries as indicated in the battery
compartment. Reversed batteries may cause damage to the device.
3. Do not mix different types of batteries together (e.g. Alkaline and Carbon-Zinc) or old batteries
with fresh ones.
4. If the device is not to be used for a long period of time, remove the batteries to prevent
damage or injury from possible battery leakage.
5. Do not try to recharge batteries not intended to be recharged; they can overheat and rupture
(Follow battery manufacturer’s directions.)
5
HD9971_ib_drafts.p65
5
19/4/2002, 15:52
AC OPERATION (AC Adapter not included)
Connect the AC adapter to your 120V AC outlet. Then connect the small plug to the
"DC IN 4.5V" jack on the back of the player as shown in the following illustration.
NOTE:
This optional AC adapter, should be rated as follows:
Input :
120V / 60Hz AC.
Output : 4.5V DC 500mA.
The adapter must have a female-type plug with a positive center:
Negative (–)
Positive (+)
• Be sure the adapter is UL listed. If you use a “Universal”-type adapter, be sure to
set the output selector to “DC 4.5V”.
• If the AC adapter will not be used for an extended period of time, remove it from
the wall outlet by pulling on the adapter housing. Do not remove the adapter by
pulling on the cord. Do not touch the AC adapter with wet hands.
6
HD9971_ib_drafts.p65
6
19/4/2002, 15:52
OPERATING INSTRUCTIONS
NORMAL PLAYBACK
1.) Connect the headphones to the Headphone jack.
2.) Set the VOLUME control to minimum.
3.) Press the CD door OPEN
VOLUME
button to open the CD door. Place
your CD on the center spindle,
label side up and gently press
down until it is firmly held in place.
4.) Close the CD door and push down
on the “CLOSE” position, to make
sure that the door locks properly.
5.) Slide the HOLD switch to the “OFF” position.
6.) Press the PLAY/PAUSE
button and the total number of tracks and total
playing time will show on the display window. The player will then start playing
track 1 automatically. Track number and elapsed playing time are displayed.
7.) Adjust the VOLUME and DBBS (Bass Boost)controls as desired.
8.) When all tracks have been played the player stops and the display shows the
total tracks and playing time on the disc. After approximately 1 minute the
power shuts off and the display goes blank.
To stop playback before the disc ends press the STOP
Press the STOP
9.) Press the OPEN
button at any time.
button again to shut the power off immediately..
button to open the door and remove your disc. Close the
CD Door and return your disc to its protective storage case.
7
HD9971_ib_drafts.p65
7
19/4/2002, 15:52
PAUSE CONTROL
Press the PLAY/PAUSE
button during
playback to pause momentarily. The sound
stops. The time display flashes but the disc
continues to spin.
Press the PLAY/PAUSE
button again to cancel pause and resume playback.
The sound returns and the display stops flashing.
SKIP/SEARCH CONTROLS
To skip forward or reverse to another track during playback press
the
or
buttons repeatedly until the desired track number
appears in the display. Playback will begin on the desired track.
To search forward or backward within a track to locate a specific musical passage
press and hold either the
or
buttons. The player moves forward or reverse
at high speed. When you reach the desired point in the track, release the buttons
and normal playback resumes.
REPEAT PLAYBACK
Repeat One Track
1.) Press the REPEAT button until the
Repeat Indicator (RPT) is flashing on the
display.
2.) Select the desired track by pressing the
3.) Press the PLAY/PAUSE
continuously.
/
buttons.
button. The selected track will be repeated
Repeat All Tracks
1.) Press the REPEAT button until the Repeat
Indicator “RPT” remains on the display.
2.) Press the PLAY/PAUSE
button. The
entire disc will be repeated continuously.
8
HD9971_ib_drafts.p65
8
19/4/2002, 17:00
“Point A” To “Point B” Repeat
button to start the disc and use the SKIP/SEARCH
1.) Press the PLAY/PAUSE
button to advance the player until it is close to the point where you want to
begin repeating (Point A).
2.) Press the REPEAT button 3 times until
the “RPT” (Repeat) indicator stays on
and the “A
” indicator is flashing.
3.) When you reach the point where you want to
begin repeat playback, press the PLAY/
PAUSE
button once. The “A
” indicator
stays ”On” and the “B” indicator begins to
flash.
4.) When you reach the point where you want to
end repeat playback, press the PLAY/PAUSE
button once more. The “B” indicator stops
flashing and remains “On”. The player will
begin repeating the portion of the disc between your selected points A and B.
TO CANCEL REPEAT PLAY MODES
• Press the REPEAT button until all of the repeat indicators are ‘Off’.
• Pressing the STOP
playback modes.
button or opening the CD door also cancels the repeat
9
HD9971_ib_drafts.p65
9
19/4/2002, 15:52
INTRO PLAY (INTRO)
This feature plays only the first 10 seconds of each track on the disc.
button until the total track number
1.) If the disc is playing, press the STOP
and total playing time appears on the display.
2.) Press the P. MODE button until the
Intro Indicator (INTRO) is shown on
the display.
3.) Press the PLAY/PAUSE
button to start playing the Intro mode.
4.) To cancel Intro Scan press the STOP button or press the P. MODE button
until none of the special playback mode indicators appear in the display.
5.) The disc will then play the first 10 seconds of each track once, and then stop
automatically.
PROGRAM PLAY (PGM)
1.) Press the P. MODE button until the Program Indicator (PGM) is flashing on
the display.
2.) Press the SKIP/SEARCH
/
buttons to select the desired track
number.
3.) Press the REPEAT button to store that track number in
that program number. The next program number will
appear on the display.
4.) Repeat Steps 2 and 3 to store up to 22 tracks in the program memory.
5.) Press the PLAY/PAUSE
button to start the program
play. The Program Indicator (PGM) stops flashing.
6.) When the last programmed track has finished playing, the player will stop
automatically.
10
HD9971_ib_drafts.p65
10
19/4/2002, 15:52
TO CHECK THE PROGRAMMED CONTENT
1.) Press the P. MODE button until the program memory indicator (PGM) flashing
on the display.
2.) Every time the REPEAT button is pressed, the programmed tracks will be
displayed one by one in the programmed order.
TO CLEAR THE PROGRAMMED CONTENTS
Press the STOP
button twice or open the CD door to clear the program.
RANDOM PLAY (RND)
1.) If the disc is playing, press the STOP
button until the total track number
and total playing time appear on the display.
2.) Press the P. MODE button until the Random Indicator (RND) is shown on the
display.
3.) Press the PLAY/PAUSE
button
to start random play.
4.) The unit will play all the tracks on the disc in a random order.
5.) When all tracks have been played once, the player stops automatically.
NOTE: During random playback you can press the SKIP/SEARCH
button to
skip to the next randomly selected track, but it is not possible to skip backward.
11
HD9971_ib_drafts.p65
11
19/4/2002, 15:52
ELECTRONIC SKIP PROTECTION (ESP)
This CD player is equipped with an automatic 40 second Electronic Skip Memory
and an Anti-Rolling Mechanism that will eliminate virtually all skipping during most
active uses. When you press the ESP button the player immediately begins to
store 40 seconds of music in a solid state memory that is impervious to shock. The
player is always reading the disc 40 seconds ahead of the music you are hearing
and storing that information in the memory. If the player is subjected to shock or
bumps of less than 40 seconds duration you will not notice them at all. If the bumps
last longer than 40 seconds the anti-skip memory may be depleted and the player
may skip or stop.
1.) Press the Electronic Skip Protection (ESP) button to activate the
Skip Protection Control function. The ESP indicator appears.
2.) The player will store the CD’s digital data in its Anti Skip memory
and then playing back from the memory. The ‘Bars’increase.
3.) When all 4 "bars" appear the Anti-Skip memory contains 40 seconds
of music and is "full".
4.) If vibration occurs on the disc, the player will continue the playback
for 40 seconds.
5.) If the player is bumped or shaken the "bars" may start to disappear
as the memory is depleted. If all 4 "bars" disappear the memory is
empty and the player may skip if the bumps continue.
6.) When the bumps stop the memory starts to fill up again and all 4
"bars" will reappear.
NOTE:
• The battery power consumes more quickly when the Electronic Skip Protection
control is used.
• Set the Electronic Skip Protection ‘Off’when player is used in a place free of
vibration.
12
HD9971_ib_drafts.p65
12
19/4/2002, 15:52
HOLD SWITCH
1.) If you are carrying the unit in a backpack, school bag etc, you can slide the
HOLD switch to the ‘ON’ position. This prevents the unit from starting
accidentally and draining the batteries.
2.) Set to ‘OFF’position to resume normal operation.
DBBS SWITCH
1.) This switch enhances the low frequency (BASS)
response.
2.) Set the VOLUME control to a low listening level before activating the DBBS
switch, then adjust to your preference.
CONNECTION TO AN EXTERNAL AUDIO SYSTEM
You can connect this CD player to a home stereo system, receiver, amplifier, or
recorder if desired. Connect the LINE OUT jack of this CD player to the Left/Right
Auxiliary Inputs, Line Inputs, or Record Inputs of the external device. The connection
cable is NOT included. Set the DBBS(Bass Boost) switch of this CD player to the
“OFF” position. Be sure to follow the external source connection instructions for
the other equipment as well.
13
HD9971_ib_drafts.p65
13
19/4/2002, 16:59
CARE AND MAINTENANCE
CLEANING THE CABINET
Wipe with a soft cloth. If the cabinet is very dirty, dampen the cloth with a weak
solution of neutral detergent and water, and then wipe clean.
CLEANING THE LENS
A dirty lens will cause sound skipping and, if the lens is very dirty, the CD may not
work. Open the disc cover and clean the lens as follows:
DUST OR DRY PARTICLES
Using a camera lens brush/blower, blow on the lens
several times, then wipe it lightly with the brush to remove
dust. Then, blow on the lens once more.
FINGERPRINTS
To remove fingerprints from the lens, use a cotton swab
starting in the middle and working to the outside edge.
Use only very light pressure on the lens to avoid forcing
it out of alignment.
CLEANING THE DISC
When a disc becomes dirty, clean it with a cleaning cloth. Wipe the disc from the
center out.
NOTE:
Do not use solvents such as benzine, thinner, commercially available
or anti-static spray intended for analog discs.
14
HD9971_ib_drafts.p65
14
19/4/2002, 15:52
cleaners
TROUBLESHOOTING GUIDE
If you experience a problem with this unit, check the chart below before calling for
service.
SYMPTOM
Unit will not turn on.
Disc will not play.
No sound from
headphones.
Erratic playback.
CAUSE
Weak or dead
batteries.
CD compartment not
closed.
Disc inserted incorrectly.
Dirty or defective disc.
Moisture or condensation
on disc or lens.
Headphone plug not
inserted correctly.
VOLUME controls set to
SOLUTION
Replace batteries.
Close CD compartment.
Reinsert disc correctly.
Try another disc.
Disc: wipe with soft cloth.
Lens: see page 14.
‘Care and Maintenance’
Reinsert headphone plug
correctly.
Raise volume controls on
minimum.
main unit and/or headphone
Weak batteries.
Defective disc.
Dirty or defective disc.
cable.
Replace batteries.
Try another disc.
Clean or replace disc.
SERVICE
FOR ADDITIONAL SET-UP OR OPERATING ASSISTANCE
PLEASE CALL:
1-800-898-9020
FOR CUSTOMER SERVICE, PLEASE WRITE TO:
Emerson Radio Corp.
Consumer Affairs Dept.
1901 Diplomat Drive,
Farmers Branch, TX 75234.
15
HD9971_ib_drafts.p65
15
19/4/2002, 15:52
EMERSON RADIO CORP.
LIMITED WARRANTY
What does this warranty cover ? Any manufacturing defects in original material, including original parts and
workmanship, under normal use and conditions.
For how long? For a period of ninety (90) days from the date of original purchase in the U.S.
What will we do ? If you need service under this Warranty, and you provide us with the dated proof of
purchase, we will provide repair service at no charge for labor and parts at an authorized Depot Repair Facility,
or replace the product in our discretion.
How do you make your warranty claim ? If it becomes necessary to repair your unit, you can obtain the name
and mailing location of a Depot Repair Facility by dialing 1-800-695-0098. You should pack your unit in a wellpadded heavy corrugated box, enclose your check or money order payable to the Depot Repair Facility in the
amount of $9.00 to cover the return shipping and handling costs, and enclose a copy of your proof of purchase
(warranty service will not be provided without a dated proof of purchase). Finally, you should ship the unit
prepaid via UPS or parcel post (insured).
What does your warranty not cover ? Your warranty does not cover the following :
•
•
•
•
•
•
•
•
•
•
•
Damage from negligence, misuse, abuse, accident, or failure to follow operating instructions.
Use of product in a commercial application or rentals.
Changes or repairs by anyone other than an authorized Depot Repair Facility.
Damage because your unit is improperly connected to the equipment of other manufacturers.
Unit on which the serial number has been defaced, modified or removed.
Damage to equipment not properly connected to the product.
Cost incurred in shipping your unit to and from an authorized Depot Repair Facility.
Ordinary adjustments which you can perform as outlined in the owner’s manual.
Signal reception problems caused by external antenna or cable systems.
Products purchased, used, serviced, or damaged outside of the United States.
Damage to compact discs or cassettes.
What other limitations apply to your warranty ?
THIS WARRANTY IS NON-TRANSFERABLE AND APPLIES ONLY TO THE ORIGINAL PURCHASER
AND DOES NOT EXTEND TO SUBSEQUENT OWNERS OF THE PRODUCT. THIS WARRANTY IS VALID
ONLY IN THE UNITED STATES OF AMERICA. ANY APPLICABLE IMPLIED WARRANTIES, INCLUDING
THE WARRANTY OF MERCHANTABILITY, ARE LIMITED IN DURATION TO A PERIOD OF THE
EXPRESSED WARRANTY AS PROVIDED ABOVE BEGINNING WITH THE DATE OF ORIGINAL
PURCHASE AT RETAIL AND NO WARRANTIES, WHETHER EXPRESSED OR IMPLIED, SHALL APPLY
TO THE PRODUCT THEREAFTER. WE MAKE NO WARRANTY AS TO THE FITNESS OF THE PRODUCT
FOR ANY PARTICULAR PURPOSE OR USE.
THE EXTENT OF OUR LIABILITY UNDER THIS LIMITED WARRANTY IS THE REPAIR OR
REPLACEMENT PROVIDED ABOVE AND IN NO EVENT WILL OUR LIABILITY EXCEED THE
PURCHASE PRICE PAID BY THE PURCHASER OF THE PRODUCT. UNDER NO CIRCUMSTANCES
WILL WE BE LIABLE FOR ANY LOSS, DIRECT, INDIRECT, INCIDENTAL, SPECIAL, OR
CONSEQUENTIAL DAMAGE ARISING OUT OF OR IN CONNECTION WITH THE USE OF THIS
PRODUCT.
How does state law apply to your warranty ?
THIS WARRANTY GIVES YOU SPECIFIC LEGAL RIGHTS, BUT YOU MAY ALSO HAVE OTHER RIGHTS
WHICH VARY FROM STATE TO STATE. SOME STATES DO NOT ALLOW LIMITATIONS ON IMPLIED
WARRANTIES OR EXCLUSION OR LIMITATION OF INCIDENTAL OR CONSEQUENTIAL DAMAGE,
SO THESE RESTRICTIONS MAY NOT APPLY TO YOU.
AU898F
16
HD9971_ib_drafts.p65
16
19/4/2002, 15:52
EMERSON RADIO CORP.
EMERSON
PART NO. :16-2861
204-01
HD9971_ib_drafts.p65
PRINTED IN CHINA
17
19/4/2002, 15:52