1
ClickShare
Installation Guide
R5900004/00
21/08/2012
Barco nv
President Kennedypark 35, 8500 Kortrijk, Belgium
Phone: +32 56.23.32.11
Fax: +32 56.26.22.62
Support: www.barco.com/esupport
Visit us at the web: www.barco.com
Printed in China
Changes
Barco provides this manual ’as is’ without warranty of any kind, either expressed or implied, including but not limited to the implied warranties or merchantability and fitness for a particular purpose. Barco may make improvements and/or changes to the product(s) and/or the
program(s) described in this publication at any time without notice.
This publication could contain technical inaccuracies or typographical errors. Changes are periodically made to the information in this
publication; these changes are incorporated in new editions of this publication.
The latest edition of Barco manuals can be downloaded from the Barco web site www.barco.com or from the secured Barco web site
https://my.barco.com.
Copyright ©
All rights reserved. No part of this document may be copied, reproduced or translated. It shall not otherwise be recorded, transmitted or
stored in a retrieval system without the prior written consent of Barco.
Barco ClickShare End-User License Agreement (EULA)
PLEASE READ THIS DOCUMENT CAREFULLY BEFORE OPENING OR DOWNLOADING AND USING SOFTWARE OR HARDWARE
PROVIDED TO YOU BY BARCO AS IT CONTAINS THE TERMS AND CONDITIONS BY WHICH BARCO OFFERS TO LICENSE THE
SOFTWARE. BY OPENING THE SOFTWARE PACKAGE, OR USING THE HARDWARE IN WHICH THE SOFTWARE IS EMBEDDED,
YOU AGREE TO BECOME BOUND BY THE TERMS OF THIS AGREEMENT.
The Software as supplied by BARCO is licensed, not sold to you, on a non-exclusive basis for use only under the terms of this license,
and BARCO reserve all rights not expressly granted to you. You own the disk(s) on which the Software is provided, but the Software is
owned and copyrighted by BARCO or by third party suppliers. Your license confers no title or ownership and is not a sale of any rights in
the Software or its documentation.
By installing, executing and/or using the Software, either as initial version or as an upgrade, update, patch or enhancement of a prior
release, this Software License shall supersede any terms and conditions previously agreed upon (whether or not in writing) between Barco
and you with respect to the subject matter of this Software License and such previous terms shall from the date hereof cease to have any
force or effect; provided, however that this Software License shall not be construed as a renunciation, discharge or waiver of any right or
remedy provided in any terms and conditions previously agreed upon with respect to a failure of either party to perform any of its obligations
under any terms and conditions previously agreed upon.
Software Specifications
The Software contains the following product: ClickShare (Base Unit, Button and client software).
Software License Terms
1.
This Software License is between you and BARCO NV, a corporation organized and existing under the laws of Belgium registered
under number BE 0473.191.041, Commercial Companies’ Register of Kortrijk, having its registered office President Kennedypark, 35
at B-8500 Kortrijk, Belgium ("Barco") for the use of the Software.
You hereby undertake to inform all Authorized Users of the terms of this Software License and to bind all Authorized Users to accept all
such terms of this Software License as applies to them. Barco grants you a limited, non-exclusive, non-assignable, non-transferable
license (without the right to grant sublicenses).
2.
The Software component parts must not be separated, replicated or reverse engineered in any manner. You and Authorized Users
are entitled to use the Software for the purposes and in the manner set out in this EULA (and documentation), but neither you nor
any Authorized User are entitled to: (i) sell or grant a security interest in the Software to other parties in any way, or to rent, lease or
sub-license the Software to others without the express prior written consent of Barco; or (ii) exploit the Software or any of its component
parts for any commercial purpose, other than use by you and/or Authorized Users of the Software.
3.
Barco shall hold you harmless and indemnify you from and against direct damages, losses and expenses arising from infringement
or alleged infringement of any patent, trademark or copyright of such third party by the license and the right to install the Software as
permitted by this Software License and defend and settle at its sole expense any claim, action, suit or proceeding brought against you,
provided that (i) you promptly notify Barco in writing after a claim has been asserted against you or the commencement of any claim,
action, suit or proceeding, and (ii) Barco shall assume sole control of the defense and any settlement negotiations related to any claim,
action, suit or proceeding, and (iii) you shall not negotiate, settle or compromise any claim, action, suit or proceeding without the prior
written consent of Barco and (iv) you, at your cost, shall cooperate with Barco and provide assistance and support, as may reasonably
required by Barco, in connection with the defense and any settlement negotiations related to any claim, action, suit or proceeding.
Barco shall have no indemnity obligation for any Software, or any portion thereof, (i) that is based on specifications, drawings, models
or other data furnished by you or, (ii) that is not provided by Barco or, (iii) that is modified, in spite of the prohibition for you to modify
the software or, (iv) to the extent that you continue allegedly infringing activity after having been provided modifications that avoid the
alleged infringement, or (v) where the use of the Software, or the combination or thereof with other Software, processes or materials or
the distribution thereof rather than the Software itself is the primary cause of an alleged infringement. In case it has been determined
by a finally awarded judgment that Barco infringed or misappropriated such third party rights or earlier, at Barco’s discretion, it may, at
its option and cost, (i) modify the Software in such a way that it shall not infringe upon or misappropriate the rights of the third party or
(ii) obtain for you a license or other right to use the rights allegedly infringed or (iii) replace the Software in question with non-infringing
Software. The remedies set forth in this paragraph shall constitute your sole and exclusive remedy and Barco’s sole and exclusive
liability for a third party claim that the Product infringes or misappropriates any intellectual property right of a third party.
4.
Barco (and Barco’s licensors, as appropriate) retain ownership of all intellectual property rights in the Software and any copies you or
any Authorized User may make of such Software. The Software is protected by national copyright laws, international copyright treaties
and conventions, and other applicable laws. All rights not expressly licensed to you in this Software License are reserved to Barco
and Barco’s licensors, as appropriate. The Software contains certain other licensed materials and Barco’s licensors may protect their
rights in the event of any violation of this Software License. Neither you nor any Authorized User may, whether in whole or in part,
copy, translate, reverse engineer, derive source code from, modify, disassemble, decompile, create derivative works based on the
Software, or remove any proprietary notices or labels on the Software, save as may be permitted by law or this Software License,
without the prior consent, in writing, of Barco.
5.
The duration of this Software License will be from the date of your acceptance (as set forth above) of the Software, with no termination
date, unless otherwise specified. You may terminate this Software License at any time by destroying all copies of the Software then
in your possession and returning all associated materials and documentation, to Barco or the appointed Barco reseller that sold or
provided these to you. Barco may terminate this Software License forthwith by informing you at any time if you and/or any Authorized
User are in breach of any of the Software License’s terms.
6.
YOU UNDERSTAND THAT THE SOFTWARE IS BEING PROVIDED TO YOU "AS IS". BARCO DOES NOT MAKE NOR INTENDS
TO MAKE ANY WARRANTIES OR REPRESENTATIONS, EXPRESS OR IMPLIED AND SPECIFICALLY DISCLAIMS ALL IMPLIED
WARRANTIES OF MERCHANTABILITY FITNESS, FOR A PARTICULAR PURPOSE AND NON-INFRINGEMENT OF INTELLECTUAL PROPERTY AND DOES NOT WARRANT THAT THE SOFTWARE WILL BE FREE FROM ERRORS OR THAT SUCH ERRORS
WILL BE CORRECTED BY BARCO AND YOU ARE SOLELY RESPONSIBLE FOR ALL COSTS AND EXPENSES ASSOCIATED
WITH RECTIFICATION, REPAIR OR DAMAGE CAUSED BY SUCH ERRORS.
YOU ALSO ACKNOWLEDGE AND AGREE THAT:
BARCO ACCEPTS NO LIABILITY FOR ANY DAMAGES, LOSSES OR CLAIMS YOU OR ANY THIRD PARTY MAY SUFFER AS A
RESULT OF YOUR USE OF THE SOFTWARE, AND YOU HEREBY AGREE TO INDEMNIFY, KEEP INDEMNIFIED, DEFEND AND
HOLD HARMLESS BARCO AND BARCO’S AFFILIATES AND SUBSIDIARIES FROM AND AGAINST ANY AND ALL ACTIONS,
PROCEEDINGS, LIABILITY, LOSS, DAMAGES, FEES AND COSTS (INCLUDING ATTORNEYS’ FEES), AND OTHER EXPENSES
INCURRED OR SUFFERED BY BARCO ARISING OUT OF OR IN CONNECTION WITH ANY BREACH BY YOU OF THE TERMS OF
THIS SOFTWARE LICENSE. TO THE MAXIMUM EXTENT PERMITTED BY LAW, IN NO EVENT WILL BARCO BE LIABLE FOR ANY
INDIRECT, SPECIAL, PUNITIVE, INCIDENTAL OR CONSEQUENTIAL LOSS OR DAMAGES OF ANY KIND WHICH MAY ARISE
OUT OF OR IN CONNECTION WITH THE SOFTWARE, THIS SOFTWARE LICENSE OR THE PERFORMANCE OR PURPORTED
PERFORMANCE OF OR FAILURE IN THE PERFORMANCE OF BARCO’S OBLIGATIONS UNDER THIS SOFTWARE LICENSE
OR FOR ANY ECONOMIC LOSS, LOSS OF BUSINESS, CONTRACTS, DATA, GOODWILL, PROFITS, TURNOVER, REVENUE,
REPUTATION OR ANY LOSS ARISING FROM WORK STOPPAGE, COMPUTER FAILURE OR MALFUNCTION OF THE SOFTWARE AND ANY AND ALL OTHER COMMERCIAL DAMAGES OR LOSSES WHICH MAY ARISE IN RESPECT OF USE OF THE
SOFTWARE, EVEN IF BARCO HAS BEEN ADVISED OF THE POSSIBILITY OF THEIR OCCURRENCE; AND
7.
You shall treat as confidential all information obtained from the other pursuant to this Software License which is marked ’confidential’
or the equivalent or has the necessary quality of confidence about it and shall not divulge such information to any persons without
Barco’s prior written consent provided that this Paragraph 7 shall not extend to information which was rightfully in the possession of
you prior to the commencement of the negotiations leading to this Software License, which is already public knowledge or becomes
so at a future date (otherwise than as a result of a breach of this paragraph 7), is required to be disclosed by law or which is trivial or
obvious. You are aware of and ensure to comply with the provisions of this paragraph 7. The foregoing obligations as to confidentiality
shall survive any termination of this Software License.
8.
You agree with and fully accept the following limited service and support statements.
You will remain responsible for the maintenance of your hardware, operating system, the functioning of your network and in keeping
your systems virus-free. You acknowledge that the Software is a complex computer software application, and that the performance
thereof may vary depending hardware platform, software interactions and configuration. You acknowledge that the Software is not
designed and produced specifically to meet your specific requirements and expectations and the selection of the Software by you is
entirely your own choice and decision.
For the avoidance of doubt, nothing in this clause shall impose any obligation on Barco to provide Support Services.
9.
This Software License is the only understanding and agreement between you and Barco for use of the Software by you and/or Authorized Users. The Software License supersedes all other communications, understandings or agreements we had prior to this Software
License (with the exception of any continuing confidentiality agreement) although nothing in this Software License purports to exclude
liability for fraudulent misrepresentation. You may not export or re-export the Software or any copy or adaptation in violation of any
applicable laws or regulations. This Software License shall not be altered, amended or varied. If any provision of this Software License is determined to be illegal, void or unenforceable, or if any court of competent jurisdiction in any final decision so determines,
this Software License shall continue in full force save that such provision shall be deemed to be deleted with effect from the date of
such decision, or such earlier date.
10. You acknowledge that this Software may be subject to U.S. or other governments Export Jurisdiction. You agree to comply with all
applicable international and national laws that apply to the Software, including the U.S. Export Administration Regulations, as well as
end-user, end-use, and destination restrictions issued by the U.S. or other governments.
11. Barco shall be entitled to sub-contract all or any of Barco’s obligations hereunder to a third party and/or any of Barco’s affiliated
companies.
12. The construction, validity and performance of this Software License shall be governed in all respects by the laws of Belgium without
recourse to its conflict of law principles. All disputes arising in any way out of or affecting this Software License shall be subject
to the exclusive jurisdiction of the courts of Kortrijk, without prejudice to enforcement of any judgment or order thereof in any other
jurisdiction.
13. The United Nations Convention on Contracts for the International Sale of Goods (the "Convention") shall not apply to this Software
License, however, if the Convention is deemed by a court of competent jurisdiction to apply to this Software License, Barco shall not
be liable for any claimed non-conformance of the Software under Article 35(2) of the Convention.
This software uses the following Open Source Software in the version as mentioned or higher.
•
Crypto ++ 5.6.1
Compilation Copyright (c) 1995-2010 by Wei Dai. All rights reserved. This copyright applies only to the software distribution package as
a compilation, and does not imply a copyright on any particular file in the package. This compilation can be used, copied, modified, and
distributed compilation for any purpose, including commercial applications, without fee, under the terms available at http://www.cryptopp.com/License.txt. THE SOFTWARE AND ANY DOCUMENTATION ARE PROVIDED "AS IS" WITHOUT EXPRESS OR IMPLIED
WARRANTY INCLUDING, BUT NOT LIMITED TO, THE IMPLIED WARRANTIES OF MERCHANTABILITY AND FITNESS FOR A
PARTICULAR PURPOSE. IN NO EVENT WILL WEI DAI OR ANY OTHER CONTRIBUTOR BE LIABLE FOR DIRECT, INCIDENTAL
OR CONSEQUENTIAL DAMAGES, EVEN IF ADVISED OF THE POSSIBILITY OF SUCH DAMAGES.
•
Ogg 1.1.4 / Vorbis 1.2.3
© 2011, Xiph.Org Foundation. This software can be redistributed and used in source and binary forms, with or without modification under the BSD-like license available at http://www.xiph.org/licenses/bsd/. This software is provided by the copyright holders and
contributors “as is” and any express or implied warranties, including, but not limited to, the implied warranties of merchantability and
fitness for a particular purpose are disclaimed. In no event shall the foundation or contributors be liable for any direct, indirect, incidental, special, exemplary, or consequential damages (including, but not limited to, procurement of substitute goods or services; loss
of use, data, or profits; or business interruption) however caused and on any theory of liability, whether in contract, strict liability, or
tort (including negligence or otherwise) arising in any way out of the use of this software, even if advised of the possibility of such
damage.”
•
Linux Kernel 2.6.39 / Busybox 1.18.5
This program is free software; you can redistribute it and/or modify it under the terms of the GNU General Public License
(http://www.gnu.org/licenses) as published by the Free Software Foundation. This program is distributed in the hope that it will
be useful, but WITHOUT ANY WARRANTY; without even the implied warranty of MERCHANTABILITY or FITNESS FOR A
PARTICULAR PURPOSE. See the GNU General Public License for more details.”
•
Ath9k 2.6.39.2 / isc-dhcpd v4.1.1
Permission to use, copy, modify, and/or distribute this software for any purpose with or without fee is hereby granted conform the
ISC open source license available at http://www.isc.org/software/license. THE SOFTWARE IS PROVIDED "AS IS" AND ALL WARRANTIES WITH REGARD TO THIS SOFTWARE INCLUDING ALL IMPLIED WARRANTIES OF MERCHANTABILITY AND FITNESS
ARE DISCLAIMED. THERE SHALL BE NO LIABLITY FOR ANY SPECIAL, DIRECT, INDIRECT, OR CONSEQUENTIAL DAMAGES
OR ANY DAMAGES WHATSOEVER RESULTING FROM LOSS OF USE, DATA OR PROFITS, WHETHER IN AN ACTION OF
CONTRACT, NEGLIGENCE OR OTHER TORTIOUS ACTION, ARISING OUT OF OR IN CONNECTION WITH THE USE OR PERFORMANCE OF THIS SOFTWARE.
•
Hostapd 0.7.3 / wpa_supplicant 0.7.3
Copyright (c) 2002-2012, Jouni Malinen <[email protected]> and contributors. All Rights Reserved. This program is licensed under the BSD
license available at http://www.opensource.org/licenses/BSD-3-Clause. This software is provided by the copyright holders and contributors “as is” and any express or implied warranties, including, but not limited to, the implied warranties of merchantability and fitness
for a particular purpose are disclaimed. In no event shall the foundation or contributors be liable for any direct, indirect, incidental,
special, exemplary, or consequential damages (including, but not limited to, procurement of substitute goods or services; loss of use,
data, or profits; or business interruption) however caused and on any theory of liability, whether in contract, strict liability, or tort (including negligence or otherwise) arising in any way out of the use of this software, even if advised of the possibility of such damage.”
•
libjpeg turbo 1.1.1
This software can be redistributed and used in source and binary forms, with or without modification under the BSD-like license
available at http://libjpeg-turbo.svn.sourceforge.net/viewvc/libjpeg-turbo/trunk/README-turbo.txt. This software is provided by the
copyright holders and contributors “as is” and any express or implied warranties, including, but not limited to, the implied warranties
of merchantability and fitness for a particular purpose are disclaimed. In no event shall the foundation or contributors be liable for
any direct, indirect, incidental, special, exemplary, or consequential damages (including, but not limited to, procurement of substitute
goods or services; loss of use, data, or profits; or business interruption) however caused and on any theory of liability, whether in
contract, strict liability, or tort (including negligence or otherwise) arising in any way out of the use of this software, even if advised of
the possibility of such damage.”
•
lighttpd 1.4.26
Copyright (c) 2004, Jan Kneschke, incremental. All Rights Reserved. This program is licensed under the BSD license available at
http://www.opensource.org/licenses/BSD-3-Clause. This software is provided by the copyright holders and contributors “as is” and
any express or implied warranties, including, but not limited to, the implied warranties of merchantability and fitness for a particular
purpose are disclaimed. In no event shall the foundation or contributors be liable for any direct, indirect, incidental, special, exemplary,
or consequential damages (including, but not limited to, procurement of substitute goods or services; loss of use, data, or profits; or
business interruption) however caused and on any theory of liability, whether in contract, strict liability, or tort (including negligence or
otherwise) arising in any way out of the use of this software, even if advised of the possibility of such damage.”
•
Grub 1.99 / rsync 3.0.9
This program is free software: you can redistribute it and/or modify it under the terms of the GNU General Public License as published
by the Free Software Foundation (http://www.gnu.org/copyleft/gpl.htm). This program is distributed in the hope that it will be useful,
but WITHOUT ANY WARRANTY; without even the implied warranty of MERCHANTABILITY or FITNESS FOR A PARTICULAR PURPOSE.”
•
Monit 5.3.2
Copyright (C) 2000-2011 Tildeslash Ltd. This program is free software: you can redistribute it and/or modify it under the terms of the
GNU Affero General Public License as published by the Free Software Foundation, either version 3 of the License, or (at your option)
any later version. This program is distributed in the hope that it will be useful, but WITHOUT ANY WARRANTY; without even the
implied warranty of MERCHANTABILITY or FITNESS FOR A PARTICULAR PURPOSE. See the GNU Affero General Public License
for more details. You should have received a copy of the GNU Affero General Public License along with this program. If not, see
http://www.gnu.org/licenses/.
•
RSA Data Security, Inc. MD5 Message-Digest Algorithm
Copyright (C) 1991-2, RSA Data Security, Inc. Created 1991. All rights reserved. License to copy and use this software is granted
provided that it is identified as the "RSA Data Security, Inc. MD5 Message-Digest Algorithm" in all material mentioning or referencing
this software or this function. License is also granted to make and use derivative works provided that such works are identified as
"derived from the RSA Data Security, Inc. MD5 Message-Digest Algorithm" in all material mentioning or referencing the derived work.
RSA Data Security, Inc. makes no representations concerning either the merchantability of this software or the suitability of this
software for any particular purpose. It is provided "as is" without express or implied warranty of any kind.
•
Zend Framework 1.11.11
Copyright (c) 2005-2010, Zend Technologies USA, Inc. All rights reserved. Redistribution and use in source and binary forms, with
or without modification, are permitted provided that the following conditions are met:
* Redistributions of source code must retain the above copyright notice, this list of conditions and the following disclaimer.
* Redistributions in binary form must reproduce the above copyright notice, this list of conditions and the following disclaimer in the
documentation and/or other materials provided with the distribution.
* Neither the name of Zend Technologies USA, Inc. nor the names of its contributors may be used to endorse or promote products
derived from this software without specific prior written permission.
THIS SOFTWARE IS PROVIDED BY THE COPYRIGHT HOLDERS AND CONTRIBUTORS "AS IS" AND ANY EXPRESS OR IMPLIED WARRANTIES, INCLUDING, BUT NOT LIMITED TO, THE IMPLIED WARRANTIES OF MERCHANTABILITY AND FITNESS
FOR A PARTICULAR PURPOSE ARE DISCLAIMED. IN NO EVENT SHALL THE COPYRIGHT OWNER OR CONTRIBUTORS BE
LIABLE FOR ANY DIRECT, INDIRECT, INCIDENTAL, SPECIAL, EXEMPLARY, OR CONSEQUENTIAL DAMAGES (INCLUDING,
BUT NOT LIMITED TO, PROCUREMENT OF SUBSTITUTE GOODS OR SERVICES; LOSS OF USE, DATA, OR PROFITS; OR
BUSINESS INTERRUPTION) HOWEVER CAUSED AND ON ANY THEORY OF LIABILITY, WHETHER IN CONTRACT, STRICT
LIABILITY, OR TORT (INCLUDING NEGLIGENCE OR OTHERWISE) ARISING IN ANY WAY OUT OF THE USE OF THIS SOFTWARE, EVEN IF ADVISED OF THE POSSIBILITY OF SUCH DAMAGE.
Trademarks
Brand and product names mentioned in this manual may be trademarks, registered trademarks or copyrights of their respective holders.
All brand and product names mentioned in this manual serve as comments or examples and are not to be understood as advertising for
the products or their manufacturers.
Guarantee and Compensation
Barco provides a guarantee relating to perfect manufacturing as part of the legally stipulated terms of guarantee. On receipt, the purchaser
must immediately inspect all delivered goods for damage incurred during transport, as well as for material and manufacturing faults Barco
must be informed immediately in writing of any complaints.
The period of guarantee begins on the date of transfer of risks, in the case of special systems and software on the date of commissioning,
at latest 30 days after the transfer of risks. In the event of justified notice of complaint, Barco can repair the fault or provide a replacement
at its own discretion within an appropriate period. If this measure proves to be impossible or unsuccessful, the purchaser can demand a
reduction in the purchase price or cancellation of the contract. All other claims, in particular those relating to compensation for direct or
indirect damage, and also damage attributed to the operation of software as well as to other services provided by Barco, being a component
of the system or independent service, will be deemed invalid provided the damage is not proven to be attributed to the absence of properties
guaranteed in writing or due to the intent or gross negligence or part of Barco.
If the purchaser or a third party carries out modifications or repairs on goods delivered by Barco, or if the goods are handled incorrectly,
in particular if the systems are commissioned operated incorrectly or if, after the transfer of risks, the goods are subject to influences not
agreed upon in the contract, all guarantee claims of the purchaser will be rendered invalid. Not included in the guarantee coverage are
system failures which are attributed to programs or special electronic circuitry provided by the purchaser, e.g. interfaces. Normal wear as
well as normal maintenance are not subject to the guarantee provided by Barco either.
The environmental conditions as well as the servicing and maintenance regulations specified in the this manual must be complied with by
the customer.
Disposal Information
Waste Electrical and Electronic Equipment
This symbol on the product indicates that, under the European Directive 2002/96/EC governing waste from electrical and electronic
equipment, this product must not be disposed of with other municipal waste. Please dispose of your waste equipment by handing it over to
a designated collection point for the recycling of waste electrical and electronic equipment. To prevent possible harm to the environment
or human health from uncontrolled waste disposal, please separate these items from other types of waste and recycle them responsibly
to promote the sustainable reuse of material resources.
For more information about recycling of this product, please contact your local city office or your municipal waste disposal service. For
details, please visit the Barco website at: http://www.barco.com/en/AboutBarco/weee
Disposal of batteries in the product
This product contains batteries covered by the Directive 2006/66/EC which must be collected and disposed of separately from
municipal waste.
If the battery contains more than the specified values of lead (Pb), mercury (Hg) or cadmium (Cd), these chemical symbols will appear
below the crossed-out wheeled bin symbol.
By participating in separate collection of batteries, you will help to ensure proper disposal and to prevent potential negative effects on the
environment and human health.
EN55022/CISPR22 Class A ITE (Information Technology Equipment)
Class A ITE is a category of all other ITE which satisfies the class A ITE limits but not the class B ITE limits. Such equipment should not
be restricted in its sale but the following warning shall be included in the instructions for use:
Warning : This is a class A product. In a domestic environment this product may cause radio interference in which case the user may be
required to take adequate measures.
Federal Communication Commission Interference Statement
This equipment has been tested and found to comply with the limits for a Class B digital device, pursuant to Part 15 of the FCC Rules.
These limits are designed to provide reasonable protection against harmful interference in a residential installation. This equipment generates, uses and can radiate radio frequency energy and, if not installed and used in accordance with the instructions, may cause harmful
interference to radio communications. However, there is no guarantee that interference will not occur in a particular installation. If this
equipment does cause harmful interference to radio or television reception, which can be determined by turning the equipment off and on,
the user is encouraged to try to correct the interference by one of the following measures:
•
Reorient or relocate the receiving antenna.
•
Increase the separation between the equipment and receiver.
•
Connect the equipment into an outlet on a circuit different from that to which the receiver is connected.
•
Consult the dealer or an experienced radio/TV technician for help.
This device complies with Part 15 of the FCC Rules. Operation is subject to the following two conditions: (1) This device may not cause
harmful interference, and (2) this device must accept any interference received, including interference that may cause undesired operation.
FCC Caution: Any changes or modifications not expressly approved by the party responsible for compliance could void the user’s authority
to operate this equipment.
IMPORTANT NOTE:
FCC Radiation Exposure Statement: This equipment complies with FCC radiation exposure limits set forth for an uncontrolled environment.
This equipment should be installed and operated with minimum distance 20 cm between the radiator and your body. If this device is going
to be operated in 5.15 ~ 5.25 GHz frequency range, then it is restricted in indoor environment only. This transmitter must not be co-located
or operating in conjunction with any other antenna or transmitter.
Base Unit:
•
Contains FCC ID: RYK-WPEA121N
•
IC: 4104 A-AR5BHB116
Button
•
Contains FCC ID: XF 6–RS9110N1103
•
IC: 8407 A-RS9110N1103
Turkey RoHS compliance
Türkiye Cumhuriyeti: EEE Yönetmeliğine Uygundur.
[Republic of Turkey: In conformity with the EEE Regulation]
中国大陆 RoHS – Chinese Mainland RoHS
根据中国大陆《电子信息产品污染控制管理办法》(也称为中国大陆RoHS), 以下部分列出了Barco产品中可能包含的有毒和/或有害物质
的名称和含量。中国大陆RoHS指令包含在中国信息产业部MCV标准:“电子信息产品中有毒物质的限量要求”中。
According to the “China Administration on Control of Pollution Caused by Electronic Information Products” (Also called RoHS of Chinese
Mainland), the table below lists the names and contents of toxic and/or hazardous substances that Barco’s product may contain. The RoHS
of Chinese Mainland is included in the MCV standard of the Ministry of Information Industry of China, in the section “Limit Requirements
of toxic substances in Electronic Information Products”.
零件项目(名称)
有毒有害物质或元素
Component Name
Hazardous Substances or Elements
汞
铅
镉
(Hg)
(Pb)
(Cd)
六价铬
多溴联苯
多溴二苯醚
(Cr6+)
(PBB)
(PBDE)
印制电路配件
x
0
x
0
0
0
Printed Circuit
Assemblies
电(线)缆
x
0
x
0
0
0
Cables
底架
x
0
x
0
0
0
Chassis
电源供应器
x
0
x
0
0
0
Power Supply Unit
文件说明书
0
0
0
0
0
0
Paper Manuals
O: 表示该有毒有害物质在该部件所有均质材料中的含量均在 SJ/T 11363-2006 标准规定的限量要求以下.
O: Indicates that this toxic or hazardous substance contained in all of the homogeneous materials for this part is below the limit
requirement in SJ/T11363-2006.
X: 表示该有毒有害物质至少在该部件的某一均质材料中的含量超出 SJ/T 11363-2006 标准规定的限量要求.
X: Indicates that this toxic or hazardous substance contained in at least one of the homogeneous materials used for this part is
above the limit requirement in SJ/T11363 2006.
在中国大陆销售的相应电子信息产品(EIP)都必须遵照中国大陆《电子信息产品污染控制标识要求》标准贴上环保使用期限(EFUP)标签。
Barco产品所采用的EFUP标签(请参阅实例,徽标内部的编号使用于制定产品)基于中国大陆的《电子信息产品环保使用期限通则》标准。
All Electronic Information Products (EIP) that are sold within Chinese Mainland must comply with the “Electronic Information Products
Pollution Control Labeling Standard” of Chinese Mainland, marked with the Environmental Friendly Use Period (EFUP) logo. The number
inside the EFUP logo that Barco uses (please refer to the photo) is based on the “Standard of Electronic Information Products Environmental Friendly Use Period” of Chinese Mainland.
Image -1
Table of contents
TABLE OF CONTENTS
1. Introduction to the Installation Guide .. .. .. .. .. .. .. .. .. .. .. .. .. .. .. .. .. .. .. .. .. .. .. .. .. .. .. .. .. .. .. .. .. .. .. .. .. 3
1.1
1.2
1.3
About this Guide . . . . . . . . . . . . . . . . . . . . . . . . . . . . . . . . . . . . . . . . . . . . . . . . . . . . . . . . . . . . . . . . . . . . . . . . . . . . . . . . . . . . . . . . . . . . . . . . . . . . . . . . . . . . . . . . . . . . . . 3
About the documentation. . . . . . . . . . . . . . . . . . . . . . . . . . . . . . . . . . . . . . . . . . . . . . . . . . . . . . . . . . . . . . . . . . . . . . . . . . . . . . . . . . . . . . . . . . . . . . . . . . . . . . . . . . . . . 3
Symbols and fonts . . . . . . . . . . . . . . . . . . . . . . . . . . . . . . . . . . . . . . . . . . . . . . . . . . . . . . . . . . . . . . . . . . . . . . . . . . . . . . . . . . . . . . . . . . . . . . . . . . . . . . . . . . . . . . . . . . . . 4
2. ClickShare Specifications .. .. .. .. .. .. .. .. .. .. .. .. .. .. .. .. .. .. .. .. .. .. .. .. .. .. .. .. .. .. .. .. .. .. .. .. .. .. .. .. .. .. .. .. 5
2.1
2.2
2.3
2.4
About the
About the
About the
About the
product. . . . . . . . . . . . . . . . . . . . . . . . . . . . . . . . . . . . . . . . . . . . . . . . . . . . . . . . . . . . . . . . . . . . . . . . . . . . . . . . . . . . . . . . . . . . . . . . . . . . . . . . . . . . . . . . . . . . .
Base Unit . . . . . . . . . . . . . . . . . . . . . . . . . . . . . . . . . . . . . . . . . . . . . . . . . . . . . . . . . . . . . . . . . . . . . . . . . . . . . . . . . . . . . . . . . . . . . . . . . . . . . . . . . . . . . . . . . .
Button . . . . . . . . . . . . . . . . . . . . . . . . . . . . . . . . . . . . . . . . . . . . . . . . . . . . . . . . . . . . . . . . . . . . . . . . . . . . . . . . . . . . . . . . . . . . . . . . . . . . . . . . . . . . . . . . . . . . . .
Tray . . . . . . . . . . . . . . . . . . . . . . . . . . . . . . . . . . . . . . . . . . . . . . . . . . . . . . . . . . . . . . . . . . . . . . . . . . . . . . . . . . . . . . . . . . . . . . . . . . . . . . . . . . . . . . . . . . . . . . . .
5
6
8
9
3. Getting started .. .. .. .. .. .. .. .. .. .. .. .. .. .. .. .. .. .. .. .. .. .. .. .. .. .. .. .. .. .. .. .. .. .. .. .. .. .. .. .. .. .. .. .. .. .. .. .. .. .. . 11
3.1
Basic Workflow . . . . . . . . . . . . . . . . . . . . . . . . . . . . . . . . . . . . . . . . . . . . . . . . . . . . . . . . . . . . . . . . . . . . . . . . . . . . . . . . . . . . . . . . . . . . . . . . . . . . . . . . . . . . . . . . . . . . . . 11
4. Installing ClickShare. .. .. .. .. .. .. .. .. .. .. .. .. .. .. .. .. .. .. .. .. .. .. .. .. .. .. .. .. .. .. .. .. .. .. .. .. .. .. .. .. .. .. .. .. .. .. . 13
4.1
4.2
4.3
4.4
4.5
4.6
Installation methods . . . . . . . . . . . . . . . . . . . . . . . . . . . . . . . . . . . . . . . . . . . . . . . . . . . . . . . . . . . . . . . . . . . . . . . . . . . . . . . . . . . . . . . . . . . . . . . . . . . . . . . . . . . . . . . . . 13
On the table . . . . . . . . . . . . . . . . . . . . . . . . . . . . . . . . . . . . . . . . . . . . . . . . . . . . . . . . . . . . . . . . . . . . . . . . . . . . . . . . . . . . . . . . . . . . . . . . . . . . . . . . . . . . . . . . . .. . . . . . . . 13
Wall mounted . . . . . . . . . . . . . . . . . . . . . . . . . . . . . . . . . . . . . . . . . . . . . . . . . . . . . . . . . . . . . . . . . . . . . . . . . . . . . . . . . . . . . . . . . . . . . . . . . . . . . . . . . . . . . . . . . . . . . . . . 14
Mounted in a rack . . . . . . . . . . . . . . . . . . . . . . . . . . . . . . . . . . . . . . . . . . . . . . . . . . . . . . . . . . . . . . . . . . . . . . . . . . . . . . . . . . . . . . . . . . . . . . . . . . . . . . . . . . . . . . . . . . . 15
Mounted to the ceiling . . . . . . . . . . . . . . . . . . . . . . . . . . . . . . . . . . . . . . . . . . . . . . . . . . . . . . . . . . . . . . . . . . . . . . . . . . . . . . . . . . . . . . . . . . . . . . . . . . . . . . . . . . . . . . . 17
Connecting. . . . . . . . . . . . . . . . . . . . . . . . . . . . . . . . . . . . . . . . . . . . . . . . . . . . . . . . . . . . . . . . . . . . . . . . . . . . . . . . . . . . . . . . . . . . . . . . . . . . . . . . . . . . . . . . . . . . . . . . . . . 18
5. Configuring ClickShare . .. .. .. .. .. .. .. .. .. .. .. .. .. .. .. .. .. .. .. .. .. .. .. .. .. .. .. .. .. .. .. .. .. .. .. .. .. .. .. .. .. .. .. .. . 21
5.1
5.2
5.3
Pairing . . . . . . . . . . . . . . . . . . . . . . . . . . . . . . . . . . . . . . . . . . . . . . . . . . . . . . . . . . . . . . . . . . . . . . . . . . . . . . . . . . . . . . . . . . . . . . . . . . . . . . . . . . . . . . . . . . . . . . . . . . . . . . . 21
Pre-install of the Client software . . . . . . . . . . . . . . . . . . . . . . . . . . . . . . . . . . . . . . . . . . . . . . . . . . . . . . . . . . . . . . . . . . . . . . . . . . . . . . . . . . . . . . . . . . . . . . . . . . . . 22
Web Interface . . . . . . . . . . . . . . . . . . . . . . . . . . . . . . . . . . . . . . . . . . . . . . . . . . . . . . . . . . . . . . . . . . . . . . . . . . . . . . . . . . . . . . . . . . . . . . . . . . . . . . . . . . . . . . . .. . . . . . . . 22
5.3.1 Accessing the ClickShare Web Interface . . . . . . . . . . . . . . . . . . . . . . . . . . . . . . . . . . . . . . . . . . . . . . . . . . . . . . . . . . . . . . . . . . . . . . . . . . . . . . . . . . . . 22
5.3.2 Configuring ClickShare through the Web Interface . . . . . . . . . . . . . . . . . . . . . . . . . . . . . . . . . . . . . . . . . . . . . . . . . . . . . . . . . . . . . . . . . . . . . . . . . . 23
5.4 Software update . . . . . . . . . . . . . . . . . . . . . . . . . . . . . . . . . . . . . . . . . . . . . . . . . . . . . . . . . . . . . . . . . . . . . . . . . . . . . . . . . . . . . . . . . . . . . . . . . . . . . . . . . . . . . . . . . . . . . 39
6. Troubleshooting .. .. .. .. .. .. .. .. .. .. .. .. .. .. .. .. .. .. .. .. .. .. .. .. .. .. .. .. .. .. .. .. .. .. .. .. .. .. .. .. .. .. .. .. .. .. .. .. .. . 41
6.1
Troubleshooting list . . . . . . . . . . . . . . . . . . . . . . . . . . . . . . . . . . . . . . . . . . . . . . . . . . . . . . . . . . . . . . . . . . . . . . . . . . . . . . . . . . . . . . . . . . . . . . . . . . . . . . . . . . . . . . . . . . 41
Index. .. .. .. .. .. .. .. .. .. .. .. .. .. .. .. .. .. .. .. .. .. .. .. .. .. .. .. .. .. .. .. .. .. .. .. .. .. .. .. .. .. .. .. .. .. .. .. .. .. .. .. .. .. .. .. .. .. .. . 43
R5900004 CLICKSHARE 21/08/2012
1
Table of contents
2
R5900004 CLICKSHARE 21/08/2012
1. Introduction to the Installation Guide
1. INTRODUCTION TO THE INSTALLATION GUIDE
In this section you get a short introduction to the available ClickShare documentation.
1.1
•
About this Guide
•
About the documentation
•
Symbols and fonts
About this Guide
Version
Partnumber
Description
Level
R5900004
Installation Guide
Installation engineer
Always check for the latest version of the manual on https://my.barco.com.
Depending on the version of your ClickShare, some graphics might be different to the ones used in this manual. This however does not have any effect on the functionality.
1.2
About the documentation
List of available ClickShare documents
The ClickShare documentation consists of the following manuals:
Guide
Article number
User Guide
R5900001
Quick Start Guide
R5900002
IT & Facilities Guide
R5900003
Installation Guide (this guide)
R5900004
Safety Guide
R5900005
Service Guide
R5900006
Button Guide
R5900007
Rack Mount Guide
R5900008
Recycling Manual
R5900009
A printed copy of the Safety Guide and the Quick Start Guide is included in the ClickShare box at purchase.
Please check online for the other documents.
This installation guide explains how to install ClickShare in a meeting room and how to make it operational. It also provides detailed
information on how to configure ClickShare.
R5900004 CLICKSHARE 21/08/2012
3
1. Introduction to the Installation Guide
1.3
Symbols and fonts
Symbol overview
The following icons are used in the manual :
Caution
Warning
Info, term definition. General info about the term
Note: gives extra information about the described subject
Tip: gives extra advice about the described subject
Font overview
4
•
Buttons are indicated in bold, e.g. OK.
•
Menu items are indicated in italic.
•
Step related notes, tips, warnings or cautions are printed in italic.
•
Procedure related notes, tips, warnings or cautions are printed in bold between 2 lines preceded by the corresponding icon.
R5900004 CLICKSHARE 21/08/2012
2. ClickShare Specifications
2. CLICKSHARE SPECIFICATIONS
This chapter gives an overview of the different parts of the ClickShare product.
•
About the product
•
About the Base Unit
•
About the Button
•
About the Tray
2.1
About the product
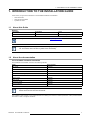
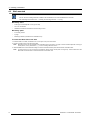
Main Components
The standard ClickShare Set consists of a Base Unit, a Tray and 4 Buttons. Depending on the location you buy the product, the
software of the Base Unit is different. If needed, you can buy additional Buttons and Trays.
1
3
2
Image 2-1
ClickShare main components
1
2
3
Base Unit
Button
Tray
Accessories
Depending on the country where you buy the product, the following regionalized accessories are also included in the ClickShare
box.
Regional version
European version
Japanese version
Chinese version
North American version
R5900004 CLICKSHARE 21/08/2012
Accessories included
•
power cables of type C and type G
•
wall/ceiling mounting brackets
•
a DVI to VGA converter
•
power cable of type A
•
wall/ceiling mounting brackets
•
a DVI to VGA converter
•
power cable of type I CCC
•
wall/ceiling mounting brackets
•
a DVI to VGA converter
•
power cable of type A
•
wall/ceiling mounting brackets
•
a DVI to VGA converter
5
2. ClickShare Specifications
2.2
About the Base Unit
Base Unit
The Base Unit receives the wireless input from the Buttons and controls the content of the meeting room display.
The Base Unit can be installed in three different ways. For more information on the actual installation, refer to "Installing
ClickShare", page 13.
Front layout of the Base Unit
At the front of the Base Unit you can find a standby button, status LED strips and a USB port.
2
1
3
2
Image 2-2
Base Unit
1
2
3
USB port
Status LED strips
Standby button
USB port
You can use the USB port to update the software of both the Base Unit and the Buttons.
When you plug the Button into the Base Unit, the Button is paired to the Base Unit. The Base Unit checks whether the Button’s
software and firmware are up to date. If not, the Base Unit updates the software and/or firmware.
To update the Base Unit software, download the latest version of the software from the Barco website. Copy the file on a USB stick
and plug it into the USB port of the Base Unit. Follow the progress and instructions on the display.
Status LED strips
The color of the LEDs at the front of the Base Unit give information on the status of the system.
LEDs behavior
static red
blinking white
slow blinking white
static white
red blinking
6
Explanation
•
receiving content from the Buttons and streaming towards the display.
•
pairing and software update of the Button is done. You can now unplug the
Button from the Base Unit.
•
during the first phase of the Base Unit boot process.
•
system is starting up (during the second phase)
•
Button pairing is in progress
•
software update of the Base Unit
•
standby mode (i.e. muting the display output)
•
awake and ready (i.e. showing the welcome message on the display)
•
pairing is done
•
an error occurred
R5900004 CLICKSHARE 21/08/2012
2. ClickShare Specifications
Standby button
The button at the front of the Base Unit has a power on/off function and a standby function.
•
When the system is awake, a short push triggers the system to go into standby mode.
•
When the system is in standby mode, a short push triggers the system to wake up.
•
When the system is powered on, a long push makes the system to shut down and power off.
•
When the system is shut down, a long push or short push triggers the system to start up.
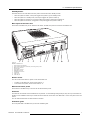
Back layout of the Base Unit
At the back of the Base Unit you can find the rocker switch, the label, the ports and connectors of the Base Unit.
1
2
3
4
5
6 7
8
9
10
1
Image 2-3
Backside of the Base Unit
1
2
3
4
5
6
7
8
9
10
Fixture points for the antennae
Label containing the article number and power rating of the product
Mains power connector
Rocker switch
DVI-I display connector
DisplayPort connector
LAN Ethernet connection
4 USB ports
Audio In port
Audio Out port
Rocker switch
You can use the rocker switch to power on and off the Base Unit.
•
To switch on the Base Unit, set the rocker switch to “I”.
•
To shut down the system, set the rocker switch to “0”.
Mechanical fixture points
At the bottom of the Base Unit you can see the mechanical fixture points.
Antennae
Two antennae are included in the ClickShare box at purchase. To avoid damage during transport, they are not pre-mounted. Depending on the installation method you should secure the antennae to the back of the Base Unit or to the front panel of the rack
mount.
You can rotate the antennae for better wireless connection.
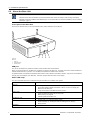
Ventilation grids
On the top and sides of the Base Unit you can find ventilation grids.
R5900004 CLICKSHARE 21/08/2012
7
2. ClickShare Specifications
Image 2-4
Ventilation grids IN and OUT
Make sure not to cover these grids during operation of the Base Unit. Always keep a free area of minimum 50
mm in front of all ventilation grids.
Bottom layout of the Base Unit
At the bottom of the Base Unit you can find the serial number label with the applicable certification logos. The serial number label
contains:
•
the Barco logo
•
the Barco part number
•
the serial number
•
the revision number
•
the production date (month/year)
•
markings for applicable standards (CE, CCC, UL, ...)
•
markings for waste regulation
•
“Made in ...”
2.3
About the Button
Button layout
A Button consists of three main components.
1
2
3
Image 2-5
Button layout
1
2
3
8
USB connector
Button
LED ring
R5900004 CLICKSHARE 21/08/2012
2. ClickShare Specifications
USB connector
Through the USB connector you can plug the Button in your laptop (for sharing your screen) or in the Base Unit (for pairing the
Button to the Base Unit or updating its software).
Button
If you click the button, the content of your screen will be shown on the display. Clicking the button during the meeting will toggle the
sharing of your screen.
Holding the button for 2 seconds brings the content of your screen on the display full screen, removing other sources currently
displayed.
LED ring
The LED ring indicates the current status of your ClickShare.
LEDs behavior
white blinking
static white
static red
red blinking
off (no light)
Explanation
•
the Button is plugged in the laptop and initializing or waiting for the user
to start the ClickShare application.
•
pairing/software update of the Button in the Base Unit is in progress.
•
ClickShare is ready to start sharing your screen.
•
pairing is done. You can now unplug the Button from the Base Unit.
•
sharing your screen with the display.
•
software update is done. You can now unplug the Button from the Base Unit.
•
an error occurred.
•
the Button is not or not properly inserted into the USB port.
•
the Button might be defective.
•
the USB port or computer might be defective.
Button label
The label at the bottom of the Button contains:
•
the Barco logo
•
the Barco part number
•
the serial number
•
the revision number
•
the production date (month/year)
•
markings for applicable standards (CE, CCC, UL, ...)
•
markings for waste regulation
•
“Made in...”
Handle the Button cable with care. Rough handling might cause defects.
2.4
About the Tray
Tray layout
The function of the Tray is to hold the Buttons on the table after the meeting is finished. The Tray can hold up to 5 Buttons.
R5900004 CLICKSHARE 21/08/2012
9
2. ClickShare Specifications
Image 2-6
Tray layout
Article number
You can find the specific article number at the bottom of the Tray.
Do not clean the Tray with products containing alcohol.
10
R5900004 CLICKSHARE 21/08/2012
3. Getting started
3. GETTING STARTED
3.1
Basic Workflow
Before actual use of the ClickShare product you should
1. Unpack the ClickShare components and accessories from the box.
For a detailed overview of the content of the ClickShare box, refer to "About the product", page 5.
2. Install the Base Unit in the meeting room using one of the 3 possible installation methods.
For more information on the installing procedures, refer to "Installing ClickShare", page 13.
3. Connect the Base Unit to the mains power and the display and start up.
For more information on connecting the Base Unit, refer to "Connecting", page 18.
4. If desired, configure your ClickShare via the Web Interface.
You can find more information on different ways to configure your ClickShare in chapter "Configuring ClickShare", page 21.
ClickShare is ready to be used.
For more information on using your ClickShare, refer to the ClickShare User Guide (R5900001). You can find it on the Barco
website.
R5900004 CLICKSHARE 21/08/2012
11
3. Getting started
12
R5900004 CLICKSHARE 21/08/2012
4. Installing ClickShare
4. INSTALLING CLICKSHARE
This chapter gives an overview of the different ways to install the ClickShare product.
•
Installation methods
•
On the table
•
Wall mounted
•
Mounted in a rack
•
Mounted to the ceiling
•
Connecting
WARNING:
Do not connect to the mains power during installation.
WARNING:
Make sure the mains power is within range of the users at all times!
CAUTION: You cannot mount the Base Unit under a random angle.
It should be mounted horizontal.
WARNING: Only use the antennae that are delivered with the product.
4.1
Other antennae are not allowed.
Installation methods
Introduction to the installation methods
There are three different ways to install the Base Unit in a meeting room. The Base Unit can be wall mounted or put on the meeting
room table. A third possibility is to mount the Base Unit to the ceiling.
The antennae are removable so they can be fixed to the Base Unit depending on the way the Base Unit is installed in the room. You
can rotate the antennae for better wireless connection.
Using extension cables for the antennae is allowed, but this can reduce performance.
For optimal performance, install the Base Unit close to the display and avoid obstacles between the Base Unit
and the Buttons. Do not block the fan inlets and outlets of the Base Unit!
4.2
On the table
Placing the Base Unit on a table
You can easily put the Base Unit on a meeting room table.
The total weight of the Base Unit is 2,6 kg.
CAUTION:
When placing the Base Unit inside a closed cabinet, make sure there is sufficient ventilation for
hot air exhaust.
R5900004 CLICKSHARE 21/08/2012
13
4. Installing ClickShare
4.3
Wall mounted
Wall mounted
You can use the mounting brackets included in the ClickShare box to mount the Base Unit to the wall.
The total weight of the Base Unit — including the mounting brackets — is 2,9 kg.
Necessary tools
•
a drill (type of drill depends on the type of wall)
•
Torx T10 screwdriver
•
Additional screwdriver that matches the mounting screws
Necessary parts
•
2 mounting screws
•
2 plugs
•
Mounting brackets (included in the ClickShare box)
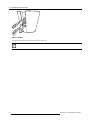
To install the Base Unit to the wall
1. Drill two holes in the wall, at a distance of 173 mm (6.81 inch) from each other.
2. Tighten 2 screws in the holes using the plugs.
Note: Mounting screws are not included in the ClickShare box at purchase. The type of screws needed depends on the type
of wall (stone, wood, plasterboard, ...) you are mounting the Base Unit to.
3. Install the Base Unit on the brackets making use of the mechanical fixture points at the bottom of the Base Unit.
Note: For this purpose you can use the pre-mounted Pan Head T10 M3 screws (refer to image 4-2). Remove them from the
Base Unit and reuse them to fixate the brackets to the Base Unit.
14
R5900004 CLICKSHARE 21/08/2012
4. Installing ClickShare
17
3m
m
Image 4-1
4. Secure the Base Unit to the wall with its front directed towards the ceiling, by putting the slots over the 2 screws.
CAUTION: It is only allowed to mount the Base Unit front side up or down. Mounting on its side is not allowed!
4.4
Mounted in a rack
Rack mounted
You can also mount the Base Unit in a 19 inch rack. In this case, you need to order a rack mount separately. Please
contact your Barco dealer.
The total weight of the Base Unit — including the rack mount plate — is 6,1 kg.
Necessary tools
•
Torx T10 screwdriver
•
Additional screwdriver that matches the mounting screws
Necessary parts
•
A rack mount (to be ordered separately)
•
4 screws (included in the rack mount)
R5900004 CLICKSHARE 21/08/2012
15
4. Installing ClickShare
To install the Base Unit in a 19 inch rack
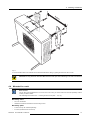
1. Remove the four T10 torx screws at the bottom of the Base Unit.
Image 4-2
Removal of pre-mounted screws
2. Place the Base Unit on the rack mount and secure it by using the four T10 torx screws.
Refer to “1” on the figure below.
3. Fasten the antennae to the front panel of the rack mount.
Refer to “2” on the figure below.
3
3
2
1
2
1
Image 4-3
4. Tighten the antenna cables to the back of the Base Unit.
Refer to “3” on the figure above.
5. Use the four included screws to mount the rack mount into the rack.
16
R5900004 CLICKSHARE 21/08/2012
4. Installing ClickShare
4.5
Mounted to the ceiling
Mounted to the ceiling
You can use the mounting brackets included in the ClickShare box to mount the Base Unit to a (false) ceiling.
Necessary tools
•
a drill (type of drill depends on the type of ceiling)
•
T10 torx screwdriver
Necessary parts
•
Mounting brackets (included in the ClickShare box)
•
4 mounting screws
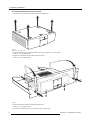
To install the Base Unit to the ceiling
1. Drill four holes in the ceiling according to the dimensions indicated in the picture below.
m
7m
15
mm
277
Image 4-4
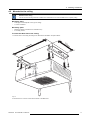
2. Remove the four T10 torx screws at the bottom of the Base Unit.
R5900004 CLICKSHARE 21/08/2012
17
4. Installing ClickShare
Image 4-5
3. Secure the mounting brackets to the Base Unit using the four T10 screws.
4. Mount the Base Unit to the ceiling with the four mounting screws.
Tip:
This procedure should be performed by two people: one person holding the Base Unit in place, one person tightening
the screws.
4.6
Connecting
CAUTION:
Make sure the Base Unit is installed properly before connecting.
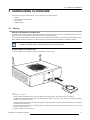
To connect the Base Unit before use
1. Plug the power cable in the mains power connector at the back of the Base Unit
Refer to “1” on the figure below.
Note: The local variant of the power cable is included in the ClickShare box at purchase.
2. Connect the Base Unit to the display using a display cable.
Refer to “2” on the figure below.
Note: A display cable is not included in the ClickShare box at purchase.
Supported types of displays are:
-
Single Link DVI
-
DisplayPort
-
VGA: use the adapter included in the ClickShare box
-
HDMI: use an adapter cable (not included in the box)
3. If you want to change settings on the web interface during installation, insert a network cable in the LAN port.
Refer to “3” on the figure below.
4. To power on the Base Unit, set the rocker switch to “I”.
Refer to “4” on the figure below.
18
R5900004 CLICKSHARE 21/08/2012
4. Installing ClickShare
4
1
2
3
Image 4-6
R5900004 CLICKSHARE 21/08/2012
19
4. Installing ClickShare
20
R5900004 CLICKSHARE 21/08/2012
5. Configuring ClickShare
5. CONFIGURING CLICKSHARE
In this section you get an overview of how you can configure the ClickShare product.
5.1
•
Pairing
•
Pre-install of the Client software
•
Web Interface
•
Software update
Pairing
Pairing of the Buttons to the Base Unit
To be able to use a Button it should be assigned to the Base Unit you are using. This process is called pairing. By default, the four
Buttons delivered in the ClickShare set are already paired to the specific Base Unit.
In case you buy additional Buttons or when a Button should be assigned to another Base Unit, the Button needs to be paired (again).
When updating the Base Unit software, it is advised to also pair your Buttons with the Base Unit to update their software.
A Button can only be paired to one Base Unit at a time.
The Button will always make connection to the Base Unit it was last paired to.
To pair a Button to the Base Unit
1. Insert the Button in the USB port at the front of the Base Unit you are using.
Image 5-1
Inserting Button into the Base Unit
Both the LEDs of the Button and the LEDs of the Base Unit are blinking white. This means pairing is in progress.
The Base Unit automatically checks whether the software of the Button is up to date. If not, the Base Unit updates the Button
software. This may take more time.
When the LEDs become static white, the Button is paired to the Base Unit, but no software update was needed. You can unplug
the Button from the Base Unit.
When the LEDs become static red, the Button is paired to the Base Unit and the software update has finished. You can unplug
the Button from the Base Unit.
2. Unplug the Button from the Base Unit.
R5900004 CLICKSHARE 21/08/2012
21
5. Configuring ClickShare
Image 5-2
Unplug Button from Base Unit
The Button is now ready for use.
5.2
Pre-install of the Client software
Client pre-install
You can pre-install the ClickShare software on your laptop or on company level. How this is done depends on your IT infrastructure.
When the software is pre-installed, a launcher application runs in the background. When you plug the Button in your laptop, the
ClickShare application will be run from the Button automatically. There is no need to run the file from the Button.
The pre-installer can be downloaded from the Barco website or from the Button mass storage drive in the folder Launcher service.
5.3
Web Interface
Overview
•
Accessing the ClickShare Web Interface
•
Configuring ClickShare through the Web Interface
5.3.1
Accessing the ClickShare Web Interface
Getting access to the Web Interface
There are three ways to access the ClickShare Web Interface:
•
Via the LAN
•
Via a crossed cable
•
Via the Base Unit wireless network
To access the Web Interface via the LAN
1. Open a browser.
Note: Supported browsers are Internet Explorer, Firefox, Google Chrome and Safari.
2. Browse to the IP address you can find in the top left corner of the ClickShare welcome screen.
Note: The IP address is only visible when the Base Unit is connected to the LAN.
A login screen appears.
22
R5900004 CLICKSHARE 21/08/2012
5. Configuring ClickShare
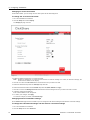
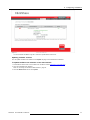
3. Enter the user name ’admin’ and the password and click OK.
By default, the password is set to ’admin’.
The web interface opens.
Image 5-3
The ClickShare web interface contains three tab pages: Setup, Maintenance and Help.
If you cannot find the IP address (e.g. there is no screen available) you should connect to the Base Unit
directly with your laptop via an Ethernet crossover cable and access the web interface using the fixed IP
address 192.168.1.23. Make sure your own LAN adapter is set in the 192.168.1. range.
To access the Web Interface via a crossed cable
1. Connect the Base Unit to your laptop using a crossed cable.
2. On your laptop, open a browser.
Note: Supported browsers are Internet Explorer, Firefox and Safari.
3. Browse to http://192.168.1.23.
A login screen appears.
4. Enter the user name ’admin’ and the password and click OK.
By default the password is set to ’admin’.
The web interface opens.
To access the Web Interface via the Base Unit wireless network
1. On your laptop, connect to the Base Unit wireless network.
The default SSID and password to connect to the Base Unit are respectively ’ClickShare-<serial base number>’ and ’clickshare’.
2. On your laptop, open a browser.
Note: Supported browsers are Internet Explorer, Firefox and Safari.
3. Browse to http://192.168.2.1.
A login screen appears.
4. Enter the user name ’admin’ and the password and click OK.
By default the password is set to ’admin’.
The web interface opens.
5.3.2
Configuring ClickShare through the Web Interface
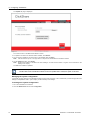
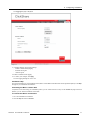
Setup
On the Setup tab page of the web interface you can add a welcome text to your screen, choose a specific wallpaper, change the
display resolution and adapt some other advanced settings.
Changing the basic settings
On the Basic tab page you can enter the name of the meeting room, add a welcome message and the location that will appear on
the screen. It is also possible to change the language of the web interface.
To change the basic settings
1. Go to the ClickShare web interface.
R5900004 CLICKSHARE 21/08/2012
23
5. Configuring ClickShare
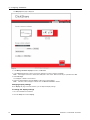
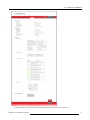
2. Click the Setup tab and click Basic.
The Basic tab page is displayed.
Image 5-4
3. In the Identification section you can now
-
enter the name of the meeting room
-
add a welcome message to the screen
-
enter a location
Note:
The name of the meeting room is used by the Client software to identify the Base Unit it is connected to.
4. Choose the language you prefer for the web interface.
5. Click Apply to confirm your changes.
The web interface language has been changed and the data you entered appear in the top left corner of the display.
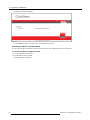
Image 5-5
Choosing a specific background
If desired, you can choose another ClickShare background wallpaper.
24
R5900004 CLICKSHARE 21/08/2012
5. Configuring ClickShare
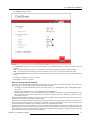
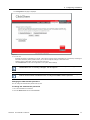
To choose another background wallpaper
1. Go to the ClickShare web interface.
2. Click the Setup tab and click Wallpaper.
The Wallpaper tab page is displayed.
Image 5-6
3. Select one of the available wallpapers and click Apply.
Note: By default, two wallpapers are present: a general Barco ClickShare wallpaper and the ClickShare Quick Start Guide.
The following message appears.
Image 5-7
The selected wallpaper is now in use.
You can also add a personal wallpaper, e.g. your company logo. For more information on adding a new wallpaper to the list, see Managing background wallpapers.
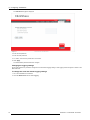
Managing background wallpapers
Via the web interface you can upload a personal background wallpaper.
To manage your background wallpapers
1. Go to the ClickShare web interface.
2. Click the Setup tab and click Wallpaper.
R5900004 CLICKSHARE 21/08/2012
25
5. Configuring ClickShare
The Wallpaper tab page is displayed.
Image 5-8
3. In the Manage available wallpapers section, click Browse.
4. In the Choose file window, browse to the specific wallpaper you want to add and click Open.
Note: The wallpaper should be in JPEG, PNG, BMP, GIF or TIFF format. Maximum file size per uploaded file is 2MB.
5. Click Add image.
The wallpaper is added to the list above.
6. Select the added wallpaper and click Apply to make it the current wallpaper.
Note: If desired, select a wallpaper in the list and click Remove selected to delete it.
Changing display settings
On the Display tab page of the web interface, you can adapt the display settings.
To change the display settings
1. Go to the ClickShare web interface.
2. Click the Setup tab and click Display.
26
R5900004 CLICKSHARE 21/08/2012
5. Configuring ClickShare
The Display tab page is shown.
Image 5-9
3. In the Resolution drop-down list, select the desired resolution or select Custom to enter a resolution (not present in the list)
manually.
Note: By default, the correct resolution is automatically set through the EDID (Extended Display Identification Data).
Note:
The maximum output resolution supported by ClickShare is 1920 x 1200. This includes Full HD 1920 x 1080.
4. In the Standby Timeout drop-down list, select the time interval of inactivity after which the display output is disabled (standby
mode).
By default, the standby time-out is set to ’Infinite’.
5. Click Apply to confirm your changes.
Note concerning reduced blanking
The timings of the ClickShare Base Unit display output are based on the information contained in the EDID of the meeting room
display or projector. Such an EDID contains at least the following information:
•
Information on supported “Established Timings” (most legacy timings, e.g. 720x400@70Hz, 88Hz; 800x600@56Hz, 60Hz,
72Hz, 75Hz; ... ; ...)
•
Standard Timing Identifications (e.g. 1280x1024@60Hz, 1600x1200@60Hz,...)
•
Detailed Timing Information. This is the “Preferred Timing” of the display and usually the most important information in the
EDID. It describes in full detail the preferred timing: pixel clock, active pixels, active lines, blanking, sync width, sync offset
(horizontal and vertical),...
When the ClickShare Base Unit display output is put in auto mode, the display output timings will be based on the Preferred Timing
as described in the meeting room display or projector EDID.
When resolution is selected manually, the timings of this resolution are taken from the information described in the meeting room
display or projector EDID. If the timing is not described in the EDID, the timing is generated by the Base Unit following the VESA
CVT standard with reduced blanking. The calculation is based on the official VESA calculation.
For example when the meeting room display or projector has native WUXGA resolution (1920x1200), this will be described by the
Detailed Timing Information in its EDID. In this case Full HD resolution (1920x1080) will not be described by the EDID. When in auto
mode, the Base Unit will use the WUXGA timing as described in the EDID. But when putting it in 1920x1080 mode manually, the
timing will be according to VESA CVT with reduced blanking.
R5900004 CLICKSHARE 21/08/2012
27
5. Configuring ClickShare
Changing on-screen text format
Via the web interface, you can change the color and style of the text and background.
To change the on-screen text format
1. Go to the ClickShare web interface.
2. Click the Setup tab and click Display.
The Display tab page is shown.
Image 5-10
3. Enable (or disable) changing the on-screen text format.
Note: Enabling or disabling the on-screen text format shows or hides the meeting room name, the welcome message, the
location and IP address on the display.
4. Click the icon next to the Text Color field to choose the text color you want to be used.
5. Select the desired text style from the Text Style drop-down list.
6. Select the desired text size from the Text Size drop-down list (Small, Medium or Large).
7. Click the icon next to the Background Color text field to choose the background color you want to be used on-screen.
8. If desired, change the transparency.
Enter a value between 0 and 100 percent.
9. To confirm your changes, click Apply.
To revert the changes you made, click Refresh Page.
Changing advanced ClickShare settings
On the Advanced tab page of the web interface you can change the LAN network settings and the wireless connection settings.
To change the LAN network settings and the wireless connection settings
1. Go to the ClickShare web interface.
2. Click the Setup tab and click Advanced.
28
R5900004 CLICKSHARE 21/08/2012
5. Configuring ClickShare
The Advanced tab page is displayed.
Image 5-11
3. If desired, in the LAN Network Settings section, change:
-
the addressing: DHCP Assigned or Fixed Address.
-
the DHCP Client ID.
-
the hostname (by default ’ClickShare-<serial base number>’)
4. In the WiFi Settings section, you can now:
-
enter a public name (SSID) for the wireless network.
Default SSID = ClickShare-<serial base number>
-
indicate whether you want to broadcast the SSID or not.
-
enter a passphrase and confirm it.
Default password = clickshare
-
select the wireless connection frequency band: 2.4 GHz or 5 GHz.
-
change the wireless connection channel.
The channels available in the list vary according to the regional version of your Base Unit. Repairing Buttons is not required
when changing the frequency band or wireless connection channel.
5. Click Apply to confirm your changes or click Refresh Page to cancel them.
WARNING: It is not allowed to operate the Base Unit outside its intended geographical region.
Maintenance
On the Maintenance tab page of the web interface you can check the status of your ClickShare, get an overview of the paired
Buttons, update the software, manage the system configuration, change the administrator password and change the logging settings.
R5900004 CLICKSHARE 21/08/2012
29
5. Configuring ClickShare
Consulting the status of your ClickShare
On the Status tab page of the web interface you can check the status of your ClickShare and get more information on the system
characteristics.
To check the status of your ClickShare
1. Go to the ClickShare web interface.
2. Click the Maintenance tab and click Status.
The Status tab page is displayed.
30
R5900004 CLICKSHARE 21/08/2012
5. Configuring ClickShare
Image 5-12
It contains information on the LAN interface, the wireless network, the update history of the system, etc.
R5900004 CLICKSHARE 21/08/2012
31
5. Configuring ClickShare
The bottom of this page contains important status information such as proper functioning of all processes on the Base Unit and
system temperatures.
3. If desired, click Restart System to restart or click Shutdown System to shut down.
Consulting Buttons information
The Buttons tab page of the web interface gives information on the Buttons that have been paired to the Base station.
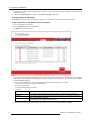
To get information on the Buttons paired to the Base
1. Go to the ClickShare web interface.
2. Click the Maintenance tab and click Buttons.
The Buttons tab page is displayed.
Image 5-13
The list gives an overview of the Buttons that have in the past been paired to this Base Unit. If a Button has in the meantime
been paired to another Base Unit, it will still appear in this list. To remove it from the list, at the right of the tab page, click More
and select Remove from list.
In the overview of paired Buttons, for each Button that has been paired to this Base Unit, you will find:
-
whether or not the Button is connected to the Base Unit
-
the specific serial number
-
the date the Button was last connected
-
the status
Status indication
Explanation
OK
Button firmware and software are up to date. The Button has been paired to the Base Unit.
WARNING
Button firmware version differs from the Base Unit firmware version, but the Button can still be
used. Pairing the Button is advised.
The Button needs to be paired to the Base Unit again before using it. The Button firmware version
is incompatible with the Base Unit firmware version.
ERROR
3. To get more information on the Button firmware, the number of connections and the MAC address, click More....
32
R5900004 CLICKSHARE 21/08/2012
5. Configuring ClickShare
Image 5-14
You can download the Button’s log file or remove a specific Button from the list.
Updating software versions
You can update the Base Unit software via the Update tab page of the ClickShare web interface.
To update the Base Unit software via the web interface
1. Download the latest version of the software from the Barco website (www.barco.com/clickshare).
2. Open the ClickShare web interface.
Refer to "Accessing the ClickShare Web Interface", page 22.
3. Click the Maintenance tab and click Update.
R5900004 CLICKSHARE 21/08/2012
33
5. Configuring ClickShare
The Update tab page is displayed.
Image 5-15
The current version of the Base Unit software is shown.
4. To upload a new version of the Base station software, click Browse.
5. On your laptop, navigate to the new version of the software and click Open.
Note: This should be an ipk file. You might have to unzip the file downloaded from the Barco website.
6. On the Update tab page, click Upload.
Note: Updating the software to the Base Unit and installing it can take several minutes. Progress can be followed on the
meeting room display.
The Base Unit software is updated.
It is advised to pair all Buttons in the meeting room to the Base Unit after a software update has been done.
The Base Unit checks if the Button software needs to be updated and if needed, the update is executed.
Managing the system configuration
It is possible to export and import configuration settings from the base web server. This is useful when you want to apply the same
settings to multiple Base Units in your company or take a backup of the settings.
To manage the system configuration
1. Go to the ClickShare web interface.
2. Click the Maintenance tab and click Configuration.
34
R5900004 CLICKSHARE 21/08/2012
5. Configuring ClickShare
The Configuration tab page is displayed.
Image 5-16
3. You can now:
-
download the system configuration as .xml file. There are two versions of the configuration file: a full backup containing all
information and history and a portable version you can use to duplicate settings on other base units.
-
upload a system configuration .xml file to the base web server
-
click Load Defaults to restore the configuration to the system default settings
Wallpapers are not included in the download configuration file. They need to be uploaded and applied on each
individual Base Unit. For selecting a wallpaper, refer to image 5-8.
When uploading a config file, the history of software updates and paired dongles is lost. Paired dongles will
however remain functional if the Base Unit has not changed from SSID or wireless password.
Changing the administrator password
You can change the administrator password at any time.
To change the administrator password
1. Go to the ClickShare web interface.
2. Click the Maintenance tab and click Password.
R5900004 CLICKSHARE 21/08/2012
35
5. Configuring ClickShare
The Password tab page is displayed.
Image 5-17
3. Enter the old password.
4. Enter the new password.
5. To confirm, enter the new password a second time.
6. Click Apply.
The administrator password has been changed.
Changing the logging settings
On the web interface it is possible to change the local and remote logging settings. Local logging means the log file is saved on the
Base Unit itself.
To change the local and remote logging settings
1. Go to the ClickShare web interface.
2. Click the Maintenance tab and click Logging.
36
R5900004 CLICKSHARE 21/08/2012
5. Configuring ClickShare
The Logging tab page is displayed.
Image 5-18
3. If needed, adapt the local logging settings:
-
enable or disable debug logging
-
download the log file
-
clear the log file
4. Enable or disable remote logging:
5. To confirm your changes, click Apply.
The new logging settings are now in use.
ClickShare Help
You can find information on your ClickShare product, Barco contact data and the End-User License Agreement (EULA) on the Help
tab page of your ClickShare web interface.
Consulting the Barco contact data
If a problem occurs while using your ClickShare product, you can contact service for help. On the Contact tab page of the web
interface, you can find the ClickShare contact data.
To consult the Barco contact data
1. Go to the ClickShare web interface.
2. Click the Help tab and click Contact.
R5900004 CLICKSHARE 21/08/2012
37
5. Configuring ClickShare
The Contact tab page is displayed.
Image 5-19
On the Contact tab page you can find a link to the ClickShare home page.
Consulting the Barco ClickShare EULA
You can consult the Barco ClickShare End-User License Agreement on the Legal tab page of the web interface.
To consult the Barco ClickShare EULA
1. Go to the ClickShare web interface.
2. Click the Help tab and click Legal.
The Legal tab page is displayed.
38
R5900004 CLICKSHARE 21/08/2012
5. Configuring ClickShare
Image 5-20
Here you can find the complete Barco ClickShare End-User License Agreement.
3. If desired, click Save ... to save a copy of the agreement on your laptop.
4. In the File Download window, click Save.
The Save as window opens.
5. Browse to the location you want to save the EULA file and click Save.
A copy of the Barco ClickShare EULA has been saved to your laptop.
5.4
Software update
Software update procedures
There are two ways to update the Base Unit software:
•
via the Web Interface
Refer to Updating software versions. Progress can be followed on the meeting room display.
•
by copying the software on a USB stick
To update the Base Unit software by copying the software on a USB stick
1. From the Barco website, download the latest ClickShare software version.
2. Copy the ipk file to a USB stick.
If necessary, first unzip the file.
3. If needed, rename the file to ’clickshare_firmware.ipk’.
4. Insert the USB stick into the USB port at the front of the Base Unit.
5. Follow the instructions on screen.
You can follow progress on the display.
R5900004 CLICKSHARE 21/08/2012
39
5. Configuring ClickShare
6. At the end of the process, remove the USB stick from the Base Unit.
Now the Base Unit reboots.
40
R5900004 CLICKSHARE 21/08/2012
6. Troubleshooting
6. TROUBLESHOOTING
6.1
Troubleshooting list
Problem solving
Locate the problem you are experiencing in the table below and apply the solution.
Problem
Cause
Solution
Quality of the image on the meeting room The quality or length of the cable between
•
Replace the cable.
display is not satisfactory
the Base Unit and the display or the
connection between these two.
•
Use another cable.
Change the resolution on the web interface
Bad resolution of the display
and match it to the native resolution of the
The system can handle the average laptop meeting room display.
resolution of 3 Megapixel. However, up or
down scaling on the meeting room display
can cause visible artefacts.
Wireless congestion
Users have a bad wireless connection.
•
Use a WiFi scanner to find a free
The connection from the Button to the
wireless channel and select it via
Base Unit keeps falling away.
the web interface. You can use
commercial as well as free online
tools such as inSSIDer or Xirrus for
this. Refer to “Changing advanced
ClickShare settings”.
Low signal strength
•
Put the Base Unit closer to the
meeting room table.
Web interface is not accessible
Browser
No connection
Users do not get a ClickShare drive when No automatic refresh of drives
inserting the Button in their laptop.
Bad connection at USB port on the laptop
•
•
Change the orientation of the
antennae at the back of the Base
Unit.
•
Remove or limit as much as possible
all obstructions between the Buttons
and the Base Unit.
•
Use another browser (version).
•
Check the browser settings.
There are three methods to access the
web interface. Refer to the corresponding
chapter of the documentation.
Refresh your view on the laptop.
•
Reconnect to the USB port.
•
Try another USB port.
•
Reboot the laptop.
If possible, change the USB port policy on
Some types of USB devices might be the laptop.
blocked as a company policy.
•
Low video performance
USB port settings on the laptop might
limit the usage of high power USB
devices when on battery power.
Laptop performance
•
Lower the screen resolution of the
laptop.
•
Disable the hardware acceleration for
video.
•
Wireless connectivity
Video is not shown on screen
Player uses overlays
Some programs of Windows are not shown Use of overlays, 3D or hardware
on the display
acceleration in the GPU
R5900004 CLICKSHARE 21/08/2012
Use only a part of the display to show
the video.
See “Users have bad connectivity”
Disable the usage of overlays in the
preferences of the video player.
Disable overlays or hardware acceleration
in the GPU.
41
6. Troubleshooting
Problem
Cause
When using Windows 7 the following
message about the Windows Aero color
scheme appears: "Windows has detected
your computer’s performance is slow. This
could be because there are not enough
resources to run the Windows Aero color
scheme. To improve...".
Base Unit does not start up correctly.
ClickShare uses resources from the GPU. It is safe to ignore this message and
In combination with other programs which choose ’Keep the current color scheme’.
do so, Windows 7 sometimes shows this
message suggesting to disable Aero to
improve the performance of your laptop.
During start-up the Base Unit freezes
a few minutes displaying the message
“ata_id[…]: HDIO_GET_IDENTIFY failed
for …”.
Base Unit does not function properly.
42
Solution
A USB stick, ClickShare Button or another Remove the connected USB device and
USB device is connected to one of its USB restart the unit.
slots at start-up.
This is a known issue.
The freeze lasts maximum 2 or 3 minutes.
The Base Unit starts up normally.
The LAN IP address the Base Unit
received from the DHCP server is in the
192.168.1.xxx range.
Disconnect the LAN cable.
R5900004 CLICKSHARE 21/08/2012
Index
INDEX
A
About 3, 5–6, 8–9
Base Unit 6
Button 8
ClickShare documentation
ClickShare product 5
Guide 3
Tray 9
3
3
P
B
Base Unit 6, 18
About 6
Connecting 18
Basic Workflow 11
Button 8, 21
About 8
Pairing 21
C
Client software 22
Pre-install 22
Configuration 21
Connecting 18
Table 18
G
Getting Started
Wall 14
Installing ClickShare 13
Introduction 3–4
Fonts 4
Installation Guide 3
symbols 4
Introduction to the Installation Guide
11
I
Installation 13–15, 17
Ceiling 17
Introduction 13
On table 13
rack mount 15
R5900004 CLICKSHARE 21/08/2012
Pairing Buttons 21
Pre-install of the Client software
Product specifications 5
22
S
Software 39
Update 39
Specifications 5
Symbols 4
T
Tray 9
About 9
Troubleshooting 41
Troubleshooting list 41
U
Update 39
Software 39
W
Web Interface 22–23
Access 22
Configuring 23
43