1
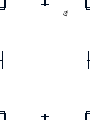
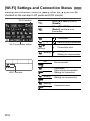
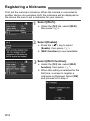
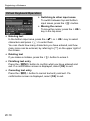
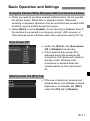
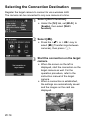
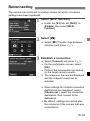
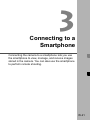
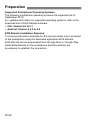
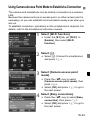
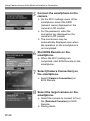
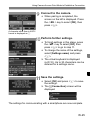
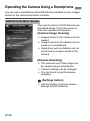
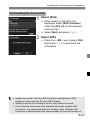
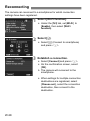
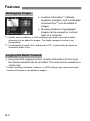
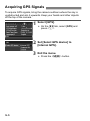
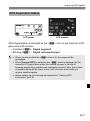
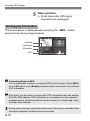
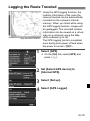
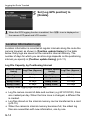
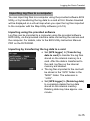
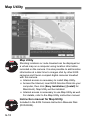
CANON INC.
30-2 Shimomaruko 3-chome, Ohta-ku, Tokyo 146-8501, Japan
Europe, Africa & Middle East
CANON EUROPA N.V.
PO Box 2262, 1180 EG Amstelveen, The Netherlands
For your local Canon office, please refer to your warranty card or to www.canon-europe.com/Support
The product and associated warranty are provided in European countries by Canon Europa N.V.
EOS 6D (WG)
Wi-Fi Function Basic Instruction Manual
GPS Function Instruction Manual
For Wi-Fi functions, basic operation procedures for "Transferring Images between
Cameras" and "Connecting to a smartphone" are explained; for more detail, refer
to the "Wi-Fi Function Instruction Manual" included on the EOS Camera Instruction
Manuals Disk (DVD-ROM).
For GPS functions, operation procedures for all functions are explained.
CEL-ST6VA210
© CANON INC. 2012
PRINTED IN THE EU
ENGLISH
EOS 6D (WG)
Wi-Fi Function Basic Instruction Manual
What You Can Do Using the Wireless LAN Functions
This camera’s wireless LAN functions let you perform a range of tasks
wirelessly, from sending images to Web services and other cameras to
controlling the camera remotely, simply by connecting to a Wi-Fi
network or other device supporting this camera’s wireless LAN
functions.
(1) Transfer images
between cameras
Exchange images
(2) Connect to a
smartphone
(6) View images using
a media player
Make images
viewable
Remote shooting
View images
(Canon Image Gateway)
(5) Send images to
a Web service
(3) Print images using
a Wi-Fi printer
Save and share images
Print images
(4) Operate the camera
remotely using EOS Utility
Remotely control the camera
* To use function (2) via an access point, refer to the “Wi-Fi Function Instruction
Manual” PDF file included on the EOS Camera Instruction Manuals Disk (DVD-ROM).
* For the procedure to use functions (3) to (6), refer to the “Wi-Fi Function
Instruction Manual” PDF file included on the EOS Camera Instruction Manuals
Disk (DVD-ROM).
W-2
What You Can Do Using the Wireless LAN Functions
(1) z Transfer images between cameras (p.W-13)
Transfer images between this camera and other Canon cameras
with built-in wireless LAN functions.
(2) q Connect to a smartphone (p.W-21)
View saved images or operate the camera from your smartphone.
You must install the dedicated application “EOS Remote” on your
smartphone to use these functions.
(3) l Print images using a Wi-Fi printer
Connect the camera to a wireless LAN compatible printer supporting
PictBridge (DPS over IP) to print images wirelessly.
(4) D Operate the camera remotely using EOS Utility
Use EOS Utility via a wireless LAN instead of an interface cable, and
operate your camera from computer wirelessly.
(5) w Send images to a Web service
Upload your images to CANON iMAGE GATEWAY, an online photo
service for Canon users (free registration required), to share them
with family and friends.
(6)
View images using a media player
Display images on the camera’s memory card on your TV set, by
using a media player supporting DLNA* via a wireless LAN.
* Digital Living Network Alliance
W-3
Conventions Used in This Manual
In this manual, the term “wireless LAN” is used as a general term for
Wi-Fi and Canon’s original wireless communication functions.
The ** (numbers) for “(p.**)” in this manual indicate reference page
numbers for more information.
Sections of this manual labeled with the following symbols contain
particular types of information as described below.
: Warnings to prevent potential problems during operation.
: Supplemental information to basic operation.
Windows is a trademark or registered trademark of Microsoft Corporation in
the United States and other countries.
Macintosh is a registered trademark of Apple Inc. in the United States and
other countries.
Wi-Fi is a registered trademark of the Wi-Fi Alliance.
Wi-Fi Certified, WPA, WPA2, and the Wi-Fi Certified logo are trademarks of
the Wi-Fi Alliance.
WPS used on camera settings screens and in this manual stands for Wi-Fi
Protected Setup.
UPnP is a trademark of the UPnP Implementers Corporation.
All other corporate and product names and trademarks mentioned in this
manual are the property of their respective owners.
Note that Canon cannot be held liable for any loss or damage from erroneous
wireless LAN settings for using the camera. In addition, Canon cannot be held
liable for any other loss or damage caused by use of the camera.
W-4
Contents
Introduction
What You Can Do Using the Wireless LAN Functions ................ W-2
Conventions Used in This Manual ............................................... W-4
[Wi-Fi] Settings and Connection Status....................................... W-6
1
Basic Settings for Wireless LAN Functions
W-7
Registering a Nickname............................................................... W-8
Basic Operation and Settings .................................................... W-11
2
Transferring Images Between Cameras
W-13
Selecting the Connection Destination ........................................ W-14
Sending Images ......................................................................... W-16
Reconnecting ............................................................................. W-19
3
Connecting to a Smartphone
W-21
Preparation ................................................................................ W-22
Using Camera Access Point Mode to Establish a Connection .. W-23
Operating the Camera Using a Smartphone.............................. W-26
Reconnecting ............................................................................. W-28
W-5
[Wi-Fi] Settings and Connection Status
Settings and connection status for [Wi-Fi] under the [53] tab can be
checked on the camera’s LCD panel and LCD monitor.
Wi-Fi function
When [53: Wi-Fi] is set to
[Disable]
When [53: Wi-Fi] is set to
[Enable] but there is no
connection
Connected
(I J)
Wi-Fi connection status
z
(Blinking)
(Blinking)
(Off)
Connection error
Waiting for connection
Waiting for reconnection
Not connected
Connected
Data is being transmitted
Waiting for connection
Wi-Fi function
(Blinking)
(Blinking)
(Blinking)
W-6
Data is being transmitted
Waiting for reconnection
Connection error
1
Basic Settings for
Wireless LAN Functions
This chapter describes settings necessary for using the
camera’s wireless LAN functions.
W-7
Registering a Nickname
First, set the camera’s nickname. When the camera is connected to
another device via a wireless LAN, the nickname will be displayed on
the device. Be sure to set a nickname for your camera.
1
Select [Wi-Fi].
Under the [53] tab, select [Wi-Fi],
then press <0>.
[Enable].
2 Select
Press the <V> key to select
[Enable], then press <0>.
X [Wi-Fi function] is now selectable.
[Wi-Fi function].
3 Select
Under the [53] tab, select [Wi-Fi
function], then press <0>.
X When this setting is selected for the
first time, a screen to register a
nickname is displayed. Select [OK]
and proceed on to step 4.
W-8
Registering a Nickname
a nickname.
4 Enter
For instructions on entering
characters, see “Virtual Keyboard
Operation” on the next page.
Up to 16 characters can be entered.
5 Finish.
When you are finished, press the
<M> button.
Select [OK] on the confirmation
screen, then press <0>. The
nickname is registered, and [Wi-Fi
function] screen will appear.
To change the nickname, press the
<B> button on the screen above,
then select [Edit nickname] on the
screen displayed.
W-9
Registering a Nickname
Virtual Keyboard Operation
Switching to other input areas
To switch between top and bottom
input areas, press the <Q> button.
Moving the cursor
To move the cursor, press the <U>
key in the top area.
Entering text
In the bottom input area, press the <V> or <U> key to select
characters and press <0> to enter them.
You can check how many characters you have entered, and how
many more can be entered, by referring to [*/*] on the upper right of
the screen.
Deleting text
If you make a mistake, press the <L> button to erase it.
Finishing text entry
Press the <M> button to confirm what you have entered and
exit. If a confirmation screen is displayed, select [OK] to exit.
Canceling text entry
Press the <B> button to cancel text entry and exit. If a
confirmation screen is displayed, select [OK] to exit.
W-10
Basic Operation and Settings
Using the Camera While Wireless LAN Functions Are Active
When you want to prioritize wireless LAN functions, do not operate
the shutter button, Mode Dial, or playback button. Otherwise,
shooting or playback operation may be prioritized and wireless LAN
functions may be ended during the process.
When [Wi-Fi] is set to [Enable], movie shooting is disabled. Even if
the camera is connected to a computer, printer, GPS receiver, or
other devices via an interface cable, they cannot be used (p.W-12).
Auto Power Off
Under the [52] tab, set [Auto power
off] to [Disable] if necessary.
If the camera’s auto power off is
activated during the wireless LAN
connection, the camera will switch to
standby mode. Wireless LAN
connection is restored when the
camera wakes up from auto power
off.
[Wi-Fi] Under the [53] Tab
If the use of electronic devices and
wireless device is prohibited on board
airplanes or in hospitals, set [Wi-Fi]
under the [53] tab to [Disable].
W-11
Basic Operation and Settings
Connecting with an Interface Cable
When [Wi-Fi] under the [53] tab is set to [Enable], interface cable
connection is disabled. Set it to [Disable] to connect the interface cable.
When the camera is connected to a computer, printer, GPS receiver, or
any other devices via an interface cable, the settings for [Wi-Fi] cannot
be changed. Disconnect the interface cable and then configure settings.
Using an Eye-Fi card
When [Wi-Fi] under the [53] tab is set to [Enable], image transfer using
an Eye-Fi card is disabled.
W-12
2
Transferring Images
Between Cameras
Images can be transferred between Canon cameras via
the built-in wireless LAN functions.
Wireless connection is possible for Canon cameras with built-in
wireless LAN functions marketed in 2012 or later. Note that the
camera cannot be connected to Canon camcorders, even if they
have built-in wireless LAN functions.
The camera cannot be connected to Canon cameras without
built-in wireless LAN functions, even if they support Eye-Fi
cards.
Still photos can be transferred only if their file format is JPEG.
Although movies can be transferred, they cannot be played if
the target camera does not support the file format of the
received movies.
W-13
Selecting the Connection Destination
Register the target camera to connect to via a wireless LAN.
The camera can be connected to only one camera at a time.
1
Select [Wi-Fi function].
Under the [53] tab, set [Wi-Fi] to
[Enable], then select [Wi-Fi
function].
[z].
2 Select
Press the <V> or <U> key to
select [z] (Transfer imgs between
cameras), then press <0>.
the connection on the target
3 Start
camera.
When the screen on the left is
displayed, start the connection on the
target camera as well. For the
operation procedure, refer to the
instruction manual of the target
camera.
When a connection is established,
the settings are automatically saved
and the images on the card are
displayed.
W-14
Selecting the Connection Destination
the images to send.
4 Select
Select images on the camera sending
the images (p.W-16).
Do not operate the camera receiving
the images.
Note that GPS information is not displayed on the camera’s playback
screen even if GPS information is appended to the received image.
Shooting locations can be viewed on a virtual map, using the Map Utility
software.
The connection settings are automatically saved/registered with the
nickname of the camera to which a connection was established.
Auto power off does not function when the camera is connected to
another camera.
W-15
Sending Images
Sending Images One by One
Selected images are sent one by one.
1
Select an image to send.
Press the <U> key to select an
image to send, then press <0>.
Press the <u> button and turn the
<6> dial to the left to select an
image on the index display. To return
to the single-image display, turn the
<6> dial to the right.
[Send img shown].
2 Select
To select the size of the image to
send, press the <U> key and
select [Resize image].
Press the <U> key to select [Send
img shown], then press <0>.
X The transfer progress screen is
displayed.
To send another image, repeat steps
1 and 2.
connection.
3 Terminate
Press the <M> button to display
the confirmation screen. Press the
<U> key to select [OK], then press
<0> to terminate the connection.
X The [Wi-Fi function] setting screen
will reappear.
If playback or shooting operation is started during the connection, the
connection will be terminated.
RAW images cannot be sent.
W-16
Sending Images
Sending Selected Images
Multiple images (up to 50 files) can be selected and sent.
1
Press <0>.
[Send selected].
2 Select
To select the size of the image to
send, press the <U> key and
select [Resize image].
Press the <U> key to select [Send
selected], then press <0>.
the images to send.
3 Select
Press the <U> key to select the
images to send, then press <0>.
X <X> is displayed on the upper left of
the image to send.
Press the <u> button and turn the
<6> dial to the left to select an
image on the three-image display. To
return to the single-image display,
turn the <6> dial to the right.
After selecting the images to send,
press the <Q> button.
W-17
Sending Images
the image size.
4 Reduce
Set it if necessary.
the images.
5 Send
Press the <V> key to select [Send],
then press <0> to send the images.
X The transfer progress screen is
displayed.
To transfer other images, repeat
steps 1 to 5.
connection.
6 Terminate
Press the <M> button to display
the confirmation screen. Press the
<U> key to select [OK], then press
<0> to terminate the connection.
X The [Wi-Fi function] setting screen
will reappear.
When sending large files, make sure that the battery is adequately
charged so it does not run out during the process.
If playback or shooting operation is started during the connection, the
connection will be terminated.
RAW images cannot be sent.
You can send up to 50 files.
W-18
Reconnecting
The camera can reconnect to another camera for which connection
settings have been registered.
1
Select [Wi-Fi function].
Under the [53] tab, set [Wi-Fi] to
[Enable], then select [Wi-Fi
function].
[z].
2 Select
Select [z] (Transfer imgs between
cameras) and press <0>.
a connection.
3 Establish
Select [Connect] and press <0>.
On the confirmation screen, select
[OK].
Perform the reconnection procedure
on the target camera as well.
X The images on the card are displayed
and the images to send can be
selected.
When settings for multiple connection
destinations are registered, select
[Choose set.], select the connection
destination, then connect to the
destination.
By default, settings are named after
the nickname of the camera that was
connected to.
W-19
W-20
3
Connecting to a
Smartphone
Connecting the camera to a smartphone lets you use
the smartphone to view, manage, and receive images
stored in the camera. You can also use the smartphone
to perform remote shooting.
W-21
Preparation
Supported Smartphone Operating Systems
The following smartphone operating systems are supported (as of
September 2012).
For updated information on supported operating systems, refer to the
download site of EOS Remote software.
• iOS: Version 5.0 to 5.1
• Android: Version 2.3.3 to 4.0
EOS Remote Installation Required
To communicate with a smartphone, the camera needs to be connected
to the smartphone using the dedicated application EOS Remote.
EOS Remote can be downloaded from the App Store or Google Play.
Install EOS Remote on the smartphone and then perform the
procedures to establish the connection.
W-22
Using Camera Access Point Mode to Establish a Connection
The camera and smartphone can be directly connected via a wireless
LAN.
Because the camera acts as an access point, no other access point is
necessary, so you can establish communications easily even when you
are out.
To establish connection, operations on the smartphone is required. For
details, refer to the smartphone instruction manual.
1
Select [Wi-Fi function].
Under the [53] tab, set [Wi-Fi] to
[Enable], then select [Wi-Fi
function].
[q].
2 Select
Select [q] (Connect to smartphone)
and press <0>.
[Camera access point
3 Select
mode].
Press the <V> key to select
[Camera access point mode], then
press <0>.
Select [OK] and press <0> to go to
the next screen.
[Easy connection].
4 Select
Press the <V> key to select [Easy
connection], then press <0>.
Select [OK] and press <0> to go to
the next screen.
W-23
Using Camera Access Point Mode to Establish a Connection
the smartphone to the
5 Connect
camera.
On the Wi-Fi settings menu of the
smartphone, select the SSID
(network name) displayed on the
camera’s LCD monitor.
For the password, enter the
encryption key displayed on the
camera’s LCD monitor.
X The next screen may be
automatically displayed even when
the operation on the smartphone is
not completed.
EOS Remote on the
6 Start
smartphone.
When the Wi-Fi settings are
completed, start EOS Remote on the
smartphone.
[Camera Connection] on
7 Select
the smartphone.
Select [Camera Connection] on
EOS Remote.
the target camera on the
8 Select
smartphone.
Select the camera to connect to from
the [Detected Cameras] on EOS
Remote.
X Pairing starts.
W-24
Using Camera Access Point Mode to Establish a Connection
to the camera.
9 Connect
When pairing is completed, the
screen on the left is displayed. Press
the <U> key to select [OK], then
press <0>.
A character other than in ASCII
format is displayed as 8.
further settings.
10 Perform
To finish settings in this stage, press
the <V> key to select [OK], then
press <0> to go to step 11.
To change the name of the settings,
select [Settings name] and press
<0>.
X The virtual keyboard is displayed
(p.W-10). Up to 30 characters can be
entered for a settings name.
the settings.
11 Save
Select [OK] and press <0> to save
the settings.
X The [qConnection] screen will be
displayed.
The settings for communicating with a smartphone are now complete.
W-25
Operating the Camera Using a Smartphone
You can use a smartphone with EOS Remote installed to view images
stored on the camera and shoot remotely.
EOS Remote Main Screen
The main functions of EOS Remote are
described below. Touch the screen to
learn the operation procedures.
[Camera Image Viewing]
Images stored in the camera can be
viewed.
Images stored in the camera can be
saved on a smartphone.
Operations such as deletion can be
performed on images stored in the
camera.
[Remote Shooting]
The camera’s Live View image can
be viewed using a smartphone.
Camera settings can be changed.
You can shoot using the release
operation.
(Settings button)
Use this button to access various
settings for EOS Remote.
W-26
Operating the Camera Using a Smartphone
Terminating the Connection
1
Select [Exit].
If the screen on the left is not
displayed, select [Wi-Fi function]
under the [53] tab on the camera’s
menu screen.
Select [Exit] and press <0>.
[OK].
2 Select
Press the <U> key to select [OK],
then press <0> to terminate the
connection.
Images are saved in S2 size JPEG format on smartphones. RAW
images are also saved as S2 size JPEG images.
Although movies are included in the list, they cannot be saved.
If the camera’s auto power off is activated during the wireless LAN
connection, the camera will switch to standby mode. Wireless LAN
connection is restored when the camera wakes up from auto power off.
W-27
Reconnecting
The camera can reconnect to a smartphone for which connection
settings have been registered.
1
Select [Wi-Fi function].
Under the [53] tab, set [Wi-Fi] to
[Enable], then select [Wi-Fi
function].
[q].
2 Select
Select [q] (Connect to smartphone)
and press <0>.
a connection.
3 Establish
Select [Connect] and press <0>.
On the confirmation screen, select
[OK].
X The camera will reconnect to the
smartphone.
When settings for multiple connection
destinations are registered, select
[Choose set.], select the connection
destination, then connect to the
destination.
W-28
EOS 6D (WG)
GPS Function Instruction Manual
Features
Geotagging Images
Location information*1 (latitude,
longitude, elevation, and coordinated
universal time*2) can be added to
images.
Shooting locations of geotagged
images can be viewed on a virtual
map on a computer.
*1: Certain travel conditions or GPS settings may cause inaccurate location
information to be added to images. The digital compass function is not
incorporated.
*2: Coordinated Universal Time, abbreviated UTC, is essentially the same as
Greenwich Mean Time.
Logging the Route Traveled
Using the GPS logging function, location information for the route
the camera traveled can be recorded. This route can be viewed on a
virtual map.
* Certain traveling conditions, locations, or GPS settings may cause inaccurate
location information to be added to images.
G-2
Features
Setting the Camera Time
The camera time can be set using GPS signals.
Viewing Images and Information on a Virtual Map
Shooting locations and the route traveled can be viewed on a virtual
map, using the Map Utility software (p.G-18).
Map data ©2012 ZENRIN -
Geotagging Images on a Computer
Map data ©2012 ZENRIN -
Using the GPS logging function,
recorded location information can be
added to images. It is also possible to
add location information at a later
time to images shot by other EOS
cameras and Canon compact digital
cameras travelled with this camera.
This function is applicable to JPEG
and RAW images (file extension:
CR2).
G-3
Conventions Used in this Manual
Meaning of Symbols
: Warning to prevent shooting problems.
: Supplemental information.
(p.**)
: Reference page numbers for further information.
The icons and markings indicating the camera’s controls and settings
used in the manual correspond to the icons and marking on the camera.
Basic Assumptions
All operation procedures in this manual assume that the camera
power switch is set to <ON>.
Trademarks
Windows is a trademark or registered trademark of Microsoft
Corporation in the United States and other countries.
Macintosh is a registered trademark of Apple Inc. in the United
States and other countries.
GoogleTM, Google MapsTM, and Google EarthTM are trademarks
of Google Inc.
Map Utility uses Google MapsTM to display images and routes
traveled on a map.
All other corporate and brand names in this manual are
trademarks or registered trademarks of their respective owners.
G-4
Table of Contents
Features ...................................................................................... G-2
Conventions Used in this Manual.............................................. G-4
Acquiring GPS Signals ............................................................... G-6
Setting the Positioning Interval ............................................... G-11
Setting Time from GPS on the Camera ................................... G-12
Logging the Route Traveled..................................................... G-13
GPS Precautions ....................................................................... G-17
Map Utility .................................................................................. G-18
Specifications............................................................................ G-19
G-5
Acquiring GPS Signals
To acquire GPS signals, bring the camera outdoors where the sky is
unobstructed and aim it upwards. Keep your hands and other objects
off the top of the camera.
1
Select [GPS].
On the [52] tab, select [GPS] and
press <0>.
[Select GPS device] to
2 Set
[Internal GPS].
the menu.
3 ExitPress
the <M> button.
G-6
Acquiring GPS Signals
GPS Acquisition Status
LCD panel
LCD monitor
GPS signal status is indicated by the <r> icon on the camera’s LCD
panel and LCD monitor.
• Constant <r> : Signal acquired
• Blinking <r> : Signal not acquired yet
When you shoot while the <r> mark is lit, the image will be
geotagged.
When [Internal GPS] is selected, the <r> mark is displayed on the
camera’s LCD panel even when the camera’s power is turned off
because signals from satellites are constantly received. Also, the number
of possible shots will be lower, since it will consume more battery to
receive satellite signals.
Status details can be checked as described in “Viewing GPS Information” (p.G-9).
G-7
Acquiring GPS Signals
Under favorable conditions, signal acquisition takes approx. 30-60
seconds after turning on the camera if radiowave conditions are good.
The antenna of the internal GPS is located at the front of the hot shoe.
GPS signals can be received even when an external flash is attached.
However, acquisition will slightly be weakened.
GPS signals can be received even when shooting with the camera
positioned vertically.
When traveling long distance, inaccurate information may be recorded.
Poor GPS Coverage
Location information may not be recorded, or inaccurate information may be
recorded where GPS signal coverage is poor, such as in the following
locations.
Indoors, underground, in tunnels or forests, near buildings or in valleys.
Near high-voltage power lines or mobile phones operating on the
1.5 GHz band.
When traveling through different environments.
Even in other locations, satellite movement may interfere with
geotagging and cause missing or inaccurate location information. The
information may also indicate that the camera has been used in a
different location, even if you are shooting at the same place.
G-8
Acquiring GPS Signals
Viewing GPS Information
1
Select [GPS].
On the [52] tab, select [GPS] and
press <0>.
[Select GPS device] to
2 Set
[Internal GPS].
When using the GPS Receiver GP-E2
(sold separately), select [External GPS].
3 Select [Set up].
[GPS information display].
4 Select
X Detailed GPS information is displayed.
[UTC] (Coordinated Universal Time) in
this sample screenshot is essentially
the same as Greenwich Mean Time.
The icon <A> indicates signal
conditions. When <C> is displayed,
elevation can also be recorded.
However, elevation cannot be
recorded when <B> is displayed.
Generally, elevation is not as
accurate as latitude and longitude
due to the characteristic of GPS.
G-9
Acquiring GPS Signals
a picture.
5 Take
X Shots taken after GPS signal
acquisition are geotagged.
Geotagging Information
The screen below is displayed when pressing the <B> button
several times during image playback.
Latitude
Longitude
Elevation
UTC
Connecting External GPS
It is recommended to attach an external GPS to the hot shoe. When [Wi-Fi]
on the [53] tab is set to [Enable], interface cable connection to the external
GPS is disabled.
Note that if you play back an image with GPS information shot with another
EOS 6D (WG) camera, GPS information is not displayed on the camera’s
playback screen. Shooting locations can be viewed on a virtual map, using
the Map Utility software.
During movie shooting, information at the start of shooting is recorded. Note
that signal reception conditions are not recorded.
G-10
Setting the Positioning Interval
The interval (time) to update the location information can be set. Shorter
positioning intervals yield more accurate location information for your
images. However, fewer shots can be taken per charge.
1
Select [GPS].
On the [52] tab, select [GPS] and
press <0>.
[Select GPS device] to
2 Set
[Internal GPS].
3 Select [Set up].
4 Select [Position update timing].
5 Select the time.
The number of possible shots is less when signal conditions are
unfavorable.
The nature of GPS may cause some inconsistency in positioning
intervals.
G-11
Setting Time from GPS on the Camera
The camera time can be set using GPS signals.
1
Select [GPS].
On the [52] tab, select [GPS] and
press <0>.
[Select GPS device] to
2 Set
[Internal GPS].
3 Select [Set up].
[Auto time setting].
4 Select
Select an option and press <0>.
[Auto update] updates the time after
the camera is turned on and a GPS
signal is received.
If the GPS signal cannot be received from five or more satellites, time
setting is not possible. [Set now] will be unavailable.
Even if [Set now] is selected, auto time adjustment may not be possible,
depending on the timing of GPS signal acquisition.
When [Auto time setting] is set to [Auto update], the date or time
cannot be manually set from [Date/Time] setting on the [52] tab.
G-12
Logging the Route Traveled
Map data ©2012 ZENRIN -
1
Using the GPS logging function, the
location information of the route the
camera traveled can be automatically
recorded on the camera’s internal
memory. When you shoot while using
the GPS logging function, images will
be geotagged. The recorded location
information can be viewed on a virtual
map on a computer using the Map
Utility software (p.G-18).
The GPS logging function is enabled
even during auto power off and when
the power is turned <2>.
Select [GPS].
On the [52] tab, select [GPS] and
press <0>.
[Select GPS device] to
2 Set
[Internal GPS].
3 Select [Set up].
4 Select [GPS Logger].
G-13
Logging the Route Traveled
[Log GPS position] to
5 Set
[Enable].
When the GPS logging function is enabled, the <x> icon is displayed on
the camera LCD panel and LCD monitor.
Location Information Logs
Location information is recorded at regular intervals along the route the
camera traveled, as shown in [Position update timing] in the table
below. Daily logs are saved on the camera’s internal memory. The
number of days for which you can store logs depends on the positioning
interval you specify in [Position update timing] (p.G-11).
Log File Capacity, by Positioning Interval
Position update
Position update
Log Files (Approx.)
Log Files (Approx.)
timing
timing
Every 1 sec.
4.4 days
Every 30 sec.
100 days
Every 5 sec.
22 days
Every 1 min.
100 days
Every 10 sec.
44 days
Every 2 min.
100 days
Every 15 sec.
67 days
Every 5 min.
100 days
* Capacity when logging eight hours per day
Log file names consist of date and number (e.g.2012103100). Files
are created per day. When the time zone is changed, a different file
is created.
Log files stored on the internal memory can be transferred to a card
(p.G-15).
When the camera’s internal memory becomes full, the oldest log
files are overwritten with new information, one by one.
G-14
Logging the Route Traveled
Importing log files to a computer
You can import log files to a computer using the provided software EOS
Utility, or by transferring the log data to a card at first. Routes travelled
will be displayed on a virtual map when you open the log files imported
to the computer with the Map Utility software (p.G-18).
Importing using the provided software
Log files can be imported to a computer using the provided software
EOS Utility, via the provided interface cable connecting the camera and
the computer. For details, refer to the EOS Utility Instruction Manual
PDF on the DVD-ROM.
Importing by transferring the log data to a card
Set [GPS logger] to [Transfer log
data to card] to transfer the log files
stored on the internal memory to a
card. After the data is transferred to
the card, log files on the internal
memory are deleted.
The log files imported to the card will
be stored in the “GPS” folder in the
“MISC” folder. The extension is
“.LOG”.
Set [GPS logger] to [Delete log data]
to completely delete the log data
stored on the internal memory.
Deleting data may take approx. one
minute.
G-15
Logging the Route Traveled
When carrying the camera in a bag or suitcase as you travel, make sure
the camera faces upward and nothing is on top of it.
Set the camera time and date as accurately as possible. Also, set
appropriate time zone and daylight saving time for the shooting location.
When using the Map Utility software, images are geotagged by
comparing image date/time tags to logged date and time information. An
incorrect date and time setting may prevent accurate geotagging.
Since location information, date, and time are constantly recorded, the
battery is consumed even when the camera is turned off. Therefore, the
battery level may already be low when the camera is used. Charge the
battery when necessary or prepare a charged spare battery (sold
separately).
When you shoot while using the GPS logging function, images taken will
be geotagged. The recorded location information can be viewed on a
virtual map on a computer using the Map Utility software.
It is also possible to add location information at a later time to images
shot by other EOS cameras and Canon compact digital cameras
travelled with this camera using the Map Utility software. This function is
applicable to JPEG and RAW images (file extension: CR2).
Movie files can also be geotagged this way at a later time, when using
cameras that display [GPS device settings] in the menu (except with
the EOS 7D).
G-16
GPS Precautions
Keep the following points in mind when using the GPS function.
In certain countries and regions, the use of GPS may be restricted.
Therefore, be sure to use GPS in accordance with the laws and
regulations of your country or region. Be particularly careful when
traveling outside your home country.
Be careful about using GPS functions where the operation of
electronic devices is restricted.
Others may be able to locate or identify you by using location data in
your geotagged pictures or movies. Be careful when sharing these
geotagged images, movies or GPS log files with others, such as
when posting them online where many people can view them.
GPS signal reception may take a longer time in some cases.
G-17
Map Utility
Map Utility
EOS Solution Disk XXX
CEL-XXX XXX
XXXXX
XXXXX
XXXXX
XXXXX
XXXXX
Windows XXX XXX
Mac OS X XXX XXX
© CA
U.
the E
NON INC
. 20XX. Made in
Shooting locations or route traveled can be displayed on
a virtual map on a computer using location information
recorded on the camera. It is also possible to add location
information at a later time to images shot by other EOS
cameras and Canon compact digital cameras travelled
with this camera.
Internet access is necessary to install Map Utility.
Access the Internet, insert EOS Solution Disk into your
computer, then click [Easy Installation] ([Install] for
Macintosh). Map Utility will be installed.
Internet access is necessary to use Map Utility as well.
For details, refer to the Map Utility instruction manual.
Instruction manual for Map Utility
EOS Camera Instruction Manuals Disk XXX
CEL-XXX XXX
XXXXX
XXXXX
XXXXX
XXXXX
XXXXX
Windows XXX XXX
Mac OS X XXX XXX
© CA
.
e EU
NON IN
C. 20XX. Made in th
G-18
Included in the EOS Camera Instruction Manuals Disk
(DVD-ROM).
Specifications
Geotagging Images:
Reception frequency:
Positioning Interval:
Time adjustment:
Log data:
Deleting log data:
Latitude, longitude, elevation, time (UTC) and signal
acquisition
For cameras not compatible with GPS, geotagging is
possible using the Map Utility software (based on log
information).
1575.42 MHz (L1 band)
1, 5, 10, 15, or 30 seconds, or 1, 2, or 5 minutes
Camera time is set from GPS time data.
NMEA-0183 format
One file per day
* When the time zone is changed, a different file is
created.
* Log files stored on the internal memory can be
transferred to a card/computer.
* When the camera’s internal memory becomes full, the
oldest log files are overwritten with new information,
one by one.
Supported
All information in this manual is based on Canon testing standards.
Product specifications and the exterior are subject to change without notice.
G-19
CANON INC.
30-2 Shimomaruko 3-chome, Ohta-ku, Tokyo 146-8501, Japan
Europe, Africa & Middle East
CANON EUROPA N.V.
PO Box 2262, 1180 EG Amstelveen, The Netherlands
For your local Canon office, please refer to your warranty card or to www.canon-europe.com/Support
The product and associated warranty are provided in European countries by Canon Europa N.V.
EOS 6D (WG)
Wi-Fi Function Basic Instruction Manual
GPS Function Instruction Manual
For Wi-Fi functions, basic operation procedures for "Transferring Images between
Cameras" and "Connecting to a smartphone" are explained; for more detail, refer
to the "Wi-Fi Function Instruction Manual" included on the EOS Camera Instruction
Manuals Disk (DVD-ROM).
For GPS functions, operation procedures for all functions are explained.
CEL-ST6VA210
© CANON INC. 2012
PRINTED IN THE EU
ENGLISH


![[Fonction Wi-Fi].](http://vs1.manualzilla.com/store/data/006512457_1-b8255500254f9fb49fa978f62125923d-150x150.png)


![[Función Wi-Fi].](http://vs1.manualzilla.com/store/data/006250771_1-0922bcb29d32b92c76fd94aebe59172e-150x150.png)