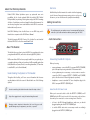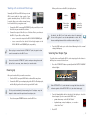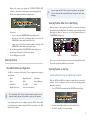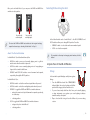
1
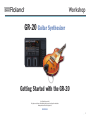
Workshop ®ÂØÒňΠ® GR-20 Guitar Synthesizer Getting Started with the GR-20 © 2006 Roland Corporation U.S. All rights reserved. No part of this publication may be reproduced in any form without the written permission of Roland Corporation U.S. GR20WS01 About the Workshop Booklets Roland’s GR-20 Guitar Synthesizer opens up spectacular new sonic possibilities for the electric guitarist. With the included GK-3 Divided Pickup installed, any six-string electric guitar can play the GR-20’s amazing collection of synthesizer sounds and sampled real-world instruments. You can also mix your guitar’s own sound with those in the GR-20 to create new timbres that are all your own. Hot Links Each Workshop booklet is meant to be read in order from beginning to end. However, if we mention an upcoming section—and you see this arrow—you can click the arrow to jump there immediately. Making Connections To avoid damage to your speakers or ears from unexpected loud noises, make all of your audio connections before powering up the GR-20. Each GR-20 Workshop Series booklet focuses on one GR-20 topic, and is intended as a companion to the GR-20 Owner’s Manual. This booklet requires GR-20 O.S. Version 2.00 or higher. You can download the latest GR-20 O.S. for free from www.RolandUS.com. About This Booklet Audio Connections Effect-loop jacks Output jacks This booklet shows you how to set up the GR-20 for your playing style, tune your guitar with the GR-20, and how to select and play GR-20 patches. We’ll assume that a GK-3 has been properly installed on your guitar by you or a guitar technician, or that you’ve purchased a GR-compatible guitar from Godin, Brian Moore, Ibanez, Fender, or another guitar-maker. (To learn how to install a GK-3, see its Owner’s Manual.) Connecting the GR-20’s Outputs • a mono guitar amp—connect the GR-20’s rear-panel OUTPUT R (MONO) jack to the amp’s input using a standard 1/4” instrument cable. Understanding the Symbols in This Booklet • Throughout this booklet, you’ll come across information that deserves special attention—that’s the reason it’s labeled with one of the following symbols. a stereo guitar amp, two mono amps, or a stereo mixer or recorder— connect the GR-20’s rear-panel OUTPUT L (PHONES) and R (MONO) jacks to the other device’s left and right inputs, respectively. • headphones—connect a standard 1/4” stereo headphone plug to the GR-20’s rear-panel OUTPUT L (PHONES) jack. When you’re using: A note is something that adds information about the topic at hand. About the GR-20’s Smart Jacks A tip offers suggestions for using the feature being discussed. When you’ve connected cables to both the OUTPUT L (PHONES) and R (MONO) jacks, the GR-20 sends one side of its stereo mix to each jack, since it assumes you’re connected to a stereo receiving device. Therefore: Warnings contain important information that can help you avoid possible damage to your equipment, your data, or yourself. • to listen to the GR-20 through headphones—make sure you haven’t plugged anything into the OUTPUT R (MONO) jack. • to send the GR-20’s entire mix to a mono amp—make sure nothing’s plugged into the OUTPUT L (PHONES) jack. When you first turn on the GR-20, its display shows: Working with an External Effects Loop Normally, the GR-20 and GK-3 allow you to mix GR-20 sounds with the clean sound of your guitar’s standard pickups. The GR-20’s effectloop jacks allow you to add in external stompbox or rack effects to your guitar sound: � Connect the GR-20’s rear-panel GUITAR OUT jack to your effect, or to the first effect in your external effects chain. � Connect the output of the effect, or of the last effect in your chain, to the GR-20. If your effect or effect chain is: • • When a plug is inserted into the GUITAR OUT jack, the guitar’s clean sound is removed from the GR-20’s mix. You can also use the GUITAR OUT jack to send your clean guitar sound by itself to its own amp, mixer channel, or recorder track. then... flashes to show you’re in Guitar mode until... appears: the number of the current patch. By default, the GR-20 is in Guitar mode, where it’s optimized for use with a guitar. It can also be optimized for a bass. We’ll discuss switching between Guitar and Bass modes on Page 8. mono—connect its output to the GR-20’s MIX IN R (MONO) jack. stereo—connect the last device’s left and right outputs to the GR-20’s MIX IN L and R (MONO) jacks, respectively. and then... � Turn the LEVEL knob up to set the desired listening level—its normal setting is halfway up. Selecting Your Output Type To get the best sound from the GR-20, set its output type for the device to which you’ve connected it. Here’s how: � Press the SYSTEM EDIT button repeatedly until the OUTPUT LINE/AMP indicator lights. Powering Up Once you’ve made all of your audio connections: � Turn the GR-20’s rear-panel LEVEL knob volume all the way down. � Connect the GR-20’s power adaptor plug to the GR-20’s AC adaptor jack, and the AC plug on the other end to a grounded AC outlet. To help avoid accidentally disconnecting the AC adaptor, wrap the adaptor’s cable around the post above the adaptor jack. � When SYSTEM EDIT is lit, each indicator’s orange label shows what the indicator signifies. When PATCH EDIT is lit, the white labels apply. � Press the rear-panel POWER button to turn the GR-20 on. Turn the Number/Value dial to the right of the display to select the desired output. If you’ve connected the GR-20 to a: • • � guitar or bass amp—select GA, for “Guitar.” keyboard amp, mixer, headphones, or recorder— select Ln for “Line.” Press EXIT. Working the GK-3 GUITAR/MIX/GK Switch Setting the GR-20 Sensitivity Since every guitarist has a unique way of playing, it’s important to set the GR-20’s sensitivity for your style and for the way your pickup’s installed. To set the GR-20’s sensitivity: The three-way GUITAR/MIX/GK switch on the GK-3 allows you choose between using the GR-20’s sound alone, the guitar’s sound alone, or mixing the two. You can flip this switch at any time as you play. To: • • • � Press the GK SIGNAL•SENS button so its indicator lights � Play a single open string—the string’s number appears at the left of the display, and its current sensitivity value appears at the right. (Here, we’ve played the low E, or sixth string, and its sensitivity value is 8.) � Turn the Number/Value dial so that all of the BANK indicators above the SENS button light briefly when you forcefully play the string. � Repeat Step 3 for your guitar’s other strings. � Press SENS or EXIT—as the GR-20 stores your settings, a dot in the lower-right corner of the display flashes, and the BANK indicators light. The current patch’s number is displayed when it’s done. hear only the GR-20 sounds—flip the switch to its GK position. hear a mix of the GR-20’s sound and the guitar’s clean sound—flip the switch to the middle, MIX position. hear only the guitar’s sound—flip the switch to the GUITAR position. We’ll discuss the GK-3’s DOWN/S1 AND UP/S2 switches a bit later. Adjusting Levels at the Guitar While the GR-20 has its own overall output knob, you can also adjust the level of the GR-20 sounds and your guitar sound from the GK-3 and the guitar itself, whether you’re using only GR-20 sounds, the guitar sound alone, or both together. To adjust: • • the GR-20 sound level at the guitar—turn the large dial on the GK-3. the clean guitar level at the guitar—use the guitar’s own volume controls. When SENS is lit, these indicators act as a Sensitivity meter. Using the GR-20 Tuner While the tuner is on, your guitar and all GR-20 sounds are silenced. The GR-20’s built-in tuner helps you easily tune your guitar—this is essential for making sure the GR-20 understands the notes you play. � Press the TUNER button so its indicator lights. � Play an open string—the GR-20 displays its name. Here’s what note names look like on the GR-20 display. (A circle to the right of a note indicates a sharp.) If the string’s tuned to the wrong pitch, adjust its tuning until the correct note is displayed. When you’re tuning your guitar, the SYSTEM EDIT/PATCH EDIT indicators—shown here circled in green—act as tuning indicators. � If you’re using the GR-20 with an external sequencer, the sequencer can also select patches using MIDI Program Change and Bank Select messages. Play the note again and watch the tuning indicators. Selecting Patches When You’re Not Playing If the note’s: • • in tune—the green SW MODE•RESO indicator lights green. • sharp—one or both of the red indicators light to the right of SW MODE•RESO to show exactly how sharp the note is. flat—one or both of the red indicators light to the left of SW MODE•RESO to show exactly how flat the note is. � Re-tune the string until the SW MODE•RESO indicator lights green. � Repeat Steps 2 through 4 for all of the other strings. � Press TUNER again, or press EXIT. BANK knob Selecting Patches Selecting Patches as You Play The GR-20’s sounds are called “patches.” They’re organized into categories called “banks:” Piano Brass Synth/Lead Rhythm/Percussion Number/Value dial Once you’ve selected the bank you want, turn the Number/Value dial to choose the desired patch within the selected bank. How GR-20 Patches are Organized • • • • When you want to select a patch on the GR-20, you start by selecting the patch’s bank using the BANK knob. The indicator for the currently selected bank lights to show you where you are. In the illustration below, the STRINGS/ORCH indicator is lit. • • • • Organ/Keyboard Wind Voice/Pad • • • Bass/Guitar Strings/Orchestra Ethnic User (your own patches) Selecting Patches Using the GR-20 Foot Switches While the GLIDE and HOLD foot switches normally allow you control the behavior of notes you play, you can also use them for selecting patches, hands-free. Here’s how: � Press SYSTEM EDIT repeatedly until the SW MODE indicator lights. � Turn the Number/Value dial to select 2, for Switch Mode 2. � Press EXIT—the GR-20 stores your settings. The Customizing GR-20 Patches Workshop booklet explains how to customize factory patches and save them as your own User patches. Select patches when you’re not playing using the GR-20’s knobs. While you’re playing, select patches using the GR-20 foot switches or the GK-3 switches on your guitar. Once you’re in Switch Mode 2, you can press the GLIDE and HOLD foot switches to select patches. Press to select the next-lowest patch. Press to select the next-highest patch. To return the GLIDE and HOLD foot switches to their original settings, repeat the above steps, selecting Switch Mode 1 in Step 2. Selecting Patches Using the GK-3 In the default switch mode—Switch Mode 1—the GK-3’s DOWN/S1 and UP/S2 switches allow you to change GR-20 patches. Press the: • • About The Two Switch Modes GLIDE foot switch—causes each currently playing note to glide to another note when the switch is depressed. • HOLD foot switch—causes currently playing notes to keep playing as long as the foot switch is held down. • DOWN/S1 and UP/S2 GK-3 switches—move downward and upward, respectively, through the GR-20’s patches. In Switch Mode 2, the: • • • • GLIDE foot switch—selects the next-lowest patch when it’s pressed. A Quick Tour of the GR-20 Patches Strings Let’s start with a patch that plays easily from a guitar: Strings. � Turn the BANK knob until the STRINGS/ORCH indicator lights. Since we’re checking out the first patch in this category, that’s all we have to do. � Try some clean, simple lead lines first. Since you’re actually playing a string instrument—your guitar—your usual playing technique translates easily to this patch. � Play a chord and let it ring to hear the fullness of your new string section. HOLD foot switch—selects the next-highest patch when it’s pressed. DOWN/S1—toggles the GLIDE and HOLD foot switches between: • raising the current note’s pitch downward or upward, respectively, in octave steps • selecting patches. UP/S2—toggles the GLIDE and HOLD foot switches between: • • UP/S2—to select the next patch. To jump back to the steps for changing switch modes, click this button. In Switch Mode 1, the default switch mode, the: • DOWN/S1 switch—to select the next-lower-numbered patch. acting as they do in Switch Mode 1 selecting patches. Wood Bass � It only makes sense that patches that emulate guitars and basses should be easy to play from your guitar, and they are. Check out Patch 23, Drum Kit—in this patch, each string plays a different sound in a drum kit. � Try out the other patches in this category. They run from melodic percussion instruments such as vibraphone, all the way to insanely fun rhythm patterns. � Turn the BANK knob until the BASS/GTR indicator lights. Okay, you’re already playing a guitar—so why play guitar or bass patches? Because you’ve got quite a collection of great guitar and bass sounds in the GR-20. � Try the first patch in this category: a really nice upright sound called “Wood Bass.” � Turn the Number/Value dial to try out the other patches in this category. You’ll find electric basses, synth basses, and all sorts of guitars and hybrid instruments. � Don’t forget Patch 40, Guitar & Pad—it’s really beautiful. Trumpet � Turn the BANK knob to light the BRASS indicator and play the first patch in this category: Trumpet. Trumpet is a very realistic patch as long as you play its notes as a trumpet player would. For example, you can’t slide between notes here, because you can’t do that on a trumpet. � Try playing, clean lines, or simple two-note harmonies for a trumpet duet sound. � Turn the Number/Value dial to try out different sounds in the BRASS category, and then give the WIND-category patches a try. RHYTHM/PERC Patches Let’s finish our tour in the toybox: the RHYTHM/ PERC category. � Turn the BANK knob to select RHYTHM/PERC. � Turn the Number/Value dial to choose Patch 37, Tambourine and Tabla Phrase. � Try this: play the low E string and let it ring to start playback of a tabla pattern. Now play the other strings to add tambourine. Tips for Playing GR-20 Sounds You may have already noticed that playing GR-20 patches from your guitar is a bit different from just playing guitar. This is because when you’re working with the GR-20, your guitar is not really acting as a guitar: it’s acting as a MIDI controller that just happens to look and feel like a guitar. As a result, you’ve got to keep some new thoughts in mind as you play. The GK-3 is a Very Sensitive Pickup In order to faithfully catch every nuance of your playing, the GK-3 listens very carefully to what you do. In fact, you might say it listens more carefully than most musicians do. It captures even the tiniest notes you play, including those that are sounded when you pull off a string, or squeak a string. Normally, you don’t even notice these sounds, but the GK-3 has to notice everything in order to successfully capture your playing style. What this means is that you’ve got to play very cleanly and carefully to avoid making unintended noises. When you’re playing lead lines, this is pretty easy to do, but you’ll need to practice playing chords and finger-picking to get them super-clean. Busy strumming is especially difficult to do without accidentally causing pull-off notes. Tweak a Sound You can adjust each sound’s Play Feel to make it work optimally for you. The St (for“Strum”) Play Feel setting can be especially helpful as you practice using the GR-20 since it tells the GR-20 to ignore soft notes. We’ll explain how to change a patch’s Play Feel setting, and how to store it as a User patch in the Customizing GR-20 Patches Workshop booklet. (You can also read about it on Page 21 in the GR-20 Owner’s Manual) Think Like the Instrument’s Real-World Player Many of the GR-20 patches emulate real-world instruments. If you play, for example, a sax patch like a guitarist, it’s obviously not going to sound like a sax. So you have to think like a sax player, playing notes the way a sax player would: Pause as a sax player would in order to take breaths, and play one note at a time. With a little effort, you’ll be amazed at the realism you can achieve. Guitar and Bass Modes At the factory, the GR-20 is set up for being played from a guitar. However, it’s easy to configure it for use with a GK-3-equipped bass, so the lower notes you play result in sensible pitches in the GR-20 patches. Here’s how to change to Bass mode: � Turn off the GR-20. � While holding down the SENS button, turn on the GR-20. In a few moments, the GR-20 display shows you your current mode: • • Gt—means you’re in guitar mode. bG—means you’re in Bass mode. � Turn the Number/Value dial clockwise to select bG. � Press EXIT—the GR-20 stores your setting and leaves you ready to play patches from your bass. To return to Guitar mode, repeat these steps, turning the Number/ Value dial counter-clockwise to select Gt in Step 3. The End We hope you’ve found this workshop helpful. Keep an eye out for other GR-20 Workshop booklets for downloading at www.RolandUS.com.