1
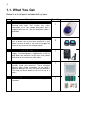
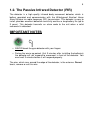
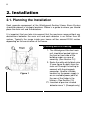
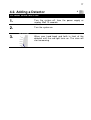
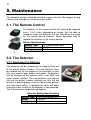
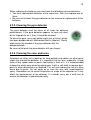
Watchguard™ Sentinel
Wireless Alarm System
Model: WGLCA
Document: Watchguard Sentinel – User Manual.doc
Release: 23 January 2009
User
Manual
Designed in Australia & Made in Taiwan By:
www.rhino.com.au
2
Contents
Contents ......................................................................................................... 2
1. Introduction ................................................................................................. 3
1.1. What You Get ....................................................................................... 4
1.2. The Passive Infrared Detector (PIR) ..................................................... 5
2. Installation................................................................................................... 6
2.1. Planning the Installation........................................................................ 6
2.2. The Main Unit ....................................................................................... 7
2.3. The Power Supply ................................................................................ 8
2.4. The Detectors ....................................................................................... 9
2.4.1. Tips for positioning ......................................................................... 9
2.4.2. Powering the detector .................................................................. 11
2.4.3. Warm up period............................................................................ 11
3. Operation .................................................................................................. 12
3.0. Turning the system on ........................................................................ 12
3.1. Remote Control Functions .................................................................. 12
3.2. ARM Mode.......................................................................................... 12
3.3. DISARMING ....................................................................................... 13
3.4. PANIC Mode....................................................................................... 13
3.8. The Passive Infrared Detectors .......................................................... 13
3.8.4. Dual Edge Sensing (DES) technology ‘explained’ ........................ 13
4. Programming ............................................................................................ 16
4.1. Adding New Remotes ......................................................................... 16
4.2. Adding a Detector ............................................................................... 17
5. Maintenance ............................................................................................. 18
5.1. The Remote Control ........................................................................... 18
5.2. The Detector....................................................................................... 18
5.2.1. Replacing the batteries................................................................. 18
5.2.2. Cleaning the pyro detector ........................................................... 19
5.2.3. Cleaning the case and lense ........................................................ 19
6. Warranty ................................................................................................... 20
6.1. Warning Limitations & Warranty.......................................................... 20
3
1. Introduction
Your Watchguard Sentinel Home Alarm System is specifically designed for
simple DIY installation (Do It Yourself). It is suitable for use in homes or
offices where the owner wishes a siren to trigger if there is unauthorized entry
into the premises.
Main Features include:
• Simple installation
• Hand held remote controls
• Remote functions include arm, disarm, and panic.
• Ability to add or erase detectors from your system.
• Up to 5 wireless devices can be used (any combination of remotes or
sensors)
• Protects your family and property
• Suitable for home and office
• Powerful external siren with flashing blue warning light
• Main power adaptor with a 10m lead
• Latest technology
• Wireless detectors available include Passive Infrared detectors, Reed
Switches and Smoke Sensors.
4
1.1. What You Get
Below is a list of parts included with system.
Item
Description
1. Main control unit
The unit incorporates a powerful siren and a
flashing blue light. The system has mains
connection via a low voltage plug pack that is
supplied with the unit. 10m of connection cable is
provided.
2.
1
Passive Infrared Detector
Designed to detect the body movement of an
intruder inside your premises. These intelligent
devices allow simple installation, as no cable is
required between the main unit and the detectors.
The long life lithium batteries will last for up to 3
years.
5.
2
Power Supply (plug pack)
The main unit requires a regular mains power
supply. The Watchguard is supplied with a 12V DC
plug pack that connects to the main units power
connector on the end of the 10m cable.
4.
1
Remote controls
2 x Remote Controls. These allow you to easily
arm & disarm the system from anywhere in your
home. In case of duress, you can also trigger the
alarm at any time from the remote control.
3.
Quantity
1
Mounting Material & Screws
Necessary wall mounting screws & wall plugs are
included.
1
Image
5
1.2. The Passive Infrared Detector (PIR)
The detector is a high quality infrared body movement detector, which is
battery operated and communicates with the Watchguard Sentinel Home
Alarm System via radio frequency (RF) transmission. This detector is easy to
install, provides excellent detection sensitivity and has a long battery life (up to
3 years). This detector transmits an alarm code to the unit when a valid
movement is detected.
IMPORTANT NOTES
• NEVER touch the pyro detector with your fingers
• During the warm up period, (first 3 minutes after installing the batteries)
the detector will not respond to movement in front of the detector. You
must wait 3 minutes before it will respond properly.
The wire, which runs around the edge of the detector, is the antenna. Do not
touch, remove or cut this wire
6
2. Installation
2.1. Planning the Installation
Each separate component of the Watchguard Sentinel Home Alarm System
should be placed in strategic locations. Below is a guide to where you should
place the main unit and the detectors.
It is important that you take into account that the maximum range without any
obstructions between the main unit and each detector is no further than 50
metres. Typically the range inside your house will be around 20-50 metres
depending on the construction of the house.
Planning and Wire Routing
Figure 1
1- The Watchguard Sentinel main
unit should be located high on
the front or front side of the
building under an eave of
covering. (See Section 2.2)
2- Route the white-white/black wire
(2 core-figure 8 cable) from the
main unit through the ceiling to
connect with the plug pack
connector. Another suitable
location for the power supply is
on an available power point at
the rear of the fridge in the
kitchen. (See Section 2.3)
P1- Location of passive infrared
detector zone 1. (Example only)
7
2.2. The Main Unit
Mount the Watchguard main unit at the front or front side of the building. The
mounting position should be under an eave or out of direct contact with rain or
other water sources. The position should allow line of sight viewing from both
the street (for visual deterrent) and from your main point of entry (for visual
confirmation of arming/disarming).
Use the wall plugs and screws provided if suitable for your particular building
construction.
Installing the main unit
Figure 2
Figure 3
1. Drill mounting holes (7mm
diameter, 25mm minimum in
depth) into the chosen wall.
2. Use the green star plug. Press
each one into the 3 main
mounting holes.
3. Make a hole and push the wires
through the wall and up into the
ceiling.
4. Screw the top 2 screws half way
in.
5. Place the unit to support itself
from the top 2 screws.
6. Screw in and tighten the bottom
mounting screw then tighten the
top two screws.
8
2.3. The Power Supply
Inside Roof
Power Supply Mounting
1. Drill a small hole (15mm diameter)
into the ceiling where the wire can
go through to be connected to the
wire from the main unit.
2. Feed the wire through the hole in
the ceiling and up to where it will
join the wire from the main unit.
3. Connect the connector from the
power supply into the plug from
the main unit as shown below.
Wall
Figure 4
9
2.4. The Detector
Firstly, the mounting bracket must be fixed to the wall using the self-tapping
screw and other accessories supplied. Mounting must be at a minimum height
of 1.2 metres and maximum of 2.1 metres (lower is better).
Drill a 5mm diameter hole (at least 30mm deep)
into the gyprock for mounting the detector
bracket/socket base. Push the wall plug into the
hole then screw in the mounting bracket. It will clip
into the base. The detector can now be slid onto
the swivel bracket. See diagram below.
Approx mounting
angle at 2.1m
Figure 5
2.4.1. Tips for positioning
• This detector utilises the very latest in detection processing technology to
reduce the possibility of false alarms. However, correct mounting of the
detector is critical to ensure best detection or "catch" performance. You
cannot just screw the detector directly to a wall up high in a corner and
expect best performance. Thoroughly test each detector, and if detection is
not acceptable in the location you have chosen, adjust the angle of the
detector slightly & re-test. You will find that a slight up/down angle change
may improve catch performance significantly.
10
• Mount the detector on your wall using the swivel mount provided at a
minimum height of 1.2 metres and maximum of 2.1 metres (lower is better).
Make sure the detector is a minimum of 5 metres away from your main unit
so it doesn’t swamp the receiver with a signal that is too strong to decode.
• Always mount your detector so that an intruder has to walk across its zone,
i.e. walk past the detector, not towards it.
• DON’T mount detector facing glass doors or windows. Always mount above
windows and doors to look inside.
• DON’T mount detector facing hot areas or areas where the temperature
may change suddenly, e.g. open fire places, direct sunlight or air
conditioning vents.
• Select a location where the detector can provide the best detecting range.
Always ensure that you do not cover an area with multiple detectors, so as
to avoid simultaneous transmission back to the receiver in your Watchguard
Sentinel Home Alarm System. The receiver can only decode one coded
signal at any given time.
• If the detector is mounted close to metal frames or doors, this may reduce
the radio transmitting range.
• The detector is not waterproof and is designed for indoor use only.
11
2.4.2. Powering the detector
When you first remove the detector from the box it is
not powered, although the batteries are in place. To
turn the detector on, pull the piece of plastic from one
of the battery terminals (in the direction indicated in
figure 7).
If the light does not flash, the plastic has not been
removed properly. You may need to clear any excess
plastic from the battery terminal. If all plastic have been
cleared and the detector is still not responding then
remove the batteries, which the plastic was covering
and slide the batteries back into their original position.
If after this you still don’t have any response from the
detector then the batteries may be flat.
I M P O R T A N T
2.4.3. Warm up period
Figure 6
Unclip the front cover
as shown
You must wait approximately 3 minutes for the
detector to warm up after connecting the batteries. This
time starts from when the detector starts flashing the
red light after removing the piece of plastic from under
one of the battery terminals. During this period the
detector will not respond and should be left
untouched until the 3 minute period is up.
Figure 7
12
3. Operation
3.0. Turning the system on
The system is automatically turned on when the power plug is connected and
switched on. On power up the system is in the armed state, which means that
the alarm can be triggered by the detectors. This function is to make sure that
if the power is disconnected i.e. via a blackout or switched on/off that the
system is not disarmed when power is restored.
3.1. Remote Control Functions
Press
ARM/DISARM
Pressing the button will arm or disarm the alarm system
depending on the current state of the alarm. That means if
the alarm is armed then pressing the button would disarm
it, similarly if the alarm is disarmed then pressing the button
would arm it.
PANIC mode
Press and hold (approximately 3 seconds) to activate PANIC mode.
3.2. ARM Mode
When to use
This mode is used when leaving the building or premise. Arming the system in
this mode will activate all detectors.
Indications
The siren will beep once and the blue light will flash once. There will be a 20
second delay before the system is fully armed. During this delay detectors
cannot trigger the alarm.
Triggering
If a detector is triggered, when the system is fully armed, the alarm will sound
for 5 minutes or until the system is disarmed (which ever occurs first).
13
3.3. DISARMING
When to use
The system should be disarmed before entering the building or premise.
Indications
The siren will beep twice and the blue light will flash twice. The siren will beep
12 times instead of twice, if the alarm has been triggered while the system was
armed.
3.4. PANIC Mode
When to use
This mode should be used when the user wishes to activate the siren possibly
used in an emergency situation.
What happens
The siren will sound and the blue light will flash to alert people in the area.
3.8. The Passive Infrared Detector
It is vital that the detector is tested carefully for each installation. At
25°Celsius, the detector should have a detection range of approximately 10
metres and a scope angle of 90°, i.e. 45° either side of the centre position
straight ahead of the lens.
3.8.4. Dual Edge Sensing (DES) technology ‘explained’
Figure 8 – side view, detection pattern in optimal temperature
environment
14
This detector has Dual
Edge Sensing (DES)
Technology,
developed to eliminate
false alarms yet still
provide
maximum
security.
The detector uses a
pattern of infrared
beam zones to sense
body movement. The
detection pattern in an
optimal
temperature
environment is shown
in figure 9.
Each time you walk
into or out of an
infrared beam zone
this will be sensed and
processed by the DES
technology built into
the detector. The red
trigger light will not
turn on until the
detector has made a
valid
movement
detection in normal
mode.
Figure 9 – detection pattern in the
optimal temperature environment
15
Triggering the detector
Figure 10 – most
sensitive trigger
In figure 10, a body moving from position 1 to position
2, into the infrared beam zone, will create a pulse.
Moving from position 2 to 3, out of the other side of
the same infrared beam zone, will create another
pulse. If the body moves from position 1 to position 3
within 10 seconds then the detector will have
received 2 pulses in 10 seconds. This means the
detector will have made a valid movement detection
and will trigger, indicated by the red light. This also
applies if the body moves in the opposite direction.
No trigger body movements
No trigger body movements are body movements
which are too small to be recognized as valid body
movements to trigger the detector.
Figure 11 – no
trigger
In the example, shown by figure 11, a body walking
into one side of the infrared beam zone, then back
out the same side of the infrared beam zone will not
trigger the detector. A body moving from position 1 to
2, into the infrared beam zone, will only create
pulsing. A body moving from position 2 back to
position 1 or from position 2 to position 3 (out of the
same side of the infrared beam zone) may create
further pulses but will not trigger the detector. This
also applies if the body is moving in and out of the
infrared beam zone from the other side.
16
4. Programming
Turning the unit off and on enters programming mode. On each instance of
programming mode only a single device may be learnt in. To learn in another
device programming mode must be re-entered by turning the device off then
on again.
4.1. Adding New Remotes
+
TO ADD A NEW REMOTE
1.
Turn the system off, by turning off the power supply.
Wait 10 seconds.
2.
Turn the system on.
3.
Press the remote button several times until the siren
starts beeping.
Your Watchguard Sentinel Home alarm System can only store a maximum of
FIVE wireless devices in its memory. If you learn in an 6th remote, the 1st
remote control will be erased. If you loose a remote control, or have one
stolen, or wish to delete a detector simply repeat the procedure above with
one of your remote controls at least 5 times. This will ensure that you have
erased all wireless devices (except the remote control being used in the
procedure) from the memory of your Watchguard Sentinel Home Alarm
System.
17
4.2. Adding a Detector
+
TO ADD A DETECTOR
1.
Turn the system off, from the power supply or
unplug. Wait 10 seconds.
2.
Turn the system on.
3.
Wave your hand back and forth in front of the
detector until the red light turns on. The siren will
start screaming.
18
5. Maintenance
The complete system should be tested at regular intervals. We suggest testing
it once every fortnight or at least once per month.
5.1. The Remote Control
The batteries in the remote control will need to be replaced
every 1 to 3 years, depending on usage. You are able to
recognise when the batteries are low from when the range
on the remote control reduces. Below describes how to
replace the batteries in the remote control.
Battery Specifications
Battery Type
Model
Voltage
2 x Lithium button cells
CR1616
3 Volts
5.2. The Detector
5.2.1. Replacing the batteries
The batteries can be removed by un-clipping them out
of the plastic battery holders. The new batteries must
be handled only by the edges as the chemicals in your
skin may cause a poor battery connection. Fingerprints
can be cleaned off the batteries with a soft cloth and
some alcohol solution. The new batteries can now be
slid into the battery holders making sure that the top
terminal is pressing down firmly on top of each battery.
Just after each battery is replaced the lights will begin
flashing 6 times to confirm the detector is now powered.
The 3 minute warm up period now applies.
Detector Battery Specifications
Battery Type
Model
Voltage
2 x Lithium button cells
CR2450
3 Volts
19
When replacing the batteries you must take the following into consideration:
• You must replace both batteries at the same time. Don’t just replace one of
them.
• Be sure not to touch the pyro detector on the removal or replacement of the
batteries.
5.2.2. Cleaning the pyro detector
The pyro detector must be clean at all times for optimum
performance. If the pyro detector appears to have any dust,
dirt or fingerprints on it, then it should be cleaned.
To clean the pyro, use a soft cotton cloth (not a tissue), which
has been dampened with Metholated Spirits (Alcohol). Gently
wipe across the window of the pyro detector with the
dampened cloth.
Be sure not to touch the pyro detector with you fingers.
5.2.3. Cleaning the case and lense
Detectors are often left in position for long periods and spiders or other pests
might stay around the detector. It is important that the lens, especially, is kept
clean of any spider webs or pests from being in front of it. It is recommended
to keep the whole case clean by wiping over it with a soft cloth to remove dust,
pests or other obstructions as required. This will also reduce the risk of a false
alarm due to pests. Do not spray on or near the lens with insect/repellent
spray. Remember not to move the position or angle of the detector as it may
affect the performance of the detector. If in doubt, carry out a walk test to
ensure the detector is operating correctly.
20
6. Warranty
6.1. Warning Limitations & Warranty
While this system is an advanced design security system, it does not offer guaranteed
protection against burglary, fire or any other emergency. Any alarm system, whether
commercial or residential, is subject to compromise or failure to warn for a variety of
reasons. For example:
•
Intruders may gain access through unprotected openings, or have the technical
sophistication to bypass an alarm detector or disconnect an alarm warning device.
•
Intrusion detectors (e.g., passive infrared detectors), smoke detectors, and many other
sensing devices will not work without power. Battery operated devices will not work
without batteries, with dead batteries or if the batteries are not put in properly. Devices
powered solely by AC will not work if their AC power supply is cut off for any reason,
however briefly.
•
Signals sent by wireless transmitters may be blocked or reflected by metal before they
reach the alarm receiver. Even if the signal path has been recently checked during a
weekly test, blockage can occur if a metal object is moved into the path. A user may not
be able to reach a panic or emergency button quickly enough.
•
While smoke detectors have played a key role in reducing residential fire deaths, they
may not activate or provide early warning in as many as 35% of all fires, for a variety of
reasons, according to data published by the US Federal Emergency Management
Agency (Figures from USA Statistics only). Some of the reasons smoke detectors used
in conjunction with this system may not work are as follows: Smoke detectors may have
been improperly installed and positioned. Smoke detectors may not sense fires that start
where smoke cannot reach the detectors, such as in chimneys, in walls, or roofs, or on
the other side of closed doors. Smoke detectors may not sense a fire on another level of
a residence or building. A second floor detector, for example, may not sense a first floor
or garage fire. Moreover, smoke detectors have sensing limitations. No smoke detector
can sense every kind of fire. In general, detectors may not always warn about fires
caused by carelessness and safety hazards like smoking in bed, violent explosions,
escaping gas, improper storage of flammable materials, overloaded electrical circuits,
children playing with matches, or arson. Depending on the nature of the fire and/or the
location of the smoke detectors, the detector, even if it operates as anticipated, may not
provide sufficient warning to allow all occupants to escape in time to prevent injury or
death.
•
Passive Infrared Motion Detectors can only detect intrusion within the designed ranges
as diagrammed in their installation manual. Passive Infrared Detectors do not provide
volumetric area protection. They do create multiple beams of protection, and intrusion
can only be detected in unobstructed areas covered by the beams. They cannot detect
motion or intrusion that takes place behind walls, ceilings, floors, closed doors, glass
partitions, glass doors, or window. Mechanical tampering, masking, painting, or spraying
of any material on the mirrors, windows or any part of the optical system can reduce
their detection ability. Passive Infrared Detectors sense changes in temperature;
however, as the ambient temperature of the protected area approaches the temperature
range of 32°c to 65°c, the detection performance can decrease.
21
•
Alarm warning devices such as sirens, bells or horns may not alert people or wake up
sleepers who are located on the other side of closed or partly open doors. If warning
devices sound on a different level of the residence from the bedrooms, then they are
less likely to waken or alert people inside the bedrooms. Even persons who are awake
may not hear the warning if the alarm is muffled by noise from a stereo, radio, air
conditioner or other appliances, or by passing traffic. Finally, alarm warning devices,
however loud, may not warn hearing-impaired people or waken deep sleepers.
•
Telephone lines needed to transmit alarm signals from a premise to a central monitoring
station may be out of service or temporarily out of service. Telephone lines are also
subject to compromise by sophisticated intruders.
•
Even if the system responds to the emergency as intended, however, occupants may
have insufficient time to protect themselves from the emergency situation. In the case of
a monitored alarm system, authorities may not respond appropriately.
•
This equipment, like other electrical devices, is subject to component failure. Even
though this equipment is designed to last as long as 10 years, the electronic
components could fail at any time.
•
The most common cause of an alarm system not functioning when an intrusion or fire
occurs is inadequate maintenance. This alarm system should be tested weekly to make
sure all detectors are working properly.
•
Installing an alarm system may make one eligible for lower insurance rates, but an alarm
system is not a substitute for insurance. Homeowners, property owners and renters
should continue to act prudently in protecting themselves and continue to insure their
lives and property.
We continue to develop new and improved protection devices. Users of alarm systems owe
it to themselves and their loved ones to learn about these developments.
LIMITED WARRANTY
RhinoCo Technology (Seller), warrants its products to be in conformance with its own plans and
specifications and to be free from defects in materials and workmanship under normal use and
service for twelve months from the date of original purchase. Sellers obligation shall be limited to
repairing or replacing, at its option, free of charge for materials or labor, any part which is proved not
in compliance with Sellers specifications or proves defective in materials or workmanship under
normal use and service. Seller shall have no obligation under this Limited Warranty or otherwise if
the product is altered or improperly repaired or serviced by anyone other than Seller. For warranty
service, return transportation prepaid, to your local RhinoCo branch. Seller has no obligation to
attend the buyer’s location to retrieve the goods or make repairs onsite.
There are no warranties, expressed or implied, of merchant ability, or fitness for a particular purpose
or otherwise, which extend beyond the description on the face hereof. In no case shall seller be
liable to anyone for any consequential or incidental damages for breach of this or any other
warranty, express or implied, or upon any other basis of liability whatsoever, even the loss or
damage is caused by its own negligence or fault.
Seller does not represent that the products it sells may not be compromised or circumvented; that
the products will prevent any personal injury or property loss by burglary, robbery, fire or otherwise;
or that the products will in all cases provide adequate warning or protection. Customer understands
that a properly installed and maintained alarm system may only reduce the risk of a burglary,
robbery, or fire without warning, but it is not insurance or a guarantee that such will not occur or that
there will be no personal injury or property loss as a result.
Consequently, seller shall have no liability for any personal injury; property damage or other loss
based on a claim the product failed to give any warning. However, if seller is held liable, whether
directly or indirectly, for any loss or damage arising under this limited warranty or otherwise, regard
22
less of cause or origin, seller's maximum liability shall not in any case exceed the purchase price of
the product, which shall be the complete and exclusive remedy against seller.
This warranty replaces any previous warranties and is the only warranty made by Seller on this
product. No increase or alteration, written or verbal, of the obligations of this Limited Warranty is
authorised.
NOTE: In addition to the warranty conditions, warranty will not be given where
a product has been immersed in water under any circumstances, or where
damage has been caused by hosing the main unit, without all due care taken
by the owner to protect the main unit by covering with some sort of plastic
sheeting.
23
PLEASE CUT OUT & RETURN THIS INFORMATION
WITHIN 14 DAYS OF PURCHASE TO YOUR LOCAL OFFICE:
RhinoCo Technology Head Office: 9 Hannabus Place, McGrath’s Hill, NSW, 2756 Australia
UK Sales Office
Italy Sales Office
South Africa Sales Office
Unit 6 Ubique Park, March Way,
Battlefield Enterprise Park,
Shrewsbury, SY1 3JE
United Kingdom
24 Piazza Garibaldi, 98034
Francavilla Di Sicilia (ME)
Italy
Route 21 Corp/Park, Unit C3
Prospect Close, 311 Regency Drive,
Irene Ext 30,
South Africa
Wa tc hguar d Se nti nel Hom e Al a r m S ys t e m Wa rra nt y Ca rd
Name
Address
Suburb
Email
Date of Purchase
Daytime Phone
Where did you purchase your
Watchguard System?
Store Location
State
Postcode
Invoice Number
Who installed your Watchguard System?
This information will only be used by the manufacturer and will not be sold to any third parties.
Dear Customer,
We appreciate your confidence in our product, and you can be certain that we will do everything
possible to ensure that you are happy with your decision and that you have years of satisfaction
from your Watchguard System.
We take extreme care in the research, design and development of our products to ensure they meet
your needs. Additionally, we keep in close contact with our dealers worldwide, and should any
problem occur, we will work closely with your local dealer to see that it is resolved quickly.
As a leading designer and manufacturer, we are continually endeavouring to exceed the
expectations of our customers. Furthermore, we appreciate your input regarding potential design
improvements, issues regarding our service and support, and any other ideas you may have which
could help us to serve you better.
Please make any comments you have here: