1
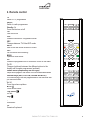
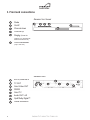
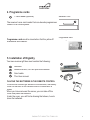
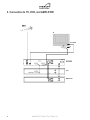
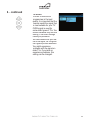
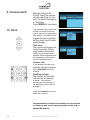
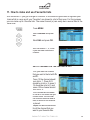
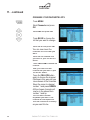
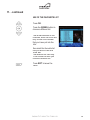
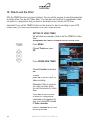
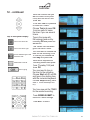
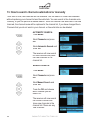
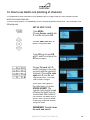
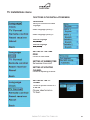
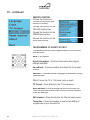
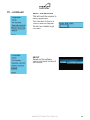
��������������������
���������������������������������������
���������
USER MANUAL (UK)
IMPORTANT!
Please read this manual before
you connect the receiver!
DIGIALITY T-2000 FTA / T-2001 CX
1
2
DIGIALITY T-2000 FTA / T-2001 CX
TABLE OF CONTENTS
BASIS USE AND BASIS FUNCTIONS
1.
2.
3.
4.
5.
6.
7.
8.
9.
10.
11.
12.
13.
14.
About Digiality T-2000 FTA / T-2001 CX........................................................ page
Remote control...............................................................................................page
Front and connections................................................................................... page
Programme cards.......................................................................................... page
Installation of Digiality.................................................................................... page
Connection to TV, VCR and amplifier............................................................ page
Navigation..................................................................................................... page
Turning on the receiver (first time)................................................................ page
Channel search............................................................................................. page
Clock..............................................................................................................page
How to make and use favourite lists ............................................................. page
How to use the timer .....................................................................................page
How to search channels automatic or manually............................................ page
How to use Adult Lock (blocking of channels)................................................page
4
5
6
7
7
8
9
10
12
12
13
16
18
19
EXTENDED USE OF THE RECEIVER
15. Installation menu........................................................................................... page 21
Due to possible software updates parts of your Digiality® manual
can be changed without prior notice.
At www.kjaerulff1.com you can always download the latest new
manual for your Digiality® receiver.
DIGIALITY T-2000 FTA / T-2001 CX
3
1. About Digiality T-2000 FTA / T-2001 CX
Read this manual carefully before connecting the receiver.
Your new Digiality receiver is a very simple and user-friendly receiver that can receive terrestrial
digital channels. Furthermore, the T-2001 CX can receive scrambled channels in Conax.
One of our objectives in the development of the receiver has been to create a menu system that
is as easy to use as possible. We have done our best to make the software stabile, so that it
does not require frequent updates. There can of cause be cases in which we need to update the
software, e.g. if the operator changes the format in which they broadcast the channels. If we have
to update the software we will use a technique that allows us to update the software “over the air”.
This allows us to update the software so that the user always has the best software available.
Giving better performance and user gratification.
In case you experience problems with the receiver, please contact your dealer.
SAFETY!
4
Power Supply:
190-250V AC 50/60 Hz
Overload:
Please do not overload the wall plug or extension cord;
this can cause an electrical fire.
Fluids:
Please do not expose the receiver to water or any other
kind of fluids.
Ventilation:
The ventilation holes on top of the receiver must never be
covered. Make sure that there are always a minimum of
10 cm “free space” around the receiver, i.e. to the rear,
on both sides and on top. Never place the receiver on
a carpet or any other kind of soft material. Never expose
the receiver to heat such as direct sunlight or heat from a
radiator.
Never place any other electrical Items on top of the
receiver. Never place the receiver on top of any other
electrical items. If the receiver is correctly ventilated it will
perform much more stable and have a longer lifetime.
Connection:
Please do not connect any devices not mentioned in the
user manual to the receiver.
The warranty does not cover:
Damages from lightning, damages caused by water or
fluids, connection of equipment not mentioned in this
manual, installation of unauthorized (i.e. patch or copied)
software and any other mistreatment of the receiver.
DIGIALITY T-2000 FTA / T-2001 CX
2. Remote control
DIGIALITY T-2000 FTA / T-2001 CX
��
�� ���
���
���
���
����
�� ��
����
� ���
�
�
�
�
�
�
��
�
�
����
�
�
�
TV
Switch to TV programmes
RADIO
Switch to radio programmes
Standby I
Turns the receiver on/off
TXT
Tele Text on/off
EPG
Shows the Electronic Programme Guide
SRC
Changes between TV/Video/SAT mode
BACK
Back to the last shown channel or menu
EXIT
Exit the menu without saving
MENU
Opens the main menu
OK
Shows the programme list or confirms a choice in the menu
P+ / PChanges (up/down) between the different options in the
display and changes programmes (up/down)
Double arrow (respectively left and right)
Skips whole pages in the menu or move forward/backwards
Shortcut keys (RED, YELLOW, GREEN and BLUE)
The coloured keys can be programmed for the functions that
you use most often
V+ / VTurns the volume up/down
MUTE
Turns off the sound
Play pause
No use
Stop
No use
i
Information
0-9
Numerical keyboard
�
�
�
� ��� � ���
�
� ���
� ���
� ���
� ���� � ���
� ����
�
�
����
��� �
�
�Ç
�V
�
R2
5
3. Front and connections
Receiver front closed
1
2
3
Diode
On/off
Channel down
5
Channel up
Display (Shows the
6
Conax cardreader
4
1
2
3
4
6
5
channel number when the
receiver is on, and the time
when the receiver is off)
(only T-2001 CX)
Receiver back
1
2
3
4
5
6
7
8
6
Ant IN, antenna in
TV OUT
Scart Video OUT
RS232
Scart TV
Audio OUT L+R
Spdif Dolby Digital™
Power connection
4
1
ANT in
2
3
TV out
DIGIALITY T-2000 FTA / T-2001 CX
5
8
6
7
4. Programme cards
1
1 Card reader (optional)
Receiver front
1
The receiver has a card reader that can decode programmes
coded in the Conax system.
Programme cards must be inserted so that the yellow IC
downwards and inwards.
Programme card
Canal Digital
5. Installation of Digiality
Your new receiver gift box must contain the following:
2
1
1
2
3
4
Receiver
Remote control, incl. two pcs AAA batteries
Scart cable
This User manual
PLACING THE BATTERIES IN THE REMOTE CONTROL
To avoid that children get access to the batteries, the battery
cover on the back of the remote control is locked with a
screw.
When you have removed the screw, you can take off the
cover and place the batteries.
Under the cover, you will find a drawing that shows, how to
place the batteries.
DIGIALITY T-2000 FTA / T-2001 CX
3
4
USE
������
���������
�������
���
R MA
NU
AL
����
����
�
����
����
�����
����
����
�����
��
���
����� �����
����
7
6. Connection to TV, VCR, and AMPLIFIER
DVB-T
TV
RF CABLE
SCART
230Vac
RECEIVER
CABLE IN
TV SCART
VCR
VCR SCART
AUDIO
8
DIGIALITY T-2000 FTA / T-2001 CX
AMPLIFIER
SPDIF
7. Navigation
When you want to highlight
a line in the menu, you can
move up and down in the
menu structure by using the
buttons P+ and P-.
With the OK button you
choose the menu line that
you have marked in the
menu.
With double arrow right and
double arrow left you can
jump one page forward or
backwards. This function is
used when you want to move
fast up and down in a long
programme list.
With the Menu button
you will get into the main
menu, where you can set
the receiver, search for
programmes, and edit the
programme list.
By pressing the EXIT button
you will leave the menu.
With the BACK button you
jump back to the previous
menu, or if you are out of the
menu, you will get back to
the previous channel.
The numerical keyboard
is used for typing in codes,
frequencies, and programme
choices. The text function on
the keyboard will not be used
on this receiver model.
DIGIALITY T-2000 FTA / T-2001 CX
9
8. Turning on the receiver
STEP BY STEP
Connect the receiver to the
mains power supply.
The Installation guide is now
shown on your TV.
MENU LANGUAGE
The first thing that the guide
will ask you, is to choose the
language you wish to use.
You choose the language by
pressing P+ or P-. When you
have chosen the language
you wish, you press the OK
button.
TV FORMAT
The TV format is the picture
format that your TV has.
4:3 (Normal) is the correct
setting if you do not have a
widescreen TV.
You choose via TV - if you
have a widescreen TV.
10
DIGIALITY T-2000 FTA / T-2001 CX
See instructions under
Front and Connections
8. - continued
TV-SCART
In order to receive the
programmes in the best
quality, it is important that the
receiver sends the signal that
is most suitable for your TV.
CVBS signal is used for
some older types of TVs. You
should therefore only use this
setting, if the other settings
cause you problems.
We recommend that you use
the RGB signal, as this gives
the highest picture resolution.
You might experience
problems with the signal on
older TVs. If you later on
experience problems, this
setting can be changed.
DIGIALITY T-2000 FTA / T-2001 CX
11
9. Channel search
10. Clock
GREEN
After the setting of the
SCART output, the receiver
will start searching for channels. The search can take up
to 10 minutes.
Press GREEN for next menu.
The receiver has a clock that
shows the actual time and
that is used for programming
recordings. The receiver will
suggest the correct settings,
but you might need to make
some changes.
Time zone
The receiver will suggest the
correct time zone, but you
might need to change this
setting if you have chosen
another menu language than
the language of the country
that you are situated in.
Summer time
If the receiver should automatically change to summer
time, Automatic must be
chosen.
Updating channel
The receiver will automatically choose an updating
channel. This channel
should only be changed, if
the operator informs you to
change it.
Press the GREEN button to
save the changes.
Congratulations you have now installed your receiver and
it is ready for use. On the next pages you can see, how to
operate the receiver.
12
DIGIALITY T-2000 FTA / T-2001 CX
11. How to make and use Favourite lists
With terrestrial TV you get a range of channels. It is therefore a good idea to organise your
channel list in a way so all your “favorites” are placed in a list of their own. For this purpose
you can make up to 4 favorite lists. The same channel (s) can easily be in several lists at the
same time.
Press MENU.
Mark Channels and press
OK.
Mark Edit and press OK.
With the buttons 1, 2, 3 and
4 you add new channels to
channel.
SETUP CHANNELS IN THE FAVOURITE LIST
First, you mark the channel
that you want in the list with P+
and P-.
Press 1 if the channel should
be in list nr. 1. Press 2 if it
should be in list nr. 2, press 3
if it should be in list nr. 3 and
press 4 if the channel should
be in list nr. 4.
The channels will be added
to the list in the order that you
choose them. You will after
the channel name be able to
see, in which list the channel
is placed.
Repeat the above-mentioned
for all the channel that you
want in your favourite lists.
DIGIALITY T-2000 FTA / T-2001 CX
13
11. - continued
ORGANISE YOUR FAVOURITE LISTS
Press MENU.
Mark Channels and press
OK.
Mark Edit and press OK.
Press BLUE to choose the
list that you want to change.
Mark the list and press OK.
You can now move the
channels into the order you
want.
Mark the first channel that
you want in your list with P+
and P-.
Press YELLOW to choose the
channel.
Now, you mark the next
channel that you want in your
list with P+ and P-.
Press the YELLOW button
again to choose the channel.
Continue in this way until you
have chosen all the channels.
Move the cursor to channel
number 1 and press GREEN.
All the chosen channels will
now be in the placed from
number 1 and up.
You can add channels
anywhere you want in the
channel list and repeat this
until the channel list is exactly
as you want it to be.
14
DIGIALITY T-2000 FTA / T-2001 CX
11. - continued
USE OF THE FAVOURITE LIST
Press OK.
Press the GREEN button to
choose a different list.
The list All contains all the
channels, while the other lists
only contain the channels
that you have put into the
lists.
Now mark the favourite list
that you want to use and
press OK.
The receiver will then stay
in the chosen list until you
choose a different list.
Press EXIT to leave the
menu.
DIGIALITY T-2000 FTA / T-2001 CX
15
12. How to use the timer
With the TIMER function you have 2 options. You can set the receiver to record programmes
at certain times, this we call “Video timer”. You can also use the timer to programme a channel switch to a programme that you want to remember to see, this we call TV-timer.
Important! If you set the TIMER function on the receiver to start a recording on your VCR
(Video timer), you must also remember to set your Video recorder!
SETTING OF VIDEO TIMER
We will show an example of how to set the TIMER for Video
timer:
A programme on CNN on 10 August 2004 at 19:30 to 20:00.
Press MENU.
Choose Timer and press
OK.
Press GREEN NEW TIMER.
Choose Function and press
OK.
Choose Video recorder and
press OK to set the timer for
video recording.
Remember! Also to program
you video recorder, when
you set the receiver for Video
timer.
If you want to set the timer
to switch to a programme
(remember a programme for
you), you choose TV instead
of Video recorder.
Move to Channel with P- and
P+ and press OK.
16
DIGIALITY T-2000 FTA / T-2001 CX
12. - continued
Keys in the Keyboard display:
move cursor to the left
move cursor to the right
choose between upper-case
and lower-case
delete letter to the left
OK for typing
Mark the channel that you
want to record from (here:
CNN) with P+ and P- and
press OK.
In the field Text it is possible
to name the TIMER.
Choose Text and press OK.
It can be useful to name
the timer if you use several
timers.
Type in the name with
the keyboard and end by
choosing OK and press the
OK button.
The TIMER has now been
given the name “news”.
You now need to choose the
date for the recording. With
P- and P+ you choose the
field Day and press OK.
Mark which day/date the
recording should take place
(here: Thursday 10/8) and
press OK.
You now need to type in
the time for the recording.
Choose Start with P- and P+
and type in the starting time
with the numerical keyboard.
Choose Stop similarly (here:
start = 19:30 and stop =20:
00)
You have now set the TIMER
for the wanted recording.
Press GREEN SUBMIT to
save the TIMER settings.
Press EXIT to return.
GREEN
DIGIALITY T-2000 FTA / T-2001 CX
17
13. How to search channels automatical or manually
From time to time, new channels will be available. You can search in these new channels
without replacing your channel list and favourite lists. You can search in the channels automatically, or you can perform a manual search. When the receiver has searched in the new
channels, the channel name will be replaced in the channel list, if you have changed them.
Channels that you do not want in your channel- or favourite lists can be deleted.
AUTOMATIC SEARCH:
Press MENU.
Mark Channels and press
OK.
Mark Automatic Search and
press OK.
The receiver will now search
for new channels and place
the new channels in the
channel list.
MANUAL SEARCH:
Press MENU.
Mark Channels and press
OK.
Mark Manual Search and
press OK.
Press the OK and choose
which channel you will
search for.
The receiver will now search
the chosen channel and
place new channels in the
channel list if there are any
new channels.
18
DIGIALITY T-2000 FTA / T-2001 CX
14. How to use Adult Lock (blocking of channels)
It is possible to lock channels in the receiver with a 4-digit code, so that children cannot
watch the locked channels.
To lock the channels, it is necessary first to encode a general adult lock. This is done in the
following way:
SET UP ADULT LOCK
Press MENU.
Choose Access control with
P- and P+ and press OK.
Choose Adult lock with Pand P+ and press OK.
Press OK and choose ON
with P- and P+ and press the
OK button again.
Choose Pin code with Pand P+ and type in the code
you want with the numerical
keyboard. Choose Pin code
again with P- and P+ and
retype the code. The code
must contain 4 digits.
When you have typed in
the code twice, you press
GREEN SUBMIT. The
receiver must now be turned
off before the Adult lock will
be activated. After restart of
the receiver the adult lock is
active, and it is not possible
to edit any channels without
using the code.
REMEMBER! To write down
the code and save it.
DIGIALITY T-2000 FTA / T-2001 CX
19
14. - continued
USE ADULT LOCK TO LOCK A PROGRAMME
Press MENU.
Type in your 4-digit code with
the numerical keyboard.
Choose Channels with P+
and P- and press OK.
Choose Edit with P+ and
P- and press OK.
Choose the channel that you
want to lock and press OK.
Choose ADULT LOCK with
P- and P+ and type in the
time for start locking (the
first field) with the numerical
keyboard. Choose the time to
the right with >> and type in
the time for end locking (the
second field). If you type in
respectively 00:00 and 00:00,
the channel will be blocked
all day and night.
Press GREEN SUBMIT.
GREEN
Repeat the above-mentioned
if you want to lock more
channels.
Press EXIT when you have
locked the programmes.
REMEMBER! The Adult
lock will not be activated
until you have restarted the
receiver.
20
DIGIALITY T-2000 FTA / T-2001 CX
15. Installations menu
FUNCTIONS IN THE INSTALLATIONS MENU
LANGUAGE
Here you choose the menu
language.
Audio language priority 1.
Audio language priority 2.
Subtitle language
1st priority.
Subtitle language
2nd priority.
SETTING UP THE TIME
ZONE
Choice of time zone.
SETTING UP SUMMER TIME
Set summer time on/off.
SETTING UP UPDATING
CHANNEL
Choice of updating channel.
SETTING UP THE TVFORMAT
Choice of picture format 4:3
or via TV.
Choose video format on
TV-Scart.
DIGIALITY T-2000 FTA / T-2001 CX
21
15. - continued
REMOTE CONTROL
Choose the function for
the RED shortcut key (see
options on screen).
Choose the function for the
YELLOW shortcut key.
Choose the function for the
GREEN shortcut key.
Choose the function for the
BLUE shortcut key.
PROGRAMMING OF SHORTCUT KEYS
The following functions are programmable on the coloured
shortcut keys:
RED
BLUE
YELLOW
None = No function.
GREEN
Signal Information = Read out information about signal
strength and BER.
Soundtrack = Chooses another soundtrack for the chosen
channel.
Subtitles = Chooses another language for subtitles or totally
removes them.
16:9 = Forces the TV in 16:9 mode (only on scart).
TV Format = Goes directly to the TV format menu.
Move subtitles = After pressing the shortcut key you can
move the subtitles up and down in the picture with doubble
arrow left and right.
Edit channel = Goes directly into the Channel setup menu.
Favourites = Opens the window to use for fast adding of
programmes in your favourite list.
22
DIGIALITY T-2000 FTA / T-2001 CX
15. - continued
RESET THE RECEIVER
This will reset the receiver to
factory adjustment.
You now need to type in a
code to reset the receiver.
Contact your dealer to get
this code.
ABOUT
Reads out the software
version and serial number of
the receiver.
DIGIALITY T-2000 FTA / T-2001 CX
23
24
© Kjaerulff 1 A/S 2004