1
%/!
22" HD LCD Television
with Built-in DVD Ployer
LCD22VH65
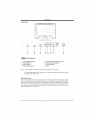
AIR (TV)/CABLE
MODE SELECTION
The Air/CABLE menu option is set to the "CABLE" (Cable Television) mode at the factory.
If you want to use an antenna for the built-in TV tuner, this menu option must be set to the
"Air" mode. Please refer to "6. Channel MENU" in page 16 of this manual for the details.
FOR QUESTIONS
Please
OR TECHNICAL
cal!: / Favor
de Ilamar
SUPPORT
al:
(USAICANADA!
r_co)
Please
do
not
return
Par Favor NO Regrese
this
TV to
the
store
aste Televisor a la Tienda
Contents
Contents
2
Caution
3
Safety Information
4
Unit and Accessories
4
Product
4
Feature
Introduction
5-7
1. Front View
5
2. Rear View
6
3. Remote Control
7
Connection
8-10
Basic
11
Ope-ration
OSD Menu
1. Picture
2. Audio
11-17
menu
11
menu
12
3. Time menu
12
4. Setup
13
menu
5. P.G menu
6. Channel
Caution
14-15
menu
and
16-17
DVD SIDE PANEL
18
18
Features
General
Setup
19
Steps of setup menu
19
Items Introduction
DVD REMOTE CONTROL OPERATION
24
Mp3 PLAYBACK
25
DVD Trouble
26
shooting
-1-
Caution
The lightening flash with arrowhead symbol, within an equilateral
triangle is intended to alert the user to the presence of un-insulated
"dangerous voltage" within the products enclosure that may be of
sufficient magnitude to constitute a risk of electric shock to the persons.
The exclamation
point within an equilateral
user to the presence of important operating
instructions
in the literature accompanying
triangle is intend to alert the
and maintenance
(servicing)
the appliance.
Correct disposal of this Product
(Waste Electrical & Electronic Equipment
(WEEE)Your
product is
designed and manufactured
with high quality materials and components
which can be recycled and reused.
This symbol means that electrical and electronic
equipment, at their
end-of-life
should be disposed of separately
from your household
waste. Please dispose of this equipment at your local community
waste
collection/recycling
centre.
In the USA there are separate collection systems for used electrical and
electronic products. Please help us to conserve the environment
we live
in!
_T_,_us
theThis
environment
unit weC°mpli
eswilivethAm
eriin_ ca Safety di rectives.help
3124140
CONFORMS
TO UL STD.
60065
This unit complies
with FCC directives.
-2-
us to co nse rye
Sa et In brmadon
Safety
Information
To ensure reliable and safe operation of this equipment,
please
instructions
in this user guide, especially the safety information
Electrical
read carefully
below.
all the
safety
-The TVset should only be connected
to a mains supply which matches that stated
on
the label on the mains adaptor
-To prevent overload, don't share the same mains supply socket with too many other
items of equipment.
1.Do not place any connecting wires where they may be stepped on or tripped over.
2.Do not place heavy items on the leads, which may damage them.
3.Hold the Mains plug, not the wires, when removing from a socket.
4.During a thunderstorm
or while leaving the TVfor long periods, disconnect
the
aerial (if outdoor) and mains adaptor from the supply.
5.Do not allow water or moisture to enter the TV or mains adaptor. Do NOT use in wet
or moist areas such as Bathrooms, steamy kitchens or near swimming pools.
-Pull the plug out immediately,
and seek professional
help if:
1.the mains plug or cable is damaged
2.liquid is spilt onto the set, or if it is accidentally
exposed to water or moisture
3.anything
accidentally
penetrates
the ventilation
slots
4.the set does not work normally.
5.Do NOT remove the safety covers. There are no user serviceable
parts inside.
You may invalidate the warranty. Qualified personnel only are permitted to service
this apparatus.
6.To avoid battery leakage, remove exhausted
batteries from the remote control
handset, or when not using for along period.
7.Do NOT break open or throw exhausted
batteries on a fire.
Physical
safety
1.Do NOT block ventilation slots in the back cover. You may place the TVin a cabinet,
but ensure at least 5cm (2") clearance all around the unit.
2. Do NOT tap or shake the TVscreen,
you may damage the internal circuitry. Take
good care of the remote control, do not drop it or allow it to come into contact with
liquids.
3.To clean the TV use a soft dry cloth. Do NOT use solvents or petrol based fluids.
For stubborn stains, you may use a damp soft cloth with diluted detergent.
-3-
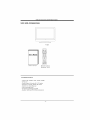
Unit and Accessories
and Product Feature
unit anO Accessories
TV set
m_ii
UserU$
Mahua|
iJ @ 0 _i ii
User's manual
Product
Remote control
Batteries: 2xAA
Feature
- Inputs: RF, VIDEO, VGA, YPbPr, HDMI
- DVD slot
-Audio Input:AVAudio
R/L, PC Audio
- Support TV mode: NTSC-M,ATSC
- Search TV: Auto/Manual
- Auto-shutting
down
- Program exchange and edit
-Support QAM and 8VSB demodulation
-4-
Introduction
introduction
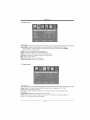
, Front View
j-..
f=
'\_
sou_cEi
SOURCE
k _
J MENU i
F_
'\ _
CH_
MENU
CH+
Fm
_J
IL
_
i c.
½_
CH
j
voL,
\
1:
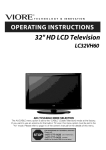
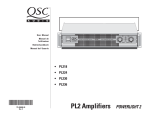
Remote
2:
Indicator
control sensor.
LED:
GREEN
RED
POWER
®
ON.
STANDBY.
The effective receiving range for the signal is 5-8 metres from the front of the remote
control window, and 300 to the left or right side and 20 o above or below the remote
control window
3:
Key board
1). SOURCE:
Display the input source menu.
2). MENU:
Display main MENU.
3). CH+/CHIn TVmode,
press "CH+" or"CH-"
to change
the channel up and down.
In MENU mode, press "CH+"
or"CH-"
to select
items .
In standby mode, press"CH+"
or"CH-"
to turn
on the TV.
4). VOL+/VOLAdjust sound level.
In MENU mode, press "VOL+"
or "VOL-"
to
adjust the item that you selected.
-5-
4: Power:
Press this button to turn the
unit ON from STANDBY
mode. Press it again to turn
The set back to STANDBY.
Introduction
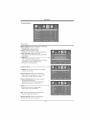
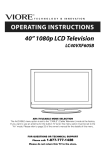
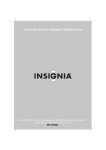
2 Rear View
QTf"
1.AC POWER INPUT
2. HDMI INPUT
3, VGAINPUT
4. PC AUDIO INPUT
Note: 1.AV, S-VlDEO
5. AV/S-VlDEO AUDIO INPUT
6. REARAUDIO
INPUT
7. YPbPr INPUT
8.ANT
and YPbPr share the Rear Audio input channel.
2. When HDMI port get DVl signal,the
the audio from HDMI port.
PC Audio channel
will change to receive
Wall Mounting
The TV is provided with mounting holes for a VESAapproved
wall mounting bracket.
Remove the two Posi screws holding the base to the base bracket and lift the base
away (do not remove the base mounting bracket). Mount the VESAbracket
using 4 x
M4 x10 Iso metric threaded screws (not supplied).
Do not use screws longer than I0
ram, damage will occur to the internal parts. Fit the wall bracket securely following
the manufacturers
instructions.
-6-
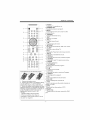
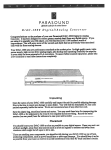
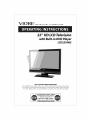
REMOTE CONTROL
1 :POWER
ii
@
@
@
@
@
@
@
@-@
@@@@
000e
i@
}
@@@@
Insert Batteries Into the Remote Control
1. Remove the battery cover.
2. Inserting the 2 AAA 1.5V batteries making
sure the polarity (+ or -) of the batteries
matches the polarity marks inside the unit,
3, Mount the battery cover, Replace with new
batteries when the TV set begins to show the
following symptoms:Operation
is unsteady or
erratic, Sometimes the TV set does not
f_nction with Remote Control Unit,
emark:
1) Alkaline Battery Recommended.
2) Remove batteries when they are
exhausted or if the remote control is not to
To set the TV standby or on.
2:NUMBER
KEY:
For direct access to program.
3:MENU
To displayTV
menu or to return to the
previous
menu.
4: CURSOR
To move within the menu.
5: EXIT
Used to exit menu.
6: VOL+/To adjust sound level.
7: PIM
To switch picture mode.
8: MTS/SAP
Switch the sound stereo, SAP and mono.
9: SLEEP
Set time to turn off the TV.
10:P.G
Setting the Parental Control level control.
11 :MUTE
To disable or enable the sound.
12: RECALL
To access the previously viewed program.
13: SOURCE
To display or exit TV input source menu.
14: ENTER
Confirms selection.
15: TV DISPLAY
Displays/removes
the program
Information
16: S.M
To switch sound mode.
17: CH+/CHTo access the next or previous Program.
18: ASPECT
To change picture aspect.
19: CC
Enable or disable the CC function.
20:CH LIST:
Used to display the channel list
21 :FAV:
Used to access your favourite
digital TV mode.
22:EPG:
channels
in
Display all the information
of DTV
programs.
23:DVD keys :
Please refer to the user manual for DVD
part.
be used for long time.
-7-
Connection
Connection
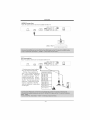
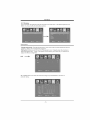
Power Cord Connection
- Connect the power cord to a wall outlet as shown, and turn the switch (Page 6) on.
- When you connect the power, the TV set comes into standby mode and the LED
indicator (Page
5) lights red.
-You can bring the TVout of standby mode by press the POWER button on TV set
(page 5) or
remote control(page
7), and the LED indicator lights green•
Antenna
cable
connection
Wall jack with F-Connector
Coaxial (Round)
Antenna
Cabh
4
I
/
,
tI
•
External
i
Antenna
Press SOURCE button on the remote control to display the input source menu, press
vA buttonto select TV, then press OK button to confirm, TVscan and you will receive
the signal•
-8-
Connection
Antenna
cabJe
connection
AV Input ConnectionNote:AII
cables
shown are not included
with the TV.
RCAAudio
Cable
V
j"
\
DVD
YPbPr Connection
Note: All cables shown are not included
or
VCR
with the TV.
AudJ o Cab] e
L
[
YPbPr
Cabte
V_
DVD or VCR
-9-
zzzzzz
::::::::::::::::::::::::::::::::::::::::::::
i_
Connection
HDMI Connection
Note:All cables shown are not included
................................................
_ _ v _,62!4_..................................
_
...........................
_
with the TV.
....................
[,_?F ?_Tf'_T................................................................................................................
V
DVD or VCR
..................
r
,_ooo i
PC Connection
Note: All cables shown are not included with the TV.
- If using a sound card, adjust
the PC sound as required
.- Set the video resolution
of
your PC to1024x768,60Hz
on
its original monitor.
Make the
connections
between
theTV
monitorandyourPC,
switch
on the monitor before
booting
the PC. You can nowsetyour
preferred
resolution from the
choice
supported.
See the
tableofsupported
resolutions
on the right.
r Supported
PC resolutions
640 x 480, 60 Hz
640
x 480,
72 Hz
640 x 480, 75 Hz
800
800
800
1024
1024
x 600, 75 Hz
x 600,60
Hz
x 600, 72 HZ
x 768,
x 768,
60 Hz
70 Hz
1024 x 768, 75 Hz
128D
x 768,
60 Hz
1360
x 768,
60 Hz
-10-
R_B-P¢
OUTPUT
AUDIO
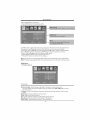
Basic 0 eration
Basic OSD Menu operation
Press MENU button to display
the OSD
Use4i_ button to select the main menu, and press v button to enter the submenu.ln
the submenu, useVAbutton
to select the function item, and you could:adjust
("Contrast"
item in Picture menu for example) with_l_ button; select ("Picture Mode"
item in Picture menu for example) with4t, button; enter the submenu ("Close
Caption" item in Setup menu for example) with) button.
* (Press MENU button to return to the upper menu.)
* (Press EXIT button to exit the menu display.)
Note1:
Note2:
Only when you input the suitable signal, the relevant items can be activated
Please operating the OSD menu according
to hint on the bottom of the banner.
OSD Menu
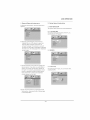
1. Picture menu
Description
Picture
mode:
Select between Standard, Dynamic, soft and personal.
You may select the picture mode directly by pressing the PICTURE button on the
Remote control.
Contrast:
Control the difference between the bright and dark regions of the screen
picture.
Brightness:
Adjust brightness
of the picture.
Color: Adjust color of the picture.
Tint: Control the fresh tones to make them appear natural.
Sharpness:
Set the amount of fine detail in the picture.
Color Temp.: select between Normal, Cool and Warm.
-11-
OSD
2.Audio
Menu
menu
Description
Sound Mode: Select your desired sound mode as follow: Standard, Music, Movie,
And personal.
You may select the sound mode directly by pressing the SOUND
Button on the remote control.
Bass: control the intensity of low frequencies.
Treble: control the intensity of high frequencies.
Balance:
Left and right stereo audio channels balance.
Surround:
Activate or deactivate
the Surround function.
AVC: Auto volume control.
Spdif Type: Spdif output format select.
Audio Language:
Select audio language.
3. Timer menu
Description
Sleep timer: You may set the automatic
shutdown timer choosing from 5 to 240
minutes, or deactivate this function.
Time zone: Select between Pacific, Alaska, Hawaii, Eastern, Central and Mountain,
time zones.
Daylight
Saving Time: Select between On and Off.
Clock: Clock time is automatically
set when the TVis
station.
Clock time is not user-adjustable.
-12-
tuned to a broadcast
digital
TV
OSD Menu
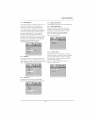
4. Setup menu
Description
Menu Language:
Select OSD menu language.
Transparency:
Turn on or off the
transparency
menu function.
Aspect:
Select the aspect mode
between 16:9, Zoom, Cinema and Normal.
Noise reduction:
Select the noise
reduction mode between Strong, Off, Weak
and Middle.
PC SETUP:
If the video input signal comes
from your PC, you may adjust the V-Position,
H-Position,
Clock, Phase or even
perform an Auto adjustment.
Closed
Caption:
CC Mode: Allow you to select the CC Mode
among: On and Off.
Basic Selection:
Allow you to select the
basic selection among: CC1, CC2, CC3,
CC4, Text1, Text2, Text3 and Text4.
Advanced
Selection:
Allow
the advanced selection
among: Service1,
Service4, Service
you to select
Service2, Service3
5 and Service 6.
Option
Use remote buttons to operating
option menu AsYourdesire.
in
×VS: Activate / deactivate
the automatic
dynamic brightness
function.
Restore Default: Restore all settings
SETUP menu to factory settings.
in
-13-
OSD
5. P.G menu
You must enter the password to gain access
6666. You may modify the following options:
Menu
to the P.G menu. The default
password
is
L?®so¢_Sfo#
Change password:
Change the password, you must enter the new password twice to
confirm it. Note: Do not forget the password.
P.G Switch: Allow you to turn on or off the system lock. If deactivated,
the functions
described
below don' t work. This option menu allows you to lock any TV channel or
adjust the Movie rating filter.
US:
TV: UseA_buttons
unblock rating.
to select the desired
rating and press4_button
-14-
to block or
OSD Menu
MPAA: The Movie rating (MPAA) is used for original movies rated by the Motion
Picture Association
of America (MPAA) as broadcasted
on cable TVand not edited for
television.
UseA_button
to select N/A, G, PG, PG-13, R, NC-17 or X.
Description
G
PG
Age
PG-I_
Restrict. Under 17 requires accompanying
guardian(age
varies in some jurisdictions)
R
NC-17
X
General audiences,
All Ages admitted
Parental Guidance suggested.
Some material may not be
Suitable for children.
Parents strqnqly cautioned.
Some material .may be
approprlateTor
cnuaren unaer _,_.
X is an order rating that is unified with NC-17 but may be
encoded in the data of order movies.
Canada English:
Select among:
C, C8+, G, PG, 14+ and 18+.
E,
Canada French:Selectamong:
G,8ans+,13ans+,16ans+and
18ans+.
E,
RRT:Allow
or adult
No one 17 and under admitted.
Canada:
Reset
parent
you to reset the RRTsetting.
-15-
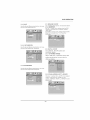
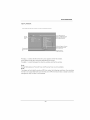
OSD
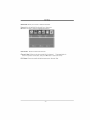
6. Channel
menu
L_esor_p#on
Air/Cable:
Allow you to select antenna
between Air and Cable. If you selet
Auto Scan:
Enter the Auto Scan menu to start auto scan.
If you select
"Air" or "Cable"
as input
signal in Antenna item, you can press _button
to search the channels automatically.
The
receivable channels will be stored
automatically.
When searching channels,
press MENU to stop. NOTE: It will take a while
to auto scan in NTSC orATSC
mode, please
wait patiently.
Favorite:
Allow you to add these channels which you
desired as the favorite channeis.UseAT
button to highlight the desired item, then press
OK button to add or remove the highlighted
channel as favorite.
-16-
Menu
OSD Menu
Show/Hide:Allow
you to show or hide the channels.
Use_,_'button
to highlight the desired item, then press
OK button to show or hide the highlighted
channel.
Channel
No.: Show and select the channel.
Channel
Label: Allow you to setup a label for the channel.
Press ,_T button
select the position of the table, and press4_button
to select the words.
DTV Signal:
Show the quality
of digital
signal:
-17-
good, Normal,
Bad.
to
D VD OPERA
TION
Features
Disc formats supported
MPEG-#
Caution
MPEG4 files on disc
The DVD video player is A class t laser product.
Use of controls or adjustments or performance of
procedures other than those specified herein. May
result in hazardous radiation Exposure. As the laser
beam used in this DVD video player. Is harmful to
the eyes, do not attempt to disassemble the Cabinet.
Refer servicing to qualified personnel only.
by this player:
rl[l
BIG|TAL
Dolby Digital
VIDEO
DVD
Subtitle
MP3 files on CD-R/
CD-RW
video
choices
Multi-angle
®))
TV Aspect
modes
USB
Ratio
Audio choices
R_RESTRICTEDJ
NEXT
Parental
Lock
PREV
STOP
This product incorporates
copyright
protection
technology
that is protected
by method claims of
certain U.S. patents and other intellectual
property
rights owned by Macro vision Corporation
and
other rights owners. Use of this copyright
protection
technology
must be authorized
by Macro vision
Corporation,
and is intended for home and other
limited viewing uses only unless otherwise
authorized
by Macro vision Corporation.
Reverse
engineering
or disassembly
is prohibited.
PLAY/PAUSE
OPEN/CLOSE_
How to enter DVD source
Please press the SOURCE key and select the
DVDitem,
then LCDTV will enter DVD mode.
Manufactured under license from Dolby Laboratories.
"Dolby" and the double-D symbol are trademarks of
Dolby Laboratories. Confidential Unpublished Works.
© 1992-t997
Dolby Laboratories, Inc. All rights
reserved.
USB
In DVD mode,press
DVD/USB button in the
remote
controller,
you can insertaUSBdisc
ora Mp3 playerwith
USB interface
to play
the mp3,JPEG and Mp4 files.
Caution:
When using USB function,
please do not insert
in the wrong direction, or else it will be
damaged.
-18-
DVD OPERATION
l.
GeneraIStepsofsetupmenu
A) Press the setup
appears.
button,
2.
the main setup
Setup
items
introduction
menu
2.1 SYSTEM
The system
2.1.1
SETUP
setup
options
are illustrated
TV SYSTEM
According
to the Color System
can choose the TV System.
B) Press the Left and Right arrow
highlight the iconofthedesired
below:
of the TV, you
buttons to
page, then
press the Down or Right arrow button to
activate that page. For example, if you want
to setup the video page, press Right to highlight
the video icon, the video page will be displayed
on the screen.
C) Press the Down arrow button to highlight the
desired option. Press Enter or press Right to
2.1.3
select. The choices of that option appear on
the right. For example,
press the Down arrow
the Arrow buttons to highlight the Exit
option, then press Enter or Setup again
to exit Setup
TV TYPE
According
to the TV type, you can choose
4:3LB or 4:3PS.
button to highlight the BRIGHTNESS
option,
then press Enter to select, the brightness
choices appear on the right.
A)Press
Setup
2.1.2VIDEO
Menu.
-19-
16:9,
DVD OPERATION
2.1.4
PASSWORD
2.2
LANGUAGE
SETUP
The password
option is initially
locked, and you
can not set the ratings limit or change the
The language
password.
In order for the Ratings feature to
work, the password
mode must be turned on.
If you want to set the ratings limit, you will need
Highlight
to enter the default password.
Which is 6666.
then press Enter to confirm. To change the
password,
you will be prompted for the old
and it will display OSD in that language.
Note: The OSD LANGUAGE
display
is
subject to sales country.
2.2.1
setup options
are illustrated
below:
OSDLANGUAGE
the OSD LANGUAGE
option,
and
press the Arrow buttons to choose the OSD
language you prefer. Press Enter to confirm,
password,
then be prompted
for new one. Enter
a 4-digit number ( this is your password).Press
remember
your PASSWORD,
as the DEFAULT
setting will revert everything.
But the
PASSWORD
to the factory defaults.
2.2.2
Highlight
2.1.5
RATING
The Rating feature is a rating limit system, like
movie ratings. It works with DVD discs that have
been assigned a rating. This helps you control
types for DVDs that your family watches.
2.1.6
the
DEFAULT
The DEFAULT setup options are RESTORE
factory setup. Let your player work on best state.
-20-
AUDIOLANG
theAUDIO
LANG
option,
and press
the Arrow buttons to choose the audio language
you prefer. Press Enter to confirm. If the disc
you are playing has that language
available,
it
will output that language
Note: The AUDIO LANGUAGE
subject
to sales country..
display
is
DVD
2.2.3
2.4
SUBTITLELANG
Highlight
the SUBTITLE
press the Arrow buttons
VIDEO
The video
LANGoption,
and
to choose the subtitle
OPERATION
SETUP
setup
options
are illustrated
below:
language
you prefer. Press Enter to confirm.
If the disc you are playing has that language
available,
it will display subtitles
in that language.
Note: The SUBTITLE
LANGUAGE
is subject to sales country..
display
2.4.1
BRIGHTNESS
Use the Up and
move the scroll
2.2.4
Down arrow
buttons
to
and adjust
the
brightness.
MENULANG
Highlight
the MENU LANG option,
press the Arrow
buttons
to choose
language
you prefer.
Press Enter
If the disc
availabel.lt
and
the menu
to confirm.
you are playing
has that Language
will display
the menu in the
language.
Note: The
MENU
LANGUAGE
subject
to sales country..
display
is
2.4.2
CONTRAST
Use the Up and Down arrow
buttons
to
move
the scroll
and adjust
the contrast.
2.3
AUDIO
SETUP
-21-
DVD
2.4.3
2.4.4
2.5
HUE
Use the Up and Down arrow buttons
the scroll and adjust the hue.
to move
SPEAKER
SETUP
The speaker setup options
are illustrated
below:
2.5.1
DOWNMIX
A)LT/RT
Choose
this setting when theDVD
player is connected
toa2Channel
Analog
Audio input.
B)STEREO
Choose
this setting when the DVD
player is connected
toaTVor
therefore
modulator.
SATURATION
Use the Up and Down arrow buttons
the scroll and adjust the saturation.
to move
2.6 DIGITAL
SETUP
The DIGITAL
SETUP options
illustrated
below:
are
2.6.1
DYNAMIC
When
LINE OUT is selected,choose
setting
different
2.4.5
OPERATION
to adjust
RANGE
this
the line out ratio for
effects.
SHARPNESS
Use the Up and Down arrow buttons
the scroll and adjust the Sharpness.
to move
2.6.2
DUAL
MONO
Choose
to setup
mode.
There
are
option:
STEREO,
MIN MONO.
-22-
(LEFT
+ RIGHT)
the Land
Rmonooutput
four modes
in this
MONO
L, MONO
R, and
DVD
_
0-9
@_
keys
• These keys are used to input the time, as well
as title, chapter and track numbers.
• When a numeric item is displayed
on the screen,
press the 0-9 keys to select the desired
and press ENTER to confirm.
entry,
• When a numeric item is larger than 9 press
GOTO key to select the display entry.
_
@ _
@ %
from stop mode to start
during
<ENTER>
wilI
item in a menu,
enter
the
Press
@ _
SETUP
• Press
SETUP
repeatedly
• Press
PLAY to resume
playback
* During
to pause
• During
display
title.
Note:
to play frame.
normal
playback.
RETURN
Press
DVD playback,
press RETURN to
the DVD title menu or play the first
this function
to resume
play.
to pause
normal
playback.
REV
DVD or CD playback,
press and holp4_l
is subject
44 X2-'_ 44 X4 =_ "_4X8 =_ _4 X 20 7
PLAY to resume
normal
playback.
FWD
DVD or CD playback,
press and holpb-_
to scan forward.
The player will review the
disc at 2, 4, 8 and 20 times normal speed as
follows:
F_
_5
playback
to scan in reverse. The player will review the
disc at 2, 4, 8 and 20 times normal speed as
follows:
F_
during
PLAY/PAUSE
Press PLAY/PAUSE
playback.
" Press PLAY/PAUSE
" During
menus.
• Press SETUP
playback.
OPERATION
,, Press PLAY/PAUSE
@ _b
ENTER
• Pressing
selected
CONTROL
the
UPIDOWNILEFTIRmGHT
Used to navigate
REMOTE
@ _
_1_,X2 "_ I_ X4 =-- I_- X8 "'_ _'_ X 20_
PLAY to resume
Note: This function
@ _,
During
press
is subject
MENU to return
to the disc.
AUDIO
DVD playback
" Press AUDIO repeatedly
Audio language/formats.
Note: This function
-23-
playback.
MENU
- During DVD, playback,
to the program menu.
to the disc.
normal
to select
is disc specific.
from up to 8
O%
GOTO
During pmayback, press GOTO show
current
time counter
position.
DVD
REMOTE
@_;'
PREV
Press
the
O
CONTROL
OPERATION
PREV to skip to previous
_::_
playback, press DISPLAY
time counter position.
Enter number
to choose
the Play time.
to choose
Chapter
DVD/USB
Switch
O
between
Total
Chapter
Current
Disc
type
Current
O'_
to show the
Play time
of the
current
title
Total
Chapter
Enter number
the Chapter.
or track.
DISPLAY
,, During
current
Enter number to
choose the title
chapter
title
Total title
Press DISPLAY to show
message menu.
the Audio and Subtitle
disc and USB operation.
Languag,
Audio
_:::_ OPEN/CLOSE
Angle
Subtitle
• To open the disc tray, press OPEN/CLOSE.
• To close the disc tray, press OPEN/CLOSE
again.
STOP
• Press STOP once during
hold playback.
= Press PLAY to resume
you pressed STOP.
playback
playback
to stop and
from the point
Press STOP twice to stop playback
@_
Press
During
SUBTITLE
DVD playback
• Press SUBTITLE
repeatedly
to 32 subtitle languages.
completely.
Note: This function
38:NEXT
NEXT to skip to the next chapter
O_
or track.
-24-
to select
is disc specific.
from
up
DVD
OPERATION
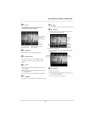
Mp3 PLAYBACK
When
a MPEG
and
a Mp3
disc
is loaded,
the screen
will be displayed
as follows:
Current
Current
MP3/JPEG
File Switch
the file type
and
The p}aying
file
is a Mp3 audio
file.
PresgG-O
Press
the
Region:
of the
Displays
p}aying
switching.
The p}aying file is
a JPEG picture fi}e.
to select
the file when the cursor
select to play the current
PressC:ll:_
file
name,
If a JPEG
file is being
played,
the name should
have
a JPEG
extension.
directory
name
to switch
between
appears
file selected
the directory
in the file window.
by the cursor.
window
and the file window.
Note:
During
Note:
Mp3 playback,
The player
format
Forward
will not identify
is not supported(make
damaged
Scan and Reverse
Scan are not available.
or play a MP3 disc under
the following
sure the files are in MP3 format),the
or dirty, the disc is not finalised.
-25-
conditions:
the recording
disc is badly scratched,
DVD Trouble
shooting
If you have any questions,
® Ensure
the power
button
® Ensure
the power
outlet
•
please
consult
the troubleshooting
guide below:
is on.
Make sure the Main unit s POWER
is operational.
Ensure
the power
cord is not damaged.
® Ensure
the power
plug is connected
®
Ensure
the remote
®
Point the remote
batteries
control
button
is on
are working.
directly
at the player
between
the remote
firmly to the outlet.
®
Turn off the power, and then turn
it on again.
Remove
any obstacles
I R sensor.
....
......
® Ensure the audio
is not set to mute.
® Ensure you have set the player
settings correctly.
sAUDIO
D I_ _
® Ensure you have set the player
settings correctly
® Ensure
the disc is not scratched
!
;i
s IR
sensor.
DI
LAY E D
sAUDIO
or stained.
®
Ensure
you have put the disc on the tray.
®
Ensure
the disc is not upside
®
Ensure
the disc is not distorted,
AYE
scratched.
Ensure
the disc is not warped,
Ensure
the disc is not badly stained
damaged
Ensure
the disc format
is compatible
or deformed.
or damaged.
with the player.
Please check whether you have tried to play a software
CD. If so, please restart the player.
-26-
down.
stained
or
and the
Viore,lnc.
7801Hayvenhurst
Avenue,
VanNuys,CA91406
Printed
inChina