1
Network UPS Tools User Manual
i
Network UPS Tools User Manual
Network UPS Tools User Manual
ii
REVISION HISTORY
NUMBER
DATE
2.6.0
2011-01-14
DESCRIPTION
First release of AsciiDoc documentation for
Network UPS Tools (NUT).
NAME
Network UPS Tools User Manual
iii
Contents
1
Introduction
1
2
Network UPS Tools Overview
1
2.1
Description . . . . . . . . . . . . . . . . . . . . . . . . . . . . . . . . . . . . . . . . . . . . . . . . . . . . . .
1
2.2
Installing . . . . . . . . . . . . . . . . . . . . . . . . . . . . . . . . . . . . . . . . . . . . . . . . . . . . . . .
1
2.3
Upgrading . . . . . . . . . . . . . . . . . . . . . . . . . . . . . . . . . . . . . . . . . . . . . . . . . . . . . . .
1
2.4
Configuring and using . . . . . . . . . . . . . . . . . . . . . . . . . . . . . . . . . . . . . . . . . . . . . . . . .
1
2.5
Documentation . . . . . . . . . . . . . . . . . . . . . . . . . . . . . . . . . . . . . . . . . . . . . . . . . . . .
1
2.6
Network Information . . . . . . . . . . . . . . . . . . . . . . . . . . . . . . . . . . . . . . . . . . . . . . . . .
2
2.7
Manifest . . . . . . . . . . . . . . . . . . . . . . . . . . . . . . . . . . . . . . . . . . . . . . . . . . . . . . . .
2
2.8
Drivers . . . . . . . . . . . . . . . . . . . . . . . . . . . . . . . . . . . . . . . . . . . . . . . . . . . . . . . .
2
2.8.1
Extra Settings . . . . . . . . . . . . . . . . . . . . . . . . . . . . . . . . . . . . . . . . . . . . . . . . .
3
2.8.2
Hardware Compatibility List . . . . . . . . . . . . . . . . . . . . . . . . . . . . . . . . . . . . . . . . .
3
2.8.3
Generic Device Drivers . . . . . . . . . . . . . . . . . . . . . . . . . . . . . . . . . . . . . . . . . . . .
3
2.8.4
UPS Shutdowns . . . . . . . . . . . . . . . . . . . . . . . . . . . . . . . . . . . . . . . . . . . . . . .
4
2.8.5
Power distribution unit management . . . . . . . . . . . . . . . . . . . . . . . . . . . . . . . . . . . . .
4
Network Server . . . . . . . . . . . . . . . . . . . . . . . . . . . . . . . . . . . . . . . . . . . . . . . . . . . .
4
2.10 Monitoring client . . . . . . . . . . . . . . . . . . . . . . . . . . . . . . . . . . . . . . . . . . . . . . . . . . .
4
2.10.1 Master . . . . . . . . . . . . . . . . . . . . . . . . . . . . . . . . . . . . . . . . . . . . . . . . . . . .
4
2.10.2 Slave . . . . . . . . . . . . . . . . . . . . . . . . . . . . . . . . . . . . . . . . . . . . . . . . . . . . .
4
2.10.3 Additional Information . . . . . . . . . . . . . . . . . . . . . . . . . . . . . . . . . . . . . . . . . . . .
5
2.11 Clients . . . . . . . . . . . . . . . . . . . . . . . . . . . . . . . . . . . . . . . . . . . . . . . . . . . . . . . . .
5
2.11.1 upsc . . . . . . . . . . . . . . . . . . . . . . . . . . . . . . . . . . . . . . . . . . . . . . . . . . . . . .
5
2.11.2 upslog . . . . . . . . . . . . . . . . . . . . . . . . . . . . . . . . . . . . . . . . . . . . . . . . . . . . .
5
2.11.3 upsrw . . . . . . . . . . . . . . . . . . . . . . . . . . . . . . . . . . . . . . . . . . . . . . . . . . . . .
5
2.11.4 upscmd . . . . . . . . . . . . . . . . . . . . . . . . . . . . . . . . . . . . . . . . . . . . . . . . . . . .
6
2.12 CGI Programs . . . . . . . . . . . . . . . . . . . . . . . . . . . . . . . . . . . . . . . . . . . . . . . . . . . . .
6
2.12.1 Access Restrictions . . . . . . . . . . . . . . . . . . . . . . . . . . . . . . . . . . . . . . . . . . . . . .
7
2.12.2 upsstats . . . . . . . . . . . . . . . . . . . . . . . . . . . . . . . . . . . . . . . . . . . . . . . . . . . .
7
2.12.3 upsimage . . . . . . . . . . . . . . . . . . . . . . . . . . . . . . . . . . . . . . . . . . . . . . . . . . .
7
2.12.4 upsset . . . . . . . . . . . . . . . . . . . . . . . . . . . . . . . . . . . . . . . . . . . . . . . . . . . . .
7
2.13 Version Numbering . . . . . . . . . . . . . . . . . . . . . . . . . . . . . . . . . . . . . . . . . . . . . . . . . .
7
2.14 Backwards and Forwards Compatibility . . . . . . . . . . . . . . . . . . . . . . . . . . . . . . . . . . . . . . .
7
2.15 Support / Help / etc. . . . . . . . . . . . . . . . . . . . . . . . . . . . . . . . . . . . . . . . . . . . . . . . . . .
8
2.16 Hacking / Development Info . . . . . . . . . . . . . . . . . . . . . . . . . . . . . . . . . . . . . . . . . . . . .
8
2.17 Acknowledgements / Contributions . . . . . . . . . . . . . . . . . . . . . . . . . . . . . . . . . . . . . . . . . .
8
2.9
Network UPS Tools User Manual
iv
3
Features
8
3.1
Multiple manufacturer and device support . . . . . . . . . . . . . . . . . . . . . . . . . . . . . . . . . . . . . .
8
3.2
Multiple architecture support . . . . . . . . . . . . . . . . . . . . . . . . . . . . . . . . . . . . . . . . . . . . .
9
3.3
Layered and modular design with multiple processes . . . . . . . . . . . . . . . . . . . . . . . . . . . . . . . .
9
3.4
Redundancy support - Hot swap/high availability power supplies . . . . . . . . . . . . . . . . . . . . . . . . . .
9
3.5
Security and access control . . . . . . . . . . . . . . . . . . . . . . . . . . . . . . . . . . . . . . . . . . . . . .
9
3.6
Web-based monitoring . . . . . . . . . . . . . . . . . . . . . . . . . . . . . . . . . . . . . . . . . . . . . . . . 10
3.7
Free software . . . . . . . . . . . . . . . . . . . . . . . . . . . . . . . . . . . . . . . . . . . . . . . . . . . . . 10
3.8
UPS management and control . . . . . . . . . . . . . . . . . . . . . . . . . . . . . . . . . . . . . . . . . . . . 10
3.9
Monitoring diagrams . . . . . . . . . . . . . . . . . . . . . . . . . . . . . . . . . . . . . . . . . . . . . . . . . 10
3.9.1
"Simple" configuration . . . . . . . . . . . . . . . . . . . . . . . . . . . . . . . . . . . . . . . . . . . . 10
3.9.2
"Advanced" configuration . . . . . . . . . . . . . . . . . . . . . . . . . . . . . . . . . . . . . . . . . . 11
3.9.3
"Big Box" configuration . . . . . . . . . . . . . . . . . . . . . . . . . . . . . . . . . . . . . . . . . . . 11
3.9.4
"Bizarre" configuration . . . . . . . . . . . . . . . . . . . . . . . . . . . . . . . . . . . . . . . . . . . . 12
3.10 Image credits . . . . . . . . . . . . . . . . . . . . . . . . . . . . . . . . . . . . . . . . . . . . . . . . . . . . . 12
3.11 Compatibility information . . . . . . . . . . . . . . . . . . . . . . . . . . . . . . . . . . . . . . . . . . . . . . 12
3.11.1 Hardware . . . . . . . . . . . . . . . . . . . . . . . . . . . . . . . . . . . . . . . . . . . . . . . . . . . 12
3.11.2 Operating systems . . . . . . . . . . . . . . . . . . . . . . . . . . . . . . . . . . . . . . . . . . . . . . 12
4
Download information
4.1
13
Source code . . . . . . . . . . . . . . . . . . . . . . . . . . . . . . . . . . . . . . . . . . . . . . . . . . . . . . 13
4.1.1
Stable tree: 2.6 . . . . . . . . . . . . . . . . . . . . . . . . . . . . . . . . . . . . . . . . . . . . . . . . 13
4.1.2
Testing tree: 2.6.x-pre . . . . . . . . . . . . . . . . . . . . . . . . . . . . . . . . . . . . . . . . . . . . 13
4.1.3
Development tree: 2.7 . . . . . . . . . . . . . . . . . . . . . . . . . . . . . . . . . . . . . . . . . . . . 13
Code repository . . . . . . . . . . . . . . . . . . . . . . . . . . . . . . . . . . . . . . . . . . . . . . . . 13
Browse code . . . . . . . . . . . . . . . . . . . . . . . . . . . . . . . . . . . . . . . . . . . . . . . . . 14
Snapshots . . . . . . . . . . . . . . . . . . . . . . . . . . . . . . . . . . . . . . . . . . . . . . . . . . . 14
4.1.4
4.2
5
Older versions . . . . . . . . . . . . . . . . . . . . . . . . . . . . . . . . . . . . . . . . . . . . . . . . 14
Binary packages . . . . . . . . . . . . . . . . . . . . . . . . . . . . . . . . . . . . . . . . . . . . . . . . . . . . 14
Installation instructions
5.1
14
Installing from source . . . . . . . . . . . . . . . . . . . . . . . . . . . . . . . . . . . . . . . . . . . . . . . . . 14
5.1.1
Prepare your system . . . . . . . . . . . . . . . . . . . . . . . . . . . . . . . . . . . . . . . . . . . . . 15
System User creation . . . . . . . . . . . . . . . . . . . . . . . . . . . . . . . . . . . . . . . . . . . . . 15
5.1.2
Build and install . . . . . . . . . . . . . . . . . . . . . . . . . . . . . . . . . . . . . . . . . . . . . . . 15
Configuration . . . . . . . . . . . . . . . . . . . . . . . . . . . . . . . . . . . . . . . . . . . . . . . . . 15
Build the programs . . . . . . . . . . . . . . . . . . . . . . . . . . . . . . . . . . . . . . . . . . . . . . 15
Installation . . . . . . . . . . . . . . . . . . . . . . . . . . . . . . . . . . . . . . . . . . . . . . . . . . 15
State path creation . . . . . . . . . . . . . . . . . . . . . . . . . . . . . . . . . . . . . . . . . . . . . . 16
Network UPS Tools User Manual
v
Ownership and permissions . . . . . . . . . . . . . . . . . . . . . . . . . . . . . . . . . . . . . . . . . 16
5.2
Installing from packages . . . . . . . . . . . . . . . . . . . . . . . . . . . . . . . . . . . . . . . . . . . . . . . 16
5.2.1
Debian, Ubuntu and other derivatives . . . . . . . . . . . . . . . . . . . . . . . . . . . . . . . . . . . . 17
5.2.2
Mandriva . . . . . . . . . . . . . . . . . . . . . . . . . . . . . . . . . . . . . . . . . . . . . . . . . . . 17
5.2.3
Suse / Opensuse . . . . . . . . . . . . . . . . . . . . . . . . . . . . . . . . . . . . . . . . . . . . . . . 17
5.2.4
Red Hat, Fedora and CentOS . . . . . . . . . . . . . . . . . . . . . . . . . . . . . . . . . . . . . . . . . 18
5.2.5
FreeBSD . . . . . . . . . . . . . . . . . . . . . . . . . . . . . . . . . . . . . . . . . . . . . . . . . . . 18
Binary package . . . . . . . . . . . . . . . . . . . . . . . . . . . . . . . . . . . . . . . . . . . . . . . . 18
Port . . . . . . . . . . . . . . . . . . . . . . . . . . . . . . . . . . . . . . . . . . . . . . . . . . . . . . 18
6
Configuration notes
6.1
6.2
19
Details about the configuration files . . . . . . . . . . . . . . . . . . . . . . . . . . . . . . . . . . . . . . . . . 19
6.1.1
Generalities . . . . . . . . . . . . . . . . . . . . . . . . . . . . . . . . . . . . . . . . . . . . . . . . . . 19
6.1.2
Line spanning . . . . . . . . . . . . . . . . . . . . . . . . . . . . . . . . . . . . . . . . . . . . . . . . . 20
Basic configuration . . . . . . . . . . . . . . . . . . . . . . . . . . . . . . . . . . . . . . . . . . . . . . . . . . 20
6.2.1
Driver configuration . . . . . . . . . . . . . . . . . . . . . . . . . . . . . . . . . . . . . . . . . . . . . 20
6.2.2
Starting the driver(s) . . . . . . . . . . . . . . . . . . . . . . . . . . . . . . . . . . . . . . . . . . . . . 20
6.2.3
Data server configuration (upsd) . . . . . . . . . . . . . . . . . . . . . . . . . . . . . . . . . . . . . . . 21
6.2.4
Starting the data server . . . . . . . . . . . . . . . . . . . . . . . . . . . . . . . . . . . . . . . . . . . . 21
6.2.5
Check the UPS data . . . . . . . . . . . . . . . . . . . . . . . . . . . . . . . . . . . . . . . . . . . . . 22
Status data . . . . . . . . . . . . . . . . . . . . . . . . . . . . . . . . . . . . . . . . . . . . . . . . . . 22
All data . . . . . . . . . . . . . . . . . . . . . . . . . . . . . . . . . . . . . . . . . . . . . . . . . . . . 22
6.2.6
6.3
Startup scripts
. . . . . . . . . . . . . . . . . . . . . . . . . . . . . . . . . . . . . . . . . . . . . . . . 23
Configuring automatic shutdowns for low battery events . . . . . . . . . . . . . . . . . . . . . . . . . . . . . . 23
6.3.1
Shutdown design . . . . . . . . . . . . . . . . . . . . . . . . . . . . . . . . . . . . . . . . . . . . . . . 24
6.3.2
How you set it up . . . . . . . . . . . . . . . . . . . . . . . . . . . . . . . . . . . . . . . . . . . . . . . 24
NUT user creation . . . . . . . . . . . . . . . . . . . . . . . . . . . . . . . . . . . . . . . . . . . . . . 24
Reloading the data server . . . . . . . . . . . . . . . . . . . . . . . . . . . . . . . . . . . . . . . . . . . 25
Power Off flag file . . . . . . . . . . . . . . . . . . . . . . . . . . . . . . . . . . . . . . . . . . . . . . 25
Securing upsmon.conf . . . . . . . . . . . . . . . . . . . . . . . . . . . . . . . . . . . . . . . . . . . . 25
Create a MONITOR directive for upsmon . . . . . . . . . . . . . . . . . . . . . . . . . . . . . . . . . . 25
Define a SHUTDOWNCMD for upsmon . . . . . . . . . . . . . . . . . . . . . . . . . . . . . . . . . . 26
Start upsmon . . . . . . . . . . . . . . . . . . . . . . . . . . . . . . . . . . . . . . . . . . . . . . . . . 26
Checking upsmon
Startup scripts
. . . . . . . . . . . . . . . . . . . . . . . . . . . . . . . . . . . . . . . . . . . . . . 26
. . . . . . . . . . . . . . . . . . . . . . . . . . . . . . . . . . . . . . . . . . . . . . . . 26
Shutdown scripts . . . . . . . . . . . . . . . . . . . . . . . . . . . . . . . . . . . . . . . . . . . . . . . 26
Testing shutdowns . . . . . . . . . . . . . . . . . . . . . . . . . . . . . . . . . . . . . . . . . . . . . . 27
6.3.3
Using suspend to disk . . . . . . . . . . . . . . . . . . . . . . . . . . . . . . . . . . . . . . . . . . . . 27
6.3.4
RAID warning . . . . . . . . . . . . . . . . . . . . . . . . . . . . . . . . . . . . . . . . . . . . . . . . 28
Network UPS Tools User Manual
vi
7
6.4
Typical setups for enterprise networks and data rooms . . . . . . . . . . . . . . . . . . . . . . . . . . . . . . . . 28
6.5
Typical setups for big servers with UPS redundancy . . . . . . . . . . . . . . . . . . . . . . . . . . . . . . . . . 29
6.5.1
Example configuration . . . . . . . . . . . . . . . . . . . . . . . . . . . . . . . . . . . . . . . . . . . . 30
6.5.2
Multiple UPS shutdowns ordering . . . . . . . . . . . . . . . . . . . . . . . . . . . . . . . . . . . . . . 30
6.5.3
Other redundancy configurations . . . . . . . . . . . . . . . . . . . . . . . . . . . . . . . . . . . . . . . 31
Advanced usage and scheduling notes
7.1
7.2
31
The simple approach, using your own script . . . . . . . . . . . . . . . . . . . . . . . . . . . . . . . . . . . . . 31
7.1.1
How it works relative to upsmon . . . . . . . . . . . . . . . . . . . . . . . . . . . . . . . . . . . . . . . 31
7.1.2
Setting up everything . . . . . . . . . . . . . . . . . . . . . . . . . . . . . . . . . . . . . . . . . . . . . 31
7.1.3
Using more advanced features . . . . . . . . . . . . . . . . . . . . . . . . . . . . . . . . . . . . . . . . 32
7.1.4
Suppressing notify storms . . . . . . . . . . . . . . . . . . . . . . . . . . . . . . . . . . . . . . . . . . 32
The advanced approach, using upssched . . . . . . . . . . . . . . . . . . . . . . . . . . . . . . . . . . . . . . . 32
7.2.1
How upssched works relative to upsmon . . . . . . . . . . . . . . . . . . . . . . . . . . . . . . . . . . . 32
7.2.2
Setting up your upssched.conf . . . . . . . . . . . . . . . . . . . . . . . . . . . . . . . . . . . . . . . . 33
The big picture . . . . . . . . . . . . . . . . . . . . . . . . . . . . . . . . . . . . . . . . . . . . . . . . 33
Establishing timers . . . . . . . . . . . . . . . . . . . . . . . . . . . . . . . . . . . . . . . . . . . . . . 33
Executing commands immediately . . . . . . . . . . . . . . . . . . . . . . . . . . . . . . . . . . . . . . 33
8
9
7.2.3
Writing the command script handler . . . . . . . . . . . . . . . . . . . . . . . . . . . . . . . . . . . . . 34
7.2.4
Early Shutdowns . . . . . . . . . . . . . . . . . . . . . . . . . . . . . . . . . . . . . . . . . . . . . . . 34
7.2.5
Background . . . . . . . . . . . . . . . . . . . . . . . . . . . . . . . . . . . . . . . . . . . . . . . . . . 34
NUT outlets management and PDU notes
35
8.1
Introduction . . . . . . . . . . . . . . . . . . . . . . . . . . . . . . . . . . . . . . . . . . . . . . . . . . . . . . 35
8.2
NUT outlet data collection . . . . . . . . . . . . . . . . . . . . . . . . . . . . . . . . . . . . . . . . . . . . . . 35
8.3
Outlets on PDU . . . . . . . . . . . . . . . . . . . . . . . . . . . . . . . . . . . . . . . . . . . . . . . . . . . . 35
8.4
Outlets on UPS . . . . . . . . . . . . . . . . . . . . . . . . . . . . . . . . . . . . . . . . . . . . . . . . . . . . 36
8.5
Other type of devices . . . . . . . . . . . . . . . . . . . . . . . . . . . . . . . . . . . . . . . . . . . . . . . . . 36
Notes on securing NUT
36
9.1
How to verify the NUT source code signature . . . . . . . . . . . . . . . . . . . . . . . . . . . . . . . . . . . . 37
9.2
System level privileges and ownership . . . . . . . . . . . . . . . . . . . . . . . . . . . . . . . . . . . . . . . . 37
9.3
NUT level user privileges . . . . . . . . . . . . . . . . . . . . . . . . . . . . . . . . . . . . . . . . . . . . . . . 37
9.4
Network access control . . . . . . . . . . . . . . . . . . . . . . . . . . . . . . . . . . . . . . . . . . . . . . . . 38
9.5
9.4.1
NUT LISTEN directive . . . . . . . . . . . . . . . . . . . . . . . . . . . . . . . . . . . . . . . . . . . . 38
9.4.2
Firewall . . . . . . . . . . . . . . . . . . . . . . . . . . . . . . . . . . . . . . . . . . . . . . . . . . . . 38
9.4.3
TCP Wrappers . . . . . . . . . . . . . . . . . . . . . . . . . . . . . . . . . . . . . . . . . . . . . . . . 38
Configuring SSL . . . . . . . . . . . . . . . . . . . . . . . . . . . . . . . . . . . . . . . . . . . . . . . . . . . 39
9.5.1
Install OpenSSL . . . . . . . . . . . . . . . . . . . . . . . . . . . . . . . . . . . . . . . . . . . . . . . 39
9.5.2
Recompile and install NUT . . . . . . . . . . . . . . . . . . . . . . . . . . . . . . . . . . . . . . . . . 39
Network UPS Tools User Manual
vii
9.5.3
Create a certificate and key for upsd . . . . . . . . . . . . . . . . . . . . . . . . . . . . . . . . . . . . . 39
9.5.4
Figure out the hash for the key . . . . . . . . . . . . . . . . . . . . . . . . . . . . . . . . . . . . . . . . 39
9.5.5
Install the client-side certificate . . . . . . . . . . . . . . . . . . . . . . . . . . . . . . . . . . . . . . . 39
9.5.6
Create the combined file for upsd . . . . . . . . . . . . . . . . . . . . . . . . . . . . . . . . . . . . . . 40
9.5.7
Note on certification authorities (CAs) and signed keys . . . . . . . . . . . . . . . . . . . . . . . . . . . 40
9.5.8
Install the server-side certificate . . . . . . . . . . . . . . . . . . . . . . . . . . . . . . . . . . . . . . . 40
9.5.9
Clean up the temporary files . . . . . . . . . . . . . . . . . . . . . . . . . . . . . . . . . . . . . . . . . 40
9.5.10 Restart upsd . . . . . . . . . . . . . . . . . . . . . . . . . . . . . . . . . . . . . . . . . . . . . . . . . . 40
9.5.11 Point upsmon at the certificates . . . . . . . . . . . . . . . . . . . . . . . . . . . . . . . . . . . . . . . 41
9.5.12 Recommended: make upsmon verify all connections with certificates . . . . . . . . . . . . . . . . . . . 41
9.5.13 Recommended: force upsmon to use SSL . . . . . . . . . . . . . . . . . . . . . . . . . . . . . . . . . . 41
9.5.14 Restart upsmon . . . . . . . . . . . . . . . . . . . . . . . . . . . . . . . . . . . . . . . . . . . . . . . . 41
9.5.15 Recommended: sniff the connection to see it for yourself . . . . . . . . . . . . . . . . . . . . . . . . . . 41
9.5.16 Potential problems . . . . . . . . . . . . . . . . . . . . . . . . . . . . . . . . . . . . . . . . . . . . . . 42
9.5.17 Conclusion . . . . . . . . . . . . . . . . . . . . . . . . . . . . . . . . . . . . . . . . . . . . . . . . . . 42
9.6
chrooting and other forms of paranoia . . . . . . . . . . . . . . . . . . . . . . . . . . . . . . . . . . . . . . . . 42
9.6.1
Generalities . . . . . . . . . . . . . . . . . . . . . . . . . . . . . . . . . . . . . . . . . . . . . . . . . . 42
9.6.2
symlinks . . . . . . . . . . . . . . . . . . . . . . . . . . . . . . . . . . . . . . . . . . . . . . . . . . . 43
9.6.3
upsmon . . . . . . . . . . . . . . . . . . . . . . . . . . . . . . . . . . . . . . . . . . . . . . . . . . . . 43
9.6.4
Config files . . . . . . . . . . . . . . . . . . . . . . . . . . . . . . . . . . . . . . . . . . . . . . . . . . 44
A Glossary
44
B Acknowledgements / Contributions
44
B.1 The NUT Team . . . . . . . . . . . . . . . . . . . . . . . . . . . . . . . . . . . . . . . . . . . . . . . . . . . . 44
B.1.1
Active members . . . . . . . . . . . . . . . . . . . . . . . . . . . . . . . . . . . . . . . . . . . . . . . 44
B.1.2
Retired members . . . . . . . . . . . . . . . . . . . . . . . . . . . . . . . . . . . . . . . . . . . . . . . 45
B.2 Our main supporter: Eaton . . . . . . . . . . . . . . . . . . . . . . . . . . . . . . . . . . . . . . . . . . . . . . 45
B.3 Supporting manufacturers . . . . . . . . . . . . . . . . . . . . . . . . . . . . . . . . . . . . . . . . . . . . . . . 45
B.3.1
UPS manufacturers . . . . . . . . . . . . . . . . . . . . . . . . . . . . . . . . . . . . . . . . . . . . . . 45
B.3.2
Appliances manufacturers . . . . . . . . . . . . . . . . . . . . . . . . . . . . . . . . . . . . . . . . . . 46
B.4 Other contributors . . . . . . . . . . . . . . . . . . . . . . . . . . . . . . . . . . . . . . . . . . . . . . . . . . . 46
B.5 Older entries (before 2005) . . . . . . . . . . . . . . . . . . . . . . . . . . . . . . . . . . . . . . . . . . . . . . 46
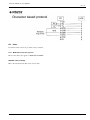
C NUT command and variable naming scheme
46
C.1 Variables . . . . . . . . . . . . . . . . . . . . . . . . . . . . . . . . . . . . . . . . . . . . . . . . . . . . . . . 47
C.1.1
device: General unit information . . . . . . . . . . . . . . . . . . . . . . . . . . . . . . . . . . . . . . . 47
C.1.2
ups: General unit information . . . . . . . . . . . . . . . . . . . . . . . . . . . . . . . . . . . . . . . . 47
C.1.3
input: Incoming line/power information . . . . . . . . . . . . . . . . . . . . . . . . . . . . . . . . . . . 48
C.1.4
output: Outgoing power/inverter information . . . . . . . . . . . . . . . . . . . . . . . . . . . . . . . . 49
Network UPS Tools User Manual
viii
C.1.5
Three-phase additions . . . . . . . . . . . . . . . . . . . . . . . . . . . . . . . . . . . . . . . . . . . . 49
Phase Count Determination . . . . . . . . . . . . . . . . . . . . . . . . . . . . . . . . . . . . . . . . . 49
DOMAINs . . . . . . . . . . . . . . . . . . . . . . . . . . . . . . . . . . . . . . . . . . . . . . . . . . 49
Specification (SPEC) . . . . . . . . . . . . . . . . . . . . . . . . . . . . . . . . . . . . . . . . . . . . . 49
CONTEXT . . . . . . . . . . . . . . . . . . . . . . . . . . . . . . . . . . . . . . . . . . . . . . . . . . 49
Valid CONTEXTs . . . . . . . . . . . . . . . . . . . . . . . . . . . . . . . . . . . . . . . . . . . . . . 49
Valid SPECs . . . . . . . . . . . . . . . . . . . . . . . . . . . . . . . . . . . . . . . . . . . . . . . . . 49
C.1.6
EXAMPLES . . . . . . . . . . . . . . . . . . . . . . . . . . . . . . . . . . . . . . . . . . . . . . . . . 50
C.1.7
battery: Any battery details . . . . . . . . . . . . . . . . . . . . . . . . . . . . . . . . . . . . . . . . . . 50
C.1.8
ambient: Conditions from external probe equipment . . . . . . . . . . . . . . . . . . . . . . . . . . . . 51
C.1.9
outlet: Smart outlet management . . . . . . . . . . . . . . . . . . . . . . . . . . . . . . . . . . . . . . . 52
C.1.10 driver: Internal driver information . . . . . . . . . . . . . . . . . . . . . . . . . . . . . . . . . . . . . . 52
C.1.11 server: Internal server information . . . . . . . . . . . . . . . . . . . . . . . . . . . . . . . . . . . . . . 52
C.2 Instant commands . . . . . . . . . . . . . . . . . . . . . . . . . . . . . . . . . . . . . . . . . . . . . . . . . . . 52
D Hardware Compatibility List
53
E Documentation
53
E.1 User Documentation . . . . . . . . . . . . . . . . . . . . . . . . . . . . . . . . . . . . . . . . . . . . . . . . . 53
E.2 Developer Documentation . . . . . . . . . . . . . . . . . . . . . . . . . . . . . . . . . . . . . . . . . . . . . . 53
E.3 Offsite Links . . . . . . . . . . . . . . . . . . . . . . . . . . . . . . . . . . . . . . . . . . . . . . . . . . . . . 54
E.4 News articles and Press releases . . . . . . . . . . . . . . . . . . . . . . . . . . . . . . . . . . . . . . . . . . . 54
F Support instructions
54
F.1
Documentation . . . . . . . . . . . . . . . . . . . . . . . . . . . . . . . . . . . . . . . . . . . . . . . . . . . . 54
F.2
Mailing lists . . . . . . . . . . . . . . . . . . . . . . . . . . . . . . . . . . . . . . . . . . . . . . . . . . . . . . 55
F.2.1
Request help . . . . . . . . . . . . . . . . . . . . . . . . . . . . . . . . . . . . . . . . . . . . . . . . . 55
F.2.2
Post a patch, ask a development question, . . . . . . . . . . . . . . . . . . . . . . . . . . . . . . . . . . . 55
F.2.3
Discuss packaging and related topics . . . . . . . . . . . . . . . . . . . . . . . . . . . . . . . . . . . . 55
G Cables information
55
G.1 APC . . . . . . . . . . . . . . . . . . . . . . . . . . . . . . . . . . . . . . . . . . . . . . . . . . . . . . . . . . 55
G.1.1 940-0024C clone . . . . . . . . . . . . . . . . . . . . . . . . . . . . . . . . . . . . . . . . . . . . . . . 55
G.1.2 940-0024C clone for Macs . . . . . . . . . . . . . . . . . . . . . . . . . . . . . . . . . . . . . . . . . . 56
G.2 Belkin . . . . . . . . . . . . . . . . . . . . . . . . . . . . . . . . . . . . . . . . . . . . . . . . . . . . . . . . . 56
G.2.1 OmniGuard F6C***-RKM . . . . . . . . . . . . . . . . . . . . . . . . . . . . . . . . . . . . . . . . . . 56
G.3 Eaton . . . . . . . . . . . . . . . . . . . . . . . . . . . . . . . . . . . . . . . . . . . . . . . . . . . . . . . . . 57
G.3.1 MGE Office Protection Systems . . . . . . . . . . . . . . . . . . . . . . . . . . . . . . . . . . . . . . . 57
DB9-DB9 cable (ref 66049) . . . . . . . . . . . . . . . . . . . . . . . . . . . . . . . . . . . . . . . . . 57
DB9-RJ45 cable . . . . . . . . . . . . . . . . . . . . . . . . . . . . . . . . . . . . . . . . . . . . . . . 58
Network UPS Tools User Manual
ix
DB9-RJ12 cable . . . . . . . . . . . . . . . . . . . . . . . . . . . . . . . . . . . . . . . . . . . . . . . 59
G.3.2 Powerware LanSafe . . . . . . . . . . . . . . . . . . . . . . . . . . . . . . . . . . . . . . . . . . . . . 61
G.3.3 SOLA-330 . . . . . . . . . . . . . . . . . . . . . . . . . . . . . . . . . . . . . . . . . . . . . . . . . . 61
G.4 HP - Compaq . . . . . . . . . . . . . . . . . . . . . . . . . . . . . . . . . . . . . . . . . . . . . . . . . . . . . 62
G.4.1 Older Compaq UPS Family . . . . . . . . . . . . . . . . . . . . . . . . . . . . . . . . . . . . . . . . . 62
G.5 Tripp-Lite . . . . . . . . . . . . . . . . . . . . . . . . . . . . . . . . . . . . . . . . . . . . . . . . . . . . . . . 62
H Configure options
63
H.1 Driver selection . . . . . . . . . . . . . . . . . . . . . . . . . . . . . . . . . . . . . . . . . . . . . . . . . . . . 63
H.2 Optional features . . . . . . . . . . . . . . . . . . . . . . . . . . . . . . . . . . . . . . . . . . . . . . . . . . . 64
H.3 Other configuration options . . . . . . . . . . . . . . . . . . . . . . . . . . . . . . . . . . . . . . . . . . . . . . 65
H.4 Installation directories . . . . . . . . . . . . . . . . . . . . . . . . . . . . . . . . . . . . . . . . . . . . . . . . 66
H.5 Directories used by NUT at run-time . . . . . . . . . . . . . . . . . . . . . . . . . . . . . . . . . . . . . . . . . 67
H.6 Things the compiler might need to find . . . . . . . . . . . . . . . . . . . . . . . . . . . . . . . . . . . . . . . . 68
H.7 HAL addons (deprecated) . . . . . . . . . . . . . . . . . . . . . . . . . . . . . . . . . . . . . . . . . . . . . . . 68
I
Upgrading notes
68
I.1
Changes from 2.6.0 to 2.6.1 . . . . . . . . . . . . . . . . . . . . . . . . . . . . . . . . . . . . . . . . . . . . . . 68
I.2
Changes from 2.4.3 to 2.6.0 . . . . . . . . . . . . . . . . . . . . . . . . . . . . . . . . . . . . . . . . . . . . . . 69
I.3
Changes from 2.4.2 to 2.4.3 . . . . . . . . . . . . . . . . . . . . . . . . . . . . . . . . . . . . . . . . . . . . . . 69
I.4
Changes from 2.4.1 to 2.4.2 . . . . . . . . . . . . . . . . . . . . . . . . . . . . . . . . . . . . . . . . . . . . . . 69
I.5
Changes from 2.4.0 to 2.4.1 . . . . . . . . . . . . . . . . . . . . . . . . . . . . . . . . . . . . . . . . . . . . . . 69
I.6
Changes from 2.2.2 to 2.4.0 . . . . . . . . . . . . . . . . . . . . . . . . . . . . . . . . . . . . . . . . . . . . . . 69
I.7
Changes from 2.2.1 to 2.2.2 . . . . . . . . . . . . . . . . . . . . . . . . . . . . . . . . . . . . . . . . . . . . . . 69
I.8
Changes from 2.2.0 to 2.2.1 . . . . . . . . . . . . . . . . . . . . . . . . . . . . . . . . . . . . . . . . . . . . . . 69
I.9
Changes from 2.0.5 to 2.2.0 . . . . . . . . . . . . . . . . . . . . . . . . . . . . . . . . . . . . . . . . . . . . . . 70
I.10 Changes from 2.0.4 to 2.0.5 . . . . . . . . . . . . . . . . . . . . . . . . . . . . . . . . . . . . . . . . . . . . . . 70
I.11 Changes from 2.0.3 to 2.0.4 . . . . . . . . . . . . . . . . . . . . . . . . . . . . . . . . . . . . . . . . . . . . . . 70
I.12 Changes from 2.0.2 to 2.0.3 . . . . . . . . . . . . . . . . . . . . . . . . . . . . . . . . . . . . . . . . . . . . . . 70
I.13 Changes from 2.0.1 to 2.0.2 . . . . . . . . . . . . . . . . . . . . . . . . . . . . . . . . . . . . . . . . . . . . . . 70
I.14 Changes from 2.0.0 to 2.0.1 . . . . . . . . . . . . . . . . . . . . . . . . . . . . . . . . . . . . . . . . . . . . . . 70
I.15 Changes from 1.4.0 to 2.0.0 . . . . . . . . . . . . . . . . . . . . . . . . . . . . . . . . . . . . . . . . . . . . . . 71
J
Project history
J.1
J.2
71
Prototypes and experiments . . . . . . . . . . . . . . . . . . . . . . . . . . . . . . . . . . . . . . . . . . . . . . 72
J.1.1
May 1996: early status hacks . . . . . . . . . . . . . . . . . . . . . . . . . . . . . . . . . . . . . . . . . 72
J.1.2
January 1997: initial protocol tests . . . . . . . . . . . . . . . . . . . . . . . . . . . . . . . . . . . . . . 72
J.1.3
September 1997: first client/server code . . . . . . . . . . . . . . . . . . . . . . . . . . . . . . . . . . . 72
Smart UPS Tools . . . . . . . . . . . . . . . . . . . . . . . . . . . . . . . . . . . . . . . . . . . . . . . . . . . 73
J.2.1
March 1998: first public release . . . . . . . . . . . . . . . . . . . . . . . . . . . . . . . . . . . . . . . 73
Network UPS Tools User Manual
x
J.2.2
J.3
J.4
J.5
Network UPS Tools . . . . . . . . . . . . . . . . . . . . . . . . . . . . . . . . . . . . . . . . . . . . . . . . . . 74
J.3.1
September 1999: new name, new URL . . . . . . . . . . . . . . . . . . . . . . . . . . . . . . . . . . . 74
J.3.2
June 2001: common driver core . . . . . . . . . . . . . . . . . . . . . . . . . . . . . . . . . . . . . . . 74
J.3.3
May 2002: casting off old drivers, IANA port, towards 1.0 . . . . . . . . . . . . . . . . . . . . . . . . . 74
Leaving 0.x territory . . . . . . . . . . . . . . . . . . . . . . . . . . . . . . . . . . . . . . . . . . . . . . . . . 75
J.4.1
August 2002: first stable tree: NUT 1.0.0 . . . . . . . . . . . . . . . . . . . . . . . . . . . . . . . . . . 75
J.4.2
November 2002: second stable tree: NUT 1.2.0 . . . . . . . . . . . . . . . . . . . . . . . . . . . . . . . 75
J.4.3
April 2003: new naming scheme, better driver glue, and an overhauled protocol . . . . . . . . . . . . . . 75
J.4.4
July 2003: third stable tree: NUT 1.4.0 . . . . . . . . . . . . . . . . . . . . . . . . . . . . . . . . . . . 76
J.4.5
July 2003: pushing towards 2.0 . . . . . . . . . . . . . . . . . . . . . . . . . . . . . . . . . . . . . . . 76
networkupstools.org . . . . . . . . . . . . . . . . . . . . . . . . . . . . . . . . . . . . . . . . . . . . . . . . . . 76
J.5.1
J.6
November 2003: a new URL . . . . . . . . . . . . . . . . . . . . . . . . . . . . . . . . . . . . . . . . . 76
Second major version . . . . . . . . . . . . . . . . . . . . . . . . . . . . . . . . . . . . . . . . . . . . . . . . . 76
J.6.1
J.7
June 1999: Redesigned, rewritten . . . . . . . . . . . . . . . . . . . . . . . . . . . . . . . . . . . . . . 73
March 2004: NUT 2.0.0 . . . . . . . . . . . . . . . . . . . . . . . . . . . . . . . . . . . . . . . . . . . 76
The change of leadership . . . . . . . . . . . . . . . . . . . . . . . . . . . . . . . . . . . . . . . . . . . . . . . 77
J.7.1
February 2005: NUT 2.0.1 . . . . . . . . . . . . . . . . . . . . . . . . . . . . . . . . . . . . . . . . . . 77
Network UPS Tools User Manual
1 / 77
1
Introduction
The primary goal of the Network UPS Tools (NUT) project is to provide support for Power Devices, such as Uninterruptible
Power Supplies, Power Distribution Units and Solar Controllers.
NUT provides many control and monitoring features, with a uniform control and management interface.
More than 100 different manufacturers, and several thousands models are compatible.
This software is the combined effort of many individuals and companies.
This document intend to describe how to install software support for your Power Devices (UPS, PDU, . . . ), and how to use the
NUT project. It is not intended to explain what are, nor distinguish the different technologies that exist. For such information,
have a look at the General Power Devices Information.
If you wish to discover how everything came together, have a look at the Project History.
2
2.1
Network UPS Tools Overview
Description
Network UPS Tools is a collection of programs which provide a common interface for monitoring and administering UPS, PDU
and SCD hardware. It uses a layered approach to connect all of the parts.
Drivers are provided for a wide assortment of equipment. They understand the specific language of each device and map it back
to a compatibility layer. This means both an expensive high end UPS, a simple "power strip" PDU, or any other power device
can be handled transparently with a uniform management interface.
This information is cached by the network server upsd, which then answers queries from the clients. upsd contains a number
of access control features to limit the abilities of the clients. Only authorized hosts may monitor or control your hardware if you
wish. Since the notion of monitoring over the network is built into the software, you can hang many systems off one large UPS,
and they will all shut down together. You can also use NUT to power on, off or cycle your data center nodes, individually or
globally through PDU outlets.
Clients such as upsmon check on the status of the hardware and do things when necessary. The most important task is shutting
down the operating system cleanly before the UPS runs out of power. Other programs are also provided to log information
regularly, monitor status through your web browser, and more.
2.2
Installing
If you are installing these programs for the first time, go read the installation instructions to find out how to do that. This document
contains more information on what all of this stuff does.
2.3
Upgrading
When upgrading from an older version, always check the upgrading notes to see what may have changed. Compatibility issues
and other changes will be listed there to ease the process.
2.4
Configuring and using
Once NUT is installed, refer to the configuration notes for directions.
2.5
Documentation
This is just an overview of the software. You should read the man pages, included example configuration files, and auxiliary
documentation for the parts that you intend to use.
Network UPS Tools User Manual
2 / 77
2.6
Network Information
These programs are designed to share information over the network. In the examples below, localhost is used as the hostname. This can also be an IP address or a fully qualified domain name. You can specify a port number if your upsd process runs
on another port.
In the case of the program upsc, to view the variables on the UPS called sparky on the upsd server running on the local
machine, you’d do this:
/usr/local/ups/bin/upsc sparky@localhost
The default port number is 3493. You can change this with "configure --with-port" at compile-time. To make a client talk to upsd
on a specific port, add it after the hostname with a colon, like this:
/usr/local/ups/bin/upsc sparky@localhost:1234
This is handy when you have a mixed environment and some of the systems are on different ports.
The general form for UPS identifiers is this:
<upsname>[@<hostname>[:<port>]]
Keep this in mind when viewing the examples below.
2.7
Manifest
This package is broken down into several categories:
• drivers - These programs talk directly to your UPS hardware.
• server - upsd serves data from the drivers to the network.
• clients - They talk to upsd and do things with the status data.
• cgi-bin - Special class of clients that you can use with your web server.
• scripts - Contains various scripts, like the Perl and Python binding, integration bits and applications.
2.8
Drivers
These programs provide support for specific UPS models. They understand the protocols and port specifications which define
status information and convert it to a form that upsd can understand.
To configure drivers, edit ups.conf. For this example, we’ll have a UPS called "sparky" that uses the apcsmart driver and is
connected to /dev/ttyS1. That’s the second serial port on most Linux-based systems. The entry in ups.conf looks like
this:
[sparky]
driver = apcsmart
port = /dev/ttyS1
To start and stop drivers, use upsdrvctl. By default, it will start or stop every UPS in the config file:
/usr/local/ups/bin/upsdrvctl start
/usr/local/ups/bin/upsdrvctl stop
However, you can also just start or stop one by adding its name:
/usr/local/ups/bin/upsdrvctl start sparky
/usr/local/ups/bin/upsdrvctl stop sparky
To find the driver name for your device, refer to the section below called "HARDWARE SUPPORT TABLE".
Network UPS Tools User Manual
3 / 77
2.8.1
Extra Settings
Some drivers may require additional settings to properly communicate with your hardware. If it doesn’t detect your UPS by
default, check the driver’s man page or help (-h) to see which options are available.
For example, the usbhid-ups driver allows you to use USB serial numbers to distingish between units via the "serial" configuration
option. To use this feature, just add another line to your ups.conf section for that UPS:
[sparky]
driver = usbhid-ups
port = auto
serial = 1234567890
2.8.2
Hardware Compatibility List
The Hardware Compatibility List is available in the source directory (nut-X.Y.Z/data/driver.list), and is generally distributed with
packages. For example, it is available on Debian systems as:
/usr/share/nut/driver.list
This table is also available online.
If your driver has vanished, see the FAQ and Upgrading notes.
2.8.3
Generic Device Drivers
NUT provides several generic drivers that support a variety of very similar models.
• The genericups driver supports many serial models that use the same basic principle to communicate with the computer.
This is known as "contact closure", and basically involves raising or lowering signals to indicate power status.
This type of UPS tends to be cheaper, and only provides the very simplest data about power and battery status. Advanced
features like battery charge readings and such require a "smart" UPS and a driver which supports it.
See the genericups(8) man page for more information.
• The usbhid-ups driver attempts to communicate with USB HID Power Device Class (PDC) UPSes. These units generally
implement the same basic protocol, with minor variations in the exact set of supported attributes. This driver also applies
several correction factors when the UPS firmware reports values with incorrect scale factors.
See the usbhid-ups(8) man page for more information.
• The blazer_ser and blazer_usb drivers supports the Megatec / Q1 protocol that is used in many brands (Blazer, Energy
Sistem, Fenton Technologies, Mustek and many others).
See the blazer(8) man page for more information.
• The snmp-ups driver handles various SNMP enabled devices, from many different manufacturers. In SNMP terms, snmp-ups
is a manager, that monitors SNMP agents.
See the snmp-ups(8) man page for more information.
• The powerman-pdu is a bridge to the PowerMan daemon, thus handling all PowerMan supported devices. The PowerMan
project supports several serial and networked PDU, along with Blade and IPMI enabled servers.
See the powerman-pdu(8) man page for more information.
Network UPS Tools User Manual
4 / 77
2.8.4
UPS Shutdowns
upsdrvctl can also shut down (power down) all of your UPS hardware.
Warning
if you play around with this command, expect your filesystems to die. Don’t power off your computers unless they’re
ready for it:
/usr/local/ups/bin/upsdrvctl shutdown
/usr/local/ups/bin/upsdrvctl shutdown sparky
You should read the Configuring automatic UPS shutdowns chapter to learn more about when to use this feature. If called at the
wrong time, you may cause data loss by turning off a system with a filesystem mounted read-write.
2.8.5
Power distribution unit management
NUT also provides an advanced support for power distribution units.
You should read the Configuring automatic UPS shutdowns chapter to learn more about when to use this feature.
2.9
Network Server
upsd is responsible for passing data from the drivers to the client programs via the network. It should be run immediately after
upsdrvctl in your system’s startup scripts.
upsd should be kept running whenever possible, as it is the only source of status information for the monitoring clients like
upsmon.
2.10
Monitoring client
upsmon provides the essential feature that you expect to find in UPS monitoring software: safe shutdowns when the power fails.
In the layered scheme of NUT software, it is a client. It has this separate section in the documentation since it is so important.
You configure it by telling it about UPSes that you want to monitor in upsmon.conf. Each UPS can be defined as one of two
possible types:
2.10.1
Master
This UPS supplies power to the system running upsmon, and this system is also responsible for shutting it down when the
battery is depleted. This occurs after any slave systems have disconnected safely.
If your UPS is plugged directly into a system’s serial port, the upsmon process on that system should define that UPS as a
master.
For a typical home user, there’s one computer connected to one UPS. That means you run a driver, upsd, and upsmon in master
mode.
2.10.2
Slave
This UPS may supply power to the system running upsmon, but this system can’t shut it down directly.
Use this mode when you run multiple computers on the same UPS. Obviously, only one can be connected to the serial port on
the UPS, and that system is the master. Everything else is a slave.
For a typical home user, there’s one computer connected to one UPS. That means you run a driver, upsd, and upsmon in master
mode.
Network UPS Tools User Manual
5 / 77
2.10.3
Additional Information
More information on configuring upsmon can be found in these places:
• The upsmon(8) man page
• Typical setups for big servers
• Configuring automatic UPS shutdowns chapter
• The stock upsmon.conf that comes with the package
2.11
Clients
Clients talk to upsd over the network and do useful things with the data from the drivers. There are tools for command line
access, and a few special clients which can be run through your web server as CGI programs.
For more details on specific programs, refer to their man pages.
2.11.1
upsc
upsc is a simple client that will display the values of variables known to upsd and your UPS drivers. It will list every variable
by default, or just one if you specify an additional argument. This can be useful in shell scripts for monitoring something without
writing your own network code.
upsc is a quick way to find out if your driver(s) and upsd are working together properly. Just run upsc <ups> to see what’s
going on, i.e.:
morbo:~$ upsc sparky@localhost
ambient.humidity: 035.6
ambient.humidity.alarm.maximum: NO,NO
ambient.humidity.alarm.minimum: NO,NO
ambient.temperature: 25.14
...
If you are interested in writing a simple client that monitors upsd, the source code for upsc is a good way to learn about using
the upsclient functions.
See the upsc(8) man page and NUT command and variable naming scheme for more information.
2.11.2
upslog
upslog will write status information from upsd to a file at set intervals. You can use this to generate graphs or reports with
other programs such as gnuplot.
2.11.3
upsrw
upsrw allows you to display and change the read/write variables in your UPS hardware. Not all devices or drivers implement
this, so this may not have any effect on your system.
A driver that supports read/write variables will give results like this:
$ upsrw sparky@localhost
( many skipped )
Network UPS Tools User Manual
6 / 77
[ups.test.interval]
Interval between self tests
Type: ENUM
Option: "1209600"
Option: "604800" SELECTED
Option: "0"
( more skipped )
On the other hand, one that doesn’t support them won’t print anything:
$ upsrw fenton@gearbox
( nothing )
upsrw requires administrator powers to change settings in the hardware. Refer to upsd.users(5) for information on defining
users in upsd.
2.11.4
upscmd
Some UPS hardware and drivers support the notion of an instant command - a feature such as starting a battery test, or powering
off the load. You can use upscmd to list or invoke instant commands if your hardware/drivers support them.
Use the -l command to list them, like this:
$ upscmd -l sparky@localhost
Instant commands supported on UPS [sparky@localhost]:
load.on - Turn on the load immediately
test.panel.start - Start testing the UPS panel
calibrate.start - Start run time calibration
calibrate.stop - Stop run time calibration
...
upscmd requires administrator powers to start instant commands. To define users and passwords in upsd, see upsd.users(5).
2.12
CGI Programs
The CGI programs are clients that run through your web server. They allow you to see UPS status and perform certain administrative commands from any web browser. Javascript and cookies are not required.
These programs are not installed or compiled by default. To compile and install them, first run configure --with-cgi,
then do make and make install. If you receive errors about "gd" during configure, go get it and install it before continuing.
You can get the source here:
http://www.libgd.org/
In the event that you need libpng or zlib in order to compile gd, they can be found at these URLs:
http://www.libpng.org/pub/png/pngcode.html
http://www.gzip.org/zlib/
Network UPS Tools User Manual
7 / 77
2.12.1
Access Restrictions
The CGI programs use hosts.conf to see if they are allowed to talk to a host. This keeps malicious visitors from creating queries
from your web server to random hosts on the Internet.
If you get error messages that say "Access to that host is not authorized", you’re probably missing an entry in your hosts.conf.
2.12.2
upsstats
upsstats generates web pages from HTML templates, and plugs in status information in the right places. It looks like a distant
relative of APC’s old Powerchute interface. You can use it to monitor several systems or just focus on one.
It also can generate IMG references to upsimage.
2.12.3
upsimage
This is usually called by upsstats via IMG SRC tags to draw either the utility or outgoing voltage, battery charge percent, or load
percent.
2.12.4
upsset
upsset provides several useful administration functions through a web interface. You can use upsset to kick off instant
commands on your UPS hardware like running a battery test. You can also use it to change variables in your UPS that accept
user-specified values.
Essentially, upsset provides the functions of upsrw and upscmd, but with a happy pointy-clicky interface.
upsset will not run until you convince it that you have secured your system. You must secure your CGI path so that random
interlopers can’t run this program remotely. See the upsset.conf file. Once you have secured the directory, you can enable
this program in that configuration file. It is not active by default.
2.13
Version Numbering
The version numbers work like this: if the middle number is odd, it’s a development tree, otherwise it is the stable tree.
The past stable trees were 1.0, 1.2, 1.4, 2.0, 2.2 and 2.4, with the latest stable tree designated 2.6. The development trees were
1.1, 1.3, 1.5, 2.1 and 2.3. As of the 2.4 release, there is no real development branch anymore since the code is available through
a revision control system (namely Subversion) and snapshots.
Major release jumps are mostly due to large changes to the features list. There have also been a number of architectural changes
which may not be noticeable to most users, but which can impact developers.
2.14
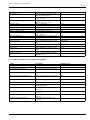
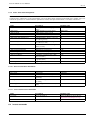
Backwards and Forwards Compatibility
The old network code spans a range from about 0.41.1 when TCP support was introduced up to the recent 1.4 series. It used
variable names like STATUS, UTILITY, and LOADPCT. Many of these names go back to the earliest prototypes of this software
from 1997. At that point there was no way to know that so many drivers would come along and introduce so many new variables
and commands. The resulting mess grew out of control over the years.
During the 1.3 development cycle, all variables and instant commands were renamed to fit into a tree-like structure. There are
major groups, like input, output and battery. Members of those groups have been arranged to make sense - input.voltage and
output.voltage compliment each other. The old names were UTILITY and OUTVOLT. The benefits in this change are obvious.
The 1.4 clients can talk to either type of server, and can handle either naming scheme. 1.4 servers have a compatibility mode
where they can answer queries for both names, even though the drivers are internally using the new format.
When 1.4 clients talk to 1.4 or 2.0 (or more recent) servers, they will use the new names.
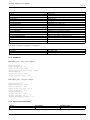
Here’s a table to make it easier to visualize:
Network UPS Tools User Manual
8 / 77
Client version
1.0
1.2
1.4
2.0+
Server version
1.0
yes
yes
yes
no
1.2
yes
yes
yes
no
1.4
yes
yes
yes
yes
2.0+
no
no
yes
yes
Version 2.0, and more recent, do not contain backwards compatibility for the old protocol and variable/command names. As a
result, 2.0 clients can’t talk to anything older than a 1.4 server. If you ask a 2.0 client to fetch "STATUS", it will fail. You’ll have
to ask for "ups.status" instead.
Authors of separate monitoring programs should have used the 1.4 series to write support for the new variables and command
names. Client software can easily support both versions as long as they like. If upsd returns ERR UNKNOWN-COMMAND to a
GET request, you need to use REQ.
2.15
Support / Help / etc.
If you are in need of help, refer to the Support instructions in the user manual.
2.16
Hacking / Development Info
Additional documentation can be found in:
• the Developer Guide,
• the Packager Guide.
2.17
Acknowledgements / Contributions
The many people who have participated in creating and improving NUT are listed in the user manual acknowledgements appendix.
3
Features
NUT provides many features, and is always improving. Thus this list may lag behind the current code.
Features frequently appear during the development cycles, so be sure to look at the release notes and change logs to see the latest
additions.
3.1
Multiple manufacturer and device support
• Monitors many UPS, PDU and SCD models from more than 100 manufacturers with a unified interface (Hardware Compatibility List).
• Various communication types are supported with the same common interface:
– serial,
– USB,
– network (SNMP, Eaton / MGE XML/HTTP).
Network UPS Tools User Manual
9 / 77
3.2
Multiple architecture support
• Cross-platform - different flavors of Unix can be managed together with a common set of tools, even crossing architectures.
• This software has been reported to run on Linux distributions, the BSDs, Apple’s OS X, Solaris, IRIX, HP/UX, Tru64 Unix,
and AIX.
• Windows users may be able to build it directly with Cygwin. There is also a port of the client-side monitoring to Windows
called WinNUT.
• Your system will probably run it too. You just need a good C compiler and possibly some more packages to gain access to the
serial ports. Other features, such as USB / SNMP / whatever, will also need extra software installed.
3.3
Layered and modular design with multiple processes
• Three layers: drivers, server, clients.
• Drivers run on the same host as the server, and clients communicate with the server over the network.
• This means clients can monitor any UPS anywhere as long as there is a network path between them.
Warning
Be sure to plug your network’s physical hardware (switches, hubs, routers, bridges, . . . ) into the UPS!
3.4
Redundancy support - Hot swap/high availability power supplies
• upsmon can handle high-end servers which receive power from multiple UPSes simultaneously.
• upsmon won’t initiate a shutdown until the total power situation across all source UPSes becomes critical (on battery and low
battery).
• You can lose a UPS completely as long as you still have at least the minimum number of sources available. The minimum
value is configurable.
3.5
Security and access control
• Manager functions are granted with per-user granularity. The admin can have full powers, while the admin’s helper can only
do specific non-destructive tasks such as a battery test.
• The drivers, server, and monitoring client (upsmon) can all run as separate user IDs if this is desired for privilege separation.
• Only one tiny part of one program has root powers. upsmon starts as root and forks an unprivileged process which does the
actual monitoring over the network. They remain connected over a pipe. When a shutdown is necessary, a single character is
sent to the privileged process. It then calls the predefined shutdown command. In any other case, the privileged process exits.
This was inspired by the auth mechanism in Solar Designer’s excellent popa3d.
• The drivers and network server may be run in a chroot jail for further security benefits. This is supported directly since version
1.4 and beyond with the chroot= configuration directive.
• IP-based access control relies on the local firewall and TCP Wrapper.
• SSL is available as a build option ("--with-ssl"). It encrypts sessions with upsd and can also be used to authenticate servers.
Network UPS Tools User Manual
10 / 77
3.6
Web-based monitoring
• Comes stock with CGI-based web interface tools for UPS monitoring and management, including graphical status displays.
• Custom status web pages may be generated with the CGI programs, since they use templates to create the pages. This allows
you to have status pages which fit the look and feel of the rest of your site.
3.7
Free software
• That’s free beer and free speech. Licensed under the GNU General Public License version 2 or later.
• Know your systems - all source code is available for inspection, so there are no mysteries or secrets in your critical monitoring
tools.
3.8
UPS management and control
• Writable variables may be edited on higher end equipment for local customizations
• Status monitoring can generate notifications (email/pager/SMS/. . . ) on alert conditions
• Alert notices may be dampened to only trigger after a condition persists. This avoids the usual pager meltdown when something
happens and no delay is used.
• Maintenance actions such as battery runtime calibration are available where supported by the UPS hardware.
• Power statistics can be logged in custom formats for later retrieval and analysis
• All drivers are started and stopped with one common program. Starting one is as easy as starting ten: upsdrvctl start.
• Shutdowns and other procedures may be tested without stressing actual UPS hardware by simulating status values with the
dummy-ups pseudo-driver. Anything which can happen in a driver can be replicated with dummy-ups.
3.9
Monitoring diagrams
These are the most common situations for monitoring UPS hardware. Other ways are possible, but they are mostly variants on
these four.
Note
these examples show serial communications for simplicity, but USB or SNMP or any other monitoring is also possible.
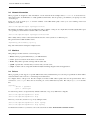
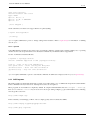
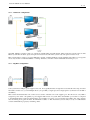
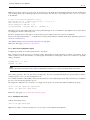
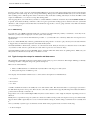
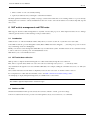
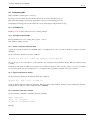
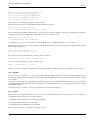
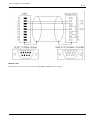
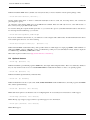
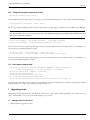
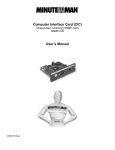
3.9.1
"Simple" configuration
One UPS, one computer. This is also known as "Standalone" configuration.
This is the configuration that most users will use. You need at least a driver, upsd, and upsmon running.
Network UPS Tools User Manual
11 / 77
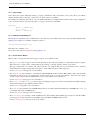
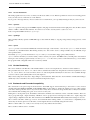
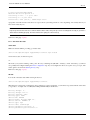
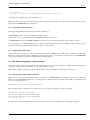
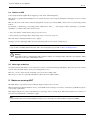
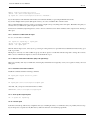
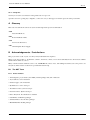
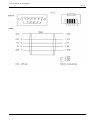
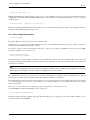
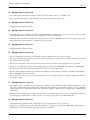
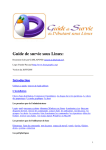
3.9.2
"Advanced" configuration
One UPS, multiple computers. Only one of them can actually talk to the UPS directly. That’s where the network comes in. The
Master system runs the driver, upsd, and upsmon in master mode. The Slave systems only run upsmon in slave mode.
This is useful when you have a very large UPS that’s capable of running multiple systems simultaneously. There is no longer the
need to buy a bunch of individual UPSes or "sharing" hardware, since this software will handle the sharing for you.
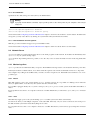
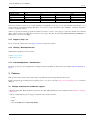
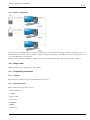
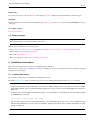
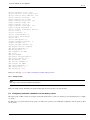
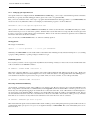
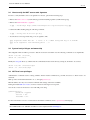
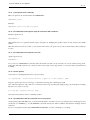
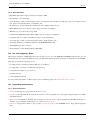
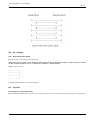
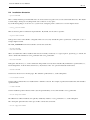
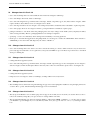
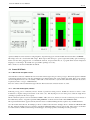
3.9.3
"Big Box" configuration
Some systems have multiple power supplies and cords. You typically find this on high-end servers that allow hot-swap and other
fun features. In this case, you run multiple drivers (one per UPS), a single upsd, and a single upsmon (as master for both UPS 1
and UPS 2)
This software understands that some of these servers can also run with some of the supplies gone. For this reason, every UPS is
assigned a "power value" - the quantity of power supplies that it feeds on a system. The total available "power value" is compared
to the minimum that is required for that hardware. For example, if you have 3 power supplies and 3 UPSes, but only 2 supplies
must be running at any given moment, the minimum would be 2. This means that you can safely lose any one UPS and the
software will handle it properly by remaining online.
Network UPS Tools User Manual
12 / 77
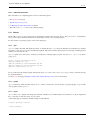
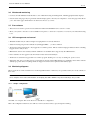
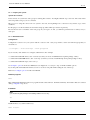
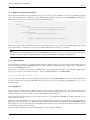
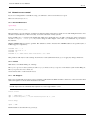
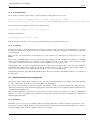
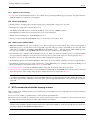
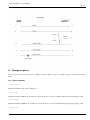
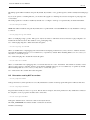
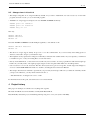
3.9.4
"Bizarre" configuration
You can even have a UPS that has the serial port connected to a system that it’s not feeding. Sometimes a PC will be close to a
UPS that needs to be monitored, so it’s drafted to supply a serial port for the purpose. This PC may in fact be getting power from
some other UPS. This is not a problem.
The first system ("mixed") is a Master for UPS 1, but is only monitoring UPS 2. The other systems are Slaves of UPS 2.
3.10
Image credits
Thanks to Eaton for providing shiny modern graphics.
3.11
Compatibility information
3.11.1
Hardware
The current list of hardware supported by NUT can be viewed here.
3.11.2
Operating systems
This software has been reported to run on:
• Linux distributions,
• the BSDs,
• Apple’s OS X,
• Sun Solaris,
• SGI IRIX,
• HP/UX,
• Tru64 Unix,
Network UPS Tools User Manual
13 / 77
• AIX.
There is also a port of the client-side monitoring to Windows called WinNUT. Windows users may be able to build it directly
with Cygwin.
Your system will probably run it too. You just need a good C compiler and possibly some more packages to gain access to the
serial ports. Other features, such as USB / SNMP / whatever, will also need extra software installed.
Success reports are welcomed to keep this list accurate.
4
Download information
This section presents the different methods to download NUT.
4.1
Source code
Note
You should always use PGP/GPG to verify the signatures before using any source code.
You can use the - Else, you can read the following procedure. to do so.
4.1.1
Stable tree: 2.6
• nut-2.6.1.tar.gz
• PGP/GPG signature
• SHA-256 sum: 4ba1d297a98190db0ae86eb31136c780f35e6d3f47ae845316b44eaa9245a86e
• Release notes
• ChangeLog
You can also browse the stable source directory.
4.1.2
Testing tree: 2.6.x-pre
There is currently no testing release.
4.1.3
Development tree: 2.7
Code repository
The development tree is available through a Subversion repository hosted on the Debian Alioth server.
To retrieve the current development tree, use the following command:
$ svn co svn://anonscm.debian.org/nut/trunk
To generate the build scripts, you must call, from the trunk directory:
$ ./autogen.sh
Then refer to the NUT user manual for more information.
Note
Users that need the latest developments to support new devices must use snapshots.
Network UPS Tools User Manual
14 / 77
Browse code
You can also browse the code with WebSvn, or through the Trac mirror, kindly hosted and maintained by Charles Lepple.
Snapshots
The latest Subversion developments are available through snapshots on the Buildbot. Look for the latest [tarball] link on the top
of the page.
4.1.4
Older versions
Browse source directory
4.2
Binary packages
Note
The only official releases from this project are source code.
NUT is already available in the following systems:
• Linux: Arch Linux, Debian, Gentoo Linux, Mandriva, Red Hat / Fedora, Novell Suse / openSUSE, OpenWrt Ubuntu.
• BSD systems: FreeBSD, NetBSD, OpenBSD.
• Mac OS X: Fink, MacPorts
• Windows (complete port, Beta): Windows MSI installer 2.6.0-1
5
Installation instructions
This chapter describe the various methods for installing Network UPS Tools.
Whenever it is possible, prefer installing from packages. Packagers have done an excellent and hard work at improving NUT
integration into their system.
5.1
Installing from source
These are the essential steps for compiling and installing this software.
The NUT Packager Guide, which presents the best practices for installing and integrating NUT, is also a good reading.
Keep in mind that. . .
• the paths shown below are the default values you get by just calling configure by itself. If you have used --prefix or similar,
things will be different. Also, if you didn’t install this program from source yourself, the paths will probably have a number of
differences.
• by default, your system probably won’t find the man pages, since they install to /usr/local/ups/man. You can fix this by editing
your MANPATH, or just do this:
man -M /usr/local/ups/man <man page>
• if your favorite system offers up to date binary packages, you should always prefer these over a source installation. Along
with the known advantages of such systems for installation, upgrade and removal, there are many integration issues that
have been addressed.
Network UPS Tools User Manual
15 / 77
5.1.1
Prepare your system
System User creation
Create at least one system user and a group for running this software. You might call them "ups" and "nut". The exact names
aren’t important as long as you are consistent.
The process for doing this varies from one system to the next, and explaining how to add users is beyond the scope of this
document.
For the purposes of this document, the user name and group name will be ups and nut respectively.
Be sure the new user is a member of the new group! If you forget to do this, you will have problems later on when you try to
start upsd.
5.1.2
Build and install
Configuration
Configure the source tree for your system. Add the --with-user and --with-group switch to set the user name and group that you
created above.
./configure --with-user=ups --with-group=nut
If you need any other switches for configure, add them here. For example:
• to build and install USB drivers, add --with-usb (note that you need to install libusb development package or files).
• to build and install SNMP drivers, add --with-snmp (note that you need to install libsnmp development package or files).
• to build and install CGI scripts, add --with-cgi.
See Configure options from the User Manual, docs/configure.txt or ./configure --help for all the available options.
If you alter paths with additional switches, be sure to use those new paths while reading the rest of the steps.
Reference: Configure options from the User Manual.
Build the programs
make
This will build the NUT client and server programs and the selected drivers. It will also build any other features that were selected
during configuration step above.
Installation
Note
you should now gain privileges for installing software if necessary:
su
Install the files to a system level directory:
make install
Network UPS Tools User Manual
16 / 77
This will install the compiled programs and man pages, as well as some data files required by NUT. Any optional features selected
during configuration will also be installed.
This will also install sample versions of the NUT configuration files. Sample files are installed with names like ups.conf.sample
so they will not overwrite any existing real config files you may have created.
If you are packaging this software, then you will probably want to use the DESTDIR variable to redirect the build into another
place, i.e.:
make DESTDIR=/tmp/package install
make DESTDIR=/tmp/package install-conf
State path creation
Create the state path directory for the driver(s) and server to use for storing UPS status data and other auxiliary files, and make it
owned by the user you created.
mkdir -p /var/state/ups
chmod 0770 /var/state/ups
chown root:nut /var/state/ups
Ownership and permissions
Set ownership data and permissions on your serial or USB ports that go to your UPS hardware. Be sure to limit access to just the
user you created earlier.
These examples assume the second serial port (ttyS1) on a typical Slackware system. On FreeBSD, that would be cuaa1. Serial
ports vary greatly, so yours may be called something else.
chmod 0660 /dev/ttyS1
chown root:nut /dev/ttyS1
The setup for USB ports is slightly more complicated. Device files for USB devices, such as /proc/bus/usb/002/001, are usually
created "on the fly" when a device is plugged in, and disappear when the device is disconnected. Moreover, the names of these
device files can change randomly. To set up the correct permissions for the USB device, you may need to set up (operating system
dependent) hotplugging scripts. Sample scripts and information are provided in the scripts/hotplug and scripts/udev directories.
For most users, the hotplugging scripts will be installed automatically by "make install".
(If you want to try if a driver works without setting up hotplugging, you can add the "-u root" option to upsd, upsmon, and drivers;
this should allow you to follow the below instructions. However, don’t forget to set up the correct permissions later!).
Note
if you are using something like devfs or udev, make sure these permissions stay set across a reboot. If they revert to the old
values, your drivers may fail to start.
You are now ready to configure NUT, and start testing and using it.
You can jump directly to the NUT configuration.
5.2
Installing from packages
This chapter describes the specific installation steps when using binary packages that exist on various major systems.
Network UPS Tools User Manual
17 / 77
5.2.1
Debian, Ubuntu and other derivatives
Note
NUT is packaged and well maintained in these systems. The official Debian packager is part of the NUT Team.
Using your prefered method (apt-get, aptitude, Synaptic, . . . ), install the nut package, and optionaly the following:
• nut-cgi, if you need the CGI (HTML) option,
• nut-snmp, if you need the snmp-ups driver,
• nut-xml, for the netxml-ups driver,
• nut-powerman-pdu, to control the PowerMan daemon (PDU management)
• nut-dev, if you need the development files.
Configuration files are located in /etc/nut. nut.conf must be edited to be able to invoke /etc/init.d/nut
Note
Ubuntu users can access the APT URL installation by clicking on this link.
5.2.2
Mandriva
Note
NUT is packaged and well maintained in these systems. The official Mandriva packager is part of the NUT Team.
Using your prefered method (urpmi, RPMdrake, . . . ), install one of the two below packages:
• nut-server if you have a standalone or netserver installation,
• nut if you have a netclient installation.
Optionaly, you can also install the following:
• nut-cgi, if you need the CGI (HTML) option,
• nut-devel, if you need the development files.
5.2.3
Suse / Opensuse
Note
NUT is packaged and well maintained in these systems. The official Suse packager is part of the NUT Team.
Install the nut-classic package, and optionaly the following:
• nut-drivers-net, if you need the snmp-ups or the netxml-ups drivers,
• nut-cgi, if you need the CGI (HTML) option,
• nut-devel, if you need the development files,
Note
Suse and Opensuse users can use the one-click install method to install NUT.
Network UPS Tools User Manual
18 / 77
5.2.4
Red Hat, Fedora and CentOS
Note
NUT is packaged and well maintained in these systems. The official Red Hat packager is part of the NUT Team.
Using your prefered method (yum, Add/Remove Software, . . . ), install one of the two below packages:
• nut if you have a standalone or netserver installation,
• nut-client if you have a netclient installation.
Optionaly, you can also install the following:
• nut-cgi, if you need the CGI (HTML) option,
• nut-xml, if you need the netxml-ups driver,
• nut-devel, if you need the development files.
5.2.5
FreeBSD
You can either install NUT as a binary package or as a port.
Binary package
To install the main component, use the following command:
# pkg_add -r nut
Port
The port is located under /usr/ports/sysutils/nut. To install it, use the following command:
# cd /usr/ports/sysutils/nut/ && make install clean
You have to define WITH_NUT_CGI to build the optional CGI scripts.
Optionaly, you can also install the following ports:
• sysutils/nut-snmp, for the SNMP driver,
• sysutils/nut-usb, for the USB drivers,
• sysutils/nut-libupsclient, for the upsclient library.
You are now ready to configure NUT, and start testing and using it.
You can jump directly to the NUT configuration.
Network UPS Tools User Manual
19 / 77
6
Configuration notes
This chapter describe most of the configuration and use aspects of NUT, including establishing communication with the device
and configuring safe shutdowns when the UPS battery runs out of power.
There are many programs and features in this package. You should check out the NUT Overview and other accompanying
documentation to see how it all works.
Note
NUT does not currently provide proper graphical configuration tools. However, there is now support for Augeas.
6.1
6.1.1
Details about the configuration files
Generalities
All configuration files within this package are parsed with a common state machine, which means they all can use a number of
extras described here.
First, most of the programs use an uppercase word to declare a configuration directive. This may be something like MONITOR,
NOTIFYCMD, or ACCESS. The case does matter here. "monitor" won’t be recognized.
Next, the parser does not care about whitespace between words. If you like to indent things with tabs or spaces, feel free to do it
here.
If you need to set a value to something containing spaces, it has to be contained within "quotes" to keep the parser from splitting
up the line. That is, you want to use something like this:
SHUTDOWNCMD "/sbin/shutdown -h +0"
Without the quotes, it would only see the first word on the line.
OK, so let’s say you really need to embed that kind of quote within your configuration directive for some reason. You can do that
too.
NOTIFYCMD "/bin/notifyme -foo -bar \"hi there\" -baz"
In other words, \ can be used to escape the ".
Finally, for the situation where you need to put the \ character into your string, you just escape it.
NOTIFYCMD "/bin/notifyme c:\\dos\\style\\path"
The \ can actually be used to escape any character, but you only really need it for \, ", and # as they have special meanings to the
parser.
# is the comment character. Anything after an unescaped # is ignored.
Something like this. . .
identity = my#1ups
i. will actually turn into "identity = my", since the # stops the parsing. If you really need to have a # in your configuration,
then escape it.
identity = my\#1ups
Much better.
Network UPS Tools User Manual
20 / 77
6.1.2
Line spanning
You can put a backslash at the end of the line to join it to the next one. This creates one virtual line that is composed of more
than one physical line.
Also, if you leave the "" quote container open before a newline, it will keep scanning until it reaches another one. If you see
bizarre behavior in your configuration files, check for an unintentional instance of quotes spanning multiple lines.
6.2
Basic configuration
This chapter describe the base configuration to establish communication with the device.
This will be sufficient for PDU. But for UPS and SCD, you will also need to configure automatic shutdowns for low battery
events.
6.2.1
Driver configuration
Create one section per UPS in /usr/local/ups/etc/ups.conf
To find out which driver to use, check the Hardware Compatibility List, or data/driver.list.
Once you have picked a driver, create a section for your UPS in ups.conf. You must supply values for "driver" and "port".
Some drivers may require other flags or settings. The "desc" value is optional, but is recommended to provide a better description
of what your UPS is supporting.
A typical device without any extra settings looks like this:
[mydevice]
driver = mydriver
port = /dev/ttyS1
desc = "Workstation"
Note
USB drivers (usbhid-ups, bcmxcp_usb, tripplite_usb, blazer_usb and richcomm_usb) are special cases and ignore the port
value. You must still set this value, but it does not matter what you set it to; a common and good practice is to set port to auto,
but you can put whatever you like. If you only own one UBS UPS, the driver will find it automatically. If you own more than one,
refer to the driver’s manual page for more information on matching a specific device.
References: ups.conf(5), nutupsdrv(8), bcmxcp_usb(8), blazer(8), richcomm_usb(8), tripplite_usb(8), usbhid-ups(8)
6.2.2
Starting the driver(s)
Start the driver(s) for your hardware:
/usr/local/ups/bin/upsdrvctl start
Network UPS Tools User Manual
21 / 77
Make sure the driver doesn’t report any errors. It should show a few details about the hardware and then enter the background.
You should get back to the command prompt a few seconds later. For reference, a successful start of the usbhid-ups driver
looks like this:
# /usr/local/ups/bin/upsdrvctl start
Network UPS Tools - Generic HID driver 0.34 (2.4.1)
USB communication driver 0.31
Using subdriver: MGE HID 1.12
Detected EATON - Ellipse MAX 1100 [ADKK22008]
If the driver doesn’t start cleanly, make sure you have picked the right one for your hardware. You might need to try other drivers
by changing the "driver=" value in ups.conf.
Be sure to check the driver’s man page to see if it needs any extra settings in ups.conf to detect your hardware.
If it says "can’t bind /var/state/ups/. . . " or similar, then your state path probably isn’t writable by the driver. Check the permissions
and mode on that directory.
After making changes, try the Ownership and permissions step again.
References: man pages: nutupsdrv(8), upsdrvctl(8)
6.2.3
Data server configuration (upsd)
Configure upsd, which serves data from the drivers to the clients.
First, edit upsd.conf to allow access to your client systems. By default, upsd will only listen to localhost port 3493/tcp. If you
want to connect to it from other machines, you must specify each interface you want upsd to listen on for connections, optionally
with a port number.
LISTEN 127.0.0.1 3493
LISTEN ::1 3493
Note
Refer to the NUT user manual security chapter for information on how to access and secure upsd clients connections.
Next, create upsd.users. For now, this can be an empty file. You can come back and add more to it later when it’s time to
configure upsmon or run one of the management tools.
Do not make either file world-readable, since they both hold access control data and passwords. They just need to be readable by
the user you created in the preparation process.
The suggested configuration is to chown it to root, chgrp it to the group you created, then make it readable by the group.
chown root:nut upsd.conf upsd.users
chmod 0640 upsd.conf upsd.users
References: man pages: upsd.conf(5), upsd.users(5), upsd(8)
6.2.4
Starting the data server
Start the network data server:
/usr/local/ups/sbin/upsd
Make sure it is able to connect to the driver(s) on your system. A successful run looks like this:
Network UPS Tools User Manual
22 / 77
# /usr/local/ups/sbin/upsd
Network UPS Tools upsd 2.4.1
listening on 127.0.0.1 port 3493
listening on ::1 port 3493
Connected to UPS [eaton]: usbhid-ups-eaton
upsd prints dots while it waits for the driver to respond. Your system may print more or less depending on how many drivers you
have and how fast they are.
Note
if upsd says that it can’t connect to a UPS or that the data is stale, then your ups.conf is not configured correctly, or you have a
driver that isn’t working properly. You must fix this before going on to the next step.
Reference: man page: upsd(8)
6.2.5
Check the UPS data
Status data
Make sure that the UPS is providing good status data.
/usr/local/ups/bin/upsc myupsname@localhost ups.status
You should see just one line in response:
OL
OL means your system is running on line power. If it says something else (like OB - on battery, or LB - low battery), your driver
was probably misconfigured during the Driver configuration step. If you reconfigure the driver, use upsdrvctl stop to stop it, then
start it again as shown in the Starting driver(s) step.
Reference: man page: upsc(8)
All data
Look at all of the status data which is being monitored.
/usr/local/ups/bin/upsc myupsname@localhost
What happens now depends on the kind of device and driver you have. In the list, you should see ups.status with the same value
you got above. A sample run on a UPS (Eaton Ellipse MAX 1100) looks like this:
battery.charge: 100
battery.charge.low: 20
battery.runtime: 2525
battery.type: PbAc
device.mfr: EATON
device.model: Ellipse MAX 1100
device.serial: ADKK22008
device.type: ups
driver.name: usbhid-ups
driver.parameter.pollfreq: 30
driver.parameter.pollinterval: 2
Network UPS Tools User Manual
23 / 77
driver.parameter.port: auto
driver.version: 2.4.1-1988:1990M
driver.version.data: MGE HID 1.12
driver.version.internal: 0.34
input.sensitivity: normal
input.transfer.boost.low: 185
input.transfer.high: 285
input.transfer.low: 165
input.transfer.trim.high: 265
input.voltage.extended: no
outlet.1.desc: PowerShare Outlet 1
outlet.1.id: 2
outlet.1.status: on
outlet.1.switchable: no
outlet.desc: Main Outlet
outlet.id: 1
outlet.switchable: no
output.frequency.nominal: 50
output.voltage: 230.0
output.voltage.nominal: 230
ups.beeper.status: enabled
ups.delay.shutdown: 20
ups.delay.start: 30
ups.firmware: 5102AH
ups.load: 0
ups.mfr: EATON
ups.model: Ellipse MAX 1100
ups.power.nominal: 1100
ups.productid: ffff
ups.serial: ADKK22008
ups.status: OL CHRG
ups.timer.shutdown: -1
ups.timer.start: -1
ups.vendorid: 0463
Reference: man page: upsc(8), NUT command and variable naming scheme
6.2.6
Startup scripts
Note
This step is not need if you installed from packages.
Edit your startup scripts, and make sure upsdrvctl and upsd are run every time your system starts.
6.3
Configuring automatic shutdowns for low battery events
The whole point of UPS software is to bring down the OS cleanly when you run out of battery power. Everything else is roughly
eye candy.
To make sure your system shuts down properly, you will need to perform some additional configuration and run upsmon. Here
are the basics.
Network UPS Tools User Manual
24 / 77
6.3.1
Shutdown design
When your UPS batteries get low, the operating system needs to be brought down cleanly. Also, the UPS load should be turned
off so that all devices that are attached to it are forcibly rebooted.
Here are the steps that occur when a critical power event happens:
1. The UPS goes on battery
2. The UPS reaches low battery (a "critical" UPS)
3. The upsmon master notices and sets "FSD" - the "forced shutdown" flag to tell all slave systems that it will soon power
down the load.
(If you have no slaves, skip to step 6)
4. upsmon slave systems see "FSD" and:
• generate a NOTIFY_SHUTDOWN event
• wait FINALDELAY seconds - typically 5
• call their SHUTDOWNCMD
• disconnect from upsd
5. The upsmon master system waits up to HOSTSYNC seconds (typically 15) for the slaves to disconnect from upsd. If any
are connected after this time, upsmon stops waiting and proceeds with the shutdown process.
6. The upsmon master:
• generates a NOTIFY_SHUTDOWN event
• waits FINALDELAY seconds - typically 5
• creates the POWERDOWNFLAG file - usually /etc/killpower
• calls the SHUTDOWNCMD
7. On most systems, init takes over, kills your processes, syncs and unmounts some filesystems, and remounts some read-only.
8. init then runs your shutdown script. This checks for the POWERDOWNFLAG, finds it, and tells the UPS driver(s) to
power off the load.
9. The system loses power.
10. Time passes. The power returns, and the UPS switches back on.
11. All systems reboot and go back to work.
6.3.2
How you set it up
NUT user creation
Create a upsd user for upsmon to use while monitoring this UPS.
Edit upsd.users and create a new section. upsmon will connect to upsd and use this user name (in brackets) and password to
authenticate. This example is for a user called "monuser":
[monuser]
password = mypass
upsmon master
# or upsmon slave
References: upsd(8), upsd.users(5)
Network UPS Tools User Manual
25 / 77
Reloading the data server
Reload upsd. Depending on your configuration, you may be able to do this without stopping upsd:
/usr/local/ups/sbin/upsd -c reload
If that doesn’t work (check the syslog), just restart it:
/usr/local/ups/sbin/upsd -c stop
/usr/local/ups/sbin/upsd
Note
if you want to make reloading work later, see the entry in the FAQ about starting upsd as a different user.
Power Off flag file
Set the POWERDOWNFLAG location for upsmon.
In upsmon.conf, add a POWERDOWNFLAG directive with a filename. upsmon will create this file when the UPS needs to be
powered off during a power failure when low battery is reached.
We will test for the presence of this file in a later step.
POWERDOWNFLAG /etc/killpower
References: man pages: upsmon(8), upsmon.conf(5)
Securing upsmon.conf
The recommended setting is to have it owned by root:nut, then make it readable by the group and not world. This file contains
passwords that could be used by an attacker to start a shutdown, so keep it secure.
chown root:nut upsmon.conf
chmod 0640 upsmon.conf
This step has been placed early in the process so you secure this file before adding sensitive data in the next step.
Create a MONITOR directive for upsmon
Edit upsmon.conf and create a MONITOR line with the UPS definition (<upsname>@<hostname>), username and password
from the NUT user creation step, and the master or slave setting.
If it’s the master (i.e., it’s connected to this UPS directly):
MONITOR myupsname@mybox 1 monuser mypass master
If it’s just monitoring this UPS over the network, and some other system is the master:
MONITOR myupsname@mybox 1 monuser mypass slave
The number "1" here is the power value. This should always be set to 1 unless you have a very special (read: expensive) system
with redundant power supplies. In such cases, refer to the User Manual:
• typical setups for big servers,
• typical setups for data rooms.
References: upsmon(8), upsmon.conf(5)
Network UPS Tools User Manual
26 / 77
Define a SHUTDOWNCMD for upsmon
Still in upsmon.conf, add a directive that tells upsmon how to shut down your system. This example seems to work on most
systems:
SHUTDOWNCMD "/sbin/shutdown -h +0"
Notice the presence of "quotes" here to keep it together.
If your system has special needs, you may want to set this to a script which does local shutdown tasks before calling init.
Start upsmon
/usr/local/ups/sbin/upsmon
If it complains about something, then check your configuration.
Checking upsmon
Look for messages in the syslog to indicate success. It should look something like this:
May 29 01:11:27 mybox upsmon[102]: Startup successful
May 29 01:11:28 mybox upsd[100]: Client [email protected]
logged into UPS [myupsname]
Any errors seen here are probably due to an error in the config files of either upsmon or upsd. You should fix them before
continuing.
Startup scripts
Note
This step is not need if you installed from packages.
Edit your startup scripts, and add a call to upsmon.
Make sure upsmon starts when your system comes up. Do it after upsdrvctl and upsd, or it will complain about not being
able to contact the server.
You may delete the POWERDOWNFLAG in the startup scripts, but it is not necessary. upsmon will clear that file for you when
it starts.
Note
Init script examples are provide in the scripts directory of the NUT source tree, and in the various packages that exist.
Shutdown scripts
Note
This step is not need if you installed from packages.
Edit your shutdown scripts, and add upsdrvctl shutdown.
You should configure your system to power down the UPS after the filesystems are remounted read-only. Have it look for the
presence of the POWERDOWNFLAG (from upsmon.conf(5)), using this as an example:
Network UPS Tools User Manual
27 / 77
if (test -f /etc/killpower)
then
echo "Killing the power, bye!"
/usr/local/ups/bin/upsdrvctl shutdown
sleep 120
# uh oh... the UPS power-off failed
# you probably want to reboot here so you don’t get stuck!
# *** see also the section on power races in the FAQ! ***
fi
Warning
• Be careful that upsdrvctl command will probably power off your machine. Don’t use it unless your system is ready to
be halted by force. If you run RAID, read the RAID warning below!
• Make sure the filesystem(s) containing upsdrvctl, ups.conf and your UPS driver(s) are mounted (possibly in read-only
mode) when the system gets to this point. Otherwise it won’t be able to figure out what to do.
Testing shutdowns
UPS equipment varies from manufacturer to manufacturer and even within model lines. You should test the shutdown sequence
on your systems before leaving them unattended. A successful sequence is one where the OS halts before the battery runs out,
and the system restarts when power returns.
The first step is to see how upsdrvctl will behave without actually turning off power. To do so, use the -t argument:
/usr/local/ups/bin/upsdrvctl -t shutdown
It will display the sequence without actually calling the drivers.
You can finally test a forced shutdown sequence (FSD) using:
/usr/local/ups/sbin/upsmon -c fsd
This will execute a full shutdown sequence, as presented in Shutdown design, starting from the 3rd step.
If everything works correctly, the computer will be forcibly powered off, may remain off for a few seconds to a few minutes
(depending on the driver and UPS type), then will power on again.
If your UPS just sits there and never resets the load, you are vulnerable to a power race and should add the "reboot after timeout"
hack at the very least.
Also refer to the section on power races in the FAQ.
6.3.3
Using suspend to disk
Support for suspend to RAM and suspend to disk has been available in the Linux kernel for a while now. For obvious reasons,
suspending to RAM isn’t particularly useful when the UPS battery is getting low, but suspend to disk may be an interesting
concept.
This approach minimizes the amount of disruption which would be caused by an extended outage. The UPS goes on battery, then
reaches low battery, and the system takes a snapshot of itself and halts. Then it is turned off and waits for the power to return.
Once the power is back, the system reboots, pulls the snapshot back in, and keeps going from there. If the user happened to be
away when it happened, they may return and have no idea that their system actually shut down completely in the middle.
Network UPS Tools User Manual
28 / 77
In order for this to work, you need to shutdown NUT (UPS driver, upsd server and upsmon client) in the suspend script and start
them again in the resume script. Don’t try to keep them running. The upsd server will latch the FSD state (so it won’t be useable
after resuming) and so will the upsmon client. Some drivers may work after resuming, but many don’t and some UPS’es will
require re-initialization, so it’s best not to keep this running either.
After stopping driver, server and client you’ll have to send the UPS the command to shutdown only if the POWERDOWNFLAG
is present. Note that most likely you’ll have to allow for a grace period after sending upsdrvctl shutdown since the system will
still have to take a snapshot of itself after that. Not all drivers support this, so before going down this road, make sure that the
one you’re using does.
6.3.4
RAID warning
If you run any sort of RAID equipment, make sure your arrays are either halted (if possible) or switched to "read-only" mode.
Otherwise you may suffer a long resync once the system comes back up.
The kernel may not ever run its final shutdown procedure, so you must take care of all array shutdowns in userspace before
upsdrvctl runs.
If you use software RAID (md) on Linux, get mdadm and try using mdadm --readonly to put your arrays in a safe state. This has
to happen after your shutdown scripts have remounted the filesystems.
On hardware RAID or other kernels, you have to do some detective work. It may be necessary to contact the vendor or the author
of your driver to find out how to put the array in a state where a power loss won’t leave it "dirty".
Our understanding is that most if not all RAID devices on Linux will be fine unless there are pending writes. Make sure your
filesystems are remounted read-only and you should be covered.
6.4
Typical setups for enterprise networks and data rooms
The split nature of this UPS monitoring software allows a wide variety of power connections. This chapter will help you identify
how things should be configured using some general descriptions.
There are two main elements:
1. There’s a UPS attached to a communication (serial, USB or network) port on this system.
2. This system depends on a UPS for power.
You can play "mix and match" with those two to arrive at these descriptions for individual hosts:
• A: 1 but not 2
• B: 2 but not 1
• C: 1 and 2
A small to medium sized data room usually has one C and a bunch of Bs. This means that there’s a system (type C) hooked to
the UPS which depends on it for power. There are also some other systems in there (type B) which depend on that same UPS for
power, but aren’t directly connected to it.
Larger data rooms or those with multiple UPSes may have several "clusters" of the "single C, many Bs" depending on how it’s
all wired.
Finally, there’s a special case. Type A systems are connected to a UPS’s serial port, but don’t depend on it for power. This usually
happens when a UPS is physically close to a box and can reach the serial port, but the wiring is such that it doesn’t actually feed
it.
Once you identify a system’s type, use this list to decide which of the programs need to be run for monitoring:
• A: driver and upsd
Network UPS Tools User Manual
29 / 77
• B: upsmon (as slave)
• C: driver, upsd, and upsmon (as master)
To further complicate things, you can have a system that is hooked to multiple UPSes, but only depends on one for power. This
particular situation makes it an "A" relative to one UPS, and a "C" relative to the other. The software can handle this - you just
have to tell it what to do.
Note
NUT can also serve as a data proxy to increase the number of clients, or share the communication load between several upsd
instances.
If you are running large server-class systems that have more than one power feed, see the next section for information on how to
handle it properly.
6.5
Typical setups for big servers with UPS redundancy
By using multiple MONITOR statements in upsmon.conf, you can configure an environment where a large machine with redundant power monitors multiple separate UPSes.
Network UPS Tools User Manual
30 / 77
6.5.1
Example configuration
For the examples in this section, we will use a server with four power supplies installed.
Two UPS, Alpha and Beta, are each driving two of the power supplies. This means that either Alpha or Beta can totally shut
down and the server will be able to keep running.
The upsmon.conf configuration that reflect this is the following:
MONITOR ups-alpha@myhost 2 monuser mypass master
MONITOR ups-beta@myhost 2 monuser mypass master
MINSUPPLIES 2
With that configuration, upsmon will only shut down when both UPS reaches a critical (on battery + low battery) condition, since
Alpha and Beta provide the same power value.
As an added bonus, this means you can move a running server from one UPS to another (for maintenance purpose for example)
without bringing it down since the minimum power will be provided at all times.
The MINSUPPLIES line tells upsmon that we need at least 2 power supplies to be receiving power from a good UPS (on line or
on battery, just not on battery and low battery).
Note
we could have used a Power Value of 1 for both UPS, and MINSUPPLIES set to 1 too. These values are purely arbitrary, so you
are free to use your own rules. Here, we have linked these values to the number of power supplies that each UPS is feeding
(2).
6.5.2
Multiple UPS shutdowns ordering
If you have multiple UPSes connected to your system, chances are that you need to shut them down in a specific order. The goal
is to shut down everything but the one keeping upsmon alive at first, then you do that one last.
To set the order in which your UPSes receive the shutdown commands, define the sdorder value in your ups.conf.
[bigone]
driver = usbhid-ups
port = auto
sdorder = 2
[littleguy]
driver = mge-shut
port = /dev/ttyS0
sdorder = 1
[misc]
driver = blazer_ser
port = /dev/ttyS1
sdorder = 0
The order runs from 0 to the highest number available. So, for this configuration, the order of shutdowns would be misc, littleguy,
and then bigone.
Note
If you have a UPS that shouldn’t be shutdown when running upsdrvctl shutdown, set the sdorder to -1.
Network UPS Tools User Manual
31 / 77
6.5.3
Other redundancy configurations
There are a lot of ways to handle redundancy and they all come down to how many power supplies, power cords and independent
UPS connections you have. A system with a 1:1 cord:supply ratio has more wires stuffed behind it, but it’s much easier to move
things around since any given UPS drives a smaller percentage of the overall power.
More information can be found in the NUT user manual, and the various user manual pages.
7
Advanced usage and scheduling notes
upsmon can call out to a helper script or program when the device changes state. The example upsmon.conf has a full list of
which state changes are available - ONLINE, ONBATT, LOWBATT, and more.
There are two options, that will be presented in details:
• the simple approach: create your own helper, and manage all events and actions yourself,
• the advanced approach: use the NUT provided helper, called upssched.
7.1
7.1.1
The simple approach, using your own script
How it works relative to upsmon
Your command will be called with the full text of the message as one argument.
For the default values, refer to the sample upsmon.conf file.
The environment string NOTIFYTYPE will contain the type string of whatever caused this event to happen - ONLINE, ONBATT,
LOWBATT, . . .
Making this some sort of shell script might be a good idea, but the helper can be in any programming or scripting language.
Note
Remember that your helper must be executable. If you are using a script, make sure the execution flags are set.
For more information, refer to upsmon(8) and upsmon.conf(5) manual pages.
7.1.2
Setting up everything
• Set EXEC flags on various things in upsmon.conf(5):
NOTIFYFLAG ONBATT EXEC
NOTIFYFLAG ONLINE EXEC
If you want other things like WALL or SYSLOG to happen, just add them:
NOTIFYFLAG ONBATT EXEC+WALL+SYSLOG
You get the idea.
• Tell upsmon where your script is
NOTIFYCMD /path/to/my/script
• Make a simple script like this at that location:
Network UPS Tools User Manual
32 / 77
#! /bin/bash
echo "$*" | sendmail -F"ups@mybox" [email protected]
• Restart upsmon, pull the plug, and see what happens.
That approach is bare-bones, but you should get the text content of the alert in the body of the message, since upsmon passes the
alert text (from NOTIFYMSG) as an argument.
7.1.3
Using more advanced features
Your helper script will be run with a few environment variables set.
• UPSNAME: the name of the system that generated the change.
This will be one of your identifiers from the MONITOR lines in upsmon.conf.
• NOTIFYTYPE: this will be ONLINE, ONBATT, or whatever event took place which made upsmon call your script.
You can use these to do different things based on which system has changed state. You could have it only send pages for an
important system while totally ignoring a known trouble spot, for example.
7.1.4
Suppressing notify storms
upsmon will call your script every time an event happens that has the EXEC flag set. This means a quick power failure that
lasts mere seconds might generate a notification storm. To suppress this sort of annoyance, use upssched as your NOTIFYCMD
program, and configure it to call your command after a timer has elapsed.
7.2
The advanced approach, using upssched
upssched is a helper for upsmon that will invoke commands for you at some interval relative to a UPS event. It can be used to
send pages, mail out notices about things, or even shut down the box early.
There will be examples scattered throughout. Change them to suit your pathnames, UPS locations, and so forth.
7.2.1
How upssched works relative to upsmon
When an event occurs, upsmon will call whatever you specify as a NOTIFYCMD in your upsmon.conf, if you also enable the
EXEC in your NOTIFYFLAGS. In this case, we want upsmon to call upssched as the notifier, since it will be doing all the work
for us. So, in the upsmon.conf:
NOTIFYCMD /usr/local/ups/bin/upssched
Then we want upsmon to actually use it for the notify events, so again in the upsmon.conf we set the flags:
NOTIFYFLAG
NOTIFYFLAG
NOTIFYFLAG
... and so
ONLINE SYSLOG+EXEC
ONBATT SYSLOG+WALL+EXEC
LOWBATT SYSLOG+WALL+EXEC
on.
For the purposes of this document I will only use those three, but you can set the flags for any of the valid notify types.
Network UPS Tools User Manual
33 / 77
7.2.2
Setting up your upssched.conf
Once upsmon has been configured with the NOTIFYCMD and EXEC flags, you’re ready to deal with the upssched.conf details.
In this file, you specify just what will happen when a given event occurs on a particular UPS.
First you need to define the name of the script or program that will handle timers that trigger. This is your CMDSCRIPT, and
needs to be above any AT defines. There’s an example provided with the program, so we’ll use that here:
CMDSCRIPT /usr/local/ups/bin/upssched-cmd
Then you have to define the variables PIPEFN and LOCKFN; the former sets the file name of the FIFO that will pass communications between processes to start and stop timers, while the latter sets the file name for a temporary file created by upssched
in order to avoid a race condition under some circumstances. Please see the relevant comments in upssched.conf for additional
information and advice about these variables.
Now you can tell your CMDSCRIPT what to do when it is called by upsmon.
The big picture
The design in a nutshell is:
upsmon ---> calls upssched ---> calls your CMDSCRIPT
Ultimately, the CMDSCRIPT does the actual useful work, whether that’s initiating an early shutdown with upsmon -c fsd, sending
a page by calling sendmail, or opening a subspace channel to V’ger.
Establishing timers
Let’s say that you want to receive a page when any UPS has been running on battery for 30 seconds. Create a handler that starts
a 30 second timer for an ONBATT condition.
AT ONBATT * START-TIMER onbattwarn 30
This means "when any UPS (the *) goes on battery, start a timer called onbattwarn that will trigger in 30 seconds". We’ll come
back to the onbattwarn part in a moment. Right now we need to make sure that we don’t trigger that timer if the UPS happens to
come back before the time is up. In essence, if it goes back on line, we need to cancel it. So, let’s tell upssched that.
AT ONLINE * CANCEL-TIMER onbattwarn
Executing commands immediately
As an example, consider the scenario where a UPS goes onto battery power. However, the users are not informed until 60 seconds
later - using a timer as described above. Whilst this may let the logged in users know that the UPS is on battery power, it does not
inform any users subsequently logging in. To enable this we could, at the same time, create a file which is read and displayed to
any user trying to login whilst the UPS is on battery power. If the UPS comes back onto utility power within 60 seconds, then we
can cancel the timer and remove the file, as described above. However, if the UPS comes back onto utility power say 5 minutes
later then we do not want to use any timers but we still want to remove the file. To do this we could use:
AT ONLINE * EXECUTE ups-back-on-power
This means that when upsmon detects that the UPS is back on utility power it will signal upssched. Upssched will see the above
command and simply pass ups-back-on-power as an argument directly to CMDSCRIPT. This occurs immediately, there are no
timers involved.
Network UPS Tools User Manual
34 / 77
7.2.3
Writing the command script handler
OK, now that upssched knows how the timers are supposed to work, let’s give it something to do when one actually triggers. The
name of the example timer is onbattwarn, so that’s the argument that will be passed into your CMDSCRIPT when it triggers.
This means we need to do some shell script writing to deal with that input.
#! /bin/sh
case $1 in
onbattwarn)
echo "The UPS has been on battery for awhile" \
| mail -s"UPS monitor" [email protected]
;;
ups-back-on-power)
/bin/rm -f /some/path/ups-on-battery
;;
*)
logger -t upssched-cmd "Unrecognized command: $1"
;;
esac
This is a very simple script example, but it shows how you can test for the presence of a given trigger. With multiple ATs creating
various timer names, you will need to test for each possibility and handle it according to your desires.
Note
You can invoke just about anything from inside the CMDSCRIPT. It doesn’t need to be a shell script, either - that’s just an
example. If you want to write a program that will parse argv[1] and deal with the possibilities, that will work too.
7.2.4
Early Shutdowns
One thing that gets requested a lot is early shutdowns in upsmon. With upssched, you can now have this functionality. Just set a
timer for some length of time at ONBATT which will invoke a shutdown command if it elapses. Just be sure to cancel this timer
if you go back ONLINE before then.
The best way to do this is to use the upsmon callback feature. You can make upsmon set the "forced shutdown" (FSD) flag on
the upsd so your slave systems shut down early too. Just do something like this in your CMDSCRIPT:
/usr/local/ups/sbin/upsmon -c fsd
It’s not a good idea to call your system’s shutdown routine directly from the CMDSCRIPT, since there’s no synchronization with
the slave systems hooked to the same UPS. FSD is the master’s way of saying "we’re shutting down now like it or not, so you’d
better get ready".
7.2.5
Background
This program was written primarily to fulfill the requests of users for the early shutdown scenario. The "outboard" design of the
program (relative to upsmon) was intended to reduce the load on the average system. Most people don’t have the requirement of
shutting down after n seconds on battery, since the usual OB+LB testing is sufficient.
This program was created separately so those people don’t have to spend CPU time and RAM on something that will never be
used in their environments.
The design of the timer handler is also geared towards minimizing impact. It will come and go from the process list as necessary.
When a new timer is started, a process will be forked to actually watch the clock and eventually start the CMDSCRIPT. When a
timer triggers, it is removed from the queue. Cancelling a timer will also remove it from the queue. When no timers are present
in the queue, the background process exits.
This means that you will only see upssched running when one of two things is happening:
Network UPS Tools User Manual
35 / 77
1. There’s a timer of some sort currently running
2. upsmon just called it, and you managed to catch the brief instance
The final optimization handles the possibility of trying to cancel a timer when there’s none running. If there’s no process already
running, there are no timers to cancel, and furthermore there is no need to start a clock-watcher. As a result, it skips that step and
exits sooner.
8
NUT outlets management and PDU notes
NUT supports advanced outlets management for any kind of device that proposes it. This chapter introduces how to manage
outlets in general, and how to take advantage of the provided features.
8.1
Introduction
Outlets are the core of Power Distribution Units. They allow you to turn on, turn off or cycle the load on each outlet.
Some UPS models also provide manageable outlets (Eaton, MGE, Powerware, Tripplite, . . . ) that help save power in various
ways, and manage loads more intelligently.
Finally, some devices can be managed in a PDU-like way. Consider blade systems: the blade chassis can be controlled remotely
to turn on, turn off or cycle the power on individual blade servers.
NUT allows you to control all these devices!
8.2
NUT outlet data collection
NUT provides a complete and uniform integration of outlets related data, through the outlet collection.
First, there is a special outlet, called main outlet. You can access it through outlet.{id, desc, . . . } without any index.
Any modification through the main outlet will affect all outlets. For example, calling the command outlet.load.cycle will cycle
all outlets.
Next, outlets index starts from 1. Index 0 is implicitly reserved to the main outlet. So the first outlet is outlet.1.*.
For a complete list of outlet data and commands, refer to the NUT command and variable naming scheme.
An example upsc output (data/epdu-managed.dev) is available in the source archive.
Note
The variables supported depend on the exact device type.
8.3
Outlets on PDU
Smart Power Distribution Units provide at least various meters, related to current, power and voltage.
Some more advanced devices also provide control through the load.off, load.on and load.cycle commands.
Network UPS Tools User Manual
36 / 77
8.4
Outlets on UPS
Some advanced Uninterruptible Power Supplies provide smart outlet management.
This allows to program a limited backup time to non-critical loads in order to keep the maximum of the battery reserve for critical
equipment.
This also allows the same remote electrical management of devices provided by PDUs, which can be very interesting in Data
Centers.
For example, on small setup, you can plug printers, USB devices, hubs, (. . . ) into managed outlets. Depending on your UPS’s
capabilities, you will be able to turn off those loads:
• after some minutes of back-up time using outlet.n.delay.start,
• when reaching a percentage battery charge using outlet.n.autoswitch.charge.low.
This will ensure a maximum runtime for the computer.
On bigger systems, with bigger UPSs, this is the same thing with servers instead of small devices.
Note
If you need the scheduling function and your device doesn’t support it, you can still use NUT scheduling features.
Warning
don’t plug the UPS’s communication cable (USB or network) on a managed outlet. Otherwise, all computers will be
stopped as soon as the communication is lost.
8.5
Other type of devices
As mentioned in the introduction, some other devices can be considered and managed like PDUs. This is the case in most blade
systems, where the blade chassis offers power management services.
This way, you can control remotely each blade server as if it were a PDU outlet.
This category of devices is generally called Remote Power Controls - RPC in NUT.
9
Notes on securing NUT
The NUT Team is very interested in providing the highest security level to its users.
Many internal and external mechanisms exist to secure NUT. And several steps are needed to ensure that your NUT setup meets
your security requirements.
This chapter will present you these mechanisms, by increasing order of security level. This means that the more security you
need, the more mechanisms you will have to apply.
Note
you may want to have a look at NUT Quality Assurance, since some topics are related to NUT security and reliability.
Network UPS Tools User Manual
37 / 77
9.1
How to verify the NUT source code signature
In order to verify the NUT source code signature for releases, perform the following steps:
• Retrieve the NUT source code (nut-X.Y.Z.tar.gz) and the matching signature (nut-X.Y.Z.tar.gz.sig)
• Retrieve the NUT maintainer’s signature:
$ gpg --fetch-keys http://www.networkupstools.org/source/nut-key.gpg
• Launch the GPG checking using the following command:
$ gpg --verify nut-X.Y.Z.tar.gz.sig
• You should see a message mentioning a "Good signature", like:
gpg: Signature made Thu Jul 5 16:15:05 2007 CEST using DSA key ID 204DDF1B
gpg: Good signature from "Arnaud Quette ..."
...
9.2
System level privileges and ownership
All configuration files should be protected so that the world can’t read them. Use the following commands to accomplish this:
chown root:nut /etc/nut/*
chmod 640 /etc/nut/*
Finally, the state path directory, which holds the communication between the driver(s) and upsd, should also be secured.
chown root:nut /var/state/ups
chmod 0770 /var/state/ups
9.3
NUT level user privileges
Administrative commands such as setting variables and the instant commands are powerful, and access to them needs to be
restricted.
NUT provides an internal mechanism to do so, through upsd.users(5).
This file defines who may access instant commands and settings, and what is available.
During the initial NUT user creation, we have created a monitoring user for upsmon.
You can also create an administrator user with full power using:
[administrator]
password = mypass
actions = set
instcmds = all
For more information on how to restrict actions and instant commands, refer to upsd.users(5) manual page.
Note
NUT administrative user definitions should be used in conjunction with TCP Wrappers.
Network UPS Tools User Manual
38 / 77
9.4
Network access control
If you are not using NUT on a standalone setup, you will need to enforce network access to upsd.
There are various ways to do so.
9.4.1
NUT LISTEN directive
upsd.conf(5).
LISTEN interface port
Bind a listening port to the interface specified by its Internet address. This may be useful on hosts with multiple interfaces. You
should not rely exclusively on this for security, as it can be subverted on many systems.
Listen on TCP port port instead of the default value which was compiled into the code. This overrides any value you may have
set with configure --with-port. If you don’t change it with configure or this value, upsd will listen on port 3493 for
this interface.
Multiple LISTEN addresses may be specified. The default is to bind to 127.0.0.1 if no LISTEN addresses are specified (and ::1
if IPv6 support is compiled in).
LISTEN
LISTEN
LISTEN
LISTEN
127.0.0.1
192.168.50.1
::1
2001:0db8:1234:08d3:1319:8a2e:0370:7344
This parameter will only be read at startup. You’ll need to restart (rather than reload) upsd to apply any changes made here.
9.4.2
Firewall
NUT has its own official IANA port: 3493/tcp.
The upsmon process on slave systems (as well as upsc) connects to the upsd process on the master system via this TCP port.
The upsd process does not connect out.
You should use this to restrict network access.
9.4.3
TCP Wrappers
If the server is build with tcp-wrappers support enabled, it will check if the NUT username is allowed to connect from the client
address through the /etc/hosts.allow and /etc/hosts.deny files.
Note
this will only be done for commands that require the user to be logged into the server.
hosts.allow:
ups : [email protected]/32
ups : [email protected]/32 [email protected]/24
hosts.deny:
upsd : ALL
Further details are described in hosts_access(5).
Network UPS Tools User Manual
39 / 77
9.5
Configuring SSL
SSL is available as a build option (--with-ssl).
It encrypts sessions between upsd and clients, and can also be used to authenticate servers.
This means that stealing port 3493 from upsd will no longer net you interesting passwords.
Several things must happen before this will work, however. This chapter will present these steps.
9.5.1
Install OpenSSL
Install OpenSSL as usual, either from source or binary packages.
9.5.2
Recompile and install NUT
Recompile NUT from source, starting with configure --with-ssl.
Then install everything as usual.
9.5.3
Create a certificate and key for upsd
openssl (the program) should be in your PATH, unless you installed it from source yourself, in which case it may be in /usr/local/ssl/bin.
Use the following command to create the certificate:
openssl req -new -x509 -nodes -out upsd.crt -keyout upsd.key
You can also put a -days nnn in there to set the expiration. If you skip this, it may default to 30 days. This is probably not what
you want.
It will ask several questions. What you put in there doesn’t matter a whole lot, since nobody is going to see it for now. Future
versions of the clients may present data from it, so you might use this opportunity to identify each server somehow.
9.5.4
Figure out the hash for the key
Use the following command to determine the hash of the certificate:
openssl x509 -hash -noout -in upsd.crt
You’ll get back a single line with 8 hex characters. This is the hash of the certificate, which is used for naming the client-side
certificate. For the purposes of this example the hash is 0123abcd.
9.5.5
Install the client-side certificate
Use the following commands to install the client-side certificate:
mkdir <certpath>
chmod 0755 <certpath>
cp upsd.crt <certpath>/<hash>.0
Example:
Network UPS Tools User Manual
40 / 77
mkdir /usr/local/ups/etc/certs
chmod 0755 /usr/local/ups/etc/certs
cp upsd.crt /usr/local/ups/etc/certs/0123abcd.0
If you already have a file with that name in there, increment the 0 until you get a unique filename that works.
If you have multiple client systems (like upsmon slaves), be sure to install this file on them as well.
We recommend making a directory under your existing confpath to keep everything in the same place. Remember the path you
created, since you will need to put it in upsmon.conf later.
It must not be writable by unprivileged users, since someone could insert a new client certificate and fool upsmon into trusting a
fake upsd.
9.5.6
Create the combined file for upsd
To do so, use the below commands:
cat upsd.crt upsd.key > upsd.pem
chown root:nut upsd.pem
chmod 0640 upsd.pem
This file must be kept secure, since anyone possessing it could pretend to be upsd and harvest authentication data if they get a
hold of port 3493.
Having it be owned by root and readable by group nut allows upsd to read the file without being able to change the contents.
This is done to minimize the impact if someone should break into upsd.
9.5.7
Note on certification authorities (CAs) and signed keys
There are probably other ways to handle this, involving keys which have been signed by a CA you recognize. Contact your local
SSL guru.
9.5.8
Install the server-side certificate
Install the certificate with the following command:
mv upsd.pem <upsd certfile path>
Example:
mv upsd.pem /usr/local/ups/etc/upsd.pem
After that, edit your upsd.conf and tell it where to find it:
CERTFILE /usr/local/ups/etc/upsd.pem
9.5.9
Clean up the temporary files
rm -f upsd.crt upsd.key
9.5.10
Restart upsd
It should come back up without any complaints. If it says something about keys or certificates, then you probably missed a step.
If you run upsd as a separate user id (like nutsrv), make sure that user can read the upsd.pem file.
Network UPS Tools User Manual
41 / 77
9.5.11
Point upsmon at the certificates
Edit your upsmon.conf, and tell it where the CERTPATH is:
CERTPATH <path>
Example:
CERTPATH /usr/local/ups/etc/certs
9.5.12
Recommended: make upsmon verify all connections with certificates
Put this in upsmon.conf:
CERTVERIFY 1
Without this, there is no guarantee that the upsd is the right host. Enabling this greatly reduces the risk of man in the middle
attacks.
This effectively forces the use of SSL, so don’t use this unless all of your upsd hosts are ready for SSL and have their certificates
in order.
9.5.13
Recommended: force upsmon to use SSL
Again in upsmon.conf:
FORCESSL 1
If you don’t use CERTVERIFY 1, then this will at least make sure that nobody can sniff your sessions without a large effort.
Setting this will make upsmon drop connections if the remote upsd doesn’t support SSL, so don’t use it unless all of them have
it running.
9.5.14
Restart upsmon
You should see something like this in the syslog from upsd:
foo upsd[1234]: Client mon@localhost logged in to UPS [myups] (SSL)
If upsd or upsmon give any error messages, or the (SSL) is missing, then something isn’t right.
If in doubt about upsmon, start it with -D so it will stay in the foreground and print debug messages. It should print something
like this every couple of seconds:
polling ups: myups@localhost [SSL]
Obviously, if the [SSL] isn’t there, something’s broken.
9.5.15
Recommended: sniff the connection to see it for yourself
Using tcpdump, Wireshark (Ethereal), or another network sniffer tool, tell it to monitor port 3493/tcp and see what happens. You
should only see STARTTLS go out, OK STARTTLS come back, and the rest will be certificate data and then seemingly random
characters.
If you see any plaintext besides that (USERNAME, PASSWORD, etc.) then something is not working.
Network UPS Tools User Manual
42 / 77
9.5.16
Potential problems
If you specify a certificate expiration date, you will eventually see things like this in your syslog:
Oct 29 07:27:25 rktoy upsmon[3789]: Poll UPS [for750@rktoy] failed SSL error: error:14090086:SSL routines:SSL3_GET_SERVER_CERTIFICATE: certificate verify fail
You can verify that it is expired by using openssl to display the date:
openssl x509 -enddate -noout -in <certfile>
It’ll display a date like this:
notAfter=Oct 28 20:05:32 2002 GMT
If that’s after the current date, you need to generate another cert/key pair using the procedure above.
9.5.17
Conclusion
SSL support should be considered stable but purposely underdocumented since various bits of the implementation or configuration may change in the future. In other words, if you use this and it stops working after an upgrade, come back to this file to find
out what changed.
This is why the other documentation doesn’t mention any of these directives yet. SSL support is a treat for those of you that
RTFM.
There are also potential licensing issues for people who ship binary packages since NUT is GPL and OpenSSL is not compatible
with it. You can still build and use it yourself, but you can’t distribute the results of it. Or maybe you can. It depends on what
you consider "essential system software", and some other legal junk that we’re not going to touch.
Other packages have solved this by explicitly stating that an exception has been granted. That is (purposely) impossible here,
since NUT is the combined effort of many people, and all of them would have to agree to a license change. This is actually a
feature, since it means nobody can unilaterally run off with the source - not even the NUT team.
Note that the replacement of OpenSSL by Mozilla Network Security Services (NSS) is scheduled in the future, to avoid the above
licensing issues.
9.6
chrooting and other forms of paranoia
It has been possible to run the drivers and upsd in a chrooted jail for some time, but it involved a number of evil hacks. From the
1.3 series, a much saner chroot behavior exists, using BIND 9 as an inspiration.
The old way involved creating an entire tree, complete with libraries, a shell (!), and many auxiliary files. This was hard to
maintain and could have become an interesting playground for an intruder. The new way is minimal, and leaves little in the way
of usable materials within the jail.
This document assumes that you already have created at least one user account for the software to use. If you’re still letting it
fall back on "nobody", stop right here and go figure that out first. It also assumes that you have everything else configured and
running happily all by itself.
9.6.1
Generalities
Essentially, you need to create your configuration directory and state path in their own little world, plus a special device or two.
For the purposes of this example, the chroot jail is /chroot/nut. The programs have been built with the default prefix, so they are
using /usr/local/ups. First, create the confpath and bring over a few files.
Network UPS Tools User Manual
43 / 77
mkdir -p /chroot/nut/usr/local/ups/etc
cd /chroot/nut/usr/local/ups/etc
cp -a /usr/local/ups/etc/upsd.users .
cp -a /usr/local/ups/etc/upsd.conf .
cp -a /usr/local/ups/etc/ups.conf .
We’re using cp -a to maintain the permissions on those files.
Now bring over your state path, maintaining the same permissions as before.
mkdir -p /chroot/nut/var/state
cp -a /var/state/ups /chroot/nut/var/state
Next we must put /etc/localtime inside the jail, or you may get very strange readings in your syslog. You’ll know you have this
problem if upsd shows up as UTC in the syslog while the rest of the system doesn’t.
mkdir -p /chroot/nut/etc
cp /etc/localtime /chroot/nut/etc
Note that this is not "cp -a", since we want to copy the content, not the symlink that it may be on some systems.
Finally, create a tiny bit of /dev so the programs can enter the background properly - they redirect fds into the bit bucket to make
sure nothing else grabs 0-2.
mkdir -p /chroot/nut/dev
cp -a /dev/null /chroot/nut/dev
Try to start your driver(s) and make sure everything fires up as before.
upsdrvctl -r /chroot/nut -u nutdev start
Once your drivers are running properly, try starting upsd.
upsd -r /chroot/nut -u nutsrv
Check your syslog. If nothing is complaining, try running clients like upsc and upsmon. If they seem happy, then you’re done.
9.6.2
symlinks
After you do this, you will have two copies of many things, like the confpath and the state path. I recommend deleting the real
/var/state/ups, replacing it with a symlink to /chroot/nut/var/state/ups. That will let other programs reference the .pid files without
a lot of hassle.
You can also do this with your confpath and point /usr/local/ups/etc at /chroot/nut/usr/local/ups/etc unless you’re worried about
something hurting the files inside that directory. In that case, you should maintain a master copy and push it into the chroot path
after making changes.
upsdrvctl itself does not chroot, so the ups.conf still needs to be in the usual confpath.
9.6.3
upsmon
This has not yet been applied to upsmon, since it can be quite complicated when there are notifiers that need to be run. One
possibility would be for upsmon to have three instances:
• privileged root parent that listens for a shutdown command
• unprivileged child that listens for notify events
• unprivileged chrooted child that does network I/O
This one is messy, and may not happen for some time, if ever.
Network UPS Tools User Manual
44 / 77
9.6.4
Config files
You may now set chroot= and user= in the global section of ups.conf.
upsd chroots before opening any config files, so there is no way to add support for that in upsd.conf at the present time.
A
Glossary
This section document the various acronyms used throughout the present documentation.
NUT
Network UPS Tools.
PDU
Power Distribution Unit.
SCD
Solar Controller Device.
UPS
Uninterruptible Power Supply.
B
Acknowledgements / Contributions
This project is the result of years of work by many individuals and companies.
Many people have written or tweaked the software; the drivers, clients, server and documentation have all received valuable
attention from numerous sources.
Many of them are listed within the source code, AUTHORS file, release notes, and mailing list archives, but some prefer to be
anonymous. This software would not be possible without their help.
B.1
The NUT Team
B.1.1
Active members
• Arnaud Quette: project leader (since 2005), Debian packager and jack of all trades
• Arjen de Korte: senior lieutenant
• Charles Lepple: senior lieutenant
• Kjell Claesson: senior developer
• Alexander Gordeev: junior developer
• David Goncalves: Python developer
• Eric S. Raymond: Documentation consultant
• Oden Eriksson: Mandriva packager
• Stanislav Brabec: Novell / Suse packager
• Michal Hlavinka: Redhat packager
Network UPS Tools User Manual
45 / 77
B.1.2
Retired members
• Russell Kroll: Founder, and project leader from 1996 to 2005
• Peter Selinger: senior lieutenant
• Carlos Rodrigues: author of the "megatec" drivers, removing the numerous drivers for Megatec / Q1 protocol. These drivers
have now been replaced by blazer_ser and blazer_usb
• Niels Baggesen: ported and heavily extended upscode2 to NUT 2.0 driver model
• Niklas Edmundsson: has worked on 3-phase support, and upscode2 updates
• Martin Loyer: has worked a bit on mge-utalk
• Jonathan Dion: MGE internship (summer 2006), who has worked on configuration
• Doug Reynolds: has worked on CyberPower support (powerpanel driver)
• Jon Gough: has worked on porting the megatec driver to USB (megatec_usb)
• Dominique Lallement: Consultant (chairman of the USB/HID PDC Forum)
• Julius Malkiewicz: junior developer
• Tomas Smetana: former Redhat packager (2007-2008)
B.2
Our main supporter: Eaton
Through the acquisition of MGE Office Protection Systems (a carve out of the MGE UPS SYSTEMS small systems, up to 10
KVA), Eaton has been supporting NUT, and more generally the Free/Libre Opensource Software Community since around 2002.
This support includes the following actions:
• providing extensive technical documents (Eaton protocols library),
• providing units to developers of NUT and related projects,
• hosting the networkupstools.org webserver,
• providing artwork,
• promoting NUT in general.
For more detailed information on Eaton’s Opensource commitment, please refer to Eaton Opensource website.
B.3
B.3.1
Supporting manufacturers
UPS manufacturers
• Eaton, our main supporter, as presented in the above section.
• Gamatronic, through Nadav Moskovitch, has revived the sec driver (as gamatronic), and expanded a bit genericups for its UPSs
with alarm interface.
• Microdowell, through Elio Corbolante, has created the microdowell driver to support the Enterprise Nxx/Bxx serial devices.
They also proposes NUT as an alternative to its software for Linux / Unix.
• Powercom, through Alexey Morozov, has provided extensive information on its USB/HID devices, along with development
units.
Network UPS Tools User Manual
46 / 77
B.3.2
Appliances manufacturers
• OpenGear has worked with NUT’s leader to successfully develop and integrate PDU support. Opengear, through Scott Burns,
and Robert Waldie, has submitted several patches.
B.4
Other contributors
• Pavel Korensky’s original apcd provided the inspiration for pursuing APC’s smart protocol in 1996
• Eric Lawson provided scans of the OneAC protocol
• John Marley used OCR software to transform the SEC protocol scans into a HTML document
• Chris McKinnon scanned and converted the Fortress protocol documentation
• Tank provided documentation on the Belkin/Delta protocol
• Potrans provided a Fenton PowerPal 600 (P series) for development of the safenet driver.
B.5
Older entries (before 2005)
• MGE UPS SYSTEMS was the previous NUT sponsor. They provided protocols information, many units for development of
NUT-related projects. Several drivers such as mge-utalk, mge-shut, snmp-ups, hidups, and usbhid-ups are the result of this
collaboration, in addition to the WMNut, MGE HID Parser the libhid projects, . . . through Arnaud. All the MGE supporters
have now gone with Eaton (through MGE Office Protection Systems), which is the new NUT sponsor.
• Fenton Technologies contributed a PowerPal 660 to the project. Their open stance and quick responses to technical inquiries
were appreciated for making the development of the fentonups driver possible. Fenton has since been acquired by Metapo.
• Bo Kersey of VirCIO provided a Best Power Fortress 750 to facilitate the bestups driver.
• Invensys Energy Systems provided the SOLA/Best "Phoenixtec" protocol document. SOLA has since been acquired by Eaton.
• PowerKinetics technical support provided documentation on their MiniCOL protocol, which is archived in the NUT protocol
library. PowerKinetics was acquired by the JST Group in June 2003.
• Cyber Power Systems contributed a 700AVR model for testing and development of the cyberpower driver.
• Liebert Corporation supplied serial test boxes and a UPStation GXT2 with the Web/SNMP card for development of the liebert
driver and expansion of the existing snmp-ups driver. Liebert has since been acquired by Emerson.
Note
If a company or individual isn’t listed here, then we probably don’t have enough information about the situation. Developers are
requested to report vendor contributions to the NUT team so this list may reflect their help. If we have left you out, send us
some mail.
C
NUT command and variable naming scheme
This is a dump of the standard variables and command names used in NUT. Don’t use a name with any of the dstate functions
unless it exists here.
If you need a new variable or command name, contact the Development Team first.
Put another way: if you make up a name that’s not in this list and it gets into the tree, and then we come up with a better name
later, clients that use the undocumented variable will break when it is changed.
Note
"opaque" means programs should not attempt to parse the value for that variable as it may vary greatly from one UPS to the
next. These strings are best handled directly by the user.
Network UPS Tools User Manual
47 / 77
C.1
C.1.1
Variables
device: General unit information
Note
these data will be redundant with some ups.* information during a transition period. The ups.* data will then be removed.
Name
device.model
device.mfr
device.serial
device.type
C.1.2
Description
Device model
Device manufacturer
Device serial number (opaque string)
Device type (ups, pdu, scd)
Example value
BladeUPS
Eaton
WS9643050926
ups
Description
UPS status
UPS alarms
Internal UPS clock time (opaque
string)
Internal UPS clock date (opaque
string)
UPS model
UPS manufacturer
UPS manufacturing date (opaque
string)
UPS serial number (opaque string)
Vendor ID for USB devices
Product ID for USB devices
UPS firmware (opaque string)
Auxiliary device firmware
UPS temperature (degrees C)
Load on UPS (percent)
Load when UPS switches to overload
condition ("OVER") (percent)
UPS system identifier (opaque string)
Interval to wait before restarting the
load (seconds)
Interval to wait before rebooting the
UPS (seconds)
Interval to wait after shutdown with
delay command (seconds)
Time before the load will be started
(seconds)
Time before the load will be rebooted
(seconds)
Time before the load will be shutdown
(seconds)
Interval between self tests (seconds)
Results of last self test (opaque string)
Language to use on front panel (*
opaque)
Example value
OL
OVERHEAT
12:34
ups: General unit information
Name
ups.status
ups.alarm
ups.time
ups.date
ups.model
ups.mfr
ups.mfr.date
ups.serial
ups.vendorid
ups.productid
ups.firmware
ups.firmware.aux
ups.temperature
ups.load
ups.load.high
ups.id
ups.delay.start
ups.delay.reboot
ups.delay.shutdown
ups.timer.start
ups.timer.reboot
ups.timer.shutdown
ups.test.interval
ups.test.result
ups.display.language
01-02-03
SMART-UPS 700
APC
10/17/96
WS9643050926
0463
0001
50.9.D
4Kx
042.7
023.4
100
Sierra
0
60
20
30
10
20
1209600 (two weeks)
Bad battery pack
E
Network UPS Tools User Manual
48 / 77
Name
ups.contacts
ups.efficiency
ups.power
ups.power.nominal
ups.realpower
ups.realpower.nominal
ups.beeper.status
ups.type
ups.watchdog.status
ups.start.auto
ups.start.battery
ups.start.reboot
C.1.3
Description
UPS external contact sensors (*
opaque)
Efficiency of the UPS (ratio of the
output current on the input current)
(percent)
Current value of apparent power
(Volt-Amps)
Nominal value of apparent power
(Volt-Amps)
Current value of real power (Watts)
Nominal value of real power (Watts)
UPS beeper status (enabled, disabled
or muted)
UPS type (* opaque)
UPS watchdog status (enabled or
disabled)
UPS starts when mains is (re)applied
Allow to start UPS from battery
UPS coldstarts from battery (enabled
or disabled)
Example value
F0
95
500
500
300
300
enabled
offline
disabled
yes
yes
yes
input: Incoming line/power information
Name
input.voltage
input.voltage.maximum
input.voltage.minimum
input.voltage.nominal
input.voltage.extended
input.transfer.reason
input.transfer.low
input.transfer.high
input.transfer.low.min
input.transfer.low.max
input.transfer.high.min
input.transfer.high.max
input.sensitivity
input.quality
input.current
input.current.nominal
input.frequency
input.frequency.nominal
input.frequency.low
input.frequency.high
input.frequency.extended
input.transfer.boost.low
input.transfer.boost.high
input.transfer.trim.low
input.transfer.trim.high
Description
Input voltage
Maximum incoming voltage seen
Minimum incoming voltage seen
Nominal input voltage
Extended input voltage range
Reason for last transfer to battery (*
opaque)
Low voltage transfer point
High voltage transfer point
smallest settable low voltage transfer
point
greatest settable low voltage transfer
point
smallest settable high voltage transfer
point
greatest settable high voltage transfer
point
Input power sensitivity
Input power quality (* opaque)
Input current (A)
Nominal input current (A)
Input line frequency (Hz)
Nominal input line frequency (Hz)
Input line frequency low (Hz)
Input line frequency high (Hz)
Extended input frequency range
Low voltage boosting transfer point
High voltage boosting transfer point
Low voltage trimming transfer point
High voltage trimming transfer point
Example value
121.5
130
100
120
no
T
91
132
85
95
131
136
H (high)
FF
4.25
5.0
60.00
60
47
63
no
190
210
230
240
Network UPS Tools User Manual
49 / 77
C.1.4
output: Outgoing power/inverter information
Name
output.voltage
output.voltage.nominal
output.frequency
output.frequency.nominal
output.current
output.current.nominal
C.1.5
Description
Output voltage (V)
Nominal output voltage (V)
Output frequency (Hz)
Nominal output frequency (Hz)
Output current (A)
Nominal output current (A)
Example value
120.9
120
59.9
60
4.25
5.0
Three-phase additions
The additions for three-phase measurements would produce a very long table due to all the combinations that are possible, so
these additions are broken down to their base components.
Phase Count Determination
input.phases (3 for three-phase, absent or 1 for 1phase) output.phases (as for input.phases)
DOMAINs
Any input or output is considered a valid DOMAIN.
input (should really be called input.mains, but keep this for compat) input.bypass input.servicebypass
output (should really be called output.load, but keep this for compat) output.bypass output.inverter output.servicebypass
Specification (SPEC)
Voltage, current, frequency, etc are considered to be a specification of the measurement.
With this notation, the old 1phase naming scheme becomes DOMAIN.SPEC Example: input.current
CONTEXT
When in three-phase mode, we need some way to specify the target for most measurements in more detail. We call this the
CONTEXT.
With this notation, the naming scheme becomes DOMAIN.CONTEXT.SPEC when in three-phase mode. Example: input.L1.curre
Valid CONTEXTs
L1-L2 \
L2-L3
\
L3-L1
for voltage measurements
L1-N
/
L2-N
/
L3-N /
L1 \
L2 for currrent and power measurements
L3 /
N - for current measurement
Valid SPECs
Valid with/without context (ie. per phase or aggregated/averaged)
Network UPS Tools User Manual
50 / 77
Name
current
current.maximum
current.minimum
peakcurrent
voltage
voltage.nominal
voltage.maximum
voltage.minimum
power
power.maximum
power.minimum
power.percent
power.maximum.percent
power.minimum.percent
realpower
powerfactor
crestfactor
Description
Current (A)
Maximum seen current (A)
Minimum seen current (A)
Peak current
Voltage (V)
Nominal voltage (V)
Maximum seen voltage (V)
Minimum seen voltage (V)
Apparent power (VA)
Maximum seen apparent power (VA)
Maximum seen apparent power (VA)
Percentage of apparent power related to maximum load
Max seen percentage of apparent power
Min seen percentage of apparent power
Real power (W)
Power Factor (dimensionless value between 0.00 and 1.00)
Crest Factor (dimensionless value greater or equal to 1)
Valid without context (ie. aggregation of all phases):
Name
frequency
frequency.nominal
C.1.6
Description
Frequency (Hz)
Nominal frequency (Hz)
EXAMPLES
Partial Three phase - Three phase example:
input.phases: 3
input.frequency: 50.0
input.L1.current: 133.0
input.bypass.L1-L2.voltage: 398.3
output.phases: 3
output.L1.power: 35700
output.powerfactor: 0.82
Partial Three phase - One phase example:
input.phases: 3
input.L2.current: 48.2
input.N.current: 3.4
input.L3-L1.voltage: 405.4
input.frequency: 50.1
output.phases: 1
output.current: 244.2
output.voltage: 120
output.frequency.nominal: 60.0
C.1.7
battery: Any battery details
Name
battery.charge
Description
Battery charge (percent)
Example value
100.0
Network UPS Tools User Manual
51 / 77
Name
battery.charge.low
battery.charge.restart
battery.charge.warning
battery.voltage
battery.capacity
battery.current
battery.temperature
battery.voltage.nominal
battery.runtime
battery.runtime.low
battery.alarm.threshold
battery.date
battery.mfr.date
battery.packs
battery.packs.bad
battery.type
battery.protection
battery.energysave
C.1.8
Description
Remaining battery level when UPS
switches to LB (percent)
Minimum battery level for UPS restart
after power-off
Battery level when UPS switches to
"Warning" state (percent)
Battery voltage (V)
Battery capacity (Ah)
Battery current (A)
Battery temperature (degrees C)
Nominal battery voltage (V)
Battery runtime (seconds) Remaining
battery runtime
when UPS switches to LB (seconds)
Battery alarm threshold
Battery change date (opaque string)
Battery manufacturing date (opaque
string)
Number of battery packs
Number of bad battery packs
Battery chemistry (opaque (opaque
string)
Prevent deep discharge of battery
Switch off when running on battery
and no/low load
Example value
20
20
50
24.84
7.2
1.19
050.7
024
1080
180
0 (immediate)
11/14/00
2005/04/02
001
000
PbAc
yes
no
ambient: Conditions from external probe equipment
Name
ambient.temperature
ambient.temperature.alarm
ambient.temperature.high
ambient.temperature.low
ambient.temperature.maximum
ambient.temperature.minimum
ambient.humidity
ambient.humidity.alarm
ambient.humidity.high
ambient.humidity.low
ambient.humidity.maximum
ambient.humidity.minimum
Description
Ambient temperature (degrees C)
Temperature alarm (enabled/disabled)
Temperature threshold high (degrees
C)
Temperature threshold low (degrees
C)
Maximum temperature seen (degrees
C)
Minimum temperature seen (degrees
C)
Ambient relative humidity (percent)
Relative humidity alarm
(enabled/disabled)
Relative humidity threshold high
(percent)
Relative humidity threshold high
(percent)
Maximum relative humidity seen
(percent)
Minimum relative humidity seen
(percent)
Example value
25.40
enabled
40
5
37.6
18.1
038.8
enabled
80
10
60
13
Network UPS Tools User Manual
52 / 77
C.1.9
outlet: Smart outlet management
Note
n stands for the outlet index. For more information, refer to the NUT outlets management and PDU notes chapter of the user
manual. A special case is "outlet.0" which is equivalent to "outlet", and represent the whole set of outlets of the device.
Name
outlet.n.id
outlet.n.desc
outlet.n.switch
outlet.n.status
outlet.n.switchable
outlet.n.autoswitch.charge.low
outlet.n.delay.shutdown
outlet.n.delay.start
outlet.n.current
outlet.n.current.maximum
outlet.n.realpower
outlet.n.voltage
outlet.n.powerfactor
outlet.n.crestfactor
outlet.n.power
C.1.10
Example value
1
Description
Driver name
Driver version (NUT release)
Internal driver version (if tracked
separately)
Parameter xxx (ups.conf or cmdline
-x) setting
Flag xxx (ups.conf or cmdline -x)
status
Example value
usbhid-ups
X.Y.Z
1.23.45
driver.parameter.xxx
driver.flag.xxx
180
120
0.19
0.56
28
247.0
0.85
1.41
46
(varies)
enabled (or absent)
server: Internal server information
Name
server.info
Description
Server information
server.version
Server version
C.2
Main outlet
on
on
yes
80
driver: Internal driver information
Name
driver.name
driver.version
driver.version.internal
C.1.11
Description
Outlet system identifier (opaque
string)
Outlet description (opaque string)
Outlet switch control (on/off)
Outlet switch status (on/off)
Outlet switch ability (yes/no)
Remaining battery level to power off
this outlet (percent)
Interval to wait before shutting down
this outlet (seconds)
Interval to wait before restarting this
outlet (seconds)
Current (A)
Maximum seen current (A)
Current value of real power (W)
Voltage (V)
Power Factor (dimensionless value
between 0 and 1)
Crest Factor (dimensionless, equal to
or greater than 1)
Apparent power (VA)
Instant commands
Example value
Network UPS Tools upsd vX.Y.Z http://www.networkupstools.org/
X.Y.Z
Network UPS Tools User Manual
53 / 77
Name
load.off
load.on
shutdown.return
shutdown.stayoff
shutdown.stop
shutdown.reboot
shutdown.reboot.graceful
test.panel.start
test.panel.stop
test.failure.start
test.failure.stop
test.battery.start
test.battery.start.quick
test.battery.start.deep
test.battery.stop
calibrate.start
calibrate.stop
bypass.start
bypass.stop
reset.input.minmax
reset.watchdog
beeper.enable
beeper.disable
beeper.mute
beeper.toggle
D
Hardware Compatibility List
Refer to the online HCL.
E
E.1
Documentation
User Documentation
• FAQ - Frequently Asked Questions
• NUT user manual
• Cables information
• User manual pages
E.2
Developer Documentation
• NUT Developer Guide
• NUT Packager Guide
• UPS protocols library
• Developer manual pages
• NUT Quality Assurance
Description
Turn off the load immediately
Turn on the load immediately
Turn off the load possibly after a delay and return when
power is back
Turn off the load possibly after a delay and remain off even
if power returns
Stop a shutdown in progress
Shut down the load briefly while rebooting the UPS
After a delay, shut down the load briefly while rebooting
the UPS
Start testing the UPS panel
Stop a UPS panel test
Start a simulated power failure
Stop simulating a power failure
Start a battery test
Start a "quick" battery test
Start a "deep" battery test
Stop the battery test
Start runtime calibration
Stop runtime calibration
Put the UPS in bypass mode
Take the UPS out of bypass mode
Reset minimum and maximum input voltage status
Reset watchdog timer (forced reboot of load)
Enable UPS beeper/buzzer
Disable UPS beeper/buzzer
Temporarily mute UPS beeper/buzzer
Toggle UPS beeper/buzzer
Network UPS Tools User Manual
54 / 77
E.3
Offsite Links
These are general information about UPS and PDU.
• UPS HOWTO (The Linux Documentation Project)
• UPS on Wikipedia
• PDU on Wikipedia
• UPS on The PC Guide
These are writeups by users of the software.
• Deploying NUT on an Ubuntu 10.04 cluster (Stefano Angelone)
• Monitoring a UPS with nut on Debian or Ubuntu Linux (Avery Fay)
• Installation et gestion d’un UPS USB en réseau sous linux (Olivier Van Hoof, french)
• Network UPS Tools (NUT) on Mac OS X (10.4.10) (Andy Poush)
• Interfacing a Contact-Closure UPS to Mac OS X and Linux (David Hough)
• How to use UPS with nut on RedHat / Fedora Core (Kazutoshi Morioka)
• FreeBSD installation procedure (Thierry Thomas, from FreeBSD)
• Gestionando un SAI desde OpenBSD con NUT (Juan J. Martinez, spanish)
• HOWTO: MGE Ellipse 300 on gentoo (nielchiano)
• Cum se configureaz˘a un UPS Apollo seria 1000F pe Linux (deschis, Romanian)
• Install a UPS (nut) on a Buffalo NAS (various authors)
• NUT Korean GuideBook (PointBre)
E.4
News articles and Press releases
• Linux UPS Without Tears (A. Lizard)
• Graceful UPS shutdowns on Linux (Carla Schroder)
F
Support instructions
There are various ways to obtain support for NUT.
F.1
Documentation
• First, be sure to read the FAQ. The most common problems are already addressed there.
• Else, you can read the NUT user manual. It also covers many areas about installing, configuring and using NUT. The specific
steps on system integration are also discussed.
• Finally, User manual pages will also complete the User Manual provided information. At least, read the manual page related
to your driver(s).
Network UPS Tools User Manual
55 / 77
F.2
Mailing lists
If you have still not found a solution, you should search the lists before posting a question.
Someone may have already solved the problem:
search on the NUT lists using Google
Finally, you can subscribe to a NUT mailing list to:
F.2.1
Request help
Use the NUT Users mailing list.
In this case, be sure to include the following information:
• OS name and version,
• exact NUT version,
• NUT installation method: from source tarball, package or subversion,
• exact device name and related information (manufacturing date, web pointers, . . . ),
• complete problem description, with any relevant trace, like system log excerpt, and driver debug output. You can obtain this
last using the following command, as root and after having stopped NUT:
/path/to/driver -DDDDD -a <upsname>
If you don’t include the above information in your help request, we will not be able to help you!
F.2.2
Post a patch, ask a development question, . . .
Use the NUT Developers mailing list.
Refer to the NUT Developer Guide for more information, and the chapter on how to submit patches.
F.2.3
Discuss packaging and related topics
Use the NUT Packagers mailing list.
Refer to the NUT Packager Guide for more information.
G
G.1
G.1.1
Cables information
APC
940-0024C clone
From D. Stimits
Network UPS Tools User Manual
56 / 77
Note
The original 940-0024C diagram was contributed by Steve Draper.
G.1.2
940-0024C clone for Macs
From Miguel Howard
G.2
G.2.1
Belkin
OmniGuard F6C***-RKM
From "Daniel"
A straight-through RS-232 cable (with pins 2-7 connected through) should work with the following models:
• F6C110-RKM-2U
• F6C150-RKM-2U
• F6C230-RKM-2U
• F6C320-RKM-3U
Network UPS Tools User Manual
57 / 77
G.3
Eaton
Documents in this section are provided courtesy of Eaton.
G.3.1
MGE Office Protection Systems
The two first cables also applies to MGE UPS SYSTEMS.
DB9-DB9 cable (ref 66049)
This is the standard serial cable, used on most units.
Network UPS Tools User Manual
58 / 77
DB9-RJ45 cable
This cable is used on the more recent models, including Ellipse MAX, Protection Station, . . .
Network UPS Tools User Manual
59 / 77
DB9-RJ12 cable
This cable is used on some older Ellipse models.
Network UPS Tools User Manual
60 / 77
Network UPS Tools User Manual
61 / 77
G.3.2
Powerware LanSafe
G.3.3
SOLA-330
Just uses a normal serial cable, with pin 1-1 through to 9-9.
Network UPS Tools User Manual
62 / 77
G.4
G.4.1
HP - Compaq
Older Compaq UPS Family
This cable can be used with the following models:
T700, T1000, T1500, T1500j, T700h, T1000h, T1500h, R1500, R1500j, R1500h, T2000, T2000j, T2400h, T2400h-NA, R3000
/ R3000j, R3000h, R3000h-International, R3000h-NA, R6000h-NA, R6000i, R6000j.
UPS PC 9 pin connector
1 --------- 3
2 --------- 2
4 -\
4 --------- 5
|
6 -/
6 --------- 7
Contributed by Kjell Claesson and Arnaud Quette.
G.5
Tripp-Lite
From Tripp-Lite, via Bryan Kolodziej
This cable (black 73-0844 cable) is used on various models, using the "Lan 2.2 interface" and the genericups driver (upstype=5).
Network UPS Tools User Manual
63 / 77
H
Configure options
There are a few options that can be given to configure to tweak compiles. See also "./configure --help" for a current and complete
listing.
H.1
Driver selection
--with-serial
Build and install the serial drivers (default: yes)
--with-usb
Build and install the USB drivers (default: auto-detect) Note that you need to install the libusb development package or files.
--with-snmp
Build and install the SNMP drivers (default: auto-detect) Note that you need to install libsnmp development package or files.
--with-neon
Network UPS Tools User Manual
64 / 77
Build and install the XML drivers (default: auto-detect) Note that you need to install neon development package or files.
--with-drivers=<driver>,<driver>,...
Specify exactly which driver or drivers to build and install (this works for serial, usb, and snmp drivers, and overrides the
preceding three options).
As of the time of this writing (2010), there are 46 UPS drivers available. Most users will only need one, a few will need two or
three, and very few people will need all of them.
To save time during the compile and disk space later on, you can use this option to just build and install a subset of the drivers.
To select mge-shut and usbhid-ups, you’d do this:
--with-drivers=apcsmart,usbhid-ups
If you need to build more drivers later on, you will need to rerun configure with a different list. To make it build all of the drivers
from scratch again, run make clean before starting.
--with-doc=<output-format(s)>
(default: no)
Build and install NUT documentation file(s). The possible values are "html-single" for single page HTML, "html-chunked" for
multi pages HTML, "pdf" for a PDF file or "auto" to build all the possible previous documentation formats. Verbose output can
be enabled using: ASCIIDOC_VERBOSE=-v make
This feature requires AsciiDoc 8.6.3 (http://www.methods.co.nz/asciidoc).
H.2
Optional features
--with-cgi (default: no)
Build and install the optional CGI programs, HTML files, and sample CGI configuration files. This is not enabled by default, as
they are only useful on web servers. See data/html/README for additional information on how to set up CGI programs.
--with-lib (default: no)
Build and install the upsclient library and header files.
--with-all (no default)
Build and install all of the above (the serial, USB, SNMP, XML/HTTP and PowerMan drivers, the CGI programs and HTML
files, and the upsclient library).
--with-ssl (default: auto-detect)
Enable SSL development code. Read the section "Configuring SSL" in docs/security.txt for instructions on SSL support.
--with-wrap (default: auto-detect)
Enable libwrap (tcp-wrappers) support. Refer to upsd man page for more information.
--with-ipv6 (default: auto-detect)
Enable IPv6 support.
Network UPS Tools User Manual
65 / 77
--with-hal (default: no)
Build and install Hardware Abstraction Layer support. If you own a USB unit, only protect your local system and run the Gnome
or KDE desktop, this will enable a full Plug & Play usage. See docs/nut-hal.txt for additional information on how to set up and
use HAL support.
--with-powerman
(default: auto-detect)
Build and install Powerman PDU client driver. This allows to interact with the Powerman daemon, and the numerous Power
Distribution Units (PDU) supported by the project.
H.3
Other configuration options
--with-port=PORT
Change the TCP port used by the network code. Default is 3493.
Ancient versions of upsd used port 3305. NUT 2.0 and up use a substantially different network protocol and are not able to
communicate with anything older than the 1.4 series.
If you have to monitor a mixed environment, use the last 1.4 version, as it contains compatibility code for both the old "REQ"
and the new "GET" versions of the protocol.
--with-user=<username>
--with-group=<groupname>
Programs started as root will setuid() to <username> for somewhat safer operation. You can override this with -u <user> in several
programs, including upsdrvctl (and all drivers by extension), upsd, and upsmon. The "user" directive in ups.conf overrides this
at run time for the drivers.
Note
upsmon does not totally drop root because it may need to initiate a shutdown. There is always at least a stub process remaining
with root powers. The network code runs in another (separate) process as the new user.
The <groupname> is used for the permissions of some files, particularly the hotplugging rules for USB. The idea is that the
device files for any UPS devices should be readable and writable by members of that group.
The default value for both the username and groupname is "nobody". This was done since it’s slightly better than staying around
as root. Running things as nobody is not a good idea, since it’s a hack for NFS access. You should create at least one separate
user for this software.
If you use one of the --with-user and --with-group options, then you have to use the other one too.
See the INSTALL document and the FAQ for more on this topic.
--with-logfacility=FACILITY
Change the facility used when writing to the log file. Read the man page for openlog to get some idea of what’s available on your
system. Default is LOG_DAEMON.
Network UPS Tools User Manual
66 / 77
H.4
Installation directories
--prefix=PATH
This is a fairly standard option with GNU autoconf, and it sets the base path for most of the other install directories. The default
is /usr/local/ups, which puts everything but the state sockets in one easy place.
If you like having things to be at more of a "system" level, setting the prefix to /usr/local or even /usr might be better.
--exec_prefix=PATH
This sets the base path for architecture dependent files. By default, it is the same as <prefix>.
--sysconfdir=PATH
Changes the location where NUT’s configuration files are stored. By default this path is <prefix>/etc. Setting this to /etc or
/etc/ups might be useful.
The NUT_CONFPATH environment variable overrides this at run time.
--bindir=PATH
--sbindir=PATH
Where executable files will be installed. Files that are normally executed by root (upsd, upsmon, upssched) go to sbindir, all
others to bindir. The defaults are <exec_prefix>/bin and <exec_prefix>/sbin.
--datadir=PATH
Change the data directory, i.e., where architecture independent read-only data is installed. By default this is <prefix>/share, i.e.,
/usr/local/ups/share. At the moment, this directory only holds two files - the optional cmdvartab and driver.list.
--mandir=PATH
Sets the base directories for the man pages. The default is <prefix>/man, i.e., /usr/local/ups/man.
--includedir=PATH
Sets the path for include files to be installed when --with-lib is selected. For example, upsclient.h is installed here. The default is
<prefix>/include.
--libdir=PATH
Sets the installation path for libraries. This is just the upsclient library for now. The default is <exec_prefix>/lib.
--with-drvpath=PATH
The UPS drivers will be installed to this path. By default they install to "<exec_prefix>/bin", i.e., /usr/local/ups/bin.
The "driverpath" global directive in the ups.conf file overrides this at run time.
--with-cgipath=PATH
Network UPS Tools User Manual
67 / 77
The CGI programs will be installed to this path. By default, they install to "<exec_prefix>/cgi-bin", which is usually /usr/local/ups/cgibin.
If you set the prefix to something like /usr, you should set the cgipath to something else, because /usr/cgi-bin is pretty ugly and
non-standard.
The CGI programs are not built or installed by default. Use "./configure --with-cgi" to request that they are built and installed.
--with-htmlpath=PATH
HTML files will be installed to this path. By default, this is "<prefix>/html". Note that HTML files are only installed if --with-cgi
is selected.
--with-pkgconfig-dir=PATH
Where to install pkg-config *.pc files. This option only has an effect if --with-lib is selected, and causes a pkg-config file to be
installed in the named location. The default is <exec_prefix>/pkgconfig.
Use --without-pkgconfig-dir to disable this feature altogether.
--with-hotplug-dir=PATH
Where to install Linux 2.4 hotplugging rules. The default is /etc/hotplug, if that directory exists, and not to install it otherwise.
Note that this installation directory is not a subdirectory of <prefix> by default. When installing NUT as a non-root user, you
may have to override this option.
Use --without-hotplug-dir to disable this feature altogether.
--with-udev-dir=PATH
Where to install Linux 2.6 hotplugging rules, for kernels that have the "udev" mechanism. The default is /etc/udev, if that
directory exists, and not to install it otherwise. Note that this installation directory is not a subdirectory of <prefix> by default.
When installing NUT as a non-root user, you may have to override this option.
Use --without-udev-dir to disable this feature altogether.
H.5
Directories used by NUT at run-time
--with-pidpath=PATH
Changes the directory where pid files are stored. By default this is /var/run. Certain programs like upsmon will leave files here.
--with-altpidpath=PATH
Programs that normally don’t have root powers, like the drivers and upsd, write their pid files here. By default this is whatever
the statepath is, as those programs should be able to write there.
--with-statepath=PATH
Change the default location of the state sockets created by the drivers.
The NUT_STATEPATH environment variable overrides this at run time.
Default is /var/state/ups.
Network UPS Tools User Manual
68 / 77
H.6
Things the compiler might need to find
--with-gd-includes="-I/foo/bar"
If you installed gd in some place where your C preprocessor can’t find the header files, use this switch to add additional -I flags.
--with-gd-libs="-L/foo/bar -labcd -lxyz"
If your copy of gd isn’t linking properly, use this to give the proper -L and -l flags to make it work. See LIBS= in gd’s Makefile.
Note
the --with-gd switches are not necessary if you have gd 2.0.8 or higher installed properly. The gdlib-config script will be detected
and used by default in that situation.
--with-ssl-includes, --with-usb-includes, --with-snmp-includes,
--with-neon-includes, --with-powerman-includes="-I/foo/bar"
If your system doesn’t have pkg-config and support for any of the above libraries isn’t found (but you know it is installed), you
must specify the compiler flags that are needed.
--with-ssl-libs, --with-usb-libs, --with-snmp-libs,
--with-neon-libs, --with-powerman-libs="-L/foo/bar -labcd -lxyz"
If your system doesn’t have pkg-config and support for any of the above libraries isn’t found (but you know it is installed), you
must specify the linker flags that are needed.
H.7
HAL addons (deprecated)
--with-hal-includes="-DDBUS_API_SUBJECT_TO_CHANGE -I/usr/include/hal \
-I/usr/include/dbus-1.0 -I/usr/lib/dbus-1.0/include"
--with-hal-libs="-lhal -ldbus-1 -lpthread"
--with-hal-user="haldaemon"
--with-hal-device-match-key="info.bus"
--with-hal-callouts-path="${libdir}/hal"
--with-hal-fdi-path="${datarootdir}/hal/fdi/information/20thirdparty"
If system doesn’t have pkg-config or it fails to provides hints for some of the settings that are needed to set it up properly and the
build in defaults are not right, you can specify the right variables here.
I
Upgrading notes
This file lists changes that affect users who installed older versions of this software. When upgrading from an older version, be
sure to check this file to see if you need to make changes to your system.
I.1
Changes from 2.6.0 to 2.6.1
• nothing that affects upgraded systems.
Network UPS Tools User Manual
69 / 77
I.2
Changes from 2.4.3 to 2.6.0
• users of the megatec and megatec_usb drivers must respectively switch to blazer_ser and blazer_usb.
• users of the liebertgxt2 driver are advised that the driver name has changed to liebert-esp2.
I.3
Changes from 2.4.2 to 2.4.3
• nothing that affects upgraded systems.
I.4
Changes from 2.4.1 to 2.4.2
• The default subdriver for the blazer_usb driver USB id 06da:0003 has changed. If you use such a device and it is no longer
working with this driver, override the subdriver default in ups.conf (see man 8 blazer).
• NUT ACL and the allowfrom mechanism has been replaced in 2.4.0 by the LISTEN directive and tcp-wrappers respectively.
This information was missing below, so a double note has been added.
I.5
Changes from 2.4.0 to 2.4.1
• nothing that affects upgraded systems.
I.6
Changes from 2.2.2 to 2.4.0
• The nut.conf file has been introduced to standardize startup configuration across the various systems.
• The cpsups and nitram drivers have been replaced by the powerpanel driver, and removed from the tree. The cyberpower driver
may suffer the same in the future.
• The al175 and energizerups drivers have been removed from the tree, since these were tagged broken for a long time.
• Developers of external client application using libupsclient must rename their "UPSCONN" client structure to "UPSCONN_t".
• The upsd server will now disconnect clients that remain silent for more than 60 seconds.
• The files under scripts/python/client are distributed under GPL 3+, whereas the rest of the files are distributed under GPL 2+.
Refer to COPYING for more information.
• The generated udev rules file has been renamed with dash only, no underscore anymore (ie 52-nut-usbups.rules instead of
52_nut-usbups.rules)
I.7
Changes from 2.2.1 to 2.2.2
• The configure option "--with-lib" has been replaced by "--with-dev". This enable the additional build and distribution of the
static version of libupsclient, along with the pkg-config helper and manual pages. The default configure option is to distribute
only the shared version of libupsclient. This can be overriden by using the "--disable-shared" configure option (distribute static
only binaries).
• The UPS poweroff handling of the usbhid-ups driver has been reworked. Though regression is not expected, users of this driver
are encouraged to test this feature by calling "upsmon -c fsd" and report any issue on the NUT mailing lists.
I.8
Changes from 2.2.0 to 2.2.1
• nothing that affects upgraded systems. (The below message is repetead due to previous omission)
• Developers of external client application using libupsclient are encouraged to rename their "UPSCONN" client structure to
"UPSCONN_t" since the former will disappear by the release of NUT 2.4.
Network UPS Tools User Manual
70 / 77
I.9
Changes from 2.0.5 to 2.2.0
• users of the newhidups driver are advised that the driver name has changed to usbhid-ups.
• users of the hidups driver must switch to usbhid-ups.
• users of the following drivers (powermust, blazer, fentonups, mustek, esupssmart, ippon, sms) must switch to megatec, which
replaces all these drivers. Please refer to doc/megatec.txt for details.
• users of the mge-shut driver are encouraged to test newmge-shut, which is an alternate driver scheduled to replace mge-shut,
• users of the cpsups driver are encouraged to switch to powerpanel which is scheduled to replace cpsups,
• packagers will have to rework the whole nut packaging due to the major changes in the build system (completely modified,
and now using automake). Refer to packaging/debian/ for an example of migration.
• specifying -a <id> is now mandatory when starting a driver manually, ie not using upsdrvctl.
• Developers of external client application using libupsclient are encouraged to rename the "UPSCONN" client structure to
"UPSCONN_t" since the former will disapear by the release of NUT 2.4.
I.10
Changes from 2.0.4 to 2.0.5
• users of the newhidups driver: the driver is now more strict about refusing to connect to unknown devices. If your device was
previously supported, but fails to be recognized now, add productid=XXXX to ups.conf. Please report the device to the NUT
developer’s mailing list.
I.11
Changes from 2.0.3 to 2.0.4
• nothing that affects upgraded systems.
• users of the following drivers (powermust, blazer, fentonups, mustek, esupssmart, ippon, sms, masterguard) are encouraged to
switch to megatec, which should replace all these drivers by nut 2.2. For more information, please refer to doc/megatec.txt
I.12
Changes from 2.0.2 to 2.0.3
• nothing that affects upgraded systems.
• hidups users are encouraged to switch to newhidups, as hidups will be removed by nut 2.2.
I.13
Changes from 2.0.1 to 2.0.2
• The newhidups driver, which is the long run USB support approach, needs hotplug files installed to setup the right permissions
on device file to operate. Check newhidups manual page for more information.
I.14
Changes from 2.0.0 to 2.0.1
• The cyberpower1100 driver is now called cpsups since it supports more than just one model. If you use this driver, be sure to
remove the old binary and update your ups.conf driver= setting with the new name.
• The upsstats.html template page has been changed slightly to reflect better HTML compliance, so you may want to update
your installed copy accordingly. If you’ve customized your file, don’t just copy the new one over it, or your changes will be
lost!
Network UPS Tools User Manual
71 / 77
I.15
Changes from 1.4.0 to 2.0.0
• The sample config files are no longer installed by default. If you want to install them, use make install-conf for the main
programs, and make install-cgi-conf for the CGI programs.
• ACCESS is no longer supported in upsd.conf. Use ACCEPT and REJECT. Old way:
ACCESS grant all adminbox
ACCESS grant all webserver
ACCESS deny all all
New way:
ACCEPT adminbox
ACCEPT webserver
REJECT all
Note that ACCEPT and REJECT can take multiple arguments, so this will also work:
ACCEPT adminbox webserver
REJECT all
• The drivers no longer support sddelay in ups.conf or -d on the command line. If you need a delay after calling upsdrvctl
shutdown, add a call to sleep in your shutdown script.
• The templates used by upsstats have changed considerably to reflect the new variable names. If you use upsstats, you will need
to install new copies or edit your existing files to use the new names.
• Nobody needed UDP mode, so it has been removed. The only users seemed to be a few people like me with ancient asapm-ups
binaries. If you really want to run asapm-ups again, bug me for the new patch which makes it work with upsclient.
• make install-misc is now make install-lib. The misc directory has been gone for a long time, and the target was ambiguous.
>>>>>>> switch UPGRADING information to AsciiDoc, and integrate these in the User Manual.
• The newapc driver has been renamed to apcsmart. If you previously used newapc, make sure you delete the old binary and fix
your ups.conf. Otherwise, you may run the old driver from 1.4.
– File trimmed here on changes from 1.2.2 to 1.4.0 *
For information before this point, start with version 2.4.1 and work back.
J
Project history
This page is an attempt to document how everything came together.
The Network UPS Tools team would like to warmly thank Russell Kroll.
Russell initially started this project, maintaining and improving it for over 8 years (1996 - mid 2005).
Network UPS Tools User Manual
72 / 77
J.1
J.1.1
Prototypes and experiments
May 1996: early status hacks
APC’s Powerchute was running on kadets.d20.co.edu (a BSD/OS box) with SCO binary emulation. Early test versions ran in
cron, pulled status from the log files and wrote them to a .plan file. You could see the results by fingering [email protected]
while it lasted:
Last login Sat May 11 21:33 (MDT) on ttyp0 from intrepid.rmi.net
Plan:
Welcome to the UPS monitor service at kadets.d20.co.edu.
The Smart-UPS attached to kadets generated a report at 14:24:01 on 05/17/96.
During the measured period, the following data points were taken:
Voltage ranged from 115.0 VAC to 116.3 VAC.
The UPS generated 116.3 VAC at 60.00 Hz.
The battery level was at 27.60 volts.
The load placed on the UPS was 024.9 percent.
UPS temperature was measured at 045.0 degrees Celsius.
Measurements are taken every 10 minutes by the upsd daemon.
This report is generated by a script written by Russell Kroll<rkroll@kadets>.
Modified for compatibility with the BSD/OS cron daemon by Neil Schroeder
This same status data could also be seen with a web browser, since we had rigged up a CGI wrapper script which called finger.
J.1.2
January 1997: initial protocol tests
Initial tests with a freestanding non-daemon program provided a few basic status registers from the UPS. The 940-0024C cable
was not yet understood, so this happened over the [attachment:apcevilhack.jpg evil two-wire serial hack].
Communicating with SMART-UPS 700 S/N WS9643050926 [10/17/96]
Input voltage range: 117.6 VAC - 118.9 VAC
Load is 010.9% of capacity, battery is charged to 100.0% of capacity
Note that today’s apcsmart driver still displays the serial number when it starts, since it is derived from this original code.
J.1.3
September 1997: first client/server code
The first split daemon/client code was written. upsd spoke directly to the UPS (APC Smart models only) and communicated with
upsc by sending binary structures in UDP datagrams.
The first CGI interface existed, but it was all implemented with shell scripts. The main script would call upsc to retrieve status
values. Then it would cat a template file through sed to plug them into the page.
Network UPS Tools User Manual
73 / 77
upsstats actually has since returned to using templates, despite having a period in the middle when it used hardcoded HTML.
The images were also created with shell scripts. Each script would call upsc to get the right value (utility, upsload, battcap).
It then took the value, plugged it into a command file with sed, and passed that into fly, a program which used an interpreted
language to create images. fly actually uses gd, just like upsimage does today.
This code later evolved into Smart UPS Tools 0.10.
J.2
J.2.1
Smart UPS Tools
March 1998: first public release
Version 0.10 was released on March 10, 1998. It used the same design as the pre-release prototype. This made expansion difficult
as the binary structure used for network communications would break any time a new variable was added. Due to byte-ordering
and struct alignment issues, the code usually couldn’t talk over the network to a system with a different architecture. It was also
hopelessly bound to one type of UPS hardware.
Five more releases followed with this design followed. The last was 0.34, released October 27, 1998.
J.2.2
June 1999: Redesigned, rewritten
Following a long period of inactivity and two months of prerelease testing versions, 0.40.0 was released on June 5, 1999.
It featured a complete redesign and rewrite of all of the code. The layering was now in three pieces, with the single driver
(smartups) separate from the server (upsd).
Clients remained separate as before and still used UDP to talk to the server, but they now used a text-based protocol instead of
the brittle binary structs. A typical request like "REQ UTILITY" would be answered with "ANS UTILITY 120.0".
The ups-trust425-625 driver appeared shortly after the release of 0.40.0, marking the first expansion beyond APC hardware.
Over the months that followed, the backupspro driver would be forked from the smartups driver to handle the APC Back-UPS
Pro line. Then the backups driver was written to handle the APC Back-UPS contact-closure models. These drivers would later
be renamed and recombined, with smartups and backupspro becoming apcsmart, and backups became genericups.
Network UPS Tools User Manual
74 / 77
The drivers stored status data in an array. At first, they passed this data to upsd by saving it to a file. upsd would reread this file
every few seconds to keep a copy for itself. This was later expanded to allow shared memory mode, where only a stub would
remain on the disk. The drivers and server then passed data through the shared memory space.
upsd picked up the ability to monitor multiple drivers on the system, and the "upsname@hostname" scheme was born. Access
controls were added, and then the network code was expanded to allow TCP communications, which at this point were on port
3305.
J.3
J.3.1
Network UPS Tools
September 1999: new name, new URL
Several visitors to the web page and subscribers to the mailing lists provided suggestions to rename the project. The old name
no longer accurately described it, and it was perilously close to APC’s "Smart-UPS" trademark. Rather than risk problems in the
future, the name was changed. Kern Sibbald provided the winner: Network UPS Tools, which captures the essence of the project
and makes for great short tarball filenames: nut-x.y.z.tar.gz.
The new name was first applied to 0.42.0, released October 31, 1999. This is also when the web pages moved from the old
http://www.exploits.org/~rkroll/smartupstools/ URL to the replacement at http://www.exploits.org/nut
to coincide with the name change.
More drivers were written and the hardware support continued to grow. upsmon picked up the concepts of "master" and "slave",
and could now handle environments where multiple systems get power from a single UPS. Manager mode was added to allow
changing the value of read/write variables in certain UPS models.
J.3.2
June 2001: common driver core
Up to this point, all of the drivers compiled into freestanding programs, each providing their own implementation of main(). This
meant they all had to check the incoming arguments and act uniformly. Unfortunately, not all of the programs behaved the same
way, and it was hard to document and use consistently. It also meant that startup scripts had to be edited depending on what kind
of hardware was attached.
Starting in 0.45.0, released June 11, 2001, there was a new common core for all drivers called main.c. It provided the main
function and called back to the upsdrv_* functions provided by the hardware-specific part of the drivers. This allowed driver
authors to focus on the UPS hardware without worrying about the housekeeping stuff that needs to happen.
This new design provided an obvious way to configure drivers from one file, and ups.conf was born. This eventually spawned
upsdrvctl, and now all drivers based on this common core could be started or stopped with one command. Startup scripts now
could contain "upsdrvctl start", and it didn’t matter what kind of hardware or how many UPSes you had on one system.
Interestingly, at the end of this month, Arnaud Quette entered the UPS world, as a subcontractor of the now defunct MGE UPS
SYSTEMS. This marks the start of a future successful collaboration.
J.3.3
May 2002: casting off old drivers, IANA port, towards 1.0
During the 0.45.x series, both the old standalone drivers and the ones which had been converted to the common core were
released together. Before the release of 0.50.0 on May 24, 2002, all of the old drivers were removed. While this shrank the list
of supported hardware, it set the precedent for removing code which isn’t receiving regular maintenance. The assumption is that
the code will be brought back up to date by someone if they actually need it. Otherwise, it’s just dead weight in the tree.
This change meant that all drivers could be controlled with upsdrvctl and ups.conf, allowing the documentation to be greatly
simplified. There was no longer any reason to say "do this, unless you have this driver, then do this".
IANA granted an official port number to the project, and the network code switched to port 3493. It had previously been on 3305
which is assigned to odette-ftp. 3305 was probably picked in 1997 because it was the fifth project to spawn from some common
UDP server code.
After 0.50.1, the 0.99 tree was created to provide a tree which would receive nothing but bug fixes in preparation for the release
of 1.0. As it turned out, very few things required fixing, and there were only three releases in this tree.
Network UPS Tools User Manual
75 / 77
J.4
J.4.1
Leaving 0.x territory
August 2002: first stable tree: NUT 1.0.0
After nearly 5 years of having a 0.x version number, 1.0.0 was released on August 19, 2002. This milestone meant that all of
the base features that you would expect to find were intact: good hardware support, a network server with security controls, and
system shutdowns that worked.
The design was showing signs of wear from the rapid expansion, but this was intentionally ignored for the moment. The focus
was on getting a good version out that would provide a reasonable base while the design issues could be addressed in the future,
and I’m confident that we succeeded.
J.4.2
November 2002: second stable tree: NUT 1.2.0
One day after the release of 1.0.0, 1.1.0 started the new development tree. During that development cycle, the CGI programs were
rewritten to use templates instead of hard-coded HTML, thus bringing back the flexibility of the original unreleased prototype
from 5 years before. multimon was removed from the tree, as the new upsstats could do both jobs by loading different templates.
A new client library called upsclient was created, and it replaced upsfetch. This new library only supported TCP connections,
and used an opaque context struct to keep state for each connection. As a result, client programs could now do things that used
multiple connections without any conflicts. This was done primarily to allow OpenSSL support, but there were other benefits
from the redesign.
upsd and the clients could now use OpenSSL for basic authentication and encryption, but this was not included by default. This
was provided as a bonus feature for those users who cared to read about it and enable the option, as the initial setup was complex.
After the 1.1 tree was frozen and deemed complete, it became the second stable tree with the release of 1.2.0 on November 5,
2002.
J.4.3
April 2003: new naming scheme, better driver glue, and an overhauled protocol
Following an extended period with no development tree, 1.3.0 got things moving again on April 13, 2003. The focus of this tree
was to rewrite the driver-server communication layer and replace the static naming scheme for variables and commands.
Up to this point, all variables had names like STATUS, UTILITY, and OUTVOLT. They had been created as drivers were added
to the tree, and there was little consistency. For example, it probably should have been INVOLT and OUTVOLT, but there was
no OUTVOLT originally, so UTILITY was all we had. This same pattern repeated with ACFREQ - is it incoming or outgoing?
- and many more.
To solve this problem, all variables and commands were renamed to a hierarchical scheme that had obvious grouping. STATUS
became ups.status. UTILITY turned into input.voltage, and OUTVOLT is output.voltage. ACFREQ is input.frequency, and the
new output.frequency is also now supported. Every other variable or command was renamed in this fashion.
These variables had been shared between the drivers and upsd as values. That is, for each name like STATUS, there was a #define
somewhere in the tree with an INFO_ prefix that gave it a number. INFO_STATUS was 0x0006, INFO_UTILITY was 0x0004,
and so on, with each name having a matching number. This number was stored in an int within a structure which was part of the
array that was either written to disk or shared memory.
That structure had several restrictions on expansion and was dropped as the data sharing method between the drivers and the
server. It was replaced by a new system of text-based messages over Unix domain sockets. Drivers now accepted a short list of
commands from upsd, and would push out updates asynchronously. upsd no longer had to poll the state files or shared memory.
It could just select all of the driver and client fds and act on events.
At the same time, the network protocol on port 3493 was overhauled to take advantage of the new naming scheme. The existing
"REQ STATUS@su700", "ANS STATUS@su700 OL" scheme was showing signs of age, and it really only supported the UPS
name (@su700) as an afterthought. The new protocol would now use commands like GET and LIST, leading to exchanges like
"GET VAR su700 ups.status" and "VAR su700 ups.status OL". The responses contain enough data to stand alone, so clients can
now handle them asynchronously.
Network UPS Tools User Manual
76 / 77
J.4.4
July 2003: third stable tree: NUT 1.4.0
On July 25, 2003, 1.4.0 was released. It contained support for both the old "REQ" style protocol (with names like STATUS), and
the new "GET" style protocol (with names like ups.status). This tree is provided to bridge the gap between all of the old releases
and the upcoming 2.0.
2.0 will be released without support for the old REQ/STATUS protocol. The hope is that client authors and those who have
implemented their own monitoring software will use the 1.4 cycle to change to the new protocol. The 1.4 releases contain a lot
of compatibility code to make sure both work at the same time.
J.4.5
July 2003: pushing towards 2.0
1.5.0 forked from 1.4.0 and was released on July 29, 2003. The first changes were to throw out anything which was providing
compatibilty with the older versions of the software. This means that 1.5 and the eventual 2.0 will not talk to anything older than
1.4.
This tree continues to evolve with new serial routines for the drivers which are intended to replace the aging upscommon code
which dates back to the early 0.x releases. The original routines would call alarm and read in a tight loop while fetching
characters. The new functions are much cleaner, and wait for data with select. This makes for much cleaner code and easier
strace/ktrace logs, since the number of syscalls has been greatly reduced.
There has also been a push to make sure the data from the UPS is well-formed and is actually usable before sending updates out
to upsd. This started during 1.3 as drivers were adapted to use the dstate functions and the new variable/command names. Some
drivers which were not converted to the new naming scheme or didn’t do sanity checks on the incoming UPS data from the serial
port were dropped from the tree.
This tree was released as 2.0.0.
J.5
J.5.1
networkupstools.org
November 2003: a new URL
The bandwidth demands of a project like this have slowly been forcing me to offload certain parts to other servers. The download
links have pointed offsite for many months, and other large things like certain UPS protocols have followed. As the traffic grows,
it’s clear that having the project attached to exploits.org is not going to work.
The solution was to register a new domain and set up mirrors. There are two initial web servers, with more on the way. The
main project URL has changed from http://www.exploits.org/nut/ to http://www.networkupstools.org. The actual
content is hosted on various mirrors which are updated regularly with rsync, so the days of dribbling bits through my DSL should
be over.
This is also when all of the web pages were redesigned to have a simpler look with fewer links on the left side. The old web
pages used to have 30 or more links on the top page, and most of them vanished when you dropped down one level. The links
are now constant on the entire site, and the old links now live in their own groups in separate directories.
J.6
J.6.1
Second major version
March 2004: NUT 2.0.0
NUT 2.0.0 arrived on March 23, 2004. The jump to version 2 shows the difference in the protocols and naming that happened
during the 1.3 and 1.5 development series. 2.0 no longer ships with backwards compatibility code, so it’s smaller and cleaner
than 1.4.
Network UPS Tools User Manual
77 / 77
J.7
J.7.1
The change of leadership
February 2005: NUT 2.0.1
The year 2004 was marked by a release slowdown, since Russell was busy with personal subjects. But the patches queue was
still growing quickly.
At that time, the development process was still centralized. There was no revision control system (like the current Subversion
repository), nor trackers to interact with NUT development. Russell was receiving all the patches and requests, and doing all the
work on his own, including releases.
Russell was more and more thinking about giving the project leadership to Arnaud Quette, which finally happened with the 2.0.1
release in February 2005.
This marked a new era for NUT. . .
First, Arnaud aimed at opening up the development by creating a project on the Debian Alioth Forge. This allowed to build the
team of hackers that Russell dreamed about. It also allows to ensure NUT’s continuation, whatever happens to the leader. And
that would most of all boost the projects contributions.