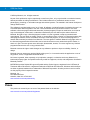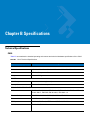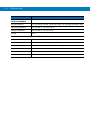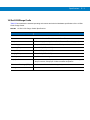
1
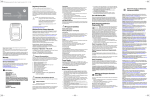
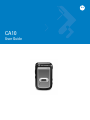
CA10
User Guide
CA10
User Guide
72E-124942-01
Revision A
August 2009
ii
CA10 User Guide
© 2009 by Motorola, Inc. All rights reserved.
No part of this publication may be reproduced or used in any form, or by any electrical or mechanical means,
without permission in writing from Motorola. This includes electronic or mechanical means, such as
photocopying, recording, or information storage and retrieval systems. The material in this manual is subject to
change without notice.
The software is provided strictly on an “as is” basis. All software, including firmware, furnished to the user is on
a licensed basis. Motorola grants to the user a non-transferable and non-exclusive license to use each
software or firmware program delivered hereunder (licensed program). Except as noted below, such license
may not be assigned, sublicensed, or otherwise transferred by the user without prior written consent of
Motorola. No right to copy a licensed program in whole or in part is granted, except as permitted under
copyright law. The user shall not modify, merge, or incorporate any form or portion of a licensed program with
other program material, create a derivative work from a licensed program, or use a licensed program in a
network without written permission from Motorola. The user agrees to maintain Motorola’s copyright notice on
the licensed programs delivered hereunder, and to include the same on any authorized copies it makes, in
whole or in part. The user agrees not to decompile, disassemble, decode, or reverse engineer any licensed
program delivered to the user or any portion thereof.
Motorola reserves the right to make changes to any software or product to improve reliability, function, or
design.
Motorola does not assume any product liability arising out of, or in connection with, the application or use of
any product, circuit, or application described herein.
No license is granted, either expressly or by implication, estoppel, or otherwise under any Motorola, Inc.,
intellectual property rights. An implied license only exists for equipment, circuits, and subsystems contained in
Motorola products.
MOTOROLA and the Stylized M Logo and Symbol and the Symbol logo are registered in the US Patent &
Trademark Office. Bluetooth is a registered trademark of Bluetooth SIG. Microsoft, Windows and ActiveSync
are either registered trademarks or trademarks of Microsoft Corporation. All other product or service names
are the property of their respective owners.
Motorola, Inc.
One Motorola Plaza
Holtsville, New York 11742-1300
www.motorola.com/enterprisemobility
Patents
This product is covered by one or more of the patents listed on the website:
www.motorola.com/enterprisemobility/patents
iii
Warranty
Mobile Device
The CA10 is warranted against defects in workmanship and materials for a period of one year (12 months)
from date of shipment, provided the product remains unmodified and is operated under normal and proper
conditions.
Accessories
CA10 accessories, such as cables, cradles and power supplies, carry a warranty term of ninety (90) days from
the date of shipment.
For the complete Motorola hardware product warranty statement, go to:
www.motorola.com/enterprisemobility/warranty
CA10 Installation Software
The CA10 Installation Software ships with Motorola’s standard 90-day software warranty. During the warranty
period, Motorola will replace damaged or defective media. Telephone and e-mail access are also provided for
the sole purpose of reporting a non-conformance issue, and for Motorola to verify the existence of the issue
and determination of the conditions under which the issue may recur.
Revision History
Changes to the original manual are listed below:
Change
72E-124942-01
Date
8/2009
Description
Version A
iv
CA10 User Guide
About This Guide
Introduction
This guide provides information about installation, configuration, setup, monitoring, operation and maintenance of
the CA10, accessories and system.
Order Configurations
This guide covers the following order configurations:
Configuration No.
Description
CA1060-000A1NV01R
One pack of CA10
CA1060-000A1NV010R
10-pack of CA10 units
CHS1060-A000CR
One 10-Slot Charge Cradle including: Cradle Base, Power Supply Unit, AC Line Cord
KT-121364-01
10-pack accessory kit including: wrist/neck lanyards, headsets
Chapter Descriptions
Topics covered in this guide are as follows:
•
Chapter 1, Getting Started provides information on charging and getting the CA10 up and running for the first
time.
•
Chapter 2, Using the CA10 provides basic instructions for using the interface of the CA10.
•
Chapter 3, Deployment and Configuration provides site installation guidelines for planning WLAN
Infrastructure and CA10 units for proper customer deployment. This includes planning, preparing and
maintaining a customer site environment.
•
Chapter 4, Maintenance and Troubleshooting provides instructions on cleaning and troubleshooting solutions
for potential problems during operation.
•
Chapter A, Accessories provides descriptions and features of the CA10 accessories.
•
Chapter B, Specifications provides technical specifications for the CA10 and cradle.
vi
CA10 User Guide
Notational Conventions
The following conventions are used in this document:
•
“unit” refers to the Motorola CA10
•
“cradle” refers to Motorola 10-Slot CA10 Charge Cradle
•
Italics are used to highlight the following:
• Chapters and sections in this and related documents
• Dialog box, window and screen names
• Drop-down list and list box names
• Check box and radio button names
• Icons on a screen
•
Bold text is used to highlight the following:
• Key names
• Button names on a screen or window
•
Bullets (•) indicate:
• Action items
• Lists of alternatives
• Lists of required steps that are not necessarily sequential
•
Numbered lists describe step-by-step procedures.
NOTE
This symbol indicates something of special interest or importance to the reader. Failure to read
the note will not result in physical harm to the reader, equipment or data.
CAUTION
This symbol indicates that if this information is ignored, damage to data or material may
occur.
WARNING!
This symbol indicates that if this information is ignored, serious personal injury may occur.
Related Documents
The following documents provide more information about the CA10.
•
CA10 Quick Reference Guide, p/n 72-124939-01-xx
•
CA10 Regulatory Guide, p/n 72-124941-01-xx
•
CHS1060 Cradle Regulatory Guide, p/n 72-124943-01-xx
For the latest version of this guide and all guides, go to: www.motorola.com/enterprisemobility/manuals.
About This Guide
vii
Safety Information
Battery Safety
Use & Safety for Battery-Powered Devices
•
Do not store or use your CA10 in temperatures below -10°C (14°F) or above 60°C (140°F).
•
Do not recharge your CA10 in temperatures below 0°C (32°F) or above 40°C (104°F).
•
Conditions inside a parked car can exceed this range. Do not store your devices in a parked car.
•
Do not store your accessory in direct sunlight.
•
Storing your fully charged accessory in high-temperature conditions may permanently reduce the life of
the internal battery.
•
Battery life may temporarily shorten under low temperature conditions.
Symbol
Definition
Important safety information follows.
032374o
032376o
Do not dispose of your battery or
smartphone in a fire.
You can find some generic battery safety guidance at: www.motorola.com/batterysafety.
Acoustic Safety
Best Practices for using a headset.
Sound Level Warnings
032374o
WARNING!
Exposure to loud noises from any source for extended periods of time may
temporarily or permanently affect your hearing. The louder the volume sound level,
the less time is required before your hearing could be affected. Hearing damage from
loud noise is sometimes undetectable at first and can have a cumulative effect.
To protect your hearing, some hearing experts suggest that you:
•
Start your volume control at a low setting, and use as low a volume as possible.
•
Limit the amount of time you use headsets or headphones at high volume.
•
Where possible, use your headset in a quiet environment with low background noise.
•
Avoid turning up the volume to block out noisy surroundings.
•
Turn the volume down if you cannot hear people speaking near you.
If you experience hearing discomfort, including the sensation of pressure or fullness in your ears, ringing in
your ears, or muffled speech, you should stop listening to the device through your headset or headphones and
have your hearing checked by your doctor.
viii
CA10 User Guide
Information on Hearing Damage
Understanding Noise Induced Hearing Loss
Exposure to loud sounds can damage your hearing, causing hearing loss and tinnitus (ringing or buzzing in the
ears). While a variety of things can lead to hearing loss, including aging and side effects of certain medications, the
most common cause of non-age-related hearing damage is loud noise. Extremely loud sounds, such as gun shots
or firecrackers at close range, can cause immediate hearing damage. Hearing damage can also occur over time
due to repeated exposure to loud sounds such as industrial noise or loud music. With continued exposure to loud
noises, ears may become accustomed to the sound level, which may result in permanent damage to hearing
without any noticeable discomfort.
Temporary and permanent hearing loss
Noise induced hearing loss and tinnitus may be temporary or permanent.
Ears typically recover from temporary hearing damage in a short time.
However, ears may not recover completely, and some damage may be permanent. Repeated exposure to loud
sound can cause more and more damage, and eventually lead to serious hearing problems. Scientists generally
agree that, over time, exposure to harmful levels of noise can lead to permanent noise-induced hearing loss by
damaging and/or destroying the inner ear’s sensory hair cells.
Loud sounds + time = hearing loss
The more time you spend exposed to loud sounds, the more likely you are to damage your hearing. All of the loud
sounds that you are exposed to during a day add up - continued exposure to loud sounds can prevent your ears
from recovering and also cause additional damage.
Symptoms of Hearing Loss
While not all noise-induced hearing loss is noticeable, symptoms may include a sensation of pressure or fullness in
your ears, ringing in your ears, or muffled speech. If you experience these symptoms or believe you may have
experienced noise induced hearing loss, you should have your hearing checked by an ear doctor or audiologist.
People with Pacemakers
032374o
WARNING!
The cradle connector on the CA10 contains a magnet. To avoid potential of magnetic
interference with the function of the pacemaker, do not wear the CA10 on your shirt.
The CA10 radio generates magnetic energy. Pacemaker manufacturers recommend that a
minimum of 15 cm (6 inches) be maintained between a handheld wireless device and a
pacemaker to avoid potential interference with the pacemaker.
About This Guide
Service Information
If you have a problem with your equipment, contact Motorola Enterprise Mobility Support for your region.
Contact information is available at: http://www.motorola.com/enterprisemobility/contactsupport
When contacting Enterprise Mobility Support, please have the following information available:
•
Serial number of the unit
•
Model number or product name
•
Software type and version number
Motorola responds to calls by e-mail, telephone or fax within the time limits set forth in support agreements.
If your problem cannot be solved by Motorola Enterprise Mobility Support, you may need to return your
equipment for servicing and will be given specific directions. Motorola is not responsible for any damages
incurred during shipment if the approved shipping container is not used. Shipping the units improperly can
possibly void the warranty.
If you purchased your Enterprise Mobility business product from a Motorola business partner, contact that
business partner for support.
ix
x
CA10 User Guide
Table of Contents
About This Guide
Battery Safety ................................................................................................................................
Sound Level Warnings .............................................................................................................
Information on Hearing Damage ..............................................................................................
People with Pacemakers .........................................................................................................
vii
vii
viii
viii
Chapter 1: Getting Started
Introduction ..........................................................................................................................................
Recommended Deployment Steps ......................................................................................................
Components in the CA10 Solution .......................................................................................................
Unpacking ............................................................................................................................................
Wearing the CA10 ...............................................................................................................................
Lanyard ..........................................................................................................................................
Shirt Clip ........................................................................................................................................
Using a D-Clip Earpiece ......................................................................................................................
CA10 Features .....................................................................................................................................
Charging ..............................................................................................................................................
Charging Indications ......................................................................................................................
Saving battery power .....................................................................................................................
Powering on / off ..................................................................................................................................
Turning on ......................................................................................................................................
Turning off ......................................................................................................................................
1-1
1-1
1-2
1-2
1-2
1-2
1-3
1-4
1-5
1-7
1-8
1-8
1-8
1-8
1-8
Chapter 2: Using the CA10
Introduction ..........................................................................................................................................
Calling ..................................................................................................................................................
Group Call ......................................................................................................................................
Placing a Group Call ................................................................................................................
Public response to a Group Call ..............................................................................................
Private Reply Call ..........................................................................................................................
Indications during use ....................................................................................................................
Profiles .................................................................................................................................................
2-1
2-1
2-1
2-2
2-3
2-4
2-5
2-5
xii
CA10 User Guide
Resetting the CA10 .............................................................................................................................. 2-5
Reset to factory default .................................................................................................................. 2-5
Chapter 3: Deployment and Configuration
Introduction ..........................................................................................................................................
Host Computer Requirements .............................................................................................................
Operating system & web browser support .....................................................................................
Wireless Network Requirements .........................................................................................................
Deployment and Configuration ............................................................................................................
Setting your host computer ............................................................................................................
Setting Your Wireless Access Point ...............................................................................................
Installing the Deployment and Configuration software ...................................................................
Configuring the CA10 units ............................................................................................................
Device Profiles ...............................................................................................................................
Monitor Devices tab .......................................................................................................................
Name .......................................................................................................................................
IP-Address ...............................................................................................................................
Active Profile ............................................................................................................................
WT-Channel .............................................................................................................................
Firmware ..................................................................................................................................
Hardware .................................................................................................................................
Signal .......................................................................................................................................
Battery ......................................................................................................................................
Last Heard ...............................................................................................................................
3-1
3-1
3-1
3-1
3-2
3-2
3-4
3-4
3-7
3-9
3-11
3-11
3-11
3-11
3-12
3-12
3-12
3-12
3-12
3-12
Chapter 4: Maintenance and Troubleshooting
Overview ..............................................................................................................................................
Maintaining the CA10 ..........................................................................................................................
Cleaning ...............................................................................................................................................
Materials Required .........................................................................................................................
Cleaning the CA10 or Cradle Housing ...........................................................................................
Cleaning the CA10 or Cradle Connectors ......................................................................................
Cleaning Frequency .......................................................................................................................
Troubleshooting the CA10 ...................................................................................................................
Troubleshooting the 10-Slot Charge Cradle ........................................................................................
Self Diagnostic Feature .......................................................................................................................
Operational status ....................................................................................................................
Communication settings ...........................................................................................................
Hardware status .......................................................................................................................
4-1
4-1
4-1
4-1
4-2
4-2
4-2
4-2
4-3
4-3
4-3
4-4
4-4
Appendix A Accessories
Overview ..............................................................................................................................................
Accessories .........................................................................................................................................
10-Slot CA10 Charge Cradle ...............................................................................................................
Cradle Installation Options ...................................................................................................................
Desk-top Setup ..............................................................................................................................
Wall Mount Setup ...........................................................................................................................
A-1
A-1
A-2
A-2
A-2
A-5
Table of Contents
D-Clip Earpiece .................................................................................................................................... A-8
Appendix B Specifications
Technical Specifications ...................................................................................................................... B-1
CA10 .............................................................................................................................................. B-1
10-Slot CA10 Charge Cradle ......................................................................................................... B-3
Glossary
Index
xiii
Chapter 1 Getting Started
Introduction
The CA10 is a compact Push-to-Talk over wireless LAN (PoWLAN) communications device designed to operate
throughout the wireless local area network of your enterprise environment. You can use the CA10 as you would
any normal Push-to-Talk radio. The CA10 enables instant employee accessibility through a simultaneous call to a
group of workers and a person-to-person reply call from a group member. The CA10 solution can communicate
with other Motorola mobile computers and enterprise devices communicating over Wi-Fi.
The CA10 can be clipped onto clothing, worn on a lanyard, or slipped inside a pocket and can be deployed either
as a personal or shared device. In environments where workers change shifts daily, an employee can select any
available CA10.
The CA10 solution includes a Deployment and Configuration application. The application uses a personal
computer based program for configuring, monitoring and maintaining the CA10 units.
Other sections in this chapter include:
• Recommended deployment steps
• A list of the components in the CA10 system
• Unpacking the shipping box (see Unpacking on page 1-2)
• How to wear the CA10 (see Wearing the CA10 on page 1-2)
• A list of CA10 features (see CA10 Features on page 1-5)
• How to charge the CA10 (see Charging on page 1-7)
Recommended Deployment Steps
1.
Install the cradle.
2.
Charge the CA10 units.
3.
Download and install the Deployment and Configuration application.
4.
Configure the wireless system and CA10 units.
1-2
CA10 User Guide
Components in the CA10 Solution
The following components are required to implement the CA10 solution:
• CA10 units
• Deployment and Configuration application (see Deployment and Configuration on page 3-2)
• 10-Slot Charge Cradle (see Accessories on page A-1)
• Wireless access point (provided by the customer)
• Optional accessories such as earpiece (see Accessories on page A-1)
Unpacking
After opening the shipping box, inspect the contents. You should have received the following:
• CA10 unit(s)
• CA10 Quick Start Guide
• Regulatory Guide for CA10
• CA10 Feature Sheet
Depending on the configuration ordered, the shipping box or additional shipping container may include:
• 10-Slot CA10 Charge Cradle (with cradle base, power supply unit and AC line cord)
• Regulatory Guide for the 10-Slot Charge Cradle CA10 (only when cradle is included)
• D-Clip Earpiece(s)
• Lanyard(s)
• Wrist Strap(s)
Inspect the equipment for damage. If you are missing any equipment or if you find any damaged equipment,
contact Motorola Enterprise Mobility Support immediately. See Service Information on page ix for contact
information. Save the shipping box for later storage and shipping.
Wearing the CA10
Lanyard
To install the Lanyard:
1.
Connect the Lanyard Extension to the CA10 clip (item 1 in Figure 1-1).
2.
Attach the Lanyard Extension to the Lanyard Clasp (item 2 in Figure 1-1).
3.
Use the Length Adjustment to resize the lanyard loop (item 3 in Figure 1-1).
Getting Started
1-3
Safety Clip
Lanyard Extension
1
Length Adjustment
3
2
Lanyard Clasp
Figure 1-1 Installing and Wearing the Lanyard
WARNING!
When the neck lanyard is worn properly, the length adjustment should be behind the
neck. Otherwise, the safety clip will not work properly and could result in injury (see
Figure 1-1).
Shirt Clip
To wear the CA10 on a belt or shirt, use the Shirt Clip (see Figure 1-2).
Figure 1-2 Wearing the CA10 on a Belt or Shirt
WARNING!
Persons with pacemaker: The CA10 contains a magnet and its radio generates
magnetic energy. To avoid magnetic interference with the pacemaker, do not wear the
CA10 on a shirt.
1-4
CA10 User Guide
Using a D-Clip Earpiece
To wear the CA10 D-Clip Earpiece (see Figure 1-3).
A
B
CA10
A
B
CA10
Figure 1-3 Wearing the CA10 D-Clip Earpiece
WARNING!
When using a headset / earpiece, you may not hear the surrounding sounds. Do not
use a headset / earpiece where it can endanger your safety.
Persons with pacemakers should:
• Use the ear opposite the pacemaker to minimize the potential for interference.
• Remove the headset / earpiece immediately if you have any reason to suspect
that interference is taking place.
To protect your hearing:
• Start your volume control at a low setting, and use as low a volume as possible.
• Limit the amount of time you use headset / earpiece at high volume.
• Where possible, use your headset / earpiece in a quiet environment with low
background noise.
• Avoid turning up the volume to block out noisy surroundings.
• Turn the volume down if you cannot hear people speaking near you.
Getting Started
CA10 Features
Speaker
Left Side View
Front Side View
CA10
Shirt Clip
Push-to-Talk
(PTT) Button
Private Reply Button
Advance
Button
Microphone
Status LED
Right Side View
Back Side View
Headset Jack
Lanyard Fastener Hole
Cradle Connector
Volume Up / Down
Figure 1-4 CA10 Features
1-5
1-6
CA10 User Guide
Table 1-1 lists and describes the features of the CA10.
Table 1-1 CA10 Features
Feature
Private Reply Button
Event
Press and release the Private Reply button to:
• Initiate a private response to the last communing member. Press within 10
seconds of the last message (see Private Reply Call on page 2-4).
• End a Private Replay Call.
PTT (Push-to-Talk Button)
Press and hold the PTT when you wish to speak (see Group Call on page 2-1).
Status LED
The Private Reply button is backlit by a Status LED to provide visual feedback of the
CA10 status (green, red, or amber).
When the CA10 is in use, the LED provides battery power status, operation and
communication indications (see CA10 Status Indications on page 2-5).
When the CA10 is docked onto a cradle, the LED indicates the charging status (see
Charging Indications on page 1-8).
Advance Button
The Advance button is a optional use button. The functionality of the Advance
button can be programmed through the Device Profiles tab of the CA10 Deployment
and Configuration application (see Deployment and Configuration on page 3-2).
Volume Up / Down
• Click the Volume Up button to increase the speaker volume / sound
notifications.
• Click the Volume Down button to decrease the speaker volume / sound
notifications.
• To mute the CA10 for 2 minutes; press and hold the Volume Down button
for two seconds until a click sound is heard. To unmute within the 2 minutes,
press and release the Volume Up button.
• To place the CA10 into "Unavailable" mode, press and hold the Volume
Down button for five seconds until a tune is played. To resume availability,
press and release the Volume Up button.
Microphone
Speak into the microphone while transmitting. Note that the microphone minimizes
the amount of background noise that is picked up from the surrounding area.
Cradle Connector
Charging contacts for cradle connections. The connector contains a magnet for
docking the CA10 onto the cradle.
Headset Jack
Connect your headset / earpiece to this port.
Speaker
The speaker is used for receiving voice, indication tones and voice menu prompts.
Shirt Clip
A 360° rotating clip with index stops which fits on a shirt (see Shirt Clip on page 1-3).
Lanyard Fastener Hole
Fastener hole for neck lanyard or wrist strap (see Lanyard on page 1-2).
Getting Started
1-7
Charging
This section describes how to use the 10-Slot CA10 Charge Cradle with the CA10 units.
The cradle supports simultaneous charging of up to ten CA10 units. Charging status is indicated via the Status LED
on the CA10.
The CA10 has an internal, non-replaceable battery. Before using the CA10 for the first time, fully charge the battery
until the Status LED shows steady green (see Table 1-2 for charge status indications). The CA10 fully charges in
less than 3 hours and provides up to 10 hours of typical functionality.
CAUTION
NOTE
Note that the charging temperature is monitored and controlled by the CA10 and the cradle.
Charging is halted at temperatures above 40°C (104° F).
When charging, the CA10 cannot be used for communication although the wireless connection
to the network remains active.
To charge the CA10 using the 10-Slot CA10 Charge Cradle (see Figure 1-5):
1.
Install the cradle. Proper connection of AC line power to the cradle is indicated via the green Power LED on the
cradle (see Cradle Installation Options on page A-2).
2.
Disconnect the Lanyard Clasp of the Lanyard Extension (see Figure 1-1).
3.
Place the CA10 onto a Magnetic Charging Base on the cradle (see Figure 1-5).
4.
The CA10 starts to charge automatically. The Status LED on the CA10 indicates the charge status. See Table
1-2 for charging indications.
Status LED
Power LED
A
Magnetic
Charging
Base
Figure 1-5 Using the 10-Slot CA10 Charge Cradle for Charging the CA10
A
1-8
CA10 User Guide
Charging Indications
Table 1-2 CA10 Charging Indications
Status LED
(on CA10)
Indications
Steady green
Charge complete and ready for use.
Steady amber
Power-up state (battery is getting ready to charge).
Blinking amber
Charge in progress.
Steady red
Pre-charge state (brief condition prior to active charging).
Saving battery power
• Battery life depends on the signal strength of the wireless network, temperature and features you use.
• Ensure that the CA10 associates with the wireless network as quickly as possible.
• Use the headset or earpiece when possible.
• Optimize the wireless network for voice over IP operation (see your access point user manual).
• Remain within the coverage range of your wireless system. When a CA10 is out of range of an access point,
radio power consumption may be higher, reducing runtime / battery life.
Powering on / off
Turning on
To turn on the CA10:
Simultaneously hold down the PTT and Private Reply buttons for about half a second. During initialization, the
Status LED lights steady amber for five seconds followed by a brief red / amber flash. This is followed by a "start
tune".
NOTE
The CA10 powers on automatically when placed onto the cradle.
Turning off
To turn off the CA10:
Simultaneously press and hold the PTT and Private Reply buttons. Release the buttons as soon as the CA10 starts
playing the power-down tone sequence. The CA10 beeps four times and turns off, playing a “turn off tune”.
NOTE
If the CA10 is in an abnormal state, turning off the CA10 may require holding the PTT and
Private Reply buttons for 10 seconds before releasing. In such case, the CA10 turns off without
playing a “turn off tune”.
Chapter 2 Using the CA10
Introduction
This chapter provides basic instructions for the use of the CA10, including communication, profiles and reset.
Calling
NOTE
The CA10 only operates within the wireless coverage area of your enterprise.
Group Call
Group Call is a one-to-many communication mode that utilizes the wireless infrastructure within the four walls of a
facility. Only one group member can initiate a group call at a time.
For example, a group member carrying a CA10 can press the Push-to-Talk (PTT) button and communicate with a
group of associates carrying CA10s. While a group member talks, the listening associates cannot respond until the
communicating group member releases the PTT button.
2-2
CA10 User Guide
Placing a Group Call
For Example: You are looking for help from an available person in your group (see Figure 2-1).
To place a Group Call:
1.
Press and hold the PTT button and begin talking after your CA10 emits a beep (for example: say “Hi - I need
some help up front”).
NOTE
2.
If you hear a tone, release the PTT button and wait for the current communicating person to
finish speaking before you press and hold the PTT button to make another attempt.
Release the PTT button when you finish talking.
PTT Button
ab
Figure 2-1 Placing a Group Call
Using the CA10
2-3
Public response to a Group Call
For Example: One person from a group responds to the group call, notifying all that he is available for help (see
Figure 2-2).
To respond to a Group Call:
1.
During a group call, wait for the current communicating person to finish speaking (a tone plays indicating that
the channel is clear).
2.
Press and hold the PTT button and begin talking after your CA10 emits a beep (for example: say “I can help - I
will be there soon”).
NOTE
3.
If you hear a tone, release the PTT button and wait for the current communicating person to
finish speaking before you press and hold the PTT button to make another attempt.
Release the PTT button when you finish talking.
PTT Button
Figure 2-2 Public Response to a Group Call
ab
2-4
CA10 User Guide
Private Reply Call
A Private Reply Call is a person-to-person call to the last communicating member. Private response to the last
communicating member can only be initiated once a group call has been established (see Figure 2-3).
Private Reply can be initiated up to 10 seconds after the last communicating member has finished speaking.
For example: One person from a group uses a private reply to a group call, notifying the last communicating
member that he is available to help.
For private reply to the last communicating member:
1.
During a group call, wait for the last communicating member to finish speaking (a tone plays indicating that the
channel is clear).
2.
Press and release the Private Reply button and listen for the tone to finish playing. The Status LED should
blink green.
3.
Press and hold the PTT button and start talking after the beep plays. Remember, your voice is heard only by
the last talking member in your group.
4.
Release the PTT button when you finish talking and listen for the reply.
5.
To terminate a private reply call, press and release the Private Reply button.
ab
Figure 2-3 Private Reply Call
PTT Button
ab
2
ab
1
Private Reply Button
Using the CA10
2-5
CA10 Status Indications
Indications during use
The Private Reply button has a backlight to provide visual feedback of the CA10 status when the CA10 is in use
(not charging).
The CA10 status indications are listed in Table 2-1.
Table 2-1 CA10 Status Indications
LED Status
Event
No light
CA10 is turned off.
Blinking green
• Repeated slow blink: incoming Private Reply Call
• Repeated fast blink: Private Reply Call is active
• Single blink every 10 seconds: standby state
Blinking red
• Repeated single blink: low power, re-charge the CA10
• Repeated sequence of blinks: no wireless connection
Blinking amber
CA10 is powering-up.
Profiles
The CA10 uses a profile to save a collection of configuration settings for the CA10. You can create or use a default
profile and load it on the CA10 as part of system deployment (see Configuring the CA10 units on page 3-7).
Resetting the CA10
If the CA10 is not functioning properly, turn off the CA10 and turn it on again (see Powering on / off on page 1-8). If
the CA10 does not respond, reset the CA10 to its factory default configuration.
Reset to factory default
To restore the CA10 to its factory default configuration:
1.
Place the CA10 onto the cradle.
2.
Simultaneously hold down the Volume Down button and Advance button until the CA10 beeps four times
followed by a fast stutter tune. The CA10 automatically restarts with factory default settings.
3.
Configure the CA10 (Configuring the CA10 units on page 3-7).
Chapter 3 Deployment and Configuration
Introduction
This chapter provides an overview on how to deploy and configure the CA10s to work on your wireless network.
This chapter contains the following sections:
• Host Computer Requirements
• Wireless Network Requirements
• Deployment and Configuration steps
Host Computer Requirements
Operating system & web browser support
To install and use the CA10 Deployment and Configuration application, you need a host computer running Internet
Explorer 5.0 or 6.0 or 8.0 with one of the following operating systems:
• Windows® XP Professional Service Pack 2 or 3
• Windows® Vista Small Business Edition
It is recommended that the same host computer become the dedicated computer for configuring, managing and
monitoring the CA10 units on the wireless network.
Use a host computer with a 802.11b/g wireless LAN interface to connect to an access point. Otherwise, use an
Ethernet cable from the host computer to the access point.
Wireless Network Requirements
In most cases, a single 802.11b/g access point covers distances up to 100 meters (300 feet). Signal loss can occur
if metal, concrete, walls, brick, floors or other architectural barriers block transmission. If your location includes
these kind of obstructions, you may need to add additional access points (with identical setting) to increase
coverage.
3-2
CA10 User Guide
Deployment and Configuration
The CA10 Deployment and Configuration application contains a built-in browser interface for system configuration
and remote management using a standard Web browser such as Microsoft Internet Explorer. The browser
interface also allows for system monitoring of the CA10 units.
Before starting, download the Deployment and Configuration application file from: www.motorola.com/ca10. The
installation file includes documentation and software utilities to help you set up and manage the CA10 units on your
network.
There are only a few basic steps you need to complete in order to connect the CA10 units to your network and start
communicating.
Setting your host computer
The configuration example assumes that Windows XP is running on your host computer and you have retained the
default interface for Windows XP.
To set your host computer:
1.
Click on the Start button.
2.
Select Settings.
3.
Select Control Panel.
4.
Double-click Network Connections.
5.
Double-click Local Area Connection. The Local Area Connection Status window appears (see Figure 3-1):
Figure 3-1 Local Area Connection Status Window
Deployment and Configuration
6.
Click Properties (see Figure 3-1).
Figure 3-2 Local Area Connection Properties Window
7.
Ensure that the box next to Internet Protocol (TCP/IP) is checked (see Figure 3-2).
8.
Click to highlight Internet Protocol (TCP/IP) and click Properties.
Figure 3-3 Internet Protocol (TCP/IP) Properties Window
3-3
3-4
CA10 User Guide
9.
Enter 192.168.0.201 in the IP Address field (see Figure 3-3).
10. Enter 255.255.0.0 in the Subnet mask field.
11. Click OK twice and close the Local Area Connection window.
Setting Your Wireless Access Point
To set the access point:
1.
Follow the instructions in your access point user guide to access the configuration menu of your access point.
2.
Proceed to the Configure Your Wireless Settings section to set up the security settings:
• ESSID: motorola
• Encryption Status: No security
• Subnet Mask: Class B (255.255.0.0)
Installing the Deployment and Configuration software
To install the Deployment and Configuration software:
1.
Start the Deployment Application installation file. As the installation starts, the following welcome window
displays. Click Next to continue.
Figure 3-4 Welcome Window
Deployment and Configuration
2.
The Select Installation Folder window displays. Select the disk drive and destination directory in which to install
the application. To limit access to the application after the installation, select Just me. To grant access to all,
select Everyone. Click Next to continue.
Figure 3-5 Select Installation Folder Window
3.
3-5
The Confirm Installation window displays. Click Next to confirm and continue the installation.
Figure 3-6 Confirm Installation Window
3-6
CA10 User Guide
4.
The program begins to extract files and the installation runs without further intervention.
Figure 3-7 File Extraction and Installation Bar
5.
The Installation Complete window displays. Click Close to end the installation.
Figure 3-8 Installation Complete Window
Deployment and Configuration
3-7
Configuring the CA10 units
To configure the CA10 units:
1.
Start the Deployment and Configuration application by double-clicking the Start_CA10_Deployment_Service
Icon located on your computer desktop. To start the application, you can also click the Start button and select
All Programs > Motorola > Deployment Application > Start_CA10_Deployment_Service.
Important: wait until the “Press enter to stop service” message appears. DO NOT PRESS ENTER - this will
stop the service.
2.
Start the Deployment and Configuration application by double-clicking the Start_CA10_Deployment_UI Icon
located on your computer desktop. To start the application, you can also click the Start button and select All
Programs > Motorola > Deployment Application > Start_CA10_Deployment_UI.
3.
Turn on all CA10s (see Powering on / off on page 1-8).
4.
Go to the Configure Devices tab (see Figure 3-9) and verify that all CA10s are shown on the screen.
Figure 3-9 Configure Devices Tab
5.
If necessary, click Upload Another to upload a new firmware version and follow the instructions on the screen.
3-8
CA10 User Guide
6.
Go to the Network Settings tab (see Figure 3-10) and enter the SSID (should be identical to the ESSID of
your access point) and security. Enter the name for your network and click Save.
Figure 3-10 Network Settings Tab
7.
Go back to the Configure Devices tab, enter a new name in the Configuration field and click Add new.
8.
If applicable, select the new firmware in the Firmware field.
9.
Select the name for your network from the drop-down.
10. Click on Save.
11. Click on Apply Settings or click on a single CA10 you want to configure and select Apply Configuration /
Reset. The Status LED of all CA10s should blink amber, indicating download in progress. Firmware download
may take two to three minutes. If only network settings are changed, download may take 20 seconds.
Deployment and Configuration
3-9
Device Profiles
The Deployment and Configuration Application use profiles to customize the CA10 settings according to groups or
associate's role in an organization.
For example, you can select a profile named Group-2 to call a group of people working in sales department and
select a profile named Group-3 to call a specific person such as store manager.
Up to 8 profiles can be created and loaded into the CA10; each has its own communication channel (channels 1 to
8).
When a profile is set, communication channels and button actions are fill in and the profile is ready to be
downloaded to the CA10 by using the Configure Devices tab.
Figure 3-11 Device Profiles Tab
To display a specific profile from the Profile Name drop-down:
1.
Click on the Device Profiles tab.
2.
Select a profile from the Profile Name drop-down.
To add a new profile:
1.
Click on the Device Profiles tab.
2.
Click on Add New.
3.
Enter a new profile name in the Profile Name box.
4.
Select a communication channel from the Walkie Talkie Channel drop-down.
3 - 10 CA10 User Guide
To set an action to the Advance / Private Reply buttons:
1.
Click on the Single Click box. The Action windows appear next to the Advance and Private Reply buttons.
2.
Click on the Action box to expand the drop list and select:
• Profile - to retain the default button operation described in the operation chapter.
• AltCh-Perm - set this action and select an alternative group from the Target box. When the user press and
release this button, the alternative grope is associated for communications. The user press and release this
button again to associate with the previews group.
• AltCh-Temp - set this action and select an alternative from the Target box. When the user press and release
this button, the alternative grope is associated for communications. Following a Group Call, the CA10
automatically associates with the previews group.
3.
Click on the Double Click box and repeat step 2 to set double click action to the buttons.
4.
Click on the Hold Down box and repeat step 2 to set press and hold action to the buttons.
5.
Click Save to retain the profile.
Deployment and Configuration 3 - 11
Monitor Devices tab
Use the Monitor Devices tab (see Figure 3-12) to monitor the CA10s that are on your network. The information
shown on this screen is automatically refreshed as new data is received from an active CA10.
This screen enables you to view the CA10s based on Name, IP Address, Profile, Time, Firmware, Hardware,
Access Point, Serial Number, Signal, Battery Power and Channel Status.
Devices send an update every 60 seconds, so any information on the Monitor Devices tab may be delayed by a
maximum of 60 seconds.
Figure 3-12 Monitor Devices Tab
Name
Display the names of the CA10 units that are registered in the system database. After a device is discovered, it
remains in the asset inventory until it is purged from the database.
IP-Address
Displays a view of the IP address of all CA10s.
Active Profile
The profile number of the CA10 that is set in the Device Profiles Tab.
3 - 12 CA10 User Guide
WT-Channel
The CA10 system supports up to 32 channels of different broadcast voice streams. Each CA10 listens to one
channel only. These channels are used to identify departments, functions or other types of communication. The
CA10 system has priorities associated with each channel (for example: an emergency channel has priority over
other channels).
Firmware
An updated firmware version that is embedded inside the memory of the CA10 and controls its operation. An
updated Firmware version can be downloaded to the CA10 from the Configure Devices tab.
Hardware
The hardware configuration of the CA10.
Signal
The signal power transmitted from CA10 to the access point. The higher the signal power, the farther the
communication range. Signal power can be affected by distance from the access point and high-power signals.
High-power signals may interfere with the operation of CA10s in the service area.
Battery
Shows the battery power level of the CA10 over time.
Last Heard
A Last Updated timestamp received from the unit.
Chapter 4 Maintenance and Troubleshooting
Overview
This chapter includes instructions on cleaning the CA10 and cradle and provides troubleshooting solutions for
potential problems during device operation.
Maintaining the CA10
For trouble-free service, observe the following tips when using the CA10:
• Do not to drop the CA10 or subject it to strong impact.
• Protect the CA10 from temperature extremes. Do not use or store the CA10 at temperatures below -10°C
(14°F) or above 60°C (140°F).
• Do not store or use the CA10 in any location that is dusty, damp, or wet.
• Do not store the CA10 or cradle in direct sunlight.
• Storing a fully charged CA10 at high-temperature conditions may permanently reduce the life of the internal
battery.
• Do not allow the CA10 to be immersed in or soaked with liquid.
• Do not spill liquid on the speaker grid.
Cleaning
Materials Required
• Soft cloth
• Cotton-tipped applicators
• Isopropyl alcohol
4-2
CA10 User Guide
• Window cleaning solution
• Water
CAUTION
Always wear eye protection when handling cleaning agents. Read warning label on cleaning product
before using. If you have to use any other solution for medical reasons, please contact Motorola for
more information.
Cleaning the CA10 or Cradle Housing
Clean the CA10 with a soft cloth moistened with a diluted window cleaning solution or alcohol.
Cleaning the CA10 or Cradle Connectors
To clean the connectors on a cradle:
1.
Remove the AC Line cord from the AC power outlet.
2.
Dip the cotton portion of the cotton-tipped applicator in isopropyl alcohol.
3.
Rub the cotton tip along the pins / contacts of the connector. Do not leave any cotton residue on the pins.
4.
Allow at least 10 to 30 minutes for the alcohol to air dry (depending on ambient temperature and humidity)
before applying power to the cradle.
Cleaning Frequency
Frequency of cleaning frequency is at the customer’s discretion, due to the varied environments in which the
CA10s are used. CA10s may be cleaned as frequently as required.
Troubleshooting the CA10
Table 4-1 Troubleshooting the CA10
Problem
Cause
Solution
CA10 does not turn on.
CA10 battery is not charged.
Fully charge the CA10.
CA10 battery does not
charge.
The cradle is not powered.
Check the cradle cable connections.
Verify the Power LED on the cradle illuminates green.
CA10 is not seated
properly onto the cradle.
Remove and replace the CA10 on the cradle, ensuring
it is firmly seated.
CA10 is removed from the
cradle while the battery is
charging.
The battery is not fully charged. Charge the CA10 until
the Status LED shows steady green.
Ambient temperature during
battery charging is too high
or too low.
Move the cradle and device to another location with
ambient temperatures between 0°C to +40°C (32°F to
104°F).
Battery failed.
Contact service.
Maintenance and Troubleshooting
Problem
Cause
4-3
Solution
CA10 does not emit sound. Volume setting is low or
turned off.
Adjust the volume. If this still does not solve the
problem, contact the help desk.
There is no Wireless
connection.
CA10 battery is not charged.
Fully charge the CA10.
Your access point does not
operate properly.
Use the Deployment and Configuration application to
reconnect the CA10 to the wireless system.
Verify that your access point is operating.
Use the access point documentation to troubleshoot
the coverage and connection of the wireless system.
Troubleshooting the 10-Slot Charge Cradle
Table 4-2 Troubleshooting the 10-Slot Charge Cradle
Problem
Cause
Solution
Power LED on the cradle
does not light.
Cradle is not
receiving power.
Ensure the AC line cord and the DC cable are
connected securely to both the power supply unit,
cradle and to AC power outlet.
CA10 is not charging.
CA10 is removed from
cradle or cradle is
unplugged from AC power
too soon.
Ensure cradle is receiving power. Ensure CA10 is
seated correctly. The CA10 battery fully charges in
less than 3 hours.
CA10 battery is faulty.
Verify that another CA10 charges properly from the
same connector. If so, replace the faulty CA10.
Ambient temperature of the
cradle is too warm.
Move the cradle to an area where the ambient
temperature is between 0°C to +40°C (32°F to 104°F).
Extreme CA10 temperature
(the CA10 becomes warm to
the touch).
The CA10 does not charge if ambient temperature is
below 0°C (32°F) or above 40°C (104°F).
Self Diagnostic Feature
The CA10 self diagnostic feature provides voice notifications for the status of the operation, communication
settings and hardware.
Operational status
To listen to the status of the CA10 Operational status:
1.
Simultaneously hold down the PTT and Advance buttons; the CA10 starts to beep slowly.
4-4
CA10 User Guide
2.
After hearing the first beep, release the PTT and Advance buttons; the CA10 provides voice notifications for
the current operational status of the CA10 (such as: access point association, profile, battery power, wireless
LAN signal level).
Communication settings
To listen to the status of the CA10 Communication settings:
1.
Simultaneously hold down the PTT and Advance buttons; the CA10 starts to beep slowly.
2.
After hearing the second beep, release the PTT and Advance buttons; the CA10 provides voice notifications
for the current communication settings of the CA10 (such as: IP Address, IP Mask, IP Gateway, AP, MAC
Address, Channel, Security, SSID etc.).
Hardware status
To listen to the status of the CA10 hardware:
1.
Simultaneously hold down the PTT and Advance buttons; the CA10 starts to beep slowly.
2.
After hearing the third beep, release the PTT and Advance buttons; the CA10 provides voice notifications for
the CA10 hardware status (such as: memory status, battery information and temperature, last AP, transmission
power level, etc.).
Chapter A Accessories
Overview
CA10 accessories provide a variety of product support capabilities. Accessories include: Lanyard, Wrist Strap and
Earpiece.
Accessories
Table 1-1 lists the CA10 accessories.
Table A-1 CA10 Accessories
Accessory
Description
10-Slot CA10 Charge Cradle
10-slot cradle for simultaneously charging up to ten CA10 units.
The cradle includes: cradle base, power supply unit, AC line cord.
PTT Headset
Standard Motorola headset with PTT button and microphone
D-clip Earpiece
Short Cable Motorola D-clip earpiece
Lanyard
Neck Lanyard with safety clip
Wrist Strap
Adjustable Wrist Strap
A-2
CA10 User Guide
10-Slot CA10 Charge Cradle
This section describes how to use a 10-Slot CA10 Charge Cradle.
Cradle Installation Options
The cradle supports both desktop and wall-mount options.
Desk-top Setup
Figure A-1 shows two desktop setup options for the 10-Slot CA10 Charge Cradle (one with and one without a
Cradle Base).
110-220 VAC, 50-60Hz
20W Line Power
Desktop configuration using a cradle base
Power LED
A
AC Line Cord
Cradle Base
DC Cable
Magnetic Charging Base
Basic desktop configuration
Power Supply Unit
A
Figure A-1 10-Slot CA10 Charge Cradle - Desktop Setup Options
CAUTION
Use only an approved power supply 50-14000-148R output rated 12 VDC and minimum 3.3 A with AC
line cord 23844-00-00. The power supply is certified to EN60950-1 with SELV outputs. Use of an
alternative power supply invalidates any approval given to this device and may be dangerous.
Accessories
A-3
To set the cradle on a desktop using a Cradle Base:
1.
Position the Power Supply Unit inside the Cradle Base and connect the AC Line Cord to the Power Supply Unit
(see Figure A-2). Do not plug the AC Line Cord into an AC power outlet.
AC Line Cord
Power Supply Unit
Cradle Base
Figure A-2 Desktop Base
2.
Wrap the spare length of the DC Cable around the Cable Guides (see Figure A-3).
Cable Guides
Figure A-3 Cable Guides
3.
Route the DC Cable out of the cradle through the Cable Holders (see Figure A-4). Use the Cable Notch as an
end point guide to measure the length of cable required for reaching the DC power connector.
Cable Holders
See cable notch mark
on the cradle base wall
Cable Notch
Figure A-4 DC Cable Route
DC Cable
A-4
CA10 User Guide
4.
Engage the hooks of the Cradle Base with the holes on the bottom of Cradle. Lower the Cradle onto the Cradle
Base until it engages the snaps (see Figure A-5).
Cradle
Snap
Snap
Hook
Hook
Figure A-5 Cradle Base Snaps
5.
Plug the DC Power Connector into the cradle (see Figure A-6).
DC Power
Connector
Figure A-6 DC Power Connector
6.
Connect the AC Line Cord to a 110-220 Vac, 50-60Hz AC line power source; the Power LED on the cradle
lights green.
Accessories
A-5
Wall Mount Setup
A Cradle Base is available for mounting a CA10 cradle on a wall.
Wall mounting requires hanging the cradle along its width (or length) using the four slots on the bottom side of the
cradle base and using the bracket itself as a mounting template for the screws.
The cradle can be mounted onto any plaster, concrete or wood wall surface provided the appropriate hardware is
used.
The mounting hardware and tools (customer-provided) required to install the cradle on a wall are:
• Four Phillips pan head self-tapping screws #6-18 X 0.875in (see Figure A-7). Type A or AB self-tapping
screws, or (ANSI Standard Metric) M3.5 X 0.6 X 20mm Type D self-tapping screws
• Four wall anchors
To mount the cradle to a wall:
1.
Orient the Cradle Base on the wall by its width or length.
2.
Using the cradle base as a template, mark points on the midline of the slots for the screws and remove the
cradle base.
3.
At each point, drill a hole in the wall, insert an anchor, screw the wall mounting screw into the anchor and stop
when there is 3.2mm (0.125 in.) between the screw head and the wall.
NOTE
For safe mounting, it is essential to use wall anchors appropriate to the wall type (i.e. plaster, wood,
concrete, etc.). Mount to wood studs whenever possible.
If pre-drilling a hole, the recommended hole size is 2.8mm (0.11in.) if the screws are going directly into the wall
and 6 mm (0.23 in.) if wall anchors are being used.
4.
Align the four slots on the cradle base with the screws on the wall. Attache cradle base to the wall and press
downwards to lock the cradle base into place (see Figure A-7).
Figure A-7 Wall Installation of Cradle Base
A-6
CA10 User Guide
5.
Position the Power Supply Unit inside the Cradle Base and connect the AC Line Cord to the Power Supply
Unit. Do not plug AC Line Cord into an AC power outlet. (see Figure A-8).
Power Supply Unit
AC Line Cord
Figure A-8 Power Supply Unit Inside a Cradle
6.
Wrap the spare DC Cable around the Cable Guides and route the AC Line Cord out of the cradle (see Figure
A-9).
Cable Guides
DC Cable
AC Line Cord
Figure A-9 Wrap of Spare DC Cable
Accessories
7.
A-7
Route the DC Cable out of the cradle through the Cable Holder (see Figure A-10). Use the Cable Notch as an
end point guide to measure the length of cable required to reach the DC power connector.
See cable notch mark on
the cradle base wall
Cable
Holder
Cable Notch
DC Cable
Figure A-10 Routing DC Cable out of the Cradle
8.
Engage the hooks of the Cradle Base with the holes on the bottom of Cradle. Lower the Cradle onto the Cradle
Base until it engages the snaps (see Figure A-11).
Hook
Hook
Cradle
Cradle Base
Snaps
Figure A-11 Snaps of Cradle Base
A-8
CA10 User Guide
9.
Plug the DC Power Connector into the cradle (see Figure A-12).
DC Power Connector
Figure A-12 Plugging in the DC Power Connector
10. Connect the AC Line Cord to a 110-220 VAC, 50-60Hz AC line power source; the Power LED on the cradle
lights green.
D-Clip Earpiece
You can use a single ear headset / earpiece (such as Motorola D-Clip earpiece p/n 21-69024-01R) for
communication. The headset / earpiece can be used when the CA10 is worn on the shirt. When a headset /
earpiece is connected, the CA10 microphone continues to operate and the CA10’s speaker is disabled (muted). To
use a headset / earpiece, plug the connector into the Headset Jack on the side of the CA10 (see Figure A-13).
Motorola D-Clip Earpiece p/n 21-69024-01R
A
B
CA
10
Headset Jack
Figure A-13 D-Clip Earpiece
Chapter B Specifications
Technical Specifications
CA10
Table B-1 summarizes the intended operating environment and technical hardware specifications of the CA10.
Table B-1 CA10 Technical Specifications
Item
Description
PHYSICAL CHARACTERISTICS
Dimensions
2.5 in. H x 1.5 in. W x 1.01 in. D / 6.35 cm H x 3.81 cm W x 2.56 cm D
Notification
LED flash, Beep or .wav file
Weight
1.6 oz. / 45.37 g.
POWER
Main Battery
590 mAh Li-ion battery (internal)
Battery Life
10 hours of continuous operations
REGULATORY SPECIFICATIONS
EMC
EN 55024, EN 61000-3-2, ICES 003 Class B, EN 61000-3-3, FCC Part 15 Class B,
EN 301 489-17, EN 55022, EN 301 489-1, IEC 60601-1-2
Electrical Safety
EN 60950-1, C22.2 No. 60950-1, UL 60950-1, IEC 60950-1
Environmental
RoHS Directive 2002/95/EEC
RF Exposure
EN 50360, FCC Part 2, OET Bulletin 65, RSS102, EN 50361
Radio
EN 301 893, EN 300 328
B-2
CA10 User Guide
Item
Description
USER ENVIRONMENT
Drop Specifications
5 ft./1.5m drop to concrete, 6 drops per 6 sides, over operating temperature range
Operating Temperature
+14° F to 104° F / -10° C to + 40° C
Storage Temperature
-40° F to 158° C / -40° C to +70° C
Sealing
IP54
WIRELESS LAN DATA AND VOICE COMMUNICATIONS
Antenna
Internal
Data Rates
802.11b: up to 11 Mbps; 802.11g: up to 54 Mbps
Frequency Range
All country dependent: 802.11b - 2.4G Hz; 802.11g - 2.4G Hz
Output Power
100 mW U.S. and international
Voice Service
PTT style (1:Many) and private call back
WLAN
IEEE® 802.11b/g
Specifications
B-3
10-Slot CA10 Charge Cradle
Table B-2 summarizes the intended operating environment and technical hardware specifications of the 10-Slot
CA10 Charge Cradle.
Table B-2 10-Slot CA10 Charge Cradle Specifications
Item
Description
PHYSICAL CHARACTERISTICS
Dimensions
11.42 in. x 6.48 in. x 3.07 in. / 29 cm x 16.5 cm x 7.8 cm.
Weight
35.27 oz. / 1 kg. (Including: Cradle, Cradle Base and Power Supply Unit)
Power Supply
AC Input: 110-220 VAC, 50-60Hz, 20 W. DC Output:12 V, 3.3 A
Operating Temperature
0° C to 40° C (32° F to 104° F)
Storage Temperature
-10°C to 60°C (14° F to 140° F)
Charging Temperature
0° C to 40° C (32°F to 104°F)
Humidity
5% - 90% non-condensing
Drop Specification
3 ft. drop to concrete, 6 drops per 6 sides over operating temperature range; 4
ft. drop to concrete, 6 drops per 6 sides at ambient temperature
Electrostatic Discharge (ESD)
+/-8 kV air, +/- 4 kV contact, 2 kV charge body
Sealing
IP54
Glossary
A
Access Point. A wireless Access Point (AP) is a device that enables wireless communication devices (such as
CA10) to connect to a wireless network using Wi-Fi.
AESCCMP. 128 bits encryption algorithm used in the 802.11i security protocol created to replace both TKIP and
WEP protocols. CCMP is a mandatory part of the WPA2 standard, an optional part of the WPA standard, and a
required option for Robust Security Network (RSN) Compliant networks.
AirBeam. A smart mobile device manager utility that delivers data by utilizing different optimization
techniques to address wireless communication issues.
AP. Access Point or Access Port.
API. An interface by means of which one software component communicates with or controls another. Usually used
to refer to services provided by one software component to another, usually via software interrupts or function
calls.
Aperture. The opening in an optical system defined by a lens or baffle that establishes the field of view.
Application Programming Interface. See API.
ANSI Terminal. A display terminal that follows commands in the ANSI standard terminal language. For example, it
uses escape sequences to control the cursor, clear the screen and set colors. Communications programs
support the ANSI terminal mode and often default to this terminal emulation for dial-up connections to online
services.
Autodiscrimination. The ability of an interface controller to determine the code type of a scanned bar code. After
this determination is made, the information content is decoded.
1-2
CA10 User Guide
B
Bit. Binary digit. One bit is the basic unit of binary information. Generally, eight consecutive bits compose one byte
of data. The pattern of 0 and 1 values within the byte determines its meaning.
Bits per Second (bps). Bits transmitted or received.
bps. See Bits Per Second.
Byte. On an addressable boundary, eight adjacent binary digits (0 and 1) combined in a pattern to represent a
specific character or numeric value. Bits are numbered from the right, 0 through 7, with bit 0 the low-order bit.
One byte in memory is used to store one ASCII character.
BOOTP. A protocol for remote booting of diskless devices. Assigns an IP address to a machine and may specify a
boot file. The client sends a bootp request as a broadcast to the bootp server port (67) and the bootp server
responds using the bootp client port (68). The bootp server must have a table of all devices, associated MAC
addresses and IP addresses.
boot or boot-up. The process a computer goes through when it starts. During boot-up, the computer can run
self-diagnostic tests and configure hardware and software.
C
COM port. Communication port; ports are identified by number, e.g., COM1, COM2.
Cradle. A cradle is used for charging the CA10 battery and provides a storage place for the CA10 when not in use.
D
Decryption. Decryption is the decoding and unscrambling of received encrypted data. Also see, Encryption and
Key.
Default Gateway. A node on a computer network that is selected when the IP address does not belong to any other
entities in the Routing Table. Gateway is usually the ISP-provided device that connects the user to the Internet,
such as a modem or a router that routes the traffic from a computer to another network device.
Device Configuration Package. The Motorola Device Configuration Package provides the Product Reference
Guide (PRG), flash partitions, Terminal Configuration Manager (TCM) and the associated TCM scripts. With this
package hex images that represent flash partitions can be created and downloaded to the mobile computer.
DHCP. Dynamic Host Configuration Protocol (DHCP) is a network application protocol used by network devices
(clients) to obtain configuration information from the Internet Protocol (IP) network for operation.
DRAM. Dynamic random access memory.
Getting Started
1-3
E
ESD. Electro-Static Discharge
F
Firmware. Firmware is a software program that internally control an electronic device. The firmware enables the
device basic operation as well as higher level functions.
Flash Memory. Flash memory is responsible for storing the system firmware and is non-volatile. If the system
power is interrupted the data is not be lost.
G
G.729a. Codec used to Encode/Decode CVC PTT packets.
Gateway. See Default Gateway.
Group Broadcast. One to Many half duplex PTT communication.
Group Broadcast Button. Button for initiating Group Broadcast (1:N).
Group Broadcast Period. The maximum recording duration of a Group Broadcast PTT communication
H
Hz. Hertz; A unit of frequency equal to one cycle per second.
Host Computer. A computer that serves other terminals in a network, providing such services as computation,
database access, supervisory programs and network control.
I
IDE. Intelligent drive electronics. Refers to the solid-state hard drive type.
IEC. International Electrotechnical Commission. This international agency regulates laser safety by specifying
various laser operation classes based on power output during operation.
IEEE Address. See MAC.
Internet Protocol Address. See IP.
1-4
CA10 User Guide
I/O Ports. interface The connection between two devices, defined by common physical characteristics, signal
characteristics, and signal meanings. Types of interfaces include RS-232 and PCMCIA.
Input/Output Ports. I/O ports are primarily dedicated to passing information into or out of the terminal’s memory.
CA10 includes USB ports.
IP. Internet Protocol. The IP part of the TCP/IP communications protocol. IP implements the network layer (layer 3)
of the protocol, which contains a network address and is used to route a message to a different network or
subnetwork. IP accepts “packets” from the layer 4 transport protocol (TCP or UDP), adds its own header to it
and delivers a “datagram” to the layer 2 data link protocol. It may also break the packet into fragments to support
the maximum transmission unit (MTU) of the network.
IP Address. (Internet Protocol address) The address of a computer attached to an IP network. Every client and
server station must have a unique IP address. A 32-bit address used by a computer on a IP network. Client
workstations have either a permanent address or one that is dynamically assigned to them each session. IP
addresses are written as four sets of numbers separated by periods; for example, 204.171.64.2.
K
Key. A key is the specific code used by the algorithm to encrypt or decrypt the data. Also see, Encryption and
Decrypting.
L
LED Indicator. A semiconductor diode (LED - Light Emitting Diode) used as an indicator, often in digital displays.
The semiconductor uses applied voltage to produce light of a certain frequency determined by the
semiconductor's particular chemical composition.
Light Emitting Diode. See LED.
M
MAC. a Media Access Control (MAC) address is a unique identifier assigned to a network devices (such as the
CA10 or Access Point) by the manufacturer for identification.
MC. Mobile Computer.
N
NDS . The Domain Name System (DNS) is a hierarchical naming system for computers connected to a network.
The NDS serves as the "phone book" for the Internet by translating human-friendly computer host names into
IP addresses. For example, www.motorola.com translates to 72.247.207.224.
Getting Started
1-5
Nominal. The exact (or ideal) intended value for a specified parameter. Tolerances are specified as positive and
negative deviations from this value.
O
Open System Authentication. Open System authentication is a null authentication algorithm.
P
PAN . Personal area network. Using Bluetooth wireless technology, PANs enable devices to communicate
wirelessly. Generally, a wireless PAN consists of a dynamic group of less than 255 devices that communicate
within about a 33-foot range. Only devices within this limited area typically participate in the network.
Parameter. A variable that can have different values assigned to it.
R
RAM. Random Access Memory. Data in RAM can be accessed in random order, and quickly written and read.
RF. Radio Frequency.
ROM. Read-Only Memory. Data stored in ROM cannot be changed or removed.
Router. A device that connects networks and supports the required protocols for packet filtering. Routers are
typically used to extend the range of cabling and to organize the topology of a network into subnets. See
Subnet.
S
SDK. Software Development Kit
Shared Key. Shared Key authentication is an algorithm where both the AP and the MU share an authentication key.
Soft Reset. See Warm Boot.
Space. The lighter element of a bar code formed by the background between bars.
SSID. Service Set Identifier is a friendly name that identifies a particular 802.11 local wireless network. A wireless
device (such as CA10) receives broadcast messages from all access points within range advertising their SSIDs
so that the device can automatically connect to the network.
Subnet. A subset of nodes on a network that are serviced by the same router. See Router.
1-6
CA10 User Guide
Subnet Mask. A 32-bit number used to separate the network and host sections of an IP address. A custom subnet
mask subdivides an IP network into smaller subsections. The mask is a binary pattern that is matched up with
the IP address to turn part of the host ID address field into a field for subnets. Default is often 255.255.255.0.
T
TCP/IP. (Transmission Control Protocol/Internet Protocol) A communications protocol used to internetwork
dissimilar systems. This standard is the protocol of the Internet and has become the global standard for
communications. TCP provides transport functions, which ensures that the total amount of bytes sent is
received correctly at the other end. UDP is an alternate transport that does not guarantee delivery. It is widely
used for real-time voice and video transmissions where erroneous packets are not retransmitted. IP provides
the routing mechanism. TCP/IP is a routable protocol, which means that all messages contain not only the
address of the destination station, but the address of a destination network. This allows TCP/IP messages to be
sent to multiple networks within an organization or around the world, hence its use in the worldwide Internet.
Every client and server in a TCP/IP network requires an IP address, which is either permanently assigned or
dynamically assigned at startup.
Telnet. A terminal emulation protocol commonly used on the Internet and TCP/IP-based networks. It allows a user
at a terminal or computer to log onto a remote device and run a program.
Terminal. See Mobile Computer.
TKIP. Temporal Key Integrity Protocol (TKIP) uses the same as WEP for encryption with advanced key
management and effective message integrity checking.
TFTP. (Trivial File Transfer Protocol) A version of the TCP/IP FTP (File Transfer Protocol) protocol that has no
directory or password capability. It is the protocol used for upgrading firmware, downloading software and
remote booting of diskless devices.
W
WEP40. Wired Equivalent Privacy encryption based on 64-bit key string.
WEP128. Wired Equivalent Privacy encryption based on 128-bit key string of 26 hexadecimal (base 16) characters
(0-9 and A-F).
WPA. Wi-Fi Protected Access is security protocol for wireless 802.11 networks from the Wi-Fi Alliance.
Index
Numerics
D
20 seconds download 3-8
32 channels 3-12
DC cable A-6
Deployment and configuration 3-2
Diagnostic 4-3
Download software 3-2
A
AC line cord A-2
Access Point association 4-4
Accessories A-1
Add new 3-8
Alcohol 4-1
AP 4-4
Approved power supply A-2
E
B
Firmware 3-8
First time charge 1-8
battery information 4-4
Battery temperature 4-4
Boot 2-5
C
Cable length A-3
Ch Status 3-12
Class B 3-4
Clean 4-1
Communication settings 4-4
Configure CA10 3-7
Configure Devices tab 3-7, 3-8
Cradle Base A-3
Cradle base A-3
Cradle Power LED 1-7
Cradle Power LED lights green A-4
Cradle wall-mount A-5
Encryption Status 3-4
ESSID 3-4
Ethernet cable 3-1
F
H
Halt charging 1-7
Hardware status 4-4
Host computer 3-1
I
Installation Options A-2
Internet Explorer 3-1
Internet Protocol window 3-3
IP Address 3-4
IP Gateway 4-4
IP Mask 4-4
Isopropy 4-1
L
Last AP 4-4
1-2
CA10 User Guide
LED blinking Amber (charging) 1-8
LED status during use 2-5
LED status in cradle 1-8
LED steady green (charging) 1-8
LED steady red (charging) 1-8
Local Area Connection window 3-2, 3-4
Turn off 1-8
Turn off tune 1-8
Turn on 1-8
U
unpacking 1-2
M
MAC Address 4-4
Maintaining 4-1
Maximized consumption 1-8
Monitor CA10 3-11
Monitor Devices Tab 3-11
MotoDemo 3-4
N
Network requirements 3-1
Network Settings tab 3-8
O
Operational status 4-4
Optimized wireless network 1-8
P
pacemakers 1-4
Place Group Call 2-2
Properties 3-3
protect hearing 1-4
Push-to-Talk 2-1
R
Reset 2-5
Response 2-3
S
Security 4-4
Self-Tapping screw A-5
SELV outputs A-2
Setting access point 3-4
Setting PC 3-2
signal level 4-4
signal power 3-12
SSID 3-8
T
Transmission power level 4-4
Troubleshoot 4-2
W
Windows 3-1
Motorola, Inc.
One Motorola Plaza
Holtsville, New York 11742, USA
1-800-927-9626
http://www.motorola.com
MOTOROLA and the Stylized M Logo and Symbol and the Symbol logo are registered in the U.S. Patent and Trademark Office.
All other product or service names are the property of their registered owners.
© Motorola, Inc. 2009
72E-124942-01 Revision A - August 2009