1
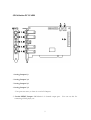
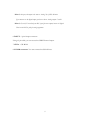
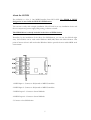
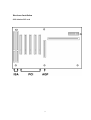
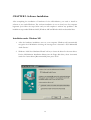
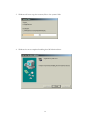
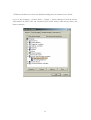
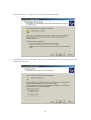
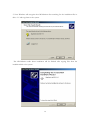
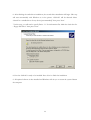
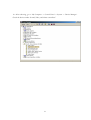
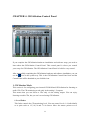
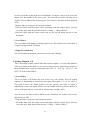
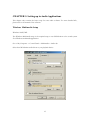
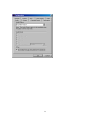
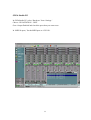
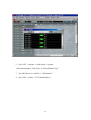
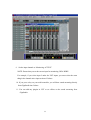
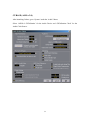
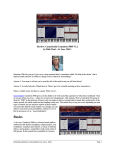
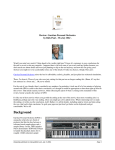
The Hard Disk Sampler Tool Kit !
GIGAStation
Owner’s Manual
www.egosys.net
All rights to this document are reserved. No part of this document may be copied reproduced, or distributed in any form or by
any means without the prior written permission of EGO SYStems Inc.
WARRANTY
EGO SYStems Inc. warrants to the original purchaser that this product, under normal use, will be free from defects in materials
and workmanship for as long as the purchaser owns this product. EGO SYS will, at its sole option, repair or replace a product
which is found to be defective. This warranty shall be null and void if, in the sole opinion of EGO SYS, a product failure is the
result of misuse, abuse, modification, or misapplication.
Except as expressly provided above, this product is provided “as is” without warranty of any kind. No claim is made for
merchantability or fitness for any purpose. In no event will EGO SYS be liable for any direct, indirect, consequential, or
incidental damages arising out of use of this product.
You must contact EGO SYS or our regional representative for prior approval before returning a failed product. All such
returns must be shipped to EGO SYS or our regional representative in original or equivalent protective packaging material,
with freight prepaid and adequate insurance. If the product is deemed to be defective, the repaired or replacement product will
be returned to you at no charge via carrier chosen by EGO SYS.
TRADEMARKS
EGO SYS, GIGAStation, and the GS2120 are trademarks of EGO SYStems Inc. IBM is a registered trademark of International
Business Machines Corporation. Windows is a trademark of Microsoft Corporation. Other product and brand names are
trademarks or registered trademarks of their respective companies.
RADIO FREQUENCY INTERFERENCE
NOTE: This equipment has been tested and found to comply with the limits for a Class A device, pursuant to Part 15 of the
FCC Rules., and EN50 081-1/2:1992 of CE Test Specifications. This equipment generates, uses, and can radiate radio frequency
energy. If not installed and used in accordance with the instructions, it may cause interference to radio communications.
CORRESPONDENCE
For technical support inquiries, contact your nearest GIGAStation dealer or contact us directly. Direct all other correspondence
to:
EGO SYStems Inc.
Suite 1003, Shinhan Bldg. 45-11, Yoido-dong,
Youngdungpo-gu, Seoul, Korea
Tel: +82 2 780-4451~3
Fax: +82 2 780-4454
Web Site: www.egosys.net
1
Contents
1. INTRODUCING GIGA STATION ----------------------------------------------------------------- 4
FEATURES------------------------------------------------------------------------------------------------- 4
WHAT’S IN THE BOX------------------------------------------------------------------------------------ 5
GIGASTAION PCI CARD------------------------------------------------------------------------------ 6
ABOUT THE GS 2120------------------------------------------------------------------------------------ 8
2. HARDWARE INSTALLATION-------------------------------------------------------------------- 9
SYSTEM REQUIREMENTS------------------------------------------------------------------------ 9
HARDWARE INSTALLATION------------------------------------------------------------------- 10
3. SOFTWARE INSTALLATION-------------------------------------------------------------------- 14
INSTALLATION UNDER WINDOWS 98SE/ME-------------------------------------------------------- 14
INSTALLATION UNDER WINDOWS 2000-------------------------------------------------------------18
4. CONTROL PANEL REFERENCE----------------------------------------------------------------23
5. SETTING UP IN AUDIO APPLICATIONS-----------------------------------------------------27
WINDOWS MULTIMEDIA SETUP----------------------------------------------------------------------27
POWER DVD---------------------------------------------------------------------------------------------28
GIGASTUDIO (GSI/F)-------------------------------------------------------------------------------30
* GIGA-WIRE------------------------------------------------------------------------------------------31
CUBASE (ASIO)---------------------------------------------------------------------------------------34
6. SPECIFICATIONS------------------------------------------------------------------------------------35
2
CHAPTER 1. INTRODUCING GIGA STATION
Thank you for choosing GIGAStation. You have made the best choice for a Hard Disk
Sampler Tool Kit as you will find out shortly.
GIGAStation is the new alternative to the sampler. By using your hard disk as sampler
memory, you can enjoy creativity on a much larger scale than ever imagined.
GIGAStation is the audio card specifically designed for use with GigaStudio. It includes all
the features you need to build a hard disk sampler from scratch.
Features
GIGA-WIRE
GIGA-WIRE is the driver technology developed by Ego Sys/Audio Trak which routes the
output of GigaStudio into the inputs of ASIO. You can record directly from Cubase and insert
all VST plugins into Cubase under the channels streaming from GigaStudio.
20-bit D/A converter
GIGAStation has 20-bit D/A converters. You can work with the best quality audio using the
20-bit D/A converters.
8 Analog Outputs
GIGAStation provides eight 1/4” stereo phone jack outputs.
5.1/7.1 ch. Dolby Surround
GIGAStation can be used for 5.1/7.1 ch. Dolby Surround sound. You will need a DVD ROM
and DVD software player to build a high-quality surround system. Also, you can produce
surround audio with software capable of producing surround sound using a Dolby surround
DVD player in your computer.
S/PDIF Coaxial Digital output
GIGAStation has an S/PDIF coaxial digital output port that will minimize signal loss when
transferring digital data to or from other digital equipment including MD and DAT players.
3
CD-ROM Analog Input
GIGAStation has an analog input port to connect the CD-ROM drive analog output that allows
you to listen to audio CDs with your CD-ROM drive.
Various Sample Rate Support
GIGAStation supports various sample rates from 32kHz, to 44.1kHz and 48kHz. GIGAStation
automatically detects the sample rate in order to select the appropriate sample rate. You will only
need to set up the sample rate in your software in order to have GIGAStation set it accordingly.
32-bit PCI Slot for PCI Bus Mastering Support
GIGAStation uses only a small amount of system resources. This allows you to use more
software plug-in effects without placing a heavy burden on the CPU.
What’s in the box
GIGAStation is shipped with the following contents:
1 GIGAStation PCI Card
2. GIGAStation connector
3. GS2120 MIDI Interface CARD
4. GS2120 Cable
5. Four MIDI connector plugs
6. Installation disk
7. This manual
8. Nemesys GigaStudio LE (CD)
9. Nemesys GigaPiano (CD)
10. GM500 (CD)
11. Power DVD (CD)
4
GIGAStation PCI CARD
1. Analog Outputs 1,2
2. Analog Outputs 3,4
3. Analog Outputs 5,6
4. Analog Outputs 7,8
- Four ports are stereo, so there is a total of 8 Outputs.
5. Coaxial SPDIF Output: GIGAStaion’s 2 channel output port. You can use this for
connecting a DAT player, etc.
5
Note: In this port, the output is the same as Analog 7,8 of GIGAStation.
If you want to use the digital output, you have to choose Analog outputs 7 and 8.
Note: In Coaxial, You need only one RCA jack for stereo output, because it’s digital.
Don’t use this RCA jack for analog equipment.
6. DOUT – 2 pin Output connector
Using a 2 pin cable, you can access the SPDIF format Output.
7. CD In – CD-ROM
8. GS 2120 connector: You can connect the GS2120 here.
6
About the GS2120
The GS2120 is a 2 In, 2 Out MIDI Interface from EGO SYS. The GS2120 is ONLY
designed to be used with the EGO SYS GIGAStation.
You can use it easily with a simple installation. The GS 2120 is an easy installation device and
does not require any power supply, IRQ setting, or driver to install.
The GS2120 driver is already included in the driver of GIGA Station.
Therefore, by the installation of the driver for GIGAStation, you can use the GS2120 right
away. The GS2120 can be used under Windows 98SE/ME/2000 with GIGA Station. One
point of interest is that it will work under Windows 2000 to provide the most stable MIDI work
environment.
1. MIDI Input 1 : Connect to Keyboards or MIDI Controllers
2. MIDI Input 2 : Connect to Keyboards or MIDI Controllers
3. MIDI Output 3 : Connect to Sound Modules
4. MIDI Output 4 : Connect to Sound Modules
5. Connect to the GIGAStaion
7
CHAPTER 2. Hardware Installation
System Requirements:
To take advantage of the GIGAStation and its full capacity, the computer specifications are
very important. Even though the GIGAStation is built to have low-CPU dependability, the
computer needs to meet some requirements in order to achieve maximum performance. The
GIGA Station is not just a simple soundcard, but a multimedia digital audio device with
various functions. Therefore, the performance of the GIGAStation is affected by the
computer specs that are required to process a vast amount of digital data. A faster CPU,
faster hard disk, and larger amounts of RAM are recommended.
Minimum system requirements:
1. Intel Pentium II CPU
2. 64MB of RAM
3. One available PCI slot
4. Microsoft Windows 98 SE/ME/2000 Operating System
5. Ultra DMA 33 hard disk drive
Recommended System Requirements:
1. Intel Pentium III CPU or higher
2. More than 128MB of Ram
3. One available PCI Slot
4. Microsoft Windows 98/ME/2000 Operating System
5. UDMA 66/100 7200 rpm hard disk drive
*** For using the GS2120, you need an open space in your computer rack. However,
the GS2120 doesn’t need to be inserted in a PCI slot.
8
Hardware Installation
GIGAStation PCI card
9
To install the GIGAStation card in your computer:
1. Turn off your computer. Leave it plugged in so that it is grounded.
2. Open the computer case. Remove the screw and the rear slot cover of an available PCI
expansion slot in your computer.
3. Discharge any static electricity that may be on your clothes or body by touching a
grounded metal surface such as the power supply case inside the computer.
4. Remove the card from its anti-static bag.
5. Push the card firmly but gently into the PCI slot until the card’s connector clicks into
place. Make sure that the audio connectors at the end of the card go through the rear slot of
the computer.
6. Attach the rear bracket of the card to the computer, using the screw from the rear slot
cover.
10
GS2120 MIDI Interface
To install the GS2120 card in your computer:
1. You require one empty slot close to the GIGAStation.
2. Connect the GS2120 connection cable to the GIGAStation connector. The cable can
be connected only one way.
3. Place the GS2120 into the empty slot. Be careful not to touch other cards to avoid any
damage to the cards.
11
4. Check to see that the GS2120 is firmly in place.
5. Locate the MIDI cable connector at the back of the computer.
6. Connect all 4 MIDI connector plugs that are provided.
7. Connect the MIDI cables to the MIDI plugs (MIDI cables are not included in the
package).
12
CHAPTER 3. Software Installation
After completing the installation of hardware for the GIGAStation, you need to install its
software to use under Windows. The software installation is not too hard, even for computer
beginners. Just follow the steps below and you will complete it without any problems. The
installation steps under Windows 98 SE, Windows ME and Window 2000 are described here.
Installation under Windows ME
1. After the hardware installation, turn on your computer. Windows will automatically
recognize the GIGAStation showing the message that it detected a ‘PCI Multimedia
Audio Device.’
2. Windows “Add New Hardware Wizard” will try to locate the driver for the new device.
Put the GIGAStation Installation diskette into the floppy disk drive, select ‘Automatic
search for a better driver [Recommended]’ then press ‘Next.’
13
3. Windows will now copy the necessary files to the system folder.
4. Windows has now completed installing the GIGAStation driver.
14
5. After installing the driver for the GIGAStation, Windows will automatically detect the
“GS2120,” the optional MIDI interface for GIGAStation. Just let the installation finish. Select
“Automatic search for a better driver [Recommend]” then press ‘Next.’
6. Windows will copy the necessary files to the Windows system folder and complete the
installation for the GS2120. Press ‘Finish.’
15
7. Windows will inform you that it has finished installing the new hardware. Press ‘Finish.’
8. Go to ‘My Computer ->Control Panel -> System -> Device Manager.’ Check the devices
‘GIGAStation by EGO SYS’ and ‘GS2120 by EGO SYS’ devices under Sound, Video, and
Game controllers.
16
Installation under Windows 2000
1.
After the hardware installation, turn on your computer. Windows will automatically
recognize the GIGAStation showing the message that it detected a ‘PCI Multimedia
Audio Device.’
2.
The “Found New Hardware Wizard” will pop up as in the following window. Select
“Add/Troubleshoot a device” then press ‘Next.’
17
3. Select “Search for a suitable driver for my device [recommended].”
4. Specify the location of the driver. Insert the provided diskette into the floppy disk drive and
select ‘floppy disk drive.’
18
5. Now Windows will recognize the GIGAStation after searching for the installation files in
drive “A” and copy them to the system.
The GIGAStation audio driver installation will be finished after copying files from the
installation disk to the system.
19
6. After finishing the audio driver installation, the second driver installation will begin. This step
will start automatically with Windows as in the picture. “GS2120” will be detected. Select
“Search for a suitable driver for my device [recommended]” then press ‘Next.’
7. In this step, you will need to specify Drive “A” for information files. Mark the check box for
“ floppy disk drives” then press ‘Next.’
8. Now the ‘GS2120’ is ready to be installed. Press ‘Next’ to finish the installation.
9. All required software is then installed and Windows will ask you to restart the system. Restart
the computer.
20
10. After rebooting, go to ‘My Computer -> Control Panel -> System -> Device Manager.’
Check the devices under “Sound, Video, and Game controllers.”
21
CHAPTER 4. GIGAStation Control Panel
If you complete the GIGAStation hardware installation and software setup, you need to
learn about the GIGAStation Control Panel. This control panel is where you control
your setup for GIGAStation. The GIGAStation Control Panel is built for easy control.
After successfully completing the GIGAStation hardware and software installation, you can
see the
icon in the system tray. This is the GIGAStation Control Panel icon and the
Control Panel will be launched as you click this icon.
1. CD Monitor Mode
This section is for configuring your internal CD-ROM and GIGAStation for listening to
audio CDs. The CD monitoring works only in the analog 1,2 outputs.
This means that you can listen to CDs only via the analog output. You can enjoy
listening to audio CDs, but you can’t record using GIGAStation.
1. Level Fader
This fader controls the CD monitoring level. You can control levels 1~8 individually
or as pairs such as 1-2,3-4,5-6 and 7-8 in Stereo. Move the mouse pointer over a
22
specific port fader to adjust the level individually. To adjust a stereo level, move the
mouse over the middle of the stereo ports. The selected port fader will turn into a
brighter color to indicate the selected ports. You can move the fader in three different
ways:
-Drag the fader as you press the left mouse button.
-Select the fader with the mouse cursor and adjust with the mouse wheel. You can
select the steps from the pull-down menu. ‘Config’ -> ‘Mouse Wheel.’
-Select the fader with the mouse cursor and use the up and down arrows of your
keyboard.
2. Level Meter
The Level Meter will display incoming signal levels. This will be active when there is
a signal coming from the CD Input.
3. Input Level Indicator
The Level Indicator shows the current level set for the CD Input.
2. Analog Outputs 1~8
This is the output volume control fader that controls outputs 1~8 of the GIGAStation.
All 8 level faders act the same so you need to learn only one. The 4 Stereo outputs of
the GIGAStation PCI card are connected with OUT 1,2 OUT 3,4 OUT 5,6 and
OUT 7,8 of the Control Panel.
1. Level Fader
The Level Fader will change the level of the wave out volume. You can control
outputs 1~8 individually or control the stereo pairs like outputs 1-2, 3-4, 5-6, and 7-8.
You need to move the mouse pointer over the specific port fader to adjust it
individually or move the mouse pointer over the middle of the two ports to adjust it in
stereo. If the port fader(s) is selected, it will turn into a brighter color.
You can move the fader in three different ways. Basically, the volume level can be
adjusted by ±0.5dB.
- Drag the fader as you press the left mouse button.
- Select the fader with the mouse cursor and adjust with the mouse wheel. You can
select the steps from the pull-down menu, ‘Config’ ->’Mouse Wheel.’
23
- Select the fader with the mouse cursor and use the up and down arrows of your
keyboard.
2. Level Meter
The Level meter displays the signal level of the wave signal. You can see the level of
each output to compare them and adjust the level on the basis of these meters. If you
wish to send out the wave to an external device, refer to the level meters to adjust the
signal to a proper level.
3. Output Level Indicator
The Output Level Indicator shows the current level setting for each of the outputs.
You can compare the output levels based on this indicator in order to adjust the output
level to a desired level. Move the output level fader to set it to a proper level.
4. MON – Monitoring On / Off
You can use the monitoring button to use 1,2 channel as the Master Output.
3. Master Output
This is the master output volume control fader that controls all outputs of the
GIGAStation..
1. Level Fader
The Level Fader will change the level of the wave out volume.
You can move the fader in three different ways. Basically, the volume level can be
adjusted by ±0.5dB.
- Drag the fader as you press the left mouse button.
- Select the fader with the mouse cursor and adjust with the mouse wheel. You can
select the steps from the pull-down menu, ‘Config’ ->’Mouse Wheel.’
- Select the fader with the mouse cursor and use the up and down arrows of your
keyboard.
2. Level Meter
The Level meter displays the signal level of the master output signal. If you wish to
send out the wave to an external device, refer to the level meters to adjust the signal
24
to a proper level.
3. Output Level Indicator
The Output Level Indicator shows the current level setting for the master outputs.
Move the output level fader to set it to a proper level.
4. Mute – On / Off Button
The Mute button can mute the total sound of GIGAStation.
4. Pull-down Menu Bar
The GIGAStation Control Panel includes a pull-down menu bar that contains the
configuration for the Control Panel. The menu bar consists of a file menu and a Config
menu.
1. File – Exit
File- Exit will terminate the GIGA Station Control Panel applet but it will not shut down
the Control Panel. You can launch the Control Panel again by clicking on the GIGA
Station icon in your system tray.
2. Config - Mouse Wheel
The Config - Mouse Wheel will control the mouse wheel adjustment. When you use the
mouse wheel to adjust the volume level, the adjustment step is set to 0.5dB . You can
configure the adjustment steps to your preference.
Step 1 : When you move the mouse wheel one step, the fader will move by 0.5dB.
Step 2 : When you move the mouse wheel one step, the fader will move by 1dB.
Step 4 : When you move the mouse wheel one step, the fader will move by 2dB.
Step 8 : When you move the mouse wheel one step, the fader will move by 4dB.
3. Config –Sample Rate
25
The Sample Rate option gives you three sample rates which are available for the
GIGAStation. The GIGAStation supports 32KHz, 44.1KHz, and 48KHz. The sample rate
must be selected here, then the same sample rate has to be set in your application.
4. Config –Latency
This will decide the latency of the GIGAStation. The GIGAStation provides 4 different
sample buffer sizes: 64 samples, 128 samples, 256 samples, and 512 Samples. In general,
a 64 sample buffer size results in 3 milliseconds of latency.
5. Config –Factory Default
This returns all GIGAStation configurations to their default setting.
6. Always on Top
This will set the GIGAStation Control Panel to always display over the active windows.
If this is not selected, the active windows will be set over the GIGAStation.
26
CHAPTER 5. Setting up in Audio Applications
This chapter only contains the basic setup for some audio software. For more detailed info,
please refer to the manual of the software.
Windows Multimedia Setup
Windows 98 SE/ME
The Windows Multimedia setup is the required setup to use GIGAStation as the sound system
for a Windows multimedia application.
Go to ‘My Computer -> Control Panel-> Multimedia-> Audio tab.
Select the GIGAStation audio driver as your playback device.
27
Power DVD
On the Power DVD Main applet, click the right mouse button, and choose
‘Configuration.’
Select the ‘Audio’ Tab.
Select ‘6 Speaker Output.’
Now you can enjoy 5.1 Ch DVD Sound.
28
29
GIGA Studio LE
In GIGAStudio LE, select ‘Hardware’ from ‘Settings.’
Choose ‘GIGASTATION – GSIF.’
Goto ‘Output Enabled’and check the ports that you want to use.
In ‘MIDI In ports,’ Set the MIDI ports to ‘GS2120.’
30
* GIGA-WIRE
GIGA-WIRE is the driver technology developed by Ego Sys/Audiotrak which routes the
output of GigaStudio into the inputs of ASIO. It is not available for WDM because GIGAWIRE is a dynamically loaded driver like ASIO. You can record directly from Cubase and
insert all VST plugins into Cubase under the channels streaming from Giga Studio.
However, there are some limitations to consider and here are some steps to follow:
GIGA-WIRE will only work with GigaStudio v2.2.41 or higher. With this version
of GigaStudio, all latencies in the Control Panel can be used (eg. 64,128, 256, &
512)
The priority of GigaStudio -> Settings ->General -> Sequencer -> Priority.
“Priority” should be set to “8.” Otherwise, you will encounter dropouts.
NOTE: This is crucial in order to achieve proper functioning of GIGA-WIRE!
We recommend you to set the latency in the Control Panel:
64 or 128 samples – for 1 track of real-time keyboard inputs.
256 or 512 samples – for recording or mixdown projects.
Here is an example:
1. Start GigaStudio V 2.2.41 (or higher).
2. Load a sample.
3. Start Cubase.
4. Open Cubase -> Panels -> VST inputs.
-
It should now be possible to see GIGA-WIRE. (IF you didn’t start GigaStudio
prior to Cubase, GIGA-WIRE will not appear under the VST Input Panel.)
5. Select a GIGA-WIRE input.
31
6. Open VST -> Options -> Audio Setup -> Systems.
Select Monitoring as “Tape Type” or “Record Enable Type.”
7. Set ASIO Device as “ASIO 2.0 – GIGAStation.”
8. Open VST -> Panels -> VST Channel Mixer 1.
32
9. Set the input channel as “Monitoring ACTIVE.”
NOTE: Ensure that you set the correct input for monitoring GIGA-WIRE.
For example, if you select input 2 under the VST inputs, you must select the same
thing in the channel mixer input section of Cubase.
10. If you press a key on your midi-controller, you will hear sound streaming directly
from GigaStudio into Cubase.
11. You can add any plugins in VST to set effects on the sound streaming from
GigaStudio.
33
CUBASE (ASIO v.2.0)
After launching Cubase, go to ‘System’ under the ‘Audio’ Menu.
Select ‘ASIO2.0- GIGAStation’ for the Audio Device and ‘GIGAStation Clock’ for the
Audio Clock Source.
34
Specifications:
1. Output LEVEL: -10dBV Unbalanced, -10dBV Nominal, +6.5dBV Max
2. Output Impedance: 100 ohm
3. Output Attenuation: Analog -34.5dB ~ 0dB, 0.5dB Step Size
4. Master Output Attenuation: Analog -34.5dB ~ 0dB, 0.5dB Step Size
5. Sample Rate: 32KHz, 44.1KHz, 48KHz
6. D/A Specs:
1) Resolution:
2) Dynamic Range:
3) THD+N:
4) Frequency Response:
7. Digital Out Specs:
1) Type:
2) Format:
3) Sample Rate:
4) Resolution:
20 Bits
90 dB A-Weighted (Typical)
-86 dB Fs (Typical)
20 ~ 20KHz
Coaxial connector
IEC-958 Consumer S/DIF
44.1 KHz, 48KHz
16 Bits
35
Hard Disk Sampler Tool Kit
GIGAStaion
Owner’s Manual
EGO SYStems Inc.
Suite 1003, Shinhan Bldg. 45-11
Yoido-dong
Youngdungpo-gu, Seoul, Korea
Tel : +82 2 780 4451~3
Fax : + 82 2 780 4454
www.egosys.net
36