1
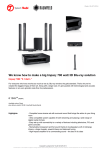
swarop
Epson PowerLite Home Cinema 700
Reviewer’s Guide
Table of Contents
Review Unit Elements...…………………………….…….…….....………………....………..…………………2
Product Overview ………………………………………………….…………..….………..…………………...2
Key Features and Benefits.…..………...……………...………...….………………....….……........................3
Competitive
Products………...……………………..……...................................................................................................3
Experiencing the PowerLite Home Cinema 700……....…………………….....…….………...…..............3
Connecting the Video Source……………....………………………...…….………………..……….............4
Adjusting the Picture……………...................………………………...….….…..…………..………...............4
For Best Image Quality………………………………………………………………….………………………5
Other Fun Ways to Use the PowerLite Home Cinema 700. ………. …..…...…..……..………...........…5
Troubleshooting……………………………...……………………..……....…………...….................................6
Your Review Unit Includes
−
−
−
−
−
−
−
Epson PowerLite® Home Cinema 700
Power Cable
Remote Control
Quick Setup Sheet
User’s Guide
Reviewer’s Guide (this document)
Product Press Release
Product Overview
Epson PowerLite Home Cinema 700
12.9” x 9.6” x 3.6” (excluding feet)
Weight: approx 6 lb.
The Epson PowerLite Home Cinema 700 makes it easy and affordable to enjoy movies,
videogames, TV, sporting events, and photos in spectacular 720p high definition on a truly grand
scale. With a variety of inputs, including HDMI, this versatile projector allows you to plug in your
DVD player, videogame console, satellite or cable receiver, computer, SD card, or even thumb
drive. The Home Cinema 700 lets you enjoy rich, vibrant images up to 120 inches – 8 times larger
than on a 40-inch widescreen TV. And, with a built-in 7-watt speaker and up to 2,000 lumens of
brightness*, it projects vivid, bright and clear images, even in a lighted room.
- Confidential Epson Reviewer’s Guide – Epson PowerLite Home Cinema 700
Page 2
Key Features and Benefits
High value versatility for widescreen entertainment
o
o
o
o
o
o
o
o
o
o
o
o
o
720p high-definition performance
2,000 lumens of Color and White Light Output*
HDMI interface for connecting high-definition video equipment
Project an 80-inch widescreen image from just 8.5 feet away or a 120-inch image from just
13 feet away
One built-in seven-watt speaker
SD card slot and USB thumb drive port for photo slideshows
Seven color modes to optimize viewing for different environments and image content
Auto Keystone correction and 1.2X optical zoom for easy picture adjustments
Versatile connectivity with Component Video, S-Video, HDMI, and USB Type A and B digital
connections
Energy efficient E-TORL® lamp lasts up to 4,000 hours**
Sleek, compact white design blends into contemporary decors or ceilings if mounted
3LCD technology for amazing color, reliability and details with no possibility of color breakup or rainbow effect
MSRP: $799
* Light output varies depending on modes [color and white light output].
** Lamp life results vary depending upon mode selected; environmental conditions and usage.
Lamp brightness decreases over time.
Competitive Products
Based on price, features and performance, the Optoma HD65 home theater projector may be
considered for comparison reviews.
Experiencing the Epson PowerLite Home Cinema 700
Enjoy the Home Cinema 700 wherever it’s convenient – on a table, in an entertainment center
or mounted on the ceiling. Depending on the image settings you’ve chosen, you can place the
projector anywhere from 3 feet to 33 feet from the wall or screen. Use the tables on page 20 of
the User’s Guide to help you determine the best projection distance for the size image you want.
•
•
•
To project onto a wall, choose a flat, light-colored wall with a fairly smooth surface and
make sure to adjust the size of the image to fit the wall using the aspect ratio adjustment or
the zoom ring on the projector. See “Focusing and Zooming the Image” on page 42 of the
User’s Guide.
The Home Cinema 700 can also be set up for a more professional-quality viewing experience
with a projection screen. Projection screens have optimal coatings that enhance brightness,
contrast and sharpness, increasing the natural contrast of images projected in rooms with
ambient light by absorbing the room light and preserving darker blacks.
Place the Home Cinema 700 directly in front of the screen or wall, facing straight ahead,
Make sure there is plenty of space for ventilation around and under the projector.
- Confidential Epson Reviewer’s Guide – Epson PowerLite Home Cinema 700
Page 3
Connecting the Video Source
You can connect several video sources to the Home Cinema 700 at the same time. Before
starting, look at your video equipment to determine its available video output connections.
•
•
•
•
•
If your video player has an HDMI connector, see “Connecting an HDMI Video Source” on
page 24.
o If you connect using an HDMI cable, the video and sound are both transferred and you
won’t need to connect any additional cables for audio.
If your video player has a component video port (three connectors labeled either Y/Cb/Cr
or Y/Pb/Pr), see “Connecting a Component Video Source” on page 25.
If your video player has a yellow RCA video output connector, see “Connecting a
Composite Video Source” on page 26.
If your video player has an S-Video connector, see “Connecting an S-Video Source” on
page 27.
If your video player has an RGB video port, see “Connecting an RGB Video Source” on page
28.
After connecting video cables (except HDMI), you may also want to connect an optional audio
cable to play sound through the projector; see page 32 of the User Guide.
Adjusting the Picture
Once the Home Cinema 700 is set up, adjustments may need to be made to the picture:
•
•
•
Adjust the vertical/horizontal placement of the image:
o Raise the image by pressing the foot release lever and lifting the front of the projector;
release the lever to lock the foot in position.
o Rotate the Zoom Ring to reduce or enlarge picture size.
See “Focusing and Zooming the Image” on page 42 of the User’s Guide.
Adjust the shape of the image:
o If the image loses its rectangular shape due to tilting of the projector, use the keystone
buttons on the projector to adjust the image shape. See “Adjusting the Image Shape”
on page 41 of the User’s Guide.
Choose a Color Mode:
o Select the right Color Mode according to the lighting conditions in the room and the
type of content you are viewing. Press the Color Mode button on the remote control;
press it repeatedly to move through the options.
– Game: Brightest mode; for video games or TV in a bright room.
– Theatre: For natural-toned movies in a darkened room.
– Dynamic: For projecting in a bright room (brightest mode).
– Dark Wall: For projecting on a dark wall or chalkboard.
– Living Room: For projecting black-and-white images in a bright room.
– Photo: For vivid, high-contrast still images in a bright room (only available when
the source is set to Computer or USB or Slideshow).
– sRGB: Matches the color palette of standard sRGB computer displays.
– Sports: For vivid TV images in a bright room (only available for component video,
S-Video, composite video, or HDMI sources).
- Confidential Epson Reviewer’s Guide – Epson PowerLite Home Cinema 700
Page 4
For Best Image Quality
For movies and games viewed in a dark room, such as a home theater environment, make sure
Auto Iris ON:
•
Set the color mode to Theater or Game.
o Theater mode defaults Auto Iris to ON
o Game mode defaults Auto Iris to OFF. To turn Auto Iris ON, please see pages 57 and
58 of the User’s Guide
To ensure the best quality video possible, particularly if connected to composite or S-Video
sources, turn the Progressive setting ON. If you are viewing photos, keep the setting OFF. Please
see pages 59 and 60 of the User’s Guide.
Other Fun Ways to Use the Epson PowerLite Home Cinema 700
In addition to watching DVD movies or televised programs, you can also connect a variety of
other devices to the Home Cinema 700 for even more entertainment options. Readers may
want to experience the best seats out of the house and set up a backyard theater. There are
inflatable and portable screens on the market to project onto, but even the wall of the garage
can work!
•
•
•
•
•
Videogames: Enjoy a much more immersive experience when videogames are super-sized.
Connect a Wii, Xbox 360 or PS3 videogame console and play larger-than-life videogames.
Note: if playing a Wii game with the standard wired sensor bar, be sure to place the
projector where your movements will not block the light path. You may need to place the
projector on a coffee table, for example, and stand behind it.
Photo slideshows: Remember the old carousel slide projector and family viewing of vacation
slides? Seeing loved ones on the big screen created something magical. For an updated
version of this, use an SD card or flash/thumb drive to run a looping slideshow of digital JPEG
photos. Use the USB port to connect the flash/thumb drive.
Apple iPod™: Project videos and play songs from your favorite playlists.
External high definition video sources: View images from an HD cable or satellite TV receiver,
HD DVR or HD camcorder using the HDMI video connection.
PC or Mac: Display content stored on a computer. This function allows the Home Cinema
700 to double as a business projector for presentations. Connect through the VGA port or
USB Type B port (latter is Windows only).
See “Connecting to Video Equipment” page 23 of the User’s Guide for details on how to
connect external devices to the Home Cinema 700. An additional adapter may be needed
with some devices.
- Confidential Epson Reviewer’s Guide – Epson PowerLite Home Cinema 700
Page 5
Troubleshooting
To ensure the best projection quality, here are some helpful guidelines:
•
•
•
•
•
•
•
Using On-Screen Help
o If the image doesn’t look right or your audio isn’t working, you can get help by pressing
the ? Help button on the projector or the remote control.
Selecting an Image Source
o You may need to select the image source if you have multiple sources connected to the
projector (such as a DVD player and a computer). Selecting the image source lets you
switch between image signals from different pieces of connected equipment.
o If you don’t see the image you want, press the Search button or one of the Source
buttons on the remote control, or press the Source Search button on the projector.
When the lights on the Home Cinema 700 flash:
o Flashing green: The projector is warming up. Wait for the image to appear.
o Green: The projector is operating normally.
o Orange: The projector is in sleep or standby mode. You can unplug it or press the power
button to turn it on.
o Red, flashing red, or orange: There is a problem with the projector. Please refer to the
diagnosis table on page 84 of the User’s Guide.
No picture appears on the screen:
o Check that the Power light is green (not flashing) and that the A/V Mute slide is open.
Also press the A/V Mute button on the remote control to make sure the picture has not
been turned off temporarily.
– See “Solving Problems with the Image or Sound” on page 85 of the User Guide.
The picture is out of focus or blurry:
o Adjust the focus using the focus ring; “Focusing and Zooming the Image” on page 42 of
the User’s Guide.
The image is too light or dark:
o Press the Color Mode button or select a different Color Mode option in the Image menu.
Refer to page 90 of the User’s Guide
The message “Not Supported” is displayed.
o Make sure the correct input signal is selected in the Signal menu (see page 59 of the
User’s Guide).
o Make sure your computer’s resolution and frequency or refresh rate is supported by the
projector ((see page 98).
- Confidential Epson Reviewer’s Guide – Epson PowerLite Home Cinema 700
Page 6