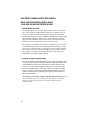
1
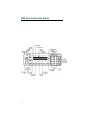
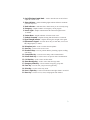
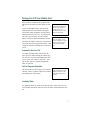
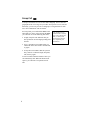
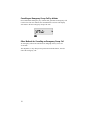
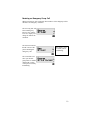
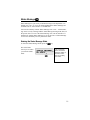
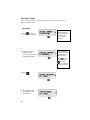
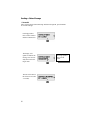
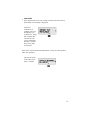
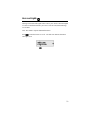
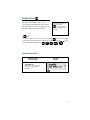
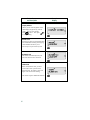
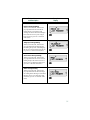
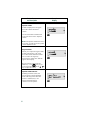
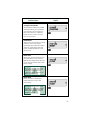
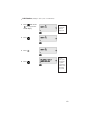
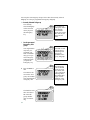
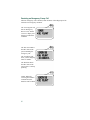
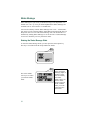
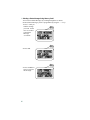
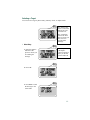
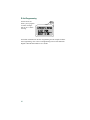
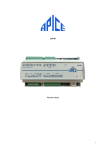
iDEN
LM 3000E
Getting Started
68P81084C17-0
Welcome
Congratulations on your purchase of the iDEN Advanced Feature Mobile
(LM3000E) by Motorola. This manual explains all the features that are available on your mobile.
The Advanced Features Mobile lets you make and receive person-to-person
or group radio calls, send and receive alphanumeric Status Messages, and initiate Emergency Group Calls. The unit also supports 4.8 Kb circuit data for
FAX/modem use (when a Handset is connected with a Data Hangup Cup).
Before operating your unit, take time to read the “Safety and General
Information” section. For operation of the Advanced Feature Mobile used
with a Handset, see the section titled, “Handset.”
General Features
Group Call-Your organization can be set up in different talkgroups so you
can have one-to-many radio communication. Talkgroups can be based on
local, targeted, or wide area selections.
Private Conversation-Private Conversation™ is used for one-to-one private
radio communication.
Call Alert-You can send Call Alerts™ to individuals, indicating that you want
to speak to them.
Horn and Lights-Causes your vehicle’s horn and lights to come on and flash
each time you receive a Private Call, Status Message, or Call Alert.
Advanced Features
Status Message-You can send Status Messages to individuals. This feature
reduces talktime and lets you leave short alphanumeric (aliased) status messages.
Emergency Group Call-This feature provides you with priority access to
talkgroup members. It will give you visible and audible indications of an
emergency condition.
Feature Menu
An easy to use Feature Menu is provided to customize your radio to meet
your individual needs.
1
iDEN Advanced Feature Mobile
2
1. On/Off/Volume Control Knob— Used to turn the unit on and off and
adjust the volume levels.
2. Status Indicators—Solid or blinking lights indicate different conditions
your unit may be in.
3. Mode Indicators— Indicator shows which mode you are currently using.
4. Emergency—Graphic indicator of emergency call in progress.
5. Horn & Lights—Graphic indication that the Horn and Lights feature
is enabled.
6. Feature Menu—Graphic indicator of feature menu in use.
7. Handset Connected—Graphic showing that the handset is connected.
8. Signal Strength Indicator—Graphic showing the strength of the signal.
9. Alphanumeric Keypad—Used for direct entry of radio IDs, service area
IDs, talkgroup IDs, or names.
10. Microphone Jack—Used to connect the microphone.
11. Area Key—Used to select service areas.
12. Directional Keys—Used to perform Memory Scrolling, option scrolling,
and editing.
13. Group Mode Key—Used for one-to-many radio communication.
14. Private Mode Key—Used for one-to-one private radio communication.
15. Call Alert Key—Used to enter call alert mode.
16. Status Message Key—Used to enter status message mode.
17. Emergency Mode Key—Used to initiate emergency group calls.
18. Clear Key—Used to clear your previous keypad entry.
19. Select Key—Used to select entry items.
20. Horn & Lights Key—Used to turn the Horn and Lights feature on and off.
21. Menu Key—Used to review, select, and program radio features.
3
The Display
The two-line display provides information to operate your mobile unit. There
are different modes your unit can be in: Group, Private, Alert, Status, or
Emergency. These are your Radio Operation modes. Each mode has a
“home” or default screen. To help you become familiar with the display operation, shown below is the “home” screen for Group Call Radio Mode.
Area —>
Talkgroup —>
4
Turning On/Off Your Mobile Unit
Press the Power/Volume knob (located on the,
left front of the unit) to turn the mobile on and
off.
To prevent unauthorized use, your unit will
automatically lock when turned on using the
power knob (using the ignition switch will not
automatically lock your unit). To unlock your
unit, enter your passcode. See the “Feature
Menu” section for further information on locks.
Each time the mobile is turned on, it performs a
self-check and system registration routine. Once
completed, the unit will display the last mode it
was in.
The display illuminates
during the self-check routine to verify operation.
Notify your service
provider if any error messages are displayed.
When using your mobile
while the engine is off,
you are operating on your
vehicle’s battery power,
and may drain the battery.
Automatic Turn On/Off
To enable Automatic Turn On/Off, leave the
unit’s power on before turning the vehicle ignition off. Now your unit will automatically turn
on every time your vehicle is turned on. Turning off your vehicle’s ignition automatically
turns off your unit.
Call-in-Progress Protection
This feature allows calls in progress to continue
after the vehicle’s ignition is turned off, without
interrupting your conversation.
In Group or Private
mode, you must be transmitting in order for Callin-Progress Protection to
operate.
Inactivity Timer
An eight-hour inactivity timer is built into the radio. If the radio is left on
for more than eight hours with no activity, the radio will automatically turn
off.
5
Adjusting the Speaker Volume
Turn the Power/Volume knob clockwise to increase or counter-clockwise to
decrease the speaker volume.
You can also adjust the speaker and keypad volumes through the Feature
Menu. Refer to the “Feature Menu” section for instructions on adjusting
these volumes.
6
Radio Operations
This section explains:
•
•
•
•
•
•
•
Basic Operation
Group Call
Private Conversation
Call Alert
Emergency Call
Status Message
When idle in radio
Group or Private modes
(not talking or listening),
you are able to receive
incoming radio calls.
When talking or listening, however, Call
Alerts, Private Conversations, and Status Messages are not received.
Horn and Lights
Basic Operation
To make a radio call:
1. Select the appropriate mode.
2. Hold the microphone in front of your mouth and press the PTT. Listen
for the tone that lets you know it’s okay to talk.
3. After the tone, speak into the microphone.
4. When you are done talking, release the PTT to listen.
To respond when someone calls you on the radio:
1. Hold the microphone in front of your mouth and press the PTT to talk.
2. Speak into the microphone.
3. Release the PTT to listen.
As long as your unit is powered on and is idle, you can receive radio calls.
7
Group Call
A Group Call consists of a service area and a talkgroup. Service areas are
geographic areas of coverage for your radio. Your specific service areas are
defined by your service provider. A talkgroup is an organization of radio
users who communicate with each other.
In Group Calls, press and hold the PTT to talk
and release it to listen. Upon pressing the PTT,
you will hear one of the following alert tones:
•
A high, chirp-like tone indicates that you
have permission to talk. Begin speaking after
the tone.
•
A low, continuous tone indicates that you
cannot talk at this time. Wait a moment and
try again.
•
A busy-like tone indicates that the system is
busy. Wait for a call-back (high, chirp-like)
tone, then try again.
A time-out timer limits the amount of time you
can continuously talk. When the allotted time
expires, you will hear a low-pitched cut-off
tone.
8
Your unit may be programmed with a courtesy
tone. Upon releasing the
PTT, a courtesy tone
alerts listeners that you
have completed your
transmission.
Service Area Selection
When making outgoing Group Calls, you may
choose from three different service area selections:
•
•
•
Local Area
Targeted Area
Wide Area.
Area selection only
applies to Group Calls
you initiate. Your lastselected area appears on
your display, regardless of
the origin of any incoming call.
In each case, you are speaking with members
of the talkgroup (shown on line 2 of the display) who are in that service area. Your unit is equipped with a pre-programmed list of service areas. You can add, edit, or erase areas. You can also
assign names (aliases) to them. (See the “Feature Menu” section for programming information.)
Local Area
A Local Area Group Call allows you to communicate with talkgroup members located in the service area you are currently in. Your radio automatically
updates your Local Area as you travel from one service area to another. Dispatchers are always included in a Local Area call, regardless of their location. (Example: Talk to Talkgroup 7 members in your Local Area. Area 6 is
your current Local Area. Talkgroup 7 is your selected talkgroup.)
1. Press
.
2. Press PTT.
Pressing the PTT allows
you to talk with “TALKGRP 7” members who
are currently in your
Local Area and your dispatcher.
9
Targeted Area
A Targeted Area Group Call allows you to communicate with talkgroup
members in a specific service area and your local cell. A Targeted Area can
be selected by: Direct Entry or Memory Scroll.
• Direct Entry
Allows you to use the keypad to input service area IDs. (Example: Select
area ID #12 using the keypad. Centreville is service area 1. Area 6 is your
current Local Area. Talkgroup 7 is your selected talkgroup.)
1. Press
When in the Local Area,
the word “LOCAL”
appears before the service
area ID or name.
.
2. Press
.
3. Press
4. Press
5. Press PTT.
10
.
Service area ID #1 has
been programmed with
a name, Centreville.
.
The word “AREA”
appears before the service
area ID unless a name has
been programmed.
• Memory Scroll
Allows you to use the
keys to scroll through memory for areas.
When programmed, names appear in place of service area IDs.
(Example: Select “MIDWAY,” which is second in your service area list.
Area 6 is your current Local Area. Talkgroup 7 is your selected talkgroup.)
1. Press GRP.
2. Press ARE.
3. Press
twice.
4. Press PTT.
Press and hold the
or
keys to activate
the Auto Scroll feature.
Auto Scroll allows you to
quickly scroll through
your lists.
Pressing PTT allows
you to talk with the
“TALKGRP 7” members
currently in the “MIDWAY” service area plus
your local cell.
Pressing SEL confirms
your service area selection
without initiating a Group
Call.
11
Wide Area
A Wide Area Group Call allows you to talk with talkgroup members in all
service areas and your dispatcher. (Example: Select Wide Area. Area 6 is
your current Local Area. Talkgroup 7 is your selected talkgroup.)
1. Press
.
When “LOCAL” appears
on the display, press
once to locate Wide Area.
2. Press ARE.
3. Press
.
4. Press PTT.
“WIDE AREA” is at the
end of your service area
list. With the
on the
top line, use your
to scroll to
“WIDE AREA.”
Pressing PTT allows you
to talk with your dispatcher and the “TALKGRP 7” members in all
service areas.
Pressing SEL confirms
your Wide Area selection
without initiating a Group
Call.
12
Talkgroup Selection
A talkgroup is an organization of radio users who communicate with each
other. Your unit is equipped with a pre-programmed list of talkgroups. You
can add, edit, or erase talkgroups. You can also assign names (aliases) to
them. (See the “Feature Menu” section for programming information.) A
talkgroup can be selected by: Direct Entry or Memory Scroll.
• Direct Entry
Allows you to use the keypad to input talkgroup IDs. (Example: Select
talkgroup 18. “SE PLANT” is talkgroup 1.)
1. Press
.
2. Press
.
3. Press
.
Talkgroup Selection is
independent of Service
Area Selection.
To erase a digit, press
. To clear all digits,
press and hold
. To
return to your previously
selected talkgroup, press
CLR.
To transmit, press PTT.
To listen only, press
.
The word “TALKGRP”
appears before the talkgroup ID unless a name
has been programmed.
4. Press PTT.
Pressing SEL confirms
your Group selection
without initiating a
Group Call.
13
• Memory Scroll
Allows you to use the
keys to scroll through memory for talkgroups. When programmed, names appear in place of talkgroup IDs.
(Example: Select “PAINTERS,” which is eighth in the list. Talkgroup 7 is
your selected talkgroup and is seventh in the list.)
1. Press
2. Press
.
.
3. Press PTT.
Press and hold the
or
keys to activate the Auto Scroll feature. Auto Scroll allows
you to quickly scroll
through your lists.
To transmit, press PTT.
To listen only, press SEL.
PTT - ID
The PTT - ID displays the ID or alias of the user currently transmitting in a
group call.
14
Private Conversation™
A Private Conversation is a radio call between two individuals. No other
radios can hear the conversation. A Private Conversation is placed by selecting the radio ID for the person you want to call. Your unit is equipped with a
pre-programmed list of radio IDs. You can add, edit, or erase radio IDs. You
can also assign names (aliases) to them. (See the “Feature Menu” section for
programming information.) A radio ID can be selected by: Direct Entry or
Memory Scroll.
Making a Private Conversation Call
• Direct Entry
Allows you to use the keypad to input radio IDs. (Example: Make a Private Conversation call to Jane. Her radio ID is 12. Jack’s radio ID is 1.
The last Private Conversation or Call Alert was with radio ID 5.)
1. Press
.
2. Press
.
3. Press
.
4. Press PTT.
When you enter the
mode, the last sent
or received radio ID or
name appears.
Upon pressing PTT, you
will hear a tone. Refer to
the “Group Call” section
for a description of these
tones.
15
• Memory Scroll
Allows you to use the
keys to scroll through memory for radio
IDs. When programmed, names appear in place of radio IDs. (Example:
Call Mark who is the 13th entry in your radio ID list. Jane is 12th.)
1. Press
2. Press
.
.
3. Press PTT.
16
When you enter the Prvt
mode, the last sent or
received radio ID or
name appears.
Receiving a Private Conversation Call
Two alert tones signal that you have received a Private Conversation call. In
addition, the following message appears on the display, indicating the person
calling you. (Example: Mark is Private calling you.)
The person’s ID appearing on the display is
stored as the last radio ID
received. When programmed, names appear
in place of radio IDs.
You will immediately begin hearing the voice of the person calling. To
respond to the call, wait until the caller is finished speaking. Then press and
hold the PTT and talk. Release to listen.
17
Call Alert™
You can initiate a Call Alert from any mode. An alert tone notifies the targeted person that you want to get in touch with them. A Call Alert is placed by
selecting the radio ID for the person you want to alert. A radio ID can be
selected by: Direct Entry or Memory Scroll.
Sending a Call Alert
• Direct Entry
Allows you to use the keypad to input radio IDs. (Example: Send a Call
Alert to Jane. Her radio ID is 12. Jack’s radio ID is 1. The last Private
Conversation or Call Alert was with Mark.)
1. Press ALE.
2. Press
.
3. Press
.
4. Press PTT.
An alert tone and this
message are presented
when the Call Alert successfully reaches the targeted unit.
18
If the targeted unit is out-of-range, busy, or turned off, an alert tone is heard
and an error message is displayed. Refer to the “Safety and General Information” section for a description of all error messages.
• Memory Scroll
To send a Call Alert using Memory Scroll,
use the same procedure described in the “Private Conversation” section.
The list of radio IDs and
names used to initiate a
Call Alert is the same list
that is used in Private
Conversation.
Receiving a Call Alert
Four recurring alert tones signal that you have received a Call Alert. In addition, the following message appears on the display, identifying the person
attempting to contact you. (Example: Sheila is alerting you.)
•
To talk to the person:
Press PTT.
You will be taken to Private mode when
responding to a Call
Alert.
•
If you are unable to respond to the Call Alert, press CLR to clear the display and silence the recurring tones.
•
To silence the recurring alert tones only, press any key (except PTT, Grp ,
Prvt, Alert , Sts , Emer or Men).
Note: If not cleared, all incoming calls will be blocked.
19
Emergency Group Call
An Emergency Group Call allows a user to have priority access to his talkgroup members and provide them visual and audible indications of an emergency condition. The Emergency call can be placed from any mode.
Placing an Emergency Group Call
1.
Press and hold the
Emergency Key.
The radio will emit
an emergency start
tone to indicate that
you have successfully requested an
emergency call.
The emergency call
will be sent on either
a pre-programmed
emergency talkgroup
or the last selected
talkgroup.
Emergency will flash
until the system
acknowledges the
emergency condition. A tone will be
generated to provide
indication that the
channel is ready to
begin the call.
20
Placing an emergency call will
exit any operation
you are in.
To end an emergency call, press
and hold the
for 3 seconds. The
radio will return
to the last selected
talkgroup.
You can place an Emergency Group Call to either the currently selected
talkgroup or to the pre-programmed emergency talkgroup, depending on
how your radio is programmed.
• Currently Selected
Talkgroup
The currently
selected talkgroup
will be selected
when you press
the Emergency
key.
•
Pre-Programmed
Emergency Talkgroup
Your organization
may have programmed your
radio to automatically go to a specific Emergency
Talkgroup when
you press the
Emergency key.
2. Press the PTT to
talk.
The initiator cannot
exit the emergency
call without first
cancelling the emergency call.
The display will
show the alias or ID
of the talk group
member who is
transmitting.
If you place an
emergency call to
the currently
selected talkgroup, the second
line will stay the
same and not
flash.
The second line
will flash to indicate the unit is
affiliating with
the pre-programmed emergency talkgroup.
The initiator of
the Emergency
Call is blocked
from receiving
any Private Call,
Call Alerts, and
Status Messages
for the duration of
the emergency
call.
The second line
will show the
talkgroup along
with the ID (alias)
of the person currently transmitting.
21
Cancelling an Emergency Group Call by Initiator
Press and hold the Emergency key until the unit generates an Emergency Call
Cancel tone. This tone indicates the cancellation has occurred. The display
will return to the non-emergency Group Call state.
Other Methods for Cancelling an Emergency Group Call
An emergency call will be cancelled if no talkgroup activity occurs for
30 seconds.
The dispatcher, or any other person provisioned with this feature, can also
cancel the emergency call.
22
Receiving an Emergency Group Call
When an emergency call is initiated, other members of the talkgroup will be
notified of an emergency condition.
The receiving unit will
hear an Emergency
Receive tone, and the
receiver’s display will
change to indicate the
condition.
The first line indicates
the ID or alias of the
person initiating the
emergency call.
The display you’ll
see when you are
transmitting.
The second line will
show you the talkgroup name or number
with the ID or name
of the person currently
transmitting.
23
Receiver Operations During an Emergency Call
Other members of the Emergency Group Call talkgroup can leave the emergency call and change modes while involved in the call.
While listening to the emergency call, the receiving unit will not receive
Call Alert, Status Message, Private Conversation, or other group calls for the
duration of the emergency call.
24
Status Message
Status Message lets you send a pre-defined message to the dispatcher or to
another user’s ID. Up to 10 pre-defined alphanumeric Status Messages are
available such as “AT LUNCH” or ”EN ROUTE”.
You can also send any numeric Status Message from 1-255. A Status Message can be sent by selecting both the Status Message and target ID (alias) of
the person who is to receive the Status Message. You can cut talk time to a
minimum by sending Status Messages. You can also leave a Status Message
for receivers while they are away from their radios.
Entering the Status Message Mode
To enter the Status Message mode, press the
This is the home
screen you see when
you enter the Status
mode.
key.
The second line
shows the Status
Message (alpha or
numeric) of the
last successfully
sent status.
25
Selecting a Status Message
Once you are in Status Mode, you can select a Status Message by Direct
Entry or by using Memory Scroll.
• Direct Entry
Direct Entry allows you to use the keypad to select the message you want
to send. Enter any number from 1-255 to select a Status Message. The
number can correspond to one of 10 pre-programmed alphanumeric
status messages or any other numeric Status Message within the range of
1-255.
1. Press Sel .
2. Press Sel .
3. Press PTT.
26
Pressing the PTT
at this time will
send the message
to the last radio
ID to which you
sent a successful
Status Message.
• Selecting a Status Message Using Memory Scroll
Once you are in Status Mode, you can select Status Messages by
scrolling through the 10 named (aliased) Status Messages you have programmed by using the < > keys.
1. Press > until you
find the message
you want. In this
case we scrolled to
the Status Message,
”At Lunch.”
2. Press Se l.
Pressing the PTT
at this time will
send the message
to the last radio
ID to which you
sent a successful
Status Message.
3. Press PTT.
27
Selecting a Target
Once you have selected a Status Message, you can select a target by Direct
Status or
Entry
Message,
Memoryyou
Scroll.
can
select a target by Direct
Entry or Memory Scroll.
• Direct Entry
1. Press
to move
to the target selection.
2. Enter the numeric
radio ID of the
person to whom you are
sending the message.
3. Press
.
4. Press PTT to send
the message to the
selected ID.
28
The second line
reflects the ID or
alias to whom you
last sent a successful Status
Message.
The ID list is the
same as Call Alert
and Private Conversation List.
The
key acts
as a backspace.
Clr returns to
show you the last
selected radio ID.
• Memory Scroll
You can select a target by scrolling through radio IDs or aliases by using
the
keys.
1. Press the
key
until you find the
person to whom you
want to send the
message.
2. Press
.
3. Press PTT.
The display shows
the message that has
been sent.
29
Sending a Status Message
• Successful
After selecting both a Status Message and desired target ID, press the PTT
to send the message.
Four high pitched
tones will be heard to
indicate transmission.
The display will
update to indicate the
message was successfully delivered to the
target radio.
The unit will return to
the status screen (after
3 seconds).
30
Two high-pitched
tones will be
heard.
• Unsuccessful
If the targeted unit is busy, out-of-range or turned off, an alert tone is
heard and an error message is displayed.
Target Not
Available is an
example of an error
message that you
could receive. Target
Not Available indicates that the unit
you are sending the
message to is either
busy, out of range,
or turned off.
Refer to the “Safety and General Information” section for a description of
other error messages.
The unit will return
to the status screen
(after 3 seconds).
31
Exiting the Status Mode
Press the
, Privat, or Alert key to exit the Status Message screen.
Receiving a Status Message
The unit will receive a
message along with alert
tones.
To silence the recurring
alert tones only, press any
key (except PTT,
, Prv t, Aler t, S ts ,
or Men).
Note: If not cleared, all
incoming calls will be
blocked.
32
Line 1 shows the
ID (Alias) of the
sending unit.
Line 2 shows the
message.
Clr clears the Status Message and
returns you to the
mode you were in
prior to receiving
the Status Message.
Pressing the GRP,
PRV, ALER, STATUS, or MENU
keys will also clear
the Status Message.
Horn and Lights
Turning on the Horn and Lights feature causes your vehicle’s horn and lights
to come on and flash each time you receive a Private Call, Status Message,
or Call Alert.
Note: This feature requires additional hardware.
Press H/L to turn this feature on or off. The bell icon indicates that Horn
and Lights is on.
33
Feature Menu
The Feature Menu allows you to review,
select, and program additional radio features.
The table below provides a description of the
features available in the Feature Menu.
•
The Feature Menu can be
accessed using the
MENU key at any time
without interrupting radio
operation.
Key
The Feature Menu can be accessed by pressing the ME key on the front right
of the radio. You can then select features by scrolling using the
keys.
To exit the Feature Menu, press
,
,
,
or
.
Feature Menu Table
Feature Name
and Description
Example
Display
Own Radio ID
Allows you to program, edit,
and review your personal
Radio ID.
35
Feature Name
and Description
Display Dimmer
Allows you to set the brightness of the
radio display (bright for day, dim for
night). There are four settings.
Press SEL to select. Then press
to change setting.
Manual Lock
Locking your unit prevents unauthorized
use and disables incoming and outgoing
calls. Manual lock allows you to
selectively lock your unit at any time.
Automatic Lock
This feature automatically locks your
unit each time the unit is turned on.
Theft Alarm
When Theft Alarm is ON, you have
30 seconds to enter your Passcode.
After that time, the vehicle’s horn and
lights come on and start flashing.
This feature requires additional hardware.
36
Example
Display
Feature Name
and Description
Example
Display
Radio ID List Programming
Allows you to add, edit, and erase the
pre-programmed list of radio IDs for
making Private Conversations and
sending Call Alerts and Status Messages.
Each radio ID can be up to five digits
long and can be given an 11-character
name (alias).
Talkgroup List Programming
Allows you to add, edit, and erase the
pre-programmed list of talkgroup IDs
for making Group Calls. Each talkgroup
ID can be up to three digits long and can
be given an 11-character name (alias).
Service Area List Programming
Allows you to add, edit, and erase the
pre-programmed list of service areas for
making Group Calls. Each service area
can be up to two digits long and can be
given an 11-character name (alias).
Status List Programming
Allows you to add, edit, and erase the
pre-programmed list of status messages
for sending Status Messages. Each Status
Message can be up to three digits long
and can be given an 11-character name
(alias).
37
Feature Name
and Description
Speaker Volume
Volume is displayed as a bar graph.
Seven bars indicate maximum
volume.
Use the On/Off Power/Volume knob
on the front of the radio to adjust the
volume.
Note: If the Speaker Volume Set Tone is
set to OFF, you will not hear the speaker
volume adjustment tones.
Keypad Volume
Allows you to adjust the keypad volume.
Volume is displayed as a bar graph.
Seven bars indicate maximum volume.
You can silence the keypad by
decreasing the volume until “SILENT”
appears on the display.
Keypad Volume is listed under the
MENU key. Press SEL when you get
to the Keypad display to use the
keys to adjust the volume.
Speaker Volume Set Tone
Disabling this feature (OFF) will
prevent speaker volume adjustment
tones from being heard. When this
feature is enabled (ON), a tone
will be heard indicating the
volume level of the speaker.
38
Example
Display
Feature Name
and Description
Example
Display
Changing Your Passcode
The passcode is initially set to ØØØØ.
This feature allows you to personalize
your passcode to any four digits you
select. Passcode entry is required to
unlock the unit, as well as to access
other security features.
Feature Reset
Allows you to conveniently reset certain
features to their factory settings.
Specifically, Reset returns all volumes,
Auto-Lock, Theft Alarm, Horns and
Lights, and Display Dimmer to their
factory levels.
Master Clear
Master Clear performs all functions of
the Feature Reset. It also returns the
Radio ID list, Talkgroup list, Status list,
Service Area list, and Passcode to their
factory settings.
CAUTION
Master Clear erases all entries stored
in your Radio ID, Talkgroup, Status
and Service Area lists. Once confirmed, this procedure cannot be cancelled or reversed.
Master Reset
Resets your radio’s identification
number and Service Key to their
initial settings.
CAUTION
Master Reset disables service of your
unit until a new identification number
and Service Key are generated. Once
confirmed, this procedure cannot be
cancelled or reversed.
39
Feature Name
and Description
Changing the Service Key
Designed to reduce fraud, the Service
Key is a 32-character authentication
code that, once generated, must be
given to your service provider.
CAUTION
Changing the Service Key disables service of your unit until you notify the service provider of the new Service Key.
Once confirmed, this procedure cannot
be cancelled or reversed.
NAM Selection
Number Assignment Module (NAM)
allows you to have local service
in different cities. NAM also allows you
to register with different service providers
in the same city.
40
Example
Display
Feature Menu Examples
• List Programming
Adding an Entry (Example: Add Al to your Radio ID list.)
1. Press ME .
2. Press
until you
get to the Radio ID
List Program.
3. Press SEL .
4. Press SEL .
5. Press
to
assign Radio ID 1.
You can program
your Area,
Group, Radio ID,
and Status Message List.
41
6.
Press
7.
Press
8.
Press
9. Press
.
.
To erase a
character,
press
.
To clear all
characters,
press and
hold
.
.
three times .
10. Press SEL to add AL to
your Private Radio List.
Wait three seconds
11. Press CLR to exit List
Programming.
42
To select a
letter:
1st press
= 1st letter;
2nd press
= 2nd letter;
3rd press
= 3rd letter.
4th press =
number
12. Press
to exit
Menu Mode or any
mode key.
43
• Editing an Entry
(Example: Change the Radio ID #1 from Al to Joe.)
1. Press
.
2. Press
until you get
to the Radio ID
List Program display.
3. Press
.
4. Press
to go to the
Edit Screen.
5. Press
44
.
6.
Press
7.
Press
8.
.
At this point, the
name can be
changed using
the procedure
described in
“Adding an
Entry” above.
.
Enter Joe and press
aaaa.
A confirmation
message is displayed for a
moment.
Wait 3 seconds.
9.
Press
when
you have finished
the editing.
45
• Erasing an Entry
(Example: Erase Joe, the first entry in your Radio ID List.)
1.
Press
2.
Press
until
you get to the
Radio ID List
Program Display.
3.
Press
4.
Press
once
or
twice.
5.
Press
.
6.
Press
.
46
.
.
Press
to cancel
the operation.
7.
Press
.
Joe is erased and the
display returns to the
Erase Entry display.
8.
Press
when you
have finished the
erase function.
9.
Press
to exit Feature Menu Mode.
47
• Changing Passcode
1. Press
and use the
xxx key to get to the
Change Passcode dis
play.
2.
Press
3.
Enter the old code.
4.
Enter the new code.
5.
Re-enter the new
code.
.
Wait 3 seconds.
48
If you are setting the passcode for the
first time, the
old code is
ØØØØ.
Your Passcode
must be four
digits long. It
will appear as
“****” on the
display.
A confirmation message
is displayed.
• NAM Selection (Example: Select your second NAM.)
1.
Press
and use the
xxxxkey to get to the
NAM display.
2.
Press
.
3.
Press
.
4.
Press
.
The currently selected
NAM is
displayed.
At this
point, your
unit begins
a system
registration
routine onto
the NAM
#2 system.
49
Handset Operation
Adding a Handset to your mobile will give you increased functionality such
as Phone Operations and Message Mail. See the Handset Manual (LM2000)
to learn all the basic features of the Handset. When the handset is used with
the Advanced Feature Mobile, all functionality is routed to the handset.
This section explains how the handset works when it ships from the factory.
Many features are programmable by your organization. Be sure to refer to
your organization’s instructions to find out the differences.
Emergency Group Call
Emergency Group Call - Provides priority access to talkgroup members, and
provides visible and audible indications of an emergency condition. The
emergency call will take place on a pre-programmed emergency talkgroup or
the last selected talkgroup (depending on how the radio is programmed).
Note: The Emergency Key is still operable from the mobile keypad. The
handset Emergency Key is the upper most key on the PTT side.
Emergency Key
PTT Button
Location of Emergency Key on Handset
Status Message
Status Message - Allows you to send a Status Message to the dispatcher, or
to the target ID of your choice. Status Messages like “AT LUNCH” and “EN
ROUTE” can be programmed and sent. Up to 10 named (aliased) Status
Messages are available per unit.
51
PTT - ID
The PTT - ID displays the ID or alias of the user currently transmitting in a
group call.
52
Emergency Group Call
An Emergency Group Call allows a user to have priority access to his talkgroup members and provide them visual and audible indications of an emergency condition. The Emergency call can be placed from any mode (private,
group, phone).
Placing an Emergency Group Call
1.
Press and hold the
Emergency Key.
The radio will emit
an emergency start
tone to indicate that
you have successfully requested an
emergency call. A
sample display is
shown here:
Placing an emergency call will
exit any operation
you are in.
To end an emergency call, press
and hold the
Emergency Key
for 3 seconds. The
radio will return
to the last selected
talkgroup.
The emergency call
will be sent on either
a pre-programmed
emergency talkgroup
or the last selected
talkgroup.
Emergency will flash
until the system
acknowledges the
emergency condition. A tone will be
generated to provide
indication that the
channel is ready to
begin the call.
53
You can place an Emergency Group Call to either the currently selected
talkgroup or to the pre-programmed emergency talkgroup.
• Currently Selected Talkgroup
The currently
selected talkgroup
will be selected
when you press
the Emergency
key.
•
Pre-Programmed
Emergency Talkgroup
Your organization
may have programmed your
radio to automatically go to a specific Emergency
Talkgroup when
you press the
Emergency key.
2.
Press the PTT to
talk.
The initiator cannot exit the emergency call without
first cancelling the
emergency call.
The third line will
show the alias or
ID of the talk
group member
who is transmitting.
54
If you place an
emergency call to
the currently
selected talkgroup, the second
line will stay the
same and not
flash.
The second line
will flash to indicate the unit is
affiliating with
the pre-programmed emergency talkgroup.
The initiator of
the Emergency
Call is blocked
from receiving
any Phone, Private, Call Alerts,
Message Mail,
and Status Messages for the
duration of the
emergency call.
Cancelling an Emergency Group Call by Initiator
Press the Emergency key until the unit generates an Emergency Call Cancel
tone. This tone indicates the cancellation has occurred. The display will return
to the non-emergency state.
Other Methods for Cancelling an Emergency Group Call
An emergency call will be cancelled if no talkgroup activity occurs for
30 seconds.
The dispatcher, or any other person provisioned with this feature, can also
cancel the emergency call.
55
Receiving an Emergency Group Call
When an emergency call is initiated, other members of the talkgroup will be
notified of an emergency condition.
The receiving unit will
hear an Emergency
Receive tone, and the
receiver’s display will
change to indicate the
condition.
The first line indicates
the ID or alias of the
person initiating the
emergency call.
The second line will
show you the talkgroup
name or number.
The third line shows
the ID or alias of the
person who is currently
speaking.
NOTE: When the
receiving unit initiates
a transmission, the
third line will be blank.
56
Receiver Operations During an Emergency Call
Other members of the Emergency Group Call talkgroup can leave the emergency call and change modes (phone, group, private) while involved in the
call.
While listening to the emergency call, the receiving unit will not receive
phone, Call Alert, Message Mail, Status Message, Private Conversation, or
other group calls for the duration of the emergency call.
57
Status Message
Status Message lets you send a pre-defined message to the dispatcher or to
another user’s ID. Up to 10 pre-defined alphanumeric Status Messages are
available such as “AT LUNCH” or ”EN ROUTE”.
You can also send any numeric Status Message from 1-255. A Status Message can be sent by selecting both the Status Message and target ID (alias) of
the person who is to receive the Status Message. You can cut talk time to a
minimum by sending Status Messages. You can also leave a Status Message
for receivers while they are away from their radios.
Entering the Status Message Mode
To enter the Status Message mode, you must press the status option key.
This key is accessible from the Group and Private modes.
This is the default
screen you see when
you enter the Status
mode.
58
The second line
shows the Status
Message (alpha or
numeric) of the
last successfully
sent status.
EXIT returns you
back to either
Group or Private
mode. TARGT
takes you to the
Target ID selection screen.
Selecting a Status Message
You can select a Status Message by Direct Entry or by using Memory Scroll.
• Direct Entry
Direct Entry allows you to use the keypad to select the message you want
to send. Enter any number from 1-255 to select a Status Message. The
number can correspond to one of 10 pre-programmed alphanumeric
status messages or any other numeric Status Message within the range of
1-255.
1. Press 2.
.
2. Press OK.
Pressing the PTT
at this time will
send the message
to the last radio
ID to which you
sent a successful
Status Message.
3. Press TARGT.
EXIT will return
you to the Status
Message screen.
59
• Selecting a Status Message Using Memory Scroll
You can select Status Messages by scrolling through the 10 named
(aliased) Status Messages you have programmed by using the < > keys.
1. Press > until you
find the message
you want. In this
case we scrolled
to the Status
Message,
”At Lunch.”
2. Press OK.
3. Press TARGT to
select a target for
this message.
60
Selecting a Target
You can select a target by Direct Entry, Memory Scroll, or Alpha Search.
The ID list is the
same as Call Alert
and Private Conversation List.
The second line
reflects the ID or
alias to whom you
last sent a successful Status
Message.
• Direct Entry
1. Enter the numeric
radio ID of the
person to whom you
are sending the
message.
The < key acts as
a backspace.
CANCL returns to
show you the last
selected radio ID.
2. Press OK.
3. Press PTT to send
the message to the
selected ID.
61
• Memory Scroll
You can select a target by scrolling through radio IDs or aliases by using
the < > keys.
1. Press the > key
until you find the
person to whom
you want to send
the message.
2. Press OK.
3. Press PTT.
The display shows
the message that
has been sent.
62
• Alpha Search
You can select a radio ID by entering the first letter of the name (alias). If
no name is stored under a letter, the unit will automatically search forward, alphabetically, until the next name is found.
1. Press the ALPHA
key.
2. Press a numeric
key. ie: Press
twice to view the
names (aliases) that
begin with the letter
R.
63
3. Use either the < >
keys to scroll to
the name (alias)
who is to receive
the Status Message.
4. Press PTT.
64
Sending a Status Message
• Successful
After selecting both a Status Message and desired target ID, press the PTT
to send the message.
Four high pitched
tones will be heard to
indicate transmission.
The display will
update to indicate the
message was successfully delivered to the
target radio.
Two high-pitched
tones will be
heard.
The unit will return to
the status screen (after
3 seconds).
65
• Unsuccessful
If the targeted unit is busy, out-of-range or turned off, an alert tone is
heard and an error message is displayed.
Target Not
Available is an
example of an error
message that you
could receive. Target
Not Available indicates that the unit
you are sending the
message to is either
busy, out of range,
or turned off.
Refer to the “Safety and General Information” section of this manual
for a description of other error messages.
The unit will return
to the status screen
(after 3 seconds).
66
Exiting the Status Mode
Press the PHONE, GROUP, or PRVT key to exit the Status Message screen.
Pressing the EXIT option key from the Status Message screen will also
allow you to exit the status mode.
Receiving a Status Message
The unit will receive a
message along with alert
tones.
Note: All calls are
blocked until the
message is cleared.
To silence the recurring
alert tones only, press
any key (except PHONE,
GROUP, PRVT or the
CLEAR option key).
Line 1 shows the
ID/Alias of the
sending unit.
Line 2 shows the
message.
CLEAR clears
the Status Message and returns
you to the mode
you were in prior
to receiving the
Status Message.
Pressing the
PHONE, GROUP
or PRVT keys
will also clear the
Status Message.
67
ID List Programming
Feature menu #25
allows you to program
10 status messages,
each up to 11 characters long.
For further information on ID List Programming and an example of Phone
List Programming, refer to the List Programming section of the Motorola
Digital Communicator Handset User’s Guide.
68
Safety and General Information
Features
Benefits
Automatic Scroll
Allows you to quickly scroll through your lists.
Call Alert
Ensures that you never miss important radio
calls. This feature also provides radio call
screening and easy call-back.
Digital Technology
Assures you of crystal clear sound, less static,
fewer dropped calls, and improved security.
Direct Entry
Allows you to quickly enter radio IDs using the
keypad.
Group Call
A convenient way to communicate with a group
of individuals simultaneously.
Emergency Call
A fast way to contact your team in an emergency.
Status Message
An easy way to reduce radio talktime or leave
messages for others on the network when they
are away from their radio.
Horn and Lights
Ensures that you never miss important private
radio calls or Call Alerts while you are away
from your vehicle.
List Programming
Allows you to personalize your phone and
radio lists.
Lock Features
Prevents unauthorized use of your mobile unit.
Memory Scroll
A convenient way of searching through lists for
a desired number or name.
Passcode
Provides added security to your mobile unit.
Private Conversation
An easy-to-operate person-to-person radio call.
Radio Operation
A cost-effective means of communicating with
other radio users.
Service Area Selection
Allows you to direct Group Calls to specific
geographic sites.
Talkgroup Selection
Allows you to direct Group Calls to a specific
group of individuals.
69
IMPORTANT GENERAL SAFETY INFORMATION
READ THIS INFORMATION BEFORE USING
YOUR iDEN ADVANCED FEATURE MOBILE.
• Efficient Mobile Operation
For the safe and efficient operation of your mobile, observe these guidelines. Your mobile is a radio transmitter and receiver. When it is ON, it
receives, and also sends out, radio frequency (RF) energy. The mobile
operates in the frequency range of 806MHz to 866MHz, and employs digital modulation techniques. When you use your mobile, the system handling your call controls the power level at which your mobile transmits.
The power level can range from 0.01 of a watt to 3.0 watts.
Do not operate your mobile when a person is within two feet (0.6 meters)
of the antenna unless that person is shielded from the antenna by a metal
surface such as the roof of the car. Otherwise you may impair call quality,
may cause your mobile to operate at at higher power level than is necessary, and may expose that person to RF energy in excess of the levels
established by the updated ANSI Standard.
• Exposure to Radio Frequency Energy
In 1991 the Institute of Electrical and Electronics Engineers (IEEE), and in
1992 the American National Standards Institute (ANSI) updated the 1982
ANSI Standard for safety levels with respect to human exposure to RF
energy. Over 120 scientists, engineers, and physicians from universities,
government health agencies, and industry, after reviewing the available
body of research, developed this updated Standard. In March, 1993, the
Federal Communications Commission (FCC) proposed the adoption of
this updated Standard.
The design of your mobile complies with this updated Standard. If you
want to limit RF exposure even further, you may choose to control the
duration of your calls and operate your mobile in the most powerefficient manner.
70
• Antenna Care and Replacement
Do not use the mobile with a damaged antenna. If a damaged antenna
comes into contact with the skin, a minor burn may result. Replace a damaged antenna immediately. Use only the supplied or approved antenna.
Unauthorized antennas, modifications, or attachments could damage the
mobile and may violate FCC regulations.
• Driving
Check the laws and regulations on the use of communication devices in
the areas where you drive. Always obey them. Also, when using your
mobile while driving, please:
•
•
•
give full attention to driving,
use hands-free operation, if available, and
pull off the road and park before making or
answering a call if driving conditions so require.
• Electronic Devices
Most modern electronic equipment – for example, equipment in hospitals
and cars – is shielded from RF energy. However, RF energy from your
mobile may affect some electronic equipment.
Consult your physician or the manufacturer of any personal medical
devices (such as pacemakers, hearing aids, etc.) to determine if they are
adequately shielded from external RF energy. The operation of inadequately shielded medical devices may be adversely affected when a mobile
is ON.
Turn your mobile OFF in health care facilities when any regulations posted in the areas instruct you to do so. Always request permission before
using your mobile near medical equipment.
RF energy may affect some electronic systems in motor vehicles. Check
with your vehicle manufacturer’s representative to be sure your mobile
will not affect the electronic system of your vehicle.
71
• Children
Do not allow children to play with your mobile. It is not a toy. Children
could hurt themselves or others. Children also could damage the mobile,
or make calls that increase your service bills.
• Blasting Areas
To avoid interfering with blasting operations, turn your unit OFF when in
a “blasting area” or in areas posted: “turn off two-way radio.” Construction crews often use remote-control RF devices to set off explosives.
• Potentially Explosive Atmospheres
Turn your mobile OFF when in any area with a potentially explosive
atmosphere. It is rare, but your mobile or its accessories could generate
sparks. Sparks in such areas could cause an explosion or fire resulting in
bodily injury or even death.
Areas with a potentially explosive atmosphere are often, but not always,
clearly marked. They include: fueling areas such as gas stations, below
deck on boats, fuel or chemical transfer or storage facilities, and areas
where the air contains chemicals or particles, such as grain, dust, or metal
powders.
Do not transport or store flammable gas, liquid, or explosives in the compartment of your vehicle which contains your mobile or accessories.
Vehicles powered by liquefied petroleum gas (such as propane or butane)
must comply with the National Fire Protection Standard (NFPA-58). For a
copy of this standard, contact the National Fire Protection Association.
One Batterymarch Park, Quincy, MA 02269, Attn: Publications Sales
Division.
• For Vehicles Equipped with Air Bags
An air bag inflates with great force. DO NOT place objects, including
communication equipment, in the area over the air bag or in the air bag
deployment area. If the communication equipment is improperly installed
and the air bag inflates, this could cause serious injury.
Installation of vehicle communication equipment should be performed by
a professional installer/technician qualified in the requirements for such
installations. An air bag’s size, shape, and deployment area can vary by
vehicle make, model, and front compartment configuration (for example,
bench seat vs. bucket seats).
Contact the vehicle manufacturer’s corporate headquarters, if necessary, for
specific air bag information for the vehicle make, model, and front compartment configuration involved in your communication equipment installation.
72
Cleaning Instructions
Clean the external surfaces with a damp cloth, using a mild solution of dishwashing detergent and water. Some household cleaners may contain chemicals which could seriously damage the unit. Avoid the use of any
petroleum-based solvent cleaners. Also, avoid applying liquids directly on the
mobile unit.
Status Indicator Table
There are two status indicators above the display which visually tell you the different
states of your unit. The left is yellow and the
right is bicolor red and green. Below is a
description of these indicators.
Status Indicator
Illuminates While:
Solid Green
Talking/Transmitting
Blinking Green
In Service
Blinking Yellow
Roaming
Solid Red
No Service
Blinking Red
Registering on
a Network
Blinking Yellow,
Red, Green, Off
In Service with a Weak
Signal.
The unit is roaming when
operating outside of your
“home” system.
The area within which
your unit operates is
defined by your service
provider. Since this is a
radio system, no exact
boundaries (as on a map)
can be drawn. The red
status indicator (No Service) lights solid if you
are beyond range of a service area. There may be
locations within your
area, such as tunnels and
underground parking
facilities, where the unit
may act as if it were
beyond range.
73
Error Message Table
Below is a list of the messages that may be displayed while operating your
mobile unit. Before contacting your service provider, note the message and
the state at which it appeared.
Error Message
Message Description
The entered number is not valid.
The targeted unit of your call is either busy,
out-of-range, or turned off. Please try again
later.
The targeted unit of your call has not purchased
this service.
The network is experiencing difficulty.
Please try again later.
This service is temporarily not available.
Please try again later.
The targeted unit that you are trying to
contact is busy in a private call.
74
This service has been restricted by your service
provider or it has not been purchased.
This feature is not available on the current network.
The system is experiencing heavy traffic. Please try
again later.
This service cannot be enabled because an incompatible service has already been turned on.
A general error has occurred.
A fault has been detected with your unit. Should
this error recur, note the error code and contact
your sales representative.
An operational fault has occurred. Turn your unit
off and contact your sales representative immediately.
75
76
Index
A
Group Mode Key.......................................3
H
Adjusting Volumes....................................6
Alarm, Theft ............................................36
Alert, Call............................1, 3, 18, 19, 68
Alert Tones . 7, 8, 15, 17, 18, ,19, 20, 22,
23, 30, 31, 32, 38, 53, 55, 56, 65, 66, 67
Aliases (Names) ......................................21
Alpha Characters, Entering .....................43
Alpha Search .....................................63, 64
Alphanumeric Keypad...........................2, 3
Antenna, Installing the ............................71
Area .........................................................10
Audio Volume ...........................................1
Automatic Lock...................................5, 36
Auto Scroll ........................................14, 69
Automatic Turn On/Off.............................5
B
Basic Operation .........................................7
C
Call Alert (Alert).................1, 3, 18, 19, 69
Call in Progress .........................................5
Cancel Emergency Call.....................22, 55
Cleaning Instructions...............................73
Clear Key (Clr)..........................................3
D
Direct Entry .10, 13, 15, 18, 26, 28, 59, 61,
70
Display.......................................................4
Display Dimmer ..................................1, 36
E
Editing List Entries..................................44
Emergency Group Call ....1, 20, 22, 23, 24,
51, 53, 54, 55, 56, 57, 69
Erasing List Entries .................................46
Error Messages ..................................74, 75
Exit Status Mode ...............................32, 67
F
Feature Menu...................................1, 3, 35
Feature Reset ...........................................39
Features and Benefits ..............................69
G
Group Call (Grp) ..............................1,8, 69
Handset ...................................................51
Handset Emergency Group Call..............51
Handset Status Message ..........................51
Horn and Lights (H/L) ..............1, 3, 33, 69
I
ID List Programming ..............................68
Inactivity Timer .........................................5
Invalid Entry............................................74
K
Keypad, Alphanumeric..............................3
Keypad Volume.......................................38
L
List Programming........................41, 68, 69
Local Area .................................................9
Lock, Automatic ......................................36
Lock, Manual...........................................36
M
Manual Lock............................................36
Master Clear ............................................39
Master Reset ............................................39
Memory Scroll..... 11, 14, 16, 19, 27, 29
60, 62, 69
Menu (Feature Menu) .....................1, 3, 35
Mode Indicators.....................................2, 3
N
Names .....11, 13, 15, 16, 21, 27, 37, 51, 63
NAM Selection..................................40, 49
Network Trouble .....................................74
O
Own Radio ID .........................................35
P
Passcode ......................................39, 48, 69
Please Try Again .....................................75
Power, On/Off ...........................................5
PTT (Push to Talk) button ............. 7, 51
PTT - ID ............................................14, 51
Pre-Programmed Emergency Group .......54
Private Conversation .........,1, 15,16, 17, 69
Prvt Mode Key ..........................................3
77
Turning On/Off Your Mobile Unit.........5
R
Radio ID List Programming.................37
Radio Display....................................2, 3, 4
Roaming .................................................1
S
Safety and General Information ....69, 70,
71, 72, 73
Select Key (Sel).....................................2, 3
Self Check Error .....................................75
Self Check Fail........................................75
Sending a Status Message ....30, 31, 65, 66
Service Area List Programming ............37
Service Area Selection .....................9, 69
Service Conflict ....................................75
Service Key, Changing.........................40
Service Not Available ............................75
Service Out of Order ..............................74
Service Restricted...................................75
Set Tone, Speaker Volume ....................38
Signal Strength Indicator................1, 2, 3
Silent Keypad .......................................38
Speaker ..............................................2, 3
Speaker Volume ...................................38
Status Indicators...............2, 3, 31, 32, 73
Status List Programming ......................37
Status Message (Sts) ..1, 25, 26, 27, 30, 51,
58, 59, 60, 65, 66, 67, 69
System Busy Try Later ..........................75
V
Volume Controls ....................................6
Volume Settings ...................................38
W
Wide Area.............................................12
T
Talkgroup Selection ...........13, 28, 29, 69
Talkgroup List Programming ...............37
Target Busy in Dispatch ........................74
Target Not Authorized ...........................74
Target, Selecting..........................61, 62, 63
Target Not Available................31, 66, 74
Targeted Area .......................................10
Theft Alarm .............................................36
Time-Out Timer .....................................8
Tones .... 7, 8, 15, 17, 18, ,19, 20, 22, 23,
30, 31, 32, 38, 53, 55, 56, 65, 66, 67
?W2@@@@6X?e
?7@@@@@@1?e
?@?@@@@?@?e
?@@@@@@@@?e
?@@@@@@@@?e
?@@V40Y@@?e
?3@?e?@5?e
?V4@@@@0Y?e
, Motorola, Private Conversation, and Call Alert
are trademarks of Motorola, Inc.
78