1
Version 2005 for Windows
®
Copyright PG Music Inc.1989-2005. All rights reserved.
PG Music Inc. License Agreement
CAREFULLY READ THE FOLLOWING TERMS AND CONDITIONS BEFORE COMPLETING THE INSTALLATION OF THIS
SOFTWARE. USAGE OF THE SOFTWARE INDICATES YOUR ACCEPTANCE OF THE FOLLOWING TERMS AND CONDITIONS.
LICENSE
A.
The program may only be used on a single machine.
B.
You may transfer the program and license to another party if the other party agrees to accept the terms of this Agreement. If you
transfer the program, you must either transfer all copies, whether in printed or machine readable form, to the same party, or, destroy
all copies not transferred. This includes all modifications and/or portions of the program merged into other programs.
C.
You may receive the program in more than one media. Regardless of the type or size of media you receive, you may install or use the
media on a single machine.
D.
The program (including any images, “applets,” photographs, animations, video, audio, music, and text incorporated into the program)
is owned by PG Music Inc. or its suppliers, and is protected by international copyright laws and international treaty provisions.
You may not use, copy, or transfer the program, or any copy, modification or merged portion of the program, in whole or in part, except as
expressly provided for in this license. If you transfer possession of any copy, modification or merged portion of the program to another party,
your license is automatically terminated.
LIMITATION OF REMEDIES
PG Music Inc.'s entire liability and your exclusive remedy shall be:
A.
The replacement of any media not meeting PG Music Inc.'s “Limited Warranty,” which are returned to PG Music Inc., or an
authorized PG Music Inc. dealer, with a copy of your receipt.
B.
If PG Music Inc. or the authorized dealer is unable to deliver replacement media which is free of defects in materials or workmanship,
you may terminate this agreement, and your money will be refunded.
In no event will PG Music Inc. be liable to you for any damages, including but not limited to lost profits, lost savings, or other incidental or
consequential damages arising out of the use or the inability to use such program, even if PG Music Inc. or an authorized PG Music Inc. dealer
has been advised of the possibility of such damages, or for any claim by any other party.
TRADEMARKS
Band-in-a-Box®, PG Music®, and PowerTracks Pro® are the registered trademarks of PG Music Inc. in the United States, Canada, and other
countries. Microsoft® and Windows® are either registered trademarks or trademarks of Microsoft Corporation in the United States and/or other
countries. Apple®, the Apple logo, Macintosh®, Mac®, Power Mac®, QuickTime® and True Type® are trademarks of Apple Computer, Inc.,
registered in the U.S. and other countries. IBM® is the registered trademark of International Business Machines Corporation. Other brands and
their products are trademarks or registered trademarks of their respective holders and should be noted as such.
PATENTS
Band-in-a-Box is protected under US Patent 5990407. The TC-Helicon Harmony feature in Band-in-a-Box is protected under US Patents
5567901, 5641926, 5986198, 34583, 296.80.173.9, PI9603819.5, 0368046, 0750776, 6,046,395, and patents pending.
Printed in Canada
2
PG Music Inc. License Agreement
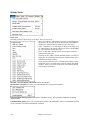
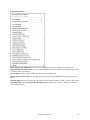
Table of Contents
PG MUSIC INC. LICENSE AGREEMENT.............................................................................................................2
TABLE OF CONTENTS ............................................................................................................................................3
CHAPTER 1: WELCOME TO BAND-IN-A-BOX!.................................................................................................6
WHAT IS BAND-IN-A-BOX? ........................................................................................................................................6
®
INSTALLING BAND-IN-A-BOX FOR WINDOWS ...........................................................................................................7
CHAPTER 2: QUICKSTART..................................................................................................................................11
STEP 1 – TYPING IN THE CHORDS .............................................................................................................................11
STEP 2 – CHOOSING A STYLE ....................................................................................................................................13
STEP 3 – PLAY YOUR SONG!......................................................................................................................................15
CHAPTER 3: BAND-IN-A-BOX VERSION 2005 .................................................................................................17
NEW FEATURES IN BAND-IN-A-BOX 2005................................................................................................................17
QUICKSTART TUTORIAL FOR THE VERSION 2005 UPGRADE.....................................................................................22
CHAPTER 4: THE MAIN SCREEN.......................................................................................................................30
MAIN SCREEN OVERVIEW ........................................................................................................................................30
STATUS BAR .............................................................................................................................................................32
SYNTH WINDOW / PIANO KEYBOARD .......................................................................................................................33
TITLE WINDOW ........................................................................................................................................................38
CHORDSHEET AREA .................................................................................................................................................39
CHAPTER 5: GUIDED TOUR OF BAND-IN-A-BOX .........................................................................................41
LOADING AND PLAYING SONGS................................................................................................................................41
ADD A MELODY – MIDI AND/OR AUDIO ..................................................................................................................45
ADD A SOLO - “THE SOLOIST”..................................................................................................................................47
VIEW AND PRINT NOTATION ....................................................................................................................................48
PIANO ROLL WINDOW ..............................................................................................................................................50
LEAD SHEET NOTATION WINDOW ............................................................................................................................57
THE GUITAR WINDOW .............................................................................................................................................60
BIG PIANO WINDOW.................................................................................................................................................65
PLAY THE JUKEBOX ..................................................................................................................................................65
IMPORT A MIDI FILE ................................................................................................................................................67
AUTOMATIC SONGS - “THE MELODIST” ...................................................................................................................68
MAKE YOUR OWN SONGS ........................................................................................................................................69
SAVING YOUR WORK ...............................................................................................................................................77
BURN YOUR OWN AUDIO-CD..................................................................................................................................78
CHAPTER 6: BAND-IN-A-BOX POWERGUIDE ................................................................................................80
OPENING FILES .........................................................................................................................................................80
CHORD ENTRY .........................................................................................................................................................81
REPEATS AND ENDINGS ............................................................................................................................................84
PLAYING/PAUSING/STOPPING SONGS .......................................................................................................................84
ADDITIONAL PATCHES .............................................................................................................................................87
CHANGING VOLUME, PANNING, REVERB, CHORUS, BANK .......................................................................................89
EDIT FUNCTIONS ......................................................................................................................................................90
APPLYING STYLES ....................................................................................................................................................93
BREAKS - RESTS, SHOTS, AND HELD CHORDS ..........................................................................................................99
SONG SETTINGS DIALOG ........................................................................................................................................101
Table of Contents
3
SAVING SONGS .......................................................................................................................................................102
THE JUKEBOX .........................................................................................................................................................105
CHAPTER 7: NOTATION AND PRINTING ......................................................................................................107
EDITABLE NOTATION MODE ..................................................................................................................................109
NOTE ROLL NOTATION MODE ................................................................................................................................112
NOTATION WINDOW OPTIONS ................................................................................................................................113
LEAD SHEET WINDOW ...........................................................................................................................................120
LYRICS ...................................................................................................................................................................126
PRINTING ................................................................................................................................................................128
CHAPTER 8: AUTOMATIC MUSIC FEATURES.............................................................................................132
AUTOMATIC SONGS – “THE MELODIST” ................................................................................................................132
AUTOMATIC SOLO GENERATION – “THE SOLOIST” ................................................................................................135
AUTOMATIC GUITAR SOLOS – “THE GUITARIST”...................................................................................................139
AUTOMATIC EMBELLISHMENTS – “THE EMBELLISHER”.........................................................................................142
CHAPTER 9: MIDI RECORDING.......................................................................................................................147
RECORDING LIVE IN REAL TIME ............................................................................................................................147
ENTERING NOTES MANUALLY ...............................................................................................................................148
RECORDING WITH THE WIZARD FEATURE ..............................................................................................................149
IMPORTING MIDI FILES..........................................................................................................................................149
EDITING THE MELODY TRACK................................................................................................................................151
CHAPTER 10: AUDIO RECORDING AND RENDERING...............................................................................154
AUDIO TRACK ........................................................................................................................................................154
RECORD AUDIO ......................................................................................................................................................154
PLAYING THE AUDIO FILE ......................................................................................................................................158
EDIT THE AUDIO FILE .............................................................................................................................................158
TC-HELICON AUDIO HARMONIES ..........................................................................................................................159
PITCH STYLES PRESET DETAILS (ONE PER VOICE) ..................................................................................................163
APPLYING AUDIO PLUG-INS ...................................................................................................................................164
RENDERING AUDIO FILES .......................................................................................................................................165
BURN YOUR OWN AUDIO-CD .................................................................................................................................169
CHAPTER 11: USER PROGRAMMABLE FUNCTIONS.................................................................................173
THE STYLEMAKER™ .............................................................................................................................................173
THE HARMONY MAKER..........................................................................................................................................187
THE SOLOIST MAKER .............................................................................................................................................190
THE MELODIST MAKER ..........................................................................................................................................193
THE GUITARIST MAKER .........................................................................................................................................196
CHAPTER 12: TUTORS AND WIZARDS ..........................................................................................................199
VOCAL WIZARD .....................................................................................................................................................199
CHORD SUBSTITUTION WIZARD .............................................................................................................................201
CHORD BUILDER ....................................................................................................................................................203
EAR TRAINING TUTOR ............................................................................................................................................205
RHYTHM GUITAR CHORD TUTOR ...........................................................................................................................209
MIDI FILE CHORD INTERPRETATION WIZARD .......................................................................................................211
MIDI FILE TO STYLE WIZARD................................................................................................................................216
CHAPTER 13: TOOLS AND UTILITIES............................................................................................................221
ROLAND VSC3 VIRTUAL SOUND CANVAS .............................................................................................................221
GUITAR TUNER.......................................................................................................................................................222
DYNAMIC 3D DRUM KIT WINDOW.........................................................................................................................222
4
Table of Contents
MIDI MONITOR......................................................................................................................................................225
SOUND BLASTER SUPPORT .....................................................................................................................................226
CHAPTER 14: REFERENCE................................................................................................................................227
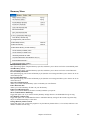
BAND-IN-A-BOX MENU DESCRIPTIONS ..................................................................................................................227
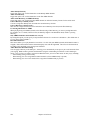
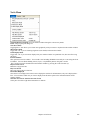
FILE MENU .............................................................................................................................................................227
EDIT MENU ............................................................................................................................................................230
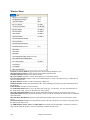
STYLES MENU ........................................................................................................................................................235
OPT. MENU.............................................................................................................................................................237
PLAY MENU ...........................................................................................................................................................266
LYRICS MENU ........................................................................................................................................................268
MELODY MENU ......................................................................................................................................................270
SOLOIST MENU .......................................................................................................................................................274
AUDIO MENU .........................................................................................................................................................277
GM MENU ..............................................................................................................................................................280
HARMONY MENU ...................................................................................................................................................283
NOT’N MENU .........................................................................................................................................................285
WINDOW MENU .....................................................................................................................................................286
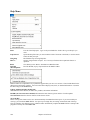
HELP MENU............................................................................................................................................................288
KEYSTROKE COMMANDS - HOT KEYS ....................................................................................................................290
CHORD LIST ...........................................................................................................................................................293
BAND-IN-A-BOX FILES ...........................................................................................................................................294
PG MUSIC INC. ......................................................................................................................................................295
INDEX ......................................................................................................................................................................296
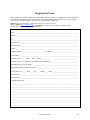
REGISTRATION FORM .......................................................................................................................................305
5
Chapter 1: Welcome to Band-in-a-Box!
Congratulations on your purchase of Band-in-a-Box, the favorite of musicians, students, and
songwriters everywhere. Get ready to have fun!
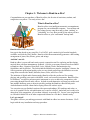
What is Band-in-a-Box?
Band-in-a-Box is an intelligent automatic accompaniment
program for your multimedia computer. You can hear and
play along to many song ideas and go from “nothing” to
“something” in a very short period of time when you have
Band-in-a-Box as your “on demand” backup band.
Band-in-a-Box is so easy to use!
Just type in the chords to any song (like C or Fm7b5), pick a musical style from the hundreds
available, and click the [Play] button. Band-in-a-Box then automatically generates a full backing
arrangement of piano, bass, drums, guitar, and strings.
And that’s not all...
Band-in-a-Box is a powerful and creative music composition tool for exploring and developing
musical ideas with near-instantaneous feedback. Over the years many features have been added
to Band-in-a-Box - Notation, Piano Roll, Lyrics, Melody Tracks, Harmonization, the
StyleMaker, and StylePicker. The Soloist and the Melodist are popular “intelligent” features; the
Soloist generates professional quality solos over any chord progression, the Melodist can create
songs from scratch with Chords, Melodies, Intros, Solos, and even a Title!
The inclusion of digital audio features makes Band-in-a-Box the perfect tool for creating,
playing, and recording your music with MIDI, vocals, and acoustic instruments. Band-in-a-Box
for Windows® can also record an acoustic instrument or voice to add to the composition, with
processing through DirectX audio effects. Its built-in audio harmonies will turn your audio track
into multiple harmony parts or adjust its pitch by tracking the Band-in-a-Box Melody track.
Audio harmonies include vibrato and scooping effects for realistic styles.
You can print out your finished creation with repeats and endings, DC markings and codas, or
save it as a graphic file for web publication or to e-mail to a friend. And when you're ready to let
others hear your composition, you can burn it directly to an audio CD. Or save your composition
as a Windows Media File or in other compressed formats for a file that’s “Internet ready.”
Let’s get started!
This guide will have you making great music with Band-in-a-Box in a matter of minutes. We’ll
begin with the easy installation and setup procedure.
6
Chapter 1: Welcome to Band-in-a-Box!
Installing Band-in-a-Box for Windows
®
Minimum System Requirements
-
Windows® 9x/ME/NT/2000/XP.
At least 16MB of available RAM for MIDI features.
MIDI features require a 486DX processor or faster.
Digital Audio features require additional RAM (at least 32MB recommended) and a Pentium-class (or faster)
system.
35MB to135MB available hard drive space. Add-on products and Digital Audio features require additional
space and memory.
PC sound card or external MIDI device (synthesizer, sound module, etc.).
Installing the Program
- Use any of the following three methods to install the program files into the Band-in-a-Box directory. By default
this directory is C:\bb; you may choose another location.
Method 1 – Auto Run.
1. Insert the program CD-ROM into the CD drive.
2. In a few seconds, a browser window will open with a list of the CD contents.
3. Double click on SETUP.EXE to run the installation program.
Method 2 – My Computer.
1.
Insert the program CD-ROM into the CD drive.
2.
Access your CD-ROM drive from the Windows desktop by double clicking on the My Computer icon.
Then, double-click on the CD-ROM drive icon and double-click again on the SETUP.EXE program found in
3.
the root or main folder of the CD-ROM.
Method 3 – Start Menu.
1. Insert the program CD-ROM into the CD drive.
2. From the Windows [Start] button select Run.
3. Type D:\SETUP in the “Open:” command line box. If your CD-ROM drive uses another drive letter type
the appropriate letter, for example E:\SETUP.
4. If you don’t know the drive letter for your CD-ROM you can use the [Browse…] button to find it.
SETUP.EXE will copy all of the program files to your Band-in-a-Box subdirectory (usually C:\bb) and install
icons to a Band-in-a-Box program group. Click on the Band-in-a-Box icon or launch bbw.exe to open the
program and configure the setup.
Setup Instructions
Band-in-a-Box uses the multimedia drivers for your MIDI interface and/or sound card that are supported by the
Windows operating system. To get sound playback you need to have a MIDI (and audio - for songs with digital
audio) driver installed.
To start using the program you will need to make sure that your MIDI interface, audio driver, and Windows sound
source is installed and configured.
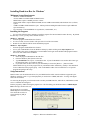
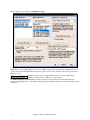
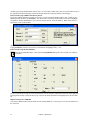
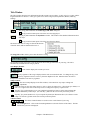
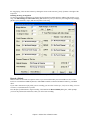
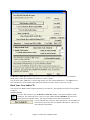
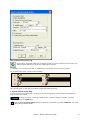
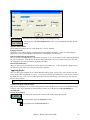
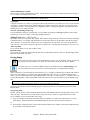
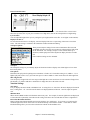
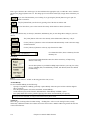
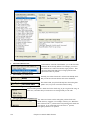
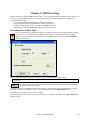
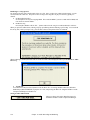
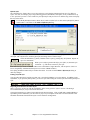
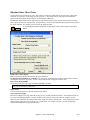
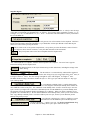
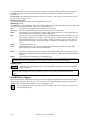
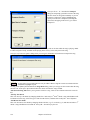
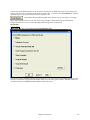
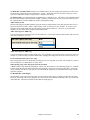
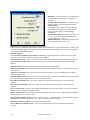
Run the program by double-clicking the program icon. The first dialog you should encounter is a MIDI Output
Driver message similar to this one:
The program sets your initial
MIDI output driver automatically.
Note which driver has been
selected and press [OK] to
continue.
Chapter 1: Welcome to Band-in-a-Box!
7
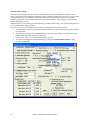
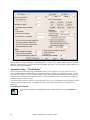
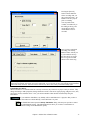
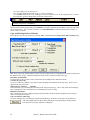
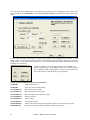
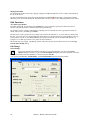
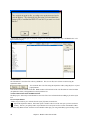
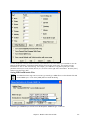
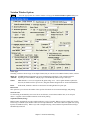
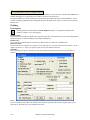
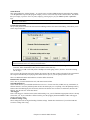
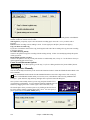
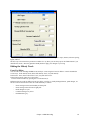
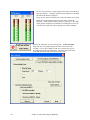
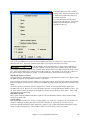
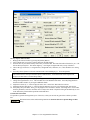
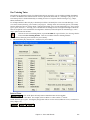
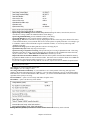
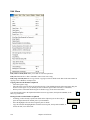
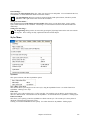
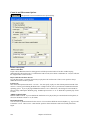
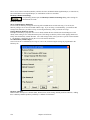
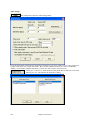
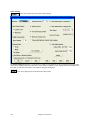
The next dialog you encounter is the MIDI Driver Setup.
If the driver that was selected is not the best choice, simply make an alternate selection from the MIDI Driver
Setup dialog. Select a MIDI Output Driver to use for MIDI sound playback and optionally a MIDI Input Driver if
you are using an external MIDI controller keyboard or guitar. If the setup is panned to mono, the program offers to
change it to stereo.
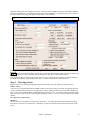
Perhaps the easiest way to configure Band-in-a-Box is to press the [Run Driver
Wizard..] button in the Opt. | MIDI driver setup window.
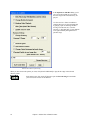
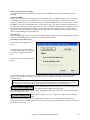
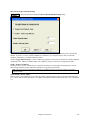
The MIDI Output Driver Wizard dialog will take you step-by-step through the process of auditioning and
selecting an appropriate driver. This assumes that the appropriate Windows sound drivers are installed and correctly
configured.
8
Chapter 1: Welcome to Band-in-a-Box!
DirectX Instrument Synthesizer (DXi plug-in) Support
Software synthesizers allow Band-in-a-Box to play high quality sounds directly through your computer sound card,
without requiring any external MIDI hardware. Most new software synthesizers are released as “DXi plug-ins,” so
they will work in a standard way with many programs. Connecting Band-in-a-Box to the software synth as a plug-in
provides several advantages over the previous method of connecting as a MIDI driver. The plug-in allows Band-ina-Box to merge/synch in any existing audio file (vocals etc.) with the synth output. You can also directly render
your performance to a .WAV file using the DXi plug-in. Sampler-based synths allow you to assemble a huge,
customized library of instrument samples to use with Band-in-a-Box. Examples of popular DXi synths include the
RolandED VSC-DXi and Hyper Canvas.
To use DXi with Band-in-a-Box, you should think of the DXi as a type of “MIDI Out Driver.” As such, you visit
either the Opt. | MIDI driver setup or click on [Pref] [MIDI Driver] and select the “Use DXi Synth” checkbox.
When you do this, you can select the type of DXi to use (from a list of installed DXi, if any), and also will see a
panel display of the DXi that allows you to make settings directly for your DXi synth.
The DXi will convert the MIDI information to audio, which Band-in-a-Box will playback through your sound card
to audio speakers.
You can select DirectX DXi Software Synthesizers as the MIDI destination, and also apply DirectX Audio plug-ins
to the Band-in-a-Box audio track.
Check the Use DXi Synth checkbox to enable DXi playback.
Note: To use this option, you must have a polyphonic DXi synthesizer installed on your computer, such as the
Roland/Edirol VSC DXi. It will also be most convenient if your DXi synthesizer can use General MIDI or GM2 patches.
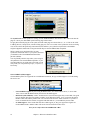
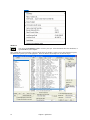
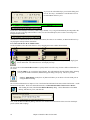
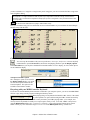
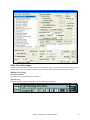
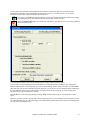
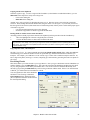
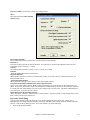
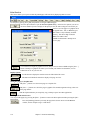
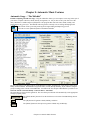
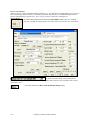
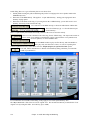
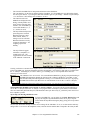
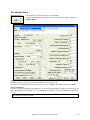
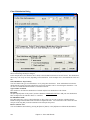
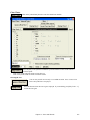
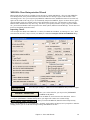
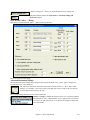
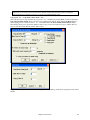
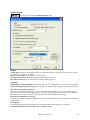
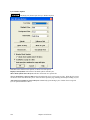
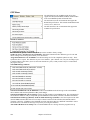
To select the DXi synthesizer, click the [DXi Synth Settings] button, which will open the DirectX Plugins window.
Chapter 1: Welcome to Band-in-a-Box!
9
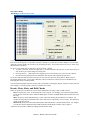
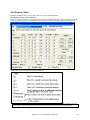
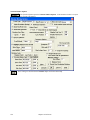
The Synth Track tab edits Synthesizer settings, and the Audio Track tab edits Band-in-a-Box audio track DirectX
plug-ins. Select your desired DXi synth in the top plug-in Insert Slot 1.
To apply DirectX audio plug-ins to the synth, insert DX audio plug-ins to Insert Slots 2, 3, or 4. This can be useful
to add EQ, Reverb, Compression, or Peak Limiting plug-ins, if the “raw sound” of the synthesizer needs sweetening.
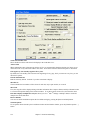
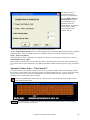
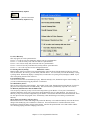
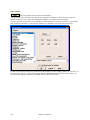
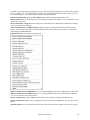
You can also choose the patch map (instrument list) that matches your synthesizer keyboard or sound module.
Original equipment sound cards or integrated sound chips are General MIDI (GM) compatible.
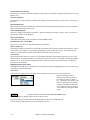
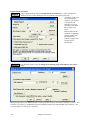
We have made preset drum/patch files for many
synthesizers and sound cards. If your synth is not listed
you should use the General MIDI Instrument Misc.
patch kit (default).
You can probably omit this step unless you're using an
old synth that is not General MIDI compatible. If your
non-GM synthesizer or sound card is not listed you can
easily make your own patch map in Opt. | Preferences |
Patch Map.
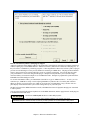
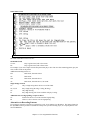
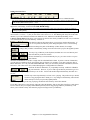
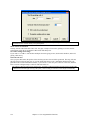
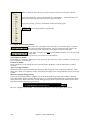
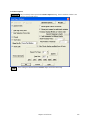
General MIDI 2 (GM2) Support
General MIDI 2 patches are supported for 128 additional instruments, the type of GM2 support is set in this dialog.
The choices are:
-
General MIDI 2 support: If you're using the Roland VSC3, or a newer Sound Canvas (i.e. newer than
1999, or newer than the Roland SC88), then choose this GM2 support.
-
Roland GS (older Modules): “Older” Sound Canvases (SC55/SC88) support GS, but not GM2. The good
news is that they have the same patches available, just at different locations. So if you choose this option,
Band-in-a-Box will find the patches at the “GS” locations instead of the “GM2” locations. If you have a
newer GS module like the SC8820, it supports both GM2 and GS - you should likely choose GM2.
-
No GM2 support: Some sound cards don't have GM2 support yet; they just support the original 128
General MIDI sounds. Band-in-a-Box will use the closest instrument in these cases.
Now you’re ready to have fun with Band-in-a-Box!
10
Chapter 1: Welcome to Band-in-a-Box!
Chapter 2: QuickStart
Creating music with Band-in-a-Box is as easy as 1-2-3! In this chapter, you’ll see just how easy it is to get Band-ina-Box working for you.
Step 1 – Typing in the Chords
There are numerous ways of entering chords into Band-in-a-Box. We’ll discuss five fast ways of entering chords:
1. Using the computer keyboard.
2. Playing directly on a MIDI controller keyboard.
3. Using the Chord Builder feature.
4. Importing chords from a MIDI file.
5. Loading an Existing Band-in-a-Box format song.
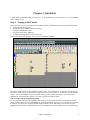
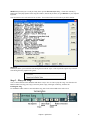
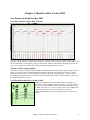
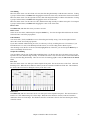
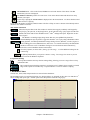
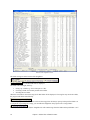
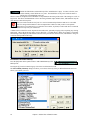
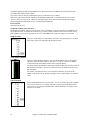
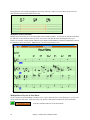
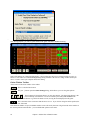
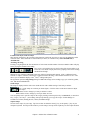
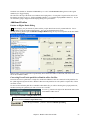
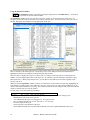
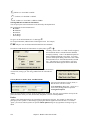
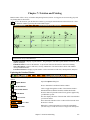
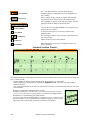
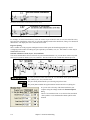
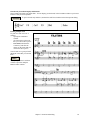
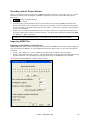
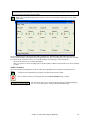
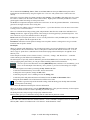
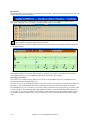
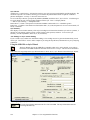
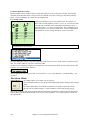
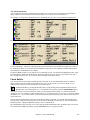
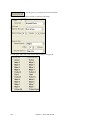
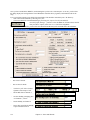
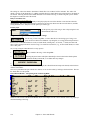
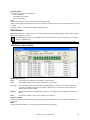
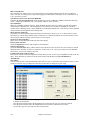
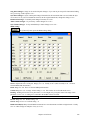
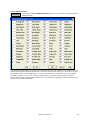
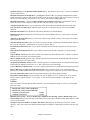
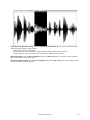
On the main screen of the program, you’ll see an area called the chordsheet.
Band-in-a-Box main screen showing chordsheet.
Each of the numbered cells on the chordsheet represents a bar. In this example, we see that there is an E chord in
the first bar of this song, an A chord in bar 5, and later in the song, an E7 in bar 12. Notice the box in the first half
of bar 1. This is the highlight cell, and it represents the bar you are currently working on. You can move the
highlight cell around using the cursor keys, or select a specific bar using the mouse.
Enter Chords Using the Computer Keyboard
To enter a specific chord, move the highlight cell to where you want to place the chord. For example, to add (or
change) a chord in bar 10, you would highlight bar 10 on the chordsheet. Next, type in your chords. If you want an
E at bar 10, type the [E] key on your keyboard, and press [Enter]. Notice that when you use the enter key, the
highlight cell moves to the second half of the bar. You could then enter another chord at beat 3. Chords names are
Chapter 2: QuickStart
11
normally typed using standard chord symbols (like C or Fm7 or Bb7 or Bb13#9/E), but you can enter them in any of
the supported chord symbol display formats like Roman Numerals, Nashville Notation, and Solfeggio.
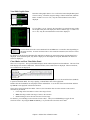
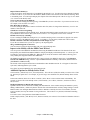
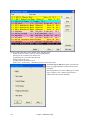
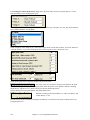
Enter Chords Using a MIDI Controller Keyboard
If you have a MIDI controller keyboard, you can use it to enter chords into Band-in-a-Box. Play a chord on your
MIDI keyboard, and then type Ctrl+Enter. The chord will be entered into the chordsheet at the current highlight
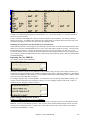
cell position. Another method allows you to choose alternate chords. From the Window | MIDI Chord Detection
menu item, you’ll see this window:
When you play chords, Band-in-a-Box shows you the chord name and suggests alternates that you can choose from.
Typing Ctrl+Enter enters the first selection, and advances the highlight cell by ½ bar.
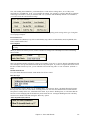
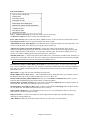
Enter Chords Using the Chord Builder
Press the Chord Builder button. This opens the Chord Builder dialog with a list of chord roots and their
extensions.
To enter a chord at the current bar, select the chord root from the left pane, and then the extension on the right pane.
Pressing [Enter Chord] or using the arrow keys will enter the chord and advance the highlight cell to the next half
bar.
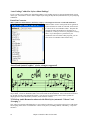
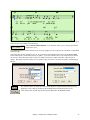
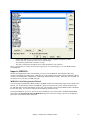
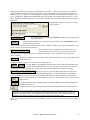
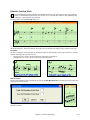
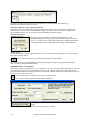
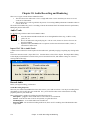
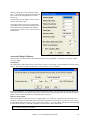
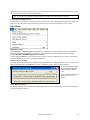
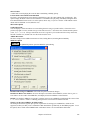
Import Chords from a MIDI File
You can have Band-in-a-Box import chords from an existing MIDI file. Choose Import Chords from MIDI File on
the File menu.
12
Chapter 2: QuickStart
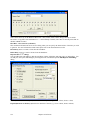
When the dialog opens, press the [Open (Change)…] button to choose a MIDI file that you want Band-in-a-Box to
interpret the chords from. To help Band-in-a-Box interpret the chords better, you should choose a genre (Preset) for
the song. Choose from among such genres as Pop, Rock, or Jazz Standard.
Tip: It helps if you’ve previously listened to the MIDI file, in order that you can choose a genre most appropriate to the
song.
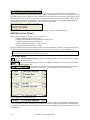
Loading an existing Band-in-a-Box format Song
Press the Open Song button. The first time you use this button, Band-in-a-Box will offer to build a Song
list for you. We’ve included many demonstration songs; they are listed in the song list.
You could also load a pre-existing song by using the File | Open menu item, or by typing [F3], which will launch
the Windows file dialog. Songs usually load a “Style,” which we’ll learn about in the next section.
Step 2 – Choosing a Style
Band-in-a-Box creates backing arrangements based on the chords you type in, applied to a particular Style.
What’s a Style?
A style is a set of rules that determine how Band-in-a-Box creates music using your chords. By adjusting the rules,
we have created hundreds of styles for everything from Country to Bebop, such as Jazz Swing, Blues Shuffle, Hip
Hop, Country 4/4, Pop Ballad, Waltz, and Medium Rock to name just a few. If you don’t find a pre-made style that
suits your tastes, create one from scratch using the StyleMaker. There’s a “how-to” section on custom Styles in this
manual.
Four Fast ways to open a Style
Method 1:
To open a user style from disk, you can just type the [F9] key. You will be presented with a Windows file dialog
from which you can select a specific Style. Alternately you can select from the Styles menu item at the top of the
screen.
Chapter 2: QuickStart
13
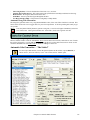
Method 2:
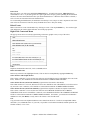
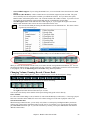
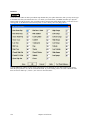
You can use the StylePicker window to select your style. Select the button above the chordsheet, or
type Ctrl+F9 on your computer.
This window shows styles listed by Category and by Styles Set number. Select a Set or genre from the left pane,
and choose the specific style on the right pane. There are Memos and examples for each of the Styles.
14
Chapter 2: QuickStart
Method 3: Styles that you’ve used previously show up in the Favorite Styles dialog. Choose this with the [f]
button next to the [Style] button in the song title window, from the Styles menu, or type Shift+F9 on your computer
keyboard.
You can choose to save a Favorites set for use later. You can also load a set of favorite styles in this manner.
Method 4:
In the Styles menu, you can choose from among the 24 “built-in” styles. This list provides a quick way to choose
from among the most popular music genres.
Step 3 – Play your song!
You’ve entered chords on the chordsheet and chosen a style. Now it’s time to play the song! You’ll need to tell
Band-in-a-Box how long your song is, how many times to play it through, in what key, and how fast.
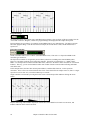
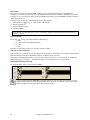
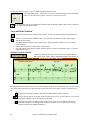
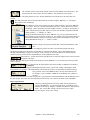
Framing the Song
To tell Band-in-a-Box where to start and end the song, take a look at the middle of the main screen.
Chapter 2: QuickStart
15
Locate the framing buttons. There are three of them, one each for Beginning of Chorus, End of Chorus, and
Number of Choruses. In the example above, the chorus starts at bar 1, ends on bar 32, and is going to play 3 times.
Setting the Key
In the example above the key is set to C. However, you can set this to any key. In our first view of the chordsheet
the Blues song was in the key of E. If you do change the key, Band-in-a-Box will offer to transpose the chordsheet
for you.
Setting the Tempo
If you know the tempo value of your song, you can enter it in the tempo box. The song example above has a tempo
of 120. There is an even faster way to enter a tempo. Locate the minus key [-] and the equals key [=] in the number
row of your computer keyboard, they are usually next to each other. If you tap the minus key 4 times at your tempo,
Band-in-a-Box will set the tempo automatically for you. If you tap the equals key four times, Band-in-a-Box will
set the tempo and begin song playback!
More fun with Band-in-a-Box…
That’s all there is to quickly creating music with Band-in-a-Box. Band-in-a-Box has many more features and user
settings, which are discussed in later chapters. Have fun making music with Band-in-a-Box!
16
Chapter 2: QuickStart
Chapter 3: Band-in-a-Box Version 2005
New Features in Band-in-a-Box 2005
New Fully-Featured “Piano Roll” Window!
Now you can edit your tracks using the new “Piano Roll” window, similar to the type found in many sequencer
programs. Edit the Melody or Soloist tracks with greater ease and precision. There are 2 panes in the window – one
for notes and the other for controllers, velocity, and other data. All notes and controllers are displayed as bars on a
grid. You can change note duration and pitch by selecting and dragging with your mouse.
Alternate Guitar Tunings added!
The Guitar window now supports alternate tunings, including DADGAD, Drop D, Double Drop D, Open G, and 11
others! You can also select “Nashville High Strung” tunings, which tune certain strings up an octave. The new
tunings are supported in Styles, Chord Diagrams, Guitar Tutor, Notation, Tab, and Printout. Learn how to play
these tunings by watching the on-screen Guitar Fretboard or Notation/Tab window. Easily change any style to use
the alternate tuning that you want.
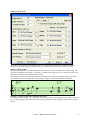
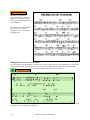
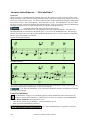
New Harmonies added with voicing in 4ths!
Modern Jazz harmonies often voice chords in 4ths. For example, a C
chord with C melody might be voiced C, G, D, A, E. Now you can select
4ths voicings easily in Band-in-a-Box to harmonize the Melody, Soloist,
or THRU parts using 3, 4, or 5 part voicings in 4ths. We’ve added presets
for these harmonies, so you can easily select them. Use these
sophisticated 4ths harmonies on your existing melodies to create a new
sound.
Chapter 3: Band-in-a-Box Version 2005
17
“Auto Endings” added for Styles without Endings!
If you‘ve made a style, and haven’t included an ending, a 2-bar ending can now be generated automatically, based
on the style. This makes it easier to make complete styles using the Style Wizard, which makes a style by analyzing
a MIDI file.
Patch List Converter
Make Synthesizer Patch file lists (.PAT files) easily by converting PowerTracks or Cakewalk Patch lists!
Band-in-a-Box can now read a patch file list generated
by PowerTracks Pro Audio or Cakewalk, and convert it
to a .PAT file for use in Band-in-a-Box. The patch file
contains the name and numbers for all patches on a
synthesizer, so that you can access your patches easily by
name. If you already have a patch list for your
synthesizer from one of these other programs, you can
now convert it to Band-in-a-Box format easily.
“Jazz Chord Symbol Graphics” (circles, triangles) supported!
Jazz and Pop music often use certain non-alphabetic symbols for chord types. These include a delta (triangle) for
major chords, a circle for diminished, and a circle with a slash for half-diminished. Also, tensions like b9 and b13
are stacked vertically and contained in brackets. You can now select this option, and see these symbols for
display/printout on the Chord Sheet, Notation, and Lead Sheet windows.
TC-Helicon Audio Harmonies enhanced with Pitch Styles (automatic “Vibrato” and
“Scooping”)!
Now, when you generate audio harmonies to your recorded vocal tracks, you can select pitch styles to add vibrato
and scooping effects to the vocal harmonies. Choose from presets, including “Ballad,” “Broadway,” “Pop Diva”
and more!
18
Chapter 3: Band-in-a-Box Version 2005
StylePicker now Editable!
You can now add your own styles to the StylePicker list by pressing an ADD/EDIT button on the StylePicker. You
can see all the information about the style, including memo, genre, feel, tempo, range, etc.
“Vocal Wizard” finds the best song keys for your vocal range!
This feature helps you choose the best song key for your vocal range from your vocal type (baritone, tenor, etc.), or
a custom range. The wizard analyzes the song and recommends the best keys for that song. There are options to
“include/exclude falsetto range” and “restrict choices to these keys […].”
Non-Destructive Audio Track Editing!
With previous versions of Band-in-a-Box, any changes to the audio track would be permanent, even if you didn’t
save the song. Now the changes are non-destructive and only become permanent if you save the file.
Support for Multiple Sound Cards!
For the audio track, you can now choose which sound card to use, if you have more than one.
Multiple lines of Lyrics Supported on Fake Sheet and Printout!
If your song has 1st and 2nd endings or multiple verses of lyrics, multi-line lyrics can be displayed, so you’ll see all
verses on the same Fake Sheet.
Full Stereo or Mono support for Audio Track!
You can now choose between mono and stereo for the audio track and the audio plug-ins work for mono or stereo.
Tracks can be edited in either format, and converted from stereo to mono or vice versa.
Enhanced Audio Plug-in Effects!
Enhanced audio plug-in effects are included for EQ, Peak-Limit, and Reverb.
Selective Humanize option for the Melody Embellisher!
There is a new option for the Embellisher to only humanize the timing of the music if the timing was “stiff” to begin
with. This allows the Embellisher to leave the timing of human input melodies alone, and humanize only the ones
that were entered in step-time.
Lead Sheet highlighting is more visible!
During playback, the highlighting of bars on the Lead Sheet and Fake Sheet window is more visible, with red
rectangles to highlight the current bar.
Karaoke Files (.KAR) now can be opened, including lyrics!
The popular Karaoke file format (.KAR) can now be opened directly into Band-in-a-Box, just like MIDI files.
Chord symbols are displayed (Band-in-a-Box intelligently analyzes the chords of the song), as well as the lyrics
from the Karaoke files.
Import .WAV file to Audio Track support!
A mono or stereo .WAV file can now be imported to the audio track, optionally merging or replacing any existing
audio track.
Pitch Bends are now displayed on the Guitar Fretboard!
Pitch bends now show up on the Guitar Fretboard. As the pitch bend occurs, a blue line moves along the string in
real time to show the height of the pitch bend.
Shift-Click support for Selecting Region of Chordsheet, Notation, or Audio Window!
To select a region of Chordsheet, Notation, or Audio Window, you can now Shift-click on the end point to easily
select a large area.
Colors editor for Note Colors in the Notation Window!
Note colors for the Notation window may be edited to create custom color sets, using a new dialog box.
Chapter 3: Band-in-a-Box Version 2005
19
Entire song name displayed in Taskbar hint when Band-in-a-Box is minimized!
This is useful to find the name of a song playing when Band-in-a-Box is playing in the background.
Multi-colors for Event List!
Different colors are used for different event types in the event list, to visually distinguish notes, patch changes etc.
Song Picker Enhanced – Subfolder Support!
The SongPicker has been enhanced and now can optionally display songs from subfolders. For example, if you get
a song list of c:\bb, it can include songs in subfolders of c:\bb like c:\bb\styles34. You can also lock the SongPicker
to always open in the same folder (EG: C:\bb), so that you can use the same list to keep track of all songs on your
disk. Other enhancements like “change folder,” and “go up one folder” are included.
Notation supports time signature changes!
Time signature changes are now printed on the Notation/Lead Sheet!
“Favorite Folder-Open Song” button!
By opening a song using “Favorite Folder-Open Song,” you first select the folder from a list of recently used folders,
and then you can directly open the song from that folder. This allows you to quickly find a song in another folder.
Lyric breaks hidden in Lead Sheet window!
For lyrics, line break and paragraph marks (‘/’ and ‘\’) are no longer shown on the Lead Sheet window.
Auto MIDI and Karaoke lyrics display!
Lyrics window optionally auto-opens for MIDI files with lyrics and Karaoke files!
Guitar TAB visibility is improved!
For the guitar tablature, the numbers are now more visible, as a portion of the black guitar line is “whited out” when
a tab fret number is drawn.
Notation display improved!
The first note in every bar is drawn farther away from the bar line.
Big Lyrics Window Enhancements!
Chords can now be displayed on a row above the lyrics on the Big Lyrics Window. Separate chord colors are used
for the Chords and Lyrics, allowing these elements to be visually separated.
MIDI file text markers for part markers!
MIDI files are now written with descriptive text markers for part markers! Text markers are also read in from MIDI
files, and displayed as section markers on the notation.
Decibel (dB) scale now present in the Audio Edit window!
New rest insert key!
In Editable Notation mode, you can now insert a rest by holding the back-quote key (tilde key without pressing
Shift) then clicking on the Notation window. This is a way to avoid having to check the “Rest” checkbox first.
Reset to factory settings improved!
Reset to factory settings also offers to nuke the drum kit and MIDI driver choice, making the return to factory
settings complete.
“Transpose” Chordsheet option added!
This is useful for non-concert pitch instruments like tenor saxophone. This option is also available on the Notation
window.
20
Chapter 3: Band-in-a-Box Version 2005
“Play Selected Area as a Loop” function!
Shift-click on the Play button, or press F10 (Play Selected Area as Loop) and the program will play a selected
region as a loop. For example, you can select bars 10 and 11, and then press F10, and bars 10 and 11 will play
looped.
StyleMaker Enhancements!
If you don’t save the style, the previous style will load in, instead of reverting to “ZZJAZZ.STY.”
Guitar Tutor Enhancements!
The Guitar Chord Tutor now has an “Anticipate” mode that plays the next chord X beats in advance, allowing time
for the user to prepare the chord for playing along. 11 new tutors have been added for the Alternate tunings like
DADGAD, Open G, etc.
No more drum crash cymbals on Bar 1 of the song!
The very first bar of the song is (optionally) no longer considered to be following a fill, so a drum crash cymbal
won’t be played. Most drummers wouldn’t play a crash cymbal on bar 1 of the song.
New hot keys added for Prefs tab dialog!
This allows navigation of the Preferences tabs by single keystrokes.
Auto “Staves per Page” Option!
Notation | Options now has an option to allow “Staves per Page” setting to be automatic or not!
Print to much larger BMP files!
Notation | Print to Graphics command can now print to high resolution BMP’s like 2400 x 3000! This feature is
only limited by available memory.
Guitar TAB lines easier to see!
Guitar TAB lines now print in black, instead of grey, so tab is easier to read.
Larger Harmony display boxes!
Harmony display boxes are wider by 64 pixels on the main screen and Melodist/Soloist dialogs!
VU meters added for Audio!
These show the Record and Playback levels for audio, allowing adjustment of microphone and speaker levels.
Mouse wheel support!
Mouse wheel support added to the Chordsheet screen and other windows.
… and many more!
Chapter 3: Band-in-a-Box Version 2005
21
QuickStart Tutorial for the Version 2005 Upgrade.
The full descriptions of the new features in Version 2005 of Band-in-a-Box are provided elsewhere. This tutorial is
a QuickStart tour of the new features in Band-in-a-Box 2005.
Note: It is assumed that you are somewhat familiar with the previous release of Band-in-a-Box.
Explore Band-in-a-Box Version 2005
First, we’ll take a quick tour of the new features in Band-in-a-Box 2005. Then we’ll do an in-depth tutorial for the
new Piano Roll window. The other chapters in the manual are also tutorial style presentations of the new features.
Load in any song with a melody...
Now launch the Piano Roll window, by pressing the piano roll button on the toolbar, or choosing Window | Piano
Roll Window. You’ll then see the Piano Roll window.
Drag the notes to change pitch, duration, or timing.
Insert notes by mouse click (while holding down Ctrl+Shift).
We’ll explore the piano roll in detail later in the tutorial.
Now let’s close the Piano Roll window, and open the Notation window. You can do this by pressing the
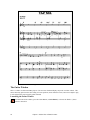
notation button.
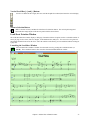
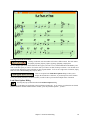
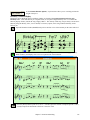
Let’s hear the fourths harmonies…
Load in c:\bb\Tutorial - BB 2005\ 4 Trumpets in 4ths - Harmony 219 demo. This will play the melody in 4-part
harmony, using 4ths harmonies.
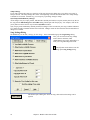
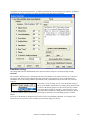
Let’s display “Jazz chord symbol graphics” to this song.
Use the Opt. | Preferences menu option and click on “Notation” to open the Notations Options dialogue box. In
the Notation Options dialog:
Press the [Jazz Fonts] button to select the Jazz music font.
Select the “Jazz Symbols” checkbox.
Exit the Options dialog, and you’ll now see Jazz chord symbols.
22
Chapter 3: Band-in-a-Box Version 2005
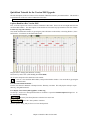
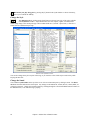
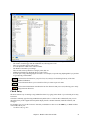
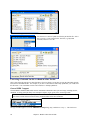
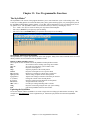
Let’s examine the improvements in the SongPicker.
Open the SongPicker. (The program may rebuild the song list prior to opening the dialog.)
Look at the folder name displayed at the bottom of the dialog.
Select the checkboxes “Always open in this folder” and “Include Subfolders.”
If the folder name isn’t already c:\bb, press the [Change] button near the bottom of the dialog, to change
the folder to c:\bb.
If the program doesn’t rebuild the list automatically, then force a rebuild by pressing the
[Rebuild List] button.
The Song list will then be rebuilt, displaying ALL of the
songs in your c:\bb folders and subfolders. If you have the MegaPAK, this will be over 2,000 songs, riffs, and style
demos!
Use the FILTER to manage this
list. Set the Filter to “any column.” For example, type the word Bluegrass in the filter, and press [Apply Filter].
You’ll now see a list of 29 songs, all with the word Bluegrass somewhere in the title, filename, genre, or other field.
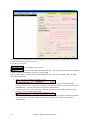
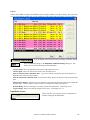
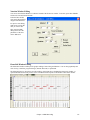
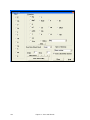
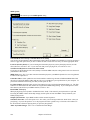
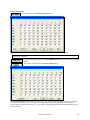
Let’s explore the new “Vocal Wizard.”
The Vocal Wizard determines the best keys for any song in your vocal range.
Load in the song c:\bb\ Tutorial - BB 2005\Old Folks at Home.MGU. This is in the key of F. We’ll assume that
you are a male with a baritone range. If so, F is not a good key for this song, it is too high.
Choose Window | Vocal Wizard or press the Vocal Wizard button on the toolbar.
The Vocal Wizard will open. It displays color coded scores for each possible key, and has determined that they key
of D is the best key for that song in your vocal range, which you can set in the same dialog.
When you call out to your
piano player “We can do this song in D.” he replies, “I don’t play much in D, I’m a Jazz player.”
Chapter 3: Band-in-a-Box Version 2005
23
So you use the “Allowable Keys” preset in this dialog, and
set it to “Jazz keys,” and then the Vocal Wizard revises its
recommendation to the key of C.
If you select “Auto-transpose to best key when a song is loaded,” every song will automatically be transposed to the
best key for your vocal range when loaded. For now, let’s de-select that option, since we don’t want songs to be
transposed when loaded.
Note that the Vocal Wizard can also be used for instruments, like tenor sax or trombone, to determine the best keys
for playing the melody on those instruments.
Let’s check out the new PLAY LOOP feature.
On the Chordsheet, select the 2 bars from 9 to 10 by dragging the mouse to make the bars black.
Now, press the [Loop] button on the toolbar, or press F10, or choose the Play | Play (loop) Highlighted
Section menu item. The 2 bars from 9 to 10 will play in a loop.
We can use the new Favorite Folders feature to quickly OPEN or SAVE a song from/to a different folder than we
are in now.
Hold the Shift key as you click the [Open] button. This will launch the Favorite Folder dialog, allowing
you to pick the folder to load from, and then the typical dialog will open up. This saves you time.
Similarly, Shift-clicking on the [Save As] button will allow you to choose a favorite folder prior to
seeing the Save As dialog.
The TC-Helicon Harmonies are improved. Let’s load in the Tutorial Demo from 2004, called c:\bb\Tutorial – Audio
Harmonies\Listen.MGU. We’ll now add audio harmonies, and the audio harmonies will now have vibrato!
After loading in Listen, launch the TC-Helicon Harmony dialog. Choose Harmonize to the MIDI
Melody, and harmony #172, and click OK.
Now, in the TC-Helicon Harmony dialog, notice the new combo boxes at the bottom of the screen for Pitch Style
presets (vibrato and scooping).
24
Chapter 3: Band-in-a-Box Version 2005
Set the 4 harmonies to the first vibrato setting “1 BNatural Vibrato,” and press the [PREVIEW]
button. You’ll now hear these harmonies,
generated from MIDI notes in the Band-in-a-Box harmony, but with various types of vibrato and scooping pitch
effects. On held notes, the vibrato is essential for a natural vocal sound.
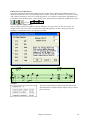
Now let’s move on to the Piano Roll Tutorial.
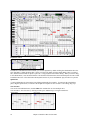
Piano Roll Tutorial
The Piano Roll window enables precise graphic editing of note timing and duration. You can also graphically edit
note velocity, controllers, program changes, channel aftertouch, or pitch bend.
The Piano Roll may be opened as a movable window (which floats above the Band-in-a-Box main window), or it
may be opened embedded, which occupies the same position as the Chordsheet/Notation panel in the Band-in-a-Box
main window.
Let’s load the song “PianoRollDemoSong.MGU.” This is a medium Bossa Nova with some horn noodling to
demonstrate Piano Roll features. The song contains example use of several MIDI data types with which to
experiment.
To open the Piano Roll, in the Band-in-a-Box Window menu, select the item Piano Roll Window.
Chapter 3: Band-in-a-Box Version 2005
25
Playback Control
In addition to other Band-in-a-Box methods, you can start playback by double-clicking the Chords Ruler above the
Note Time Ruler. When polishing edits, it can be convenient to double-click the Chords Ruler to hear a couple of
bars, and then click the Ruler or tap the <space bar> to stop playback and continue editing. When you click or drag
in the Chords Ruler, it sets the Insertion Point. The Insertion Point determines the location that pasted events would
be added to the track. It also determines the Playback Start bar if you use the Ctrl+G “play from here” keystrokes.
Splitter Bar
A vertical Splitter Bar sits between the Note Editing and Graphic Event panels. To maximize the Note Editing
panel, drag the Splitter down, to maximize the Graphic Event panel for more accurate event editing, drag it up.
Note Selection
You can click on individual notes, and also Shift-click or Ctrl-click to select multiple notes.
You can make a “box selection” by clicking on white space and drawing a rectangle around notes.
26
Chapter 3: Band-in-a-Box Version 2005
Note Editing
Move the mouse cursor over the left side of a note, then click-drag horizontally to edit the note's start time. To drag
a group of selected notes, hold Shift while dragging the head of one of the notes, and all of the selection will follow!
Move the mouse cursor over the right side of a note, then click-drag horizontally to edit the note's duration. To drag
a group of selected notes, hold Shift while dragging the tail of one of the notes.
Move the mouse cursor over the center of a note, and then click-drag vertically to edit the note's pitch. To transpose
a group of selected notes, hold Shift while dragging the center of one of the Notes.
Insert a Note
Hold Shift+Ctrl, and then click where you want a new note.
Delete a Note
Select one or more notes, and then tap the computer's Delete key. You Can also right-click and choose the “Delete
Selected Events” item in the pop-up menu.
Undo Mistakes
You can use Edit | Undo (or Ctrl+Z) to recover from edits gone horribly wrong. You can also right-click and
choose the “Undo” item in the pop-up menu.
If you make a mistake when inserting an event, it is often easy to fix by re-editing the event. For instance, if you
intended to insert a C note, but accidentally inserted a B note, it is trivial to drag the new B note up to C.
After inserting events, the new events are selected (highlighted red). Therefore, you can also tap the Delete key to
remove accidentally inserted events.
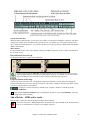
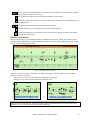
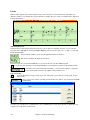
Graphic Event Editing
You can edit the value or time of individual graphic data items. To edit the value, move the mouse cursor over the
top half of an event, and click-drag vertically. To edit the time of the event, move the cursor over the bottom half of
an event, and click-drag horizontally. There are two tools for inserting graphic events, the Line Tool and the Pencil
Tool.
Line Tool
Move the mouse cursor over white space in the Graphic Event panel. The cursor becomes a Line Tool. Click and
then drag a line. When the mouse button is released, events are inserted or modified to fit the line. This illustrates
the effect of the Line Tool for editing the velocity of the first 6 notes.
Pencil Tool
Hold Shift+Ctrl, and move the mouse cursor over white space in the Graphic Event panel. The cursor becomes a
Pencil Tool. Click and then drag a free-form shape. When the mouse button is released, events are inserted or
modified to fit the free-form shape. This illustrates the effect of the Pencil Tool for free form drawing the velocity
of the first 6 notes.
Chapter 3: Band-in-a-Box Version 2005
27
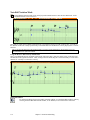
Program Changes
The Piano Roll demo song contains some embedded program change events as a demo of this new method. Set the
“View/Edit” control to “Program,” and the few program changes are displayed in the Graphic Event panel.
Program changes are zero-based. For example, General MIDI piano is zero rather than one. The demo song intro
has a flute program change. Then the first chorus is trumpet, the second chorus is flute, and the third chorus is
soprano sax.
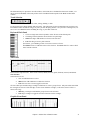
Expression Controller
Set the View/Edit combo box to “Control” (controller MIDI events). Then select “11 Expression MSB” in the
controller type combo box.
The Expression controller is recognized by most modern synthesizers (including most General MIDI synths).
However, some older synths do not recognize this controller. Expression is an alternative to “7 Main Volume
MSB.” Use the Expression controller for individual tracks, and reserve the main Volume controller for overall track
loudness. That way, you can use the Band-in-a-Box main window Volume controls without affecting individual
notes in the track.
In the example shown, the intro flute ostinato pattern fades in, and then fades back out, via the expression
controllers. These events were entered with the Line Tool. Notice that before the trumpet comes in, there is a single
expression event of value 127, to kick the loudness up to “normal.”
Single controllers are inserted by moving the mouse cursor to the desired position and then clicking the mouse
button.
Play the demo song, and watch how Expression controls have been added for soft attack on some notes, and
loudness reduction at the end of some notes.
28
Chapter 3: Band-in-a-Box Version 2005
Modulation Controller
Set the View/Edit combo box to “Control” (Controller MIDI Events). Then select “1 Mod Wheel MSB” in the
controller type combo box.
The Modulation controller is not firmly defined, but it is usually a Vibrato or Tremolo effect (especially in General
MIDI synths).
Play the Demo Song, and watch how Modulation has been added to some notes to add Vibrato. It is usually best to
use tasteful amounts of Controllers. With graphic edits, too much is almost always too much!
Pitch Bend
Set the View/Edit combo box to “Pitch Bend.” Play the demo song, and watch how a few pitch bends have been
inserted to “scoop” some note attacks, “sting” the middle of a note, or “fall off” some note releases.
More Details
Please see the Piano Roll Window topic for more information about this feature.
________________________________________________________________
This is the end of the tutorial. Thanks for taking the time to read this section. The next sections examine the new
features in detail.
Chapter 3: Band-in-a-Box Version 2005
29
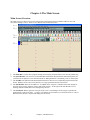
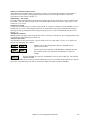
Chapter 4: The Main Screen
Main Screen Overview
The main screen gives direct access to the major features and program settings of Band-in-a-Box for ease and
convenience during a session. There are five different areas on the main screen.
1→
2→
3→
4→
5→
The main screen of Band-in-a-Box with a new, blank song.
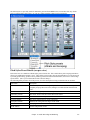
1. The Status Bar is used to show program running status messages and path names of the currently loaded song.
2. The Synth Window is the area between the Menu Bar and the Piano Keyboard where Instruments patches are
set and levels are adjusted. It also includes buttons for adding harmonies to the Melody, Thru, or Soloist parts.
3. The Tool Bar area under the Piano Keyboard has buttons for direct access to important program features and
menus. Hold the mouse cursor on any button to see a pop-up hint that describes its function.
4. The Title Window shares the Tool Bar area. In addition to the song title, it includes all the other settings for
the song such as its Key Signature, Tempo, and Chorus settings. To the right of the Title Window are two
floating, dockable toolbars that can be configured by the user.
5. The Chordsheet Area occupies the lower part of the screen. Chord changes for the song are typed into the
numbered bars (cells) in the sheet. “a” and “b” part markers are entered here to switch between the “a” and “b”
Band-in-a-Box substyles. Repeats and endings are also shown.
30
Chapter 4: The Main Screen
Personalizing the Main Screen
Band-in-a-Box gives you many options to personalize the main screen.
Screen Layout
The Chordsheet area (or Notation Screen) can be placed at the top of the screen if desired by selecting the “Put
Notation/Chords on Top” from the Window menu or by pressing Ctrl+T. (This is reversed by selecting the same
option.)
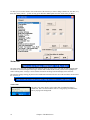
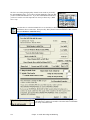
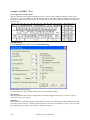
Display Options
Go to Opt. | Preferences or click on the [Pref] button to open the Preferences dialog. Then click on the [Display]
button to open the Display Options dialog where you can select a toolbar mode, show or hide the on-screen piano,
pick a song title font and set options for the chordsheet display including the number of rows to display for the main
chordsheet, the font to use, and the font size too. This allows you to read the chordsheet window from “across the
room.”
If you choose a Custom font, you can choose the size as well. Choose a preset font, and the size will be set
automatically to fit into the height of the row. Choose Jazz Symbols to see shorthand Jazz chord symbols in the
chordsheet and notation. To revert to the “old look” that used a small System font, and lots of rows, you can choose
that as the type of font “Small font (system).”
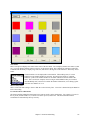
Color Schemes
You can choose from several color sets using the 256-color palette in Windows. Choose from pre-made color
schemes or make your own. To change the color scheme, select Opt. | Preferences from the main screen, and then
click on the [Colors] button in the Preferences dialog to launch the Color Selection dialog.
To select a pre-made color scheme, press the [Import..] button and choose from the list of schemes. Select [OK] to
make the changes permanent. Use the [Export..] button to save and share your customized color schemes.
Chapter 4: The Main Screen
31
To make your own color scheme, click on the name of the element you wish to change (Chord Area, List Box, etc.),
then click on the [Choose…] button to bring up the Windows Color palette and click on the color you desire.
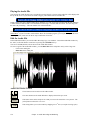
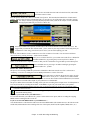
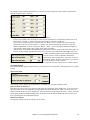
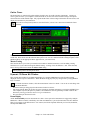
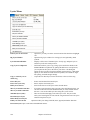
Status Bar
The name of the open song is identified in the status bar at the top of the screen. The full file name and path name
are shown, as well as the length of the song in minutes and seconds and the current position of the highlight cell.
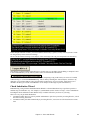
Other “running status” messages such as Soloist Generation and Song Generation display in the status bar.
The status bar changes during playback to show additional information like the current bar and chorus location and
the current style.
Status bar during playback.
Taskbar hint
The entire song name displays in the taskbar hint when Band-in-a-Box is
minimized. This is useful to find the name of a song playing when Band-in-aBox is playing in the background.
32
Chapter 4: The Main Screen
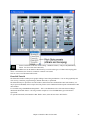
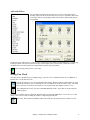
Synth Window / Piano Keyboard
The Piano Keyboard:
This keyboard displays the notes (in different colors) that are being played by all instruments on various parts of the
piano keyboard during playback (except drums). The MIDI Thru/Soloist is also displayed on the piano keyboard.
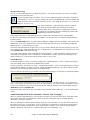
Instruments and Parts:
Part Settings: The Bass/Drum/Piano/Guitar/Strings/Melody/Soloist and Thru buttons refer to instrument parts.
To change a setting for one of the parts you need to do the following:
- Select the part by mouse clicking on the part name, or on the button immediately to the left of
the part name.
- Change the desired parameter to affect the new setting.
Instruments - Choosing
The instrument panel allows you to change the instrument for any part:
- Clicking on the drop-down arrow produces an instrument list that you can choose from by highlighting and
clicking on the desired instrument name.
- Clicking the [F] button produces a representative list of predefined favorite instruments that you can choose
from.
The [GM2] button lets you select patches from a list of both General MIDI and General MIDI 2 patches if
your system supports GM2.
Clicking on the [+] button produces a comprehensive list of ALL the patches available for your
synthesizer, including ones on higher banks
(if applicable). This list displays your patch names by name, where the patch is located (patch #, bank) and lets you
pick them from an easily customizable list.
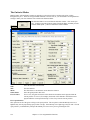
Harmony
The Harmony area displays the current Melody and Thru Harmony. At the top right, you'll see the harmony boxes
for the Melody and the Thru/Soloist.
The [M] button is for Melody harmony - pressing the [M] button produces a
list of harmonies you can choose from.
Here it's set to SuperSax for a Big Band saxophone section harmony.
Chapter 4: The Main Screen
33
Pressing the [F] button produces a list of
your favorites; the 50 most recently loaded
harmonies.
The keystrokes Shift+F10 allow or disable
the Melody harmony.
Tip: You can also search for a harmony
by a keyword (i.e. typing in the first few
letters of a harmony name) in either the
Harmonies or Favorite Harmonies dialog.
The [T] button is for Thru/Soloist harmony. Either your live part or
the Soloist will be harmonized in real time - in this case using George
Shearing Quintet type harmony (piano, vibes and guitar). Pressing the [f] button produces a list of your favorites;
the 50 most recently loaded harmonies. Pressing the Shift+F11 keys toggles the Thru harmony on and off.
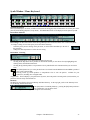
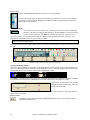
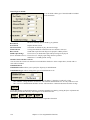
Toolbars
The main toolbar extends the full width of the screen. (It is divided in two here.)
The [New] button clears the Chordsheet to start a new song. Band-in-a-Box reminds you to save your
work before it erases the chords.
The [Open] button is used to open (load) songs into the program from a standard Windows Open File
dialog.
Use the [Prev.] button to immediately open the previous song in the same folder (in alphabetical order)
without going through the usual file opening process.
Use the [Next] button to instantly open the next song in the same folder (in alphabetical order) without
going through the usual file opening process.
The [Save] button saves the song to disk with the standard Windows Save As dialog.
This saves the song, allowing you to choose or confirm the name and location for the file save.
34
Chapter 4: The Main Screen
The [.MID] button allows you to make a Standard MIDI File and save it to disk as a file with extension
.MID or to the Windows Clipboard with type “Standard MIDI File.” Type 0 and Type 1 MIDI files are
supported, or you can also choose to save the song as a Karaoke file with the .KAR extension.
This is the “Render to WAV file” button, which will convert (render) your MIDI arrangement to an audio
wave file.
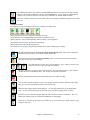
Transport Controls
These buttons are like the transport controls on a CD player or a media player.
[Play] button generates a new arrangement and plays the song.
[Loop] plays the selected (highlighted) section of the chordsheet in a loop.
[Replay] plays the song from the beginning without creating a new arrangement.
[Stop] button stops the song or the Jukebox from playing.
[Pause] button pauses the song during playback.
[From] button is used to play a song starting anywhere in the song, including tags or endings.
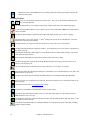
The [Melodist] button opens the Generate Chords and/or Melody dialog, where you can choose the
Melodist you wish to have generate chord changes and melody.
The [Soloist] button opens the Select Soloist Dialog, where you can choose the Soloist you wish to
have play over any given chord changes.
The [Juke] button is used to start or stop the Jukebox. The [<] and [>] arrow keys are
to move to the next or previous song in the Jukebox.
The [Rec.] button is to record a song from the beginning. The music that you play in to the computer
will then be stored on the Melody track. The “R” key is the keyboard equivalent.
The [R. Aud] button launches the Record Audio dialog for live audio recording.
You can make yourself sound like a 5 piece vocal group! Record a vocal part, and add a 4 part audio
harmony. Press the audio harmony button on screen to do this.
Band-in-a-Box supports DirectX Audio plug-ins – you can apply them directly to the digital audio
track. Use the cool PG Music plug-ins provided, or any other DirectX plug-ins that you have.
This allows you to select and configure DXi (DirectX instruments) software synthesizers. The “Use
DXi Synth” checkbox must be selected in the MIDI Driver Setup dialog.
Sends out an “all notes off” message to your synthesizer, so it can function as a “panic” button to stop
a hung or stuck note .
Chapter 4: The Main Screen
35
This button resets General MIDI devices by sending a GM mode On message and then setting up the
Band-in-a-Box patches.
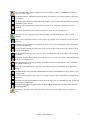
Floating Toolbars
These are Copy and Paste buttons for chords or notes. They copy to the Windows clipboard, and
paste from the clipboard.
The Folder button allows you to change song and style folders or directories from within the program.
Use the Favorite Folders button to select a folder from previously used folders. Shift-click on this button to
choose any folder.
The guitar button launches a guitar fretboard window that displays guitar notes as music is playing.
This button allows you to enter repeats, 1st and 2nd endings, DS al coda, DC al coda and more. The AutoFind feature enters them automatically.
The [Intro] allows you to generate and insert an intro into a song with a “press of the button.”
The Big Piano button launches a Big Piano window. It will display the notes to any track (except drums) as
the music is playing.
This launches the Windows Mixer applet. Use the Windows Mixer to make global settings to your sound
card's input and output options.
Press the Guitar Chord button to launch the “Generate Guitar Chord Solo” dialog.
The Ear Training button opens the Ear Training Window that plays chord types and intervals for you to
improve your playing-by-ear.
The Vocal Wizard selects and transposes the song to the best key for a singer’s vocal range.
This button launches the Chord Options dialog box, which allows you to add chord pushes, rests, shots, and
held chords for any given bar.
The grace note button opens the Melody Embellisher dialog for customizing the Melody Embellisher.
You can convert your composition to an audio CD. Press the CD button to burn a CD with the built-in CD
burner program.
This button connects to the www.pgmusic.com web site.
If you have a Sound Blaster card, this button runs the Creative Mixer.
This button opens the Notation window, where you can enter chords and lyrics, edit notation, and view
MIDI notation in “note roll” style.
The Lead Sheet notation is a full-screen notation window with optional Fake Sheet mode that shows 1st and
2nd endings, repeats, and codas.
Launches the Piano Roll window for editing the Melody or Soloist tracks in a piano roll format, including
graphic controller editing.
36
Chapter 4: The Main Screen
The Audio Edit window displays a graphical waveform and allows editing. Hold Shift when pressing to
open a moveable window.
Use the Print button to launch the Print Options dialog, which allows you to print Lead Sheet or Fake Sheet
style notation.
The Drum button launches an animated Drum Kit window. Press it to launch this fully functional (and fun)
GM-MIDI “virtual” drum kit.
The Song Title button generates a song title for the current song. Each time it is pressed a new title is
generated.
This button opens the Big Lyrics window for full screen “Karaoke-style” scrolling lyrics.
The Audio VU meters display the input volume for audio recording and the output volume for audio
playback.
There’s a Lyric Document window so you can easily copy and paste lyrics to and from your favorite word
processor.
This button opens the Windows Recording mixer where you set your recording inputs. Select Microphone
or Line-in to record audio.
The [Pref] button will bring up a dialog box where you can set various settings all at once and access most
of the program options.
The StyleMaker button opens the current style in the StyleMaker, allowing you to edit the style by editing
the patterns.
This button opens the “Hybrid Styles” feature that allows you to create a new style by using instrument parts
from up to five different styles.
This opens the Style Creation Wizard dialog, where Band-in-a-Box will automatically convert a MIDI file
into a Band-in-a-Box style.
This is the Chord Builder button. Chords may be heard and entered to the chordsheet by clicking in this
dialog.
The MIDI Monitor button launches a MIDI Monitor that displays the MIDI Data flowing in and out of your
computer/synth.
The tuner button opens the Guitar Tuner so you can tune a guitar or other instrument that is plugged into the
sound card.
The SB button opens the Sound Blaster control panel, but only if you use a Sound Blaster card. Sound fonts
are loaded in the control panel.
This button toggles the chord display among standard (CMaj7), Roman Numeral (Imaj7), Nashville (1Maj7),
and Solfeggio (DoMaj7).
This runs the stand-alone Title Generator program, which will generate and print 50 new song titles at a
time.
Chapter 4: The Main Screen
37
Title Window
The Title window shows the basic information about the current song at a glance - its title, style, key, tempo, and the
length and number of choruses. It also gives quick access to the Song List, the StylePicker, Memos, and Song
Settings.
The [Song] button launches the Load Song by Full Titles dialog box.
The [F] favorites button opens a list of the last 150 songs played.
The [Style] button launches the StylePicker window. This window offers detailed information about
each style.
The [F] favorites button opens a list of the last 150 styles chosen.
The names of the last five songs are listed at the bottom
of the File menu, and are numbered from 0 to 4.
The Song Title window allows you to enter the name of a song.
Click in the box with your mouse to start an insertion cursor and type in the name of your song. The title is
automatically included when the song is printed.
Style Display Window
This window displays the current style in use.
Key Signature
The key signature of the song is displayed on the main screen under the title. To change the key, click
on the key signature to choose a new key from the dropdown list box. Band-in-a-Box will offer to
transpose the chordsheet to the new key signature.
Tempo Control
The current tempo displays in the Title window, with controls for easy tempo settings and
adjustments.
Click the mouse on the spin control arrows to raise or lower the tempo in by 5 bpm (beats per minute) at a
time. Use a right mouse click on the tempo arrows to change the tempo by 1 bpm at a time.
Tap the [=] key on the number row of your computer keyboard for 4 beats to set the tempo and start the
playback immediately at that tempo. (Or click the [=] button on the screen with your mouse pointer.)
Tap the [-] key on the number row of your computer keyboard (see illustration above) for 4 beats to set the
tempo. Or click the [-] button on the screen with your mouse pointer.
Chorus Control
The Chorus Control buttons are used to set the overall format of your song.
Chorus Begin button: Click on the Chorus Begin Button to select the first bar of the chorus. The Bar
number that you select is displayed.
38
Chapter 4: The Main Screen
Chorus End button: Click on the Chorus End Button to select the last bar of the chorus. The Bar
number that you select is displayed.
The number of choruses possible for a tune is 40. Click on the chorus button and choose how many
choruses you require.
As the song is playing the current chorus is displayed at in the chorus button. 2/3 shows that the second
of three choruses is playing.
If you change the number of choruses, Band-in-a-Box will offer to fill up or remove choruses of the Melody track to
match the new number of choruses.
Title window checkboxes
When the loop checkbox in the Title window is checked, the song plays endlessly until stopped by
the [Esc] key, the space bar, or the [Stop] button. At the end of the song, it plays again from the start.
Enables fake sheet mode for the chordsheet with 1st and 2nd endings and repeats. Right click to autodetect repeats.
The Wizard is an intelligent play along feature that uses your QWERTY keyboard as a
substitute for an external MIDI piano-style keyboard. Toggle this checkbox “on” to play along with Band-in-a-Box.
During playback, the Melody Embellisher changes timing of notes, durations, velocities, legato, as
well as adding grace notes, additional notes, and “turns.” It is turned on and off by the Embellisher
checkbox on the main screen. Embellisher settings are accessed from the menu item Melody |
Embellisher or the Embellisher button on the toolbar.
Press the [S] button, or choose Edit | Settings (for This Song)… to select additional settings for the
current song.
The [Memo] button allows you to put in a memo to a song. You can type in a memo or you can
paste text from the Windows clipboard.
Loop Section Settings
The loop button launches the Loop Section Settings dialog, allowing you to set a range of bars to loop
in Band-in-a-Box.
The LoopSec/LoopScn checkbox turns the Loop Section on/off. When it shows LoopSec a selected
range of bars repeats in an endless loop. LoopScn indicates a screen of notation is looping.
Chordsheet Area
Chords, rests, shots, holds, and part markers are entered in the Chordsheet.
The chordsheet can be viewed in the full linear view showing all bars, or optionally in fake sheet view that shows 1st
and 2nd endings and repeat signs. Another option shows bars past the end of the song in gray.
Chapter 4: The Main Screen
39
Chord Entry
The basic way of entering a song into Band-in-a-Box is to type in the chords to the song on the chordsheet
(worksheet). The arrow keys move the active (highlighted) cell around in the chordsheet. The Enter key advances
to the next ½ bar. Chords can be entered from the QWERTY keyboard or an external MIDI keyboard (see Window
| MIDI Chord Detection…).
Chords are typed in using any of the supported chord symbol displays:
1. Standard chord symbols (e.g., C or Fm7 or Bb7 or Bb13#9/E).
2. Roman numerals (Imaj7).
3. Nashville Notation (1Maj7).
4. Solfeggio (DoMaj7).
Notes: It is not necessary to type upper or lower case. The program will sort this out for you. Any chord may be entered
with an alternate root (“Slash Chord”) e.g.: C7/E = C7 with E bass. Separate chords with commas to enter 2 chords in a 2
beat cell, e.g., Dm, G7
Shortcut Chords:
If you enter a lot of songs, you'll appreciate these shortcut keys.
- J = Maj7
- H = m7b5 (H stands for Half diminished)
- D = dim
- S = Sus
Example: To type CMaj7, just type CJ (it will be entered as CMaj7)
Add your own chord shortcuts.
You can make your own shortcuts text file and name it \bb\shortcut.txt. This allows you to add new chord shortcuts.
(Note that this file doesn't ship with Band-in-a-Box or it would overwrite your file.)
If you find a chord that Band-in-a-Box won't accept like Csus2 (it expects C2), you can enter this on a single line
(without the quotes) “Csus2@C2.” Then Band-in-a-Box will enter the chord C2 if you type in Csus 2.
Play Selected Area as a Loop
To use this function, select a region on the Chordsheet
.
Click on the[Loop] button, Shift-click on the [Play] button, or press F10 (Play Selected Area as Loop)
and the program will play a selected region, and loop the selection. For example, you can select bars 19
and 20, and then press F10, and bars 19 and 20 will play looped.
40
Chapter 4: The Main Screen
Chapter 5: Guided Tour of Band-in-a-Box
With Band-in-a-Box you can arrange, record, save, and print your own song ideas. Just type in the chords to any
song; choose a style and press [Play] to hear the “band” play a full arrangement. Then record a Melody - either
MIDI or live audio – or have Band-in-a-Box write an original Melody for you. Add Melody embellishments and
harmony, an automatically improvised Soloist, an Intro, and print out a multi-part Lead Sheet or a Fake Sheet with
repeats and endings in a “handwritten” Jazz font. Edit the notes for the Melody or Soloist track in the Piano Roll
window, with precision graphic editing of controllers. Use the Melody Pitch Tracking feature to “tweak” the pitch
of your Band-in-a-Box audio track, and then add amazing “stylized” 4-part audio harmonies.
Loading and Playing Songs
Open any song file with the familiar dialog box, just like any other file on your disk.
Start song playback.
The [Loop] button plays the highlighted section of the chordsheet or notation in an endless loop.
Click and drag the mouse to highlight a section of bars to loop.
Replays the song without regenerating the tracks, so the current arrangement is preserved. ( Save the
song to a MIDI file to permanently save the arrangement.)
Stop song playback.
Pause playback with the [Pause] button; resume by pressing it again.
Jump to any bar in the song. Press the [From] button to choose which chorus and bar number to
jump to.
The [Song] button opens the SongPicker window, a resizable window that lists all of the songs in the
current directory and, optionally, its subdirectories. For example, if you get a song list of c:\bb,
it can include songs in subfolders like c:\bb\styles34. You can lock the SongPicker to always open in the same
folder and use the same list to keep track of all songs on your disk.
The first time that you select the [Song] button Band-in-a-Box automatically writes the song list. The current folder
name is displayed in the title bar, with the total # of songs displayed.
From then on, the SongPicker opens when the button is pressed and songs can be selected by title from the
alphabetical list. Songs can be sorted by any of the column headings, like Song Title, File Name, Style, Tempo, etc.
Check “Play when chosen” to automatically play the selected song.
Chapter 5: Guided Tour of Band-in-a-Box
41
Band-in-a-Box SongPicker window.
The folder settings are at the bottom of the SongPicker.
The Current Folder name is displayed.
The folder can be changed, either by:
1. Going “up” a folder (e.g. from c:\bb\styles to c:\bb).
2. Choosing a folder from recently used favorites folder.
3. Selecting the new folder.
When the new folder is chosen, the song list for that folder will be displayed. The song list may need to be rebuilt;
the program will do that automatically.
If the “Always open in this folder” item is selected, the song picker will always open up in the specified folder. So
if you put all of your songs in c:\songs, you can make the SongPicker always open to the c:\songs folder!
If “Include Subfolders” is selected, the SongPicker list will contain songs from the folder and any subfolders. So if
42
Chapter 5: Guided Tour of Band-in-a-Box
you have subfolders to c:\songs like c:\songs\country and c:\songs\jazz, you can see/search all of these songs in the
same SongPicker dialog.
Tip: If you choose c:\ as your folder, the SongPicker would find every Band-in-a-Box file on your hard drive and display it in
the SongPicker. You might instead find it easier to put all of your songs within a folder like c:\songs, and have various
subfolders to that. And then set the SongPicker to always open up in the c:\songs folder. Then you’ll have access to all of
your songs easily.
Use the Favorites folder button to jump to other folders easily.
Once you’ve loaded a song you’ll see the chords on-screen in the chordsheet so you can follow the chord changes
and play along with the band.
Chordsheet Options
You can set up the chordsheet with your own preferences. Go to Opt. | Preferences or choose the [Pref]
toolbar button to open the Preferences, and click on the [Display] button to open the Display Options.
In the Chordsheet area you can pick a chordsheet font and the number of rows to display, as well as other options
for the chordsheet display.
Transpose Chordsheet option
The “Transpose” option is also found in
the Display Options dialog. It is useful
for non-concert pitch instruments like
Tenor Saxophone. This option is also
available on the Notation window.
Play along with your MIDI Controller Keyboard
If you have an external MIDI keyboard controller connected to your computer system, you can use the MIDI THRU
features to play along with the program, including the Harmony feature.
When playing along on a keyboard to the Band-in-a-Box “band,” if the sound
of your keyboard is too quiet and increasing the THRU Volume doesn't help
enough, use this option to boost the THRU velocity and make your THRU playing louder. (For example, nonvelocity sensitive keyboards are usually set to output a quiet velocity of 64). To set this “THRU velocity boost,”
open the MIDI Settings dialog (Opt. | Preferences | Channels). Click on the [Options] button and set “Boost
THRU Velocity by” to a value in the range of –127 to +127 in the MIDI Options dialog. (Default is 0.)
Chapter 5: Guided Tour of Band-in-a-Box
43
Harmonize your play along part by pressing the [T] button in the Synth window to choose a harmony,
just as you would for the Melody.
Change the Style
Try different styles by clicking on the [Style] button to choose from a list of the styles available
in the StylePicker window. Styles that have the same feel (triplets, eighths, sixteenths) and a
similar tempo range to the current prototype will be indicated with an (*) asterisk. Styles with (^) caret have a
similar feel but a different tempo range.
Band-in-a-Box StylePicker window.
You can also change the style at any bar in the song, so you could use a few similar styles to add variety while
keeping the same feel.
Change the Sound
You’ll find the Synth window at the top of the screen. Select an instrument part by clicking its name. The black
dot beside the name indicates the selected part. Any changes to the Instrument, Volume, Reverb, Chorus, Bank, etc.
will apply to that part. Change the instrument patch by scrolling through the 128 General MIDI instrument names in
the Instrument box, even while the song is playing.
44
Chapter 5: Guided Tour of Band-in-a-Box
The Band-in-a-Box Synth window controls instrument settings.
Solo an Instrument Part
While listening to Band-in-a-Box, you can easily solo (isolate) a certain part by holding the Control key and mouse
clicking (left or right) on the instrument at the top of the screen. For example, if you want to hear only the Piano
part, Control-Click on the Piano part. If you want to use hot keys for this, you can press Alt+2 (Mute-All) and then
Alt+4 (Unmute Piano).
Mute All Parts
To mute/unmute all parts as the song is playing, simply press Alt+2 or right-click on the “Combo” radio buttons at
the top of the screen.
Play Selected Area as a Loop
To use this function select a region on the Chordsheet.
Click on the[Loop] button, Shift-click on the [Play] button, or press F10 (Play Selected Area as Loop)
and the program will play a selected region, and loop the selection. For example, you can select bars 19
and 20, and then press F10, and bars 19 and 20 will play looped until Stop is pressed.
Loop any Section of the song.
You can loop any section of the song. The program will then start playback at the first loop point and play the
looped section until stop is pressed or looping is turned off. This feature is handy for looping a full chorus or other
section of a song for practice or performance.
Looping of a section of the song is enabled by the “LoopSec” checkbox or with the keystroke
NUMPAD 1.
Open up the Loop Section Settings dialog by clicking the Loop button, or pressing NUMPAD 2. The Loop
settings dialog will then display.
Add a Melody – MIDI and/or Audio
Band-in-a-Box is much more than an intelligent arranger and accompanist.
You can record your live MIDI performance to the Melody track, enter a Melody in the Notation note-bynote, or use the Wizard to record from your computer keyboard.
Chapter 5: Guided Tour of Band-in-a-Box
45
Enable the Embellisher, and the Melody will be embellished as it plays. You hear a livelier, more
realistic Melody, and it's different every time. The Embellisher is only active while the music is
playing; the recorded Melody track isn’t
affected. There is an option for the Embellisher to only humanize the timing of the music if the timing was “stiff” to
begin with. This allows the Embellisher to leave the timing of human input melodies alone, and humanize only the
ones that were entered in step-time.
You can record an audio track of your live vocal or instrumental performance and save it to an audio
wave file along with the Band-in-a- Box accompaniment. Make sure that you have a microphone
plugged in to your sound card, or a connection from a mixer, keyboard, or other audio device connected
to the Line In jack on your sound card.
A Mono or Stereo WAV file can be imported to the Audio track, optionally merging with or replacing any existing
audio track. Choose the menu item Audio | Import WAV File. You then choose a WAV file to import. The Import
WAV dialog is then displayed, which allows selection of the point to insert the WAV file, and whether to merge or
overwrite existing audio in the range.
Harmonize the MIDI Melody
Press the [M] button in the Synth window to add a MIDI harmony to the
Melody track.
Pressing the [F] favorites button brings up a list of the last 50 harmonies used.
The Select Melody Harmony dialog box allows you to choose from any of the pre-defined harmonies and even
allows you to define your own.
46
Chapter 5: Guided Tour of Band-in-a-Box
Play Along with the Wizard
The Wizard is an intelligent play along feature that is controlled with the bottom two rows of your computer’s
QWERTY keyboard. The bottom row of keys plays chord tones; the second row plays passing tones. You play any
key in either row and never make a mistake!
In the Play menu, toggle Wizard uses “Smart” notes to “off” (unchecked) to have the Wizard provide you access to
the chromatic scale. Toggle it “on” to have access only to the notes based on the chord/key of the song.
This also allows you to record to the Melody or Soloist track without an external MIDI keyboard, and can even be
used to trigger the Soloist Wizard. Also, play along using the Wizard works with the harmony feature, so you can
play along live from your QWERTY keyboard in 4-part saxophone harmony for example.
Playing the Wizard
The Wizard Keys are active during playback. The active keys are the lower 2 rows of the keyboard.
Changing Instruments / Settings for the Wizard
As a play along instrument, the Wizard uses the Thru instrument part. To change the instrument patch, volume,
reverb, etc. for the Wizard select the Thru instrument in the synth window.
Add a Solo - “The Soloist”
That’s right! Band-in-a-Box can “solo like a pro” in over 200 styles.
Use the [Soloist] button on the main screen to open the Select Soloist dialog box and choose from over
200 Soloist profiles.
Chapter 5: Guided Tour of Band-in-a-Box
47
Use the preset Soloist settings, or choose a Mode and which Choruses to solo.
The Soloist Maker [Edit…] button gives access to the advanced settings in the Soloist Editor
where you can edit existing profiles or create new Soloists of your own.
To see the Soloist part play in standard music notation open the Notation window and press the [S] button at
the far right of the instrument buttons.
View and Print Notation
Open the Notation window with the Notation button. You will see standard notation on the grand staff.
1.
2.
3.
There are 3 notation modes in Band-in-a-Box, the [N] button in the Notation window toolbar toggles
through the three modes;
Standard Notation for display of notes, chords, lyrics, and optional guitar tablature as well as entering
chords and lyrics.
Editable Notation to enter or edit notation with the mouse.
Note roll Notation works like the Editable Notation plus note velocities and durations can be viewed and
edited with the mouse.
Standard Notation Window
Click on the instrument buttons to see the notation for the different parts:
Bass, Drums, Piano, Guitar, Strings, and the Melody [M], or the Soloist [S].
Band-in-a-Box Standard Notation window.
The Standard Notation window can be used for notation display and the entry of chords and lyrics. Just type a chord
name and it will be inserted at the current time line location (the black vertical stripe just below the notation tool
bar.)
Toggle between Standard, Editable, and Note roll notation modes with the [N] button.
Press the [Opt.] button to set Notation window options such as track type, bar resolution, lyric font size,
and position, transpose options, and Regular or Jazz fonts.
This button opens the Lead Sheet window, which provides a full screen of notation either for an
individual instrument or for multiple instruments that you choose to view together by clicking the
instrument buttons while holding the Ctrl key.
48
Chapter 5: Guided Tour of Band-in-a-Box
Print out any part with the Print Button. In the Print Preview window save your notation as a graphic
file to upload to the Internet or to e-mail.
The [#] button opens the Event List for editing the Melody or Soloist tracks.
This is the button for note-based lyrics, which are automatically aligned with the corresponding note in
the Melody track.
Use the plus and minus buttons to zoom the Notation in and out.
The text button lets you enter section text or boxed text into the notation.
When the Scrub button is selected, notes will play as the mouse is dragged over them while holding
down the left mouse button.
Editable Notation Mode
Click on the [N] button to go from Standard Notation to Editable Notation mode. Chords, lyrics, and text can be
entered as in the Standard Notation window; the Editable Notation mode also permits point-and-click entry of notes
and rests as well as drag-and-drop editing.
Band-in-a-Box Editable Notation window.
This is the screen for step-entry of a melody or for editing existing parts. Note that each beat is sub-divided by
either 3 or 4 broken vertical lines.
-
Swing styles use 3 lines to divide each beat into eighth note swing triplets.
-
Straight styles use 4 lines to divide each beat into sixteenth notes.
Example of swing (triplet) resolution.
Example of straight (16ths) resolution.
Tip: The edits you make to Band-in-a-Box accompaniment parts will be overwritten when the [Play] button is pressed and the
program generates a new arrangement. To hear the song play as edited, use the [Replay] button found next to the [Play] button.
Edited songs can be permanently saved as a MIDI file with the [.MID] button.
Chapter 5: Guided Tour of Band-in-a-Box
49
Note roll Notation Mode
In addition to the editing features of the Editable Notation mode, in Note roll mode the velocity (vertical line) and
duration (horizontal line) of notes can be edited with the mouse.
Piano Roll Window
You can edit your tracks using the “Piano Roll” window, similar to the type found in many sequencer programs.
Edit the Melody or Soloist tracks with greater ease and precision. There are 2 panes in the window – one for notes
and the other for controllers, velocity, and other data. All notes and controllers are displayed as black/gray bars on a
grid. You can change note duration and pitch by selecting and dragging with your mouse.
The Piano Roll window enables precise graphic editing of note timing and duration. You can also graphically edit
note velocity, controllers, program changes, channel aftertouch, or pitch bend.
50
Chapter 5: Guided Tour of Band-in-a-Box
The Piano Roll may be opened as a movable window, which floats above the Band-in-a-Box main window, or it
may be opened embedded, in the same position as the Chordsheet/Notation panels in the Band-in-a-Box main
window.
Track Selection
Select the Track - Bass, Drums, Piano, Guitar, Strings, Melody, or Solo.
It is most practical to edit the Melody and Solo tracks. The other tracks for the accompaniment are rewritten every
time Band-in-a-Box rebuilds the song (every time you click the [Play] button). So if you edit a “backing track,” be
sure to save as a MIDI file before rebuilding the song, or your edits will be lost.
Keyboard Pitch Panel
1.
2.
3.
4.
Click on a single note of the keyboard to select all notes of the clicked pitch.
Click-drag on the keyboard to select all notes in a pitch range.
Shift-click-drag to add another set of notes to the selection.
Ctrl-click-drag to invert a pitch selection.
For instance, you could drag C5 thru C6 to select an octave of notes.
Then Shift-click A3 to add all A3 notes to the selection. Then Ctrl-click F5 to remove all F5
notes from the selection.
Note Panel
Horizontal bars represent notes. Notes can be selected, edited (start time, pitch, duration), inserted, and deleted.
Note Selection
Selected notes are red.
1. Click on individual notes to select.
2. Shift-click on individual notes to add to the selection.
3. Ctrl-click on a note to invert (toggle) its selection.
Click on white space and then drag a rectangle around notes to select a group of notes. Only notes that start within
the rectangle are selected. If the left edge of a note is not inside the rectangle, it will not be selected. This is a
feature, not a bug!
1. Shift-drag a rectangle to add another group of notes to the selection.
2. Ctrl-drag a rectangle to toggle the selection of the notes in the rectangle.
Graphic Event Panel
Chapter 5: Guided Tour of Band-in-a-Box
51
Graphically display and edit non-note MIDI events. This panel only shows MIDI events specified in the Chan,
View/Edit, and Controller Type controls.
Zero-value events are drawn as small hollow squares, to make them easy to identify.
With events such as pitch bend or controllers like modulation and sustain, it is important to take care to end a
“gesture” with a zero-value event. Otherwise, subsequent notes will be affected, with an unwanted “hanging”
permanent pitch bend, permanent vibrato, or sustain pedal locked down.
Event Selection
Selected Events are red.
Graphic Event Ruler Time Selections:
The Graphic Event Ruler will only select non-note events. In addition, it will only select the type of MIDI events
specified in the Chan, View/Edit, and Controller Type controls. When you make a Ruler Time selection, ONLY
THE VISIBLE events in this time range are selected. Other MIDI events in this time range are not selected.
Snap-to-Grid
Selections, Inserted Notes, or Edited Notes will snap to the grid spacing. If you do not
want snap-to-grid, select [NONE] in the drop-down menu.
View/Insert Channel
If a track contains multiple channels, “All” will display MIDI events on all channels.
Otherwise, select the channel that you need to see. If “All” is selected, new MIDI
events are inserted on the Band-in-a-Box track's assigned channel.
Except for perhaps multi-channel Guitar tracks, Band-in-a-Box plays all track events on
the assigned track channel. Therefore, in almost all cases, the channel of track events
does not matter.
For instance, if the Melody track is set to transmit on channel 4, all events on the
Melody track will be sent on channel 4 regardless of the “actual channel” of each track
event.
Note Duration
Set the default duration of new inserted notes. It is easy to mouse-edit a note's duration
after a note is inserted, so it is usually sufficient to select a typical note duration that
makes sense for your purposes and then mouse-edit the duration of “exception” notes
after they are inserted.
52
Chapter 5: Guided Tour of Band-in-a-Box
View/Edit Graphic Data
Determine what graphic data to view or edit in the bottom Graphic Data panel.
Choose Velocity, Controller, Program Change, Channel Aftertouch, and Pitch
Bend. If Chan is not set to “All,” only the selected channel events will be
displayed.
Controller Type
If “View/Edit” is set to “Control,” the Controller Type control becomes visible.
The Graphic Data panel will display the chosen controller type. If Chan is not
set to “All,” only the selected channel events will be displayed.
Cursor Location Info Panel
The Info Panel shows the cursor's Bar:Beat:Tick and MIDI note or controller value (depending on
the cursor location). In cursor locations where a value would be nonsensical, the status text values
are blank.
For instance, in the Note panel, Bar:Beat:Tick and Pitch are displayed. In the Ruler panels, only Bar:Beat:Tick is
displayed. In the left Piano panel, only Pitch is displayed. In the Graphic Event panel, Bar:Beat:Tick and Event
Value are displayed.
Chord Ruler and Note Time Ruler Panel
There are two top rulers. The top Chord Ruler displays chords and the Playback Location Indicator. The Note Time
Ruler displays bars and bar subdivisions. When zoomed-in, more subdivisions are displayed. When zoomed-out,
fewer subdivisions are displayed.
Click or drag in the Chords Ruler to set the Insertion Point (useful if you wish to use the menu Edit/Paste (Ctrl+V)
to paste into the Piano Roll). If a song is playing, a Chords Ruler click will stop playback.
Double-click the Chords Ruler to start playback at the indicated bar. You can also set the Insertion Point and then
tap Ctrl+G to start playback at the desired location.
Notes can be selected with the Note Ruler. However, the Note Ruler does not select non-note events such as
controllers or pitch bend.
1 Click-drag on the Note Ruler to select a time-range of notes.
2 Shift-click-drag to add a time-range of notes to the selection.
3 Ctrl-click-drag to invert the note selection of a time range.
For instance, you could drag to select all notes in bars 2 thru 7. Then you could Ctrl-drag to toggle off note
selections in bar 4. By using the Shift and Ctrl keys, very flexible time selections can be made.
Chapter 5: Guided Tour of Band-in-a-Box
53
Note Editing
Edit Note Time Stamp (start time):
Move the cursor over the left of a note. An east-west cursor appears. Then click-drag the note to a new time
(horizontal dragging).
If multiple events are selected, and you want to move all selected events, use Shift-click-drag. Otherwise a click on
a note will deselect the previous selection, and it will only select/edit the clicked note.
Edit Note Pitch:
Move the cursor over the middle of a note. A north-south cursor appears. Then click-drag the note pitch (vertical
dragging).
If multiple events are selected, and you want to transpose all selected events, use Shift-click-drag. Otherwise a click
on a note will deselect the previous selection, and it will only select/transpose the clicked note.
Edit Note Duration:
Move the cursor over the right of a note. A right-arrow cursor appears. Then click-drag the note duration
(horizontal dragging).
If multiple events are selected, and you want to change duration of all selected events, use Shift-click-drag.
Otherwise a click on a note will deselect the previous selection, and it will only select/edit the clicked note.
Insert a Note:
Hold the Shift+Ctrl keys. The cursor becomes a pencil. Click where you want the note and it is inserted with a
duration from the “Dur” drop-down menu, and on the channel selected by the “Chan” drop-down menu.
If “Snap” is enabled, the note is inserted at the nearest grid boundary. For instance, if the snap-to-grid setting is a
quarter note, inserted notes will snap to the nearest quarter note boundary.
There are many on-screen visual cues to assist cursor positioning. The Cursor Position Time Markers in the Time
Rulers can assist time positioning. The Cursor Pitch Marker in the Keyboard can assist pitch positioning. The
Cursor Location Info Panel gives precise time and pitch info. Also, the Note Panel has time grid markings, and
pitch accidentals are marked in light gray on the background.
If you make a mistake inserting a note, you can hit the Delete key to remove the new note. Alternately, it is very
easy to immediately drag the note to correct mistakes in time, pitch, or duration.
Delete a Note:
Select a note (or group of notes), then tap the Delete key. Alternately, select some notes, right-click, and choose the
“Delete Selected Events” item in the pop-up menu.
Splitter Bar
A vertical Splitter Bar sits between the Note and Graphic Event panels. If you want to maximize the Note panel to
see more notes, drag the Splitter down. If you want to maximize the Graphic Event panel for more accurate event
editing, drag the Splitter up.
Edit Events
Edit Event Value:
Move the cursor over the top half of an event. A north-south cursor appears. Click-drag vertically to scale event
values. To scale a selected group of events, Shift-click-drag vertically on one of the events in the selection.
Edit Event Time:
Move the cursor over the bottom half of an event. An east-west cursor appears. Click-drag horizontally to slide the
event in time. To slide a selected group of events, Click-drag horizontally on one of the events in the selection.
Insert Events
Line Tool:
With no modifier keys, the “white space” cursor is a Line Tool. Move the cursor to white space and then click-drag
to draw a line. When the mouse button is released, a series of events are inserted which follow the line slope.
To avoid choking the MIDI stream, the maximum event density is one event per 10 ticks. Repeated events of the
same value are not inserted. Therefore, long gradual Line Tool fades have a lower density than short extreme Line
Tool fades.
54
Chapter 5: Guided Tour of Band-in-a-Box
Pencil Tool:
Move the cursor over white space and hold the Shift+Ctrl keys. A Pencil Tool appears. Shift+Ctrl-drag to
freehand-draw a curve. If you don't get the curve quite right on the first pass, just keep holding the mouse button
and move the mouse back-and-forth to draw your desired freehand curve. When the mouse button is released, a
series of events are inserted to follow the freehand curve.
To avoid choking the MIDI stream, the maximum event density is one event per 10 ticks. Repeated events of the
same value are not inserted. Therefore, many freehand curves have a fairly low density.
Delete Events
Make a selection of events with the Ruler or by clicking on events. Then tap the Delete key. You can also rightclick and choose the “Delete Selected Events” item in the pop-up menu.
Right-Click Contextual Menu
The pop-up menu can be accessed by right-clicking on the notes, graphic events, or any of the rulers.
Undo:
Duplicates the Band-in-a-Box Edit | Undo (or Ctrl+Z) action.
Delete Selected Events:
Deletes any selected events (highlighted in red). This can also be accomplished by tapping the Delete key.
Select All Notes and Graphic Events:
If the “Chan” combo box is set to All, this item will select ALL EVENTS on ALL CHANNELS (all events in the
track). Otherwise, ALL EVENTS are selected which match the CURRENT MIDI CHANNEL.
Select All Note Events (Of Current Channel): (right-click the Note Panel or Note Ruler)
If the Chan combo box is set to All, this item will select ALL NOTES on ALL CHANNELS, but it will not select
any non-note events. Otherwise, ALL NOTES are selected which match the CURRENT MIDI CHANNEL.
Select All Note Events (Of Current Channel): (right-click the Graphic Event Panel or Graphic Event Ruler)
If the “Chan” combo box is set to All, this item will select ALL GRAPHIC EVENTS of the CURRENT
VIEW/EDIT TYPE on ALL CHANNELS. Otherwise, ALL GRAPHIC EVENTS of the CURRENT VIEW/EDIT
TYPE are selected which match the CURRENT MIDI CHANNEL. For instance, you could select all channel 4
modulation events, then Delete, to easily remove all of those events from the track.
Cut:
Copy selected events to the clipboard and then remove them from the track. Can also be accomplished with the
menu Edit | Cut (or Ctrl+X) action. If you wish, it is possible to cut from the Piano Roll, and then paste into the
Notation window, or vice-versa.
Chapter 5: Guided Tour of Band-in-a-Box
55
Copy:
Copy Selected Events to the clipboard can also be accomplished with the menu Edit | Copy (or Ctrl+C) action. If
you wish, it is possible to copy from the Piano Roll, and then paste into the Notation window, or vice-versa.
Paste - Replace:
If no events are on the clipboard, this item is dimmed.
The paste occurs at the time location of your right-click. Move the mouse cursor to the desired insert location.
Right-click on the Note Panel, Graphic Event Panel, or any of the Rulers. Then choose this item from the pop-up
menu. Any previous event types in the paste range which match event types in the clipboard are removed before the
clipboard data is added to the track.
If the “Chan” combo box is set to All, pasted events keep their original (copied) MIDI channel. Otherwise, the
pasted events will be re-channeled to match the “Chan” combo box.
Paste - Merge:
If no events are on the clipboard, this item is dimmed.
The paste occurs at the time location of your right-click. Move the mouse cursor to the desired insert location.
Right-click on the Note Panel, Graphic Event Panel, or any of the Rulers. Then choose this item from the pop-up
menu. Events from the clipboard are merged with existing data in the track.
If the “Chan” combo box is set to All, pasted events keep their original (copied) MIDI channel. Otherwise, the
pasted events will be re-channeled to match the “Chan” combo box.
The feature can also be accomplished with the menu Edit | Paste (or Ctrl+V) action (to match the Notation window,
which also uses a merge style of pasting). Before using the main menu Edit | Paste (or Ctrl+V), first make sure the
insertion marker is set to your desired paste time location.
This is easy to do. Just click or drag in the Chord Ruler to place the insertion marker where you want it. Then tap
Ctrl+V.
Re-Channel All Events to the Track Channel (Ch = xx)
Re-channel all notes and graphic events (the entire track) to the MIDI Output channel assigned for this track.
Sometimes this can come in handy to bring some “sanity” into Piano Roll editing.
For instance, though the default Melody output channel might be channel 4, meaning that Band-in-a-Box transmits
any events in the Melody track on channel 4. The actual events in the Melody track might be channel 1, or a
mixture of several channels.
For ordinary playback or note tweaking, it doesn't matter if the event channels are “mixed up,” as long as you have
the view channel set to All. But if you wish to use Paste - Replace, the Paste - Replace function is smart enough not
to “stomp on” a track's events that differ from the channels of the clipboard MIDI data. So if you force all events to
the track channel, the Paste - Replace function will always replace appropriately.
Re-Channel Selected Events to the Track Channel (Ch = xx)
Re-channel only the selected events to the track channel.
Re-Channel Selected Events to the View Channel
When editing a multi-channel guitar part or editing an imported multi-channel MIDI file, this command may be
useful. Beware that it might initially appear confusing.
For instance, one might set the view channel to ALL, and make a selection (intending to set these events to Ch 12).
Then set the view channel to 12, and of course the selected events disappear (if the events had some other MIDI
Channel). But then when you invoke “Re-Channel Selected Events to the View Channel,” the MIDI events will
reappear on the Piano Roll.
Horizontal Scroll Bar, [+] and [-] Buttons
Scroll in time, and zoom the horizontal display.
56
Chapter 5: Guided Tour of Band-in-a-Box
Vertical Scroll Bar, [+] and [-] Buttons
Scroll to see different note ranges (does not scroll the Graphic Event Panel) and zoom the vertical display.
Zoom to Selection Button
Make a selection of notes, and then click the Zoom To Selection button. The vertical pitch range and
horizontal time range adjusts to fill the note panel with the selected notes.
Lead Sheet Notation Window
The Lead Sheet Notation window displays a full page of notation with lots of options such as a selectable number of
staves per page, clefs to show, font size, margins, scroll ahead notation, and lyrics. You can set it to a big font size
and read the notation from across the room. Since the notation scrolls ahead, you can read ahead without waiting for
a page turn.
Launching the Lead Sheet Window
You can launch the Lead Sheet window from the main screen by pressing the Lead Sheet button (or
Alt+W). The Lead Sheet button is also accessible from the Standard Notation window.
Chapter 5: Guided Tour of Band-in-a-Box
57
During playback, red rectangles highlight the current bar. If the bar is empty (or in Fake Sheet mode), the Lead
Sheet will draw the staff lines and bar lines in red.
Multiple Tracks of Notation
Multiple tracks of notation can be viewed together in the Lead Sheet window. To select tracks, hold down the Ctrl
key and click on the part buttons at the top of the screen in the order that the tracks should appear from top to
bottom. For example, clicking on [M], and then on [P] and [B] with the Ctrl key held down would display and print
the multi-stave staff system shown. Multiple tracks can also be printed like a score.
Band-in-a-Box Lead Sheet Notation window displaying multiple parts.
Multiple lines of Lyrics on Fake Sheet.
If your song has 1st and 2nd endings or multiple verses of lyrics, multi-line lyrics can be displayed, so you’ll see all
verses on the same fake sheet. Load in the song c:\bb\ Tutorial - BB 2005\Listen Multi-line lyrics Demo.MGU.
Open the Lead Sheet and select “Fake Sheet Mode.”
58
Chapter 5: Guided Tour of Band-in-a-Box
This song has a 1st/2nd ending entered, with separate lyrics for each ending. Multiple lines of lyrics will also appear
if there are lyrics in multiple verses (choruses).
In the Notation Window Options, “Lyric Position” allows you to vertically position the
height of the lyrics.
In the Print Preview screen the notation can be saved as a graphics file to be imported to a document or uploaded to
an Internet page.
Choose the file type that you'd like to save to. If you want an exact rendition of the screen, choose MONO BMP,
since bitmap files are saved without any loss of quality. If you want a smaller file of your composition for Internet
use, choose a format like JPG, or PNG. These are smaller, because they compress the data, with some loss of
quality. JPG requires specific settings, for save quality (range of 0 to 100). 100 is the best quality, and the biggest
JPG file.
The notation can also be copied as a bitmap to the Windows clipboard and then pasted into any
application. This is done by clicking on the [Clipbd] button in the Print Preview screen.
Click on this button to print only the current page displayed in the Preview window.
Chapter 5: Guided Tour of Band-in-a-Box
59
Full-page view of Band-in-a-Box MultiTrack notation.
The Guitar Window
This is a window for Guitar and Bass players! The on-screen fretboard displays any track on Guitar or Bass. This
feature has many option such as auto-setting of correct positions, notes named on-screen, auto-octave adjust to play
in selected position, and a resizable guitar fretboard.
Launching the Guitar Window
To launch the Guitar window, press the Guitar Button, or Ctrl+Shift+G, or choose the Window | Guitar
Window menu item.
60
Chapter 5: Guided Tour of Band-in-a-Box
When you have a note or chord highlighted press the [Ch-] or [Ch+] (insert guitar chord) button on the
guitar, or 7 or 8 on the NUMPAD keypad. Each time you press the [Ch-] or [Ch+] you'll see that the
guitar chord changes to a different
voicing, cycling through the available 5-10 voicings possible for each chord. (Some notes won't have any chord
voicings, for example a C# note on a Cmaj7 chord, because it is always a passing tone.)
In a similar manner, you can convert a chord to a guitar note using the insert guitar note button.
Pressing the [N+] (or 3 or 4 on the NUMPAD keypad) repeatedly cycles through playing the same
note on all 6 strings.
This generates a Chord Solo, using the Guitarist.
Notice the various areas of the Guitar Window.
- The top title bar states the key of the song is Cm, the Melody track is the track displayed, and the guitar is at the
8th position.
- The fretboard is displayed with the highest notes of the guitar at the top, and the open position of the guitar on
the left.
- There are names for the open strings displayed on the left (E B G D A E).
- There are fret positions marked at the bottom of the fretboard. You can mouse click on these positions to
change the current fret position.
- There are Note Names displayed for two positions on the guitar fretboard. One of the positions is the scale
beginning with the third of the scale on the lowest string. In the key of F, this is the 5th position beginning on
an A note (the third of the scale). Because it begins on the third of the scale, this position is referred to as the
Phrygian Position (since an A Phrygian scale is the same as an F scale). Similarly, the other popular scale is the
scale beginning on the 6th of the scale, in the key of F, this is up at the 10th position, and is called the Aeolian
Position.
- There are note names displayed in color, with ellipses around the notes that are in the scale. The root note of
the scale is highlighted in red, the third and fifth of the scale are in purple, and the rest of the scale tones are
circled in gray.
- Pitch bends show up on the Guitar Fretboard. As the pitch bend occurs, a blue line moves along the string in
real time, illustrating the height of the pitch bend. Load in the c:\bb\Tutorial\Pitch Bend demo song. You’ll
then see pitch bends written as a blue color moving along the string.
Automatic Settings for Guitar Display
Band-in-a-Box does a lot of things automatically on the Guitar window to ensure that the notes are displayed
intelligently on a guitar fretboard. These include:
- Automatically setting the two positions that will display the note names based on the key.
- Auto-Scanning the track to be played, and adjusting the display octave on the guitar fretboard to ensure that the
best octave is picked to minimize the number of notes that will be outside of the current position displayed on
the fretboard.
- After Auto-scanning the track, the best position for displaying the music on the guitar is determined. This is
always one of the two positions, Aeolian or Phrygian, though you may over-ride this by clicking on any fret
position.
- Color-coding note displays. In addition to the note names being outlined in the colors, when the note is played
it is highlighted in green if it is a scale note and yellow if it is an out-of-scale note.
Chapter 5: Guided Tour of Band-in-a-Box
61
Alternate Guitar Tunings
The Guitar window supports alternate tunings, including DADGAD, Drop D, Double Drop D, Open G, and 11
others. You can also select “Nashville High Strung” tunings, which tune certain strings up an octave. These tunings
are supported in Styles, Chord Diagrams, Guitar Tutor, Notation, Tab, and Printout. Learn how to play these
tunings by watching the on-screen Guitar Fretboard or Notation/Tab window. Easily change any style to use the
alternate tuning that you want.
In this discussion, we’ll be referring to DADGAD tuning, a popular alternate tuning. The same reasoning applies to
all of the other alternate tunings available.
There are four ways you can use Band-in-a-Box playing in DADGAD (or any alternate) tunings.
1. See any Melody (or Soloist track) displayed in DADGAD tuning. This will display on the guitar fretboard,
tab, and printout.
2. See guitar parts (chording etc.) in DADGAD tuning, using correct chord shapes. For this, choose a style
that has DADGAD tuning, and view the guitar part.
3. Use the Guitar Tutor, to view DADGAD chording for any style.
4. View guitar chord diagrams in DADGAD tuning, by setting the Notation Window Options “Guitar
Chord” to “DADGAD.”
62
Chapter 5: Guided Tour of Band-in-a-Box
Guitar Fretboard
To see the guitar neck displayed in DADGAD, choose Melody | Track Type | Guitar – DADGAD Tuning.
When you open up the Guitar window and choose the Melody track, you’ll see the DADGAD tuning.
Any melody will now display in the chosen tuning. Similarly, you can set the Soloist track to an alternate guitar
tuning with the Soloist | Track Type menu.
The Guitar track (or Piano, Strings) is controlled by the style, and will only reflect the type of tuning stored in the
style. Load in some alternate tuning styles included in Styles Set #44 – Requested 4 to see the chording on the
guitar track in alternate tunings. Another way to see the guitar play chords in alternate tunings is to use the “Guitar
Tutor.”
Select DADGAD tuning, and enable guitar Tutor.
Chapter 5: Guided Tour of Band-in-a-Box
63
Now, during playback, you will see guitar chords on the guitar fretboard in DADGAD tuning.
The examples above are for DADGAD tuning, but apply similarly to all 11 alternate tunings included.
Some of the tunings are “Nashville High Strung.” These tuning have the lowest 3 strings tuned up an octave, to
achieve a close sound. So a DADGAD High Strung tuning would have the lowest 3 strings “DAD” tuned up an
octave. Listen to some style examples that use this tuning.
Guitar Window Toolbar
At the bottom of the Guitar window is the toolbar.
There is a Guitar Tutor button.
The [Set…] button opens the Guitar Settings dialog, which allows you to set the guitar options.
These buttons will chord step advance, or note-step advance. The chord step advance is the
most commonly used function. It is also accessible by the hotkeys Ins and Del on the
numeric keypad and will advance or go back one chord at a time, leaving the chord displayed on the guitar.
This is the name of the current note that the mouse is over. If you click on the guitar at that position, the
note will sound.
If the Notation Window is open (in editable notation or note roll mode), that note will get inserted on the notation at
the current position on the timeline – you can disable that option to insert notes.
64
Chapter 5: Guided Tour of Band-in-a-Box
The “position” button. This toggles between the two popular positions displayed with note names.
When you open the Guitar Window, the first thing you'll want to do is choose the track
that you want to display. Usually this will be a Melody track or a Soloist track.
In the diagram here, the Melody track is the current track, and it has a red rectangle around it to indicate this.
To get to the Soloist track, you would click on the [S] button or use the hotkey Ctrl+F5, which toggles between the
Melody and the Soloist. Similarly, you can display other tracks like Bass, Piano, or Strings.
Big Piano Window
The Big Piano window can display the notes of any track on a resizable piano keyboard. You can also set the range
of the piano and number of octaves to display. Additionally, you can display notes names or guide notes --showing
the scale notes of the current key. Notes can be displayed using a different color for each note. There's an “AutoOctave” setting that will scan the track to be displayed and auto-size the piano to the largest size that would display
all of the notes. This 'Big Piano' makes it easier to learn piano parts from within Band-in-a-Box.
The Big Piano window is launched (or closed) by pressing the piano icon on the toolbar at the right-middle
of the screen, or by pressing Ctrl+Shift+N, or choosing Window | Big Piano Window.
-
The default settings for this feature can be customized by pressing the [Settings…] button.
The Big Piano window displays a single track on the piano.
The piano can be resized by dragging the bottom of the window to enlarge it vertically.
The key of the song is displayed at the top.
The range of the piano is set automatically (based on the actual notes in the track) to show the largest possible
piano).
The notes of the scale are circled on the piano, with the note names included.
The root of the scale is colored in red. As the song plays, scale tones are colored green; other notes are colored
yellow.
The name of the note that the mouse cursor is over is highlighted at the top of the window. Clicking on the Big
Piano plays a note (using the Thru part) and this can be recorded or sent to the Notation window when entering
notation. You can select the track to use by clicking the [B|D|P|G|S|M|S] line of buttons.
Play the Jukebox
Use the Jukebox for continuous playback of a whole list of Band-in-a-Box songs.
Click the [Juke] button to open the Options for Juke Box dialog.
The <- Juk button plays the previous song in the directory; the Juk -> button plays the next song in alphabetical
order.
Chapter 5: Guided Tour of Band-in-a-Box
65
In the Options for Juke Box dialog you’ll
see a list of options that lets you control
how the songs in the chosen directory are
played.
Use the “Preview” feature to audition a
complete directory of songs automatically
by playing a part of each song and then
moving on to the next one, or use the
onscreen [<-Juk] and [Juk->] cursor buttons
to navigate manually through the list of
jukebox songs.
Band-in-a-Box Jukebox options dialog.
When you have chosen the options you want, click [PLAY JUKE BOX] to play all the songs in the selected
directory folder.
In the main screen, click on the [F] button to open the Favorite Songs list and make
your own custom set lists for the Jukebox.
66
Chapter 5: Guided Tour of Band-in-a-Box
- Songs can be added or removed from the list with the [Insert], [Append], and [Delete] buttons.
- Use the [Save Set..] button to save the list of selected songs.
- The [Load Set] button loads a saved list of songs.
- The [Juke..] button plays through the list of songs automatically, like a jukebox.
This is a great feature for saving a list of current song projects, or for performing a live set with Band-in-a-Box
accompaniment.
Import a MIDI File
With the amazing Band-in-a-Box Chord Wizard, you can convert any MIDI file into a Band-in-a-Box song,
complete with Melody and Soloist parts. Then apply all of the powerful music making features of Band-in-a-Box to
create new accompaniments, add harmonies, add soloing, and embellish the melody. And when you're finished, you
can always resave your song as a MIDI file again.
MIDI File Chord Interpretation Wizard
You can open up any MIDI file in Band-in-a-Box, and Band-in-a-Box will automatically figure out the chords of the
song for you. It automatically analyzes the MIDI file, figures out where the bass, piano, melody and other tracks
are, and then figures out the chord changes for the song. The chords are written onto the Band-in-a-Box Chordsheet
like any other song. You can also read tracks into the Melody and Soloist tracks.
To interpret a MIDI file, go to File | Import Chords from MIDI file or use the keystroke combination Ctrl+Alt+I.
This launches the Interpret Chords from MIDI file dialog where either user settings or presets can be applied to
specify how the chords should be interpreted.
Chapter 5: Guided Tour of Band-in-a-Box
67
You can open an entire MIDI file into Band-in-a-Box. The chords will get auto-interpreted by the Chord Wizard
and the MIDI file will play and display on the Melody track. A “Silent” style will be loaded so you'll only hear the
MIDI file. When the file is saved, the extension will be MGX, allowing you to easily identify the BB songs that you
have that contain entire MIDI files.
Automatic Songs - “The Melodist”
Feel like composing a brand new song? With Band-in-a-Box you can compose a new song, in the style of your
choice complete with intro, chords, melody, arrangement, and improvisations, all created by the program! All you
have to do is pick from one of the “Melodists” and press [OK] - the program then automatically generates the intro,
chords, melody, and arrangement in the chosen style. It even auto-generates a title! You can go from nothing to a
completed song in less than 1 second!
You can also auto-regenerate any part of a song and modify it to suit you. The Melodist will also generate a melody
over an existing chord progression. A “Melodist Juke Box” mode creates and performs new compositions in
succession.
Launching the Melodist
To launch the Melodist, press the [Melodist] button on the main screen, or use the Shift+F5 hot
keys.
68
Chapter 5: Guided Tour of Band-in-a-Box
Make Your Own Songs
Now that you see how much fun it is to play music with Band-in-a-Box, you’ll be pleased to discover how easy it is
to make songs of your own. This section shows you how with step-by-step instructions from start to finish.
Making a New Song
Clear the Chordsheet
Click on the [New] button to blank the Chordsheet.
Name the Song
Enter the title of the song by clicking in the title area and typing in the name.
Chapter 5: Guided Tour of Band-in-a-Box
69
Choose a Key
Click on the Key Select List and choose the key of your song instantly.
It's easy to change the key by simply selecting another key from the list. Click on “YES” when the
program asks, “OK to transpose WorkSheet” and Band-in-a-Box will automatically transpose the
entire song into the chosen key.
Type in the Chords
The chords we will enter are F, Bb, and C7. Mouse click on the first cell in the Chordsheet
and type f. The letter f will appear in the chord box. Press the Enter key to enter the chord
Chord Box
F on the first beat of bar one. The Enter key advances the chord cell ½ bar at a time, i.e.,
2 beats in 4/4 time. Next, type the letters bb and press Enter to put a Bb chord on beat three of bar one. The
highlight cell will advance to bar two, type c7 and press Enter.
Tip: A chord can be entered on each beat. To enter two chords in the highlight cell type a comma between the two chord
names as shown in the example above.
This song will have no intro, and the chorus will be 32 bars long. The chord sheet we want to end up with will look
like this:
Chordsheet and Song Title window with chords and song settings.
Copying and Pasting Chords
Since many songs repeat the same sequence of chords throughout, a faster method to enter a song into Band-in-aBox is to COPY and PASTE the repeating chords. Highlight a section of chords by dragging the mouse over them
while holding the left mouse button. The area will be highlighted in black.
Press Ctrl+C, or select the Edit | Copy menu item. The highlighted area will be copied to the Windows clipboard.
It can then be pasted back into the Chordsheet at any location, and reused as many times as you like.
Use the arrows keys or the mouse to move the
highlight cell to the destination bar where you
want to paste the chords.
Paste the copied section with press Ctrl+V command, or select the Edit | Paste menu item. The chords will then
appear at the new location.
Choose a Style
Pressing the [Style] button will open the Select Style dialog box where you can choose from the
hundreds of available styles.
70
Chapter 5: Guided Tour of Band-in-a-Box
Load Previous Style, Load Next Style.
This function, analogous to the Load Next Song function, loads in the previous (or next) style in alphabetical order
of the file name. These functions are found in the Styles menu, or with the hot keys Ctrl+Alt+Shift+F8 (or
Alt+Shift+F8).
“Framing” the Song
Framing a song designates the first and last bars of each chorus and the number of choruses Band-in-a-Box will play
before playing the standard 2 bar ending.
Here we have selected bar one to be the first bar of the chorus and bar 32 to
be the last. The chorus will play three times, jumping to the two bar ending
the third time through.
With the “Loop” checkbox enabled the entire song will keep repeating until stopped. (This is a different feature
from the “LoopSec” checkbox, which loops a selected section of the song.) The “FakeSh” checkbox is for a “fake
sheet” style of chordsheet display with 1st and 2nd endings and repeats.
The [S] button opens the Song Settings dialog for additional settings such as endings, tags, style variations, pushes,
rests, and chord embellishments.
Set the tempo
The tempo is displayed on the main screen under the title with a default setting of 120 beats per minute.
-
Let’s set the tempo to 160 beats per minute (bpm). Click the mouse on the arrow buttons to adjust
the tempo.
LEFT mouse click to change by 5 beats per minute at a time.
RIGHT mouse click to change by 1 beat per minute at a time.
You can quickly enter a specific tempo for the song by clicking on the tempo (hot key is Ctrl+Alt+T, or menu item
Play | Tempo | Set Tempo…), and a dialog will open up allowing you to type in a tempo. Similar dialogs are
available for Volume, Panning, Reverb, Chorus, and Bank settings.
Tap the tempo
Not sure of the tempo for your song? Tap it in real time on either the minus [-] key or the equals [=] key on your
computer keyboard. Four taps on the minus key sets the tempo, four taps on the equals key sets the tempo and starts
Chapter 5: Guided Tour of Band-in-a-Box
71
the song playing. This can also be done by clicking the mouse on the onscreen [-] and [=] buttons to the right of the
tempo box.
Finishing the Song Arrangement
Use the powerful musical intelligence of features like the Harmonies and the Soloist to add the final touches to your
song. The Edit Settings for Current Bar dialog (F5 function key) lets you fine tune your arrangement by changing
patches, styles, harmonies, tempo, and meter anywhere in the song.
Add variations in the Edit Settings for Current Bar dialog.
Record a Melody
Band-in-a-Box has two built-in sequencer tracks so you can record and edit your own melodies or solos. These
tracks are recorded from a MIDI keyboard (or other MIDI controller) connected to Band-in-a-Box by your MIDI
driver.
If you want a metronome to play while you are recording, you can select it in the Opt. | Preferences dialog. You can
even have a visual metronome if you like.
Press the [Rec] toolbar button to begin recording. This launches the Record Melody dialog box, which prompts
you to set the position (bar and chorus) where you wish to start recording.
72
Chapter 5: Guided Tour of Band-in-a-Box
Pressing the [Record]
button will start Band-ina-Box recording what you
play on the Thru track. An
audible count-in is played
prior to recording.
You can punch in/out,
overdub, record directly to
the ending or the tag, and
use the filter to choose
which MIDI events are
recorded.
Once you have completed
recording your melody,
Band-in-a-Box will ask you
if you would like to keep
the take and if you would
like to copy the recorded
chorus to the whole song.
Tip: Looking for inspiration? At the click of a button, the Band-in-a-Box Melodist will write entire new songs from scratch, complete
with Chords, Intro, Melody, Solo, Ending, and even an original Title. Or you can enter your own chord changes and let the Melodist
create a new melody over them. There are more than 100 Jazz, Pop, Rock, Latin, Country, and Classical melody styles.
Embellishing the Melody
When musicians see a Lead Sheet that has a melody written out, they almost never play it exactly as written. They
change the timing to add syncopation, change durations to achieve staccato or legato playing, add grace notes, slurs,
extra notes, vibrato, and other effects. Now you can have Band-in-a-Box do these automatically using the
Embellisher.
If you enable the Embellisher, any Melody will be embellished as it is played so that you hear a
livelier and more realistic Melody - and it's different every time.
The Embellisher button opens the Melody Embellisher dialog with many user options to control
the embellishment settings. The Embellisher Presets allow you to choose a combination of
common settings for the Embellisher quickly.
Chapter 5: Guided Tour of Band-in-a-Box
73
The Embellisher Memo describes the current
embellishment, with statistics counting the number of
embellished notes.
Adding Note-Based Lyrics to Your Song
Open the Notation window by pressing the notation button.
Press the [L] button on the Notation toolbar. The Lyric Edit window opens up and the current note is
highlighted. In this example, lyrics have already been entered in bars 1 and 2, and the first note of bar three
is highlighted. The first syllable of the word “Swanee” has been typed in the lyric box.
Now by pressing [Enter] or [Tab] “Swa –” will be entered under the highlighted note and the highlight will
automatically advance to the next note.
Viewing the Lyrics
The big [L] button in the user configurable toolbar opens the Big Lyrics/Karaoke window. The font and
colors are selectable, you can show or hide the chords, and words highlight as the music plays.
Record a Vocal or Any Live Instrument
The digital audio capability offered in Band-in-a-Box enables you to combine MIDI music with live digital audio
recordings of voice and live instruments in a fully produced arrangement. It also offers the ability to render a MIDI
or MIDI+ audio composition into a single digital audio wave file. This file can then be converted into a CD audio or
streaming Internet audio file.
74
Chapter 5: Guided Tour of Band-in-a-Box
To start, plug your instrument or microphone into the computer’s sound card. The Line Out from electronic
instruments or amplifiers can be plugged directly into the Line In jack. To record your voice, or an acoustic
instrument such as a flute, plug a microphone into the Mic jack.
If you have a Sound Blaster card, this button is used to select the Microphone input and/or Line In input
to record digital audio. The Windows mixer Record settings can also be used.
Open the Record Audio dialog box with the [R. Aud] button. This dialog box lets you set the parameters
for the recording session.
You can adjust recording levels from this dialog with the [Set Recording Properties] button.
Once you have set the recording properties and tested the recording input levels, recording is easy. Simply tell
Band-in-a-Box the place in the song where you want to start recording, whether or not you want to record the MIDI
data along with your acoustic instrument, and press [Record]. If you choose to start recording from the beginning of
the song, Band-in-a-Box will start with a lead-in count before the music starts playing. If you are starting from
elsewhere in the song recording starts instantly.
Press the Esc key or click on [Stop] to stop recording. Band-in-a-Box will prompt you to keep the take or take
again.
When you get a take you like, press the [OK – Keep Take] button to save your recording. Use the Options to record
one Chorus and then copy it to the whole song, to overdub underlying audio on the track, and to retain audio past the
new take just recorded (punch out).
Chapter 5: Guided Tour of Band-in-a-Box
75
Add Audio Harmonies
You can apply a harmony to the audio part – allowing you to automatically create up to 4 part vocal harmonies from
your singing. And don’t worry if your singing is not in perfect tune, Band-in-a-Box can now “fix” vocals to the
correct pitch - automatically! Band-in-a-Box generates the harmonies using the world-leading TC-Helicon Vocal
Technologies engine. Once you have recorded a vocal part into Band-in-a-Box, you can use this feature in many
ways, including:
-
Record yourself singing into a Band-in-a-Box file. Create a vocal harmony for part or all of the song by
selecting a Band-in-a-Box harmony and choosing the Generate Audio Harmonies option (Harmony | Audio
Harmonies & Pitch Tracking or Audio | Audio Harmonies & Pitch Tracking). You can now hear yourself
singing in perfect harmony!
-
Did you hit a few “out-of-tune” notes when you recorded your singing to Band-in-a-Box? Fixing your “out-oftune” singing is easy, by instructing the program to correct the pitches to the Melody track.
76
Chapter 5: Guided Tour of Band-in-a-Box
Add Audio Effects
You can add professional audio effects like reverb, echo, and compression by
choosing a plug-in from the Audio menu (Audio | Plug-in). Band-in-a-Box comes
with a large selection of high quality audio effects built-in, and DirectX plug-ins
are supported.
The plug-ins apply audio effects or utilities such as compression to the already recorded audio part. A typical plugin dialog is shown. The [Preview] button will play a short sample of the processed track, and the Edit | Undo
command will restore the original track if applied before another edit is performed.
Press the [Play] button to hear your results!
Saving Your Work
Now that you have produced a great sounding song, it is time to save it as a Band-in-a-Box file, as a MIDI file, a
Karaoke file, or as an audio wave file.
The [Save] button saves your song in Band-in-a-Box format. Band-in-a-Box accompaniments are saved
with the file extension *.sgu. If a melody has been recorded the file extension will be *.mgu. The audio
track, if present, is saved as an associated wave file with the song name and the extension *.wav.
The [.MID] button will save your file in Standard MIDI File format. These files can be played in any
MIDI file player.
If you have recorded an acoustic instrument, Band-in-a-Box can render the MIDI data to a wave file (*.wav) and
merge it with your live audio recording to produce a complete digital audio file.
Press the [.WAV] button and Band-in-a-Box will render the song arrangement to an audio wave file.
Chapter 5: Guided Tour of Band-in-a-Box
77
The Render to Audio File dialog box permits you to save your file as either a wave file (*.wav) or a Windows
Media Audio (*.wma) file to upload to the Internet or e-mail to a friend.
You can direct render “MIDI only” songs into high quality wave files with the Roland VSC3. The MIDI parts are
converted directly to audio without being rendered (recorded) in real time, usually in just a few seconds.
Burn Your Own Audio-CD
You can burn your Band-in-a-Box composition directly to an audio CD. The resulting CD will play in any standard
CD player.
To burn your CD:
Press the [.WAV] button to open the Render to Audio File window. Then press the [Burn to Audio
CD] button. This renders the file to a stereo wave file, and then launches MiniBurn, the built-in CD
burner application in Band-in-a-Box. The song just rendered will be listed in the burn list.
You can add other files to the list to make up a full CD, or choose [Burn CD –
No Finalize] to allow other files to be burned to the CD later. The CD will
not be playable until finalized.
78
Chapter 5: Guided Tour of Band-in-a-Box
Note: This feature requires that you have a CD-R or CD-RW drive. If your drive is not recognized by MiniBurn then you
should burn the rendered .WAV file to CD using the software supplied with the CD drive.
Congratulations!
You can now produce a complete song in Band-in-a-Box with a Melody, Solo, Harmonies, plus an audio track with
harmonies and professional effects. You can print out beautiful notation in a stylish Jazz font, complete with chord
symbols, lyrics and your own text markers and annotations. And you can save your song in either MIDI or audio
form for playback from your computer, over the Internet, or from an audio CD. You’re on your way to making lots
of great music with Band-in-a-Box.
Chapter 5: Guided Tour of Band-in-a-Box
79
Chapter 6: Band-in-a-Box PowerGuide
This chapter is a guide to the advanced settings in Band-in-a-Box. Any user can use these settings to quickly and
easily become a Band-in-a-Box power user.
Descriptive Hints
The pop-up hints make it “too easy” to become a power user. They are comprehensive fly-by hints that appear when
you move over an item, including hints for the dialog boxes and various windows. Go to Opt. | Preferences or
select the [Pref] button to open the Preferences dialog and set the type of hints to display and to set the time delay
and duration. Set a longer delay if you find that the hints are popping up too often and getting in your way.
Opening Files
File Associations
Go to the menu item File | File Utilities to associate the file types for Band-in-a-Box songs and styles in Windows.
Once set, this means that you can double click on a song or style and Band-in-a-Box will open up with that song or
style.
Choose the menu items File | File Utilities | Associate File types (songs, styles) with Windows… to associate the
Band-in-a-Box file types, and Remove File Associations (songs, styles) with Windows… to remove the associations.
Custom File Selection Dialog
The custom Open File dialog opens if you press Ctrl+Shift+F3 to load a song. You can make it the default dialog
if you go to Opt. |
Preferences and select “Use custom filename dialog” under the Environment Options in the Preferences
dialog. Then the [Open] button, or the menu command File | Open, or the F3 key will launch the custom
Open File dialog.
File | Favorite Folders
By opening a song using the “Favorite Folder-Open Song,” you first select the folder from a list of recently used
folders, and then you can directly open the song from that folder. This allows you to quickly find a song in another
folder.
Hold the Shift key as you click the [Open] button. This will launch the Favorite Folders dialog,
allowing you to pick the folder. This saves you the time needed to navigate through the Explorer-style
folder choice, which can be time consuming if you’re hopping back and forth between folders.
Similarly, Shift-clicking on the [Save As] button will allow you to choose a favorite folder prior to
seeing the Save As dialog.
80
Chapter 6: Band-in-a-Box PowerGuide
The custom Open File dialog has several advantages over the traditional Windows dialogs:
- The window is much bigger than the traditional one, allowing more room.
- There is a selectable font size and typeface.
- You can adjust the widths of the various columns.
- The Window remembers your settings.
- There are tabs at the top that allow sorting by name, date etc.
- Additional information is displayed (file size, time of file).
- You can open a song without typing the extension. For example, to open the song MySong.MGU you just have
to type MySong, without MGU.
The Font Selection button lets you pick a font, size, and style for the dialog from any of the fonts
installed in Windows.
The Search button allows you to search for a file by its name or part of a name.
The Favorite Folders button remembers the last few directories that you've used, allowing you to easily
change between directories.
Chord Entry
The most common way of entering a song in Band-in-a-Box is by typing in the chords. Up to 4 chords per bar may
be entered.
Chords are commonly typed-in using standard chord symbols (like C or Fm7 or Bb7 or Bb13#9/E), but you can
enter them in any of the supported chord symbol display formats - Roman Numerals, Nashville Notation, and
Solfeggio.
For example, type c6 to get the C6 chord. Note that you should never have to use the Shift key, as Band-in-a-Box
will sort this out for you.
- Use b for a flat, e.g. Ab7.
Chapter 6: Band-in-a-Box PowerGuide
81
-
Use 3 for a sharp #, e.g. for F#7 type f37.
Use / for slash chords with alternate roots, e.g. C7/E (C7 w/E bass).
Use a comma to separate the ½ bar, enabling you to enter 2 chords in a cell. In the example below, we would
type Ab9,G9 to get the 2 chords in the cell on beat 3 and 4 of bar 2.
Note: We're able to type A7#9 as “a739” because Band-in-a-Box knows to use the uppercase of the 3, which is #. The >
indicates a carriage return, or the Enter key.
You can also enter chords from an external MIDI keyboard using the Window | MIDI chord detection… feature.
Play the chord on the keyboard, then press Ctrl+Enter to insert the chord into the chordsheet on the first beat of the
current chord cell, i.e., beat 1 or beat 3 of the bar. Use Ctrl+Shift+Enter to insert the chord on the next beat, i.e.,
beat 2 or beat 4 of the bar.
Copy and Pasting Section of Chords
One of the best ways to copy chords is by pressing Alt+C, which launches the Copy Chords and/or melody dialog.
This allows you to copy chords/ melody/ soloist/ lyrics for a range of bars by entering the From and To locations and
the number of bars to copy. Select the checkboxes for the items you want to include in the copy.
Insert Bars at destination
If selected prior to the Copy bars will be inserted onto the Chordsheet at the destination chosen.
# of times to repeat copy
If set to more than one, multiple copies will be made, optionally with transpositions on each copy. These are all
applied to the first chorus only.
With each copy, transpose ___ semitones
If more than one copy is selected, this will transpose the song with each copy. This is most useful when wanting to
learn a short phrase ("riff") in different keys, or modulating a section of a song.
Random # of semitones
This will transpose the copy a random transposition and would be useful for advanced students who are trying to
master a riff or phrase in all keys.
Copy 1st Chorus to whole song
If set, this will apply any of the copying commands in this dialog to all choruses of the song, not just chorus #1.
This button toggles between [Show More] and [Show Less], depending on whether just the
basic functions or all Copy functions are displayed.
82
Chapter 6: Band-in-a-Box PowerGuide
Copying chords to the clipboard.
Select the region to copy. To select a region of the Chordsheet (or the Notation or Audio Edit window), you can
Shift-click on the end point to easily select a large area.
- Click on the starting bar.
- Shift-click on the ending bar.
Another way to select a region is by dragging the mouse over it. Place the mouse cursor at the bar to begin the
selection. Then, holding down the left mouse button, drag the mouse over the region. As you do this you will see
that the region will be inverted (white characters on a black background). When you have selected the proper region
of chords to copy, then
- copy the selected (blackened) region to the clipboard
- click on the Copy button or choose Copy from the Edit menu.
Pasting chords to another section of the chordsheet.
Assuming you have already copied some chords to the clipboard you then paste them into the chordsheet by:
1.
Move the highlight cell to the bar to begin the paste of chords.
2.
Click on the Paste button or choose Paste from the Edit menu.
Tip: Remember that the copied section remains in the clipboard and can be repeatedly used. Example: If you're inputting a
song with verse, verse, bridge, verse you can just copy the first verse to the clipboard, and then repeatedly paste in the
other verses. The information on the clipboard remains intact even if you load in a new song, which means you can copy
and paste between songs.
Copy, Repeat X times, with Transpose.
The Edit | Copy From.. To.. menu command opens the Copy Chords and/or melody dialog, which has additional
fields allowing you to define the number of times to repeat each copy and define the number of semitones you
transpose. For example, you could have a 16 bar section, copy it 3 times with a semitone transpose each time. Or,
take a single 4 bar phrase, and copy it 11 times, transposing up a 4th each time, generating the same 4 bar phrase in
all 12 keys.
Previewing Chords
This feature allows you to hear chords as you to type them in. After you type a chord name onto the Chordsheet (or
notation window), press the Shift+Enter keys. This enters the chord onto the chordsheet and then plays the chord
for you, using the patches on the Piano part and Bass Part. You can also listen to a chord that has already been
entered, by just pressing the Shift+Enter keys after moving to that bar with the chord. If there is no chord entered
at that bar, you will hear the last chord that was entered.
You can right-mouse click on the chordsheet
and choose Chord Settings to launch the
Chord Options dialog, and then press the
[Preview] button to hear the current chord in
the Chord Options Dialog.
Chapter 6: Band-in-a-Box PowerGuide
83
Support for other chord display types
You can enter or display chords in Roman Numeral notation, Nashville notation, or Solfeggio notation. For
example, the chord Gm7 in the key of F would be displayed as IIm7 in Roman Numeral Notation, 2m7 in Nashville
Notation, and Rem7 in Solfeggio. These systems are very useful for learning or analyzing tunes, since they are
independent of the key signature. You can take an existing song, and print it out in Roman numeral notation, so you
can study the chord progression. You can also type a chord in any of these systems, like “4” which will enter the 4
chord in the current key.
You can switch among any of these systems by pressing the Roman Numeral button on the right side of the
screen to toggle among the various settings.
The Roman numeral and other nonstandard displays use superscript for the chord display when in the Notation
window (or when printing out). Therefore, the alternative chord symbol displays are best viewed in the Notation
window.
maj7
Tip: Print out a song in Nashville Notation or Roman numeral notation. Then, learn the song this way, i.e. 1
4maj7
3m7b5 67b9. You'll soon discover that it is much easier to play the song in any key. Since you know the song goes from
the 1 chord to the 4 chord, so you can easily play it in the key of Bb, for example.
Repeats and Endings
You can add repeats and endings so that the Lead Sheet window will display and printout using 1st /2nd endings.
There’s a Wizard that will intelligently add 1st/2nd endings automatically for you, so you can view and convert any
Band-in-a-Box song to include 1st/2nd endings in lead sheet format. Simply select the “Fake Sheet” checkbox on
the Lead Sheet window, and Band-in-a-Box will display the Fake Sheet using 1st and 2nd endings. You can add
your own repeats and endings by right-mouse-clicking the Repeats-Endings option.
Playing/Pausing/Stopping Songs
Use the tool bar buttons to control the playback of your song in Band-in-a-Box.
Play song
Loop selection
Replay song
Stop playback
Pause (Hold)
Play from any bar
You can also use the Play menu commands or keystrokes.
Lead-In Counts and Metronome
These settings are made in the Preferences dialog. Click on the [Count-in/Met.] button to open
the Count-in and Metronome Options.
You can select any drum instrument for the count in and choose different count-in rhythms (e.g. Tap on 2 and 4
instead of 1-2-3-4).
The Smart Lead-in feature avoids playing the count-in drum sound during a Melody pickup.
There's an option to play the drum count-in in all circumstances, useful when the style doesn’t have drums or for
drummers who play along with Band-in-a-Box by muting the drum track.
You can display a visible metronome on-screen during
the entire song (or just the lead-in). Choose the screen
position, the size (up to near full screen size), and the
visual metronome pattern. The on-screen metronome is
a great way for a student to learn to keep on the beat,
and with a settable size, students can view this from
across the room.
84
Chapter 6: Band-in-a-Box PowerGuide
Play Selected Area as a Loop
Click on the [Loop] button, Shift-click on the [Play] button, or press F10 (Play Selected Area as Loop)
and the program will play a selected region, and loop the selection.
For example, you can select bars 10 and 11, and then press F10, and bars 10 and 11 will play looped.
To use this function, select a region on the Chordsheet.
Choose Play | Play (loop) Highlighted Section (or press F10).
The selected region will then play, and continue looping until STOP is pressed.
Loop any Section of the song.
You can loop any section of the song. The program will then start playback at the first loop point and play the
looped section until stopped.
Looping of a section of the song is enabled by the “LoopSec/ LoopScn” checkbox or with the
keystroke NUMPAD 1.
Open up the Loop Section Settings dialog by clicking the Loop button, or pressing NUMPAD 2. The Loop
settings dialog will then display.
Chapter 6: Band-in-a-Box PowerGuide
85
The “Play within loop” command allows you to quickly play a looped section. Highlight the range of bars to loop
on the Chordsheet, press NUMPAD 2 to open the Loop Section Settings dialog, and click the [Play within loop]
button.
To enter settings manually in this dialog, you start by choosing either “Loop a Single Screen of Notation” or “Loop
Range of Bars.” If you want the custom range of bars, then enter the starting “From Bar” number, the “Chorus #,”
and the “# bars” for the length of the looped section. You can then play the song with the [Play within loop] button
and then [Close] the dialog.
Presets are available to set the loop points to Intro, First / Middle /Last
Choruses, Ending, or All. As the different buttons are selected you will see
the “Loop Range of Bars” settings update. Hot keys are also available for
these, look in the Play menu under the Looping submenu.
Loop Keystroke Commands (useful for live performance)
NUMPAD 1
Toggle looping on/off.
NUMPAD 2
Open Loop Section Settings dialog.
Ctrl+NUMPAD 1
Play with last chorus looped.
Ctrl+NUMPAD 2
Play with middle choruses looped.
Ctrl+NUMPAD 3
Play with middle and last choruses looped.
Ctrl+NUMPAD 4
Jump to last chorus.
Ctrl+NUMPAD 5
Jump to ending.
Ctrl+NUMPAD 7
Loop Notation screen.
NUMPAD [DEL]
Advances the notation, lead sheet, and guitar window by one chord (group of notes).
NUMPAD [INS]
Backs up the notation, lead sheet, and guitar window by one chord.
86
Chapter 6: Band-in-a-Box PowerGuide
Notebook users should set “Simulate NUMPAD Keys” to “ON” in the Preferences dialog, then use the regular
number keys to trigger looping.
The Title bar at the top of the main screen indicates the looping status. If a song has a looped section, this will be
listed at the top of the screen (e.g. “Will loop Middle Choruses” or “Currently looping Middle Choruses”). So you
can tell what is going to happen with the looping during a live performance.
Additional Patches
Patches on Higher Banks Dialog
This displays your patch names by name and lets you pick them from an easily customizable list. You've
probably got great sounds on higher banks -- now you can find and use them easily!
Clicking on the [+] button opens the Patches on Higher Banks dialog for easy access to patches on all other banks
as well as General MIDI
Band-in-a-Box can read a patch file list generated by PowerTracks Pro Audio or Cakewalk, and convert it to a .PAT
file for use in Band-in-a-Box.
Converting PowerTracks patch list to Band-in-a-Box .Pat files.
PowerTracks stores its patch lists in a single file, called PATCHES.INI. This file contains all of the patch lists for
the synths supported by PowerTracks. Band-in-a-Box stores the patch list for each synth in a separate file, with an
extension of .PAT.
To convert a PowerTracks patch file to a Band-in-a-Box Patch file, you will be choosing the c:\pt\ptw\patches.ini,
and then choosing the synth that you want to convert to a .PAT file.
Press the [+] button to the right of the Instrument name on the
main Band-in-a-Box screen.
This will open the Patches on Higher Banks dialog.
Note: If a .PAT file has not been previously selected, a File Open dialog will appear. Select a .PAT file from the \bb
directory to launch the Patches on Higher Banks dialog.
Press the [Open INI/INS…] button to launch the BB File open dialog.
Chapter 6: Band-in-a-Box PowerGuide
87
Choose the file c:\pt\patches.INI.
You’ll then see a menu of synths stored in the patches.INI file. Select
one to convert. Create a name for the .PAT file (e.g. My Patch
List.PAT) and save it to c:\bb.
Converting a Cakewalk .Ins file to a Band-in-a-Box .Pat file.
This is done using the same process described above for PowerTracks, except that you open the individual .INS file
instead of a PATCHES.INI file. For example, if you have a Cakewalk file called “My Synth.INS” you would select
this file name. You would then save that converted list to c:\bb\My Synth.PAT.
General MIDI 2 support
General MIDI 2 standard (GM2) adds 128 new instruments to Band-in-a-Box styles and songs, including ukulele,
mandolin, 12-string guitar plus many new and improved piano, organ, guitar, brass, and string sounds.
Note: The included Roland VSC3 synth supports the new GM2 instruments, as do many newer modules/sound cards. If
yours doesn't, a similar instrument from the existing 128 General MIDI sounds will be substituted.
The type of GM2 support is set in the MIDI Driver Setup dialog (Opt. | MIDI driver setup…). The choices are:
88
Chapter 6: Band-in-a-Box PowerGuide
-
-
General MIDI 2 support: If you're using the Roland VSC3, or a newer Sound Canvas then choose this GM2
support.
Roland GS (older Modules): “Older” Sound Canvases (SC55/SC88) support GS, but not GM2. The good
news is that they have the same patches available, just at different locations. So if you choose this option,
Band-in-a-Box will find the patches at the “GS” locations instead of the “GM2” locations. If you have a newer
GS module like the SC8820 that supports both GM2 and GS you should likely choose GM2.
No GM2 support: Most sound cards don't have GM2 support yet, so just support the original 128 General
MIDI sounds. Band-in-a-Box will use the closest instrument in these cases.
You can select the GM2 patch using the GM2 button next to the Instrument box. This shows a menu
organized by instrument types.
Technical note: For a GM patch like Nylon Guitar the patch is 25. For a GM2 patch like Ukulele, the patch is also 25, but it
is accompanied by two bank settings, MSB Bank Controller 0 setting of 121 and LSB Bank Controller 32 setting of 1.
When you select the instrument from this menu, it will make the bank settings (Bank0 and LSB) for you. You can
also change the bank #s directly, and the patch in the box will change. GM2 patches can also be selected elsewhere
in the program, such as the Edit Settings for Current Bar dialog and the StyleMaker.
Changing Volume, Panning, Reverb, Chorus, Bank
To change the Volume, Panning, Reverb, Chorus, or Bank of a part, click on the desired part to change.
Then click on the spin control arrow keys to increase or decrease the setting.
-
The left mouse button increases/decreases by 5 at a time.
The right mouse button increases/decreases by 1 at a time.
You can also click directly on the number field to open a dialog and type the value in directly.
Chase Volumes.
For a file with Volume change events (Controller 7) written into the Melody (or other tracks) – if the song is played
back from somewhere in the middle, the most recent volume setting prior to the start of playback will be sent.
Solo an Instrument Part
While listening to Band-in-a-Box, you can easily solo (isolate) a certain part by holding the Ctrl key and mouse
clicking (left or right) on the instrument at the top of the screen. For example, if you want to hear only the Piano
part, Ctrl+click on the Piano part. If you want to use hot keys for this, you can press Alt+2 (Mute-All) and then
Alt-+4 (Unmute Piano).
Chapter 6: Band-in-a-Box PowerGuide
89
Muting Instruments
To mute/unmute all parts as the song is playing, simply press Alt+2 or right-click on the “Combo” radio buttons at
the top of the screen.
To mute an instrument click on the name of the desired part with the right mouse button. Click again to unmute.
When the part is successfully muted, the instrument name will turn to red in color, indicating that the part is muted.
Edit Functions
“K” Quick Copy Method
By simply typing “K” at a bar followed by the Enter key you can instantly copy the last 8 bars to the current
position. The current position is advanced to the bar beyond the copy.
For example, if you're entering a song that has a repeating section of chords for 8 bars, type in the first 8 bars of
chords, move to bar 9, and then type: k, Enter.
The last 8 bars will be copied to bar 9-16, and the cursor will be moved to bar 17, so you're ready to continue with
the tune. If you get to bar 25, and would like the chords from 1-8 to be copied to 25-32, type k,1 and this will copy
8 bars from bar 1 to bar 25. By adding additional keys in the K command, you can customize this shortcut (e.g.
typing K 12, 3 would copy from bar 3 for 12 bars to current position.)
The chords always get copied. The Melody, Soloist, and Lyrics also get copied if these items are set in the Copy
Chords and/or melody dialog.
Edit Dialogs
Chord Settings
If you can’t remember the various keystrokes to put in rests and pushes, you can use the Chord
Options dialog box instead. To get to the Chord Options dialog box press the [C7] button, click with
the right mouse button onto the chordsheet, or use the keystrokes Alt+F5.
You can launch the Preview, Chord Builder, or Chord Substitution functions from this window.
90
Chapter 6: Band-in-a-Box PowerGuide
Settings for Current Bar
The number of beats per bar, tempo changes, patch, style, and harmony changes can be made by selecting the
Settings For Current Bar option on the Edit menu or by pressing [F5] after you have selected a bar to edit.
Number of Beats this Bar
The initial time signature of the song is determined by the style (e.g., Jazz =4/4, Waltz =3/4). In some songs you
will want to change the time signature, for example, you might want a single bar of 2/4, or 8 bars of 3/4 time. This
option allows a change of time signature during a song.
The change takes place at the beginning of the bar and continues until a new time signature change is specified.
You can select from 1 to 4 beats per bar. Time signature changes are printed on the Notation/Lead Sheet.
Example: A song in 4/4 time with a single bar of 6/4 time.
The maximum # beats per bar is =4, so we’ll split the 6/4 bar into 2 bars, a 4/4 bar and a 2/4 bar. Insert a # beats per
bar =2 at the beginning of the 2/4 bar, then restore the time signature to 4/4 by assigning # beats per bar =4 for the
next bar.
Chapter 6: Band-in-a-Box PowerGuide
91
Tempo Change
If you want to change the tempo at a certain bar of the song, then use this dialog box to type in the new tempo in
beats per minute. The tempo change takes effect at the beginning of the bar and remains until a new tempo change
at another bar is inserted. Alternatively, you can specify a percentage change in tempo.
Style/Tempo/Patch/Harmony Changes
Insert changes of styles, tempo, patches, and harmonies (melody and soloist) at any bar (and any beat of any bar) in
the song with the Edit Settings for Current Bar dialog, which opens with the [F5] key. For example, click on the
[.STY] button to choose the new style from the StylePicker window.
Style, tempo, patch, and harmony (Melody and Soloist) changes will be recorded on your song worksheet indicated
by a small red square around the bar that will be affected. Changes remain in effect from that bar forward until new
changes are recorded.
Song Settings Dialog
The Ctrl+N keys or the Edit | Settings (for This Song)… menu command brings up the Song Settings dialog.
Here, you can choose from song settings
such as chorus variations, chord
embellishments, tag jumps, and endings, to
make your song interesting and varied.
The [S] button on the main screen will
also bring up the Song Settings dialog.
This button opens a dialog box where the song’s title and its main settings can be
typed in.
92
Chapter 6: Band-in-a-Box PowerGuide
This buttons opens the Edit Settings for Current Bar dialog.
This button opens the Chord Options dialog where you can edit chords and add rests and
pushes.
Options and Utilities
These settings are found in the Opt. menu and the Opt. | Utilities submenu.
Language Selection
This allows you to change language from English to another language for display. If there are other languages
supported by your version of Band-in-a-Box, then they will display in this dialog box.
Edit Chord Shortcuts file (shortcut.txt)
Have you found a chord that Band-in-a-Box doesn't recognize? If so, you can make a text file called \bb\shortcut.txt
for your own shortcuts. (Note that this file doesn't ship with Band-in-a-Box or it would overwrite your file!) The
file \bb\pgshortc.txt is only for shortcuts supplied by PG Music.
Refresh Chord Shortcuts…
When you have saved your shortcuts file click on Refresh Chord Shortcuts… to start using them. Changes to your
chord shortcuts won’t take effect until you choose this command.
Applying Styles
There are many styles available for use with the Band-in-a-Box program. Styles refer to styles of music like Jazz
Swing, Tango, Blues, Pop Ballad, or Country. You can pick a musical style either before or after you have entered
the chords to a song. Once a style is loaded, the song will be played back using your chosen style. All style files
have an .STY extension.
Note: The program defaults to the “Jazz Swing” style or it may be “aliased” to another style, such as the newer J_WYNT_K
style.
Load Previous Style, Load Next Style.
This function, analogous to the Load Next Song function, loads in the previous (or next) style in alphabetical order
of the file name. These functions are found in the Styles menu, or use the hot keys Ctrl+Alt+Shift+F8 (or
Alt+Shift+F8).
Current Style Window
The name of the current style is shown in the window below the song title.
The [Style] button opens the StylePicker window.
The [f] button opens the Favorite Styles list.
Chapter 6: Band-in-a-Box PowerGuide
93
Using the StylePicker Window
The StylePicker window is opened by pressing the [Style] button or the Shift+F9 keys. It lists all of
the styles that are present in the \bb folder.
The StylePicker window allows easy selection of styles by category or from a complete list of all styles. For
example, you can select Jazz styles and see a list of all of your Jazz styles. Then you can select any style to see its
full title, description, and examples of songs appropriate to the style.
The current style of the song is listed at the top of the window; in this case it is the Jazz Swing style (ZZJAZZ.STY).
This is referred to as the Prototype Style. The prototype style can be changed to the current selection that is
highlighted in the list by pressing the [*Change Prototype Style] button.
There are filters to display only styles of a certain “Feel” or “Tempo” or only the styles of a certain Styles Set
number, as well as displaying the name of the Styles Set. To select this, open the StylePicker, and choose “Only
Show Styles Set #.” When you pick Styles Set #, you can then see only that Styles Set listed, regardless of the
category you are in.
When you open the StylePicker window, it shows you which styles would work best in your song, highlighting all
styles that have a similar tempo, genre, and feel to your song. You can preview styles before loading them so you
can hear what they'll sound like in your song. The window remembers the style and genre that you've used, and will
return to it the next time you visit the window.
For each style, you see the following information:
-
94
The asterisk (*) or (^) caret indicates if the style is a perfect or good match to the prototype style.
ZZJAZZ is the name of the .STY style file.
“sw” indicates that the style is in a Swing feel vs. “EV” for Even feel.
The “8” indicates that the style is an 8th note feel (vs. 16th note feel).
160 is the tempo for this style.
Jazz Swing Style is the full name of the style.
SD #0 indicates that the style is found on Styles Disk #0, one of the original 24 Band-in-a-Box styles.
Chapter 6: Band-in-a-Box PowerGuide
Styles that are similar to the prototype are indicated with an asterisk (*). These are styles that have the same feel
(triplets/ eighths/ sixteenths) and a similar tempo range. Styles with similar feel but a different tempo range are
marked by a caret (^) symbol. So you can quickly see styles that are similar to Jazz Swing (in this example). The
styles J_BASIE and J_DIXIE could be substituted with a perfect match so are marked with an asterisk (*). Styles
like J_DJANGO are marked with a caret (^) because they sound best in a much faster tempo than the prototype Jazz
Swing style.
Use the filters to display all styles, or only ones
that you choose.
You can play the style demo from the StylePicker window by pressing the [Load
Song Demo] button.
The [Search] button that lets you find data in any of the fields. Also, the StylePicker window
opens up at the current style.
There is an option for this called “Defaults to current style.” When you choose a style with the song playing, it will
switch to the new style and continue playing!
When you find a style that you'd like to test, double click on its
name in the list to hear a preview of your song in the new style.
Note that you must set the option Preview on Double Click for this to work. Alternatively you can press the
[Preview] button.
The [Preview] button generates and plays an arrangement with the new style; use the [Stop] button
to end the preview.
Change the tempo by typing in a new tempo in the t= field at the top.
You can [Reduce] or [Expand] the duration of the chords, useful when changing the feel
of songs. If the Prompt With Preview item is set, the program will ask you if you want
to change the feel of the song's melody, or auto-reduce/expand the chord durations when the styles change.
When a new style is previewed, patches appropriate to the new style
get loaded in if you have selected “Auto Change Melody/Soloist Patch.” So when you load in a “Chopin Piano
Style” the Melody patch of your song will change to Piano. This allows the song to blend in with the new style.
This will copy the Styles List to the clipboard so that it can then be printed as a text file from any
word processor.
If you have added new styles to Band-in-a-Box (or edited the BBW.LST file) the [Re-Build] button
will update the styles list.
You can add your own styles to the StylePicker list by pressing the [Edit] button on the StylePicker.
Technical Note: All of the styles that you add will be appended to the bottom of the StylePicker under new category and
style names. This is because we don’t want editing of the main style list (BBW.LST) provided by PG Music, because we
update that list frequently ourselves, and the updated list would overwrite your changes. The edits that you make in the
StylePicker editor will stay permanently, and not be overwritten by future versions of Band-in-a-Box.
When you first launch it, there won’t be any styles added, so you’ll see a screen with only a blank category with no
styles on it.
Chapter 6: Band-in-a-Box PowerGuide
95
The category here is called “My Styles,” you can change the name using the yellow “Category Name” area. For this
example, change the name to “Favorite Jazz.”
Let’s add a Style to the list.
Press the [Add New Style] button.
A style has been added, called NONAME.STY. You now need to fill in all of the information
in PINK, to supply the information for the style you have added.
Note: For this example, we’ll add a Jazz style called NEWONE.STY. This style is included in the C:\bb folder.
This information includes:
1. Name of the Style (8 characters maximum + .STY).
2.
3.
96
You can type in the style name, or press the Choose button to pick a style name from the \bb folder.
If the style doesn’t exist, a <not found> will appear in the style list beside the style name (as it does for the
NONAME.STY). Press the [Choose] button and choose NEWONE.STY.
Long Name of the style. This is a descriptive name that appears on the StyleMaker, and can be up to 32
characters. Enter “A Brand New Jazz Style.”
Memo and Examples. You can enter a memo for the style, and example songs that could be played in that
style. The memo and example can total 200 characters maximum. Enter a memo and examples for
NEWONE.STY.
Chapter 6: Band-in-a-Box PowerGuide
4.
We now enter settings to tell Band-in-a-Box what Soloist it should use when making improvisations using
this NEWONE.STY. For this, we need to know the genre of the style (Jazz, Country, and Pop etc.),
whether it is in an even or shuffle feel, and whether a soloist should be playing primarily 8th or 16th notes.
From the drop down combo box that appears, for this Jazz Swing style (newone.sty), we should choose
“Jazz Swing Triplet feel 8th notes.”
By doing this, Band-in-a-Box will then choose from many Jazz Swing type of Soloists available in BB.
5.
6.
But if we want a specific soloist to always be used, we can specify that soloist number. You can see the
soloist numbers in the Soloist dialog. In this example, we leave this at zero, so Band-in-a-Box will choose
between many different soloists.
Next we describe the feel of the style. Are the 8th notes straight or shuffle? Is the time signature 3/4
(waltz) or 4/4, is it a 16th note based style (tempo usually less than 120), or an 8th note style (tempo usually
above 120).
For the NEWONE.STY, enter these checkboxes as above. (Not straight 8ths, not a waltz, and not 16th
notes.)
Next is the Tempo area. Here you can enter the typical tempo and the range of the tempo for the style.
7.
You can assign a number for the style disk. We recommend that you use numbers higher than 1,000 and
pick a unique number for your styles. You can then search for them easily. It is not necessary to enter a
Style disk #.
8.
When a style is chosen in the StylePicker, it will send out patch changes on the Melody and Soloist tracks,
to make the song sound more authentic in that style. The settings for Melody and Soloist patches allow you
to select which patch types will get sent out. Here we choose “Jazz Patches” for our NEWONE.STY
We’re finished adding the NEWONE.STY.
We could now continue adding new styles, and categories, for all of our new styles that are not in the list.
But let’s see our added style on the StylePicker.
Press the [OK – Save] button. This exits the dialog, returning to the StylePicker. The StylePicker
will recommend rebuilding the style list for the added styles. Answer “Yes” to this.
Chapter 6: Band-in-a-Box PowerGuide
97
You will then see a rebuilt style list, and your category “Favorite Jazz” and your new style “NEWONE.STY” will
appear in that category.
Technical notes:
The information is stored in a file called A_USER.LS3. This is a text file, but it is better to edit it using the
StylePicker editor.
You can make other .LS3 files using the StylePicker editor, using the [Save As] and
[Open] buttons.
You can also erase an .LS3 file from disk. Band-in-a-Box will load in all of the .LS3 files that are in the \bb folder
(in alphabetical order), and append them to the StylePicker list.
Technical Information about the BBW.LST file
The Help topics “Select Style with information” and “LS3 files” have information about adding styles to the Styles
List.
Favorite Styles Button
Another way to load a style is with the favorite styles [F] button, located to the
right of the StylePicker button. This button opens a window with a list of the 150 styles you have used most
recently. This lets you quickly load in styles that have been used your last few sessions with Band-in-a-Box.
Click the “Play When Chosen” checkbox to have Band-in-a-Box play your song immediately upon selecting a style.
98
Chapter 6: Band-in-a-Box PowerGuide
Style Aliases Dialog
This dialog is found in the Styles menu.
Let's say you've got a new style for Jazz called “Wynt_K.” You can create an alias so that when Band-in-a-Box
looks for a Jazz Swing style, it will load in “Wynt_K” instead, so you don't have to make changes to all your songs.
And when you have found a new favorite style, just change the alias. You can also load or save sets of “Alias” files
and share them with others.
To type in a style name that you don't have, use the [Custom...] button.
1. To create a new alias, click on an empty spot (i.e. no alias defined) in the alias list, or click on the alias you
wish to edit if you wish to change an existing alias.
2. Press the [Choose …] button below the Original style box and select the style you wish to be replaced.
3. Press the [Choose] button below the Substitution box and select the replacement style (alias).
If you have made a mistake and wish to change your style selection, press the [Clear] button. When you have
successfully made an alias, you will notice that there will be a small arrow in the Styles box on the Main Screen
indicating that you have an alias loaded.
You can Export and Import alias files to share with your friends by clicking the [Import..] button to read an alias file
from a floppy, or click the [Export..] button to send one out to a disk.
Breaks - Rests, Shots, and Held Chords
Breaks are points in a song when one or more of the instruments rests, plays a shot, or holds a chord.
- Rests can specify any, some, or all instruments to rest at any bar. For example, you could rest all instruments
except the bass for the first 4 bars, and then add the piano for 4 bars, and then add the entire band for the rest of
the song.
- Shots can specify certain instruments play a “shot,” where the chord is played and then a rest follows. For
example the song “Rock Around The Clock” has a shot on beat 1 followed by a rest for 2 bars. The duration of
“shots” is 60 ticks per beat.
- Held chords specify that certain instruments hold a chord sustained for a certain number of bars. For example,
you can have the bass and piano hold a chord sustained while the drums continue to play a pattern
A chord can be specified as a REST by adding a period after the chord.
Chapter 6: Band-in-a-Box PowerGuide
99
indicates a C chord that is a REST.
indicates a C chord that is a SHOT.
indicates a C chord that is a HELD CHORD.
Selecting BREAKS for different instruments.
You can specify that some instruments not be affected by the rhythm break.
The coded names for the instruments are:
- B for Bass
- D for Drums
- P for Piano
- G for Guitar
- S for Strings
To type a rest for all instruments on a C chord type C.
To exempt instruments, add their letters following the break. For example,
C.bd will put a rest on all instruments EXCEPT the bass and drums.
To indicate a held chord for all instruments except the piano, type C...p
Normally, when a “shot” or a “held” chord is assigned,
the instruments that are excluded from the shot/held
chord play normally. There is an additional option for
those excluded instruments to stay silent. To set this,
open the chord options dialog, and select a shot or held
chord, and then select “Excluded instrument(s) should
rest.” This option gives you the ability to rest some
instruments while others play the shot or held chord.
You can set the rests to happen only in the first, middle, or last choruses.
Choose Edit | Settings (for This Song), and deselect the “Allow Rests”
setting.
Velocity Boosts for Pushes, Shots, and Held Chords
You can set the amount of velocity boost, so
that the effect won't be too loud.
In the Preferences dialog (Opt. | Preferences)
click on the [Arrange] button to open the
Arrangement Options.
Then type in the amount of velocity boost for pushes, shots, and holds. The style can override the velocity for the
pushes, and drum velocity for shots, held chords, and pushes is also set in the StyleMaker.
Pushes
“Pushes” (also called anticipations) are chords that are played before the beat. For example, in Jazz Swing, the
piano player often “pushes” a chord change by playing the chord an eighth note before the beat. To execute a
“push,” you can use either keystrokes or open the Chord options dialog box by right mouse clicking on a given
chord.
100
Chapter 6: Band-in-a-Box PowerGuide
To use keystrokes, type the caret symbol [^] before the chord. The caret symbol is located above the numeral 6 on
your computer keyboard.
- Type a single caret to get a chord an eighth note before the beat, e.g., ^C7.
- Type a double caret to get a chord a sixteenth note before the beat, ^^C7.
Part Markers
Part markers are used to indicate a substyle change or to insert drum fills.
and
Part markers
beginning of any bar.
are placed on the chordsheet to indicate a new part of the song. They may be placed at the
Placing Part Markers
- Move the highlight cell to the bar that you want the part marker at. Then press the P key. Repeatedly pressing
the P key will toggle between part markers or no part marker, or
- Position the mouse cursor directly over the bar line (or an existing Part Marker). Then, click the left mouse
button. Repeat this procedure to toggle among the A, B, and NO PART MARKER options.
Changing Substyles
and . The song continues to play in one substyle until it encounters a new
Each style has 2 available substyles
part marker, or on second choruses (see below). There is always a part marker at bar 1 so that Band-in-a-Box knows
which substyle to begin with.
Substyle
is usually used for the verse of a song.
is usually used for the bridge of a song, and for soloing in the middle choruses. The entire middle
Substyle
choruses of the song will be automatically played in the “b” substyle.
Placing Drum Fills
A one bar drum fill will occur in the bar preceding a part marker. If you want a drum fill at bar 7 of a song, you
insert a part marker on the bar after the bar with the drum fill (i.e. Bar 8). You can either retain the original substyle
or change the substyle (a or b) when you place the part marker.
Song Settings Dialog
The [S] button on the main screen will bring up the Song Settings dialog. The keystrokes Ctrl+N key or
the Edit | Settings (for This Song)… menu command also brings up this window.
Here, you can choose from various song settings such as chorus embellishments, tag jumps, and endings, to make
your song interesting and varied.
These are additional song settings that are saved with the song.
Vary Style in Middle Choruses
If set to “Yes” the song will play in substyle “b” for all but the first and last choruses. For example, in the Jazz
Swing style, since the “b” substyle is swing, all of the middle choruses will have swing bass, whereas the “a”
substyle is playing half notes on the bass.
If set to “No” the middle choruses will play “a” and “b” substyles exactly as they appear in the song as outlined by
the part markers.
Allow Pushes in Middle Choruses
This is most frequently used if there are pushes in a song (indicated by the “^” symbol), but you don't want these
pushes to play in the middle choruses. Simply set the checkbox to “No” (disabled) and the pushes will be ignored in
the middle choruses. This is to allow for uninterrupted soloing choruses.
Allow Rests in First/Middle/Last Chorus
These parameters allow you to decide which choruses will play any rests that are present in a song (indicated by the
“.” symbol). For example, you may have put rests into a song but don't want the rests to play in the middle
choruses, since you are using them for soloing: simply set the ALLOW RESTS IN MIDDLE CHORUSES checkbox
to “No” (off).
Allow Pedal Bass in Middle Choruses
This determines whether Pedal Bass effect will be allowed in middle choruses.
Chapter 6: Band-in-a-Box PowerGuide
101
Allow Embellishment of Chords
The Jazz styles include embellishment of chords. This means that if you type a C7 chord, the piano part may play a
C13 or a C7b9, a common practice in Jazz.
Tip: If you are hearing b9 and b13 embellishments on a C7 chord that is clashing with the melody, you should rename the
chord C9 or C13, which will ensure natural 9 and 13 embellishments.
Tag Settings
A tag (also referred to as a coda) is a group of bars that are played in the very last chorus of a song. If you select the
“Tag Exists?” check box then the tag will play during the last chorus of the song. After the bar you specify as the
“Tag Jump After Bar #” the song jumps to the “Tag Begin At Bar #” and plays through the “Tag Ends After Bar #”
and then plays a 2 bar ending as usual.
Generate 2 bar Ending for this song
You can disable the ending for a certain song. You can disable the endings for all songs regardless of this setting
from the Opt | Preferences dialog. (Allow Any Endings checkbox.)
Sliding Tracks (Play | Slide Tracks…)
This allows you to move any of the Bass, Drums, Piano, Guitar, Strings, Melody, or Soloist track ahead or behind by
a definable amount. For example, slide the Bass track a little ahead of the rest of the band to make the bass player
“drive the band.” To slide tracks, select the Slide Tracks option from the Play menu. The values are measured in
“ticks-per-beat” with 120 ticks being the equivalent of a quarter note. The musically useful range is from -10 to 10.
Allow Any Slides
If you want the slides to occur, then set this to YES.
Humanize Slides
If set to YES, the slides will be humanized to slide the track a different amount for each note. Humanizing the slide
makes the track sounds more alive.
Saving Songs
Once you have made a song (or have made changes to a song), you will probably want to save the song
by clicking on the [Save] button. Or choose Save from the File menu, or press [F2], or Ctrl+S.
Use [Save As] to save a song with a different name or in a different location. Shift-clicking on the
[Save As] button will allow you to choose a favorite folder prior to seeing the Save As dialog.
Songs will always be saved with last file extension letter of “U,” regardless of whether they are made with a built-in
style or not. For example, if you make a song with ZZJAZZ.STY as the style (i.e., one of the 24 built-in styles)
earlier versions of BB would save the song as MySong.MG1, where the “1” indicates Style #1 – ZZJAZZ. Now it is
saved as MySong.MGU. Older songs loaded in with .MG1 will still be re-saved as MG1 to prevent duplicate song
files.
Note: Make sure you remember to save your songs as Band-in-a-Box song files (not only as MIDI files). The Band-in-aBox song files contain the names of the chords, etc. and are much smaller than MIDI files.
If you have an audio file associated with the song, the audio portion will be saved separately, and will be called
MySong.WAV.
Saving Song With …
Patches, Volume, Reverb, Chorus, Panning, Bank, Harmony (both Melody and Thru), and the Soloist may be saved
with your songs. This is done by selecting the Save Song with Patches & Harmony option from the File menu.
If you would like to save certain patches with a song:
a) Type in the number of the patch (instrument) that you would like. Leave the other instruments at = 0 for no
patch change. Remember that the General MIDI numbering system is always used for instruments.
or
b) Press the [Fill w/Patches] button. This will fill the patch number boxes with the current patch settings showing
on your main screen instrument panel.
102
Chapter 6: Band-in-a-Box PowerGuide
Use the checkboxes to choose which instruments you would like to save and whether you would like to save the
Melody and Thru harmony assignments and the Soloist selected to play on the song. You can also save the
instruments as “On” or “Off” for each song. For example, you could have a song with no piano part. Other
parameters that may be saved (Volume, Reverb, etc.) are shown on the right side of the window. Press the [Save]
button to save the song to disk.
Saving MIDI and Karaoke Files
Your Band-in-a-Box songs can be saved as Type 0 and Type 1 MIDI files as well as Karaoke files and
General MIDI lyrics. Click on the [.MID] button to launch the dialog.
Select the type of MIDI file you want to save in the dropdown “MIDI File type” combo box.
Chapter 6: Band-in-a-Box PowerGuide
103
By default, Band-in-a-Box writes Type 1 multiple track Standard MIDI Files. You can also save Type 0 MIDI files,
they have all of the parts on a single track and are used by many hardware modules and other devices that play MIDI
files because they are simpler to play (since they only have 1 track).
Karaoke files (.KAR) are a special type of sing-along MIDI file with text events for the lyrics and a specific order
for the tracks. There is an option to write the MIDI file with separate tracks for each drum instrument. In the “MIDI
File type” combo box select “Drums on separate tracks.”
Save Options
[File on Disk] saves a MIDI file to your hard drive or floppy disk. You can then load the
MIDI file into your sequencer for further editing.
[Clipboard] copies the MIDI file to the Windows Clipboard as a Standard MIDI File. This
feature allows clipboard enabled programs to Edit | Paste the Band-in-a-Box MIDI file
directly into the program. For example, you can clipboard-paste Band-in-a-Box MIDI data to PowerTracks Pro
Audio, CakeWalk, Musicator, etc.
The Melody/Soloist (with harmonies) will be written to the MIDI file. If you’ve set a Melody or Soloist/Thru
Harmony, that MIDI data will be written to the MIDI file also. See the settings in the Opt | Preferences dialog box
to control how the harmony is written to a MIDI file.
The Chordsheet part markers are written to the MIDI files. They can be read by PowerTracks Pro Audio and by
Band-in-a-Box if re-importing the MIDI file with the Chord Wizard.
“Write Lyrics in General MIDI format” is an option. The GM specification has agreed upon specific
requirements for writing lyrics in MIDI files, which are now supported, so that lyrics that you save in Band-in-a-Box
should show up identically in other MIDI programs. This is one of the MIDI File options in the
Preferences dialog. We recommend the GM format.
Select the [MIDI File] button in the Preferences dialog for more
MIDI File options.
MGX Files
When a MIDI file is loaded onto the Melody (or Soloist) track, the Track Type for the Melody (or Soloist) gets set to
Multi-Track. When the file is saved, the extension will be MGX, allowing you to easily identify the Band-in-a-Box
songs that you have that contain entire MIDI files.
Text Markers for part markers
MIDI files are now written with descriptive Text Markers for part markers! Text markers are also read in from
MIDI files, and displayed as Section Markers on the Notation.
If “Include Part Marker text markers” is selected in the MIDI File Options, the resulting MIDI file will have text
markers. Then, in PowerTracks Pro Audio (in the Bars window), you’ll see the descriptive text markers.
For example, at bar 3, there is an “A, Chorus 1” marker, to indicate a part marker “a” substyle and chorus 1.
104
Chapter 6: Band-in-a-Box PowerGuide
The Jukebox
The Jukebox will load and play an entire subdirectory (folder) of songs. Songs play
continuously, one after the other. The Jukebox will continue to play while you move
to other Windows programs, providing continuous background music.
Click the [Juke] button to open the Options for Juke Box dialog.
Jukebox Options
Only Play song with melodies: If set to YES, the program plays only songs with melodies, that is, songs with an
.MG? file extension. If NO, the Jukebox will include ALL songs in the subdirectory.
Change Melody instrument: If you set this option to “Yes,” then the program will randomly change the melody
instrument among your favorite 10 Melody instruments.
Random order Playback: If set to “Yes,” the songs will be played in random order (though not repeating a song).
If set to “No,” the songs will be played in the order they are listed in the subdirectory.
Hide Titles (until title clicked): This feature is used to play the “Guess the Song” game. When set to “Yes,” the
titles are hidden till you click the title box.
Audible Count-in Click: While listening to the Jukebox, you might not want to hear the Count-in Click. If set to
“No” you won't hear the count-in click.
Harmony Settings: Set the change harmony box to true/enabled if you would like harmonies to be randomly
assigned within a given range for use with the Melody and Soloist/Thru tracks (if applicable to the song).
Chapter 6: Band-in-a-Box PowerGuide
105
Generate Solos: Set this option to “On” to permit the Soloist to play a Solo over all the songs selected for Jukebox
Playback.
1. Change to this directory by loading/opening a song from the c:\bb\solodemo directory.
2. Instead of playing the song you have loaded, press the [Juke] button.
3. Ensure that the Generate Solos checkbox is set to “Yes.”
4. Select [PLAY JUKE BOX]. The Soloist Select Dialog will pop up with a suggestion to use a Soloist for the
first song in the Jukebox list. This is normal. Press [OK] to accept the Soloist suggestion. (The Jukebox will
not bother you with the Select Soloist dialog again; it will simply choose an appropriate Soloist for any given
song in the Jukebox song list.)
Preview:
The Jukebox Preview mode will optionally
play just one chorus of each song, or play a set
number of bars of each song (e.g. 16 bars).
To access this, press the [Juke] button, and select the Preview checkbox. Set the # of bars to use for the preview, a
setting of 99 plays one chorus of each song.
You can change the directory before starting the Juke Box with the [Change Directory]
button.
Favorite Songs
The Favorite Songs window is accessed by the [F] button, found on the main screen beside the
[Song] button. You can make a list of songs for a set by using the [Clear] button followed by
the [Append], [Insert], and [Delete] buttons to add songs. This can be saved as a set using the [Save Set..] button,
and reloaded with the [Load Set] button. Once you have the set, you can press the [Juke..] button.
This will play the set file in order, not randomly. It will start from the currently selected song.
106
Chapter 6: Band-in-a-Box PowerGuide
Chapter 7: Notation and Printing
Band-in-a-Box offers a variety of notation and printing features, both for viewing parts on-screen as they play and
for printing them as sheet music.
To view the notation, open the Notation window by pressing the notation button on the main screen. Close
the Notation window by pressing the notation button again.
Band-in-a-Box Notation screen displaying the melody track in Standard Notation mode.
Tip: You can rearrange the windows so that the Notation window is at the top of the screen with Window | Put
Notation/Chords On Top or with Ctrl+T keys.
-
Standard Notation to display or print Notation. The grand piano staff and/or guitar tablature with notes, chord
symbols, and lyrics.
Editable Notation to enter or edit notation. A special staff with time divisions for mouse-based editing.
Note roll Notation, to enter or edit notes, velocity, and duration. The note heads are shown with editable
velocity and duration lines.
Lead Sheet Notation to display or print notation. Full screen notation with notes, chord symbols, and lyrics.
Exploring the Notation Window
With the Notation window open, the Tool Bar at the top of the window gives you access to its many features and
options.
Options Button
Lead Sheet Button
Notation Mode Button
Print Button
Current Note
Note / Rest
Mono Mode
Opens the Options dialog box.
Press to launch the Lead Sheet Notation window.
Click to toggle through the 3 modes of the Notation window Standard Notation, Editable Notation, and Note Roll mode.
Press this button to print the notation to any printer supported by
your Windows system.
This box displays the name of the note that will be inserted when
you click the mouse.
These determine whether a Note or a Rest will be inserted when
the mouse is clicked.
When this is selected, the notation is entered as monophonic
(one note only) to avoid extra notes in a single note melody line.
Chapter 7: Notation and Printing
107
Clean Notation
The “Clean Notation Mode” cleans up the notation by
eliminating display of redundant grace notes and glitches for
easier reading.
Loop Screen
While a song is playing, click the “LoopScn” button and the
song will loop for the 4 bars shown on the notation screen.
Track Select
You can display or print any track from the program. Press the
appropriate button to change to the desired track.
Event List Editor
You can edit events including all MIDI events and lyric events
using the Event List Editor.
Lyrics Button
To enter note-based lyrics press the Lyrics button on the
Notation toolbar.
Zoom Buttons
Section Text
Scrub Mode
The zoom buttons make it easy to increase or decrease the font
size of the notation.
Add or edit Section Text on the Notation.
When this button is pressed in you can drag the mouse over
notes to hear them.
Standard Notation Window
The Standard Notation window displays the notation for any individual track, and allows for the entry of chords and
lyrics. Features include:
- Notation display for the Bass, Drums, Guitar, Piano, Strings, Melody, or Soloist track.
- As the notation plays, the notes that are sounding are highlighted in red. This helps with sight reading or
following the music.
- You can set the notation to scroll either 1 or 2 bars ahead of the music without interfering with your view of the
current notation.
- Handles Jazz eighth notes and triplet figures correctly.
- Automatic options such as auto durations, clean notation, mono display, minimize
rests, hard rests, and engraver spacing produce very musical and readable notation.
- Beamed notes are automatically given slanted beams.
- Groups of 5 notes will automatically display as groups of 3+2 or 2+3, and can be set
this way manually as well. If you'd prefer to see them as a group of 5 notes, you can
right mouse click on the timeline, and set the resolution to 5 for the beat.
108
Chapter 7: Notation and Printing
Editable Notation Mode
Enter the Editable Notation mode from the Standard Notation screen with a single mouse click on the [N]
button. In the Editable Notation mode you can enter, move, and edit notes and rests using standard mouse
techniques – point and click, drag and drop,
and right click to open the Note Edit dialog box.
This is the screen for step-entry of a melody or for editing existing parts. Notice the grid of vertical lines, which
sub-divide each beat. These lines indicate where the notes will be placed according to the resolution of the song.
Resolution
The above example is in Jazz Swing style; so Band-in-a-Box has automatically set the grid resolution to 3 per beat
(triplets) based upon the style that is in use.
- Swing styles use 3 lines to divide each beat into eighth note swing triplets.
- Straight styles use 4 lines to divide each beat into sixteenth notes.
Beat Resolution
The user can manually set the resolution for any beat in the Beat Resolution dialog, which opens with a right click
on the black vertical time line.
Setting the Treble Clef Resolution for this beat to 5 allows a group of five notes to be
placed on one beat.
Chapter 7: Notation and Printing
109
Entering Notes
To insert a new note on the staff move the mouse to the location that you want. If you want beat 1, move to the first
dotted line in the bar. Click on the staff over the note that you want.
The Current Note box in the toolbar will give you the name of the note that you're on.
Click with the left mouse button to insert the note:
- To insert a sharp: Hold down the Shift key as you click the note.
- To insert a flat: Hold down the Ctrl key as you click the note.
- To insert a natural: Hold down the Alt key as you click the note.
Brackets (#) are drawn around accidentals after a bar line as a courtesy, where no
accidental is required.
How is the length of the notes determined?
Band-in-a-Box uses an intelligent auto-duration feature to determine how long the note should likely be. Autodurations mean that you can enter a lead sheet style melody by clicking only once per note, speeding up the entry of
notation.
Any note that is entered will initially have a duration of 2 bars (2 whole notes). When the next note is put in 2 beats
later, Band-in-a-Box will adjust the duration of the previous note to just shorter than 2 beats. This means that you
don't have to worry about durations at all, and can simply point and click to enter the notes where you want them. If
you want to override the auto duration, you can edit the note using the right mouse key, which will permit you to
type the exact duration that you want.
Entering Rests
Insert a rest by holding the back-quote key (tilde key without pressing shift) then clicking on the notation window.
Another way to enter a rest is to click the Rest checkbox and then point and click where you want the rest to appear.
This automatically shortens the duration of the previous note.
Tip: If it is important to see rests less than a quarter note, make sure you de-select the Minimize Rests checkbox in the
Options dialog box.
Forced Rests (Hard Rests)
This allows you to insert a rest on the notation, which will be in effect even if you have Minimize Rests set to false.
For example, we are able to display a 16th note rest even though the Minimize Rests feature is on. To do this, click
on the [Rests] button and then click on the notation at the location that you'd like a 16th note rest. The Hard Rest
will show up in blue in the editable notation window and can be removed by holding the [DEL] key and clicking on
the rest.
Moving a note in time.
If you want to change the start time of a note, drag the note with the left mouse button to the new location. This is a
simple way to move the note. Alternatively, you could edit the note numerically with the right mouse button.
Changing the pitch of a note.
Similarly, you can drag the note vertically to change the note value, and release it when you're on the note you want.
Hold down the Shift, Ctrl, or Alt key to have the note inserted as a sharp, flat or natural respectively.
Insert Bends In Notation.
In the Editable Notation window, any note can be made into a bend by holding down the “b” key on the computer
keyboard and right-clicking on the note.
110
Chapter 7: Notation and Printing
Editing a note's values.
Right click on a note. This brings up the Note edit dialog box that lets you change any values about the note in
numerical data.
In the Note edit dialog box, you can manually change the characteristics of a note by entering the exact values you
wish for any given note. For example, you can change the Velocity and Duration by increments of 1 tick, as well as
the note's pitch and relative positioning in the bar.
To select a region of the Notation you can Shift+click on the end point to easily select a large area.
- Select a small region by dragging the mouse.*
- Enlarge the region by Shift-clicking on the end point.
*Note: Shift-click is also used to enter a sharp (#) note, so the selection via Shift-click requires that a small region be
already selected.
Chapter 7: Notation and Printing
111
Note Roll Notation Mode
In the Editable Notation mode, click on the [N] notation mode button to enter the Note Roll mode. In the
Standard Notation screen click twice.
This mode is similar to the Editable Notation Mode, except that the beats begin right on the bar line. You can see
the duration of the note visually represented by a horizontal blue line and the note’s velocity displayed as a vertical
blue line.
Tip: If you can't see these lines, press the [Opt.] button to check that “Show Note Durations, Show Velocity Lines,” and
“Show Bar/Beat Lines” options are enabled.
Using the Mouse to Edit Velocity and Duration
There is an additional function available in this mode; right mouse drag. Place the mouse cursor on the note head
and hold down the right-mouse button. Then, starting at the note head, drag the cursor horizontally to set the note's
duration, or vertically to set the note's velocity.
Piano Roll Window
For advanced editing of notes plus graphic controller editing, go to the Piano Roll window, either by
selecting the Piano Roll button on the toolbar, or the Window | Piano Roll Window menu item.
112
Chapter 7: Notation and Printing
Notation Window Options
Press the [Opt.] button in a notation window to bring up the Notation Window Options dialog box:
Track Type
Normally you'd leave the track type set to Single Channel, but you can also set it to Multi-Channel, Guitar, or Piano.
Multi (16) All MIDI channel assignments are preserved and output on playback. This would be useful for
-Channel: importing an entire MIDI file, and playing it from the Melody channel using a silent style.
Guitar:
MIDI channels 11 to 16 are assigned to the guitar strings 1 to 6. Correct guitar tablature replaces the
bass clef, the notation will be up an octave, and guitar channel assignments are saved with MIDI files.
Piano:
In this mode, channels 8 and 9 are treated as the left and right hand of a piano part.
Bars/Screen
This option lets you to choose the number of bars per line for both the on-screen notation display and printing.
New Line each
Use this setting to automatically start a new line on each chorus, on each chorus and the intro, or on each part
marker. It applies to the Lead Sheet notation screen and to printing.
Triplet Resolution (Swing)
Band-in-a-Box automatically sets the resolution whenever a style is loaded. When a style has a triplet feel (such as
Jazz Swing or a Shuffle style), Band-in-a-Box selects Triplet Resolution. This ensures that Jazz eighth notes (swing
triplets) are handled correctly. When a style with a straight feel (Pop, Latin) loads the Triplet Resolution setting is
automatically turned off.
Chapter 7: Notation and Printing
113
Load notation layout w/songs
When this box is checked your Notation Option settings will be saved with the song and restored the next time you
load the song.
Show Key Signature
If turned off, you won't have the key signature box displayed on the Notation Screen. This will save some space on
the screen.
Show Bar/Beat Lines
This setting is for the Note roll mode only. When turned off (unchecked) only the staff lines will show, helpful for
editing note Duration and Velocity lines.
Guitar Chord Diagrams
These are available on the notation, lead sheet, or printout for Folk, Pop, and Jazz voicings. There is an option to
show the fret numbers on the diagrams.
Show Note Durations
A Note Roll mode setting to show or hide the horizontal Duration lines.
Duration Line Color (Green /Blue)
There are two color choices for the Duration lines, green and blue.
Snap To Grid Lines
If the Snap To Grid Lines checkbox is checked, the inserted note will be lined up with the closest grid line. This is
similar to the way a graphics or typesetting program aligns elements accurately on a page. This means that you
don't have to click exactly on the beat to have the note inserted precisely on the beat.
Scroll Ahead
The notation window can be set to scroll 1 or 2 bars ahead of the music without interfering with your view of the
current notation. To enable this feature, select the number of bars you wish to scroll-ahead in the Notation Window
Options (1 or 2). Select zero bars to disable this feature. When the notation scroll-ahead feature is enabled, the
lyrics will also scroll ahead.
Highlight playback notes in Red
Good sight-readers who like to read ahead can use this option to disable the highlighting of notes in red as the song
is playing so it won't be distracting.
Note Colors
Colored notes will appear in color for printout on color printers or when saved in a color graphics file.
Notation can display notes in
different colors based on absolute
note names or relative to chord or
key. The default color scheme is one
that was introduced by the Russian
composer Alexander Scriabin (18721915). When a scheme is chosen, it
can be edited by selecting the [Edit]
button.
Pressing the [Edit] button launches the Note Color Editor dialog.
Change the colors by clicking on the color above the note name.
Pressing the [OK-Save] button will close the dialog and save the file as c:\bb\default.NCL.
You can also save/load different NCL files for different color sets.
114
Chapter 7: Notation and Printing
Note Names
There is an option to display note names in the center of the note head. You can display absolute note names (A, Bb
etc.) or you can display numbers relative to the key or the current chord. This is helpful for learning to read music.
Combined with the ability to display large font sizes, this achieves the big note look common to “EZ-2-Play” music
books.
Channel numbers are also displayable on the notation. When editing notes, it is often
helpful to see the channel number of each note. By setting Note Names to “Channel
Numbers” you'll see the channel number for each note written into the note head of the
notes. This is useful (for example) when viewing an entire MIDI file that you've loaded
onto the Melody track, and want to examine the channel information, or for editing a guitar
track that uses channels 11 to 16.
Show Velocity Lines
This is a Note roll mode setting to show or hide the vertical Velocity lines. Line color is determined by the Duration
Line Color setting.
Use chord scale for enharmonics
The sharps and flats in Band-in-a-Box notation are context sensitive to the chord names. For example, if you are in
the key of Eb, and the chord is E7, a G# note will show up as G#, and not Ab. This means that the notation
accidentals will automatically show up correctly.
Chapter 7: Notation and Printing
115
Enharmonics for chord tones are automatically based on the chord.
Enharmonics for passing tones are based on chords if “Use Chord Scale Enharmonics” is set to true.
For example, on an F#7 chord in the key of Eb, the Ab note is part of the F#7 scale (as a G#, the 2nd of the scale),
but is also part of the Eb key of the song. If you want to display based on the chord scale, setting “Use chord scale
enharmonics” will display the note as a G# instead of an Ab.
Engraver Spacing
This is another one of the program's intelligent features which spaces the Notation appropriately to avoid
overlapping notation while accounting for space required by accidentals, rests, etc. This feature is visible only in
Standard Notation mode.
Selection of Font for Chords, Lyrics, Text, and Titles
You can use the PG Music fonts or Jazz fonts for your chords and notation. Or you can choose Arial or any other
font on your system for chords, lyrics, text, and titles. The Jazz fonts have the “handwritten manuscript” look.
To select just the Jazz music font select the “Use Jazz Music Font” option, then choose
your Chord, Lyrics, Text, and Title fonts.
The [Jazz Fonts] button installs a pre-selected group of Jazz fonts.
The [Arial] button installs the regular notation font and Arial for everything else.
Or you can select from any of the fonts installed on your
computer using the settings found in the Notation Options
dialog.
Check “Use Jazz Music Font” to use the Jazz font, and check
“Jazz Symbols” to use shorthand Jazz chord symbols in the
notation.
116
Chapter 7: Notation and Printing
Jazz Chord Symbol Graphics (circles, triangles)
Jazz and Pop music often use certain non-alphabetic symbols for chord types. These include a delta (triangle) for
major chords, a circle for diminished, and a circle with a slash for half-diminished. Also, tensions like b9 and b13
are stacked vertically and contained in brackets. You can now select this option, and see these symbols for
display/printout on the Chord Sheet, Notation, and Lead Sheet windows.
The Jazz Chord Symbol Graphics can be displayed independently on the Chordsheet and the Notation or Lead Sheet
windows.
To get the Jazz Chord Symbol Graphics on the Chordsheet, choose Opt. | Preferences | Display Options and set
“Chordsheet Font” to “Jazz Chord Symbols.”
You’ll then see a chord sheet like this.
To see the Jazz Chord Symbol Graphics on the Notation/Lead Sheet printout, set the Notation
Options. The Notation will then look like this.
The Lyrics and Text fonts appear in the Notation window, the Lead Sheet, and the printout. The Title font is used
for the Titles, Composer, and Styles names that appear on the Lead Sheet window and printout. You can choose
from selected fonts, or use the “Other…” selection to use any font. For example, you could use PG Jazz Text
Extended (PGTextje) for a jazzy look.
Note: PG Music notation and text fonts are installed automatically by the program in your Windows | System directory.
Chapter 7: Notation and Printing
117
Chord Vertical Position
This controls how high the chords will be written above the staff. If set to = 5 the chords will be written 5 notes
above the top of the staff. If your piece contains a lot of high notes, then set the chord position to a high setting.
Lyric Position
You can adjust the height of the lyrics by setting the lyric height (smaller values like –8 are higher on the notation).
Display Font Size %
To select the notation font size for display, enter the Display Font Size as a percentage, either more or less than
100%. The same setting is available in the Lead Sheet window and the Print dialog.
Transpose Options
These preset transpose settings for non-concert instruments like brass and
woodwinds will auto-select the correct transpose settings and clef split points
for the instrument. For example, Trumpet +2 will write the music up 2
semitones, and the split point will be adjusted to display the music in treble
clef.
Guitar and bass settings are also included.
Transpose
The Transpose setting lets you manually adjust the Notation window to display notes either higher or lower than
their actual pitches.
Clefs split at
Determines the split point for placing notes on the Bass or Treble clef. The default setting is C5, middle C. Use a
higher split point, such as C6, if you want notes up to a G above middle C written on the bass clef with ledger lines.
Max Ledger Lines
You can specify an upper limit of a note range so that high notes won't result in an excessive number of ledger lines.
The default is 6, which would show a maximum of 6 ledger lines above the treble clef staff.
Notation Settings
Tick Offset
Lets you display the music ahead or behind the beat. A setting from 1 to 120 to have the music displayed forward in
time, a setting from -1 to -120 will cause the music to be displayed ahead of the beat. 120 ticks equal one quarter
note.
Minimize Rests
When checked, Band-in-a-Box will eliminate unnecessary rests. For example, if staccato eighth notes are displayed
as sixteenth notes separated by sixteenth rests the setting will remove the rests and show the notes as eighth notes.
Detect Fine Resolution Notation
Improved auto-transcription identifies and correctly displays up to 128th notes. To set a beat to a certain specific
resolution right mouse-click on the Time Line located at the top of the Notation window. You'll then see a Beat
Resolution dialog where you can set the resolution for both the Treble and Bass clefs.
118
Chapter 7: Notation and Printing
R/L Cursor Edits is used in the keystroke note editing features.
More..
This button opens the Other Notation
Options dialog.
Inserted Note Defaults
These settings determine the default values for notes that you enter manually.
Duration %
Notes are not always played for their full duration. If a whole note is inserted with a duration of 80%, the note
would play for 80% of 4 beats = 3.2 beats.
Velocity
The loudest possible note has a velocity of 127; a velocity of 0 is silent.
Channel
Assign the MIDI channel of the inserted notes.
Play Inserted Notes
When checked, notes that you insert will sound briefly as they are inserted. This lets you hear that the note you
inserted sounds correct.
Advanced Notation Settings
These advanced settings give you control over the clean notation features.
Chord Note Separation in MS and Chord Total Separation in MS
This lets you set the width of chords. Band-in-a-Box will display a new group of notes on the notation for every
chord. If you know that a track is single notes and therefore couldn't have any chords, set the chord note separation
to a small value like 10ms and then every note will be displayed on a new note stem. The chord width parameter is
also used for the “chord step advance” feature.
Glitch Duration in MS and Glitch Velocity
When set properly, “Glitches” will not be shown on the notation. Any note less than a certain length of time or less
than a certain velocity can be filtered out.
Keystroke Note Editing
You can easily edit notes using only keystrokes. By stepping through the notes one-by-one, when a note is
highlighted you can change the pitch using the cursor keys, and other values (timing, duration, channel) with other
hot keys. This speeds up editing of notes. To use this function, you do the following:
1. Open up the Notation Window.
Chapter 7: Notation and Printing
119
2.
3.
4.
Move to the note that you want to edit, and then press the Chord Advance (INS or DEL key on the Numeric
Keypad). This highlights the current note.
With the note highlighted in red, use the cursor up/down keys to change the pitch of the note. You hear the
pitch change as the note changes.
Use the cursor left/right keys to change the note's start time, duration, channel, or velocity (depending on the
setting of the “Right/ Left Cursor Edits” field in the Notation Options Dialog.
Press the [Esc] key or [Stop] button when you're done.
Section Text for Notation
You can add custom Section Text and Boxed Text messages at any position in the notation track, with
optional box to appear around the text.
To put a section text comment on the notation track:
- Open up the notation window, and press the [N] button to enable editable notation.
- Right click on the track at the point that you want to enter the section text. Answer YES to the question
“Would you like to enter Section Text?”
- This launches the Section Text Event dialog box that allows you to type in the text. You can set the text type
to “Boxed” or “Regular.”
Scrub Mode on Notation
Scrub mode allows you to move the mouse over a group of notes and hear them playing. To enable the
scrub mode, press the Scrub button in the Notation window toolbar. Then hold the mouse and drag it over
the notes that you want to hear.
Lead Sheet Window
The Lead Sheet window displays a full screen of notation with one or more parts. Other options include a selectable
number of staffs per page, clefs to show, font size, margin, scroll-ahead notation, and lyrics. If you like to sight-read
along with Band-in-a-Box, this is the window for you.
Launch the Lead Sheet window from the main screen by pressing the Lead Sheet button (or Alt+W
keys), or with the Window | Lead Sheet Window menu option. This button is also available from the
Standard Notation window. As the notation scrolls ahead, you can read ahead without waiting for a page turn.
During playback, red rectangles highlight the current bar. If the bar is empty (or in Fake Sheet mode), the Lead
Sheet will draw the staff lines and bar lines in red.
The Lead Sheet is also useful as a kind of “Print Preview” feature, as it offers you the ability to correlate the onscreen notation to a hard copy printout.
You can move around the Lead Sheet window in various ways. Cursor keys and mouse clicks will move a small
blue rectangle around the screen, which lets you type in chords at that location. Double-clicking the mouse at any
bar will start playback from that position.
120
Chapter 7: Notation and Printing
Selecting Parts in the Lead Sheet
Clicking on the track selection toolbar will select a different track. The track names
are [B]ass, [D]rums, [P]iano, [G]uitar, [S]trings, [M]elody, and [S]oloist.
To view multiple parts click on the button for the top part you want to view, and then hold down the Ctrl key and
click on the other parts you want to view in the order you want to see them, from top to bottom. You will then see a
group of tracks, displaying in the order that you have requested them. To revert to a single track of notation, simply
click on a track without holding the [Ctrl] key down.
There is an option in the Lead Sheet Options dialog to allow you to
display the chords above each track, or just the top track of the notation.
If you press [Print] from the Lead Sheet window you will be able to print out the multiple tracks of notation.
Lead Sheet Options Dialog
Pressing the [Opt.] button launches the Lead Sheet Options dialog.
The settings in this dialog are applicable to the Lead Sheet window only. If you want to set options that are shared
by the Lead Sheet window and the Notation window, press the [Notation Options…] button.
Chapter 7: Notation and Printing
121
Treble Clef and Bass Clef
These checkboxes choose which clefs will display in the Lead Sheet view.
AutoSet Clefs
When set Band-in-a-Box will attempt to pick the clef for you, automatically displaying the bass clef when you are
on the bass track or any other track with low bass notes. It will show both clefs when on the piano or drum track.
Clef Sign Every Line and Key Signature Every Line
By default, the Clef and Key will be shown at the beginning of every page, but if you want one every line, you can
check these options.
Chords and Staff Lines
Both are shown by default. Uncheck if you don’t want them to display.
Show Bar #s
Choose whether the bar numbers will be shown for each bar, only at part markers, or not at all.
Show Title
If set, the song title will be displayed along with other information like Composer Names and Style information that
is set in the Print Options dialog of the Notation window. To set these options choose File | Print from the menu.
Fake Sheet displays multiple lines of lyrics shows lyrics for 1st and 2nd endings or multiple choruses stacked as
multiple lines on the fake sheet.
Restore Defaults
You can reset all the Lead Sheet Options back to default settings by pressing the [Restore Defaults] button.
Notation Options
To set Options that are shared by the Lead Sheet window and the Notation window, press the [Notation Options…]
button.
122
Chapter 7: Notation and Printing
Margins
Set margins for the Lead Sheet window, just like the margins in a word processor. This feature has no effect on
printout; the Print dialog has its own margin settings.
Show Chords above each track
When using multiple tracks of Notation, this determines whether each track will show the chord names or not.
Show track names for multi-track notation
If checked, the Band-in-a-Box track names will be inserted at the start of each part in the multitrack notation display.
Harmony display
-
[Convert Harmony to track] will add a harmony to an existing Melody.
-
[Remove] will remove the harmony from the track.
-
Split Harmonies to different tracks enables the splitting of the harmonies to different tracks on the lead sheet.
-
Show Harmony Voice allows you to select ALL tracks, which will cause each track to display on a different
track on the Lead Sheet. Or select a specific Voice to display only that voice. For example, if you choose
“Voice 2” and press OK, you'll now see just voice 2 of the harmony.
You can control the volume of the selected harmony voice relative to the other voices in the harmony. The Play
Volume of harmony voice setting can be set to:
-
Normal
Harmony plays as normal.
-
Solo
Only the selected voice will play.
-
50% Solo
Selected voice is much louder than other voices.
-
Quiet
Selected Voice is much quieter than other voices.
-
Muted
Selected Voice is muted.
Staves Per Page
The number of staves shown in the lead sheet can be set by typing in a number or using the [+] and [-] buttons. If
“Auto-Set” is selected, the number of staves will be set automatically, attempting to fit the lead sheet on a single
page.
Font Size
Choose the font size with one of the preset buttons for popular sizes, or type a number between 45% and 300%.
Fake Sheet Mode
The Lead Sheet window has its own Fake Sheet Mode checkbox. When it is NOT selected, the lead sheet will work
as it always has (in linear mode).
Chapter 7: Notation and Printing
123
When Fake Sheet mode IS
selected, the form will show like a
lead sheet, with only one chorus
showing, and 1st/2nd endings and
repeats displayed.
The Fake Sheet can show multiple
lines of lyrics for 1st and 2nd
endings or several verses stacked
in multiple lines.
Multiple lines of Lyrics on Fake Sheet.
If your song has 1st and 2nd endings or multiple verses of lyrics, multi-line lyrics can be displayed, so you’ll see all
verses on the same fake sheet. Load in the song c:\bb\ Tutorial - BB 2005\Listen Multi-line lyrics Demo.MGU.
Open the Lead Sheet and select “Fake Sheet Mode.”
This song has a 1st/2nd ending entered, with separate lyrics for each ending. Multiple lines of lyrics will also appear
if there are lyrics in multiple verses (choruses).
124
Chapter 7: Notation and Printing
In the Notation Window Options, “Lyric Position” allows you to vertically position the
height of the lyrics.
Harmony Notation Display
Harmonies can be displayed on the Lead Sheet window (or printed) with separate notation tracks for each
harmony voice. View each harmony on a separate track, or view/print a single harmony voice. To examine the
harmony display features, load in the song “Night_T.MGU.” The melody of this song was previously converted to a
harmony using the Melody | Edit | Convert Melody to Harmony option, so this song contains a harmony on the
Melody part.
Open the Notation window (Ctrl+W) and you'll see all four voices of the harmony on the same treble clef.
Now open the Lead Sheet window. Band-in-a-Box now recognizes that this is a harmony (generated by
Band-in-a-Box), and displays each voice on a separate track of the lead sheet.
Press the [Print] button to print out “Voice 2.” If needed, press the notation “Transpose Options” to first
visually transpose the instrument to Eb for an “Alto Sax” chart.
Chapter 7: Notation and Printing
125
Lyrics
Band-in-a-Box supports lyrics in three different ways, Note-based Lyrics, Line-based Lyrics, and a Big Lyrics
(Karaoke) window. The complete list of lyrics functions is found in the Lyrics menu. See the Reference chapter for
itemized descriptions.
Note-based Lyrics
Note-based lyrics offer accurate placement of lyrics as you can place a word under each note. As you enter the
lyrics, the note is highlighted. Pressing the Tab or Enter key moves to the next note. Use “/” and “\” to enter line
breaks and paragraphs.
On the Notation window, you see the paragraph/line breaks for the lyrics.
But on the Lead Sheet, the marks are not shown.
Note-based lyrics are saved with the MIDI file, so you can use them in your other MIDI programs.
You can enter note-based lyrics by pressing Ctrl+L keys or pressing the [L] button on the Notation toolbar.
Placement is set in the Notation Options dialog. A Lyric Position setting of -10 puts the
lyrics directly under the treble clef. Higher values put them lower.
Lyrics Event List
You can edit the lyrics using an event list as well. This allows you to enter lyrics at any point, not just
tied to a note.
Once you press the # button, you then press the [Edit Lyrics] button. You can then see the Edit
Lyrics dialog.
From here, you can edit lyrics, or INSERT new lyrics or APPEND lyrics to the end of the track, or DELETE lyrics.
A single lyric event can be 128 characters.
126
Chapter 7: Notation and Printing
Lyric Document Window
The Lyric Document window displays a full screen of fully formatted lyrics so you can easily copy and paste lyrics
to and from your favorite word processor. If you have the lyrics available you can quickly paste them into Band-ina-Box.
You may already have the lyrics to your song typed into a word processor, nicely formatted with font/color/bold
choices etc. Previously, you would need to retype them into Band-in-a-Box and would lose your formatting. Now
you can simply Copy/Paste them to/from your word processor. This allows you to quickly add lyrics to any Bandin-a-Box song.
Big Lyrics (Karaoke) Window
The Big Lyrics window is great for sing along or Karaoke. It opens from the Lyrics menu, with the keystrokes
Ctrl+Shift+L, or with the [L] toolbar button.
Each word is highlighted as it plays, and the window can be customized by clicking on the [Options] button. Click
on any word in the Big Lyrics window to start the song playing from that point.
Lyric Window Options
Add chord symbols, customize your color scheme, choose a favorite font, and select a size in the Lyric Window
Options dialog. Chords can be displayed on a row above the lyrics on the Big Lyrics window
On the Big Lyrics window Options dialog, if you set “Show chord symbols above the lyrics,”
you then see the chords written on a separate line.
Separate chord colors are used for the Chords and Lyrics, allowing these elements to be visually separated.
You can also select the color for the chords in the options dialog.
When there are no lyrics for a few bars, the Big Lyrics window displays the chords in a line divided by bars so that
they are easy to read. When the lyrics resume, the chords are interleaved with the words as before.
With this option selected the Big Lyrics scroll a page at a time. When the lyric
cursor reaches the next-to-last line of the lyrics it will scroll to the top of the
page, allowing uninterrupted reading of lyrics.
Chapter 7: Notation and Printing
127
If you have the Lyrics window option “Auto-open lyrics window for songs with lyrics” selected, and a MIDI file (or
.KAR) containing lyrics is opened, the lyrics window will open to show the lyrics.
The popular Karaoke file format (.KAR) can be opened directly into Band-in-a-Box just like MIDI files. Chord
symbols are displayed (Band-in-a-Box intelligently analyzes the chords of the song), as well as the lyrics from the
Karaoke files.
Printing
Print Options
Pressing the printer button launches the Print Options dialog box. Print options include title, bar
numbers, composer, style, and copyright.
Include Chords
If selected, this will include the chords of the song on the lead sheet. Remember that you can set the height that the
chords will appear in a different dialog box (the Options Dialog box).
Include Notes
If you want only a chord lead sheet with no Notes, then turn this off. Otherwise it should be ON.
Bar #s (new Part)
If set to YES, this will include a bar # written at every part marker, as well as the letter of the part marker. So bar 1
might be written as 1a. There is no option to print out every bar number at this time.
Staff Lines
Set to off (uncheck) to print a “chords only” fake sheet with chord symbols and bar lines but no staff lines or
notation.
Lyrics
Lyrics can either be printed above the chords, below the staff, separately at the end (on a separate page), or not
printed at all. Normally lyrics are printed below the staff.
128
Chapter 7: Notation and Printing
Treble Clef
Normally you will want to include the treble clef unless you're printing a bass part or left hand piano part alone and
want to save space.
Bass Clef
For melodies or solos, you probably won't want the bass clef printed. For other parts (piano, bass, drums, etc.) you
should set this option to YES.
AutoSet Clefs
With this setting the program will print only the clefs that are necessary. For example, a Melody would probably
print with just the treble clef, while a bass part would use only the bass clef, and a piano part would use both clefs.
Tab
Enables tablature display and printout for guitar and bass tracks.
Clef Split At
This determines where the notation will split the treble and bass clefs. Middle C is normally considered to be C5,
and C4 is one octave below. For a melody or soloist part, you will probably want the entire part to be printed on the
treble clef, so you could choose to split the clefs at C4.
Clef Sign Every Line
Leave this unchecked if it’s not needed and you want an uncluttered look.
Key Signature Every Line
Most modern fake books don't include the key signature every line. If you would like to see a key signature at every
line, set this to “Yes.”
Print Note-based Lyrics
Set to “Yes” to print the Melody part with Lyrics, or turn off to print just the music for the melody line.
Print Range (First Chorus/Last Chorus/Whole Song)
You can either print the First chorus, the Last chorus, or the whole song. When you change this setting, Band-in-aBox will reset the number of staves per page setting in order to auto-fit the printout to one page, if possible.
Tip: You'll want to print the last chorus in a song that has a tag ending, or if you want to see a 2-bar ending printed.
Include Lead-In
If your song has a lead-in (pickup) to bar 1 then make sure you've checked the Lead-In. Actually, Band-in-a-Box
sets this for you by looking for notes in the lead-in measure. You can override this automatic setting, if necessary.
Font Size
This is the font size for the printed music. Changes will be seen in the Print Preview.
Staves per page
Band-in-a-Box sets this setting for you automatically to auto-fit on 1 page, use this to override the auto setting.
Remember that the title takes up 1 stave. The “Auto-Set” option will set the number automatically, and will try to
fit the lead sheet on a single page.
More… (Print Margins)
Click here to set margins. You can also select the Always fill tempo option, which automatically writes the current
tempo on the song sheet.
Title/Style/Tempo/Composer/Copyright
Enter this information in the fields provided. If the title is long the font size will be reduced, and the title won’t be
underlined. Titles are limited to 60 characters.
- Click the [A] button to print the title in upper case.
- The [T] button automatically inserts the current tempo setting for the song.
- The [©] button will insert the copyright symbol into the copyright field.
- The [S] button will enter the full style name into the Style field.
Setup Printer
This launches the setup dialog box for your printer. If you choose a new printer, Band-in-a-Box will automatically
set this as your default printer. Click on the [Setup…] button to open the printer properties to set paper size,
resolution, page orientation and other settings controlled by the printer driver.
Tip: In the Notation Options you can specify an upper limit of a note range with the “Max Ledger Lines” setting high so
notes won’t have an excessive number of ledger lines.
Chapter 7: Notation and Printing
129
Print Preview
This feature allows you to preview what the printed pages will look like by displaying them on-screen.
Use the [Prior], [Next], [First], and [Last] buttons to navigate additional pages.
Press the options button to open the Preview Options dialog. In the Preview Options you can set
the exact number of pixels to display for the print preview, the same settings are also used if you
choose to save the pages to a graphics file in
the popular .JPG, .TIF, or .BMP file types.
This feature is only limited by available
memory. This allows high resolution
BMP’s like 2400 x 3000.
A BMP of 2400x3000 is 300 dpi for an
8”x10” page.
You will then see a high-res graphic on screen, and you can save that to a BMP using the [Save…]
button. Printing to a graphics file allows you to embed your notation in a document, or in an
HTML file for use on your web site.
Display Options
Use this button to display the notation across the full width of the screen.
This button will shrink the notation to display a full page at a time.
Saving the page(s) as Graphics files
The [Save…] button saves the current page as a Graphics file.
The [Save + +] button saves all of the pages to graphics files named songnamexxx.bmp, where xxx
is the page number.
With the clipboard button you can quickly copy a bitmap to paste into other applications.
Printing from the Print Preview
You can print the page(s) by pressing the [Print…] button to return to the Print Options and then pressing the [OK –
Print] button.
Press the [PrintPage] button to print only the page that is shown onscreen in the Preview
window, not the complete song or a full chorus.
130
Chapter 7: Notation and Printing
Chords-Only Lead Sheet Display and Printout
Need a simple fake book style chord chart? You can display just the chords in the Lead Sheet window or print out a
lead sheet with just chord symbols.
To print a chords-only lead sheet, uncheck the Staff lines checkbox in the Print Options dialog.
Printing Multiple Parts
To print more than one track of
notation:
- Open up the Lead Sheet
window.
- Click the mouse on the track
that you want on the top stave.
- Ctrl+click (hold down the
Control key and click the
mouse) on the tracks that you
want below the top stave.
You will then see a group of tracks
displayed in the order you selected
them.
Press [Print] from the Lead Sheet
window to print the multipart
Band-in-a-Box notation.
Chapter 7: Notation and Printing
131
Chapter 8: Automatic Music Features
Automatic Songs – “The Melodist”
Feel like composing a brand new song? Using the “Melodist” feature you can compose a new song in the style of
your choice, complete with intro, chords, melody, arrangement, etc. All you have to do is pick from one of the
many “Melodists” available and press [OK] button. The program then creates the intro, chords, melody, and
arrangement in any given style. The Melodist will also generate a melody over an existing chord progression.
This feature can be a powerful practicing aid for sight reading and improving your ear.
Press the on-screen [Melodist] button to launch the Melodist.
The left side of this screen displays the list of the Melodists available, including Pop, Swing, Bossa, Waltz, Rock,
Bebop, and Jazz Ballads. The Melodist will generate Intro, Chords, Melody Harmony, Style, and Solos using the
group of settings preset with the selected Melodist. Scroll down the list, and pick a Melodist that you'd like to use.
Generate Chords / Generate Melody / Generate Intros / Auto-Titles
The items that are selected will be generated. The convenient preset buttons will automatically set the appropriate
settings to popular presets.
The [Chords & Mel.] button will set the checkboxes to Generate Chords & Melody (but not
Solos).
The [All] button will generate Chords, Melody, and Solos.
The [Chords] button sets the options to generate Chords only (no Melody).
132
Chapter 8: Automatic Music Features
The [Melody] button will set the options to generate only a Melody (no chords) over an
existing chord progression.
Insert Bass Pedals
When selected Pedal Bass figure will be inserted during the intro and at the end of sections.
Solo in Middle Choruses
This will generate an improvisation in the middle choruses of the song.
Allow Style Changes
When selected, this option allows a Melodist to load in the style associated with it. If you don't want Melodists to
change the current style that you have loaded, then deselect this option.
Form
This selection box allows you to choose between a song generated with a specific form (AABA 32 bars) or “free”
form. The AABA defaults to 32-bar form, which is the most popular song form.
Tip: Melodists may alternatively be set to 64 bars (e.g. Melodist # 18 ColeP 64 bar form). The song “form” refers to the
pattern that the verse and chorus repeat. An “AABA 32” form has 4 sections of 8 bars each: the “A” section is the verse and
the “B” is the chorus (or bridge) of the song.
# Choruses
This determines how many choruses of the song form (Melodies) are to be generated. For example, if set to 5, the
Melodist will generate 5 choruses, enough for an intro chorus, ending chorus, and 3 Middle Choruses. The #
choruses setting defaults to the # choruses present in the current song.
This button sets the Melodist back to its default settings.
Tempo / Auto Tempo
The Tempo Setting determines the Tempo of the song, and defaults to the current tempo of the previous song. If the
“Auto-Tempo” is checked, the tempo will be set at the tempo range stored within the Melodist.
A2 Transpose
In songs with an AABA form, it is common for the second “A” section to be transposed. For example, the first “A”
section might be in the key of Eb, and the second would be transposed up to the key of Gb. Some Melodists are set
to transpose the A2 sections, set the A2 transpose to none if you don’t want it transposed. If set to “section plus” it
will transpose the A2 section, and might also transpose 2 bars early or 2 bars late.
This area determines the key for the song. If set to “Any Key” the program will randomly
pick a key for the song, weighed more heavily toward the popular keys (C, F, etc.). “min.
key%” determines what % of songs are generated in minor keys vs. major keys.
If set to 20, then 20% of the songs would be generated in minor keys.
Select whether you want to generate the Whole Song or just part of it. If you select Part of
Song, you can specify which bar and chorus to start at, and how many bars to generate.
Tip: You can also set the “Song Key Combo” box to a specific key, or set it to use the current key of the previous song. If
you want to generate only part of a song, an easy way to set the range of bars is to highlight/select the bars by dragging the
mouse over the chord area prior to launching the Melodist dialog. Then the “Generate” form will be automatically set to
“Part of Song” and the range of bars will be set to the selected area.
Replace Thru form
If the form of the song is AABA, you'd normally want the regenerated section to be repeated throughout the form in
all of the “A” sections. This option will instruct the Melodist to copy the generated bars to the other “A” sections.
Tip: If you'd like to remove the current Intro, Melody, or Soloist Track, press the [Kill Intro], [Kill Melody] or [Kill Soloist] button.
Press the [Search] button and type in part of a Melodist name, memo, style name, or other text associated with a
Melodist. This will cause the Melodist selection to change to the next item containing the text. Similarly, you can
type in a # of a Melodist and press the [Go To #] button.
Chapter 8: Automatic Music Features
133
The Memo area displays a Memo for the current Melodist, as well as the name of the Database (e.g.
MELPOP1.ST2) that the Melodist is based on.
Instrument / Harmony / Style / Change Instruments
Melodists can store patch and harmony settings, and these are displayed in the Instrument area of the Melodist
selection screen. You can also set the instrument to change each chorus. You can override the settings of the
current Melodist and choose your own patch, harmony and change instrument settings.
The Melodist Juke Box
Press [Juke Songs Now] button to launch the Melodist Jukebox. It will
continuously generate new songs and play them in Jukebox fashion. Using the
“From…To” setting, you can set the range of Melodists to include in the Jukebox,
or keep the Jukebox on the same Melodist by deselecting “Change Melodists.”
Write to track
Usually, the Melodist is written to the Melody track. To write it to the Soloist track, perhaps as a counter-melody,
then set this setting to Soloist.
The Favorites button allows you to pick a Melodist that you've used recently.
If you'd like to create your own Melodists, or permanently change the settings of existing Melodists, press the
[Edit…] button to launch the Melodist Maker.
Automatic Intro – Song Intros
With a single button you can generate a 2, 4, or 8-bar intro for any song. The chords will be different each time, and
you can keep pressing until you get the progression that you want. The intro generated is an appropriate chord
progression in the chosen style of music (Jazz/Pop), with optional pedal bass, and leads correctly to the first chord of
the song. Intros can also be removed.
Press the [Intro] button or select Edit | Intro Bars to generate an intro.
Once you press the [Intro] button, the Intro Dialog is displayed.
Pressing this button will insert or replace an intro in the song, with the given
settings.
-
134
Chord Types - You can choose between Jazz and Pop styles of chords.
Chapter 8: Automatic Music Features
-
Intro Length (bars) - This sets the duration of the intro to 2, 4, or 8 bars.
Starting chord (after intro) is - This setting assures the generated intro smoothly transitions into the song.
Remove Intro - Pressing this button removes the intro.
Pedal Bass - Inserts a pedal bass figure throughout the intro.
Use Maj7 instead of Maj6 - Choose between using Maj7 or Maj6 chords.
Automatic Song Title Generation
The Song Title generator names every song that the Melodist writes, if the Auto-Titles checkbox is selected. This
feature can be used on its own to suggest titles for your own compositions. It will keep making titles until you get
one you like.
Press the [SONG TITLE] button to generate a song title , a new title will appear immediately in the title
area of the screen. Click again for another one. Select Edit | Undo Title to go back one title.
Customizing the song title generator
These word lists stored in a text file calledTITL1.TXT. This file has several sections, each with two sets of words
that will be put together. You can add new sections, with an adjective section and a noun section. Please see the
comments included in the file TITL1.TXT for details on adding text to the file.
Automatic Solo Generation – “The Soloist”
To select a pre-made Soloist, click on the [Soloist] button on the toolbar, or press Shift+F4, or
choose Soloist | Generate and Play a Solo. The “Select Soloist” window opens.
Chapter 8: Automatic Music Features
135
Pick a type of Soloist in the “Soloist type” list box and choose the appropriate style, or enable the “Auto” checkbox
and press the [Suggest] button next to it. This brings up a list of Soloists in that style; simply choose which one you
like.
If you can’t find the Soloist you’re looking for, try pressing the [Search] button to type in part of a
name to search for.
The [Fav] button finds your favorites by opening a list of the last 50 Soloists used.
Go To# box allows you to select from the list exactly which Soloist to choose (if known).
The pre-made Soloists may set the style, instrument, and harmony, but you can change these settings to your own
choices.
The [Clear] buttons will remove the currently selected Instrument, Harmony, or Style.
Use the [Choose(1)] button to select an instrument and automatically set the soloist note range
for that instrument.
Use the [Choose(2)] button to select any style from the \bb folder.
For a harmonized solo, choose a harmony from the
Harmony list.
Solo Mode
In Normal Solo Mode, Band-in-a-Box solos in the normal way of improvising
choruses of the song.
Several other options are provided for adding improvisation to your song in a variety
of ways, including Fills, Around Melody, Trade4s, Solo Wizard, and a user-defined
Custom setting.
Fills%
Fill instructs the Soloist to “noodle” on the song part of the time (% box).
Around Melody
To solo around the Melody, do the following:
- Open up a song that has a Melody, preferably a sparse Melody with some space in it that a Soloist might be
able to “jump in.”
- Press the [Soloist] button. Select the Solo Mode “Around Melody.”
- Set the Soloist to play in All Choruses, and uncheck the “Mute Melody in Middle” option.
- Press [OK] and the Solo will be generated, playing riffs at times when the Melody isn't playing.
Tip: For added effect, add a guitar chord solo to the Soloist part using the Chord Solo button in the Guitar window and
choosing Solo as the destination, or simply choose a Guitar Harmony like 32 J Pass.
Trading 4s
There is a type of soloing called “Trade4s”soloing. “Trading fours” refers to a solo lasting four bars, usually
followed by a different melodic solo or drum solo for the next four bars. Band-in-a-Box can generate the first four
or the second four bars.
136
Chapter 8: Automatic Music Features
Soloist Wizard
This option enables the “Soloist Wizard.” As you play notes on either a MIDI keyboard connected to the computer
or on the QWERTY keyboard, the program will play “correct” notes in the style of the current Soloist! This means
that you can play a “perfect” solo every time, simply by pressing any key on your MIDI keyboard or QWERTY
keys.
Tip: The Soloist will use the velocities you play or pick its own, depending on the setting in Opt | Preferences (2) | Use MIDI
velocity for Soloist Wizard.
Custom Solo Generation
The [Custom] button located on the Soloist Selection Dialog launches the Custom Solo Dialog. This allows you to
set the range for the solo:
Tip: You can have these values preset to the values you'd like by first selecting/highlighting the range of bars that you'd like
from the Chordsheet screen, then clicking on the Soloist button.
-
In real life, a Soloist tends play a couple of extra notes after the solo section ends. Setting “OK to solo for an
extra beat” allows the Band-in-a-Box soloist to behave in the same way.
If you want to overdub a solo and you have multiple solo tracks going at once, de-select “Overwrite existing
solo in range.”
Once you press the [Generate Solo Now] button, the portion of the solo that you have selected will be (re)generated.
The song will automatically start playing 2 bars before the new part, so you can quickly hear the new solo.
There are additional buttons and checkboxes to further define the Soloist.
Double Time? Checkbox
Set to “true” if you want a double-time solo; 16th notes instead of 8ths.
Solo Which Choruses?
Select which choruses you would like the Soloist to solo over. Choose from first, middle, last, any combination, or
all three choruses. Press the [All Solo] button to have the Soloist play over everything. Press the [Melody & Solo]
button to have the Melody play the first chorus, then have the Soloist come in on the second chorus, then have the
Melody “play the tune out” on the last chorus.
Auto-Suggest
If the “Auto-Suggest” checkbox in the Select Soloist Dialog is on, you will find that an appropriate soloist is already
selected for you. If you would like a different soloist, press the [Suggest] button and Band-in-a-Box will suggest
another appropriate choice.
Load/Save settings w/song
These settings allow the saving and loading of Soloist settings. Enable these checkboxes if you with to load and
save these settings with a song.
Chapter 8: Automatic Music Features
137
Force to # of Choruses
Allows you to set a song to a definable number of choruses (e.g. 5) so that there are enough choruses for everyone to
take a turn Soloing. This box allows you to quickly decide how many choruses you would like Band-in-a-Box to
generate without having to open the User | Force song to # choruses menu item. The default is 5.
The Soloist Maker [Edit] button launches the Soloist Editor module where you can make
your own or modify an existing Soloist. This feature allows you to define your own Soloists.
You can control how many notes per beat that the
Soloist will use. If you set a “Rock Guitar” Soloist to use nothing shorter than 16th notes it produces less 32nd note
“guitar hero” solos.
This button launches the More Soloist & Melodist Settings dialog.
138
Chapter 8: Automatic Music Features
This dialog can also be
accessed from the Opt. |
Preferences [Soloist] button.
Set “Use MIDI Volume for
Soloing Wizard” to true if
you want MIDI velocity
information sent to the
Soloing Wizard. If you have a
velocity sensitive MIDI
device attached to your
computer and you
want to control the dynamics of the Soloist, you should enable this feature.
Set the “Trigger Playback Early” to true to enable song playback to start before the Soloist has actually completed
composing a solo. Otherwise, Band-in-a-Box will completely compose a solo before song playback begins.
Soloist – Prefer Long Phrases
Set this checkbox to “True” (enabled) if you would like the Soloist to use the longest musical phrases it “knows.”
Soloist/Melody Velocity Adjust
This box allows you to quickly boost or reduce the volume of the Soloist part relative to the other instrument parts.
For a realistic mix the soloist instrument is set slightly louder than the other instruments/parts in a song. The default
is 5.
Automatic Guitar Solos – “The Guitarist”
The Guitarist allows you to generate a guitar chord solo for any melody. Band-in-a-Box will intelligently arrange
the melody to a guitar chord solo by inserting real guitar voicings throughout the piece. You can select from among
many “Guitarists” in order to create your arrangement. You can also define your own Guitarists; choosing
parameters such as strum speed, types of voicings
(Pop/Jazz), embellishments, and much more. Guitar Solos are selected from the Guitar window, which
opens with the Guitar button.
Press the [Ch Sol…] button to launch the Generate Guitar Chord Solo function, or use the Melody |
Generate Chord Solo menu item.
Chapter 8: Automatic Music Features
139
Here are the steps to generate a Guitar Chord Solo:
1.
Select the Guitarist to use.
In the main list at the left of the Window, you see the list of the
Guitarists that are already defined. For example, you can see
that Guitarist #2 is called “Jazz Guitar, single position.” That
will create chord solos that stick to a single position on the
guitar neck whenever possible.
2.
Select Melody (or Soloist) track.
Normally, the Guitar Chord solo is written to the Melody track.
But you can also select the Soloist track as the destination.
3.
Confirm the Guitar Patch selection.
The Guitarist that you pick will already have chosen the guitar
patch to use, but you can override it with this setting.
4.
Select the Range of the song to use.
You can either generate a chord solo for the whole song, or just a region of the song. In
either case, remember that you need to have an existing melody to work with.
5.
Select the Main Guitar Position to use.
The “Auto-Set” feature sets the main guitar position for the solo
based on the key signature. For example, in the key of C, Band-in-aBox will choose the 5th position as the best position for the chord solo
to be played. If you wanted the solo to be in the 12th position,
you could de-select the “Auto-Set” and then set the guitar position to 12th position.
140
Chapter 8: Automatic Music Features
If you already have a guitar track that has guitar channels (for
example if it was played on a guitar controller as a single string
guitar part), then you might want to tell Band-in-a-Box not to change the guitar positions of the notes that it finds.
Otherwise set “OK to change existing guitar channels” to true.
6.
Press OK to generate the Solo.
You'll then see a dialog box that tells
you the solo has added a solo to the
track, adding about how many notes
to the existing number of notes. The
playback will begin automatically,
and you'll see the guitar voicings on
the Guitar neck.
As you listen to the solo, you'll notice the following:
- Some of the notes are left as melody, and some are assigned to chords.
- A wide variety of guitar chords are used, including some advanced chords. All of them are popular chords
played by real guitarists – there are no theoretical chords.
- The chords are strummed, to simulate a real guitar player.
- The Track Type for the Melody has been set to Guitar – so the notation shows [Tab], and the MIDI file will be
saved with the Guitar Channels (11-16) preserved which preserves the fret positions.
- All of these items can be customized in the Guitarist Editor.
Technical Note: Since some of the guitarists can be assigned to strum the chords in a delayed fashion, if you repeatedly regenerate the solo, the melody will become more and more delayed. The solution(s) for this occurrence would be to choose Edit |
Undo Solo prior to regenerating the solo, or picking a Guitarist that doesn't delay the strum. The Strum Delay Status is indicated
on the “Info” panel of the Select Guitarist screen.
Once you have generated a guitar chord solo…
The chord solo is now part of the notation track. You can edit it like any other part, by deleting/inserting notes, etc.
You can use the special guitar features discussed in the Guitar Window section to change the guitar voicings or
replace a note with a chord and vice versa.
When you have a note or chord highlighted press the [Ch-] or [Ch+] Insert Guitar Chord button on the
guitar window (or 7 or 8 on the NUMPAD keypad). Each time you press the [Ch-] or [Ch+], you'll see that
the guitar chord changes to a different voicing, cycling through the available 5-10 voicings possible for
each chord
In a similar manner, you can convert a chord to a guitar note, and use the Insert Guitar Note button for this.
Pressing the [N+] (or 3 or 4 on the NUMPAD keypad) repeatedly cycles through playing the same note on
all 6 strings.
The solo will be saved with the song (.MGU) and exported to a MIDI file with the string positions intact because we
use channels 11 to 16 for the Guitar part. You can remove the solo at any time, even after the solo has been saved or
reloaded, by choosing Melody | Remove Harmony part menu item.
Guitarists can be customized using the Guitarist Maker.
Chapter 8: Automatic Music Features
141
Automatic Embellishments – “The Embellisher”
Overview
When musicians see a lead sheet that has a melody written out, they almost never play it exactly as written. They
change the timing to add syncopation, change durations to achieve staccato or legato playing, add grace notes, slurs,
extra notes, vibrato and other effects. You can have Band-in-a-Box do these automatically using the Embellisher so
that you hear a livelier, more realistic Melody - and it's different every time. The Embellisher is only active while
the music is playing; it doesn't permanently affect the Melody track. There is an option to make the Embellishment
permanent, so that if you like a certain embellishment you can add it to the Melody track.
The Melody Embellisher feature is turned on and off by the
Embellisher checkbox on the main screen. The Embellisher only functions during playback. You will see the
Embellished Melody on the notation as the Melody plays, so you can see the Embellished notes. When [Stop] is
pressed, the notation will revert to the original (unembellished) melody. Here is a “before and after” example that
shows a typical embellishment of a Melody.
Normal (unembellished) Melody…
Embellished Melody…
As you can see in the notation examples, the Embellished melody adds an anticipation in bar 9, and in bar 10 adds
extra notes, timing changes, and grace notes to “spice up” the melody.
If you disable the Embellisher, by de-selecting the Embellisher checkbox, the Melody will function
as normal with no changes.
Using The Embellisher
The Embellisher settings are accessed during playback with the Embellisher button in the main screen
toolbar, or with the menu item Melody | Embellish Melody Dialog, or with the key strokes Ctrl+Alt+L.
There is a Melody Embellisher dialog that allows you to:
- Customize the settings of the Embellisher, or choose Embellisher presets.
- Make a particular Embellishment permanent.
“Live Auto-embellish during every playback” is the same
142
Chapter 8: Automatic Music Features
setting that is on the main page checkbox. If enabled, embellishment will occur during every playback. If disabled,
embellishment will not occur unless you choose the [Embellish NOW] button in the dialog.
Embellisher Settings
The settings that affect the embellishment can be turned on and off, and given a certain percentage strength.
Humanize
The velocities, durations (legato), and timing of the notes are humanized. The original velocities etc. of the notes
are ignored. The option to only humanize the timing of the music if the timing was “stiff” to begin allows the
Embellisher to leave the timing of human input melodies alone, and humanize only the ones that were entered in
step-time.
The setting is “Only if melody is stiff,” and is the default setting. If
this is set, the Melody embellisher won’t change timing, durations and
velocities if the melody appears to be have been played by a human
(instead of entered “stiffly” by step entry). This is because it’s not
always desirable to humanize a melody that has already been played
by a human. Band-in-a-Box will auto-analyze the melody to determine if it was probably played by a human.
Octave
The octave of the Melody is changed to the best octave for the current Melody instrument. For example, if the
instrument were a piccolo, the octave would be raised to the best range for a piccolo.
Chapter 8: Automatic Music Features
143
Anticipations
An anticipated note is playing a note early (“ahead of the beat”).
Unembellished notes.
ANTICIPATIONS on beat 1 and 3.
Less Anticipations
This is the opposite of anticipations. This finds notes that are anticipated, and “embellishes” them by playing them
later (on the beat).
Grace Notes
The grace notes are brief notes played just before, and a semi-tone below the original note. The grace notes
intentionally don't show on the notation, so that it will remain easily readable. They can be heard.
Doubled Notes
Melody notes are doubled with the same pitch.
Unembellished.
Quarter note doubled.
Extra Notes
Extra notes are added between melody notes.
Unembellished.
With extra notes added.
Note Turns
With a note turn, a single note is replaced by a group of notes that include the original note and semitone or scale
tones above and below the note.
In this “before and after” example, the C note is replaced by a turn of 3 notes with a note a scale tone above the C.
Unembellished.
144
Embellished with turn.
Chapter 8: Automatic Music Features
Vibrato
Vibrato can be added according to the additional vibrato settings available in the “More” dialog. The vibrato can't
be seen on the Notation window, but you can examine the events in the Event list (Notation | Event List Editor).
If set, the Melody will be delayed a little, providing a “laid-back” feeling.
There are additional settings, in the Embellisher Additional Settings dialog box. This
allows you to set advanced settings for the Embellisher.
These include:
-
Vibrato Depth: This is the amplitude of the vibrato, and ranges from 0-127.
-
Vibrato Speed: This is the speed of the vibrato (slow-fast) range 0-127.
-
Only use Vibrato if Note is this many ticks: e.g. If set to 120 ticks (one quarter note), then only notes of
duration at least 120 ticks will get vibrato.
-
Start the Vibrato after this many ticks: For notes that will get vibrato, the vibrato will start after this many
ticks.
-
Adjust Octave Method: If the octave is to be adjusted, it will either only adjust it if the notes are outside the
playable range, or always adjust it to the best octave, according to the setting you make here.
-
Dynamic Range: Refers to the range of velocities used for the humanization. Useful range 30-50.
-
Legato Settings: Refers to the amount of legato for the notes. Useful range 55 to 75.
Embellisher Presets
The presets allow you to quickly choose a combination of
common settings for the Embellisher.
Chapter 8: Automatic Music Features
145
The Embellisher Memo describes the current embellishment,
with statistics counting the number of embellished notes.
If the song is playing and the embellisher is enabled, you can
update the embellishment by pressing this button.
This is useful if you've changed settings, and want to hear what the new embellishment sounds like.
Normally the embellishment occurs live when the song is
playing, and doesn't affect the Melody permanently.
But if you like the Embellishment, and want to apply it permanently to the Melody, you can choose the “Make
Current Embellishment Permanent” option.
If the song is not currently playing, you can still create an
embellishment and have it apply permanently by pressing the
[Embellish NOW – Permanent] button. The original Melody is not affected permanently unless you have pressed
the [Embellish NOW – permanent] button.
If you have done this, and want to restore the original Melody, you
can press the [Restore Original Melody] button.
The Embellisher is usually referred to as the Melody Embellisher,
because you'll usually want to have it affecting the Melody track. But if
you'd like, you can choose to Embellish the Soloist track.
-
146
Chapter 8: Automatic Music Features
Chapter 9: MIDI Recording
Band-in-a-Box has two built-in MIDI sequencer tracks. They are named the Melody and Soloist tracks, but they can
be used to record any MIDI part you like – such as drum overdubs or layered accompaniments. MIDI can be
recorded in Band-in-a-Box
- Live with a MIDI keyboard, MIDI guitar, or MIDI wind controller.
- In step time by entering notes in the Notation window with the mouse.
- Using the Wizard feature to “play” notes with your QWERTY keyboard.
- Importing a pre-recorded Standard MIDI File into the Melody or Soloist.
Recording Live In Real Time
You can punch In/Out, do unlimited overdubs, record directly to the tag or the ending, and start recording
from any bar. To record live using your MIDI keyboard, guitar, or wind controller click on the [Rec.]
button, or type the letter [R], or choose the menu option Melody | Record Melody. The Record Melody
dialog box will appear.
If you're sure that the settings are correct, just press “R” twice to immediately start Recording.
Tip: If you select the “Overdub underlying melody” option in the Record Melody dialog, you will hear the underlying melody
while recording.
Pressing this button will launch the MIDI Recording Filter. The Record Filter supports all MIDI
controllers and the sustain pedal.
You can record any type of MIDI information to the Melody or Soloist tracks, and use the Record Filter to select
what types to include. Choosing Opt. | Filter for recording will also launch the Record Filter dialog.
Press [Record] or the [R] key again to begin recording.
Stop recording by pressing the [Esc] key, or the spacebar, or by clicking the [Stop] button. The OK – Keep Take
dialog will open.
Chapter 9: MIDI Recording
147
Keep Take (yes/no) saves the take you just recorded. Remember that it’s easy to fix small glitches in the Editable
Notation window or in the Event List editor.
Take Again lets you quickly reject a take and start the recording again. Press the “A” key to do this with a
keystroke.
Cancel ends the recording session; nothing is saved. To start again press the [Rec.] button or the [R] key.
Copy 1st chorus to whole song
If you have recorded one chorus of the song, checking this at the end of the recording will copy the same recording
to all of the choruses.
Overdub Underlying melody
You have the option to merge the recording with the existing melody. If there is no underlying melody this option
will be grayed out.
Retain Melody past last recorded
You have the option to erase any melody after the last recorded melody note, or keep it. Use this feature when you
want to punch out at the end of a take.
Count-In and Metronome Options
To set these options, go to the Opt. | Preferences dialog and select the [Count-in/Met.] button.
Entering Notes Manually
You can enter melody notes directly to the track in the Notation window in either the Editable Notation Mode or the
Note roll Mode.
Enter the Editable Notation mode from the Standard Notation screen with a single mouse click on the [N]
button. In the Editable Notation mode you can enter, move, and edit notes and rests using standard mouse
techniques – point and click, drag and drop, and right click to open the Note Edit dialog box.
Once you have some melody entered, you can copy and paste chunks of it as
you would in a text document. To copy and paste notation, highlight an area of
notation by dragging the mouse over the region. Then select Edit | Copy.
Click on the place where you want to paste to (by clicking at the time line on
top of the notation window) and then choose Edit | Paste. You can specify a
precise paste location in the Paste Melody dialog.
148
Chapter 9: MIDI Recording
Recording with the Wizard Feature
This is a very helpful feature if you don’t have a MIDI keyboard but you want to record with a “live” feel. Use the
Wizard to record notes from the computer’s QWERTY keyboard for a track that’s more natural than step time.
Here’s how:
Enable the Wizard checkbox.
1.
2. Press [R] key to record.
3. As the song plays, play the melody on any keys on the bottom two rows of the QWERTY keyboard, in the
rhythm of the melody. The “wizard” notes won't be the correct melody of course, but don't worry about that as
you record. When you're finished, look in the Notation window. You’ll see the wrong notes in the right places
with the correct durations.
4. Drag the notes (with the left mouse button) to the correct place on the staff. You’ll hear the notes play as you
drag them, and the names will show in the note name box. For sharps, flats, and naturals, hold down the Shift
key, Ctrl key, or Alt key respectively.
Tip: If you have the Wizard “On” the spacebar won't stop playback. You need to press the Esc key to stop playback when
the Wizard is on. This is to prevent stopping the song if you mistakenly hit the spacebar while playing the Wizard.
Importing MIDI Files
Importing to the Melody or Soloist Tracks
Standard MIDI files can be read in to the Melody or Soloist tracks from MIDI files or from the Windows clipboard.
You can read in all of a MIDI file, or selected channels and a specific range of bars. Use one of the following two
commands:
1. Melody | Import MIDI File – to select a MIDI file from disk using the Windows Open File dialog.
2. Melody | Import MIDI File from Clipboard - when the MIDI data is already copied from another program to the
Windows clipboard. The clipboard option will be grayed out if there is no MIDI data in the clipboard.
Once chosen, the Import MIDI File - Options dialog box opens.
Chapter 9: MIDI Recording
149
Import Which Channel(s)?
You'll need to know which channel(s) of your MIDI file the melody is on. You then select these channels for Bandin-a-Box to read-in. If you select all of the channels, Band-in-a-Box will read in all of the channels and merge them
to the Melody track. You can import and play the complete file on the Melody track if the Track Type is set to Multi
(16) -Channel in the Melody menu.
# bars to offset from start of MIDI file
If you want to start reading from the beginning of the MIDI file, select 0 as the offset. If you want to start at bar 32,
for example, select an offset of 32 (bars).
How Many Bars to import?
Leave this setting at the default of 1000 to read-in the entire file (unless it’s longer than 1000 bars!), or set it to the
number of bars that want.
# blank bars to insert at beginning
This will insert blank bars into the Melody track. Remember that Band-in-a-Box normally has a 2 bar lead-in count.
If your MIDI file has no lead-in, then you'll need to set this to = 2 to compensate for the 2 bars of lead-in.
Include notes early by (120 PPQ)
If you’re reading in a MIDI file starting at bar 5, it would be annoying to have a note that was played 1 tick earlier
than bar 5 left out of the MIDI file that is read in. To include it, you can set this, and the note will be read in.
Include continuous controllers and pitch bend / Patch changes / Lyrics
If you don’t need these items you can save space by not importing them.
Merge with Existing Data on the track
You can choose to merge the imported data with your existing Melody track.
Import to the Melody with the MIDI Chord Wizard
You can open an entire MIDI file into Band-in-a-Box using the MIDI Chord Wizard. The chords will be autointerpreted by the Chord Wizard and the MIDI file will play and display on the Melody track. A “silent” style will
be loaded so you'll only hear the MIDI file. When the file is saved, the extension will be MGX, allowing you to
easily identify the songs that contain entire MIDI files.
The MIDI Chord Wizard is opened from the File | Import Chords from MIDI File menu item. In the Interpret
Chords from MIDI file dialog, select the “Open ENTIRE MIDI File to Melody” radio button, and then click on
[INTERPRET CHORDS NOW].
The chords will be interpreted and written to the Band-in-a-Box chordsheet and an “X” will appear in front of the
style name, indicating that the style is silent.
Press [Play] to hear the MIDI file play on the Melody track.
Additional Options for Melody/Soloist Track
Choose Melody | Edit Melody Track | Time Shift Melody. This will move (slide) the melody a certain # ticks. There
are 120 ticks per quarter note. For example, to give the song a more laid-back feel, shift the melody about 10 ticks
ahead.
In the same submenu, choose Insert Beats or Melody | Delete Beats to insert or delete beats in the Melody. For
example, to insert 2 bars in the melody at bar 5, choose Melody | Insert Beats, select bar 5, and select 8 beats (2
bars) to insert.
Intelligent Humanize of Melody and Soloist Track
Quantize routines can leave the music sounding stiff and unmusical. Some routines attempt to humanize a part by
adding “randomization,“ which rarely has the desired effect since humans don't randomly change timing or volume.
Band-in-a-Box uses intelligent humanization routines to humanize a melody from one feel to another, from one
tempo to another, and vary the amount of swing to 8th notes. The results are very musical, with natural sounding
melodies.
Let's look at some of the parameters found under Humanize.
In this example, Melody | Edit Melody Track | Humanize Melody was selected. The window for Humanize Soloist is
the same.
150
Chapter 9: MIDI Recording
As you can see, we have broken down the Humanize effect into 5 main categories: tempo, lateness, 8th note spacing,
legato, and feel.
The best way to learn how these parameters combine is to try them (you can always press the UNDO button if you
don't like the results.) Press the [Quantize NOW] button to apply your changes to your song.
Editing the Melody Track
Event List Editor
You can edit events including all MIDI events and lyric events using the Event List Editor. It can be launched in
several ways. In the Melody menu, choose Edit Melody Track | Step Edit Melody.
In the Soloist menu, choose Edit Soloist Track | Step Edit Soloist Part.
In the Notation menu, choose Event List Editor…
or in the Notation window by pressing the event list button (#).
Different colors are used for different event types in the event list, to visually distinguish notes, patch changes, etc.
The Event list for the notation colors the events differently as follows:
- Notes starting near the beat boundary are dark pink.
- Notes starting on the off-beat are light pink.
- Patch changes are cyan.
- Controller changes are yellow.
- Pitch Bends are grey.
Chapter 9: MIDI Recording
151
The Event List Editor allows you to modify, insert, and delete notes:
- Double-click on an event to edit it (or press the [Edit] button.)
- [Insert] puts an event before the current event.
- [Append] puts an event at the end of the track.
- [Delete] removes an event.
- [Update] redraws the notation screen.
- [Edit Lyrics] – [Edit Soloist] – [Edit Melody] selects which track to edit.
The Event Type to Edit dialog opens when either the
[Insert] or [Append] buttons are pressed in the Event
List Editor.
This dialog allows you to select which type of event to
insert or append - note, controller, pitch bend, etc. –
and then opens the selected edit dialog.
152
Chapter 9: MIDI Recording
Notation Window Editing
You can use the Notation Window to edit notes instead of the Event List window. To do this, open either Editable
Notation or Note Roll Notation mode.
In both of these modes,
notes can be dragged and
dropped with the mouse.
For precise note editing,
right mouse click on the
note you want to edit.
This opens the Note
dialog where all of the
parameters of the note
can be addressed.
Piano Roll Window Editing
The Piano Roll window enables precise graphic editing of note timing and duration. You can also graphically edit
note velocity, controllers, program changes, channel aftertouch, or pitch bend.
The Piano Roll may be opened as a movable window, which floats above the Band-in-a-Box main window, or
opened embedded in the same position as the Chordsheet/Notation panels in the Band-in-a-Box main window.
Chapter 9: MIDI Recording
153
Chapter 10: Audio Recording and Rendering
There are two types of audio features in Band-in-a-Box:
1. The first refers to the Audio track. This is a single 44K mono or stereo track that you can use to record
vocals or live instruments.
2. The second refers to rendering which is the process of converting a MIDI performance in Band-in-a-Box to
a stereo .WAV file.
The audio track includes only your live recording, whereas the rendered .WAV file includes the entire performance;
MIDI parts plus the audio track.
Audio Track
Try the following with the Audio Track in Band-in-a-Box:
1.
2.
3.
Press this button and add an audio track to an existing Band-in-a-Box song. Add live vocals,
guitar, sax, etc.
Process an audio track using audio plug-ins - such as reverb, chorus etc. (choose from over 20
plug-ins included).
Export the audio (and MIDI) track to sequencers such as PowerTracks Pro Audio, Cubase, or
Cakewalk for further work.
Import WAV file to Audio Track
A Mono or Stereo WAV file can be imported to the Audio track, optionally merging or replacing any existing audio
track.
Choose the menu item Audio | Import WAV File. You then choose a WAV file to import. The Import WAV dialog
is then displayed, which allows selection of the point to insert the WAV file, and whether to merge or overwrite
existing audio in the range.
Record Audio
Before you begin recording, you'll need to:
Set the Recording Properties
This tells your sound card (and Band-in-a-Box) what sources you would record from. You may be recording from a
microphone or a line-in plug into your sound card. If so, you need to have those items selected in the recording
properties panel for your sound card.
Most sound cards are capable of recording from the following sources:
- Microphone – plugged in to the sound card to record vocals or live instruments.
- Line-In – from the Line-Out of a mixer or keyboard, or a guitar direct box.
- CD-ROM player – to record the audio from an audio CD.
- Outgoing MIDI - not used when recording audio tracks, but is used if “rendering” the whole Band-in-a-Box
song to audio.
154
Chapter 10: Audio Recording and Rendering
Technical Note: This is only true if you are using the sound card for your output MIDI driver. If you have an external MIDI
device like the Roland Sound Canvas you'd need to route the Line Out from your Sound Canvas back in to the Line-In of
your sound card in order to record (render) the MIDI.
When you press the Recording Properties button, you'll see the Recording control panel of your sound
card's mixer.
The panel displayed here is the typical panel that sound cards use. Different makes and models may not look
exactly like the example, but the basic layout and operation is the same. From this panel, you can set the recording
level for the items you want to record. Let’s take the example of recording live with a microphone.
- We select the check box to record the microphone.
- Then, we set the level of the recording input for the microphone with the aid of the built-in VU meters in Bandin-a-Box.
Audio VU meters
These show the Record and Playback levels for audio, allowing adjustment of microphone and speaker levels.
VU Meters can be launched by pressing the VU Meters button on the toolbar.
The VU Meters will also open automatically when the Record Audio dialog is opened.
The VU Meters will close or stay open when the dialog is exited depending on
the “Leave VU Meters open” setting in the Record Audio dialog.
Chapter 10: Audio Recording and Rendering
155
The VU meters show the average strength of the signal, with a dB scale,
and a clip indicator. “Clipping” indicates that the signal has overloaded,
and will sound distorted (“clipped”).
The green area represents normal levels, while red indicates an overload.
Ideally, the sounds should remain in the green and avoid the red
altogether. Unlike analog recording, where it's good to get a “hot” high
signal, digital recordings need to absolutely avoid high levels since any
overload of the signal will result in clipping and a ruined recording.
Press the [R.Aud] button to start recording audio. The Record Audio
dialog will open. This dialog displays the mono/stereo status of the
recording. If you want to change to/from stereo (to/from mono), press
the [Audio Options] button in this dialog. The mono/stereo track status
is also indicated on the Title bar at the top of the screen.
156
Chapter 10: Audio Recording and Rendering
Set the start point for the recording.
You can record from the Start of the song, or somewhere in the middle, by choosing a bar and chorus # to start
recording.
Also Record MIDI?
In most cases you will only be recording audio, so you should set this to “No MIDI recording.” But if you want to
record MIDI at the same time (in a situation where you were playing a MIDI piano at the same time as you are
singing for example), then you could set this setting to “Also Record MIDI to Melody” (assuming that you wanted
the MIDI to get recorded to the Melody track - use the Soloist setting if you want it recorded to the Soloist track).
If you have previously recorded audio on the track, and want to overdub (to add a harmony for example), then you
should select the Overdub underlying Audio. It is not essential to select it at this point, since you'll get another
chance at the end of the recording. Note that the audio track will not play during record, so you'd have to sing the
harmony without hearing the original audio part.
Press [Record].
Audio recording begins. If you've set the “Show VU Meter while recording” option, then the Recording VU Meter
will open up and display during recording so you can monitor the VU meters.
Press [Stop] or press the [Esc] key.
You will then see the “Keep Take?”
dialog.
If you are happy with your recording,
you should choose [OK -Keep Take] and
the audio will be added to the Audio
track.
You can listen to the results by pressing
[Play].
If you are then not happy with the results, you can choose Edit | Undo Keep Audio Take and you will be back to
where you were prior to the recording. You can also choose the option to [Take Again], which reopens the
Recording dialog.
Technical Details: The recorded take is recorded to a temporary wave file called TEMP_REC.WAV. This resides in the
\bb directory or the directory of the current song. Once you decide to keep the take, the TEMP_REC.WAV is merged with
the main wave file for the program, which is usually titled with the same name as the song (e.g. MySong.wav).
If you've recorded only 1 chorus of the song, you can choose the option to
copy that first chorus of audio to the whole song.
This will fill up the whole song with the audio by repeating it as many times as necessary. Then you'd just need to
record the ending of the song.
At the end of recording, you receive an option to overdub with the underlying
audio.
This means that both recordings will be merged together to form a new file, with both recordings preserved.
There is also an option to “Retain audio past last recorded.” This allows you to “punch out” and preserve the rest of
a previously recorded take.
Chapter 10: Audio Recording and Rendering
157
Playing the Audio File
You can play the Audio file that you've recorded by pressing [PLAY]. The size of the audio file will be displayed at
the top of the screen. If you haven't saved the song yet, your window title will look like this.
In this example, the song is titled NoName.SGU, and there is a 6.1mb .WAV file associated with the file, and that's
1 minute and 9 seconds of audio. The total duration of the song is 3 minutes and 20 seconds. Save the song with
the name “My First Song.” Then the window title will look like this…
Once the song is saved, the wave file will be called with the same name as the song, which is MY FIRST
SONG.WAV. If you ever need to work with the .WAV file in another program, you can just directly edit the wave
file. If you do this, make sure the .WAV stays a 44K mono .WAV file.
Edit the Audio File
In the Audio Edit window you can edit audio data using Copy, Cut, and Paste. Launch the Audio Edit window by
the Audio | Audio Edit Window menu item or pressing the Ctrl+Shift+A keys.
You can see the dB (decibel) scale at the left of the Audio Edit window.
To select a region of the Audio Edit window, you can Shift+click on the end point to easily select a large area.
- Click on the starting bar.
- Shift-click on the ending bar.
Audio Edit Window Toolbar
These buttons zoom in and out to the audio window.
The 100% button sets the Audio Window to display about 8 bars per screen.
This button zooms to the sample level so that you can see the actual sine waves present. The
[100%] button restores the wave view.
This setting allows you to select audio by snapping to a 16th note (or a triplet in swing styles).
158
Chapter 10: Audio Recording and Rendering
This button plays the selected area, and then stops. The other instruments are all muted;
you just hear the audio.
This button selects the whole track, useful for applying one of the built-in audio plug-ins.
Non-Destructive Audio Track Editing
The changes you make to the audio track are non-destructive and only become permanent if you save the file.
If you have a song file called MySong.MGU, the audio track is stored in a MySong.WAV file. If you are editing the
audio, the edits are now made to a temporary WAV file called TEMPMAIN.WAV, and not to MySong.WAV. If
you save the song, the changes get written to the MySong.WAV audio file, but if you don’t save, the original file is
preserved.
TC-Helicon Audio Harmonies
You can apply a harmony to the audio part – allowing you to automatically create up to 4-part vocal harmonies from
your singing. And don’t worry if your singing is not in perfect tune, Band-in-a-Box can “fix” vocals to the correct
pitch - automatically! Simply record your vocal part, choose a harmony, and Band-in-a-Box will generate the vocal
harmony part for you using the world-leading TC-Helicon Vocal Technologies engine.
Once you have recorded a vocal part into Band-in-a-Box, you can use this feature in many ways, including:
- Record yourself singing into a Band-in-a-Box file. Create a vocal harmony for part or all of the song by
selecting a Band-in-a-Box harmony and choosing the Generate Audio Harmony option. You can now hear
yourself singing in perfect harmony!
- Did you hit a few “out-of-tune” notes when you recorded your singing to Band-in-a-Box? Fixing your “out-oftune” singing is easy, by instructing the program to correct the pitches to the Melody track.
Audio Harmonies Tutorial
Note: All of the demo songs are located in the Tutorial - Audio Harmonies folder in the Band-in-a-Box (C:\bb) folder.
Let’s load in the song “Listen.MGU.”
First off, play the song “Listen” – it has an audio track, so you’ll be hearing a male vocal track lasting about 16 bars
(since WAV files are big, we only include a small 16 bar sample of the WAV file).
We’re going to apply some audio harmony to this “Listen” demo.
Since any edits we save to the audio WAV file are permanent, we want to make sure that we keep a copy of the
original file around that is unaltered.
Save a copy of the song as “Listen 4 Part Harmony.”
Press the [Save As] button, and choose a name of “Listen 4 part harmony.” We will now be working
with this file, so our original Listen file won’t be affected.
Choose menu item Harmony | Audio Harmonies & Pitch Tracking. You’ll see the Generate Audio Harmonies
dialog.
Chapter 10: Audio Recording and Rendering
159
In this dialog, there are 3 types of harmony that we can choose from:
1. Melody Pitch Tracking only (this would change the pitch of our singing to the correct pitches found on the
MIDI Melody track).
2. Harmonize to the MIDI Melody. This applies a 1-4 part audio harmony – turning your singing track into a
harmony singing quartet.
3. Harmonize to the chords of the song. If your song doesn’t have a MIDI melody, you can still create a vocal
harmony, based only on the chords of the song.
Let’s harmonize to the MIDI melody, so choose the radio button with that title.
Then select Harmony type “131 Four Freshmen 4 part
Vocal Harmony.”
This is a 4 part harmony that includes the melody, and one of the voices is above the melody.
Since we want to harmonize the entire song, choose “Whole Song.” The output can be mono or
stereo. Since we’re making a 4-part harmony, and we want to hear the voices panned across
our stereo speakers, we choose STEREO here.
We want Band-in-a-Box to play our files directly, and since Band-in-aBox plays only one WAV file at a time, we won’t be exporting the 4
voices as separate WAV files, and we don’t select the “Output (Export) as separate WAV file” option.
Press OK, and this launches the TC-Helicon Vocal Harmony dialog, which lets you control the
sound of your harmonies.
Let’s examine the various sliders on this dialog, as they apply to our “Listen 4 part Harmony” File.
The “Dry Voice Level” slider is the level of our original voice. We can make the harmony to include more of our
original voice by raising this slider. Set it half way up (to 12dB).
160
Chapter 10: Audio Recording and Rendering
The 4 columns labeled Melody, Voice 2, Voice 3, and Voice 4- 8va are the 4 part MIDI harmony that will be
transformed to an audio harmony using our original voice. The “8va” tells you that Voice 4 will be above the
melody.
Each of the voices have sliders for “Level” (loudness) and “Gender.” The “Gender” slider makes the voice sound
like a male or female (raise the slider to make it more female). Higher pitches of harmony should have a female
gender applied. Make the settings as in the picture above.
The Octave is an important setting that controls the overall octave of ALL the generated harmonies. If the harmony
generated is too high, lower the octave setting here.
Try out the preview with the octave on 0, and then again on –1, you’ll hear all of the voices an octave lower on the –
1 setting. Leave it at 0 for this demo.
There are 3 Humanization settings (timing, pitch, and portamento) that affect the sounds of the individual voices.
Timing controls how “tight” the group sounds, with a setting of zero being perfectly synced start/stop times. Let’s
set it to about 20, to give some natural looseness to the group.
Pitch controls how steady the pitch will be. If set to zero the pitch will be exactly the MIDI pitch, if set higher, the
pitch will vary up/down with the original WAV file.
Portamento controls how fast the pitch will change from one pitch to another. Settings above zero give smooth
transition from one pitch to another.
Pitch Styles
When you generate audio harmonies to your recorded vocal tracks, you can select Pitch Styles to add vibrato and
scooping effects to the vocal harmonies. There is a drop down combo list at the bottom of each voice. You can
choose a type of “pitch effect” (combination of vibrato and scooping) called a Pitch Style to be applied to each
harmony voice.
In the example screenshot, we have chosen “Crooner,” “Lite Jazz,” “Lounge,” and “Head Voice” – somewhat
similar vibrato types, but different for each harmony voice.
The Pitch Styles are especially useful for harmonies generated from MIDI tracks, because these lack any vibrato.
Now by applying these pitch effects, you can get a natural sounding vibrato for these harmonies.
Now let’s preview our harmonies! Press the [PREVIEW] button, and after a 5-10 second delay, you’ll
hear a 10 second sample of the harmony. Once you hear it, you can tweak the settings, for example:
-
make the original voice louder by increasing the Dry Voice Level slider.
to make the individual harmony voices louder, increase their sliders.
to change the stereo separation, change the Pan sliders
to make the group more “loose” sounding, increase the Timing slider
to make the pitches and pitch-transitions more human, increase the Pitch and Portamento sliders
change the whole Octave of all of the harmonies with the octave slider.
If you’d like to get more help on-line about the settings, inside the dialog press the Help button and then
click anywhere in the dialog.
This launches the Band-in-a-Box help file with more information.
When you are happy with the settings, press the [GENERATE] button. This generates a harmony for the complete
song (takes about 20 seconds for “Listen” depending on your CPU speed).
The dialog then exits, and your song is ready to play in Band-in-a-Box.
Band-in-a-Box gives you a confirmation message that the audio harmony has been created.
Tip: When playing back the harmonies, mute the MIDI melody (right click on Melody part at the top of the screen or Alt+9).
If you want to hear what the harmonies should sound like – we have included a completed version of “Listen 4 part
harmony.MP3” and this is included on the “c:\bb\Tutorial - Audio Harmonies” folder.
Chapter 10: Audio Recording and Rendering
161
Melody Pitch Tracking
Now let’s use the Audio Harmonies for a different purpose, to “fix” pitches that may be out of tune, or to change
some pitches to more interesting notes.
For this, reload the song Listen.MGU. Now resave it by [Save As] and give it the name “Listen Pitch
Tracking.MGU.” Now, we’re going to change some notes of the MIDI melody. Open the notation, and
change the pitch of the D note at the end of bar 2 to an E. Also change the ‘B’ at bar 7 to a ‘G’ below it.
At bar 10, change the ‘E’ note to a C#.
Now, choose Harmonies – Audio Harmonies, and select “Melody
Pitch Tracking” and press OK to again launch the TC-Helicon
Harmony Dialog. Now, we’re going to be changing the vocal track
into a different vocal track that instead is matching the pitches of the
MIDI melody (without any harmony).
So the dialog reflects this, by only showing one of the columns with a track name, and it is “Melody (BB).”
For this one, we should leave the original voice at ZERO (so we don’t hear any of it), and put some humanization
settings as shown.
Now try the [PREVIEW] button. You’ll hear that the harmony is ONE OCTAVE TOO HIGH. This is because the
MIDI melody is one octave higher than the vocal track (males sing in the bass clef!). No problem, just adjust the
Octave setting to –1, and try the preview again.
You’ll hear what sounds like the original voice, except you’ll notice that the pitch is fixed to perfectly in tune, and
some of the notes are changed in pitches (the ones we changed above, for example the E note on end of bar 2). Now
press [GENERATE] to hear this whole song.
If you want to hear what the pitch tracking final file should sound like – we have included a completed version of
“Listen Pitch Tracking.MP3” in the “c:\bb\Tutorial - Audio Harmonies” folder. (Play this file from Explorer by
double clicking on it.) Your tutorial example should sound very close to this.
Chordal Harmony
For the last example on “Listen,” we’ll do an example of the “Chordal Harmony.” This is a 4 part harmony based
only on the chords, when we don’t have a MIDI melody available.
Load in Listen.MGU. Save the file as “Listen – Chordal Harmony.MGU.” Now erase the Melody (just to convince
yourself that the Melody is not going to be used). Melody-Edit-Kill Entire Melody. Now choose Harmony-Audio
Harmonies to open the dialog, and then choose Chordal Harmonies.
You’ll see that the only harmony type available will be the Chordal Harmony, because there is no Melody available.
You can choose many different harmony variations, such as Four Above, or Three above etc. Let’s choose Four
Above. This will give us 4 harmony voices above our original melody. We want to include the original vocal track
as well, so we will mix the “dry voice level” up into the mix. Make the settings as shown in this dialog, and press
[PREVIEW], and then [GENERATE].
Playback this demo song, and also play the included “Listen Chordal Harmony.MP3” file – your file should sound
similar.
Audio Harmonies Pitch Styles (automatic “Vibrato” and “Scooping”)
When you generate audio harmonies to your recorded vocal tracks, you can select Pitch Styles, which adds vibrato
and scooping effects to the vocal harmonies. Choose from many vibrato/pitch presets, including “Ballad,”
“Broadway,” “Pop Diva” and more!
When you launch the TC-Helicon Audio Harmony dialog, you can see that there is a new drop down combo list at
the bottom of each voice. You can choose a type of “pitch effect” (combination of vibrato and scooping) called a
Pitch Style to be applied to each harmony voice. In the example screenshot, we have chosen “Natural Vibrato,”
“Ballad,” “Broadway,” and “Crooner” – different vibrato types for each harmony voice.
162
Chapter 10: Audio Recording and Rendering
The Pitch Styles are especially useful for harmonies generated from MIDI tracks, because these lack any vibrato.
Now by applying these pitch effects, you can get a natural sounding vibrato for these harmonies.
Pitch Styles Preset Details (one per voice)
Each of the four voice banks has a Pitch Styles preset selection list. This control allows pitch scooping and vibrato
effects to be added to the harmony voices. These effects can be used to increase the naturalness of vocals processed
by melody pitch tracking, produce a more polished, professional sound in the harmonies, and even to create strange
special effects. (Have you ever harmonized with a flock of sheep?)
The following table provides a list of the presets, as well as descriptions to help you decide when to use them.
Style Name
Description
1 B Natural Vibrato
This is a very subtle vibrato along with pitch effect that causes the harmony voice
to slightly scoop up into some notes, making it seem more distinct from the lead
voice.
2 Ballad Rock Vibrato
A Rock vibrato typically used in slower pieces.
3 Broadway Vibrato
The classic vibrato of the New York Show-Tune sound.
4 Classic Rock Vibrato
Classic Rock - A rich and potent sound.
5 Crooner Vibrato
The classic sound of the Las Vegas entertainers.
6 Deep Jazz Vibrato
Reminiscent of the great Jazz singers of the 1950s.
7 Discreet Vibrato
A very light vibrato.
8 Folk Vibrato
A warm and pleasant vibrato.
Chapter 10: Audio Recording and Rendering
163
9 Funk Vibrato
An energetic sound from the 70s.
10 Head Voice Vibrato
A very resonant vibrato, using pitch and amplitude modulation.
11 Hi Energy Vibrato
A fast vibrato.
12 Lite Jazz Vibrato
A lighter Jazz sound.
13 Lounge Vibrato
The bold and big sound of the lounge entertainer.
14 Mellow Folk Vibrato
A sweet, mellow sound.
15 Mellow Pop Vibrato
Light accents to a Pop vocal.
16 Nervous Tremolo Vibrato
A very fast, “nervous,” and choppy vibrato.
17 Opera Tenor Vibrato
The sound of a Classical Tenor singer.
18 Tenor Delayed Vibrato
A Classical tenor sound with a delayed onset. Better for slow songs.
19 Pop Diva Vibrato
The sound heard on many hit Pop recordings.
20 Pop Diva XT Vibrato
A thicker and fuller Pop Diva vibrato, with a faster onset time.
21 R&B Vibrato
Vibrato from another Pop music culture - Rhythm and Blues.
22 Slow Ballad Vibrato
A style typical of slow Pop ballads of the 1970s. Use this on slow songs only
because the vibrato isn’t triggered on short notes.
23 Slow Gospel Vibrato
The big sound of the southern US Gospel singer.
24 Smooth Pop Vibrato
A smoother Pop vibrato.
25 Soprano Vibrato
The vibrato sound of a Classical soprano.
26 Tremolo Vibrato
No pitch modulation, just amplitude modulation.
27 Warm Vibe Vibrato
A warm and quick vibrato sound.
28 Memphis Scoop Vibrato
A style typical in ballads of a certain singer from Memphis. Long scoops into some
notes, and a strong, slow vibrato.
29 Changing Scoop Vibrato
A style typical of a certain tambourine man. This one works best on slow songs if
you just speak the lyrics without singing them!
30 Country Scoop Vibrato
A style that mimics that Country “flip” sound on note onsets.
31 Jungle Vibrato
Special Effect. The sound of the jungle-man.
32 Landing Vibrato
Special Effect. The sound of a close encounter with a spaceship landing.
33 Motorbike Vibrato
Special Effect. A motorcycle-like sound.
34 Nervous Vibrato
Special Effect. An agitated, uneasy sound.
35 Sheep Vibrato
Special Effect. The likeness of sheep bleating in the field.
36 Siren Vibrato
Special Effect. The sound of a North American emergency vehicle.
37 Slicer Vibrato
Special Effect. A choppy alternative to a standard vibrato.
38 UFO Vibrato
Special Effect. The sound of your science-fiction imagination
Applying Audio Plug-Ins
When you've recorded audio, you'd likely want to apply some type of effect to the audio recorded. The usual one is
reverb. Choose the audio plug-in that you want from the Audio | Plugin menu. For reverb, choose the Reverb
option. You'll then see a plug-in with its own settings, specific to the type of plug-in.
Inside the plug-in, you can preview the plug-in effect, and if you like it you can then proceed with processing the
entire .WAV file. You can undo the affects of any plug-in by choosing Edit | Undo.
Direct-X Plug-ins
You can apply your favorite DirectX plug-in to the digital audio track.
164
Chapter 10: Audio Recording and Rendering
To process a WAV
track with a DirectX
plug-in, choose
Audio | Plugin |
DirectX Audio
plugins.
Apply DirectX
Audio Plug-ins (or
more precisely,
“Audio Transform
Filters”) to a track.
Important! This feature requires that you have Microsoft DirectX installed. You can download the latest version of
Microsoft DirectX from www.microsoft.com.
Reading the Audio and MIDI tracks into other programs
If you have a Band-in-a-Box song that has an audio track as well, and want to export that song to a sequencer like
PowerTracks Pro Audio, follow these steps:
For a song called MYSONG.MGU, the associated .WAV file (audio track) will be called MYSONG.WAV.
You should make a MIDI file (by pressing the .MID button). Save the .MID in the same folder as the song.
Then your sequencer can read the entire file by doing the following inside your sequencer:
Open the MIDI file.
Import the .WAV file track into the sequence.
Tip: PowerTracks Pro Audio recognizes that this is a Band-in-a-Box file with a wave file associated with it, and will offer to
read them both in. In earlier versions of PowerTracks Pro and other sequencers you'll need to follow the steps above.
Rendering Audio Files
Direct-to-Disk Audio Rendering
Audio rendering means converting a song to audio format, usually to a WAV file. You can render directly to disk,
choose the “Save As WAV” (Audio Conversion) option, and your Band-in-a-Box file will save to disk in WAV
format in a matter of seconds!
Chapter 10: Audio Recording and Rendering
165
The file is saved using the high quality Sound Canvas sound set powered by
the included Roland VSC3. To use Direct-to-Disk Rendering, make sure that
you have installed the Roland VSC3. If you have installed the Roland VSC3,
you'll see it listed as one of the output drivers when you choose Opt. | MIDI
driver setup.
You don't have to select the Roland VSC3 to use the Direct-to-Disk Rendering; you just need to have
installed the driver at some time. Then press the [.WAV] button on the main Band-in-a-Box screen to
launch the Render to Audio File dialog.
You can specify a number of seconds of silence at the beginning of the
file and specify a number of seconds to wait at the end to accommodate
the decay of the final sound.
166
Chapter 10: Audio Recording and Rendering
You can elect to include the 2 bar lead-in for the WAV file, and include
the Drum Count in sound.
Press the [Direct Render (Save WAV) w/Roland VSC3] button. This launches the Roland VSC3 Virtual Sound
Canvas. You'll see the two panes of the Roland VSC3. If you only see one of the panes, then you need to open up
the “Player” section by pressing the [Player] button. Then you'll see the “Player” section, which has
the MIDI file already prepared and ready to convert to a WAV file.
Press the [AUDIO-CONV] button, and then choose the location and name for the WAV file to save. We
suggest that you name the files with the suffix _VSC3, so that if your song is called “Violet Song” then you
could name it Violet Song_VSC3.WAV, but of course you can call it anything you want.
The WAV file will then be saved as a 44K stereo wave file in a matter of seconds. You can choose a different
conversion rate by pressing the Setup – Audio Conversion Rate.
Once you've saved the WAV file, you can then convert the file to a .WMA file
(Windows Media File), by pressing the [Convert any WAV to WMA…]
button. You can then select compression rates so that your file could stream on typical dial-up web modem speed.
You could then convert your song to an audio recording by pressing the
[Burn to Audio CD…] button.
Real Time Audio Rendering
The process of converting a MIDI file performance in Band-in-a-Box into an audio wave file is referred to as
“rendering.” It involves recording the real time MIDI performance as a stereo .WAV file.
Pressing this button or choosing the menu item Audio | Render
MIDI to Stereo .WAV file etc… enables you to render a MIDI
file into an audio .WAV file. Use this feature if you do not want to direct render with the Roland VSC3, for instance
you might want to record the audio output of your synthesizer or sound module.
The process differs from usual audio recording, in that you aren't recording from an input source of a Microphone or
Line-In, but instead are recording the OUTPUT of the MIDI as it goes out your sound card to your speakers.
Note: If you use an external MIDI module as your driver, then you would be recording from the Line Out of the external module
to the Line-In of the sound card.
These selections are done from the Recording panel of your Windows sound card mixer. This is launched
from the Rendering dialog.
If you use your sound card as your MIDI driver …
It is essential that when you render the file, you have selected the correct inputs, and are recording the outgoing
MIDI, and not recording the Mic or Line-In.
If you use an external MIDI module as your MIDI Driver …
You should connect a cable from the audio Line Out of the MIDI module (like Sound Canvas) to the Line-In on the
sound card, and then deselect the recording of the rest of the inputs (Audio CD, Microphone, MIDI, Wave, etc.).
Chapter 10: Audio Recording and Rendering
167
Rendering is a 3 step process:
It's quickest to do this with a small sample of the wave file. Once you have the volume mixed properly, you can
record (render) the whole file. This process takes as long as the song takes to play in real time, typically 3-4
minutes.
1. Set Recording Properties
Set the inputs to record your outgoing MIDI. This would be MIDI if you use a sound card for MIDI, and
Line-In for an external module.
2. Render the song
Press the [(Re)-Render to WAV File…] button and wait as the song is recorded (rendered) in real time.
When you press the render button, a dialog will pop up indicating that the rendering is proceeding. You can STOP
this at any time, and if you stop it early, you'll be able to listen to the portion of the file rendered.
When rendering is finished, the name and size of the saved file will be displayed at the top of the Render to Audio
File dialog.
3. Test the file.
You can then use the [Test WAV] button to test the WAV file. For testing, Band-in-a-Box uses Windows
Media Player (MPLAYER.EXE) to play the wave file, compressing the WAV file using the Windows Audio
Compression Manager (ACM Drivers).
Saving in other audio formats
When you choose this option, Band-in-a-Box will
launch the Windows Audio Compression Manager.
168
Chapter 10: Audio Recording and Rendering
From this dialog, you can choose the type of
compression that is appropriate (from the
available installed codecs). You can save your
settings as named presets by using the [Save As]
button.
Saving as Windows Media File
Band-in-a-Box has enhanced audio support for saving in Windows Media Player format. Once you've saved a
WAV file, you can compress the file for Internet use, using the Windows Media Player audio format (.WMA).
Press the [Save in Windows Media format (WMA)…] button to save your Band-in-a-Box song as a Windows Media
Audio file.
Using the Audio Rendered Stereo .WAV file with other programs.
In our example we rendered a stereo 44K wave file called _MY FIRST SONG.WAV. To read this file directly into
other programs such as Windows Media Player or Real Audio Player Plus you would choose File | Open. Most
audio programs have a similar ability to read a 44.1K stereo .WAV file.
Burn your own Audio-CD
Press the [Burn to Audio CD] button to launch the MiniBurn program and
burn your wave file to a CD, which will then play in a standard CD player.
Chapter 10: Audio Recording and Rendering
169
Note: Any CD you create won't be playable in an Audio CD player until the disc is finalized. Therefore, if you choose [Burn
CD - No Finalize] make sure that when you burn the CD for the last time the disc is finalized.
If launched from Band-in-a-Box, the current BIAB song has automatically been added to the Burn List. If MiniBurn
is running standalone, you must add Wave files to the Burn List.
Burn List
Burn list files are displayed in MiniBurn’s central file list region.
Column 1- Track Number
Column 2- Path and name of Wave files
Column 3- Play time of each Track, formatted in minutes:seconds:frames
Burn Time indicates the sum of all the burn list track times.
Avail Time indicates the time available on the blank CD-R in the CD Burner. If no disc has been inserted, Avail
Time reads “No Disc.” If an unwritable disc has been inserted (CD-ROM disc or already-finalized CD-R, CD-RW),
Avail Time reads “UnWritable.”
Add Files to the Burn List
Wave files can be added three ways:
1.
Use the menu item File/Add Track…
2.
Right-click on the Burn List and select “Add Track” from the pop-up menu.
3.
Drag wave files into the MiniBurn window from an open Windows folder view.
Note: Only Wave files are accepted, and Wave files must be 16 bit stereo, 44.1 K sample rate (the standard format for
Audio CDs).
Remove Files from the Burn List
Files can be removed two ways:
1.
Left-click to select a track, then use the menu item File | Remove Selected Track.
2.
Left-click to select a track, then right-click on the Burn List and pick “Remove Track” from the pop-up
menu.
Clear All Files from the Burn List
The list can be cleared two ways:
1.
Use the menu item File | Clear All Tracks From Burn List.
2.
Right-click on the Burn List and select “Clear All Tracks” from the pop-up menu.
Change the Order of Tracks in the Burn List
Left-click on the “Trk” column of the file you wish to move, and drag the file to a new location in the list.
Audition Tracks in the Burn List
Left-click to select a track in the Burn List, then right-click and pick “Play Selected File” from the pop-up menu.
To stop playback, right-click the Burn List and pick “Stop” from the pop-up menu.
It is not necessary to stop a wave file before playing a new wave file. It is not necessary to stop playback before
burning. Playback stops automatically before burning begins.
Burner Controls
Eject: Open the drive tray using the menu item CD Recorder | Eject. Of course you can also press the eject button
on the CD drive.
Close the Drive Tray: Close the drive tray using the menu item CD Recorder | Close Tray. You can also press the
eject button on the CD drive, or gently push the drive tray to close it. Some manufacturers advise against closing the
tray with a push.
170
Chapter 10: Audio Recording and Rendering
Select a Burner
If the computer contains multiple burners, select a drive with the Burner drop-down menu. If a computer doesn’t
have any supported drives, the Burner menu will be empty and burning is not possible.
Set the Burn Rate
MiniBurn automatically selects the fastest rate reported by your drive. It is typical to use the fastest rate, unless you
know from previous experience that your computer doesn’t burn well at high speed. In that case, set a slower burn
rate to ensure a good burn.
Test Mode Checkbox (Simulate Burn)
To test the CD Burner without actually writing a CD, turn on the Test Mode checkbox. After your PC has “proven
itself” with a couple of good burns, routine testing is not necessary.
Cache Files Checkbox
If Cache Files is turned ON, MiniBurn writes an encoded temporary file before burning the CD. Unless burn errors
are encountered, performance is faster with this option turned OFF. It is not usually necessary to Cache Files, but
there are some situations where Caching is helpful:
1.
On a very slow PC, the computer may not be fast enough to translate the wave file to CD audio while burning.
Caching may be necessary to avoid errors.
2.
If Burn List audio files are stored in another PC on your local network, the network transfer delay may cause
errors. Caching will pre-fetch the files to your local hard disk before burning the CD.
Use Burn Proof Checkbox
Burn Proof is a technology available on many newer CD/DVD burners. With Burn Proof, it is less likely to
accidentally make a bad CD. If a burner has the Burn Proof feature, the checkbox is automatically enabled and
turned ON. If a burner does not have this feature, the checkbox is grayed-out and cannot be adjusted. Unless Burn
Proof seems to be causing unlikely strange problems, always use this feature if it is available.
Burn CD + Finalize (Make Playable CD)
Start CD burning. This button is the preferred way to make CDs for use with standalone Audio CD Players. With
the other options, ‘Burn CD – No Finalize’ and ‘Finalize Only’, the tracks will typically be readable by computer
CDROM drives, but all of your recorded tracks may not be visible to standalone Audio CD Players, even after the
disc is finalized.
Note: If you want the disc to be playable in standalone audio CD Players, remember to use CD-R (CD Recordable) discs
rather than CD-RW (CD Rewritable) discs. Most stand-alone audio CD players cannot read CD-RW discs.
Burn CD – No Finalize (allow tracks to be added later)
Audio CDs must be “finalized” before they can be recognized by the majority of stand-alone audio CD players
(stereos, boom boxes, portable CD players, automobile CD Players), or television DVD players. However, many
computer CD drives can play “Un-Finalized” audio CDs, so you can play them on your computer until all the songs
have been added to the CD.
Use ‘Burn CD – No Finalize’ if you wish to add tracks to an audio CD over more than one session.
Note: Be sure to use ‘Burn CD + Finalize’ or ‘Finalize Only’ when you add the final track(s) to a multi-session Audio CD.
When adding tracks to an “Un-Finalized” audio CD, the Available Time field displays the “empty” time remaining
on the CDR (the disc currently loaded in your burner).
Example: If you have already recorded 40 minutes to a 74 minute CDR, MiniBurn will display about 34 minutes of
Available Time. Take care not to add more tracks than will properly fit on the CD’s remaining empty space.
Make sure that the Total Time does not exceed the Available Time!
Finalize Only (Make Playable CD without adding new tracks)
Audio CDs must be “Finalized” before they can be recognized by the majority of stand-alone audio CD players
(stereos, boom boxes, portable CD players, automobile CD Players), or television DVD players. If you have
previously added tracks to a disc with the Burn CD – No Finalize function, you can finalize the disc with the
Finalize Only button.
Chapter 10: Audio Recording and Rendering
171
Stop Burn
Stop burning before the disc is finished.
Note: If you prematurely Stop, the CD will almost certainly be ruined.
Burning Progress
While a CD is burning, progress is indicated in the lower-left of the MiniBurn window. Progress messages are also
displayed in the Status Bar at the bottom of the window.
Read Buffer %- The computer’s disk read buffer usage. If Burn Proof is not available, you may have burn errors if
this drops to zero in mid-burn. In this case, try a slower Burn Rate.
Drive Buffer %- The CD Burner’s write buffer usage. If Burn Proof is not available, you may have burn errors if this
ever drops to zero. In this case, try a slower Burn Rate.
If a bona-fide buffer under-run actually occurs, MiniBurn also displays an error dialog at the end of the burn.
The two Buffer fields are most useful for diagnosing problems-- If the Read Buffer gets too low, it may mean that
the Hard Drive (or network connection) is not fast enough. If the Drive Buffer gets too low but the Read Buffer
remains adequate, it may mean that background processes are stealing too much CPU time from MiniBurn.
Track Written- Indicate the current track’s progress.
Total Written- Indicate the progress of the entire burn.
172
Chapter 10: Audio Recording and Rendering
Chapter 11: User Programmable Functions
The StyleMaker™
The StyleMaker is the section of the program that allows you to create brand new styles or edit existing styles. This
is done by recording patterns for each of the drums, bass, piano, guitar and strings parts, or by entering these parts in
the StyleMaker Pattern Editor notation window. If you don't want an instrument in a style you don't need to record
any patterns for it. The StyleMaker window is accessed from the Styles menu by choosing any one of:
- New – Make a New Style to create an entirely new style from a blank template.
- Edit a Style (Alt+F9 keys) to open any style for editing.
- Edit Current Style (Ctrl+Shift+F9 keys) to open the current style in use for editing.
StyleMaker Pull-Down Menu Items
The StyleMaker has a separate pull-down menu to the main program. Many of the menu commands can be accessed
directly with the on-screen buttons in the StyleMaker window.
Buttons on Main StyleMaker Screen
These options are also available from the StyleMaker window pull-down menus.
Saves and overwrites existing style using current name.
Save
Saves the style, but allows you to rename it first.
Save As
Plays the current pattern.
Play
Stops the playback of the current pattern.
Stop
Plays the current pattern over a specific chord.
Chord
Rec (Record)
Begins live recording of a pattern after a 2-bar intro.
Opt (Options)
Allows setting of options for the current pattern.
Q (Quantize)
Adjusts note timing to a number of divisions per measure.
V (Volume)
Change the volume of the selected pattern.
L (Legato)
Increases or decreases note durations for the pattern.
Pat (Patch)
Assign instruments to the style.
Misc. (misc.)
Overall style settings including master volumes.
Plays the current song using the new style you're making.
Song
Exits the StyleMaker and closes the window.
Exit
Exploring the StyleMaker
To become familiar with the StyleMaker it is easiest to begin with an existing style and examine its makeup. This
example uses ZZLITROK.STY, a basic Light Rock style. Patterns are played back from the main StyleMaker
screen:
Chapter 11: User Programmable Functions
173
The StyleMaker always opens to the Drums window, as indicated by the highlighted button to the left of Drums.
Other parts are selected by clicking on their buttons, just as in the main Band-in-a-Box screen.
The rows of cells are for the musical patterns that have been recorded for the style. Each numbered cell is a pattern;
the blank cells are for new patterns. The numbers are the weights assigned to the pattern, a higher number, or
weight, means that a pattern will be played more often. The average weight is 5.
In the example above, you will notice that there are 4 rows of drum patterns.
- A pattern is the row to record drum patterns for the A substyle.
- B pattern is the row to record for the B substyle.
- drum fills are recorded on the drum fills row
- end drums are ending patterns (2 consecutive patterns of 1 bar)
This style shown has nine drum patterns for its “a” substyle, and eight more for the “b” substyle variation. It also
has eight drum fills and four ending patterns.
What’s a pattern?
A pattern is one musical figure, a single element of a musical style. When Band-in-a-Box combines the various note
patterns into arrangements we hear what the different instrumentalists would play for a song in that style.
Drum Patterns
In our example, the drum patterns are what the drummer plays for a Light Rock song. You can view any drum
pattern in the row if you click on the box and then on the [Rec] button to open the Drum Editor.
The Drum Editor grid shows which drums in an 18-piece kit are being played on what beats and with what velocity
(force) they are being hit. Each group of columns separated by a vertical line represents one beat in a four-beat bar,
sub-divided into 16th notes. If there was a number in each cell across the row for any instrument, that instrument
would play sixteenth notes for the whole bar.
In a swing style each beat would be sub-divided into eighth-note triplets, with three columns to a beat.
174
Chapter 11: User Programmable Functions
Let’s examine the pattern in detail.
The highlighted cell shows that the Bass Drum is being played on beat 1 at a velocity of 83. (The loudest possible
note has a velocity of 127, while 0 is silent.) Moving to the right, you will see that the Bass Drum plays again on the
second eighth note of beat 2 with a velocity of 73, and then on beat 3 with a velocity of 93, the familiar “boom-baboom” Pop/ Bossa Nova beat.
The Closed High Hat plays straight eighth notes at different velocities.
The Snare Drum plays on beats 2 and 4 in a typical Light Rock backbeat.
You can easily create new patterns of your own by selecting an empty box in a row of patterns and then clicking the
[Rec] button to open a blank Drum Pattern Editor grid. To hear the pattern you have made click on the [Play]
button. Click on the [Help] button for more tips and details.
Tip: All Band-in-a-Box styles must have at least one drum pattern, even if there are no drums in the style. In that case,
open the Drum Grid Editor and enter a value of 0 on beat 1 of the pattern for any drum and then save the pattern.
Click on the [Exit] button to return to the Drum
window.
The Drum Options dialog will open, click on [OK]
and it will close. The options are explained in the
in-depth tutorial.
This type of pattern is found in earlier Band-in-aBox styles. Later styles use live MIDI drums,
which are edited as notation.
Now let’s examine a bass pattern.
Chapter 11: User Programmable Functions
175
Bass Patterns
Click on the button to the left of Bass to open the bass pattern window. Notice that the status bar gives the Row and
Column number for the current pattern.
You’ll see that this window is different from the Drums window, it has rows for different lengths of patterns – 8
beat, 4 beat, 2 beat and 1 beat – for both the A and B substyles, and a row for endings.
To see a bass pattern, select any numbered box and click on the notation button. The StyleMaker Pattern
Editor will open, showing the selected pattern as notation.
Click on the [N] button to enter the Editable Notation mode. In this mode notes can be edited, added, or deleted as
in the regular notation.
A new pattern can be created by selecting an empty cell in the StyleMaker grid and then opening the StyleMaker
Pattern Editor window to enter notes with your mouse. A quicker way to make a new pattern is to record it live
from a MIDI keyboard or any other MIDI controller that is connected to your computer.
Recording a New Pattern
New patterns are recorded by playing them live in real time as the StyleMaker plays an accompaniment on the
drums and other instrument parts for the style.
Go to the correct row for the length of the pattern you want to record (8 beat, 4 beat, etc.) and click on an empty cell.
Recording is started with the [Rec] button, drums, and other parts ill start to play but recording has not begun.
The StyleMaker gives you a 2-bar intro, so you can play along with the intro for a “flying start” or just use the 2 bars
to count yourself in. Recording then begins and continues for another 2 bars, no matter what length of pattern you
are recording. If you are just recording a 4 beat pattern you will still hear the 2-bar intro and then another 2 bars of
accompaniment while the pattern records. You would just play your 4 beat pattern and then wait until recording
stops.
176
Chapter 11: User Programmable Functions
When recording stops, a Record Options dialog
opens. The options are explained in the Help, and
they can always be changed after the style has
been saved.
Click on OK to save the pattern. Click Cancel to
erase the take and try again.
To hear the pattern you have just recorded click
on the [Play] button. Remember that the pattern
can be edited in the StyleMaker Pattern Editor;
you don’t have to redo a “close” take because of a
small mistake.
Advanced Editing Of Patterns
Patterns can be “tweaked” with the other advanced features in the StyleMaker - Trim Pattern, Late Notes, and the
Event List Editor.
Trim Pattern
The Trim Pattern routine deletes notes past the end of a pattern, or (optionally) a specified distance from the end of a
pattern. This can be accessed from the Pattern | Trim Pattern(s), row(s) command.
In the dialog displayed, we are trimming 50 ticks from an 8 beat pattern. This means that all of the information past
8 beats (less 50 ticks) will be deleted. This feature is useful to erase “busy playing” that is present near the end of a
pattern, and also delete notes that are just taking up space in the style.
Pattern Velocity Adjust
This function adds or reduces the velocity of a single pattern, row of patterns, or all patterns in an instrument. It is
useful for reducing or increasing the volume of an entire instrument, or fine-tuning the velocities in a style. Choose
the StyleMaker menu item Pattern | Velocity Adjust for 1 pattern, 1 row or all patterns, and input the velocity change
to make for the pattern(s). This adds or subtracts a certain velocity value to the patterns.
Tip: There is another velocity command, “Volume adjust,” but it works differently. It will change the velocities to a certain
value, useful for “smoothing out” velocities.
Chapter 11: User Programmable Functions
177
Late Notes
The [Late Note] button is found inside the Misc. Style Settings dialog, it opens a dialog with “Settings for Making
Late notes quieter.” There are settings for allowing or not allowing late notes, and for how late the notes can be.
The global setting for late notes in Opt. | Preferences [Arrange] will reduce the volume of the late notes for a
smoother transition from one chord to another.
Event List Editor
The [#] button in the StyleMaker Pattern Editor notation window opens an event list for editing, inserting, or
deleting notes in the patterns.
178
Chapter 11: User Programmable Functions
Piano, Guitar and String Patterns
Piano, Guitar and String patterns are recorded in the same way as live Drums or Bass patterns, but with added
features and options. Guitar styles can be created with authentic strumming and rhythm patterns using correct fret
positions.
Guitar Styles with the StyleMaker
Guitar Styles with incredible authenticity are possible in the StyleMaker. You can use new macro notes to be played
back as a Jazz, Folk, or Pop guitar chord using correct fret positions for accurate guitar-friendly chords.
Playing back Guitar Styles
Guitar Styles are identified by the exclamation point (!) in the style name. This is not a requirement, but is usually
present in the style name.
You can see which tracks have intelligent guitar parts by looking at the title window of the Guitar fretboard when
the track is highlighted. If it is a Guitar Style track, it will say [Guitar voicings] after the name of the track.
The styles can be set to use different types of voicings for guitar. For example, there are Jazz, Pop, and Folk (open
position) voicings. Also, some of the styles allow the guitar to play advanced chords and inversions. Some of the
styles play chord patterns, so the chord in the song might be F7, but the guitar plays a “walking-chord” pattern of
F7,Cm7/G, Abdim, F7/A on each beat. There can be fingerpicking styles that have a lowest note alternate between
root and 5th.
Guitar Parts use channels 11 to 16 for the notes, corresponding to strings 1 to 6 of the guitar. When you make a
MIDI file, the notes will all get written on a single guitar channel. Sequencers like PowerTracks Pro Audio will
recognize guitar parts on all 6 channels, so if you want to write the MIDI file from an intelligent guitar style, you
can set Band-in-a-Box to do this from the Opt | Preferences… | Write Guitar part on 6 channels option.
To make a Guitar Style:
Press the [Misc] button to enter the Misc. Style Settings window, and then press the
[Guitar Macros] button to launch the Settings for Guitar chord macros dialog.
Note: A macro is a single note that triggers a preset chord pattern.
Chapter 11: User Programmable Functions
179
In the Settings for Guitar chord macros dialog choose the tracks that you want to put guitar parts on. Use the
Piano and Strings to layer multiple guitar parts.
In the dropdown “Guitar Chord Types to Use” combo box, set the type of chords to use: Jazz, Pop, Folk, Half Note
(sax), Ukulele, Mandolin, 5-string Banjo.
Set the complexity of the chords to use. These can be single chords, chords with variations, inversions, and chord
“walking” patterns. If you want a simple guitar style, set the first one to 100%, and the rest to 0%.
Set the strum speed and fret range that should be played on the guitar.
The Guitar styles have an option to keep the same chord for the whole
pattern when using databases that have changing chords within the pattern. If set, databases that have changing
chords like the “Half Note (sax)” chords will only use the first chord in the pattern.
Exit the dialog and record a guitar pattern using Guitar Macro notes.
When the recording of the pattern finishes, set “OK to use Macros” and
“Guitar Macros” to Yes.
Save the style, using the convention of putting an exclamation (!) somewhere in the name to indicate that it is an
intelligent guitar style.
180
Chapter 11: User Programmable Functions
Guitar Macro Notes
Tip: Middle C is C5 or note number 60
The main Guitar Macro notes to use are:
Strummed Chords
C6 note
Plays a guitar chord, with a slow strum.
D6
Plays a guitar chord, with a faster strum.
For example, if you want a simple 4-in-the-bar pattern that plays a slow-fast-slow-fast strumming pattern, play the
notes C6 D6 C6 D6 for the pattern.
Additional strumming macros are:
F#6
Back strum, chromatic below.
G6
Back strum.
G#6
Back strum, chromatic above.
A6
Back strum, chromatic above, fast strum.
Single Strings in chord
C4
Plays a single string that is the low root of the chord.
G4, C5, E5
Plays single string (D string, G string, B string).
G5
Plays high E string.
F5
Plays high E string, but if none available will play G string.
Additional notes for fingerpicking, not part of chord
G3
Fifth below the low root of the chord for fingerpicking.
E4
Fifth or 3rd above the low root for fingerpicking.
Alternatives to Recording Patterns
It’s not always necessary to record every pattern for a style, or any patterns, for that matter. The import features in
the StyleMaker make it possible to assemble an entirely new style from existing styles, or to import patterns from
favorite MIDI files.
Chapter 11: User Programmable Functions
181
Hybrid Styles
The “Hybrid Styles” feature allows you to play and create a style that has instruments from up to five different
styles! You can, for example, play a song with a Reggae bass, Rock drums, Salsa piano, or any combination of up
to five styles that you want. Create a name for your hybrid style and you can save it with the song so that it will play
that way in the future.
To use the Hybrid Styles feature, choose Styles | Make a Hybrid style or click on the hybrid [STY] button
in the toolbar. You’ll then see the Make a Hybrid style dialog.
Your hybrid style can be up to five instruments, each from a different style. For example, you can have a Latin
drum part, with a Zydeco bass, and Jazz guitar part, and strings from a Classical style!
Select the instrument (e.g. Bass), and then select a style by pressing the [.STY] button. Repeat for
up to five instruments.
When you’re ready to generate the Style, press [OK- (re) Generate style
with name ---〉], and choose a name for your style.
Remember that style names in Band-in-a-Box can be a maximum of eight characters, with no spaces! (This is to
insure compatibility with Macintosh and previous versions of Band-in-a-Box.)
Press [Play] in Band-in-a-Box and you can hear the results. You can revisit the Make a Hybrid style dialog to
make any changes.
Editing a Hybrid Style
You can edit a hybrid style just like any other style. Open the StyleMaker to view the patterns. In addition, in the
StyleMaker, if you press the [Misc] button, you’ll see a style memo listing the various styles that made up the hybrid
style.
Importing Instruments from Other Styles
This is a great way to have fun with the StyleMaker, and to create great new styles in no time. The dialog is
accessed from the Style | Import Instrument menu item.
Choose the instrument you want to import and select the desired options. Click on [OK] and a standard Windows
Open dialog will be launched so you can select any style on your computer as the source for the instrument. Mix
and match instruments from different styles to create fresh new arrangements.
182
Chapter 11: User Programmable Functions
This feature also works well to modify
existing styles. Import an instrument from
a similar style to make interesting style
variations in minutes.
Try some instruments from dissimilar
styles for fun and surprises! You can also
add parts that were not present in the
original style this way.
Importing Patterns from a MIDI file
You can use any MIDI file as a source for new StyleMaker patterns by accessing Pattern | Import Pattern from
MIDI file menu item. The import # patterns option allows you to import more than one at a time.
In the StyleMaker, when you choose Pattern | Import from a MIDI File (or
clipboard or Melody track) the dialog shows a further option at the bottom.
For example, if you import 8 patterns, the 8 patterns will be inserted in the first available 8 positions on the current
row. They will be offset by the # of beats present on the current row. For example, if you are on the “4 beat” row,
the patterns will get inserted offset by 4 beats, so you'd get patterns for each bar in the 8 bars imported.
Map Melody track to C7 Chord
Choose the Melody | Map Melody track to C7 chord. The purpose of this function is to allow you to quickly import
any MIDI file track into the StyleMaker and make a style from it.
Once you choose the option, you select whether it is a bass track to import, or a piano track (actually any part other
than bass or drums). A bass track uses notes below C4 (MIDI note #48) and above the lowest note you select in the
dialog.
If you select piano track the notes will all be mapped to a C7 chord, it is not important that the chords on the
spreadsheet are correct. However, if you are importing a bass track, it is important that the chords are correct. You
can select options to allow patterns that are anticipations, and also convert chords to “macro notes.” There is full
documentation in the online Help.
Slide Pattern X ticks
This is option on the StyleMaker menu allows a pattern to be time shifted any number of ticks, based on a PPQ
setting of 120 clock ticks.
Velocity Adjust
This function adds or reduces the velocity of a single pattern, row of patterns, or all patterns in an instrument. It is
useful for reducing or increasing the volume of an entire instrument, or fine-tuning the velocities in a style.
Choose the menu items Pattern-Velocity Adjust (for 1 pattern, 1 row, or whole instrument) and input the velocity
change to make for the pattern(s). This will add or subtract a certain velocity value to the patterns.
Chapter 11: User Programmable Functions
183
Style Checker
Analogous to a “Spell Checker,” this function analyzes your style-in-progress and identifies possible problems. The
results are output to a text window, allowing you to examine the patterns and fix them if required. It identifies
patterns that might be “too busy” or incorrect macro notes etc.
To access the Style Checker, open up the StyleMaker (Ctrl+F9), and choose Style | Style Checker. You'll then get a
text report about the style, listing possible problems with the style. Here is a sample printout:
-----Start of style checking ------JAZQUINT.STY
Drums: Row 1, Column 1 First pattern of instrument shouldn't contain masks in it. It should be generic.
Piano: Row 1, Column 3 Non Chord tones found (other than C, E, G, Bb) and pattern is not set to a chord mask, riff
based, or MACRO.
Style Summary
This displays a text window summary of the style, including lots of information about the style such as # patterns, #
patterns for each substyle, patches, pushes, volume changes, guitar patterns, and more. To access the style
summary, from the StyleMaker, choose Style | Style Summary.
Auto Endings for Styles without Endings
If you‘ve made a style, and haven’t included an ending, a 2-bar ending can now be generated automatically, based
on the style. This makes it easier to make complete styles using the Style Wizard, which makes a style by analyzing
a MIDI file.
Using the MIDI File to Style Wizard
The Style Wizard converts any MIDI file to a Band-in-a-Box style. In this tutorial, we're going to
load in the Violet.MID found in the \bb folder and convert it to a style - which we'll call Violet.STY.
Start with a new song and press the Style Wizard button or choose Styles | Style Wizard to launch the Style Wizard.
The dialog is largely empty because we haven't chosen a MIDI file yet.
Press the [Open] button and load in the file c:\bb\violet.MID. The Style Wizard then does the
following automatically:
184
Chapter 11: User Programmable Functions
-
The chords for the MIDI file are interpreted and written on the Chordsheet.
The “part markers” for the file are displayed on the Chordsheet. For Violet.MID, the Style Wizard has found
the correct part markers – by looking for drum fills and other signs of a part change – and has assigned substyle
“a” to all of them. We'll change some of them to “b” later.
-
The channels used in the
MIDI file are displayed in the
dialog, with the patches used
and # of notes played on each
channel. (For Violet.MID you
can see that channels 2, 3, 4,
6, 7, and 10 are used.)
-
The Style Wizard analyzes the
parts and guesses at which
Band-in-a-Box part - Bass,
Piano, Drums, Guitar, or
Strings to use for each track.
Band-in-a-Box has correctly
assigned 5 instruments – not
assigning a part to the
Melody.
-
The Style Wizard suggests
which bars (“snapshots”) to
include in the style. The
suggested bars are bars with all
of the “BB Part” instruments.
Usually you'll want to customize these snapshot bars to control which bars get included in the “a” or “b” substyle.
In the Violet.MID style, the Style Wizard has offered to include Bars 9-101 (inclusive) and wants to put them all on
the “a” substyle. Continuing on, we want to make a great sounding style, so it is important that we have the
following two items correct:
The “BB Parts” have to be correct. We can audition the MIDI file by playing a loop and listening to
the MIDI file and muting channels by clicking on the “Channel” checkboxes. From that, we can
hear the individual parts and assign them correctly, as we would like them in the style. By playing
the MIDI file inside the Style Wizard we can tell which bars to use for the “a” and “b” substyles.
Note: The Style Wizard has entered some of these settings automatically – but you'll have to type in the data as shown.
The Snapshot Bars should be correct for the “a” and “b” substyle. You need to tell the program what bars to
use for the “a” substyle and for the “b” substyle. The program makes an attempt to guess at this, but since MIDI
files can contain many different substyles (and a Band-in-a-Box style allows only 2), you'll likely want control over
these snapshots yourself.
Tip to help you choosing which bars to use:
To listen to the MIDI file, you can either exit the Style Wizard dialog and
just play the song like any other Band-in-a-Box file, or play a looped
section inside the Style Wizard using the [Play], [Stop], and “Loop at Bar”
settings.
OK, the Style Wizard has already made the correct settings for the “BB Parts” for us, so we don't need to make any
changes there. Let's move to the Snapshots section, and enter the bar numbers that correspond to the substyles that
Chapter 11: User Programmable Functions
185
we'd like for the Jazz tune. After listening to the tune, we notice that there is a “2-feel” Jazz section, and a “4-in-thebar” section. We want those as “a” and “b” substyles, so we enter the bar #s that correspond to these settings.
In the Snapshots area of the Style Wizard:
-
Enter “1-20” for the bars for the “A” Substyle.
-
Enter “21-28, 37-68” for the “B” Substyle.
-
Enter “12, 20” for the “A” Drum Fills.
Enter “28, 36, 44, 52, 60, and 68” for the “B” Drum Fills.
-
Note: Of course you don't need to enter this much detail. You could just enter a single range like 1-20 for the “a” substyle
and make a quickie style. We're illustrating “advanced” style-generation here.
Press [Generate NEW style…]; choose a name for your style, and the style
will be made.
Let's call it Violet.STY. Now to hear your style! You could play the style with any song of course, by loading in a
song and then loading in the Violet.STY It is easily available from the Favorite Styles dialog (Shift+F9).
For this tutorial, load in the song V_TEST.MGU that we made for you. That's a Jazz Swing song using different
chords than Violet, and it uses the Violet.STY (So you need to have made that style before you try to play the song
or you'll get a “Violet.STY not found” message.)
Save the existing song before loading in the new song. When Band-in-a-Box saves a song that has an entire MIDI
file on the Melody or Soloist tracks it gives it a special MGX extension. So you'll be saving the file as Violet.MGX.
Alternatively, if you'd prefer to play the Violet.STY style without loading in another song, you can do it as follows.
Since the Violet.MGX file currently has the entire MIDI file on the Melody track the first thing we need to do is
Mute the Melody (Alt+9 or right-click on the Melody part at the top of the screen). The next thing is the Enable the
Style, by choosing Style | Style is Enabled so that this item has a checkbox.
Auto Endings for Styles without Endings
If you‘ve made a style, and haven’t included an ending, a 2-bar ending can be generated automatically, based on the
style. This makes it easier to make complete styles using the Style Wizard.
To hear an example, load in the song c:\bb\Tutorial – BB 2005\No Ending.MGU. This song uses
NOENDING.STY, a style that doesn’t have an ending. An ending will be generated automatically for this style.
So we've made our first style! In summary, making styles with the Style Wizard is a process involving:
1. Loading a MIDI file into the Style Wizard.
2. Listening to the MIDI file by muting channels to identify parts.
3. Picking the channels to use for the BB Parts.
4. Picking the snapshot bars for the “a” and “b” substyle.
5. Pressing the [Generate NEW style…] button.
186
Chapter 11: User Programmable Functions
The Harmony Maker
The Harmony Maker allows you to create or edit your own or existing harmonies.
Each harmony can use up to 3 channels.
Harmony Channel A, B, and C. If your harmony only has one instrument, then you will use Channel A for all the
voices. If your harmony uses Flute and Bass, then you could use Flute on Channel A and Bass on Channel B.
You'll see the voices down the left side of the dialog box.
Tip: When you want to hear the harmony as you are developing it, have a song with a melody playing before you enter the
Harmony Maker. After you have made changes to the harmony, hear the changes by pressing the [Update] button.
Chapter 11: User Programmable Functions
187
Settings For Each Voice
Chan. A 1-instrument harmony will use Channel A only. Additional instruments can use Channel B and C.
Tip: These channels are set to numbers in the Harmony Channels Dialog box, accessible by selecting the [Harmony] button
under the Opt | MIDI Channels, options… menu.
Octave This allows the harmony to “drop-down” or “go up” by a number of octaves. This octave change will only
happen in a certain range, as chosen in the LOW, HIGH settings.
Tip: There is also an Overall Harmony Octave setting that changes the octave of the entire harmony setting (accessible by
pressing the [More] button).
O. Double (Octave Double) This setting lets you double any voice. Usually you want to do this by doubling an
octave below (i.e. octave = -1), but you can set the octave from -2 to +2. The doubling will always be on the same
channel, if you want a different instrument to double the voice, and then use the Melody Doubling Voices.
V. Boost (Velocity Boost) This allows you to increase or decrease the velocity (loudness) of each voice, to make the
voice stand out more or less in the harmony. Default = 0.
The Patches setting at the bottom allows you to assign a patch to the harmony. If
you set “No patch,” the harmony won't change the patch. This is a useful setting
for making a generic harmony that doesn't change the patch of the Melody or Thru channel, for example.
Changes that you make to the harmony settings won't take effect until you press the [Update] button.
You may Copy a Harmony to the clipboard, and then move to a new harmony and
Paste the harmony to the new location.
Because the harmony is saved automatically for you, you won’t need to ever press
these buttons.
All of the 256 harmonies are saved in a single .har file called DEFAULT.HAR. If you have run out of harmonies,
you can start a new harmony file by pressing the [Save As] button. For example, if you make a 3rd party disk of
add-on harmonies, save it as your name MYNAME.HAR. Then you can load in your bank of harmonies (from the
Harmonies | Edit a Harmonies File) without disrupting the existing DEFAULT.HAR file.
Each .har file has 256 harmonies, so you probably need only 1 DEFAULT.HAR for
all your harmonies. However, if you've made a great harmony and want to give it to
a friend, you can export a single harmony as an .h1 file. Your friend can then import this harmony into their own
.har file.
The best way to develop a harmony is to hear it as it’s playing. The preferred way to do this
is to have a song playing that has a melody in it. Any changes to the harmony will be heard
on the melody as soon as you press the [Update] button.
You can also play along as the song is playing, and hear the new harmony on the Thru channel.
If you don't want to have a song playing, and want to hear the harmony, then set the [Test Chord] to a certain chord.
If set to CMAJ7, then you can play on the MIDI keyboard (with no song playing) and hear your harmony. This
allows you to examine exactly what notes the program is using to make your harmony.
188
Chapter 11: User Programmable Functions
Additional Harmony Options
Press the [More…] button to launch the
Additional Harmony Options dialog.
Use Close Harmony
This only applies to 2 and 3 part harmonies.
If set to = 0 it will use only close harmonies, mainly 3rds for 2 part harmonies.
If set to = 1 it will use mostly 3rds, with some 6ths for 2 part harmonies.
If set to = 99 it will use mostly 6ths, with some 3rds for 2 part harmonies.
If set to = 100 it will use only wide harmonies, mainly 6ths for 2 part harmonies.
If set to > 2 < 98 it will vary between close and open harmonies.
Use Passing Chords (melody)
DEFAULT = 100 %
Band-in-a-Box will sort out when to use passing harmonies, based on factors like the duration of the note, the next
note, the chord tone, the velocity, previous notes, and other factors. You can visually see when the harmony is using
a passing chord. The harmony display is usually blue, but when there is a passing chord, it displays as RED. If you
don’t want passing chords set this value to 0.
Lowest Harmony Note
You can set a lowest note for the harmony to play. When the melody is low, harmonies begin to sound “muddy,” so
you can avoid the harmony being played below a certain note.
Overall Harmony Octave
This sets the overall octave of the harmony. For example, in the 5-part Trumpets harmony the harmony is always be
played an octave higher than the recorded melody. This is because the 5-part harmony is spread over 2 octaves.
No Harmony if duration less than nn milliseconds
You can specify a harmony to only occur for notes longer than a given duration. If every note is harmonized
unrealistic harmonies result, since a piano player doesn't harmonize notes of a short duration. You can specify a
harmony to only occur for notes longer than a given duration. Notes shorter than that will not be harmonized. There
are also options for how the program “fixes” the harmony when chord changes occur during a sustained note
harmony.
OK to make new harmony with new chord
Most harmonies have a feature that changes the pitch of the harmony voices under the Melody note when the chord
changes if the underlying voice wouldn't be a chord tone. For some harmonies it would be unrealistic for the
instruments to change the inner voicings in this manner. Deselect this option and the voices that conflict with the
new chord stop playing instead of changing to new notes.
Chapter 11: User Programmable Functions
189
Use Guitar Harmony Voicings
Harmony Maker will use real guitar chord voicings that display correctly on the guitar fretboard. Selecting this
checkbox means that guitar chord voicings will be used, instead of any other voicings specified in the Harmony
Maker. Check out Harmony #32 (J Pass) for an example of this
Use voicings in 4ths
Modern Jazz harmonies often voice chords in 4ths. For example, a C
chord with C melody might be voiced C, G, D, A, E. You can select 4ths
voicings easily in Band-in-a-Box to harmonize the Melody, Soloist, or
Thru parts using 3, 4, or 5 part voicings in 4ths. We’ve added presets for
these harmonies, so you can easily select them. Use these sophisticated
4ths harmonies on your existing melodies to create a new sound.
Tip: To quickly hear what some of the 4ths harmonies, sound like, look in the c:\bb\ Tutorial - BB 2005 demos folder for
pre-made songs with 4ths harmonies.
To use the harmonies with any song, choose harmonies in the range 213 to 219. Each of these is a harmony using
4ths. For example, Harmony 218 uses 4 trombones in 4ths.
To make your own harmony using 4ths for the harmonies, enter the Harmony Maker, press the [More] button, and
select the “Use Voicing in 4ths” checkbox.
Then the harmonies will be voiced in 4ths. You can make a 2, 3, 4, or 5 part harmony (+ melody doubling, + low
root note).
The Soloist Maker
This module allows you to define your own soloists.
Access the Soloist Maker by pressing the Soloist Maker [Edit] button within the Select Soloist
dialog.
The Soloist Maker allows you to define the parameters essential to a particular soloist's
playing, such as instrument range (i.e. tenor saxophone), extra legato playing, playing
more on top of the beat, and playing straighter 8th notes than usual swing 8th notes. Phrasing options include how
long the phrases should be and how much “space” to leave between phrases. You can also set how “outside” the
playing should be.
190
Chapter 11: User Programmable Functions
10 easy steps to make a Soloist
1. Bring up the Soloist window by pressing the [Soloist] Button.
2. Select a blank spot in your list of soloists and press the [Edit] button.
3. Insert the title of your soloist and any memo note you wish to add. The Num field will be filled in for you. Call
this one Bebop Saxophone. The memo might say, “extra legato, straighter 8th notes, on top of the beat.”
4. Choose the type of soloist (i.e. swing 8th notes, straight 8th notes, 16th notes, etc.) This should be set to Swing
8ths.
5. Press the [Choose] button to select the instrument the soloist should play (i.e. Tenor Saxophone).
Tip: You may also select an instrument from the Patch Change window, but selecting an instrument with the [Choose]
button will also fill in the note range information specific to that instrument. You'll notice that the correct range for tenor
saxophone has been filled in to the Note Range settings.
6.
7.
Modify (if required) the phrase length, space length, and outside range parameters.
Change the Legato Boost to 10 %. This will add 10% to the duration of the notes. Press the [Help] button in
the Soloist Editor window if you require additional details.
8. Adjust the Lateness by -5. This will play the notes more “on the beat” than other Jazz soloists.
9. Adjust the 8th Note Spacing by -5. This will play the 8th notes in a more even feel than other Jazz soloists.
10. Press [OK], and you're done. Then, give the program a few moments to load its “knowledge base” of solo ideas
and new parameters, and a few moments more to analyze the chords. Playback will begin automatically as soon
as the Soloist has performed the operations mentioned above.
Custom Solo Generation
It is possible to generate and regenerate parts of the solo, so that you can redo any part of the solo that you don't
like.
This button in the Select Soloist Dialog launches the Generate Solo for a Specific Range of Bars
dialog.
Chapter 11: User Programmable Functions
191
Tip: You can have these values preset to the values you'd like by first selecting the range of bars that you'd like from the
Spreadsheet screen, and then clicking on the [Soloist] button.
OK to solo for an extra beat
Usually, Soloists end a little after a bar's end – they play a couple of extra notes, spilling over to the next bar.
Selecting this option the gives Band-in-a-Box soloist this ability also.
Overwrite existing solo in range
If you want to “overdub” a solo and have multiple solo tracks going at once, deselect this checkbox, and avoid
getting a little messy.
Generate Solo Now
Once you press this button, the portion of the solo that you have selected will be generated. The song will start
playing two bars before the new part, so you can quickly hear the new solo. Remember that the custom solo
generation can be used with different soloists, so you can use a “tenor sax jazz” soloist for a few bars, and then
insert a custom “bluegrass banjo” soloist for four bars and so on.
Tip: Band-in-a-Box even solos over the “slash chords.” The Band-in-a-Box Soloist feature analyzes slash chords like C/Bb
to determine the best scale type to use (e.g. Bb Lydian). There's nothing you need to do, as this happens automatically!
192
Chapter 11: User Programmable Functions
The Melodist Maker
This module lets you define or edit your own Melodists.
Press the Melodist Maker [Edit] button from the Select Melodist dialog to launch the
Melodist Editor.
Num
The Num selection box allows you to select the Melodist that you'd like to edit.
The top area of the Melodist Maker screen also allows you to set the Title of the Melodist and supply a Memo.
Choose ST2 Database
Select the associated ST2 database for the Melodist. Some ST2 Melodist databases are MEL1.ST2=Jazz Swing (8th
notes), MELPOP1.ST2 (Pop Ballads, 16th notes), MELWLZ1.ST2 (Waltzes, 8th notes), and MELROK1.ST2 (Rock,
8th notes).
Tip: Soloist databases also have extensions of ST2, but they are not compatible with Melodists. Melodist databases are
easily identified, they all begin with MEL.
Chapter 11: User Programmable Functions
193
The Patch Change area allows you to select an
instrument and Harmony, and to set Change
Instrument setting for when you would like to
change to a new Melody patch (e.g. Each Chorus).
In the Change Style to .. window you can choose a
style for the Melodist, and specify the feel for the
style in the .STY is box.
Legato Boost % changes the legato (length) of the
notes generated. Instruments like Saxophone have
longer legato phrasing.
Increase lateness by (/120ppq) refers to how much after the beat the notes are played. This is normally left at zero
for Melodists.
Increase 8th note spacing by (/120ppq) is usually left at zero (0). If set to a nonzero value, the 8th notes will be
farther apart (based on units of 120 PPQ).
The rest of the settings in the Melodist Maker allow you to select options that control what type of melody will be
generated.
Unique Themes
This is normally left at 100%. But if you want to force the Melodist to stick with the same theme throughout the
song, set this to a lower value (say 80%). It shouldn't be set much lower than 80. Default = 100.
Unusual Placed Phrasing
The Melodist tries to make phrases that are appropriate for the position in the song. For example, the first 2 bars of
the melody are appropriate for “opening phrases.” But if you want to experiment with phrases that don't follow
these rules, set the Unusual Placed Phrasing to a value higher than 0%. Default = 0.
Simple 1st and 2nd Endings
This setting only applies to Melodists that are using the Jazz Swing (MEL1.ST2) or Waltz (MELWLZ1.ST2)
databases. This determines the % of time that endings of the A sections (in AABA forms) will be simple endings (1
or 2 notes) instead of complete phrases. Usually AABA tunes end with simple phrases at the end of the A section.
Default = 80%.
Choose Unusual Chord Progressions
If set to a value other than zero, the Melodist will generate atypical chord progressions. For example, instead of a
Dm7 | G7 | Cmaj7, the Melodist might generate Dm7 | Db7 | Cmaj7 Am7. Default = 0.
Force Long Phrases
This determines the % of time that the Melodist will try to generate long phrases (4 bars or more). The downside to
setting it higher than 20 will be a loss of uniqueness in the phrases generated. The setting shouldn't be set much
higher than 20. Default = 20.
Mix Minor and Major Chord Progressions
Typical major key chord progressions have progressions like (in the key of C) Dm7 | G7 | Cmaj7, whereas in the key
of Am, they would be |Bm7b5| E7 |Am6. This setting determines how much the two types of progressions should be
mixed in a single song. Default = 0.
Chord Substitutions Throughout the Form
Normally an AABA song has identical chords for each A section. If this setting is greater than zero, the Melodist
will generate chord substitutions throughout the various A sections, while preserving the identical melodies!
Default = 0.
194
Chapter 11: User Programmable Functions
Number of Variations to Choose From
As the Melodist is determining what type of phrase to generate, it will narrow the possibilities to the number of
variations set in this variable. Setting a higher number results in more interesting melodies, but the chord
progressions are more unusual. Default = 15.
Tempo Range / Auto Tempo
The Tempo Range setting determines the tempo range that the tune will be created with (it will be a random tempo
in the range). The Auto Tempo setting must be set on the Melodist Selection screen for the tempo range to work.
Default from 110 to 180 bpm.
Transpose A2 Section
In songs with an AABA form, it is common for the second “A” section to be transposed. Some Melodists are set to
transpose the A2 sections. This setting determines the % chance that the song will be generated with a transpose.
The song will only get transposed if the A2 transpose setting isn't set to “none” on the Melodist selection screen.
Default = 30.
Anticipations in Phrases
Melodic phrases often begin a little before the beat. This is referred to as anticipation. This setting determines what
% of the phrases will be anticipated. Default = 20.
Always Use this Soloist
Since Melodists can also generate Solos, a specific Soloist can be set in this setting. If set to “0 - no Soloist” the
program will intelligently pick a Soloist.
Melodists can be copied and pasted to make new Melodists that are
variations of each other.
You can export (save) and import (load) individual as Melodists.M1 files.
This would be useful if you wanted to send a Melodist to a friend, for
example.
The entire Melodist file, with up to 256 Melodists, can be saved to a .MEL file. The usual file
is DEFAULT.MEL.
The DEFAULT.MEL file is saved every time the OK button is pressed, so you don't need to explicitly save this file
by the [Save As] button unless you want to save alternate .MEL files and go beyond 256 Melodists.
Chapter 11: User Programmable Functions
195
The Guitarist Maker
Band-in-a-Box will intelligently arrange any melody to a guitar chord solo by inserting real guitar voicings
throughout the piece. There are many preloaded Guitarists to choose from, or you can customize existing Guitarists’
settings or make your own Guitarists from scratch in the Guitarist Maker.
The Guitarist Maker is accessed from the Guitarist window. Click on the [Ch
Sol…] button to open the Generate Guitar Chord Solo dialog, and then press the
Guitarist Maker [Edit…] button to launch the Guitarist Editor.
Num
Title
Memo
Guitar Patch
Frets To Move
Select the Guitarist from this field.
Title the Guitarist.
This field allows a 100-character memo about the Guitarist.
Select the guitar patch in this field.
If set to zero, the guitar chord solo will be limited to chords that can be played within the
current position. If set to 5 (for example), the chords will be limited to chords that can be
played within the current position and up to 5 frets away from the current position.
Force Open Position
This option forces all of the guitar voicings to the open position. The exception is when the Melody notes are so
high that they can't be played using open position voicings. If the Melody is in a high range, and you want a “forced
open position” you should likely transpose the Melody to a lower octave prior to generating the solo.
196
Chapter 11: User Programmable Functions
The settings for Note Duration thresholds to get a chord refer to how long a note must be before a chord will be
generated. (Quarter note = 120 ticks.)
Looking at the settings above these would be interpreted as follows:
- If a note occurs and it is the “First Note of a New Chord” and the note is not followed by another note for at
least 50 ticks (120 ticks = 1 quarter note), then a chord will get voiced 90% of the time.
- If a note occurs (not the first note of a chord), that is on “Beat 1 of a bar,” and the note is not followed by
another note for at least 50 ticks (120 ticks = 1 quarter note) then a chord will get voiced 90% of the time.
- Similar interpretations for notes occurring on “Beat 2, 3 and 4.” You can see that the threshold is higher for
notes on beat 2 and 4, which is how a guitar player makes chord solos.
- “Passing notes” are defined as short duration notes that aren't on the beat, and are followed by a note that is on
the beat. In this example, passing notes will never be voiced as chords since the tick threshold is set to zero.
A further threshold is applied to the possibility that a note is
voiced to a chord. These are defined as durations in
milliseconds. In the settings shown, if the note occurs less
than 100ms (Time to Previous Note) after the previous note,
the note will not be voiced as a chord.
If the note is followed by another note within 80ms (Time to the next note), the note will not be voiced as a chord.
Strumming Settings
If the Guitar Chord is all played at the same time, it will sound as if it was plucked. Guitar playing is more typically
a strum.
Speed of the strum
If the setting is 80ms, then the guitar chord will be “strummed” over a period of 80milliseconds.
Delay start time of strum by %
If the Delay start time is left at zero, the strum will end at the original time of the melody note. If you set it to 50%
delay, the strum will be in its midpoint at the original start time of the Melody note, while if it's set to 100%, the
strum won't start till the time of the original note. The most musical setting is about 50% delay. A delay of 0% also
sounds good, and has the added advantage that it doesn't shift the actual time of the Melody note (relevant if you
keep regenerating the solo on the Melody track).
Plucked / Strummed
Pressing these buttons will set the settings to preset values.
Chapter 11: User Programmable Functions
197
Chord Types to Include
You can decide which types of chords should be included
in the chord solo.
Best Chords
Good chords
Advanced chords
Unusual chords
Barre chords
Include Open Strings
(Never/ Sometimes/ Favor)
The most commonly played chords by pro guitarists.
Popular alternate chords.
Chords that are difficult to play, advanced voicings.
Voicings that should be avoided in most cases but have some uses.
Chords that require the index finger to be played in a Barre position.
If set to Never, no chords that require and open string will be played.
If set to Favor, it will play open strings whenever possible.
Sometimes is a “middle ground” setting.
Include Chords with this # of Notes
You can select the # of notes for chords to be included in the chord solo. In the example above, chords with 2-6
notes will be included.
Embellish Chords
Embellish how often: Allows you to specify the frequency of embellishment.
Embellishment type: Allows setting of the types of embellishments to do.
-
Pop Guitarists should be set to use 9ths only. This will change C7 chords to C9 and Cm7 to Cm9.
The “7ths/9ths” setting should be used for Jazz. This adds the embellishments of C to Cmaj7 and Cm to Cm7.
The “7/9/11/13” embellishment should be used for “Advanced Jazz” Guitarists add 11ths and 13ths voicings.
If you make changes to the Guitarist settings, you need to manually save them by pressing the [Save As] button and
then finding the \bb home directory and saving the file as DEFAULT.GIT.
Individual Guitarists can be copied, pasted, exported, or imported to/from disk.
198
Chapter 11: User Programmable Functions
Chapter 12: Tutors and Wizards
Vocal Wizard
The “Vocal Wizard” displays the best song keys for your vocal range!
This feature helps you choose the best song key for your vocal range. Open the Vocal Wizard, enter your vocal type
(baritone, tenor, etc.), or choose a custom range. Then the wizard analyzes the song and recommends the best keys
for that song. Options available to “include/exclude falsetto range,” “restrict choices to these keys […],” and
“transpose now.”
Before we enter the Vocal Wizard, we’re going to load in the song Old Folks at Home (present in the c:\bb\Tutorial
- BB 2005 folder). The song Old Folks at Home is in the key of F, we’ll use the Vocal Wizard to find the best key
for a baritone.
To enter the Vocal Wizard, choose the menu item Window | Vocal Wizard, or press the Vocal Wizard
button on the toolbar. This launches the Vocal Wizard.
Here’s the dialog that you see when you enter the Vocal Wizard.
You can see from the screenshot that the Vocal Wizard has picked the key of D (colored green) as the best key for
the song, using the baritone vocal range. Other recommended keys are colored yellow. Un-recommended keys are
colored grey, and include the current key of the song (F).
Let’s explore the areas of the Vocal Wizard screen.
There are 4 areas that require your input.
Chapter 12: Tutors and Wizards
199
1.
Entering your Vocal Range.
2.
Here you enter your “comfortable” vocal range, from lowest note to highest note. If you can sing falsetto,
you can also enter the highest falsetto note, and the % of falsetto notes that would be acceptable as falsetto
notes.
You can also select a preset (like Baritone Male or Contralto Female). Or you can select one of 8 “User
Preset slots” to enter and save a custom range (if you press the [Save & Name User Preset] button)
Selecting the keys that would be “allowable.”
3.
Most musicians have favorite keys, so this area allows selection of keys that would be acceptable for the
Vocal Wizard to choose. For example, if we choose “Jazz” keys, we’ll see that the Vocal Wizard now
recommends the key of C instead of D.
Setting the range of the song to analyze (usually the whole song).
4.
Normally you’d want to analyze the whole song, but this allows you to select a partial range.
Selecting the track to analyze. You’d usually pick the Melody track, but can also choose the Soloist track.
You can then analyze the Melody by pressing the [Analyze] button. Most functions
automatically re-analyze the song, but pressing the [Analyze] button forces a reanalysis of the song. This displays the analysis of the song.
1. A purple area describes the current range of the song, low note to high note, and compares it to your vocal range.
2. The radio buttons show each of the 12 semitone keys, and show a score for each key. The lowest score is the
best. Keys are also colored – green (best key), yellow (good key), and grey (bad key for the song).
200
Chapter 12: Tutors and Wizards
In the example Old Folks at Home, you can see that D is the best key (“green”), but any of the keys from G to Db
are also good keys in the selected vocal range.
The area in black at the bottom gives an analysis of the vocal range if the song was transposed to the chosen key.
Now that the Vocal Wizard has told us the best key for this song, we can either close the dialog, or transpose it now
to the recommended key (or any other key that we have selected with the radio buttons.
The Vocal Wizard can also work in an automatic mode, transposing a song to the best key as soon as it is loaded,
without having to visit the Vocal Wizard dialog. This is done by checking the “Auto-transpose” checkbox. By
doing this, you can insure that any song you load will be in the best key for your vocalist! And if the key isn’t
deemed to be ideal, just visit the Vocal Wizard to see an analysis of the ranges to pick an alternate key.
Chord Substitution Wizard
Reharmonizing a song with the Chord Substitution Wizard is a fun and educational way to perform or practice a
familiar song in a brand new way. For example, if you had chords such as “Dm7 G7 Cmaj7,” a list of substitutions
including the tritone substitution “Dm7 Db7b5 Cmaj7” would be offered to you for use in your song.
There are 2 ways to get chord substitutions
1. Let Band-in-a-Box show you a list of possible substitutions to pick from yourself by accessing Window | Chord
Substitution Dialog menu item.
2. Let Band-in-a-Box pick them automatically by accessing Window | Auto-Generate Chord Substitutions menu
item.
Chapter 12: Tutors and Wizards
201
Chord Substitution Dialog
This dialog depends on what chords were present at the bar that was currently highlighted. This bar number is
shown in the dialog and may be changed.
In the example shown, the chord was an F7 chord, so the substitutions shown are for an F7 chord. The substitutions
shown may work for up to 4 bars, depending on the substitution. In the examples above, the substitutions work for 2
bars.
Jazz Substitutions / Pop/ Country
You can control what types of substitutions to see by using these checkboxes. Some substitutions include more
chords than the original, and some simplify the progression, and these can be viewed using the checkboxes. You
can elect to exclude substitutions that have a chord on each beat.
Types of Subs. to include
This combo box will filter the substitutions to include only the best substitutions or all of them.
Recompile
The [Recompile] button is only used if you have edited the CHORDSUB.TXT file to add your own substitutions.
This recompiles the file and takes about 1 to 2 minutes.
Do Substitution NOW
Press this button once you see a substitution that you like so that you can enter it onto the worksheet directly.
Double clicking on the substitution line will also accomplish the same. You can then move the current bar to the
next part of the song that you need a substitution for and repeat the process.
Restore / Restore ALL
You can UNDO the substitution by pressing the [Restore] button, or the [All] button to UNDO all substitutions.
202
Chapter 12: Tutors and Wizards
Auto Chord Substitutions
You can quickly auto-generate substitutions for an entire song, or portion of a song using the auto-substitution
dialog, which is accessed with the menu command Window | Auto Generate Chord Substitutions.
For example, we can generate substitutions for the !Freddie.MGU song. Here is the original chord progression.
By using the auto-substitution dialog, we can generate substitutions for the whole song, and we get this result:
You can see that Band-in-a-Box chose the substitutions for about 70% of the chords in the song (that's what we told
it to do in the dialog). It began by replacing the F6 chord with an Fmaj7 Gm7 Abdim Am7 progression. Some of
the substitutions chosen are even more advanced than that (replacing two bars of Bbmaj7 with Bb6 Ebmaj7 Dm7
Gm7 | Bbmaj7 Cm7 Dbdim Dm7 for example).
If you'd like Band-in-a-Box to only generate for a certain range of bars, you should first highlight that range of bars
in the chordsheet, and then launch the dialog. The Range will then be set to “Part of Song” and the “Bar” and “#
bars” settings will also be set. You can override these settings with manual settings.
Chord Builder
You can right-click on any chord to instantly hear how it sounds, or use the Chord Builder feature to audition
different chords until you find the one that sounds best to you. In other words, you can enter chords “by ear” without having to know the actual chord names or any music theory.
Launch the Builder by pressing the Builder button, or right clicking on the chordsheet and pressing the
Builder button, or by choosing the User | Chord Builder menu option to open the Chord Builder dialog.
You can click on the root of the chord in the “Root” group, and the Extension (Maj7 etc.), and also an alternate
“slash-note” root. For example, to make the chord F9/A, you would click on the “F” root, the “9” extension, and the
Slash Root of /A. As you click on them, you'll hear the bass note played on the Bass part, and the extension played
on the Piano track.
Press the [Enter Chord] button to enter the chord at the bar and beat specified. To insert the chord automatically
when you click on the note/extension names, select the “Enter chord when clicked” option. This will advance the
Bar/Beat position. Change the Bar/Beat settings to move to a different bar.
The Chord Builder can be left open as you work entering chords into Band-in-a-Box. Remember that you can also
enter chords from a MIDI keyboard by pressing Ctrl+Enter after you've played a chord.
Chapter 12: Tutors and Wizards
203
204
Chapter 12: Tutors and Wizards
Ear Training Tutor
Ear training is an important exercise for all musicians and you can practice your ear training with help from Bandin-a-Box. In addition to the common interval exercises (perfect 4th, minor 2nd, etc.), learning to “play-by-ear” for
Jazz and Pop music is further enhanced by ear training exercises to recognize common chord types (e.g., Major,
Minor, Dominant, etc.).
For example, Band-in-a-Box will play a chord and you will have to identify the correct root and chord type. Your
score can be tracked, allowing you to monitor your progress. Clicking on the various chord types lets you instantly
hear the differences between various chords. Other options include “types of roots and chords to use,” and “voicing
types” (open, closed, etc.) – allowing you to customize the ear training exercises for beginner through to advanced.
Interval recognition is also customizable from beginner to advanced, with such options as instrument type, octave
range, up/down intervals and more.
1.
2.
Click the on-screen ear training button, or press Ctrl+Shift+J, or go to Window | Ear Training Window
to launch the Ear Training Window. There are 2 modules in the Ear Training Window:
The Interval Tutor plays note intervals for you to identify.
The Chord Tutor plays chords (root + extension) for you to identify.
Interval Tutor
Click on the [Interval Tutor] button to launch the Interval Tutor module.
Click on the intervals to hear them. For example, click on “Minor 3” to hear a minor 3rd interval.
Set the interval types to guess. Pressing the [Easy] button will set it to the easiest (within one octave, second note is
always higher, etc).
Chapter 12: Tutors and Wizards
205
Start the game by pressing the [Guess Interval] button.
You can control the starting note and the second note in the dialog.
Once the game starts, click on the interval that you think is being played.
206
Chapter 12: Tutors and Wizards
Chord Tutor
Click on the [Chord Tutor] button to enter the Chord Tutor module.
-
Press the [Play Tonic] button to familiarize yourself with the root note of the scale as a
reference point.
Click on any of the other note names to hear that root.
Click on any of the chord extensions to hear that sound.
Guessing the root
You can test yourself on roots only or root AND extension. Press “Guess a New
Root” and you'll hear a root played.
Press this button to hear the root-to-guess replayed. If you need help, press [Play Tonic – C]
to hear the root again.
Chapter 12: Tutors and Wizards
207
When you think you know the root, press the root name on the list of note names at the left.
If you guess incorrectly, you'll see a message that says “Wrong Root.” You'll then hear the note
that you guessed playing, followed by the root-to-guess note again.
If you guess correctly, you'll see a confirmation of that, and can play again.
Press the [Stop] button to stop the game.
Guessing the Root and the Extensions
The Guess a New Chord game works in the same way as the Root game, except that
here you are guessing chord extensions. The root is always the same, whatever the
setting is at the left. Click on the extension to guess, and [Replay Chord] button to hear the chord again.
In this mode, you need to guess both the Root and the Extension. You can guess them
in any order.
Click on the root, and when you get it correct you can move on to the extension.
Types of Roots to Include
For the Roots, you can choose which types of roots to include. This can be any of the 12 semitones, or just the scale
tones, or just the 1-4-5 of the scale.
Extension to Include
For the extensions, you can include all of the extensions listed in the dialog, or just the subset that are common
extensions.
Types of Voicings to Include
The chord extension will be played using the voicing type that you specify in the voicing types combo box. These
can be open, closed, or root position voicings. This setting also applies to the voicing used when you are previewing
a chord.
Show notes on piano during guessing
If you were an advanced musician, seeing the notes on the piano during the guessing game would be “cheating,”
since you'd probably quickly recognize the chord. However, a beginner might benefit from seeing the notes played
on the piano screen. If this “show notes on piano during guessing” option is selected, these chords will play on the
small piano located on the main program screen.
The score is displayed on the window. You can reset these results to zero by pressing the [Reset] button.
208
Chapter 12: Tutors and Wizards
Rhythm Guitar Chord Tutor
Use the Guitar Tutor to analyze any song. This feature will show the chords that are playing on the virtual guitar
fretboard, in your choice of a Jazz, Pop, or Folk perspective. The Guitar Tutor is a fun way to learn about new
guitar chords while playing along with your favorite Band-in-a-Box tune.
The Rhythm Guitar Chord Tutor is most useful on styles that aren't guitar styles, because the guitar styles already
have a guitar part that you can learn from. Using the tutor, you can see (and optionally hear) guitar chords played on
the guitar fretboard. This teaches you how to play the chords on guitar.
To turn the Rhythm Guitar Chord Tutor on, launch the Guitar window and press the [Tutor]
button.
Enable Chord Tutor Display
This setting silently displays the chords on the guitar fretboard.
The Display Chords EARLY by (120/PPQ) is an “anticipate” mode that plays the next chord X beats in advance,
allowing time for the user to prepare. If set to 120, the tutor chords will appear a full beat early.
Play Chords through MIDI
To hear the chords, select the “Play Chords through MIDI” checkbox.
Tip: The Tutor uses the MIDI THRU part to playback on. You can control volume, panning, etc. by using the THRU
settings on the main Band-in-a-Box screen.
Guitar Patch
You can select the patch to use directly from the Tutor dialog.
Type of chords to display
The tutor will display Jazz, Pop, and Folk voicings in easy, medium, and advanced forms. The advanced forms use
inversions, and changing patterns of chords, while the easier ones just stick to the common “campfire” chords.
Half Note (sax) chords use the advanced Jazz Guitar “highest-4-strings-comping mode.” This usually plays on the 4
highest strings, and it plays several chords over a single chord. For example, for 2 bars of Cmaj7 it might play
Cmaj7-Dm7-Ebdim-Em7 all played as half notes.
Chapter 12: Tutors and Wizards
209
There are also tutors for the alternate tunings like DADGAD, Open G, etc. They can be selected from this dropdown list.
Show muted high note of 3 note comping
One of the tutors uses 3 note Jazz voicings to simulate the famous Big Band chord guitar comping styles. If you use
this, you'll only see 3 notes in the chords of course. Since it sometimes helps to see the entire 4 chord voicing in this
case, there is the option to show the muted note as well.
Note: This applies to the guitar tutor. There is also the option to show this for the guitar styles. This option is present in the
Guitar Options dialog.
Copy to melody track / Copy to Soloist track
Pressing either one of these buttons will send the chord to the appropriate track.
210
Chapter 12: Tutors and Wizards
MIDI File Chord Interpretation Wizard
Many people who play music by ear think of songs in terms of “Chords and Melody.” However many MIDI files
lack chord symbols, so they become difficult to learn without the user having to figure out the chords in a time
consuming process. Now you can open up any MIDI file in Band-in-a-Box, and Band-in-a-Box will automatically
figure out the chords of the song for you. It automatically analyzes the MIDI file, figures out where the bass, piano,
melody and other tracks are, and then works out the chord changes for the song. The chords are written onto the
Band-in-a-Box chordsheet like any other song. This allows you to quickly learn how to play a song from a MIDI
file - just read it into Band-in-a-Box and you'll see the chord symbols, and then learn the Melody! You can also read
tracks into the Melody and Soloist tracks.
Importing Chords
You can import the chords from a MIDI file. To do this, first blank the chordsheet, by choosing File | New. Then
select the menu item File | Import Chords from MIDI file to launch the Interpret Chords from MIDI file dialog.
Press the [Open (Change)…] Button to select the MIDI file that you'd like to import.
Once you've selected the file, you can press the [INTERPRET
CHORDS NOW] button.
When you do that, the chords will be interpreted from the MIDI file, and written onto the chord sheet. Prior to
pressing the [INTERPRET CHORDS NOW] button, you might want to make some custom settings.
When you load in the MIDI file, Band-in-a-Box interprets many
things from the MIDI file for you automatically. Normally you'd want this to happen, but if you'd prefer to make the
settings yourself, you can set the Auto Interpret settings from MIDI file to false.
Chapter 12: Tutors and Wizards
211
Once you have loaded in the MIDI file, and assuming that you have the “Auto Interpret” set to true, you'll see that
the dialog displays the settings that the Chord Wizard has found for the key signature, and channels used for the
song.
Let's work with an example song called Violet Song.MID. This should be included in your c:\bb directory.
- Start with a blank worksheet by choosing File | New.
- Choose the MIDI File chord Wizard dialog by choosing File | Import Chords from MIDI file.
Press the [Open (Change)…] button to select the MIDI file, and then choose the file
that you'd like to import, in this case it is “C:\bb\Violet Song.MID.”
Once you load in the MIDI file, you'll see that the Chord Wizard has analyzed it and made these determinations.
It has automatically determined that the “Violet Song.MID” file
-
has 2 bars of lead-in.
-
has 103 bars of chords.
-
is in the key of F with a 4/4 time
signature, and a tempo of 120.
-
has the Bass Part on channel 2.
-
has the chording (comping) parts
on Channels 3, 6 and 7.
-
has the Melody on Channel 4.
-
has no other parts like the Melody
to put on the Soloist track.
212
Chapter 12: Tutors and Wizards
Now, after loading in the MIDI files, you'd normally have a look at these settings above, to see if they seem
reasonable for your MIDI file. If not, you can change the settings. For example, if you know that the key signature
of the song is not F but is C, then you would set that. Or, if you knew that the Melody channel was on channel 3,
you could override the Chord Wizard settings.
Once you have done that, you should choose one of the Presets, to quickly put the settings to the type of song that
we are trying to interpret.
Preset choices are:
Jazz Standard, Jazz (Modern), Pop (with seventh chords), Pop (with no seventh chords), Rock, Pop Ballad, Solo
Piano, and Solo Piano (Jazz).
Chord Options
Important note: Pressing the Preset buttons sets these Chord Options automatically for you. You can override them in
this dialog.
When you choose one of these presets, it makes a number of settings in the Chord Options section of the dialog.
These include:
Chord Resolution
This is the minimum number of beats for a chord. For example, if you set it to “2 beats” then the Chord Wizard will
never attempt to come up with different chords that are only a beat apart. If you have a song that has a short section
that does include chords every beat, you can redo that section of the song with a “1 beat” resolution. (Default = 2
beats)
Include Slash Chords
If set, the Chord Wizard will include “slash chords” like F7/A or Cm/G.
Bass Part Type
You can set this to “Root,” “Root-3-5,” or “Walking Bass.” If you choose “Root,” the chord Wizard will assume
that any bass note is the root of the chord. Choosing “Root-3-5” will cause the Chord Wizard to assume that the
bass pattern is mainly on the root, 3rd and 5th of the chord. If you choose “Walking bass,” it will assume that the
bass notes can be changing and can include many notes beside the root. Setting the Walking bass line will likely
result in fewer chords overall than setting the “Root only” option.
Allow Suspended (Sus) Chords
Chapter 12: Tutors and Wizards
213
The setting for “Allow Sus chords” determines if chords like Csus or Bbsus7 will be included. The “Allow 7th
chords” specifies if 7th chords like C7 or Bbm7 would be allowed. Simple Rock songs might not have 7th chords or
Sus chords. Allowing chords with no thirds should be set in a hard rock song, or similar song with “power chords”
that might not contain the 3rd of the chords.
Delay Lowest Bass Note
Usually a bass player plays the root of the chord at or near the time when the
chord changes. But in solo piano playing or some bass styles, the bass doesn't state the root until later on, and this
setting should be set to “delayed” in a solo piano style of this type.
Primary Style
Set the primary style of the song to Jazz or Pop using the Lead
Sheet Method combo box.
Using the Chord Options Presets to quickly make settings
For the song “Violet Song.MID,” we know that this is a Jazz Swing type of song, so we
press the Preset Called “Jazz Standard.” By doing this, we see that the chord options have
then been set to Chord Resolution of 2 beats, no slash chords, walking bass, sus chords, 7th chords, and Jazz lead
sheet. These settings look OK for our Jazz song, if we wanted to customize it (e.g., to allow slash chords) we could
do it at this point.
So, to recap, using the Chord Wizard is a 3-step process.
1.
2.
We've loaded in the song “Violet Song.MID.”
Pressing the preset button called [Jazz Standard], we then looked at the Chord Options
settings for the various channels and they looked OK, so we didn't make any changes.
3.
We then press [INTERPRET CHORDS NOW] – this gets the Chord Wizard to interpret the chords, and write them
onto the Chord Sheet.
Once we've pressed the Interpret Chords Now button, we can see the results, by looking at the chord sheet. Here are
the chords that were interpreted.
Chord Wizard Results – interpreting from “Violet Song.MID.”
So that we can see how well the Chord Wizard did, we can compare it to the “correct chords” of the song, input by a
musician listening to the song.
214
Chapter 12: Tutors and Wizards
As you can see, by comparing the two sets of chords, the Chord Wizard got almost all of the chords correct in this
example. The Chord Wizard purposely avoids chords like “C13.” It will put a simpler “C7” instead, since this is
more like a typical lead sheet.
If you've read in the entire MIDI file, you have 103 bars of chords on the Chord sheet. This actually contains 3
choruses of the song. You might want to reduce that to a single chorus by setting the chorus end of the song to bar
36 and then erasing the excess bars (after bar 36) by choosing Edit | Erase.
Examining the song that has been interpreted by the Chord Wizard.
You'll notice that the title (Violet Song), key (F), and tempo (120) have been set to the values found in the file. Part
markers are not set; the Chord Wizard doesn't try to guess where part markers might be occurring. You need to put
the part markers in yourself. You also need to choose the style to use (a Jazz Swing style in this case). If you
examine the Melody track (by opening the Notation window and right clicking on some notes or pressing the Event
List (#) button), you'll notice that the Melody track contains notes from Channel 4, which is what we specified in the
Chord Wizard dialog.
Importing Part of a MIDI file
(or re-doing a section of the Chord Sheet)
Normally we'd want to import an entire MIDI file worth of chords. But if you only want to import some bars, you
can deselect the “Import Complete song” checkbox, and then specify where to start in the MIDI file (i.e. the number
of lead-in bars in MIDI file) and what bar to start at in Band-in-a-Box (Insert to BB starting at bar #) and the number
of bars to import (How Many Bars to import?).
For example, using the song “Violet Song.MID,” we could redo a section of the song using different settings. (For
example, a chord resolution of 1 beat instead of 2 beats.) If we were unhappy with the results at bar 7 and 8, we
could redo this by making the settings as follows:
Other Settings for the Chord Wizard
Band-in-a-Box and PowerTracks Pro Audio songs contain special events that write the exact chord names into the
MIDI file. So if the Chord Wizard sees these events, it will use them instead of interpreting the chords, since they
are likely to be completely accurate. If you'd prefer to ignore these chord events, set the “OK to use PG Music
Chord names from MIDI File” to false.
Chapter 12: Tutors and Wizards
215
The setting for “Write Chord Summary Notes to Soloist Track” is only used for diagnostic or special purposes.
When set, the Soloist track will contain a special track that has a chord written every 2 beats (or whatever the setting
for chord resolution is) that contains every note found for the chord. This shows you the type of logic that the Chord
Wizard is basing its decisions on. If you encounter a song that gives incorrect results for the chords, you can try this
setting and then examine the Soloist track to see the actual notes of the chords. Chord-stepping through the track
(using [Ins] and [Del] on the Numpad) allows you to quickly hear the chords.
You can optionally include controllers, pitch bend, patch changes, and lyrics from the MIDI file.
MIDI File to Style Wizard
Making styles with the Style Wizard is a process involving:
− Loading a MIDI file into the Style Wizard.
− Listening to the MIDI file by muting channels to identify parts.
− Picking the channels to use for the BB Parts.
− Picking the snapshot bars for the “a” and “b” substyle.
− Pressing the [Generate NEW style…] button.
The Style Wizard is used to generate a Band-in-a-Box Style from a MIDI file. It does this by analyzing the file and
creating patterns emulating the notes and rhythms for the style. First off, you'd need to get a MIDI file to use.
Important: You should use a MIDI file that you have composed and arranged – if not, you need to first get permission of
the composer and arranger before making a style from the MIDI file.
Style Wizard Dialog
Open the Style Creation Wizard dialog with the Style Wizard button or from the Styles menu by choosing
the Style Wizard menu item.
Once you open the dialog, you should select a MIDI file. You'll then see the name of the MIDI file
in the MIDI file label.
Once chosen, the Style Wizard will display the channels, patches, and number of
events in the “Tracks Area” of the Style Wizard. It will look like this…
Here's a sample row from the Tracks Area.
This indicates that “Channel 2” is used in the file. The checkbox indicates that it will sound when the [Play] button
in the Style Wizard is pressed. Deselecting this checkbox will mute the channel during playback. Muting/Playing
the channels is essential in auditioning the MIDI file to determine which “BB Parts” to use, and what bars to use for
“Snapshot bars.”
216
Chapter 12: Tutors and Wizards
The “Channel selector” presets help with the selection of the channels as described above. The
[None] button de-selects (mutes) all of the channels. The [All] button selects (plays)
all of the channels. The [Solo] button will “solo” the last channel that was pressed before the Solo button was
pressed.
The “BB” part button selects all of the channels that are currently using the “BB Parts,” i.e., the Drums/
Bass/ Piano/ Guitar/ and Strings.
The “BB Part” section is the area that you choose which channels to use for the “BB Parts”
in your style. There are 5 possible instruments in the style – Drums, Bass, Piano, Guitar,
and Strings. Tracks that are not part of the rhythm section (i.e., melody or soloist parts) or
“extra” instruments that you don't want to use in the style should be assigned to a BB Part
setting of None (----), “Melody,” or “Other.”
The Style Wizard automatically sets these “BB Parts” for you, but you should over-ride
these settings to your own choices for the style. For example, if the program has chosen an
instrument for Band-in-a-Box part of Strings, and you don't want strings in the style, then
change that BB Part setting to “----” (none) or “Other.”
The Patch setting is the patch (instrument) that is found in the MIDI file, and it
is the
suggested one to use in the style. You can change the patch if you'd like to use a different patch in the Style.
The #Notes column reports the number of notes that are found on each channel. This is helpful information in
deciding which BB Parts to assign. For example, if only 10 notes are used on the channel, it's unlikely that the
channel is playing much in the file, and shouldn't be used as a BB Part in the style.
The [Auto-Set…] button instructs the Style Wizard to re-make the settings for the Tracks Area and
Snapshots of the Style
Wizard. The Auto-Settings are already invoked when you load a MIDI file, so you would rarely need to press this
button explicitly.
The [+] button beside the [Open] button also allows loading of a MIDI file, but displays
the Interpret
Chords from MIDI file dialog (the Chord Import Wizard) to allow you to tweak settings controlling the chord
interpretation. For example, if the interpretation of the chords isn't accurate, use this button for different settings.
The [=] button will re-load a MIDI file that is already on the Melody track.
For example, if you've loaded in a MIDI file to the Melody track (outside of
the Style
Wizard), and would now like to make a style from it, you just need to load in the MIDI file from the Melody track to
the style wizard. This won't cause an interpretation of the Chords; it uses the current chords on the Chordsheet.
Play Looped Sections
The [Play] and [Stop] buttons and “Loop at Bar” allows playback of a
region of the MIDI file. As you hear the playback, you audition various
channels for the style by using the “Channel” checkboxes to mute/un-mute
tracks. The “Loop at Bar” setting is the bar for the loop to begin.
The # bars is the number of bars for the loop following the “Loop at bar” setting.
Chapter 12: Tutors and Wizards
217
Snapshot Regions
This area is for the “snapshots” for A substyle, B substyle, and A, B drum fills. For the “A” substyle enter the range
of bars that you would like to be included in the “A” substyle. You can enter values separated by commas “1, 2, 4,”
or ranges “1-7, 9-14,” or combinations “1-4, 9, 11, 12-24.” To determine which bar numbers to enter you'll need to
listen to the MIDI file.
Pressing the [Auto-Generate Snapshot bars] button will generate a list of bar numbers for the snapshots. This list is
based on the part markers in the BB Chordsheet, so you should first exit the Style Wizard to insure that the part
markers are correct before pressing this button.
This is similar to the “Auto-generate snapshot bars,” except when you select this button; a menu of choices
will appear to allow selection of all bars, or only bars that include all of the instruments.
The [Clear] button removes the current snapshots from the snapshot areas.
The “Add looped bars as a snapshot” adds the current looped area as a snapshot. You can of course type the
information directly into the snapshot areas.
The Defaults button sets the Style Wizard settings to their default state, including the settings in the
“More” Dialog.
The “Resolution” is set automatically, and should be confirmed.
It is set to Triplets for style with a “shuffle” feel such as Jazz Swing or any style with a triplet feel to the 8th notes (or
a swing feel to the 16th notes). The other setting is Straight for styles with straight 8th or straight 16th notes.
The Jazz checkbox setting is to indicate whether the style is a “Jazz” type style with Jazz chords or a “Pop” type
style with Pop chords.
The “Copy Melody to Melody Track” is a utility function that
should only be used when the style is “finished.” Prior to executing this command, the Melody track contains the
entire MIDI file with all of the parts. This “MIDI-file-on-the-Melody-track” is used to create the style. Once the
style is created, you might want to extract the actual Melody track from the MIDI file to put on the Melody track.
The channels used are the channels that have the BB Part set to “Melody.” When you do this command, you are
prompted to save the MGX file (i.e. the file with the MIDI file on the Melody track), so that you can revisit the file.
This “Copy Melody to Melody Track” is useful to audition your new style, because you can then hear just the
Melody along with your style.
“Copy Melody to Soloist track” works in a similar way except
that it doesn't erase the MIDI file part on the Melody track.
“Generate NEW style…” makes a new style. The Style Creation Wizard dialog
is exited, and a file dialog allows you to pick a name for the style.
218
Chapter 12: Tutors and Wizards
“Add to existing style...” allows you to add the patterns to an existing style.
The [More] button launches the Style Wizard – Advanced Settings and
Preferences dialog.
Style Wizard “More…” Dialog
This dialog is launched from the [More…] button in the Style Wizard.
There are 2 sections to this dialog.
Advanced Instrument Settings
The advanced instrument settings allow settings for the instruments (drums / bass / piano / guitar / strings) to be
included in the style. The settings are:
The “Substyles” determines whether the instrument is included in the “A,” “B,” or both “A&B”
substyles. For example, if you want to make a style that only uses the strings on the “B” substyle,
set the strings instrument part to “B” only.
The Voicings settings determine, for the various instruments:
Drums (“voicings”): Whether the patterns will use live or grid style patterns.
Default mode is “auto,” which normally uses live patterns, but you can force
it to use live or grid style patterns. Live patterns have higher resolution and
more instruments.
Chapter 12: Tutors and Wizards
219
Bass (“voicings”) determine if the bass part will use All notes / Scale tones
only / Root 3rd, 5th, 7th / Root, 3rd, 5th / Root and 5th / or just the Root. The
default is “Auto-select” which usually allows all 12 semitones.
Piano, Guitar, and Strings Voicings determine how the Piano patterns will
be voiced. The choices are Auto, Include Full Voicings, and Tritones only
(3rd/7ths). The auto-setting usually uses the “Include full voicings.” If the
part uses 2-note chords, you should over-ride this setting to “use tritones” so
that the most important chord notes (the tritone) are included.
The Embellish checkbox determines if the patterns for piano, guitar, and strings will be embellished.
If embellished, on a chord like D7 (in the key of C) 13ths, 9ths, and #11 notes might be added to embellish the
chord.
The “Include Empty patterns Threshold” setting defaults to None. Possible settings are None /
2 beat / 1 bar / 2 bars. If set to none, the instrument will always play in the style, if set to “1
bar” there will be “spaces of silence” up to 1 bar long (perhaps longer if chained together) in
the style for that instrument. So if an instrument is used sparsely in a style, set this setting to
something higher than none.
The Velocity Adjust will make an instrument louder or softer in the style.
(Default = Yes)
When set, the Style Wizard will set the channels, BB Parts, and snapshots for you. Normally this setting should be
left on.
(Default = No)
If this option is set when you create style patterns to add to an existing style, the entire instrument will be erased in
the style for any instrument used in the new style. When you generate a style by adding to an existing style, the
StyleMaker allows you to pick a new name for the style (to preserve the existing style).
(Default = 0)
If set to zero (the default), the Style Wizard can create the biggest style possible – filling up the rows completely
with patterns. But if you set this to a non-zero value it will limit the # of patterns that can be made. Since there are
30 rows in the StyleMaker, you can set this setting from 0 to 29.
The Style Wizard won't insert patterns unless they are unique compared to the ones already entered. At the default
setting of 8, after 8 duplicates of the same pattern, a 2nd pattern will be entered that is a duplicate of another pattern.
Setting this to zero would mean that every pattern would be entered (regardless of whether it was unique); setting it
to a high number like 200 would mean that only truly unique patterns are entered.
220
Chapter 12: Tutors and Wizards
Chapter 13: Tools and Utilities
Roland VSC3 Virtual Sound Canvas
An important part of Band-in-a-Box is the band that you actually hear. This is determined by the MIDI driver that
you use for output. The Roland Virtual Sound Canvas (VSC) is a top-quality software synthesizer.
You need to install the Roland VSC3, which is a separate install from the Band-in-a-Box program. When you
install the VSC3, you'll see a “Roland VSC” MIDI Output driver listed in the Band-in-a-Box MIDI Driver Setup
dialog.
Use the Roland VSC3 with Band-in-a-Box and any other MIDI program
that supports MIDI Drivers (almost all of them do). To use the Roland
VSC3 for your output sounds, choose Opt. | MIDI driver setup... and
select the “Roland VSC” as the MIDI Output Driver.
You will also find the Virtual Sound Canvas listed in your Windows
programs. This allows you to run the VSC3 as a stand-alone program.
The VSC3 has a latency of 430ms; it takes 430 milliseconds to produce
the sound after instructed to do so by Band-in-a-Box. So you should set
the latency to 430ms in the Opt. | MIDI Driver Setup dialog.
In addition to using the Roland VSC3 for output, remember that you can use it for the Direct-to-Disk rendering
feature of converting a Band-in-a-Box song to a WAV file (described elsewhere).
Chapter 13: Tools and Utilities
221
Guitar Tuner
The Guitar Tuner is optimized for guitar and bass, though it may be useful with other instruments. Connect an
electric guitar or bass to your computer’s sound card Line-In, or tune an acoustic instrument using a microphone
connected to the sound card Mic input. Play a pitch and the tuner will auto-range to determine the nearest note, and
display the intonation of your instrument.
Press the on-screen [Tuner] button or select the Window | Guitar Tuner menu item to launch the Tuner
Window.
Tip: There are detailed Guitar Tuner instructions in the online Help topic Connecting an Instrument.
The Guitar Tuner must be able to receive audio from your instrument via the line-in or microphone input of your
sound card. Please make sure that either the Microphone In or Line-In is enabled in the Recording Properties of the
Windows Mixer (or the appropriate Mixer application for your sound card).
Master Tuning
This function allows you to tune your sound card or module to another instrument, as well as adding a testing
function to see if your sound card supports Master Tuning. A setting of 0 is the default A = 440. Select the GM |
Master Tuning menu item to launch the Master Tune dialog.
Tip: Not all sound cards/modules support the Master Tuning feature. To see if your sound card supports Master Tuning,
press the [TEST] button in the dialog shown above.
Dynamic 3D Drum Kit Window
This sizeable drum window is an animated 3D display of a complete MIDI drum kit with all 61drum sounds
displayed on their respective instruments. Watch the drums being played or play-along/record by using QWERTY
keys or a mouse.
-
-
To launch the Drums window, click the Drums button in the View Panel. You can do several things with
the Drums Window:
Watch the Drum part being played on the Drums window in real time.
Play along with the drums in real time by mouse clicking on the drum instruments, or using the QWERTY keys.
The computer keyboard, the piano key number, and sound names can all (optionally) be made visible on the
hint line by moving your mouse cursor over a given instrument.
Record a drum part into PowerTracks.
Drum Display
All the General MIDI percussion instruments are shown. Some percussion instruments are triggered by multiple
MIDI notes. When a sound is controlled by more than one MIDI note, a percussion instrument will show different
behavior in response to the different notes. For instance, the Hi-Hat responds differently to Close Hat, Pedal Hat,
and Open Hat MIDI notes.
222
Chapter 13: Tools and Utilities
The Drum Kit window can be resized to tile or fit with other windows of interest, or the drums can be moved offscreen. The window looks best if your computer display is in High Color (16 bit) or True Color (32 bit) video
mode.
The onscreen instruments may be played by mouse clicking or by pressing the appropriate computer keys. There is
an option to display all the QWERTY names on the drums at the same time, so that you can see what keys to hit
without having to mouse over the instrument. When playing by mouse click or computer keys, the Shift key can be
used to switch the velocity between two user-specified levels (i.e. loud=100 and soft=50).
The drums that you play show up in green; the computer played drums are red.
The multi-note instruments send different MIDI notes to your sound source, depending on where you “click” on the
instrument. For instance, the Kick Drum can send three different notes: Ac. Bass Drum (MIDI note 35), Bass Drum
1 (MIDI note 36), and Square Kick (MIDI Note 32).
Control Buttons:
-
Record: Puts Band-in-a-Box in Record mode so drums can be recorded.
Play: Starts song playback.
Rewind: Stop and return to song start.
Stop: Stops song playback.
Size Buttons 1/1 - 1/2 - 1/4: Clicking on these buttons changes the size of the drums window to full size, half
size, or quarter-size. (You can also resize the drums window to any size by dragging a window border.)
Settings: Adjusts program behavior. See settings window section below.
Help: To launch the drum Help File, press F1.
Chapter 13: Tools and Utilities
223
Computer “QWERTY” Keys
Press computer keys to play drums.
Drums are grouped on the computer keyboard by category. The kick, snare, and hi-hat sounds are on the lowest
keyboard row. The lower-middle row contains toms and cymbals. The upper-middle row contains Latin drums, and
the top row contains Latin hand percussion. The Numpad keys contain the rest of the Latin hand percussion plus the
electronic tones.
Settings Dialog
Press the Settings button to adjust the various Drum Kit Settings.
Drum window is always on top
Use this checkbox to keep the Drums window on top of other program windows.
Note Velocity
When playing drums with a mouse or computer keys, the shift key toggles between two levels of note velocity,
which can be set any way desired.
Randomize
Use this checkbox to enable the program to send random velocity levels when playing the drums, handy when using
non- velocity sensitive devices. “Range” refers to the range of velocities. For example, if velocity is set to 127, and
the random range is set to 20%, notes would vary between 127 and 102.
224
Chapter 13: Tools and Utilities
Instrument Hints
Customize the appearance of the Hint line.
- Show Note Name
- Show MIDI Note Number
- Show Computer Key
Show
“Show All Instruments” shows all instruments in the drum window.
“Show Used Instruments” displays the basic trap kit, but does not display any extra instruments unless they are used
in a song.
The drum window is cleared each time Play or Stop is pressed.
MIDI Monitor
MIDI Monitor displays a listing of data received from computer MIDI Input and/or Band-in-a-Box output, useful for
educational or diagnostic purposes.
The MIDI Monitor opens with the [MIDI] button on the main screen toolbar, or with the menu command
Window | MIDI Monitor.
Tip: To display the data received from the computer MIDI Input, the MIDI THRU option must be enabled in Band-in-a-Box.
MIDI Monitor- Main Window
MIDI Display Controls
Event
The current event number since the display was last cleared.
Clear
Clears MIDI Display, Event counter, and Channel Activity panel.
Save Text
Save a tab-delimited text file of the data in the MIDI display. The file can be opened with a word
processor or spreadsheet program, for printing or further study. Various Save Text options can be
adjusted in the Settings window.
Settings
Open the Settings dialog, to adjust display behavior. The display can be modified to suit the task at
hand.
Filter
Open the Filter dialog, where receive settings can be adjusted.
Sequencer Control
The [Play], [Rewind], and [Stop] buttons control song playback without the need to return to the main Band-in-aBox screen.
Timer
A millisecond timer useful for viewing timing relationships between messages.
Chapter 13: Tools and Utilities
225
To use Band-in-a-Box to measure in milliseconds- set Band-in-a-Box PPQN to 480, and Band-in-a-Box tempo to
125 BPM. With this special resolution and tempo, tick values in the Event List window will correspond to
milliseconds.
Current Time - The millisecond count since the timer was last started. Click anywhere in the Timer area to clear
the Current time, setting it to zero.
Channel Activity Panel
This panel has an array of “LEDs” to show which channels are active.
MIDI Display Area
The MIDI Display area at the bottom of the main window, displays the data generated by Band-in-a-Box and/or data
received at the computer MIDI input. Each row is a single MIDI event.
Event number, starting from when the display was last cleared.
Evt #
Time (mS) The time in milliseconds of the event, from when the timer was last cleared.
Int means the event was generated by Band-in-a-Box, and Ext means the event was generated by an
Source
external MIDI Device attached to the computer MIDI In port.
The raw bytes representing each MIDI message. Most MIDI Message types contain three bytes, but
Raw
some messages contain one or two bytes. Sysex messages can contain an arbitrary number of bytes.
This field is blank in the case of Sysex messages. With Sysex messages, up to 16 “Raw” bytes are
displayed in the Data fields. Long Sysex messages are displayed on multiple lines, at 16 bytes per
line.
Text name of the Event type.
Status
MIDI channel of the Event. This field is blank for System messages (values from $F0 to $FF).
Chan
System messages do not have an associated channel.
Data 1
Data 2
Text name for the meaning of the first data byte of the MIDI message. For some messages such as
Pitch Bend or Song Position Pointer, the value of both data bytes 1 and 2 are calculated and displayed
in Data 1.
Text name for the second data byte of a MIDI Message.
Note: Some MIDI messages, such as Program Change or Channel Pressure, have only a single Data byte, and the Data 2
field will be blank. Also, some MIDI Messages have no data bytes, in which case both Data fields will be blank.
Display Filter
The Display Filter dialog allows you to select what MIDI events will be recognized by the MIDI
Monitor program.
Tip: Virtually any combination of display events can be selected in the filter. It is therefore possible to select combinations
that do not display any MIDI events at all. If you find that you are not receiving what you expected re-examine these
settings.
Sound Blaster Support
This includes a built-in AWE Editor, allowing you to edit the synthesizer sounds on the AWE 32/64 series and to
directly load Sound Fonts. There are also on-screen buttons to launch the Sound Blaster applets that control the
MIDI Synthesizer (AWE Control) and Mixer on the Sound Blaster card.
Press the [SB] button at the right of the main screen toolbar, or select GM | Run Other Program to run
the Sound Blaster applet.
226
Chapter 13: Tools and Utilities
Chapter 14: Reference
Band-in-a-Box Menu Descriptions
This chapter gives line-by-line descriptions for all Band-in-a-Box menus.
File Menu
New is used to blank the chordsheet and start a new song.
Open (BB song) is used to open an existing Band-in-a-Box song.
Open MIDI file loads a MIDI file into Band-in-a-Box and the MIDI file will play with the chords intelligently
interpreted on-screen.
Import Chords from MIDI File uses the MIDI File Chord Wizard to interpret chords from any midi file, and also
read tracks to the melody and soloist tracks.
Open Karaoke (KAR) File opens Karaoke files directly in Band-in-a-Box, displaying the lyrics and chord symbols
for the song.
Open Special opens a sub-menu with more options for opening songs.
Chapter 14: Reference
227
Open (Using Custom Dialog) uses the custom dialog that allows long-file-names, font selection, and even
remembers its settings (unlike the standard windows 95/98 dialogs).
Open Using Standard Dialog uses the standard windows 95/98 dialog.
Open with Melodies lists only song files that have melodies (*.mg?).
Open Song by Title allows selection of songs by displaying the full title of the song (not 8 character file name).
A search function allows you to search the title list for a word or phrase to quickly find a title. For example, type
in “Oldfolks” and the search will find the song title “Old Folks at Home,” as well as any other songs with
“Oldfolks” in the title.
Open Favorite Songs opens the dialog that shows the last 150 songs played.
Open Filtered by Style loads only song in current style.
Open Next Song and Open Previous Song will open the next/previous song in alphabetical order. If the song
loaded has a file name of “Paul,” choosing load-next-file will find the next file in alphabetical order after Paul,
maybe it would be “Peter.” Shift+F8 and Ctrl+Shift+F8 are the hot keys for this.
Import Chords from PG Music MIDI file will read in the chord symbols from PG Music MIDI files made by
programs like Band-in-a-Box or PowerTracks Pro Audio. Note that it won’t read in the chords from a MIDI file
that doesn't have special chord symbols typed in to it, i.e., it doesn't interpret chords.
If you want to interpret chords from any midi file, use the File | Import Chords From MIDI File option instead.
Tip: If you're working with a lot of Band-in-a-Box songs doing editing etc., remember the “Open Next Song” commands –
they will save you a lot of time!
Save song saves current song under original title.
Save song As... is to save songs (*.?G?).
Save Song with Patches & Harmony. If you would like to save certain patches with a song, then type in the
number of the patch (instrument) that you would like. Leave the other instruments at zero (0) for No Patch change.
Remember that - as with all other Band-in-a-Box functions - you use the General MIDI number for the instrument,
regardless of the synth you are using.
Favorite Folders… opens a list of recently used folders for quick access.
File utilities… opens a sub-directory of file utilities.
Change Directory (Path) opens the Browse Folder window where a new directory can be selected.
228
Chapter 14: Reference
Run Explorer in Current Directory launches Explorer. Pressing Ctrl+Shift+F3 is the usual way to get to this
item, and will quickly open Explorer. Once Explorer is open, you could double click on a song or style to load it in.
(Assuming that there is a file association for Band-in-a-Box songs and styles made in Explorer.)
Auto-rename song files to Long File Names will rename all song files in the current directory to long file names,
using the song title as the name.
Rename Any File on disk… or Rename CURRENT song filename allows you to rename files.
Delete File from disk deletes a song file without exiting the program
“Nuke It!” (Delete CURRENT song file from list).. deletes the current song.
Associate File types (songs, styles) with Windows… / Remove File Associations (songs, styles) with
Windows… will associate (or remove associations for) the file types for Band-in-a-Box songs and styles in
Explorer. Once set, this means that you can double click on a song or style in Explorer and Band-in-a-Box will open
up with that song or style.
Make Standard MIDI File makes a standard midi file. You can save in Type 1 (multi-tracks) or Type 0 (single
track) files. Karaoke MIDI files are also supported.
To save a MIDI file as a Type 0, 1, or Karaoke file, press the MIDI file button, and choose the desired
MIDI file type.
This button saves a MIDI File to Disk. You can then load the MIDI File into your sequencer
for further editing.
This button copies the MIDI File to the Windows Clipboard. Then you can clipboard-paste
Band-in-a-Box MIDI data to PowerTracks Pro Audio, Cakewalk, etc.
Go to Opt. | Preferences and press the [MIDI File] button to open the MIDI file options dialog box to control how
the Melody, Solo, and Harmony are written to a MIDI file.
Print Song - Chords/Melody opens the Print Options dialog.
Print Multiple Songs… prints all songs, or just selected songs, in a song directory.
Make Song Titles allows you to assign long, full titles to song filenames.
Load User Style allows you to choose a user style. (See Selecting Styles.)
Exit to exit completely from the Band-in-a-Box program.
Chapter 14: Reference
229
Edit Menu
Edit | Undo and Edit | Redo allow you to undo or redo most operations.
Edit | Cut functions like a delete command to remove bars from a song.
Edit | Copy and Edit | Paste are to copy chords. Copying a section of chords can be done in the same manner as
copying text in a Windows word processor.
Copying Chords to the Windows Clipboard
- Select the region to copy.
- Place the mouse cursor at the bar to begin the selection. Then, holding down the left mouse button, drag the
mouse over the region. As you do this you will see that the region will be inverted (i.e. looks dark).
- When you have selected the desired region of chords to copy, release the mouse button.
Copy the selected region to the clipboard with the on-screen copy button, the keystrokes Ctrl+C, or the
Edit |Copy menu item.
Pasting Chords from the Windows Clipboard
-
230
Assuming you have already copied some chords to the clipboard, you are then ready to
paste the copied chords into another part of your chordsheet.
Move the highlight cell to the bar to begin the paste of chords.
Copy the chords at the highlighted bar with the on-screen paste, the keystrokes Ctrl+V, or
choose the Edit | Paste menu item.
Chapter 14: Reference
Tip: The copied section remains in the clipboard and can be used repeatedly. If your song is in the form verse-versebridge-verse, you can simply copy the first verse to the clipboard, and then paste in the other verses. The clipboard
contents remain even if you load in a new song, so you can copy and paste between songs.
Copy From…To… / Copy Rests / Erase From… To…
One of the best ways to copy chords is the Copy From… To… command, or pressing Alt+C, which will launch the
Copy Chords and/or melody dialog. The Copy Rest command will similarly bring up the Copy Rests dialog to
allow copying of rests. The Erase From… To… command launches the Erase Chords and/or melody dialog.
These dialogs allow you to specify the number of bars to copy or erase, the location to copy to, and the option to
copy or erase the Chords, Melody, Soloist, and/or Lyrics.
Copy/Move Tracks opens the Track-to-Track Copy/Move/Delete dialog, which allows copying from one track to
another.
Chapter 14: Reference
231
Source track can be any of the Band-in-a-Box tracks – Bass, Drums, Piano, Guitar, Strings, Melody, or Soloist.
The track to “Copy/Move selected channels to ->” can be Melody or Soloist (since these are the only tracks that are
editable in Band-in-a-Box).
Intro Bars - Auto Generate (or Remove)
This command will launch the Generate Intro dialog where you can specify the characteristics of the intro you wish
to generate. For more information on this feature please refer to the Automatic Intro section.
Insert Bar(s) inserts a certain # of bars into the chordsheet.
Delete Bar(s) removes a certain # of bars from the chordsheet.
Repeats/codas/1st-2nd endings
You can add repeats and endings so that the Lead Sheet window will display and print using 1st /2nd endings. You
can add your own repeats and endings by choosing this menu command to open the Edit Repeats and Endings
dialog.
Reduce (durations of chords by 1/2) cuts chord durations by 50% (e.g., 4beats>>2beats; 2beats>>1beat).
Expand (durations of chords by 2) doubles the durations of chords (e.g., 1beat>>2beats; 2beats>>4beats).
232
Chapter 14: Reference
Unfold (convert to 1 BIG chorus)
Choose this command to unfold a multi-chorus song into one BIG chorus. When selected, Band-in-a-Box will
display all choruses and verses of a song without loops or repeats. It is useful, for instance, when you have a song
with 3 choruses and want to convert it to a single large chorus, or to customize a song with the “Edit Settings for
Current Bar” feature to change meter, tempo, patches, styles, and/or harmonies and generate a MIDI file for export.
becomes...
Set Time Signature (range of bars)
You can assign a specific time signature at any bar and apply it to a range of bars, as often as you want. For
example, to have one 5/4 bar, bar 13, select this menu item, and toggle the 5/4 button. Then, type in the bar
beginning (13) and number of bars (1) in the space provided.
Time signature changes are printed on the Notation and Lead Sheet.
Transpose
This menu command opens a submenu with both manual and
automated options for transposing the complete song or selected
parts of the song.
Chapter 14: Reference
233
Transpose From .. To .. launches the Transpose
dialog for transposing a particular section of the song.
The bar values can be typed in manually or you can
transpose a portion of a song by highlighting the
region you wish to have transposed, selecting this
menu item, and typing in the new key you wish to
transpose to.
Transpose DOWN or UP 1 semitone transposes the entire song. This can be done while the song is playing. Bandin-a-Box will pause briefly, and then resume playing in the new key at the same place in the song.
Transpose # of semitones opens a dialog where you can type in the number of semitones to transpose the song.
Song Memo…
A song memo of up to 2000 characters may be added. When a song has a memo associated with it the
word Memo highlights in pink.
Clicking on the [Memo] button launches the Song Memo dialog, where you can type or edit a memo about the song
and select an “Auto-open” option that will show the memo each time the song is loaded.
Auto-Generate Song Title allows you to generate a title for a song. There is also a button on the main screen for
this.
‘Jazz Up’ The chords
This will “Jazz Up” the chords by changing chords like C and Cmaj to 7th and 6th chords. Song embellishment will
be turned on for the song. Select the type of 7ths from the list box, and then click on the [OK – Jazz UP] button.
‘Jazz Down’ The chords
This will “Jazz Down” the chords by changing chords with 7ths (e.g. C7) to triads (e.g. C) and 9ths and 13ths to 7th
chords. Song embellishment is turned off. Press [OK – Jazz Down] to proceed.
234
Chapter 14: Reference
Chord Settings…
This launches the Chord Options dialog box, where you can put in rests and pushes. You can launch the Preview,
Chord Builder, or Chord-Substitution Functions from this window.
The Chord Options dialog box can also be opened with the chord options button, with the keystrokes
Alt+F5 or with a right mouse button click on the chordsheet.
Settings for Current Bar…
This command opens the Edit Settings for Current Bar dialog where you can change meter, tempo, patches,
styles, and/or harmonies at the current bar. This dialog is covered in detail elsewhere in this manual and in the
online Help.
Settings (for This Song)…
The Song Settings dialog can also be accessed by pressing the [S] settings button on the main screen under
the song title. These settings are fully explained in the PowerGuide chapter.
Styles Menu
StyleMaker
This opens a submenu with three StyleMaker options.
New - Make A New Style
This function allows you to begin to create a new style, using the StyleMaker feature. See online Tutorial #6:
StyleMaker - Making a New Style.
Edit a Style
This allows you to edit an existing style (*.STY) from disk. The resulting style can then be saved with the same
name or a different name. This function uses the StyleMaker. See online Tutorial #5: StyleMaker – Editing Styles.
Edit Current Style
This allows you to quickly get into the StyleMaker to edit the current style. The current style is the style that is
displayed in the Style Box on the main screen.
Usually you would use Ctrl+F9 to do this quickly. See online Tutorial #5: StyleMaker – Editing Styles.
Chapter 14: Reference
235
Make a Hybrid Style
The “Hybrid Styles” feature allows you to play and create a style that has instruments from up to five different
styles! You can, for example, play a song with a Reggae bass, Rock drums, Salsa piano, or any combination of up
to five styles that you want.
Style Wizard (Auto-Create Style from MIDI file)
Launches the Style Creation Wizard, which automatically converts a MIDI file (.MID) to a Band-in-a-Box Style
(.STY). Simply open a MIDI file, select your options, and press “Save-As Style.”
Style is Enabled
This item will Enable or Disable the style. When disabled, the name of the style will have an X at the beginning,
which indicates a disabled style. The disabled style won't sound or write any data to the MIDI file. The most
common use for disabling a style is when a MIDI file is loaded to the Melody track. Then the style won't sound and
conflict with the full arrangement on the Melody track.
OK to load style with songs
Normally this is checked so that songs load with the associated style. But let’s say we’ve discovered a new style,
and want to try it out on many different songs. In that case we would ensure that this item is NOT checked. Then
when a song is loaded it will play in the new style we are trying out.
Open a User Style from disk…
Styles can be selected and loaded with Long File Name dialogs.
Browse Styles with info…
Opens the StylePicker window with complete style information.
Select Favorite Styles…
Opens the Favorite Styles dialog, which contains a list of the most recent 150 styles used. Since these are ordered
based upon how often they are used, we call this the “favorite styles” list. Since you can also store user-definable
favorite lists, we also refer to them as Set Lists.
Load Previous Style, Load Next Style.
This function, like the Load Next Song function, loads in the previous (or next) style in alphabetical order of the file
name. These functions are in the Styles menu, and accessible with the hot keys Ctrl+Alt+Shift+F8 (or
Alt+Shift+F8).
Style Aliases
You can create an alias so that when Band-in-a-Box looks for a style, it will load its alias instead, so when you have
found a new favorite style just change the alias and you don’t have to change all of your songs.
-
236
To create a new alias, click on an empty spot in the Alias list, or click on the alias you wish to edit if you wish
to change an existing alias.
Press the [Choose] button below the Original Style box and select the style you wish to be replaced.
Press the [Choose] button below the Substitution box and select the replacement style (alias).
If you want to type in a style name use the [Custom] button.
Chapter 14: Reference
When you have successfully made an alias, you will notice that there will be a small arrow in the Styles box on the
main screen indicating that you have an alias loaded.
Tip: You can temporarily totally disable the Alias feature by disabling the Allow Any Style Aliases checkbox found in the
dialog. You can also have confirmation of alias substitutions by enabling the Confirm Substitution checkbox.
Choose from 24 “Built-in” Styles
Use this list as a convenient way to make a quick pick from the list of 24 original Band-in-a-Box styles. Once you
load a style, the song will be played back using your chosen style and you can change the style any time.
Opt. Menu
MIDI Driver setup…
Select MIDI Input and MIDI Output drivers and choose a Synthesizer / Sound Card patch map. Select the [Run
Driver Wizard] button for help with your selection. This topic is discussed in detail in the setup instructions.
Use/Set ALTERNATE MIDI output driver for session
Use/Set Alternate MIDI Driver for session, allows you to set a temporary MIDI Driver for a session, useful when
your main MIDI Driver is “in-use” by another application.
Return to Factory Settings
Choosing this command will reset all settings to the default at the time of shipping. Return to Factory Settings also
offers to nuke the drum kit and MIDI Driver choice, making the return to factory settings complete.
If you choose MOST settings,
the patch map and drum kit
will be left intact, and not
reset.
If you choose ALL settings, all
settings will be reset to
factory.
What add-ons do I have?…
An intelligent dialog, also accessible from the Help menu that will search your directory to tell you which add-ons
you have and which you don’t.
Chapter 14: Reference
237
Utilities
Edit Chord Shortcuts file (shortcut.txt)… / Refresh Chord Shortcuts…
If you have found a chord that Band-in-a-Box doesn't recognize, you can add your own shortcuts in a text file that
you make yourself called c:\bb\shortcut.txt and Band-in-a-Box will allow you to type in that chord in the future.
Click on this menu command to open or create your own chord shortcuts file. Make sure to save the file after
editing. Changes won’t take effect until you choose Edit | Refresh Chord Shortcuts…
The text file \bb\shortcut.txt allows you to add new chord shortcuts. If you find a chord that Band-in-a-Box won't
accept, like Csus2 when it expects C2 instead, you can enter this on a single line (without the quotes) “Csus2@C2.”
Then Band-in-a-Box will enter the chord C2 whenever you type in Csus 2. You can also use it for shortcuts. For
example, if you entered j@maj7 Band-in-a-Box would let you type Cj for CMaj7. See the file c:\bb\pgshortc.txt for
examples of shortcuts.
Note: The shortcut.txt file doesn't ship with Band-in-a-Box or it would overwrite your file! The file c:\bb\pgshortc.txt should
be used only by PG Music Inc. for shortcuts supplied with Band-in-a-Box.
Save Default Configuration (Mysetup.DK file)
This will rewrite the Band-in-a-Box configuration file mysetup.dk with your current settings. This file contains:
- MIDI Channels/Patches/Volumes/Reverb/Chorus/Bank
- Patch Map
- Favorite Patches, Favorite Combos settings
- Drum Kit
Save / Load alternate Drum/Patch File .DK
Allows you to save different custom drum kits or load preset or custom kits.
Display General MIDI Patch Numbers
This opens the General MIDI Patch List for reference.
Send a SysEx file (*.SYX) is a command that sends SysEx information to your MIDI device.
Choose Patch from General MIDI Patches... allows you to select a patch for the currently selected instrument
from an organized list of GM patches.
Choose Patch from Higher Bank... allows you to select a patch using the advanced search and higher bank/patch
support capabilities.
Make an Advanced Patch map
Patch maps contain information for mapping the patches and drum notes to your synthesizer as well as Velocity
offset, Octave offset, bank Controller 0 setting, bank Controller 32 setting, etc. There are also advanced options like
sending a SysEx file by loading the .DK file.
These options are useful either if you have a newer synthesizer that supports bank changes and has nice patches in
higher banks or if you have an older synth that requires custom mapping of sounds. To access these features tick the
Enable Advanced Settings checkbox. Then, type in the values you would like to change. Say, for example, you
have some great string sounds on your synth on Bank 4, Controller 32. With this feature you can save them as part
of your Band-in-a-Box setup by clicking the [Save] button. This will append your MYSETUP.DK file to include all
of the patches you like to use, regardless of where they are on your synth.
238
Chapter 14: Reference
Language Selection
This allows you to change language from English to
another language for display. If there are other
languages supported by your version of Band-in-aBox, then they will be displayed in this dialog box.
International language support files are available for
download from www.pgmusic.com.
Preferences…
This dialog box allows you to set various settings that are saved in the Band-in-a-Box for Windows configuration
file called INTRFACE.BBW. You can open the dialogs with keystrokes by typing the underlined letter shown on
the tabs. For example, you can open the “Arrange” Prefs tab by the keystrokes
- Ctrl+E to open the Prefs dialog, then
- A to open the Arrangement Options.
The underlined letter of the Prefs tab items indicates the hot key.
Environment Options
OK to Save/Load Reverb, Vol etc. w/Songs
Select this checkbox if you wish to embed Reverb, Volume, Pan, Chorus, and Bank information with songs for later
recall, or if you wish to enable any such embedded information with songs that are loaded. The last settings that are
in effect on the main screen instrument panel when you save the song will be recorded. Individual settings can be
enabled/disabled in the File | Save Song w/Patches and Harmony menu item.
OK to Prompt to Reduce/Expand Song
Chapter 14: Reference
239
If a style is changed with a different feel (16th notes instead of 8th notes), Band-in-a-Box will automatically offer to
expand or reduce the duration of the chords, and change the tempo to accommodate the new style.
StylePicker defaults to current style
Since the StylePicker can now default to the current style, this option is available. If you want the StylePicker to
stay at the style that you left it, de-select this item
Use custom filename dialog
When selected, the [Open] button, or the menu command File | Open, or the F3 key will launch the custom Open
File dialog. The custom Open File dialog has several advantages over the traditional Windows dialogs:
- The window is much bigger than the traditional one, allowing more room.
- There is a selectable font size and typeface.
- You can adjust the widths of the various columns.
- The Window remembers your settings.
- There are tabs at the top that allow sorting by name, date etc.
OK to “beep” with messages
Now that people have their sound cards hooked up to big speaker systems, a simple “beep” issued by Windows
when an incorrect key is pressed can seem loud enough to “wake your neighbors.” Setting the “silent beep” option
allows Band-in-a-Box to visually flash the window title bar to get your attention, instead of generating an audible
“beep.”
Always save songs with “U” extension
At program boot up…
On session start, you can elect to have the last song or style that was used loaded in automatically. Or not.
Boot up in directory of the last session
On program boot up, the current directory will get set to the last directory used in the previous session.
Keystroke Options
Enter Key Advances Highlight Bar
The Enter key advances the highlight bar on the chord sheet. This speeds up the entry of songs for people who
prefer to use the Enter key. When you enter a chord on the chord worksheet, press the Enter key to place your
chord in the highlighted cell. The highlighted region will then move automatically to the next cell. The right arrow
key can also be used to move the highlight cell.
SPACEBAR Key
There are three options for spacebar operation.
- Enters no chord (deletes current chord)
- Plays from current position (Ctrl – Space from start)
- Plays from start (Ctrl – Space from current pos.)
Simulate NUMPAD keys (for notebook users)
Notebook users often don't have a number pad so they can't use the Band-in-a-Box looping features
(Ctrl+NUMPAD 1-6 keys). With this option the regular numbers can be used to trigger the looping feature. For
example, pressing Ctrl+2 will start playback of looped choruses.
Pause Play until MIDI or Key received
This allows playback to be started by a MIDI note received at the MIDI In port, or by pressing a key on the
computer keyboard. Band-in-a-Box generates its arrangement, and then “stands by” for your start command.
Text Hints
Choose to enable or disable the fly-by text hints, the comprehensive program hints, and/or the dialog box hints. Set
the time delay in ms before the hint pops up, and the length of time it will display.
Preferences Buttons
Most program settings and options can be accessed from the rows of buttons at the top of the Preferences dialog.
240
Chapter 14: Reference
Display Options
The [Display] button opens the Display Options dialog.
Toolbars
Toolbar mode settings are for the main toolbar. The Normal mode shows toolbar icons with text labels. Options
are Text only, Icons only, or No toolbar.
Show on-screen piano shows or hides the on-screen piano.
Floating Toolbars Always Show Text toggles floating toolbar text off or on.
Song Title area font allows the selection of any installed font the song title.
Chordsheet
Enable display of Repeats/Endings allows repeats signs and 1st/2nd ending markers to be shown on the chordsheet.
Display bars higher than end of song in gray will “gray out” the bars on the chordsheet after the end of the song.
Show chords with push/rest characters
The push character is the caret symbol (^). So a C chord with a push is displayed as ^C. The rest character is a
period (.) so a C chord with a rest is displayed as C. (C period). If you prefer to not see these characters displayed,
then set this to false. These characters won’t show up on the printout regardless of this setting.
Show chords with pushes/rests in color
If set to YES, pushes are displayed in GREEN and rests are displayed in RED. This only applies to the Chordsheet,
not the notation.
Chord display
Use this setting to change the chord display from normal to Roman Numeral, Nashville, or Solfeggio.
For Roman Numerals of Chords in minor keys, use relative major
Chapter 14: Reference
241
For minor keys, base roman numerals on the relative major. For example in key of Am, Am is either the Im chord
or the VIm chord.
Chordsheet Font/Number of rows
You can choose the Font to use, and the # of rows per screen.
If you choose a Custom font, you can choose the size as well. If you choose one of the preset
fonts, the size is set automatically to fit into the height of the chordsheet row.
If you click on the [Jazz Symbols] button then “Jazz Chord Symbols” will be selected and you
will see shorthand Jazz chord symbols on the chordsheet.
To revert to the classic style that used a small System font and lots of rows, you can choose that as the type of font
“Small font (system).”
Transpose
This will visually transpose the chordsheet and notation display by a number of semi-tones for concert or nonconcert instruments, either by typing in a number or choosing a preset.
Arrangement Options
The [Arrange] button opens the Arrangement Options dialog.
Boost Velocity of pushes by
The pushes in Band-in-a-Box are the chords that get played before the beat. Typically pushes are played a little
louder than other patterns. You can leave this setting at 0, or set it to between 0 and 10.
Boost shots by
Shots can be accented with this setting.
Boost ‘Holds’ by
Use this setting to boost the velocity of held chords.
Allow Any Rests
242
Chapter 14: Reference
You can disable the rests feature. You might want to do this if you’ve got a song with a lot of rests in it, and are
then having difficulty recording a melody because you don’t hear the drums providing the beat (due to the drums
resting). If so, you can temporarily disable the rests so that you can record and listen to the drums.
Allow Any Pushes
If for some reason you don't want a style or a song to have pushes, you can set this to no.
Allow Style Pushes
If for some reason you don't want a style to have pushes, you can set this to no.
OK To Load Style With Songs
This loads the style that is saved with the Band-in-a-Box song. Set it to NO if you don’t want the saved styles to
load, perhaps to audition a new style with several different songs.
Concert Pitch Adjust
This is useful for non-concert instruments such as Saxophone or Trumpet. The output is transposed so that you see
the music in one key, and it plays in another.
Trumpet players and other Bb instruments should set Concert Pitch Adjust to –2.
Alto Sax and other Eb instruments should set Concert Pitch adjust to +3.
Note: This concert pitch adjust setting is an old one. It is preferable that you use the Notation-Transpose Option instead.
Allow Any Endings
You can disable the endings from all the songs by using this setting.
Lowest Bass Note
Styles will normally play bass notes (down to the low E) if the pattern won't go below a low E note. This happens
with all styles automatically, but there is also an option to set the lowest note that the bass can go real low (so you
can get a low C if you want to!).
Prevent “too low” guitar notes
Allow late notes in pattern, just before chord change
Styles will normally play notes near the end of a pattern, before a chord change. Sometimes this makes the style
sound “too busy.” If you set this to, say 70%, then 30% of the time, the note at the end of the pattern will play
quieter, typically at half the volume.
Drum Brushes
Most GM modules have brushes available on patch 41 on the drums. On some Sound Blasters you need to load a
GS sound font for this to occur, and you need to use the Sound Blaster software to do this (AWE Control Panel). On
the Yamaha XG, you likely need to send a “GS mode on” message from the GM menu in Band-in-a-Box. But if
your module just doesn't have brushes available, then you can set this option, and the style will remap the notes to
different drum instruments that don't have brushes.
First bar of first chorus of song gets a drum cymbal crash
If selected, the first bar of the song (following the intro) might get a cymbal crash. Usually this is left unselected,
since most drummers wouldn’t play a crash cymbal on bar 1 of the song.
Chapter 14: Reference
243
Count-in and Metronome Options
This opens the Count-in and Metronome Options dialog.
Drum Lead-in options
Allow Lead-In Bars
People who use Band-in-a-Box for soloing practice will likely turn the lead-in off to allow endless looping
uninterrupted by the lead-in count. To eliminate the lead-in count, select Allow Lead-In Bars to = NO, this will start
the song from bar 1 with no lead in.
Play Lead-In Even If Intro Present
If a song has an intro, it’s usually not necessary to play the 2 bar lead-in count. There's a new option to always
OMIT the lead-in if an intro is present.
Lead-in type
This can be drum patterns instead of “1-2-1234.” You can specify to play two bars of drum patterns instead of the
count-in. You may prefer hearing the drum beat to a simple count-in, since it provides more information about the
upcoming groove. If you’re playing with Band-in-a-Box live on a “dance floor,” this setting will avoid “dead air”
between songs, and keep the drumbeat going. Includes options to have “a” or “b” drum fills or patterns play for the
two bars.
Audible Lead-In/Volume
Enables audible count-in. If you would like the lead-in bars to be played, but just want the drum lead-in quieter (or
silent) set the Drum Volume to = 0 (for silent).
Instrument/ Pattern
You can select any drum instrument for the count in. You can choose different count-in rhythms, e.g., tap on 2 and
4 instead of 1-2-3-4. There's a new “smart lead-in” option to silence the drum count-in if a melody lead-in has
begun.
244
Chapter 14: Reference
Smart Lead-in
A smart lead-in avoids playing the count-in drum sound during a Melody pickup.
Lead-in drum count if drums muted/disabled
Previously, when the drum track was muted (or disabled in a song), the count-in drum click wouldn't play. This
option can play the drum count-in in all circumstances. Drummers who play along with BB by muting the drum
track should find this feature useful. To set this option, choose Opt. | Preferences and set “Lead-in drum count if
drums muted or disabled” to true (default is true).
Metronome Options
Visible Metronome
You can display a visible metronome on-screen during the entire song (or just the lead-in). Choose the screen
position (top-right or center), and the size (up to near full screen size). Also choose the visual metronome pattern
(1234, 1-3, 1---, or –2-4). Seeing a metronome on-screen is a great way for a student to learn to keep on the beat,
and with a settable size, students can view this from across the room.
Audible Metronome
The three settings for the audible metronome are None, During Record, or During Record and Play.
MIDI File Options
The [MIDI File] button opens the MIDI file options dialog.
Include Patch Changes in MIDI files will include the patch (instrument) changes.
Include Part Marker text markers will write descriptive text markers to the MIDI file, such as “bar 23, part A.”
Text markers are also read in from MIDI files, and displayed as Section Markers on the Notation.
Include 2 bar lead-in in MIDI file is selected if you don't want to create a MIDI file containing the first 2 bars of the
1—2—1-2-3-4 count-in. If there is a Melody pickup, then the 2 bar lead-in will remain in the file.
Write Lyrics in General MIDI or PG Music format
The GM specification has agreed upon specific requirements for writing lyrics in MIDI files, which are now
supported, so that lyrics that you save in Band-in-a-Box should show up identically in other MIDI programs. To set
this option, choose either General MIDI format or PG Music format. We recommend the GM format.
Chapter 14: Reference
245
Write Section Text as Text Events
Your section text can be included in the MIDI file as text events.
Include Volume/Reverb/Chorus/Panning
This will include the volume, reverb, chorus, and panning settings that you have made in the Band-in-a-Box synth
window in your MIDI file.
Include Forced Channel Meta Event
This will include the forced channel META event. It is recognized by PowerTracks Pro Audio and other PG Music
Inc. programs only.
Include Guitar Position Controller
This will insert a controller 84 which PG Music uses to indicate the fret position. Since some synths also use this for
Portamento Control, you should use this setting with caution.
Write Soloist Part On Channel 5
Normally the program writes the Soloist part on channel 8. Since that could also mean the left hand of a piano track
using the convention of channel 8/9 for piano, this option allows you to write it on channel 5 instead.
Write Harmony To MIDI File
If set to YES, the harmony will be written to the MIDI file. If not, just the melody will be written to the MIDI file.
MIDI File Harmony on separate tracks
If set to YES, the harmony will be written to the MIDI file on separate tracks for each voice. You could use this to
print out individual parts to your printer for example.
Write Guitar part on 6 channels
If set to YES, the styles that are Intelligent Guitar Styles will result in a MIDI file that has the Guitar part written on
6 channels (11-16). Then, when you read it in PowerTracks, or another sequencer that uses the convention of 11-16
for guitar strings, the guitar part will display correctly.
MIDI Driver Setup
The [MIDI Driver] button launches the MIDI Driver Setup.
246
Chapter 14: Reference
MIDI Input Driver
Select the Driver that you would like to use for input from a MIDI keyboard. If you don't have a MIDI keyboard,
you can select <No MIDI/Sound Input>.
MIDI Output Driver
Select a Driver For MIDI Output. This also includes Sound Card output (like Sound Blaster).
Perhaps the easiest way to configure Band-in-a-Box is to press the [Run Driver
Wizard..] button.
The MIDI Output Driver Wizard dialog will take you step-by-step through the process of auditioning and
selecting an appropriate driver. This assumes that the appropriate Windows sound drivers are installed and correctly
configured.
Synthesizer / Sound Card
Selecting the type of synth allows Band-in-a-Box to automatically load in the appropriate Drum/Patch kit file
(*.DK). It is not essential to set this - if you don't then leave it as <synth card not listed >.
Driver Latency
Software synths (like the Roland VSC) have a specific timing issue associated with them; “latency.” This means
that it takes about 430ms from the time Band-in-a-Box sends the MIDI information to the Virtual Synthesizer to
generate and hear the sound. To keep everything (i.e. the notation display, etc.) "in sync," you should set this
latency option. In most cases, Band-in-a-Box will prompt you to do this. If you are using a regular sound card or
MIDI module you should not encounter any latency, so you should set the latency option to zero (0) if it's not
already set this way.
Use DXi Synth
Check the Use DXi Synth checkbox to enable DXi playback.
To use this option, you must have a polyphonic DXi synthesizer installed on your computer, such as the
Roland/Edirol VSC DXi. It will also be most convenient if your DXi synthesizer can use General MIDI or GM2
patches.
DXi Synth Settings
To select the DXi synthesizer, click the [DXi Synth Settings] button, which will open the DirectX Plugins window.
Select your DXi synth and apply real time DirectX effects.
GM2 support
The type of GM2 support is set here. The choices are:
- General MIDI 2 support: If you're using the Roland VSC3, or a newer Sound Canvas (i.e. newer than 1999, or
newer than the Roland SC88), then choose this GM2 support.
- Roland GS (older Modules): “Older” Sound Canvases (SC55/SC88) support GS, but not GM2. The good
news is that they have the same patches available, just at different locations. So if you choose this option,
Band-in-a-Box will find the patches at the “GS” locations instead of the “GM2” locations. If you have a newer
GS module like the SC8820, it supports both GM2 and GS - you should likely choose GM2.
- No GM2 support: Most sound cards (Sound Blasters etc.) don't have GM2 support yet, so just support the 128
sounds. Band-in-a-Box will use the closest instrument in these cases.
Chapter 14: Reference
247
MIDI Options
This button opens the MIDI Options dialog.
Send GM Mode On at startup / Send XG Mode On at startup
You can elect to have Band-in-a-Box automatically send a GM or XG Mode On command every time the program is
started. Toggle this option ON if you have a GM or XG unit to ensure that it is always set to the appropriate mode.
Local ON (Ext. Keyboard): If you are hearing the information played on your keyboard played twice (an echo
effect) then set Local ON to “No.” If you can't hear what you are playing at all, set Local ON to “Yes.”
Turn External Keyboard’s Local On at end of session
If you have set the Keyboard Local to Off (usually to eliminate MIDI echo) this setting turns it back on at the end of
your Band-in-a-Box session.
MIDI Thru: Set to “No” if you don't want the information played on your MIDI keyboard to be sent through Bandin-a-Box to the output driver.
Controllers Thru: Guitar synthesizers and wind controllers contain large amounts of additional MIDI data which
may not be required for Band-in-a-Box and may only serve to hinder the system performance of your computer. To
prevent this information from being sent Thru, set this option to “No.”
Use Thru Channel: Band-in-a-Box uses the Thru channel as a part, just like the Bass/Drums/Piano, etc. The Thru
Channel is re-channeled to the Thru channel as assigned in the MIDI settings dialog. If you would prefer to set the
Thru channel yourself from your MIDI controller, set this to “No.”
Boost THRU Velocity by
When playing along on a keyboard to the Band-in-a-Box “band,” if the sound of your keyboard is too quiet and
increasing the THRU Volume doesn't help enough, use this option to boost the THRU velocity and make your
THRU playing louder.
Output Sync/Start info: Syncs Band-in-a-Box with an external sequencer.
Send Extra Note Offs: Leave this option set to “No” unless you are having trouble with “Stuck Notes” when you
press [Stop]. If you set this option to “Yes” the program will send a “global sweep” of all notes off in addition to
the selected notes off that are playing when you press the [Stop] button.
Allow Any Patch Changes: Set to “No” to disable All Patch changes.
248
Chapter 14: Reference
Song Patch Changes: Songs can be saved with patch changes. If you want to prevent specific instruments loading
for a given song, set this option to “No.”
Style Patch Changes: Styles contain patch change information for the instruments that were used when the Style
was created. To use your own instrument selection, not the original instruments, change this setting to “No.”
Drum Patch Changes: To disable patch changes in Drums, set to NO.
Allow Volume Changes: To prevent any volume changes set to “No.”
Style Volume Changes: To stop embedded style volume changes set to “No.”
MIDI Settings
The [Channels] button opens the MIDI Settings dialog.
MIDI Channels: Range 0 to 16. If set to 0 the part will be Off/Disabled, which is not the same as muted.
Octave: Adjusts the octave of the part. Range (-2 to +2). Usually set to 0. (Bass is usually set to -1 for most
General MIDI (GM) instruments.)
Patch: Range 0 to 128. These are General MIDI patch numbers.
Volume: Range 0 to 127. Average volume setting is = 90. This can also be set from the main screen.
Panning: Panning refers to the stereo placement (i.e. Left to Right) of a given part's sound. The range of this
parameter is -63 to +63. A setting of 0 is centered in the middle of the stereo field.
Note: Only General MIDI, XG, and GS instruments respond to Reverb, Chorus, and Bank changes.
Reverb: Range 0 to 127. Default setting = 40.
Chorus: Range of 0 to 127. Default setting = 0.
Bank0 and LSB(32): Many General MIDI instruments have extra instruments available on higher banks. Usually
set to 0. Other settings are multiples of 8 (0, 8, 16 etc.).
Chapter 14: Reference
249
These can use either Controller 0 (Bank 0), which is also know as MSB for Most Significant Byte, or Controller 32,
also called LSB for Least Significant Byte, or combinations of the two controllers.
Harmony Channels and Settings
The [Harmony] button opens the Harmony Channels and Settings dialog where settings for
the harmonies are made.
Harmony Settings
OK to Load Harmonies With Songs
If set to YES, the harmony settings for each song will be loaded and saved with each song. If set to NO, the
harmony setting won’t be saved or leaded with the songs. If you are using a certain harmony, you should set this
setting to NO, otherwise you’ll have to keep re-selecting the harmony when you load in new songs.
Change Harmony With New Chords
Example: If a harmony is played on bar 1 on a C chord, and then the note is held as the chord changes to a Fm7
chord, (if this setting is set to YES) the harmony notes will change so that they will be still be playing chord tones.
If they don’t the harmony sounds dissonant. Leave this setting to YES, unless you have a specific reason to disable
it. The harmony is changed by moving the voices to the nearest chord tone.
Overall Harmony Volume Adjust
Sets a level for the overall harmony in a range of -128 to 128, with 0 leaving the settings as programmed in the
Harmony file.
Harmony Channels
Band-in-a-Box already uses 7 channels (Bass, Drums, Piano, Guitar, Strings, Melody and Thru channels). Adding
these 4 harmony channels produces potentially 11 channels of information.
250
Chapter 14: Reference
More Soloist & More Melodist Settings
The [Soloist] button launches the More Soloist & Melodist Settings dialog.
Set “Use MIDI Volume for Soloing Wizard” to true if you want MIDI velocity information sent to the Soloing
Wizard. If you have a velocity sensitive MIDI device attached to your computer and you want to control the
dynamics of the Soloist, you should enable this feature.
Set the “Trigger Playback Early” to true to enable song playback to start before the Soloist has actually completed
composing a solo. Otherwise, Band-in-a-Box will completely compose a solo before song playback begins.
Soloist – Prefer Long Phrases
Set this checkbox to “True” (enabled) if you would like the Soloist to use the longest musical phrases it “knows.”
This setting is normally used in conjunction with the Use Large Soloist files setting.
Note: This option may also increase Soloist creation times. Disable this feature if you are using a slower or low-memory
equipped computer.
Soloist/Melody Velocity Adjust
This box allows you to quickly boost or reduce the volume of the Soloist part relative to the other instrument parts.
For a realistic mix the soloist instrument is set slightly louder than the other instruments/parts in a song. The default
is 5.
Chapter 14: Reference
251
Color Selection
The [Colors] button opens the Color Selection dialog.
You can choose from several color sets using the 256-color palette in Windows. Choose from pre-made color
schemes or make your own. This is like changing the Windows color scheme in the control panel.
To select a pre-made color scheme, press the [Import..] button and choose from the list of schemes. Select [OK] to
make the changes permanent. Use the [Export..] button to save and share your customized color schemes.
To make your own color scheme, click on the name of the element you wish to change (Chord Area, List Box, etc.),
then click on the [Choose…] button to bring up the Windows Color palette and click on the color you desire. Or
you can enter the appropriate Red, Green, and Blue values in the boxes provided.
252
Chapter 14: Reference
General MIDI Patch Edit
This opens the General MIDI Patch Edit dialog, where you can make a customized General
MIDI patch map.
Type in the patch number that your synth uses for each instrument listed. For example, if your sound source has its
Acoustic Piano at patch location 41select the box to the left of Acoustic Piano and type 41. Do the same for all of
the instruments in the General MIDI patch list. If your synth doesn't have an exact match, use a close sounding
patch that it does have. Once you have made a patch map in this way, whenever Band-in-a-Box encounters
Acoustic Piano (which is General MIDI instrument #1), it will look up this Patch Map Location and then send out
Patch 41 to your synth/sound module.
Chapter 14: Reference
253
Drum Kit
If you have been unable to find a preset drum map that matches your synth's drum notes, then you may need to type
in the drum notes that your sound source uses. To do this, you need to hook your MIDI controller up to play the
Drum sounds from the keyboard. Play up and down the keyboard to hear all the drum sounds. Locate note 36 as a
starting point; on the Band-in-a-Box onscreen piano it is the C directly above the [Play] button.
Type the MIDI note numbers for the various instruments as you find them on your drum machine or keyboard.
Press the [Save] button to save the kit as MYSETUP.DK. If you are making a kit to save under a different name
then save the kit under Opt. | Utilities | Save Alternate Patch/Drum Kit.
254
Chapter 14: Reference
Favorite Instruments
This button opens the Favorite Instruments dialog.
For each of the Band-in-a-Box parts you can assign up to 10 “favorite” General MIDI instruments.
Note: If you use a custom patch map it will convert your synth’s non-GM patch numbers, always enter GM patch numbers
for the favorite instruments.
The [Patch List] button displays the General MIDI Patch List of instrument names and patch
numbers.
The [Combos] button opens the Favorite Combos dialog.
The Favorite Combos dialog box allows you to save up to 10 of your favorite instrument combos. For example,
you could setup Combo #1 to be an Acoustic Jazz combo which would send out patches like Acoustic Bass,
Acoustic Piano, Acoustic Guitar, Flute, etc. After you have finished typing in the instrument patch numbers select
the [Save] button.
Chapter 14: Reference
255
Output Chords on Channel
The [OutputCh.] button opens the Output Chords on Channel dialog. Some external music
hardware devices require chords played in root position to drive them in real time.
An example of this is the
TC-Helicon Quintet,
which lets you sing into
a microphone and
harmonize your voice
according to the chords
that are input to the
device.
Band-in-a-Box has the
capability of outputting a
separate channel with
the chords in root
position to support such
external devices
automatically.
Transpose
The [Transpose] button opens the Settings for transposing songs when loaded or “Do it Now”
dialog.
When playing along on your MIDI keyboard, you can set the Thru transpose to transpose semitones or octaves. You
can define a “favorite key” and Band-in-a-Box will optionally transpose any and all loaded songs to that key. This
is a great feature for practicing in a certain key.
256
Chapter 14: Reference
You can also set the THRU transpose to the favorite key to transpose the THRU part so that you can always play
along in your favorite key (regardless of the actual key of the song). To Activate, press Ctrl+Shift+K or select the
menu item Options | Preferences and click on the “Transpose” tab.
This launches the Vocal Wizard, which shows the best keys given a singer’s vocal range.
When “Auto-transpose to best VOCAL key when a song is loaded” is checked the song will automatically
transposed to the best key for a vocalist, depending on the settings in the Vocal Wizard.
Record Filter
The [Rec. Filter] button opens the Record Filter dialog.
Record Filter supports all MIDI controllers and sustain pedal. You can record any type of MIDI information to the
melody or soloist tracks by using the Record Filter feature to select which types to include. With this window you
can choose what types of MIDI information Band-in-a-Box will record
Chapter 14: Reference
257
Notation Window Options
The [Notation] button opens the Notation Window Options. If the Notation window is not open
the program will launch it.
These settings are described in the Notation chapter and in the online Help.
258
Chapter 14: Reference
Lead Sheet Options
The [Lead sheet] button opens the Lead Sheet Options dialog. If the Lead Sheet window is not
open the program will open it.
These settings are described in the Notation chapter and in the online Help.
Chapter 14: Reference
259
Audio Settings
The [Audio] button opens the Audio Settings dialog.
If your PC has multiple sound cards, the [Audio Drivers] button lets you choose which one to use. Most people have
a single sound card, so don’t require this feature. But if you have added an audio device (such as a USB Audio
Adapter), you would have multiple audio devices, and are now able to choose which one to use.
Choose Opt. | Preferences | Audio and click on the [Audio Drivers] button to select which
audio driver to use. This launches the Audio Driver dialog.
260
Chapter 14: Reference
The DMA Size and DMA Offset settings are set automatically by the auto-testing of the sound card. This test can
be repeated by pressing the [Get from sound card…] button. The default value for all of these settings is 0 (zero).
You can override these settings if required, but it is usually not necessary.
The Offset in mS is not a setting that gets set automatically. It defaults to zero. This allows you to adjust the timing
that the sound card plays audio in relation to MIDI. Normally you'd leave this at zero, but if you need to fine tune
the synchronization of audio to MIDI you could try changing this setting.
Audio Latency in mS
DirectX audio plug-ins and DXi synthesizer plug-ins can have playback latency (the delay between when a note is
played, and when it is heard). Adjust “Audio Latency in mS” to fine-tune for your computer. If you have a fast
computer and excellent sound card, the audio latency can be adjusted rather low. However, if you hear audio
dropouts, you can set the latency as high as 2000 milliseconds.
Audio Track Type for THIS song
You can choose between mono and stereo for the audio track. Tracks can be edited in either format, and converted
from stereo to mono or vice versa.
Note: The built-in audio plug-ins work for either mono or stereo tracks.
Audio Track Type for THIS song.
You can select Mono or Stereo for the current song. You can change a project from mono<>stereo at any time. For
example, if you have already recorded a MONO track, changing the setting will convert the track to stereo for you.
Preferred default track type for new songs.
This setting (mono/stereo) sets the default recording type for new songs that you record. For example, if you have a
stereo microphone, you should likely record in stereo.
When opening songs, show message if WAV file not found
A Band-in-a-Box song called "My Song.MGU" will have the associated wave file called "My Song.wav." If Bandin-a-Box loads this song file and it can't find its associated file, it will put up a message to that effect. If for some
reason you don't have the wave files that were recorded with the songs then you can disable that message with this
option box (disable).
Use Realtime DX Audio Plugins
The advantage of real time processing is that you can set effects today, and if you decide you don’t like the effects
tomorrow, the settings can be easily changed, since the real time effects did not permanently affect your audio track
on the hard disk. Check this to enable real time DirectX audio plug-ins.
Chapter 14: Reference
261
Guitar Settings
The [Guitar] button opens the Guitar Settings dialog.
The Guitar Settings dialog allows you the ability to adjust various parameters on the virtual guitar fretboard so that
music can be displayed effectively (and easily) on this window, regardless of the original instrument intended for the
track data. It also offers the ability to enter notation using the virtual guitar.
Click on the [Help] button for detailed online descriptions.
262
Chapter 14: Reference
Big Piano Settings
This button opens the Big Piano Settings dialog.
This dialog allows you to set various options on the Big Piano.
- You can set a specific range for the Big Piano, a starting note and a number of octaves, by over-riding the
“auto” settings.
- “Show out-of-range notes” ensures that all notes will be displayed.
- If the “Send Notes to Notation Window” checkbox is enabled, clicking a virtual key on the big piano will insert
a note to the notation track. (Note: the notation window must be opened and set to editable notation mode.)
- If “Note Guides” is selected guide notes will be shown on the keyboard. The guide notes can be scale tones,
chord tones, or roots only.
- Note Names and Note Colors can be used as in the Notation settings.
- There is an option to Show Out-of-Scale notes in Yellow.
- The size of the piano keyboard can be entered in pixels, or set with the preset buttons, or set by dragging the
bottom border of the window.
Chapter 14: Reference
263
Lyric Window Options
The [BigLyrics] button opens the Lyric Window Options.
Individual color elements can be picked, or choose one of the presets.
Display Chord Symbols will interleave the chord symbols with the lyrics.
Show chord symbols above the lyrics will show the chords on a separate line.
With the Scroll lyrics a page at a time option selected the Big Lyrics scroll a page at a time. When the lyric cursor
reaches the next-to-last line of the lyrics it will scroll to the top of the page, allowing uninterrupted reading of lyrics.
Auto-open lyrics window for songs with lyrics automatically opens the Big Lyrics window when a song with
lyrics is opened in Band-in-a-Box.
264
Chapter 14: Reference
Print Options
The [Print] button opens the Print Options dialog.
These options are described in the Notation chapter and in the online Help.
Chapter 14: Reference
265
Play Menu
Note: Most commands in the Play menu are performed by onscreen buttons, or by the keystrokes listed to the right of the
menu command.
Play
Stop Playback
-
Generates a new arrangement and plays the song.
Stops playback. To resume either use the Play From Current Position command or the
[From] button the play from the start of the current bar, or use the [Play] or Replay [+]
buttons to play from the start of the song.
- Pauses the song. Repeating this command resumes play from the exact location
Hold (pause)
where the song was paused.
- Plays the current arrangement from the start without regenerating the parts. Edits to
Replay
accompaniment parts are kept.
- Drag the mouse cursor to select a region of bars in the chordsheet and then use this
Play (loop) Highlited
command to play the selected region as a loop.
Section
- Choose a chorus and bar to play from in the current arrangement. Parts are not
Play From Bar…
regenerated. Use this command during playback to jump to any bar in the song.
- When the song is stopped this command starts playback again at the bar with the
Play From Current
highlight cell.
Position
- Launches an Open File dialog for selection of any song in any directory. The
Go (Open and Play)
selected song loads and plays automatically in Band-in-a-Box.
Step Advance submenu - When a song is paused these commands can be used to navigate step-by-step
through the currently selected track in the Notation, Lead Sheet, or Guitar windows.
Pressing the advance buttons will display the next note or chord of the melody on
the piano display, guitar display, lead sheet, and notation window.
266
Chapter 14: Reference
Slide Tracks
-
This allows you to move any of the Bass, Drums, Piano, Guitar, Strings or Melody
track ahead or behind by a certain amount. You could, for example, slide the Bass
track so it plays a little ahead of the rest of the band. This has the effect of making
the bass player “drive the band,” and is useful in Jazz styles to make the music
sound more exciting.
Looping
-
You can loop any section of the song. The program will then start playback at the
first loop point and play the looped section until stop is pressed or looping is turned
off.
- Looping of a section of the song is enabled by the “LoopSec” checkbox, with the
Loop section Enabled command, or with the keystroke NUMPAD 1.
- Open up the Loop Section Settings dialog with the menu command, by clicking the
Loop button in the toolbar, or pressing NUMPAD 2. The Loop settings dialog will
then display; see its online Help for detailed instructions.
The remaining commands in this submenu are also found in the Loop Section Settings
dialog.
Tempo
-
-
Juke Box Play
Previous Juke Box
Song / Next JukeBox
song
Wizard Playalong
feature
Wizard uses “Smart”
notes
-
Panic!
-
-
You can quickly enter a specific tempo for a song with the Set Tempo… command
(hot key is Ctrl+Alt+T), or by clicking on the tempo. A dialog opens up where you
can type in a tempo.
You can quickly change to different speeds with the menu commands or hot keys.
For example, choosing Half Speed (or the hot keys Ctrl -) will change the playback
speed to half, and Normal Speed (Ctrl =) will revert to normal speed.
Opens the Options for Juke Box dialog to select and play a jukebox list.
Navigate back and forth in a juke box set list.
The Wizard is a play along feature that allows you to use the QWERTY Keyboard
to play along with Band-in-a-Box. The Wizard is only active during playback.
Toggle this on so the Wizard will only play notes based on the chord/key of the
song. Toggle “Smart” notes OFF (unchecked) to have the Wizard provide you
access to the chromatic scale.
Select this if your MIDI notes are stuck ON and it’s driving you crazy!
Chapter 14: Reference
267
Lyrics Menu
Enter Lyrics at current bar
-
Opens the Lyric entry box at the current location of the timeline or highlight
cell.
Big Lyrics Window
-
Opens the Big Lyrics window for viewing lyrics and, optionally, chord
symbols.
Lyric Document Window
-
Displays a full screen of formatted lyrics. Easily copy and paste lyrics to
and from your favorite word processor.
Copy Lyrics to Clipboard
-
This function allows you to copy a song's lyrics (and/or the chords) to the
Standard Windows Clipboard. By pasting this data into a word processor,
you can print out the lyrics in the font of your choice. The dialog has
options to allow copying of note-based and/or line-based lyrics. With either
option you can choose to include the chord symbols, have double or single
line spacing, and make margin settings.
Copy 1st chorus Lyrics to
whole song
-
Copies the note-based lyrics for the first chorus to the rest of the song.
Erase all Lyrics
-
Erases note-based and line-based Lyrics.
Erase Note Lyrics only
-
Erases only the note-based lyrics.
Kill Lyrics Choruses
-
Select from a list box to kill lyrics in the selected chorus.
Move Lyric ahead to time line
-
If you have a note-based lyric that you want to time shift ahead or back, you
can click on the time line at the destination that you want, and then choose
this item. You can also shift lyric times using the Lyric Event list.
-
These are functions that apply to the entire lyric track. They are useful
when you're inserting bars or beats into the song and need to move the lyrics
around to keep them in sync.
Move Lyric back to time line
Timeshift Lyrics (ticks)
Insert Beat(s) in Lyrics
Delete Beat(s) from Lyrics
Edit Lyrics as Event List
Opens the Edit Lyrics dialog with Edit, Insert, Append, and Delete functions.
Line-based Lyrics opens a sub-menu with additional features.
268
Chapter 14: Reference
Copy Line Lyrics to Note Lyrics converts line-based lyrics to note based lyrics. It is imprecise, because the linebased lyrics don't correspond to individual notes. But you can edit the positions of the note-based lyrics using the
event list or the Move Lyric back/ahead to time line functions discussed above.
Move Line lyrics to Note Lyrics works like the Copy Line lyrics to Note Lyrics function, except it erases the Linebased lyrics.
Auto-Update all songs in folder to Note-based Lyrics will update an entire folder worth of songs, copying the
Line Lyrics to Note Lyrics. Only Note-based Lyrics get displayed in the Big Lyrics Dialog, so this feature will
allow you to see these lyrics in the Big Lyrics Window.
Move Lyrics Up or down row(s)… moves a line of line-based lyrics up/down a number of rows.
Erase Line-based Lyrics only erases only the line-based lyrics, preserving the note-based lyrics.
Chapter 14: Reference
269
Melody Menu
Track Type
Normally you'd leave the track type set to Single. But you can set it to:
- Multi (16) -Channel – All channels get preserved, and outputted on
the channels, this would be useful for importing an entire MIDI file,
and playing it from the Melody channel (using a silent style).
- Guitar – Channels 11 to 16 will display on the guitar as strings 11 to
16, TAB will show, the notation will be up an octave, and the MIDI
file will contain the channels preserved.
- Piano – In this mode, channels 8 and 9 are treated as the left and
right hand of a piano part.
-
Selecting any one of Bass, Ukulele, Mandolin, Banjo, or Violin will
display the correct tablature in the Notation window and the correct
fretboard in the Guitar window.
-
Set the track to match any of the 11 alternate guitar tunings, such as
DADGAD, Open G, or Double Drop D that are supported by Bandin-a-Box. Then you’ll see the correct notes on the guitar fretboard,
in the notation and tablature.
Melodist – Generate Melody and Chords launches the Melodist.
Melody Maker submenu items allow you to edit Melodist files using the Melody Maker.
Embellish Melody during playback launches the Embellisher dialog. This optionally embellishes the Melody
during playback.
Embellish Melody Dialog allows you to customize the settings of the Embellisher, choose an embellisher type from
presets, and make a particular Embellishment permanent.
270
Chapter 14: Reference
Edit Melody submenu
Import Melody from MIDI File allows you to import MIDI data from a file (*.MID) into the Melody track.
Import Melody from Clipboard allows you to import MIDI data that has been pasted into the clipboard (e.g., from
a sequencer such as PowerTracks).
Record Melody launches the Record Melody dialog to record a MIDI melody.
Record melody From any bar starts recording at the current location of the highlight cell after playing a two bar
lead-in.
Step Edit Melody allows you to enter/edit a melody in step time from the Notation window. This uses an event list.
Quantize Melody opens the Quantize Melody Options dialog. The Humanize Melody… feature is an advanced
version of this function.
Chapter 14: Reference
271
-
Resolution. Choose the division you would like the
track quantized to. Choosing 16 will Quantize to
16th notes.
-
Starting at Bar# and Chorus #. Quantization will
begin at the place you select and applied for the
number of bars.
% strength. Choose 100% if you want the notes
quantized exactly to the division. Otherwise, the
notes will be moved the % toward the target
quantization.
Quantize Start Times. By default, this option is set
to “Yes.” If you don't want the beginnings of the
notes quantized, set it to “No.”
Quantize Durations. This quantizes the END of the
notes. By default, this is set to “Off.”
-
-
-
Humanize with Straight Feel / Humanize with Swing Feel
Band-in-a-Box uses intelligent humanization routines, which can humanize a melody from one feel to another, from
one tempo to another, and vary the amount of swing in 8th notes (but not randomly). The results are very musical
with natural sounding MIDI melodies.
Humanize Melody
Opens the Melody: Quantize to New Tempo or Feel dialog. The humanize effect is broken down into 5 main
categories: Tempo, Lateness, 8th Note Spacing, Legato, and Feel.
Transpose Melody only… allows you to transpose the melody track without affecting the other tracks in the song.
Copy 1st chorus to whole song stretches the melody track out over the entire song (i.e. first, last, and middle
choruses).
Kill entire melody erases the melody track and any data that was contained therein.
Kill Melody Choruses eliminates the Melody from the First Chorus, Middle Choruses, or Last Chorus as selected
from a list box.
Adjust Level of melody allows you to increase or decrease the volume (velocity) of the Melody track without
affecting the other tracks.
Timeshift Melody (ticks) allows you to move the Melody forwards or backwards in small increments relative to the
rest of the song tracks. (Measured in ticks or parts per quarter, PPQ).
Insert Beat(s) in Melody allows you to insert a blank beat or beats into the song relative to the current time
signature.
Delete Beat(s) from Melody allows you to delete a beat or beats from the song relative to the current time
signature.
Copy to Soloist Track copies the entire contents of the Melody track to the Soloist Track. Useful for a temporary
holding area for your Melody or bouncing tracks.
Move to Soloist Track copies the entire contents of the Melody track and erases the original data from the Melody
track, preparing it for a new track or data.
Swap Melody and Soloist Track performs a “double copy/move” so that the data that was in the Melody track gets
transferred to the Soloist track and visa versa. This is also known as track bouncing.
Map Melody track to C7 chord is a useful tool when making styles.
Convert Harmony to Melody Track… converts a single line Melody track to include the current harmony
selection.
272
Chapter 14: Reference
Remove Harmony (or guitar solo) from Melody Track removes a harmony from a track, providing that the
harmony was put there by Band-in-a-Box in the first place using the Convert Harmony to Melody Track command.
Generate Guitar Chord Solo opens the Guitar feature dialog for generating a guitar chord solo.
Rechannel to Guitar Display converts channels on a track to channels 11 to 16. Channels 11 to 16 are used by
Band-in-a-Box to indicate strings 1 to 6 of a guitar. It uses the current position marker on the guitar for this
command.
Utilities
There is a Utilities sub-menu that has utility functions to convert the pitch bend range of a track, insert pitch bend
note events, transpose, and transform melodies.
Eliminate Note Overlap – Preserve Double Stops / Eliminate Note Overlap – Remove Double Stops opens a
Choose Range dialog to select the range of bars where note overlap will be eliminated while double stops are either
preserved or eliminated.
Change Pitch Bend Range… lets you set the range in semitones.
Insert Guitar Bend events when pitch bend found… will insert controllers so the guitar will display bends.
Transpose One Octave DOWN / Transpose One Octave UP transposes the Melody part one octave in either
direction. This is often useful if the Melody instrument has been changed. Transposing can be done while the song
plays.
Transform Waltz Melody & Soloist to 4/4
If you have a song with a 3/4 time signature, you can instantly hear it as a 4/4 feel. Simply load the Waltz song and
then change the style to a 4/4 style. Band-in-a-Box uses intelligent algorithms to transform the melody to the new
time signature.
Transform 4/4 Melody & Soloist to Waltz
You can automatically transform any 4/4 song/melody to a Waltz 3/4 feel. Simply load in any 4/4 song and change
the style to a Waltz style. The program will offer to transform the melody so that it works as a Waltz. It’s fun and
educational to hear and play familiar songs in a Waltz feel.
Chapter 14: Reference
273
Soloist Menu
Track Type
Normally you'd leave the track type set to Single. But you can set it to:
-
-
-
Multi (16) -Channel – All channels get preserved, and outputted on
the channels, this would be useful for importing an entire MIDI file,
and playing it from the Melody channel (using a silent style).
Guitar – Channels 11 to 16 will display on the guitar as strings 11 to
16, TAB will show, the notation will be up an octave, and the MIDI
file will contain the channels preserved.
Piano – In this mode, channels 8 and 9 are treated as the left and
right hand of a piano part.
-
Selecting any one of Bass, Ukulele, Mandolin, Banjo, or Violin will
display the correct tablature in the Notation window and the correct
fretboard in the Guitar window.
-
Set the track to match any of the 11 alternate guitar tunings, such as
DADGAD, Open G, or Double Drop D that are supported by Bandin-a-Box. Then you’ll see the correct notes on the guitar fretboard,
in the notation and tablature.
Generate and play a Solo...
Opens the Select Soloist dialog where a preset Soloist style can be selected or your own Soloist can be defined.
Soloist Maker submenu
Start a Soloists File allows you to make and edit Soloist styles saved under the filename of your choice. See
Soloist Edit dialog for additional details on importing/exporting/saving Soloists.
Edit a Soloists file opens an Open File dialog where you can select any Soloist file (*.SOL) to edit. To edit the
soloist you are using, use the Edit Current Soloist File command.
If you want to make your own soloists or modify an existing Soloist, use the Soloist Maker (edit) module. The
Soloist Maker allows you to define the parameters essential to a soloist's playing, such as instrument range (i.e. tenor
274
Chapter 14: Reference
saxophone), extra legato playing, playing more on top of the beat, playing straighter 8th notes than usual swing 8th
notes. In addition, you can set phrasing options, such as how long the phrase should be, and how much “space” to
leave between phrases. You can also set how “outside” the playing should be.
Edit Current Soloists File opens the Select Soloist dialog with the currently installed Soloists file.
Refresh Soloist allows the Soloist full access to all solo ideas contained in its database. Use to refresh after several
Soloists have been made.
OK to Load Soloists w/Songs Enable this option if you want Soloists to be automatically loaded with a song that
was saved with Soloist information.
Allow Soloist Harmony (on THRU Harmony) Enable this option to permit the Soloist to utilize the Harmony
features. This will allow the Soloist to make a harmonized solo with the harmony of your choice. See the Select
Soloist dialog for additional details.
Edit Soloist Track is a sub-menu of editing options.
Import to Soloist Part from MIDI File allows you to import MIDI data from a file (*.MID) into the Soloist track.
Import to Soloist Part from Clipboard allows you to import MIDI data that has been pasted into the clipboard
(e.g., from a sequencer such as PowerTracks).
Record To Soloist Part records a MIDI part to the Soloist track instead of recording to the Melody track.
Record to Soloist Part From… starts recording at the current location of the highlight cell after playing a two bar
lead-in.
Step Edit Soloist allows you to enter/edit a soloist in step time from the Notation window. This uses an event list.
Chapter 14: Reference
275
Quantize Soloist opens the Quantize Soloist Options dialog. The Humanize Soloist Part… feature is an advanced
version of this function.
Humanize Soloist Part w/Straight Feel / …/Swing Feel. Band-in-a-Box uses intelligent humanization routines,
which can humanize a Soloist from one feel to another, from one tempo to another, and vary the amount of swing in
8th notes (but not randomly). The results are very musical, with natural sounding MIDI solos.
Humanize Soloist Part… opens the Soloist: Quantize to New Tempo or Feel dialog. The humanize effect is
broken down into 5 main categories: Tempo, Lateness, 8th Note Spacing, Legato, and Feel.
Transpose Soloist Part allows you to transpose the Soloist track without affecting the other tracks in the song.
Copy 1st chorus to whole song stretches the Soloist track out over the entire song (i.e. first, last, and middle
choruses).
Kill entire Soloist Part erases the Soloist track and any data that was contained therein.
Kill Soloist Choruses eliminates the Soloist from the First Chorus, Middle Choruses, or Last Chorus as selected
from a list box.
Adjust Level of Soloist Part allows you to increase or decrease the volume (velocity) of the Soloist track without
affecting the other tracks.
Timeshift Soloist Part (ticks) allows you to move the Soloist forward or backwards in small increments relative to
the rest of the song tracks. (Measured in ticks or parts per quarter, PPQ.)
Insert Beat(s) in Soloist Part allows you to insert a blank beat or beats into the song relative to the current time
signature.
Delete Beat(s) from Soloist Part allows you to delete a beat or beats from the song relative to the current time
signature.
Copy to Melody Track copies the entire contents of the Soloist track to the Melody Track. Useful for a temporary
holding area for your soloist or for bouncing tracks.
Move to Melody Track copies the entire contents of the Soloist track and erases the original data from the Soloist
track, preparing it for a new track or data.
Swap Melody and Soloist Track performs a “double copy/move” so that the data that was in the Soloist track gets
transferred to the Melody track and vice versa. This is also known as track bouncing.
Convert Harmony to Soloist Track… converts a single line Soloist track to include the current harmony selection.
Remove Harmony (or guitar solo) from Soloist Track removes a harmony from a track, providing that the
harmony was put there by Band-in-a-Box in the first place using the Convert Harmony to Soloist Track command.
Generate Guitar Chord Solo opens the Guitar feature dialog for generating a guitar chord solo.
Rechannel to Guitar Display converts channels on a track to channels 11 to 16. Channels 11 to 16 are used by
Band-in-a-Box to indicate strings 1 to 6 of a guitar. It uses the current position marker on the guitar for this
command.
Utilities
There is a Utilities sub-menu that has utility functions to convert the pitch bend range of a track, or to insert pitch
bend note events.
Eliminate Note Overlap – Preserve Double Stops / Eliminate Note Overlap – Remove Double Stops opens a
Choose Range dialog to select the range of bars where note overlap will be eliminated while double stops are either
preserved or eliminated.
Transpose One Octave DOWN / Transpose One Octave UP transposes the Soloist part one octave in either
direction. This is often useful if the Soloist instrument has been changed. Transposing can be done while the song
plays.
276
Chapter 14: Reference
Audio Menu
The Record Audio function is used to Record Audio using a microphone plugged into your sound card or a guitar
(or mixer) plugged into the line-in on your sound card. This launches the Record Audio Dialog and the Record
Audio – Keep Take dialog.
The next two items, Record Audio and MIDI (Melody) and Record Audio and MIDI (Soloist) refer to the
situation where you want to simultaneously record an audio track (vocals etc.) as well as a MIDI piano part. You
can record the MIDI to the Melody or Soloist track.
The Plugin menu command refers to running a plug-in
audio effect. This applies an audio effect such as Reverb
or Chorus to the already recorded audio part.
Band-in-a-Box comes with a large selection of high
quality audio effects built-in, such as Compressor, Gate,
Distortion, Reverb, Echo, Chorus, Flanger, Ring Mod,
Tremolo, Tone Control, Graphic EQ, Parametric EQ,
Gain Change, De-Ess, Auto-Wah, Pitch Shift, Exciter,
Enhancer and Hum Filter. DirectX plug-ins from PG
Music and other makers are also supported.
The plug-ins are fully documented in the online Help.
Chapter 14: Reference
277
Edit Audio submenu
Copy 1st chorus to whole song copies the first chorus to the rest of the song.
The Kill entire Audio menu item is used to erase the Audio Track.
Erase Audio Choruses will erase the First Chorus, Middle Choruses, or the Last Chorus as chosen from a list box.
Erase Region of Audio will erase a specified region of bars/beats of audio.
Adjust Output Level of Audio (Quick) uses the Windows mixer to adjust the output level of the audio track. You
can also use the Windows mixer directly by pressing the yellow speaker icon.
Adjust level of region of .WAV file (permanent)… changes the volume of the audio track itself. It uses a
sophisticated peak-limiting algorithm to ensure that increases in the volume do not result in clipping of the sound,
which would be heard as a loud distortion. It accepts units of decibels (dB). Zero means no change in the level,
whereas +6 would be a doubling of the sound, and –6 halves the sound level.
Timeshift Audio (ms)… is used to time shift the whole audio track a certain number of milliseconds. Normally you
wouldn't have to time shift a track at all. There are settings in the Audio-Options Dialog (see below) that can adjust
for synchronization differences between your sound card and MIDI devices.
Tip: 1000ms = 1 second. Positive values move the audio track ahead, negative values move it back.
Insert Beat(s) in Audio and Delete Beat(s) from Audio are used to insert, silence, or remove parts of the audio
track. You can specify the region to use. For example, if you decide to add an extra 2 bars to the intro in Band-in-aBox, and you've already recorded an audio track, you should insert 2 bars (8 beats in a 4/4 time signature) into the
audio track as well.
Mute Audio is a toggle switch to mute and unmute the audio track.
Render MIDI to Stereo .WAV file etc… This command launches the dialog that allows you to Render (convert)
the Band-in-a-Box song (with or without an audio track) to a stereo .WAV file.
Burn an Audio CD (using CD-R, CDRW Drive) takes you to the Render to Audio File dialog where you can
launch the built-in MiniBurn program with the [‘Burn’ to Audio CD] button.
Playback Mixer / Playback VU Meter takes you directly to the Windows Playback control to adjust volumes on
your sound card. Note that not all sound devices have VU meters.
Recording Mixer / Recording VU Meter takes you directly to the Windows Recording control to adjust volumes
on your sound card. Note that not all sound devices have VU meters.
Export Audio to Sequencer… gives instructions on how easy it is to use your Band-in-a-Box wave file in any
audio sequencer, like PowerTracks Pro Audio.
Import WAV File… a mono or stereo WAV file can be imported to the Audio track, optionally merging or
replacing any existing audio track.
Audio Window launches the audio edit window where the wave file can be viewed and edited.
278
Chapter 14: Reference
Audio Harmonies & Pitch Tracking opens the Generate Audio Harmonies dialog. There are three uses of the
Audio Harmonies in Band-in-a-Box, namely:
- Pitch tracking (fixing) of the melody.
- Harmonizing your voice using Band-in-a-Box harmonies (when a MIDI melody is present)
- Harmonizing your voice to the chords of the song (when no MIDI melody is present)
DXi Synth Settings opens the DirectX Plugins dialog to the Synth Track where you can select a DXi synth and
apply real time effects to its audio output.
Realtime DX Audio Settings opens the DirectX Plugins dialog to the Audio Track where you can apply real time
effects to the Band-in-a-Box audio track.
Chapter 14: Reference
279
GM Menu
The GM functions work on MIDI sound devices that
support the GM (General MIDI) standard, which includes
most newer MIDI Keyboards and sound cards.
The GS functions work on instruments that support the
Roland GS specification. This includes the Roland Sound
Canvas, SCC1, and JV-30.
The XG functions work on instruments that support the
Yamaha XG specification.
Roland GS submenu
Reset Roland GS (Quick) and Reset GS (all ID’s) reset the module to factory settings.
Set Reverb Type or Set Chorus Type (GS Module): Roland GS instruments allow different type of reverb and
chorus settings. These settings boxes allow you to select them.
Assign Part/Channel etc. for GS Module The GS Part settings are for GS compatible synthesizers only. These
synthesizers have 16 parts. The default is for part 1 to be channel 1, part 2 channel 2 etc., but you can change a part
to another channel. This allows you to use the same channel for 2 parts, so that you hear a layer of 2 instruments
playing the same part.
Send MIDI Message submenu
Send General MIDI mode ON, & BB Patches sends a General MIDI mode ON message to the external MIDI
device and the sends the startup Band-in-a-Box patch changes.
Send General MIDI mode ON (no patches) sets the external module to General MIDI mode. This command will
ensure that the module is ready to accept GM-specific MIDI data such as Bank, Controller, and Patch information.
Send GS Mode On Message (Roland) / Send XG Mode On Message (Yamaha): Since the inception of the GM
(General MIDI) standard, there have been two major subsets/extensions of this standard; GS (Roland) and XG
(Yamaha). Therefore, in addition to the GM Mode-on menu item feature there are additional commands to send a
GS mode ON or a XG mode ON message at any time by accessing the GM menu.
Auto-Send GM Mode On at startup sends a “General MIDI mode on” message when the program boots up.
280
Chapter 14: Reference
Auto-Send GS Mode On at startup sends a Roland GS system on message when the Band-in-a-Box program
boots up.
Auto-Send XG Mode On at startup sends a Yamaha XG system on message when the Band-in-a-Box program
boots up.
Turn Local OFF / ON (external MIDI keyboard)
“Local” refers to music playing on an external MIDI keyboard. If set to “Off,” Band-in-a-Box will play the
keyboard via the THRU part. If set to “On,” both Band-in-a-Box and the keyboard might be playing the same Thru
part.
When program quits, turn Local ON automatically turns the external MIDI keyboard back on at the end of the
Band-in-a-Box session.
Master Tuning… allows you to master tune your sound card or sound module. This is useful if you're playing
along with an instrument or recording that can't easily be re-tuned like an acoustic piano. A setting of 0 is the
default A = 440.
Note: Not all sound cards/ modules support Master Tuning. To see if your sound card supports Master Tuning, press the
[Test..] button.
Master (Combo) Volume Adjust submenu
Master Volume uses MIDI messages instead of GS/GM Sysex should be set by all users except if you have a
Roland GS synth, Roland Sound Canvas, or Roland VSC. If set, the Combo settings will allow Master Volume and
other MIDI settings to work. This submenu allows you to set whether to use Roland - GS or General MIDI for
Master Volume messages. Unless you have a Roland you should select General MIDI.
If you want to “turn it all up or down,” this can be done quickly with menu commands or hot keys to set the Master
Volume. There are also hot keys that control the overall volume by reducing (or increasing) volumes on all parts by
5 to simulate a Master Volume effect (especially useful for sound cards that don't support Master Volume changes).
These items also have hot keys as listed on the menu (Ctrl+Alt+Shift Q, W, and E). Commands and hot keys are
also provided to change the volume of the current part only.
Set Panning to MONO sets the panning of your Band-in-a-Box parts (Bass, Drums, Piano, etc.) to mono.
Set Panning Mode to Stereo sets the panning of your Band-in-a-Box parts (Bass, Drums, Piano, etc.) to a typical
stereo setup, which is saved with the preferences.
Chapter 14: Reference
281
Run Other Program submenu
Sound card Volume / Playback VU Meter launches the Windows mixer to adjust volumes on your sound card
with the Playback panel.
Sound card Recording / Recording VU Meter launches the Windows Mixer to adjust volumes on your sound card
with the Recording panel.
Note: This uses the c:\windows\sndvol32.exe Mixer program. You may need to have the Windows 98 version of this
program for the Recording Panel to open properly. If you don't, you'd see the “Volume Control” panel and will have to
manually set it to the Recording Panel (by choosing Options | Properties | Recording).
SoundBlaster AWE Control Panel applies only to users with a SoundBlaster. This function launches the “AWE
Control” application.
SoundBlaster Mixer is also for Sound Blaster users only, and launches the mixer for volumes.
Run Windows Control Panel… runs the Windows Control Panel, which lets you examine MIDI and Audio
settings in the Multimedia, Add New Hardware, and System panels.
Run Other Application… and Choose [Other Application…] allows you to specify and run any other application
(mixer application, PowerTracks etc.).
Run DLL or &EXE plugin… and Choose DLL or EXE PlugIn… allows you to run a plug-in that has been made
specifically for a PG Music product.
Convert Patch list from PowerTracks or Cakewalk…
This will let you convert a PowerTracks Pro Audio .INI file or a Cakewalk .INS file to a Band-in-a-Box .PAT file.
282
Chapter 14: Reference
Harmony Menu
Melody Harmony (select)…
This option brings up the complete Harmony styles list, and allows you to choose one for the current Melody track.
Thru Harmony (select)…
This option brings up the complete Harmony styles list, and allows you to choose one for the current Thru track.
Favorite Melody Harmonies
This option brings up your favorite 50 Harmony styles (based on recent usage) and allows you to choose one to use
on the Melody track.
Favorite Thru Harmonies
This option brings up your favorite 50 Harmony styles (based on recent usage) and allows you to choose one to use
on the Thru track.
Start a New Harmonies File
Allows you to make and edit Harmony styles saved under your own filename.
Edit a Harmonies File
Allows you to edit a Harmony file that is in your \bb directory.
Edit Current Harmonies File
Allows you to edit the Harmony file that is currently loaded on your system.
OK to Load Harmonies With Songs
Toggle this option “On” if you want to load any harmony settings that were saved/embedded in a given song.
Save Harmony with this song
Toggle this option “On” to allow Band-in-a-Box to embed the harmony settings for the current song so that they
may be recalled automatically at a later time.
Change Harmony with new chord
Toggle this option “On” to allow the program to vary the harmony characteristics (i.e. inversions) each time a new
chord is encountered in the song.
Chapter 14: Reference
283
Allow Melody Harmony
Toggle this option “On” to allow harmonies on the Melody MIDI channels.
Allow Thru Harmony
Toggle this option “On” to allow harmonies on the Thru MIDI channels.
Allow Soloist Harmony (on THRU Harmony)
Toggle this option “On” to allow the Thru MIDI channels to utilize the harmony features for the Soloist track.
Convert Harmony to Melody Track…
Converts a single line Melody track to include the current harmony selection.
Convert Harmony to Soloist Track…
This converts a single line Soloist track to include the current harmony selection (On the Thru harmony).
Use Passing Harmonies for THRU
When playing along on a MIDI keyboard (or the Wizard) using a Thru harmony, you can use passing harmonies.
For example, on a C7 chord, with an Ab note, the harmony might be a B diminished chord, which is a passing
harmony.
Only THRU Harmonize if note held down = 36 (C3)
By setting this option you can specify to only harmonize the note if a certain note is held down. (The default note is
a C two octaves below middle C.)
Real Time Harmonies
This feature allows you to play harmonies in real-time. Use this with your MIDI keyboard (while Band-in-a-Box is
stopped). Hold a chord down with the left hand and play notes with the right hand. The notes will be harmonized
according to the chord that you're playing in the left hand.
Audio Harmonies & Pitch Tracking
You can apply a harmony to the audio part – allowing you to automatically create up to 4 part vocal harmonies from
your singing. Band-in-a-Box generates the harmonies using the world-leading TC-Helicon Vocal Technologies
engine. Once you have recorded a vocal part into Band-in-a-Box, you can use this feature in many ways, including:
- Pitch tracking (fixing) of the melody.
- Harmonizing your voice using Band-in-a-Box harmonies (when a MIDI melody is present)
- Harmonizing your voice to the chords of the song (when no MIDI melody is present)
284
Chapter 14: Reference
Not’n Menu
Notation/edit/note roll mode moves the notation window through its various entry modes.
Print... brings up the print dialog box.
Note Insert mode
Toggling this to “On” allows you to insert notes graphically with your mouse or keyboard on the notation window.
Mono Entry Mode
Toggle this “On” if you are inserting single notes (not chords) on the notation window.
Clean Display Mode
Toggle this “On” if you want notes displayed on your notation window in a quantized view (does not affect song
playback).
Event List Editor
This opens the Event List window. You can edit events including all MIDI events and lyric events using the Event
List Editor. You can edit the Melody, Soloist, Lyrics, or StyleMaker patterns using this event list.
The event list can also be launched from the Notation window by pressing the event list button (#).
Play Previous Screen
Backs the song up four bars.
Play Next Screen
Moves the song to the next four bars.
Instrument Displayed
Since there is not enough room on the screen to display the notation for all instruments, only one is displayed at a
time. You can choose which one you want to display from this menu option or the instrument buttons on the
notation window.
Switch to Next Track / Switch to Previous Track
Select parts from left to right in the Instrument row buttons.
Chapter 14: Reference
285
Window Menu
Notation (or chords) Window toggles between the notation and the chordsheet views.
Movable Notation Window opens a movable and resizable notation window.
Lead Sheet Window launches the lead sheet notation.
Big Lyrics Window launches a window that displays lyrics in a Karaoke format.
Lyric Document Window displays a full screen of formatted lyrics. Easily copy and paste lyrics to and from your
favorite word processor.
Big Piano Window launches a window that displays a Big Piano.
Drum Kit Window launches the animated Drum Kit. Once launched, press [Help] to get more information about
the Drum Kit.
Guitar Window launches an on-screen Guitar.
The Audio Edit Window allows you to edit audio data, using copy, cut, and paste. You can zoom the audio in to
the sample level so that you can see the actual sine waves present.
Moveable Audio Edit Window opens the regular Audio Edit Window but lets you reposition it on the screen.
Piano Roll Window launches the Piano Roll window where you can edit the Melody or Soloist track in a traditional
piano roll format.
Moveable Piano Roll Window opens the regular Piano Roll window, but lets you move and reposition it on the
screen.
Put Notation/Chords on Top moves the notation window to the top of the main screen and moves the piano roll at
the bottom of the main screen.
The MIDI Monitor, Guitar Tuner, and AWE Editor items launch the selected module. Each one has extensive
help available inside the module. There are also buttons available for these items.
286
Chapter 14: Reference
Chord Substitution Dialog (choose your own)
This allows you to see a list of possible chord substitutions for the current chord progression. You can also access it
from a right mouse click on the chordsheet, and by pressing the Chord Substitution button.
Auto-Generate Chord Substitutions…
This will automatically pick chord substitutions for all or part of the song.
Ear Training Window
Practice your ear training with help from Band-in-a-Box. In addition to the common interval exercises (perfect 4th,
minor 2nd, etc.), learning to play-by-ear is further enhanced by ear training exercises to recognize common chord
types.
Vocal Wizard selects and transposes the song to the best key for the singer’s vocal range.
Chord Builder submenu
Chord Builder… Allows you to build up chords using mouse clicks.
Play Current Chordsheet Chord plays the current chord on the chordsheet. It is most commonly accessed by
pressing Shift+Enter on the chordsheet.
MIDI Chord Detection…
This command brings up a submenu for entering chords from a keyboard.
Select MIDI Chord Detection… and play any chord on your MIDI keyboard. Band-in-a-Box will then provide you
with up to 4 interpretations of the chord you played, with its best suggestion at the top and alternates below.
Choose the chord you want to have pasted into your song by clicking the appropriate [Enter] button beside the chord
name. You can insert up to two chords per bar in this fashion, and move backwards and forwards in a song with the
[<] [>] buttons in the top right section of the dialog.
Tip: You can also insert chords this way without opening up this dialog. Just press Ctrl+Enter keys at any time to insert the
last chord that you've played on your MIDI keyboard onto the worksheet.
Chapter 14: Reference
287
Help Menu
Index
Topic Search
Using help
How to…
Basics
Tutorials
Show help hints
Lists all of the Help topics. Type in a keyword under the “Index” tab to go to the topic you
want.
Opens the Help file where you can search the Table of Contents or the Index, or use the Search
feature to find your topic.
Has Windows tips for using Help files.
Opens a categorized list of topics. It’s a fast way to find out about a particular feature or
operation.
Goes directly to the “Basics” introduction to Band-in-a-Box.
Provide detailed, step-by-step instructions for Band-in-a-Box.
Band-in-a-Box has comprehensive fly-by hints that appear when you move over an item. These include hints for the
dialog boxes and various windows. You can set the hints to display none, basic, or detailed information. Customize
the hint settings in the Prefs2 dialog.
Update, Add/On and other Product info
Other Band-in-a-Box add-ons, PG Music Inc. products, and contact information.
ReadMe (for Latest info not in manual) documents the latest features, plus an archive of earlier updates.
Newest Features describes the new features in the current version.
Tip of the Day
Power user tips, this feature can be set to run automatically when Band-in-a-Box opens. If you want to add your
own tips, you can edit the BBW.TIP file. Just put a tip on a single line (no carriage return till the end of the tip).
Tips are limited to 255 characters per tip. Band-in-a-Box automatically compiles the BBW.TIP file at startup of the
program to a binary file called BBW.TPB.
288
Chapter 14: Reference
What add-ons do I have?…
One of the greatest strengths of Band-in-a-Box is the ability to add-on and enhance the program through add-ons.
The “What Add-ons” feature scans your computer's Band-in-a-Box directory and displays what add-ons are and
aren't found. To see the latest add-ons click on the [www.pgmusic.com/addons.htm] button to go directly to the
add-ons page on the PG Music Inc. web site.
Web www.pgmusic.com
Links to some important pages on the PG Music Inc. web site. Selecting one of these topics will automatically
launch your Web Browser, and direct you to the PG Music web site.
About Band-in-a-Box launches a dialog with key information such as the version number you are running and
computer system information.
Chapter 14: Reference
289
Keystroke Commands - Hot Keys
It’s often faster to use keystrokes instead of using the mouse. For example, there are keystroke “hot keys” to mute
instruments or to adjust volume, panning, reverb, chorus, or bank of instruments.
Muting Parts
Alt+3
Mutes the Bass
Alt+4
Mutes the Piano
Alt+5
Mutes the Drums
Alt+6
Mutes the Guitar
Alt+7
Mutes the Soloist
Alt+8
Mutes the Strings
Alt+9
Mutes the Melody
Selecting Parts
Ctrl+3
Selects the Bass
Ctrl+4
Selects the Piano
Ctrl+5
Selects the Drums
Ctrl+6
Selects the Guitar
Ctrl+7
Selects the Soloist
Ctrl+8
Selects the Strings
Ctrl+9
Selects the Melody
Instrument Part Settings
Hold down Ctrl+Shift and the letter to change these instrument settings.
Q,W
Decrease/Increase Volume
E,R
Decrease/Increase Panning
T,Y
Decrease/Increase Reverb
U,I
Decrease/Increase Chorus
O,P
Decrease/Increase Bank
Use Ctrl+Shift together with the 1-9 and 0 keys on the keyboard to select Favorite Instruments. For example, let’s
change the Piano part to Rhodes Piano.
1.
Press Ctrl+4 to select the Piano part.
2.
Press Ctrl+Shift+2 to select the Favorite #2. That is Rhodes Piano.
Use Ctrl+Shift and the [-] and [=] keys to decrease/increase the patch by 1.
Volume Settings
Ctrl+Alt+Shift+R
Set current part’s volume.
Ctrl+Alt+A
Decrease master volume by 5.
Ctrl+Alt+S
Increase master volume by 5.
Ctrl+Alt+D
Set master volume.
Ctrl+Alt+Shift Q
Reduce all part volumes by 5.
Ctrl+Alt+Shift W
Increase all part volumes by 5.
Ctrl+Alt+Shift E
Set all part volumes.
290
Chapter 14: Reference
Looping / Song Navigation Keystrokes
NUMPAD 1
Toggle looping on/off.
NUMPAD 2
Open Loop Section Settings dialog.
Ctrl+NUMPAD 1
Play with last chorus looped.
Ctrl+NUMPAD 2
Play with middle choruses looped.
Ctrl+NUMPAD 3
Play with middle and last choruses looped.
Ctrl+NUMPAD 4
Jump to last chorus.
Ctrl+NUMPAD 5
Jump to ending.
Ctrl+NUMPAD 7
Loop Notation screen.
NUMPAD [DEL]
Advances the notation, lead sheet, and guitar window by one chord (group of notes).
NUMPAD [INS]
Backs up the notation, lead sheet, and guitar window by one chord.
Transpose Settings
Ctrl+Alt+1
Transpose Melody down one octave
Ctrl+Alt+2
Transpose Melody up one octave
Ctrl+Alt+3
Transpose Soloist down one octave
Ctrl+Alt+4
Transpose Soloist up one octave
Ctrl+Alt+5
Transpose down 1 semitone.
Ctrl+Alt+6
Transpose up 1 semitone.
Ctrl+Alt+7
Transpose setting dialog.
Custom File Open Dialog
Ctrl+Shift+F3
Load song with custom file dialog.
Alt+F
In custom file dialog - Favorite Folders.
Alt+N
In custom file dialog - Font selection.
Alt+S
In custom file dialog - Search dialog.
Windows
Ctrl+W
Toggle Notation and Chordsheet windows.
Ctrl+O
Movable Notation window.
Alt+W
Lead Sheet window.
Ctrl+T
Put Notation/Chords at top of screen.
Ctrl+Shift+A
Audio Edit window.
Ctrl+Shift+D
Drum Kit window.
Ctrl+Shift+G
Guitar window.
Ctrl+Shift+J
Ear training window.
Ctrl+Shift+L
Big Lyrics window.
Ctrl+Shift+N
Big Piano window.
StyleMaker Hot Keys
F1, Shift+F1, Ctrl+F1
Help
F2
Save style
Alt+F2
Save style as ...
R or F3
Record pattern
<Spacebar> or F4
Play pattern
Chapter 14: Reference
291
F8
Play pattern on chord
F10
Edit pattern options
F6 or Shift+F6
Change instrument
Cursor Keys
Move around screen
Alt+F4
Quit the StyleMaker
StyleMaker Drum Screen Hot Keys
F5
Drum alternate notes
Bottom row (ZXCVBNM,. /)
Drum note entry
F6
Time base
F10 or Alt+F4
Exit
Additional Keystrokes
There are additional keystrokes available, listed on the pull down menus beside the function. Hot keys may access
any function on the pull-down menu by pressing the Alt key and the first letter of the Menu followed by the
underlined letter of the command. For example, Alt+F+O would access File | Open.
Playing songs.
Spacebar twice or F4
Stopping songs.
Spacebar or Esc
Help.
F1, Shift+F1, Ctrl+F1
Record (melody or pattern).
R
Record from any bar.
R
Jukebox start/stop.
F8
Save song.
F2
Save song with patches.
Alt+F2
Load song.
F3
Load song using favorite song list.
Shift+F3
Load song using titles window.
Ctrl+F3
Load songs with melodies.
Alt+F3
Load song with standard long file dialog.
Alt+Shift+F3
Load next file (alphabetical by file name).
Shift+F8
Load previous (alphabetical by file name).
Ctrl+Shift+F8
Load next style. (in alphabetical order).
Alt+Shift+F8
Load previous style. (in alphabetical order).
Ctrl+Alt+Shift+F8
Enable/disable style.
Alt+S then E
Launch MIDI File to Style Wizard.
Alt+S then W
Load songs in current style.
F7
Choose a user style.
F9
Open StylePicker.
Ctrl+F9
Select favorite styles.
Shift+F9
Edit user style.
Alt+F9
Edit current style.
Ctrl+Shift+F9
Select Melody Harmony
Alt+F10
Favorite Melody Harmonies
Ctrl+F10
Allow Melody Harmony
Shift+F10
292
Chapter 14: Reference
Select Thru Harmony
Alt+F11
Favorite Thru Harmonies
Ctrl+F11
Allow Thru Harmony
Shift+F11
Turn song Embellisher on/off.
Ctrl+Alt+E
Import chords from MIDI file.
Ctrl+Alt+I
Send GM mode on message.
Ctrl+Alt+Q
Set tempo.
Ctrl+Alt+T
Open the Preferences dialog.
Ctrl+E
Open the Song Settings dialog.
Ctrl+N
Launch Chord Builder.
Ctrl+Shift+B
Edit current bar options.
F5
Save MIDI file.
F6
Quit the program.
Alt+F4
Chord List
Commonly used chords are displayed here in bold type.
These chords are displayed in a list in the Chord Builder Dialog, accessible from the User Menu or by right clicking
on the chordsheet.
Major Chords
C, Cmaj, C6, Cmaj7, Cmaj9, Cmaj13, C69, Cmaj7#5, C5b, Caug, C+, Cmaj9#11, Cmaj13#11
Minor Chords
Cm, Cm6, Cm7, Cm9, Cm11, Cm13, Cmaug, Cm#5, CmMaj7
(half diminished)
Cm7b5,
Diminished
Cdim
Dominant 7th Chords
C7, 7+, C9+, C13+, C13, C7b13, C7#11, C13#11, C7#11b13, C9,
C9b13, C9#11, C13#11, C9#11b13, C7b9, C13b9, C7b9b13, C7b9#11,
C13b9#11, C7b9#11b13, C7#9, C13#9, C7#9b13, C9#11, C13#9#11, C7#9#11b13
C7b5, C13b5, C7b5b13, C9b5, C9b5b13, C7b5b9, C13b5b9, C7b5b9b13,
C7b5#9, C13b5#9, C7b5#9b13, C7#5, C13#5, C7#5#11, C13#5#11, C9#5,
C9#5#11, C7#5b9, C13#5b9, C7#5b9#11, C13#5b9#11, C7#5#9, C13#5#9#11,
C7#5#9#11, C13#5#9#11
Sustained 4 Chords
Csus, C7sus, C9sus,
C13sus, C7susb13, C7sus#11, C13sus#11, C7sus#11b13, C9susb13, C9sus#11, C13sus#11, C9sus#11b13, C7susb9,
C13susb9, C7susb9b13, C7susb9#11,
C13susb9#11, C7susb9#11b13, C7sus#9, C13sus#9, C7sus#9b13, C9sus#11, C13sus#9#11, C7sus#9#11b13,
C7susb5, C13susb5, C7susb5b13, C9susb5, C9susb5b13, C7susb5b9,
C13susb5b9, C7susb5b9b13, C7susb5#9, C13susb5#9, C7susb5#9b13,
C7sus#5, C13sus#5, C7sus#5#11, C13sus#5#11, C9sus#5, C9sus#5#11, C7sus#5b9, C13sus#5b9, C7sus#5b9#11,
C13sus#5b9#11, C7sus#5#9, C13sus#5#9#11, C7sus#5#9#11, C13sus#5#9#11,
Chapter 14: Reference
293
Notes:
-
It is not necessary to type upper or lower case. The program will sort this out for you.
-
Any chord may be entered with an alternate root (“Slash Chord”) e.g.: C7/E = C7 with E bass.
-
Separate chords with commas to enter 2 chords in a 2 beat cell, e.g., Dm,G7
Tricky Chords:
C5b This is “C flat 5.” It is spelled this way to avoid confusion.
C2, C5, C4, C69, C7alt, Cm7#5
You can type C-7 for Cm7 (i.e. use the minus sign) or C7-9 for C7b9.
Shortcut Chords:
If you enter a lot of songs, you'll appreciate these shortcut keys.
J = Maj7
H = m7b5
(H stands for Half diminished)
D = dim
S = Sus
Example: To type CMaj7, just type CJ (it will be entered as CMaj7)
Add your own chord shortcuts.
Have you found a chord that Band-in-a-Box doesn't recognize? If so, add it to your chord shortcuts file, and Bandin-a-Box will allow you to type in that chord in the future. This also lets you define chord “shortcuts,” one-letter
abbreviations for longer chord names (“J” for “Maj7” etc.). If you find a chord that Band-in-a-Box won't accept like
Csus2, when it expects C2 instead you can enter this on a single line (without the quotes) “Csus2@C2.” Then
Band-in-a-Box will enter the chord C2 if you type in Csus 2.
The text file c:\bb\Shortcut.txt allows you to add new chord shortcuts. Note that this file doesn't ship with Band-ina-Box (or it would overwrite your file!). The file \bb\pgshortc.txt for shortcuts supplied by PG Music. You can add
your own shortcuts in a text file you make yourself and name \bb\shortcut.txt.
Band-in-a-Box files
Essential Program Files
Band-in-a-Box for Windows requires the following files to operate.
BBW.EXE
Executable file.
BBWDLL4.DLL
DLL handling playback.
CPALETTE.DLL
Required DLL.
ZZ*.STY
Band-in-a-Box needs Style Files for the built-in Styles.
ZZDEFAULT.HAR
These are the default harmonies.
BBW.LST
This is the text file for the Style List Information.
CTL3DV2.DLL
This is the required DLL for 3D dialogs and controls.
PGMUS.TTF
PG Music notation font.
PGTEXT.TTF
PG Music text font.
Transferring Files Among Computer Platforms (IBM to Mac)
Many of the Band-in-a-Box song/style and patch map files are directly compatible. Any Macintosh file
automatically gets a 128-byte header added on to it by the Macintosh system.
If transferring the files by modem, make sure the Macintosh modem software strips off the header off the files.
Other than that, the files are identical.
Note: Atari files are the same format as IBM files; no conversion is needed.
294
Chapter 14: Reference
PG Music Inc.
Band-in-a-Box
®
is protected by copyright and is the property of
PG Music Inc. and its licensors.
Copyright © 1989-2005 PG Music Inc.
All rights reserved.
PG MUSIC INC.
29 Cadillac Avenue
Victoria, BC V8Z 1T3
Canada
Contacts:
E-mail: [email protected]
Phone: toll free in the United States and Canada
1-800-268-6272, 1-888-PG-MUSIC (746-8742),
Or 1-250-475-2874 (tolls apply)
Universal International Freephone Service:
Outside of the United States and Canada (where available).
+ 800-4PGMUSIC (800-4746-8742)
Fax: toll free in the United States and Canada
1-877-475-1444,
Or 1-250-475-2937 (tolls apply)
Technical Support:
Phone: toll free in the United States and Canada
1-866-9TECHPG (866-983-2474),
Or 1-250-475-2708 (tolls apply)
E-mail: [email protected]
Live Internet Chat: www.pgmusic.com
Be sure to visit the FAQ pages at www.pgmusic.com for information about known troubleshooting issues as well as the
latest technical support bulletins.
PG Music Inc.
295
Index
A2 Transpose, 133
chords above, 127
Alias substitutions, 237
options, 127
Big Piano Window, 65
Alternate Guitar Tunings, 62
Guitar Tutor, 63
Breaks, 100
selecting, 63
Burn CD, 78
CD
audible drum count-in, 245
Finalized, 170
Audio, 154, 159
Burn to CD, 78
CD Burner, 78
compressing WAV, 168
Changing Directories, 36
effects, 164
Channels
Setting, 249
enhancements, 159
Chord
harmonies, 159
import wave, 46, 154
Entry, 81
non-destructive editing, 159
Extensions, 207, 208
other audio programs, 169
preview, 83
other formats, 168
shortcuts, 40, 294
playing audio file, 158
Tutor, 207
Chord Builder, 203
plug-ins, 164
enter chords, 203
recording, 154
Rendering, 165, 167
Chord Entry, 40
stereo, 261
Chord List, 293
TC-Helicon, 159
Chord Substitution
VU meters, 155
example, 203
Chord Wizard
Audio Features
3-steps, 214
Applying Plugins, 164
chord options, 213
Audio Harmonies, 76
harmonize to chords, 162
import bars, 215
harmonize to MIDI, 160
interpret chords dialog, 211
melody pitch tracking, 162
tutorial, 212
Audio Harmony Pitch Styles, 161, 162
Chordal Harmony, 162
Audio Menu, 277
Chords
Edit Audio, 278
copy and paste, 70
plug-ins, 277
entering, 11
Chordsheet, 11, 40
Auto-endings, 184, 186
chord entry, 40
Automatic Intro, 134
options, 43
Automatic Song Titles, 135
Chorus
Banks
Begin & End, 38
higher, 33
Chorus Control, 38
Big Lyrics window
296
Index
Styles, 98
Clefs, 129
Clipboard, 149, 231
Favorite song folders, 80
Color Schemes
Favorite Songs, 67
File Associations, 80
Changing, 32, 252
file selection
Combos
no extension, 81
Favorite, 255
Files
Convert patch lists
Cakewalk to BB, 88
essential, 294
PowerTracks to BB, 87
transferring to Mac, 294
Copyright, 295
filter styles, 94
custom file selection, 80
Forced Rests, 110
Descriptive hints, 80
Fourths Harmonies, 190
DirectX
General MIDI 2, 88
GM Menu, 280
instruments, 9
Display Options, 31
Master Volume Adjust, 281
Document Window, 127
Roland GS, 280
Drum
run other program, 281
Send MIDI message, 280
Fills, 101
GM2, 88
Window, 225
bank settings, 89
Drums
patches, 89
count-in, 245
Roland VSC3, 88
DXi, 9
settings, 10, 88
select synth, 9
Ear Training Tutor, 205
GM2 button, 89
Editable Notation
Graphics File, 130
Guitar
Window, 109
Controller, 248
Embellisher
button, 142
enhancements, 61
disable, 142
Macros, 180
enable, 142
pitch bends on fretboard, 61
memo, 146
Styles, 179
Comping, 209
overview, 142
Guitar Macros, 180
settings, 143
strummed chords, 181
settings dialog, 143
Guitar Tutor, 209
Embellishment
alternate tunings, 210
Song, 102
chord tutor, 209
Endings, 102
Enharmonics, 115
Guitar Window Toolbar, 64
Factory reset, 237
Guitarist, 139
guitar chord solo, 140
Fake Sheet, 123
Guitarist Maker, 196
Favorite
Harmonize to Chords, 162
Combos, 255
Index
297
Lead Sheet, 128
Harmonize to MIDI Melody, 160
Fake Sheet Mode, 123
Harmony, 34
creating, 187
show title, 122
selecting, 33
Lead sheet options
test chord, 188
convert harmony, 123
velocity boost, 188
Harmony display, 123
Harmony Maker, 187
Harmony volume, 123
Lead Sheet options
Harmony Menu, 283
print harmony, 125
Held chords
License, 2
options, 100
load next style, 71, 93, 236
Help Menu, 288
load previous style, 71, 93, 236
show hints, 288
Loading
Hot Keys, 290
Songs, 13
Humanize
Styles, 98
Melody and Solo, 150
Hybrid Styles, 182
Loading and Playing Songs, 41
Installation, 7
Local OFF, 281
Instrument Panel, 33
Local ON, 281
Intelligent Guitar
long file names, 80
Parts, 179
Loop button, 85
Style, 179
Loop Button, 45
Interval Tutor, 205
Loop Keystroke Commands, 87
Intro
Loop region, 40, 85
automatic, 134
Loop Section, 45, 85
Inversions, 179
button, 45, 85
Jazz Chord Symbol Graphics, 117
checkbox, 45, 85
chordsheet, 117
enable, 45, 85
lead sheet, 117
looping status, 87
notation, 117
Presets, 86
Jukebox, 65
settings, 45, 85
Looping
options, 105
K Quick Copy, 90
keystroke commands, 87
Key Signature, 38
Screen, 108
Keyboard
Song, 39
looping status, 87
display, 33
Lyrics
Keystroke List, 290
document window, 127
Kill
Intro, 133
Event List, 126
Melodist, 133
Menu, 126
Soloist, 133
Lyrics enhancements
Karaoke file lyrics, 128
Lead sheet
MIDI file lyrics, 128
Options, 121
298
Index
Melody Menu
multiple lines, 58, 124
Edit Melody, 270
Lyrics Menu, 268
Quantize Melody Options, 271
line-based lyrics, 268
Lyrics options, 127
track type, 270, 274
Main Chordsheet
Utilities, 273
font size, 31
Melody Pitch Tracking, 162
number of rows, 31
Memo, 39
select font, 31
Metronome
visual metronome, 84
Main Screen
colors, 31
MGU files, 102
layout, 31
MIDI
Channels
options, 31
Setting, 249
overview, 30
Files
status messages, 32
Standard, 149
Master Tuning, 222
Master Volume, 281
Keyboard, 287
Melodies
Local On, 248
Note Offs, 248
Recording, 147
Sync, 248
Melodist, 132
Thru, 209
64 Bar Form, 133
A2 Transpose, 133
Controllers, 248
Allow Style Changes, 133
Setting, 248
MIDI drivers
Auto-Tempo, 133
wizard, 8
Go To #, 133
Insert Bass Pedals, 133
MIDI drivers, 7
Jukebox, 134
MIDI File
Karaoke, 104
Kill Intro, 133
Kill Melody, 133
MIDI File Chord Wizard, 211
Kill Soloist, 133
MIDI File to Style Wizard, 216
Memo, 134
Minimize Rests, 110
Number of Choruses, 133
Mute All, 45, 90
Replace Thru Form, 133
New features
Solo in Middle Choruses, 133
alternate guitar tunings, 17
Song Form, 133
audio harmony pitch styles, 18
Tempo, 133
audio VU meters, 21
Write To Track, 134
auto lyrics display, 20
auto Staves per Page, 21
Melodist Maker, 193
auto-endings, 18
choose unusual chord progressions, 194
Big Lyrics enhanced, 20
Melody
drum crash option, 21
edit track, 151
editable StylePicker, 19
Melody Embellisher
embellisher selective humanize, 19, 143
selective humanization, 46
Index
299
enhanced audio plug-ins, 19
editable, 109
favorite folder button, 20
Editing
Notes, 119
full stereo audio track, 19
Guitar Tutor anticipate mode, 21
enhancements, 58, 120
harmonies in 4ths, 17
fonts, 116
harmony boxes wider, 21
highlighting, 58, 120
hidden lyrics breaks, 20
insert bends, 110
hi-res bitmap printing, 21
Lyrics, 126
import wave audio, 19
multi-color event list, 151
improved factory reset, 20
Options, 113
improved notation display, 20
resolution, 109
improved tab visibility, 20
rests, 110
Jazz chord symbol graphics, 18
Roman Numeral, 84
Karaoke file support, 19
scrub mode, 120
lead sheet highlights, 19
section text, 120
loop selection, 21
settings, 118
mouse wheel support, 21
staff roll, 112
multi-color event list, 20
standard, 108
multiple lines of lyrics, 19
Style button, 129
multiples sound card support, 19
time signature changes, 91, 233
non-destructive audio edits, 19
title font, 117
notation time changes, 20
toolbar buttons, 107
note colors editor, 19
Transposing, 118
Note
patch list converter, 18
Piano Roll window, 17
duration, 110
pitch bend display, 19
edit, 111
Prefs hot keys, 21
mouse edit, 112
previous style restored, 21
Names, 115
rest insert key, 20
Offs, 248
shift+click region select, 19
Octave, 188, 249
song name in taskbar hint, 20
Overdubbing, 147
SongPicker subfolders, 20
Panic Button, 35
summary, 17
Panning, 249
tab lines more visible, 21
Parameters, 150
Song, 103
text markers for part markers, 20
Part markers
transpose chordsheet, 20
text markers, 104
Vocal Wizard, 19
Part Markers, 101
Not’n Menu, 285
drum fills, 101
Notation
channel numbers, 115
Part Settings, 33
color editor, 114
Patch list converter
Cakewalk to BB, 88
courtesy brackets, 110
300
Index
Guitar Settings, 262
PowerTracks to BB, 87
Harmony Channels and Settings, 250
Patches
keystroke options, 240
Allowing, 248
Patents, 2
Lead Sheet Options, 259
PG Music Inc., 295
Lyric Window Options, 264
Piano Roll
MIDI Driver Setup, 246
chord ruler, 53
MIDI File Options, 245
delete events, 55
MIDI Options, 248
edit events, 54
MIDI Settings, 249
event selection, 52
More Soloist and Melodist Settings, 251
graphic event panel, 52
Notation Window Options, 258
horizontal scroll bar, 56
Output Chords on Channel, 256
insert events, 54
Print Options, 265
keyboard pitch panel, 51
Record Filter, 257
note editing, 54
text hints, 240
note panel, 51
Transpose THRU Part, 256
note selection, 51
Print voice, 125
note time ruler, 53
Printing
right-click contextual menu, 55
Chords Only, 131
track selection, 51
graphics file, 130
vertical scroll bar, 57
preview, 130
window, 50, 153
printer setup, 129
zoom button, 57
range, 129
Pushes, 100
Pitch Styles, 161, 162
Keystrokes, 101
presets, 163
Pixel, 130
Quantize, 150
Play Menu, 266
QuickStart, 11
looping, 267
QuickStart, 22
step advance, 266
Randomization, 150
tempo, 267
Recording
PowerTracks, 179
manual note entry, 148
Preferences
Melodies, 147
Arrangement Options, 242
real time, 147
Audio Settings, 260
Wizard, 149
Big Piano Settings, 263
Registration Form, 305
buttons, 240
Reharmonizing, 201
Color Selection, 252
Render Audio, 165
Count-in and Metronome Options, 244
Reset to factory, 237
Display Options, 241
Rests, 110
Drum Kit, 254
Roland VSC
Favorite Instruments, 255
install, 221
General MIDI Patch Edit, 253
latency, 221
Index
301
Roman Numeral Notation, 84
Memo, 39
Root, 207, 208
new, 69
Sample level, 158
Part Markers, 101
Save
Patches
Allowing, 248
GM lyrics, 104
Saving Song with Patches, 102
pause, 84
Scale tones, 208
play, 84
Scriabin, 114
playing, 15
Select region, 83, 111, 158
save MIDI file, 103
Sequencers, 179
save with patches, 102
Setup, 7
saving, 77
Shots
Settings, 92, 101
stop, 84
options, 100
Substyles
Solo One Instrument, 45, 89
Changing, 101
Soloist
Tempo
custom solo generation, 191
Editor, 138
Change at bar, 92
Maker, 138
Time Signatures, 91
SongPicker
Mode, 136
Slash Chords, 192
enhancements, 41
Style, 136
favorites button, 43
Songs
velocities, 137
loading, 41
Wizard, 137
Soloist Maker, 190
playing, 41
10 steps, 191
Soundcards, 222
phrasing, 190
Staccato, 118
Soloist Menu, 274
Staff Roll Notation
Window, 112
Edit Soloist Track, 275
Soloist Maker, 274
Standard Notation Window, 108
Utilities, 276
Status Messages, 32
Soloist note density, 138
Staves, 129
Song
Stuck Note, 35
Style
automatic intro, 134
Changing, 92
automatic title, 135
Variations, 101
Chorus
Style Wizard
Begin and end, 39
drum fills, 101
advanced settings, 219
Embellishment, 102
Auto-intepret, 220
Entering, 11
Auto-Set, 217
framing, 71, 78
BB parts, 217
Loading, 13
BB parts, 185
Looping, 39
copy Melody, 218
302
Index
More button, 219
Sync, 248
part markers, 185
Synth Window, 33, 44
patch, 217
System Requirements, 7
snapshot regions, 218
Tag Settings, 102
snapshots, 185
TC-Helicon Harmony, 160, 161
tracks area, 216
dry voice, 160
tutorial, 184
level, 161
voicings, 219
octave, 161
Style Wizard, 216
preview, 161
StyleMaker
voices, 161
bass patterns, 176
Technical Support, 295
drum patterns, 174
Tempo
Change at bar, 92
guitar macros, 180
guitar styles, 179
Tempo Control, 38
hot keys, 291
Text markers, 104
hybrid styles, 182
Thru
Setting, 248
overview, 173
Thru velocity boost, 43, 248
patterns
editing, 177
Ticks, 118, 150
erasing, 173
Time line, 148
recording, 176
Time Signature, 91, 233
sliding, 183
Timeshift, 150
velocity adjust, 177
Title Window, 38
piano, guitar, string patterns, 179
chorus settings, 38
toolbar, 173
key signature, 38
loop section, 39
StylePicker, 94
prototype, 94, 95
song title, 38
tempo setting, 38
StylePicker Editor
Titles
add new style, 96
automatic, 135
rebuild list, 97
Toolbars
Styles
Aliases, 99
dockable, 36
choosing, 13
floating, 36
disable, 236
main, 34
enable, 236
Trademarks, 2
favorites, 98
Transport Controls, 35
filter, 94
Tutorial
audio harmonies, 159
load next, 71, 93, 236
Tutorials
load previous, 71, 93, 236
Substitutions, 202
Audio Harmonies, 24
SubStyles
Piano Roll, 25
QuickStart, 22
Changing, 101
Index
303
unmute drum count-in, 245
Voicings, 179, 209
Velocity Lines, 115
Volume
visual metronome, 245
Allowing Changes, 249
Vocal Wizard, 199
Changes, 89
Setting, 249
auto-transpose, 201
Window Menu, 286
key, 200
Chord Builder, 287
range of song, 200
select track, 200
Wizard, 39
transpose, 201
Worksheet, 40
vocal range, 200
Zoom, 158
304
Index
Registration Form
Please register your program. Registering your PG Music software entitles you to unlimited free technical support
for as long as you own the program, advance notice of product upgrades, and new product news. If you haven't
registered your PG Music software yet, please take a few minutes to register now.
Mail this form to PG Music Inc. or fax to 250-475-2937 or 1-877-475-1444.
Register online at www.pgmusic.com or by telephone at 1-250-475-2874, toll-free at 1-800-268-6272
(USA/Canada), or +800-4746-8742 (International).
Name _______________________________________________________________________________________
Address _____________________________________________________________________________________
City ________________________________________________________________________________________
State/Province ________________________________________________________________________________
Zip/Postal Code ______________________________________________________________________________
Country _____________________________________________________________________________________
Telephone number________________________________ Fax number___________________________________
E-mail address _______________________________________________________________________________
Computer (check):
IBM
MAC
Model __________________________________________________
Operating system (e.g. Windows 9x, XP; Macintosh OS X Panther) _____________________________________
What MIDI interface are you using? ______________________________________________________________
What primary synth/sound card do you use? ________________________________________________________
Favorite Styles: Jazz ____ Rock ____ Pop ____ Country ____ Other ___________________________________
Purchased from _______________________________________________________________________________
Date of purchase ______________________________________________________________________________
Comments/Suggestions
_____________________________________________________________________________________________
_____________________________________________________________________________________________
_____________________________________________________________________________________________
_____________________________________________________________________________________________
_____________________________________________________________________________________________
_____________________________________________________________________________________________
_____________________________________________________________________________________________
_____________________________________________________________________________________________
_____________________________________________________________________________________________
Registration Form
305