1
Mobile Media Solutions
Perfect Fit 2011 Toyota Sienna Installation Manual
KTX-SNA I KTX-SNA-S
Sienna Dash Kit x 1
(Panel 7095)
Power Harness x 1
Steering Wheel Remote
Control Module x 1
(KTX-SNA-S only)
~~~~
~~~~
Right Bracket x 1
(Panel 7096)
Introduction
~~~~
Left Bracket x 1
(Panel 7097)
Screws x 12
·
This KTX-SNA Perfect Fit installation kit is for 2011 + Toyota Sienna vehicles without the JBL
audio system. Included are all the parts needed to install your Alpine INA-NAV-10, INA-NAV-20,
INA-W900, INA-W900BT, or INA-W91 0 Audio Video Navigation system in a 2011 + Toyota Sienna.
KTX-SNA-S Perfect Fit installation kit also includes an interface module that allows the Sienna's
steering wheel remote control of the Alpine system. Refer to the individual instruction sections of
this manual to remove your vehicle's factory radio and assemble the kit.
Caution! Disconnect your vehicle's negative battery terminal before the installation to
help prevent electrical damage. We recommend the use of a digital multimeter to check
vehicle wiring. Do not use a test light! A test light or grounded wire probe can cause
damage to the vehicle's computer and/or diagnostic systems. Avoid all factory airbag
wiring. Airbags can accidentally deploy causing serious injury or even death.
Notes:
• See your vehicle's instructions for any special tools your installation might require.
• Read all instructions accompanying your car stereo for proper wiring and mounting
instructions
Factory Stereo Removal
1 . Unscrew factory shift knob and remove.
2. Using a proper panel removal tool unclip the panel
below the AC controls.
3. Unplug the harness from that panel.
4. Using a proper panel removal tool unclip the panel
around the shifter. Unclip the plug from the back of
the panel.
5. Using a proper panel removal tool unclip the AC
controls panel and unclip the plugs behind the
panel.
sn~----r.~
6. Remove the (4) 1Omm screws below the radio.
7. Using a proper panel removal tool unclip the panel
with the vents around the stereo.
Factory Stereo Removal (Continued)
8. Unplug the harnesses from the radio.
9. Remove the 4 Phillips screws holding in the factory
stereo.
Installing The Alpine Head Unit
1 . Attach the Right & Left brackets (panels 7096 & 7097)
to the Sienna dash kit (panel 7095) using the 4 included
screws. Then mount the Alpine head unit using the
8 included screws. Using the 4 Phillips screws you
removed in step 9 of the factory radio removal attach
the Sienna Perfect Fit to the AC vent dash piece of the
vehicle.
2. There's a big enough cavity behind the factory
radio location to hide away the Bluetooth®
module (if applicable). Also the GPS antenna
can be mounted on top of the AC vents.
3. The Bluetooth® microphone can be clipped to the
headliner next to the rear view mirror. This provides a
central location that is easy for the driver to talk into.
4. Plug the provided harness into the factory harness.
If the vehicle has steering wheel remote controls
and you are using the KTX-SNA-S make sure the
box is plugged into the harness. If you are
installing the INA-W900BT the KCE-250BT needs to
be plugged in as well.
Installing The Alpine Head Unit (Continued)
I
5. Connect the Yellow/Black foot brake wire to the Blue
with Silver dots wire at the foot brake in the vehicle. It
is located right at the brake switch. This wire will show
+12V when the brake is pressed.
6. Connect the Yellow/Blue parking brake wire to the
Red/White wire at the parking brake. It's located high
in the drivers kick panel behind the parking brake.
This wire will go to ground when the parking brake is
engaged.
Wiring Harness Diagram
Yellow/Blue
To Parking Brake Red/
White (-) at the parking
brake in drivers kick
panel
To Foot Brake Blue w/
Silver dots(+) at switch
~..;..;,;,_:~~
above pedal
To Toyota Sienna
Vehicle Harness
* No connection for INA-W91 0;
To Steering Wheel Remote
Control Module
Bluetooth® module optional for INA-W900;
KCE-250BT module included with the INA-W900BT.
Liability Disclaimer
Due to changes in design and manufacturing that may occur with your specific vehicle, it
is important that you do not rely solely on vehicle information contained in this installation
manual, such as dash disassembly, wire harness, and codes. Such information should be
confirmed with the vehicle manufacturer. Alpine Electronics, Inc. and its affiliated companies
is not responsible for damage that may occur to you or your automobile during the installation
of the Perfect Fit Kit.
If you have any further questions, feel free to contact Alpine Tech Support at 1-800-NAV-HELP.
ALPINE ELECTRONICS OF AMERICA, INC., 19145 Gramercy Place, Torrance, CA 90501, U.S.A
ALPINE ELECTRONICS OF CANADA, INC., 777 Supertest Road, Toronto, Ontario M3J 2M9,
Canada
Do not send products to these addresses.
Call the toll free number or visit the website to locate a service center.
R
IN-DASH GPS NAVIGATION RECEIVER
EN
INA-W910
FR
ES
• OWNER’S MANUAL
Please read before using this equipment.
• MODE D’EMPLOI
Veuillez lire avant d’utiliser cet appareil.
• MANUAL DE OPERACIÓN
Léalo antes de utilizar este equipo.
ALPINE ELECTRONICS MARKETING, INC.
1-1-8 Nishi Gotanda,
Shinagawa-ku,
Tokyo 141-0031, Japan
Phone 03-5496-8231
ALPINE ELECTRONICS OF AMERICA, INC.
19145 Gramercy Place, Torrance,
California 90501, U.S.A.
Phone 1-800-ALPINE-1 (1-800-257-4631)
1-888-NAV-HELP (1-888-628-4357)
ALPINE ELECTRONICS OF CANADA, INC.
777 Supertest Road, Toronto,
Ontario M3J 2M9, Canada
Phone 1-800-ALPINE-1 (1-800-257-4631)
1-888-NAV-HELP (1-888-628-4357)
ALPINE ELECTRONICS OF AUSTRALIA PTY. LTD.
161-165 Princes Highway, Hallam
Victoria 3803, Australia
Phone 03-8787-1200
ALPINE ITALIA S.p.A.
Viale C. Colombo 8, 20090 Trezzano
Sul Naviglio (MI), Italy
Phone 02-484781
ALPINE ELECTRONICS GmbH
Wilhelm-Wagenfeld-Str. 1-3, 80807 München, Germany
Phone 089-32 42 640
ALPINE ELECTRONICS DE ESPAÑA, S.A.
Portal de Gamarra 36, Pabellón, 32
01013 Vitoria (Alava)-APDO 133, Spain
Phone 945-283588
ALPINE ELECTRONICS OF U.K. LTD.
Alpine House
Fletchamstead Highway, Coventry CV4 9TW, U.K.
Phone 0870-33 33 763
ALPINE ELECTRONICS (BENELUX) GmbH
Leuvensesteenweg 510-B6,
1930 Zaventem, Belgium
Phone 02-725-13 15
ALPINE ELECTRONICS FRANCE S.A.R.L.
(RCS PONTOISE B 338 101 280)
98, Rue de la Belle Etoile, Z.I. Paris Nord Il,
B.P. 50016, 95945 Roissy Charles de Gaulle
Cedex, France
Phone 01-48638989
Designed by ALPINE Japan
68-16909Z48-B
ENGLISH
Contents
Operating Instructions
PRECAUTIONS AND NOTICES
IMPORTANT INFORMATION ....................... 8
USER AGREEMENT ...................................... 9
END USER LICENSE AGREEMENT
(Microsoft) .................................................... 9
WARNING
Points to Observe for Safe Usage ................... 11
WARNING ............................................... 11
WARNING ............................................... 11
CAUTION ................................................ 11
PRECAUTIONS ...................................... 12
Discs Playable on This Unit ................. 13
Getting Started
Accessory List ................................................ 17
Location of Controls ...................................... 17
Turning Power On or Off ............................... 17
Inserting/Ejecting a Disc ................................ 18
Inserting/Removing the SD Memory Card (Only for Updating the Navigation System) ..................................... 18
Adjusting the Monitor Viewing Angle ........... 18
Adjusting the Volume ..................................... 18
Lowering Volume Quickly ............................. 18
How to view the Display ................................ 19
Soft button operation .................................. 19
Recalling the Source ................................... 19
Displaying the Numeric Keypad Input Screen ............................................. 20
Navigation
Basic Operation .............................................. 20
Turning the Navigation System On ............ 20
Navigation Main Menu ............................... 21
Map Functions ............................................ 22
From the Map Display ....................................23
Setting a Destination ....................................23
Finding Local Places ...................................23
Setting Waypoints ........................................23
Input a Destination ..........................................24
Go to Menu ..................................................24
Set a Destination by Address .......................25
Set a Destination by Place ...........................26
Set a Destination by History ........................27
Set a Destination from the Address Book ...........................................27
Set a Destination by Coordinates ................28
Set a Destination by Intersection .................28
Destination Options ........................................29
Finding Nearby Places .................................29
Finding Alternative Routes to the Destination ...............................................29
Setting a Destination as Home ....................29
Saving a Destination into the Address Book ...........................................30
Setting Waypoints ........................................30
Route ...............................................................31
Viewing Turn List During Guidance ...........31
Finding an Alternate Route .........................32
Finding a Detour ..........................................32
Editing Waypoints .......................................32
Canceling Route ..........................................32
Home ...............................................................32
Going Home ................................................32
GUIDEVIEW WINDOW™ Function ............33
Turn on the GUIDEVIEW WINDOW™ Mode ........................................................33
GUIDEVIEW WINDOW™ Display ..........33
Settings ............................................................33
Settings Menu ..............................................33
Customizing Display ...................................35
Customizing Map ........................................35
Customizing Navigation Tool ......................35
Setting Audio ...............................................36
Regional Settings .........................................36
Traffic Settings ............................................36
Information .....................................................37
Information Menu ........................................37
Viewing Dashboard .....................................37
Viewing GPS Status .....................................37
Viewing System Information .......................38
3-EN
HD Radio
Listening to the Radio ..................................... 38
Searching by Title/Group ............................... 49
Presetting Stations Manually .......................... 39
Searching Directly by Chapter or Track Number ............................................ 49
Presetting Stations Automatically .................. 39
Tuning to Preset Stations ................................ 39
Switching the Angle ...................................... 49
Storing the tag information of HD Radio stations ....................................... 39
Scroll to Move the Page Forward or Backward .................................................... 49
Changing the Display ..................................... 40
Switching the Audio Tracks .......................... 49
Receiving a Multicast ..................................... 40
RBDS Operation
Recalling the RBDS Tuner mode ................... 40
PTY (Program Type) Tuning .......................... 41
Switching the Subtitles (Subtitle Language) .................................... 50
Switching from the disc menu ....................... 50
Other Useful Features
Storing the tag information of RBDS stations ............................................. 41
Adjusting the Audio ........................................ 50
Changing the Display (Compulsory Analog Radio mode only) ..... 41
Calling up the Preset Memory ........................ 54
CD/MP3/WMA/AAC
Storing Settings in the Memory ...................... 54
Search Function .............................................. 54
Switching Display Modes ............................... 55
Playback .......................................................... 42
Setup
Repeat Play ..................................................... 43
DVD Setup
M.I.X. (Random Play) .................................... 43
Selecting Folders (concerning MP3/WMA/AAC) ................... 43
About MP3/WMA/AAC ................................. 43
DVD/Video CD
Playing a Disc ................................................ 45
To display the DVD mode screen ............... 45
If a menu screen appears ............................. 46
Displaying the Top Menu Screen ............... 47
Displaying the Menu Screen ...................... 47
Displaying the Menu Operation Mode Screen ........................................... 47
Stopping Playback (Pre Stop) ........................ 47
Stopping Playback ......................................... 47
Fast-forwarding/Fast-reversing ...................... 47
Finding the Beginnings of Chapters/Tracks .......................................... 48
Playing Still Frames (Pausing) ...................... 48
Forward/reverse frame-by-frame Playback ..................................................... 48
Slow Motion Playback ................................... 48
Repeat Playback ............................................ 48
4-EN
DVD Setup Operation ..................................... 55
Changing the language setting .................... 56
Setting of the Menu Language .................... 56
Setting of the Audio Language ................... 56
Setting of the Subtitle Language ................. 56
Changing the Country Code Setting ........... 57
Setting the Rating Level (Parental Lock) ........................................ 57
Changing the Digital Output Setting ........... 57
Setting the Downmix Mode ........................ 59
Setting the TV Screen Mode ....................... 59
Setting of the Bonus Code .......................... 59
Setting the DVD-Audio Playback Mode ....................................... 59
Playing MP3/WMA/AAC Data (File Play Mode) ...................................... 59
Setting the compressed File Playback Data .......................................... 60
Setting the Video CD Play Mode ................ 60
SOURCE Setup
Source Setup Operation .................................. 60
Radio Setup ................................................. 61
Pandora Setup .............................................. 61
USB Search ................................................. 61
DISPLAY Setup
Display Setup Operation ................................. 62
Visual EQ Setting Operation ....................... 62
Setting the Brightness of the Backlighting ............................................. 63
Adjusting the Minimum Level of Backlight .................................................. 63
Setting the Function Guide display ON/OFF ................................................... 63
Switching the Font Back Display Color ...... 63
Adjusting the Touch Panel .......................... 64
Display On and Off ..................................... 64
GENERAL Setup
General Setup Operation ................................ 64
Displaying the Time .................................... 65
Demonstration Function .............................. 65
Sound (Beep) Guide Function ..................... 65
Setting the Scroll ......................................... 65
Adjusting the Dimmer of Button Lighting at Night .................................................... 65
SYSTEM Setup
System Setup Operation ................................. 65
Switching the function of the remote sensor ........................................... 66
Setting the Camera Input ............................. 66
Setting the AUX1 Mode .............................. 67
Setting the AUX2 Mode .............................. 67
Setting the Picture Output ........................... 67
Setting the BLUETOOTH Connection
(BLUETOOTH IN) .................................. 67
Setting the Digital Output ........................... 68
Setting the Rear Entertainment System ....... 68
SiriusXM Setup
SiriusXM Setup Operation ............................. 68
Managing Artist, Song and Sports Team Alerts ................................................. 69
Setting the Favorite Sports Team Alerts ......... 69
Setting the Parental Lock ................................ 70
Signal Strength Information ........................... 70
IMPRINT Operation (Optional)
Changing MultEQ mode ................................. 71
Adjusting Sound Setting in Manual Mode ..... 71
Equalizer Presets (F-EQ) ............................. 71
Setting the Response Slope for the High Range Speaker (TW Setup) ............ 72
Setting the MX Level (Media Xpander) ...................................... 72
Adjusting the Parametric Equalizer Curve (P-EQ) ...................................................... 72
Adjusting the Graphic Equalizer Curve (G-EQ) ..................................................... 73
Setting the Time Correction Unit (T.Corr Parameter) ................................... 73
Adjusting the Time Correction .................... 73
Adjusting the Crossover Settings (X-OVER) ................................................ 73
Storing Settings in the Memory ...................... 74
Calling up the Preset Memory ........................ 74
About Time Correction ................................... 75
About the Crossover ....................................... 76
External Audio Processor Operation
(Optional)
Adjustment Procedure for Dolby Surround ........................................... 77
Setting the External Audio Processor ............. 78
Set MX Mode of the External Audio Processor .................................................. 78
Setting Bass Sound Control ........................ 78
Using the Pro Logic II Mode ...................... 79
X-OVER Adjustment .................................. 79
Performing Time Correction Manually (Time Correction) .................................... 79
Phase Switching .......................................... 80
Graphic Equalizer Adjustments .................. 80
Parametric Equalizer Adjustments .............. 80
Setting the Speakers .................................... 81
Setting of Dolby Digital .............................. 81
Speaker Setup .............................................. 82
Adjusting the DVD Level ............................ 82
Linear PCM Setting ..................................... 82
Storing Settings in the Memory ...................... 82
Calling up the Preset Memory ........................ 82
5-EN
BLUETOOTH Operation
Setup Before Using ......................................... 83
About BLUETOOTH .................................. 83
Before Using Hands-Free Function ............ 83
How to connect to a BLUETOOTH compatible device (Pairing) ..................... 83
BLUETOOTH Setup ...................................... 83
BLUETOOTH Setup Operation .................. 83
Hands-Free Phone Control ............................. 85
About the Hands-Free Phone ...................... 85
Answering a Call ............................................ 85
Hanging up the Telephone .............................. 86
Adjusting the volume when receiving a Call ........................................................... 86
Controlling CD Changer (Optional) ............... 92
Multi-Changer Selection (Optional) ............... 93
SiriusXM Satellite Radio Operation
(Optional)
Receiving Channels with the SiriusXM Tuner
(Optional) .................................................... 93
Tuning Channels by Category ........................ 94
Changing the Display ..................................... 94
Checking the SiriusXM Radio ID Number .................................................. 94
Storing Channel Presets .................................. 94
Redial Function ............................................... 86
Tuning Channels using Presets ....................... 95
Call Switching Operation ............................... 86
Search Function .............................................. 95
Call History ..................................................... 86
Redialing a Number in Dialed Calls History ............................................ 86
Dialing a Number in Received Calls History ............................................ 87
Dialing a Number in Missed Calls History ............................................ 87
Dialing a Number In the Phone Book (Phone Book) ........................................... 87
Voice Dial Operation ................................... 87
Dialing a Number Using Direct Dial Input ................................................. 88
Phone Book Alphabet Searching Function .................................. 88
The Second Incoming Call ............................. 88
Call Waiting Function ................................. 88
Storing the Preset Dialing Number ................. 89
Storing your favorite Artist/
Song for Alerts ............................................ 95
Dialing the preset number ............................... 89
Auxiliary Device (Optional)
Operating Auxiliary Devices (Optional) ........ 89
Camera Operation (Optional)
Front camera Operation .................................. 91
Display the front view video manually ....... 91
Rear camera Operation ................................... 91
Display the rear view video manually ......... 91
Display the rear view video while the car is in reverse .................................. 91
Adjusting Alarm Volume (HCE-C300R only) .................................. 91
Adjusting Detection Sensitivity (HCE-C300R only) .................................. 92
Changer (Optional)
6-EN
Storing the desired Song/Artist ....................... 96
Receiving and Tuning to an Alert ................... 96
Replay Function .............................................. 96
Parental Lock Function ................................... 96
Using Jump Memory and Jump Recall function ............................................ 97
Storing iTunes Tagging information ............... 97
Flash Memory/Portable audio player
(Optional)
BANK Function (Tag search mode only) ....... 97
Playback .......................................................... 98
Repeat Play ..................................................... 99
Random Play Shuffle (M.I.X.) ....................... 99
Searching for a desired Song .......................... 99
Searching by Tag information ..................... 99
Searching by artist name ............................. 99
Searching by Explorer (File Name) mode (Flash Memory only) ............................. 100
Selecting Playlist/Artist/Album/Genre/
Composer (Tag search mode only) ............ 100
Select the desired Folder (Folder up/down) ....................................... 100
Creating the playlist from the Artist/Album
information of the current song (Tag search mode only) ............................. 100
Alphabet Skip Function (Tag search mode only) ............................. 101
Installation and Connections
Direct Search Function ................................. 101
Warning ................................................ 120
About MP3/WMA/AAC File of Flash Memory ........................................... 101
Caution ................................................. 120
iPod/iPhone (Optional)
Setting the iPod Control ............................... 102
Playback ........................................................ 102
Searching for a desired Song ........................ 102
Searching by artist name ........................... 103
Selecting Playlist/Artist/Album/Genre/
Composer/Episode/Category ..................... 103
Precautions .......................................... 120
Installation .................................................... 121
Calibration when connected to HCE-C300R .............................................. 124
Connections .................................................. 125
System Example ........................................... 128
LIMITED WARRANTY
Random Play Shuffle (M.I.X.) ..................... 103
Repeat Play ................................................... 104
Alphabet Skip Function ................................ 104
Direct Search Function ................................. 104
Pandora Radio (iPhone/iPod touch)
Listening to Pandora ..................................... 105
“Thumbs” Feedback ..................................... 105
Searching for a Desired Station .................... 105
Creating a New Station ................................. 105
QuickMix ...................................................... 106
Bookmarking a Desired Song or Artist ........ 106
Changing the Display ................................... 106
Remote Control
Controls on Remote Control ......................... 106
When Using the Remote Control .................. 108
Battery Replacement ..................................... 108
Information
About DVDs ................................................. 109
Terminology .................................................. 110
List of Language Codes ................................ 111
List of Country Codes ................................... 112
In Case of Difficulty ..................................... 114
Specifications ................................................ 119
7-EN
Operating Instructions
FCC COMPLIANCE STATEMENT
PRECAUTIONS AND
NOTICES
IMPORTANT INFORMATION
PLEASE READ CAREFULLY BEFORE USING THIS
PRODUCT
This product is intended to provide turn by turn instructions to
get you to a desired destination. Please make certain that all
persons using this navigation system carefully read these
precautions and the following instructions fully.
• This product is not a substitute for your personal judgment. Any
route suggestions made by this navigation system may never
supersede any local traffic regulations or your personal judgment
and/or knowledge of safe driving practices. Do not follow route
suggestions if the navigation system instructs you to perform an
unsafe or illegal maneuver, places you in an unsafe situation, or
routes you into an area which you consider unsafe.
• Glance at the screen only when necessary and safe to do so. If
prolonged viewing of the screen is necessary, pull over in a safe and
legal manner and location.
• Do not input destinations, change settings, or access any functions
requiring a prolonged view of the monitor and/or remote control
while you are driving. Pull over in a safe and legal manner and
location before attempting to access the system.
• Do not use the navigation system to route you to emergency services.
Not all locations of emergency services such as police and fire
stations, hospitals and clinics are contained in the database. Please
use your own judgment and ask for directions in these situations.
• The map database used in the navigation system is the most recent
map data available at the time of production. Because of changes in
streets and neighborhoods, there may be situations where the
navigation system is not able to route you to your desired destination.
In these cases, use your own judgment.
• The map database is designed to provide you with route suggestions
and does not take into account the relative safety of a suggested route
or of factors which may affect the time required to reach your
destination. The system does not reflect road closures or
construction, road characteristics (i.e. type of road surface, slope or
grade, weight or height restrictions, etc.), traffic congestion, weather
conditions, or any other factors which may affect the safety or timing
of your driving experience. Use your own personal judgment if the
navigation system is unable to provide you with an alternate route.
• There may be situations where the navigation system displays the
vehicle’s location erroneously. Use your own driving judgment in
this situation, taking into account current driving conditions. Please
be aware that in this situation the navigation system should correct
the vehicle’s position automatically. However, there may be times
where you may have to correct the position yourself. If this is the
case, pull over in a safe and legal manner and location before
attempting operation.
• Make certain that the volume level of the navigation system is set to a
level which still allows you to hear outside traffic and emergency
vehicles.
If there is anything in the manual about the operation of
the navigation system which you are uncertain about,
please contact your local Alpine authorized navigation
dealer or Alpine at 1-888-NAV-HELP (1-888-628-4357)
before using the navigation system.
8-EN
This equipment has been tested and found to comply with the
limits for a Class B digital device, pursuant to part 15 of the FCC
Rules. These limits are designed to provide more reasonable
protection against harmful interference in a residential
installation, and are more stringent than “outdoor” requirements.
Operation is subjected to the following two conditions: (1) This
device may not cause harmful interference, and (2) this device
must accept any interference received, including interference
that may cause undesired operation.
This equipment generates, uses, and can radiate radio
frequency energy and, if not installed and used in accordance
with the instructions, may cause harmful interference to radio
communications. However, there is no guarantee that
interference will not occur in a particular installation. If this
equipment does cause harmful interference to radio or television
reception, which can be determined by turning the equipment
off and on, you are encouraged to try to correct the interference
by one of the following measures:
• Reorient or relocate the receiving antenna.
• Increase the separation between the equipment and the receiver.
• Connect the equipment into an outlet on a circuit different from that
to which the receiver is connected.
• Consult an experienced radio/TV technician.
USER AGREEMENT
In using this Navigation System (hereinafter referred to as
“System”), which includes Alpine Electronics, Inc. (“Alpine”)
Specifications, Space Machine, Inc. (“Space Machine”)
Software and NAVTEQ North America, LLC. (“NAVTEQ”)
Database, you are bound by the terms and conditions set forth
below. By breaking the seal on the System and using your copy
of the System, you have demonstrated your agreement to the
terms and conditions of this Agreement. You should, therefore,
make sure that you read and understand the following
provisions.
The System may not be copied, duplicated or otherwise
modified, in whole or in part, without the express written
permission of Alpine, Space Machine and NAVTEQ.
The System may not be transferred or sublicensed to any third
party for profit, rent or loan or licensed for reuse in any manner.
The System may not be decompiled, reverse engineered or
otherwise disassembled, in whole or in part.
The System may not be used in a network or by any other
manner of simultaneous use in multiple systems.
The System is intended solely for personal use (or internal use
where the end-user is a business) by the consumer.
The System is not to be used for commercial purposes.
Neither Alpine, Space Machine nor NAVTEQ guarantees to the
customer that the System meet the specific objectives of the
user.
Neither Alpine, Space Machine nor NAVTEQ shall be
responsible for any damages caused by the use of the System to
the actual user and to any third party.
The warranty on the System shall not extend to an exchange or
refund due to misspelling, omission of letters, or any other
cosmetic discrepancy in layout found in the System.
The right to use the System shall expire either when the user
destroys this software, or when any of the terms for use is
violated and Alpine, Space Machine and/or NAVTEQ exercise
the option to revoke the license to use this software.
The terms and conditions hereof apply to all subsequent users
and owner’s as well as to the original purchaser.
The NAVTEQ Database may include or reflect data of licensors,
including Her Majesty The Queen in right of CANADA. Such data
is licensed on an “AS IS” basis. The licensors, including Her
Majesty The Queen, make no guarantees, representations or
warranties respecting such data, either express or implied,
arising by law or otherwise, accuracy or fitness for a particular
purpose.
The licensors, including Her Majesty The Queen, shall not be
liable in respect of any claim, demand or action, irrespective of
the nature of the cause of the claim, demand or action alleging
any loss, injury or damages, direct or indirect, which may result
from the use or possession of the data or the NAVTEQ database.
The licensors, including Her Majesty The Queen, shall not be
liable in any way for loss of revenues or contracts, or any other
consequential loss of any kind resulting from any defect in the
data or the NAVTEQ database.
End User shall indemnify and save harmless the licensors,
including Her Majesty The Queen and the minister, and their
officers, employees and agents from and against any claim,
demand or action, irrespective of the nature of the cause of the
claim, demand or action, alleging loss, costs, expenses,
damages or injuries (including injuries resulting in death) arising
out of the use or possession of the data or the NAVTEQ
database.
END USER LICENSE AGREEMENT
(Microsoft)
You have acquired a device (“DEVICE”) that includes software
licensed by Alpine Electronics, Inc. (collectively “ALPINE”) from
an affiliate of Microsoft Corporation (collectively “MS”). Those
installed software products of MS origin, as well as associated
media, printed materials, and “online” or electronic
documentation (“SOFTWARE”) are protected by international
intellectual property laws and treaties. The SOFTWARE is
licensed, not sold. All rights reserved.
IF YOU DO NOT AGREE TO THIS END USER LICENSE
AGREEMENT (“EULA”), DO NOT USE THE DEVICE OR COPY
THE SOFTWARE INSTEAD, PROMPTLY CONTACT ALPINE FOR
INSTRUCTIONS ON RETURN OF THE UNUSED DEVICE(S) FOR
A REFUND. ANY USE OF THE SOFTWARE, INCLUDING BUT
NOT LIMITED TO USE ON THE DEVICE, WILL CONSTITUTE
YOUR AGREEMENT TO THIS EULA (OR RATIFICATION OF ANY
PREVIOUS CONSENT).
GRANT OF SOFTWARE LICENSE,
This EULA grants you the following license: You may use the
SOFTWARE only on the DEVICE.
NOT FAULT TOLERANT.
THE SOFTWARE IS NOT FAULT TOLERANT. ALPINE HAS
INDEPENDENTLY DETERMINED HOW TO USE THE SOFTWARE
IN THE DEVEICE, AND MS HAS RELIED UPON ALPINE TO
CONDUCT SUFFICIENT TESTING TO DETERMINE THAT THE
SOFTWARE IS SUITALE FOR SUCH USE.
NO WARRANTIES FOR THE SOFTWARE,
THE SOFTWARE is provided “AS IS” and with all faults. THE
ENTIRE RISK AS TO SATISFACTORY QUALITY,
PERFORMANCE, ACCURACY, AND EFFORT (INCLUDING
LACK OF NEGALIGENCE) IS WITH YOU. ALSO, THERE IS NO
WARRANTY AGAINST INTERFERENCE WTH YOUR
ENJOYMENT OF THE SOFTWARE OR AGAINST
INFRINGEMENT. IF YOU HAVE RECEIVED ANY WARRANTIES
REGARDING THE DEVICE OR SOFTWARE THOSE
WARRANTIES DO NOT ORIGINATE FROM, AND ARE NOT
BINDING ON, MS.
NO LIABILITY FOR CERTAIN DAMAGES.
EXCEPTAS PROHIBITED BY LAW, MS SHALL HAVE NO
LIAVILITY FOR ANY INDIRECT, SPECIAL, CONSEQUENTIAL OR
THE SOFTWARE. THIS LIMITATION SHALL APPLY EVEN IF ANY
REMEDY FAILS OF ITS ESSENTIAL PURPOSE. IN NO EVENT
SHALL MS BE LIABLE FOR ANY AMOUNT IN EXCESS OF U.S.
TWO HUNDRED FIFTY DOLLARS (U.S. $250.00).
LIMITATIONS ON REVERSE ENGINEERING,
DECOMPILATION, AND DISASSEMBLY
You may not reverse engineer, decompile, or disassemble the
SOFTWARE, except and only to the extent that such activity is
expressly permitted by applicable law notwithstanding this
limitation.
9-EN
ADDITIONAL SOFTWARE/SERVICES.
TRADEMARKS.
The SOFTWARE may permit ALPINE, MS, Microsoft Corporation
or their affiliates to provide or make available to you SOFTWARE
updates, supplements, add-on components, or Internet – base
service components of the SOFTWARE after the date you obtain
your initial copy of the SOFTWARE (“Supplemental
Components”).
• If ALPINE provides or makes available to you Supplemental
Components and no other EULA terms are provided along
with the Supplemental Components, then the terms of this
EULA shall apply.
• If MS, Microsoft Corporation or their affiliates make available
Supplemental Components, and no other EULA terms are
provided, then the terms of this EULA shall apply, except that
MS, Microsoft Corporation or affiliate entity providing the
Supplemental Component(s) shall be licensor of the
Supplemental Component(s).
• ALPINE, MS, Microsoft Corporation and their affiliates reserve
the right to discontinue any Internet-based services provided
to you or made available to you through the use of the
SOFTWARE.
This EULA does not grant you any rights in connection with any
trademarks or service marks of ALPINE, MS, Microsoft
Corporation, their affiliates or suppliers.
PRODUCT SUPPORT.
Product support for the SOFTWARE is not provided by MS, its
parent corporation Microsoft Corporation, or their affiliates or
subsidiaries. For product support, please refer to ALPINE
support number provided in the documentation for the DEVICE.
Should you have any questions concerning this EULA, or if you
desire to contact ALPINE for any other reason, please refer to
the address provided in the documentation for the DEVICE.
SOFTWARE TRANSFER ALLOWED BUT WITH
RESTRICTIONS.
You may permanently transfer rights under this EULA only as
part of a permanent sale or transfer of the Device, and only if the
recipient agrees to this EULA. If the SOFTWARE is an upgrade,
any transfer must also include all prior versions of the
SOFTWARE.
RECOVERY MEDIA.
If SOFTWARE is provided by ALPINE on separate media and
labeled “Recovery Media” you may use the Recovery Media
solely to restore or reinstall the SOFTWARE originally installed on
the DEVICE.
UPGRADES.
If the SOFTWARE is provided by ALPINE separate from the
DEVICE on separate media or via web download or other
means, and is labeled “For Upgrade Purposes Only” you may
install one (1) copy of such SOFTWARE onto the DEVICE as a
replacement copy for the existing SOFTWARE, and use it in
accordance with this EULA, including any additional EULA terms
accompanying the upgrade SOFTWARE.
TERMINATION.
Without prejudice to any other rights, ALPINE or MS may
terminate this EULA if you fail to comply with the terms and
conditions of this EULA. In such event, you must destroy all
copies of the SOFTWARE and all of its component parts.
INTELLECTUAL PROPERTY RIGHTS.
All title and intellectual property rights in and to the SOFTWARE
(including but not limited to any images, photographs,
animations, video, audio, music, text and “applets,”
incorporated into the SOFTWARE), the accompanying printed
materials, and any copies of the SOFTWARE, are owned by MS,
Microsoft Corporation, their affiliates or suppliers. The
SOFTWARE is licensed, not sold.
You may not copy the printed materials accompanying the
SOFTWARE. All title and intellectual property rights in and to the
content which may be accessed through use of the SOFTWARE
is the property of the respective content owner and may be
protected by applicable copyright or other intellectual property
laws and treaties. This EULA grants you no rights to use such
content. All rights not specifically granted under this EULA are
reserved by MS, Microsoft Corporation, their affiliates and
suppliers. Use of any on-line services which may be accessed
through the SOFTWARE may be governed by the respective
terms of use relating to such services. If this SOFTWARE
contains documentation that is provided only in electronic form,
you may print one copy of such electronic documentation.
10-EN
EXPORT RESTRICTION.
You acknowledge that SOFTWARE is of US-origin. You agree to
comply with all applicable international and national laws that
apply to the SOFTWARE, including the U.S. Export
Administration Regulations, as well as end-user, end-use and
country destination restrictions issued by U.S. and other
governments. For additional information on exporting the
SOFTWARE, see http://www.microsoft.com/exporting
WARNING
Points to Observe for Safe Usage
• Read this manual carefully before using this disc and system
components. They contain instructions on how to use this product in a
safe and effective manner. Alpine cannot be responsible for problems
resulting from failure to observe the instructions in this manual.
• This manual uses various pictorial displays to show you how to use this
product safely and to alert you to potential dangers resulting from
improper connections and operation. Following are the meanings of these
pictorial displays. It is important to fully understand the meanings of these
pictorial displays in order to use this manual and the system properly.
WARNING
• Operation of the system while driving is dangerous. Users
should stop vehicle before operating the software.
• Road conditions and regulations take precedence over
information contained on the map display: observe actual
traffic restrictions and circumstances while driving.
• This software is designed for use exclusively in the INA-W910. It cannot and may not be used in conjunction with other
hardware.
KEEP THE VOLUME AT A LEVEL WHERE YOU CAN STILL
HEAR OUTSIDE NOISES WHILE DRIVING.
Excessive volume levels that obscure sounds such as emergency
vehicle sirens or road warning signals (train crossings, etc.) can be
dangerous and may result in an accident. LISTENING AT LOUD
VOLUME LEVELS IN A CAR MAY ALSO CAUSE HEARING
DAMAGE.
MINIMIZE DISPLAY VIEWING WHILE DRIVING.
Viewing the display may distract the driver from looking ahead of
the vehicle and cause an accident.
DO NOT DISASSEMBLE OR ALTER.
Doing so may result in an accident, fire or electric shock.
USE ONLY IN CARS WITH A 12 VOLT NEGATIVE GROUND.
(Check with your dealer if you are not sure.) Failure to do so may
result in fire, etc.
KEEP SMALL OBJECTS SUCH AS BATTERIES OUT OF THE
REACH OF CHILDREN.
Swallowing them may result in serious injury. If swallowed,
consult a physician immediately.
USE THE CORRECT AMPERE RATING WHEN REPLACING FUSES.
Failure to do so may result in fire or electric shock.
WARNING
This symbol means important instructions.
Failure to heed them can result in serious injury
or death.
INSTALL THE PRODUCT CORRECTLY SO THAT THE DRIVER
CANNOT WATCH TV/VIDEO UNLESS THE VEHICLE IS
STOPPED AND THE EMERGENCY BRAKE IS APPLIED.
It is dangerous (and illegal in many states) for the driver to watch
TV/Video while driving a vehicle. Installing this product incorrectly
enables the driver to watch TV/Video while driving. This may cause
a distraction, preventing the driver from looking ahead, thus causing
an accident. The driver or other people could be severely injured.
DO NOT WATCH VIDEO WHILE DRIVING.
Watching the video may distract the driver from looking ahead of
the vehicle and cause an accident.
DO NOT OPERATE ANY FUNCTION THAT TAKES YOUR
ATTENTION AWAY FROM SAFELY DRIVING YOUR VEHICLE.
Any function that requires your prolonged attention should only be
performed after coming to a complete stop. Always stop the vehicle
in a safe location before performing these functions. Failure to do
so may result in an accident.
DO NOT FOLLOW ROUTE SUGGESTIONS IF THE
NAVIGATION SYSTEM INSTRUCTS YOU TO PERFORM AN
UNSAFE OR ILLEGAL MANEUVER, OR PLACES YOU IN AN
UNSAFE SITUATION OR AREA.
DO NOT BLOCK VENTS OR RADIATOR PANELS.
Doing so may cause heat to build up inside and may result in fire.
USE THIS PRODUCT FOR MOBILE 12V APPLICATIONS.
Use for other than its designed application may result in fire,
electric shock or other injury.
DO NOT PLACE HANDS, FINGERS OR FOREIGN OBJECTS IN
INSERTION SLOTS OR GAPS.
Doing so may result in personal injury or damage to the product.
CAUTION
This symbol means important instructions.
Failure to heed them can result in injury or
material property damage.
HALT USE IMMEDIATELY IF A PROBLEM APPEARS.
Failure to do so may cause personal injury or damage to the
product. Return it to your authorized Alpine dealer or the nearest
Alpine Service Center for repairing.
KEEP FINGERS AWAY WHILE THE MOTORIZED FRONT
PANEL OR MOVING MONITOR IS IN MOTION.
Failure to do so may result in personal injury or damage to the product.
This product is not a substitute for your personal judgment. Any
route suggestions by this system should never supersede any local
traffic regulations or your personal judgment or knowledge of safe
driving practice.
11-EN
PRECAUTIONS
Product Cleaning
Use a soft dry cloth for periodic cleaning of the product. For more
severe stains, please dampen the cloth with water only. Anything
else has the chance of dissolving the paint or damaging the plastic.
Temperature
Be sure the temperature inside the vehicle is between +45 °C (+113 °F) and 0 °C (+32 °F) before turning your unit on.
New Discs
To prevent the disc from jamming, “Disc Error” is displayed if
discs with irregular surfaces are inserted or if discs are inserted
incorrectly. When a new disc is ejected immediately after initial
loading, use your finger to feel around the inside of the center hole
and outside edge of the disc. If you feel any small bumps or
irregularities, this could inhibit proper loading of the disc. To
remove the bumps, rub the inside edge of the hole and outside edge
of the disc with a ballpoint pen or other such instrument, then insert
the disc again.
Center Hole
Center Hole
New Disc
Moisture Condensation
You may notice the disc playback sound wavering due to
condensation. If this happens, remove the disc from the player and
wait about an hour for the moisture to evaporate.
Outside
(Bumps)
Bumps
Damaged Disc
Installation Location
Do not attempt to play cracked, warped, or damaged discs. Playing
a bad disc could severely damage the playback mechanism.
Make sure the INA-W910 will not be installed in a location
subjected to:
Maintenance
If you have problems, do not attempt to repair the unit yourself.
Return it to your Alpine dealer or the nearest Alpine Service
Station for servicing.
•
•
•
•
Direct sun and heat
High humidity and water
Excessive dust
Excessive vibrations
Correct Handling
Never Attempt the Following
Do not grip or pull out the disc while it is being pulled back into the
player by the automatic reloading mechanism.
Do not attempt to insert a disc into the unit when the unit power is
off.
Do not drop the disc while handling. Hold the disc so you will not
leave fingerprints on the surface. Do not affix tape, paper, or
gummed labels to the disc. Do not write on the disc.
CORRECT
INCORRECT
CORRECT
Inserting Discs
Your player accepts only one disc at a time for playback. Do not
attempt to load more than one disc.
Make sure the label side is facing up when you insert the disc.
“Disc Error” will be displayed on your player if you insert a disc
incorrectly. If “Disc Error” continues to be displayed even though
the disc has been inserted correctly, push the RESET switch with a
pointed object such as a ballpoint pen.
Playing a disc while driving on a very bumpy road may result in
skips, but this will not scratch the disc or damage the player.
Irregular Shaped Discs
Be sure to use round shaped discs only for this unit and never use
any special shaped discs.
Use of special shaped discs may cause damage to the mechanism.
12-EN
Disc Cleaning
Fingerprints, dust, or soil on the surface of the disc could cause the
DVD player to skip. For routine cleaning, wipe the playing surface
with a clean, soft cloth from the center of the disc to the outer edge.
If the surface is heavily soiled, dampen a clean, soft cloth in a
solution of mild neutral detergent before cleaning the disc.
Discs Playable on This Unit
Disc Accessories
There are various accessories available on the market for protecting
the disc surface and improving sound quality. However, most of
them will influence the thickness and/or diameter of the disc. Using
such accessories can cause operational problems. We recommend
not using these accessories on discs played in Alpine DVD players.
Playable Discs
The discs listed below can be played on this unit.
Mark (logo)
Recorded content
Disc size
Audio
+
Video
12 cm*
Audio
+
Video
12 cm*
DVD Video
Transparent Sheet
Disc Stabilizer
DVD Audio
• After turning the system off, a slight ghost of the image will
remain temporarily. This is an effect peculiar to LCD technology
and is normal.
• In cold temperature conditions, the screen may lose contrast
temporarily. After a short warm-up period, it will return to
normal.
• The INA-W910 draws minimal current even when its power switch is
turned off. If the switched power (ignition) lead of the INA-W910 is
connected directly to the positive (+) post of the vehicle’s battery, the
battery may be discharged. An SPST (Single-Pole, Single-Throw) switch (sold separately) can be
added to simplify this procedure. Then, you can simply place it in the
OFF position when you leave the vehicle. Turn the SPST switch back
ON before using the INA-W910. For connecting the SPST switch,
refer to the “Connection Diagram of SPST Switch (sold separately)”
(page 123). If the power (ignition) lead is unswitched, it must be
disconnected from the battery post should the vehicle be left unused
for an extended period of time.
8 cm
12 cm
Audio
+
Video
Video CD
Alpine products equipped with the Ai-NET bus, connected to the
INA-W910, can be operated from the INA-W910. Depending on
the products connected, the functions and displays will vary. For
details, consult your Alpine dealer.
Operation of some of the functions of this unit is very complex.
Because of this, it was deemed necessary to place these functions
into a special screen. This will restrict operation of these functions
to times when the vehicle is parked. This ensures the focus of the
driver’s attention will be on the road and not on the INA-W910.
This has been done for the safety of the driver and passengers.
Audio Processor Adjustments cannot be made if the car is moving.
The car must be parked and the parking brake must be engaged for
the procedure described in the Owner’s Manual to be valid. The
warning “Can’t Operate While Driving” will be displayed if any
attempts are made to perform these operations while driving.
8 cm
8 cm
12 cm
Music CD
Audio
8 cm
(CD single)
* Two-layer DVD disc compatible
The formatted discs listed below can be played on this unit.
CD-R/
CD-RW
DVD-R/
DVD-RW
DVD+R/
DVD+RW
CD Format
MP3 Format
(“mp3”)
WMA Format
(“wma”)
AAC Format
(“aac”, “m4a”)
DVD Video Format
Video CD Format
Discs that are not finalized cannot be played back.
13-EN
Discs that cannot be played
Tips for making your own discs
DVD-ROMs, DVD-RAMs, CD-ROMs (excluding MP3/WMA/
AAC files), photo CDs, etc.
The INA-W910 plays DVD Video, DVD Audio, Video CD, Audio
CD and has a built in MP3/WMA/AAC decoder.
DualDisc
This unit is not compatible with DualDisc.
Using a DualDisc may cause unit malfunction, and may cause disc
damage when the disc is inserted/ejected.
DVD region number (playable region number)
This DVD player will play back any disc whose region number is 1
(or All). DVDs with a region number other than those listed below,
cannot be played on this DVD player.
1
ALL
Using compact discs (CD/CD-R/CD-RW)
If you use unspecified compact discs, correct performance cannot
be guaranteed.
You can play CD-Rs (CD-Recordables)/CD-RWs (CDReWritables) which have been recorded only on audio devices. You
can also play CD-Rs/CD-RWs containing MP3/WMA/AAC
formatted audio files.
• Some of the following discs may not play on this unit:
Flawed discs, discs with fingerprints, discs exposed to extreme
temperatures or sunlight (e.g., left in the car or this unit), discs
recorded under unstable conditions, discs on which a recording
failed or a re-recording was attempted, copy-protected CDs
which do not conform to the audio CD industry standard.
• Use discs with MP3/WMA/AAC files written in a format
compliant with this unit. For details, see pages 43 and 44.
To customers using CD-R/CD-RW
• If a CD-R/CD-RW cannot be played back, make sure the last
recording session was closed (finalized).
• Finalize the CD-R/CD-RW if necessary, and attempt playback
again.
The following information is designed to help you create your own
music CDs (either Audio CD or MP3/WMA/AAC encoded CD-R/RW files).
What is the difference between an Audio and MP3/WMA/AAC
CD?
An Audio CD is the same format as the commercial CDs you buy
in the store (also known as CD-DA). MP3 (MPEG-1 Audio Layer
3)/WMA (Windows Media Audio)/AAC (Advanced Audio
Coding) is a data file that uses a compression scheme to reduce the
size of the music file*.
Hybrid Audio CD and Data (MP3/WMA/AAC) CD-R/RW
discs:
The INA-W910 can read either sector on the disc. Choose CD-DA
to play the CD audio section or MP3/WMA/AAC to play the MP3/
WMA/AAC section*.
Multisession CD-R/RW:
Once a recording has been stopped, this is considered one session.
If the disc is not closed (finalized), additional data may be added.
Once this additional data has been recorded, this becomes a
“multisession” CD. The INA-W910 can only read multisession
DATA Formatted discs (MP3/WMA/AAC files - Not Audio CD
files).
Properly formatted MP3/WMA/AAC Discs:
Use ISO9660 formatting to insure proper playback. You may use
standard ISO naming Level 1 (8.3 DOS standard), Level 2 (32
characters) or Joliet (Windows or Macintosh long filenames) file
naming conventions*.
* Please consult the Owner’s manual for additional information.
On handling compact discs (CD/CD-R/CD-RW)
•
•
•
•
•
•
Do not touch the surface.
Do not expose the disc to direct sunlight.
Do not affix stickers or labels.
Clean the disc when it is dusty.
Make sure that the disc is smooth and flat.
Do not use commercially available disc accessories.
Do not leave the disc in the car or the unit for a long time.
Never expose the disc to direct sunlight.
Heat and humidity may damage the disc and you may not be
able to play it again.
14-EN
Using DVD-Rs/DVD-RWs/DVD+Rs/DVD+RWs
• This unit is compatible with discs recorded in the standard DVD-Video format.
• Note that discs not finalized (processed to enable to play on
playback-only DVD players) cannot be played on this DVD
player.
• Some discs may not play back, depending on the recording
device and disc format.
• Discs or files utilizing copy protection, may not be playable.
Some recording systems may not properly format copied files to
enable proper playback.
• In the following cases, the disc may not play on this unit: discs recorded by certain DVD recorders, certain irregular discs,
flawed discs, dirty discs, when the pickup lens of this DVD
player is dirty, or when moisture condensation has occurred
inside the unit.
• Be sure to follow all cautions included with your DVD-Rs/
DVD-RWs/DVD+Rs/DVD+RWs discs.
• Do not put stickers, seals, or tape on the label side of DVD-Rs/
DVD-RWs/DVD+Rs/DVD+RWs.
• Compared to the regular discs, DVD-Rs/DVD-RWs/DVD+Rs/
DVD+RWs are more affected by heat, moisture, and direct
sunlight. If left in a car, etc. damage may occur and it might not
play on this unit.
• The operable temperature range for disc playback is as follows:
DVD-R/DVD-RW: -25 ~ +70 °C
DVD+R/DVD+RW: +5 ~ +55 °C
Disc terminology
Title
If titles are programed for the DVD, these are the largest units of
division of the information recorded on the disc.
Chapter
Each Title may also be divided into smaller divisions, called
chapters. These can be specific scenes or musical selections.
Protecting the USB connector
• Only an iPod/iPhone, Flash memory or Portable audio player
can be connected to the USB connector on this unit. Correct
performance using other USB products cannot be guaranteed.
• If the USB connector is used, be sure to use only the supplied
connector cable with the unit. A USB hub is not supported.
• Depending on the connected Flash memory device, the unit may
not function or some functions may not be performed.
• The audio file format that can be played back on the unit is MP3/
WMA/AAC.
• Artist/song name, etc. can be displayed. Certain, special
characters may not be correctly displayed.
CAUTION
Alpine accepts no responsibility for lost data, etc., even if data, etc. is
lost while using this product.
On Handling Flash Memory
• This unit can control a memory storage device that supports the
USB Mass Storage Class (MSC) protocol. Playable audio file
formats are MP3, WMA and AAC.
• Flash memory function is not guaranteed. Use Flash memory
according to the terms of agreement. Read the Flash memory
Owner’s Manual thoroughly.
• Fix the Flash memory in a location where driver operation will
not be hindered.
• Flash memory may not function correctly at high or low
temperature.
• Use only certified Flash memory. Note that even certified Flash
memory, may not function correctly depending on its type or
state.
• Depending on the settings of the Flash memory type, memory
state or encoding software, the unit may not play back or display
properly.
• Files protected by DRM (Digital Rights Management), cannot be
played back on this unit. These include AAC formatted files
purchased from the iTunes Store and WMA or other files with
some form of copyright protection.
• Flash memory may take time to start playback. If there is a
particular file other than audio in the Flash memory, it may take
considerable time before the file is played back or searched.
• The unit can play back “mp3”, “wma” or “m4a” file extensions.
• Do not add the above extensions to a file other than audio data.
This non-audio data will not be recognized. The resulting
playback may contain noise that can damage speakers and/or
amplifiers.
• It is recommended to back up important data on a personal
computer.
• Do not remove the USB device while playback is in progress.
Change SOURCE to something other than USB, then remove the
USB device to prevent possible damage to its memory.
15-EN
On Handling Portable audio player
• The unit can control a Portable audio player with the USB
interface. Playable audio file formats are MP3 and WMA.
• Portable audio player function is not guaranteed. Use Portable
audio player according to the terms of agreement. Read the
Portable audio player Owner’s Manual thoroughly.
• Avoid usage or storage in the following locations:
Anywhere in the car exposed to direct sunlight or high
temperatures.
Anywhere the possibility of high humidity or corrosive
substances are present.
• Fix the Portable audio player in a location where driver operation
will not be hindered.
• Portable audio player may not function correctly at high or low
temperature.
• Depending on the settings of the Portable audio player type,
memory state or encoding software, the unit may not play back
or display properly.
• If the Portable audio player has an MSC/MTP setting, set to
MTP.
• A Portable audio player in which data is stored by USB Mass
Storage may not be playable on the unit.
• Depending on the Portable audio player settings, USB Mass
Storage may be supported. For setting, refer to the Owner’s
Manual of the player.
• The unit can play back MP3/WMA files synchronized by
Windows Media Player (Ver. 10 or 11), and are then forwarded
to the player. The “mp3” or “wma” extensions are playable.
• If data is not synchronized by Windows Media Player and is
forwarded in another way, the unit may not be able to correctly
play back the files.
• WMDRM10 is supported by the unit.
• A file that is copy-protected (copyright protection) cannot be
played back.
• It is recommended to back up important data on a personal
computer.
• Do not remove the USB device while playback is in progress.
Change SOURCE to something other than USB, then remove the
USB device to prevent possible damage to its memory.
On Handling SD memory card
• The SD memory card reader of the unit can only be used during
the navigation system update, and it does not support the audio
and video file playback.
• During the navigation system update, please use the SD memory
card that only contains the data for update. Otherwise, the
display may be abnormal. In this case, please consult your
ALPINE dealer. For the operation on update, refer to ALPINE
website.
• This product incorporates copyright protection technology that
is protected by U.S. patents and other intellectual property
rights. Use of this copyright protection technology must be
authorized by Macrovision, and is intended for home and other
limited viewing uses only unless otherwise authorized by
Macrovision. Reverse engineering or disassembly is prohibited.
• Manufactured under license from Dolby Laboratories. Dolby
and the double-D symbol are trademarks of Dolby Laboratories.
• Manufactured under license under U.S. Patent #’s: 5,451,942;
5,956,674; 5,974,380; 5,978,762; 6,487,535 & other U S. and
worldwide patents issued & pending. DTS and the Symbol are
registered trademarks, & DTS 2.0+ Digital Out and the DTS
logos are trademarks of DTS, Inc. Product includes software. © DTS, Inc. All Rights Reserved.
• Windows Media, and the Windows logo are trademarks, or
registered trademarks of Microsoft Corporation in the United
States and/or other countries.
• iPhone, iPod, iPod classic, iPod nano, iPod touch, and iTunes
are trademarks of Apple Inc., registered in the U.S. and other
countries.
• “Made for iPod,” and “Made for iPhone,” mean that an
electronic accessory has been designed to connect specifically to
iPod, or iPhone, respectively, and has been certified by the
developer to meet Apple performance standards. Apple is not
responsible for the operation of this device or its compliance
with safety and regulatory standards.
• Pandora and the Pandora logo are registered trademarks of
Pandora Media, Inc. All rights reserved. Due to music licensing
restrictions, the Pandora radio service is only available in the
United States. This device will control Pandora when connected
to a compatible iPhone.
• HD Radio Technology manufactured under license from iBiquity
Digital Corporation. U.S. and Foreign Patents. HD Radio™ and
the HD, HD Radio, and “Arc” logos are proprietary trademarks
of iBiquity Digital Corp.
• The BLUETOOTH® word mark and logos are registered
trademarks owned by the Bluetooth SIG, Inc. and any use of
such marks by Alpine Electronics, Inc. is under license.
• SiriusXM and all related marks and logos are trademarks of
Sirius XM Radio, Inc. All rights reserved.
• “MPEG Layer-3 audio coding technology licensed from
Fraunhofer IIS and Thomson.”
• Audyssey MultEQ XT is a registered trademark of Audyssey
Laboratories Inc.
• “Supply of this product only conveys a license for private, noncommercial use and does not convey a license nor imply any
right to use this product in any commercial (i.e. revenuegeneration) real time broadcasting (terrestrial, satellite, cable
and/or any other media), broadcasting/streaming via internet,
intranets and/or other networks or in other electronic content
distribution systems, such as pay-audio or audio-on-demand
applications. An independent license for such use is required.
For details, please visit http://www.mp3licensing.com”
©2010 NAVTEQ. All rights reserved.
Portions ©2010, Microsoft Corporation. All Rights Reserved.
16-EN
AUDIO
Getting Started
Accessory List
•
•
•
•
•
•
•
•
•
•
•
•
•
•
•
•
•
•
button
Return to the AV main source screen that is displayed
before the Setup, Navigation, Telephone, Camera mode,
etc. is started.
Turn on GUIDEVIEW WINDOW™ mode (page 33) when the
current screen is audio source screen (HD Radio, CD, iPod,
etc.). Press again to turn it off.
MAP button
Head unit .............................................................................1
Power cable.........................................................................1
Microphone..........................................................................1
Remote control ....................................................................1
Battery (CR2025) .................................................................1
Mounting sleeve ..................................................................1
Bracket key..........................................................................2
Flush Head Screw (M5x8) ...................................................6
Screw (M5×8) ......................................................................8
Face plate............................................................................1
Mounting Position Seal ........................................................2
GPS Antenna .......................................................................1
Pre OUT Cable ....................................................................1
AUX I/O Cable .....................................................................1
AV extension cable ..............................................................1
USB extension cable ...........................................................1
USB 30P cable ....................................................................1
Owner’s Manual .............................................................1 set
Recall the navigation map screen.
Press and hold for at least 2 seconds to recall the saved
Jump Source channel. (When an optional SiriusXM Tuner is
connected.)
NAVI MENU button
Recall the navigation menu screen.
RESET switch
Be sure to press the RESET switch when using the unit for
the first time, after installing the CD changer, after changing
the car battery, etc.
Turn off the unit power, press RESET with a ballpoint pen or
similar pointed object.
Remote Sensor
Point the remote control transmitter towards the remote
sensor within a range of 2 meters.
About the button descriptions used in this Owner’s Manual
• The buttons found on the face of the unit are expressed in bold
(e.g. SOURCE/ ). The buttons found on the touch-screen
display are shown in bold within brackets, [ ] (e.g. [Exit]).
• This Owner’s Manual explains mainly the function of soft
buttons, when a soft button and a unit button have the same
function.
Turning Power On or Off
Some of this unit’s functions cannot be performed while the vehicle is in
motion. Be sure to stop your vehicle in a safe location and apply the
parking brake, before attempting these operations.
Optional Remote Control Interface Box
This unit is operable using the vehicle’s secondary radio controls.
An Alpine Remote Control Interface Box (optional) is required. For
details, contact your Alpine dealer.
1
Press SOURCE/
to turn on the unit.
• The unit can be turned on by pressing any button.
2
Press and hold SOURCE/
turn off the unit.
for at least 3 seconds to
Location of Controls
button
Recalls the Eject/Tilt screen.
If the disc does not eject after touching [Eject] of Disc, press
and hold
for at least 3 seconds.
/
button
Press to adjust the volume.
MUTE/PHONE button
Lowers the volume by 20 dB instantly. Press the button
again to cancel.
Press and hold for at least 2 seconds to display the
Telephone Menu screen.
(When “BLUETOOTH IN” is set to ON (page 67). )
SOURCE/
button
Turns the power on. Press and hold for at least 3 seconds to
turn the power off.
Recalls the SOURCE selection screen.
17-EN
Inserting/Ejecting a Disc
1
Press
2
Insert a disc:
Insert the SD memory card
2
Insert your SD memory card until it clicks.
on the unit.
The display changes to the Eject/Tilt screen.
Touch [Open] on the Eject/Tilt screen.
The movable monitor will open, then insert a disc into the
disc slot. Inserting a disc will close the monitor
automatically.
Remove the SD memory card
Disc Slot
2
3
4
Eject the disc:
Touch [Eject] of Disc on the Eject/Tilt screen.
The movable monitor will open. Then the disc is ejected.
After remove the disc, touch [Close] to close the movable
monitor.
• Touching [Exit] returns to the earlier main source screen.
• Do not apply shock to the movable monitor when it is open as it may
result in malfunction of the unit.
• The monitor may be dim during low temperature and immediately
after turning on the power. The brightness will return to normal as
time elapses.
• The monitor will stop at the set tilt angle when closing.
CAUTION
Keep hands (or any other object) away from the monitor while it
is opening or closing to avoid damage or injury. The back of the
movable monitor will get very warm under normal operating
conditions. This is not a malfunction. Do not touch.
Inserting/Removing the SD Memory Card
(Only for Updating the Navigation System)
Push the SD memory card that is inserted.
The SD memory card is pulled out.
Close the cover of SD memory card slot.
Close the movable monitor.
Adjusting the Monitor Viewing Angle
Adjust the monitor’s angle for better visibility.
1
2
Press
on the unit.
The display changes to the Eject/Tilt screen.
Touch [ ] or [ ] of Tilt to adjust the desired
monitor angle.
The monitor angle can be adjusted in 5 stages.
3
Touch [Exit] to return to the previous screen.
• If the monitor touches an obstacle while the angle is being adjusted,
it will stop immediately.
• The screen color will vary when viewed at certain angles. Adjust the
screen angle for the best viewing position.
• If the voltage of the vehicle’s battery power is low, the screen may
blink when the screen angle is changed. This is normal and not a
malfunction.
Adjusting the Volume
Adjust the volume by pressing
or
.
You can update the software and map of navigation system by using an
optional SD memory card. To insert and take out the SD memory card,
follow the instructions below.
Volume decreases/increases continuously by pressing and
holding
or
.
Volume: 0 - 35
1
Lowering Volume Quickly
After opening the movable monitor, open the cover
of SD memory card slot.
Activating the Audio Mute function will instantly lower the volume
level by 20 dB.
Press MUTE to activate the MUTE mode.
The audio level will decrease by about 20 dB.
Pressing MUTE again will bring the audio back to its
previous level.
18-EN
How to view the Display
Display example for HD Radio main screen
Soft button operation
• Be sure to touch the button lightly with the pad of your finger on the
display to protect the display.
• If you touch a button and there is no reaction, remove your finger
from the display, and try again.
About the button descriptions used in this Owner’s Manual
• Soft buttons, ones found in the display, are shown in bold
enclosed in brackets, [ ] (e.g. [Exit]).
• When a soft button and a head unit button have the same
function, the explanations in this Owner’s Manual will describe
the function of the soft button.
Displays the source name, such as HD Radio band,
etc., that is selected.
Changes to the Bass*1, Treble*1 and Subwoofer*2 Level
adjustment screen directly.
Recalling the Source
Here is an example explanation for the HD Radio mode display on how
to recall a source.
1
Press SOURCE/
on the unit.
The SOURCE selection screen is displayed.
Display example for SOURCE selection screen
• If the optional IMPRINT audio processor is connected, the Bass and
Treble Level can be adjusted only when MultEQ is set to Curve 1 or
Curve 2 (page 71).
• If an optional external audio processor is connected, when touch this
button, the display will change to Balance/Fader, Subwoofer Level
and Defeat setting screen directly.
Displays the time.
Function Guide:
The function guide display varies depending on each
source. The contents of the function guide change by touching [P1/2]*3, [P1/3]*3 or [P1/4]*3 on the function guide, and
many other operations can be performed.
Displays the icon of current source or artwork image*4.
If the GUIDEVIEW WINDOW™ mode is activated, the
information of Navigation system will be displayed in this
area.
*1
Adjustment cannot be performed when DEFEAT is set to ON.
Adjustment cannot be performed when SUBWOOFER is set to OFF
(page 52).
*3 Display may vary depending on the connected devices.
*4
If the playing song contains artwork data, the artwork image can be
displayed (only for USB Audio, Pandora and iPod mode).
*2
Changes the items of source selection list.
Changes to the Telephone Menu screen.
(When “BLUETOOTH IN” is set to ON (page 67). )
Displays the view video of camera.
(When an optional camera is connected and Camera IN
is set to Direct or RCA.)
Changes to main source screen.
Displays the source selection list.
(The kind of source modes that are displayed varies
depending on connection and setting).
Changes to Setup Select screen.
2
Touch [HD Radio].
The screen changes to the HD Radio mode main display.
• If your desired source is not displayed on the screen, touch [ ] to
change the items of the source selection list first. Then touch the
desired source key.
19-EN
Displaying the Numeric Keypad Input
Screen
The numeric keypad input screen is displayed when the DVD mode is
selected for searching a title or chapter. It can also be used for entering a
country code or password for DVD setup, and for selecting a channel
number in the SiriusXM Radio mode etc.
1
2
Touch [10KEY] on the selected source screen.
Touch the desired numeric key.
Display example for numeric keypad
Navigation
Basic Operation
The INA-W910 GPS Navigation Receiver provides an easy-to-use user
interface, clear, easy-to-understand spoken driving instructions, and
award winning design. INA-W910 is built upon Alpine’s history of navigation success in North
America. Please read this manual carefully. If you have any further
questions about INA-W910’s operation, feel free to call Alpine at 1-888-NAV-HELP (1-888-628-4357) for technical assistance.
Turning the Navigation System On
With this system, every time when the ignition key is turned to the ACC
or ON positions and navigation mode is activated, the opening screen
will be displayed automatically.
1
Input screen area
Closes numeric keypad input screen
All input numbers will be deleted.
Previous number will be deleted.
Input number is confirmed.
Numeric keypad
The numeric keypad input screen closes when the area
is touched while displayed.
3
2
Press MAP or NAVI MENU on the unit to activate
the navigation system.
Every time you boot up the system, both the
language selection menu and IMPORTANT! are
displayed on the screen. Touch the desired
language.
Touch [Enter] to confirm your entry.
After the language has been selected, important
information is displayed in each language.
Be sure to read the important information.
3
After you have read this important information,
touch [I Accept].
The map or Navigation Main Menu screen is displayed.
20-EN
Navigation Main Menu
Home Button
Press this to go to a saved home location. See page 32.
Settings Button
Press this to change system settings. See pages 33-36.
Info Button
Touch this to check information such as:
• GPS receiver status
• Speed and trip information
See pages 37-38.
Go to Button
Touch this to start entering a destination. See pages 24-28.
Map Button
Touch this to go to the map. See page 22.
21-EN
Map Functions
GPS Status Bar
GPS Signal Strength
Current Position
Switch Guidance Map
• You can choose between full map and arrow only in
guidance mode.
Switch Arrow Only
Displays three successive arrow maneuvers
all the way to your destination while
providing turn-by-turn guidance prompts.
• When not in the guidance mode, only the current position
can be seen. Zoom buttons, Map Orientation button and
Main Menu are available.
Next Maneuver Arrow and Voice Prompt Button
Switch Full Map
Shows a full-screen map of the area while
providing turn-by-turn guidance prompts.
Zoom Out Button
Touch this icon to zoom out.
Repeating the Announcement
Touch this icon to repeat the guide
announcement.
(Same as Next Maneuver Arrow)
Zoom In Button
Touch this icon to zoom in.
Route Button
Touch this icon and it will take you to the
route menu.
Estimate Time Display
This icon displays Estimated Time
Remaining, Estimated Time of Arrival or
Direction to Destination.
See page 35 to change this setting.
• The time estimates are based on the average speed. The
estimate time will vary depending on vehicle speed. The
arrow always points toward the destination.
Main Menu Button
Next Street Name
Highway Exit Button
When the vehicle is on a Highway, the screen is displayed.
Highway exit information is displayed as a list in order of
close proximity to current position.
You can also set a waypoint, etc. by touching the desired
Highway Exit.
Map Orientation
Touch this icon to switch between North Up, Heading Up
and 3D View.
North Up
In north up view, north is always at the top of the
display. This makes it easy to determine your
current heading with respect to the map.
Heading Up
In heading-up view, the current direction is
always pointing to the top of the display. This
makes it easy to see the direction of the next turn
on the map.
3D View
The 3D View offers you a more realistic
perspective by tilting the map and displaying it
with a horizon line. Streets are displayed as you
approach them instead of from a birds-eye view.
22-EN
Traffic Button
When traffic data is available (in selected markets), the
traffic button is displayed.
Traffic incidents (accident, etc.) will be displayed in a list
format in order of proximity to current position.
Finding Local Places
From the Map Display
1
Setting a Destination
1
2
Touch anywhere on map screen.
The vehicle arrow changes to a crosshair cursor.
Touch anywhere on map screen.
2
The vehicle arrow changes to a crosshair cursor.
Touch the selected position bar on the bottom of the
screen.
3
Select Find Nearby Places.
4
Select the desired category and the desired place.
5
Touch [Go!] on the Confirm Destination Screen.
Position bar
3
Move the cursor to the new desired street.
• Use Map Zoom button to zoom out the map if the destination is far
from the current location.
4
5
6
Touch the selected position bar on the bottom of the
screen.
• To use destination options on the Confirm Destination Screen, see
pages 29-31 for details. See Find Local Places on pages 26-27 for
finding places though Places menu.
Select Set as Destination.
Setting Waypoints
Touch anywhere on map screen.
2
The vehicle arrow changes to a crosshair cursor.
3
Move the cursor to the desired waypoint.
4
Touch [Go!] on the Confirm Destination Screen.
• To use destination options on the Confirm Destination Screen, see
pages 29-31 for details. To cancel, touch Previous Screen icon
1
.
5
6
Touch the selected position bar on the bottom of the
screen.
Select Set as Waypoint and the destination will
automatically be added to the Waypoint List.
Touch [Go!].
• To add another waypoint, see page 30.
23-EN
Input a Destination
Places Button
Select places. See pages 26-27.
Go to Menu
Go to Main Menu
Go to
Returns to the previous screen.
Page List Down
Map Button
Press this to go to the map. See page 22.
Address Book Button
Select from saved destinations. See page 27.
Address Button
Search by typing an address. See page 25.
• Last 4 Streets/Last 4 Cities:
The last four street names and city names searched are
stored in memory.
You can reselect a street name/city name from this list.
History Button
Select from recent destinations. See page 27.
Intersection Button
Set destination by intersection. See page 28.
• Last 4 Streets/Last 4 Cities:
The last four street names and city names searched are
stored in memory.
You can reselect a street name/city name from this list.
Coordinates Button
Set destination using geographic coordinates. See
page 28.
Page List Up
24-EN
Set a Destination by Address
5
If there are multiple matches, the system lists cities
containing the street name and address number that you
keyed in.
There are several ways to set a destination. You can set a destination
directly from the map (page 23) or select Go to from the main menu.
Go to Main Menu
Go to
Address
Type the desired city.
6
The Confirm Destination Screen appears. Touch
[Go!] to calculate the route.
Finding a Destination by Entering Street Name First
1
Select by Street.
2
Type the street name and touch [OK].
7
See pages 29-31, to see more details about Options
on the confirmation destination screen.
Finding a Destination by City Name First
1
Select by City.
2
Type the city name and touch [OK].
If there are multiple matches, the system automatically
displays a short list of street names.
Type only the name of the street. Prefix and suffix of the
street are not necessary.
The list of applicable street names appears.
3
If there are multiple matches, the system automatically
displays a short list of city names. Select the desired city.
Select the desired street name from the list.
3
4
5
4
Type the address number and touch [OK].
6
Type the characters of the street name and touch
[OK].
The list of applicable street names appears. Select
the desired street.
Type the address number and touch [OK].
The Confirm Destination Screen appears. Touch
[Go!] to calculate the route.
25-EN
Set a Destination by Place
You can select from approximately 6 million place locations stored
inside your INA-W910 GPS Navigation System.
Go to Main Menu
Go to
3
4
Use the arrow to the right of the list to scroll up and
down the list.
Select the desired place.
For emergency locations such as Police Stations, Hospitals,
etc., please verify availability before proceeding to such
locations.
Places
5
The Confirm Destination Screen appears. Touch
[Go!] to calculate a route.
By Type
Finding a Place From Here or Near Your Destination
1
Select by Type.
2
Select a desired type.
• Last 4 names and Last 4 types takes you to a list from the last 4
places/types you have previously entered.
• If you find a place near your destination:
When you arrive at a destination, a destination name (POI search),
address and telephone number are displayed in the display bar.
If you want to display a trip summary, touching the arrow in the
display bar, and [Summary] will display a detailed trip summary.
Display bar
3
4
By Name
1
2
Select by Name.
There are 37 Place categories to choose from
including ATMs, Banks, Gas Stations, Grocery
Stores, Hotels, Parking Lots, Restaurants and more.
Follow steps 3 through 5 of the instructions above.
Finding a Place from City Center
1
Select From City Center.
2
Select by City.
Type the desired place name. Touch [OK].
• Last 4 Cities takes you straight to the list of cities you have
previously entered.
A list of place names appears.
26-EN
3
Type a city name and select a city.
4
You can choose by Name or by Type.
5
Follow steps from “by Name” or “by Type” on
page 26.
Finding a Place along Your Route
Set a Destination from the Address Book
1
Select Along Route.
Go to Main Menu
2
Select the desired place type button. Touch [OK].
1
• Highlighted button means it is selected. You can select multiple place
types. Touch the button again to turn the selection on or off.
3
Select the desired destination.
The Confirm Destination Screen appears. Touch
[Go!] to calculate the route.
The lockout function applies to Setup Menu and Edit Address Book. To edit address book, your vehicle must be parked with the ignition key
in the ACC or ON position. To do this, follow the procedures below.
Touch [Go!].
1 Bring your vehicle to a complete stop at a safe location.
Engage the parking brake.
2 Keep pushing the foot brake and release the parking
brake once then engage it again.
3 When the parking brake is engaged for the second time,
release the foot brake.
Set a Destination by History
Go to Main Menu
1
Go to
History
The list of recent destinations appears. Select the
destination.
• For automatic transmission vehicles, place the transmission lever in
the Park position.
Go to Main Menu
1
2
3
2
Address Book
Editing Address Book
A list of places appears
Select the desired place.
4
2
Go to
Go to
Address Book
Select the destination you would like to modify.
Touch
to edit your entry.
Edit Name, Phone Number and Icon or delete the
selected destination.
The Confirm Destination Screen appears. Touch
[Go!] to calculate the route.
• To use destination options on the Confirm Destination Screen, see
pages 29-31 for details.
Deleting All History
Go to Main Menu
1
2
• Select Delete All to delete all addresses saved in the address book.
History
Touch [Clear All].
Touch [Clear All] to delete all previous
destinations.
27-EN
Set a Destination by Coordinates
Go to Main Menu
1
Go to
3
If there is only one street crossing with the first street, the
name of the street automatically appears.
Coordinates
Enter the Latitude of your destination. Touch [OK].
4
5
2
Input the second street name.
Confirm City name if there are more than one city
with the same intersection.
The Confirm Destination Screen appears. Touch
[Go!] to calculate the route.
Enter the Longitude of your destination. Touch [OK].
• To use other functions on the Confirm Destination Screen, see
pages 29-31 for details.
Finding a Intersection by Entering a City Name First
If you know the city name of the intersection you are searching, select
by City. The choice of the street is narrowed down automatically. This
saves time in entering the street information.
3
The Confirm Destination Screen appears. Touch
[Go!] to calculate the route.
• To use destination options on the Confirm Destination Screen, see
pages 29-31 for details.
1
Select by City.
2
Type the city name, then select the city from the list.
3
Input the first street name.
4
Input the second street name.
Set a Destination by Intersection
Go to Main Menu
Go to
Intersection
Finding a Intersection by Entering a Street Name First
1
Select by Street.
2
Type in the first street name. Touch [OK].
5
The Confirm Destination Screen appears. Touch
[Go!] to calculate the route.
• Last 4 Street and Last 4 Cities takes you to a list of the last 4 entries.
The list of applicable street names appears. Select the
desired street and input the address number.
28-EN
Destination Options
The Destination Options Menu allows you to find places nearby, find
alternative routes to get to your destination, set a destination as your
home, save a destination in the address book, and create waypoints.
To get to the Destination Options Menu, enter your desired destination
by using the method on pages 24-28 in order to get to the Confirm
Destination Screen.
Finding Alternative Routes to the
Destination
1
Touch [Change Method].
2
Select a method below.
Select Options.
Minimize Freeway
Avoid Toll Road
Use Time Restricted Road
Avoid Ferry
Finding Nearby Places
1
Touch [Find Nearby Places].
3
Select Quickest or Shortest.
4
Touch [OK].
Setting a Destination as Home
2
Select a desired place type.
3
Select a desired place name.
4
Touch [Go!] to calculate the route.
1
Touch [Set as Home].
2
Touch [OK] or type desired name and touch [OK].
• To find local places directly from the map, go to page 23.
3
4
Select desire icon. If there is no desired icon, touch
[No Icon].
Touch [OK].
29-EN
Saving a Destination into the Address
Book
1
2
3
4
Touch [Save to Address Book].
1
2
Before you touch [Go!] at the Waypoint List screen,
touch [+ Add Waypoint].
Enter the waypoint with any method just as finding a
destination. (pages 24-28)
Type in desired name. Touch [OK].
Select an icon. If there is no desired icon, touch [No Icon].
3
4
Touch [OK].
Setting Waypoints
You can set up to 3 waypoints between you current location and your
destination. The final destination must be set before entering any
waypoints.
Touch [Set as Waypoint] to confirm.
The system returns to the Waypoint List screen.
Touch [Go!] to calculate the new route.
Setting a Waypoint Directly from the Map
See page 23.
Optimizing Your Route
Adding a Waypoint
1
1
2
Touch [Options]. Waypoint options screen appears.
3
Touch [Optimize Route].
2
Adding another Waypoint
Touch [Set as Waypoint] and the destination is
automatically added to the Waypoint List.
Touch [Set as Waypoint]. The Waypoint List
appears.
Touch [Go!] to calculate the route.
30-EN
4
The system takes you back to the Waypoint List
screen with optimal route. Touch [Go!] to calculate
the route.
Deleting a Waypoint
1
Select the desired waypoint to delete from the list.
2
Touch [Delete].
4
5
Use the Up and Down buttons to move the waypoint.
Touch [OK] and the system returns to the Waypoint
List screen.
Deleting All Waypoints
1
2
Touch [Options].
Touch [Delete All Waypoints]. Touch [Delete All]
to confirm.
6
Touch [Go!] to calculate the route.
Route
Viewing Turn List During Guidance
3
You can view a list of street names and upcoming turns and streets.
If all waypoints are deleted, will return to the
waypoint list. To get back to the Map screen, touch
[Map] to get back to the map.
Editing Order of Waypoints
1
2
3
Main Menu
Info
Route
Edit Waypoint
or from the Map
Route Button
Edit Waypoint
Main Menu
Info
Route
or
directly from the Map
1
Touch [View Turn List].
At the Waypoint List Screen, select the desired
waypoint to edit.
Touch [Edit Order].
2
A list of upcoming streets and turns appears on the
screen.
To preview a specific point, select a street name/maneuver
on the list.
31-EN
Avoiding a Particular Street
1
2
Finding a Detour
Touch [View Turn List].
By Distance
List of upcoming streets and turns appears on the
screen. Select the street name, and touch its check
box.
Check box
1
2
On Route screen, touch [Detour].
Choose detour from 1/2 mile, 1 mile, 2 miles or 5
miles.
The system automatically calculates and displays a
detoured route.
3
Touch [Avoid].
Finding an Alternate Route
1
On Route screen, touch [Change Method].
Editing Waypoints
To edit waypoints, see page 31.
Canceling Route
From Route screen or Main Menu, touch [Cancel Route].
• After canceling the route, you cannot select Route Menu until the
next destination has been set. To set next the destination, see “Go to
Menu” on page 24.
Home
You can go Home from anywhere once the Home Address is set. See
page 29 to set a destination as Home.
Going Home
Go to Main Menu
Home
Touch [Go!] to calculate the route.
2
Touch [OK].
• You can select and re-calculate an alternate route based on Quickest
Route or Shortest Route and select Avoid Freeway, Toll Road, Time
Restricted Road or Ferry.
32-EN
GUIDEVIEW WINDOW™ Function
Route Guidance
This function allows you to get the navigation information from the
normal screen of Audio Source promptly.
Turn on the GUIDEVIEW WINDOW™ Mode
Go to any audio source screen, press AUDIO
hardkey to turn on GUIDEVIEW WINDOW™. Press again
to turn it off.
GUIDEVIEW WINDOW™ Display
Start-Up
The street name of the next maneuver is displayed in the
top portion of the screen.
Second immediate maneuver arrow is displayed only for
double maneuvers along the route.
The maneuver arrow is displayed for the upcoming
guidance.
A countdown bar is displayed when approaching the
maneuver.
The distance to the maneuver is displayed at the bottom
of the arrow.
Touching the GUIDEVIEW WINDOW will prompt the
system to announce the next maneuver.
Rerouting
Non Guidance
It will be displayed when the rerouting is calculated.
Settings
When touching the GUIDEVIEW WINDOW, the window
will toggle between displaying heading orientation and
the speed limit of the current street.
The Current street name that the vehicle is matched on
to is displayed.
If no GPS signal, the text “Locating GPS Satellites” will
be displayed.
If your vehicle is off segment, nothing is displayed in the
current street name location.
Settings Menu
The lockout function applies to Setup Menu and Edit Address Book. To
enable setup menu, your vehicle must be parked with the ignition key in
the ACC or ON position. To do this, follow the procedures below.
1 Bring your vehicle to a complete stop at a safe location.
Engage the parking brake.
2 Keep pushing the foot brake and release the parking
brake once then engage it again.
3 When the parking brake is engaged for the second time,
release the foot brake.
• For automatic transmission vehicles, place the transmission lever in
the Park position.
33-EN
Go to Main Menu
Navigation Button
For navigation settings, see page 35.
Returns to the previous screen.
Display Button
For display settings, see page 35.
Page List Down
Map Button
Press this to go to the map. See page 22.
Audio Button
For audio settings, see page 36.
Map Button
For map settings, see page 35.
Clock / Regional Button
For regional settings, see page 36.
Restore Navi Defaults Button
This allows you to delete all stored information and default
back to the original factory settings.
34-EN
Update Button
Displaying and Editing Icons on the Map
For update operation, refer to ALPINE website.
Place Icons, the Home Icon and Icons used in the Address Book can be
turned on and off from the Display Setup Menu.
• Please do not shut off power or remove the SD card during the
update.
• Touch [OK] to complete the setting.
Page List Up
Showing Trail Dots
Traffic Button For traffic settings, see page 36.
The Trail feature allows you to turn on and off trail dots that appear
wherever the vehicle icon traverses. This is especially helpful for offroad enthusiasts.
Customizing Navigation Tool
Go to Main Menu
Navigation
Customizing Display
Go to Main Menu
Display
• The Day/Night mode map color will be changed automatically based
on sunrise and sunset time.
Screen Recalibration
Route Method
This allows you to recalibrate the touch screen for better accuracy.
You can change the default routing method.
Customizing Map
See page 31 for details.
You can customize map color, vehicle icon, and place icons on the map.
Guidance Map
Go to Main Menu
You can choose between full map and arrow only in guidance mode.
Map
Route Button
You can choose between 3 different route buttons.
Arrival time & distance to destination.
Remaining time & distance to destination.
Direction of destination.
35-EN
Show Route Overview
Units
This button allows you to view the full route after the destination has
been calculated and before the guidance begins.
You can set the Units of Measure to read in kilometers or miles.
Clock / DST
Auto Zoom
This button, when selected, allows the map to automatically zoom in
when approaching maneuver.
You can set the Clock to 12 or 24 hour style and set Daylight Savings to
fit your region.
Route Unverified Roads if Possible
This button avoids using roads not verified by the map provider.
Start Demo
You can watch a navigation demonstration with the system’s voice and
screen guidance.
• Set a destination before using this function.
Time Zone
Setting Audio
Go to Main Menu
You can set the Time Zone to fit your region.
Audio
Traffic Settings
Button Sounds
This allows you to turn the soft button sounds of navigation mode ON or
OFF.
Go to Main Menu
Traffic
Guidance Prompt
This allows you to turn ON or OFF the guidance prompts.
Regional Settings
Go to Main Menu
Clock / Regional
Traffic Avoidance
You can choose between 3 options for traffic avoidance.
You will be asked to use a quicker route when traffic is
detected on route.
Automatic: The system will automatically reroute to avoid traffic.
Off:
You will not be asked and the system will not
automatically reroute to avoid traffic.
Prompt:
Language
You can select a Language from English, French and Spanish.
36-EN
Viewing Dashboard
Information
Go to Main Menu
Information Menu
Go to Main Menu
Info
Dashboard
The odometer displays the speed and time traveled.
Info
Dashboard Button
Driving Average
Average speed.
Overall Average
Average speed (includes idle time).
Maximum Speed
Maximum speed reached.
Driving Time
Time vehicle has been moving.
Idle Time
Time vehicle has been stopped (not moving).
Total Time
Total elapsed time (driving time plus idle
time).
For viewing dashboard, see page 37.
GPS Button
For viewing GPS, see page 37.
Viewing GPS Status
This feature allows you to view GPS satellite signal information. You
can view the dynamic location information received from satellite, such
as, signal strength, compass (direction information), latitude/longitude,
approximate altitude.
An explanation of the messages is shown below.
Go to Main Menu
Info
GPS
Route Button
For changing the route, see page 31.
The following messages are displayed while the GPS receiver is
tracking satellites:
Locating GPS Satellites
The INA-W910 searches the sky looking for GPS satellites.
System Button
For viewing system information, see page 38.
Acquiring GPS Signal
The INA-W910 acquires positioning information transmitted from
1 to 3 tracked satellites while searching for more satellites
(minimum 4 of needed).
Fixing GPS Position
The INA-W910 requires continuous signals from 4 or more
tracked satellites (for 30 seconds) in order to accurately fix your
position.
37-EN
Temporary Poor GPS Coverage
Thunderstorms, dense foliage or surrounding tall buildings may
cause temporary loss of position fix (acceptable if under 30
seconds).
Poor GPS Signal, Lost Position Fix
HD Radio
Display example for HD Radio main screen
You may have entered an area where consistently poor GPS
signal (lasting 30 seconds or more) makes it impossible to
maintain a position fix.
No Line of Sight, Lost GPS Tracking
You are in an area where line of sight to GPS satellites has been
blocked.
Viewing System Information
You can check software application, database version, and other
information on this screen.
Go to Main Menu
Info
System
[Tag] button: Stores the tag information. For details, refer
to “Storing the tag information of HD Radio stations” on
page 39.
[DX SEEK]* button: Displays the tuning mode selection
list.
[ANALOG] button: Activating the Compulsory Analog
Radio mode. The unit will receive Analog Radio signals
only, the display will change to RBDS Tuner mode
screen and the button will be highlighted.
Touch the highlighted button to cancel the Compulsory
Analog Radio mode.
Displays the preset number/frequency.
• Make a note of this information and refer to it whenever you
communicate with customer support.
* The button displays the current tuning mode.
This unit is able to receive signals based on the terrestrial digital radio
broadcasting standard.
When current AM/FM broadcasters are transmitting digital audio and
data services, HD Radio signals are on-the-air in their service area. You
can receive their digital broadcast and enjoy high quality sound. If there is no HD Radio signal in the current area, after 10 seconds, this
unit will switch to receive the RBDS Radio signal automatically.
However, the display is still HD Radio mode screen.
Listening to the Radio
1
Press SOURCE/
2
Touch [HD Radio].
3
Touch [BAND] to select the desired radio band.
The digital radio mode is activated and the display changes
to the HD Radio Tuner Mode screen.
Each press changes the bands as follows:
FM-1
38-EN
on the unit.
The SOURCE selection screen is displayed.
FM-2
AM
FM-1
4
Touch [DX SEEK]* to choose the tuning mode.
DX SEEK
Local SEEK
MANUAL
• There are two modes you can select for auto tuning, DX and
Local:
- DX (Distance) mode; Both strong and weak stations will be tuned in.
- Local mode; Only strong stations will be tuned in.
The initial setting is DX.
* The button displays the current tuning mode.
5
Touch [
], [
] or [
], [
] to change the
radio frequency up or down respectively.
In manual mode, touch and hold to change the frequency
continuously.
Tuning to Preset Stations
You can tune in the preset stations in memory on each band using the
preset number.
1
2
After selecting the desired band, touch [P1/3] to
change the function guide.
Touch any one of the preset buttons [P.SET 1]
through [P.SET 6] that has a station stored to it.
The preset station is received.
• When a multicast station sub channel is stored as a preset station, if
the sub channel cannot be received any longer, touch the stored
preset button, there will be no sound.
• “Digital” is displayed when a digital radio station is received.
Refer to “Digital Seek Setting” on page 61.
Storing the tag information of HD Radio
stations
Presetting Stations Manually
iTunes Tagging lets you tag songs heard on HD Radio stations. You can
preview, buy and download later, songs from your iTunes tagged
playlist the next time you sync your iPod/iPhone. If the unit is
connected to a Tagging compatible iPod/iPhone, you can use the iTunes
Tagging function. For details, refer to the Owner’s Manual of the
Tagging compatible iPod/iPhone.
1
2
3
Tune in a desired radio station you wish to store in
the preset memory by manual or automatic seek
tuning.
Touch [P1/3] to change the function guide.
Touch and hold any one of the preset buttons
[P.SET 1] through [P.SET 6] for at least 2 seconds.
The selected station is stored.
4
Repeat the procedure to store up to 5 other stations
onto the same band.
To use this procedure for other bands, simply select the
desired band and repeat the procedure.
A total of 18 stations can be stored in the preset memory (6 stations for each band; FM1, FM2 or AM).
• If a preset memory has already been set in the same preset number, it
will be cleared and the new station will be memorized.
Presetting Stations Automatically
The tuner can automatically seek and store 6 strong stations in the
selected band in order of signal strength.
After selecting the desired band, touch and hold
[A.MEMO] for at least 2 seconds.
The tuner automatically seeks and stores 6 strong stations into
[P.SET 1] to [P.SET 6] in order of signal strength.
When the automatic storing has been completed, the tuner goes
to the station stored in [P.SET 1].
When a desired song is heard on an HD Radio station, if there is tag
information of the song, the [Tag] button will light.
Touch [Tag] to save its tag information.
If no iPod/iPhone is connected, “Tag Count X” is displayed (X is
the total amount of the tag information stored in this unit).
• During tagging, the iPod/iPhone takes priority to save the tag
information. If no iPod/iPhone is connected, the tag information is
saved to this unit.
• When the memory of iPod/iPhone is full, “iPod Memory Full, Tag
Count X” is displayed. The tag information will be stored to the unit.
• If the tagging operation is interrupted by a hands-free phone call, the
tagging operation will be canceled and the unit will display “Cannot Tag”.
• This unit can store up to 50 pieces of tag information. When the
memory of the unit is full, “Tuner Memory Full. Connect iPod” may
be displayed.
• When an iPod that doesn’t support the tagging function is connected,
“Non-Tagging iPod” may be displayed.
• When the iPod/iPhone is disconnected from the unit during tagging,
its tag information will be stored in the unit.
• If there is stored tag information on the unit, when an iPod/iPhone
supporting the tag function is connected, the stored tag information
will be transferred to the iPod/iPhone automatically. When the iPod/
iPhone memory becomes full, “iPod Memory Full” will be displayed,
and any remaining tag information on the unit will not be transferred
to the iPod/iPhone.
• If tag information already exists, “Already Tagged” will be displayed
when you try to tag information again.
• If no stations are stored, the tuner will return to the original station
you were listening to before the automatic storing procedure began.
39-EN
Changing the Display
RBDS Operation
Text information, such as Station name, Song title, Artist, etc. is
displayed while receiving a digital radio station.
Display example for RBDS main screen
Touch [INFO.]*1 on the HD Radio Tuner mode main
screen.
Each time you touch this button, the display changes as shown
below.
Short Station Name *2
Long Station Name *2
Song title *3
Song title *3
Artist name *
3
Artist name *3
Album name *3
Album name *3
*1 This button is unavailable when a RBDS radio station is received due
to no HD Radio signal.
*2 Displays Short Station Name / Long Station Name in the Station
Information Service Data.
*3 Displays Song title / Artist / Album in the main program Service
Data.
[Tag] button: Stores the tag information. For details, refer
to “Storing the tag information of RBDS stations” on
page 41.
[DX SEEK]*1 button: Displays the tuning mode selection
list.
[PTY SEARCH]*2 button: Start searching for a station of
the selected program type. For details, refer to “PTY
(Program Type) Tuning” on page 41.
[ANALOG] button: Touch the highlighted button to
cancel the Compulsory Analog Radio mode.
Displays the preset number/frequency.
Receiving a Multicast
Multicasting is the ability to broadcast multiple program streams over a
single FM frequency. This increases the amount and diversity of content
choices. A maximum of eight multicast station channels can be selected
on this unit.
When a radio station multicast is received, the “Multicast” indicator
lights.
1
Touch [
2
Touch [ ] of the desired program type.
3
Touch [ ] or [ ] of
] in the HD Radio Tuner mode.
The program list is displayed.
The selected program is received.
on the function guide.
*1 The button displays the current tuning mode.
*2 Displays only when the PTY tuning mode is selected.
The RBDS (Radio Broadcast Data System) is a radio information
system. The RBDS allows you to receive a variety of information such
as traffic information, station names.
The RBDS digital data includes the following:
PS
Program Service Name
PTY
Program Type
The sub channel of the received radio station is changed.
Recalling the RBDS Tuner mode
1
Press SOURCE/
2
Touch [HD Radio].
on the unit.
The SOURCE selection screen is displayed.
The digital radio mode is activated and the display changes
to the HD Radio Tuner Mode screen.
• If there is no HD Radio signals in the current area, after 10 seconds,
the unit will change to the RBDS Tuner mode automatically.
3
4
40-EN
Touch [P1/3] to change the function guide.
Touch [ANALOG].
“Analog only” is displayed.
The Compulsory Analog Radio mode is activated. The
display changes to the RBDS Tuner mode screen and the
[ANALOG] button will be highlighted.
PTY (Program Type) Tuning
Changing the Display (Compulsory Analog Radio mode only)
FM Radio mode
1
2
Touch [DX SEEK]* to choose the PTY tuning mode.
The PTY mode is activated.
The Program Type of the station being currently received
will be displayed.
Touch [ ] or [ ] after activating the PTY mode to
choose the desired program type while “PTY”
(program type) is displayed.
Each press scrolls the program type by one.
3
Touch [PTY SEARCH] after selecting the program
type to start searching for a station of the selected
program type.
If no station is found, “NO PTY” will be displayed.
* The button displays the current tuning mode.
Storing the tag information of RBDS
stations
Text information, such as PS (Program Service name), Song title, Artist,
etc. is displayed while receiving an FM radio station of RBDS Tuner.
Touch [INFO.] on RBDS Tuner mode screen.
Each time you touch this button, the display changes as shown
below.
PS
PS
Song title *2
PTY
PTY
Artist name *2
Radio Text *1
Album name *2
*1 If there is no receivable text message or the unit cannot receive a text
message properly, the display shows blank.
*2 Displays Song title / Artist / Album in the main program Service
Data.
• If an RBDS radio station is received due to no HD Radio signal, the
PS, Song title, Artist name and Album name information of RBDS
radio station is displayed and cannot be changed by touching
[INFO.].
iTunes Tagging lets you tag songs heard on RBDS stations. You can
preview, buy and download later, songs from your iTunes tagged
playlist the next time you sync your iPod/iPhone. If the unit is
connected to a Tagging compatible iPod/iPhone, you can use the iTunes
Tagging function. For details, refer to the Owner’s Manual of the
Tagging compatible iPod/iPhone.
When a desired song is heard on an RBDS station, if there is tag
information of the song, the [Tag] button will light.
Touch [Tag] to save its tag information.
If no Pod/ Phone is connected, “Tag Count X” is displayed (X is
the total amount of the tag information stored in this unit).
• During tagging, the iPod/iPhone takes priority to save the tag
information. If no iPod/iPhone is connected, the tag information is
saved to this unit.
• When the memory of iPod/iPhone is full, “iPod Memory Full, Tag
Count X” is displayed. The tag information will be stored to the unit.
• If the tagging operation is interrupted by a hands-free phone call, the
tagging operation will be canceled and the unit will display “Cannot Tag”.
• This unit can store up to 50 pieces of tag information. When the
memory of the unit is full, “Tuner Memory Full. Connect iPod” may
be displayed.
• When an iPod that doesn’t support the tagging function is connected,
“Non-Tagging iPod” may be displayed.
• When the iPod/iPhone is disconnected from the unit during tagging,
its tag information will be stored in the unit.
• If there is stored tag information on the unit, when an iPod/iPhone
supporting the tag function is connected, the stored tag information
will be transferred to the iPod/iPhone automatically. When the iPod/
iPhone memory becomes full, “iPod Memory Full” will be displayed,
and any remaining tag information on the unit will not be transferred
to the iPod/iPhone.
• If tag information already exists, “Already Tagged” will be displayed
when you try to tag information again.
41-EN
CD/MP3/WMA/AAC
Display example for MP3/WMA/AAC main screen
Playback
1
Press SOURCE/
2
Touch the source icon of [DISC].
on the unit.
The SOURCE selection screen is displayed.
The display shows the DISC mode screen.
When a CD/MP3/WMA/AAC is inserted into the DISC SLOT
of this unit, with the label side facing up, the unit starts to
play the CD/MP3/WMA/AAC.
3
Touch [
(file).
] or [
] to select the desired track
Returning to the beginning of the current track (file):
Touch [
].
Fast reverse:
Touch and hold [
[ ] button: Refer to page 54.
CD: Displays the Track text*1/Disc text*1.
• If there is neither Track nor Disc name information, “No Text” will
be displayed.
MP3/WMA/AAC:
After displaying the file name in the upper line, the track
name is displayed if there is ID3 tag information.
After displaying the folder name in the lower line, the album
name/artist name are displayed if there is ID3 tag
information.
CD:
Displays the disc number*2/track number/elapsed time.
MP3/WMA/AAC:
Displays the disc number*3/folder number/track number/
elapsed playback time.
*1 Displayed when a CD text disc is inserted.
*2 Displayed when a CD changer is connected.
*3 Displayed when an MP3 compatible CD changer is connected.
42-EN
].
Advancing to the beginning of the next track (file):
Touch [
].
Fast forward:
Touch and hold [
].
To pause playback
Touch [ /
Touching [
].
/ ] again will resume playback.
Inserting/Ejecting a Disc
Refer to “Inserting/Ejecting a Disc” (page 18).
• The INA-W910 model includes a built-in MP3/WMA/AAC unit. You
can play CD-ROMs, DVD-ROMs, CD-Rs, CD-RWs, DVD-Rs, DVD-RWs, DVD+Rs and DVD+RWs containing MP3/WMA/AAC
files on this unit. Use the format compliant with this unit.
For further information about playing or storing MP3/WMA/AAC
files, refer to pages 43 and 44 before using the unit.
• WMA format files that are protected by DRM (Digital Rights
Management), AAC format files that have been purchased from
iTunes Music Store that are not DRM-Free and files that are copyprotected cannot be played back on this unit.
• The unit can play discs containing both audio data and MP3/WMA/
AAC data.
• The track display for CD audio data playback is the track numbers
recorded on the disc.
• Three-inch (8 cm) CDs can be used.
• “Playing MP3/WMA/AAC Data (File Play Mode)” is mentioned on
page 59.
• If an MP3/WMA/AAC disc with many files and folders is played, it
takes a little longer than normal to start playback.
• Touch [
] to activate the search mode. For operations, refer to
“Search Function” on page 54.
However, the search mode function does not work in the CD changer
mode.
• The playback time may not be correctly displayed when a VBR
(Variable Bit Rate) recorded file is played back.
Repeat Play
About MP3/WMA/AAC
Touch [ ] to play back repeatedly the track currently
being played.
The track (file) will be played repeatedly.
Touch [
] again and select OFF to deactivate Repeat play.
*1
CD:
(off)
(Repeat One)
1 Touch [P1/2]*3 to change the function guide.
2 Touch [ ] and select the desired Repeat play.
*2
*1
(off)
(Repeat One)
*1 If a CD Changer or an MP3 compatible CD changer is connected
and the Repeat Disc mode is selected, the unit repeatedly plays back
all tracks (files) on the disc selected.
*2 Only files in a folder are repeatedly played back.
*3 Display may vary depending on the connected devices.
M.I.X. (Random Play)
] during playback.
The tracks (files) on the disc will be played back in a random
sequence.
To cancel M.I.X. play, touch [
ALL*1
CD:
].
(off)
MP3/WMA/AAC:
1 Touch [P1/2]*4 to change the function guide.
2 Touch [ ] and select the desired M.I.X. play.
*3
*2
(off)
*3
ALL function is connected,
*1 If a CD Changer equipped with the
ALL will also be selectable. In this mode, the tracks on all the CDs in the current magazine will
be included in the random playback sequence.
*2 If an MP3 compatible CD changer is connected, all files in a disc are
played back in random sequence, and playback shifts to the next disc.
*3 Only files in a folder are played back in random sequence in the
mode.
*4 Display may vary depending on the connected devices.
• If the search mode (page 54) is activated, the M.I.X. play mode will
be canceled.
Selecting Folders (concerning MP3/
WMA/AAC)
Touch
[
Except for private use, duplicating audio data (including MP3/
WMA/AAC data) or distributing, transferring, or copying it,
whether for free or for a fee, without permission of the copyright
holder is strictly prohibited by the Copyright Act and by
international treaty.
What is MP3?
MP3/WMA/AAC:
Touch [
CAUTION
] or [
] to select the folder.
MP3, whose official name is “MPEG-1, 2, 2.5 Audio Layer 3”, is a
compression standard prescribed by the ISO, the International
Standardization Organization and MPEG which is a joint activity
institution of the IEC.
MP3 files contain compressed audio data. MP3 encoding is
capable of compressing audio data at extremely high ratios,
reducing the size of music files to as much as one-tenth their
original size. This is achieved while still maintaining near CD
quality. The MP3 format realizes such high compression ratios
by eliminating the sounds that are either inaudible to the human
ear or masked by other sounds.
What is AAC?
AAC is the abbreviation for “Advanced Audio Coding”, and is a
basic format of audio compression used by MPEG2 or MPEG4.
What is WMA?
WMA, or “Windows Media™ Audio,” is compressed audio data.
WMA is similar to MP3 audio data and can achieve CD quality
sound with small file sizes.
Method for creating MP3/WMA/AAC files
Audio data is compressed using software with MP3/WMA/AAC
codes. For details on creating MP3/WMA/AAC files, refer to the
user’s manual for that software.
MP3/WMA/AAC files that are playable on this device have the
file extensions.
MP3: “mp3”
WMA: “wma” (Ver. 7.1, 8 , 9, 9.1 and 9.2 are supported)
AAC: “m4a”
WMA is not supported for the following files, Windows Media
Audio Professional, Windows Media Audio 9 Voice or Windows
Media Audio 9 Pro Lossless.
There are many different versions of the AAC format. Confirm
that the software being used conforms to the acceptable
formats listed above. It’s possible that the format may be
unplayable even though the extension is valid.
Playback of AAC files encoded by iTunes is supported.
Supported playback sampling rates and bit rates
MP3
Sampling rates: 48 kHz, 44.1 kHz, 32 kHz, 24 kHz, 22.05 kHz,
16 kHz, 12 kHz, 11.025 kHz, 8 kHz
Bit rates:
32 - 320 kbps
WMA
Sampling rates: 48 kHz, 44.1 kHz, 32 kHz
Bit rates:
48 - 192 kbps
AAC
Sampling rates: 48 kHz, 44.1 kHz, 32 kHz, 24 kHz, 22.05 kHz,
16 kHz, 12 kHz, 11.025 kHz, 8 kHz
Bit rates:
16 - 320 kbps
This device may not play back correctly depending on sampling
rates.
43-EN
ID3 tags/WMA tags
If tag data is in an MP3/WMA/AAC file, this device can display
the title (track title), artist name, and album name ID3 tag/WMA
tag data (maximum 128 characters).
Root
Folder
This device can only display single-byte alphanumeric
characters and the underscore. For non-supported characters,
“No Support” is displayed.
The number of characters may be limited, or not correctly
displayed, depending on the tag information.
Playing back MP3/WMA/AAC
MP3/WMA/AAC files are prepared, then written to a CD-R, CD-RW (DVD-R/DVD-RW) using CD-R writing software. A disc
can hold up to 4,096 files/256 folders (including Root Folders),
and the maximum number of folders is 255. Playback may not
be performed if a disc exceeds the limitations described above.
Media supported
The media that this device can play back are CD-ROMs, CD-Rs,
and CD-RWs, DVD-Rs and DVD-RWs.
Corresponding File Systems
This device supports discs formatted with ISO9660 Level 1 or
Level 2.
Under the ISO9660 standard, there are some restrictions to
remember.
The maximum nested folder depth is 8 (including the root
directory). The number of characters for a folder/file name is
limited.
Valid characters for folder/file names are letters A-Z (all caps),
numbers 0-9, and ‘_’ (underscore).
This device can play back discs in Joliet, Romeo, etc. and other
standards that conform to ISO9660. However, sometimes the file
names, folder names, etc. are not displayed correctly.
Formats supported
This device supports CD-ROM XA, Mixed Mode CD, Enhanced
CD (CD-Extra) and Multi-Session.
This device cannot correctly play back discs recorded with
Track At Once or packet writing.
Order of files
Folder
MP3/WMA/AAC File
Terminology
Bit rate
This is the “sound” compression rate specified for encoding. The
higher the bit rate, the higher the sound quality, but also the larger
the files.
Sampling rate
This value shows how many times per second the data is sampled
(recorded). For example, music CDs use a sampling rate of 44.1 kHz,
so the sound is sampled (recorded) 44,100 times per second. The
higher the sampling rate, the higher the sound quality, but also the
larger the volume of data.
Encoding
Files are played back in the order that the writing software writes
them to the disc. Therefore, the playback order may not be
what’s expected. Verity the writing order in the software’s
documentation. The playback order of the folders and files is as
follows. (The following numbers may differ from actually
displayed numbers.)
Converting music CDs, WAVE (AIFF) files, and other sound files into
the specified audio compression format.
Tag
Song information such as track titles, artist names, album names, etc.
written into MP3/WMA/AAC files.
Root folder
The root folder (or root directory) is found at the top of the file
system. The root folder contains all folders and files. It is created
automatically for all burned discs.
44-EN
DVD/Video CD
Display example for DVD Video main screen
WARNING
It is dangerous (and illegal in many states) for the
driver to watch the DVD/TV/Video while driving the
vehicle. The driver may be distracted from looking
ahead and an accident could occur.
Install the INA-W910 correctly so that the driver
cannot watch DVD/TV/Video unless the vehicle is
stopped and the emergency brake is applied.
If the INA-W910 is not installed correctly, the driver
will be able to watch the DVD/TV/Video while driving
the vehicle and may be distracted from looking ahead
causing an accident. The driver or other people could
be severely injured.
To display the DVD mode screen
Displays the disc (DVD VIDEO, DVD AUDIO, VIDEO
CD) being played back.
Displays the elapsed playback time.
• Some operations cannot be carried out depending on the disc or
playback screen.
• Displays of the function guide [P1/2], etc. may vary depending on the
connected device(s).
Changes the Contrast Level adjustment screen directly.
For details, refer to “Adjusting Image Brilliance (Live
Contrast)” on page 62.
Disc types that can be used for each heading are
represented by the following marks.
DVD Commercial Video discs (used for the
distribution of movies, etc.) or a DVD-R/
DVD-RW, DVD+R/DVD+RW recorded in a
video mode can be used.
DVD Commercial Audio discs can be used.
Video-CD discs can be used.
Playing a Disc
INA-W910 has a built-in DVD player. When an optional Alpine DVD/
Video CD/CD player (or DVD changer) is connected to the INA-W910,
you can control it from the INA-W910 (except some operations).
To watch a video source, your vehicle must be parked with the ignition
key in the ACC or ON position. To do this, follow the procedures below.
1 Push the foot brake to bring your vehicle to a complete
stop at a safe location. Engage the parking brake.
2 Keep pushing the foot brake and release the parking
brake once then engage it again.
3 While the parking brake is being engaged the second
time, release the foot brake.
• For automatic transmission vehicles, place the transmission lever in
the Park position.
Now, the locking system for the DVD mode operation has been
released. Engaging the parking brake can reactivate the DVD mode, as
long as the car’s ignition has not been turned off. It is not necessary to
repeat the above procedure (1 through 3), of “To display the DVD mode
screen.”
Each time the ignition is turned OFF, perform the procedure of “To
display the DVD mode screen.”
• If you try to activate the auxiliary device while driving, the display
will show the warning-Picture off for your safety.
Caution
• Not all functions will operate for every DVD. See the
individual DVD’s instructions for details on the
features supported.
• Fingerprints on a disc may adversely affect
playback. If a problem occurs, remove the disc and
check for fingerprints on the playback side. Clean
the disc if necessary.
• If you switch the power or Ignition key OFF or change
sources during playback, playback will continue
where you left off when you resume playback.
• If you try to perform an invalid operation (based on
the type of disc being played), the following mark is
displayed on the monitor screen: .
• Play Position Memory Function Even if you turn power off or switch the Ignition key
to OFF during playback or change the source,
playback will continue from the point where
playback stopped when the power is turned ON
again.
45-EN
1
Press SOURCE/
2
Touch [DISC].
on the unit.
The SOURCE selection screen is displayed.
2 Touch [Key].
The menu operation mode will be displayed.
The display shows the DISC mode screen.
Insert a disc with the label side facing up. The unit starts to
play the disc.
• The operation screen changes to the visual screen in the DVD or
Video CD mode for 5 seconds after an operation has been performed.
Touch the display panel to display the operation screen again.
• The display mode can be changed by touching [WIDE]. For operation, see “Switching Display Modes” on page 55.
Inserting/Ejecting a Disc
Refer to “Inserting/Ejecting a Disc” (page 18).
• The reverse side of a double-sided DVD will not be played
automatically. Remove the disc, turn it over , and reinsert it.
• DO NOT insert discs containing maps for the navigation system.
Doing so could result in damage.
• Refer also to “DVD Setup” (pages 55-60).
• Be sure the remote input lead is connected to the remote output lead
of this unit when a DVD changer or DVD player is connected. If not
correctly connected, touch operation cannot be performed.
• “Can’t Downmix” is displayed when a Downmix (multi-channel
signals are mixed into 2ch) prohibited section of a DVD-Audio disc is
played. In this case, only the Lch/Rch recorded on the disc is output
as sound. (The sound of Centre speaker, L-surround speaker, R-surround speaker , and Subwoofer is not output.)
3 Select a desired menu item by touching [ ], [
4 Touch [Enter] to confirm the selected item.
], [
] or [
].
Numeric Keypad Input Operations
1 Touch any area on DVD mode screen to display the operation
keys.
If a menu screen appears
On DVDs and Video CDs with playback control (PBC), menu screens
may appear automatically. If this happens, perform the operation
described below to start playback.
• To play back a DVD-Audio disc, set “VCAP” in “Setting the DVDAudio Playback Mode” (page 59).
Direct Menu Operations
Touch the DVD menu directly.
• Some operations cannot be performed depending on the disc.
Menu Operations
1 Touch any area on DVD mode screen to display the operation
keys.
2 Touch [Key].
The menu operation mode appears.
3 Touch [Key] again.
The numeric keypad input mode screen appears.
The numeric
keypad input
screen closes
when the area is
touched while
displayed.
Touch [ ] to close the numeric
keypad input screen.
4 Touch a desired number.
5 Touch [Enter] on the numeric keypad mode screen to confirm
your selection.
Numeric Keypad Input Operations
When PBC is turned OFF, the menu screen is not displayed. Turn
it ON to display the screen (See “Setting the Video CD Play
Mode” on page 60).
1 Touch [P1/2] in the Video CD mode to change to the function
guide.
2 Touch [10KEY].
The numeric keypad is displayed.
3 Touch and input a desired number.
4 Touch [Enter] to confirm.
46-EN
Displaying the Top Menu Screen
Stopping Playback
When a DVD contains two or more titles, the top menu screen appears.
Touch [ ] twice or touch and hold [ ] for at least 2
seconds during playback.
Touch [TOP MENU] on the DVD mode main screen.
“Stop” is displayed, and playback stops.
The top menu screen appears.
• Playback starts from the beginning when [
playback is stopped.
• To perform necessary operations, see “If a menu screen appears” on
page 46.
• To play back a DVD-Audio disc, set “VCAP” in “Setting the DVDAudio Playback Mode” (page 59).
/
] is touched while
Fast-forwarding/Fast-reversing
Displaying the Menu Screen
With a DVD having two or more menus, a menu screen will appear for
the programs available, in addition to the main programs.
DVD-Video, Video-CD, DVD-Audio (VCAP mode)*:
1
Touch [MENU] on the DVD mode main screen.
• To perform necessary operations, see “If a menu screen appears” on
page 46.
1
Touch [P1/2]* on the DVD mode main screen.
2
DVD-Audio (VOFF mode)*:
1
The function guide changes.
* The display differs, depending on the disc (mode).
Touch [MENU CONT].
] (Fast-
When touched and held for more than 1 second, the disc is
forwarded/reversed at double speed. When held for 5 more
seconds or longer, the disc is forwarded/reversed at 8 times
the normal speed. When held for 10 seconds or longer, the
disc is forwarded/reversed at 21 times the normal speed.
The menu screen appears.
Displaying the Menu Operation Mode
Screen
During playback, touch and hold [
reverse) or [
] (fast-forward).
2
During playback, touch and hold [
reverse) or [
] (fast-forward).
Stop touching [
playback.
] or [
] (Fast-
] to return to normal
The menu operation mode screen appears.
• For further operation, see “If a menu screen appears” on page 46.
• To play back a DVD-Audio disc, set “VCAP” in “Setting the DVDAudio Playback Mode” (page 59).
Stopping Playback (Pre Stop)
* When “VCAP” or “VOFF” is set in “Setting the DVD-Audio
Playback Mode” (page 59).
• No sound is played during fast-forwarding/fast-reversing.
• For DVDs and Video CDs with playback control (PBC), the menu
screen may reappear during fast-forwarding/fast-reversing.
• Operation may not be possible, depending on the disc.
Press the stop button during playback to stop playback. That position is
stored in the memory.
1
Touch [ ] once during playback.
2
Touch [
“Pre Stop” is displayed.
/
] in the Pre Stop mode.
Playback starts from the position at which it was stopped.
• For some discs, the position at which playback was stopped may not
be accurate.
• To play back a DVD-Audio disc, set “VCAP” in “Setting the DVDAudio Playback Mode” (page 59).
47-EN
Finding the Beginnings of Chapters/
Tracks
During playback, touch [
] or [
].
Slow Motion Playback
1
The chapter/track switches each time the button is touched, and
playback of the selected chapter/track starts.
: Touch this to start playback from the beginning of the
following chapter/track.
: Touch this to start playback from the beginning of the
current chapter/track.
• Some DVDs do not have chapters.
• Be sure to turn PBC off before starting the search (see “Setting the
Video CD Play Mode” on page 60).
Supplementary explanation
“Chapters” are divisions of movies or musical selections on
DVDs.
“Tracks” are divisions of movies or musical selections on
Video CD, DVD Audio and music CDs.
“Groups” associate a track (one song) with other tracks
stored on a DVD-Audio. Group playback differs depending
on the disc.
2
When [
] or [
] is touched and held while in
the pause mode, the 1/8th speed slow motion
playback mode is set.
When held in for 5 more seconds, the slow motion
speed switches to 1/2 the normal speed.
Stop touching [
] or [
[ / ] to play back.
] to pause, and touch
• No sound is played during slow motion playback.
• Reverse slow motion playback is not available on the Video CD disc.
• 1/2, 1/8 are approximate speeds. The actual speed differs from disc to
disc.
Repeat Playback
Use this function to play the disc’s titles, chapters or tracks, etc.
repeatedly.
DVD Video
Touch [
].
The repeat mode switches every time the button is touched.
Playing Still Frames (Pausing)
1
2
During playback, touch [
Touch [
/
/
Repeat
The chapter is played repeatedly.
Repeat Title
The title is played repeatedly.
Repeat Off
Playback returns to normal mode.
].
] to resume playback.
• No sound is played during the still frame mode.
• The image or sound may stop temporarily when playback starts from
the pause mode. This is not a malfunction.
• Display may vary depending on the connected devices.
• The REPEAT mode is always turned off when [ ] is touched and
held for at least 2 seconds.
Video CD
Forward/reverse frame-by-frame
Playback
1
2
In the pause mode, touch [
] or [
].
The picture advances or reverses by one frame each time
the button is touched.
Touch [
/
] to return to normal mode.
• No sound is output during forward/reverse frame-by-frame playback.
• Reverse frame-by-frame cannot be carried out on the DVD-VR disc.
During playback, touch [
].
The repeat mode switches every time the button is touched.
The track is played repeatedly.
The disc is played repeatedly.
* Playback does not repeat.
* Displayed only in the changer mode.
• Display may vary depending on the connected devices.
• The track/disc repeat modes cannot be used on Video CDs with
playback control (PBC). These modes can be carried out after
turning PBC off. See “Setting the Video CD Play Mode” on page 60.
• For some discs it is not possible to switch the repeat mode.
48-EN
3
DVD Audio
Touch [
].
Touch and enter the chapter number you want to
play.
See page 46 for operation of the numeric keypad.
The repeat mode switches every time the button is touched.
VCAP mode*:
The track is played repeatedly.
The group is played repeatedly.
4
Touch [Enter] to confirm your selection.
Playback will start from the selected chapter or track.
• This function is not available for a disc on which chapters or tracks
are not stored.
Switching the Angle
The playback returns to normal mode.
On DVDs in which scenes have been filmed from multiple angles, the
angle can be switched during playback.
VOFF mode*:
The track is played repeatedly.
The group is played repeatedly.
The disc is played repeatedly.
* When “VCAP” or “VOFF” is set in “Setting the DVD-Audio
Playback Mode” (page 59).
Searching by Title/Group
Use this function to easily find positions on the DVD using the DVD’s
titles or groups.
1
Touch [P1/2]* while playback is stopped.
The function guide appears.
1
During playback, touch [P1/2]*.
The function guide changes.
* The display differs, depending on the disc (mode).
2
Touch [ANGLE].
The angle switches between the angles recorded on the
disc every time the button is touched.
• Some time may be required for the angle to change.
• Depending on the disc, the angle may switch in one of two ways.
- Seamless: The angle switches smoothly.
- Non-seamless: When the angle is switched, a still picture is
displayed first, after which the angle switches.
• To play back a DVD-Audio disc, set “VCAP” in “Setting the DVDAudio Playback Mode” (page 59).
Scroll to Move the Page Forward or
Backward
* The display differs, depending on the disc (mode).
2
3
4
Touch [10KEY].
The numeric keypad input mode screen appears.
Enter a desired title or group by touching its title or
group number.
Confirm your selection by touching [Enter].
2
Playback will start from the title number selected.
Use this function to easily move to the beginnings of the chapters or
tracks on the disc.
Touch [P1/2]* in any mode other than stop mode.
The function guide will appear.
* The display differs, depending on the disc (mode).
Touch [P1/3] twice while playing a DVD-Audio disc
in VCAP mode*.
* Playing back a DVD-Audio disc when “VCAP” is set in “Setting the
DVD-Audio Playback Mode” (page 59).
Searching Directly by Chapter or Track
Number
2
1
See page 46 for operation of the numeric keypad.
• This function cannot be used on discs on which no title numbers are
recorded.
• Playback starts from the beginning of the chapter/track number in the
state of Pre Stop.
• Some disc may not accept any operation.
1
“Page” is a still image stored on a DVD-Audio disc.
Touch [10KEY].
Touch PAGE [
] or [
].
The display switches.
Touch and hold to display the home page.
• For DVD-Audio discs without Pages, depending on the DVD-Audio
disc, the “Page” function may not be operable if images are in slide
show form.
Switching the Audio Tracks
DVDs with multiplex audio or audio languages allow switching the
sound during playback.
1
During playback, touch [P1/2]*.
* The display differs, depending on the disc (mode).
2
Touch [AUDIO].
The sound switches between the alternate audio tracks
recorded on the disc every time the button is touched.
The numeric keypad input mode screen will appear.
49-EN
• The alternate track selected becomes the default setting every time
the power is turned on or the disc is replaced. If the disc does not
include that track, the disc’s default language is selected instead.
• Not all discs will allow changing the alternate audio tracks during
playback. In these cases, select audio tracks from the DVDs menu.
• There may be a delay before the selected alternate track begins to
play.
Other Useful
Features
Video CDs with multiplex audio
1
During playback, touch [P1/2].
2
Touch [AUDIO].
Adjusting the Audio
The function guide changes.
The left and right channels will be output as shown, each
time the button is touched.
Audio LR
Audio LL
Audio RR
Audio LR
Switching the Subtitles (Subtitle Language)
1
Press SOURCE/
2
Touch [
3
Touch [
on the unit.
The SOURCE selection screen is displayed.
] on the main source screen.
The Setup Select screen is displayed.
] of Audio Setup.
The Audio Setup screen appears.
Display example for Audio Setup Screen
With DVDs on which multiple subtitle languages are recorded, the
subtitle language can be switched during playback; moreover, subtitles
can be hidden.
1
During playback, touch [P1/2]*.
The function guide changes.
* The display differs, depending on the disc (mode).
2
Touch [SUBT.].
Touching this button repeatedly selects sequentially the
subtitle languages recorded on the disc, and then turns the
subtitles OFF.
• To play back a DVD-Audio disc, set “VCAP” in “Setting the DVDAudio Playback Mode” (page 59).
• There may be a delay before the selected subtitle appears.
• Not all discs will allow changing the subtitles during playback. In
these cases, select subtitles from the DVDs menu.
• The subtitle language selected becomes the default setting every time
the power is turned on or the disc is replaced. If the disc does not
include that language, the disc’s default language is selected instead.
However, the subtitle language may differ depending on the disc.
• For some discs, the subtitles will be displayed even when this is set to
OFF. However, the subtitle language may differ depending on the
disc.
Switching from the disc menu
For some discs, the audio language, angle and subtitles can be switched
from the disc menu.
1
2
Touch [MENU] or [TOP MENU] to display the
menu.
Select an item to confirm it.
See “If a menu screen appears” on page 46.
• To play back a DVD-Audio disc, set “VCAP” in “Setting the DVDAudio Playback Mode” (page 59).
50-EN
• When the optional IMPRINT audio processor (PXA-H100) or an
external audio processor is connected, the “A.Processor” list is
displayed. For details on operation, refer to “IMPRINT Operation
(Optional)” (page 71) or “External Audio Processor Operation
(Optional)” (page 77).
• Touching [ ] or [ ] will scroll the list one line at a time.
• Touching [ ] or [ ] will scroll the list one page at a time.
• Touching [
] to return to the previous screen.
....This item is controllable with the INA-W910 only.
....This item is available when the optional IMPRINT
audio processor (PXA-H100) is connected.
....This item is available when an External Audio
Processor is connected.
Adjusting Balance/Fader
Setting the Bass Center Frequency
Touch [
] of Balance/Fader, the adjusting screen of
Balance/Fader will be displayed.
The displayed bass frequency is emphasized.
Display example for Balance/Fader Screen
Touch [ ] or [
frequency.
] of Bass Freq. to select the desired bass center
Setting range: 63 Hz, 80 Hz, 100 Hz, 200 Hz
• The operation can be performed only when the P-EQ is selected in
“Setting EQ mode” on page 53.
• Setting value will change according to the frequency value set in
Band 1 of P-EQ. Refer to “Adjusting the Parametric Equalizer Curve
(P-EQ)” on page 53.
Setting the Bass Bandwidth
Changes the boosted bass bandwidth to wide or narrow.
A wider setting will boost a wide range of frequencies
above and below the center frequency. A narrower
setting will boost only frequencies near the center
frequency.
A
Adjusting the Fader
Touch [F] or [R] to adjust the volume of the front and
rear speakers.
Setting range: F15 to R15
• If an optional IMPRINT audio processor (PXA-H100) is connected
to this unit and you have set the 2.2ch (3WAY)/4.2ch (FRONT/REAR/
SUBW.) switch to 2.2ch (3WAY), you cannot adjust the FADER mode.
For details, refer to the Owner’s Manual of PXA-H100.
B
Adjusting the Balance
Touch [L] or [R] to adjust the sound volume of the left
and right speakers.
Touch [ ] or [
band width.
Setting range: Wide1 (Narrow) to Wide4 (Wide)
• The operation can be performed only when the P-EQ is selected in
“Setting EQ mode” on page 53.
• Setting value will change according to the bandwidth value set in
Band 1 of P-EQ. Refer to “Adjusting the Parametric Equalizer Curve
(P-EQ)” on page 53.
Setting the treble level
You can emphasize the treble frequency.
Touch [
level.
Touch and move [
] to a desired setting.
] of Treble Level to select the desired treble
Setting range: -7 to +7
Adjusting the Balance/Fader Directly
Or touch a desired setting range, and [ ] will move to that
location.
Touch [L] or [R] of Balance and [F] or [R] of Fader for fine-tuning.
] or [
Setting range*2: -6 to +6
Setting range: L15 to R15
C
] of Bass Bandwidth to select the desired bass
2
* Setting value will change according to the level value set in Band 5 of
P-EQ or Band 7 of G-EQ. Refer to “Adjusting the Parametric
Equalizer Curve (P-EQ)” on page 53.
Setting the Treble Center Frequency
Adjusting Bass/Treble
The displayed treble frequency is emphasized.
You can change the bass/treble frequency emphasis to
create your own tonal preference.
Touch [ ] or [ ] of Treble Freq. to select the desired treble
center frequency.
Touch [
] to display the Bass/Treble adjusting screen.
• Adjustment cannot be performed when Defeat is set to ON.
• If OFF is set in “Changing MultEQ mode” (page 71) when the
IMPRINT audio processor is connected, the list is not displayed.
Setting the Bass level
You can emphasize or weaken the bass frequency.
Touch [
] or [
Setting range: 10 kHz, 12.5 kHz, 16 kHz, 17.5 kHz
• The operation can be performed only when the P-EQ is selected in
“Setting EQ mode” on page 53.
• Setting value will change according to the frequency value set in
Band 5 of P-EQ. Refer to “Adjusting the Parametric Equalizer Curve
(P-EQ)” on page 53.
] of Bass Level to select the desired bass level.
Setting range*1: -6 to +6
Setting range: -7 to +7
*1
Setting value will change according to the level value set in Band 1 of
P-EQ or G-EQ. Refer to “Adjusting the Parametric Equalizer Curve
(P-EQ)” on page 53 or “Adjusting the Graphic Equalizer Curve (GEQ)” on page 53.
51-EN
Subwoofer On and Off
Adjusting Nav. Mix Level
Touch [
Touch [ ] or [ ] of Nav. Mix Level to adjust the volume of
navigation interruption.
] or [
] of Subwoofer to set to ON or OFF.
Subwoofer output is off.
Subwoofer output is on.
OFF:
ON:
Adjusting the Subwoofer Level
When ON is set in “Subwoofer On and Off ”, the item is
displayed.
When an External Audio Processor is connected, the list is not
displayed.
1 Touch [
] of Subwoofer.
The display change to the Subwoofer Adjusting screen.
2 Touch [
] or [
] of Level to adjust the subwoofer output.
Setting range: 0 to 15
• The setting navigation interruption is not displayed if an external
audio processor not compatible with Nav. Mix is connected.
• While an External audio processor is connected, this function may
inoperable when Defeat is set to ON.
Setting the Media Xpander mode
When the Media Xpander is on, you can adjust the Media
Xpander level. While the car is parked, the item is displayed.
1
Setting range: 0 to 15
OFF:
ON:
Switching the Subwoofer phase
When ON is set in “Subwoofer On and Off” while the car is
parked, the item is displayed.
The subwoofer output phase is toggled subwoofer normal (0°) or
subwoofer reverse (180°).
1 Touch [
] of Subwoofer.
The display change to the Subwoofer Adjusting screen.
2 Touch [
] or [
] of Phase to select to 0° or 180°.
• When the IMPRINT audio processor is connected, set “Changing
MultEQ mode” (page 71) to OFF while the car is parked.
Setting the Subwoofer System
When ON is set in “Subwoofer On and Off” while the car is
parked, the item is displayed.
1 Touch [
] of Subwoofer.
The display change to the Subwoofer Adjusting screen.
2 Touch [
] or [
] of System to select to System 1 or System 2.
System 1: Subwoofer level changes according to the main
volume setting.
System 2: Subwoofer level change is different from the
main volume setting. For example, even at low
volume settings, the subwoofer is still audible.
Setting the Subwoofer Channel
When ON is set in “Subwoofer On and Off” while the car is
parked, the item is displayed.
1 Touch [
] of Subwoofer.
The display change to the Subwoofer Adjusting screen.
2 Touch [ ] or [
(monaural).
Stereo:
Mono:
] of Channel to select to Stereo or Mono
Subwoofer stereo (L/R) output
Subwoofer monaural output
• When the IMPRINT audio processor is connected, set “Changing
MultEQ mode” (page 71) to OFF while the car is parked.
Adjusting the Subwoofer Level
When an external audio processor is connected, the list is
displayed.
Touch [ ] or [ ] of Subw. Level to adjust the subwoofer output.
Setting range: 0 to 15
52-EN
Select ON or OFF of MX by touching [ ] or [ ] of
Media Xpander.
Turns off the MX effect of every music source.
Turns on the specified MX mode.
2
Touch [
3
Touch [ ] or [ ] of the current MX mode.
] of Media Xpander after setting to ON.
The Media Xpander setup screen appears.
• Music source (such as USB and CDs, etc.) level can be set.
MX CD (No Effect, Level 1 to 3)
CD mode processes a large quantity of data. This data is used
to reproduce the sound cleanly by making use of the data
quantity.
MX CMPM (No Effect, Level 1 to 3)/MX SXM (No Effect, Level 1 to 3)
This corrects information that was omitted at the time of
compression. This reproduces a well-balanced sound close to
the original.
MX Tuner (No Effect, Level 1 to 3 )
The medium to high frequencies become more clear, and
produces well balanced sound in all the bands.
MX DVD (No Effect, Level 1 to 3)
The dialog portion of the video is reproduced more clearly.
MX AUX (No Effect, Level 1 to 3)
Choose the MX mode that corresponds to the media connected.
•
•
•
•
•
•
•
•
When No Effect is selected, MX effect of each MX mode will be OFF.
Each music source, such as CD, MP3 can have its own MX setting.
There is no MX mode for AM radio.
MX CMPM is applied for MP3/WMA/AAC, Pandora Radio and iPod/
iPhone.
MX Tuner is applied for HD Radio and RBDS reception.
MX SXM is applied for SiriusXM reception.
The MX setting can be performed only when a source is currently
selected.
The function is inoperable when Defeat is set to ON.
Adjusting the Time Correction
Adjusting the Frequency
While the car is parked, this item is displayed.
Before performing the following procedures, refer to “About Time
Correction” (page 75).
Touch [
band.
1
2
Touch [
Refer to “Time Correction Value List” on page 75.
3
Band-1: 63 Hz~200 Hz (63 Hz)
Band-2: 160 Hz~1 kHz (160 Hz)
Band-3: 630 Hz~4 kHz (630 Hz)
Band-4: 1.6 kHz~10 kHz (1.6 kHz)
Band-5: 10 kHz~17.5 kHz (10 kHz)
The Time Correction screen appears.
L = (distance to farthest speaker) – (distance to other speakers)
Repeat step 2 to set another speaker.
By setting these values to make its sound reach the
listening position at the same time as the sound of other
speakers.
• The total adjustment distance for all speakers should be less than
680 cm (268.1 inch).
Setting the Time Correction Unit (T.Corr Parameter)
While the car is parked, this item is displayed.
You can change the unit, (cm or inch) of time correction.
Touch [ ] or [ ] of T.Corr Parameter to select cm or Inch.
Setting item: T.Corr Parameter
cm
Adjusting the Level
Touch [
Setting EQ mode
While the car is parked, this item can be adjusted. This setting gives you a choice of 5-band parametric, or 7-band
graphic equalizer.
Touch [ ] or [ ] of EQ Select to select P-EQ or G-EQ.
P-EQ: 5-band Parametric EQ.
G-EQ: 7-band Graphic EQ.
] of Level to adjust the level of selected band.
Adjustable level: -6 to +6 dB
Setting the Bandwidth
Touch [
] or [
] of Q to select the bandwidth.
Adjustable bandwidth: 1, 2, 3, 4
3
To adjust another band, repeat step 2 and adjust all
bands.
• The frequency value range of the current band should be higher than
the previous band’s setting value and lower than the next band’s
setting value.
• While adjusting the Parametric EQ, you should consider the
frequency response of the connected speakers.
• When the Parametric EQ is adjusted, the adjustment for Graphic EQ
becomes ineffective.
When G-EQ is set in “Setting EQ mode” while the car is parked,
this item can be adjusted.
You can modify the equalizer settings to create a response curve
more appealing to your personal taste.
1
When P-EQ is set in “Setting EQ mode” while the car is parked,
this item can be adjusted.
You can modify the Equalizer settings to create a response curve
more appealing to your personal taste.
Touch [
] of EQ Select after selecting G-EQ in
“Setting EQ mode”.
The G-EQ list screen appears.
2
Adjust the G-EQ to your preference.
Band-1 (80 Hz) / Band-2 (250 Hz) / Band-3 (500 Hz) / Band-4 (1,000 Hz) / Band-5 (4,000 Hz) / Band-6 (8,000 Hz) / Band-7 (16,000 Hz)
Adjusting the Parametric Equalizer Curve (P-EQ)
Adjusting the Level
Touch [
] or [
] to adjust the level of selected band.
Adjustable level: -6 to +6 dB
Touch [
] of EQ Select after selecting P-EQ in
“Setting EQ mode”.
The P-EQ list screen appears.
2
] or [
Adjusting the Graphic Equalizer Curve (G-EQ)
Inch
cm: The unit of time correction is cm.
Inch: The unit of time correction is Inch.
1
] of Freq. to adjust the frequency of the selected
Adjustable frequency bands: 63 Hz to 17 5 kHz (in 1/3 octave steps)
] of Time Correction.
Adjust the distance (0.0 to 336.6 cm) of a desired
speaker by touching the respective [ ] or [ ]
button.
] or [
Adjust the P-EQ to your preference.
3
To adjust another band, repeat step 2, and then
adjust all bands.
• When Graphic EQ is adjusted, the adjustment for Parametric EQ
becomes ineffective.
Adjusting the Band
Touch [
] or [
] of Band to select the band to be adjusted.
Band 1 / Band 2 / Band 3 / Band 4 / Band 5
53-EN
Adjusting Highpass Filter
When Defeat is set to OFF, touch the title bar of H.P.F. to adjust
screen.
Touch [ ] or [ ] of Front H.P.F. to adjust the front speaker.
Setting range: OFF, 60 Hz, 80 Hz, 100 Hz
Touch [
] or [
Search Function
Touch [
] on the function guide while in the CD or MP3/
WMA/AAC mode.
Search list screen is displayed.
] of Rear H.P.F. to adjust the rear speaker.
Setting range: OFF, 60 Hz, 80 Hz, 100 Hz
• Select OFF when no adjustment is required.
Select a desired track or folder
Touch [
] for direct playback.
Turning Defeat ON or OFF
When a hierarchical list is prepared, [
] will be displayed.
Touch [
] to display the respective hierarchy list screens.
Touch [
Display example for Search Screen
] or [
] of Defeat to set to ON or OFF.
Storing Settings in the Memory
Adjustment or setting contents of Time Correction and P/G-EQ can be
stored.
Contents that can be stored vary depends on the audio processor used.
1
2
3
Check whether the Defeat mode is OFF.
Touch [MEMORY] on the right side of bottom
screen.
Within 5 seconds, touch any one of the preset
buttons [P.SET 1] through [P.SET 6] on the bottom
screen.
The setting contents are stored.
• The stored contents will not be deleted even when the battery power
cord is detached.
Calling up the Preset Memory
1
2
Check whether the Defeat mode is OFF.
Touch any one of the preset buttons [P.SET 1]
through [P.SET 6] on the bottom display to select
the preset memory.
• It takes a few moments to call up the preset memory.
Select directly by touching [ ], and its track (or folder/
file) is played back.
Touch [
] to return to the previous list screen.
[
] is displayed if there is a hierarchical list.
Touching [Exit] will change to the main source screen.
Scroll the list one page at a time by touching [ ] or [ ].
Scroll the list one line at a time by touching [ ] or [ ].
• The search function does not work on the DVD, Video CD or CD
changer.
• A folder list is displayed only during MP3/WMA/AAC playback when
the DVD player (DVA-5210) or changer compatible with MP3 is
connected.
Internal CD player mode
1 The track list* screen appears.
2 Touch [ ] of a desired track text*.
The selected track will be played back.
* If the CD is text compatible only.
• “No Text” is displayed in the track text list if there is no text on the
disc.
Internal MP3/WMA/AAC Player/external MP3-compatible
DVD Player/Changer Mode
1 The folder list screen appears.
Select a desired folder and then touch [
]. ([
] appears
only when a file is present in the selected folder.) The file list
screen is displayed.
• Touch [
] to play back the folder directly.
2 Touch [ ] of a desired file name.
The selected file will be played back.
54-EN
Switching Display Modes
Setup
After carrying out the steps 1 to 3 of “To display the DVD mode screen”
explained on page 55, perform the operation described below.
While your vehicle is parked, touch [WIDE] on the visual
source screen.
DVD Setup
Each touch changes the display modes as follows:
Mode 1
(WIDE)
Mode 2
(CINEMA)
Mode 3
(NORMAL)
Mode 1
(WIDE)
DVD Setup Operation
To display the DVD Setup Menu screen:
Your vehicle must be parked with the ignition key in the ACC or
ON position. To do this, follow the procedure below.
1 Bring your vehicle to a complete stop at a safe
location. Engage the parking brake.
2 Keep pushing the foot brake and release the parking
brake once then engage it again.
3 When the parking brake is engaged for the second
time, release the foot brake.
In Mode 1 (Wide), the monitor displays a normal picture wider to
fit in a wide-screen monitor by evenly stretching out the picture
horizontally.
• For automatic transmission vehicles, place the transmission lever
in the Park position.
Now, the locking system for the DVD mode operation has been
released. Engaging the parking brake can reactivate the DVD
Setup Menu, as long as the car’s ignition has not been turned off.
It is not necessary to repeat the above procedure (1 through 3) of
“To display the DVD mode screen.”
Each time the ignition is turned OFF, perform the procedure of “To
display the DVD mode screen.”
In Mode 2 (Cinema), the monitor displays a normal picture by
stretching out the picture horizontally and vertically. This mode is
good for displaying a cinema type picture at the 16:9 ratio.
The DVD Setup operation can be carried out after removing the
disc from the unit.
The following steps 1 to 6 are common operations to each
“Setting item” of DVD Setup. Refer to each section for details.
In Mode 3 (Normal), the monitor displays a normal picture at the
center of the screen with a vertical black band at each side.
1
Press SOURCE/
2
Touch [
3
Touch [
4
Touch [
5
on the unit.
The SOURCE selection screen is displayed.
] on the main source screen.
The Setup Select screen is displayed.
] of Source Setup.
The Source Setup screen appears.
] of DVD Setup.
The DVD setup screen appears.
Touch [ ], [ ], etc. of the desired item to change its
setting.
Setting items:
Menu Language / Audio Language / SUBT. Language / Country Code / Parental / Digital Out Mode / Downmix Mode / TV Screen / Bonus Code / DVD-A Setup / File Play Mode / DVD Play Mode / PBC
55-EN
Display example for DVD setup screen
Setting of the Menu Language
Set the language used for the menus (title menu, etc.).
Setting item: Menu Language
Setting contents: Auto / EN / JP / DE / ES / FR / IT / SE / RU / CN
• When “Auto” is selected, the primary menu language among the
recorded ones is played.
To play in a language other than those displayed
Touch [Code] to display the numeric keypad input
screen.
Touch [ ] or [ ] to set a desired language.
Touch [ ] or [ ] to scroll a setting item list by one Line.
Touch [ ] or [ ] to scroll a setting item list by one page.
Display example for the numeric keypad input screen
1 Touch [Code].
The numeric keypad screen is displayed.
2 Touch the 4-digit numeral of the language number.
As for the language number, refer to “List of Language
Codes” (page 111).
3 Touch [Enter] to memorize the number.
Setting of the Audio Language
Set the audio language produced from the speakers.
Setting item: Audio Language
Setting contents: Auto / EN / JP / DE / ES / FR / IT / SE / RU / CN
• When “Auto” is selected, the primary audio language among the
recorded ones is played.
To play in a language other than those displayed
1 Touch [Code].
The numeric keypad screen is displayed.
2 Touch the 4-digit numeral of the language number.
As for the language number, refer to “List of Language
Codes” (page 111).
3 Touch [Enter] to memorize the number.
The numeric keypad input screen closes when the area
is touched while displayed.
Numeric keypad input screen
The numeric keypad is used if you want to play back in
a language other than that displayed, or to input your
parental lock password, etc.
6
Touch [
] to return to the previous screen.
Touch [Exit] to return to the main source screen that was
displayed before the setup operation was started.
• Immediately after changing the settings of DVD mode (while the
system is writing data automatically) do not turn the ignition key
(engine key) to OFF. Otherwise, the settings may not be changed.
Changing the language setting
The audio language, subtitle language and menu language can be set
according to your preferences.
Once set, this becomes the default language. This function is convenient
when you always want to listen in English. (The language setting is not
effective on some discs. If not, the default language is set from the
factory.)
• When the settings are changed, the old settings are overwritten.
Make a note of the current settings before making changes. The
memory is cleared when the vehicle’s battery is disconnected.
• To temporarily change the language of the current disc, either do so
from the DVD menu or by using the operation described in the
section “Switching the Audio Tracks” (page 49).
• If the disc does not include the selected language, the disc’s default
language is set.
56-EN
Setting of the Subtitle Language
Set the language of the subtitles displayed on the screen.
Setting item: SUBT. Language
Setting contents: Auto / EN / JP / DE / ES / FR / IT / SE / RU / CN
• When “Auto” is selected, the primary subtitle language among the
recorded ones is played.
To play in a language other than those displayed
1 Touch [Code].
The numeric keypad screen is displayed.
2 Touch the 4-digit numeral of the language number.
As for the language number, refer to “List of Language
Codes” (page 111).
3 Touch [Enter] to memorize the number.
Changing the Country Code Setting
Set the country number of which you want to set the rating level
(Parental lock).
Setting item: Country Code
Setting contents: Auto / Other
Auto:
Other:
The primary country code among those recorded is
played.
The setting content changes to “Other” if the desired
country code is input.
• When the settings are changed, the old settings are overwritten.
Make a note of the current settings before making changes. The
settings are cleared when the vehicle’s battery is disconnected.
1 Touch [Code].
2 Touch [Delete All] or [
].
Delete the displayed country number.
3 Touch the 4-digit country code.
As for the country number, refer to “List of Country
Codes” (pages 112 and 113).
4 Touch [Enter] to memorize the code.
Changing the password
4 Touch [Input] of Password Change.
The numeric keypad screen is displayed.
5 Touch the input screen to enter a new 4-digit password.
• Keep a note of the number somewhere safe in case you should
forget it.
6 Touch [Enter] to memorize the number.
7 Touch [
] to return to the previous screen.
Changing the rating level temporarily
Some discs may request that you change the rating level set in
the default settings during playback. In this case, the message
appears on the monitor screen “Parental Level Change OK? [Yes]
[No].”
If this screen appears, change the level as follows:
• To change parental level and play, touch [Yes].
When [Yes] is touched, the numeric keypad input screen is
displayed. Input the 4-digit password in “Setting the Rating Level
(Parental Lock)” you set, then touch [Enter].
• To play without changing the parental level, touch [No].
(When [No] is touched, playback will be at the parental level set
in “Setting the Rating Level (Parental Lock).”)
Setting the Rating Level (Parental Lock)
This function can help restrict the viewing of movies to children of
appropriate age levels only.
Setting item: Parental
Setting content: Input
• When the settings are changed, the old settings are overwritten.
Make a note of the current settings before making changes. The
memory is cleared when the vehicle’s battery is disconnected.
• On unrated DVDs, playback will not be restricted even if the rating
level is set.
• If you want to play back DVD software with the parental lock feature
and its use is currently restricted, change the rating level and the
country number in order to play back the DVD.
• Once set, this rating level remains in memory until changed. To
enable playback of discs of higher rating levels or to cancel the
parental lock, the setting must be changed.
• Not all DVDs provide a Parental Lock feature. If you are unsure
about a DVD, play it first to confirm. Do not leave DVDs accessible
to young children for whom you deem them inappropriate.
Changing the Digital Output Setting
Use the following procedure to set the digital audio signal output from
this unit.
Setting item: Digital Out Mode
Setting contents: Auto / LPCM
Auto:
LPCM:
The digital output is switched automatically according
to the type of audio signals being played.
Be sure to select “Auto” when you want to connect a
digital audio processor and play Dolby Digital audio.
“Auto” is the factory setting.
The audio signals recorded on the disc are converted
to 48 kHz/16 bit (for DVDs) or 44.1 kHz (for Video CDs
and CDs) linear PCM audio signals for output.
1 Touch [Input].
The numeric keypad screen is displayed.
2 Touch the numeric keypad to input a 4-digit password.
The initial number is 1111. Input number are displayed as “*”.
3 Touch [Enter] to memorize the number.
The Parental screen appears.
Set the rating level of PARENTAL
4 Touch [ ] of Parental to turn on.
5 Touch [ ] or [ ] of Parental Level to select the rating
level (1 to 8).
Select “OFF” to cancel the parental lock or if you do not
want to set a rating level. The smaller the number, the
higher the rating level.
6 Touch [
] to return to the previous screen.
57-EN
Audio output/Optical digital audio output
Disc
Audio recording format
Optical digital audio
output
Analog audio output
(Ai-NET, RCA output)
Format
Fs
Q
LPCM
(CD-DA,
DVD-V, DVD-A,
DVD-VR)
44.1/176.4kHz
16/20/24bit
AUTO or LPCM
44.1kHz, 16bit, LPCM
2ch (2ch Downmix)*
OK
48/96/192kHz
16/20/24bit
AUTO or LPCM
48kHz, 16bit, LPCM 2ch
(2ch Downmix)*
OK
PPCM
(DVD-A)
44.1/88.2/
176.4kHz
16/20/24bit
AUTO or LPCM
Not output
OK
48/96/192kHz
16/20/24bit
Dolby Digital
(-EX)
(DVD-V, DVD-A,
DVD-VR)
48kHz
16/18/20bit
LPCM
48kHz, 16bit, Decoded
2ch (2ch Downmix)*
OK
AUTO
Auto (Max 7.1ch)*
OK
DTS (-ES)
(CD-DA,
DVD-V, DVD-A)
44.1kHz
LPCM
44.1kHz, 16bit Decoded
2ch (2ch Downmix)*
OK
AUTO
Auto (Max 6.1ch)*
OK
LPCM
48kHz, 16bit, Decoded
2ch (2ch Downmix)*
OK
AUTO
Auto (Max 6.1ch)*
OK
LPCM
44.1kHz, 16bit,
Decoded 2ch*
OK
AUTO
Auto*
OK
LPCM
48kHz, 16bit, Decoded
2ch (2ch Downmix)*
OK
AUTO
Auto (Max 5.1ch)*
OK
LPCM
44.1kHz, 16bit,
Decoded 2ch*
OK
AUTO
Auto*
OK
LPCM
48kHz, 16bit, Decoded
2ch (2ch Downmix)*
OK
AUTO
Auto (Max 5.1ch)*
OK
48/96kHz
MPEG1Layer II
(VCD, DVD-V,
DVD-A,
DVD-VR)
44.1kHz
48kHz
MPEG2Layer II
(DVD-V, DVD-A,
DVD-VR)
44.1kHz
48kHz
MPEG1/2/
2.5Layer III
(MP3, WMA)
16/20/24bit
16/20/24bit
16bit
16bit
16bit
16bit
32kHz
16bit
AUTO or LPCM
32kHz, 16bit, Decoded
2ch
OK
44.1kHz
16bit
AUTO or LPCM
44.1kHz, 16bit,
Decoded 2ch
OK
48kHz
16bit
AUTO or LPCM
48kHz, 16bit, Decoded
2ch
OK
* Not output when playing back a DVD-Audio.
Digital output setting
(DVD SETUP)
58-EN
Setting the Downmix Mode
This function applies to Dolby Digital, DTS stream sound.
Setting item: Downmix Mode
Setting contents: Surround / Stereo
Surround: Surround compatible Downmix
Stereo:
Stereo Downmix
Setting the TV Screen Mode
Use the procedure described below to modify the output screen
according to the type of TV monitor (rear monitor) being used.
This setting can also be applied for the INA-W910.
If the rear monitor is not connected, the screen setting is 16:9.
Setting item: TV Screen
Setting contents: 4:3 LB / 4:3 PS / 16:9
• For some discs, the picture may not be set to the selected screen size.
(For details, refer to the explanation on the disc’s jacket.)
4:3 LETTER BOX:
Select this when connected to a conventional 4:3 size (normal
TV aspect ratio) monitor. There may be black stripes visible at
the top and bottom of the screen (when playing a 16:9 size
movie). The width of these stripes will depend upon the original
aspect ratio of the theatrical release of the movie.
Setting of the Bonus Code
Some DVD-Audio discs include bonus group.
The 4 digit code for the bonus group can be memorized.
Refer to the information on the jacket, etc. of the disc, for the code
number.
Setting item: Bonus Code
Setting content: Code
1
2
3
Touch [Code].
The 10 key input screen is displayed.
Input the 4 digit code number given on the jacket of
the disc, etc.
Touch [Enter] to memorize the number.
• If the code number of the bonus group differs from the code number
you set in this section, the 10 key input screen automatically appears
in the display. If a new code number is input, this code number will
be replaced.
Setting the DVD-Audio Playback Mode
To playback the DVD Audio Disc, you have a choice of 3 different
settings. If the disc containing DVD Video and Audio, set VCAP (Video
Capable Audio Player) or VOFF (Video OFF) to playback the DVD
Audio.
Setting item: DVD-A Setup
Setting contents: Video / VCAP / VOFF
Video:
VCAP:
VOFF:
4:3 PAN-SCAN:
Select this when connected to a conventional 4:3 size monitor.
The picture will fill the entire TV screen. However, due to the
mismatch in aspect ratio, parts of the movie at the extreme left
and right sides will not be visible (when playing a 16:9 size
movie).
Only DVD Video is played back if the disc contains
DVD Video and Audio.
DVD Audio is played back with Video.
DVD Audio is played back without Video.
Playing MP3/WMA/AAC Data (File Play Mode)
When using discs containing both audio data and MP3/WMA/AAC
data.
Setting item: File Play Mode
Setting contents: CD / CMPM
CD:
CMPM:
16:9 WIDE:
Select this when connected to a wide screen TV. This is the
factory setting.
Plays only the audio data on discs containing both
audio data and MP3/WMA/AAC data.
Plays only the MP3/WMA/AAC files on discs
containing both audio data and MP3/WMA/AAC
data.
• Insert the disc when playback is stopped and remove the disc from
the unit before setting.
• When an MP3-compatible CD changer is used, this setting cannot be
applied.
59-EN
Setting the compressed File Playback Data
If a disc containing both a compressed video file and a compressed
audio file is used, you have a choose to play back only a video or only
audio.
SOURCE Setup
Source Setup Operation
Setting item: DVD Play Mode
Setting contents: Video / Audio
Video:
Audio:
Only Video data is played back.
Only Audio data is played back.
To display the Source Setup Menu screen:
Your vehicle must be parked with the ignition key in the ACC or
ON position. To do this, follow the procedures below.
1 Bring your vehicle to a complete stop at a safe
location. Engage the parking brake.
2 Keep pushing the foot brake and release the parking
brake once then engage it again.
3 When the parking brake is engaged for the second
time, release the foot brake.
Setting the Video CD Play Mode
When playing a Playback Control (PBC) enabled Video CD, you can
choose to set PBC ON or OFF.
Setting item: PBC
Setting contents: OFF / ON
OFF:
ON:
The PBC menu is not displayed.
The PBC menu is displayed.
• For automatic transmission vehicles, place the transmission lever
in the Park position.
Now, the locking system for the Source mode operation has been
released. Engaging the parking brake can reactivate the Source
Setup Menu, as long as the car’s ignition has not been turned off.
It is not necessary to repeat the above procedure (1 through 3) of
“To display the Source mode screen.”
Each time the ignition is turned OFF, perform the procedure of “To
display the Source mode screen.”
The following steps 1 to 6 are common operations to each
“Setting item” of Source Setup. Refer to each section for details.
1
Press SOURCE/
2
Touch [
3
Touch [
4
Touch [
on the unit.
The SOURCE selection screen is displayed.
] on the main source screen.
The Setup Select screen is displayed.
] of Source Setup.
The Source Setup screen appears.
] of your desired Setup mode.
DVD Setup*1/Radio Setup/SiriusXM Setup*2/
BLUETOOTH Setup*3/Pandora Setup/USB Search*4
*1 Refer to “DVD Setup” on page 55.
*2 Displayed only When an optional SiriusXM Tuner Receiver Box is
connected. For detailed setting, refer to “SiriusXM Setup” on
page 68.
*3 Refer to “BLUETOOTH Setup” on page 83.
*4 The setting can be changed directly by touching [ ] or [ ].
5
Touch [ ], [ ] or [
change its setting.
], etc. of the desired item to
Radio Setup:
Tuner Condition/Digital Seek
Pandora Setup:
Pandora/Pandora Volume
6
Touch [
] to return to the previous screen.
Touch [Exit] to return to the main source screen that was
displayed before the setup operation was started.
60-EN
Radio Setup
USB Search
“Radio Setup” is selected on the source setup main menu in step 4.
“USB Search” is selected on the source setup main menu in step 4.
Setting the TUNER (FM) tone quality (Tuner Condition)
Setting the USB Search mode
This unit can set your preferred tonal quality for the FM analog
radio stations.
The unit allows you to search for the USB Audio files by Tag
information or Explorer (File Name) mode.
Setting item: Tuner Condition
Setting contents: Normal / HiFi / Stable
Setting item: USB Search
Setting contents: Tag / File Name
Normal:
HiFi:
Stable:
Standard setting
High-quality setting
Control noise
• Noise may be more noticeable when HiFi is set, depending on the
reception status. In this case, the Normal setting is recommended.
Digital Seek Setting
Digital Seek can be set to ON/OFF.
Setting item: Digital Seek
Setting contents: OFF / ON
OFF:
ON:
You can use Playlists/Artists/Albums/Songs/Genres/
Composers/Folders/Files search mode to narrow
searches.
File Name: You can search a folder/file as search files on PC.
Tag:
• After the above setting, turn the ignition key off (ACC OFF) and on
again (ACC ON).
• For search mode details, refer to “Searching for a desired Song” on
page 99.
• When a Portable audio player is connected, even though File Name
is set, the Tag information search mode will be applied.
SEEK UP/DOWN is used for digital and analog radio
stations. However, the strong signals have priority
during SEEK.
SEEK UP/DOWN is used only for the digital radio
station.
Pandora Setup
“Pandora Setup” is selected on the source setup main menu in step 4.
Setting the Pandora mode
To use your iPhone having the Pandora Compatible Application already
installed, set this item to ON.
Setting item: Pandora
Setting contents: OFF / ON
OFF:
ON:
The Pandora source icon is not displayed on the
source selection list.
The Pandora source icon is displayed on the source
selection list.
Adjusting the volume for the Pandora Radio
You can emphasize the Pandora Radio volume level.
Setting item: Pandora Volume
Touch [ ], [ ] to select the desired emphasize of volume level (0 ~ +9).
61-EN
DISPLAY Setup
Visual EQ Setting Operation
The visual setting of Bright, color, contrast, etc. can be adjusted in this
mode.
Display Setup Operation
To display the Display Setup Menu screen:
Your vehicle must be parked with the ignition key in the ACC or
ON position. To do this, follow the procedures below.
1 Bring your vehicle to a complete stop at a safe
location. Engage the parking brake.
2 Keep pushing the foot brake and release the parking
brake once then engage it again.
3 When the parking brake is engaged for the second
time, release the foot brake.
• For automatic transmission vehicles, place the transmission lever
in the Park position.
Now, the locking system for the Display mode operation has been
released. Engaging the parking brake can reactivate the Display
Setup Menu, as long as the car’s ignition has not been turned off.
It is not necessary to repeat the above procedure (1 through 3) of
“To display the Display mode screen.”
Each time the ignition is turned OFF, perform the procedure of “To
display the Display mode screen.”
Setting item: Visual EQ
Further setting items:
Live Contrast
Visual EQ*
Bright
Contrast
Sharp*
User Memory*
Color*
Tint*
* The setting is unavailable in navigation mode.
Touch [ ] or [ ] etc. of the desired item to change its
setting.
• The settings are available in the visual source mode only.
• The further setting items can be changed by touching [ ]/[ ].
• Only one setting item can be displayed on each page, you can select
the desired brightness, picture tint, etc through the screen displayed.
Adjusting Image Brilliance (Live Contrast)
The over brightness/darkness part of image will be adjusted to a proper
brilliance automatically.
Setting item: Live Contrast
Setting contents: OFF / Low / High
• You can adjust this setting in visual source mode by touching [
directly. (In this case, the “Live Contrast” is displayed as
“Contrast”.)
]
Selecting the Visual EQ Mode (Factory’s setting)
The following steps 1 to 5 are common operations to each
“Setting item” of Display Setup. Refer to each section for
details.
1
Press SOURCE/
2
Touch [
3
Touch [
4
] on the main source screen.
The Setup Select screen is displayed.
] of Display Setup.
The Display Setup screen appears.
] etc. of the desired item to
Setting items:
Visual EQ / Dimmer / Dimmer Low Level / Function Guide Fade /
Base Color / Screen Alignment / Display
5
Further setting item: Visual EQ
Setting contents: OFF (FLAT) / Night M. / Soft / Sharp / Contrast /
P-1 / P-2
on the unit.
The SOURCE selection screen is displayed.
Touch [ ], [ ] or [
change its setting.
You can select a mode suitable for the subject image.
Touch [
] to return to the previous screen.
Touch [Exit] to return to the main source screen that was
displayed before the setup operation was started.
• Immediately after changing the settings of Display Mode (While the
system is writing data automatically) do not turn the ignition key
(engine key) to OFF. Otherwise, the settings may not be changed.
OFF (FLAT): Initial Setting
Night M.:
Suitable for movies in which dark scenes
frequently appear.
Soft:
Suitable for CGs and animated films.
Sharp:
Suitable for old movies where images are not
clearly shown.
Contrast:
Suitable for recent movies.
P-1:
Recalls the Visual EQ mode being stored on
preset No.P-1 from “Storing Visual EQ” (page 63).
P-2:
Recalls the Visual EQ mode being saved on
preset No.P-2 from “Storing Visual EQ” (page 63).
• To return to the default video settings, set this function to OFF. Any
Visual EQ selection or changes made are reset their initial settings.
• If any adjustments are made to the existing Visual EQ selections
(Night M., etc.), “Custom” is displayed.
Adjusting Brightness
Further setting item: Bright
Setting content: -15 ~ +15
You can adjust the brightness between Min (-15) and Max (+15).
When it reaches the minimum or maximum point, the display
shows “Min” or “Max” respectively.
• When any Visual EQ Preset is selected, the brightness is
automatically adjusted according to the car’s interior lighting as
long as Auto is set in “Setting the Brightness of the Backlighting”
(page 63).
62-EN
Adjusting Color of Picture
Setting the Brightness of the Backlighting
Further setting item: Color
Setting content: -15 ~ +15
Backlighting is provided by a fluorescent light built into the liquid
crystal panel. The illumination control adjusts the brightness of the
backlighting based on the car ambient lighting for easier viewing.
You can adjust the color between Min (-15) and Max (+15).
When it reaches the minimum or maximum point, the display
shows “Min” or “Max” respectively.
Setting item: Dimmer
Setting contents: OFF / ON / Auto
• Color adjustment can be made only in iPod video, DVD, Video CD
and AUX modes.
OFF:
Adjusting Tint of Picture
ON:
Auto:
Further setting item: Tint
Setting content: G15 ~ R15
Adjust the color from G15 to R15. “G Max” or “R Max” is
displayed at the maximum of each color.
• When ON or Auto is set, the setting is also applied for the button
lighting in “Adjusting the Dimmer of Button Lighting at Night”
(page 65).
• Tint adjustment can be made only in iPod video and AUX modes.
• When setting PAL, you cannot adjust the TINT.
Adjusting Image Contrast
Adjusting the Minimum Level of Backlight
Further setting item: Contrast
Setting content: -15 to +15
You can adjust the brightness of the backlight (LOW). This function
could be used, for instance, to change the screen brightness while
traveling at night.
Contrast adjustment range is -15 to +15. “Low” and “High”
appear as the minimum and maximum values specified.
Setting item: Dimmer Low Level
Setting content: -15 to +15
Adjusting Picture Quality
You can adjust the level between Min (-15) and Max (+15). When
it reaches the minimum or maximum point, the display shows
“Min” or “Max” respectively.
Further setting item: Sharp
Setting content: -5 to +5
Picture quality adjustment range is -5 to +5. “Soft” and “Hard”
appear as the minimum and maximum values specified.
Setting the Function Guide display ON/OFF
• Picture quality adjustment can be made only in iPod video, DVD,
Video CD and AUX modes.
When on is set, the function guide will be hidden automatically after no
operation is performed for 5 seconds.
Storing Visual EQ
You can store the settings made for “Adjusting Image Brightness, Tint,
Depth, Picture Quality and Contrast.”
Further setting item: User Memory
Setting contents: P-1 / P-2
1 After completing “Adjusting Brightness, Tint, Depth,
Picture Quality, and Contrast” (page 62), touch [ ] or [
of User Memory and then select preset No. “P-1” or “P-2” to which the settings are to be stored.
2 After selecting a preset No., touch [Memory].
The adjusted Visual EQ mode is stored by the above
operations.
Deactivate Auto Dimmer mode to keep the background
illumination of the monitor bright.
Keep the background illumination of the monitor dark.
Adjust the brightness of the background illumination of
the monitor automatically to the brightness of the car
interior.
Setting item: Function Guide Fade
Setting contents: OFF / ON
Switching the Font Back Display Color
You can choose from 4 different display colors for the font back.
]
Setting item: Base Color
Setting contents: Blue / Red / Green / Amber
• You can recall the Visual EQ mode stored here from P-1 or P-2 of
“Selecting the Visual EQ Mode (Factory’s setting)” (page 62).
63-EN
Adjusting the Touch Panel
GENERAL Setup
Adjustment becomes necessary when the display position on the LCD
and the touch position on the touch panel do not match.
Setting item: Screen Alignment
Setting contents:
/ Reset
1 Touch [
] of Screen Alignment.
The adjustment screen appears.
2 Accurately touch the
mark provided in the lower left
corner of the screen.
The screen changes to the adjustment screen.
3 Accurately touch the
mark provided in the upper right
corner of the screen.
This completes adjustment, and returns to the Display
setup mode screen.
• If you have touched a location other than the
mark, touch [Reset]
to restore the adjustment screen to the initial setting.
• If you touch [
] on the adjustment screen, no adjustment is done
and the Display setup screen is restored.
Display On and Off
You can turn off the screen display to reduce power consumption.
This additional power enhances the sound quality.
General Setup Operation
To display the General Setup Menu screen:
Your vehicle must be parked with the ignition key in the ACC or
ON position. To do this, follow the procedures below.
1 Bring your vehicle to a complete stop at a safe
location. Engage the parking brake.
2 Keep pushing the foot brake and release the parking
brake once then engage it again.
3 When the parking brake is engaged for the second
time, release the foot brake.
• For automatic transmission vehicles, place the transmission lever
in the Park position.
Now, the locking system for the General mode operation has
been released. Engaging the parking brake can reactivate the
General Setup Menu, as long as the car’s ignition has not been
turned off. It is not necessary to repeat the above procedure (1 through 3) of “To display the General mode screen.”
Each time the ignition is turned OFF, perform the procedure of “To
display the General mode screen.”
Setting item: Display
Setting contents: OFF / ON
• If any button on the unit is pressed during display off mode, the
screen will be displayed for 5 seconds to show the operation before
returning to display off mode.
The following steps 1 to 5 are common operations to each
“Setting item” of General Setup. Refer to each section for
details.
1
Press SOURCE/
2
Touch [
3
Touch [
4
on the unit.
The SOURCE selection screen is displayed.
] on the main source screen.
The Setup Select screen is displayed.
] of General Setup.
The General Setup screen appears.
Touch [ ] or [ ] of the desired item to change its
setting.
Setting items:
Clock / Demonstration / Beep / Auto Scroll / Key Dimmer Level
5
Touch [
] to return to the previous screen.
Touch [Exit] to return to the main source screen that was
displayed before the setup operation was started.
• Immediately after changing the settings of General Mode (While the
system is writing data automatically) do not turn the ignition key
(engine key) to OFF. Otherwise, the settings may not be changed.
64-EN
Displaying the Time
SYSTEM Setup
The clock indication on the monitor display is turned on or off
respectively.
Setting item: Clock
Setting contents: OFF / ON
• The clock of the unit will be automatically updated according to the
data that the Navigation System provides, and cannot be adjusted
manually.
• If the GPS antenna is not connected correctly, the clock indication on
the unit may be wrong because the time information cannot be
received. In this case, it is suggested to set “Clock” to “OFF”.
System Setup Operation
To display the System Setup Menu screen:
Your vehicle must be parked with the ignition key in the ACC or
ON position. To do this, follow the procedures below.
1 Bring your vehicle to a complete stop at a safe
location. Engage the parking brake.
2 Keep pushing the foot brake and release the parking
brake once then engage it again.
3 When the parking brake is engaged for the second
time, release the foot brake.
Demonstration Function
This unit is equipped with a demonstration function capable of showing
basic operations of respective sources on the monitor display.
Setting item: Demonstration
Setting contents: OFF / ON
Turns on the demonstration mode to show the basic
operations.
OFF: Turns off the demonstration mode.
ON:
• The demonstration operation is automatically repeated until the
function is turned off.
Sound (Beep) Guide Function
Setting item: Beep
Setting contents: OFF / ON
OFF: Deactivate the Sound Guide mode. The sound guide
beep will not be produced when a soft or a unit button is
pressed.
ON: Activate the Sound Guide mode.
• This setting is unavailable for the navigation mode.
About the button sounds setting of navigation mode, refer to “Button
Sounds” on page 36.
Setting the Scroll
Scroll display is available if CD text, folder name, file name or tag
information is entered.
Setting item: Auto Scroll
Setting contents: OFF / ON
OFF: Turns off the Auto scroll mode. Scroll display is done
once as a track is changed.
ON: Turns on the Auto scroll mode. Scroll display is repeated
as long as the mode is turned on.
• The display scrolls on the unit when the screen is filled up.
• Song, artist and album name, etc. scrolls when an iPod/iPhone is
connected.
• Short/Long Station name, Song, Artist, and album name scrolling are
displayed in HD Radio mode.
• For automatic transmission vehicles, place the transmission lever
in the Park position.
Now, the locking system for the System mode operation has been
released. Engaging the parking brake can reactivate the System
Setup Menu, as long as the car’s ignition has not been turned off.
It is not necessary to repeat the above procedure (1 through 3) of
“To display the System mode screen.”
Each time the ignition is turned OFF, perform the procedure of “To
display the System mode screen.”
The following steps 1 to 5 are common operations to each
“Setting item” of System Setup. Refer to each section for details.
1
Press SOURCE/
2
Touch [
3
Touch [
4
on the unit.
The SOURCE selection screen is displayed.
] on the main source screen.
The Setup Select screen is displayed.
] of System Setup.
The System Setup screen appears.
Touch [ ] or [ ] etc. of the desired item to change
its setting.
Setting items:
Remote Sensor* / Camera IN / AUX1 IN / AUX2 IN / AUX Out /
BLUETOOTH IN / Optical Out / Rear Source*
* Displayed only when AUX Out is ON.
5
Touch [
] to return to the previous screen.
Touch [Exit] to return to the main source screen that was
displayed before the setup operation was started.
• Immediately after changing the settings of System Mode (while the
system is writing data automatically) do not turn the ignition key
(engine key) to OFF. Otherwise, the settings may not be changed.
Adjusting the Dimmer of Button Lighting at
Night
You can adjust the brightness of the button lighting at night with the
dimmer.
Setting item: Key Dimmer Level
Setting level: -2 to +2
65-EN
Switching the function of the remote
sensor
Adjusting the Rear Camera Guide line
You can adjust the rear camera guide line position.
Further Setting item: Guide Line Adjustment
For remote control operation, the remote sensor of the external device
(monitor, etc.) can be switched, as you prefer.
Touch [
] of Guide Line Adjustment.
The guide line adjustment screen is displayed.
Setting item: Remote Sensor
Setting contents: Front / Rear
Front:
Rear:
1
The remote sensor of this unit is effective.
The remote sensor of the external monitor
connected to AUX OUT of this unit becomes
effective. The remote control operates the source
connected to the AUX OUT terminals.
2
Touch the guide pylon you intend to adjust.
• When an optional DVD changer or DVD player is connected, and the
remote control sensor is set to Rear, some soft button operations
( [ ] STOP, etc.) cannot be performed. In this case, set the remote
control sensor to Front.
Setting the Camera Input
With an optional camera connected, video of camera is output to the
monitor. Depending on the connected camera, set this item to “Direct”
or “RCA”. For detailed information of the optional camera, refer to the
table on page 66.
Setting item: Camera IN
Setting contents: OFF / Direct / RCA
OFF:
The Camera mode cannot be used.
Direct: Use when the optional direct camera is connected.
RCA: Used when connecting to an optional camera with
RCA output connector.
• By shifting to reverse (R), the rear pictures are output.
This function is effective when the reverse wire is properly connected.
After setting this item to Direct or RCA, touch [
following further setting items can be adjusted.
] of Camera IN, the
3
Touch [ ], [ ], [
the guide.
Further Setting item: Guide Line
Setting contents: OFF / ON
] to adjust the position of
After moving the guide, when you touch [
the horizontal row are aligned in a row.
4
], the guides in
After the adjustment is completed, touch [OK].
You can touch [Reset] during adjustment to return to the
default adjustment.
Selecting the camera
Depending on the connected camera, set this item to “Topview”,
“Front” or “Rear”.
Setting item: Camera Select
Setting contents: Topview *1 / Front / Rear
About the setting information of the optional Alpine camera, refer
to the table below.
Rear camera guide line display setting
You can set whether the rear camera guide line is displayed or
not.
] or [
Direct Camera
RCA Camera *2
Front
HCE-C200F *3
—
Rear
HCE-C300R
HCE-C117D
HCE-C200R *3
HCE-C115
*1 This setting item is prepared for the Alpine Topview camera. This setting item is displayed only when Camera IN is set to RCA,
refer to page 66.
*2 Any front or rear camera which has the RCA video output can also
be connected to this unit.
*3 If both front camera HCE-C200F and rear camera HCE-C200R are
connected, please set “Camera IN” to “RCA” and “Camera Select”
to “Rear”.
Turning View Change Function ON/OFF
Depending on the connected camera, the view angle of camera
may be changed.
When a camera with View Change Function is connected, set
this item to ON.
Setting item: View Change Func.*
* Displayed only when Camera IN is set to Direct and the rear camera
is selected, refer to page 66.
66-EN
Setting the AUX1 Mode
Setting item: AUX1 IN
Setting contents: OFF / ON
OFF:
ON:
AUX1 source is not displayed.
AUX1 source is displayed.
• OFF is not displayed when the optional DVD player or DVD changer
is connected. During System setup, although the AUX1 name can be
changed, it is not displayed on the source selection screen.
• When OFF is selected, the settings related to AUX1 cannot be
changed from this unit.
Setting the AUX2 Mode
Setting item: AUX2 IN
Setting contents: iPod Video / AUX
iPod Video: Set when an iPhone or a video compatible iPod is
connected to the iPod (V)/AUX Input Connector.
AUX:
Set when an optional AV/RCA interface cable (4-pole mini AV plug to 3-RCA) is connected. A DVD
player etc. with RCA audio/video output can be
connected to this unit. In this case, the iPod video
will not be displayed.
Adjusting the AUX1 name Mode
• When the current source is iPod video or AUX2, this setting cannot
be adjusted.
After setting to ON in “Setting the AUX1 Mode”, this setting can be
carried out.
Adjusting the External Input Audio Level of AUX2
Setting items: Primary / Secondary *1
Setting contents: OFF *2 / AUX *3 / DVD / Game / EXT.DVD / DVD
CHG / USB Video / DTV
*1 When a USB Video box or TV Tuner (both are sold separately and
cannot be connected at the same time) is connected, you can use it to
connect one more External Input device. Setting the Secondary name
can change the source name display of this device.
*2 The setting is only available for Secondary.
*3 The setting is only available for Primary.
• The selected source name is displayed instead of AUX1 source name.
• You can set Secondary name only when Primary name is set to DTV or USB Video. And you cannot set the same name as in Primary
name.
Adjusting the External Input Audio Level of AUX1
After setting to ON in “Setting the AUX1 Mode”, this setting can be
carried out.
Setting item: Level
Setting contents: Low / High
Low:
High:
Decreases the external input audio level.
Increases the external input audio level.
Further Setting item: Level
Setting contents: Low / High
Low:
High:
• This setting item is adjustable only when AUX2 IN is set to AUX.
Switching the Visual Input Signal System of AUX2
Further Setting item: Signal
Setting contents: NTSC/PAL / Auto
• The video input type can be changed.
• When set to Auto, unstable display may occur while playing back
certain black and white video signal. In this case, select NTSC or
PAL mode manually.
• This setting item is adjustable only when AUX2 IN is set to AUX.
Setting the Picture Output
Outputs the picture of the source selected on the INA-W910 connected
to the rear monitor.
Setting item: AUX Out
Setting contents: OFF / ON
Switching the Visual Input Signal System of AUX1
OFF:
After setting to ON in “Setting the AUX1 Mode”, the video input type
can be changed.
ON:
Setting item: Signal
Setting contents: NTSC/PAL / Auto
NTSC/PAL: Choose the video input signal type manually.
Auto:
The suitable video input signal type will be
automatically chosen between NTSC and PAL.
• When set to Auto, unstable display may occur while playing back
certain black and white video signal. In this case, select NTSC or
PAL mode manually.
Decreases the external input audio level.
Increases the external input audio level.
The “Remote Sensor” and “Rear Source” items are
not displayed on the System Setup screen.
The “Remote Sensor” and “Rear Source” items are
displayed on the System Setup screen.
Setting the BLUETOOTH Connection
(BLUETOOTH IN)
Setting item: BLUETOOTH IN
Setting contents: OFF / ON
OFF:
ON:
BLUETOOTH function is not used.
Select when you would like to pair your Bluetooth
compatible phone with this unit.
• For details on BLUETOOTH operation, refer to “BLUETOOTH
Operation” (page 83).
• If mobile phone compatible with the Voice-Dial function is
connected, the Voice-Dial function can be used.
67-EN
Setting the Digital Output
SiriusXM Setup
To connect an audio processor using the optical digital output, set to
“ON” by the following procedure.
Setting item: Optical Out
Setting contents: OFF / ON
• Afterwards, set ACC to OFF once, then turn it ON again. The setting
of Digital Output is decided.
Setting the Rear Entertainment System
The rear entertainment function independently routes different sources
to the front and the rear inside a car. For example, while listening to the
radio or other audio source in the front, DVD can be enjoyed in the rear
with the optional rear monitor and headphones.
SiriusXM Setup Operation
The operation can be performed when the optional SiriusXM Tuner is
connected.
To display the SiriusXM Setup Menu screen:
Your vehicle must be parked with the ignition key in the ACC or
ON position. To do this, follow the procedures below.
1 Bring your vehicle to a complete stop at a safe
location. Engage the parking brake.
2 Keep pushing the foot brake and release the parking
brake once then engage it again.
3 When the parking brake is engaged for the second
time, release the foot brake.
Setting item: Rear Source
Setting contents: OFF / Disc / iPod / AUX / Game / DVD / DTV /
EXT.DVD / DVD CHG. / USB Video / AUX2
• Select OFF to cancel the rear entertainment mode.
• The display of setting contents may vary depending on the setting
and connected device.
• For automatic transmission vehicles, place the transmission lever
in the Park position.
Now, the locking system for the Sirius mode operation has been
released. Engaging the parking brake can reactivate the SiriusXM
Setup Menu, as long as the car’s ignition has not been turned off.
It is not necessary to repeat the above procedure (1 through 3) of
“To display the SiriusXM mode screen.”
Each time the ignition is turned OFF, perform the procedure of “To
display the SiriusXM mode screen.”
The following steps 1 to 6 are common operations to each
“Setting item” of SiriusXM Setup. Refer to each section for
details.
1
Press SOURCE/
2
Touch [
3
Touch [
4
Touch [
5
Touch [
on the unit.
The SOURCE selection screen is displayed.
] on the main source screen.
The Setup Select screen is displayed.
] of Source Setup.
The Source Setup screen appears.
] of SiriusXM Setup.
The SiriusXM setting Setup menu appears.
] of the desired item to change its setting.
Setting items:
Alert Setup / Game Alert Setup / Parental Lock / Signal
Indicator
6
68-EN
Touch [
] to return to the previous screen.
Touch [Exit] to return to the main source screen that was
displayed before the setup operation was started.
Managing Artist, Song and Sports Team
Alerts
The following operations can be performed to manage the stored Songs,
Artists and Sports teams information. (To learn about how to store the
information, refer to “Storing the desired Song/Artist” on page 96 and
“Setting the Favorite Sports Team Alerts” on page 69.)
Setting ON/OFF of all Songs/Artists/Games Alert
Determines whether the received alert of all stored Songs/Artist/Games
is set or not.
Touch [ ] or [ ] of the Alert to select ON/OFF.
ON:
OFF:
Set to receive alert.
No alert.
Setting item: Alert Setup
Deleting all stored Alert
Touch [
The operation will delete all stored songs, artists and teams alert
information.
] of the Alert Setup.
The display changes to Alert Setup menu screen.
Setting the Alert individually for a Song/Artist/
Sport Team
You can manage the stored Alert (Songs, Artists, Sports teams)
individually by this setting.
1
Touch [
1
2
Touch [
] of the Delete All alert.
A message is displayed.
Touch [Yes] to clear the information of all stored
Artist, Song, and Game alert items.
Touch [No] to cancel.
] of the Alert list.
The Alert List screen is displayed.
Display example for Alert List screen
Setting the Favorite Sports Team Alerts
This menu option allows you to select your favorite teams, organized by
leagues, so that you will be alerted later when your favorite teams are
playing on other channels. Some sports, individuals are considered
‘teams’.
Setting item: Games Alert Setup
Displays the type of the stored Alert.
: Song Alert
: Artist Alert
: Sports team Alert
Displays the ON/OFF of Alert.
: ON
: OFF
Displays the song, artist or team name.
Scroll the list one line at a time by touching [ ] or [ ].
Scroll the list one page at a time by touching [ ] or [ ].
2
3
Touch [
] of the desired song, artist or team.
The Alert list setting screen is displayed.
Touch [ ] or [ ] of the Song Alert, Artist Alert or
Game Alert.
Set to ON if you want to receive this alert.
Set to OFF if you do not want to receive this alert.
• Touching [
1
Touch [
2
Touch [
3
Touch the abbreviations for your favorite teams.
] of the Games Alert Setup.
The display changes to Sports setting screen.
] of your desired league.
The display changes to the team list of the selected league.
Once selected, you will be alerted when games that those
teams are playing in can be heard on a SiriusXM channel.
A “Team Saved X Used/Y Empty” pop up screen is
displayed.
X is the total number of song titles, artist names or sports
team stored in memory, and Y is the total number of memory
song titles, artist names or sports teams still available for
storage.
• Teams that you have selected will be indicated with an asterisk “*”.
• If the memory is full, you cannot select a new team. To add another team alert, you need to delete a selected one first.
Touch the team (with “*” mark) you want to delete, a message will
display. Touch [Yes] to delete it and touch [No] to cancel. You can
also delete a team from the Alertlist, for details, refer to “Managing
Artist, Song and Sports Team Alerts” on page 69.
• You can unselect all of the teams for a given league by touching the
“None” entry and confirming that request by touching “Yes” when
asked “Delete?”.
] of Delete after step 2 will delete this Alert.
69-EN
Setting the Parental Lock
You can lock out channels with passcode protection. Channels that are
locked cannot be accessed without entering the passcode. You can
unlock a channel or change the passcode using this menu option.
Changing the Lock Passcode
4
5
Setting item: Parental Lock
1
2
Touch [
The numeric keypad screen is displayed.
The initial number is 0000.
Input number are displayed as “*” (asterisk).
3
Touch [Enter] to confirm the passcode.
Or touch [ ] to cancel entry of the passcode or touch
[Delete All] to erase the digits that you have entered so you
can start over or touch [
] to erase the last digit that you
entered.
After the correct passcode is entered, the Parental Lock
options menu is display.
Clearing the Lock of ALL the locked Channels
4
5
Touch [
] of Clear All.
Touch [Yes] to clear the lock of all the locked
channels.
Touch [No] to cancel.
Setting the Lock status of individual channels
4
] of Locked Channels.
The channels list screen is displayed.
The Locked channel is marked with “L”.
Use the keypad to enter the current (old) 4-digit
passcode.
6
7
Now use the keypad to enter the new 4-digit
passcode. Touch [Enter] to confirm the entry.
Then use the keypad to enter the new 4-digit
passcode a second time to verify it. Touch [Enter] to confirm the entry.
The message “Code Saved” will be displayed.
• Remember to keep a note of the passcode in a safe place in case you
forget the code.
8
Touch [
] to return to the previous screen.
Signal Strength Information
While listening to a SiriusXM Channel, the Signal strength of the
current channel will be displayed.
Setting item: Signal Indicator
Touch [
Display example for Locked Channels screen
5
6
] of Edit Code.
The numeric keypad screen is displayed.
(The initial passcode is set to 0000).
Touch [Enter] to confirm the entry.
Touch [Delete All] to erase all of the digits that you entered.
Touch [
] to erase the last digit you entered.
Touch [ ] or [
] or [Exit] to abort changing the
passcode.
] of the Parental Lock.
Touch the numeric keypad to input a 4-digit
passcode.
Touch [
Touch the desired channels to lock or unlock it.
Touch [
70-EN
] to return to the previous screen.
This menu item displays the SiriusXM signal strength as Strong, Good,
Weak or No Signal.
• If the Signal Indicator reports Weak or No Signal and your vehicle is
parked outside with no obstructions to the southern sky, then your
SiriusXM antenna may not be properly installed or may have become
damaged.
IMPRINT Operation
(Optional)
Alpine introduces IMPRINT - the world’s first technology that
thoroughly eliminates in-car acoustic problems that normally degrade
sound quality, which enables us to experience music the way the artist
intended. When the IMPRINT audio processor (PXA-H100) (sold
separately) is connected to this unit, MultEQ and the following sound
adjustment can be performed.
To display the IMPRINT Setup Menu screen:
Your vehicle must be parked with the ignition key in the ACC or
ON position. To do this, follow the procedures below.
1 Bring your vehicle to a complete stop at a safe
location. Engage the parking brake.
2 Keep pushing the foot brake and release the parking
brake once then engage it again.
3 When the parking brake is engaged for the second
time, release the foot brake.
• For automatic transmission vehicles, place the transmission lever
in the Park position.
Now, the locking system for the IMPRINT mode operation has
been released. Engaging the parking brake can reactivate the
IMPRINT Setup Menu, as long as the car’s ignition has not been
turned off. It is not necessary to repeat the above procedure (1 through 3) of “To display the IMPRINT mode screen.”
Each time the ignition is turned OFF, perform the procedure of “To
display the IMPRINT mode screen.”
Changing MultEQ mode
MultEQ, developed by Audyssey Labs, automatically corrects the audio
for the listening environment. The system is optimized for selected
positions in the vehicle. To accomplish this, MultEQ must take
measurements of the vehicles response characteristics. For details on the
set up procedure, consult your authorized Alpine dealer.
1
2
3
4
Adjusting Sound Setting in Manual Mode
You can change these sound settings to create your own preference
when the MultEQ mode is set to OFF (Manual Mode).
Use steps 1 to 6 to select one of the Sound menu
modes to modify. See the applicable section below for
details about the selected item.
1
2
Check whether the Defeat mode is off.
Press SOURCE/
on the unit.
The SOURCE selection screen is displayed.
3
Touch [
4
Touch [
5
Touch [A.Processor].
6
] on the source selection screen.
The Setup Select screen is displayed.
] of Audio Setup.
The Audio Setup screen appears.
The A.Processor SETUP screen appears.
Touch [ ], [ ] or [
change its setting.
], etc. of the desired item to
Setting items: Media Xpander / X-Over / Time Correction / T.Corr Parameter / G-EQ / P-EQ / F-EQ / TW Setup*
* This function can be operable only when PXA-H100 (sold
separately) is connected and 2.2ch (3WAY) mode is set. For details,
refer to the Owner’s Manual of PXA-H100.
• Touching [Exit] will change to the main source screen.
• Touching [
] to return to the previous screen.
• Media Xpander, F-EQ, P-EQ and G-EQ Adjustment are inoperable
when Defeat is set to ON.
Equalizer Presets (F-EQ)
10 typical equalizer settings and 6 user’s preset setting are preset at the
factory for a variety of musical source material.
Setting item: F-EQ
Press SOURCE/
on the unit.
The SOURCE selection screen is displayed.
Touch [
] on the main source screen.
The Setup Select screen is displayed.
After touching [ ] to display the IMPRINT Setup
adjusting item, touch [
] of IMPRINT Setup, the
MultEQ mode selection screen will be displayed.
Touch [ ] or [ ] to change the setting.
Setting contents: OFF / Curve 1/Curve 2
OFF:
Curve 1/
Curve 2:
1
Touch [
2
Touch [ ] or [ ] of the desired type to set to ON.
] of F-EQ.
The F-EQ setup screen appears.
Flat / Pops / Rock / News / Jazz&Blues / Electrical Dance / Hip Hop&Rap / Easy Listening / Country / Classical / User1 /
User2 / User3 / User4 / User5 / User6
• Only one type can be set to ON.
• By selecting User’s 1 to 6, you can recall the stored preset number in
“Adjusting the Graphic Equalizer Curve (G-EQ)” (page 73) or
“Adjusting the Parametric Equalizer Curve (P-EQ)” (page 72).
Adjusting the audio settings manually to create your
own preference.
Correcting the audio for the listening environment
automatically.
• The Curve mode can be selected only when curve 1 and curve 2 are
stored.
• When MultEQ is set to Curve 1 or Curve 2, Media Xpander, X-Over,
Time Correction, Subwoofer Phase, Subwoofer Channel, TW Setup, P-EQ, G-EQ and F-EQ cannot be adjusted.
71-EN
Setting the Response Slope for the High
Range Speaker (TW Setup)
Depending on the response characteristics of the speaker, care should be
taken when setting the response slope of the high range speaker to
FLAT in 2.2ch (3WAY) mode (see “Adjusting the Crossover Settings
(X-OVER)” on page 73), as speaker damage may result.
Setting item: TW Setup
Touch [ ] or [ ] of TW Setup to select Factory’s or
User’s.
Factory’s: As protection from possible speaker damage, FLAT
cannot be set for the response slope of the high
range speaker in 2.2ch (3WAY) mode.
User’s:
The FLAT setting is possible in 2.2ch (3WAY) mode.
• The TW Setup mode can only be selected if the FRONT/REAR/
SUBW. (4.2CH)/3WAY (2.2CH) switch on the IMPRINT audio
processor (PXA-H100) is set to 3WAY (2.2CH).
Setting the MX Level (Media Xpander)
MX (Media Xpander) makes vocals or instruments sound distinct
regardless of the music source. The FM radio, CD, Flash memory and
iPod/iPhone, will be able to reproduce the music clearly even in cars
with a lot of road noise.
Setting item: Media Xpander
1
Touch [ ] or [ ] of Media Xpander to select ON or
OFF.
OFF:
ON:
2
3
Touch [
Turns off the MX effect of every music source.
Turns on the specified MX mode.
] after setting to ON.
MX CD (OFF, CD MX 1 to 3)
CD mode processes a large quantity of data. This data is used
to reproduce the sound cleanly by making use of the data
quantity.
MX CMPM (OFF, CMPM MX 1 to 3) / MX SXM (OFF, SXM MX 1 to 3)
This corrects information that was omitted at the time of
compression. This reproduces a well-balanced sound close to
the original.
MX Tuner (OFF, Tuner MX 1 to 3 )
The medium to high frequencies become more clear, and
produces well balanced sound in all the bands.
MX DVD (OFF, MOVIE MX 1 to 2)
The dialog portion of the video is reproduced more clearly.
(DVD MUSIC)
This disc contains a large quantity of data such as music clip.
MX uses this data to reproduce the sound accurately.
MX AUX (OFF, CMPM MX, MOVIE MX, MUSIC MX)
Choose the MX mode (CMPM, MUSIC, or MOVIE) that
corresponds to the media connected.
• When OFF is selected, MX effect of each MX mode will be OFF.
• Each music source, such as radio, CD and MP3 can have its own MX
setting.
• MX mode does not function when MX is ON for AM radio.
• MX CMPM is applied for MP3/WMA/AAC, Pandora Radio and iPod/
iPhone.
• MX Tuner is applied for HD Radio and RBDS reception.
• MX SXM is applied for SiriusXM reception.
• The MX setting can be performed only when a source is currently
selected.
Adjusting the Parametric Equalizer Curve
(P-EQ)
You can modify the Equalizer settings to create a response curve more
appealing to your personal taste.
The Media Xpander setup screen appears.
Setting item: P-EQ
Touch [ ] or [ ] of the desired MX mode.
1
Select L+R by touching [ ] of P-EQ.
2
Touch [
3
Adjust the P-EQ to your preference.
• Music source (such as radio broadcasts and CDs, excluding AM
radio) level can be set.
When graphic EQ is set to L+R, the setting will be turned off.
] of P-EQ after selecting L+R.
The P-EQ list screen appears.
Adjusting the Band
Touch [
] or [ ] of Band to select the band to be adjusted.
Band 1 / Band 2 / Band 3 / Band 4 / Band 5
72-EN
Adjusting the Frequency
Touch [ ] or [ ] of Freq. to adjust the frequency of the
selected band.
Setting the Time Correction Unit (T.Corr
Parameter)
Adjustable frequency bands:
20 Hz to 20 kHz (in 1/3 octave steps)
You can change the unit, (cm or inch) of time correction.
Touch [ ] or [ ] of T.Corr Parameter to select cm or Inch.
Band-1: 20 Hz~80 Hz (63 Hz)
Band-2: 50 Hz~200 Hz (150 Hz)
Band-3: 125 Hz~3.2 kHz (400 Hz)
Band-4: 315 Hz~8 kHz (1 kHz)
Band-5: 800 Hz~20 kHz (2.5 kHz)
Setting item: T.Corr Parameter
cm
Inch
cm: The unit of time correction is cm.
Inch: The unit of time correction is Inch.
Adjusting the Level
Touch [
band.
] or [ ] of Level to adjust the level of selected
Adjustable level: -6 to +6 dB
Adjusting the Time Correction
Before performing the following procedures, refer to “About Time
Correction” (page 75).
Setting the Bandwidth
Touch [
] or [ ] of Q to select the bandwidth.
Adjustable bandwidth: 1, 1.5, 3
4
To adjust another band, repeat step 3 and adjust all
bands.
• The frequencies of adjacent bands cannot be adjusted within 4 steps.
• While adjusting the Parametric EQ, you should consider the
frequency response of the connected speakers.
• When the parametric EQ is adjusted, the adjustment for graphic EQ
becomes ineffective.
Adjusting the Graphic Equalizer Curve (G-EQ)
Setting item: Time Correction
1
2
1
2
3
Select L+R by touching [ ] of G-EQ.
When parametric EQ is set to L+R, this setting will be turned
off.
Touch [
] of G-EQ after selecting L+R.
3
] or [ ] of Band to select the band to be adjusted.
Band-1 (63 Hz) / Band-2 (150 Hz) / Band-3 (400 Hz) / Band-4 (1 kHz) / Band-5 (2.5 kHz) / Band-6 (6.3 kHz) / Band-7 (17.5 kHz)
Repeat step 2 to set another speaker.
Set these values to achieve simultaneous sound
propagation to the listening position from all speakers.
Adjusting the Crossover Settings (X-OVER)
Before performing the following procedures, refer to “About the
Crossover” (page 76).
Setting item: X-Over
1
Touch [ ] or [ ] of X-Over to select L+R or L/R.
L+R: Sets the same adjustment values for the left and right
channels.
L/R: Different adjustment values can be set for the left and
right channels.
Adjust the G-EQ to your preference.
Touch [
Adjust the distance (0.0 to 336.6 cm) of a desired
speaker by touching the respective [ ] or [ ]
button.
Refer to “Time Correction Value List” on page 75.
The G-EQ list screen appears.
Adjusting the Band
] of Time Correction.
The Time Correction adjustment screen appears.
L = (distance to farthest speaker) – (distance to other speakers)
You can modify the equalizer settings to create a response curve more
appealing to your personal taste.
Setting item: G-EQ
Touch [
2
Touch [
3
Touch [
] of X-Over.
A speaker list on the X-Over screen is displayed.
] of the band to be adjusted.
The screen changes to the X-Over screen to be adjusted.
Adjusting the Level
Touch [
band.
] or [ ] of Level to adjust the level of selected
Adjustable output level: -6 to +6 dB
4
To adjust another band, repeat step 3, and then
adjust all bands.
• When graphic EQ is adjusted, the adjustment for parametric EQ
becomes ineffective.
4.2ch (FRONT/REAR/SUBW.) System
4.2ch (FRONT/REAR/SUBW.) System / (L+R)
Setting contents:
Low (SUB-W) / Mid (REAR) / High (FRONT)
4.2ch (FRONT/REAR/SUBW.) System / (L/R)
Setting contents:
Low (SUB-W)-L / Low (SUB-W)-R / Mid (REAR)-L / Mid (REAR)-R / High (FRONT)-L / High (FRONT)-R
73-EN
4
Adjust the crossover to your preference.
Selecting the Cut-Off Frequency
Touch [ ] or [ ] of Freq., then select the cut-off frequency
(crossover point).
The adjustable bandwidth differs depending on the speaker
(channel).
4.2ch (FRONT/REAR/SUBW.) System
Setting contents:
Low (SUB-W)
Mid (REAR)
High (FRONT)
20 Hz~200Hz
20 Hz~200Hz
20 Hz~200Hz
Adjusting the Slope
Touch [ ] or [ ] of Slope, then adjust the HPF or LPF slope.
Adjustable slope: FLAT, -6 dB/oct., -12 dB/oct., -18 dB/oct., -24 dB/oct.
Adjusting the Level
Touch [ ] or [ ] of Level, then adjust the HPF or LPF level.
Adjustable output level: -12 to 0 dB.
5
Repeat steps 3 to 4 to make adjustment to the other
bands.
2.2ch (3WAY) System
Adjusting the Level
Touch [ ] or [ ] of Level, then adjust the HPF or LPF level.
Adjustable output level: -12 to 0 dB.
Adjusting the Slope
Touch [ ] or [ ] of Slope, then adjust the HPF or LPF slope.
Adjustable slope: FLAT*, -6 dB/oct., -12 dB/oct., -18 dB/oct., -24 dB/oct.
* FLAT can be set for the HIGH slope only when User’s is selected in
“Setting the Response Slope for the High Range Speaker (TW
Setup)” (page 72). Depending on the response characteristics of the
speaker, care should be taken when setting the response slope to
FLAT, as speaker damage may result. With this unit, a message is
displayed when the response slope for the high range speaker is set
to FLAT.
5
Repeat steps 3 to 4 to make adjustment to the other
bands.
• While adjusting the X-Over, you should consider the frequency
response of the connected speakers.
• About the 2.2ch (3WAY)/4.2ch (FRONT/REAR/SUBW.) system You can switch the system mode with the 2.2ch (3WAY)/4.2ch
(FRONT/REAR/SUBW.) switch on the PXA-H100. For details, refer
to the Owner’s Manual of PXA-H100.
Storing Settings in the Memory
2.2ch (3WAY) System / (L+R)
Setting contents:
Low / Mid-L / Mid-H / High
2.2ch (3WAY) System / (L/R)
Setting contents:
Low-L / Low-R / Mid-L-L / Mid-L-R / Mid-H-L / Mid-H-R / High-L / High-R
4
Adjust the crossover to your preference.
Adjustment or setting contents of X-Over, Time Correction and P/G-EQ
can be stored.
Contents that can be stored vary depends on the audio processor used.
1
2
3
Selecting the Cut-Off Frequency
Touch [ ] or [ ] of Freq., then select the cut-off frequency
(crossover point).
The adjustable bandwidth differs depending on the speaker
(channel).
2.2ch (3WAY) System
Setting contents:
Low / Mid-L
Mid-H
High
20 Hz~200 Hz
20 Hz~20 kHz
(1 kHz~20 kHz)*1/(20 Hz~20 kHz)*2
*1 When Factory’s is selected, refer to “Setting the Response Slope for
the High Range Speaker (TW Setup)” (page 72).
*2 When User’s is selected, refer to “Setting the Response Slope for the
High Range Speaker (TW Setup)” (page 72).
Check whether the Defeat mode is off.
Touch [MEMORY] on the A.PROCESSOR list
display.
Within 5 seconds, touch any one of the preset
buttons [P.SET 1] through [P.SET 6] on the
A.Processor list screen.
The setting contents are stored.
• The stored contents will not be deleted even when the battery power
cord is detached.
• This operation cannot be performed when a typical equalizer setting
(e.g. Pops) is selected in “Equalizer Presets (F-EQ)” (page 71).
Calling up the Preset Memory
1
2
Check whether the Defeat mode is off.
Touch any one of the preset buttons [P.SET 1]
through [P.SET 6] on the A.Processor list display to
select the preset memory.
• It takes a few moments to call up the preset memory.
74-EN
Time Correction Value List
About Time Correction
The distance between the listener and the speakers in a car vary widely
due to the complex speaker placement. This difference in the distances
from the speakers to the listener creates a shift in the sounds image and
frequency characteristics. This is caused by the time delay between the
sound reaching the listener’s right versus the left ear.
To correct this, this unit is able to delay the audio signal to the speakers
closest to the listener. This effectively creates a perception of increased
distance for those speakers. The listener can be placed at an equal
distance between the left and right speakers for optimum staging.
The adjustment will be made for each speaker in 3.4cm steps.
Example 1. Listening Position: Front Left Seat
Adjust the time correction level of the front left speaker to a high value
and the rear right to zero or a low value.
5.1ms
0.5m
2.25m
The sound is not balanced because the distance between the
listening position and the various speakers is different.
The difference in distance between the front left speaker and the rear
right speaker is 1.75 m (68-7/8").
Here we calculate the time correction value for the front left speaker
in the diagram on the above.
Conditions:
Farthest Speaker – listening position: 2.25 m (88-9/16")
Front left speaker – listening position: 0.5 m (19-11/16")
Calculation: L = 2.25 m – 0.5 m = 1.75 m (68-7/8")
Time correction = 1.75 ÷ 343* × 1,000 = 5.1 (ms)
Time
Delay
Distance Distance
Difference
Number
(cm)
(inch)
(ms)
Time
Delay
Distance Distance
Difference
Number
(cm)
(inch)
(ms)
0
0.0
0.0
0.0
51
5.1
173.4
68.3
1
0.1
3.4
1.3
52
5.2
176.8
69.7
2
0.2
6.8
2.7
53
5.3
180.2
71.0
3
0.3
10.2
4.0
54
5.4
183.6
72.4
4
0.4
13.6
5.4
55
5.5
187.0
73.7
5
0.5
17.0
6.7
56
5.6
190.4
75.0
6
0.6
20.4
8.0
57
5.7
193.8
76.4
7
0.7
23.8
9.4
58
5.8
197.2
77.7
8
0.8
27.2
10.7
59
5.9
200.6
79.1
9
0.9
30.6
12.1
60
6.0
204.0
80.4
10
1.0
34.0
13.4
61
6.1
207.4
81.7
11
1.1
37.4
14.7
62
6.2
210.8
83.1
12
1.2
40.8
16.1
63
6.3
214.2
84.4
13
1.3
44.2
17.4
64
6.4
217.6
85.8
14
1.4
47.6
18.8
65
6.5
221.0
87.1
15
1.5
51.0
20.1
66
6.6
224.4
88.4
16
1.6
54.4
21.4
67
6.7
227.8
89.8
17
1.7
57.8
22.8
68
6.8
231.2
91.1
18
1.8
61.2
24.1
69
6.9
234.6
92.5
19
1.9
64.6
25.5
70
7.0
238.0
93.8
20
2.0
68.0
26.8
71
7.1
241.4
95.1
21
2.1
71.4
28.1
72
7.2
244.8
96.5
22
2.2
74.8
29.5
73
7.3
248.2
97.8
23
2.3
78.2
30.8
74
7.4
251.6
99.2
24
2.4
81.6
32.2
75
7.5
255.0
100.5
25
2.5
85.0
33.5
76
7.6
258.4
101.8
26
2.6
88.4
34.8
77
7.7
261.8
103.2
27
2.7
91.8
36.2
78
7.8
265.2
104.5
28
2.8
95.2
37.5
79
7.9
268.6
105.9
29
2.9
98.6
38.9
80
8.0
272.0
107.2
30
3.0
102.0
40.2
81
8.1
275.4
108.5
31
3.1
105.4
41.5
82
8.2
278.8
109.9
32
3.2
108 8
42.9
83
8.3
282.2
111.2
33
3.3
112 2
44.2
84
8.4
285.6
112.6
* Speed of sound: 343 m/s (765 mph) at 20 °C
34
3.4
115 6
45.6
85
8.5
289.0
113.9
In other words, giving the front left speaker a time correction value of
5.1 ms makes it seem as if its distance from the listener is the same
as the distance to the farthest speaker.
35
3.5
119.0
46.9
86
8.6
292.4
115.2
36
3.6
122.4
48.2
87
8.7
295.8
116.6
37
3.7
125 8
49.6
88
8.8
299.2
117.9
38
3.8
129 2
50.9
89
8.9
302.6
119.3
39
3.9
132 6
52.3
90
9.0
306.0
120.6
40
4.0
136.0
53.6
91
9.1
309.4
121.9
41
4.1
139.4
54.9
92
9.2
312.8
123.3
42
4.2
142 8
56.3
93
9.3
316.2
124.6
43
4.3
146 2
57.6
94
9.4
319.6
126.0
44
4.4
149 6
59.0
95
9.5
323.0
127.3
45
4.5
153.0
60.3
96
9.6
326.4
128.6
46
4.6
156.4
61.6
97
9.7
329.8
130.0
47
4.7
159 8
63.0
98
9.8
333.2
131.3
48
4.8
163 2
64.3
99
9.9
336.6
132.7
49
4.9
166 6
65.7
50
5.0
170.0
67.0
Time correction eliminates the differences in the time required for the
sound to reach the listening position.
The time of the front left speaker is corrected by 5.1 ms so that its
sound reaches the listening position at the same time as the sound of
other speakers.
Example 2. Listening Position: All Seats
Adjust the time correction level of each speaker to almost the same level.
1
2
Sit in the listening position (driver’s seat, etc.) and
measure the distance (in meters) between your head
and the various speakers.
Calculate the difference between the distance
correction value to the farthest speaker and the
other speakers.
L = (distance to farthest speaker) – (distance to other speakers)
These values are the time correction values for the different
speakers. Setting these values to make each sound reach the
listening position at the same time as the sound of other speakers.
75-EN
About the Crossover
Low range
Mid range High range
Crossover (X-Over):
This unit is equipped with an active crossover. The crossover limits the
frequencies delivered to the outputs. Each channel is controlled
independently. Thus, each speaker pair can be driven by the frequencies
for which they have been optimally designed.
The crossover adjusts the HPF (high pass filter) or LPF (low pass filter)
of each band, and also the slope (how fast the filter rolls off the highs or
lows).
Adjustments should be made according to the reproduction
characteristics of the speakers. Depending on the speakers, a passive
network may not be necessary. If you are unsure about this point, please
consult your authorized Alpine dealer.
(Different from actual display)
Level adjusting
Output frequency range
(0 to -12 dB)
Slope FLAT
Slope adjusting
4.2ch (FRONT/REAR/SUBW.) mode
Cut-off frequency
(1/3 octave steps)
HPF
LPF
Low range
speaker
----
20 Hz 200 Hz
Rear high
range
speaker
20 Hz 200 Hz
----
Front high
range
speaker
20 Hz 200 Hz
----
Low range
20 Hz
Slope
Level
HPF
LPF
----
FLAT, 6,
12, 18,
24 dB/oct
0 to
-12 dB
----
0 to
-12 dB
----
0 to
-12 dB
FLAT, 6,
12, 18,
24 dB/oct.
FLAT, 6,
12, 18,
24 dB/oct.
High range
(Different from actual display)
2.2ch (3WAY) mode
Cut-off frequency
(1/3 octave steps)
HPF
LPF
Low
range
speaker
----
Mid range 20 Hz speaker
200 Hz
High
range
speaker
1 kHz 20 kHz,
(20 Hz ~
20 kHz)*
20 Hz 200 Hz
20 Hz 20 kHz
----
Slope
HPF
Level
LPF
FLAT, 6,
12, 18, 24 dB/oct.
FLAT, 6,
FLAT, 6,
12, 18, 12, 18, 24 dB/oct. 24 dB/oct.
----
FLAT* 6, 12, 18, 24 dB/oct.
----
0 to
-12 dB
0 to
-12 dB
0 to
-12 dB
* Only when selecting User’s in “Setting the Response Slope for the
High Range Speaker (TW Setup)” (page 72).
76-EN
(Different from actual display)
HPF cut-off LPF cut-off
frequency
frequency
• HPF (high pass filter): Cuts the lower frequencies and allows the
higher frequencies to pass.
• LPF (low pass filter): Cuts the higher frequencies and allows the
lower frequencies to pass.
• Slope: The level change (in dB) for a frequency change of one octave.
• The higher the slope value, the steeper the slope becomes.
• Adjust the slope to FLAT to bypass the HP or LP filters.
• Do not use a tweeter without the HPF on or set to a low frequency, as
it may cause damage to the speaker due to the low frequency content.
• You cannot adjust the crossover frequency higher than the HPF or
lower than the LPF.
• Adjustment should be made according to the recommended crossover
frequency of the connected speakers. Determine the recommended
crossover frequency of the speakers. Adjusting to a frequency range
outside that recommended may cause damage to the speakers.
For the recommended crossover frequencies of Alpine speakers, refer
to the respective Owner’s Manual. We are not responsible for damage or malfunction of speakers caused
by using the crossover outside the recommended value.
External Audio Processor
Operation (Optional)
A compatible, external audio processor is operable from this unit when
connected. Some audio processors may require a wired controller. The
explanations below use the PXA-H700/PXA-H701 as an example.
Refer to the operating instructions of the audio processor for more
details.
• The adjustments or settings performed on the connected audio
processor cannot be operated properly from this unit.
• The setting “Setting the Speakers”, “Setting Bass Sound Control”,
and “Graphic Equalizer Adjustments” are not available if the MRAD550 is connected. Additionally, if the MRA-F350 is connected, the
following setting “Setting the MX mode” is not available. Also, the
setting content differs between the PXA-H700 and PXA-H701.
• This unit cannot be connected to the PXA-H510 and PXA-H900.
Adjustment Procedure for Dolby
Surround
Make the adjustments described below in order to reproduce Dolby
Digital and DTS sound with greater accuracy.
Adjustment procedure
1
Speaker Setup (page 82)
2
Adjusting the speaker levels (page 82)
3
Mixing bass sound to the rear channel
(page 81)
To display the Audio processor Setup Menu screen:
Your vehicle must be parked with the ignition key in the ACC or
ON position. To do this, follow the procedure below.
1 Bring your vehicle to a complete stop at a safe
location. Engage the parking brake.
2 Keep pushing the foot brake and release the parking
brake once then engage it again.
3 When the parking brake is engaged for the second
time, release the foot brake.
(Turning the speakers to be used on and off and
setting their response)
(Adjusting the signal output level to the various
speakers)
(Achieving smooth sound in the rear seat by mixing
the front audio signals with the rear speaker signals)
• For automatic transmission vehicles, place the transmission lever
in the Park position.
Now, the locking system for the Audio processor mode operation
has been released. Engaging the parking brake can reactivate
the Audio processor Setup Menu, as long as the car’s ignition has
not been turned off. It is not necessary to repeat the above
procedure (1 through 3) of “To display the Audio processor mode
screen.”
Each time the ignition is turned OFF, perform the procedure of “To
display the Audio processor mode screen.”
4
Adjusting the acoustic image (page 81)
5
Achieving powerful high volume sound
(page 81)
(Adjusting the acoustic image to achieve a sound as
if the center speaker were directly in front of the
listener)
(Achieving energetic sound with even greater power,
like the sound in a movie theater)
6
7
Adjusting the DVD Level (page 82)
(Adjust the volume (signal level) in the Dolby Digital,
Pro Logic II, DTS and PCM modes.)
Storing Settings in the Memory (page 82)
(Storing all the settings and adjustments made on the
INA-W910 (not only the above settings/adjusts) in the
memory)
In case of combining the Automatic adjustments, etc.
We recommend to make the Automatic adjustments before the Dolby
Surround adjustments.
77-EN
MX Tuner (OFF, Tuner MX 1 to 3 )
The medium to high frequencies become more clear, and
produces well balanced sound in all the bands.
Setting the External Audio Processor
Following Steps 1 to 5 describe the common procedures for
operating the Audio Processor setting function. For details of
the setting function items, refer to descriptions of respective
items.
1
Check the Defeat mode is OFF (page 54), and then
touch [ ] on the main screen.
The SETUP selection screen is displayed.
2
Touch [
3
Touch [
4
] of Audio Setup.
The Audio Setup screen appears.
] of A.Processor.
The A.Processor list screen appears.
Touch [ ], [ ] or the title bar of the desired item to
change its setting.
Setting items:
Media Xpander / Bass Sound Cont. / Dolby PLII / Rear Fill / X-Over / Time Correction / Phase / G-EQ / P-EQ / Speaker Select /
Multi Ch Setup / Speaker Setup / DVD Level / PCM Mode
5
You can adjust the sound of low frequencies as desired.
Select ON or OFF of MX by touching [
Media Xpander.
] or [
Touch the title bar of Media Xpander after setting to
ON.
The Media Xpander setup screen appears.
Touch [
] or [
] of the desired MX mode.
• Music source (such as CDs, iPod) level can be set.
MX CD (OFF, CD MX 1 to 3)
CD mode processes a large quantity of data. This data is used
to reproduce the sound cleanly by making use of the data
quantity.
MX CMPM (OFF, CMPM MX 1 to 3) / MX SXM (OFF, SXM MX 1 to 3)
This corrects information that was omitted at the time of
compression. This reproduces a well-balanced sound close to
the original.
78-EN
Touch [
mode.
] or [
] of Bass Comp. to select the desired
Bass sound is emphasized more as the mode is sequentially
switched as Mode 1
2
3, offering you vivid low
frequencies.
Select OFF when the setting is not necessary.
] of
OFF: Turns off the MX effect of every music source.
ON: Turns on the specified MX mode.
Setting Bass Sound Control
Setting Bass Compressor
Setting item: Media Xpander
3
• The contents of MX set here is reflected to PXA-H700 or PXA-H701.
• When OFF is selected, MX effect of each MX mode will be OFF.
• Each music source, such as CD, and MP3 can have its own MX
setting.
• There is no MX mode for AM radio.
• MX CMPM is applied for MP3/WMA/AAC, Pandora Radio and iPod/iPhone.
• MX Tuner is applied for HD Radio and RBDS reception.
• MX SXM is applied for SiriusXM reception.
• The MX setting can be performed only when a source is currently
selected.
• This function is inoperable when Defeat is set to ON.
] to return to the previous screen.
Before performing the operations below, set MX (Media Xpander)
mode of the PXA-H700 to “AUTO” when the PXA-H700 is connected.
2
MX AUX (OFF, CMPM MX, Movie MX, Music MX)
Choose the MX mode (CMPM, Music, or Movie) that
corresponds to the media connected.
Setting item: Bass Sound Cont.
Touch [
Set MX Mode of the External Audio
Processor
1
MX DVD (OFF, Movie MX 1 to 2)
The dialogue portion of the video is reproduced more clearly.
(DVD Music)
This disc contains a large quantity of data such as music clip.
MX uses this data to reproduce the sound accurately.
Setting Bass Focus
Using the previously specified delay number (time difference)
allows you to set a time difference between the front-rear/leftright speakers. Namely, it enables a time correction based on
your preference. With an initial delay of 0.05 ms for each of the 0
to 400 steps, audible time correction can be achieved.
Set the delay number in the front and rear, and on the
right and left of the desired speaker by touching the
respective [ ] or [ ] button.
• Any setting in Bass Focus is applied in time correction, too (page 79).
Using the Pro Logic II Mode
Pro Logic processing can be conducted on the music signals recorded
on two channels to achieve Dolby Pro Logic II surround sound. For two-channel Dolby Digital and DTS signals, there is also a “Rear Fill”
function for outputting the signals of the front channel to the rear
channel.
Setting items: Dolby PLII / Rear Fill
Touch [ ] or [
desired mode.
PL II Movie:
PL II Music:
OFF:
] of Dolby PLII / Rear to select the
4
Adjust the crossover to your preference.
Selecting the Cut-Off Frequency
Touch [ ] or [ ] of Freq., then select the cut-off frequency
(crossover point).
The adjustable bandwidth differs depending on the speaker
(channel).
Adjusting the Level
Touch [
] or [
] of Level, then adjust the HPF or LPF level.
Adjusting the Slope
Suits the stereo TV shows and all programs
encoded in Dolby Surround. It improves the
sound field directivity to near that of discrete
5.1-channel sound.
Can be used for all stereo music recordings, and
provides a wide, deep sound field.
Turns Dolby PL II function to OFF.
If PL II Music is selected, the center width can be adjusted with
following operations.
This function offers the optimum vocal position by adjusting the
center channel position between the center speaker and the L/R
speaker. (The adjustments established in “Adjusting the
acoustic image (Bi-Phantom)” (page 81) are ineffective while
this function is activated.)
Touch [ ] or [ ] of Center Width Cont. to adjust the level.
The level can be adjusted between 0 to +7. When the level
increases, the center channel position moves from the
center speaker position to both sides.
Touch [Off] of Center Width Cont. to turn off the center width
control.
• This adjustment is effective when the setting of the center speaker is
Small or Large in the Speaker Setup (page 82).
• “Rear Fill” function:
Depending on the input signals, the sound may only be output from
the front speakers. In this case, the “Rear Fill” function can be used
to output signals from the rear speakers as well.
• Avoid stopping, pausing, switching the disc, cueing, fast-forwarding
or switching the audio channel of this unit while making this
adjustment. The setting is canceled if the Decode mode is switched.
• This adjustment is ineffective when the speaker is set Center to OFF
in “Setting the Speakers” (page 81).
• This function only works with two-channel signals. This operation is
ineffective when 5.1-channel DTS or Dolby Digital signals are input.
• If the setting of Rear Fill is made when Rear Mix is ON, sound is
unchanged in the Rear Fill setting because Rear Mix is given priority
during 2 channel decoder other than linear PCM.
• For linear PCM signals, the voice is output from the rear speaker
regardless of the Rear Fill and Rear Mix setting.
Touch [
] or [
] of Slope, then adjust the HPF or LPF slope.
• When the speaker is set to the “OFF” mode, the X-Over for that
speaker cannot be set. Refer to “Setting the Speakers” (page 81).
• Check the playback frequencies of the connected speakers before
adjusting.
• In order to protect the speakers, there is no OFF setting for the
subwoofer low pass filter (the slope remains the same).
• The HPF cannot be set Slope to OFF if Tweeter (TW) is selected for
Front1. Or, only the subwoofer is adjustable if Stereo is selected for
the subwoofer.
Performing Time Correction Manually
(Time Correction)
Because of the particular conditions inside the vehicle, there can be
major differences in the distances between the various speakers and the
listening position. It is possible to calculate the optimum correction
values and eliminate the time error at the listening position yourself
using this function.
Setting item: Time Correction
1
2
Sit in the listening position (the driver’s seat, for
example) and measure the distance (in meters)
between your head and the various speakers.
Calculate the difference in distance between the
farthest speaker and the other speakers.
L = (distance of farthest speaker) – (distance of other speakers)
3
Divide the distances calculated for the different
speakers by the speed of sound (343 m/s
temperature 20 °C).
This value is the time correction value for the various
speakers.
X-OVER Adjustment
Setting item: X-Over
1
Touch [
L+R:
L/R:
] or [
] of X-Over to select L+R or L/R.
Sets the same adjustment values for the left and
right channels.
Different adjustment values can be set for the left
and right channels.
2
Touch the title bar of X-Over.
3
Touch the title bar of the speaker to be adjusted.
A speaker list on the X-Over screen is displayed.
The screen changes to the X-Over screen to be adjusted.
79-EN
Concrete examples
Calculating the time correction value for the front left speaker on
the diagram below.
Conditions:
Distance between farthest speaker and listening position:
2.25 m (88-3/4")
Distance between front left speaker and listening position:
0.5 m (20")
Calculation:
L = 2.25 m (88-3/4") – 0.5 m (20")= 1.75 m (68-3/4")
Compensation time = 1.75 ÷ 343 x 1000 = 5.1 (ms)
In other words, setting the time correction value for the front left
speaker to 5.1 (ms) sets a virtual distance matching the
distance to the farthest speaker.
Phase Switching
Setting item: Phase
Switch the phase (0° or 180°) by touching [
the desired speaker.
] or [
] of
Graphic Equalizer Adjustments
The graphic equalizer allows you to modify the sound using 31 bands
each for the front (left and right), rear (left and right) and center
speakers. An additional 10 bands are available for the subwoofer. This
allows you to customize the sound to suit your taste.
Setting item: G-EQ
1
2.25m
The sound is uneven because
the distance between the
listening position and the
different speakers is different.
The difference in the distance
between the front left and rear
right speakers is 1.75 meters
(68-3/4").
] or [
Time correction eliminates
the difference between the
time required for the sound
from the different speakers to
reach the listening position.
Setting the time correction of
the front left speaker to 5.1
ms makes it possible to
coordinate the distance from
the listening position to the
speaker.
] of Time Correction.
Select L+R or L/R.
L+R: Sets the same adjustment values for the left and right
channels.
L/R: Different adjustment values can be set for the left and
right channels.
5
6
] of G-EQ.
When parametric EQ is adjusted, this setting will be turned
off.
0.5m
Touch [
] or [
L+R: Sets the same adjustment values for the left and right
channels.
L/R: Different adjustment values can be set for the left and
right channels.
5.1ms
4
Select L+R or L/R by touching [
Touch the title bar of Time Correction.
The Time Correction adjustment screen appears.
Adjust the time correction value (0.00 ~ 20.00ms) of a
desired speaker by touching the respective [ ] or
[ ] button (1 step = 0.05ms).
• When the speaker is set to the “OFF” mode, the TCR for that
speaker cannot be set. Refer to “Setting the Speakers” (page 81).
• The adjustment value for Front2 (Speakers) which is adjusted in time
correction, is also applied to the front speakers in “Setting Bass
Focus” (page 78).
• The adjustment (AUTO TCR) cannot be automatically set on this
unit.
2
Touch the title bar of G-EQ.
3
Touch the title bar of the desired speaker (channel).
4
Adjust the G-EQ to your preference.
The G-EQ list screen appears.
The G-EQ adjustment screen appears.
Adjusting the Level
Touch [
level.
] or [
] of the desired frequency to adjust the
• When the speaker is set to the “OFF” mode, the graphic equalizer
for that speaker cannot be set. Refer to “Setting the Speakers”
(page 81).
• Check the playable frequency ranges of the connected speakers
before making the equalizer adjustments. If the speaker’s playable
frequency range is 55 Hz to 30 kHz, for example, adjusting the 40 Hz
or 20 Hz band has no effect. Additionally, you may overload and
damage the speakers.
• When Graphic EQ is adjusted, the adjustment for Parametric EQ
becomes ineffective.
Parametric Equalizer Adjustments
The frequency bands of the graphic equalizer are fixed. This makes it
very difficult to correct for undesired peaks and dips at specific
frequencies. The parametric equalizer’s center frequency can be tuned
to these specific frequencies. Then, the bandwidth (Q) and level are
fine-tuned, independently, to make the necessary corrections. The
parametric equalizer function is an advanced tool for serious
audiophiles.
Setting item: P-EQ
1
Select L+R or L/R by touching [
] or [
] of P-EQ.
L+R: Sets the same adjustment values for the left and right
channels.
L/R: Different adjustment values can be set for the left and
right channels.
When Graphic EQ is adjusted, this setting will be turned off.
80-EN
2
Touch the title bar of P-EQ.
3
Touch the title bar of the desired speaker (channel).
4
The P-EQ list screen appears.
The P-EQ adjustment screen appears.
Adjust the P-EQ to your preference.
Selecting the Band
Touch [
] or [
] of Band to select the desired band.
Adjusting the Frequency
Touch [ ] or [ ] of Freq. to adjust the frequency of the
selected band.
Adjusting the Level
Touch [
band.
] or [
] of Level to adjust the level of the selected
Setting the Bandwidth
Touch [
] or [
] of Q to select the bandwidth.
• When the speaker is set to the “OFF” mode, the parametric
equalizer for that speaker cannot be set. Refer to “Setting the
Speakers” (page 81).
• It is not possible to adjust the frequencies of adjacent bands within 7
steps.
• Check the playable frequency ranges of the connected speakers
before making the equalizer adjustments. If the speaker’s playable
frequency range is 55 Hz to 30 kHz, for example, adjusting the 40 Hz
or 20 Hz band has no effect. Additionally, you may overload and
damage the speakers.
• When the Parametric EQ is adjusted, the adjustment for Graphic EQ
becomes ineffective.
Setting the Speakers
Setting item: Speaker Select
Set the connected speaker by touching the respective
[ ] or [ ] button.
Front1:
Front2:
Rear:
Center:
Subw.:
OFF/Full (Full Range)/TW (Tweeter)
OFF/ON
OFF/ON
OFF/ON
OFF/Mono/Stereo
• Set the speaker which is not connected to OFF.
• Settings above can be carried out even when the speaker is set to
OFF in “Speaker Setup” (page 82).
• To use the subwoofer in Mono with PXA-H700 or PXA-H701
connected, connect the subwoofer to the subwoofer output terminal
of PXA-H700 or PXA-H701.
Setting of Dolby Digital
Setting item: Multi Ch Setup
Adjusting the acoustic image (Bi-Phantom)
In most installations, the center speaker must be placed directly
between the front passenger and driver. Using this function, the
center channel information is distributed to the left and right
speakers. This creates an acoustic image simulating a center
speaker directly in front of each listener. Adjusting the center
width in PL II Music (see “Using the Pro Logic II Mode” on
page 79), makes this function ineffective.
• Avoid stopping, pausing, switching the disc, cueing, fast-forwarding
or switching the audio channel of this unit while making this
adjustment. The setting is canceled if the Decode mode is switched.
Touch [ ] or [ ] of Bi-Phantom to adjust the level.
The level can be adjusted within the range of -5 to +5. The higher the
level, the more the position of the center speaker is shifted to the
sides.
The Bi-Phantom function is turned off by touching [Off].
• This adjustment is effective when the setting of the center speaker to
Small or Large in the speaker setup settings.
• This adjustment is ineffective when the speaker is set Center to OFF
in “Setting the Speakers” (page 81).
Mixing bass sound to the rear channel (Rear Mix)
This function mixes the front channel audio signals to the audio
signals output from the rear speakers, improving the sound in
the vehicle’s rear seat.
• Avoid stopping, pausing, switching the disc, cueing, fast-forwarding
or switching the audio channel of this unit while making this
adjustment. The setting is canceled if the Decode mode is switched.
Touch [ ] or [ ] of Rear Mix to adjust the level.
The level can adjusted in five steps: -6, -3, ±0, +3 and +6. The higher
the level, the more bass is output from the rear speakers. (The effect
differs according to the software (DVD, etc.).)
The Rear Mix function is turned off by touching [Off].
• This adjustment is ineffective when the rear speaker setup setting is
set to “OFF”.
• For linear PCM signals, the voice is output from the rear speaker
regardless of the Rear Fill and Rear Mix setting.
Achieving powerful high volume sound (Listening Mode)
With Dolby Digital, the dynamic range is compressed so that
powerful sound can be achieved at regular volume levels. This
compression can be canceled to achieve an energetic sound
with even greater power, like the sound in a movie theater. This
function works only in the Dolby Digital mode.
Touch [
MAX.
STD:
MAX.:
] or [
] of Listening Mode to select STD or
For powerful sound at regular volume levels
For powerful sound at high volumes
• Keep the volume to a level at which sounds outside the vehicle can
still be heard.
81-EN
Adjusting the speaker levels (Output Level)
Adjusting the DVD Level
The test tones help to make the volume adjustments of the
different speakers. When levels are equal, a strong sense of
presence can be heard from the different speakers at the
listening position.
The volume (signal level) for Dolby Digital, Dolby PL II, DTS and
PCM modes can be set.
• Avoid stopping, pausing, switching the disc, cueing, fast-forwarding
or switching the audio channel of this unit while making this
adjustment. The setting is canceled if the decode mode is switched.
• Avoid stopping, pausing, switching the disc, cueing, fast-forwarding
or switching the audio channel of this unit while making this
adjustment. The setting is canceled if the Decode mode is switched.
Setting item: DVD Level
1 Touch [On] of Output Level.
Test tone output is repeated for each of the different speaker
channels. They will be repeated in the order shown below.
If no operation is performed for 2 seconds, the channel
switches to the next channel.
Left
Center
Left Surround
Right
Left
Right Surround
2 While the test tone is being produced from the speakers,
touch [ ] or [ ] of Output Level balance the output from all
the speakers.
• The adjustment range for the different speakers is -10 dB ~ +10 dB.
• Adjust based on the front speakers.
Adjust the level by touching [
adjusting mode.
] of the desired
Linear PCM Setting
The output when playing discs recorded in linear PCM can be set to 2 or
3 channels.
Setting item: PCM Mode
Touch [
3 Touch [On] again to turn off.
• If a speaker is set to off mode, that speaker’s level adjustment cannot
be made. Refer to “Speaker Setup” (page 82).
] or [
] or [
] of PCM Mode to select 2CH or 3CH.
2CH: 2ch output (L/R)
3CH: 3ch output (L/R/CENTER)
• This adjustment is ineffective when the speaker is set Center to OFF
in “Setting the Speakers” (page 81).
Speaker Setup
The PXA-H700 or PXA-H701 can be set according to the playable
frequency range of your speakers.
Check the playable frequency range of the speakers (not including the
subwoofer) before performing this operation to verify whether the
speakers can play low frequencies (of about 80 Hz or less).
• Avoid stopping, pausing, switching the disc, cueing, fast-forwarding
or switching the audio channel of this unit while making this
adjustment. The setting is canceled if Decode mode is switched.
Setting item: Speaker Setup
Select the speaker characteristic by touching [
of the desired speaker setting.
OFF*1:
Small:
Large*2:
], [
]
When no speaker is connected.
When a speaker that cannot play low frequencies
(80 Hz or less) is connected.
When a speaker that can play low frequencies (80 Hz or less) is connected.
*1 It is not possible to set the front speakers to “OFF”.
*2 If the front speakers are set to “Small”, the rear and center speakers
cannot be set to “Large”.
• The subwoofer can be set only to ON/OFF.
• If the center speaker is turned “OFF”, the center channel’s audio
signals are added to the audio signals output from the front speakers.
• If you set the speaker response to “OFF”, also set the speaker setting
to “OFF” (page 81).
• Perform the setup for all the speakers (“Front”, “Center” ,“Rear”
and “Subwoofer”). If not, the sound may not be balanced.
• When center is set to “OFF”, the setting is ineffective even if center
is set with this function.
• Through changing the settings on each speaker, a change in the
output of the other speakers may occur due to the setting
requirements.
• When using the PRO Logic II, if the rear speaker is set to “Large”,
then there will be no output from the subwoofer.
82-EN
Storing Settings in the Memory
Adjustment or setting contents can be stored.
Contents that can be stored vary depends on the audio processor used.
1
2
Touch [MEMORY] on the A.Processor list display.
Within 5 seconds, touch any one of the preset
buttons [P.SET 1] through [P.SET 6] on the
A.Processor list screen.
The setting contents are stored.
• The stored contents will not be deleted even when the battery power
cord is detached.
Calling up the Preset Memory
Touch any one of the preset buttons [P.SET 1] through
[P.SET 6] on the A.Processor list display to select the
preset memory.
• It takes a few moments to call up the preset memory.
BLUETOOTH
Operation
• BT Audio source is not available with this unit.
Setup Before Using
About BLUETOOTH
BLUETOOTH is a wireless technology allowing communication
between a mobile device or personal computer over short distances.
This enables a hands-free call or data transmission between
BLUETOOTH compatible devices. BLUETOOTH transmission is
available in the unlicensed 2.4 GHz spectrum if the distance between
devices is within 10 meters. For details, refer to the BLUETOOTH
Home page (http://www.bluetooth.com).
• Depending on the BLUETOOTH version, a BLUETOOTH
compatible device may not be able to communicate with this unit.
• Proper function of this unit with all BLUETOOTH compatible
devices is not guaranteed. For handling of the BT compatible device,
consult your ALPINE dealer or ALPINE website.
• Depending on the surroundings, BLUETOOTH wireless connection
may be unstable.
• When you place a call, or perform setup operations, be sure to stop
your car in a safe place.
• Depending on the connected BLUETOOTH compatible device(s), the
function may differ. Also refer to the Owner’s Manual of the
connected device(s).
Before Using Hands-Free Function
Before using a hands-free phone function, the following setting need to
be made.
Set “BLUETOOTH IN” to ON (page 67).
• Before using a hands-free phone, it must be paired with this unit.
Refer to “BLUETOOTH Setup” (pages 83-85).
How to connect to a BLUETOOTH
compatible device (Pairing)
For details on the control from a BLUETOOTH compatible device,
refer to the Owner’s Manual of the BLUETOOTH compatible device.
1
2
3
4
Set a BLUETOOTH connection from a BLUETOOTH
compatible device.
The PIN code (“0000”) is displayed on the unit.
Input the PIN code (“0000”) in a BLUETOOTH
compatible device.
If this unit is successfully connected to a
BLUETOOTH compatible device, “Connected/
(Device name)” is displayed, and then the unit
returns to normal mode.
• Set “Setting the Search Mode” (page 84) to Visible Mode ON to
enable this unit to recognize a mobile phone. For mobile phone
passkey (passcode) input operation, refer to the mobile’s Owner’s
Manual. Additionally, the mobile phone can be searched directly
from this unit. Refer to “Registering the BLUETOOTH Device”
(page 84).
• If a BLUETOOTH compatible device is successfully connected, the
next time when the ignition key of the car is turned to on, the unit will
automatically connect to the previously connected device. However,
the connection may fail. If the auto connection fails, try the
connection manually.
BLUETOOTH Setup
BLUETOOTH Setup Operation
The following steps 1 to 6 are common to the various BLUETOOTH
functions. For details, refer to each individual function.
• While calling, BLUETOOTH Setup operation cannot be performed.
• Set “BLUETOOTH IN” to ON (page 67), and then perform
BLUETOOTH Setup operation.
1
Press SOURCE/
2
Touch [
3
Touch [
4
Touch [
5
on the unit.
The SOURCE selection screen is displayed.
] on the main source screen.
The Setup Select screen is displayed.
] of Source Setup.
The Source Setup screen appears.
] of BLUETOOTH Setup.
The BLUETOOTH Setup screen appears.
Touch [ ], [ ] or [
change its setting.
] of the desired item to
Setting items:
Paired Devices / Device Search / Clear Device / Service Provider / Visible Mode / Auto Answer / Speaker Select /
MIC Input / Firmware Version / Firmware Update / Echo Cancel /
Navi Voice IN Call / Shortcut Memory
6
Touch [
] on the left side of screen to return to the
previous screen.
Touch [Exit] to return to the main source screen that was
displayed before the setup operation was started.
83-EN
Setting the BLUETOOTH Device
Displaying the phone service provider name
Select one of 5 connected BLUETOOTH compatible devices that you
previously registered.
Setting item: Service Provider
Setting item: Paired Devices
Touch a BLUETOOTH compatible device to use (change
connection) from the Paired Device list.
• If the connection is successfully changed, “Connected NO./(Device
name)” is displayed for 2 seconds, and then the display returns to the
Setup screen.
• If you input the wrong passcode or communications fail, “Failed” is
displayed.
• If you want to connect another BLUETOOTH compatible device,
after disconnecting the current BLUETOOTH compatible device,
connect the BLUETOOTH compatible device you want to change to.
• The registration number 5 is deleted when you set ignition from ACC
to OFF. If all the 5 positions have been registered, you cannot
register the 6th device. To register another device, you need to delete
one of the devices from position 1 to 5 first.
Registering the BLUETOOTH Device
The BLUETOOTH device is used when a connectable BLUETOOTH
compatible device is searched and connected from this unit, or a new
BLUETOOTH compatible device is registered.
Setting item: Device Search
1
2
3
When Device Search is selected, “Now Searching” is
displayed, and searching starts.
Touch the device name to be connected from the
Device Search list.
If this unit is successfully connected to a
BLUETOOTH compatible device, a paired device
name and a registered number (No. 1 to 5) are
displayed, and then the unit returns to normal mode.
• If a mobile phone is registered for the first time: Input a passcode when the numeric keypad screen is displayed, then
input the same passcode in the BLUETOOTH compatible device to
make the pairing. After the pairing is completed, the unit will
automatically connect to the BLUETOOTH compatible device.
• If you input the wrong passcode or communications fail, “Failed” is
displayed.
• A passcode input on the unit is maximum 4-digit. If a passcode on the
BLUETOOTH compatible device exceeds 4 digits, reset the passcode
and make this setting again.
Deleting a BLUETOOTH Device from the list
You can delete the history of a previously connected BLUETOOTH
compatible device.
Setting item: Clear Device
1
Touch the BLUETOOTH compatible device you want
to delete from the Clear Device list.
A message is displayed.
2
Touch [Yes] if you want to delete.
• Touching [No] will cancel the setting.
• The registration number 5 is deleted once the ignition key goes from
ACC to off.
84-EN
The service provider name of the connected BLUETOOTH compatible
device will be displayed. If a BLUETOOTH compatible device is not
connected, “ID Unsent” will be displayed.
• Depending on the character type some phone service provider name
cannot be displayed.
Setting the Search Mode
You can set whether this unit can be recognized or not from a
BLUETOOTH compatible device. Normally set this to Visible Mode
ON.
Setting item: Visible Mode
ON:
OFF:
Enables recognition of this unit from the
BLUETOOTH compatible device.
Disables recognition of this unit from the
BLUETOOTH compatible device.
• Depending on the mobile phone, it may be necessary to input a
passcode. For inputting the mobile phone’s passcode, refer to the
mobile phone’s Owner’s Manual.
Setting the Received Calls automatically (Auto Answer)
When a call is received, you can set whether to receive it automatically
or not.
Setting item: Auto Answer
ON:
OFF:
When a call is received, it will be taken
automatically after about 5 seconds.
When a call is received, it will not be
received automatically. If a message is
displayed and [
] is touched when a call is
received, you can receive the call.
• If the received call setting on the mobile phone is on, the call will be
answered automatically even though this setting is set to OFF.
Selecting the output speaker
You can select the connected speaker in car to output the sound signal of
telephone.
Setting item: Speaker Select
All:
F-L:
F-R:
F-LR:
The sound be output from all of speakers in car.
The sound only be output from the front left
speaker.
The sound only be output from the front right
speaker.
The sound be output from the front left and front
right speaker.
• The setting cannot be adjusted during a phone call. Adjust the setting
before placing a call.
• When an IMPRINT audio processor (PXA-H100) or External Audio
Processor (PXA-H701, etc.) is connected, the default setting All will
be set and cannot be adjusted.
Adjusting the volume for the microphone input
You can emphasize or weaken the microphone input volume level.
Hands-Free Phone Control
Setting item: MIC Input
Touch [
] or [
] to select the desired volume level (0 ~ 7).
• The setting cannot be adjusted during a phone call. Adjust the setting
before placing a call.
• The setting can be adjusted only when the BLUETOOTH compatible
device is connected.
Displaying the firmware version
Setting item: Firmware Version
The current firmware version of this unit will be displayed.
Updating the firmware
Setting item: Firmware Update
Future BLUETOOTH firmware update of this unit (for phone
compatibility) at customer end will be available for this unit.
For information to update your BLUETOOTH firmware, please visit
Alpine America home page (http://www.alpine-usa.com).
Turning the Echo Cancel ON or OFF
Setting item: Echo Cancel
The echo of hands-free phone will be avoided correspondingly by
setting the Echo Cancel to ON.
Receving Navigation Voice while calling
Setting item: Navi Voice IN Call
The voice guidance of the navigation system will be mixed with the call
by setting the Navi Voice IN Call to ON.
Deleting the stored shortcut memory
You can delete the stored shortcut memory telephone number by using
here.
About the Hands-Free Phone
Hands-free calls are possible when using a HSP (Head Set Profile) and
HFP (Hands-Free Profile) compatible mobile phone with this unit.
• Avoid performing a hands-free call in heavy traffic or on narrow or
winding streets.
• Close the windows while calling to reduce background noise.
• If both calling parties are using hands-free devices, or the call is
made in a noisy location, difficulty hearing the other person’s voice
is normal.
• Depending on telephone line conditions or certain mobile devices
used, voices may sound unnatural.
• When using a microphone, speak as directly as you can into the
microphone to pick up the best sound quality.
• Certain mobile phone features are dependent on the capabilities and
settings of your service provider’s network. Additionally, certain
features may not be activated by your service provider, and/or the
provider’s network settings may limit the feature’s functionality.
Always contact your service provider about feature availability and
functionality.
All features, functionality, and other product specifications, as well
as the information contained in the Owner’s Manual are based upon
the latest available information and are believed to be accurate at
the time of printing.
Alpine reserves the right to change or modify any information or
specifications without notice or obligation.
Answering a Call
Incoming calls are announced by the received call ring tone and a
displayed message (Caller name/PHONE No.).
Setting item: Shortcut Memory
Touch [Delete] of preset 1 ~ 5 to delete the shortcut memory.
• About how to store the telephone number as a shortcut dial, refer to
page 89.
Touch [
].
The call starts.
• Indicator
(Signal Strength): While calling, the indicator will display the current signal strength of
mobile phone. While in the mode other than Calling, the unit cannot
read the signal strength of the mobile phone exactly. In this case, the
indicator displays the signal strength of last call.
• When “Setting the Received Calls automatically (Auto Answer)”
(page 84) is set to ON, you can receive a call automatically.
• While calling, the source sound on the unit is muted. After calling, playback will resume.
85-EN
Hanging up the Telephone
Touch [
Call History
Call History is recorded for the last dialed/received/missed calls. There
are various ways of making calls based on the “Call History”. The
following steps 1 to 3 are common to the various ways of making these
calls. For details, refer to each individual category for making calls.
].
The call finishes.
Adjusting the volume when receiving a
Call
1
Press and hold MUTE/PHONE for at least 2
seconds.
The Telephone Menu screen is displayed.
While calling, you can adjust the volume. The adjusted volume level is
stored.
2
Press
Setting items:
Dialed Calls / Received Calls / Missed Calls / Phone Book / Voice Dial / Dial Input
/
on the unit to adjust the volume.
• You may need to increase volume from your regular audio listening
source level. However, increasing the volume excessively may result
in feedback. If feedback is noticed as feedback is directly related to
the volume, turn down the volume as low as acceptable to eliminate
it. Positioning the microphone in a direction away from the main car
speakers (e.g. clipped on sun visor) may also reduce feedback at high
volume.
Touch [
] to return to the previous screen.
Touch [Exit] to return to the main source screen that was
displayed before the setup operation was started.
You can redial the person you have previously called.
After finishing a call, touch [
5 seconds.
] of the desired item to place the call.
• The unit will update the information in the Call History
automatically each time a mobile phone is connected or receiving/
dialing a call. At this time, if you select any outgoing mode, “Now
Updating” will be displayed.
• It may take some time for the list to be displayed, and also directly
after connection, the list may not be brought up to date.
3
Redial Function
Touch [
• If you place a call directly from the paired mobile phone, the phone
number is not displayed, you cannot redial from the unit in this case.
] on the screen within
Redialing a Number in Dialed Calls History
The telephone is redialed.
Previously dialed telephone numbers are stored in dialed calls history.
You can redial a number by searching from dialed calls history.
Call Switching Operation
Setting item: Dialed Calls
While making a call, this function allows you to initiate the transfer of
the audio between the mobile phone and the speakers in the car.
Touch [Call] of the person name or the telephone
number you want to call from the Dialed Calls list.
The call is placed.
While calling, touch [
] to switch the call sound
between the unit and mobile phone.
• Depending on the mobile phone, this operation may not be
performed.
86-EN
Dialing a Number in Received Calls History
Telephone numbers from received calls are stored in the received calls
history. You can redial these numbers by searching here.
Setting item: Received Calls
Touch [Call] of the person name or the telephone
number you want to call from the Received Calls list.
The call is placed.
Dialing a Number in Missed Calls History
Telephone numbers for received calls that are missed, are stored in the
missed calls history. You can redial these numbers by searching here.
Setting item: Missed Calls
Touch [Call] of the person name or the telephone
number you want to call from the Phone Book list.
The call is placed.
• If one name has several numbers registered in the telephone book,
choose and touch the title of the desired number after touching [
]
of the name, the telephone will be called. Touch [Call] of the name
directly, the default number of the name will be called. Depending on
the connected mobile phone, this function may not be performed.
• If a name cannot be obtained via the phone book, only the telephone
number (default number) is displayed. If both name and number
cannot be obtained, “ID Unsent” will be displayed.
• If the call history or phonebook of the mobile phone is added or
deleted while it is connected to the unit, the list displayed on the unit
may not be brought up to date. If it is not updated, you cannot
correctly place a call.
Voice Dial Operation
Touch [Call] of the person name or the telephone
number you want to call from the Missed Calls list.
You can call the telephone by performing voice operation.
The call is placed.
Setting item: Voice Dial
Dialing a Number In the Phone Book
(Phone Book)
Up to 1,000 telephone numbers are downloadable to the BLUETOOTH
compatible unit from a mobile phone. Dial a call by selecting a person
from the phone book list.
Setting item: Phone Book
Display example for Phone Book screen
1
Touch [
2
Touch [Yes] to activate the voice dial mode.
] of Voice Dial.
A message is displayed.
The voice dial mode is activated, and “Speak” is displayed.
• Touch [No] will return to the Telephone Menu screen.
3
Say the telephone number*, name* you want to call
into the microphone.
* The number and name depend on the voice dial information stored in
the mobile phone.
• If the voice dial fails, the unit will return to normal mode in 30
seconds.
• You can perform this operation only when a voice dial compatible
mobile phone is connected. If the mobile phone is not compatible
with the voice dial, “No Support” is displayed for 2 seconds.
• The Voice Dial function performance depends on the recognition
range of the mobile phone and mounting location of the microphone.
Note when the microphone is mounted.
• Voice dial operation depends on the function of the mobile phone.
For details, refer to the Owner’s Manual of the mobile phone.
Scroll the list one line at a time by touching [ ] or [ ].
Scroll the list one page at a time by touching [ ] or [ ].
The Alphabet Search mode is activated. Refer to “Phone
Book Alphabet Searching Function” (page 88).
87-EN
Dialing a Number Using Direct Dial Input
You can place a call by inputting the telephone number directly by the
numeric keypad screen on the unit.
Setting item: Dial Input
1
Touch [
The Second Incoming Call
While calling, a second incoming call is announced by the received call
ring tone and a display message.
Display example for receiving the Second Incoming Call Screen
] to display the item of Dial Input.
Display example for the Dial Input screen
2
The numeric keypad screen is displayed. Touch
(input) the telephone number, and then touch [Call].
The call is placed.
• About the numeric keypad : closes the numeric keypad input screen.
Delete All: deletes all input numbers.
: deletes a previous number.
Answer the second incoming call while the first call is
waiting. The call waiting mode is activated. Refer to
“Call Waiting Function” (page 88).
Hang up the first call and the second incoming call is
answered.
Hang up the second incoming call.
Call Waiting Function
Phone Book Alphabet Searching Function
Using this function, you can search the names registered in the phone
book more efficiently.
1
Touch [ALPHABET] on the Phone Book screen.
The Alphabet Search screen is displayed.
The Call Waiting Function allows you to answer an incoming call
during a current call, and freely switch between the two. When a second
call is received, the current call is placed on hold. When you are finished
with one call, the call can switch to the other automatically.
Display example for call waiting mode screen
Display example for the Alphabet Search screen
Touching [
] to return to the previous screen.
Touching [Exit] will change to the main source screen.
The alphabetic character keypad screen.
2
Touch the initial letter or number of the name one
wishes to search.
The phone book screen of the alphabet you selected is
displayed.
3
Touch [Call] of person name or the telephone
number you want to call.
The call is placed.
88-EN
Display the current calling caller (1 or 2).
Switch the call between caller 1 and caller 2.
Storing the Preset Dialing Number
Numbers that you dial frequently can be stored into a preset list for
quick recall. Five numbers can be assigned as the preset dialing
numbers. After setting, you can dial these numbers directly. About how
to make a preset dialing, refer to “Dialing the preset number” (page 89).
1
Touch [
screen.
] of the desired name on the Phone Book
The stored numbers of the selected name is listed.
Display example for the number list screen
Auxiliary Device
(Optional)
Operating Auxiliary Devices (Optional)
To operate your devices connected to the AUX terminals on the rear
panel of INA-W910 (AUX1 mode) or to the iPod (V)/AUX Input
Connector by using an optional AV/RCA interface cable (4-pole mini
AV plug to 3-RCA) (AUX2 mode), follow the procedures described
below.
WARNING
It is dangerous (and illegal in many states) for the
driver to watch the Video while driving the vehicle.
The driver may be distracted from looking ahead and
an accident could occur.
2
Touch the [Preset] of the number you want to
assign as a preset dialing number.
A message will display to show you the preset NO. (1~ 5) of
the assigned number.
• If all the 5 positions have been used, you cannot assign the 6th
number. To assign another number, you need to delete one of the
preset number from position 1 to 5 first. About how to delete the
preset number, refer to “Deleting the stored shortcut memory” on
page 85.
Dialing the preset number
Display example for Telephone Menu screen
Install the INA-W910 correctly so that the driver
cannot watch Video unless the vehicle is stopped and
the emergency brake is applied.
If the INA-W910 is not installed correctly, the driver
will be able to watch the Video while driving the
vehicle and may be distracted from looking ahead and
cause an accident. The driver or other people could
be severely injured.
To activate your auxiliary devices:
Your vehicle must be parked with the ignition key in the ACC or
ON position. To do this, follow the procedure below.
1 Bring your vehicle to a complete stop at a safe
location. Engage the parking brake.
2 Keep pushing the foot brake and release the parking
brake once then engage it again.
3 When the parking brake is engaged for the second
time, release the foot brake.
• For automatic transmission vehicles, place the transmission lever
in the Park position.
Touch any one of the preset buttons [P.SET 1] through [P.SET 5] that has a number stored to it on the
Telephone Menu screen.
Now, the locking system for the AUX mode operation has been
released. Engaging the parking brake can reactivate the AUX
mode, as long as the car’s ignition has not been turned off. It is
not necessary to repeat the above procedure (1 through 3), of “To activate your auxiliary devices”.
Each time the ignition is turned OFF, perform the procedure of “To
activate your auxiliary devices”.
• If you try to activate the auxiliary device while driving, the display
will show the warning-Picture off for your safety.
The stored preset number is dialed directly.
89-EN
1
Press SOURCE/
2
Touch [AUX1]* or [AUX2].
3
Touch [NTSC/PAL] to change the video input type.
on the unit.
The SOURCE selection screen is displayed.
The external input screen is displayed.
* The name that is given as the source name in “Setting the AUX1
Mode” on page 67 is displayed.
• .If the AUX1 mode is not displayed on the main menu, set AUX1 IN to
ON by following “Setting the AUX1 Mode” (page 67).
• If the AUX2 source is not displayed on the main menu, set AUX2 IN
to AUX by following “Setting the AUX2 Mode” (page 67).
• The display mode changes by touching [WIDE] for AUX mode.
For operation, refer to “Switching Display Modes” on page 55.
Camera Operation
(Optional)
When an optional camera is connected, the view video of camera can be
output to the monitor.
Topview camera, Front camera or Rear camera can be connected to this
unit.
Depending on your camera, please choose the connection method
(Direct or RCA) and camera type (Topview, Front or Rear) first. For
details, refer to “Setting the Camera Input” (page 66).
For the information of the Alpine camera, refer to the table below.
Direct Camera
Front
Rear
HCE-C200F
HCE-C300R *
HCE-C117D
RCA Camera
—
1
HCE-C200R
HCE-C115
Front camera*2
When the HCE-C200F is connected, conditions in front of the
vehicle, such as a poor-visibility road, can be determined.
Rear camera*2
If an HCE-C300R/HCE-C200R/HCE-C117D/HCE-C115 series
camera is connected, when the vehicle is reversed, the rear
camera view (guide marks for vehicle width and available
distance) is displayed automatically on the screen of this unit.
*1 When connecting to HCE-C300R, calibration must be performed.
For details on calibration, refer to “Calibration when connected to
HCE-C300R” (page 124) and “Calibration” in the owner’s manual
of HCE-C300R.
*2 A commodity camera (with RCA video output) can also be connected
to the Camera Video Input connector as the front or rear camera.
90-EN
Front camera Operation
Display the front view video manually
1
Press SOURCE/
2
Touch
3
4
on the unit.
The SOURCE selection screen is displayed.
(CAMERA).
The Camera mode is activated and view video is displayed.
], the view change function keys will disappear.
Panorama View
Corner View
Ground View
• For more information, please refer to the owner’s manual of
connected front camera.
Rear camera Operation
Display the rear view video manually
1
Press SOURCE/
2
Touch
on the unit.
The SOURCE selection screen is displayed.
(CAMERA).
The Camera mode is activated and view video is displayed.
Touch any area of the screen to display the view
change function keys.*3
Touch [Back], [Panorama], [Corner] or [Top] to
choose the view angle.
[Back]:
[Panorama]:
[Corner]:
[Top]:
5
2
3
Rear View
Panorama View
Corner View
Ground View
Shift the gear lever to the reverse (R) position.
The rear view image is displayed while the car remains in
reverse.
Touch any area of the screen to display the view
change function keys.*3
Touch [Back], [Panorama], [Corner] or [Top] to
choose the view angle.
[Back]:
[Panorama]:
[Corner]:
[Top]:
Touch [Panorama], [Corner] or [Top] to choose
the view angle.
[Panorama]:
[Corner]:
[Top]:
4
1
Touch any area of the screen to display the view
change function keys.
Touch [
3
Display the rear view video while the car is
in reverse
4
Rear View
Panorama View
Corner View
Ground View
Touch [Guide On] or [Guide Off] to set whether the
rear camera guide line*4 is displayed.
Touch [
], the view change function keys will disappear.
*3 Displays
only when the rear camera with view change function is
connected and View Change Func. is set to ON (page 66).
*4 Displays only on the Back view screen of rear camera.
• Be sure to also check behind the car visually. Use the camera image
to assist in showing conditions behind the car.
• This function is effective when the reverse wire is properly connected.
• For more information, please refer to the owner’s manual of
connected rear camera.
Adjusting Alarm Volume (HCE-C300R only)
This operation can be performed only when the gear lever is in the
reverse position (R).
Make sure view change function is set to ON (page 66).
1
2
3
Touch any area of the screen to display the view
change function keys.
Touch [Back] for three times.
The volume adjustment screen appears.
Touch [Panorama] to switch a desired Volume
Level.
Display example for volume adjustment screen
Touch [Guide On] or [Guide Off] to set whether the
rear camera guide line*4 is displayed.
Touch [
], the view change function keys will disappear.
Touching the button toggles the volume level.
4
Touch [
] to return to normal mode.
91-EN
Adjusting Detection Sensitivity (HCE-C300R only)
This operation can be performed only when the gear lever is in the
reverse position (R).
Make sure view change function is set to ON (page 66).
1
Touch any area of the screen to display the view
change function keys.
2
Touch [Back] for three times.
3
Touch [Back] again.
4
The volume adjustment screen appears.
The sensitivity adjustment screen appears.
Touch [Panorama] to switch a desired detection
sensitivity level.
Display example for sensitivity adjustment screen
Changer
(Optional)
Controlling CD Changer (Optional)
An optional 6-disc or 12-disc CD Changer may be connected to the
INA-W910 if it is Ai-NET compatible. With a CD Changer connected
to the Ai-NET input of the INA-W910, the CD Changer will be
controllable from the INA-W910.
If you connect a changer compatible with MP3, you can play CD-ROMs, CD-Rs, and CD-RWs containing MP3 files on the INA-W910.
Using the KCA-410C (Versatile Link Terminal) multiple changers can
be controlled by the INA-W910.
See the Multi-Changer Selection section for selecting the CD Changers
(explained on page 93).
1
Press SOURCE/
2
Touch [CD CHG.].
on the unit.
The SOURCE selection screen is displayed.
The display changes to the CD changer mode screen.
When a 6 Disc CD Changer is connected;
Touching the button toggles the volume level.
1 Touch [P1/2]*.
The Function Guide display appears.
* When an MP3 compatible CD changer or DVD changer is
connected, touch repeatedly until the disc number is
displayed.
Low:
High:
5
Detects mainly moving objects.
Almost no motionless objects are
detected.
Detects moving objects and motionless
objects.
2 Touch any one of the select buttons [DISC 1] through
[DISC 6].
DISC 1 through DISC 6 select the discs from the first disc
to 6th disc.
When an MP3 compatible CD changer is connected;
Touch [
] to return to normal mode.
1 Touch [P1/3] twice to change the Function Guide display.
2 Touch any one of the select buttons [DISC 1] through
[DISC 6].
DISC 1 through DISC 6 select the discs from the first disc
to 6th disc.
When a 12-Disc CD Changer is connected;
You can select the disc numbers 1 to 6 in the same manner as
for 6-disc Changer.
Touch [P1/3] twice to select disc numbers 7 to 12.
The function guide display changes so that DISC 7
through DISC 12 represent disc numbers 7 to 12.
• After selecting the desired disc, you can operate in the same way as
for the CD player. For details, see the CD/MP3/WMA/AAC section.
• When an MP3 compatible CD changer is connected, the unit can
play discs containing both audio data and MP3 data.
• The DVD changer (optional) is controllable from the INA-W910 as
well as the CD changer.
92-EN
Multi-Changer Selection (Optional)
When using KCA-410C (Versatile Link Terminal), you can connect two
changers.
1
2
In changer mode, touch [CHG SEL] or press BAND
on the remote control (sold separately) to select the
next changer.
To operate the selected changer, see “CD/MP3/WMA/
AAC” section.
• To operate the selected changer, see “CD/MP3/WMA/AAC”
(pages 42-44).
SiriusXM Satellite
Radio Operation
(Optional)
SiriusXM Tuner operation:
When an optional SiriusXM Tuner is connected to this unit,
the following operations may be performed.
Display example for SiriusXM main screen
[Tag] button: Stores the tag information. For details, refer
to “Storing iTunes Tagging information” on page 97.
Receiving Channels with the SiriusXM
Tuner (Optional)
About SiriusXM Satellite Radio
Everything worth listening to is on SiriusXM, getting over 130
channels, including the most commercial-free music, plus the best
sports, news, talk and entertainment. A SiriusXM Tuner and
Subscription are required. For more information, visit
www.siriusxm.com.
• The SiriusXM Satellite Radio controls on this unit are available only
when a SiriusXM Tuner is connected.
1
Press SOURCE/
2
Touch the [SiriusXM].
on the unit.
The SOURCE selection screen is displayed.
The SiriusXM main screen display appears.
• The SiriusXM source selection icon may be on the second page of
source options. Press the [ ] button to access the second page. See
“Recalling the Source” on page 19.
• The SiriusXM source selection icon will not be listed if the SiriusXM
Tuner is not connected properly. Check the tuner connections if the icon
is not shown.
3
Touch [ ] or [ ] to select the desired channel.
Touching and holding either button will rapidly
browse through the channels.
• Refer to the SiriusXM Tuner User Guide for details on how to install the
SiriusXM Tuner.
93-EN
Tuning Channels by Category
Checking the SiriusXM Radio ID Number
Channels are grouped into categories based on the type of content heard
on the channels.
To subscribe to the SiriusXM Satellite Radio service, it is necessary to
locate and identify the Radio ID of your SiriusXM Tuner. The Radio ID
contains 8 characters and can be found on the bottom of your SiriusXM
Tuner or can be displayed on when selecting Channel 0 by following the
steps below:
1
Touch CATEGORY [ ] or [ ] on the SiriusXM main
screen to activate the category browsing mode.
The channels within the category of the current channel are
listed.
1
Display example of category browsing mode screen
While receiving SiriusXM Radio, touch [ ] or [ ] to
select channel “0”.
The unit displays the ID number.
2
To cancel the ID number display, change the channel
other than “0”.
• The SiriusXM Radio ID does not contain the letters I, O, S, or F.
Storing Channel Presets
Touching the [INFO.] button changes the display of
information for the channels in the category with the
following three options.
Channel NO./Channel Name
Channel NO./Artist Name
Channel NO./Channel Name
Channel NO./Song Title
2
Touch CATEGORY [ ] or [ ] on the category
browsing mode screen to select a desired category.
You can store 18 of your favorite SiriusXM channels for easy recall
with Preset buttons.
The preset buttons are located on page 3 of the Function Guide (see page 93). The presets are divided into 3 bands of 6 presets each.
1
The Preset (P.SET) buttons are displayed.
2
Touch [ ] next to the channel number to select that
channel.
• If no operation is performed for 10 seconds, the category browsing
mode is canceled.
Touch [BAND] to select the desired band you want
to store the preset in.
There are 3 Satellite Radio Preset bands. Each touch of
[BAND] changes the band:
The Category Name is shown at the top of the display.
3
If necessary, touch the Function Guide page button
[P X/3] to select Page 3 [P 3/3].
SiriusXM-1
3
SiriusXM-2
SiriusXM-3
SiriusXM-1
Tune to the desired favorite channel and then touch
and hold any one of the preset buttons [P.SET 1]
through [P.SET 6] for at least 2 seconds.
The selected channel is stored.
4
Changing the Display
Text information, such as the channel name, artist name/feature, and
song/program title, is available with SiriusXM or channel. The unit can
display this text information as explained below.
Touch [INFO.] in SiriusXM mode.
Each time you touch this button, the display changes as shown
below.
Category name
Channel name
Artist name
Title name
94-EN
Artist name
Title name
Content info
Repeat the procedure to store up to 5 other channels
onto the same band.
To use this procedure for other bands, simply select the
desired band and repeat the procedure.
A total of 18 channels can be stored in the preset memory
(6 channels for each band; SiriusXM-1, SiriusXM-2 and
SiriusXM-3.)
• If you store a new channel into a preset which already has a channel
assigned, the current channel will be cleared and replaced with the
new one.
Tuning Channels using Presets
1
If necessary, touch the Function Guide page button
[P X/3] to select Page 3 [P 3/3].
The Preset (P.SET) buttons are displayed.
2
Touch the [BAND] button to select the band
containing your desired channel preset.
The Band number is shown at the top of the display
(SiriusXM-1, SiriusXM-2, or SiriusXM-3).
3
2
4
* Displayed only when the stored song or artist is broadcasting.
• Touch [INFO.] on the channel name search screen, the information
of the broadcasting channels will be displayed. You can choose the
desired channel from the artist name list or song name list.
Each time you touch the [INFO.] button, the display changes
as below.
Song name
Channel name
Artist name
Channel name
Searching by My Games
Touch [P1/3].
The Function Guide is switched.
In the SiriusXM mode, touch [
Function Guide.
] on page 2 of the
Category search screen is displayed.
3
1 Touch [
] of My Music* after step 1.
The artist names and song names that you have stored and
are currently playing will be displayed in a list.
2 Touch [ ] of the desired artist/song.
The channel of the selected artist/song being broadcast is
received.
Touch any one of the preset buttons [P.SET 1]
through [P.SET 6] that has your desired Satellite
Radio channel stored in memory.
Search Function
1
Searching by My Music
Touch [
] of the desired category.
The channel name search screen of the selected category
is displayed.
1 Touch [
] of My Games* after step 2.
The sport teams that you have stored and the game is
currently broadcasting will be displayed in a list.
2 Touch [ ] of the desired team.
The channel of the selected game being broadcast is
received.
* Displayed only when the game of stored team is broadcasting.
• Touch [INFO.] on the channel name search screen, the information
of the broadcasting channels will be displayed. You can choose the
desired channel from the league name list or team name list.
Each time you touch the [INFO.] button, the display changes
as below.
Channel name
League name
Team name
Channel name
Touch [ ] to receive the selected channel.
• You can change the category directly by touching CATEGORY [ ]
or [ ] on the channel name search screen.
Searching by Channel
1 Touch [
] of All Channels after step 1.
All Channels will be displayed in a list.
2 Touch [ ] to receive the selected channel.
• Touch [INFO.] on the channel name search screen, the information
of the broadcasting channels will be displayed. You can choose the
desired channel from the artist name list or song name list.
Each time you touch the [INFO.] button, the display changes
as below.
Song name
Channel name
Artist name
Channel name
Storing your favorite Artist/Song for
Alerts
You can directly select the channel number on the display of the
numeric keypad.
1
2
3
4
If necessary, Touch the Function Guide page button
[P X/3] to select Page 1 [P 1/3].
Touch [10KEY].
The numeric keypad input screen is displayed.
Touch to input the channel number.
Touch [Enter].
The selected channel is received.
• If no operation is performed for 2 seconds after inputting the number,
the channel will be received automatically.
95-EN
Storing the desired Song/Artist
Replay Function
While listening to SiriusXM Satellite Radio, you can be alerted when
your favorite songs or artists are playing on other channels. An
interruption ALERT will be displayed when a matching artist or song is
found on another channel. For receiving interruption ALERT
information, refer to “Activating the stored Alert” below.
In SiriusXM mode, you can pause, rewind and replay up to 30 minutes
of live Satellite Radio.
1
2
The Memory type selection screen is displayed.
Receiving and Tuning to an Alert
Whenever a stored sports team, artist, or song is playing on another
channel, an interruption ALERT appears on the unit display. To tune to
the game, artist or song identified by the alert, follow the steps below:
2
When stored information is broadcast, after
displaying “Song Alert”, “Artist Alert” or “Game
Alert”, the screen changes to My Music list*1 or My
Game list*2 display.
Touch [ ] of the channel on the list you want to
receive.
The display changes to the selected channel and the
channel is received.
• If [
] is touched, return to the previous screen.
• If no operation is performed for 5 seconds, or [Exit] is touched, the
screen returns to the normal mode screen.
*1 Only for Song Alert and Artist Alert.
*2 Only for Game Alert.
2
Touch [
] of Store Song or Store Artist to select
the store type.
• “Art/Sng Unavailable” appears on the display if both the artist and
song is not available to be stored. “Artist (Song) Unavailable” is displayed if the artist (song) is not
available to be stored. “Artist (Song) Already Saved” is displayed if this Artist (Song) was
previously stored.
• If there is no memory space, “Memory Full” is displayed and then
you are asked if you want to replace a stored item. If you select
“Yes”, then the list to stored alert items are displayed. Touch [
]
of the item that you want to replace.
• If [MEMORY] is touched and held for at least 2 seconds, the display
changes to the Alert list screen. You can manage the stored songs and
artist individually. Refer to “Setting the Alert individually for a Song/
Artist/ Sport Team” on page 69.
96-EN
If necessary, Touch the Function Guide page button
[P X/3] to select Page 2 [P 2/3].
The Instant Replay buttons are shown on the Function
Guide.
Touch [MEMORY] on the SiriusXM mode screen.
A “Song (Artist) Saved X Used/Y Empty” pop up screen is
displayed.
X is the total number of song titles, artist names or sports
team stored in memory, and Y is the total number of memory
song titles, artist names or sports team still available for
storage.
1
1
Touch [ /
content.
] to Pause playing of the channel
The “
(Pause)” icon and replay progress bar is
displayed.
3
Touch [
/
] again to resume playing the content.
The “
(Play)” icon lights up and offset playback
commences.
• The time difference between the real broadcasting time and the offset
playback time is displayed.
4
Touch the [ ] button to exit Instant Relay and listen
to live content.
• To fast reverse, touch and hold [
] and to fast forward, touch
and hold [
].
• Touching [
] or [
] will move a track up/down.
• If you change channels while in Replay mode, the contents of the
replay buffer are emptied.
• Contents older than 30 minutes are automatically emptied from the
replay buffer.
Parental Lock Function
This function can help restrict the listening of channels to children of
appropriate age levels only. For information on setting the Parental
Control passcode, refer to “Setting the Parental Lock” on page 70.
When a locked channel is selected, “Channel Locked” is displayed and
then the numeric keypad appears for you to enter the passcode.
Input the 4-digit passcode you set in “Setting the
Parental Lock” on page 70.
The initial number is 0000.
• If you input a wrong passcode, “Incorrect Lock Code” is displayed.
• After entering the correct passcode, you can access all locked
channels without entering the passcode again until the unit is
powered off and then back on.
Using Jump Memory and Jump Recall
function
The Jump Channel is a special channel that you can jump to with the
press of a dedicated button and then jump back to the previous channel.
This channel is often used to select your favorite SiriusXM traffic and
weather report channel.
1
2
To store the Jump channel in memory, first tune to
the channel that you wish to store and then touch
the Function Guide page button to select page 2 [P 2/3]. Then touch and hold the [JUMP] button for
at least 2 seconds.
A Flash memory or Portable audio player can be connected to the INA-W910 through the USB Connector of this unit.
If a Flash memory device or Portable audio player is connected to the
unit, MP3/WMA/AAC files of Flash memory and MP3/WMA files of
Portable audio player can be played back.
Touch [JUMP] to recall and tune to the saved Jump
channel.
Saved Jump channel can also be recalled by pressing and
holding MAP, even in modes other than SiriusXM mode.
BANK Function (Tag search mode only)
• Pressing and holding MAP again for at least 2 seconds will jump
back to the previous mode or SiriusXM channel.
• Only one channel can be stored as the jump source channel. When
you want to store a new channel, the old channel will be cleared and
the new one will be memorized.
When a Flash Memory is connected, the following description is
available only when Tag is set in “Setting the USB Search mode” on
page 61.
Storing iTunes Tagging information
iTunes Tagging lets you tag songs heard on SiriusXM channels. Using
this unit in conjunction with an optional SiriusXM Tuner and a Tagging
compatible iPod/iPhone, you can tag the music that you listen to, then
transfer the tag information to your iPod/iPhone, and later, when your
iPod/iPhone is connected to iTunes, you can preview, buy and download
your tagged songs. For details, refer to the Owner’s Manual of the
Tagging compatible iPod/iPhone.
When a desired song is heard on a SiriusXM channel, if there is tag
information of the song, the [Tag] button will light.
Touch [Tag] to save its tag information.
If no Pod/ Phone is connected, “Tag Count X” is displayed (X is
the total amount of the tag information stored in this unit).
• During tagging, the iPod/iPhone takes priority to save the tag
information. If no iPod/iPhone is connected, the tag information is
saved to this unit.
• When the memory of iPod/iPhone is full, “iPod Memory Full, Tag
Count X” is displayed. The tag information will be stored to the unit.
• If the tagging operation is interrupted by a hands-free phone call, the
tagging operation will be canceled and the unit will display “Cannot Tag”.
• This unit can store up to 50 pieces of tag information. When the
memory of the unit is full, “Tuner Memory Full. Connect iPod” may
be displayed.
• When an iPod that doesn’t support the tagging function is connected,
“Non-Tagging iPod” may be displayed.
• When the iPod/iPhone is disconnected from the unit during tagging,
its tag information will be stored in the unit.
• If there is stored tag information on the unit, when an iPod/iPhone
supporting the tag function is connected, the stored tag information
will be transferred to the iPod/iPhone automatically. When the iPod/
iPhone memory becomes full, “iPod Memory Full” will be displayed,
and any remaining tag information on the unit will not be transferred
to the iPod/iPhone.
• If tag information already exists, “Already Tagged” will be displayed
when you try to tag information again.
Flash Memory/
Portable audio
player (Optional)
What is a Bank?
A bank is a unit of up to 1,000 songs, which is stored in
memory/Portable audio player. “Banking” refers to the
grouping of songs available in Flash Memory/Portable audio
player, in banks of 1,000 songs each. However, when a
Flash Memory is connected, 1 BANK can store up to 1,000
songs under the following conditions. Otherwise, the
number of songs that can be stored may be less than 1,000.
Conditions (general estimate values)
Playlists: 20 (32 characters; 64 bytes)
Genres: 10 (32 characters; 64 bytes)
Composers: 30 (32 characters; 64 bytes)
Artists: 30 (32 characters; 64 bytes)
Albums: 100 (32 characters; 64 bytes)
Titles: 1,000 (32 characters; 64 bytes)
Folders: 100 (32 characters; 64 bytes)
Files: 1,000 (32 characters; 64 bytes)
File Paths: 1,000 (128 characters; 256 bytes)
About Banking
While a bank is being built up, “Banking” is displayed. If
another bank is selected when unit power is turned on, the
ACC position is set, or USB connection is made, banking
will start.
It can take anywhere from a few seconds to up to 10
minutes for banking to complete. This depends on the
number of files and folders in Flash memory/Portable audio
player.
Available operations while Banking
• Search functions, such as album search or tag
information (artist display, etc.) are available during the
banking process. However, during such time, tag
information display changes.
• Regular fast-forwarding and next song selection is
available.
• During Banking, the played back song order may differ
from the song order in Flash memory/Portable audio
player.
97-EN
Order of files while Banking
Files are divided in different Banks according to the time
and hierarchy they are stored into the Flash memory, up to
1,000 files for each Bank.
The order of the files is as follows:
The files in the hierarchy 1 are divided first and the files in
other hierarchies are divided according to the time when its
superior directory folder in hierarchy 1 is stored.
Hierarchy 1
Playback
1
Press SOURCE/
2
Touch [USB Audio].
3
Hierarchy 2
Flash Memory
Hierarchy 3
on the unit.
The SOURCE selection screen is displayed.
The USB mode is activated and the display changes to the
USB screen.
Touch [
(file).
] or [
] to select the desired track
Returning to the beginning of the current track (file):
Touch [
].
Fast backward:
Touch and hold [
].
Advancing to the beginning of the next track (file):
Touch [
].
Fast forward:
Touch and hold [
4
Folder
MP3/WMA/AAC File
• If some file or folder is deleted in the Flash memory, new file or
folder stored into the Flash memory may take the place of the
deleted one in some cases.
This unit has the BANK function that automatically divides every 1,000
songs stored in Flash memory/Portable audio player into individual
banks to make searching and playing back a song easier. A maximum of
1,000 songs for one bank can be stored according to the order stored in
Flash memory/Portable audio player. A maximum of 20 banks (20,000
songs) can be recognized. BANK1 (songs 1 to 1,000) is set as the
default. If you want to search beyond 1,000 songs, perform the
following operation to select a different bank.
BANK No.
BANK1
BANK2
..
..
1
2
Song number
1~1,000
1,001~2,000
BANK20
19,001~20,000
Touch [P1/2] to change the function guide.
Touch BANK [
BANK.
] or [
] to select the desired
Each operation can be performed in the selected bank.
• Even if the files are contained in the same folder, they may be saved
as different BANK.
98-EN
].
To pause playback, touch [
Touching [
/
/
].
] again will resume playback.
• WMA format files that are protected by DRM (Digital Rights
Management), AAC format files that have been purchased from
iTunes Music Store and files that are copy-protected (copyright
protection) cannot be played back on this unit.
• The playback time may not be correctly displayed when a VBR
(Variable Bit Rate) recorded file is played back.
• If there is tag information, artist name/album name/track name is
displayed.
• ID3 tag/WMA tag
If an MP3/WMA/AAC file contains ID3 tag/WMA tag information,
the ID3 tag/WMA tag information is displayed (e.g., song name,
artist name, and album name). All other tag data is ignored.
• “No Support” is scroll displayed when text information is not
compatible with this unit.
• Before disconnecting Flash memory, be sure to change to another
source or set to pause.
Repeat Play
Searching for a desired Song
Only Repeat One is available for this mode.
Repeat One:
A single song is repeatedly played back.
Repeat Folder: Only files in a folder are repeatedly played back.
You can select to search a song by Tag information or Explorer (File
Name) mode for a Flash memory. Before you search a song, select your
desired search mode in “Setting the USB Search mode” on page 61.
1
Touch [P1/2].
2
Touch [
].
The file will be played repeatedly.
(Repeat One)
3
Searching by Tag information
The function guide is displayed.
*
(off)
(Repeat Folder) (Repeat the list being
played back)
To cancel repeat play, touch [
].
Before performing the following procedures, make sure Tag is selected
in “Setting the USB Search mode” on page 61.
A Flash memory or Portable audio player can contain hundreds of
songs. By using file tag information and keeping these songs organized
in playlists, this unit’s search functions will ease song searches.
Each music category has its own individual hierarchy. Use the Playlists/
Artists/Albums/Songs/Genres/Composers/Folders/Files search mode to
narrow searches based on the table below.
* Repeat Folder is available only for flash memory and make sure
“File Name” is set (refer to “Setting the USB Search mode” on
page 61).
Hierarchy 1
Hierarchy 2
Hierarchy 3
Hierarchy 4
Playlists*1
Songs
—
—
Artists*
Albums*
Songs
—
• You can switch the Band when “Tag” is set in “Setting the USB
Search mode” (page 61), if the Band is changed, the repeat play
mode will be canceled.
Albums*
Songs
—
—
Songs
—
—
—
Genres*
Artists*
Albums*
Songs
Composers*
Albums*
Songs
—
Folders
Files
—
—
Files
—
—
—
Random Play Shuffle (M.I.X.)
The Shuffle function of the Flash memory or Portable audio player is
displayed as
on the INA-W910.
1
Touch [
] after touching [P1/2].
The songs will be played back in random sequence.
When a song is searched by Tag information
*1
(Shuffle Songs)
2
ALL*2
(Shuffle ALL)
For example: Searching by Artist name
The following example explains how an Artists search is performed.
Another search mode can be used for the same operation, although the
hierarchy differs.
(off)
Searching by artist name
When a folder/file is searched by Explorer (File Name)
mode (Flash Memory only)
1
*3
(Shuffle folders)
• Touching [
ALL*4
(Shuffle ALL)
To cancel M.I.X. play, touch [
(off)
].
*1 Song shuffle randomly plays back songs within a selected category
(playlist, album, etc.). The songs within the category are played just
once until all songs have been played.
*2 All songs in the current Bank are played back in random sequence.
Any one song does not play back again until all songs have been
played back.
*3 All songs in the current folder are played back in random sequence.
Any one song does not play back again until all songs have been
played back.
*4 All songs in the Flash Memory are played back in random sequence.
Any one song does not play back again until all songs have been
played back.
• When a song is played back during Random (M.I.X.) play, the song
can be played back again randomly even if not all songs on the Flash
Memory/Portable audio player have been played back.
*1 Playlist search is not available when a Portable audio player is
connected.
Touch [
].
The search mode is activated, and the search list screen
appears.
] for at least 2 seconds will return to last search mode.
2
Touch [
3
Select the desired artist.
] of Artists.
The Artists search screen is displayed.
To play back the artist directly
Touch [ ] next to the artist’s name.
All songs of the selected artist are played back.
To search for the album of an artist
1 Touch [
] of the selected artist.
The Albums search screen of the selected artist is displayed.
2 Touch [ ] next to the desired album’s name.
All songs of the selected album are played back.
99-EN
To search for a song in the album of an artist
1 Touch [
] of the desired album in “To search for the album
of an artist” in step 2.
The Songs search screen of the selected album is displayed.
2 Touch [ ] next to the desired song’s name.
The selected song is played back.
• In the Tag search mode, a search can be made quickly by Alphabet
skip function to find the desired artist or song, etc. For details, refer
to “Alphabet Skip Function (Tag search mode only)” on page 101.
• Touching [ ] of ALL will play back all songs in the list when you are
in a hierarchy with an asterisk “*” (see table on the previous page).
• Touching [
] of ALL will display the search list in the next
hierarchy.
• When search is made during M.I.X. play, the M.I.X. play mode will be
canceled.
• Even if the songs belong to the same playlist, they may be saved as
different Bank.
• In the search mode, you can scroll the list one page at a time by
touching [ ] or [ ].
Before performing the following procedures, make sure File Name is
selected in “Setting the USB Search mode” on page 61.
A Flash Memory can contain hundreds of songs. By folder/file name
searching, you can quickly find desired folder/file. This operation is
similar to search a folder/file from PC.
2
Touch [
(Playlist) /
(Composer).
* This item is invalid when a portable audio player is connected.
• If search selection mode is not activated, a Song search is not possible.
• If an album is selected from an artist search, the album can be
searched.
• During shuffle (M.I.X.) playback, this operation is not possible.
Touch
[
] or [
] to select the folder.
• During M.I.X. ALL playback, this operation is not possible.
• When Folder up/down is made during M.I.X. Folder play, the M.I.X.
Folder play mode will be canceled.
].
]
Touch [ ] of the selected folder to play back all songs in
the folder.
3
Touch [ ] or [ ] to select the desired
(Artist) /
(Album) /
(Genre) /
If you listen to a file from a selected folder, the folder can be changed.
The search mode is activated, and the search list screen
appears.
Touch [
] to enter the selected folder or touch [
to play back the selected file.
Playlist*/Artist/Album/Genre/Composer can be easily changed, when
Tag information search mode is selected (refer to “Setting the USB
Search mode” on page 61).
For example, if you listen to a song from a selected album, the album
can be changed.
Select the desired Folder (Folder up/down)
Searching by Explorer (File Name) mode
(Flash Memory only)
1
Selecting Playlist/Artist/Album/Genre/
Composer (Tag search mode only)
Repeat step 2 until the desired folder/file is found
when a folder is entered.
• When a Portable audio player is connected, even though File Name is
set in “Setting the USB Search mode” (page 61), the Tag information
search mode will be applied.
• By using the direct search bar, you can search for an album, song, etc.
more efficiently. For details, refer to “Direct Search Function” on
page 104.
Creating the playlist from the Artist/
Album information of the current song
(Tag search mode only)
When a song is played back, a playlist about all the songs with the same
Artist or Album stored in the Flash memory or Portable audio player
can be created.
1
2
Touch [P1/2] when a song is played back.
The function guide changes.
Touch [X-RPT ARTIST] or [X-RPT ALBUM] to
create the playlist.
• This operation cannot be performed when “File Name” is set in
“Setting the USB Search mode” on page 61.
• According to the artist/album information of the current song, a
playlist containing all the songs with the same artist/album (within
the same BANK) are made into a playlist. The playlist begins
playback immediately.
100-EN
Alphabet Skip Function (Tag search mode only)
The search list is arranged in alphabetical order, and can be skipped to
the titles with the next alphabetical character such as from A to B, B to
C. You can skip in reverse order such as B to A by touching
ALPHABET [ ].
During Tag search mode, touch ALPHABET [ ] or [ ] to perform
the Alphabet Skip Function.
Direct Search Function
The unit’s direct search function can be used to search for a folder,
album, song, etc. more efficiently.
Display example for USB Audio searching screen
Direct
search bar
By touching anywhere on the direct searching bar, or
touching and dragging the position mark to a desired place,
you can quickly target any song.
About MP3/WMA/AAC File of Flash
Memory
Playing back MP3/WMA/AAC
MP3/WMA/AAC files are prepared, then stored to a Flash
memory. A media player or jukebox can also be used to sync
music to a portable device. Do not make a file’s playback time
more than 1 hour.
Media supported
This device can play back Flash memory/Portable audio player
media.
Corresponding File Systems
This device supports FAT 12/16/32 for Flash memory device/
Portable audio player.
iPod/iPhone
(Optional)
An iPod/iPhone can be connected to this unit, by using the USB
connection cable. When this unit is connected by using the cable, you
can choose to control the iPod/iPhone using its own controls or by this
unit controls. For details, refer to “Setting the iPod Control” on
page 102.
• Internet or telephone functions, etc. of the iPhone or iPod
touch are not controllable from the unit, but these functions
can be controlled using the iPhone or iPod touch itself.
• If you connect an Phone to this unit, it can be used as an
Pod.
• To watch the video screen of the video file in the Pod
(iPhone, iPod touch, iPod classic, iPod 5th generation, 3rd,
4th and 5th generation Pod nano), do the operation as
described below.
Your vehicle must be parked with the ignition key in the ACC or ON
position. To do this, follow the procedure below.
1 Push the foot brake to bring your vehicle to a complete
stop at a safe location. Engage the parking brake.
2 Keep pushing the foot brake and release the parking
brake once then engage it again.
3 While the parking brake is being engaged the second
time, release the foot brake.
• For automatic transmission vehicles, place the transmission lever in
the Park position.
About iPod/iPhone models usable with this unit
• Confirmed devices regarding Made for iPod. Correct function
of earlier versions cannot be guaranteed.
iPod touch (4th generation): Ver.4.2.1
iPod nano (6th generation): Ver.1.0
iPod touch (3rd generation): Ver. 4.2.1
iPod nano (5th generation): Ver.1.0.2
iPod classic (Late 2009): Ver.2.0.4
iPod touch (2nd generation): Ver.4.2.1
iPod nano (4th generation): Ver.1.0.4
iPod classic (120GB): Ver.2.0.1
iPod touch (1st generation): Ver.3.1.3
iPod nano (3rd generation): Ver.1.1.3 PC
iPod classic (80GB, 160GB): Ver.1.1.2
iPod nano (2nd generation): Ver.1.1 3
iPod (5th generation): Ver.1.3
iPod nano (1st generation): Ver.1.3.1
• Confirmed devices regarding Made for iPhone. Correct
function of earlier versions cannot be guaranteed.
iPhone 4: Ver.4.2.1
iPhone 3GS: Ver.4.2.1
iPhone 3G: Ver.4.2.1
iPhone: Ver.3.1.3
• For clarity in identifying your model of iPod, please see
Apple’s own document “Identifying iPod models” at http://support.apple.com/kb/HT1353
101-EN
Setting the iPod Control
When an iPod/iPhone is connected, you can choose to operate it from
this unit or from its own controls.
Touch and hold
or
for at least 2 seconds on
the iPod main screen to switch iPod control mode
between this unit and iPod/iPhone.
Once the control mode is changed, this will set pause status,
touch [ / ] to continue.
: Switch the iPod control to Pod/ Phone.
Operate the Pod/iPhone using its own controls.
When iPod is selected, some functions will not be
operable via the head unit.
: Switch the iPod control to this unit.
Operate the Pod/iPhone via this unit.
• When using the iPod control mode, make sure the USB 30P cable is
connected to the iPod(V)/AUX Input Connector correctly by using the
AV extension cable.
• In the iPod control mode, if nothing is played back by the iPod,
“Stop” will be displayed on this unit.
• Depending upon the iPod used, iPod control may not be selectable.
Or, if iPod is selected, operation must still be from the head unit.
Playback
Press SOURCE/
2
Touch [iPod].
on the unit.
The SOURCE selection screen is displayed.
The display shows the iPod mode screen.
Touch [
] or [
] to select the desired song.
Return to the beginning of the current song:
Touch [
].
Fast backward the current song:
Touch and hold [
].
Advance to the beginning of the next song:
Touch [
].
Fast forward the current song:
Touch and hold [
].
4
To pause playback, touch [
Touching [
102-EN
Searching for a desired Song
An iPod/iPhone can contain hundreds of songs. By keeping these songs
organized in playlists, the INA-W910 can use these to ease song
searches.
Using the search mode’s individual hierarchy, you can narrow down
your search as shown in the table below.
<MUSIC Search Menu>
1
3
• If a song is playing on the iPod/iPhone when it is connected to the INA-W910, it will continue playing after the connection.
• An episode may have several chapters. The chapter can be changed
].
by pressing [
] or [
• Display mode can be changed by touching [WIDE] when an iPhone
or iPod compatible video is connected. For details, refer to
“Switching Display Modes” (page 55).
• If the artist, album or song name, created in iTunes, has too many
characters, songs may not be played back when connected to the
INA-W910. Therefore, a maximum of 250 characters is
recommended. The maximum number of characters for the head unit
is 128 (128 byte).
• Some characters may not be correctly displayed.
• “No Support” is displayed when text information is not compatible
with the INA-W910.
• If the audio source is switched to Pandora during playback of video
file in iPod/iPhone, playback will start from the beginning when the
source is switched to iPod video again.
/
/
].
] again will resume playback.
Hierarchy 1
Hierarchy 2
Hierarchy 3
Playlists
Songs
—
Hierarchy 4
—
Artists*
Albums*
Songs
—
Albums*
Songs
—
—
Songs
—
—
—
Podcasts
Episodes
—
—
Genres*
Artists*
Albums*
Songs
Composers*
Albums*
Songs
—
Audiobooks
—
—
—
• Video search mode depends on the iPod/iPhone. If the specification
of the iPod/iPhone is changed, the search mode on this unit will also
be changed.
For example: Searching by Artist name
The following example explains how an ARTISTS search is performed.
Another search mode can be used for the same operation, although the
hierarchy differs.
Searching by artist name
1
Touch [
• Touching [
2
].
The search mode is activated, and the search list screen
appears.
Touch [
] for at least 2 seconds will return to last search mode.
] of Music.
• When an iPhone or iPod compatible video is connected. Videos mode
can also be selected to playback video files stored in iPod/iPhone. If
Videos mode is selected, the Video Playlists/Movies/Music Videos/TV
Shows/Video Podcasts/Rentals search mode may be used depending
on the connected iPod/iPhone.
• Set AUX2 IN to iPod Video (page 67) when you want to activate the
Video mode.
3
Touch [
4
Select the desired artist.
] of Artists.
The Artists search screen is displayed.
Selecting Playlist/Artist/Album/Genre/
Composer/Episode/Category
Playlist/Artist/Album/Genre/Composer/Episode/Category* can be
easily changed.
For example, if you listen to a song from a selected album, the album
can be changed.
Press [ ] or [ ] to select the desired
(Artist) /
(Album) /
(Genre) /
(Episode) / Category*.
(Playlist) /
(Composer)/
* Category can be changed only when play back the video files of iPod/iPhone.
• If search selection mode is not activated, a Song search is not
possible.
• If an album is selected from an artist search, the album can be
searched.
• If Playlist/Artist/Album/Genre/Composer/Episode are not searched,
this operation is not possible.
To play back the artist directly
Touch [ ] next to the artist’s name.
All songs of the selected artist are played back.
Random Play Shuffle (M.I.X.)
To search for the album of an artist
The Shuffle function of the iPod is displayed as
1 Touch [
] of the selected artist.
The Albums search screen of the selected artist is displayed.
2 Touch [ ] next to the desired album’s name.
All songs of the selected album are played back.
Shuffle ALL:
To search for a song in the album of an artist
Shuffle Albums:
1 Touch [
] of the desired album in “To search for the album
of an artist” in step 2.
The Songs search screen of the selected album is displayed.
2 Touch [ ] next to the desired song’s name.
The selected song is played back.
• Touching [ ] of ALL will play back all songs in the list when you are
in a hierarchy with an asterisk “*” (see table on the previous page).
] of ALL will display the search list in the next
• Touching [
hierarchy.
• In the search mode, a search can be made quickly by Alphabet skip
function to find the desired artist or song, etc. For details, refer to
“Alphabet Skip Function” on page 104.
• When search is made during M.I.X. play, the M.I.X. play mode will be
canceled.
on the INA-W910.
All songs in the Pod are played back in random sequence. Any
one song does not play back again until all songs have been
played back.
The songs on each album are played back in proper order. Upon
completion of all the songs on the album, the next album is
selected randomly. This continues until all albums have been
played.
Shuffle Songs:
Song shuffle randomly plays back songs within a selected
category (playlist, album, etc.). The songs within the category
are played just once until all songs have been played.
1
Touch [
ALL]*.
The songs will be played back in random sequence.
ALL
(Shuffle ALL)
Touch [
(off)
] after touching [P1/2].
(off)
(Shuffle Albums)
2
(Shuffle Songs)
To cancel M.I.X. play, touch [
ALL] or [
].
• If a song is selected in the album search mode before selecting
Shuffle (M.I.X.), the songs will not play back randomly even when
Shuffle album is selected.
* This operation cannot be performed when play back the video files of
iPod/iPhone.
103-EN
Repeat Play
Pandora Radio
(iPhone/iPod touch)
Only Repeat One is available for the iPod.
Repeat One: A single song is repeatedly played back.
1
Touch [P1/2].
2
Touch [
The function guide is displayed.
].
The file will be played repeatedly.
(Repeat One)
3
(off)
(Repeat the list being played back)
To cancel repeat play, touch [
].
For details on the Pandora Compatible Application for iPhone/iPod
touch, visit: http://www.pandora.com/on-the-iphone
Alphabet Skip Function
The search list is arranged in alphabetical order, and can be skipped to
the titles with the next alphabetical character such as from A to B, B to
C. You can skip in reverse order such as B to A by touching
ALPHABET [ ].
During search mode, touch ALPHABET [ ] or [ ] to perform the
Alphabet Skip Function.
Direct Search Function
The unit’s direct search function can be used to search for an album,
song, etc. more efficiently.
Display example for iPod searching screen
Direct
search bar
By touching anywhere on the direct searching bar, or
touching and dragging the position mark to a desired place,
you can quickly target any song.
104-EN
Pandora Radio is your own FREE personalized radio now available to
stream music on your iPhone/iPod touch.
Just start with the name of one of your favorite artists, songs or classical
composers and Pandora will create a “station” that plays their music and
more music like it.
The INA-W910 enables you to interact with your Pandora account, by
connecting an iPhone or iPod touch that has the Pandora Compatible
Application already installed.
To control Pandora through this INA-W910, you must be running a
version of Pandora’s mobile application that supports Pandora link, on a
compatible smartphone. For information on compatible phones and
applications, visit www.pandora.com/on-the-go
• Some of the Pandora Compatible Application for iPhone or iPod
touch are not controllable from the INA-W910.
Display example for Pandora Radio screen
Listening to Pandora
Searching for a Desired Station
Set “Pandora” to ON (page 61) before using this source.
You can display your station list and select stations directly from the
INA-W910.
1
2
Launch the Pandora Application on the iPhone.
Alphabet Search
Press SOURCE/
on the unit.
1
2
The SOURCE selection screen is displayed.
3
Touch [Pandora].
4
To skip to the next song, touch [
The display changes to Pandora mode screen.
].
• The operation to replay a previous song is not available.
• Pandora limits the number of skips allowed on their service. If you
attempt to skip songs beyond the limit, “No skips remaining” is
displayed.
• INA-W910 remembers the source just before turning off the power.
Even if you reconnect an iPod/iPhone without launching Pandora
Application while the power is off, Pandora mode (not iPod mode) is
displayed when power is turned back on.
• When Pandora Volume is set to other than 0 dB in “Adjusting the
volume for the Pandora Radio” (page 61), Pandora source volume
may be higher than other sources.
• Depending on the signal status, song may be stopped during
playback.
• When the advertisement is received, the playback time will be frozen
and key operation is invalid.
• The playback time may not be correctly displayed.
“Thumbs” Feedback
] for thumbs up, or touch [
: The “ ” indicator appears in the display. Pandora will
add similar music to your station.
: The “ ” indicator is displayed. Pandora will ban that
song from your station, and the current song is skipped. If
the number of skips allowed has reached its limit, the
current song continues to play back.
• In some situations, “Thumbs” feedback may not be available.
“Unable to save your thumb rating.” will be displayed.
] to activate the Search mode.
Touch [A-Z].
The “A-Z” search mode is activated and the station names
are listed alphabetically.
Touch [
] of the desired station.
Pandora will play that station.
Search by Date Added
1
2
3
Touch [
] to activate the Search mode.
Touch [By Date].
The “By Date” search mode is activated and the station
names are listed by the date they were added to the
account.
Touch [
] of the desired station.
Pandora will play that station.
• Scroll the list one page at a time by touching [ ] or [ ].
• Scroll the list one line at a time by touching [ ] or [ ].
Creating a New Station
You can personalize your stations with “Thumbs Up” or “Thumbs
Down” feedback, which the system takes into account for future music
selections.
During playback, touch [
for thumbs down.
3
Touch [
]
Basing on the currently playing song or artist, a personalized Pandora
station can be created. The new station will play more music like it.
1
During playback, touch [
2
Touch [
].
The type selection list is displayed.
] (Song) or [
] (Artist).
After displaying “Station Created”, Pandora will play the
new station.
To cancel the operation, touch [CANCEL].
• The created station is saved to your station list.
• You can also create stations using the Pandora Application on your
iPhone or on the web at www.pandora.com.
• In some situations, creating a new station may not be available.
“Unable to create new station.” will be displayed.
105-EN
QuickMix
Remote Control
Use QuickMix to create a playlist based on two or more of your Pandora
stations. Edit your QuickMix station selections on the Pandora
Compatible Application for iPhone when it is not connected to the INA-W910.
1
2
3
Touch [
Controls on Remote Control
] to activate the Search mode.
Touch [A-Z] or [By Date].
The “A-Z” or “By Date” search mode is activated and the
station name is displayed.
Touch [ ] of Quick Mix.
• The
indicator lights, and the songs from the created stations are
played back in random sequence.
Bookmarking a Desired Song or Artist
The currently playing song or artist can be bookmarked and saved to
your Pandora account.
1
During playback, touch [ ].
2
Touch [
The type selection list is displayed.
] (Song) or [
] (Artist).
The current song or artist is bookmarked. “Bookmark Song”
or “Bookmark Artist” is displayed.
To cancel the operation, touch [CANCEL].
• Your bookmarks can be viewed on your “Profile” page at
www.pandora.com.
• In some situations, bookmarks may not be available. “Unable to save
your bookmark.” will be displayed.
PWR Button
Turns the power ON and OFF.
SRC Button
Changing the Display
Selects the audio source.
DN Button
Touch [INFO.].
Each time you touch this button, the display changes as shown
below.
Song title
Artist title
Album title
Song title
Artist title
Station title
Radio mode: Selects, in descending order, stations
programed into the radio’s presets.
MP3/WMA/AAC mode:
Folder Select (DN) Button selects the folder.
Changer mode:
DISC Select (DN) Button selects a disc in
descending order.
iPod/iPhone mode:
Selects playlist/artist/album/genre/composer/
episode in descending order.
SiriusXM mode: Selects, in descending order, the next
SiriusXM preset channel in the selected band.
VOLUME
/
Button
Increase or decreases the volume level.
RETURN Button
DVD/Video CD (PBC ON) mode:
Returns to the previous display. (Does not
return in some discs.)
106-EN
Button
Radio mode: SEEK (DN) button
CD/Changer mode:
Press the button to go back to the beginning
of the current track. Press and hold to fast
reverse.
MP3/WMA/AAC iPod mode:
Press the button to go back to the beginning
of the current file. Press and hold to fast
reverse.
DVD Video/Video CD:
• Move to the desired position on the disc.
• During playback, press and hold for
more than 1 second to reverse the disc
at double speed. Hold for more than 5
seconds to reverse the disc at 8 times
the normal speed. Hold for more than 10
seconds to reverse the disc at 21 times
the normal speed.
DVD Video:
• When pressed and held in while in the
pause mode, the disc is played in
reverse slow motion at 1/8th the normal
speed. When held in for 5 more
seconds, the reverse slow motion speed
switches to 1/2 the normal speed.
• The picture is reversed by one frame
each time the button is pressed in the
pause mode.
SiriusXM mode: • When not in Replay mode, press this
button to select, in descending order,
the next channel.
• When in Replay mode, press this button
to reverse to the beginning of the current
track or the previous track.
• When in Replay mode, press and hold
this button to fast-reverse.
/
Button
Radio mode: Chooses the tuning mode.
By pressing it more than 2 seconds,
Automatic Memory will be operated.
Disc/iPod mode: Switches between play and pause.
SiriusXM mode: This button toggles between Replay Mode
Pause and Play.
• SEARCH Button: Not used.
Button
Performs stop.
DVD Video/Video CD:
Pressing once stops the PRE stop; Pressing
twice sets stop.
SiriusXM mode: This button exits Replay mode to live audio.
MENU Button
DVD Video mode:
Shows the menu display.
DISP/TOP M. Button
DVD Video/Video CD mode:
Shows playback status (only when car is
stopped).
DVD Video mode:
By pressing more than 2 seconds, shows the
top menu display.
SETUP Button
Not used.
AUDIO Button
DVD Video/Video CD mode:
Switches audio.
BAND Button
Radio mode: Changes the band.
Changer mode: Switches the disc mode.
(when an optional KCA-410C is connected)
DVD Video/Video CD mode:
While playing a DVD, the display mode is
switched (only when car is stopped).
SiriusXM mode:
Press and hold for at least 2 seconds to
recall the saved Jump source channel. Press
and hold again will jump back to the previous
mode or SiriusXM channel.
A.PROC Button
When an external audio processor is connected:
Press the button to display the audio
processor setting screen.
When an external audio processor is non-connected:
Press the button to display the audio mode
screen.
MUTE Button
Lowers the volume by 20 dB instantly. Press the button
again to cancel.
UP Button
Radio mode: Selects, in ascending order, stations
programed into the radio’s presets.
MP3/WMA/AAC mode:
Folder Select (UP) Button to selects the
folder.
Changer mode:
DISC Select (UP) Button selects a disc in
ascending order.
iPod/iPhone mode:
Selects a playlist/artist/album/genre/
composer/podcast in ascending order.
SiriusXM mode: Selects, in ascending order, the next
SiriusXM preset channel in the selected
band.
,
,
,
CLR Button
DVD Video mode:
Selects an item displayed in the screen.
Delete the previous number on numeric keypad or close the
numeric keypad screen.
ENT. Button
Enters the selected item and press the button to confirm
your selection as on the numeric keypad input screen.
107-EN
Button
Radio mode: SEEK (UP) button
CD/Changer mode:
Press the button to advance to the beginning
of the next track. Press and hold to fast
forward.
MP3/WMA/AAC iPod mode:
Press the button to advance to the beginning
of the next file. Press and hold to fast
forward.
DVD Video/Video CD:
• Move to the desired position on the disc.
• During playback, press and hold for more
than 1 second to forward the disc at
double speed. Hold for more than 5
seconds to forward the disc at 8 times the
normal speed. Hold for more than 10
seconds to forward the disc at 21 times
the normal speed.
DVD Video/Video CD:
• When pressed and held in while in the
pause mode, the disc is played in slow
motion at 1/8th the normal speed. When
held in for 5 more seconds, the slow
motion speed switches to 1/2 the normal
speed.
• The picture is forwarded by one frame
each time the button is pressed in the
pause mode.
SiriusXM mode: • When not in Replay mode, press this
button to select, in ascending order, the
next channel.
• When in Replay mode, press this button
to skip forward to the beginning of the
next track.
• When in Replay mode, press and hold
this button to fast-forward.
Numeric Keypad
Inputs numbers.
MONITOR Button
Not used.
ANGLE Button
DVD Video mode:
Switches the angle of the picture.
SUBTITLE Button
DVD Video mode:
Switches the subtitle.
• The SETUP operation of the unit cannot be carried out from the
remote control.
• Some operations may not be possible depending on the disc.
108-EN
When Using the Remote Control
• Point the remote control at the remote sensor within
about 2 meters.
• It may not be possible to operate the remote control if
the remote control sensor is exposed to direct
sunlight.
• The remote control is a small, lightweight precision
device. To avoid damage, short battery life,
operational errors and poor response, observe the
following.
- Do not subject the remote control to excessive
shock.
- Do not put in a trouser pocket.
- Keep away from food, moisture and dirt.
- Do not place in direct sunshine.
Battery Replacement
Battery type: CR2025 battery or equivalent.
1
Opening the battery case
Slide out the battery cover while firmly pressing in the
direction of the arrow.
2
Replacing the battery
Put the battery in the case with the (+) indication upward as
shown in the illustration.
Information
About DVDs
Music CDs and DVDs have grooves (tracks) in which the digital data is
recorded. The data is represented as microscopic pits recorded into the
track – these pits are read by a laser beam to play the disc. On DVDs,
the density of the tracks and pits is twice that of CDs, so DVDs can
contain more data in less space.
CDs
• Placing a battery in backwards way may cause a malfunction.
3
Closing the cover
Slide the cover as illustrated until a click is heard.
Minimum pit
length - 0.9 μm
1.2 mm
Track pitch 1.6 μm
DVDs
Minimum pit
0.6 mm
length - 0.6 mm
0.9 μm
Warning
DO NOT OPERATE ANY FUNCTION THAT TAKES
YOUR ATTENTION AWAY FROM SAFELY DRIVING
YOUR VEHICLE.
Any function that requires your prolonged attention should
only be performed after coming to a complete stop. Always
stop the vehicle in a safe location before performing these
functions. Failure to do so may result in an accident.
Track pitch 0.74 μm
A 12 cm disc can contain one movie or about four hours of music. In
addition, DVDs provide sharp picture quality with vivid colors thanks to
a horizontal resolution of over 500 lines (compared to less than 300 for
VHS tape).
In addition, DVDs offer a variety of functions.
Multiple audio* (page 49)
Movies can be recorded in up to eight languages. The desired
language can be selected from the unit.
Subtitles function* (page 50)
Movies can include subtitles in up to 32 languages. The desired
subtitle language can be selected from the unit.
Multi angle function* (page 49)
When the DVD contains a movie shot from multiple angles, the
desired angle can be selected from the unit.
Multi story function*
With this function, a single movie includes various story lines.
You can select different story lines to view various versions of the
same movie.
Operation differs from disc to disc. Story line selection screens
including instructions appear during the movie. Just follow the
instructions.
* These functions differ from disc to disc. For details, refer to the disc’s
instructions.
109-EN
Terminology
Dolby Digital
Dolby Digital is a digital audio compression technology
developed by Dolby Laboratories that allows large quantities of
audio data to be efficiently recorded on discs. It is compatible
with audio signals from mono (1 channel) all the way up to 5.1channel surround sound. The signals for the different channels
are completely independent, and since the sound is high quality
digital there is no loss of sound quality.
Dolby Pro Logic II
Dolby Pro Logic II plays 2-channel sources in 5 channels over
the entire frequency range.
This is done with an advance, high sound quality matrix
surround decoder which draws out the spatial properties of the
original recording without adding any sounds to or changing the
sound of the source.
* The separately sold digital audio processor (PXA-H700, etc.) is
required to enjoy Dolby Pro Logic II surround sound.
Linear PCM audio (LPCM)
LPCM is a signal recording format used for music CDs. Whereas music CDs are recorded at 44.1 kHz/16 bits, DVDs are
recorded at 48 kHz/16 bits to 96 kHz/24 bits, thereby achieving
higher sound quality than music CDs.
Rating levels (parental lock)
Center
speaker
Front
speakers
Rear
speakers
Subwoofer
Speaker layout for enjoying
Dolby Digital sound/DTS sound
DTS
This is a home-use digital sound format of the DTS Sound
System. This is a high quality sound system, developed by DTS,
Inc. for use in movie theaters.
DTS has six independent sound tracks. The theater presentation
is fully realized in the home and other settings. DTS is the
abbreviation for Digital Theater System.
* To enjoy DTS surround sound you need the separately sold DTS
digital audio processor (PXA-H700, etc.). The DVD video software
must also have a DTS sound track.
The INA-W910 has a built-in DTS 2-channel audio decoder.
Analogue audio outputs are available.
110-EN
This is a function of the DVD for restricting the viewing age as
stipulated by laws in different countries. The way in which
viewing is restricted differs from DVD to DVD. Sometimes the
DVD cannot be played at all, other times certain scenes are
skipped, and other times certain scenes are replaced with other
scenes.
List of Language Codes
(For details, see page 56.)
Abbreviation
AA
AB
AF
AM
AR
AS
AY
AZ
BA
BE
BG
BH
BI
BN
BO
BR
CA
CO
CS
CY
DA
DE
DZ
EL
EN
EO
ES
ET
EU
FA
FI
FJ
FO
FR
FY
GA
GD
GL
GN
GU
HA
HI
HR
HU
HY
IA
Code
6565
6566
6570
6577
6582
6583
6589
6590
6665
6669
6671
6672
6673
6678
6679
6682
6765
6779
6783
6789
6865
6869
6890
6976
6978
6979
6983
6984
6985
7065
7073
7074
7079
7082
7089
7165
7168
7176
7178
7185
7265
7273
7282
7285
7289
7365
Language
Afar
Abkhazian
Afrikaans
Amharic
Arabic
Assamese
Aymara
Azerbaijani
Bashkir
Byelorussian
Bulgarian
Bihari
Bislama
Bengali, Bangla
Tibetan
Breton
Catalan
Corsican
Czech
Welsh
Danish
Ger man
Bhutani
Greek
English
Esperanto
Spanish
Estonian
Basque
Persian
Finnish
Fiji
Faroese
French
Frisian
Irish
Scots Gaelic
Galician
Guarani
Gujarati
Hausa
Hindi
Croatian
Hungarian
Armenian
Interlingua
Abbreviation
IE
IK
IN
IS
IT
IW
JP
JI
JW
KA
KK
KL
KM
KN
KO
KS
KU
KY
LA
LN
LO
LT
LV
MG
MI
MK
ML
MN
MO
MR
MS
MT
MY
NA
NE
NL
NO
OC
OM
OR
PA
PL
PS
PT
QU
RM
Code
7369
7375
7378
7383
7384
7387
7465
7473
7487
7565
7575
7576
7577
7578
7579
7583
7585
7589
7665
7678
7679
7684
7686
7771
7773
7775
7776
7778
7779
7782
7783
7784
7789
7865
7869
7876
7879
7967
7977
7982
8065
8076
8083
8084
8185
8277
Language
Interlingue
Inupiak
Indonesian
Icelandic
Italian
Hebrew
Japanese
Yiddish
Javanese
Georgian
Kazakh
Greenlandic
Cambodian
Kannada
Korean
Kashmiri
Kurdish
Kirghiz
Latin
Lingala
Laothian
Lithuanian
Latvian, Lettish
Malagasy
Maori
Macedonian
Malayalam
Mongolian
Moldavian
Marathi
Malay
Maltese
Bur mese
Nauru
Nepali
Dutch
Norwegian
Occitan
(Afan) Oromo
Oriya
Punjabi
Polish
Pashto, Pushto
Por tuguese
Quechua
Rhaeto-Romance
Abbreviation
RN
RO
RU
RW
SA
SD
SG
SH
SI
SK
SL
SM
SN
SO
SQ
SR
SS
ST
SU
SE
SW
TA
TE
TG
TH
TI
TK
TL
TN
TO
TR
TS
TT
TW
UK
UR
UZ
VI
VO
WO
XH
YO
CN
ZU
Code
8278
8279
8285
8287
8365
8368
8371
8372
8373
8375
8376
8377
8378
8379
8381
8382
8383
8384
8385
8386
8387
8465
8469
8471
8472
8473
8475
8476
8478
8479
8482
8483
8484
8487
8575
8582
8590
8673
8679
8779
8872
8979
9072
9085
Language
Kirundi
Romanian
Russian
Kinyarwanda
Sanskrit
Sindhi
Sangho
Serbo-Croatian
Singhalese
Slovak
Slovenian
Samoan
Shona
Somali
Albanian
Serbian
Siswati
Sesotho
Sundanese
Swedish
Swahili
Tamil
Telugu
Tajik
Thai
Tigrinya
Turkmen
Tagalog
Setswana
Tonga
Turkish
Tsonga
Tatar
Twi
Ukrainian
Urdu
Uzbek
Vietnamese
Volapuk
Wolof
Xhosa
Yoruba
Chinese
Zulu
111-EN
List of Country Codes
(For details, see page 57.)
Abbreviation
AD
AE
AF
AG
AI
AL
AM
AN
AO
AQ
AR
AS
AT
AU
AW
AZ
BA
BB
BD
BE
BF
BG
BH
BI
BJ
BM
BN
BO
BR
BS
BT
BV
BW
BY
BZ
CA
CC
CD
Code
6568
6569
6570
6571
6573
6576
6577
6578
6579
6581
6582
6583
6584
6585
6587
6590
6665
6666
6668
6669
6670
6671
6672
6673
6674
6677
6678
6679
6682
6683
6684
6686
6687
6689
6690
6765
6767
6768
CF
CG
CH
CI
CK
CL
CM
CN
CO
CR
CU
CV
CX
CY
CZ
DE
DJ
DK
6770
6771
6772
6773
6775
6776
6777
6778
6779
6782
6785
6786
6788
6789
6790
6869
6874
6875
112-EN
Abbreviation
Country
DM
Andorra
DO
United Arab Emirates
DZ
Afghanistan
EC
Antigua and Barbuda
EE
Anguilla
EG
Albania
EH
Armenia
ER
Netherlands Antilles
ES
Angola
ET
Antarctica
FI
Argentina
FJ
American Samoa
FK
Austria
FM
Australia
FO
Aruba
FR
Azerbaijan
GA
Bosnia and Herzegovina
GB
Barbados
GD
Bangladesh
GE
Belgium
GF
Burkina Faso
GH
Bulgaria
GI
Bahrain
GL
Burundi
GM
Benin
GN
Bermuda
GP
Brunei Darussalam
GQ
Bolivia
GR
Brazil
GS
Bahamas
Bhutan
Bouvet Island
GT
Botswana
GU
Belarus
GW
Belize
GY
Canada
HK
Cocos (Keeling) Islands
HM
Congo, the Democratic
Republic of the
HN
Central African Republic
HR
Congo
HT
Switzerland
HU
Cote d’lvoire
ID
Cook Islands
IE
Chile
IL
Cameroon
IN
China
IO
Colombia
IQ
Costa Rica
IR
Cuba
IS
Cape Verde
IT
Christmas Island
JM
Cyprus
JO
Czech Republic
JP
Germany
KE
Djibouti
KG
Denmark
KH
Code
6877
6879
6890
6967
6969
6971
6972
6982
6983
6984
7073
7074
7075
7077
7079
7082
7165
7166
7168
7169
7170
7172
7173
7176
7177
7178
7180
7181
7182
7183
7184
7185
7187
7189
7275
7277
7278
7282
7284
7285
7368
7369
7376
7378
7379
7381
7382
7383
7384
7477
7479
7480
7569
7571
7572
Country
Abbreviation
Dominica
KI
Dominican Republic
KM
Algeria
KN
Ecuador
KP
Estonia
Egypt
KR
Western Sahara
KW
Eritrea
KY
Spain
KZ
Ethiopia
LA
Finland
Fiji
LB
Falkland Islands
LC
LI
Micronesia, Federated States of
LK
Faroe Islands
France
LR
Gabon
LS
United Kingdom
LT
Grenada
LU
Georgia
LV
French Guiana
LY
Ghana
MA
Gibraltar
MC
Greenland
MD
Gambia
MG
Guinea
MH
Guadeloupe
MK
Equatorial Guinea
ML
Greece
MM
South Georgia and the
South Sandwich Islands
MN
MO
Guatemala
MP
Guam
MQ
Guinea-Bissau
MR
Guyana
MS
Hong Kong
MT
Heard Island and
MU
McDonald Islands
MV
Honduras
MW
Croatia
MX
Haiti
MY
Hungary
MZ
Indonesia
NA
Ireland
NC
Israel
NE
India
NF
British Indian Ocean Territory
NG
Iraq
NI
Iran, Islamic Republic of
NL
Iceland
NO
Italy
NP
Jamaica
NR
Jordan
NU
Japan
NZ
Kenya
OM
Kyrgyzstan
PA
Cambodia
Code
7573
7577
7578
7580
Country
Kiribati
Comoros
Saint Kitts and Nevis
Korea, Democratic
People’s Republic of
7582
7587
7589
7590
7665
Korea, Republic of
Kuwait
Cayman Islands
Kazakstan
Lao People’s
Democratic Republic
7666
7667
7673
7675
7682
7683
7684
7685
7686
7689
7765
7767
7768
7771
7772
7775
Lebanon
Saint Lucia
Liechtenstein
Sri Lanka
Liberia
Lesotho
Lithuania
Luxembourg
Latvia
Libyan Arab Jamahiriya
Morocco
Monaco
Moldova, Republic of
Madagascar
Marshall Islands
Macedonia, The former
Yugoslav Republic of
Mali
Myanmar
Mongolia
Macau
Northern Mariana Islands
Martinique
Mauritania
Montserrat
Malta
Mauritius
Maldives
Malawi
Mexico
Malaysia
Mozambique
Namibia
New Caledonia
Niger
Norfolk Island
Nigeria
Nicaragua
Netherlands
Norway
Nepal
Nauru
Niue
New Zealand
Oman
Panama
7776
7777
7778
7779
7780
7781
7782
7783
7784
7785
7786
7787
7788
7789
7790
7865
7867
7869
7870
7871
7873
7876
7879
7880
7882
7885
7890
7977
8065
Abbreviation
PE
PF
PG
PH
PK
PL
PM
PN
PR
PT
PW
PY
QA
RE
RO
RU
RW
SA
SB
SC
SD
SE
SG
SH
SI
Code
8069
8070
8071
8072
8075
8076
8077
8078
8082
8084
8087
8089
8165
8269
8279
8285
8287
8365
8366
8367
8368
8369
8371
8372
8373
Country
Abbreviation
SJ
Peru
SK
French Polynesia
SL
Papua New Guinea
SM
Philippines
SN
Pakistan
SO
Poland
SR
Saint Pierre and Miquelon
ST
Pitcairn
SV
Puerto Rico
SY
Portugal
SZ
Palau
TC
Paraguay
TD
Qatar
TF
Reunion
TG
Romania
TH
Russian Federation
TJ
Rwanda
TK
Saudi Arabia
TM
Solomon Islands
TN
Seychelles
Sudan
TO
Sweden
TP
Singapore
TR
Saint Helena
TT
Slovenia
TV
Code
8374
8375
8376
8377
8378
8379
8382
8384
8386
8389
8390
8467
8468
8470
8471
8472
8474
8475
8477
8478
8479
8480
8482
8484
8486
Country
Abbreviation
Svalbard and Jan Mayen
TW
Slovakia
TZ
Sierra Leone
UA
UG
San Marino
UM
Senegal
Somalia
US
Suriname
UY
Sao Tome and Principe
UZ
El Salvador
VA
Syrian Arab Republic
VC
Swaziland
Turks and Caicos Islands
VE
Chad
VG
French Southern Territories
VI
Togo
VN
VU
Thailand
WF
Tajikistan
Tokelau
WS
YE
Turkmenistan
YT
Tunisia
Tonga
YU
East Timor
ZA
Turkey
ZM
Trinidad and Tobago
ZW
Tuvalu
Code
8487
8490
8565
8571
8577
8583
8589
8590
8665
8667
8669
8671
8673
8678
8685
8770
8783
8969
8984
8985
9065
9077
9087
Country
Taiwan, Province of China
Tanzania, United Republic of
Ukraine
Uganda
United States Minor
Outlying Islands
United States
Uruguay
Uzbekistan
Holy See (Vatican City State)
Saint Vincent and the
Grenadines
Venezuela
Virgin Island, British
Virgin Islands, U.S
Viet Nam
Vanuatu
Wallis and Futuna
Samoa
Yemen
Mayotte
Yugoslavia
South Africa
Zambia
Zimbabwe
113-EN
In Case of Difficulty
If you encounter a problem, please turn the power off, then on again.
If the unit is still not functioning normally, please review the items in
the following checklist. This guide will help you isolate the problem
if the unit is at fault. Otherwise, make sure the rest of your system is
properly connected, or then consult your authorized Alpine dealer or
Alpine directly at 1-888-NAV-HELP (1-888-628-4357).
Basic
No function or display.
• Vehicle’s ignition is off.
- If connected according to the instructions, the unit will not
operate with the vehicle’s ignition off.
• Improper power lead connections.
- Check power lead connections.
• Blown fuse.
- Check the fuse on the battery lead of the unit; replace with the
proper value if necessary.
• Internal micro-computer malfunctioned due to interference
noise, etc.
- Press the RESET switch with a ballpoint pen or other pointed
article.
- Press any button to power on this unit.
• Display OFF mode is activated.
- Cancel Display OFF mode.
No sound or unnatural sound.
• Incorrect setting of volume/balance/fader controls.
- Readjust the controls.
• Connections are not properly or securely made.
- Check the connections and firmly connect.
Screen not displayed.
• Brightness control is set at the minimum position.
- Adjust the Brightness control.
• Temperature in the vehicle is too low.
- Increase the vehicle’s interior temperature to operation
temperature range.
• Connections to the DVD, CD player are not securely made.
- Check the connections and firmly connect.
Movement of displayed picture is abnormal.
• Temperature in the vehicle is too high.
- Allow the vehicle’s interior temperature to cool.
Unclear or noisy display.
• TFT-LCD MODULE is worn out.
- Replace the TFT-LCD MODULE.
The remote control is inoperative.
• The remote control sensor setting of “Rear Entertainment
Function” is not set to this unit.
- Set for this unit.
No operation
• Moisture condensation
- Allow enough time for the condensation to evaporate (about 1 hour).
• Ambient Temperature
- Make sure the temperature inside the vehicle is between 0 °C
and 45 °C (32 °F and 113 °F).
Radio
Unable to receive stations.
• No antenna, or open connection in the antenna cable.
- Make sure the antenna is properly connected; replace the
antenna or cable if necessary.
Unable to tune stations in the seek mode.
• You are in a weak signal area.
- Make sure the tuner is in DX mode.
• If the area you are in is a primary signal area, the antenna may
not be grounded and connected properly.
- Check your antenna connections; make sure the antenna is
properly grounded at its mounting location.
• The antenna may not be the proper length.
- Make sure the antenna is fully extended; if broken, replace the
antenna with a new one.
Broadcast is noisy.
• The antenna is not the proper length.
- Extend the antenna fully; replace it if it is broken.
• The antenna is poorly grounded.
- Make sure the antenna is grounded properly at its mounting location.
• The station signal is weak and noisy.
- If above solution does not work, tune in another station.
CD/MP3/WMA/AAC/DVD
Disc playback sound is wavering.
• Moisture condensation in the disc Module.
- Allow enough time for the condensation to evaporate (about 1
hour).
Disc insertion not possible.
• A disc is already in the DVD player.
- Eject the disc and remove it.
• The disc is being improperly inserted.
- Make sure the disc is being inserted following the instructions
in the CD/MP3/WMA/AAC, DVD Player Operation section.
Disc ejection not possible.
• There is dust in the DVD Player.
- After touching [Eject] of Disc on the Eject/Tilt screen, insert
another disc into the Disc Slot*. A part of the blocked disc will
be ejected, and then pull the disc out.
* Insert the disc as the Disc Slot space allows, and stop inserting while
an obstacle occurs. Do not force it into the slot to avoid a
malfunction.
Navigation
The vehicle’s position is erroneous.
• The GPS reception is poor.
- Drive the vehicle in an area of good GPS reception to allow the
unit to recalibrate itself. Move to a location where strong GPS
reception is possible.
114-EN
If the above mentioned solution does not solve the problem,
consult your nearest Alpine dealer.
Unable to fast forward or backward the disc.
• The disc has been damaged.
- Eject the disc and discard it; using a damaged disc in your unit
can cause damage to the mechanism.
Disc playback sound skips due to vibration.
• Improper mounting of the unit.
- Securely re-mount the unit.
• Disc is very dirty.
- Clean the disc.
• Disc has scratches.
- Change the disc.
• The pick-up lens is dirty.
- Do not use a commercially available lens cleaner disc. Consult
your nearest Alpine dealer.
Disc playback sound skips without vibration.
• Dirty or scratched disc.
- Clean the disc; damaged disc should be replaced.
CD-R/CD-RW playback not possible.
• Close session (finalization) has not been performed.
- Perform finalization and attempt playback again.
Picture is unclear or noisy.
• Disc is being fast-forwarded or fast-reversed.
- The picture may be slightly disturbed, but this is normal.
• Vehicle’s battery power is weak.
- Check the battery power and wiring.
(The unit may malfunction if the battery power is under 11
volts with a load applied.)
Image stops sometimes.
• Disc is scratched.
- Replaced with a non-scratched disc.
Indication for CD/MP3/WMA/AAC
• No disc is inserted.
- Insert a disc.
• Although a disc is inserted, “No Disc” is displayed and the unit
does not start to play or eject the disc.
- Remove the disc by following these steps. Press
for at least 3 seconds.
Error displays.
• Mechanical error.
- Touch [Eject] of Disc on the Eject/Tilt screen. After the error
indication disappears, insert the disc again. If the abovementioned solution does not solve the problem, consult your
nearest Alpine dealer.
MP3/WMA/AAC is not played back.
• Writing error occurred. The CD format is not compatible.
- Make sure the CD has been written in a supported format.
Refer to “About MP3/WMA/AAC” (pages 43 and 44), then
rewrite in the format supported by this device.
Unit does not operate.
• Monitor’s power is not turned on.
- Turn on the monitor’s power.
• Condensation.
- Wait a while (about 1 hour) for the condensation to dry.
No picture is produced.
• Monitor’s mode is not switched to the mode you want to see.
- Switch to the mode you want to see.
• Monitor’s parking brake lead is not connected.
- Connect the monitor’s parking brake wire and set the parking
brake. (For details, refer to the monitor’s instructions.)
Playback does not start.
• Disc is loaded upside-down.
- Check the disc and load it with the labeled side facing upward.
• Disc is dirty.
- Clean the disc.
• A disc not able to play back with this unit is loaded.
- Check if the disc is able to be played back.
• Parental lock is set.
- Cancel the parental lock or change the rating level.
• Mechanism error.
1) Touch [Eject] of Disc on the Eject/Tilt screen and eject the
disc. If not ejecting, consult your Alpine dealer.
2) When the error indication remains after ejecting, touch
[Eject] of Disc on the Eject/Tilt screen again.
If the error indication still does not turn off after trying to
touch [Eject] of Disc on the Eject/Tilt screen. for a few
times, consult your Alpine dealer.
• Disc was forcibly pulled out by hand during Auto Loading.
- When the error indication remains after loading, try to load
again.
If the error indication still does not turn off after pressing for a
few times, consult your Alpine dealer.
• Scratched disc, contaminated disc/poor recording/disc
incompatible with this unit.
- Touch [Eject] of Disc on the Eject/Tilt screen.
- Change the disc.
• A copy-protected WMA file was played back.
- You can only play back non-copy-protected files.
• A sampling rate/bit rate not supported by the unit is used.
- Use a sampling rate/bit rate is supported by the unit.
115-EN
Indication for DVD/Video CD
Indication for CD changer
• No disc is inserted.
- Insert a disc.
• Although a disc is inserted, “No Disc” is displayed and the unit
does not start to play or eject the disc.
- Remove the disc by following these steps. Press
for at least 3 seconds.
• Protective circuit is activated due to high temperature.
- The indicator will disappear when the temperature returns to
within operation range.
• Button operation on the unit or remote control is not possible.
- For some discs or playing modes, certain operations are not
possible. This is not a malfunction.
• Disc does not match regional code number.
- Load a disc that matches the regional code number.
• Mechanism error.
1) Touch [Eject] of Disc on the Eject/Tilt screen and eject the
disc. If not ejecting, consult your Alpine dealer.
2) When the error indication remains after ejecting, touch
[Eject] of Disc on the Eject/Tilt screen again. If the error indication still does not turn off after touching
[Eject] of Disc on the Eject/Tilt screen for a few times,
consult your Alpine dealer.
• Scratched disc, contaminated disc/poor recording/disc
incompatible with this unit.
- Touch [Eject] of Disc on the Eject/Tilt screen.
- Change the disc.
• The DVD setup operation was attempted when a disc is inserted
in the unit.
- Eject the disc before the DVD setup operation.
116-EN
• Malfunction in the CD Changer.
- Consult your Alpine dealer. Press the magazine eject button
and pull out the magazine. Check the indication. Insert the magazine again. If the magazine cannot be pulled out, consult your Alpine
dealer.
• Magazine ejection not possible.
- Press the magazine eject button. If the magazine does not eject,
consult your Alpine dealer.
• A disc is left inside the CD Changer.
- Press the eject button to activate the eject function. When the
CD Changer finishes the eject function, insert an empty CD
magazine into the CD Changer to receive the disc left inside
the CD Changer.
• No magazine is loaded into the CD Changer.
- Insert a magazine.
• No indicated disc.
- Choose another disc.
SiriusXM Advisory Messages
The following messages may be displayed while operating the unit
in SiriusXM mode.
• The SiriusXM Tuner is disconnected or the unit is having trouble
communicating with the Tuner.
- Connect the Tuner or check the Tuner connection to the back
of the unit.
• A locked channel is selected.
- Input the passcode on the number keypad screen, refer to
“Parental Lock Function” on page 96. If wrong passcode is
input, “Incorrect Lock Code” will be displayed and the unit
will revert to the previous channel.
• Buffer for Replay will be full within 11 seconds.
• The SiriusXM Satellite Radio antenna or cable is either damaged
or not connected correctly to the SiriusXM Tuner.
- Check that the SiriusXM antenna cable is connected to the
SiriusXM Tuner and check that the antenna cable is not kinked
or otherwise damaged. Replace the antenna if necessary.
• The SiriusXM satellite signal is too weak at the current location.
- Move the vehicle to a location with a clear view of the southern
sky.
- Make sure the Satellite Radio antenna is properly mounted and
not obstructed by metal objects.
• The active channel has become unsubscribed or the requested
channel is not available in your subscription package.
NOTE
• The unit will revert to the previous selected channel or to
channel 1 automatically.
- Visit www.siriusxm.com for information on subscribing to this
channel.
• The active channel is no longer in the SiriusXM channel lineup
or the user has entered an invalid channel number.
NOTE
• The unit will revert to the previous channel or to channel 1
automatically.
- Visit www.siriusxm.com for information on the current
channel lineup.
• The Replay buffer is full.
- Memory for storing Alert items is full. Delete some items
before you add more items.
Indication for iPod/iPhone Mode
• Abnormal current is run to the USB connector device.
- Attempt to connect another iPod/iPhone.
• An iPod/iPhone that is not supported by the unit is connected.
- Connect an iPod/iPhone that is supported by the unit.
- Reset the iPod.
• An iPod/iPhone is not connected.
- Make sure the iPod/iPhone is correctly connected and the cable
is not excessively bent.
• There are no songs in the iPod/iPhone.
- Download songs to the iPod/iPhone and connect to the INA-W910.
• Database error or decoder error.
- You can solve the problem by reconnecting the iPod/iPhone.
• Your subscription has been updated.
- Press any button to clear this message.
• Communication error or boot error, etc.
- You can solve the problem by reconnecting the iPod/iPhone or
changing source.
117-EN
• The iPod/iPhone is not verified.
- Change another iPod/iPhone.
• A Flash memory/Portable audio player is not connected.
- Make sure the Flash memory device/Portable audio player is
correctly connected and the cable of Portable audio player is
not excessively bent.
(Pandora Radio mode)
• You have not created any personalized Pandora Stations.
- When you are not driving, use the Pandora Compatible
Application for iPhone to create your Pandora station(s).
(Pandora Radio mode)
• The music cannot be played because the Pandora Compatible
Application for iPhone requires the user’s attention. Please do
not see your mobile device while driving.
- When you are not driving, please see the Pandora Compatible
Application for iPhone.
• There are no songs in the Flash memory/Portable audio player.
- Download songs to the Flash memory/Portable audio player
and connect to this unit.
• A sampling rate/bit rate not supported by the unit is used.
- Use a sampling rate/bit rate that is supported by the unit.
• A copy-protected WMA file was played back.
- You can only play back non-copy-protected files.
- Make sure the Portable audio player is set to MTP.
(Pandora Radio mode)
• You switched this unit to Pandora mode with an iPhone or iPod
touch connected, without launching or installing the Pandora
Application.
- Launch the Pandora Application on the iPhone or iPod touch.
- Select a source other than Pandora.
Indication for Flash memory/Portable audio player mode
• Abnormal current is run to the USB connector device.
Flash memory/Portable audio player is a malfunction or it is
shorted.
- Connect another Flash memory/Portable audio player.
• Database error or decoder error.
- You can solve the problem by reconnecting the Flash memory/
Portable audio player.
• Communication error or boot error, etc.
- You can solve the problem by reconnecting the Flash memory/
Portable audio player or changing source.
• The Portable audio player is not verified.
- Change another Portable audio player.
BLUETOOTH mode
• A USB device/Portable audio player that is not supported by the
unit is connected.
- Attempt to connect another Flash memory/Portable audio
player.
118-EN
• The BLUETOOTH device is not connected.
- Connect the BLUETOOTH device.
GENERAL
Specifications
Power Requirement
MONITOR SECTION
Screen Size
7.0"
LCD Type
Transparent type TN LCD
Operation System
TFT active matrix
Number of Picture Elements 1,152,000 pcs. (800 × 3 × 480)
Effective Number of Picture Elements
99% or more
Illumination System
LED
FM TUNER SECTION
Tuning Range
Mono Usable Sensitivity
50 dB Quieting Sensitivity
Alternate Channel Selectivity
Signal-to-Noise Ratio
Stereo Separation
Capture Ratio
87.7 – 107.9 MHz
9.3 dBf (0.8 μV/75 ohms)
13.5 dBf (1.3 μV/75 ohms)
80 dB
65 dB
35 dB
2.0 dB
AM TUNER SECTION
Tuning Range
Usable Sensitivity
File System
MP3 Decoding
WMA Decoding
AAC Decoding
4,000 mV/10 k ohms
±14 dB at 60 Hz
±14 dB at 10 kHz
2.7 kg (5 lbs. 15 oz)
4 V/10 k ohms (max.)
4 V/10 k ohms (max.)
1.2 V/10 k ohms
850 mV
CHASSIS SIZE (Monitor section)
Width
Height
Depth
178 mm (7")
100 mm (3-15/16")
164.6 mm (6-1/2")
1.57542 ±1.023 MHz
-130 dBm
BLUETOOTH Specification Bluetooth V2.0
Output Power
+4 dBm Max. (Power class 2)
Profile
HFP (Hands-Free Profile)
HSP (Head Set Profile)
REMOTE CONTROL
USB 1.1/2.0
USB (Play From Device)/
USB (Mass Storage Class)
FAT12/16/32
MPEG-1/2 AUDIO Layer-3
Windows Media™ Audio
AAC-LC format “.m4a” file
CD/DVD SECTION
Frequency Response
Wow & Flutter (% WRMS)
Total Harmonic Distortion
Dynamic Range
Channel Separation
Signal system
Horizontal resolution
Video output level
Video S/N ratio
Audio S/N ratio
Output Voltage
Bass
Treble
Weight
Audio output level
Preout (Front, Rear):
Preout (Subwoofer):
AUX OUT:
Ai-NET:
BLUETOOTH SECTION
USB SECTION
USB requirements
USB Class
• Power output: measured at 4 Ohms and 1% THD+N
• S/N: 80 dBA (reference: 1 W into 4 Ohms)
530 – 1,710 kHz
22.5 μV/27 dBf
NAVIGATION SECTION
Received Frequency
Receiving Sensitivity
14.4 V DC
(11–16 V allowable)
Operating temperature
+32 °F to +113 °F
(0 °C to + 45 °C)
Power Output
18 W RMS × 4*
* Primary amplifier ratings per CEA-2006 Standard
5 – 20,000 Hz (± 1dB)
Below measurable limits
0.008% (at 1 kHz)
95 dB (at 1 kHz)
85 dB (at 1 kHz)
NTSC/PAL
500 lines or greater
1Vp-p (75 ohms)
DVD: 60 dB
105 dB
Battery Type
Width
Height
Depth
Weight
CR2025 battery
51 mm (2")
119 mm (4-11/16")
13 mm (1/2")
40 g (1.4 oz)
(battery excluded)
• Due to continuous product improvement, specifications and design
are subject to change without notice.
• The LCD panel is manufactured using an extremely high precision
manufacturing technology. Its effective pixel ratio is over 99.99%.
This means that there is a possibility that 0.01% of the pixels could
be either always ON or OFF.
PICKUP
Wave length
Laser power
DVD: 666 nm
CD: 785 nm
CLASS II
CAUTION
CAUTION-Laser radiation when open, DO NOT STARE INTO BEAM
(Bottom side of player)
119-EN
Installation and Connections
Before installing or connecting the unit, please read the
following and pages 8 to 13 of this manual thoroughly for
proper use.
Caution
HAVE THE WIRING AND INSTALLATION DONE BY EXPERTS.
Warning
MAKE THE CORRECT CONNECTIONS.
Failure to make the proper connections may result in fire or product
damage.
USE SPECIFIED ACCESSORY PARTS AND INSTALL THEM
SECURELY.
USE ONLY IN CARS WITH A 12 VOLT NEGATIVE GROUND.
Be sure to use only the specified accessory parts. Use of other than
designated parts may damage this unit internally or may not
securely install the unit in place. This may cause parts to become
loose resulting in hazards or product failure.
(Check with your dealer if you are not sure.) Failure to do so may
result in fire, etc.
BEFORE WIRING, DISCONNECT THE CABLE FROM THE
NEGATIVE BATTERY TERMINAL.
Failure to do so may result in electric shock or injury due to
electrical shorts.
DO NOT ALLOW CABLES TO BECOME ENTANGLED IN
SURROUNDING OBJECTS.
Arrange wiring and cables in compliance with the manual to
prevent obstructions when driving. Cables or wiring that obstruct or
hang up on places such as the steering wheel, gear lever, brake
pedals, etc. can be extremely hazardous.
DO NOT SPLICE INTO ELECTRICAL CABLES.
Never cut away cable insulation to supply power to other
equipment. Doing so will exceed the current carrying capacity of
the wire and result in fire or electric shock.
DO NOT DAMAGE PIPE OR WIRING WHEN DRILLING
HOLES.
When drilling holes in the chassis for installation, take precautions
so as not to contact, damage or obstruct pipes, fuel lines, tanks or
electrical wiring. Failure to take such precautions may result in fire.
DO NOT USE BOLTS OR NUTS IN THE BRAKE OR STEERING
SYSTEMS TO MAKE GROUND CONNECTIONS.
Bolts or nuts used for the brake or steering systems (or any other
safety-related system), or tanks should NEVER be used for
installations or ground connections. Using such parts could disable
control of the vehicle and cause fire etc.
KEEP SMALL OBJECTS SUCH AS BATTERIES OUT OF THE
REACH OF CHILDREN.
Swallowing them may result in serious injury. If swallowed,
consult a physician immediately.
DO NOT INSTALL IN LOCATIONS WHICH MIGHT HINDER
VEHICLE OPERATION, SUCH AS THE STEERING WHEEL OR
GEARSHIFT.
Doing so may obstruct forward vision or hamper movement etc.
and results in serious accident.
IMPORTANT
Please record the serial number of your unit in the space provided
below and keep it as a permanent record. The serial number plate is
located on the bottom of the unit.
The wiring and installation of this unit requires special technical
skill and experience. To ensure safety, always contact the dealer
where you purchased this product to have the work done.
120-EN
ARRANGE THE WIRING SO IT IS NOT CRIMPED OR
PINCHED BY A SHARP METAL EDGE.
Route the cables and wiring away from moving parts (like the seat
rails) or sharp or pointed edges. This will prevent crimping and
damage to the wiring. If wiring passes through a hole in metal, use
a rubber grommet to prevent the wire’s insulation from being cut by
the metal edge of the hole.
DO NOT INSTALL IN LOCATIONS WITH HIGH MOISTURE OR
DUST.
Avoid installing the unit in locations with high incidence of
moisture or dust. Moisture or dust that penetrates into this unit may
result in product failure.
Precautions
• Be sure to disconnect the cable from the (–) battery post before
installing your INA-W910. This will reduce any chance of
damage to the unit in case of a short-circuit.
• Be sure to connect the color coded leads according to the
diagram. Incorrect connections may cause the unit to
malfunction or damage to the vehicle’s electrical system.
• When making connections to the vehicle’s electrical system, be
aware of the factory installed components (e.g. on-board
computer). Do not tap into these leads to provide power for this
unit. When connecting the INA-W910 to the fuse box, make sure
the fuse for the intended circuit of the INA-W910 has the appropriate amperage. Failure to do so may
result in damage to the unit and/or the vehicle. When in doubt,
consult your Alpine dealer.
• The INA-W910 uses female RCA-type jacks for connection to
other units (e.g. amplifier) having RCA connectors. You may
need an adaptor to connect other units. If so, please contact your
authorized Alpine dealer for assistance.
• Be sure to connect the speaker (–) leads to the speaker (–)
terminal. Never connect left and right channel speaker cables to
each other or to the vehicle body.
• The Display must be completely retracted in the casing when
installing. If it is not, problems may occur.
• When installing in automobiles, make sure the Display can open/
close without coming in contact with the gear shift.
SERIAL NUMBER:
INSTALLATION DATE:
INSTALLATION TECHNICIAN:
PLACE OF PURCHASE:
3
Installation
Caution
Do not block the unit’s fan or heat sink, thus preventing
air circulation. If blocked, heat will accumulate inside
the unit and may cause a fire.
Air ventilation hole
Remove the mounting sleeve from the main unit (see
“Removal” on page 122).
The unit can be installed in the mounting sleeve in
three positions by aligning its mounting holes (A to
C) on the sides of the unit. Position B is the factory
default position. If A or C are to be used, the hole
positions need to be modified.
First, take off the existing seal, then determine the
mounting position in the mounting sleeve and affix
the supplied seal (refer to “How to use a Seal”
(page 122)).
Slide the unit into the mounting sleeve and secure it.
• Make sure that there is a enough space depthwise before installing
the unit. If the unit is forcibly pushed into the mounting sleeve,
damage may occur.
Rear of the Unit
Mounting Sleeve (Included)
Dashboard
Caution concerning the installation location
1
This unit
Before installing, make sure that the opening and
closing of the display will not interfere with
operation of the gear shift.
Movable Display
Seal (Included)
Pressure Plates*1
Face Plate*2 (Included)
<Mounting Hole Position>
Position A
2
Angle of installation About the installation angle, please install as
horizontally as possible within the following angle
range. If the installation angle is beyond the range,
the current position may not be correctly displayed
and a maloperation may be caused for the
navigation mode.
Position B
Position C
• Depending on the position chosen, the front panel will protrude
differently.
Front Panel
Dashboard
Position A
0°
Front Panel
10°(±5°)
Front of the unit
Top of the unit
Dashboard
Position B
0-30°
Front Panel
Side of the unit
Dashboard
Position C
*1 If the installed mounting sleeve is loose in the dashboard, the
pressure plates may be bent slightly to remedy the problem.
121-EN
How to use a Seal
Reinforce the head unit with the metal mounting
strap (not supplied). Secure the ground lead of the
unit to a clean metal spot using a screw (*1) already
attached to the vehicle’s chassis.
If A is used for installation:
Affix the seal so that mounting holes B and C are covered.
• For the screw marked “*2”, use an appropriate screw for the chosen
mounting location.
Connect each input lead coming from an amplifier or
equalizer to the corresponding output lead coming
from the left rear of the INA-W910. Connect all other
leads of the INA-W910 according to details
described in the CONNECTlONS section.
If B is used for installation:
Affix the seal so that mounting holes A and C are covered.
5
If C is used for installation:
Affix the seal so that the mounting holes A and B are covered.
Slide the INA-W910 into the dashboard until it clicks.
This ensures that the unit is properly locked and will
not accidentally come out from the dashboard.
Removal
1. Insert the bracket keys into the unit, along the guides
on either side. The unit can now be removed from the
mounting sleeve.
This unit
Bracket keys
(Included)
• If the mounting sleeve is not used while installing the unit, please
stick the seal on A position to prevent the dust from entering the unit.
Installing the Face Plate
*2 If B is used, the supplied face plate may be mounted.
If A or C is used, the face plate cannot be mounted.
2. Pull the unit out, keeping it unlocked as you do so.
<JAPANESE CAR>
Take the face plate off, and secure the ground lead of the unit to
a clean metal spot using a screw (*) already attached to the
car’s chassis.
Attach the Original Mounting Bracket to each side of the INA-W910, using the screws supplied with INA-W910.
4
Screw
Screws (M5 × 8) (Included)
Hex Nut (M5)
*2
Bolt Stud
Ground Lead
Metal
Mounting
Strap
*
*1
Mounting
Bracket
Ground Lead
This unit
Chassis
122-EN
Chassis
Face Plate (Included)
Install the GPS antenna
<For inside vehicle>
1. Stick the ground pad at the center of dash board and close to windshield with one inch distance.
2. Attach GPS antenna to the center of ground pad. (the cable side faces the back of vehicle)
<For outside vehicle>
At the front or back of vehicle roof.
Wiring the GPS antenna cable
Do not bend or fold the GPS antenna cable.
• When installing the INA-W910 to the vehicle, make sure the back of unit and the cable must not be bent.
Connect the GPS antenna
Securely connect the GPS antenna connector to INA-W910.
Connection of USB extension cable (included)
Connect the USB extension cable to the USB connector of the unit, and then secure the connection using the lock case supplied with USB extension
cable as shown below.
INA-W910
USB Connector
Cable (Supplied)
Foot Brake Lead / Parking Brake Lead Connection
Foot brake lamp
FOOT BRAKE
(Yellow/Black)
INA-W910
PARKING BRAKE
Pinch Connector
(sold separately)
Foot brake lead
Foot brake switch
Chassis
Parking brake lamp
(Yellow/Blue)
Pinch Connector
(sold separately)
Parking brake lead
Battery
Parking brake switch
Connection Diagram of SPST Switch (sold separately)
(If the ACC power supply is not available)
IGNITION
(Red)
SPST SW (Optional)
FUSE (5A)
(Optional)
BATTERY
(Yellow)
FUSE (20A)
(Optional)
INA-W910
Battery
• If your vehicle has no ACC power supply, add an SPST (Single-Pole, Single-Throw) switch (sold separately) and fuse (sold separately).
• The diagram and the fuse amperage shown above are in the case when INA-W910 is used individually.
• If the switched power (ignition) lead of the INA-W910 is connected directly to the positive (+) post of the vehicle’s battery, the INA-W910 draws
some current (several hundred milliamperes) even when its switch is placed in the OFF position and the battery may be discharged.
To prevent external noise from entering the audio system.
Locate the unit and route the leads at least 10 cm away from the car harness.
Keep the battery power leads as far away from other leads as possible.
Connect the ground lead securely to a bare metal spot (remove any paint, dirt or grease if necessary) of the car chassis.
If you add an optional noise suppressor, connect it as far away from the unit as possible. Your Alpine dealer carries various
noise suppressors, contact them for further information.
• Your Alpine dealer knows best about noise prevention measures so consult your dealer for further information.
•
•
•
•
123-EN
Calibration when connected to HCE-C300R
Obstacle detection performance adjustment and guidance mark settings
of HCE-C300R (REAR VIEW CAMERA SYSTEM) require that
camera installation information be entered and calibration performed. If
camera information is not entered, accurate detection will not be
possible, so be sure to perform calibration.
For details on calibration, refer to “Calibration” in the owner’s manual
of HCE-C300R. To perform calibration with the supplied switch, refer
to “Performing Calibration” in the owner’s manual of HCE-C300R.
When connected to this unit, you can perform operations via the screen
of this unit.
To activate the Calibration Setup Mode in this unit
1
Perform steps 1 and 2 in “Performing Calibration” of
the owner’s manual of HCE-C300R.
2
Press SOURCE/
3
Touch
4
on the unit.
The SOURCE selection screen is displayed.
(CAMERA).
The Camera mode is activated and the Top menu is
displayed.
Touch any area of the screen to display the view
change function keys.
• Make sure view change function is set to ON (page 66).
Display example for Top menu screen
5
Touch [Back]
[Corner]
[Back] according to
the instructions on the screen.
The Setup Mode screen appears.
Display example for Setup mode screen
124-EN
Continue with the following operations after performing step 4 in
“Performing Calibration” of the owner’s manual of HCE-C300R. While
doing such operations, touch the button on the screen to select
“CHANGE” or “DONE” to perform calibration on this unit. Touching
[Corner] and [Back] on the screen of this unit performs the same
operation as pressing the switch which is supplied by HCE-C300R.
[Corner] = VIEW: Selects a desired item.
(The switch that is selected is enclosed by a
yellow frame.)
Executes the selection.
[Back] = SET.:
Connections
Antenna
REMOTE OUT
(White/Brown)
REMOTE IN
(White/Brown)
REVERSE
(Orange/White)
CAMERA SW
(Black)
GUIDE CONT
(White/Green)
To remote input lead
To remote output lead
To plus side of the back
lamp signal lead of the car
Not used
To guide control input terminal
To steering remote control
interface box
(Black)
Microphone
GPS Antenna
(Yellow)
To Video Output terminal
(Red)
To Audio Output terminals
(R, L)
To Video Input terminal
(White)
(Yellow)
(Red)
To Audio Input terminals
(R, L)
(White)
GUIDE
To Guide Input terminal
(Black)
CAMERA IN
To Camera with RCA Output
terminal
To SiriusXM Tuner
(Yellow)
Rear Left
Amplifier
Rear Right
Front Left
Amplifier
Front Right
Subwoofers
Amplifier
CD Changer (sold separately)
REMOTE TURN-ON
(Blue/White)
POWER ANT
(Blue)
AUDIO INTERRUPT IN
(Pink/Black)
PARKING BRAKE
To amplifier or equalizer
To power antenna
Not used
To the parking brake
signal lead
To the foot brake cord or brake lamp cord
(Yellow/Blue)
FOOT BRAKE
(Yellow/Black)
IGNITION
(Red)
BATTERY
Ignition key
(Yellow)
GND
or
(Black)
Battery
SPEAKER
SPEAKER
SPEAKER
SPEAKER
RIGHT
RIGHT
LEFT
LEFT
(White/
(Green)
(Violet/
REAR
FRONT
FRONT
REAR
Black) (Green/
Black) (Gray/
(Violet)
(White)
Black)
Black)
To Flash memory/
Portable audio player
(Gray)
Speakers
To iPod/iPhone
Front left
Rear left
Rear right
Front right
• Set the system switch to “NORM” when only a changer is connected (when the Ai-NET compatible equalizer is not used). When the IMPRINT
audio processor is connected, set to EQ/DIV position.
* The system switch is located on the bottom of the unit.
125-EN
Radio Antenna Receptacle
RCA Extension Cable (sold separately)
Remote Control Output Lead (White/Brown)
Direct CAMERA Input Connector
Connect this lead to the remote control input lead. This lead
outputs the controlling signals from the remote control.
Use when the optional direct camera is connected.
Remote Control Input Lead (White/Brown)
Connect the external Alpine product to the remote control
output lead.
Reverse Lead (Orange/White)
Use only when a back-up camera is connected. Connect to
the plus side of the car’s reverse lamp. This lamp illuminates
when the transmission is shifted into reverse (R).
With this lead properly wired, the video picture
automatically switches to the back-up camera whenever the
car is put into reverse (R).
CAMERA SW Lead (Black)
Not used for this unit now.
Guide Control Lead (White/Green)
Use when an optional External Audio Processor with guide
control input terminal is connected.
Steering Remote Control Interface Connector (Black)
To steering remote control interface box.
For details about connections, consult your nearest Alpine
dealer.
Video Input Connector (AUX INPUT) (Yellow)
Input the video.
Audio Input Connectors (AUX INPUT)
RED is right and WHITE is left input the audio.
Video Output Connector (AUX OUTPUT) (Yellow)
Output the video.
Audio Output Connectors (AUX OUTPUT)
RED is right and WHITE is left output the audio.
Guide Connector (Black)
Output the audio signal of navigation interruption.
When connecting an IMPRINT Audio processor (PXA-H100)
or an external audio processor with Guide input terminal,
connect this lead to the Guide Input terminal with an
optional RCA Extension cable.
Camera Input RCA Connector (CAMERA IN)
Use when connecting an optional camera with RCA video
output connector.
SiriusXM Tuner connector
Connect to a SiriusXM Tuner.
Refer to additional installations instructions included with
the SiriusXM tuner.
Rear Output/Input RCA Connectors
It can be used as Rear Output or Input RCA Connectors.
Front Output/Input RCA Connectors
It can be used as Front Output or Input RCA Connectors.
Subwoofer RCA Connectors
RED is right and WHITE is left.
• When an Alpine rearview camera HCE-C300R is used, please make
sure to connect it to this unit via Direct CAMERA Input Connector.
iPod (V)/AUX Input Connector
Input the Phone/video compatible Pod audio/video signal
or AUX video/audio signal.
• Set “AUX2 IN” to “iPod Video” in “Setting the AUX2 Mode”
(page 67) when an iPhone or a video compatible iPod is connected.
• Set “AUX2 IN” to “AUX” in “Setting the AUX2 Mode” (page 67)
when normal AUX video/audio is input.
GPS Antenna Receptacle
To GPS Antenna.
MIC Input Connector
To Microphone (supplied).
Ai-NET Connector
Connect this to the output or input connector of another
device (CD Changer, Equalizer, etc.) equipped with Ai-NET.
• Be sure to set “Setting the Connected Head Unit (MODEL SETUP)”
to “DVD CHG”, when the DHA-S690 is connected.
USB Connector
AUX I/O / Camera Input Connector
RCA Output/Input Connector
System Switch
When connecting an equalizer or divider using Ai-NET
feature, place the switch in the EQ/DIV position. When no
device is connected, leave the switch in the NORM position.
• Be sure to turn the power off to the unit before changing the switch
position.
Power Supply Connector
Digital Output Terminal (Optical)
Use when combining fiber optic digital input compatible
products. Be sure to use the Optical Digital Cable (KWE-610A) (sold separately) only.
Ai-NET Cable (Included with CD Changer)
Remote Turn-On Lead (Blue/White)
Connect this lead to the remote turn-on lead of your
amplifier or signal processor.
Power Antenna Lead (Blue)
Connect this lead to the +B terminal of your power antenna,
if applicable.
• This lead should be used only for controlling the vehicle’s power
antenna. Do not use this lead to turn on an amplifier or a signal
processor, etc.
Audio Interrupt In Lead (Pink/Black)
Not used for this unit.
Parking Brake Lead (Yellow/Blue)
Connect this lead to the power supply side of the parking
brake switch to transmit the parking brake status signals to
the INA-W910.
Foot Brake Lead (Yellow/Black)
Connect to the vehicle’s foot brake lead or brake lamp lead.
126-EN
Switched Power Lead (Ignition) (Red)
Connect this lead to an open terminal on the vehicle’s fuse
box or another unused power source which provides (+)
12V only when the ignition is turned on or in the accessory
position.
Battery Lead (Yellow)
Connect this lead to the positive (+) post of the vehicle’s
battery.
Fuse Holder (10A)
Ground Lead (Black)
Connect this lead to a good chassis ground on the vehicle.
Make sure the connection is made to bare metal and is
securely fastened using the sheet metal screw provided.
Right Front (+) Speaker Output Lead (Gray)
Right Front (–) Speaker Output Lead (Gray/Black)
Right Rear (–) Speaker Output Lead (Violet/Black)
Right Rear (+) Speaker Output Lead (Violet)
Left Rear (+) Speaker Output Lead (Green)
Left Rear (–) Speaker Output Lead (Green/Black)
Left Front (–) Speaker Output Lead (White/Black)
Left Front (+) Speaker Output Lead (White)
USB extension cable (Included)
AV extension cable (Included)
USB 30P cable (Included)
127-EN
System Example
Connect the Ai-NET compatible audio processor (Fiber optic digital compatible) DVD player and changer.
Audio Processor (PXA-H701)
(Ai-NET) (Fiber Optic Digital
compatible) (sold separately)
Guide Control
Ai-NET
cable
Ai-NET cable
(Yellow)
(White/Brown)
REMOTE OUT
(White/Brown)
REMOTE IN
DVD Video Player
(Ai-NET) (DVA-5210, etc.)
(sold separately)
Ai-NET cable
CD Changer
(Ai-NET) (sold separately)
* Only connect fiber optic digital compatible CD Changer
Please observe the following when using Fiber Optic Cable (Optical Digital Cable).
• Do not coil the Fiber Optic Cable smaller than a 30 mm radius.
• Do not place anything on top of the Fiber Optic Cable.
• Be careful not to bend the Fiber Optic Cable at a sharp angle.
Ai-NET Connector
Video Input Connector (AUX INPUT) (Yellow)
Connect this to the output or input connector of other
product equipped with Ai-NET.
Connect the video output lead of a DVD video player or
DVD changer to this terminal.
System Switch
AUX I/O / Camera Input Connector
When connecting an equalizer or divider using Ai-NET
feature, place the switch in the EQ/DIV position. When no
device is connected, leave the switch in the NORM position.
To Ai-NET Connector (Black)
• Be sure to turn the power off to the unit before changing the switch
position.
Ai-NET Cable (Included with Audio Processor)
Ai-NET Cable (Included with CD Changer)
Guide Connector (Black)
Ai-NET Cable (Included with DVD video player)
Output the audio signal of navigation interruption.
Remote Control Output Lead (White/Brown)
RCA Extension Cable (sold separately)
Connect this lead to the remote control input lead. This lead
outputs the controlling signals from the remote control.
Guide Input terminal
To Ai-NET Connector (Gray)
RCA Extension Cable (Included with DVD video
player)
Fiber Optic Cable (sold separately)
Digital Output Terminal (Optical)
Optical Digital Cable (KWE-610A) (sold separately)
Guide Control Lead (White/Green)
Use when an optional External Audio Processor with guide
control input terminal is connected.
128-EN
When Connecting External Equipment
Direct camera HCE-C117D, etc.
(sold separately)
To Video Output terminal
Camera with RCA video output
(sold separately)
To Audio Input terminal
Rear monitor (sold separately)
To Video Input terminal
To Video Output terminal
TV Tuner (sold separately)
To Audio Output terminal
To Video Output terminal
DVE-5207, etc. (sold separately)
To Audio Output terminal
(White/Brown)
REMOTE OUT
REMOTE IN
(White/Brown)
(White/Brown)
REMOTE IN
REMOTE OUT
(White/Brown)
(Orange/White)
REVERSE
System Switch
When connecting an IMPRINT audio processor or divider
using Ai-NET feature, place the switch in the EQ/DIV
position. When no device is connected, leave the switch in
the NORM position.
• Be sure to turn the power off to the unit before changing the switch
position.
Use only when back-up camera is connected.
AV/RCA interface cable (4-pole mini AV plug to 3-RCA) (sold separately)
Usable 4-pole mini AV plug
Wiring convention of this system is as follows:
Audio L (White)
Audio R (Red)
AUX I/O / Camera Input Connector
Ground
Camera Input RCA Connector (CAMERA IN)
Video (Yellow)
Use when connecting an optional camera with RCA video
output connector.
Video/Audio Output Connectors (AUX OUTPUT)
Use when connecting an optional monitor etc.
Video/Audio Input Connectors (AUX INPUT)
iPod (V)/AUX Input Connector
• Configuration commercially available 4-pole mini AV plugs is not
unified.
Input the iPhone/video compatible iPod audio/video signal
or AUX video/audio signal.
• Set “AUX2 IN” to “AUX” in “Setting the AUX2 Mode” (page 67)
when normal AUX video/audio is input.
• When you use this connector as normal video/audio input connector
(AUX 2 Input), an optional AV/RCA interface cable should be used.
For details, refer to
.
129-EN
Video/Audio Input Connectors
YELLOW is for input video, RED is right and WHITE is left
input the audio.
Remote Control Output Lead (White/Brown)
Connect this lead to the remote control input lead. This lead
outputs the controlling signals from the remote control.
Remote Control Input Lead (White/Brown)
Reverse Lead (Orange/White)
Use only when a back-up camera is connected. Connect to
the plus side of the car’s reverse lamp. This lamp illuminates
when the transmission is shifted into reverse (R).
With this lead properly wired, the video picture
automatically switches to the back-up camera whenever the
car is put into reverse (R).
RCA Extension Cable (sold separately)
Direct CAMERA Input Connector
Use when the optional direct camera is connected.
Camera extension cable (Included with direct
camera)
About the Rules of Bluetooth Electromagnetic Radiation Regulation
USA/Canada
This device complies with Part 15 of the FCC Rules and RSS-Gen of IC Rules. Operation is
subject to the following two conditions: (1) this device may not cause interference, and (2) this
device must accept any interference, including interference that may cause undesired operation
of this device.
FCC WARNING
Changes or modifications not expressly approved by the party responsible for compliance could
void the user’s authority to operate the equipment.
130-EN
LIMITED WARRANTY
ALPINE ELECTRONICS OF AMERICA, INC. AND ALPINE OF CANADA INC. (“Alpine”), are dedicated to quality craftsmanship and
are pleased to offer this Warranty. We suggest that you read it thoroughly. Should you have any questions, please contact your Dealer
or contact Alpine at one of the telephone numbers listed below.
PRODUCTS COVERED:
This Warranty covers Car Audio Products and Related
Accessories (“the product”). Products purchased in the Canada
are covered only in the Canada. Products purchased in the
U.S.A. are covered only in the U.S.A.
LENGTH OF WARRANTY:
This Warranty is in effect for one year from the date of the first
consumer purchase.
WHO IS COVERED:
This Warranty only covers the original purchaser of the product,
who must reside in the United States, Puerto Rico or Canada.
WHAT IS COVERED:
This Warranty covers defects in materials or workmanship (parts
and labor) in the product.
WHAT IS NOT COVERED:
This Warranty does not cover the following:
A Damage occurring during shipment of the product to Alpine
for repair (claims must be presented to the carrier).
B Damage caused by accident or abuse, including burned
voice coils caused by over-driving the speaker (amplifier level
is turned up and driven into distortion or clipping). Speaker
mechanical failure (e.g. punctures, tears or rips). Cracked or
damaged LCD panels. Dropped or damaged hard drives.
C Damage caused by negligence, misuse, improper operation
or failure to follow instructions contained in the Owner’s
manual.
D Damage caused by act of God, including without limitation,
earthquake, fire, flood, storms or other acts of nature.
Any cost or expense related to the removal or reinstallation of
the product.
E Service performed by an unauthorized person, company or
association.
F Any product which has the serial number defaced, altered or
removed.
G Any product which has been adjusted, altered or modified
without Alpine’s consent.
H Any product not distributed by Alpine within the United
States, Puerto Rico or Canada.
I Any product not purchased from an Authorized Alpine
Dealer.
HOW TO OBTAIN WARRANTY SERVICE:
A You are responsible for delivery of the product to an
Authorized Alpine Service Center or Alpine for repair and for
payment of any initial shipping charges. Alpine will, at its
option, repair or replace the product with a new or
reconditioned product without charge. If the repairs are
covered by the warranty, and if the product was shipped to an
Authorized Alpine Service Center or Alpine, Alpine will pay
the return shipping charges.
B You should provide a detailed description of the problem(s)
for which service is required.
C You must supply proof of your purchase of the product.
D You must package the product securely to avoid damage
during shipment. To prevent lost packages it is
recommended to use a carrier that provides a tracking
service.
HOW WE LIMIT IMPLIED WARRANTIES:
ANY IMPLIED WARRANTIES INCLUDING FITNESS FOR USE
AND MERCHANTABILITY ARE LIMITED IN DURATION TO
THE PERIOD OF THE EXPRESS WARRANTY SET FORTH
ABOVE AND NO PERSON IS AUTHORIZED TO ASSUME FOR
ALPINE ANY OTHER LIABILITY IN CONNECTION WITH THE
SALE OF THE PRODUCT.
HOW WE EXCLUDE CERTAIN DAMAGES:
ALPINE EXPRESSLY DISCLAIMS LIABILITY FOR
INCIDENTAL AND CONSEQUENTIAL DAMAGES CAUSED BY
THE PRODUCT. THE TERM “INCIDENTAL DAMAGES”
REFERS TO EXPENSES OF TRANSPORTING THE
PRODUCT TO THE ALPINE SERVICE CENTER, LOSS OF
THE ORIGINAL PURCHASER’S TIME, LOSS OF THE USE OF
THE PRODUCT, BUS FARES, CAR RENTALS OR OTHERS
COSTS RELATING TO THE CARE AND CUSTODY OF THE
PRODUCT. THE TERM “CONSEQUENTIAL DAMAGES”
REFERS TO THE COST OF REPAIRING OR REPLACING
OTHER PROPERTY WHICH IS DAMAGED WHEN THIS
PRODUCT DOES NOT WORK PROPERLY. THE REMEDIES
PROVIDED UNDER THIS WARRANTY ARE EXCLUSIVE AND
IN LIEU OF ALL OTHERS.
HOW STATE/PROVINCIAL LAW RELATES TO THE
WARRANTY:
This Warranty gives you specific legal rights, and you may also
have other rights which vary from state to state and province to
province. In addition, some states/provinces do not allow
limitations on how long an implied warranty lasts, and some do
not allow the exclusion or limitation of incidental or
consequential damages. Accordingly, limitations as to these
matters contained herein may not apply to you.
IN CANADA ONLY:
This Warranty is not valid unless your Alpine car audio product
has been installed in your vehicle by an Authorized Installation
Center, and this warranty stamped upon installation by the
installation center.
HOW TO CONTACT CUSTOMER SERVICE:
Should the product require service, please call the following
number for your nearest Authorized Alpine Service Center.
CAR AUDIO
1-800-ALPINE-1 (1-800-257-4631)
NAVIGATION
1-888-NAV-HELP (1-888-628-4357)
Or visit our website at; http://www.alpine-usa.com
ALPINE ELECTRONICS OF AMERICA, INC., 19145 Gramercy Place, Torrance, California 90501, U.S.A.
ALPINE ELECTRONICS OF CANADA, INC., 777 Supertest Road, Toronto, Ontario M3J 2M9, Canada
Do not send products to these addresses.
Call the toll free telephone number or visit the website to locate a service center.
EN
FR
IN-DASH GPS NAVIGATION RECEIVER
ES
INA-W910
INSTALLATION MANUAL
GUIDE D’INSTALLATION
MANUAL DE INSTALACIÓN
YAMAGATA (Wuxi) Co., Ltd.
Block 28-25,Changjiang Nanlu, WND, jiangsu, China
Designed by ALPINE Japan
Printed in China (Y)
68-16909Z54-A
Contents / Contenu / Índice
IMPORTANT
Please record the serial number of your unit in the space provided below and
keep it as a permanent record.
Specifications / Spécifications / Especificaciones ... 2
SERIAL NUMBER:
INSTALLATION DATE:
INSTALLATION TECHNICIAN:
Installation / Installation / Instalación ..................... 4
PLACE OF PURCHASE:
Connections / Raccordements / Conexiones ......... 10
IMPORTANT
Veuillez inscrire le numéro de série de votre appareil dans l’espace prévu cicontre et conservez-le soigneusement dans vos archives.
NUMÉRO DE SÉRIE :
DATE D’INSTALLATION :
INSTALLATEUR :
LIEU D’ACHAT :
IMPORTANTE
Anote el número de serie de la unidad en el espacio proporcionado a
continuación y consérvelo como registro permanente.
NÚMERO DE SERIE:
FECHA DE INSTALACIÓN:
INSTALADOR:
LUGAR DE ADQUISICIÓN:
1
Specifications / Spécifications / Especificaciones
MONITOR SECTION
Screen Size
Number of Picture
Elements
FM TUNER SECTION
Tuning Range
AM TUNER SECTION
Tuning Range
NAVIGATION SECTION
Received Frequency
Receiving Sensitivity
GENERAL
Power Requirement
7.0"
1,152,000 pcs.
(800 × 3 × 480)
87.7 - 107.9 MHz
530 - 1,710 kHz
1.57542 ±1.023 MHz
-130 dBm
14.4 V DC
(11-16 V allowable)
Power Output
18 W RMS × 4*
* Primary amplifier ratings per CEA-2006 Standard
• Power output: measured at 4 Ohms and 1% THD+N
• S/N: 80 dBA (reference: 1 W into 4 Ohms)
Weight
2.7 kg (5 lbs, 15oz)
SECTION ÉCRAN
Dimensions de l’écran
Nombre d’éléments
d’image
7,0"
1 152 000 pixels
(800 × 3 × 480)
SECTION TUNER FM
Plage de syntonisation
SECTION TUNER AM
Plage de syntonisation
SECTION NAVIGATION
Fréquence reçue
Sensibilité de réception
GÉNÉRALITÉS
Alimentation
87,7 - 107,9 MHz
530 - 1 710 kHz
1,57542 ±1,023 MHz
-130 dBm
14,4 V CC
(11-16 V autorisé)
Puissance de sortie
18 W RMS × 4*
* Niveaux d’amplificateur primaire conformes à la
norme CEA-2006
• Puissance de sortie : mesurée à 4 Ohms et 1%
THD+N
• Signal/bruit : 80 dBA (référence : 1 W en 4 Ohms)
Poids
2,7 kg
2
SECCIÓN DEL MONITOR
Tamaño de la pantalla
7,0 pulg.
Número de elementos de la
imagen
1.152.000 elementos
(800 × 3 × 480)
SECCIÓN DEL SINTONIZADOR FM
Gama de sintonía
87,7 - 107,9 MHz
SECCIÓN DEL SINTONIZADOR AM
Gama de sintonía
530 - 1.710 kHz
SECCIÓN DE NAVEGACIÓN
Frecuencia de recepción
1,57542 ±1,023 MHz
Sensibilidad de recepción -130 dBm
GENERAL
Alimentación
14,4 V CC
(11-16 V de margen
permisible)
Salida de alimentación
18 W RMS × 4*
* Calificaciones del amplificador primario de
acuerdo con la norma CEA-2006
• Salida de alimentación: medida a 4 ohmios y
1% THD+N
• Señal/Ruido: 80 dBA (referencia: 1 W en
4 ohmios)
Peso
2,7 kg (5 lbs, 15oz)
CHASSIS SIZE (Monitor section)
Width
178 mm (7")
Height
100 mm (3-15/16")
Depth
164.6 mm (6-1/2")
BLUETOOTH SECTION
BLUETOOTH
Specification
Bluetooth V2.0
Output Power
+4 dBm Max.
(Power class 2)
Profile
HFP (Hands-Free
Profile)
HSP (Head Set
Profile)
REMOTE CONTROL
Battery Type
CR2025 battery
Width
51 mm (2")
Height
119 mm (4-11/16")
Depth
13 mm (1/2")
Weight
40 g (1.4 oz)
(battery excluded)
DIMENSIONS DU CHÂSSIS (section moniteur)
Largeur
178 mm (7")
Hauteur
100 mm (3-15/16")
Profondeur
164,6 mm (6-1/2")
BLUETOOTH SECTION
Spécifications
BLUETOOTH
Bluetooth V2.0
Puissance de sortie
+4 dBm max.
(classe 2)
Profil
HFP (profil mains
libres)
HSP (profil casque)
REMOTE CONTROL
Type de pile
Piles CR2025
Largeur
51 mm (2")
Hauteur
119 mm (4-11/16")
Profondeur
13 mm (1/2")
Poids
40 g (1.4 oz)
(pile non comprise)
3
TAMAÑO DE LA CAJA (sección del monitor)
Anchura
178 mm
Altura
100 mm
Profundidad
164,6 mm
SECCIÓN DE BLUETOOTH
Especificación de
BLUETOOTH
Bluetooth V2.0
Potencia de salida
+4 dBm máx.
(Clase 2)
Perfil
HFP (Perfil manos
libres)
HSP (Perfil auriculares)
MANDO A DISTANCIA
Tipo de pila
Pila CR2025
Anchura
51 mm
Altura
119 mm
Profundidad
13 mm
Peso
40 g
(pila no incluida)
Installation / Installation / Instalación
• When making connections to the vehicle’s electrical
system, be aware of the factory installed components (e.g.
on-board computer). Do not tap into these leads to
provide power for this unit. When connecting the
INA-W910 to the fuse box, make sure the fuse for the
intended circuit of the INA-W910 has the appropriate
amperage. Failure to do so may result in damage to the
unit and/or the vehicle. When in doubt, consult your
Alpine dealer.
• The Display must be completely retracted in the casing
when installing. If it is not, problems may occur.
1
When installing in automobiles, make sure the
Display can open/close without coming in
contact with the gear shift.
Movable Display
• Lorsque vous raccordez les fils au système électrique de
la voiture, faites attention aux composants installés en
usine (par exemple, l’ordinateur de bord). Ne pas essayer
d’alimenter l’appareil en le raccordant aux fils de ces
appareils. Lorsque vous raccordez l’INA-W910 au boîtier
à fusibles, assurez-vous que le fusible pour le circuit
destiné à l’INA-W910 possède le nombre d’ampères
approprié. Sinon l’appareil et/ou le véhicule risquent
d’être endommagés. En cas de doute, consultez votre
revendeur Alpine.
• Vous devez retirer complètement l’écran du boîtier lors de
l’installation. Dans le cas contraire, des problèmes
peuvent survenir.
• Cuando haga las conexiones al sistema eléctrico del
vehículo, tenga en cuenta los componentes que vienen
instalados de fábrica (como un computador incorporado,
por ejemplo). No coja corriente de estos conductores
para alimentar esta unidad. Cuando conecte el
INA-W910 a la caja de fusibles, asegúrese de que el
fusible del circuito que piensa utilizar para el INA-W910
tiene el amperaje adecuado. De lo contrario, podría
ocasionar. daños a la unidad y al vehículo. Cuando no
esté seguro, consulte a su distribuidor Alpine.
• La pantalla deberá estar completamente cerrada en el
alojamiento al realizar la instalación. En caso contrario,
podrían surgir problemas.
1
1
Lors de l’installation dans des automobiles,
assurez-vous que l’écran peut s’ouvrir ou se
fermer sans entraver la conduite ou la
manipulation du levier de vitesses.
Écran amovible
4
Cuando instale la unidad en un automóvil,
asegúrese de que la pantalla puede abrirse/
cerrarse sin tocar la palanca de cambios.
Monitor
2
About the installation angle, please install as
horizontally as possible within the following
angle range. If the installation angle is beyond
the range, the current position may not be
correctly displayed and a maloperation may be
caused for the navigation mode.
2
Quant à l’angle d’installation, veuillez l’installer aussi
horizontalement que possible dans la plage d’angle
suivante. Si l’angle d’installation se trouve en dessous
de la plage indiquée, il est possible que la position ne
s’affiche pas correctement et qu’un dysfonctionnement
du mode de navigation se produise.
0°
0°
Front of the unit
Vista frontal de la unidad
0-30°
0-30°
Côté de l’appareil
Side of the unit
The unit can be installed in the mounting
sleeve in three positions by aligning its
mounting holes (A to C) on the sides of the
unit. Position B is the factory default position.
If A or C are to be used, the hole positions
need to be modified.
• Make sure that there is a enough space depthwise before
installing the unit. If the unit is forcibly pushed into the
mounting sleeve, damage may occur.
Vista lateral de la unidad
10°(±5°)
10°(±5°)
Top of the unit
10°(±5°)
Haut de l’appareil
3
El dispositivo debe instalarse en el ángulo más
horizontal posible, dentro del intervalo de ángulos
siguiente. Si el ángulo de instalación supera el
rango, la posición actual puede no mostrarse
correctamente y es posible que se produzcan
errores durante el modo de navegación.
0°
Partie avant de l’appareil
0-30°
3
2
Vous pouvez à présent installer l’appareil dans la
gaine de montage dans les trois positions en
alignant les orifices de montage (A sur C) situés aux
extrémités de l’appareil. La position B est la position
par défaut définie en usine. Si A ou C doit être utilisé,
la position des orifices doit être modifiée.
• Vérifiez qu’il y a suffisamment d’espace en profondeur avant
d’installer l’appareil. Si l’appareil est enfoncé de force dans
la gaine de montage, il risque d’être endommagé.
5
Parte superior de la unidad
3
La unidad se puede instalar en el manguito de
montaje en tres posiciones alineando sus orificios
de montaje (A on C) a los lados de la unidad. La
posición B es la posición predeterminada de
fábrica. Si se va a utilizar A o C, será necesario
modificar las posiciones de los agujeros.
• Antes de instalar la unidad, debe comprobar que hay espacio
suficiente para poder instalarla. Si la unidad se introduce a
la fuerza en la funda de montaje, se pueden producir daños.
Funda de montaje (incluido)
Salpicadero
Boîtier de fixation (fournie)
Tableau de bord
Mounting Sleeve (Included)
Dashboard
Cet appareil
This unit
Seal
(Included)
Pressure Plates*1
Esta unidad
Étiquette
(fournie)
Sello
(incluido)
Placas de presión*1
Plaques de maintien*1
Cadran*2
Face Plate*2
(Included)
Placa frontal*2
(incluida)
(fourni)
<Mounting Hole Position> / <Position de l’orifice de montage> / <Posición del agujero de montaje>
Position A
Position B
Position C
• Depending on the position chosen, the front panel will protrude differently. / En fonction de la position choisie, le panneau frontal dépasse différemment. / Dependiendo de la
posición elegida, el panel frontal sobresaldrá de forma diferente.
Front Panel / Panneau frontal /
Panel frontal
Front Panel / Panneau frontal /
Panel frontal
Front Panel / Panneau frontal /
Panel frontal
Dashboard / Tableau de bord /
Salpicadero
Dashboard / Tableau de bord /
Salpicadero
Dashboard / Tableau de bord /
Salpicadero
Position A / Position A / Posición A
Position B / Position B / Posición B
Position C / Position C / Posición C
*1 If the installed mounting sleeve is loose in the dashboard, the pressure plates may be bent slightly to remedy the problem. / Si le boîtier de fixation n’est pas correctement fixé sur
le tableau de bord, vous pouvez plier légèrement les plaques de maintien pour remédier au problème. / Si el manguito de montaje instalado en el salpicadero está flojo, las placas
de presión pueden doblarse un poco para solventar el problema.
6
How to use a Seal
Comment utiliser une étiquette
Uso de sellos
If A is used for installation:
Affix the seal so that mounting holes B and C are
covered.
Si A est utilisé pour l’installation :
Collez l’étiquette de sorte que les orifices B et C soient
couverts.
Si se utiliza A para la instalación:
Adhiera el sello de forma que los agujeros de montaje
B y C queden cubiertos.
If B is used for installation:
Affix the seal so that mounting holes A and C are
covered.
Si B est utilisé pour l’installation :
Collez l’étiquette de sorte que les orifices A et C soient
couverts.
Si se utiliza B para la instalación:
Adhiera el sello de forma que los agujeros de montaje
A y C queden cubiertos.
If C is used for installation:
Affix the seal so that the mounting holes A and B are
covered.
Si C est utilisé pour l’installation :
Collez l’étiquette de sorte que les orifices A et B soient
couverts.
Si se utiliza C para la instalación:
Adhiera el sello de forma que los agujeros de montaje
A y B queden cubiertos.
Installing the Face Plate
Installation du cadran
Instalación de la placa frontal
2
* If B is used, the supplied face plate may be mounted.
If A or C is used, the face plate cannot be mounted.
2
* Si vous utilisez la position B, vous pouvez fixer la
plaque frontale fournie.
Si vous utilisez A ou C, vous ne pouvez pas fixer la
plaque frontale.
7
*2 Si se utiliza B, la placa frontal suministrada se puede
montar.
Si se utiliza A o C, la placa frontal suministrada no se
puede montar.
4
Screw
4
Vis
*2
*2
Bolt Stud
Metal
Mounting
Strap
*2
Tige filetée
*1
*1
*1
This unit
Tige filetée
Fil de terre
• For the screw marked “*2”, use an appropriate screw
for the chosen mounting location.
Slide the INA-W910 into the dashboard
until it clicks. This ensures that the unit
is properly locked and will not
accidentally come out from the
dashboard.
Renforcez lunité principale à laide dune
languette de fixation métallique (non
fournie). Fixez le fil de terre de l’appareil
à un élément métallique propre à l’aide
d’une vis (*1) déjà fixée au châssis du
véhicule.
• Pour la vis désignée par le symbole « *2 », utilisez
une vis appropriée à l’emplacement de montage
choisi.
5
Cable de tierra
Châssis
Chassis
Reinforce the head unit with the metal
mounting strap (not supplied). Secure
the ground lead of the unit to a clean
metal spot using a screw (*1) already
attached to the vehicle’s chassis.
Pasador
Brida metálica
de montaje
Languette
de fixation
métallique
Ground Lead
Tornillo
Tuerca hexagonal (M5)
Ecrou hexagonal (M5)
Hex Nut (M5)
5
4
Faites glisser l’INA-W910 dans le
tableau de bord jusqu’à ce que vous
entendiez un clic. Cela permet de
s’assurer que l’appareil est
correctement bloqué et qu’il ne risque
pas de sortir accidentellement du
tableau de bord.
8
Bastidor
Esta unidad
Refuerce la unidad principal con la brida
de montaje metálica (no incluida). Fije el
cable de tierra de la unidad en un punto
metálico limpio utilizando un tornillo (*1)
ya sujeto al bastidor del vehículo.
• En el caso del tornillo marcado con “*2”, utilice un
tornillo adecuado para la ubicación de montaje
elegida.
5
Deslice el INA-W910 en el salpicadero
hasta que oiga un clic. Eso permite
asegurarse de que la unidad queda
correctamente fijada y no se saldrá
accidentalmente del salpicadero.
Install the GPS antenna
Installez l’antenne GPS
Instalación de la antena GPS
<For inside vehicle>
<À l’intérieur du véhicule>
<En el interior del vehículo>
1. Stick the ground pad at the center of dash board and
close to windshield with one inch distance.
2. Attach GPS antenna to the center of ground pad.
(the cable side faces the back of vehicle)
<For outside vehicle>
1. Collez le coussin de terre au centre du tableau de bord
et à proximité du pare-brise en laissant une distance
d’environ 2,50 cm.
2. Fixez l’antenne GPS au centre du coussin de terre (le
côté du câble doit faire face à l’arrière du véhicule).
At the front or back of vehicle roof.
<À l’extérieur du véhicule>
1. Pegue la almohadilla de sujeción en el centro del
salpicadero, cerca del parabrisas, aproximadamente a
un centímetro y medio de distancia.
2. Coloque la antena GPS en el centro de la almohadilla
(El lado del cable hacia la parte posterior del
vehículo).
Wiring the GPS antenna cable
À l’avant ou à l’arrière du toit.
<En el exterior del vehículo>
Do not bend or fold the GPS antenna cable.
• When installing the INA-W910 to the vehicle, make
sure the back of unit and the cable must not be bent.
Raccordement du câble de l’antenne GPS
En la parte posterior o delantera del techo del vehículo.
Ne pliez pas le câble de l’antenne GPS.
• Lorsque vous installez le système INA-W910 dans le
véhicule, assurez-vous que le câble n’est pas coincé et
plié à l’arrière de l’appareil.
Cableado de la antena GPS
Connect the GPS antenna
Securely connect the GPS antenna connector to
INA-W910.
Raccordez l’antenne GPS
Raccordez correctement le connecteur de l’antenne GPS
à l’INA-W910.
9
No doble ni pliegue el cable de la antena GPS.
• Si instala el modelo INA-W910 en el vehículo, es muy
importante que la parte posterior de la unidad y el
cable no queden doblados.
Conexión de la antena GPS
Conecte con firmeza el conector de la antena GPS al
modelo INA-W910.
Connections / Raccordements / Conexiones
Connections-1/2 / Raccordements-1/2 / Conexiones-1/2
Antenna
REMOTE OUT
(White/Brown)/(Blanc/Brun)/(Blanco/Marrón)
REMOTE IN
(White/Brown)/(Blanc/Brun)/(Blanco/Marrón)
REVERSE
(Orange/White)/(Orange/Blanc)/(Naranja/Blanco)
CAMERA SW
(Black)/(Noir)/(Negro)
GUIDE CONT
(White/Green)/(Blanc/Vert)/(Blanco/Verde)
(Black)/(Noir)/(Negro)
(Blue/White)/(Bleu/Blanc)/(Azul/Blanco)
REMOTE TURN-ON
(Blue)/(Bleu)/(Azul)
POWER ANT
(Pink/Black)/(Rose/Noir)/(Rosa/Negro)
AUDIO INTERRUPT IN
(Yellow/Blue)/(Jaune/Bleu)/(Amarillo/Azul) PARKING BRAKE
(Yellow/Black)/(Jaune/Noir)/(Amarillo/Negro) FOOT BRAKE
(Red)/(Rouge)/(Rojo)
IGNITION
(Yellow)/(Jaune)/(Amarillo)
BATTERY
FUSE 10A
(Black)/(Noir)/(Negro)
GND
To remote input lead/Vers fil d’entrée de la télécommande/
Al cable de entrada remota
To remote output lead/Vers fil de sortie de la télécommande/
Al cable de salida remota
To plus side of the back lamp signal lead of the car/Vers côté positif
du fil du signal du feu de recul du véhicule/Al polo positivo del cable
de señal de la luz trasera del coche
Not used/Non utilisé/No se utiliza
To guide control input terminal/Vers borne d’entrée de la commande
de guidage/Al terminal de entrada del control de la guía
To steering remote control interface box/Vers le boîtier d’interface
de la télécommande du volant/A la caja de la interfaz de control
remoto del volante
To amplifier or equalizer/Vers amplificateur ou égaliseur/
Al amplificador o al ecualizador
To power antenna/Vers antenne à commande électrique/
A la antena eléctrica
Not used/Non utilisé/No se utiliza
To the parking brake signal lead/Vers fil du signal du frein à main/
Al cable de señal del freno de mano
To the foot brake cord or brake lamp cord/Vers le cordon du frein au
pied ou vers le cordon du frein à main/Al cable del freno de pie o al
cable de la lámpara del freno
Ignition key
Battery
SPEAKER RIGHT FRONT (Gray)/(Gris)/(Gris)
Front Right
(Gray/Black)/(Gris/Noir)/(Gris/Negro)
SPEAKER RIGHT REAR (Violet)/(Violet)/(Violeta)
(Violet/Black)/(Violet/Noir)/(Violeta/Negro)
SPEAKER LEFT REAR (Green)/(Vert)/(Verde)
Rear Right
Speakers
Rear Left
(Green/Black)/(Vert/Noir)/(Verde/Negro)
SPEAKER LEFT FRONT (White)/(Blanc)(Blanco)
Front Left
(White/Black)/(Blanc/Noir)/(Blanco/Negro)
• Set the system switch to “NORM” when only a changer is connected (when the Ai-NET compatible equalizer is not used). When the IMPRINT audio processor is connected, set to EQ/DIV position. / Réglez l’interrupteur du système sur
la position NORM lorsque seul un changeur est raccordé à l’appareil (si l’égaliseur compatible Ai-NET n’est pas utilisé). Lorsque le processeur audio IMPRINT est raccordé, réglez le commutateur sur la position EQ/DIV. / Ajuste el
interruptor del sistema a “NORM” cuando sólo haya un cargador conectado (cuando no se utilice el ecualizador compatible Ai-NET). Si está conectado el procesador de audio IMPRINT, ajústelo en la posición EQ/DIV.
* The system switch is located on the bottom of the unit. / Le sélecteur de système se trouve sous l’appareil. / El interruptor del sistema está situado en la parte inferior de la unidad.
10
Connections-2/2 / Raccordements-2/2 / Conexiones-2/2
Microphone
GPS Antenna
(Yellow)/(Jaune)/(Amarillo)
(Red)/(Rouge)/(Rojo)
(White)/(Blanc)/(Blanco)
(Yellow)/(Jaune)/(Amari lo)
(Red)/(Rouge)/(Rojo)
(White)/(Blanc)(Blanco)
GUIDE
(Black)/(Noir)/(Negro)
CAMERA IN
(Yellow)/(Jaune)/(Amarillo)
To Video Output terminal/Vers borne de sortie vidéo/Al terminal
de salida de vídeo
To Audio Output terminals (R, L)/Vers bornes de sortie audio
(R, L)/A los terminales de salida de audio (R, L)
To Video Input terminal/Vers borne d’entrée vidéo/
Al terminal de entrada de vídeo
To Audio Input terminals (R, L)/Vers bornes d’entrée audio
(R, L)/A los terminales de entrada de audio (R, L)
To Guide Input terminal/Vers borne d’entrée du guidage/
Al terminal de entrada de la guía
To Camera with RCA Output terminal/Vers la caméra munie d’une
borne de sortie RCA/A la cámara con terminal de salida RCA
Camera extension cable (Included with Rear camera)
Direct camera HCE-C117D, etc.
(sold separately)
To SiriusXM Tuner/Au tuner SiriusXM/Al sintonizador SiriusXM
Rear Left
Amplifier
Rear Right
Front Left
Amplifier
Front Right
Amplifier
Ai-NET Cable (Included with CD Changer)
AV Extension Cable (Included)
Subwoofers
CD Changer
(sold separately)
USB 30P Cable (Included)
To iPhone/iPod/Vers l’iPhone/iPod/Al iPhone/iPod
USB Extension Cable (Included)
or/ou/o
11
To Flash memory/Portable audio player/À la clé USB/au
lecteur audio portable/A la memoria Flash/reproductor de
audio portátil
Foot Brake Lead/Parking Brake Lead Connection / Fil de la pédale de frein/Fil de connexion au frein à main / Cable del freno de pie/conexión
del cable del freno de mano
Foot brake lamp
FOOT BRAKE
INA-W910
(Yellow/Black)/(Jaune/
Noir)/(Amarillo/Negro)
PARKING BRAKE
Pinch
Connector
(sold separately)
Foot brake switch
Foot brake lead
Chassis
Parking brake lamp
(Yellow/Blue)/(Jaune/
Bleu)/(Amarillo/Azul)
Pinch
Connector
(sold separately)
Parking brake lead
Battery
Parking brake switch
Connection Diagram of SPST Switch (Sold Separately) / Schéma de raccordement de l’interrupteur SPST (vendu séparément) / Diagrama de
conexión del interruptor unipolar (vendido por separado)
(If the ACC power supply is not available) / (Si l’alimentation ACC n’est pas disponible) / (Si la fuente de alimentación de ciclo combinado no está disponible)
SPST SW (Optional)
IGNITION
FUSE (5A)
(Optional)
(Red)/(Rouge)/(Rojo)
BATTERY
(Yellow)/(Jaune)/(Amarillo)
FUSE (20A)
(Optional)
INA-W910
Battery
• If your vehicle has no ACC power supply, add an SPST (Single-Pole, Single-Throw) switch (sold separately) and fuse (sold separately). / Si votre véhicule est dépourvu
dalimentation ACC, installez un interrupteur SPST (Single-Pole, Single-Throw) (vendu séparément) et un fusible (vendu séparément). / Si su vehículo no tiene fuente de
alimentación de ciclo combinado, agregue un interruptor unipolar (vendido por separado) y un fusible (vendido por separado).
• The diagram and the fuse amperage shown above are in the case when INA-W910 is used individually. / Le schéma et l’ampérage des fusibles indiqués ci-dessus s’appliquent
lorsque l’INA-W910 est utilisé seul. / El diagrama y el amperaje de los fusibles que se muestran arriba corresponden a los casos en los que INA-W910 se utiliza individualmente.
• If the switched power (ignition) lead of the INA-W910 is connected directly to the positive (+) post of the vehicle’s battery, the INA-W910 draws some current (several hundred
milliamperes) even when its switch is placed in the OFF position and the battery may be discharged. / Si le fil de l’alimentation commutée (allumage) de l’INA-W910 est
directement raccordé à la borne positive (+) de la batterie du véhicule, l’INA-W910 véhicule un certain courant (plusieurs centaines de milliampères), même lorsqu’il est hors
tension, et cela risque de décharger la batterie. / Si el cable de alimentación conmutado (contacto) del INA-W910 se conecta directamente al borne positivo (+) de la batería del
vehículo, el INA-W910 absorbe parte de la corriente (unos cientos de miliamperios) incluso cuando el interruptor está apagado (posición OFF) y la batería podría descargarse.
12
IN-DASH GPS NAVIGATION RECEIVER
INA-W910
EN
FR
ES
QUICK REFERENCE GUIDE
GUIDE DE RÉFÉRENCE RAPIDE
GUÍA DE REFERENCIA RÁPIDA
ALPINE ELECTRONICS MARKETING, INC.
1-1-8 Nishi Gotanda,
Shinagawa-ku,
Tokyo 141-0031, Japan
Phone 03-5496-8231
ALPINE ELECTRONICS OF AMERICA, INC.
19145 Gramercy Place, Torrance,
California 90501, U.S.A.
Phone 1-800-ALPINE-1 (1-800-257-4631)
1-888-NAV-HELP (1-888-628-4357)
ALPINE ELECTRONICS OF CANADA, INC.
777 Supertest Road, Toronto,
Ontario M3J 2M9, Canada
Phone 1-800-ALPINE-1 (1-800-257-4631)
1-888-NAV-HELP (1-888-628-4357)
YAMAGATA (Wuxi) Co., Ltd.
Block 28-25,Changjiang Nanlu, WND, jiangsu, China
ALPINE ELECTRONICS OF AUSTRALIA PTY. LTD.
161-165 Princes Highway, Hallam
Victoria 3803, Australia
Phone 03-8787-1200
ALPINE ITALIA S.p.A.
Viale C. Colombo 8, 20090 Trezzano
Sul Naviglio (MI), Italy
Phone 02-484781
ALPINE ELECTRONICS GmbH
Wilhelm-Wagenfeld-Str. 1-3, 80807 München, Germany
Phone 089-32 42 640
ALPINE ELECTRONICS DE ESPAÑA, S.A.
Portal de Gamarra 36, Pabellón, 32
01013 Vitoria (Alava)-APDO 133, Spain
Phone 945-283588
ALPINE ELECTRONICS OF U.K. LTD.
Alpine House
Fletchamstead Highway, Coventry CV4 9TW, U.K.
Phone 0870-33 33 763
ALPINE ELECTRONICS FRANCE S.A.R.L.
(RCS PONTOISE B 338 101 280)
98, Rue de la Belle Etoile, Z.I. Paris Nord Il,
B.P. 50016, 95945 Roissy Charles de Gaulle
Cedex, France
Phone 01-48638989
ALPINE ELECTRONICS (BENELUX) GmbH
Leuvensesteenweg 510-B6,
1930 Zaventem, Belgium
Phone 02-725-13 15
Designed by ALPINE Japan
Printed in China (Y)
68-16909Z51-A
For details on all functions, refer to the Owner’s Manual stored in the supplied CD-ROM. (As it is data CD, the CD cannot be used for playing back music and images on the player.) If required, an
ALPINE dealer will readily provide you with a print out of the Owner’s Manual contained in the CD-ROM.
Pour obtenir de plus amples informations sur l’ensemble des fonctions, reportez-vous au mode d’emploi fourni sur le CD-ROM. (Étant donné qu’il s’agit d’un CD de données, ce CD ne peut pas être
utilisé pour lire des fichiers audio ou image sur le lecteur ) Si vous le souhaitez, demandez à votre revendeur ALPINE de vous fournir la version papier du mode d’emploi contenu dans le CD-ROM.
Para obtener información detallada de todas las funciones, consulte el manual del propietario contenido en el CD-ROM que se suministra. (Al ser un CD de datos, el CD no se puede utilizar para
reproducir música o imágenes en el reproductor.) Si es necesario, un distribuidor de ALPINE podrá facilitarle una copia impresa del manual del propietario incluido en el CD-ROM.
Contents / Contenu / Índice
IMPORTANT
Please record the serial number of your unit in the space provided below and
keep it as a permanent record.
Important / Importantes / Importante ...................... 2
SERIAL NUMBER:
INSTALLATION DATE:
WARNING / AVERTISSEMENT /
ADVERTENCIA ..................................................... 3
INSTALLATION TECHNICIAN:
PLACE OF PURCHASE:
CAUTION / ATTENTION / PRUDENCIA ........... 6
IMPORTANT
Veuillez inscrire le numéro de série de votre appareil dans l’espace prévu cicontre et conservez-le soigneusement dans vos archives.
Getting Started / Mise en route / Primeros pasos .... 7
Navigation / Navigation / Navegación .................. 11
NUMÉRO DE SÉRIE :
DATE D’INSTALLATION :
HD Radio/RBDS ................................................... 18
INSTALLATEUR :
LIEU D’ACHAT :
CD/MP3/WMA/AAC ............................................ 21
IMPORTANTE
DVD/VCD ............................................................. 23
Anote el número de serie de la unidad en el espacio proporcionado a
continuación y consérvelo como registro permanente.
BLUETOOTH ....................................................... 26
NÚMERO DE SERIE:
Flash memory/Portable audio player / Clé USB/
Lecteur audio portable / Memoria Flash/Reproductor
de audio portátil ..................................................... 31
FECHA DE INSTALACIÓN:
INSTALADOR:
LUGAR DE ADQUISICIÓN:
iPod/iPhone (Optional) / iPod/iPhone (en Optional) /
iPod/iPhone (opcional) .......................................... 33
Pandora Radio (iPhone/iPod touch) / Pandora Radio
(iPhone/iPod touch) / Radio Pandora (iPhone/iPod
touch) ..................................................................... 37
1
Important / Importantes / Importante
Important Information
Informations Importantes
Información Importante
This product is designed to assist you while you drive
your vehicle. It should not be used as a substitute for
your personal judgment. Road conditions and
regulations take precedence over information
contained on the map display; observe actual traffic
restrictions and circumstances while driving. For
safety, users should stop vehicle before operating the
system.
Ce produit a été conçu pour vous guider lors de la
conduite de votre véhicule. Il n’est pas un substitut de
votre propre jugement. Les informations contenues
dans l’écran de la carte ne peuvent en aucun cas
supplanter les conditions et la réglementation routières
en vigueur ; vous devez à tout moment respecter les
limitations et être attentif aux conditions de trafic. Par
mesure de sécurité, les utilisateurs doivent arrêter le
véhicule avant d’utiliser le système.
Este producto está diseñado para ayudarle durante la
conducción de su vehículo. No debe utilizarse nunca
como sustituto de sus propias decisiones personales.
El estado de las carreteras y las normas de tráfico
tienen prioridad sobre la información contenida en la
pantalla del mapa; preste atención a las restricciones
reales del tráfico y a cualquier otra circunstancia que
afecte a la conducción. Por su propia seguridad, los
usuarios deben detener el vehículo para poder utilizar
el sistema.
Map
All map coverage includes only roads and regions that
have been mapped in a digitized format.
Product information listed in this brochure is based
upon current information at the time of printing, but
cannot be guaranteed. All designs, features,
specifications and delivery dates are subject to
change without notice. For updated product
information, please visit www.alpine-usa.com or
www.alpine-canada.com | © 2011 Alpine Electronics,
Inc. All rights reserved.
Carte
La carte comprend uniquement les routes et les
régions ayant été cartographiées au format numérisé.
Les informations sur le produit contenues dans ce
document ont été mises à jour lors de la mise sous
presse, mais il est possible qu’elles soient parfois
inexactes. Les conceptions, fonctionnalités,
spécifications et dates de livraison sont susceptibles
d’être modifiées dans avis préalable. Pour obtenir la
mise à jour des informations sur le produit, visitez le
site www.alpine-usa.com ou www.alpine-canada.com |
© 2011 Alpine Electronics, Inc. Tous droits réservés.
2
Mapas
Toda la cobertura de los mapas incluye únicamente
las carreteras y las regiones en formato digitalizado.
La información del producto que aparece en este
manual se basa en la información actualizada del
tráfico en el momento de llevarlo a imprenta, pero no
se puede garantizar que siga siendo la más reciente.
Todos los diseños, funciones, especificaciones y
fechas de entrega están sujetos a cambios sin previo
aviso. Para obtener información actualizada sobre el
producto, visite la página www.alpine-usa.com o
www.alpine-canada.com o la página de alpine de su
país | © 2011 Alpine Electronics,Inc. Todos los
derechos reservados.
WARNING
This symbol means important instructions.
Failure to heed them can result in serious
injury or death.
INSTALL THE PRODUCT CORRECTLY SO THAT THE DRIVER
CANNOT WATCH TV/VIDEO UNLESS THE VEHICLE IS STOPPED
AND THE EMERGENCY BRAKE IS APPLIED.
It is dangerous (and illegal in many states) for the driver to watch TV/
Video while driving a vehicle. Installing this product incorrectly
enables the driver to watch TV/Video while driving. This may cause a
distraction, preventing the driver from looking ahead, thus causing an
accident. The driver or other people could be severely injured.
DO NOT WATCH VIDEO WHILE DRIVING.
Watching the video may distract the driver from looking ahead of the
vehicle and cause an accident.
DO NOT OPERATE ANY FUNCTION THAT TAKES YOUR
ATTENTION AWAY FROM SAFELY DRIVING YOUR VEHICLE.
Any function that requires your prolonged attention should only be
performed after coming to a complete stop. Always stop the vehicle in
a safe location before performing these functions. Failure to do so may
result in an accident.
DO NOT FOLLOW ROUTE SUGGESTIONS IF THE NAVIGATION
SYSTEM INSTRUCTS YOU TO PERFORM AN UNSAFE OR
ILLEGAL MANEUVER, OR PLACES YOU IN AN UNSAFE
SITUATION OR AREA.
This product is not a substitute for your personal judgment. Any route
suggestions by this system should never supersede any local traffic
regulations or your personal judgment or knowledge of safe driving
practice.
KEEP THE VOLUME AT A LEVEL WHERE YOU CAN STILL HEAR
OUTSIDE NOISES WHILE DRIVING.
Excessive volume levels that obscure sounds such as emergency
vehicle sirens or road warning signals (train crossings, etc.) can be
dangerous and may result in an accident. LISTENING AT LOUD
VOLUME LEVELS IN A CAR MAY ALSO CAUSE HEARING
DAMAGE.
AVERTISSEMENT
Ce symbole désigne des instructions
importantes. Le non-respect de ces
instructions peut entraîner de graves
blessures, voire la mort.
INSTALLER L’APPAREIL CORRECTEMENT DE FACON A CE QUE LE
CONDUCTEUR NE PUISSE PAS REGARDER LA TV/VIDEO TANT
QUE LA VOITURE N’EST PAS A L’ARRET ET LE FREIN A MAIN
ACTIONNE.
Il est dangereux de regarder la télévision/vidéo tout en conduisant un
véhicule. Si le produit n’est pas correctement installé, le conducteur
sera en mesure de regarder la télévision/vidéo pendant la conduite du
véhicule, ce qui risque de le distraire et de causer un accident. Le
conducteur ainsi que d’autres personnes risquent d’être blessées.
NE PAS REGARDER DE VIDEO PENDANT LA CONDUITE.
Le visionnage d’un enregistrement vidéo peut distraire le conducteur
de la conduite du véhicule et causer un accident.
ADVERTENCIA
Este símbolo indica que las instrucciones
son importantes. De no tenerse en cuenta,
podría ocasionarse heridas graves o muerte.
INSTALE LA UNIDAD CORRECTAMENTE PARA QUE EL
CONDUCTOR NO PUEDA VER EL VIDEO/TELEVISOR A MENOS
QUE EL VEHÍCULO SE ENCUENTRE PARADO Y SE HAYA
ACCIONADO EL FRENO DE MANO.
Ver el vídeo/televisor mientras se conduce se considera peligroso. Si la
unidad no se instala correctamente, el conductor podrá ver el vídeo/
televisor y distraerse mientras conduce, incrementando el riesgo de
accidente. Esto podría causar heridas graves al conductor y a otras
personas.
NO MIRE EL VÍDEO MIENTRAS CONDUCE.
El conductor puede distraer su atención de la carretera mientras mira el
vídeo y ocasionar un accidente.
N’ACTIVER AUCUNE FONCTION SUSCEPTIBLE DE DETOURNER
VOTRE ATTENTION DE LA CONDUITE DU VEHICULE.
NO REALICE NINGUNA OPERACIÓN QUE PUEDA DISTRAER SU
ATENCIÓN Y COMPROMETER LA SEGURIDAD DURANTE LA
CONDUCCIÓN DEL VEHÍCULO.
Les fonctions requérant une attention prolongée ne doivent être
exploitées qu’à l’arrêt complet du véhicule. Toujours arrêter le
véhicule à un endroit sûr avant d’activer ces fonctions. Il y a risque de
provoquer un accident.
Las operaciones que requieren su atención durante más tiempo sólo
deben realizarse después de detener completamente el vehículo.
Estacione el vehículo en un lugar seguro antes de realizar dichas
operaciones. De lo contrario, podría ocasionar un accidente.
NE PAS SUIVRE LES ITINERAIRES CONSEILLES SI LE SYSTEME
DE NAVIGATION INVITE A EFFECTUER UNE MANŒUVRE
DANGEREUSE OU ILLEGALE, OU VOUS PLACE DANS UNE
SITUATION OU A UN ENDROIT DANGEREUX.
NO SIGA LAS INDICACIONES DE RUTA SI EL SISTEMA DE
NAVEGACIÓN DA INSTRUCCIONES PARA REALIZAR MANIOBRAS
PELIGROSAS O PROHIBIDAS, O SI ESTO SUPONE
ENCONTRARSE EN SITUACIONES O ÁREAS DE RIESGO.
Ce produit ne peut en aucun cas se substituer à votre bon sens. Tout
itinéraire conseillé par ce système ne peut se substituer au code de la
route local, à votre jugement personnel ni à la sécurité de conduite.
Este producto no es sustituto de su capacidad de razonamiento. El
seguimiento de las indicaciones de ruta sugeridas por esta unidad
nunca debe contradecir las normas de tráfico locales ni sus criterios o
conocimientos de lo que supone una conducción segura.
GARDER LE VOLUME À FAIBLE NIVEAU DE MANIÈRE À POUVOIR
ENTENDRE LES BRUITS EXTÉRIEURS PENDANT LA CONDUITE.
Des niveaux de volume excessifs qui couvrent les sirènes des
ambulances ou les signaux routiers (passages à niveau, etc.) peuvent
être dangereux et provoquer un accident. UN NIVEAU DE VOLUME
TROP ÉLEVÉ À L’INTÉRIEUR DU VÉHICULE PEUT
ÉGALEMENT AVOIR DES EFFETS IRRÉVERSIBLES SUR
VOTRE AUDITION.
3
MANTENGA EL VOLUMEN A UN NIVEL QUE NO LE IMPIDA
ESCUCHAR LOS SONIDOS DEL EXTERIOR MIENTRAS CONDUCE.
Los niveles de volumen demasiado altos que reducen la percepción de otros
sonidos como las sirenas de emergencia o posibles señales acústicas de
advertencia en carretera (cruces de trenes, etc.) podrían ser peligrosos y
provocar un accidente. LOS NIVELES DE VOLUMEN ALTOS EN EL
VEHÍCULO TAMBIÉN PUEDEN DAÑAR EL SISTEMA AUDITIVO DE
LOS PASAJEROS.
MINIMIZE DISPLAY VIEWING WHILE DRIVING.
MINIMISER L’AFFICHAGE EN COURS DE CONDUITE.
Viewing the display may distract the driver from looking ahead of the
vehicle and cause an accident.
La visualisation de l’affichage peut distraire le conducteur de la
conduite du véhicule et, partant, de provoquer un accident.
DO NOT DISASSEMBLE OR ALTER.
NE PAS DESASSEMBLER NI MODIFIER L’APPAREIL.
Doing so may result in an accident, fire or electric shock.
Il y a risque d’accident, d’incendie ou de choc électrique.
USE ONLY IN CARS WITH A 12 VOLT NEGATIVE GROUND.
A UTILISER UNIQUEMENT SUR DES VOITURES A MASSE
NEGATIVE DE 12 VOLTS.
(Check with your dealer if you are not sure.) Failure to do so may
result in fire, etc.
KEEP SMALL OBJECTS SUCH AS BATTERIES OUT OF THE REACH
OF CHILDREN.
Swallowing them may result in serious injury. If swallowed, consult a
physician immediately.
USE THE CORRECT AMPERE RATING WHEN REPLACING FUSES.
Failure to do so may result in fire or electric shock.
DO NOT BLOCK VENTS OR RADIATOR PANELS.
Doing so may cause heat to build up inside and may result in fire.
USE THIS PRODUCT FOR MOBILE 12V APPLICATIONS.
Use for other than its designed application may result in fire, electric
shock or other injury.
DO NOT PLACE HANDS, FINGERS OR FOREIGN OBJECTS IN
INSERTION SLOTS OR GAPS.
Doing so may result in personal injury or damage to the product.
MAKE THE CORRECT CONNECTIONS.
Failure to make the proper connections may result in fire or product
damage.
BEFORE WIRING, DISCONNECT THE CABLE FROM THE
NEGATIVE BATTERY TERMINAL.
Failure to do so may result in electric shock or injury due to electrical
shorts.
(Vérifiez auprès de votre concessionnaire si vous n’en êtes pas certain.)
Il y a risque d’incendie, etc.
GARDER LES PETITS OBJETS COMME LES PILES HORS DE
PORTEE DES ENFANTS.
REDUZCA AL MÁXIMO LA VISUALIZACIÓN DE LA PANTALLA
MIENTRAS CONDUCE.
El conductor puede distraer su atención de la carretera mientras mira la
pantalla y ocasionar un accidente.
NO DESMONTE NI ALTERE LA UNIDAD.
Si lo hace, podrá ocasionar un accidente, un incendio o una descarga
eléctrica.
UTILICE LA UNIDAD SOLAMENTE EN VEHÍCULOS QUE TENGAN
12 VOLTIOS CON NEGATIVO A MASA.
(Consulte a su distribuidor en caso de duda.) De no ser así, podría
ocasionar un incendio, etc.
L’ingestion de tels objets peut entraîner de graves blessures. En cas
d’ingestion, consulter immédiatement un médecin.
MANTENGA LOS OBJETOS PEQUEÑOS, COMO LAS PILAS,
FUERA DEL ALCANCE DE LOS NIÑOS.
UTILISER DES FUSIBLES DE L’AMPERAGE APPROPRIE.
La ingestión de estos objetos puede provocar lesiones graves. Si esto
ocurre, consulte con un médico inmediatamente.
Il y a risque d’incendie ou de décharge électrique.
NE PAS OBSTRUER LES SORTIES D’AIR NI LES PANNEAUX DU
RADIATEUR.
Une surchauffe interne peut se produire et provoquer un incendie.
UTILISER CET APPAREIL POUR DES APPLICATIONS MOBILES DE
12 V.
Toute utilisation autre que l’application désignée comporte un risque
d’incendie, de choc électrique ou de blessure.
NE PAS INTRODUIRE LES MAINS, LES DOIGTS NI DE CORPS
ETRANGERS DANS LES FENTES ET LES INTERSTICES.
UTILICE EL AMPERAJE CORRECTO CUANDO CAMBIE FUSIBLES.
De lo contrario, puede producirse un incendio o una descarga eléctrica.
NO OBSTRUYA LOS ORIFICIOS DE VENTILACIÓN O LOS PANELES
DEL RADIADOR.
Si los bloquea, el calor podría acumularse en el interior y producir un
incendio.
UTILICE ESTE PRODUCTO CON APLICACIONES MÓVILES DE
12 V.
Si se emplea para otra aplicación distinta de la prevista, podría
producirse un incendio, una descarga eléctrica u otras lesiones.
Il y a risque de blessures ou de dommages à l’appareil.
EFFECTUER CORRECTEMENT LES CONNEXIONS.
Il y a risque de blessures ou de dommages à l’appareil.
NO INTRODUZCA LAS MANOS, LOS DEDOS NI OTROS OBJETOS
EXTRAÑOS EN LAS RANURAS DE INSERCIÓN O EN LAS
ABERTURAS.
AVANT TOUTE CONNEXION, DEBRANCHER LE CABLE DE LA
BORNE NEGATIVE DE LA BATTERIE.
Si lo hiciera, podría sufrir heridas u ocasionar daños al equipo.
Il y a risque de choc électrique ou de blessure par courts-circuits.
Una conexión incorrecta puede producir un incendio o dañar el equipo.
REALICE LAS CONEXIONES CORRECTAMENTE.
ANTES DE EFECTUAR EL CABLEADO, DESCONECTE EL CABLE
DEL TERMINAL NEGATIVO DE LA BATERÍA.
De no hacerlo así, podría ocasionar una descarga eléctrica o heridas
debido a cortocircuitos eléctricos.
4
DO NOT ALLOW CABLES TO BECOME ENTANGLED IN
SURROUNDING OBJECTS.
NE PAS COINCER LES CABLES AVEC DES OBJETS VOISINS.
Arrange wiring and cables in compliance with the manual to prevent
obstructions when driving. Cables or wiring that obstruct or hang up on
places such as the steering wheel, gear lever, brake pedals, etc. can be
extremely hazardous.
Positionner les câbles conformément au manuel de manière à éviter
toute obstruction en cours de conduite. Les câbles qui obstruent ou
dépassent à des endroits tels que le volant, le levier de changement de
vitesses, la pédale de frein, etc., peuvent s’avérer extrêmement
dangereux.
DO NOT SPLICE INTO ELECTRICAL CABLES.
NE PAS DENUDER LES CABLES ELECTRIQUES.
Never cut away cable insulation to supply power to other equipment.
Doing so will exceed the current carrying capacity of the wire and
result in fire or electric shock.
Ne jamais enlever la gaine isolante pour alimenter un autre appareil. Il
y a risque de dépassement de la capacité de courant et, partant,
d’incendie ou de choc électrique.
DO NOT DAMAGE PIPE OR WIRING WHEN DRILLING HOLES.
NE PAS ENDOMMAGER DE CONDUITES NI DE CABLES LORS DU
FORAGE DES TROUS.
When drilling holes in the chassis for installation, take precautions so
as not to contact, damage or obstruct pipes, fuel lines, tanks or
electrical wiring. Failure to take such precautions may result in fire.
DO NOT USE BOLTS OR NUTS IN THE BRAKE OR STEERING
SYSTEMS TO MAKE GROUND CONNECTIONS.
Bolts or nuts used for the brake or steering systems (or any other
safety-related system), or tanks should NEVER be used for
installations or ground connections. Using such parts could disable
control of the vehicle and cause fire etc.
DO NOT INSTALL IN LOCATIONS WHICH MIGHT HINDER VEHICLE
OPERATION, SUCH AS THE STEERING WHEEL OR GEARSHIFT.
Doing so may obstruct forward vision or hamper movement etc. and
results in serious accident.
Lors du forage de trous dans le châssis en vue de l’installation, veiller à
ne pas entrer en contact, endommager ni obstruer de conduites, de
tuyaux à carburant ou de fils électriques. Le non-respect de cette
précaution peut entraîner un incendie.
NE PAS UTILISER DES ECROUS NI DES BOULONS DU CIRCUIT
DE FREINAGE OU DE DIRECTION POUR LES CONNEXIONS DE
MASSE.
IMPIDA QUE LOS CABLES SE ENREDEN CON LOS OBJETOS
SITUADOS ALREDEDOR.
Disponga la instalación eléctrica y los cables conforme a lo descrito en
el manual para evitar obstáculos durante la conducción. Los cables que
obstaculizan la conducción o que cuelgan de partes del vehículo como
el volante de dirección, la palanca de cambios, los pedales de freno,
etc., se consideran extremadamente peligrosos.
NO EMPALME CABLES ELÉCTRICOS.
Nunca corte el aislamiento de un cable para suministrar energía a otro
equipo. Esto hace que la capacidad portadora del cable se supere y
puede ser la causa de incendios o descargas eléctricas.
EVITE DAÑAR LOS TUBOS Y EL CABLEADO CUANDO TALADRE
AGUJEROS.
Si taladra agujeros en el chasis durante la instalación, tome las
precauciones necesarias para no rozar, dañar u obstruir los tubos, las
tuberías de combustible, los depósitos o el cableado eléctrico. De lo
contrario, podría provocar un incendio.
NO UTILICE TUERCAS O PERNOS EN EL SISTEMA DE FRENOS O
DE DIRECCIÓN PARA REALIZAR LAS CONEXIONES A MASA.
Les boulons et les écrous utilisés pour les circuits de freinage et de
direction (ou de tout autre système de sécurité) ou les réservoirs ne
peuvent JAMAIS être utilisés pour l’installation ou la liaison à la
masse. L’utilisation de ces organes peut désactiver le système de
contrôle du véhicule et causer un incendie, etc.
Los pernos o tuercas empleados en los sistemas de freno o de dirección
(o en cualquier otro sistema relacionado con la seguridad del vehículo),
o los depósitos, NUNCA deben utilizarse para instalaciones de
cableado o conexión a masa. Si utiliza tales partes podrá incapacitar el
control del vehículo y provocar un incendio, etc.
NE PAS INSTALLER A DES ENDROITS SUSCEPTIBLES
D’ENTRAVER LA CONDUITE DU VEHICULE, COMME LE VOLANT
OU LE LEVIER DE VITESSES.
NO INSTALE EL EQUIPO EN LUGARES QUE PUEDAN INTERFERIR
CON LA OPERACIÓN DEL VEHÍCULO, COMO EL VOLANTE DE
DIRECCIÓN O LA CAJA DE CAMBIOS DE VELOCIDAD.
La vue vers l’avant pourrait être obstruée ou les mouvements gênés,
etc., et provoquer un accident grave.
Esto podría obstaculizar la visibilidad y dificultar el movimiento, etc. y
provocar accidentes graves.
5
CAUTION
This symbol means important instructions.
Failure to heed them can result in injury or
material property damage.
ATTENTION
Ce symbole désigne des instructions
importantes. Le non-respect de ces
instructions peut entraîner des blessures ou
des dégâts matériels.
HALT USE IMMEDIATELY IF A PROBLEM APPEARS.
Failure to do so may cause personal injury or damage to the product.
Return it to your authorized Alpine dealer or the nearest Alpine Service
Center for repairing.
KEEP FINGERS AWAY WHILE THE MOTORIZED FRONT PANEL OR
MOVING MONITOR IS IN MOTION.
Failure to do so may result in personal injury or damage to the product.
HAVE THE WIRING AND INSTALLATION DONE BY EXPERTS.
The wiring and installation of this unit requires special technical skill
and experience. To ensure safety, always contact the dealer where you
purchased this product to have the work done.
USE SPECIFIED ACCESSORY PARTS AND INSTALL THEM
SECURELY.
Be sure to use only the specified accessory parts. Use of other than
designated parts may damage this unit internally or may not securely
install the unit in place. This may cause parts to become loose resulting
in hazards or product failure.
ARRANGE THE WIRING SO IT IS NOT CRIMPED OR PINCHED BY
A SHARP METAL EDGE.
Route the cables and wiring away from moving parts (like the seat
rails) or sharp or pointed edges. This will prevent crimping and damage
to the wiring. If wiring passes through a hole in metal, use a rubber
grommet to prevent the wire’s insulation from being cut by the metal
edge of the hole.
DO NOT INSTALL IN LOCATIONS WITH HIGH MOISTURE OR
DUST.
Avoid installing the unit in locations with high incidence of moisture or
dust. Moisture or dust that penetrates into this unit may result in
product failure.
INTERROMPRE TOUTE UTILISATION EN CAS DE PROBLEME.
Le non-respect de cette précaution peut entraîner des blessures ou
endommager l’appareil. Retourner l’appareil auprès du distributeur
Alpine agréé ou un centre de service après-vente Alpine en vue de la
réparation.
NE PAS TOUCHER LE PANNEAU FRONTAL MOTORISE NI BOUGER
LE MONITEUR EN MOUVEMENT.
Il y a risque de blessures ou de dommages à l’appareil.
FAIRE INSTALLER LE CABLAGE ET L’APPAREIL PAR DES
EXPERTS.
Le câblage et l’installation de cet appareil requiert des compétences
techniques et de l’expérience. Pour garantir la sécurité, faire procéder à
l’installation de cet appareil par le distributeur qui vous l’a vendu.
UTILISER LES ACCESSOIRES SPECIFIES ET LES INSTALLER
CORRECTEMENT.
Utiliser uniquement les accessoires spécifiés. L’utilisation d’autres
composants que les composants spécifiés peut causer des dommages
internes à cet appareil ou son installation risque de ne pas être effectuée
correctement. Les pièces utilisées risquent de se desserrer et de
provoquer des dommages ou une défaillance de l’appareil.
FAIRE CHEMINER LE CABLAGE DE MANIERE A NE PAS LE
COINCER CONTRE UNE ARETE METALLIQUE.
Faire cheminer les câbles à l’écart des pièces mobiles (comme les rails
d’un siège) et des arêtes acérées ou pointues. Cela évitera ainsi de
coincer et d’endommager les câbles. Si un câble passe dans un orifice
métallique, utiliser un passe-cloison en caoutchouc pour éviter que la
gaine isolante du câble ne soit endommagée par le rebord métallique de
l’orifice.
NE PAS INSTALLER A DES ENDROITS TRES HUMIDES OU
POUSSIEREUX.
Eviter d’installer l’appareil à des endroits soumis à une forte humidité
ou à de la poussière en excès. La pénétration d’humidité ou de
poussière à l’intérieur de cet appareil risque de provoquer une
défaillance.
6
PRUDENCIA
Este símbolo indica que las instrucciones son
importantes. De no tenerse en cuenta, podría
ocasionarse heridas graves o daños materiales.
DEJE DE USAR LA UNIDAD INMEDIATAMENTE SI APARECE
ALGÚN PROBLEMA.
Su uso en estas condiciones podría ocasionar lesiones personales o
daños al producto. Lleve la unidad a un distribuidor Alpine autorizado
o al Centro de servicio Alpine más próximo para repararla.
NO TOQUE LA UNIDAD CON LOS DEDOS MIENTRAS EL PANEL
FRONTAL O MONITOR MOTORIZADOS ESTÁN EN MOVIMIENTO.
Esto podría ocasionar lesiones personales o daños al producto.
CONFÍE EL CABLEADO Y LA INSTALACIÓN A PROFESIONALES.
El cableado y la instalación de este equipo requieren una competencia
y experiencia técnica confirmada. Para garantizar la seguridad,
póngase siempre en contacto con el distribuidor al que ha comprado el
equipo para confiarle estas tareas.
UTILICE LOS ACCESORIOS ESPECIFICADOS E INSTÁLELOS
CORRECTAMENTE.
Asegúrese de utilizar los accesorios especificados solamente. La
utilización de otras piezas no designadas puede ser la causa de daños
en el interior de la unidad o de una instalación incorrecta. Las piezas
pueden aflojarse, lo que, además de ser peligroso, puede provocar
averías.
DISPONGA EL CABLEADO DE FORMA QUE LOS CABLES NO SE
DOBLEN, NO SE CONTRAIGAN NI ROCEN UN BORDE METÁLICO
AFILADO.
Aleje los cables y el cableado de piezas móviles (como los raíles de los
asientos) o de bordes puntiagudos o afilados. De esta forma evitará
dobleces y daños en el cableado. Si los cables se introducen por un
orificio de metal, utilice una arandela de goma para evitar que el borde
metálico del orificio corte el aislamiento del cable.
NO INSTALE LA UNIDAD EN LUGARES MUY HÚMEDOS O LLENOS
DE POLVO.
Evite instalar la unidad en lugares con altos índices de humedad o
polvo. Si entra polvo o humedad, el equipo puede averiarse.
Getting Started / Mise en route / Primeros pasos
English
Insert/Eject Disc
Français
Cette touche permet d’insérer et
d’éjecter le disque
Español
Inserción/Expulsión de discos
1.Appuyez sur
pour passer à l’écran Eject/Tilt.
2.Appuyez sur la touche [Open] de l’écran
Eject/Tilt, puis insérez un disque.
1.Pulse
para cambiar de pantalla y acceder
a la pantalla Eject/Tilt.
2.Toque [Open] en la pantalla Eject/Tilt y, a
continuación, inserte un disco.
2.Touch [Eject] on the Eject/Tilt screen to eject a
disc.
2.Appuyez sur la touche [Eject] de l’écran
Eject/Tilt, puis éjectez le disque.
2.Toque [Eject] en la pantalla Eject/Tilt para
expulsar un disco.
Adjust Volume
Cette touche permet de régler le
volume
Ajuste del volumen
MUTE On/Off
Activation/désactivation du mode
silencieux (MUTE)
Activación/desactivación de
silencio (MUTE)
1.Press
to change the display to the Eject/Tilt
screen.
2.Touch [Open] on the Eject/Tilt screen, then
insert a disc.
7
Power On/Off
Press any button to turn power on.
Press and hold SOURCE/
for at least 3
seconds to turn off the unit.
Select a Source
Press SOURCE/
selection screen.
to recall the SOURCE
Cette touche permet de mettre
l’appareil sous et hors tension
Appuyez sur n’importe quelle touche pour
mettre l’appareil sous tension.
Maintenez la touche SOURCE/
enfoncée
pendant 3 secondes au moins pour mettre
l’appareil hors tension.
Cette touche permet de sélectionner
une source
Appuyez sur SOURCE/
de sélection SOURCE.
pour rappeler l’écran
Conexión/Desconexión
Pulse cualquier botón para encender la
alimentación.
Mantenga pulsado SOURCE/
durante, al
menos, 3 segundos para apagar la unidad.
Selección de una fuente
Pulse SOURCE/
para recuperar la pantalla
de selección de fuentes SOURCE.
Recall the navigation map
Cette touche permet de rappeler la
carte de navigation
Recuperación de un mapa de
navegación
Recall the navigation menu
Cette touche permet de rappeler le
menu de navigation
Recuperación del menú de navegación
RESET the unit
Cette touche permet de réinitialiser
l’appareil
Restauración de la unidad
Press RESET with a ballpoint pen or similar
pointed object.
Appuyez sur le bouton RESET à l’aide d’un stylo
à bille ou d’un objet pointu.
8
Pulse RESET con un bolígrafo con punta u
objeto puntiagudo similar.
Source Selection / Sélection de la source / Selección de la fuente
Display example for SOURCE selection screen / Exemple d’affichage pour l’écran de sélection de la SOURCE / Ejemplo de visualización de
pantalla de selección de fuentes SOURCE
English
Press SOURCE/
1
2
on the unit.
The SOURCE selection screen is displayed.
Français
Appuyez sur le bouton SOURCE/
l’appareil.
Español
de
Pulse SOURCE/
en la unidad.
L’écran de sélection SOURCE s’affiche.
Aparece la pantalla de selección de fuentes
SOURCE.
Touch the desired SOURCE mode.
Appuyez sur le mode SOURCE souhaité.
Toque el modo SOURCE que desee.
Changes to SETUP main screen.
Cette touche permet d’afficher l’écran de
Cambia a la pantalla principal SETUP.
Changes the item of source selection list.
configuration principal.
Cambia el elemento de la lista de selección
Displays the source selection list.
Cette touche permet de sélectionner un autre
de fuentes.
Changes to main source screen.
élément dans la liste de sélection de la
Muestra la lista de selección de fuentes.
source.
Cambia a la pantalla de la fuente principal.
Cette touche permet d’afficher la liste de
sélection de la source.
Cette touche permet d’afficher l’écran de la
source principale.
9
To watch a video source, change setup
or edit contents:
Pour visionner une source vidéo et
modifier la configuration ou le contenu :
Para ver una fuente de vídeo, cambie los
ajustes o edite el contenido:
Your vehicle must be parked with the ignition key
in the ACC or ON position. To do this, follow the
procedures below.
1. Push the foot brake to bring your vehicle to a
complete stop at a safe location. Engage the
parking brake.
2. Keep pushing the foot brake and release the
parking brake once then engage it again.
3. While the parking brake is being engaged the
second time, release the foot brake.
• For automatic transmission vehicles, place the
transmission lever in the Park position.
Votre véhicule doit être garé et la clé de contact
doit être sur la position ACC (allumage) ou ON
(marche). Pour cela, suivez la procédure cidessous.
1. Appuyez sur la pédale de frein pour mettre
complètement votre véhicule à l’arrêt dans un
endroit sûr. Serrez le frein à main.
2. Continuez à appuyer sur le frein à pédale et
relâchez le frein à main, puis serrez-le à
nouveau.
3. Lorsque le frein à main est serré pour la
deuxième fois, relâchez le frein à pédale.
• Pour les véhicules à transmission automatique, placez le
levier de transmission en position Park.
Su vehículo deberá estar aparcado con la llave
de encendido en la posición ACC u ON. Para
ello, siga los procedimientos siguientes.
1. Pise el freno para detener el vehículo
completamente en un lugar seguro. Ponga el
freno de mano.
2. Continúe pisando el pedal de freno, suelte el
freno de mano una vez y vuélvalo a poner.
3. Cuando ponga el freno de mano por segunda
vez, suelte el pedal del freno.
• En los automóviles con cambio automático, coloque la
palanca de cambio en la posición de aparcamiento.
10
Navigation / Navigation / Navegación
Main Menu / Menu principal / Menú principal
English
Français
Español
Info Button
Touche Info
Botón Info
Press this to check information such as:
Appuyez sur cette touche pour obtenir certaines
informations, telles que :
Pulse este botón para comprobar información
como:
• L’état du récepteur GPS
• La vitesse et l'itinéraire actuel
• Estado del receptor GPS
• Información de velocidad y de viaje
Go to Button
Touche Go To
Botón Go to
Press this to start entering a destination.
Appuyez sur cette touche pour saisir une destination.
Pulse este botón para empezar a introducir un destino.
Home Button
Touche Home
Botón Home
Press this to go to a saved home location.
Appuyez sur cette touche pour vous rendre à
l’une des adresses de domicile sauvegardées.
Pulse este botón para ir a una ubicación
guardada como domicilio.
Settings Button
Touche Settings
Botón de ajustes
Press this to change system settings.
Appuyez sur cette touche pour modifier les
paramètres système.
Pulse este botón para cambiar los ajustes del
sistema.
Map Button
Touche Map
Botón Map
Press this to go to the map.
Appuyez sur cette touche pour accéder à la carte.
Pulse este botón para acceder al mapa.
• GPS receiver status
• Speed and trip information
11
Input a Destination / Saisie d’une destination / Introducción de un destino
Go to Main Menu
Go to / Accédez au menu principal
Vaya al menú principal
Go to
English
Go to /
Go to Main Menu
Go to
Address / Accédez au menu principal
Go to
Address
to
Address / Vaya al menú principal
Français
Go
Español
Type in a new address.
Saisir une nouvelle adresse.
Escriba una nueva dirección.
Select from recent destinations.
Sélectionner l’une des dernières
destinations.
Selección entre los destinos recientes.
Select from saved destination.
Sélectionner l’une des destinations
sauvegardées.
Selección entre los destinos
guardados.
More options (setting destination using
coordinates or by intersection).
Afficher les options supplémentaires
(choix d’une destination à l’aide de
coordonnées ou par intersection).
Más opciones (ajuste del destino con
coordenadas o con intersección).
Search by entering street name.
Rechercher par nom de rue.
Búsqueda por nombre de calle.
Search by entering city name.
Rechercher par nom de ville.
Búsqueda por nombre de ciudad.
Select from recent streets.
Sélectionner l’une des dernières rues
fréquentées.
Selección entre las calles recientes.
Select from recent cities.
Sélectionner l’une des dernières villes
visitées.
Selección entre las ciudades recientes.
12
Find a Place / Rechercher un lieu / Búsqueda de un lugar
Go to Main Menu
Go to / Accédez au menu principal
Go to / Vaya al menú principal
Go to
English
Go to Main Menu
Go to
Places / Accédez au menu principal
to
Places / Vaya al menú principal
Go to
Places
Français
Go
Español
Search from a list of places
(restaurants, ATMs, gas stations, etc.).
Effectuer une recherche à partir d’une
liste de lieux (restaurants, guichets
automatiques, stations-service, etc.).
Búsqueda entre una lista de lugares
(restaurantes, cajeros automáticos,
gasolineras, etc.).
Search near current location.
Effectuer une recherche à proximité de
l’emplacement actuel.
Búsqueda cerca de la ubicación actual.
Search near destination.
Effectuer une recherche à proximité de
la destination.
Búsqueda cerca del destino.
Search a place from city center.
Rechercher un lieu à partir du centreville.
Búsqueda de un lugar desde el centro
de la ciudad.
Search along current route.
Effectuer une recherche le long de
l’itinéraire actuel.
Búsqueda en la ruta actual.
13
Point of Interest (POI) Keyword Search / Recherche d’un point d’intérêt (PI) à l’aide du clavier / Búsqueda por palabra clave de punto de interés
(POI)
Don’t know the full POI name? Instead, type in what you know or need and find relevant results. This search method returns POI names containing-not necessarily
beginning with-the search term. / Vous méconnaissez le nom complet d’un pi ? Il vous suffit de saisir les informations dont vous disposez ou dont vous avez
besoin pour obtenir la liste des résultats correspondants. Cette méthode permet de rechercher les PI contenant le terme saisi, mais ne commençant pas
nécessairement par ce terme. / No conoce el nombre completo del POI? No pasa nada: puede escribir lo que recuerde y aparecerán los resultados pertinentes.
Este método de búsqueda devuelve nombres de POI aunque no comiencen necesariamente por los caracteres que esté buscando.
14
Map / Carte / Mapas
Map without Guidance / Carte sans indication de navigation / Mapa sin guía
English
Français
Español
Goes back to Main Menu screen.
Cette touche permet de revenir à
l’écran du menu principal.
Vuelve a la pantalla del menú principal.
Zooms Map View in.
Cette touche permet d’effectuer un
zoom avant sur la carte.
Amplía la vista del mapa.
Zooms Map View out.
Cette touche permet d’effectuer un
zoom arrière sur la carte.
Reduce La vista del mapa.
Displays traffic information.
Affiche des informations routières.
Muestra información sobre el tráfico.
Changes map view (2D, 3D).
Cette touche permet de modifier le type
d’affichage de la carte (2D, 3D).
Cambia al vista del mapa (2D, 3D).
Displays GPS status.
Cette touche permet d’afficher l’état du GPS.
Muestra el estado del GPS.
Displays current position.
Cette touche permet d’afficher la
position actuelle.
Muestra la posición actual.
15
Map with Guidance / Carte avec indications de navigation / Mapa con guía
Press to repeat voice guidance.
Cette touche permet d’écouter à
nouveau les indications vocales.
Pulse para repetir la guía de voz.
Press to view Route Menu.
Cette touche permet d’afficher le menu
de l’itinéraire.
Pulse para ver el menú de la ruta.
Displays next street name.
Cette touche permet d’afficher le nom
de la prochaine rue.
Muestra el nombre de la calle siguiente.
Switch to arrow only.
Cette touche permet de passer en
mode flèche uniquement.
Cambia a visualización sólo de flechas.
16
GUIDEVIEW WINDOWTM / GUIDEVIEW WINDOWTM / GUIDEVIEW WINDOWTM
When the current screen is audio source screen (Radio, CD, iPod, etc.), press AUDIO
hardkey to turn on GUIDEVIEW WINDOWTM mode. To
turn it off, press AUDIO
hardkey again. / Si l’écran de la source audio (Radio, CD, iPod, etc.) est actuellement affiché, appuyez sur le
. / Si la
bouton AUDIO
pour activer le mode GUIDEVIEW WINDOWTM. Pour de désactiver, appuyez à nouveau sur le bouton AUDIO
pantalla actual es la pantalla de la fuente de audio (Radio, CD, iPod, etc.), pulse la tecla AUDIO
para activar el modo GUIDEVIEW
.
WINDOWTM. Para desactivarlo, vuelva a pulsar la tecla AUDIO
TM
Without Route Guidance /
Display example for GUIDEVIEW WINDOW mode screen /
With Route Guidance / Avec
Sans indication de
Exemple d’affichage de l’écran du mode GUIDEVIEW
indications de navigation /
navigation / Sin guía de ruta
WINDOWTM / Ejemplo de visualización de la pantalla del
Con guía de ruta
modo GUIDEVIEW WINDOWTM
English
Français
Español
Compass
Boussole
Brújula
Current Position
Position Actuelle
Posición Actual
Next Street Name
Nom De La Prochaine Rue
Nombre De La Calle Siguiente
The direction of the next corner
Sens du prochain virage
Dirección de al esquina siguiente
The distance bar for the next corner
Indicateur de distance pour le prochain
virage
Barra de distancia hasta la esquina
siguiente
The distance to the next corner
Distance jusqu’au prochain virage
Distancia hasta la esquina siguiente
17
HD Radio/RBDS
Display example for HD Radio main screen / Exemple d’affichage de l’écran principal HD Radio / Ejemplo de visualización de la pantalla
HD Radio
• The HD Radio signal has priority to be received by this unit. If there is no HD Radio
signal in the current area, after 10 seconds, this unit will switch to receive the RBDS
Radio signal automatically. / Cet appareil donne la priorité à la réception du signal
HD Radio. Si la région dans laquelle vous vous trouvez n’émet aucun signal HD
Radio, passées 10 secondes l’appareil passe automatiquement à la réception des
signaux radio RBDS. / La señal HD Radio tiene prioridad para la recepción en esta
unidad. Si no hay señal HD Radio en la zona actual, transcurridos 10 segundos la
unidad cambiará de modo para recibir automáticamente la señal de radio RBDS.
English
Français
Español
Activate the Compulsory Analog
Radio mode
Activez le mode radio analogique
requis
Activación del modo obligatorio
de radio analógica
The display will change to RBDS Tuner
mode screen and the button will be
highlighted.
L’affichage passe à l’écran du mode tuner
RBDS et la touche est mise en
surbrillance.
La pantalla cambiará al modo de
sintonizador RBDS y el botón quedará
resaltado.
Cancel the Compulsory Analog
Radio mode
Désactivez le mode radio
analogique requis
Cancelación del modo obligatorio
de radio analogical
Touch the highlighted button to cancel the
Compulsory Analog Radio mode.
Appuyez sur la touche en surbrillance
pour annuler le mode Compulsory Analog
Radio.
Toque el botón resaltado para cancelar el
modo obligatorio de radio analógica.
Choose the tuning mode
Cette touche permet de choisir le
mode de sélection de la fréquence
radio
Selección del modo de
sintonización
DX SEEK / Local SEEK / MANUAL
DX SEEK / Local SEEK / MANUAL
18
DX SEEK / Local SEEK / MANUAL
Change the Band
FM-1
FM-2
AM
FM-1
Cette touche permet de changer
de fréquence
FM-1
Press and hold to preset Stations
Automatically
FM-2
AM
Cambio de la banda
FM-1
FM-2
AM
FM-1
FM-1
Maintenez cette touche enfoncée
pour procéder à la présélection
automatique des stations
Pulse la tecla sin soltarla para
memorizar las emisoras
automáticamente
Le tuner recherche et mémorise
automatiquement les 6 stations les plus
puissantes sur la gamme sélectionnée.
El sintonizador buscará y almacenará
automáticamente 6 emisoras de señal
intensa en la banda seleccionada.
Cette touche permet d’accorder
une station préréglée
Sintonía de emisoras
memorizadas
1.Appuyez sur [P 1/2] pour modifier le
guide des fonctions.
1.Toque [P 1/2] para cambiar la guía de
funciones.
2.Touch any one of the preset buttons
[P.SET 1] through [P.SET 6] that has a
station stored to it.
The preset station is received.
2.Appuyez sur l’une des touches de
préréglage [P.SET 1] à [P.SET 6] sur
laquelle une station a été mémorisée.
La station préréglée est captée.
2.Toque cualquiera de los botones de
memorización incluidos entre [P.SET 1]
y [P.SET 6] que contenga una emisora
almacenada.
Se escuchará la emisora memorizada.
Change the frequency
up/down
Cette touche permet de
sélectionner la fréquence
précédente/suivante
Cambio de la frecuencia
The tuner will automatically seek and
store 6 strong stations in the selected
band.
Tune to Preset Stations
1.Touch [P 1/2] to change the function
guide.
19
Receiving a Multicast (HD Radio) / Réception d’une radio de multiplexage (HD Radio) / Recepción de una multiemisora
(HD Radio)
Multicasting is the ability to broadcast multiple program streams over a single FM frequency. When a radio station multicast is received, the “Multicast” indicator lights. /
Le multiplexage est une technique par laquelle plusieurs programmes sont transmis en utilisant la même bande de fréquences FM. Lorsqu’une station radio de
multiplexage est reçue, l’indicateur « Multicast » s’allume. / La recepción de multiemisoras consiste en la emisión de varios flujos de emisoras en una sola frecuencia FM.
Cuando se recibe una emisora de radio multiemisora, se ilumina el indicador “Multicast”.
English
1
2
3
Français
Español
The program list is displayed.
La liste des programmes s’affiche.
Aparece la lista de programas.
Select the desired program type.
Sélectionnez le type de
programme de votre choix.
Seleccione el programa que
desee.
Le programme sélectionné est reçu.
Ahora se recibe el programa
seleccionado.
Changez le sous-canal de la
station radio reçue.
Cambio del canal secundario de la
emisora de radio recibida.
The selected program is received.
Change the sub channel of the
received radio station.
20
CD/MP3/WMA/AAC
Display example for MP3/WMA/AAC main screen / Exemple d’affichage de l’écran principal MP3/WMA/AAC / Ejemplo de visualización de la
pantalla principal MP3/WMA/AAC
English
Français
Español
Pause and Playback
Pause et lecture
Pausa y reproducción
Select the desired song
Touch [
] or [
] to skip to the
Cette touche permet de sélectionner
le morceau de votre choix
Appuyez sur la touche [
] ou
[
] pour revenir au début du
Selección de la canción deseada
Toque [
]o[
] para saltar al
beginning of the current song or the next
song.
principio de la canción actual o de la
siguiente canción.
morceau actuel ou du morceau suivant.
] or [
Touch and hold [
backward or fast forward.
] to fast
Select the desired folder (MP3/
WMA/AAC)
Maintenez la touche [
] ou [
]
enfoncée pour effectuer une recherche
rapide vers l’arrière ou vers l’avant.
Toque y mantenga presionado [
[
] para avanzar o retroceder
rápidamente.
Cette touche permet de
sélectionner le dossier de votre
choix (MP3/WMA/AAC)
Selección de la carpeta deseada
(MP3/WMA/AAC)
21
]o
M.I.X. (Random Play)
M.I.X. (Lecture aléatoire)
M.I.X. (Reproducción aleatoria)
Touch [ ] after touching [P 1/2].
(MP3/WMA/AAC)
Appuyez sur [ ] après avoir appuyé
sur [P 1/2]. (MP3/WMA/AAC)
Toque [ ] después de tocar [P 1/2].
(MP3/WMA/AAC)
: Seuls les fichiers d’un
dossier sont lus dans un
ordre aléatoire.
(MP3/WMA/AAC)
: Les pistes sont lues dans
un ordre aléatoire. (CD)/
Les fichiers sont lus dans
un ordre aléatoire.
(MP3/WMA/AAC)
(désactivé): Annulation
Sólo se reproducen en
secuencia aleatoria los
archivos incluidos en
una carpeta. (MP3/
WMA/AAC)
:
Las pistas se
reproducen en
secuencia aleatoria.
(CD)/ Los archivos se
reproducen en
secuencia aleatoria.
(MP3/WMA/AAC)
(desactivado): Cancelar
Repeat Play
Lecture répétée
Repetición de reproducción
Touch [ ] after touching [P 1/2].
(MP3/WMA/AAC)
Appuyez sur [ ] après avoir appuyé
sur [P 1/2]. (MP3/WMA/AAC)
Toque [ ] después de tocar [P 1/2].
(MP3/WMA/AAC)
(MP3/WMA/AAC)
(off)
(MP3/WMA/AAC)
(off)
: Only files in a folder are
played back in random
sequence.
(MP3/WMA/AAC)
: The tracks are played back
in random sequence. (CD)/
The files are played back
in random sequence.
(MP3/WMA/AAC)
: Cancel
: Only a track is repeatedly
played back.
: Only files in a folder are
repeatedly played back.
(MP3/WMA/AAC)
: Cancel
: Une seule piste est lue
d’une manière répétée.
: Seuls les fichiers d’un
dossier sont lus d’une
manière répétée.
(MP3/WMA/AAC)
(désactivé): Annulation
22
:
:
Sólo se reproduce
varias veces una pista.
:
Sólo se reproducen
varias veces los
archivos incluidos en
una carpeta.
(MP3/WMA/AAC)
(desactivado): Cancelar
DVD/VCD
Display example for DVD Video main screen / Exemple d’affichage de l’écran principal du DVD Vidéo / Ejemplo de visualización de la pantalla
principal DVD de vídeo
• After carrying out the steps 1 to 3 of “To watch a video source, change setup or edit
contents” explained on page 10 to display the video screen. If you try to activate the
auxiliary device while driving, the display will show the warning-Picture off for your safety. /
Suivez les étapes 1 à 3 de la section « Pour visionner une source vidéo et modifier la
configuration ou le contenu » (page 10) pour afficher l’écran vidéo. Si vous tentez
d’activer l’appareil auxiliaire pendant que vous conduisez, le message d’avertissement
Picture off for your safety s’affiche. / Tras realizar los pasos del 1 al 3 de la sección “Para
ver una fuente de vídeo, cambie los ajustes o edite el contenido” explicados en la página
10 para ver la pantalla de vídeo. Si intenta activar el dispositivo auxiliar mientras conduce,
se mostrará en la pantalla la advertencia Picture off for your safety (pantalla desactivada
por su seguridad).
English
Français
Español
Pause and Playback
Pause et lecture
Pausa y reproducción
Stop Playback (Pre Stop)
Cette touche permet d’arrêter la
lecture (Pre Stop)
Parada de reproducción (Pre
Stop)
1. Appuyez une fois sur la touche [ ]
pendant la lecture.
« Pre Stop » s’affiche.
2. Appuyez sur [ / ] en mode Pre Stop.
La lecture commence à partir de la
position à laquelle elle s’est arrêtée.
1. Toque [ ] una vez durante la
reproducción.
Aparecerá el texto “Pre Stop”.
2. Toque [ / ] en el modo Pre Stop.
La reproducción comenzará desde la
posición en la que se haya detenido
Cette touche permet d’arrêter la
lecture
Parada de reproducción
1. Touch [ ] once during playback.
“Pre Stop” is displayed.
2. Touch [ / ] in the Pre Stop mode.
Playback starts from the position at which
it was stopped.
Stop Playback
1. Touch [ ] twice or touch and hold [ ]
for at least 2 seconds during playback.
“Stop” is displayed, and playback stops.
2. Playback starts from the beginning when
[ / ] is touched while playback is
stopped.
1. Appuyez deux fois sur la touche [ ] ou
maintenez la touche [ ] enfoncée
pendant au moins 2 secondes pendant la
lecture.
« Stop » s’affiche et la lecture commence.
2. La lecture commence depuis le début si
vous appuyez sur [ / ] alors que la
lecture est arrêtée.
23
1.Toque [ ] dos veces o bien toque y
mantenga pulsado [ ] durante al
menos 2 segundos durante la
reproducción.
Se muestra el texto “Stop” y se detiene
la reproducción.
2. La reproducción comienza desde el
principio cuando [ / ] se ha tocado
mientras la reproducción está detenida.
Find the Beginning of Chapters/
Tracks
Touch [
] or [
] to skip to the
beginning of the current or the following
chapter/Tracks.
Touch and hold [
] or [
backward or fast forward.
] to fast
Display the Top Menu Screen
(DVD-Video, DVD-Audio)
When a DVD contains two or more titles,
the top menu screen appears.
Display the Menu (DVD-Video)
With a DVD having two or more menus, a
menu screen will appear for the programs
available, in addition to the main
programs.
Cette touche permet d’accéder au
début d’un chapitre/d’une piste
Appuyez sur la touche [
] ou
[
] pour accéder au début du
Búsqueda del inicio de capítulos/
pistas
Toque [
]o[
] para saltar al
inicio del capítulo/pista actual o siguiente.
chapitre/de la piste en cours ou du
chapitre/de la piste suivant(e).
Maintenez la touche [
] ou [
enfoncée pour reculer ou avancer
rapidement.
]
Mantenga pulsado [
]o[
]
para rebobinar o avanzar rápidamente.
Cette touche permet d’afficher l’écran
du menu principal (DVD vidéo, DVD
audio)
Visualización de la pantalla del
menú principal (DVD-Video, DVD
de audio)
Si un DVD contient au moins deux titres,
le menu principal s’affiche.
Si un DVD contiene dos o más títulos, se
visualiza la pantalla del menú principal.
Cette touche permet d’afficher le
menu (DVD vidéo)
Visualización del menú (DVDVideo)
Si un DVD contient au moins deux menus,
un écran de menus s’affiche pour les
programmes disponibles, en plus des
programmes principaux.
Si un DVD tiene dos o más menús,
aparecerá una pantalla de menú con los
programas disponibles, además de los
programas principales.
24
Repeat play
DVD Video
: The chapter is played
repeatedly.
Repeat Title : The title is played
repeatedly.
Repeat Off : Playback returns to
normal mode.
Repeat
DVD Audio
: The track is displayed
repeatedly.
Repeat group :
The group is played
repeatedly.
Repeat Off : The playback returns to
normal mode.
Repeat
Video CD
: The track is played
repeatedly.
Repeat Disc : The disc is played
repeatedly.
Repeat Off* : Playback does not
repeat.
Repeat
* Displayed only in the changer mode.
Cette touche permet de répéter la
lecture.
Reproducción repetida
DVD vidéo
Repeat
: Le chapitre est lu
plusieurs fois.
Repeat Title : Le titre est lu plusieurs
fois.
Repeat Off : Le mode de lecture
normal est rétabli.
Repeat
DVD audio
: La piste est lue
plusieurs fois.
Repeat group:
Le groupe est lu à
plusieurs reprises.
Repeat Off : La lecture revient au
mode normal.
Repeat
CD vidéo
: La piste est lue à
plusieurs reprises.
Repeat Disc : Le disque est lu à
plusieurs reprises.
Repeat Off* : La lecture ne se répète
pas.
Repeat
* S’affiche uniquement en mode changeur.
25
DVD-Video
: El capítulo se reproduce
de forma repetida.
Repeat Title : El título se reproduce de
forma repetida.
Repeat Off : La reproducción vuelve
al modo normal.
DVD de audio
: Para visualizar la pista
repetidamente.
Repeat group:
Para reproducir el grupo
repetidamente.
Repeat Off : El reproductor vuelve al
modo normal.
Repeat
Video CD
: Para reproducir la pista
repetidamente.
Repeat Disc : El disco se reproduce
de forma repetida.
Repeat Off* : La reproducción no se
repite.
Repeat
* Se muestra solamente en el modo de
cambiador.
BLUETOOTH
Display example for the incoming call screen / Exemple d’affichage de l’écran d’appel entrant / Ejemplo de visualización de pantalla de llamada entrante
• When BLUETOOTH IN is set to ON, the following operation can be performed. / Lorsque le
paramètre BLUETOOTH IN est défini sur ON, il est possible d’effectuer les opérations
suivantes. / Si BLUETOOTH IN está ajustado en ON, se puede realizar la siguiente
operación.
English
Français
Español
About BLUETOOTH
A propos de BLUETOOTH
Acerca de BLUETOOTH
BLUETOOTH is a wireless technology
allowing communication between a mobile
device or personal computer over short
distances. This enables a hands-free call
or data transmission between
BLUETOOTH compatible devices.
With BLUETOOTH wireless technology
hands-free calls are possible when using a
HSP (Head Set Profile) and HFP (HandFree Profile) compatible mobile phone with
this unit. About how to connect the mobile
phone to this unit, refer to the Owner’s
Manual stored in the supplied CD-ROM.
BLUETOOTH est une technologie sans fil qui
permet à un appareil mobile et à un ordinateur de
communiquer entre eux sur de courtes distances.
Elle permet d’établir des communications mains
libres et de transmettre des données entre des
appareils compatibles BLUETOOTH.
La technologie sans fil BLUETOOTH vous
permet de passer et de recevoir des appels
en mode mains libres en utilisant un téléphone
mobile compatible HSP (Head Set Profile) et
HFP (Hands-Free Profile) avec cet appareil.
Pour savoir comment raccorder le téléphone
portable à cette unité, reportez-vous au Mode
d’emploi qui se trouve sur le CD-ROM fourni.
BLUETOOTH es una tecnología
inalámbrica que permite comunicarse
entre un dispositivo móvil o un ordenador
personal en distancias cortas. De este
modo pueden realizarse llamadas manos
libres o transmitir datos entre dispositivos
compatibles con BLUETOOTH.
Con la tecnología inalámbrica BLUETOOTH
pueden realizarse llamadas manos libres si se
utiliza un teléfono móvil compatible con HSP
(Perfil de auriculares) y HFP (Perfil manos libres)
con la unidad. En relación con la conexión del
teléfono móvil a esta unidad, consulte el manual
del propietario del CD-ROM suministrado.
Answering the Incoming Call
Réponse à l’appel entrant
Responder una llamada entrante
Hanging up the Telephone
Mettre fin à un appel
Colgar el teléfono
Switching the call sound between
the unit and mobile phone.
Commutation du son de l’appel
entre l’appareil et le téléphone
portable.
Cambio del sonido de la
llamada entre la unidad y el
teléfono móvil.
26
Call History / Historique des appels / Historial de llamadas
Display example for SOURCE selection screen /
Exemple d’affichage de l’écran de sélection de
la SOURCE / Ejemplo de visualización de la
pantalla de selección de SOURCE
Display example for Telephone Menu screen /
Exemple d’affichage de l’écran du menu du
téléphone / Ejemplo de visualización de la
pantalla del menú Teléfono
Display example for Phone Book screen /
Exemple d’affichage de l’écran du
répertoire / Ejemplo de visualización de
la pantalla Agenda
2
3
1
English
1
2
3
Français
Español
Activate the Telephone Menu
screen.
Activez l’écran du menu du
téléphone.
Active la pantalla del menú
Teléfono.
Select the desired outgoing mode.
Sélectionnez le mode sortant
souhaité.
Seleccione el modo de llamadas
salientes que desee.
Dailed Calls/Received Calls/Missed
Calls/Phone Book
Dailed Calls/Received Calls/Missed
Calls/Phone Book
Select the desired name or
telephone number.
Sélectionnez le nom ou le numéro
de téléphone souhaité.
Seleccione el nombre o el número
de teléfono que desee.
The call is placed.
L’appel est effectué.
A continuación, se iniciará la llamada.
• Touch [ALPHABET] on the Phone Book
screen to activate the Alphabet Searching
mode. You can search the names registered in
phone book more efficiently by touching the
initial letter or number of the desired name.
• Touch any button of [P SET 1] through
[P SET 5] that has a number stored in it, the
stored number is dialed directly.
• Appuyez sur la touche [ALPHABET] de l’écran
du répertoire téléphonique pour activer le mode
de recherche alphabétique. Pour rechercher
plus efficacement les noms enregistrés dans le
répertoire, appuyez sur la lettre ou le numéro
initial correspondant au nom de votre choix.
• Appuyez sur l’une des touches de [P SET 1] à
[P.SET 5] sous lesquelles un numéro a été
mémorisé ; le numéro mémorisé est
automatiquement composé.
• Toque [ALPHABET] en la pantalla de la
agenda de teléfonos para activar el modo de
búsqueda alfabético. Puede buscar los
nombres guardados en la agenda de forma
más eficaz si toca la inicial o el número del
nombre que desee.
• Toque cualquier botón de [P SET 1] a
[P SET 5] que tenga un número guardado: el
número almacenado se marcará directamente.
Dailed Calls/Received Calls/Missed
Calls/Phone Book
27
Direct Dial Input / Fonction de numérotation directe / Marcación directa
Display example for SOURCE selection screen /
Exemple d’affichage de l’écran de sélection de
la SOURCE / Ejemplo de visualización de la
pantalla de selección de SOURCE
Display example for Telephone Menu screen /
Exemple d’affichage de l’écran du menu du
téléphone / Ejemplo de visualización de la
pantalla del menú Teléfono
Display example for Direct Input screen /
Exemple d’affichage de l’écran de
numérotation directe / Ejemplo de
visualización de la pantalla Marcación directa
3
5
1
English
Français
Español
Activate the Telephone Menu screen.
Activez l’écran du menu du téléphone.
Active la pantalla del menú Teléfono.
The Dial Input item is displayed.
Le réglage Dial Input s’affiche.
Aparecerá la opción Dial Input.
Activate the Direct Input screen.
Activez l’écran de numérotation
directe.
Active la pantalla Marcación
directa.
4
Touch (input) the telephone
number.
Composez le numéro de téléphone (en
appuyant sur les touches à l’écran).
Toque (introduzca) el número de
teléfono.
5
The call is placed.
L’appel est effectué.
A continuación, se iniciará la llamada.
: closes the numeric keypad input screen.
Delete All: deletes all input numbers.
: deletes a previous number.
: ferme l’écran de saisie du clavier
numérique.
Delete All : supprime tous les numéros composés.
: supprime le numéro précédent.
: cierra la pantalla de marcación del teclado
numérico.
Delete All: borra todos los números introducidos.
: borra el número anterior.
1
2
3
28
Voice Dial Operation / Fonctionnement de la numérotation vocale / Marcación por voz
Display example for SOURCE selection screen /
Exemple d’affichage de l’écran de sélection de
la SOURCE / Ejemplo de visualización de la
pantalla de selección de SOURCE
Display example for Telephone Menu screen /
Exemple d’affichage de l’écran du menu du
téléphone / Ejemplo de visualización de la
pantalla del menú Teléfono
Display example for Voice Dial selection
screen / Exemple d’affichage de l’écran de
sélection de la numérotation vocale /
Ejemplo de visualización de pantalla de
selección de Marcación por voz
2
1
3
English
1
2
3
Français
Español
Activate the Telephone Menu
screen.
Activez l’écran du menu du
téléphone.
Active la pantalla del menú
Teléfono.
Select Voice Dial item.
Sélectionnez l’option de
numérotation vocale.
Seleccione un elemento de
marcación por voz.
Un message s’affiche.
Aparecerá un mensaje.
Activez le mode de numérotation
vocale.
Active el modo de llamada
mediante marcación por voz.
A message is displayed.
Activate the Voice Dial Call mode.
29
4
Say the telephone number, name
you want to call into the
microphone.
Prononcez le numéro de
téléphone et le nom de la
personne que vous souhaitez
appeler dans le microphone.
Pronuncie el número de teléfono o
el nombre al que desea llamar en
el micrófono.
• You can perform this operation only when
a voice dial compatible mobile phone is
connected.
• The number and name depend on the voice
dial information stored in the mobile
phone.
• Voice dial operation depends on the
function of the mobile phone. For details,
refer to the Owner’s Manual of the mobile
phone.
• Vous ne pouvez effectuer cette opération
que lorsqu’un téléphone portable
compatible avec la numérotation vocale est
connecté.
• Le numéro et le nom dépendent des
informations de numérotation vocale
enregistrées dans le téléphone portable.
• Le fonctionnement de la numérotation
vocale dépend de celui du téléphone
portable. Pour de plus amples informations,
reportez-vous au mode d’emploi du
téléphone portable.
• Solo es posible realizar esta operación si
hay conectado un teléfono móvil
compatible con la marcación por voz.
• El número y el nombre dependen de la
información de la marcación por voz
guardada en el teléfono móvil.
• La posibilidad de utilizar la marcación por
voz depende de las funciones del teléfono
móvil. Para obtener más información al
respecto, consulte el Manual del
propietario del teléfono móvil.
30
Flash memory/Portable audio player / Clé USB/Lecteur audio
portable / Memoria Flash/Reproductor de audio portátil
Display example for USB AUDIO main screen / Exemple d’écran principal USB AUDIO / Ejemplo de visualización de la pantalla principal USB AUDIO
• If a Flash memory device or Portable audio player is connected to the unit, MP3/WMA/AAC files
of Flash memory and MP3/WMA files of Portable audio player can be played back. / Si vous
raccordez un périphérique mémoire USB ou un lecteur audio portable à cet appareil, vous
pouvez lire les fichiers MP3/WMA/AAC de la clé USB et les fichiers MP3/WMA du lecteur audio
portable. / Si se ha conectado un dispositivo de memoria Flash o un reproductor de audio portátil
a la unidad, el equipo podrá reproducir archivos MP3/WMA/AAC de la memoria Flash y archivos
MP3/WMA del reproductor de audio portátil.
• Depending on the setting of USB search mode, the function guide display varies. / L’écran du
guide des fonctions varie en fonction du paramètre du mode de recherche USB. / La pantalla de
guía de funciones varía en función de los ajustes del modo de búsqueda USB.
English
Français
Español
Pause and Playback
Pause et lecture
Pausa y reproducción
Selecting the desired song
Sélection du morceau de votre choix
Selección de la canción deseada
Touch [
] or [
] to skip to the
beginning of the current song or the next
song.
Appuyez sur la touche [
] ou
[
] pour accéder au début du
morceau actuel ou du morceau suivant.
Toque [
]o[
] para acceder al
principio de la canción actual o de la
siguiente.
] or [
Touch and hold [
backward or fast forward.
Maintenez la touche [
] ou [
]
enfoncée pour effectuer une recherche
rapide vers l’arrière ou vers l’avant.
Toque y mantenga presionado [
[
] para avanzar o retroceder
rápidamente.
• Lorsqu’un lecteur audio portable est connecté,
les opérations de recherche rapide vers l’avant
et vers l’arrière ne sont pas disponibles.
• Cuando se conecta un reproductor de audio
portátil, no están disponibles las opciones
de avance rápido/retroceso rápido.
Sélection du dossier de votre
choix
Selección de la carpeta
deseada
] to fast
• When a Portable audio player is connected,
fast-forwarding/fast-reversing is not
available.
Selecting the desired folder
31
]o
M.I.X. (Random Play)
M.I.X. (lecture aléatoire)
M.I.X. (Reproducción aleatoria)
Touch [
Appuyez sur [
[P 1/2].
Toque [
] after touching [P 1/2].
: Song shuffle randomly plays
back songs within a selected
category (playlist, album,
etc.). (Tag Search mode only)
: Solo se reproducen en
secuencia aleatoria los archivos
incluidos en una carpeta. (Solo
modo de búsqueda de
nombres de archivos)
: Seuls les fichiers d’un dossier
sont lus dans un ordre
aléatoire. (Mode de recherche
par nom de fichier uniquement)
: All songs in the Flash memory
are played back in random
sequence. (File Name Search
mode only)
All songs in the current bank
of Flash memory or Portable
audio player are played back
in random sequence. (Tag
Search mode only)
: Tous les morceaux de la clé
USB sont lus dans un ordre
aléatoire. (Mode de recherche
par nom de fichier uniquement)
Tous les morceaux enregistrés
dans la banque actuelle de la
clé USB ou du lecteur audio
portable sont lus dans un ordre
aléatoire. (Mode de recherche
par étiquettes uniquement)
: Cancel
] después de tocar [P 1/2].
: La reproducción aleatoria de
canciones reproduce las
canciones de una categoría
seleccionada (lista de
reproducción, álbum, etc.).
(Solo modo de búsqueda de
etiquetas)
: Cette fonction lit de manière
aléatoire les morceaux d’une
catégorie choisie (liste de
lecture, album, etc.). (Mode
de recherche par étiquettes
uniquement)
: Only files in a folder are
played back in random
sequence. (File Name Search
mode only)
(off)
] après avoir appuyé sur
: Todas las canciones de la
memoria Flash se reproducen
de forma aleatoria. (Solo modo
de búsqueda de nombres de
archivos)
Todas las canciones del banco
actual de la memoria Flash o
del reproductor de audio
portátil se reproducen de
forma aleatoria. (Solo modo de
búsqueda de etiquetas)
(désactivé): Annulation
(desactivado): Cancelar
Repeat Play
Lecture répétitive
Repetición de reproducción
Touch [
Appuyez sur [
[P 1/2].
Toque [
] after touching [P 1/2].
: Only a track is repeatedly
played back.
: Une seule piste est lue d’une
manière répétée.
: Only files in a folder are
repeatedly played back. (File
Name Search mode only)
(off)
] après avoir appuyé sur
: Seuls les fichiers d’un
dossier sont lus d’une
manière répétée. (Mode de
recherche par nom de fichier
uniquement)
: Cancel
] después de tocar [P 1/2].
: Solo se reproduce varias
veces una pista.
: Solo se reproducen varias
veces los archivos incluidos
en una carpeta. (Solo modo
de búsqueda de nombres de
archivos)
(desactivado): Cancelar
(désactivé): Annulation
• For the setting of Tag Search mode and
File Name Search mode, refer to the
owner manual stored in the supplied
CD-ROM.
• Pour le paramétrage du mode de
recherche par étiquettes et du mode de
recherche par nom de fichier, consultez le
mode d’emploi sur le CD-ROM fourni.
32
• Para la configuración del modo de
búsqueda de etiquetas y de nombres de
archivos, consulte el Manual del propietario
incluido en el CD-ROM suministrado.
iPod/iPhone (Optional) / iPod/iPhone
(en Optional) / iPod/iPhone (opcional)
Display example for iPod main screen / Exemple d’affichage pour l’écran principal de l’iPod / Ejemplo de visualización de la pantalla principal iPod
• When an iPhone or a video compatible iPod is connected, set AUX2 IN to iPod
Video and carry out the steps 1 to 3 of “To Watch a Video Source” explained on
page 10 to watch the video files of the iPod/iPhone. / Lorsque vous raccordez un
iPhone ou un iPod prenant en charge les fichiers vidéo, réglez AUX2 IN sur iPod
Video et suivez les étapes 1 à 3 de la section « Pour visionner une source vidéo »
(page 10) afin d’afficher les fichiers vidéo de l’iPod/iPhone. / Si se conecta un
iPhone o un iPod compatible con vídeo, ajuste AUX2 IN en iPod Video y siga los
pasos del 1 al 3 descritos en “Para ver una fuente de vídeo” en la página 10 para
ver los archivos de vídeo del iPod/iPhone.
English
Français
Español
An iPod/iPhone can be connected to this
unit by using the USB connection cable.
When this unit is connected, you can
choose to control the iPod/iPhone using
its own controls or by controls of this unit.
Il est possible de raccorder un iPod/iPhone à
cet appareil à l’aide du câble de connexion
USB. Lorsque cet appareil est raccordé,
vous pouvez choisir de commander l’iPod/
iPhone à l’aide de ses propres commandes
ou des commandes de l’appareil.
Es posible conectar un iPod/iPhone a
esta unidad mediante el cable de
conexión USB. Si la unidad está
conectada, puede elegir controlar el
iPod/iPhone con sus propios controles o
mediante los controles de esta unidad.
Press and hold to switch the
control to iPod/iPhone.
Appuyez longuement sur cette
touche pour contrôler l’iPod/iPhone
avec ses propres commandes.
Pulse este botón sin soltarlo para
cambiar el control al iPod/iPhone.
Commandez l’iPod/iPhone à l’aide de ses propres
commandes. Dans ce cas, certaines fonctions ne
seront pas disponibles sur cet appareil.
Se utiliza el iPod/iPhone con sus propios
controles. En este caso, algunas
funciones no estarán disponibles desde
esta unidad.
Operate the iPod/iPhone via this unit.
Appuyez longuement sur cette
touche pour contrôler l’iPod avec
l’appareil.
Pulse y mantenga pulsado para
cambiar el control del iPod a esta
unidad.
Vous commandez l’iPod/iPhone via cet appareil.
Controla el iPod/iPhone desde la unidad.
Pause and Playback
Pause et lecture
Pausa y reproducción
Operate the iPod/iPhone using its own
controls. In this case, some functions will
not be operable via this unit.
Press and hold to switch the iPod
control to this unit.
33
Select the desired song
Touch [
] or [
] to skip to the
beginning of the current song or the next song.
Cette touche permet de sélectionner le
morceau de votre choix
Appuyez sur la touche [
] ou [
] pour
accéder au début du morceau actuel ou du
morceau suivant.
Selección de la canción deseada
Toque [
]o[
] para acceder al
principio de la canción actual o de la siguiente.
Touch and hold [
] or [
] to fast
backward or fast forward through the current song.
Maintenez la touche [
] ou [
]
enfoncée pour effectuer une recherche rapide vers
l’arrière ou vers l’avant au sein du morceau actuel.
Toque y mantenga presionado [
]o[
para avanzar o retroceder rápidamente en la
canción actual.
Random Play Shuffle All
Lecture aléatoire ALL
Reproducción aleatoria Reproducir todo de
forma aleatoria
: Shuffle ALL plays all songs in
the iPod/iPhone randomly.
(off)
: Cancel
• This operation cannot be performed while playing
back the video files of iPod/iPhone.
: Le mode Shuffle ALL permet de
lire tous les morceaux contenus
dans l’iPod/iPhone de façon
aléatoire.
(désactivé): Annulation
• Il est impossible d’utiliser ce mode lors de la lecture
des fichiers vidéo contenus dans l’iPod/iPhone.
Random Play Shuffle (M.I.X.)
Touch [ ] after touching [P 1/2].
(off)
Lecture aléatoire (M.I.X.)
Appuyez sur [ ] après avoir appuyé sur [P 1/2].
(Shuffle Albums) :
Album shuffle playback plays back all
songs in order, then randomly selects the
next album.
(Lecture aléatoire des albums) :
La lecture aléatoire de l’album lit tous les
morceaux dans l’ordre, puis sélectionne
au hasard l’album suivant.
(Shuffle Songs) :
Song shuffle randomly plays back songs
within a selected category (playlist,
album, etc ).
: Cancel
(Lecture aléatoire des morceaux) :
Cette fonction lit de manière aléatoire les
morceaux d’une catégorie choisie (liste
d’écoute, album, etc.).
(désactivé): Annulation
: La reproducción de todo de
forma aleatoria reproduce
todas las canciones del iPod/
iPhone de forma aleatoria.
(desactivado): Cancelar
• Esta operación no se puede realizar si se están
reproduciendo archivos de vídeo del iPod/iPhone.
Reproducción aleatoria (M.I.X.)
Toque [ ] después de tocar [P 1/2].
(Reproducir álbumes de forma aleatoria) :
La reproducción aleatoria de álbumes
reproduce todas las canciones en orden
y, a continuación, selecciona el siguiente
álbum de forma aleatoria.
(Reproducir canciones de forma
aleatoria) :
La reproducción aleatoria de canciones
reproduce las canciones de una
categoría seleccionada (lista de
reproducción, álbum, etc.).
(desactivado): Cancelar
Repeat Play
Lecture répétée
Repetición de reproducción
Touch [
Appuyez sur [
Toque [
] after touching [P 1/2].
: Only a song is repeatedly
(off)
played back.
: Cancel
] après avoir appuyé sur [P 1/2].
: Un seul morceau est lu d’une
manière répétée.
(désactivé): Annulation
34
]
] después de tocar [P 1/2].
: Sólo se reproduce varias veces
una canción.
(desactivado): Cancelar
Searching for a desired Song (iPod/iPhone) / Recherche d’un morceau souhaité (iPod/iPhone) / Búsqueda de la canción
deseada (iPod/iPhone)
Display example for the search mode
selection screen / Exemple d’affichage de
l’écran de sélection du mode de recherche /
Ejemplo de visualización de la pantalla de
selección del modo de búsqueda
Display example for the Music search
menu screen / Exemple d’affichage de
l’écran du menu Music / Ejemplo de
visualización de la pantalla del menú
de búsqueda de música
Display example for the ALBUM search
screen / Exemple d’affichage de l’écran
de recherche ALBUM / Ejemplo de
visualización de la pantalla de búsqueda
ALBUM
<MUSIC Search Menu> / <Menu de recherche MUSIQUE> / <Menú de búsqueda de música>
Hierarchy 1 / Hiérarchie 1 / Jerarquía 1 Hierarchy 2 / Hiérarchie 2 / Jerarquía 2 Hierarchy 3 / Hiérarchie 3 / Jerarquía 3 Hierarchy 4 / Hiérarchie 4 / Jerarquía 4
Playlist / Liste d’écoute / Lista de
reproducción
Song / Morceau / Canción
—
—
Artist / Artiste / Artista
Album / Album / Álbum
Song / Morceau / Canción
—
Album / Album / Álbum
Song / Morceau / Canción
—
—
Song / Morceau / Canción
—
—
—
Podcast
Episode / Épisode / Episodio
—
—
Genre / Genre / Género
Artist / Artiste / Artista
Album / Album / Álbum
Song / Morceau / Canción
Composer / Compositeur / Compositor
Album / Album / Álbum
Song / Morceau / Canción
—
Audiobook / Livre parle / Audiolibro
—
—
—
English
1
Activate the search mode
selection screen.
Français
Activez l’écran de sélection du
mode de recherche.
35
Español
Active la pantalla de selección del
modo de búsqueda.
2
Select the Music search mode.
Permet de sélectionner le mode de
recherche du menu Music.
Seleccione el modo de búsqueda
de música.
Select the desired search mode.
Sélectionnez le mode de
recherche de votre choix.
Seleccione el modo de búsqueda
deseado.
Appuyez sur [
] du mode de recherche
de votre choix dans l’écran de sélection
du mode de recherche.
Toque[
] en el modo de búsqueda que
desee en la pantalla de selección del
modo de búsqueda.
Playlists/Artists/Albums/Songs/
Podcasts/Genres/Composers/
Audiobooks
Playlists/Artists/Albums/Songs/
Podcasts/Genres/Composers/
Audiobooks
Sélectionnez le morceau de votre
choix.
Seleccione la canción que desee.
Enter.
Accédez à la sélection.
Introducir.
The selected song is played back.
La lecture du morceau sélectionné
commence.
Se reproducirá la canción seleccionada.
• Touch [ ] in each hierarchy (except Songs,
Episode and Audiobooks hierarchy), all songs
of the selected hierarchy are played back.
• Touch [ ] or [ ] to scroll the list one page.
• Touch [ ] or [ ] to scroll the list one
item.
• Titles are listed alphabetically, and can be
skipped to the titles with the next alphabetical
character. e.g. touch ALPHABET [ ]
switch to the section beginning with alphabet
B from A (Only applicable to English
alphabetic characters).
• Appuyez sur la touche [ ] de chaque
hiérarchie (à l’exception des hiérarchies
Songs, Episode et Audiobooks), pour lire tous
les morceaux de la hiérarchie sélectionnée.
• Appuyez sur la touche [ ] ou [ ] pour faire
défiler la liste page par page.
• Appuyez sur la touche [ ] ou [ ] pour faire
défiler la liste élément par élément.
• Les titres sont classés par ordre alphabétique
et il est possible de passer directement aux
titres de la lettre alphabétique suivante. Par
exemple, appuyez sur la touche ALPHABET
[ ] pour passer de la section commençant
par la lettre A à la section commençant par la
lettre B (applicable uniquement aux caractères
alphabétiques anglais).
• Toque [ ] en cada jerarquía (excepto en las
jerarquías Songs, Episode y Audiobooks): se
reproducirán todas las cancionesde la
jerarquía seleccionada.
• Toque [ ] o [ ] para avanzar o retroceder
una página en la lista.
• Toque [ ] o [ ] para avanzar o retroceder
un elemento en la lista.
• Los títulos se muestran alfabéticamente. Se
puede saltar a un título con el siguiente
carácter alfabético, por ejemplo, toque
ALPHABET [ ], vaya a la sección que
empieza con la B desde la A (solo se aplica a
caracteres alfabéticos en inglés).
Touch [
] of the desired search mode
in the search mode selection screen.
3
Playlists/Artists/Albums/Songs/
Podcasts/Genres/Composers/
Audiobooks
Select the desired song.
4
5
Touch [
] of the desired title in each
hierarchy until find the song you desired.
Appuyez sur [
] du titre de votre choix
dans chaque hiérarchie jusqu’à ce que
vous trouviez le morceau désiré.
36
Toque [
] en el título que desee en
cada jerarquía hasta que encuentre la
canción que busca.
Pandora Radio (iPhone/iPod touch) / Pandora
Radio (iPhone/iPod touch) / Radio Pandora
(iPhone/iPod touch)
Display example for Pandora Radio screen / Exemple d’affichage pour l’écran Pandora Radio / Ejemplo de visualización de la pantalla de
Pandora Radio
• Set “Pandora” to ON before using this source. / Réglez « Pandora » sur ON avant
d’utiliser cette source. / Ajuste “Pandora” en ON antes de utilizar esta fuente.
English
Français
Español
Pandora Radio is your own FREE
personalized radio now available to
stream music on your iPhone/iPod touch.
This unit enables you to interact with your
Pandora account, by connecting an
iPhone/ iPod touch that has the Pandora
Compatible Application already installed.
Pandora Radio est un service radio
personnalisé GRATUIT permettant de
diffuser de la musique sur votre iPhone/
iPod touch. Cet appareil permet
d’interagir avec le service Pandora en
raccordant un iPhone/iPod touch
disposant de l’application Pandora.
Pandora Radio es una radio totalmente
personalizable y GRATUITA ahora
disponible para escuchar música en
streaming en el iPhone/iPod touch. Esta
unidad permite interactuar con su cuenta
de Pandora si conecta un iPhone/iPod
touch con la aplicación compatible con
Pandora instalada.
Pause and Playback
Pause et lecture
Pausa y reproducción
Selecting the desired song.
Sélection du morceau de votre
choix.
Selección de la canción deseada.
To skip to the next song.
Pour passer au morceau suivant.
37
Para saltar a la canción siguiente.
“Thumbs” Feedback.
Thumbs up.
Indications visuelles
personnalisées.
Pouce levé.
Opiniones “gestuales”.
Pulgar hacia arriba.
Thumbs down.
Pouce baissé.
Pulgar hacia abajo.
Bookmarking a desired Song or Artist / Marquage d’un morceau ou d’un artiste / Agregar a favoritos una
canción o artista que desee
English
1
Français
Español
The type selection list is
displayed.
La liste de sélection du type
s’affiche.
Se muestra la lista de selección
de tipos.
The current artist is bookmarked.
L’artiste actuel est mis en signet.
El artista actual se agrega a
favoritos.
The current song is bookmarked.
Le morceau actuel est mis en
signet.
La canción actual se agrega a
favoritos.
• To cancel the operation, touch
[CANCEL].
• Pour annuler l’opération, appuyez
sur [CANCEL].
• Para cancelar la operación, toque
[CANCEL].
2
38
Searching for a desired Station / Recherche d’une station / Búsqueda de una emisora deseada
English
1
Français
Activate the search selection
mode.
Activez le mode de selection de
recherche.
Active el modo de selección de
búsqueda.
Select the Date search mode.
Sélectionnez le mode de
recherche par date.
Seleccione el modo de búsqueda
por fecha.
Les noms de station sont répertoriés par
date d’ajout au compte.
Los nombres de emisoras se muestran
según la fecha en que se agregaron a la
cuenta.
Sélectionnez le mode de
recherche alphabétique.
Seleccione el modo de búsqueda
alfabética que desee.
Les noms de station sont classés par
ordre alphabétique.
Los nombres de emisoras se muestran
alfabéticamente.
Enter.
Entrée.
Introdúzcalo.
Pandora will play the selected station.
Pandora diffuse la station sélectionnée.
Pandora reproducirá la emisora
seleccionada.
The station names are listed by the date
they were added to the account.
2
Select the Alphabet search mode.
The station names are listed
alphabetically.
3
Español
39
Creating a New Station / Création d’une station / Creación de una nueva emisora
English
1
Français
Español
The type selection list is
displayed.
La liste de sélection du type
s’affiche.
Se muestra la lista de selección
de tipos.
Creating a “New Artist” Station.
Pandora will play the new station.
Création d’une station « Nouvel
artiste ».
Pandora diffuse la nouvelle station.
Creación de una emisora de
“Nuevo artista”.
Pandora reproducirá la nueva
emisora.
Creating a “New Song” Station.
Pandora will play the new station.
Création d’une station « Nouveau
morceau ».
Pandora diffuse la nouvelle station.
Creación de una emisora de
“Nueva canción”.
Pandora reproducirá la nueva
emisora.
• To cancel the operation, touch
[CANCEL].
• Pour annuler l’opération, appuyez
sur [CANCEL].
• Para cancelar la operación, toque
[CANCEL].
2
40
• This product incorporates copyright protection
technology that is protected by U.S. patents and other
intellectual property rights. Use of this copyright
protection technology must be authorized by Macrovision,
and is intended for home and other limited viewing uses
only unless otherwise authorized by Macrovision. Reverse
engineering or disassembly is prohibited.
• Manufactured under license from Dolby Laboratories.
Dolby and the double-D symbol are trademarks of Dolby
Laboratories.
• Manufactured under license under U.S. Patent #’s:
5,451,942; 5,956,674; 5,974,380; 5,978,762; 6,487,535
& other U.S. and worldwide patents issued & pending.
DTS and the Symbol are registered trademarks, & DTS
2.0+ Digital Out and the DTS logos are trademarks of
DTS, Inc. Product includes software. © DTS, Inc. All
Rights Reserved.
• Windows Media, and the Windows logo are trademarks,
or registered trademarks of Microsoft Corporation in the
United States and/or other countries.
• iPhone, iPod, iPod classic, iPod nano, iPod touch, and
iTunes are trademarks of Apple Inc., registered in the U.S.
and other countries.
• “Made for iPod,” and “Made for iPhone,” mean that an
electronic accessory has been designed to connect
specifically to iPod, or iPhone, respectively, and has been
certified by the developer to meet Apple performance
standards. Apple is not responsible for the operation of
this device or its compliance with safety and regulatory
standards.
• Pandora and the Pandora logo are registered trademarks
of Pandora Media, Inc. All rights reserved. Due to music
licensing restrictions, the Pandora radio service is only
available in the United States. This device will control
Pandora when connected to a compatible iPhone.
• HD Radio Technology manufactured under license from
iBiquity Digital Corporation. U.S. and Foreign Patents.
HD Radio™ and the HD, HD Radio, and “Arc” logos are
proprietary trademarks of iBiquity Digital Corp.
• Ce produit inclut une technologie de protection des droits
qui est protégée par des brevets américains et d’autres
droits de propriétés intellectuelles. L’utilisation de cette
technologie de protection des droits doit être autorisée
par Macrovision et ne s’adresse qu’à un usage
domestique ou d’autres usages limités uniquement, à
moins qu’il en ait été autrement autorisé par
Macrovision. La rétroconception et le désassemblage sont
interdits.
• Fabriqué sous licence de Dolby Laboratories. Dolby et le
symbole du double D sont des marques déposées de
Dolby Laboratories.
• Fabriqué sous licence sous les brevets américains nº
5 451 942; 5 956 674; 5 974 380; 5 978 762; 6 487 535
et autres brevets américains et internationaux. DTS et le
symbole correspondant sont des marques déposées, &
DTS 2.0+ Digital Out et les logos DTS sont des marques
de commerce de DTS, Inc. Ce produit contient des
logiciels. © DTS, Inc. Tous droits réservés.
• Windows Media et le logo Windows sont des marques ou
des marques déposées enregistrées de Microsoft
Corporation aux États-Unis et/ou dans d’autres pays.
• iPhone, iPod, iPod classic, iPod nano, iPod touch et
iTunes sont des marques déposées d’Apple Inc
enregistrées aux États-Unis et d’autres pays.
• “Made for iPod,” et “Made for iPhone,” indique que
l’accessoire électronique a été spécialement conçu pour
se connecter spécifiquement à un iPod, un iPhone et que
les performances des standarts Apple sont garanties par
les concepteurs. Apple n’est pas responsable quand au
fonctionnement de ce système ou bien du respect de celuici, de la législation ou des normes de sécurité en vigueur.
• Pandora et son logo sont des marques deposees de
Pandora Media Inc. Tous droits reserves. En raison de
restrictions relatives aux droits de license, la diffusion
radio de Pandora est uniquement displonible aux Etats
Unis. Lorsqu’il est connecté à un iPhone compatible, cet
appareil peut contrôler Pandora.
• HD Radio Technology est fabriqué sous licence par
iBiquity Digital Corporation. Brevets U.S. et Étrangers.
HD Radio™ et HD, HD Radio et “Arc” logos sont des
marques déposées par iBiquity Digital Corp.
41
• Este producto incorpora tecnología de protección de
derechos de autor amparada en patentes estadounidenses
y otros derechos de propiedad intelectual. El uso de esta
tecnología de protección de los derechos de autor debe de
estar autorizado por Macrovision, y está destinado para
uso doméstico y otros usos de miras limitadas a menos
que sea autorizado por Macrovision. Se prohíbe
ingeniería inversa o desmontaje.
• Fabricado bajo licencia de Dolby Laboratories. Dolby y
la marca de doble D son marcas registradas de Dolby
Laboratories.
• Fabricado bajo licencia en Estados Unidos. Números de
patente: 5.451.942; 5.956.674; 5.974.380; 5.978.762;
6.487.535 y otras patentes internacionales y
estadounidenses publicadas y pendientes. DTS y Symbol
son marcas comerciales registradas, & DTS 2.0+ Digital
Out y los logotipos de DTS son marcas comerciales de
DTS, Inc. El software va incluido con el producto.
© DTS, Inc. Todos los derechos reservados.
• Windows Media y el logotipo Windows son marcas
comerciales o marcas registradas de Microsoft
Corporation en Estados Unidos y/o en otros países.
• iPhone, iPod, iPod classic, iPod nano, iPod touch e iTunes
son marcas comerciales de Apple Inc., registradas en los
Estados Unidos y en otros países.
• “Made for iPod” y “Made for iPhone” significa que un
accesorio electrónico se ha diseñado exclusivamente
para conectarse a un iPod o iPhone, respectivamente, y
su cumplimiento de las normas de funcionamiento de
Apple ha sido certificado por los programadores. Apple
no se hace responsable del funcionamiento de este
dispositivo o cumplimiento con los requisitos normativos
y de seguridad.
• Pandora y el logotipo de Pandora son marcas
comerciales registradas de Pandora Media, Inc. Todos los
derechos reservados. Debido a restricciones de licencias
musicales, el servicio de radio Pandora sólo está
disponible en los Estados Unidos. Este dispositivo puede
controlar Pandora si se conecta a un iPhone compatible.
• HD Radio Technology fabricada bajo licencia de iBiquity
Digital Corporation. Patentes de Estados Unidos y
extranjeras. HD Radio™ y los logotipos HD, HD Radio y
“Arc” son marcas comerciales propiedad de iBiquity
Digital Corp.
• The BLUETOOTH® word mark and logos are registered
trademarks owned by the Bluetooth SIG, Inc. and any use
of such marks by Alpine Electronics, Inc. is under license.
• SiriusXM and all related marks and logos are trademarks
of Sirius XM Radio, Inc. All rights reserved.
• “MPEG Layer-3 audio coding technology licensed from
Fraunhofer IIS and Thomson.”
• Audyssey MultEQ XT is a registered trademark of
Audyssey Laboratories Inc.
• “Supply of this product only conveys a license for private,
non-commercial use and does not convey a license nor
imply any right to use this product in any commercial (i.e.
revenue-generation) real time broadcasting (terrestrial,
satellite, cable and/or any other media), broadcasting/
streaming via internet, intranets and/or other networks or
in other electronic content distribution systems, such as
pay-audio or audio-on-demand applications. An
independent license for such use is required. For details,
please visit http://www.mp3licensing.com”
©2010 NAVTEQ. All rights reserved.
Portions ©2010, Microsoft Corporation. All Rights
Reserved.
• La palabra BLUETOOTH® y sus logos son marcas
registradas propiedad de Bluetooth SIG, Inc., y todo uso
de dichas marcas por Alpine Electronics, Inc., es bajo
licencia.
• SiriusXM, ainsi que les marques et les logos associés sont
des marques de commerce de Sirius XM Radio, Inc. Tous
droits réservés.
• « Technologie de codage audio MPEG Layer-3 sous
licence Fraunhofer IIS et Thomson. »
• Audyssey MultEQ XT est une marque déposée des
laboratoires Audyssey Inc.
• « L’acquisition de ce produit ne fournit qu’une seule
licence pour un usage privé et ne permet pas à
l’utilisateur d’utiliser ce produit à des fins commerciales
(par exemple pour générer des recettes), pour une
transmission en direct (terrestre, par satellite, par câble
et/ou tout autre média), pour une transmission par
Internet, intranet et/ou autres réseaux ou avec des
systèmes de distribution de contenu électronique
(plateformes payantes ou applications de téléchargement
de matériel audio). Pour ce type d’utilisations, il est
nécessaire d’acquérir une autre licence. Pour de plus
amples informations, veuillez visiter le site
http://www.mp3licensing.com »
©2010 NAVTEQ. tous droits reserves.
Portions ©2010, Microsoft Corporation. Tous droits
réservés.
• La marca y los logotipos de la palabra BLUETOOTH®
son marcas comerciales registradas propiedad de
Bluetooth SIG, Inc. y cualquier uso de dichas marcas
realizado por Alpine Electronics, Inc. se realiza bajo
licencia.
• SiriusXM y todas las marcas y logotipos relacionados son
marcas comerciales de Sirius XM Radio, Inc. Todos los
derechos reservados.
• “Tecnología de codificación de audio MPEG Layer-3 con
licencia de Fraunhofer IIS y Thomson.”
• Audyssey MultEQ XT es una marca comercial registrada
de Audyssey Laboratories Inc.
• “El suministro de este producto sólo incluye una licencia
para uso personal y no comercial, y no incluye licencia ni
implica derecho alguno para utilizar el presente producto
en emisiones comerciales (beneficio-generación) en
tiempo real (terrestre, satélite, cable y/o cualquier otro
medio), emisiones por Internet (streaming), intranets u
otras redes, sistemas de distribución de contenido
electrónico (como aplicaciones de audio de pago o por
demanda). Es necesaria una licencia independiente para
dicho uso. Para más información, consulte
http://www.mp3licensing.com”
©2010 NAVTEQ. Todos los derechos reservados.
Portions ©2010, Microsoft Corporation. Todos los derechos
reservados.
About the Rules of Bluetooth Electromagnetic Radiation Regulation
This device complies with Part 15 of the FCC Rules and RSS-Gen of IC Rules. Operation is subject to the following two conditions: (1) this device may not cause interference, and (2) this device must accept any interference, including interference that
may cause undesired operation of this device.
FCC WARNING
Changes or modifications not expressly approved by the party responsible for compliance could void the user’s authority to
operate the equipment.
42
GARANTIE LIMITÉE
Fidèles à leur engagement de ne fournir que des produits de qualité, ALPINE ÉLECTRONIQUE DE L’AMÉRIQUE, INC. et ALPINE ÉLECTRONIQUE DU CANADA,
INC. (Alpine) sont heureuses de vous offrir cette garantie. Nous vous suggérons de le lire attentivement et en entier. Si vous avez la moindre question, veuillez
contacter l’un de nos concessionnaires ou appeler directement Alpine aux numéros listés ci-dessous.
PRODUITS COUVERTS PAR LA GARANTIE
Cette garantie couvre les produits audio de voiture et les accessoires connexes
(“le produit”). Elle ne couvre les produits que dans le pays où ils ont été
achetés.
DURÉE DE LA GARANTIE
Cette garantie est en vigueur pendant un an à partir de la date du premier achat
du client.
PERSONNES PROTÉGÉES PAR LA GARANTIE
Seul l’acheteur original du produit, s’il résisde aux États-Unis, à Porto Rico ou
au Canada, peut se prévaloir de la garantie.
CE QUI EST COUVERT
Cette garantie couvre tous les défauts de matériaux et de fabrication (pièces et
main d’œuvre) du produit.
CE QUI N’EST PAS COUVERT
Cette garantie ne couvre pas ce qui suit:
A Les dommages survenus durant le transport des produits renvoyés à Alpine
pour être réparés (les réclamations doivent être adressées au transporteur);
B Les dégâts provoqués par un accident ou une mauvaise utilisation, y
compris des bobines acoustiques grillées suite à une surexcitation des
enceintes (augmentation du niveau de l’amplificateur jusqu’à atteindre un
effet de distorsion ou d’écrêtage), une défaillance mécanique des enceintes
(perforations, déchirures ou fentes), panneaux LCD fissurés ou
endommagés, disques durs endommagés ou ayant subi une chute.
C Tout dégât provoqué par négligence, usage inapproprié, mauvaise
utilisation ou par le non-respect des instructions indiquées dans le manuel
de l’utilisateur.
D Les dommages dus à la force majeure, notamment aux tremblements de
terre, au feu, aux inondations, aux tempêtes ou aux autres cataclysmes
naturels;
Les frais ou les dépenses relatifs à l’enlèvement ou à la réinstallation du
produit;
E Les services rendus par une personne, physique ou morale non autorisée;
F Les produits dont le numéro de série a été effacé, modifié ou retiré;
G Les produits qui ont été adaptés ou modifiés sans le consentement d’Alpine;
H Les produits qui ne sont pas distribués par Alpine aux
Etats-Unis, à Porto Rico ou au Canada;
I Les produits qui n’ont pas été achetés par l’entremise d’un concessionnaire
Alpine autorisé;
COMMENT SE PRÉVALOIR DE LA GARANTIE
A Il vous faut remettre le produit nécessitant des réparations à un centre de
service autorisé Alpine ou à Alpine même et en assumer les frais de
transport. Alpine a le choix entre réparer le produit ou le remplacer par un
produit neuf ou révisé, le tout sans frais pour vous. Si les réparations sont
couvertes par la garantie et si le produit a été envoyé à un centre de service
Alpine ou à Alpine, le paiement des frais de réexpédition du produit incombe
Alpine.
B Vous devez donner une description détaillée des problèmes qui sont à
l’origine de votre demande de réparation.
C Vous devez joindre la preuve de votre achat du produit.
D Vous devez emballer soigneusement le produit pour éviter tout dommage
durant son transport. Pour éviter la perte de l’envoi, il est conseillé de choisir
un transporteur qui propose un service de suivi des envois.
LIMITATION DES GARANTIES TACITES
LA DURÉE DE TOUTES LES GARANTIES TACITES, Y COMPRIS LA
GARANTIE D’ADAPTATION À L’UTILISATION ET LA GARANTIE DE QUALITÉ
LOYALE ET MARCHANDE, EST LIMITÉE À CELLE DE LA GARANTIE
EXPRESSE DÉTERMINÉE CI-DESSUS. PERSONNE N’EST AUTORISÉ À
ENGAGER AUTREMENT LA RESPONSABILITÉ D’ALPINE EN VERTU DE LA
VENTE D’UN PRODUIT.
EXCLUSIONS DE LA GARANTIE
ALPINE STIPULE EXPRESSÉMENT QU’ELLE N’EST PAS RESPONSABLE
DES DOMMAGES-INTÉRÊTS ET DOMMAGES INDIRECTS PROVOQUÉS
PAR LE PRODUIT. LES DOMMAGES-INTÉRÊTS SONT LES FRAIS DE
TRANSPORT DU PRODUIT VERS UN CENTRE DE SERVICE ALPINE, LA
PERTE DE TEMPS DE L’ACHETEUR ORIGINAL, LA PERTE D’UTILISATION
DU PRODUIT, LES BILLETS D’AUTOBUS, LA LOCATION DE VOITURES ET
TOUS LES AUTRES FRAIS LIÉS À LA GARDE DU PRODUIT.
LES DOMMAGES INDIRECTS SONT LES FRAIS DE RÉPARATION OU DE
REMPLACEMENT D’AUTRES BIENS ENDOMMAGÉS SUITE AU MAUVAIS
FONCTIONNEMENT DU PRODUIT.
LES RECOURS PRÉVUS PAR LES PRÉSENTES EXCLUENT ET
REMPLACENT TOUTE AUTRE FORME DE RECOURS.
LIEN ENTRE LA GARANTIE ET LA LOI
La garantie vous donne des droits spécifiques, mais vous pouvez aussi jouir
d’autres droits, qui varient d’un état ou d’une province à l’autre. En outre,
certains états et certaines provinces interdisent de limiter la durée des
garanties tacites ou d’exclure les dommages accessoires ou indirects. Dans ce
cas, les limites et les exclusions de la garantie peuvent ne pas s’appliquer à
vous.
CLAUSE APPLICABLE AU CANADA SEULEMENT
Pour que la garantie soit valable, il faut qu’un centre d’installation autorisé ait
installé le système audio pour l’auto dans votre véhicule et qu’il ait ensuite
apposé son cachet sur la garantie.
NUMÉROS D’APPEL DU SERVICE À LA CLIENTÈLE
Si vous avez besoin de nos services, veuillez appeler Alpine aux numéros cidessous pour le centre de service autorisé Alpine le plus proche.
AUDIO DE VOITURE
1-800-ALPINE-1 (1-800-257-4631)
NAVIGATION
1-888-NAV-HELP (1-888-628-4357)
Ou visitez notre site Web à l’adresse http://www.alpine-usa.com
ALPINE ÉLECTRONIQUE DE L’AMÉRIQUE, INC., 19145 Gramercy Place, Torrance, California 90501, U.S.A.
ALPINE ÉLECTRONIQUE DU CANADA, INC., 777 Supertest Road, Toronto, Ontario M3J 2M9, Canada
N’envoyez aucun produit à ces adresses.
Appelez notre numéro gratuit ou visitez notre site Web si vous recherchez un centre de service.
LIMITED WARRANTY
ALPINE ELECTRONICS OF AMERICA, INC. AND ALPINE OF CANADA INC. (“Alpine”), are dedicated to quality craftsmanship and are pleased to offer this
Warranty. We suggest that you read it thoroughly. Should you have any questions, please contact your Dealer or contact Alpine at one of the telephone numbers
listed below.
PRODUCTS COVERED:
This Warranty covers Car Audio Products and Related Accessories (“the
product”). Products purchased in the Canada are covered only in the Canada.
Products purchased in the U.S.A. are covered only in the U.S.A.
LENGTH OF WARRANTY:
This Warranty is in effect for one year from the date of the first consumer
purchase.
WHO IS COVERED:
This Warranty only covers the original purchaser of the product, who must
reside in the United States, Puerto Rico or Canada.
WHAT IS COVERED:
This Warranty covers defects in materials or workmanship (parts and labor) in
the product.
WHAT IS NOT COVERED:
This Warranty does not cover the following:
A Damage occurring during shipment of the product to Alpine for repair
(claims must be presented to the carrier).
B Damage caused by accident or abuse, including burned voice coils caused
by over-driving the speaker (amplifier level is turned up and driven into
distortion or clipping). Speaker mechanical failure (e.g. punctures, tears or
rips). Cracked or damaged LCD panels. Dropped or damaged hard drives.
C Damage caused by negligence, misuse, improper operation or failure to
follow instructions contained in the Owner’s manual.
D Damage caused by act of God, including without limitation, earthquake, fire,
flood, storms or other acts of nature.
Any cost or expense related to the removal or reinstallation of the product.
E Service performed by an unauthorized person, company or association.
F Any product which has the serial number defaced, altered or removed.
G Any product which has been adjusted, altered or modified without Alpine’s
consent.
H Any product not distributed by Alpine within the United States, Puerto Rico
or Canada.
I Any product not purchased from an Authorized Alpine Dealer.
HOW TO OBTAIN WARRANTY SERVICE:
A You are responsible for delivery of the product to an Authorized Alpine
Service Center or Alpine for repair and for payment of any initial shipping
charges. Alpine will, at its option, repair or replace the product with a new or
reconditioned product without charge. If the repairs are covered by the
warranty, and if the product was shipped to an Authorized Alpine Service
Center or Alpine, Alpine will pay the return shipping charges.
B You should provide a detailed description of the problem(s) for which service
is required.
C You must supply proof of your purchase of the product.
D You must package the product securely to avoid damage during shipment.
To prevent lost packages it is recommended to use a carrier that provides a
tracking service.
HOW WE LIMIT IMPLIED WARRANTIES:
ANY IMPLIED WARRANTIES INCLUDING FITNESS FOR USE AND
MERCHANTABILITY ARE LIMITED IN DURATION TO THE PERIOD OF THE
EXPRESS WARRANTY SET FORTH ABOVE AND NO PERSON IS
AUTHORIZED TO ASSUME FOR ALPINE ANY OTHER LIABILITY IN
CONNECTION WITH THE SALE OF THE PRODUCT.
HOW WE EXCLUDE CERTAIN DAMAGES:
HOW TO CONTACT CUSTOMER SERVICE:
Should the product require service, please call the following number for your
nearest Authorized Alpine Service Center.
CAR AUDIO
1-800-ALPINE-1 (1-800-257-4631)
NAVIGATION
1-888-NAV-HELP (1-888-628-4357)
Or visit our website at; http://www.alpine-usa.com
ALPINE EXPRESSLY DISCLAIMS LIABILITY FOR INCIDENTAL AND
CONSEQUENTIAL DAMAGES CAUSED BY THE PRODUCT. THE TERM
“INCIDENTAL DAMAGES” REFERS TO EXPENSES OF TRANSPORTING
THE PRODUCT TO THE ALPINE SERVICE CENTER, LOSS OF THE
ORIGINAL PURCHASER’S TIME, LOSS OF THE USE OF THE PRODUCT,
BUS FARES, CAR RENTALS OR OTHERS COSTS RELATING TO THE CARE
AND CUSTODY OF THE PRODUCT. THE TERM “CONSEQUENTIAL
DAMAGES” REFERS TO THE COST OF REPAIRING OR REPLACING
OTHER PROPERTY WHICH IS DAMAGED WHEN THIS PRODUCT DOES
NOT WORK PROPERLY. THE REMEDIES PROVIDED UNDER THIS
WARRANTY ARE EXCLUSIVE AND IN LIEU OF ALL OTHERS.
HOW STATE/PROVINCIAL LAW RELATES TO THE WARRANTY:
This Warranty gives you specific legal rights, and you may also have other
rights which vary from state to state and province to province. In addition, some
states/provinces do not allow limitations on how long an implied warranty lasts,
and some do not allow the exclusion or limitation of incidental or consequential
damages. Accordingly, limitations as to these matters contained herein may not
apply to you.
IN CANADA ONLY:
This Warranty is not valid unless your Alpine car audio product has been
installed in your vehicle by an Authorized Installation Center, and this warranty
stamped upon installation by the installation center.
ALPINE ELECTRONICS OF AMERICA, INC., 19145 Gramercy Place, Torrance, California 90501, U.S.A.
ALPINE ELECTRONICS OF CANADA, INC., 777 Supertest Road, Toronto, Ontario M3J 2M9, Canada
Do not send products to these addresses.
Call the toll free telephone number or visit the website to locate a service center.
Owner's Manual
Mode d 'emploi
MADE IN CHINA
DESIGNED BY ALPINE JAPAN
FABRIQUE EN CHINE
CONCU PAR ALPINE JAPON
ALPINE ELECTRONICS, INC.
• System Requirements
• Configuration systeme
The CD can be used on the following operating systems:
Microsoft®, Windows®, 95/98/Me/NT/2000/XPNISTA/7 or
Apple Mac OS X 10.4/10.5/10.6. In order to use the CD,
Acrobat Reader 4.0 (or above) is required.
Ce CD peut etre utilise sous les systemes d'exploitation
suivants : Microsoft®, Windows®, 95/98/Me/NT/2000/XP/
VISTA/7 ou Apple Mac OS X 10.4/10.5/10.6. Pour pouvoir
utiliser le CD, vous devez installer Acrobat Reader 4.0 (ou
ulterieur).
• How to Use the CD
Insert the CD, open it, then click twice the file for the model
purchased.
• Caution on Handling the CD
Never try to play the CD on any other audio CD player.
Resultant loud volume may cause hearing damage or
damage to the speaker.
• About Use of Software License
Concerning provided CD, you are required to use the CD in
agreement/complying with the following provisions.
If you do not agree, the CD cannot be used.
• Terms of Use
Alpine Electronics Incorporation (following Alpine) reserves
all copyrights on the information provided on this CD. The
contents of the CD cannot be used for copying without
permission of its owners, Internet transfer, public showing, or
commercial rent, lease, etc.
• Limitation of Liability
Alpine does not guarantee correct operation of any computer
component when used with the CD. Alpine also has no
responsibility, direct or indirect, for damage resulting from
use of this CD, and no compensation can be offered.
All products and brand names described above are
trademarks or registered marks of their respective owners.
• Comment utiliser le CD
lnserez le CD, ouvrez-le, puis cliquez deux fois sur le fichier
du modele que vous avez achete.
• Precautions lors de Ia manipulation du CD
N'essayez pas de lire le CD sur un autre lecteur CD.
Le cas echeant, le niveau de volume eleve pourrait
endommager le haut-parleur ou provoquer des troubles
auditifs.
• A propos de !'utilisation de Ia licence du
logiciel
Vous devez utiliser le CD fourni conformement aux conditions
suivantes.
Si vous n'acceptez pas le contrat de licence, vous ne pouvez
pas utiliser ce CD.
• Conditions d'utilisation
Alpine Electronics Incorporation (Alpine) detient taus les
droits d'auteur relatifs aux informations fournies dans ce CD.
Le contenu de ce CD ne peut done en aucun cas etre copie,
divulgue par Internet, utilise pour une projection publique,
une location commerciale ou une concession, etc., sans
autorisation expresse du proprietaire.
• Limitation de responsabilite
Alpine ne garantit pas le bon fonctionnement des
composants de l'ordinateur lorsque vous utilisez ce CD.
Alpine decline egalement toute responsabilite, directe ou
indirecte, en cas de dommage Iars de !'utilisation de ce CD,
et n'offre aucune compensation economique.
Taus les produits et noms de marque cites ci-dessus sont des
marques commerciales ou des marques deposees de leurs
detenteurs respectifs.
SUZHOU CRESTEC PRINTING CO.,L TO.
596-598 Chang Jiang Road,Suzhou,Jiangsu,P.R.China
Printed in China (Y)
68-13530262-A
NO POSTAGE
NECESSARY
IF MAILED
IN THE
UNITED STATES
BUSINESS REPLY MAIL
FIRST-CLASS MAIL
PERMIT NO. 320
TORRANCE CA
POSTAGE WILL BE PAID BY ADDRESSEE
ATTENTION MARKETING SERVICES
ALPINE ELECTRONICS OF AMERICA INC
PO BOX 2859
TORRANCE CA 90509-9939
11.1 .. 11 .... 1.1.11 ••• 1.1 •• 1.1 .. 1.1,,,,11.1.1 .. 1... 11
I FOR USE IN USA, PLEASE FOLD HERE AND ENSURE THAT
AMERICAN ADDRESS FACES UP.
·dn S30'V'.:I SS3l:IOO'V' N'V'IO'V'N'V'O
l'V'H13l:lnSN3 ON'V' 3l:I3H 010.:1 3S'V'3ld "V'O'V'N'V'O Nl 3Sn l:IO.:I
l
1'1'1"'11'1'"1'1"1''1'111''"''11'1'1'"'11''1'11
'V:JIC:I3V\I'V :10 S31'V1S 0311Nn
9L86- ~0906 'V:::> 3:::>N'VC:IC:I01
ld A:::>CJ3V\I'VC:I£> sv ~6 ~
S:::>INOC:Il:J313 3Nidl'V
DmltiiV A811Vd J8 TIM IIVlSOd
V:JJ:IMI• t
.._
mvts IBllll
JIUOl
mYMII
AHVSUHI
:JIVliWIII
..viJNSVdJI
._
IW:11111'111Dd
.#7#"/ILPINE. Customer Care Registration
- . .-~For easy on-line registration, go to "www.alpine-usa.com/registration"
Thank you for choosing Alpine! Register your product to protect your investment and receive up-to-date product information.
First name: _ _ _ _ _ _ _ _ _ _ _ __ _ _ __
Last name: _ _ _ _ _ _ _ _ _ _ _ _ _ _ _ __
Home address: "'st=ree:-:-t-=-=ad;:;:dr::-:es:-:-s-----------
State/Prov.
City
Zip/Postal Code
Phone number: (
~-~~------------
E-mail Address: _ __ _ __ _ _ _ _ _ _ __
May we contact you?
• Gender
1. D Male
1.0Yes 2. 0No
2.0 Female
• Date of Birth Month:
• Marital Status
Year:
1. D Single
------
2. D Married
• Which ethnicity best describes yourself:
1. D Caucasian
2. D Hispanic
3. D African-American
4. 0 Asian
5. D Other _ _ _ ___
•Your highest level of education completed:
1. D
2. D
3. D
4. 0
5. D
High School Student
High School Graduate
2 Yr. Degree/Some College
Completed 4 Yr. College
Completed Graduate School
• Date of Purchase: Month: _ _ _ Year: _ __
• Occupation
1. D Executive/Managerial
2. D Secretarial/Clerical
3.0Sales
4. D General Labor
5. 0 Professional
6.
7.
8.
9.
10.
0 Engineering/Technical
D Agriculture
D Retired
Ostudent
D Other_ _ _ _ __
1. D Alpine___, (Model No.) . , - - - - - - - - - - - - 2. D Other___, (Brand Name) _ _ _ _ _ _ _ _ _ _ __
• Purpose of buying this unit:
• Household Income
1. D Less than $30,000
2. D $3o,ooo - $5o,ooo
3. D $5o,ooo - $7o,ooo
• If you purchased a navigation system, which AN
Head unit did you purchase?
4. D $7o,ooo - $9o,ooo
5. D S9o,ooo- $11o,ooo
6. 00ver$110,000
1. D Addition
2. D Replacement ___, Previous brand replaced?
1. D Factory installed
2. D Alpine
3. Dother _ _ _ _ __ __
• Which of the following statements best describes you?
1. D I usually have more electronic equipment than my friends
2. D I am usually one of the first of my friends to buy the newest
electronic equipment
3. D I usually wait until a product has been out for a while before
I purchase it
4. D I am usually one of the first of my friends to know about the
newest car
5. D I usually know more about cars than my friends
• Product purchased
1. D Head unit
7. D Subwoofer
8. D Multi-Channel Solution
2. DAN Head unit
9. D Rear Seat Entertainment
3. D Factory Integration
Technology
10. 0 iPod Solutions
4. D Installed Navigation 11 . 0Marine
12. D Other _ _ _ _ _ _ __
5. D Amplifier
6. 0Speaker
• Model Number: _ _ _ _ _ _ _ _ _ _ _ __
• Serial Number: _ _ _ _ _ _ _ _ _ _ _ _ __
Thank you for your cooperation! We value your privacy. This information will remain confidential with Alpine and its affili ates.
• When you purchased this Alpine unit, did you
compare it with other brands?
1.0Yes 2. 0No.
If yes, select all that apply.
1. D Pioneer 2. 0 Kenwood 3. 0 Sony
5. D JL
6. D Rockford
4. D JVC
7. 0 Other:_ _ __
en
m
)>
r
:I:
m
JJ
m
• Have you purchased Alpine products before?
1. DYes
2. D No
• Please tell us the type of vehicle you installed the
Alpine component(s) into:
Make: _ _ _ _ __
Model: _ _ _ _ __
Model Year: _ ___
• How was this vehicle purchased?
1. D Buy
Customer Care Registration is for Product registration.
Failure to complete and return thi s card does not diminish your warranty rights.
2. D Lease
PART NO. 68-10872Z57-A
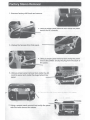

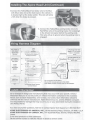


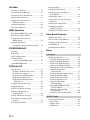


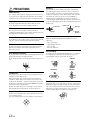
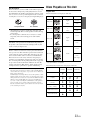
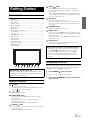
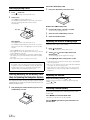
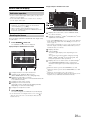

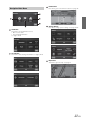
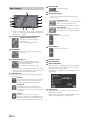
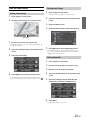
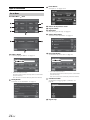


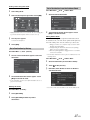
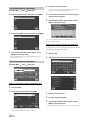

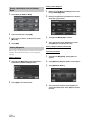

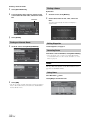
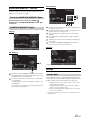
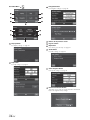

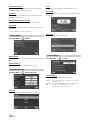
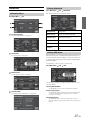
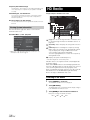
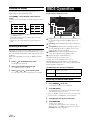


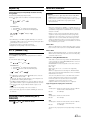
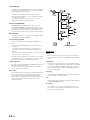
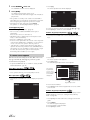


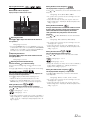


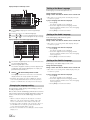

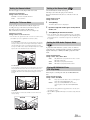
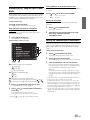
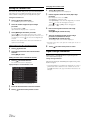

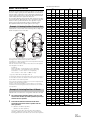


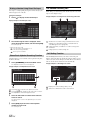
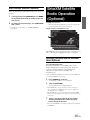


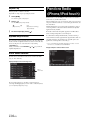
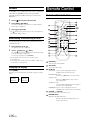
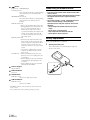


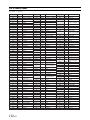
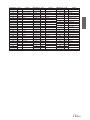


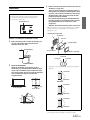
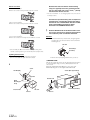

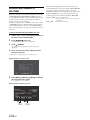
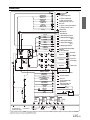


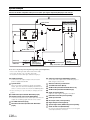
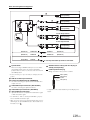


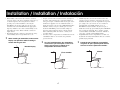
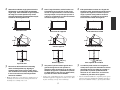
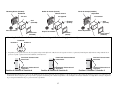

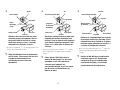


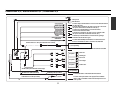


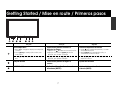

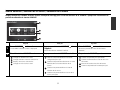


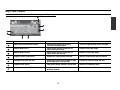

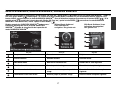
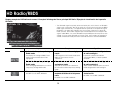

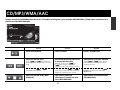
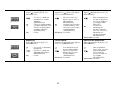


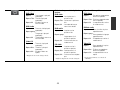
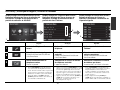

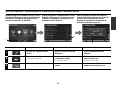

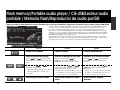

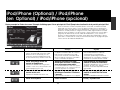
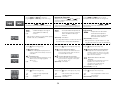


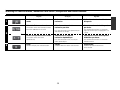


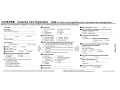

![hank yo_fo buyil_gaSamsung (}a_Te_a ]hs](http://vs1.manualzilla.com/store/data/005691502_1-2e8e29ffb67d0c8f7d0d701e3cb644b7-150x150.png)
